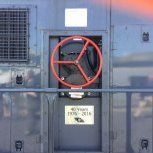
JasonB Posted March 4, 2017 Author Share Posted March 4, 2017 I gave these Oxford Diecast Land Rovers a quick makeover by removing the British Telecom signage,adding some ESB decals and painting the ladders.Not a bad result for so little work. 1 1 Quote Link to comment Share on other sites More sharing options...
Noel Posted March 4, 2017 Share Posted March 4, 2017 Jason, those wagons and the paint job are absolutely superb. Hat's off to you. What do you use to seal them after painting. Noel Quote Link to comment Share on other sites More sharing options...
enniscorthyman Posted March 4, 2017 Share Posted March 4, 2017 Great job,well done. Quote Link to comment Share on other sites More sharing options...
JasonB Posted March 4, 2017 Author Share Posted March 4, 2017 Jason, those wagons and the paint job are absolutely superb. Hat's off to you. What do you use to seal them after painting.Noel Thanks Noel much appreciated.Ive sealed them with Humbrol acrylic matt varnish.Ive also used Revell enamel varnish from the airbrush in the past but personally i just find the aerosol handier,saves cleaning the airbrush afterwards. Quote Link to comment Share on other sites More sharing options...
Sulzer201 Posted March 4, 2017 Share Posted March 4, 2017 Great job on oil tank wagons and love the ESB landys many a one of em trudged their way up to Turlough Hill back in the day. Quote Link to comment Share on other sites More sharing options...
scahalane Posted March 4, 2017 Share Posted March 4, 2017 Excellent work, the weathering really makes it. Quote Link to comment Share on other sites More sharing options...
richrua Posted March 4, 2017 Share Posted March 4, 2017 Very very nice Quote Link to comment Share on other sites More sharing options...
JasonB Posted March 7, 2017 Author Share Posted March 7, 2017 Thanks for your comments gents Quote Link to comment Share on other sites More sharing options...
jhb171achill Posted March 7, 2017 Share Posted March 7, 2017 Top class work! Quote Link to comment Share on other sites More sharing options...
Weshty Posted March 7, 2017 Share Posted March 7, 2017 Sweeeeeeet job Jason, they look very well! Quote Link to comment Share on other sites More sharing options...
burnthebox Posted March 7, 2017 Share Posted March 7, 2017 Jason that's some mega work you've nailed there, as for the LR's we've had some of them up our way very recently putting some poles back up!!! But they we'nt anything as clean as yours..... Those oil tanks look mega, mind telling me what are those SSM kits held on with, solder or glue, TIA BTB Quote Link to comment Share on other sites More sharing options...
JasonB Posted March 9, 2017 Author Share Posted March 9, 2017 Jason that's some mega work you've nailed there, as for the LR's we've had some of them up our way very recently putting some poles back up!!! But they we'nt anything as clean as yours..... Those oil tanks look mega, mind telling me what are those SSM kits held on with, solder or glue, TIABTB Hi BTB,the SSM kit was constructed and attached using super glue.Cheers for the comments. Quote Link to comment Share on other sites More sharing options...
Junctionmad Posted March 10, 2017 Share Posted March 10, 2017 Love the tank wagons Quote Link to comment Share on other sites More sharing options...
DiveController Posted March 10, 2017 Share Posted March 10, 2017 [ATTACH=CONFIG]27072[/ATTACH] Just seeing this post late. Very nice tank wagons Quote Link to comment Share on other sites More sharing options...
JasonB Posted October 14, 2017 Author Share Posted October 14, 2017 Not got much done of late so before starting anything new its back to a post from early January and to some work I had started on my bagged cement wagons from Irish Freight Models.At the time I had got as far as cutting the bodies down to sort a small issue I had with their height,taken off the plastic hand wheels which are located on one end of the wagon and had also removed the buffers and replaced them with the chunkier looking white metal type. Anyway I've recently got back around to finishing them off so here's a few pics of them now completed with some weathering and additional detail added which I've made up from plasticard and SSM break wheels/wire. 1 1 Quote Link to comment Share on other sites More sharing options...
RobertRoche Posted October 14, 2017 Share Posted October 14, 2017 Lovely work! Quote Link to comment Share on other sites More sharing options...
Weshty Posted October 14, 2017 Share Posted October 14, 2017 Very, very tasty Jason. Quote Link to comment Share on other sites More sharing options...
popeye Posted October 14, 2017 Share Posted October 14, 2017 Very beautiful and great weathering. Quote Link to comment Share on other sites More sharing options...
Noel Posted October 14, 2017 Share Posted October 14, 2017 You've transformed those wagons into something really special. Class job. Quote Link to comment Share on other sites More sharing options...
JasonB Posted October 17, 2017 Author Share Posted October 17, 2017 Thanks for the comments lads:tumbsup: Quote Link to comment Share on other sites More sharing options...
craven1508 Posted October 18, 2017 Share Posted October 18, 2017 some job done there!, just picture them with a well weathered 121 when they arrive!!!!! Quote Link to comment Share on other sites More sharing options...
ttc0169 Posted October 18, 2017 Share Posted October 18, 2017 Lovely work ,very realistic looking wagons, well done Jason. Quote Link to comment Share on other sites More sharing options...
JasonB Posted October 23, 2017 Author Share Posted October 23, 2017 On 18/10/2017 at 10:51 AM, craven1508 said: some job done there!, just picture them with a well weathered 121 when they arrive!!!!! Thanks Craven On 18/10/2017 at 5:52 PM, ttc0169 said: Lovely work ,very realistic looking wagons, well done Jason. Cheers Noel Quote Link to comment Share on other sites More sharing options...
StevieB Posted October 26, 2017 Share Posted October 26, 2017 I can understand where you are coming from in terms of height of the wagon side but, in so doing, you have changed the appearance of the side, as per this. It is always the problem when things are made too big, everything gets stretched, so when you cut down to get the size right, some of the detail goes. https://www.google.co.uk/search?q=irish+cement+wagons&client=safari&hl=en-gb&prmd=sinv&source=lnms&tbm=isch&sa=X&ved=0ahUKEwjJj67844zXAhUEXBoKHezJCI0Q_AUIEygC&biw=1024&bih=672#imgrc=HAzGfDL6iwNiiM: Stephen Quote Link to comment Share on other sites More sharing options...
JasonB Posted October 29, 2017 Author Share Posted October 29, 2017 On 26/10/2017 at 8:47 AM, StevieB said: I can understand where you are coming from in terms of height of the wagon side but, in so doing, you have changed the appearance of the side, as per this. It is always the problem when things are made too big, everything gets stretched, so when you cut down to get the size right, some of the detail goes. https://www.google.co.uk/search?q=irish+cement+wagons&client=safari&hl=en-gb&prmd=sinv&source=lnms&tbm=isch&sa=X&ved=0ahUKEwjJj67844zXAhUEXBoKHezJCI0Q_AUIEygC&biw=1024&bih=672#imgrc=HAzGfDL6iwNiiM: Stephen What I lost in detail is miniscule compared to what I gained in correcting their height.It's certainly nothing I'll be losing any sleep over, life is a little short for that.But that's just my opinion. Quote Link to comment Share on other sites More sharing options...
JasonB Posted March 4, 2018 Author Share Posted March 4, 2018 I was two days into this when IRM announced that they plan to release the Plough Van as one of their future projects So more than likely these will eventually end up in a siding but as the saying goes I've started so I'll finish.Like anything I've previously tried from SSM, Des has made it as easy as he possibly can for anyone building one of his kits so it has gone together without any hassle so far. Before I tackle getting the roof on I've added some plasticard to the interior of the veranda just to bulk up the appearance of the uprights a little, and I've also added some bracing to the central section to help keep everything rigid. 5 1 1 Quote Link to comment Share on other sites More sharing options...
Robert Shrives Posted March 4, 2018 Share Posted March 4, 2018 That looks very good and just proves the point , I have 6 42 foot flats in the works and along come IRM .... Must start several A and C class locos !! he dreams ... Robert 3 1 Quote Link to comment Share on other sites More sharing options...
JasonB Posted March 4, 2018 Author Share Posted March 4, 2018 Thanks Robert. Quote Link to comment Share on other sites More sharing options...
PJR Posted March 6, 2018 Share Posted March 6, 2018 Lovely work 1 Quote Link to comment Share on other sites More sharing options...
JasonB Posted March 9, 2018 Author Share Posted March 9, 2018 Fixing the roof and handrails to both vans was a little trickier than I expected but I got there in the end. Next job is to sort the chassis' and make up the ploughs, once that's done its on to the painting. 7 1 1 Quote Link to comment Share on other sites More sharing options...
RobertRoche Posted March 9, 2018 Share Posted March 9, 2018 Looks like a neat job! Quote Link to comment Share on other sites More sharing options...
ttc0169 Posted March 9, 2018 Share Posted March 9, 2018 Very nice Jason.. Quote Link to comment Share on other sites More sharing options...
JasonB Posted March 10, 2018 Author Share Posted March 10, 2018 14 hours ago, RobertRoche said: Looks like a neat job! 12 hours ago, ttc0169 said: Very nice Jason.. Thanks lads 1 Quote Link to comment Share on other sites More sharing options...
Noel Posted March 10, 2018 Share Posted March 10, 2018 On 4/3/2018 at 11:22 AM, jason brady said: I was two days into this when IRM announced that they plan to release the Plough Van as one of their future projects So more than likely these will eventually end up in a siding but as the saying goes I've started so I'll finish.Like anything I've previously tried from SSM, Des has made it as easy as he possibly can for anyone building one of his kits so it has gone together without any hassle so far. Before I tackle getting the roof on I've added some plasticard to the interior of the veranda just to bulk up the appearance of the uprights a little, and I've also added some bracing to the central section to help keep everything rigid. Nice job Jason. Looking great. Quote Link to comment Share on other sites More sharing options...
JasonB Posted March 10, 2018 Author Share Posted March 10, 2018 1 hour ago, Noel said: Nice job Jason. Looking great. Cheers Noel. Quote Link to comment Share on other sites More sharing options...
Recommended Posts
Join the conversation
You can post now and register later. If you have an account, sign in now to post with your account.