Robert Shrives Posted March 10, 2018 Share Posted March 10, 2018 echo above a lovely job and looking forward to seeing all done and weathered to the nines! thanks Robert 1 Quote Link to comment Share on other sites More sharing options...
JasonB Posted April 20, 2018 Author Share Posted April 20, 2018 Finally got around to finishing off the SSM plough vans during the week. You'll probably notice from the plough underneath that I had made a start on weathering these, but then decided to leave it at that. Reason being, I have my pack ordered from IRM and thought it made more sense to hold off and do a job on them as they will be running with my Ballast Wagons eventually. Anyway here's a couple of pics of the now completed vans. 7 1 2 Quote Link to comment Share on other sites More sharing options...
Noel Posted April 20, 2018 Share Posted April 20, 2018 Oh they are just stunning Jason. That must be one of the best ever jobs done on those SSM Plough kits, if not the best. That looks like factory RTR quality, so crisp, so sharp, just delightful. Quote Link to comment Share on other sites More sharing options...
Noel Posted April 20, 2018 Share Posted April 20, 2018 Jason, did you use solder or superglue? Any in build pics? Noel Quote Link to comment Share on other sites More sharing options...
JasonB Posted April 21, 2018 Author Share Posted April 21, 2018 20 hours ago, Noel said: Jason, did you use solder or superglue? Any in build pics? Noel Cheers Noel, thanks for the kind words.I used the old reliable superglue.The joins were given a rub down with a very fine sandpaper before gluing. I've used it previously on other brass kits and have had no issues afterwards. Famous last words, they'll probably fall to bits now after saying that Quote Link to comment Share on other sites More sharing options...
popeye Posted April 21, 2018 Share Posted April 21, 2018 They both look very nice and well put together. But they will need a bit of dirt. Quote Link to comment Share on other sites More sharing options...
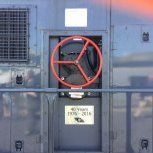
JasonB Posted May 14, 2018 Author Share Posted May 14, 2018 When I first built these cement wagons about 3 years ago I made one of the worst mistakes you probably can when modelling and rushed them, resulting in a lot of wobbling and sometimes derailing when running. Obviously the badly built chassis' were behind the running issues so about two months back I decided to start on a new batch and sort the problem once and for all. While I was working away on the building the new chassis' I took the chance to tidy up parts of the weathering and paintwork on the bodies which was another thing I hadn't been happy with, and I've also added some extra detail to both ends of each wagon by using plasticard and SSM break wheels and wire. None of this is by any means 100% accurate but I think it represents the framework and hand wheels from the prototype quite well and certainly adds to the appearance of the model. The chassis' still need some weathering applied to blend top with bottom but that's a job for another day, main thing is their now running smoothly. 5 1 3 Quote Link to comment Share on other sites More sharing options...
Noel Posted May 14, 2018 Share Posted May 14, 2018 Class job. Super looking wagons. Precise neat work. Quote Link to comment Share on other sites More sharing options...
popeye Posted May 14, 2018 Share Posted May 14, 2018 They look really nice. Good work 1 Quote Link to comment Share on other sites More sharing options...
JasonB Posted May 15, 2018 Author Share Posted May 15, 2018 Thanks guys Quote Link to comment Share on other sites More sharing options...
JasonB Posted July 27, 2018 Author Share Posted July 27, 2018 Got going on these beauties from SSM a couple of weeks ago. Just finished are the two 42' flats which will form the barrier wagons. Plenty of cutting, bending and filing with these, but when they start to take shape they really are worth the work. With the flats ready it was on to the cradles for the tanks, and in the background are the bogies for the Ammonia wagons. 5 1 Quote Link to comment Share on other sites More sharing options...
John-r Posted July 27, 2018 Share Posted July 27, 2018 Excellent work Jason,. did you superglue or solder. Will be watching the rest of your build with keen interest. very well done. Quote Link to comment Share on other sites More sharing options...
jhb171achill Posted July 27, 2018 Share Posted July 27, 2018 Absolutely top class as always, Jason. Quote Link to comment Share on other sites More sharing options...
JasonB Posted July 28, 2018 Author Share Posted July 28, 2018 21 hours ago, John-r said: Excellent work Jason,. did you superglue or solder. Will be watching the rest of your build with keen interest. very well done. Thanks John-r. I suppose the right way when it comes to brass is to solder, but superglue does the job for me and it hasn't let me down yet. 20 hours ago, jhb171achill said: Absolutely top class as always, Jason. Cheers JB, much appreciated. Quote Link to comment Share on other sites More sharing options...
JasonB Posted July 29, 2018 Author Share Posted July 29, 2018 Made a start on these cages and kegs this morning. Another great little kit from SSM and so easy to work on. One down, 5 to go. 6 2 Quote Link to comment Share on other sites More sharing options...
JasonB Posted August 4, 2018 Author Share Posted August 4, 2018 A couple of pics of the cages and kegs now finished. Perfect for in and around a yard or even better on a bogie flat. I think I'll be getting myself some more of these. 6 1 1 3 Quote Link to comment Share on other sites More sharing options...
John-r Posted August 4, 2018 Share Posted August 4, 2018 Absolutely fantastic Jason, very well done . I have a few of the keg kits to build myself they look great. can I ask what colour you used for the kegs very realistic 1 Quote Link to comment Share on other sites More sharing options...
JasonB Posted August 4, 2018 Author Share Posted August 4, 2018 7 hours ago, John-r said: Absolutely fantastic Jason, very well done . I have a few of the keg kits to build myself they look great. can I ask what colour you used for the kegs very realistic Cheers John-r, colour is Humbrol 53 Gun metal metallic. Quote Link to comment Share on other sites More sharing options...
JasonB Posted September 1, 2018 Author Share Posted September 1, 2018 (edited) No work done on these since late July, so I made a long overdue return to the barrier wagons during the week. Nearly there now , just the decals to be applied to the tanks and the flats still need a couple of coats of paint. Once that's sorted its on to the Ammonias. Edited September 1, 2018 by jason brady 10 1 1 3 Quote Link to comment Share on other sites More sharing options...
JasonB Posted September 12, 2018 Author Share Posted September 12, 2018 Managed to grab an hour or two over the last couple of evenings to continue on with the barriers. Painting of the flats is now finished and I've also made a start on weathering the tanks. Getting there slowly but surely 11 2 1 Quote Link to comment Share on other sites More sharing options...
Noel Posted September 12, 2018 Share Posted September 12, 2018 Very nicely finished wagons. Like the subtle weathering on the tanks. Quote Link to comment Share on other sites More sharing options...
John-r Posted September 12, 2018 Share Posted September 12, 2018 Lovely work Jason,. they really look the part,. Quote Link to comment Share on other sites More sharing options...
JasonB Posted September 12, 2018 Author Share Posted September 12, 2018 2 hours ago, John-r said: Lovely work Jason,. they really look the part,. Thanks as always for the comments John-r, much appreciated. 3 hours ago, Noel said: Very nicely finished wagons. Like the subtle weathering on the tanks. Cheers Noel. Plan is to have them heavily weathered when finished. They were generally manky when in service, so hoping to achieve that look when done. Quote Link to comment Share on other sites More sharing options...
flange lubricator Posted September 12, 2018 Share Posted September 12, 2018 Great job Jason. 1 Quote Link to comment Share on other sites More sharing options...
ttc0169 Posted September 13, 2018 Share Posted September 13, 2018 Lovely work Jason 1 Quote Link to comment Share on other sites More sharing options...
JasonB Posted September 22, 2018 Author Share Posted September 22, 2018 On to the Ammonias. I decided to start with the tank itself and I'm glad I did. This turned out to be a little trickier than I expected, basically its a flat sheet of brass that needs to be rolled into a cylindrical shape to form the tank by using both resin ends as a guide. There were plenty of expletives used when doing this but I got there in the end Plenty of work still to be done on the chassis 7 1 1 1 Quote Link to comment Share on other sites More sharing options...
JasonB Posted October 5, 2018 Author Share Posted October 5, 2018 Another little project I've being itching to get started on is adding some much needed weathering to my IRM Cement Bubbles. I was a little reluctant at first about attempting this but a Bubble just doesn't look right if its not manky so they've made it to the bench to be dirtied up. I'm beginning by removing the logos. I know this might seem a little drastic, but it was rare they were seen on the real thing in their later years and by doing this it cuts out any chance of them showing through the weathering when its eventually applied. I've just finished the first two from 18, only 16 to go 2 2 Quote Link to comment Share on other sites More sharing options...
popeye Posted October 5, 2018 Share Posted October 5, 2018 You could do some with the logo showing through a bit. 2 1 Quote Link to comment Share on other sites More sharing options...
JasonB Posted October 5, 2018 Author Share Posted October 5, 2018 16 minutes ago, popeye said: You could do some with the logo showing through a bit. I'll probably hold on to 3 or 4 with the logo Popeye. I have seen photos where the later IRISH CEMENT logo can be partially seen. To be honest I don't think I could bring myself to deface them all 1 Quote Link to comment Share on other sites More sharing options...
JasonB Posted October 18, 2018 Author Share Posted October 18, 2018 The logos have now been removed on all but 4 of the bubbles, so I've moved on to adding some cement spillage to the top of the tanks. This was made up from a mixture of Humbrol weathering powders and Matt Cote. When the mix had dried I began removing it until I got a look I was happy with. It was then fixed in place with matt varnish. 3 1 Quote Link to comment Share on other sites More sharing options...
RobertRoche Posted October 18, 2018 Share Posted October 18, 2018 Nice job, I think the textured finish on the cement wagons is what really makes these models look good Quote Link to comment Share on other sites More sharing options...
JasonB Posted October 18, 2018 Author Share Posted October 18, 2018 1 hour ago, RobertRoche said: Nice job, I think the textured finish on the cement wagons is what really makes these models look good Cheers Robert. Yes the powders seem to work well when trying to achieve that caked on lumpy appearance. All going to plan it will still be visible after airbrushing etc is eventually finished. 2 Quote Link to comment Share on other sites More sharing options...
JasonB Posted October 19, 2018 Author Share Posted October 19, 2018 Progress of sorts on the Ammonias... 5 1 Quote Link to comment Share on other sites More sharing options...
JasonB Posted December 9, 2018 Author Share Posted December 9, 2018 Just finished working on some 1/76 scale Transits from Oxford Diecast. A nice result for very little effort. Decals are from SSM, ladders from the spares box. Job done. Now added to the ESB fleet 6 1 1 Quote Link to comment Share on other sites More sharing options...
JasonB Posted December 28, 2018 Author Share Posted December 28, 2018 Last of the Oxford Transits done. This time finished in Eircom colours. Decals again from SSM. Great little vans for dotting around the layout. 2 1 Quote Link to comment Share on other sites More sharing options...
Recommended Posts
Join the conversation
You can post now and register later. If you have an account, sign in now to post with your account.