
Dhu Varren
-
Posts
547 -
Joined
-
Last visited
-
Days Won
1
Content Type
Profiles
Forums
Resource Library
Events
Gallery
Blogs
Store
Community Map
Posts posted by Dhu Varren
-
-
2 hours ago, jhb171achill said:
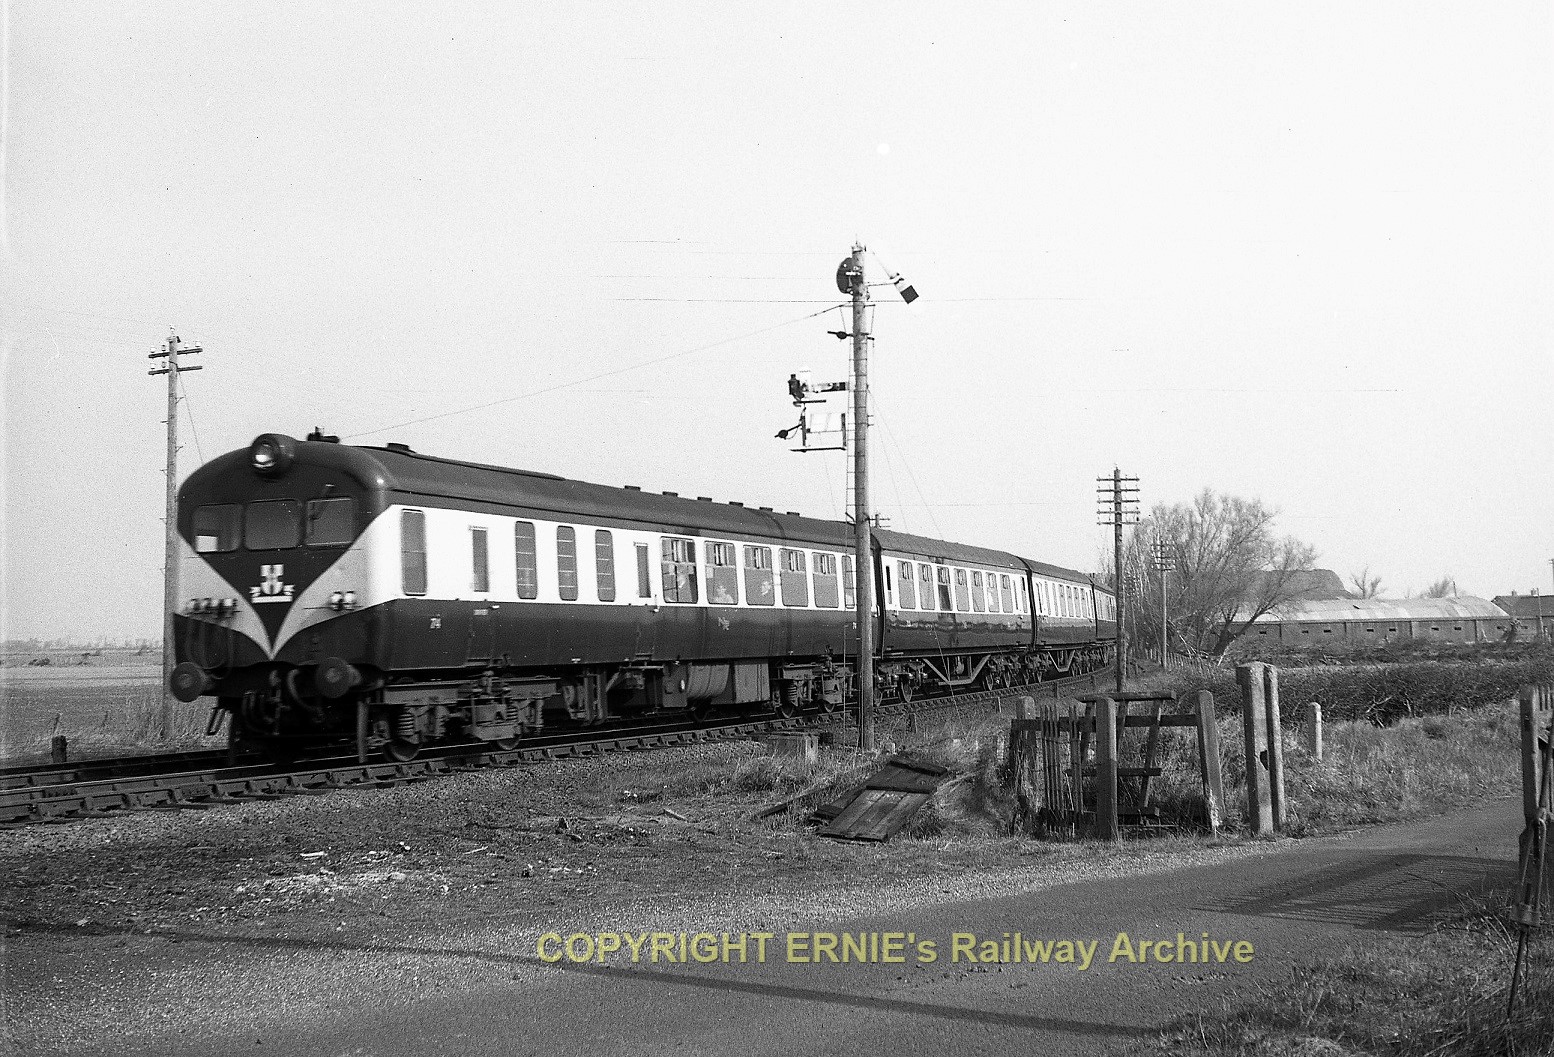
The van behind the loco is an old GNR standard covered van, behind which 9and to the right of it) are standard CIE "Bullied" corrugated open wagons. These will have come northvia the North Wall - Dundalk goods leaving them in Dundalk, and the Dundalk - Belfast (Grosvenor Road) goods dropping them at Porteedown.
On the far left is a fitted parcels van of "Y" class, repannelled in planking by the UTA.
I have to disagree about the van JB. With outside W irons and the roof shape, it has to be an ex NCC van. GNR vans had a much flatter roof.
-
 1
1
-
-
18 hours ago, Irishswissernie said:

I believe this location could be the approach to the Belfast end of Limavady Junction station. The sharp curve on the approach, and through the station, is characteristic of that station. The large building in the extreme background is still there.
-
1
-
 1
1
-
-
Interestingly, that registration number is correct for a white Fiat van.
Note also that the building in the background is an Irish business.
Very strange.
-
 1
1
-
-
12 hours ago, murphaph said:
No probs. I think it may have been Sean who figured out that it was fairly easy to get the headlights to work independently of the marker lights on the babies. I had always assumed the same LEDs were responsible for the light but it seems they aren't.
No, it was me. When reading Sean's post on getting 141/181 headlights and marker lights to work independently, I was beginning to think I had missed something obvious, as these lights on 141/181 are both on the same circuit in the loco, unlike the 071s. No amount of function remapping is ever going to get the lights in the Baby GMs to work independently without some surgery inside the locomotive.
-
2
-
-
It has all the signs of an MIR kit and mounted on an Athearn chassis.
-
1
-
-
-
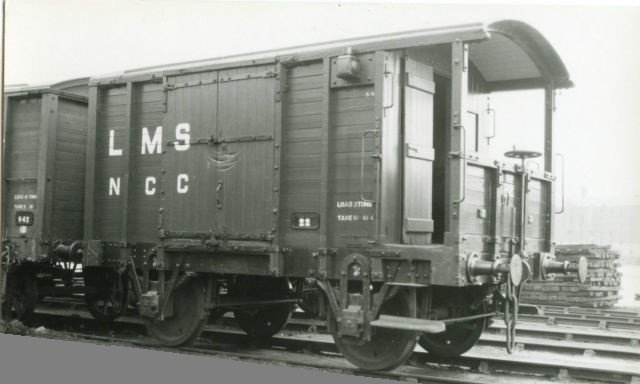
Looks like an NCC Goods Brake Van
-
3
-
1
-
1
-
 1
1
-
-
1 hour ago, Galteemore said:
Thanks Ernie. Pic 2 looks v similar to a colour one on the cover of one of the Ferris books.
Interesting picture. The cover picture of Tom Ferris's 'Irish Railways in Colour A Second Glance' is repeated in full on P63 of the book. It is identical to this picture, except that the train is different. It is loco 202, and the shadows indicate a different time of day, but the camera position is exactly the same and the trains are only a couple of sleepers different. Amazing, since the pictures are dated a year apart.
-
2
-
-
On 9/9/2021 at 7:03 AM, Irishswissernie said:
County Donegal Railways today:
Photographer recorded this as Donegal Town but I'm not so sure Railcar 18 , 1July 1959
This is though 24 August 1954
There seems to be some confusion over the picture of railcar 16 at Strabane. Airfixfan is adamant it is railcar 18, Andy Cundick says it can’t be 18, as 18 has different front windows.
Not being an expert on CDR railcars, I did a bit of research on the subject, and I found the following, but I am open to correction.
Ironically, Airfixfan and Andy are both correct, in a roundabout sort of way.
No 18, as built, was very similar to 16. However, following the fire in 1949, 18 was completely rebuilt with different front windows. The passenger compartment also received different windows. Both these differences made 18 easily recognizable. 18 ran in this condition until preservation.
In 1996, in preservation, 18 was extensively restored to it’s original ‘as built’ condition, which makes it once again look similar to 16. Hence the confusion. Dating of photographs becomes essential for identification of the railcar. In the case of this photograph, since it was taken before closure of the CDR, it has to be No 16.
-
3
-
-
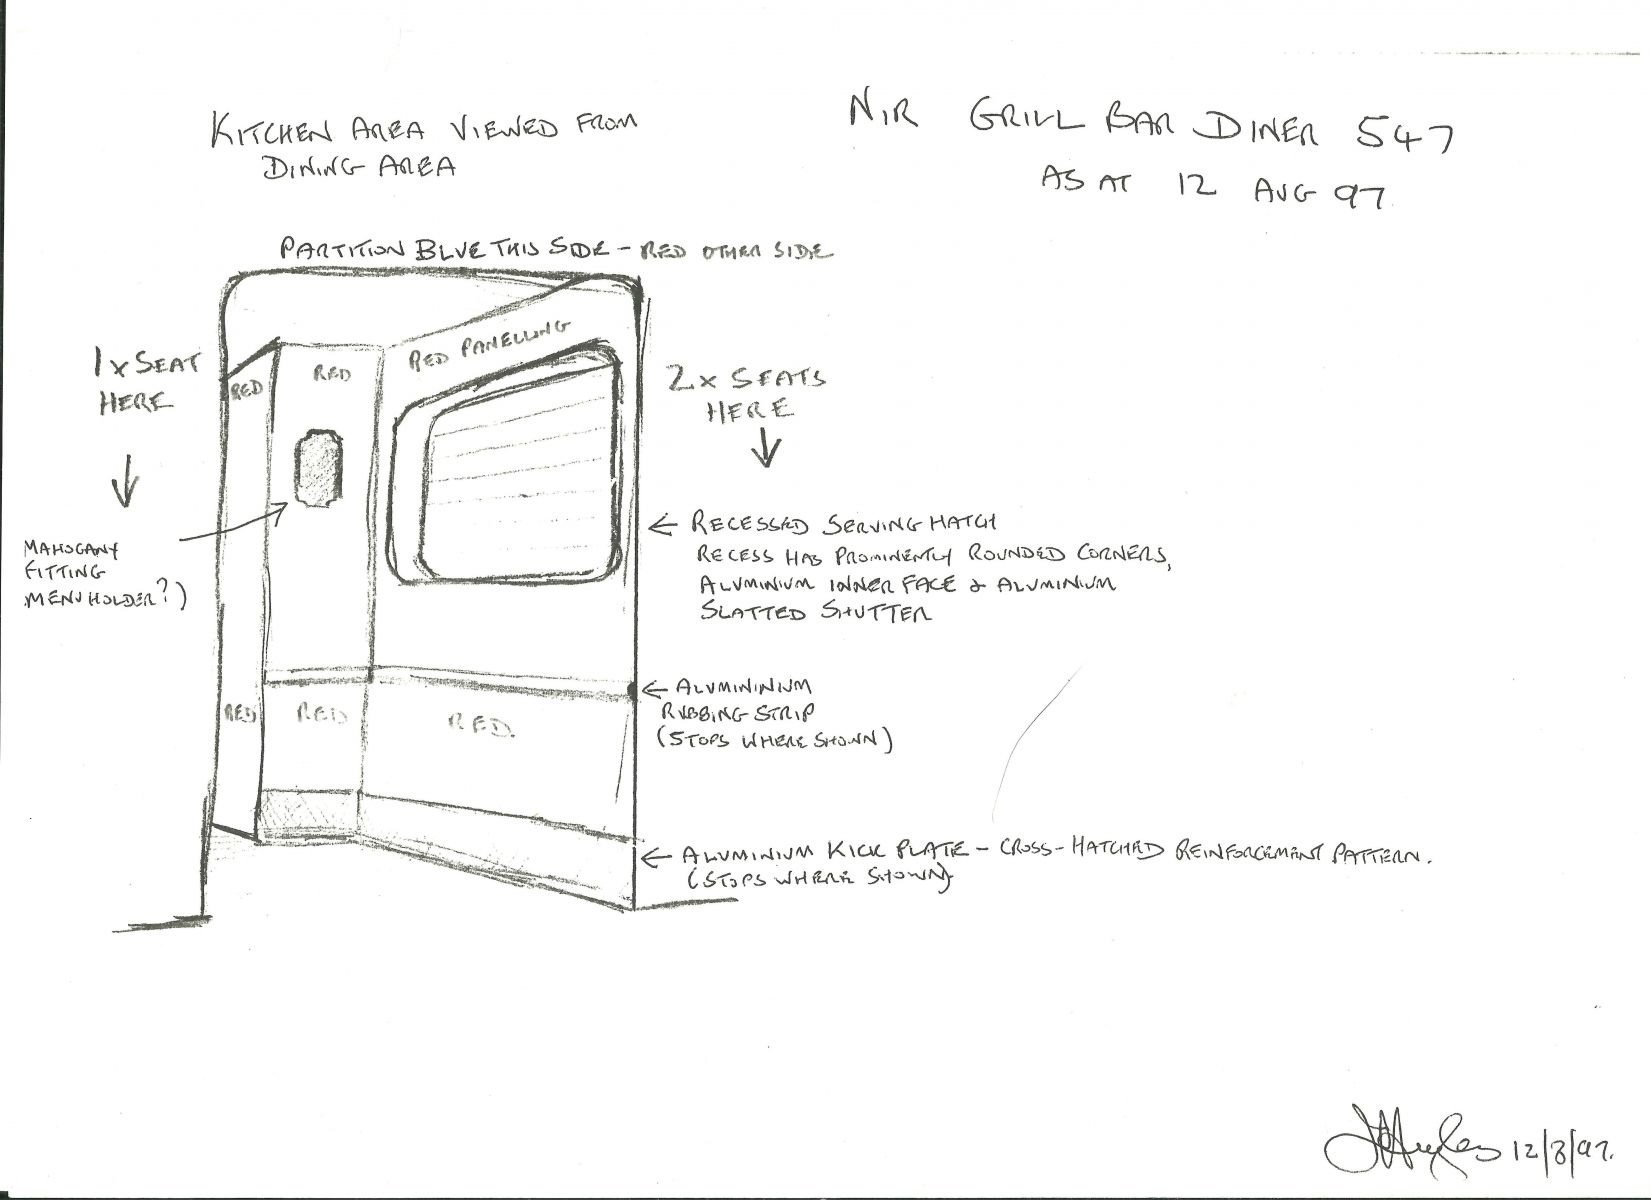
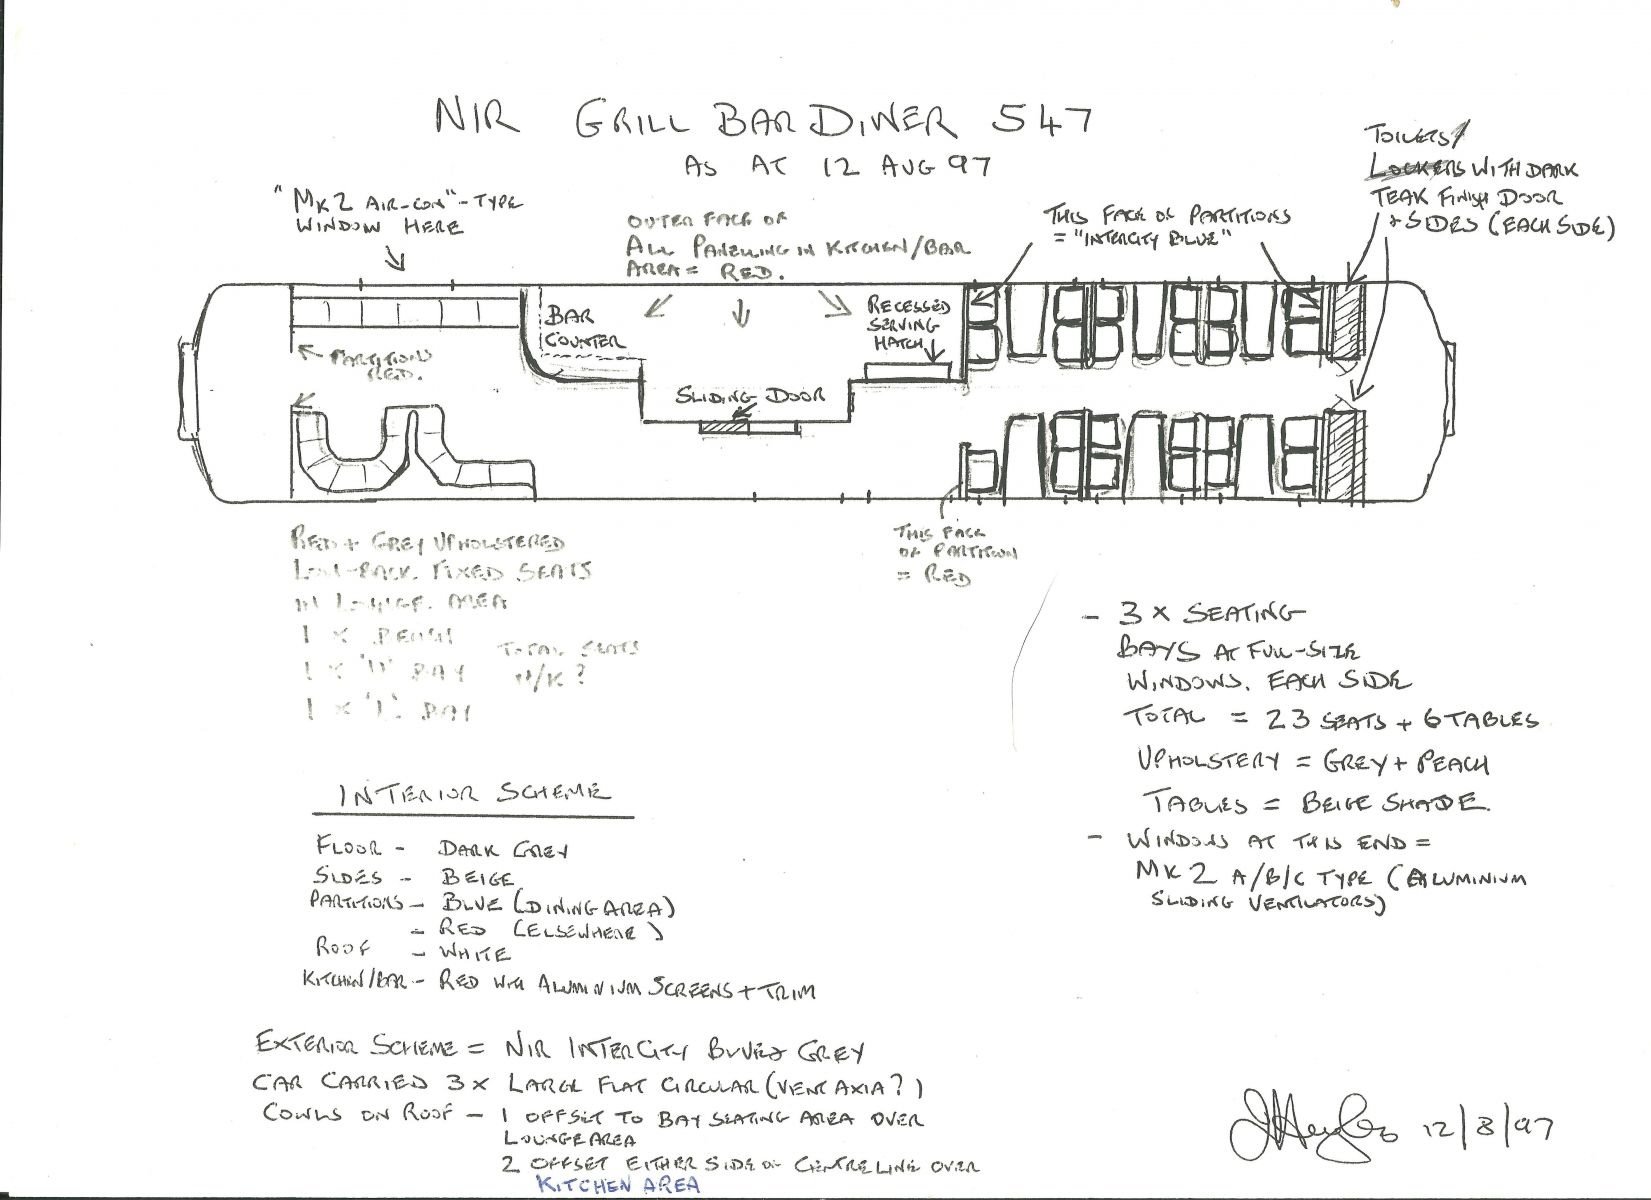
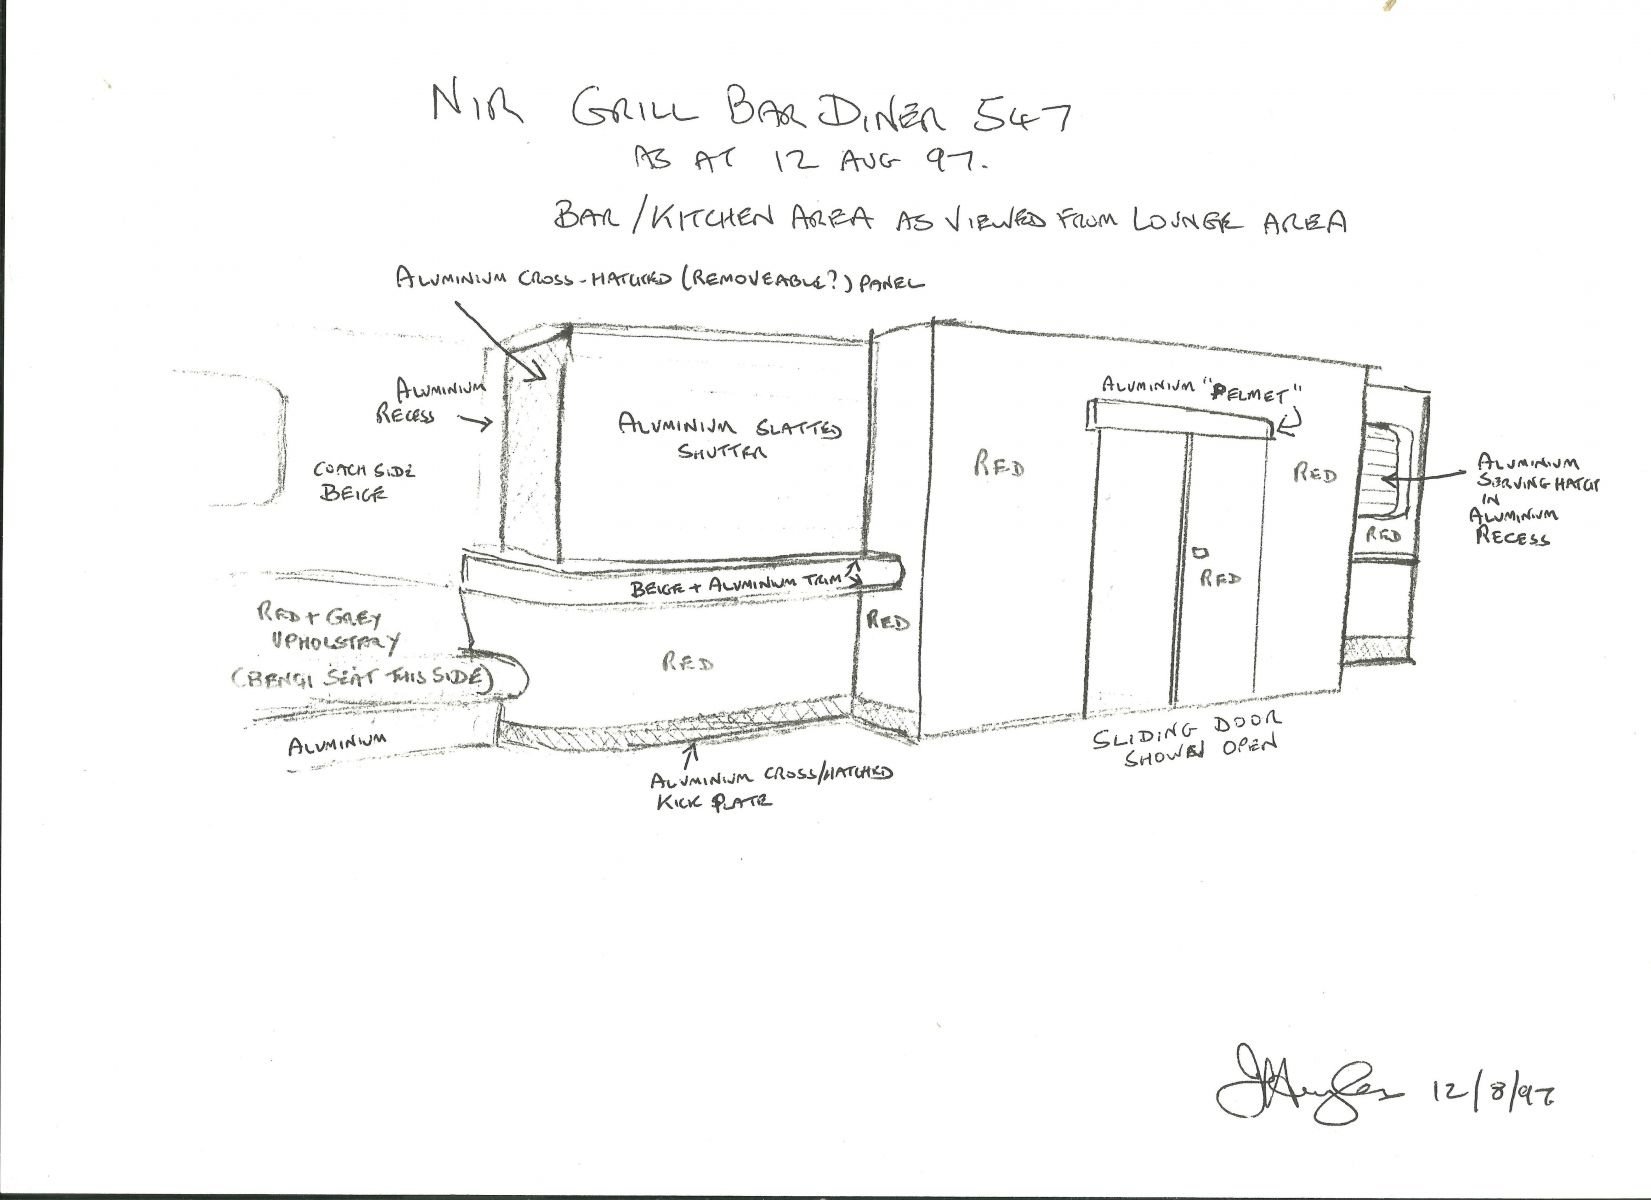
Some sketches of interior of 547.
-
3
-
5
-
2
-
-
22 minutes ago, hexagon789 said:
Perhaps because the earlier ones had the same three-pipe air brakes the 80 Class used?
Just a guess, any of the later coaches would've needed conversion as they were two-pipe.
When the 80 Class were originally ordered, they were a mix of three car and two car sets. Later, to increase the capacity of the two car sets, a number of Enterprise coaches, both three-pipe, and two-pipe versions were converted to 80 Class intermediate cars. Unlike the original intermediates, they did not have centre doors added.
-
1
-
-
3 hours ago, NIRCLASS80 said:
Mk2B Driving trailer leads an eighty set into Ballymena past a MV.
Now there’s an idea for the IRM lads!
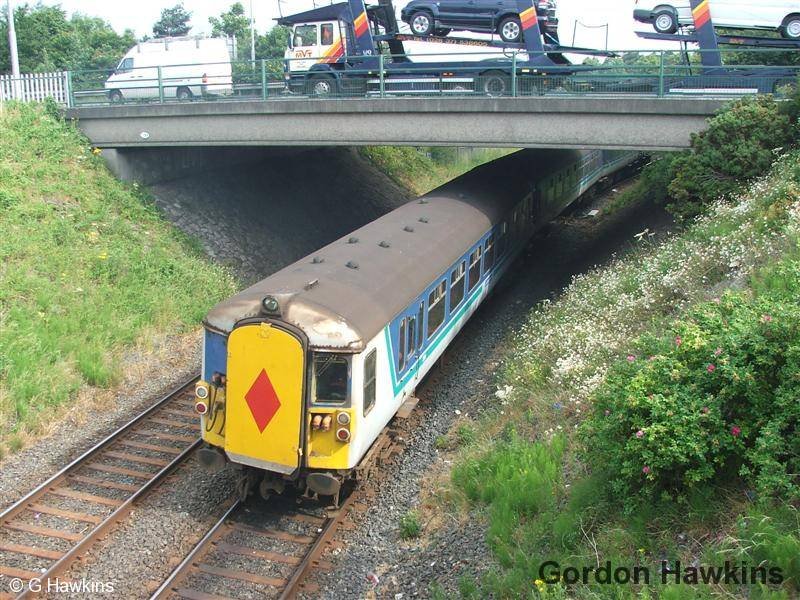
This vehicle would be ex Enterprise Driving Trailer 811, now converted to 80 Class Driving Trailer 754. At this stage it was only a partial conversion, in that the full Guards accommodation was still in situ, and there was only seating for 31 passengers. There was also no roof headlight fitted.
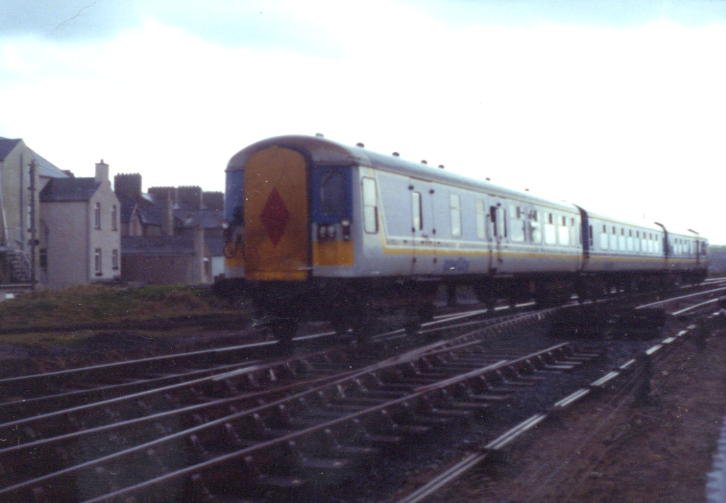
Photo below shows a side view of 754 arriving in Portrush in original condition, complete with Guards compartment.
Subsequently, 754 was fully converted with the Guards compartment being removed, and seating being increased to 75. The standard 80 Class roof headlight was also fitted. This vehicle was easily recognisable, in that it did not have a centre door, and it also retained the original roof vent layout for a Mk 2b DBSO, this can be clearly seen in the following photo by Gordon Hawkins.
-
6
-
1
-
-
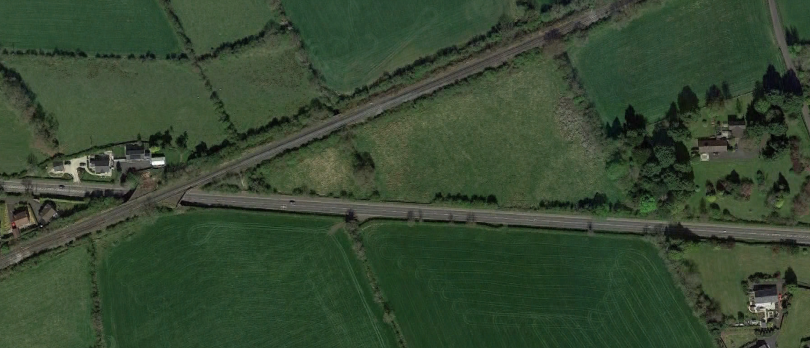
Picture 3 with the MPD, I believe to be the rebuilding of the arched bridge over the A6 just outside Templepatrick. The screen grab from Google Earth below shows the house in the top right of the photo relative to the rebuilt bridge.
-
1
-
-
The building marked X and still there, was the Technical College, known as 'The Tech'. The building behind and to the right was Foyle College, still there but the school moved out in the late 1960s.
The building next to the X where the photo was taken, was the LPHC engine shed.
Noticeably missing from the picture is HMS Stalker (known locally as HMS Neverbudge), a submarine depot ship. permanently moored at the two jetties in the top right of the picture. Can be clearly seen in the picture posted earlier by NIR.
-
1
-
-
Have examined many pictures of NIR Bumblebee liveried coaches, and there seems to be three categories of gutters, colour wise.
1. The gutter is painted light grey like the cantrail, but the grey only extends round the end as far as where the grey cantrail does, namely the edge of the door.
2. The gutter is painted light grey like the cantrail, but the grey extends all the way round the end as far as the gangway.
3. The gutter is painted the same colour as the roof. It is highly unlikely that a gutter would be so dirty that a light grey painted one would look like it was roof coloured, as carriage washing plant would clean off any accumulated dirt like the rest of the body side. For example, the picture posted earlier looks to me to be a roof coloured gutter, rather than a dirty light grey one.
-
1
-
1
-
1
-
-
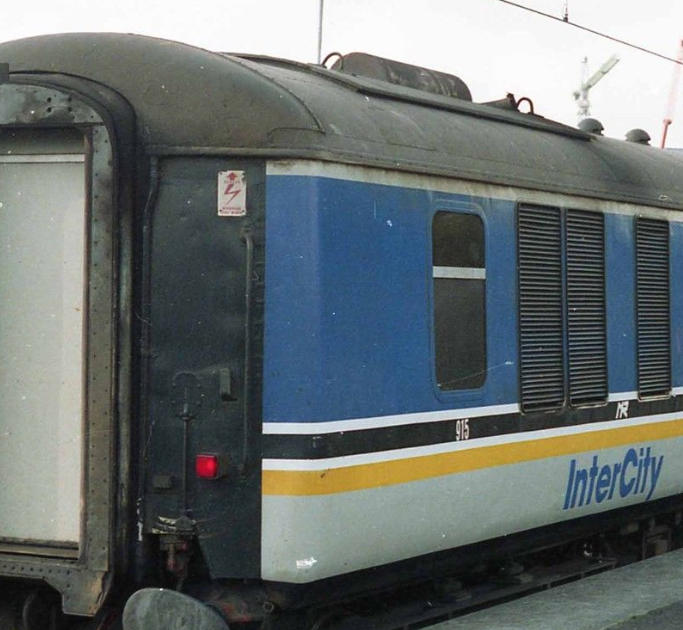
Oops, did not notice that the stripes were self adhesive vinyl. Just assumed they were waterslide, just like the ones I got from MIR years ago.
The overall width of my 'Bumblebee' stripes is about 4.25mm top to bottom.
Below is a screengrab of the end of an NIR coach showing quite clearly the stripes. From this it should be easy to work out the proportional width of each colour.
-
3
-
1
-
1
-
-
Check this out. Model Irish Railways did a sheet of 'Bumble Bee Stripes' and these appear of Fleabay from time to time. https://www.ebay.co.uk/itm/114769445134?hash=item1ab8cac10e:g:CDgAAOSw7yxfpbpz
Much cheaper than the ones from Railtec. I have used them on some of my coaches, along with full paint stripes, and even produced my own on my PC. Hard to tell them apart.
-
2
-
-
In all fairness, although the item price is way OTT, the only muppet is the person who pays such a price. As for the postage cost, blame the Global Shipping Programme, not the seller. The UK shipping is postage at cost, namely £3.20.
-
2
-
 1
1
-
-
8 hours ago, Ironroad said:
Very intriguing it is most unlikely that cars moved from the Republic to the North at that time.
If indeed it is a 'trip' working to St. Johnston, then the cars would be destined for the Republic not the North.
-
1
-
-
The arrangement of the rings on a train staff were different for every section of track. They acted like a key to ensure they could only be inserted back into a machine appropriate to the section of line to which the staff was applicable. For the train crew, identification of the section of line to which the staff was applicable was simply by the name of the section being stamped, or cast, on the staff, ie station A to station B. The signal box at each end of the section was equipped with a "token instrument". This was a machine which detected the removal or replacement of a "staff" or "token". The token was a metal key which was smaller than a staff but which performed the same function. The token instruments at each end of a single line section were electrically interlocked so that the act of removing a token/staff locked both machines and prevented further removals from either instrument until the missing token was replaced at one end or the other.
Headhunters Museum in Enniskillen have a fine collection of train staffs, one for every line section for the GNR (INWR) line from Enniskillen to Derry.
-
1
-
2
-
-
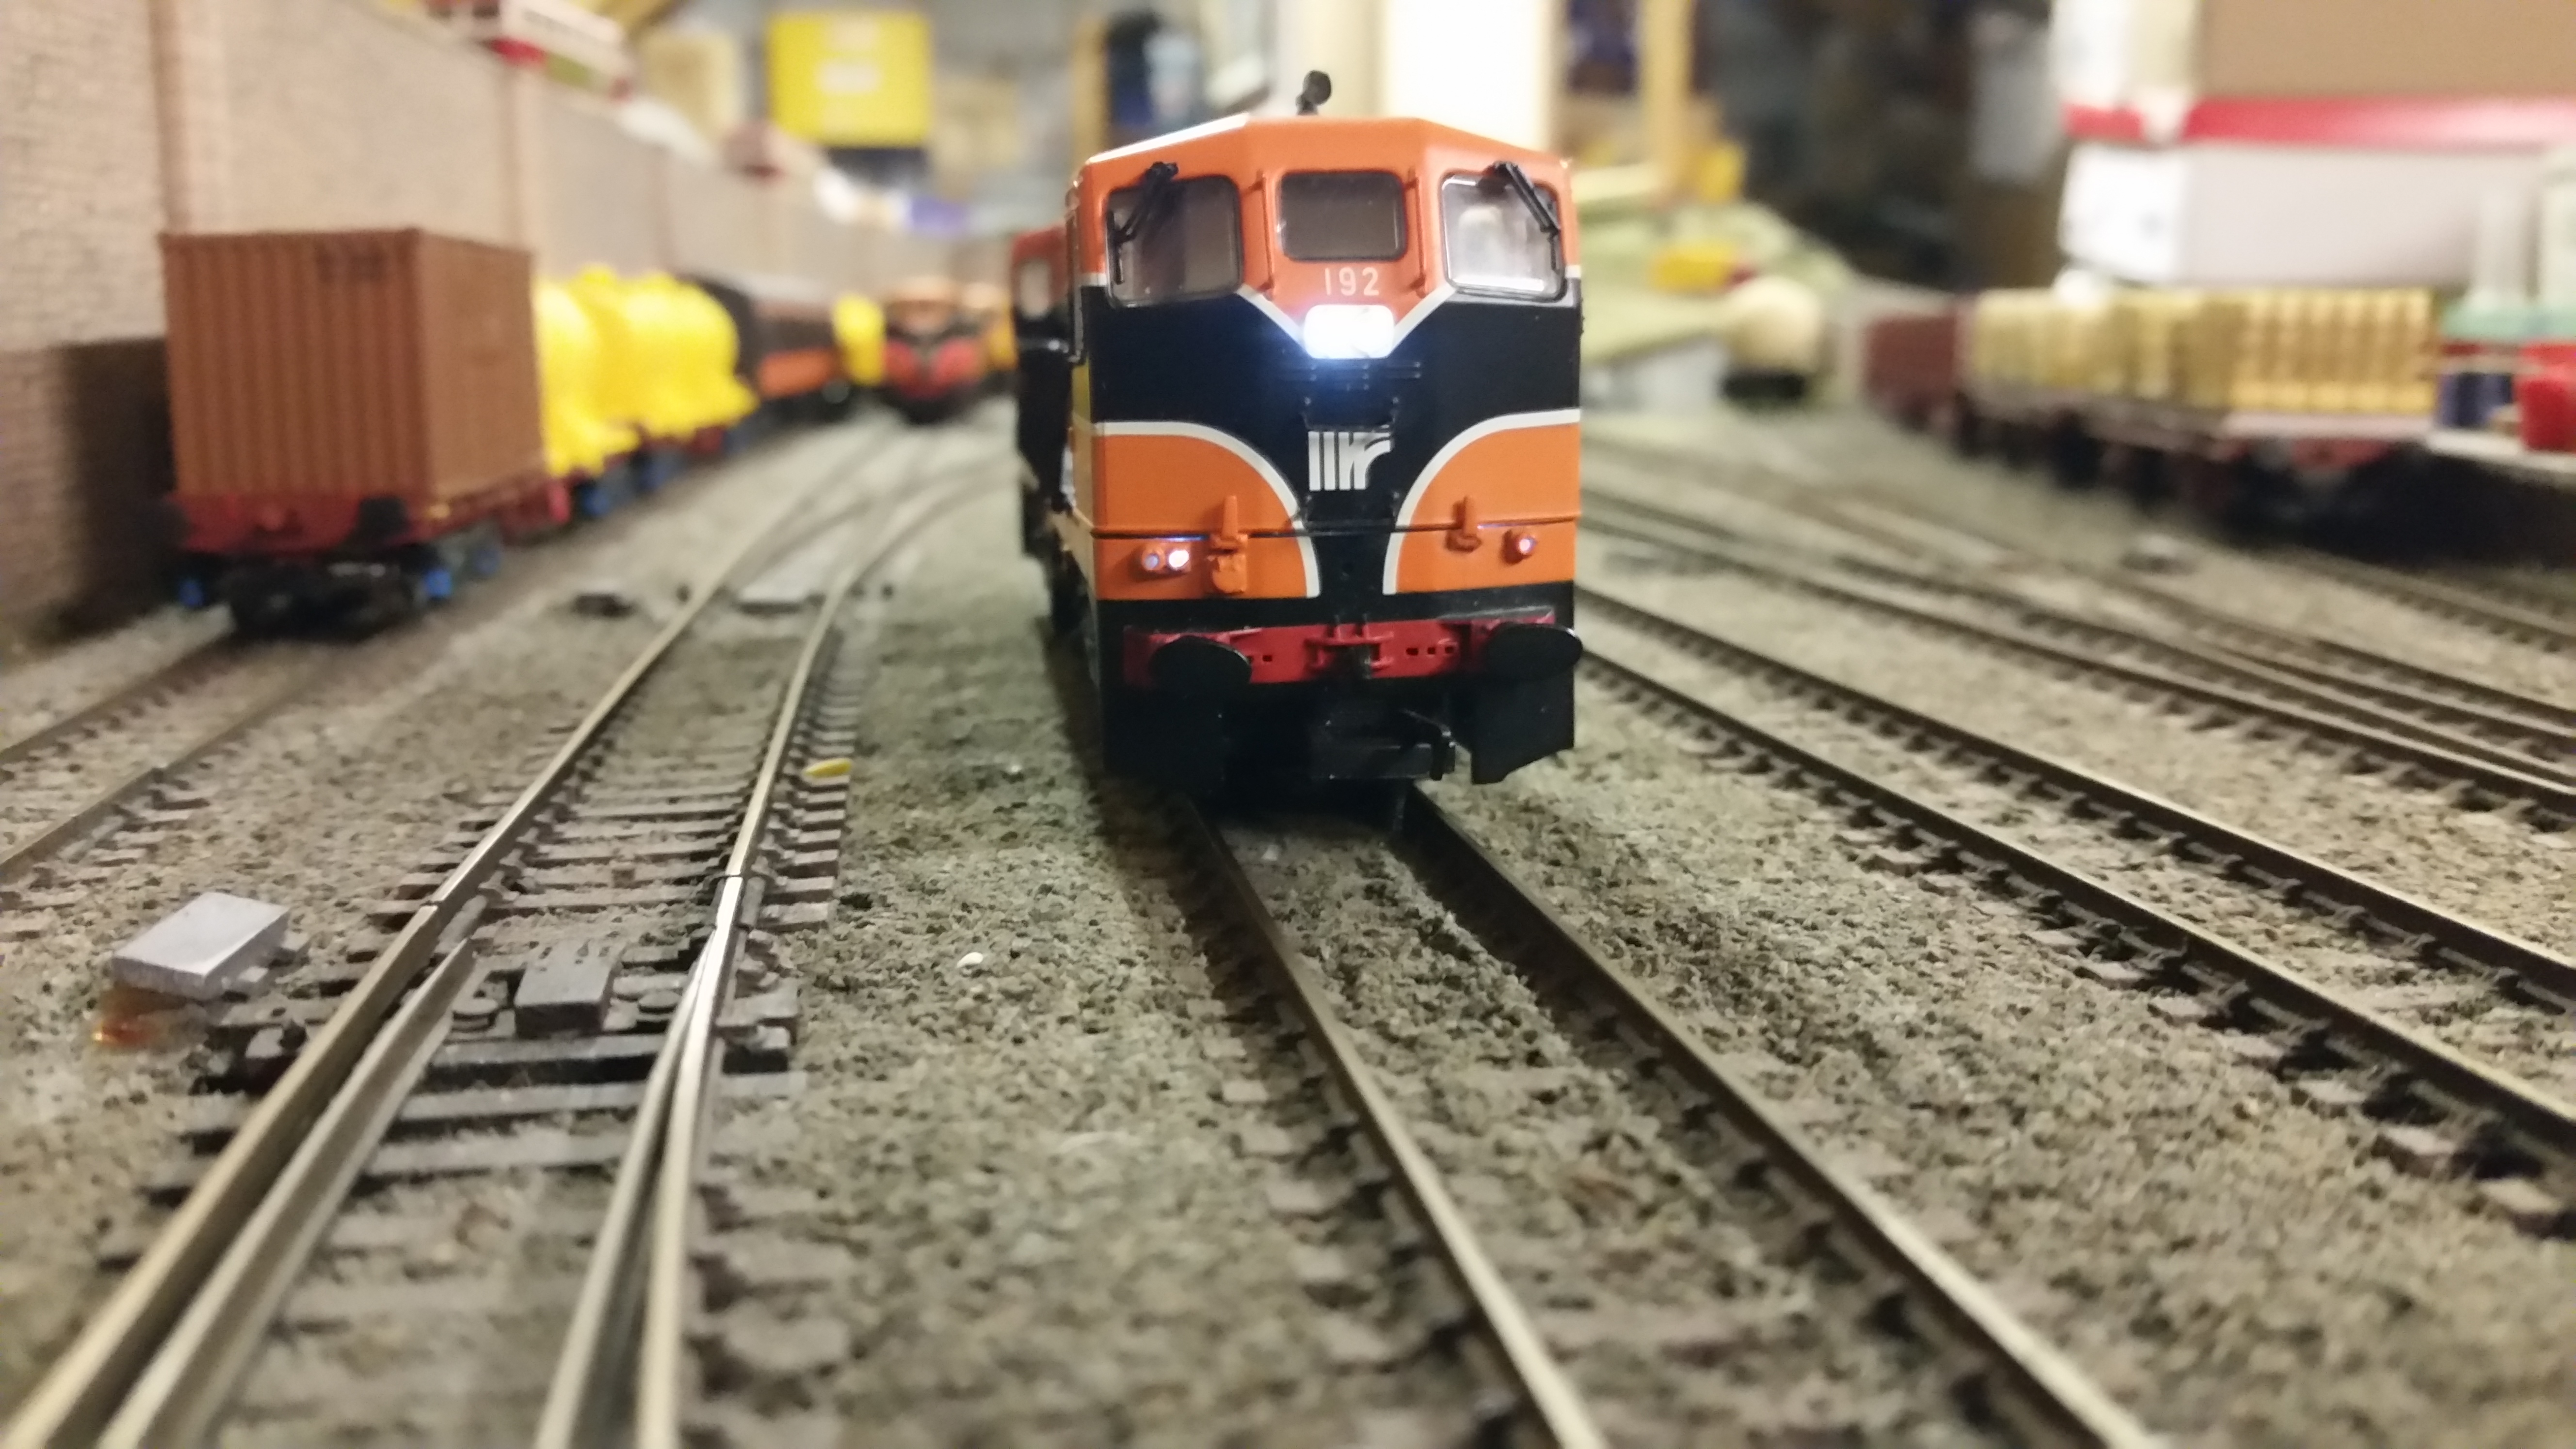
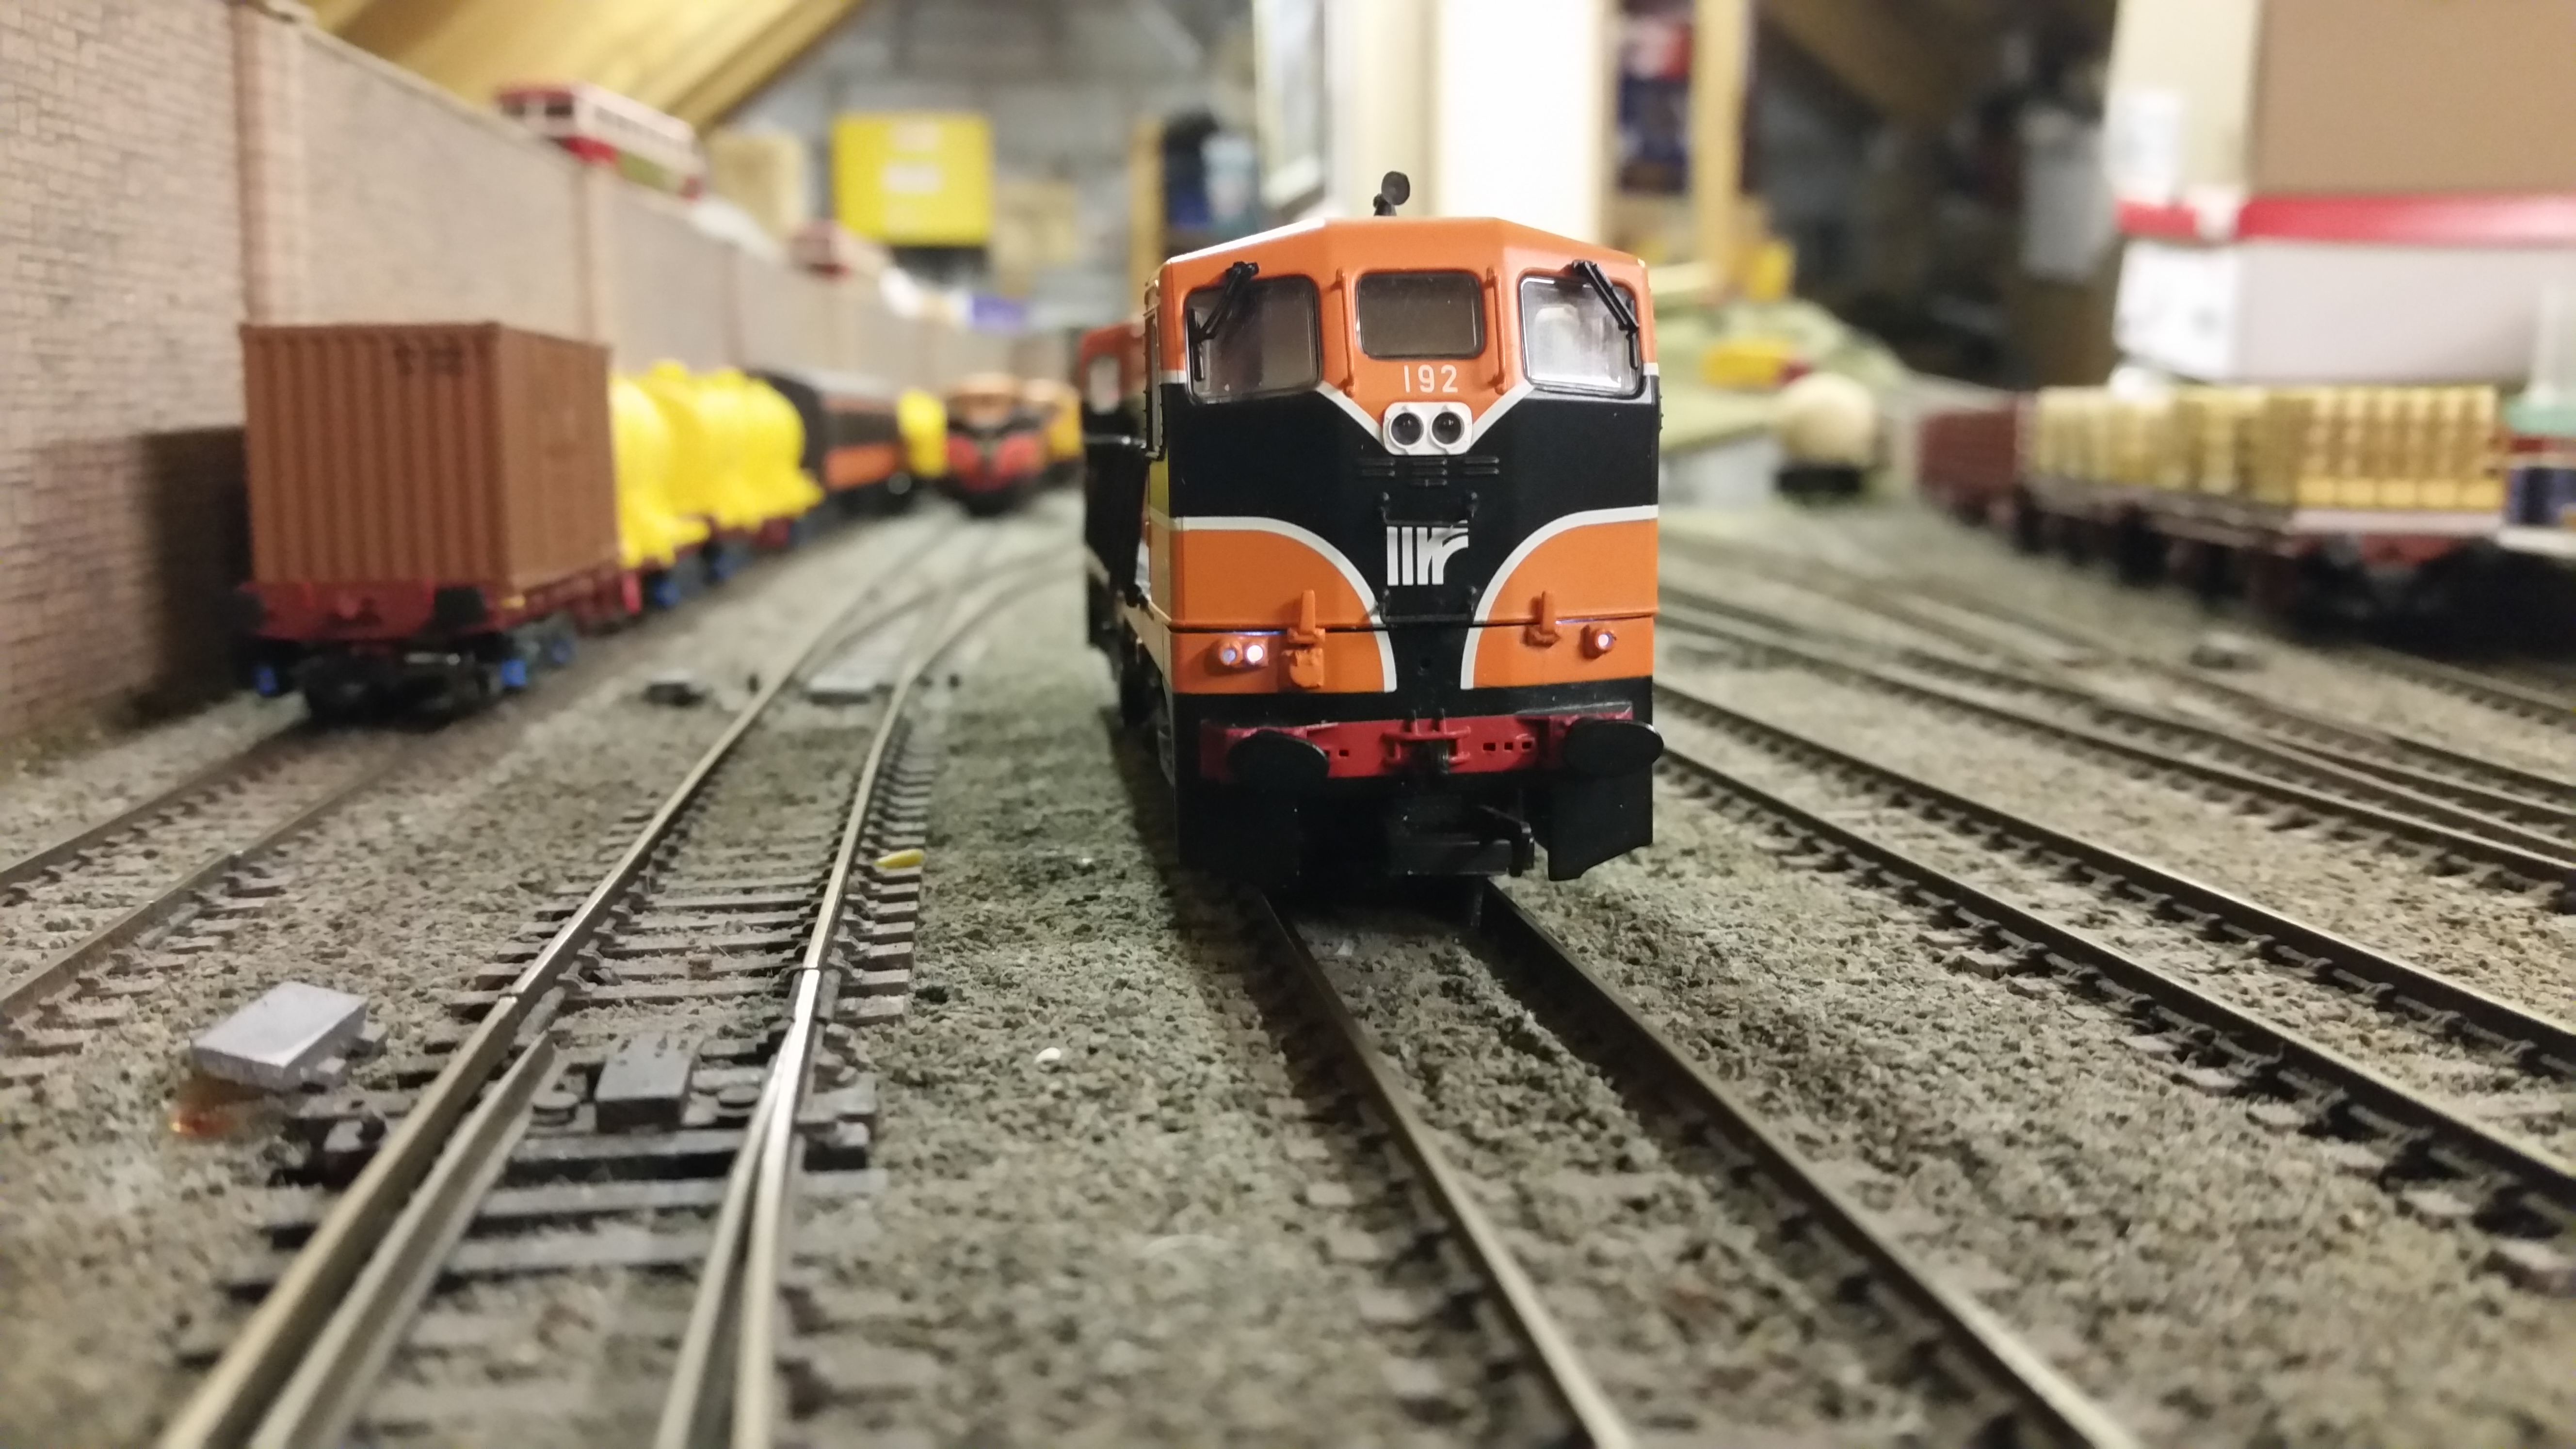
BEFORE
AFTER
I recently took the bull by the horns and decided to look into the possibility of modifying my Baby GMs to have independent headlights, thus being able to switch the headlights on and off independently from the marker lights.
Investigations revealed that it would be a relatively simple task to do.
The first task is to remove the body and cabs. The cab remote from the radiator can be removed quite simply as it is a clip fit and can be pulled straight up with a slight twisting motion. The cab at the radiator end is glued to the body, so the cab and body need to be removed together.
The cab interior needs to be removed by removing the two screws. Once removed, the lighting board can be lifted, but beware, the marker light prisms underneath are very delicate, particularly those for the early type marker lights, and the lenses are easily broken off. The two that I managed to break were repaired by using short lengths of optical fibre.
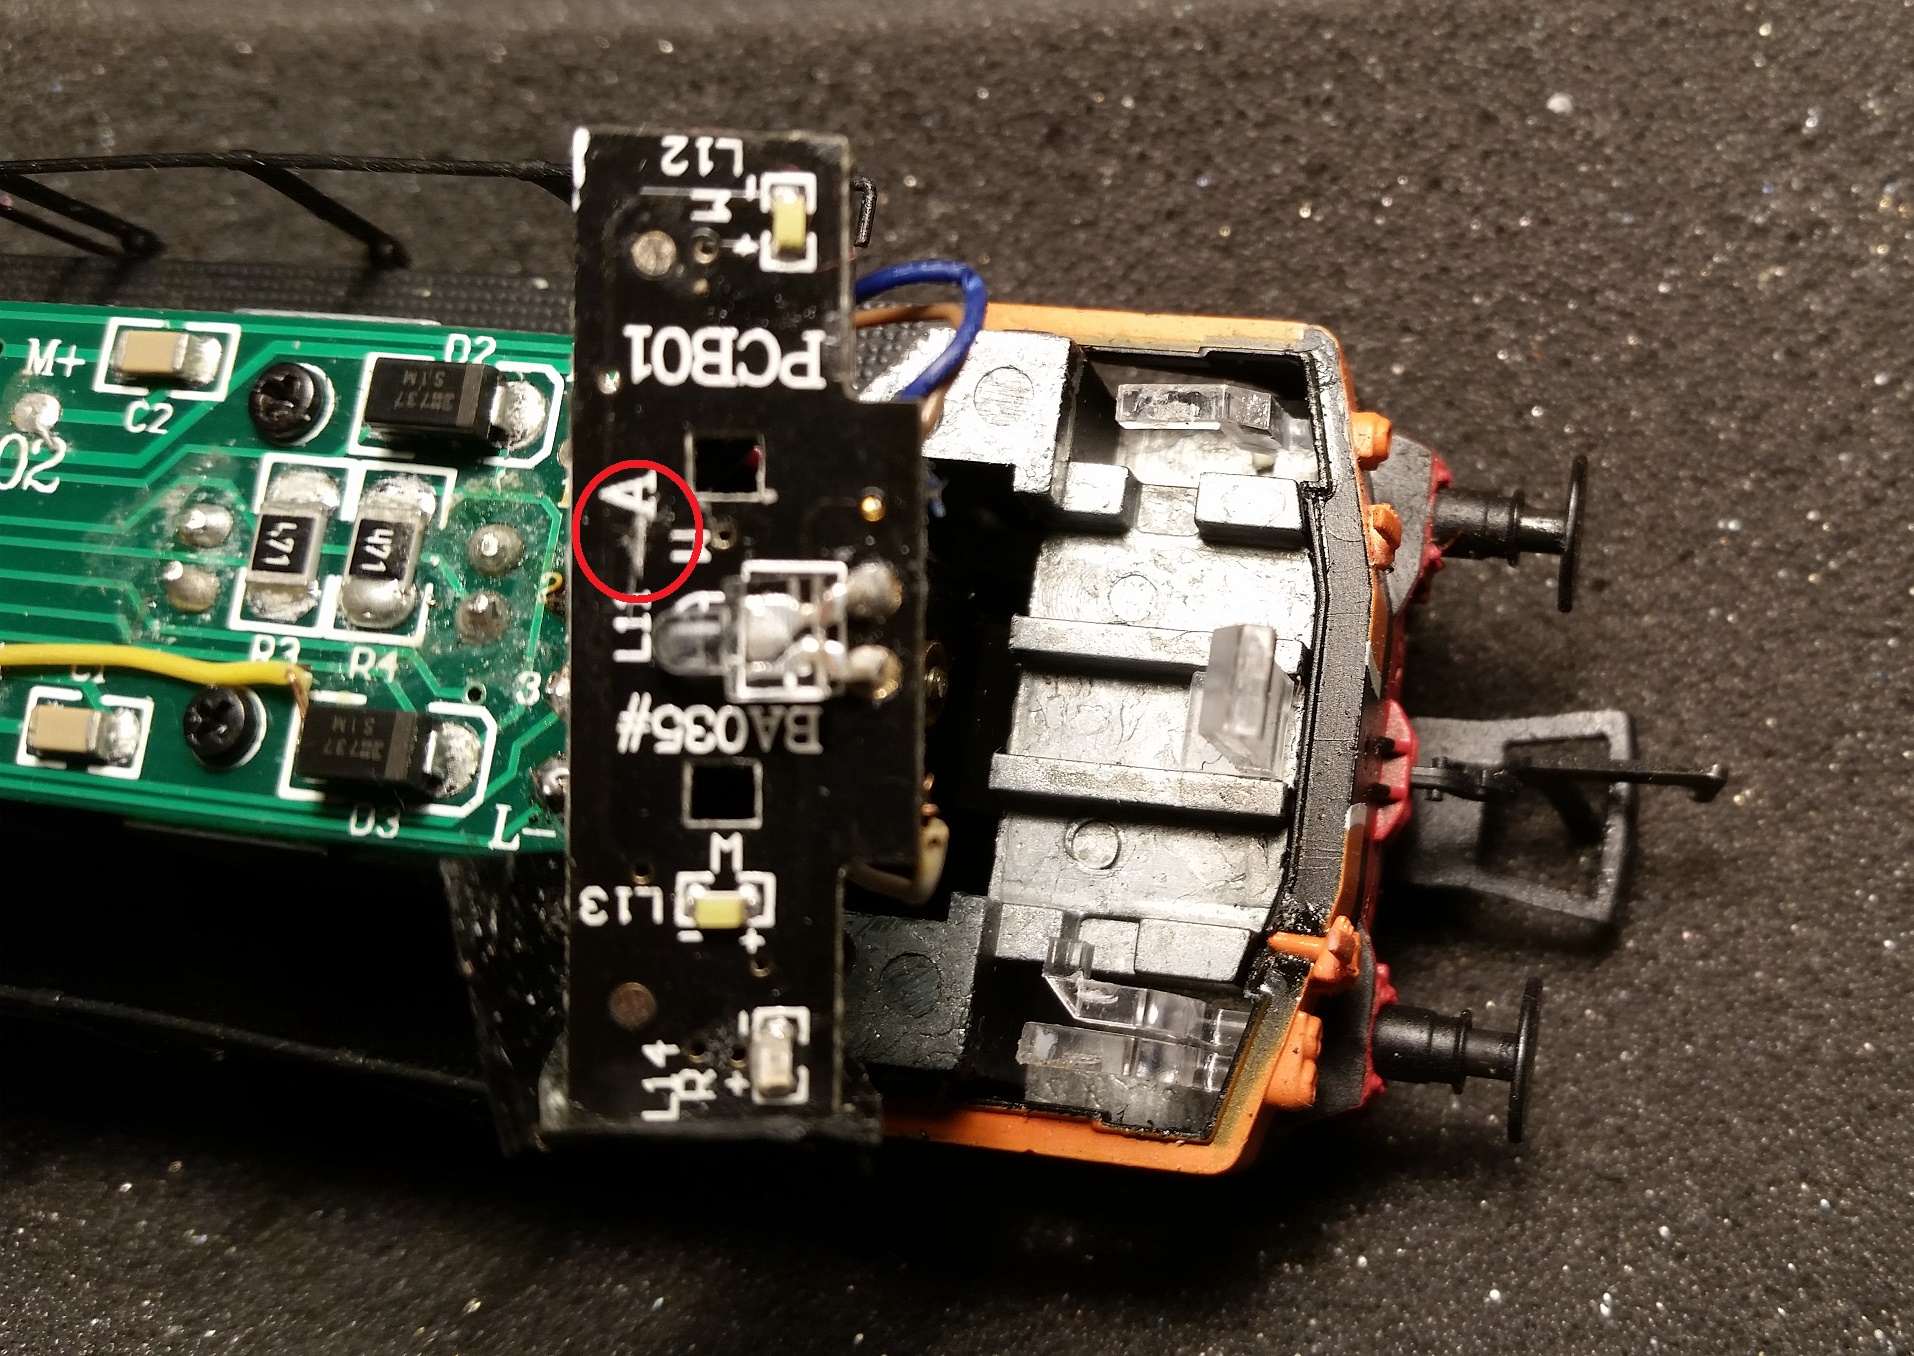
Once the lighting board has been lifted, a cut needs to be made in the copper track as shown in the picture circled in red. It is difficult to see even with a good light, but it is there. This track is the –ve for the headlight LED.
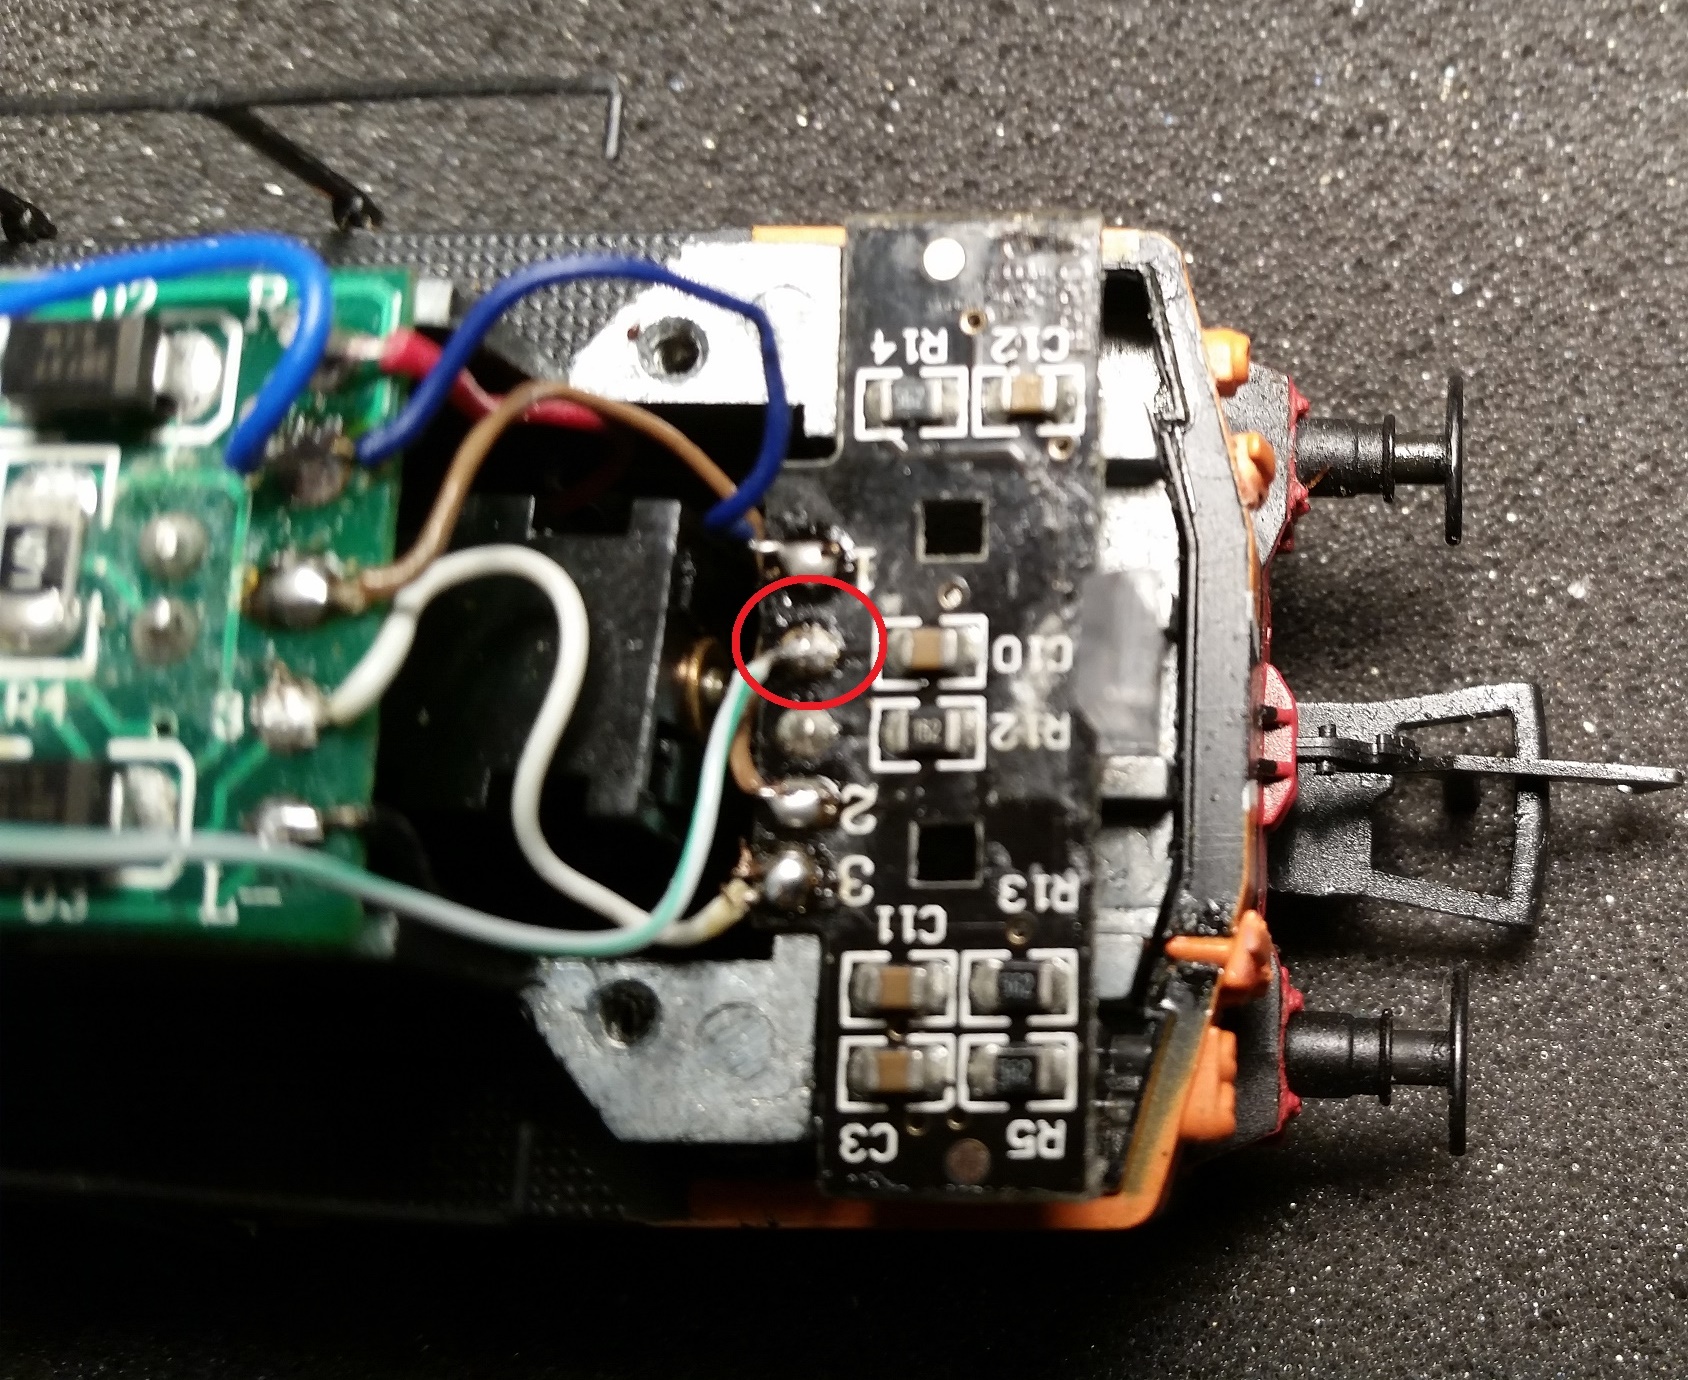
Turning the board over, there are four terminations along the back of the board. Three of them have wires attached which are connected to the marker light LEDs, the fourth one has nothing attached. A wire needs to be soldered to this termination, see picture, circled in red.
The other end of the wire is soldered to pin 15 of the socket on the main circuit board, a very fine soldering iron is needed for this task. Pin 14 is connected to the lighting board at the other end of the loco. Pin 15 is the AUX1 output from the decoder, and pin 14 is the AUX2 output. Neither of those outputs is used for any purpose on the Baby GMs, and is not connected to any circuits on the circuit board. The heavy blue wire along the top has nothing to do with this modification, it is a repair to damage on a copper track on the circuit board which was there when the loco was purchased secondhand.
Once all wiring is complete on the first end, it can be reassembled, taking care not to damage the light prisms, and ensuring that the prisms are aligned in front of the LEDs. I found that the black insulation tape used for masking the LEDs was best fitted after both ends were reassembled, and using fresh tape cut to size. Once the cab interior is refitted, everything is now secure, and work can start on the other end. Before going any further, it is a good idea to ensure that the wires attached to the rear of the lighting board are not fouling the front of the drive bogie, otherwise the bogie may not pivot fully.
Once the second end has been done, black insulating tape needs to be applied to stop any light leaking where it is not wanted. It is very much a case of trial and error with this, but essential if you do any running in low light conditions.
All that remains to be done now is to ‘map’ the decoder with which function button you wish to use for the headlights. In addition to an independent headlight button, I have mapped the decoder so that the headlights only work when the marker lights are turned on. Turning F0 off turns off all lights.
-
9
-
4
-
-
Without wanting to criticise what seems to be a solution to producing the Irish version of the Mk3 coach, but should the door at the kitchen end of the restaurant car not be a standard 'slam door', not a 'plug door' as in the picture above. Certainly all the photos I have seen of Mk3 restaurant cars show a 'slam door' at that end, and a 'plug door' at the other.
-
1
-
-
Aside from the difference in the underfloor A/C equipment between Mk 2D and Mk 2F, the Standard class/2nd class BR 2D has the toilets positioned on the same side, whereas the Standard class/2nd class 2E/F have the toilets positioned on opposite corners. Super Standard class/1st class 2D/E/F all have the toilets positioned on the same side. The Irish Standard class '2D' has the toilets positioned on opposite corners.
-
The routes to Derry/Londonderry could hardly be called a circular route as there was no connection between the GNR Foyle Road and the NCC Waterside stations.


British stuff from the Catacombs
in British Outline Modelling
Posted · Edited by Dhu Varren
The CIE Gennies were all converted from two types of 64ft Brake 2nd coaches. The vans in the picture are 57ft Full Brakes.