BJR Posted May 17 Posted May 17 Hello. A few years ago I began purchasing non-running locomotives from eBay and Adverts with the aim of restoring them to full working order. What started as a small hobby quickly developed into a real interest in the mechanical and electrical side of model railway restoration. I particularly enjoy the challenge of diagnosing faults, carrying out repairs, and carefully servicing older locomotives to bring them back to smooth, reliable running condition. As the collection has steadily grown, space is becoming a bit limited, so I’ll likely begin moving some restored models on in the future to make room for new projects. In the meantime, I’ve decided to start documenting some of the restorations currently passing through the workshop. Here are a few of the projects presently on the bench. Cheers, Ben 8
BJR Posted May 17 Author Posted May 17 First up on the bench is this Lima OO Gauge GWR 4589 Prairie Tank. I picked this one up from a gentleman on Adverts. From what I can find online, these were produced during the 1980s and feature: • Ringfield motor mounted low in the chassis • Plastic gear train • One powered axle driving the coupled wheels through the side rods As you can see from the photos, it was pretty manky when I got it — rust around the valve gear, filthy wheels, greasy underside, and the paint and decals were very tired and faded. There were also a few missing details, including a lamp iron and some roof vents. I gave it a quick test on my little bench track and it wasn’t budging at all. Once I stripped it down, I was happy to find that all the internal parts were intact, which saves a huge amount of time trying to source or fabricate replacements. All the metal parts went through the ultrasonic cleaner, while the plastic components got a good wash in warm soapy water. I then gave the Ringfield motor a full service and bench tested it. To my surprise it ran great. No idea when this thing last turned a wheel, but it’s always a great feeling hearing an old motor come back to life. Reassembly took a while, especially getting the wheel quartering and motion set up properly, but after fresh lubrication and putting everything back together, it was finally time for another test run. Back onto the track… and boom — alive again. I’m still undecided on whether to fully repaint and reline it. Part of me likes the worn, weathered look it has earned over the years. It’s got a bit of character about it. Going to try and find some of the missing details and put them back on. Anyway, that’s another non-runner rescued and back in service. Cheers, Ben 8
BJR Posted May 18 Author Posted May 18 The next loco on the bench is this Mainline BR Class J72 0-6-0T. This one came from Adverts and was effectively thrown in with two other locos as the seller just wanted rid of it, so I got it very cheaply. It had originally been advertised as “spares or repairs”, so I didn’t have particularly high hopes. I hadn’t worked on a Mainline loco before, so I started by finding the service sheet online. A bit more research and a few YouTube videos quickly confirmed what many modelers already know — these can be troublesome little engines. First impressions weren’t great. The wheels and coupling rods clearly had issues, there appeared to be corrosion coming from the diecast chassis, and there was also a mysterious blue wire hanging around inside the cab. Overall, it was quite a mess. Once I started stripping it down, it became obvious fairly quickly that I wasn’t the first person to have a go at repairing it. The biggest issue was the wheelsets. Like many Mainline locos, this model uses wheels pressed onto plastic axle centers, and unfortunately the plastic has a habit of splitting with age. When this happens, the wheels can twist out of quartering, causing the loco to bind or stall completely. Thankfully, although this loco had split axles, the wheels still seemed to grip the plastic centers reasonably well, so I’m hoping they’ll survive for now. Electrically, these models collect current through a split diecast chassis, with each half carrying a different polarity. I found an older repair where somebody had linked one side of the chassis to the motor brush retaining plate using a blue wire. Looking at the service sheet, I could see there should originally have been a long brass screw passing through the retaining plate and into the opposite chassis half to complete the electrical path. Unfortunately, the original screw had been replaced with a larger plastic self-tapping screw, which means fitting the correct brass screw now (if i could find one) won’t be straightforward. For the time being I decided to leave the repair in place, although I did at least replace the bright blue wire with a black one so it’s less obvious when hidden inside the cab. The commutator was absolutely filthy, so that got a really thorough clean, while the remaining metal parts went into the ultrasonic bath. Once reassembled, the motor actually spun up very nicely. The drive gears looked to be in good condition too, so they were cleaned out and treated to fresh grease. Re-quartering the wheels took quite a while and involved a fair amount of blasphemy along with a much-needed tea break, but eventually everything began running smoothly again. After a quick test run on the bench, I was genuinely surprised by how well it performed considering the state it arrived in. It just goes to show that even the roughest looking locos can sometimes be brought back to life with a bit of patience. I’m not particularly attached to this one, so once I’ve done a bit more fettling on the test track and given it a proper clean and polish, I’ll probably move it on to help fund a new project. Anyway, that’s another non-runner running! Cheers, Ben 5 1
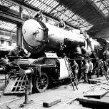
BJR Posted May 24 Author Posted May 24 Hello, Over the last while I have been tipping away on this Tri-ang Railways OO gauge LMS “Princess Elizabeth” 4-6-2 Pacific. After doing a bit of research, it looks like this model was built sometime after 1961. Visually, it’s in great condition and, thankfully, whoever owned it certainly didn’t spare the oil, as the model was pretty much covered in it. In this case that was actually a good thing because, if it had been sitting dry as a bone all those years, it probably would have needed a very different sort of restoration altogether. After popping it on the test track and using my DC bench-top power supply with the max current turned right down, I slowly increased the voltage. Straight away the bench supply indicated there was a short circuit, which was a bit of a concern. I really enjoy disassembling these old models. I find the materials and engineering in them are incredibly well made. Even the tiny brass screws are better quality than what you’d find on some €500 models nowadays. It was clear from the get-go that everything was very oily, so I stripped the loco down completely and gave everything a really good clean. The XO4 motor was especially dirty and I was hoping that was the source of the short. I disassembled it, cleaned all the parts thoroughly and made sure the commutator was nice and shiny. The magnet was already fairly strong, but I strengthened it further by offering it up to a much stronger magnet. Once reassembled, I hooked it back up to the bench supply and it spun up great. I then reassembled all the valve gear and tested the quartering by running the chassis up and down the test track. Thankfully it was running very smoothly. I was wary about removing any of the wheels on such an old model, so I left them in place and just cleaned them thoroughly on the chassis. Once the motor was refitted and fresh new wires soldered in, I gave it another test. Initially it was running fine, but then out of nowhere the short returned. After a fair bit of dismantling and reassembling, I eventually found the issue — the front set of driving wheels was shifting slightly and touching the chassis. I considered removing the wheels there and then, but decided against it. My current wheel puller works well, but I was concerned it might damage something on a model of this age. I’ve ordered a much better puller from Germany, so once that arrives I’ll remove the problem wheel properly and sort out the rubbing issue the right way. I'm hoping that a new insulting bush will do the job In the meantime, I insulated the wheel temporarily using some black insulating tape. It’s a simple fix for now, but I’d like to repair it properly in due course. After fully reassembling the locomotive, it went back onto the test track and began running up and down without acting its age at all. It got a good run on an oval tack too, and It was great sitting with a mug of coffee watching it for a while looking happy and loving life. To think this could have made a young fella very happy on a Christmas morning 60 years ago was a great feeling. Pretty remarkable that these old Tri-ang locomotives have stood the test of time. It just goes to show how well things were made back in the day. Cheers, Ben 9 1
Colonel Posted May 25 Posted May 25 Sounds like it is running better than mine ever did - three coaches was its limit and not a patch on the Hornby Dublo Pacific my friend had. Things have certainly moved on since then, but I wonder how salvageable some of the current finescale ft will be in 60 years time - especially if they are actually used in a regular basis. 3
BJR Posted May 25 Author Posted May 25 12 hours ago, Colonel said: Things have certainly moved on since then, but I wonder how salvageable some of the current finescale ft will be in 60 years time - especially if they are actually used in a regular basis. Absolutely, i guess time will tell! 1
Metrovik Posted May 25 Posted May 25 They really don't make em like they used to. Also worth baring in mind that these trains were toys first and models second. Wonder how many of today's fads will be running in 60 years time?? 1
Colonel Posted May 26 Posted May 26 I suppose that, being made first and foremost as toys, they made them sturdy. Current models are works of art, with complex mechanisms and remarkable haulage capacity. 1
irishmail Posted May 26 Posted May 26 On 17/5/2026 at 1:46 PM, BJR said: First up on the bench is this Lima OO Gauge GWR 4589 Prairie Tank. I picked this one up from a gentleman on Adverts. From what I can find online, these were produced during the 1980s and feature: • Ringfield motor mounted low in the chassis • Plastic gear train • One powered axle driving the coupled wheels through the side rods As you can see from the photos, it was pretty manky when I got it — rust around the valve gear, filthy wheels, greasy underside, and the paint and decals were very tired and faded. There were also a few missing details, including a lamp iron and some roof vents. I gave it a quick test on my little bench track and it wasn’t budging at all. Once I stripped it down, I was happy to find that all the internal parts were intact, which saves a huge amount of time trying to source or fabricate replacements. All the metal parts went through the ultrasonic cleaner, while the plastic components got a good wash in warm soapy water. I then gave the Ringfield motor a full service and bench tested it. To my surprise it ran great. No idea when this thing last turned a wheel, but it’s always a great feeling hearing an old motor come back to life. Reassembly took a while, especially getting the wheel quartering and motion set up properly, but after fresh lubrication and putting everything back together, it was finally time for another test run. Back onto the track… and boom — alive again. I’m still undecided on whether to fully repaint and reline it. Part of me likes the worn, weathered look it has earned over the years. It’s got a bit of character about it. Going to try and find some of the missing details and put them back on. Anyway, that’s another non-runner rescued and back in service. Cheers, Ben That's one thing I like about the Lima models, they are easy to strip down and service. Running can be improved by adding additional pick-ups. Though basic by todays 'standards' as others have mentioned, they are sturdy and robust and you are free to add as much or little detail as you wish. Before Hatton's closed down, I used to look at the pre-owned Lima items and would occasionally buy a non runner with the intention of stripping it for spares for the rest of my Lima fleet. However, on receiving the model most times all that was required was a broken wire needing to be re-soldered and a good clean of the mechanism and wheels. In fact I tend to run my Lima stuff more than the more recent detailed models. 2
Colonel Posted May 27 Posted May 27 In the early days of P4, rewheeled Lima diesels, with lots of added weight were known to be excellent haulers. 2
Recommended Posts
Create an account or sign in to comment
You need to be a member in order to leave a comment
Create an account
Sign up for a new account in our community. It's easy!
Register a new accountSign in
Already have an account? Sign in here.
Sign In Now