
Manicouagan
-
Posts
22 -
Joined
-
Last visited
Content Type
Profiles
Forums
Events
Gallery
Blogs
Everything posted by Manicouagan
-
Another idea for the track mat:

- 1 reply
-
- 1
-

-
Hello, this is my new project: a small "Inglenook style" layout (20 cm x 120 cm). As usual, I'll print my own track mat. All your advices, comments and criticisms are welcome.
- 1 reply
-
- 2
-
-
I have another crazy idea...
-
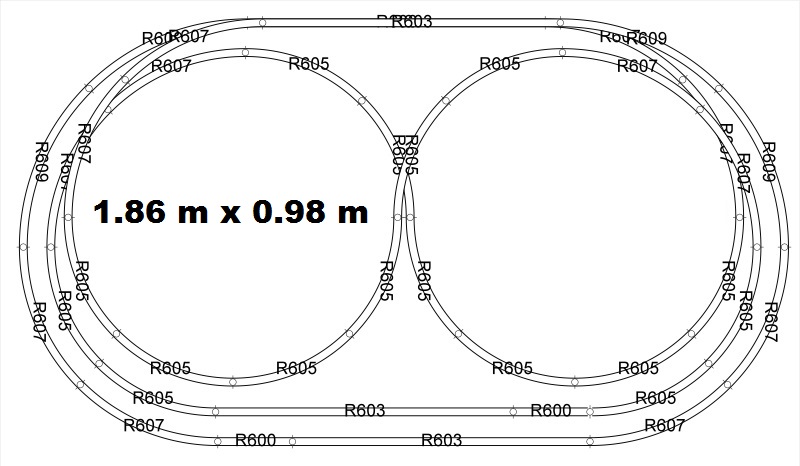
Hello, I'm planning to build this layout for absolutely no serious reason except the fun (maybe it's a very serious reason, isn't it?). I found the track plan in a very old French model railway magazine (February 1980). Even if you don't read French, the photos explain everything very well. All your comments, advice and criticisms will be greatly appreciated. http://fr.1001mags.com/parution/loco-revue/numero-413-fevrier-1980/page-22-23-texte-integral http://fr.1001mags.com/parution/loco-revue/numero-413-fevrier-1980/page-24-25-texte-integral http://fr.1001mags.com/parution/loco-revue/numero-413-fevrier-1980/page-26-27-texte-integral My own track plan. A bridge is included but not shown in the picture.
- 1 reply
-
- 3
-
-

A Switching Layout (Inglenook style)
Manicouagan replied to Manicouagan's topic in US / Canadian Railway Modelling
I can also run 00 gauge and 0n30 scale trains on my switching layout. -
I can also run H0 and 0n30 trains on my layout. So it's not a real "British style" layout.
-
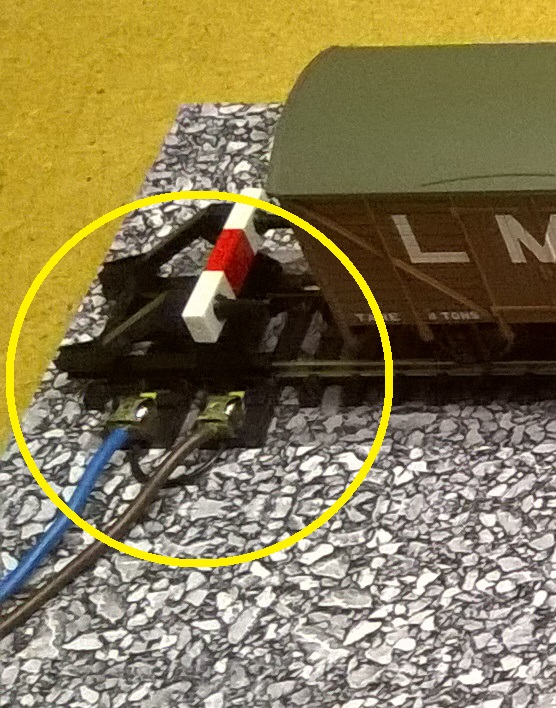
This layout is plugged to a homemade controller and a power supply (yellow circle) at the left end. I used one LM317 for this very cheap controller. I put a small heat sink on the back of the LM317 and a car bulb as cheap overload protection.
-
These few pics below will answer a lot of questions. Hope so...
-
Absolutely ! This is the entire layout (including the little fiddle yard on the left) on this photo:
-
Do you think that my new track mat is a too dark ? Thanks for your comments.
-
Just for the record, I use a cheap printer, some photos found on the web and Anyrail for the track bed (the "trace" option and the PDF function). That's all !
-
I made a kind of mockup without glue, screw or nail:
-
A Switching Layout (Inglenook style)
Manicouagan replied to Manicouagan's topic in US / Canadian Railway Modelling
A few pics of my first switching layout before I built a new baseboard and I slightly change the track plan: -
Thanks for the nice comment. There is a sort of "Inglenook sidings" inside the oval.
-
The KISS principle applies at last. This is a better track plan I guess.
-
A Switching Layout (Inglenook style)
Manicouagan replied to Manicouagan's topic in US / Canadian Railway Modelling
How will you work the uncoupling for shunting purposes? I use the "old school" method: the God's hand with a little tool. PS chipboard is prone to damage from damp. I store them in a very dry place. So no problem at all. -
Hello, I (also) built a switching layout (1,50 m x 0.30 m) using Trix C-track. It's not exactly an Inglenook sidings layout but I'm very pleased with the result. The baseboard and the track plan: I laid the track just for a test. Works fine for me. Because I'll run only American stuff on this layout, I have no need for the buffer stops. So I removed them. The length of the sidings has been increased by 50 mm. Because I absolutely don't want to make the slightest hole in my beautiful brand new chipboard, I made a little hole (5 mm) at the end of the former buffer stop of the headshunt. The track connecting wires pass through. As I'm not looking for realism (everybody already knows that !), I am very happy with the result.
-
Hello, I built this little layout (2' x 4') with very old Fleischmann track (40/45 years old !). The radius is only 250 mm (the famous Fleischmann 6020 curves). I'm very pleased with the result so far. As always, all of your comments and criticisms are welcome.
-
I drew two new track plans. What is the best ? All your advices, comments and criticisms are welcome.
-
Thanks for all these "like" guys. Very appreciated. And thanks for watching my poor work.
-
Thanks. This a picture of my trakmat (caution: not to scale !):
-
Hello, I'm very happy to be a new member of this great forum. I built a small shunting layout (120 cm x 20 cm with the fiddle yard). I print my very personal track mat. All your comments are welcome. Here is the result so far: