- Popular Post


David Holman
-
Posts
4,359 -
Joined
-
Last visited
-
Days Won
117
Content Type
Profiles
Forums
Events
Gallery
Blogs
Community Map
Posts posted by David Holman
-
-
Coming along beautifully! Love the sharpness of all the buildings and scenics.
-
 1
1
-
-
One thing I have found very useful over the years is to draw a plan of the layout. Most times it will not come to anything, but the exercise can be very cathartic and extremely useful in terms of exorcising the ghosts of such projects.
Occasionally, they even get built, though the success rate is not grest...
-
 5
5
-
 1
1
-
-
Too many to list, but 7mm scale continuous run, with a narrow gauge feeder. Just need a 15m x 6m space to build it in, plus the essential time and money...
-
2
-
-
Looking good - how has the brickwork been created/coloured?
-
1
-
-
Thanks Patrick. About a week so far, broken up in short spells to make it tolerable. Fifteen hours or so? Sometimes 30-60 minutes in the morning, often a couple of one hour sessions in the afternoon, otherwise a stiff neck can be the result, as per this morning. Herself was out most of yesterday, so probably did too much. Lesson without words!
-
1
-
 1
1
-
-
Anyone need any 20thou plasticard rectangles?
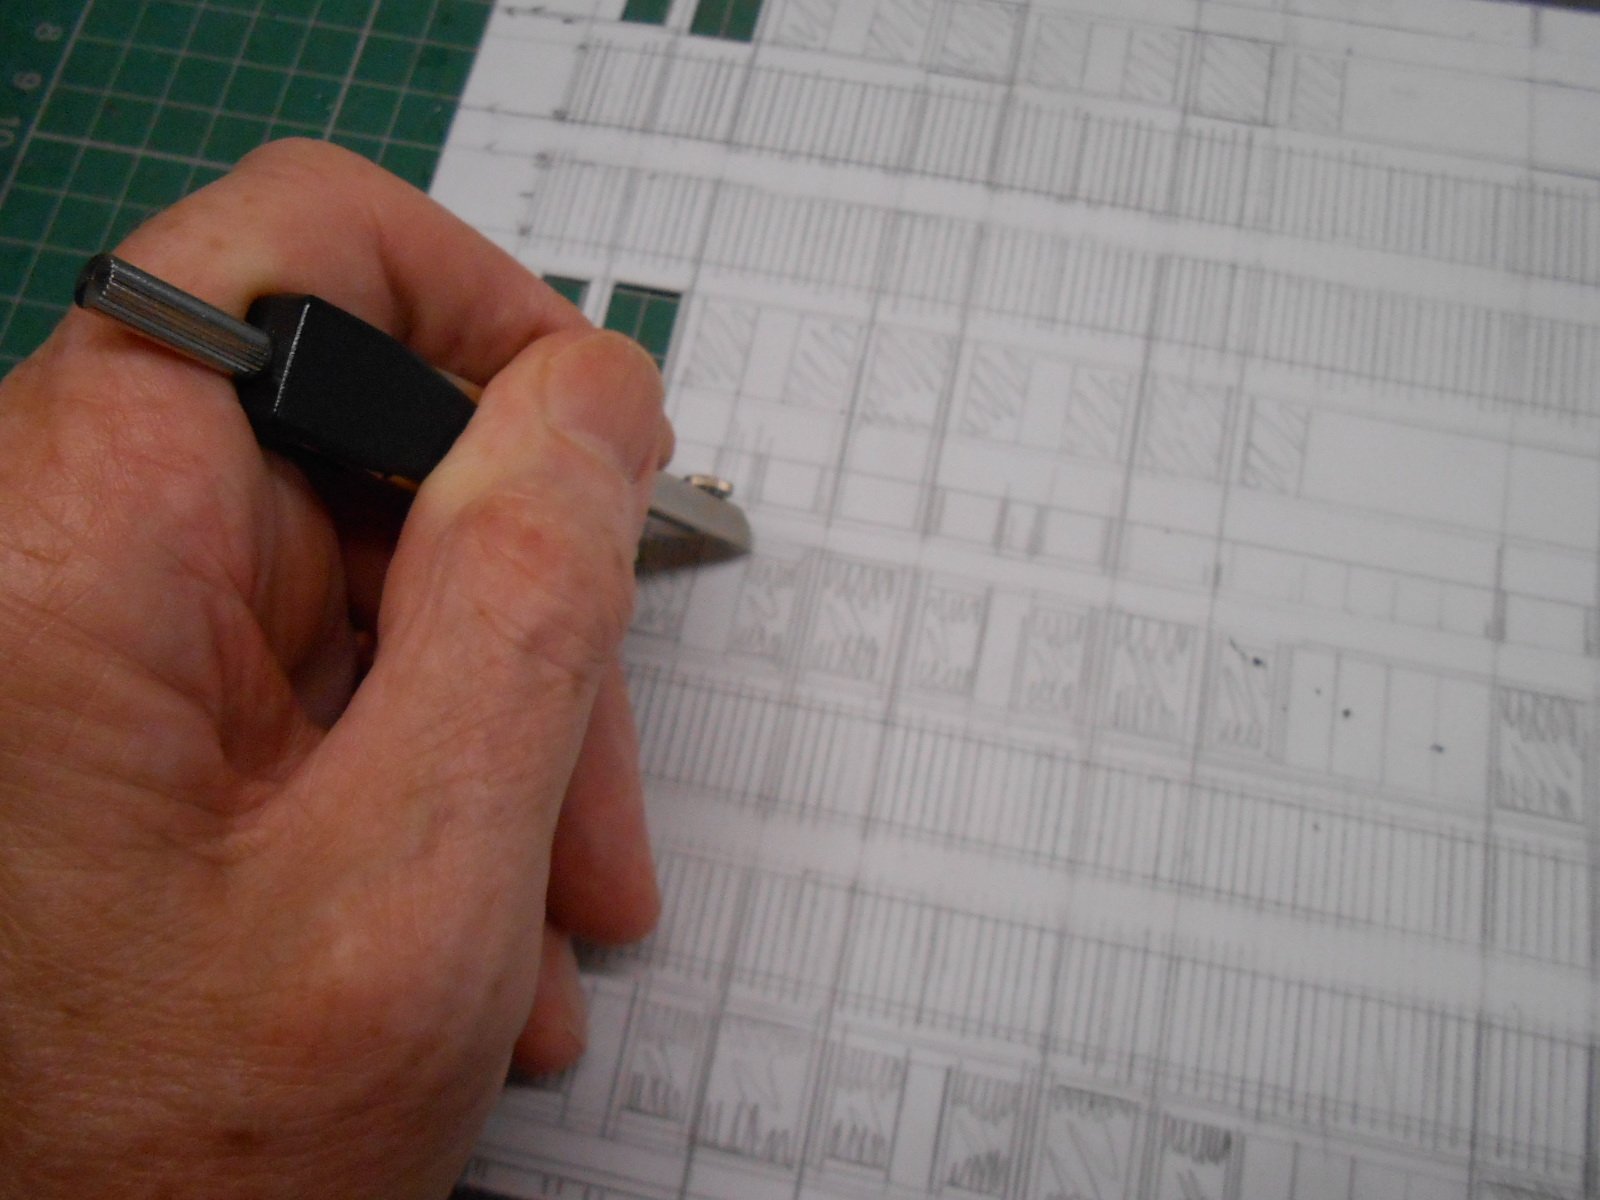
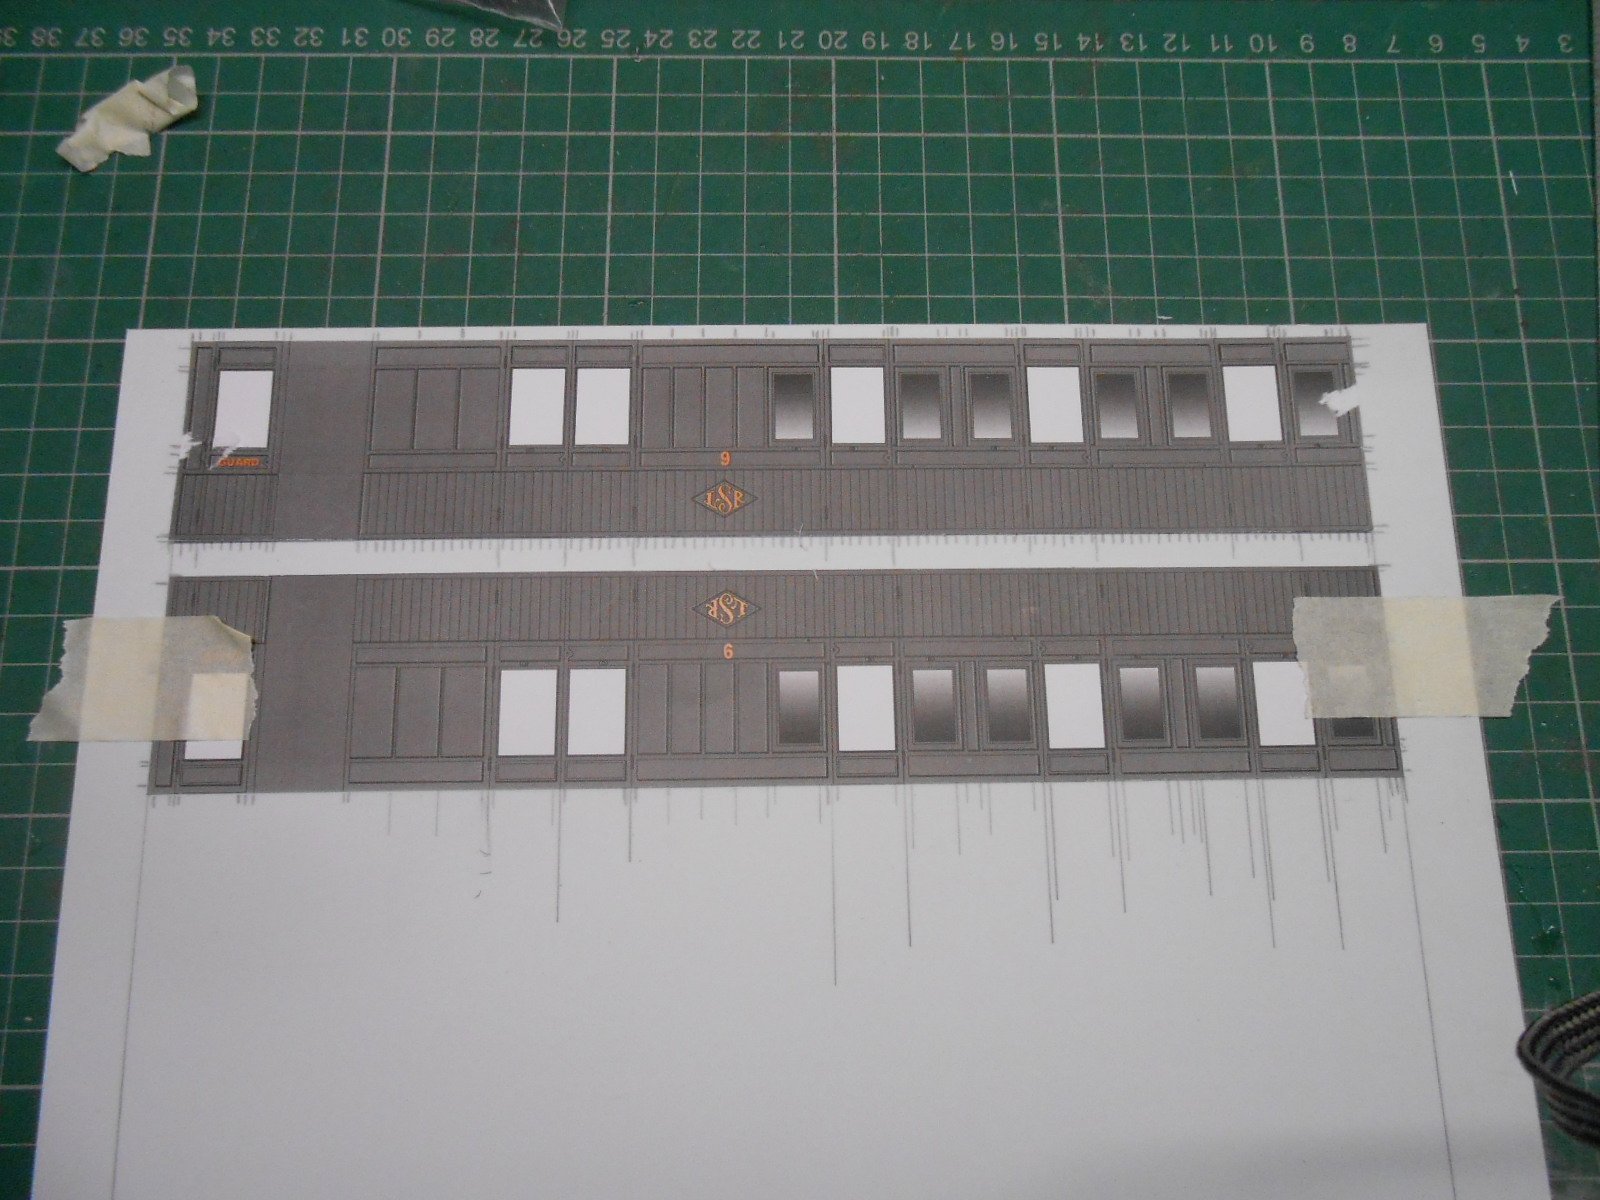
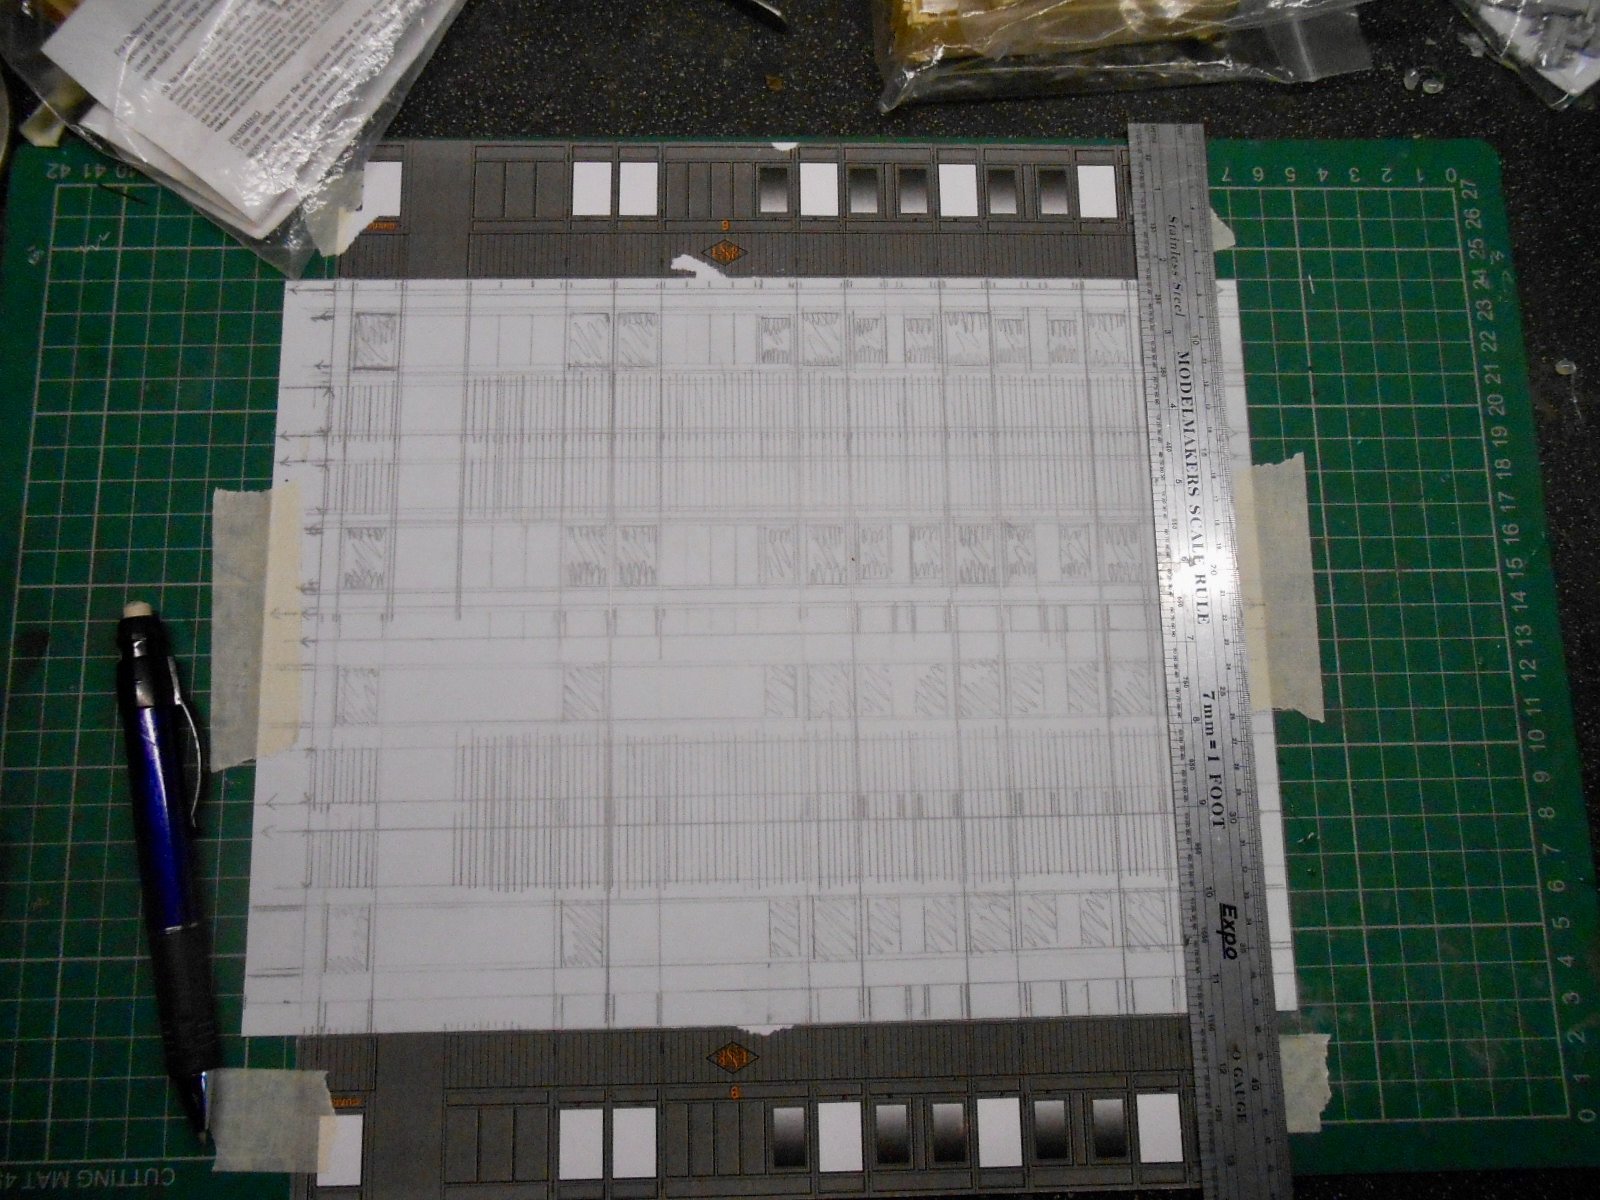
David Jenkinson's book reckons that creating a pair of coach sides is more than half the overall scratch build - and he's not wrong... One reason the marking out took me so long is the lower sides are panelled, which made for endless scribing, while being very careful about it too.
The next step was to cut out the window openings. To make life easier, I pricked the corner of each window, in the hope of not slicing through sections that don't need this. A result of this bit of work is multiple small rectangles of white plastic mentioned earlier.

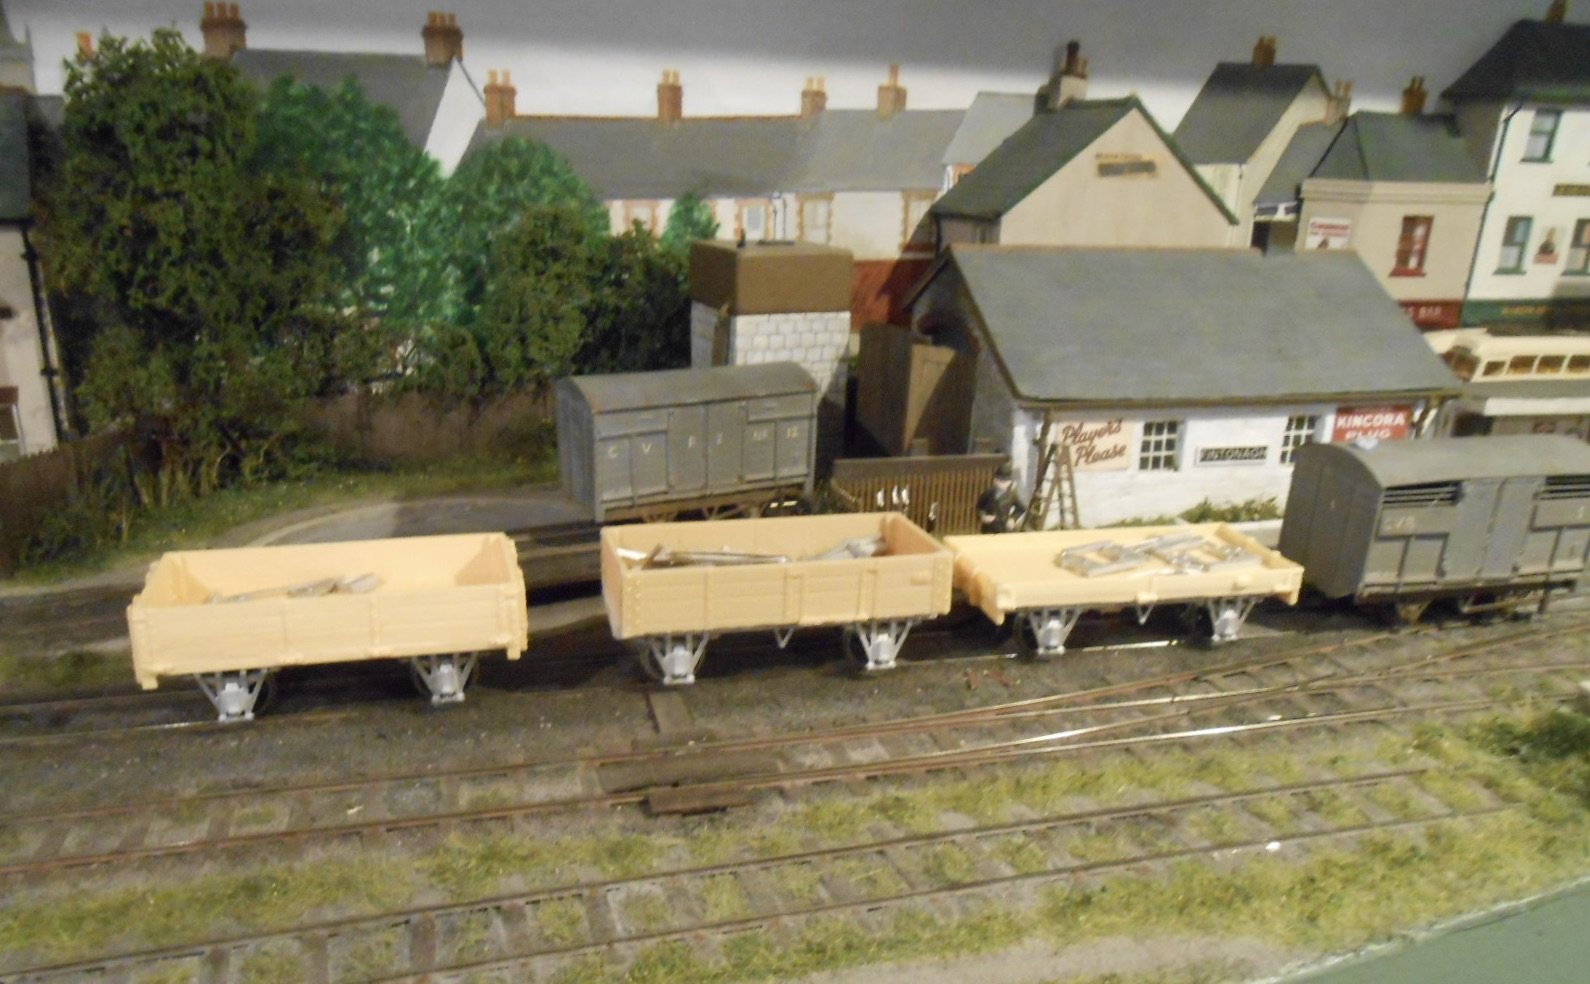
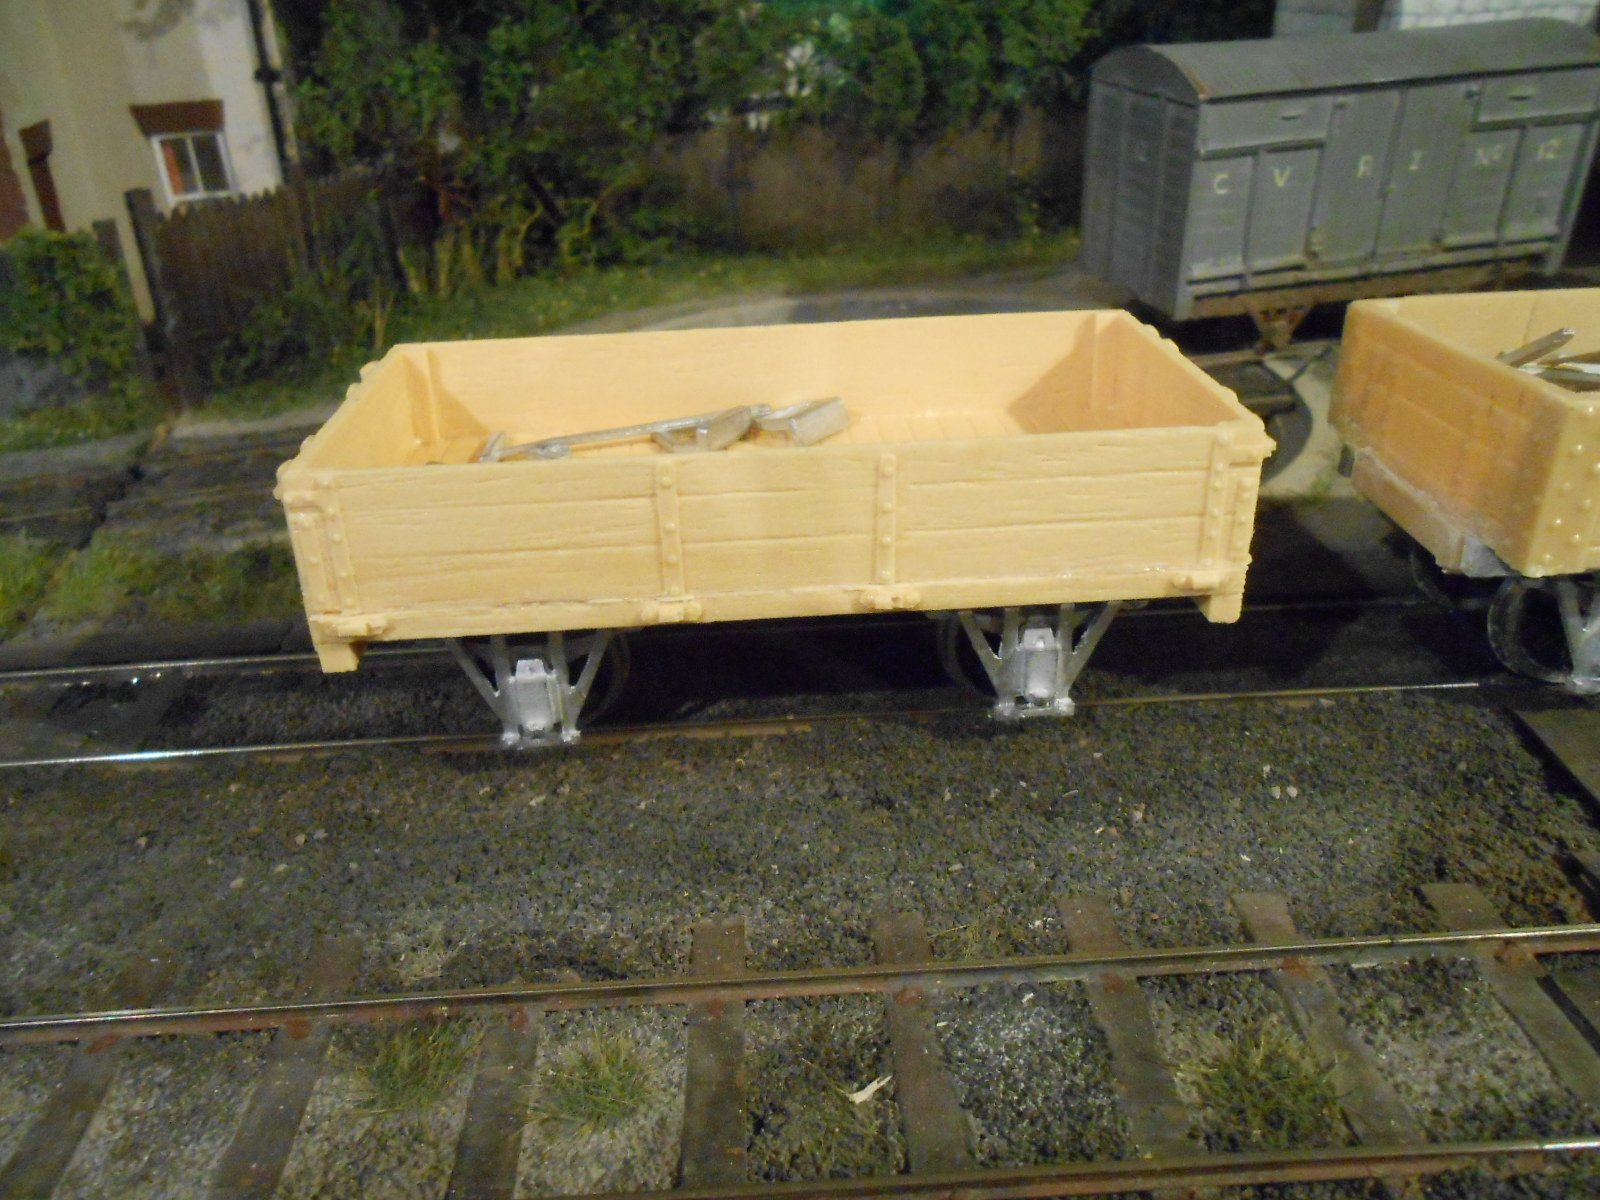
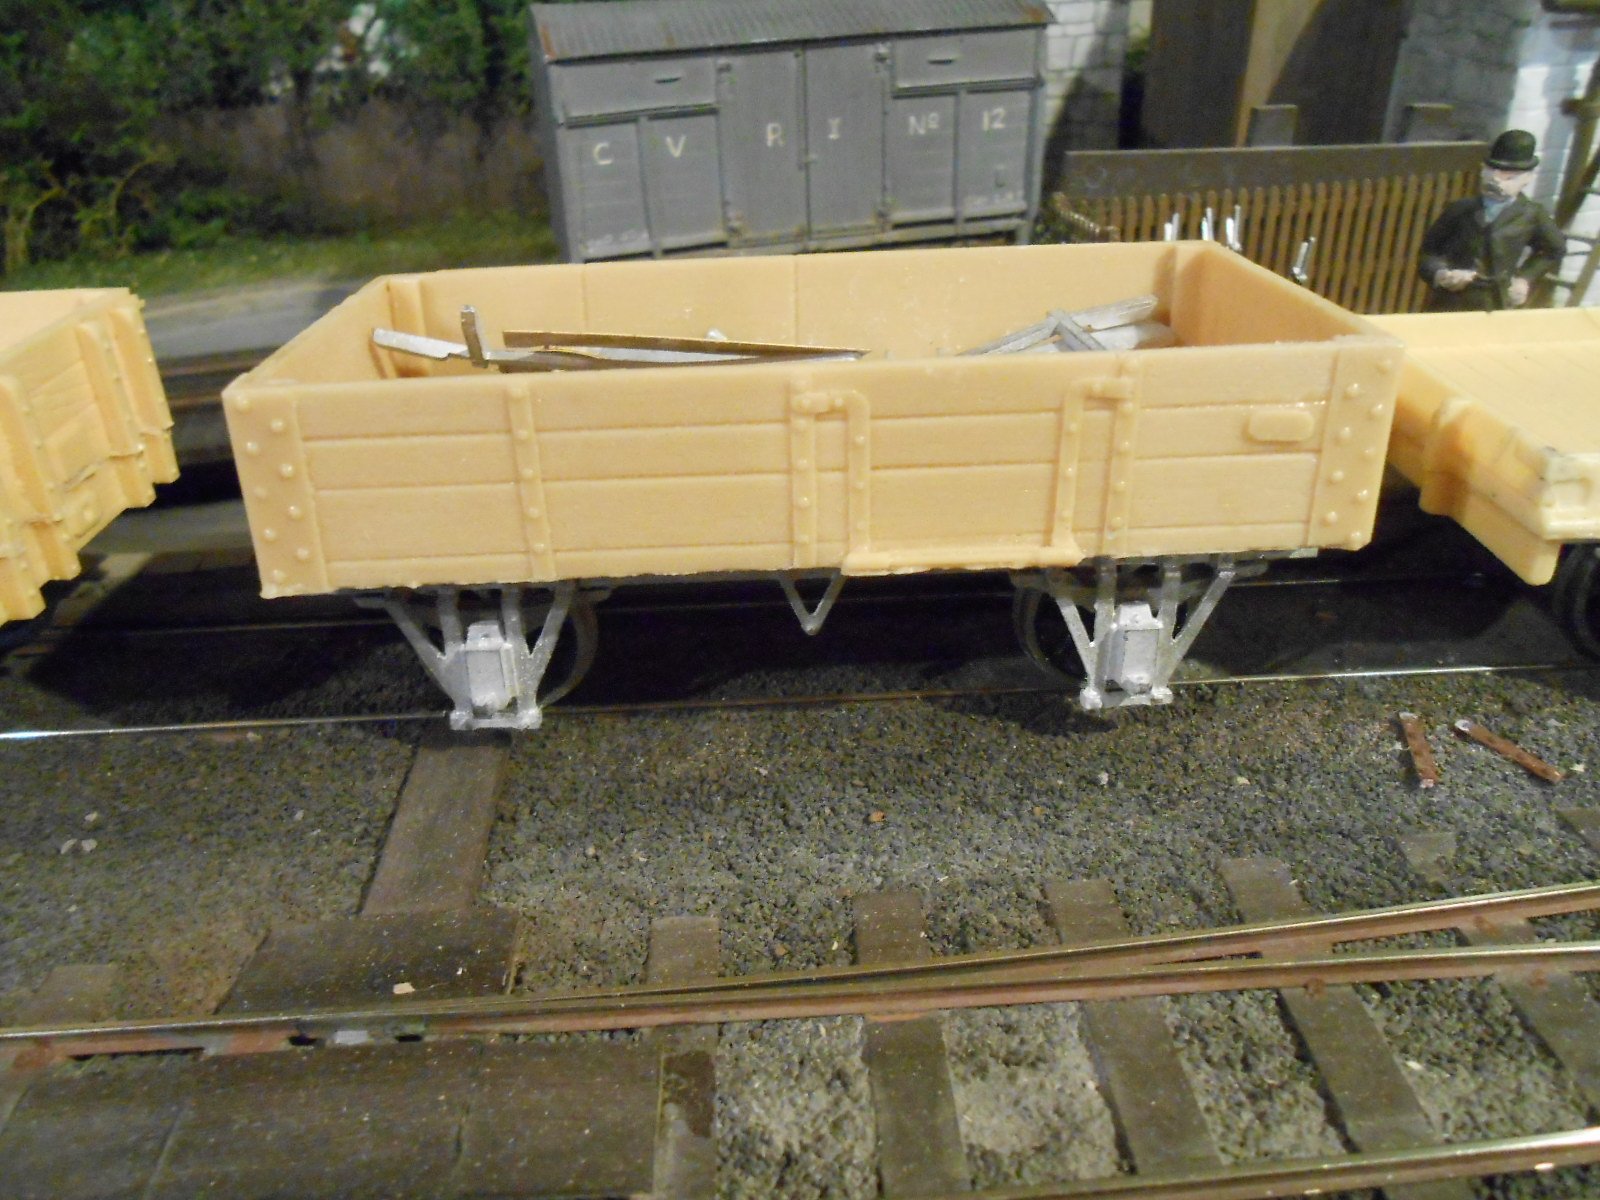
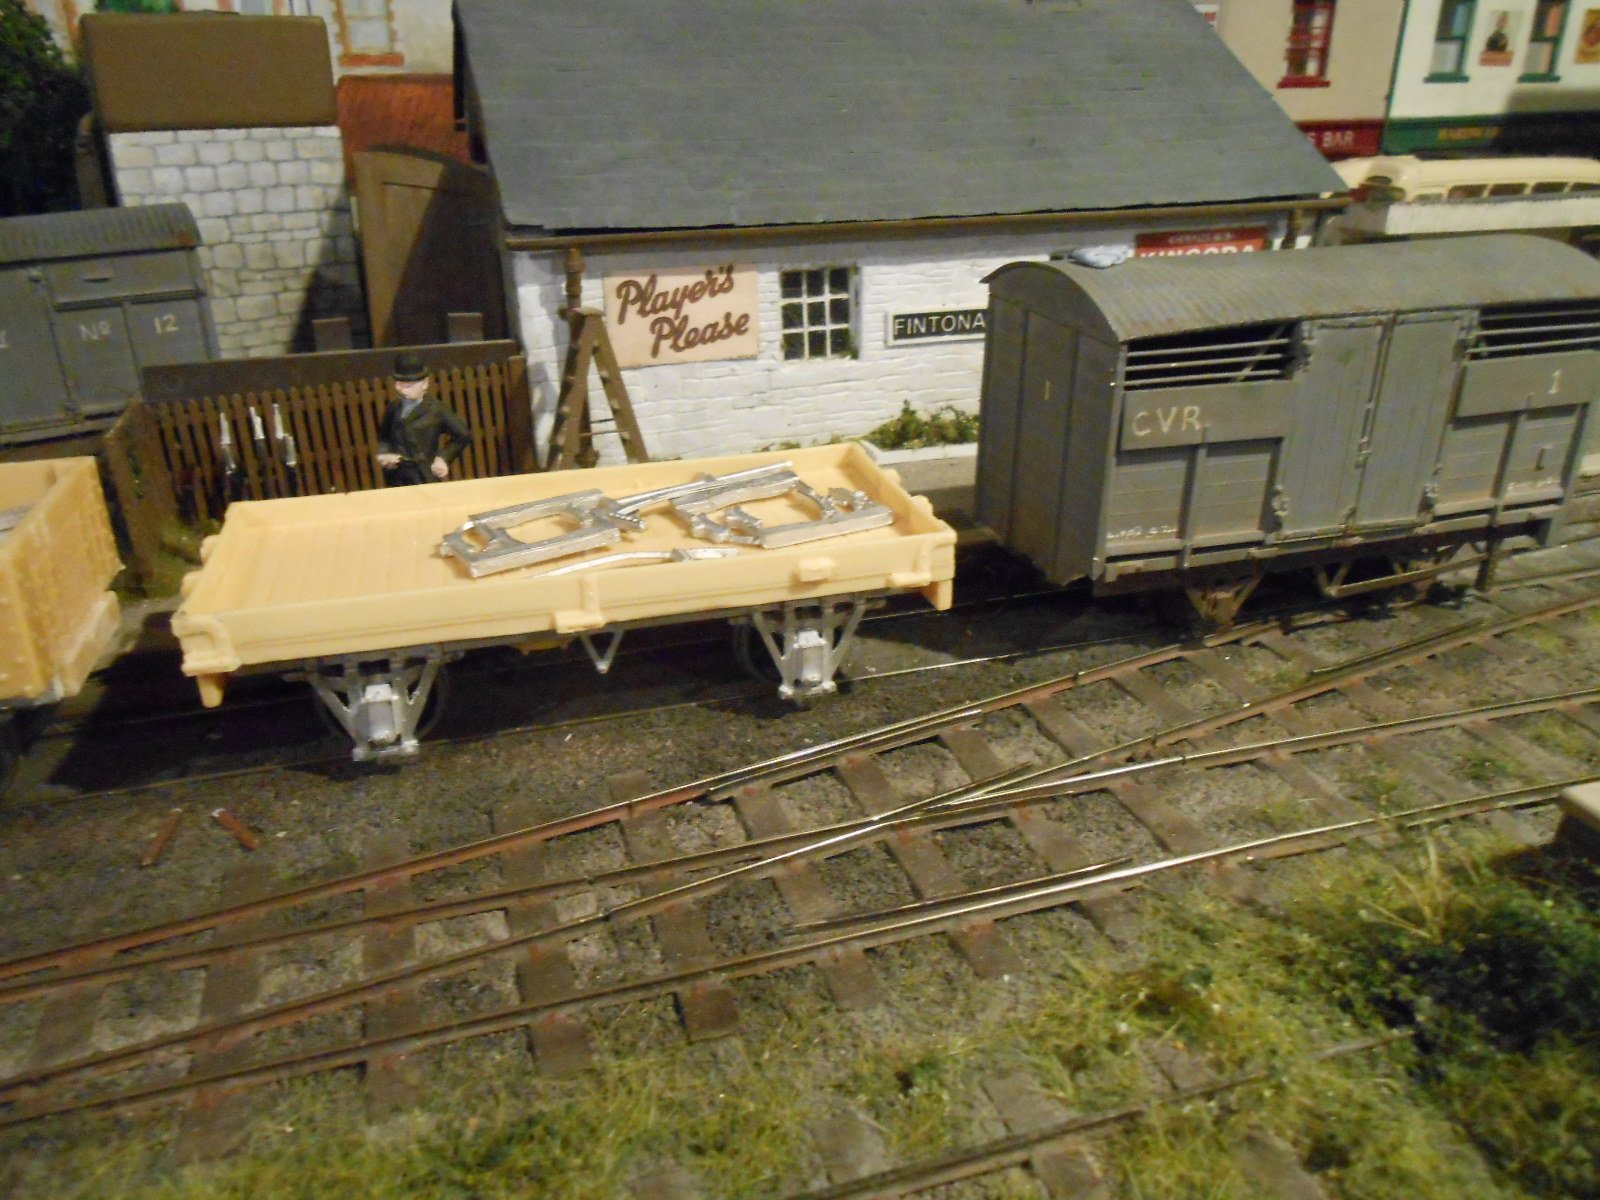
While in the middle of this, the post arrived with a package from Slater's - my 2'7", 3ft gauge wheels. The impetuous side of me meant I had to transfer my attentions almost immediately to the three wagon kits from Alphagraphix. Brake gear aside, these are fairly straightforward & I wanted to get an idea of how larger wheeled stock would look alongside my Clogher Valley wagons. The answer to that is 'not sure', but as they are unlikely to run together, hopefully this won't matter.
Only two of the wagons are Donegal, by the way, the one on the left is a Swilly.
-
15
-
1
-
-
Having opened the packets of Donegal wagon kits, very soon found myself stuck because of a complete lack of wheels. Clogher Valley Railway wheels, as per Fintonagh, were 2' diameter = 14mm in my chosen scale. However, both the Donegal and Swilly used 2'7" wheels, which creates a bit of dilemma. 14mm wheels are not a problem because in 4mm scale that equals 3'6, which is what I have used on Fintonagh, but 2'7 wheels work out at about 18mm, which is 4'6 in 4mm scale and the only things that might work would probably be spoked tender wheels of some sort.
Fortunately, Slater's do 7mm narrow gauge wheels of the correct diameter and given that all the coaches and wagons I now want to build use this type of wheel, I decided to go ahead and order 15 sets. Slightly painful, because it came to £180 - just for a few wheels! Solace comes from the fact that £180 barely buys a 4mm scale locomotive these days, while I will have the means to underpin three coaches and a dozen wagons from my hard earned.
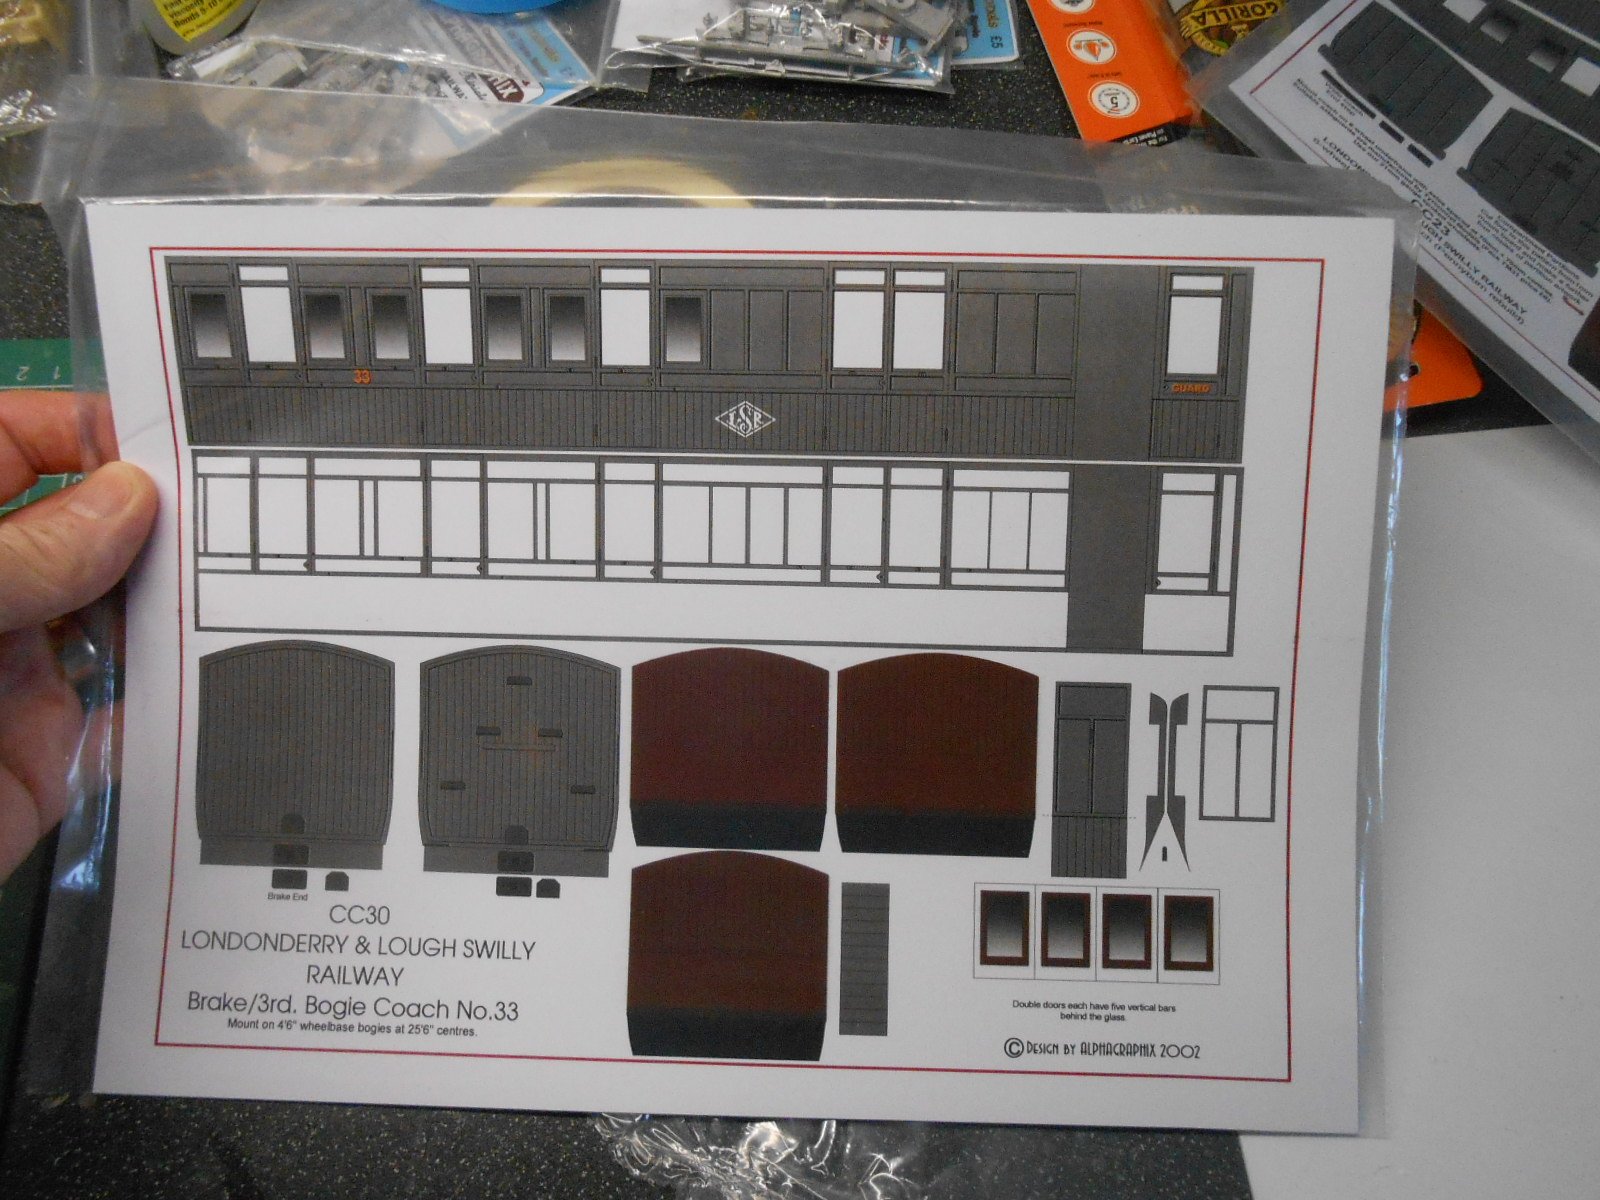
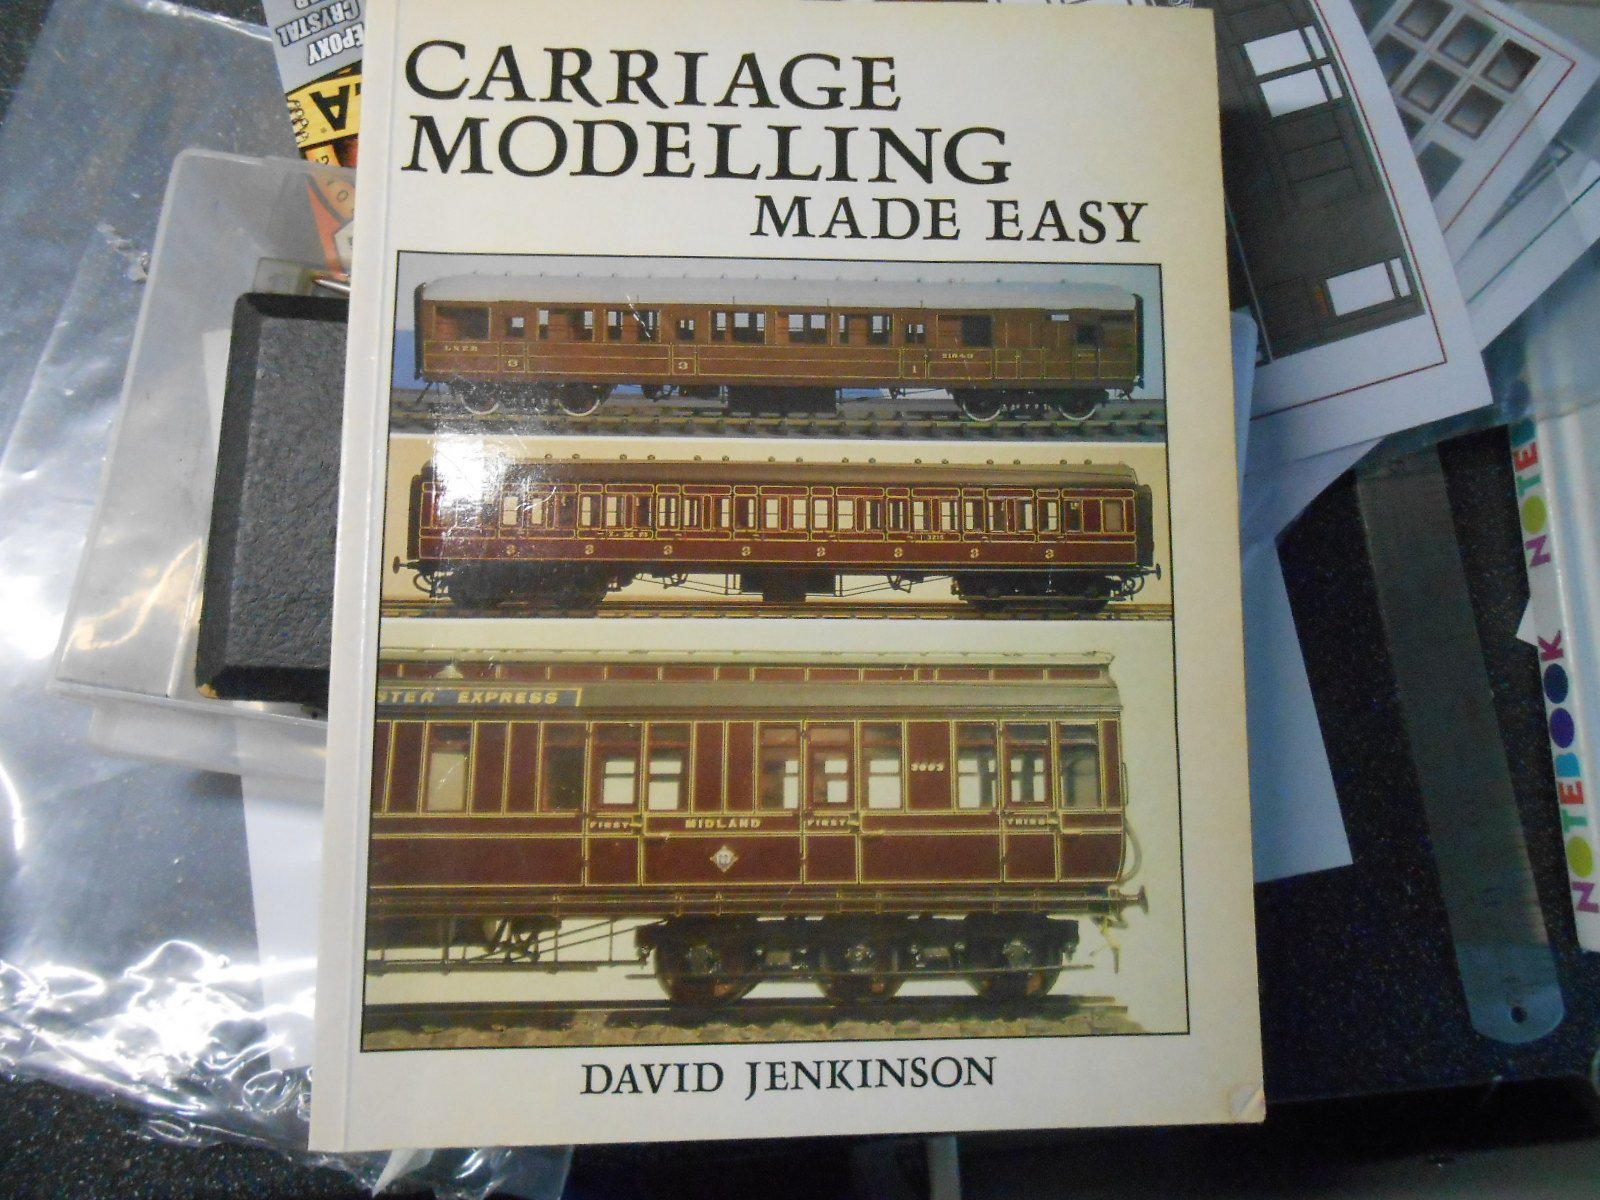
So, while waiting for the wheels to arrive, I decided to make a start on a couple of Swilly coaches. As is my want, the basis for these are the Alphagraphix card kits. Their dimensions seem right, so have begun transferring these to some 20thou [0.5mm] plastic sheet. At the same time, I dusted off David Jenkinson's 'Carriage Modelling Made Easy', a much thumbed tome over the years & which is invaluable for this sort of work.
The photos below show progress thus far. Scratchbuilding a coach is certainly not a quick fix, with the marking out alone something that certainly tests patience, eyesight and hand/arm muscles. Woe betide if you get something wrong at this stage too - been there, got a draw full of T-shirts and created many new, colourful combinations of rude words...
So far, so good though & will expand on the techniques in the Jenkinson book as we go along.
-
11
-
1
-
-
The Slater's RCH 'standard's tank wagon kit is one of the few prototypes to make it across the water (I think). It is however a challenging model to make & my own one is just a static model at the moment because the axleboxes are too tight to run well.
-
1
-
 1
1
-
-
Thanks both!
-
11 hours ago, commerlad said:
The large casting Is a frame end with the coupling hole in the centre, the other end (lowest right piece in close up) does not have the dropper parts. The kits for the other 2 wagons had frame ends cast in resin.
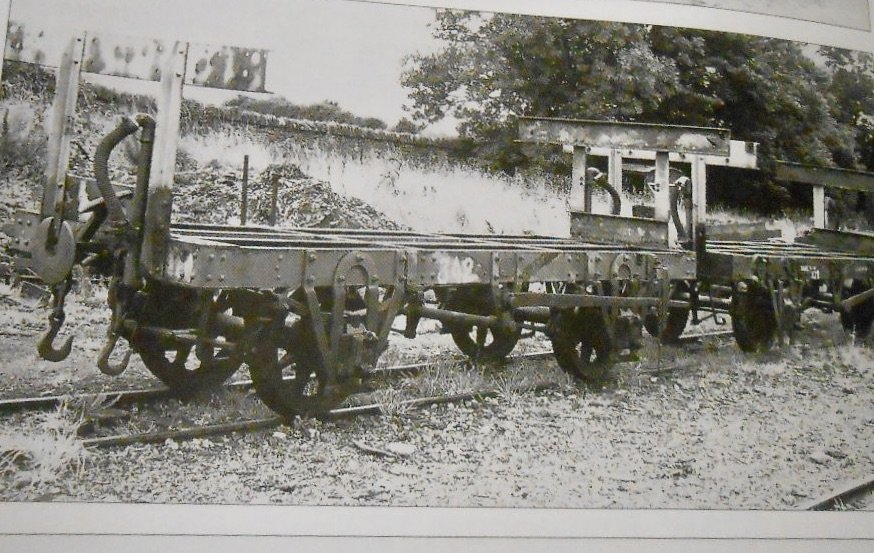
Thanks, though further investigation is making me think that casting is not part of any of the three wagons. The photo below, taken from Roger's excellent book 'The County Donegal Railways Companion' shows a hybrid wagon, converted from a Ballymena, Cushendell & Red Bay vehicle, used as a low loader. Note the raised ends, which look very like my casting - though it appears there are only two uprights, not four...
Thus far, I can't find any photos or drawings showing a wagon end like this & why is there only one, not two? All three of my wagons have one piece resin castings for the bodywork. Maybe I won't be using that bit!
-
1
-
-
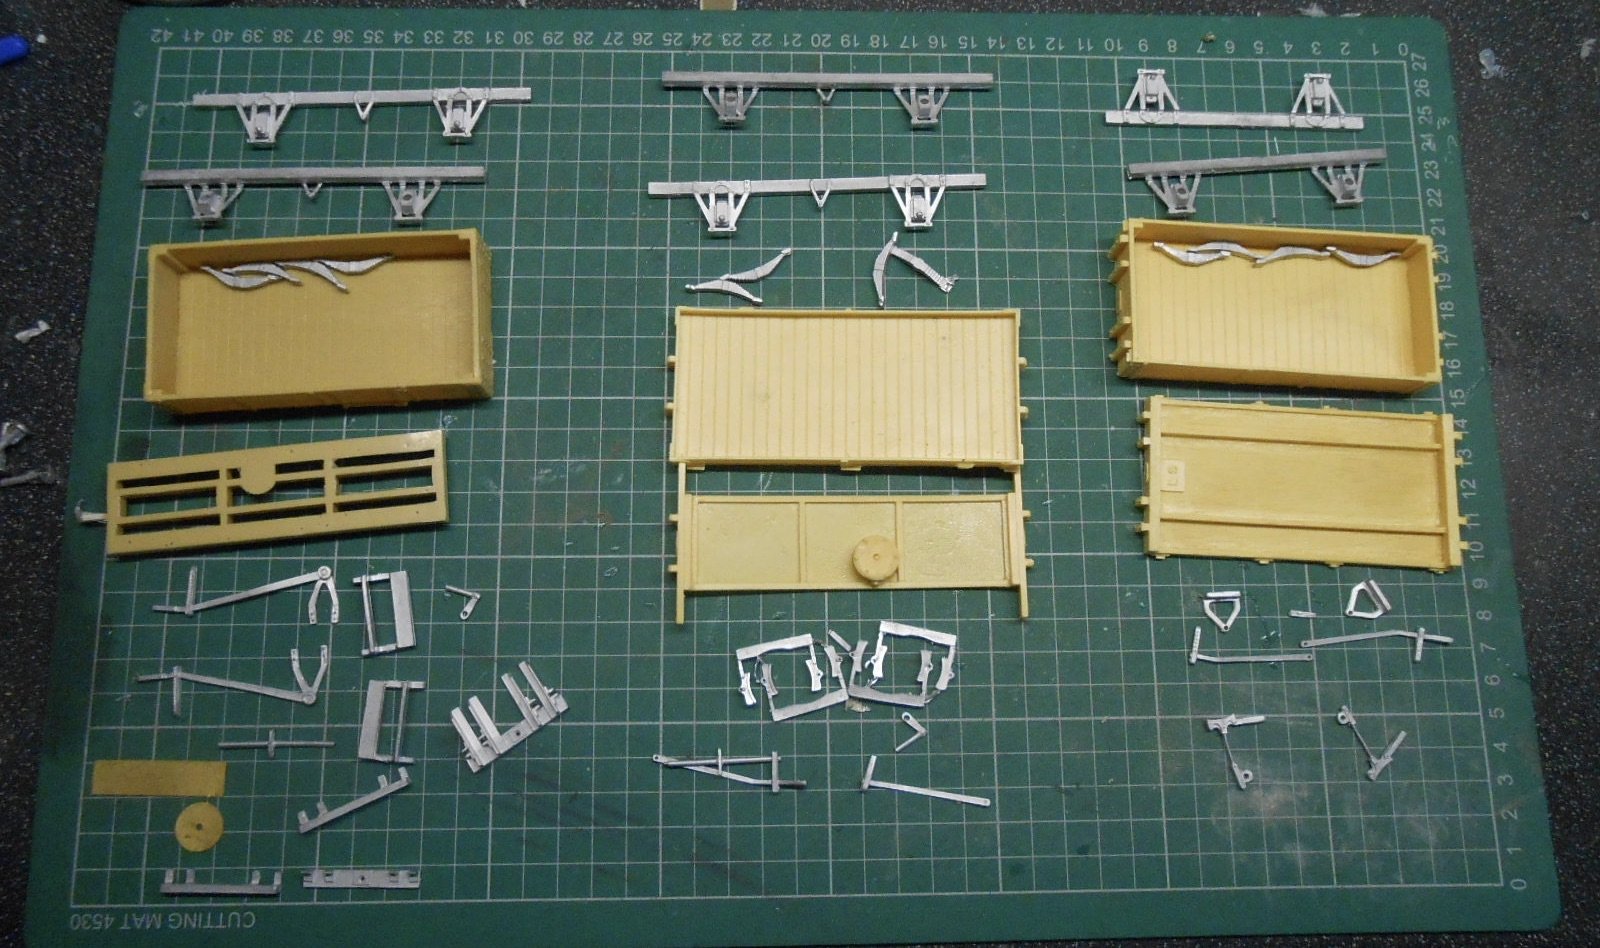
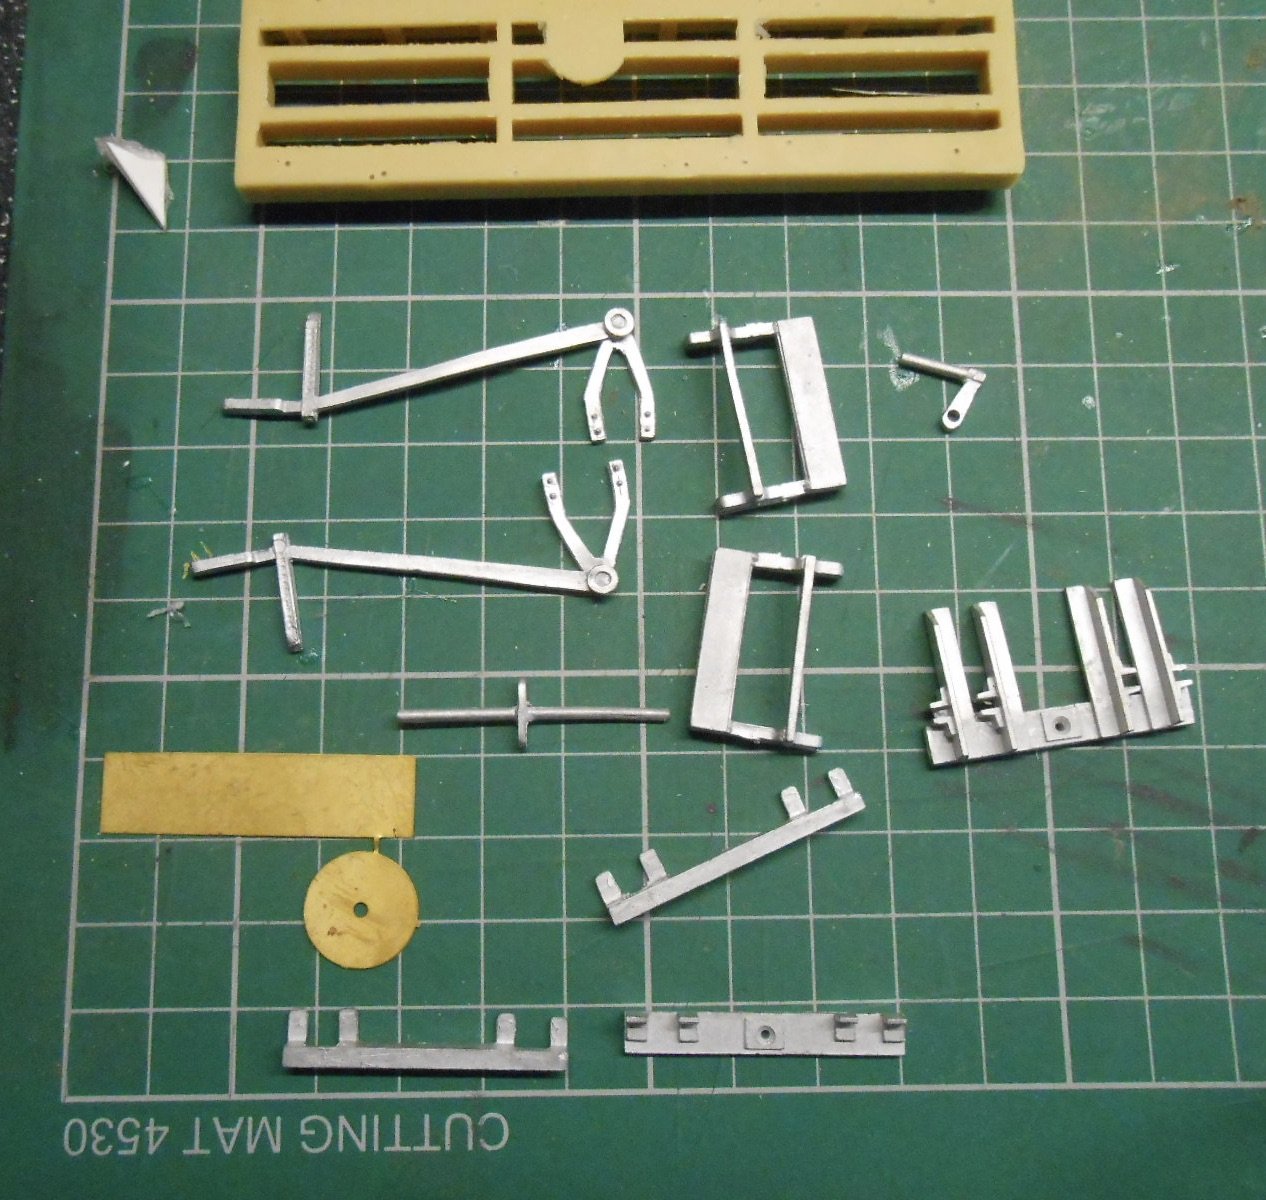
Ok, time for some new projects, namely three Tyrconnel/Alphagraphix Donegal wagon kits. However, find myself slightly bemused re the brake gear. Nothing new there, as have always found such things a challenge.
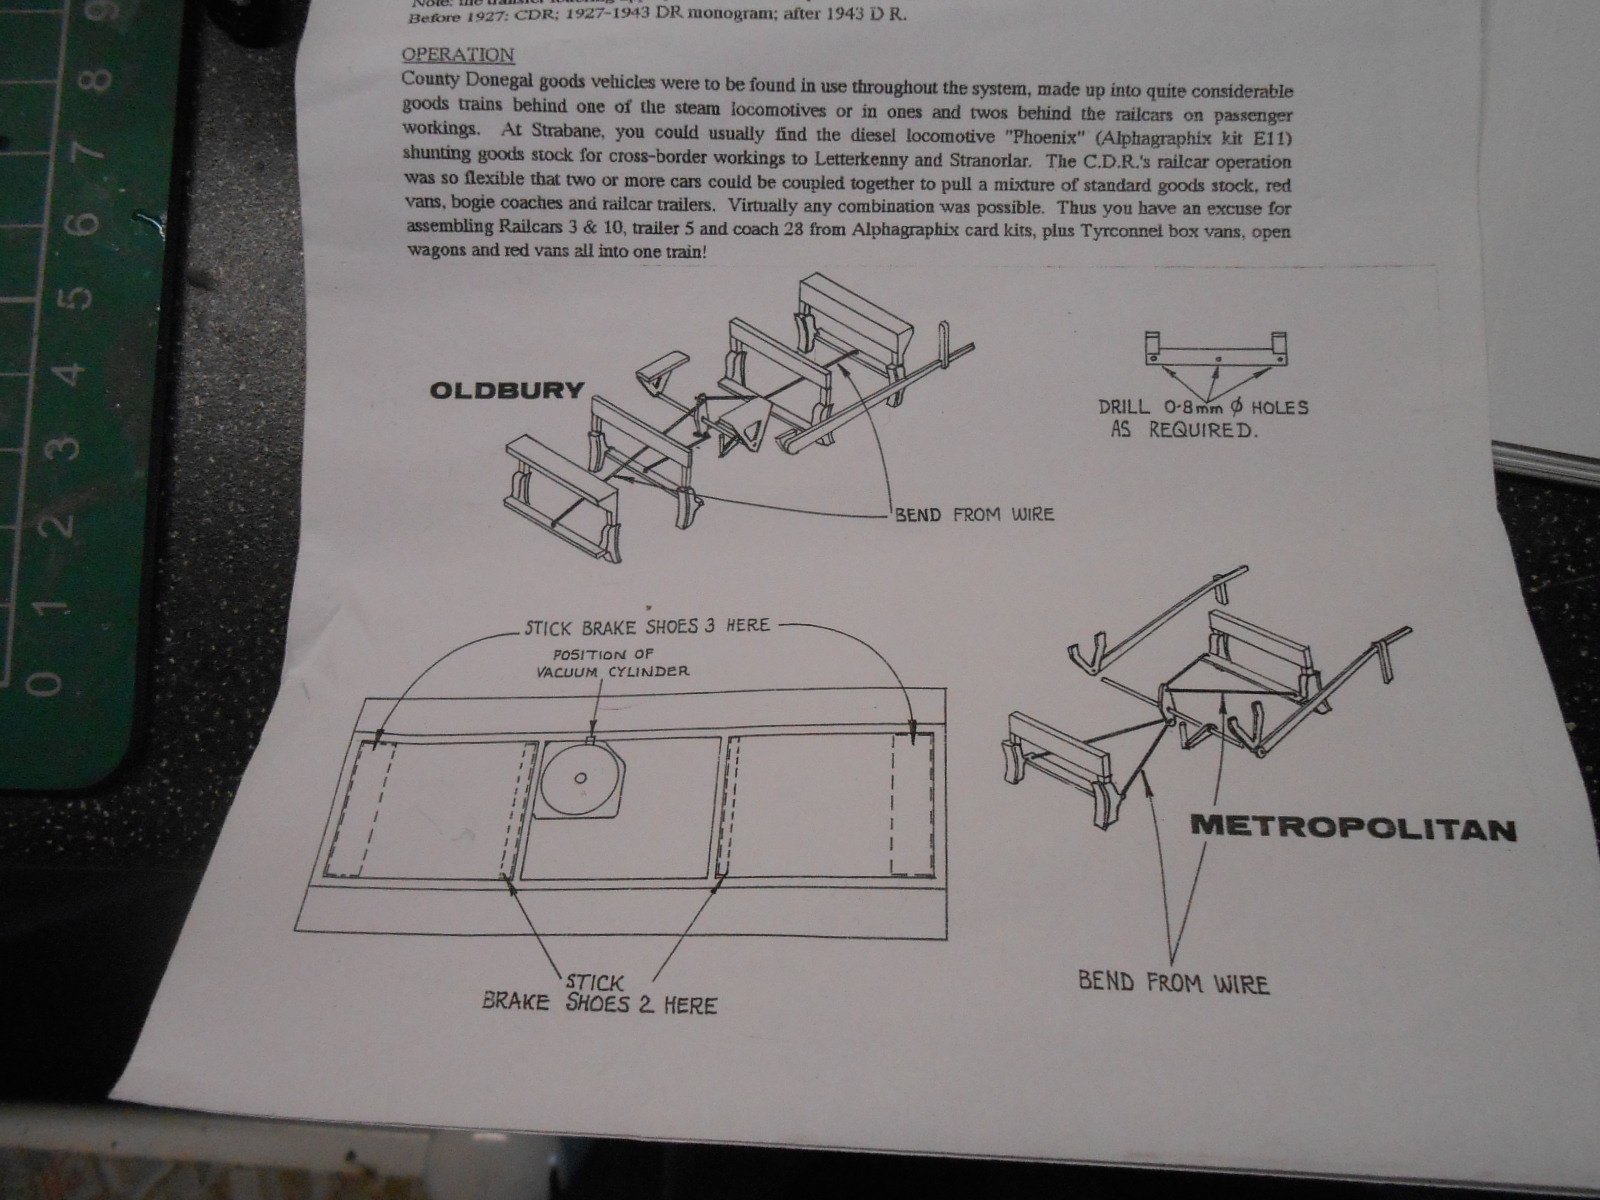
I've only got one set of instructions, which am guessing are meant to be generic, but a couple of things aren't clear. The first picture shows all three kits laid out. As you can see, each one is different. The middle kit is a one plank, the other two are three plank.
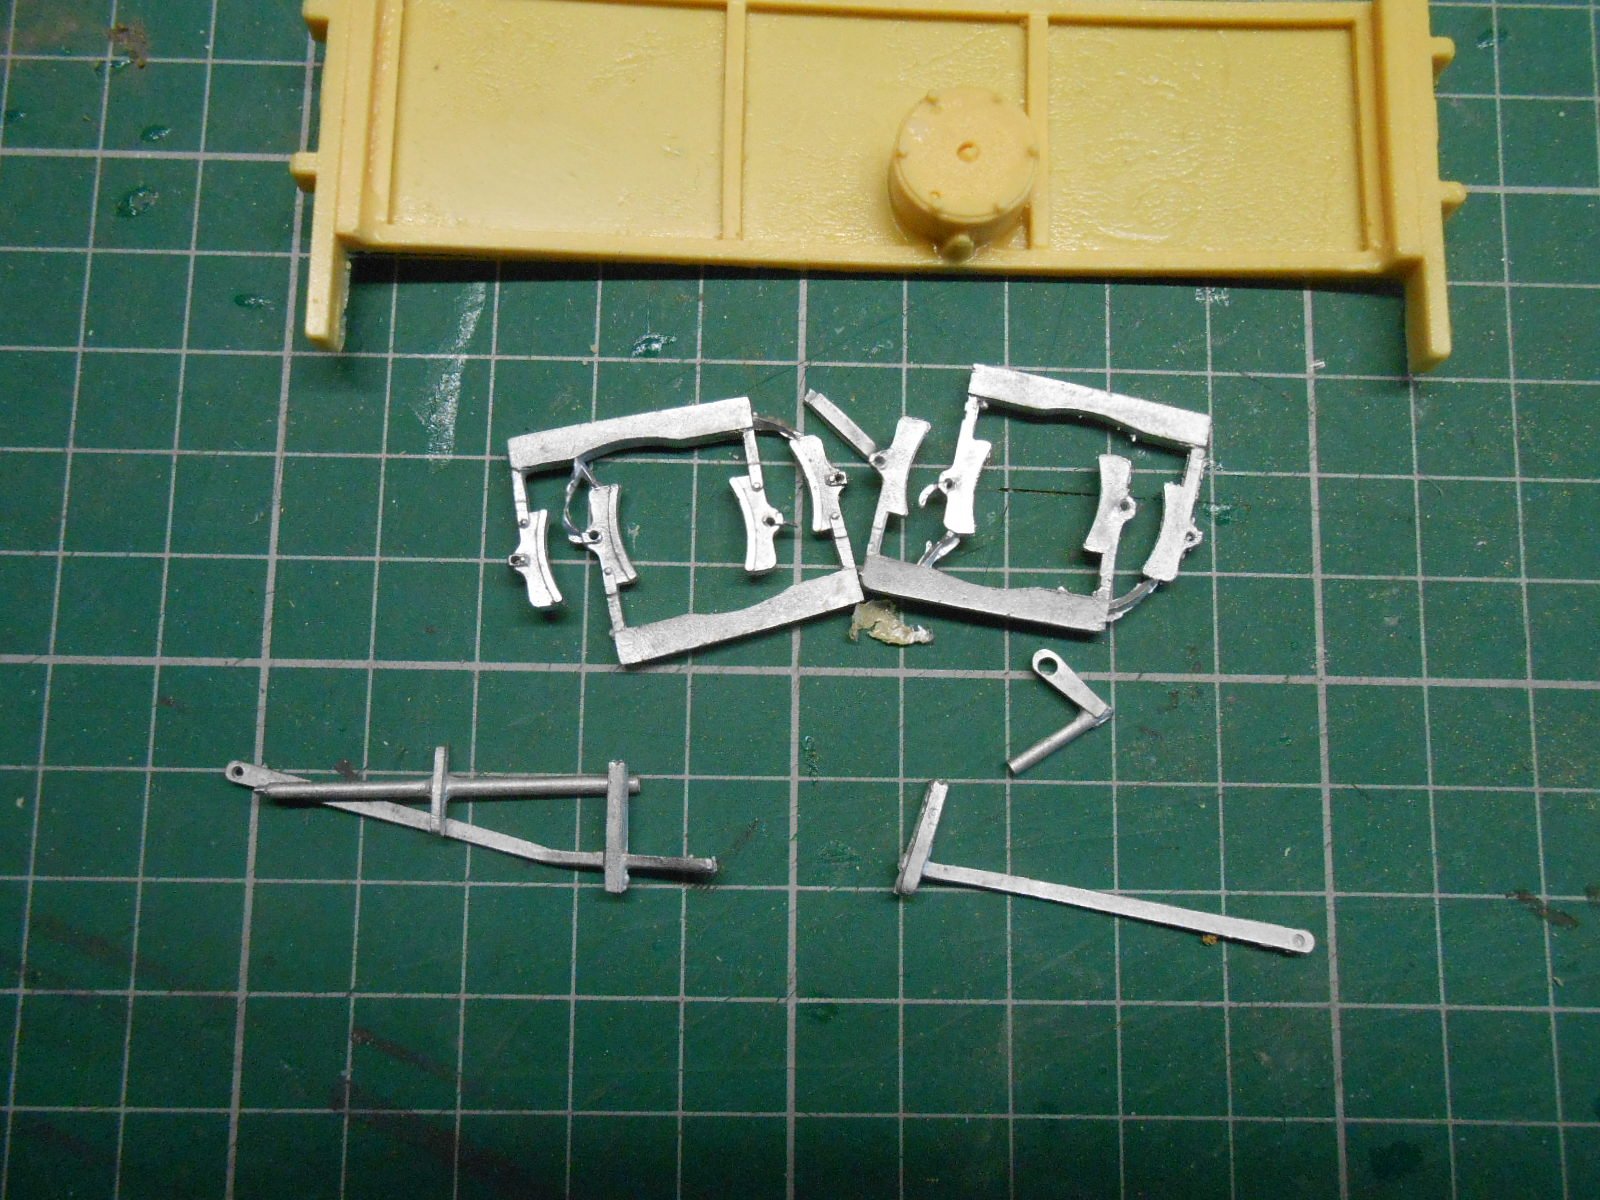
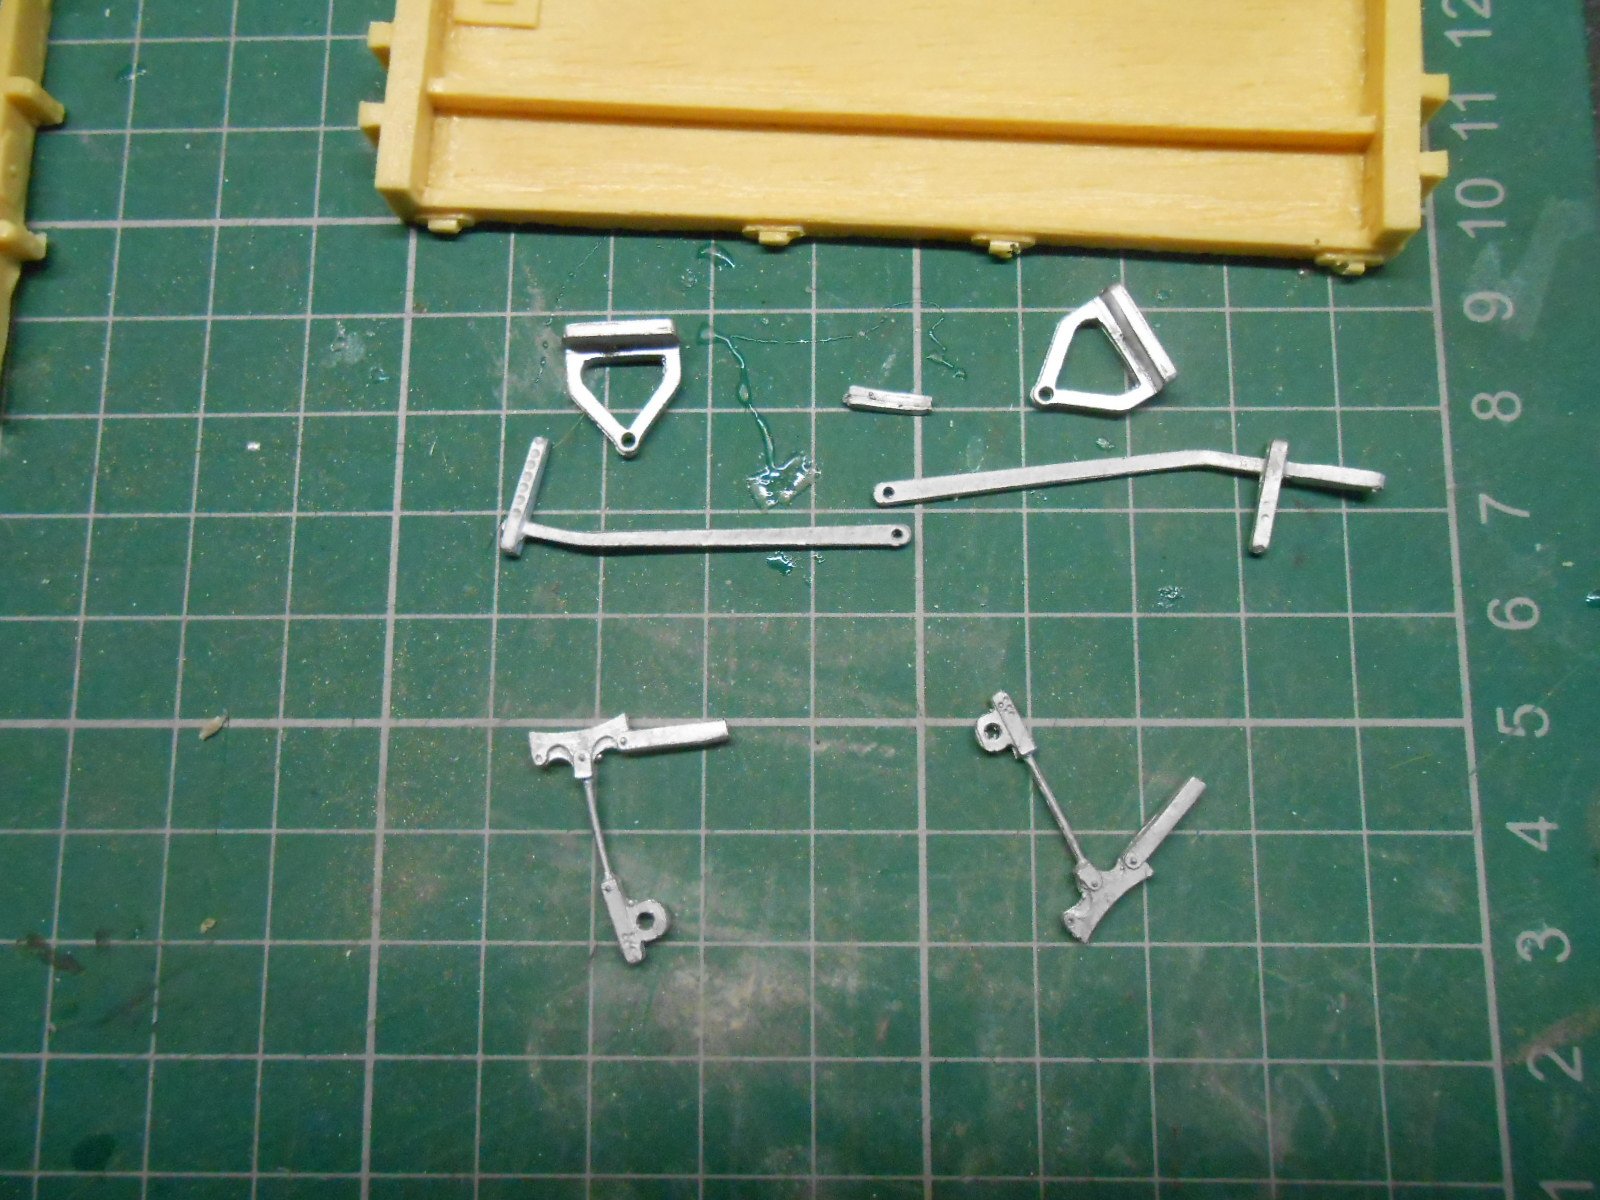
The second picture shows the brake gear of the left hand kit in more detail. The brake levers and vacuum cylinder/lever are obvious, as are the two pairs of brake shoes. Am assuming the three small castings at the bottom of the picture are for lining up the brake shoes, but what is the larger, fourth casting, bottom right? See too the instruction sheet in the last photo.
The other two chassis seem more straightforward - well, less pieces - but any comments welcome, please!
-
5
-
-
6 hours ago, Tullygrainey said:
Perfectly realised. A coherent and believable scene with real atmosphere. Lovely stuff David.
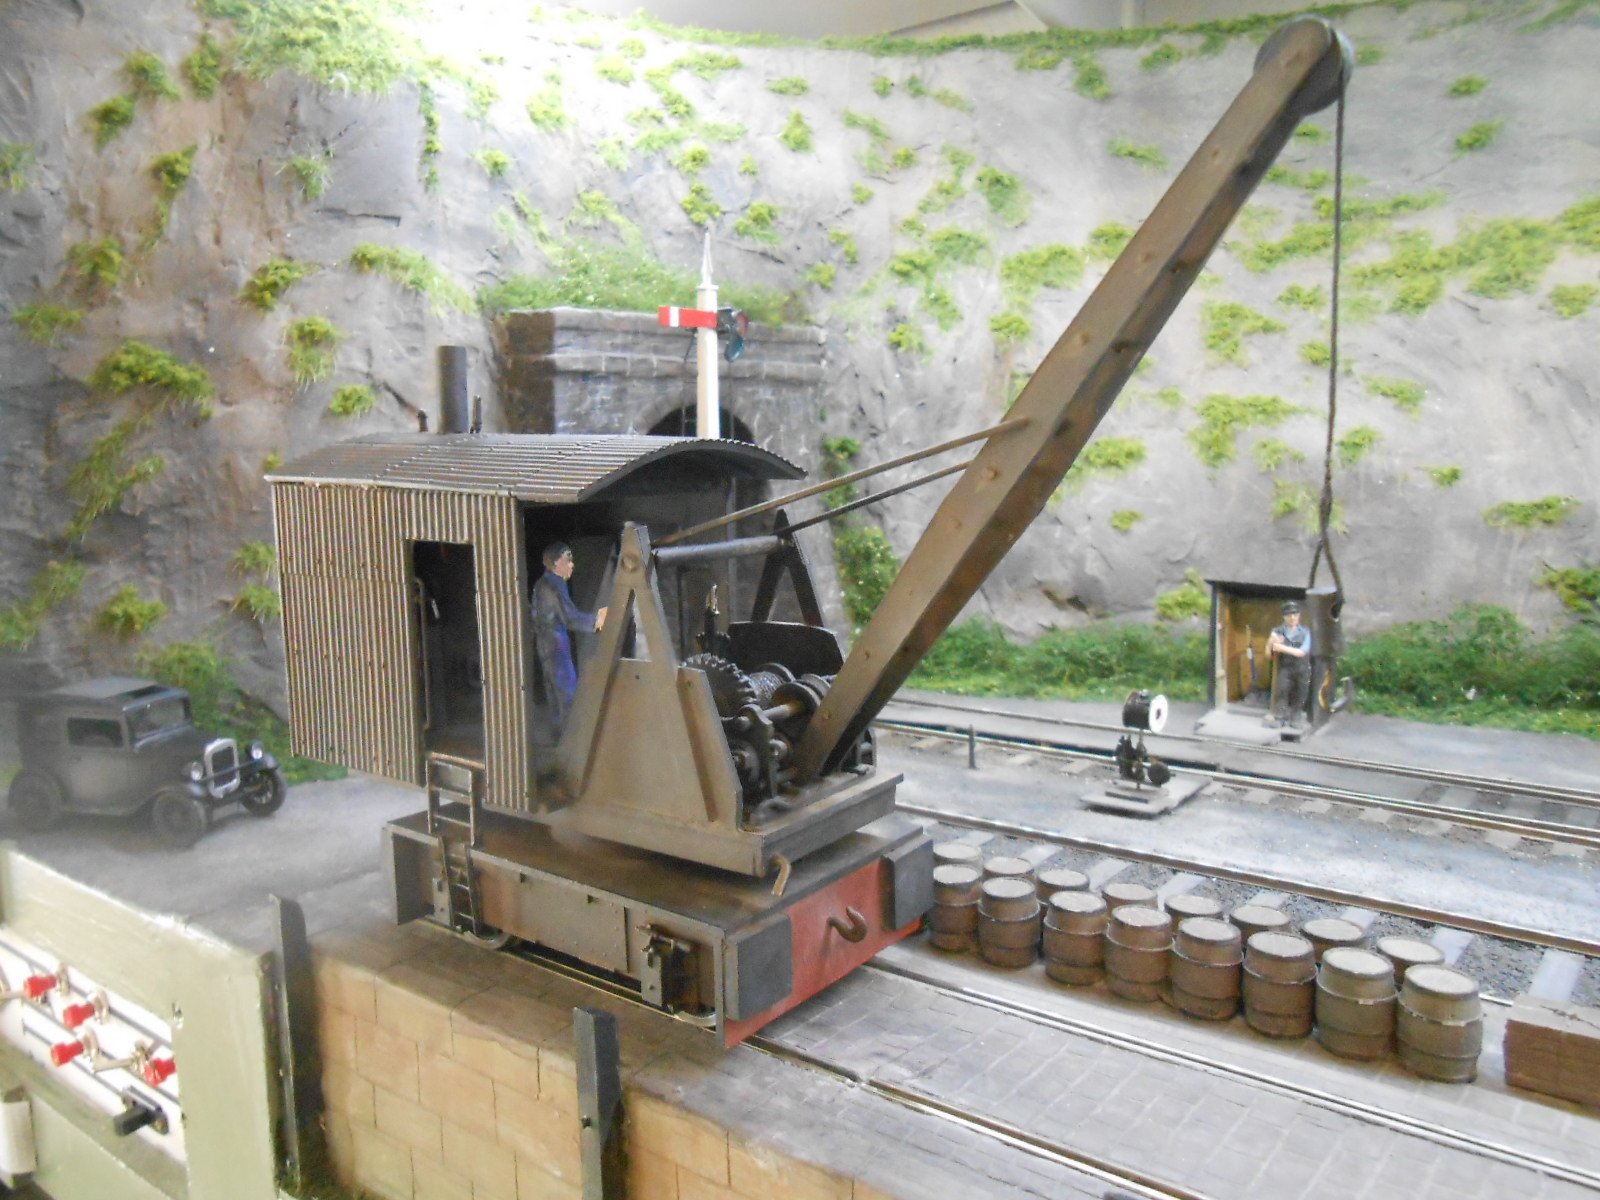
You may have already posted about this but did you manage to get the crane shuttle module working?
Afraid not, so gave up with it. Instead, the slide switch is linked to the main, hand held, controller. Hence, the crane can be manually operated in between other train movements. Not quite what I wanted, but it will do.
-
All power to your pedals!
-
1
-
-
Great to see these wonderful models!
-
1
-
1
-
-
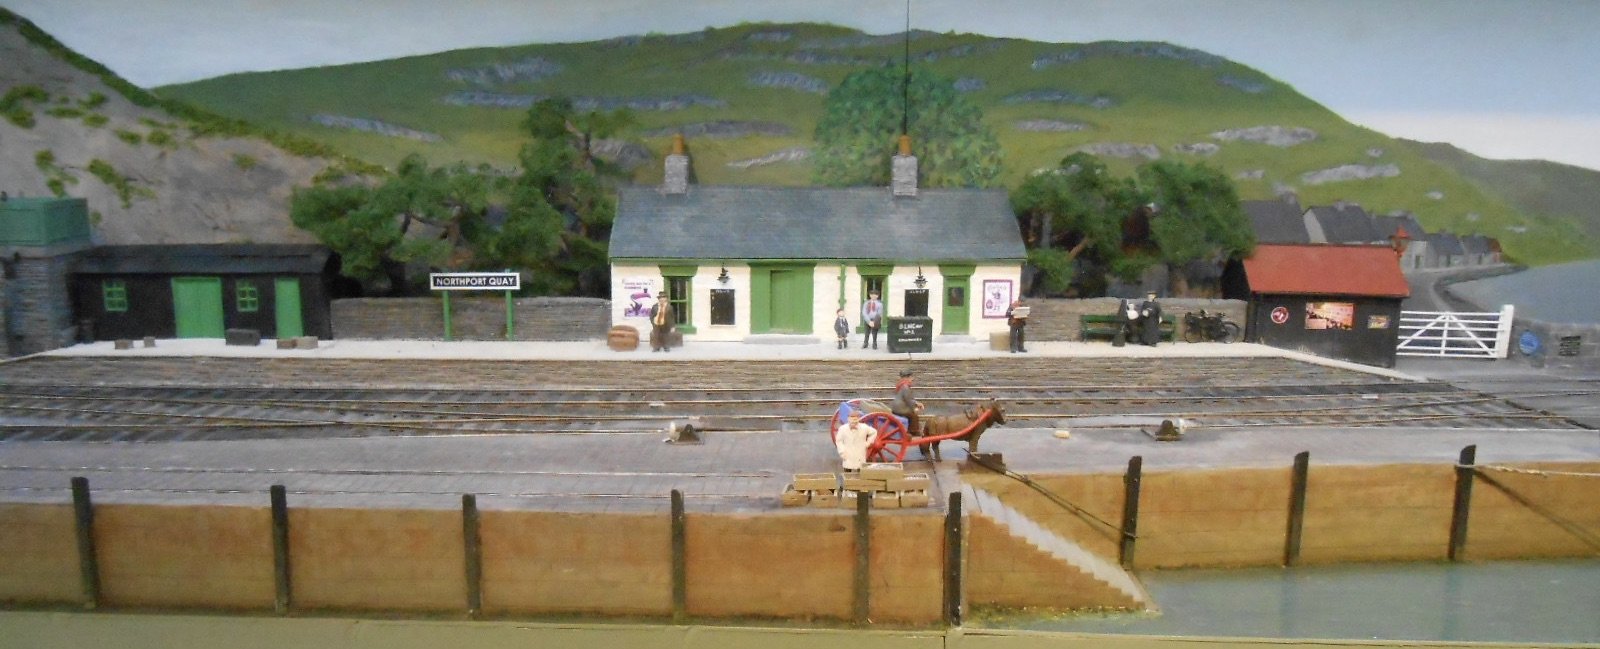
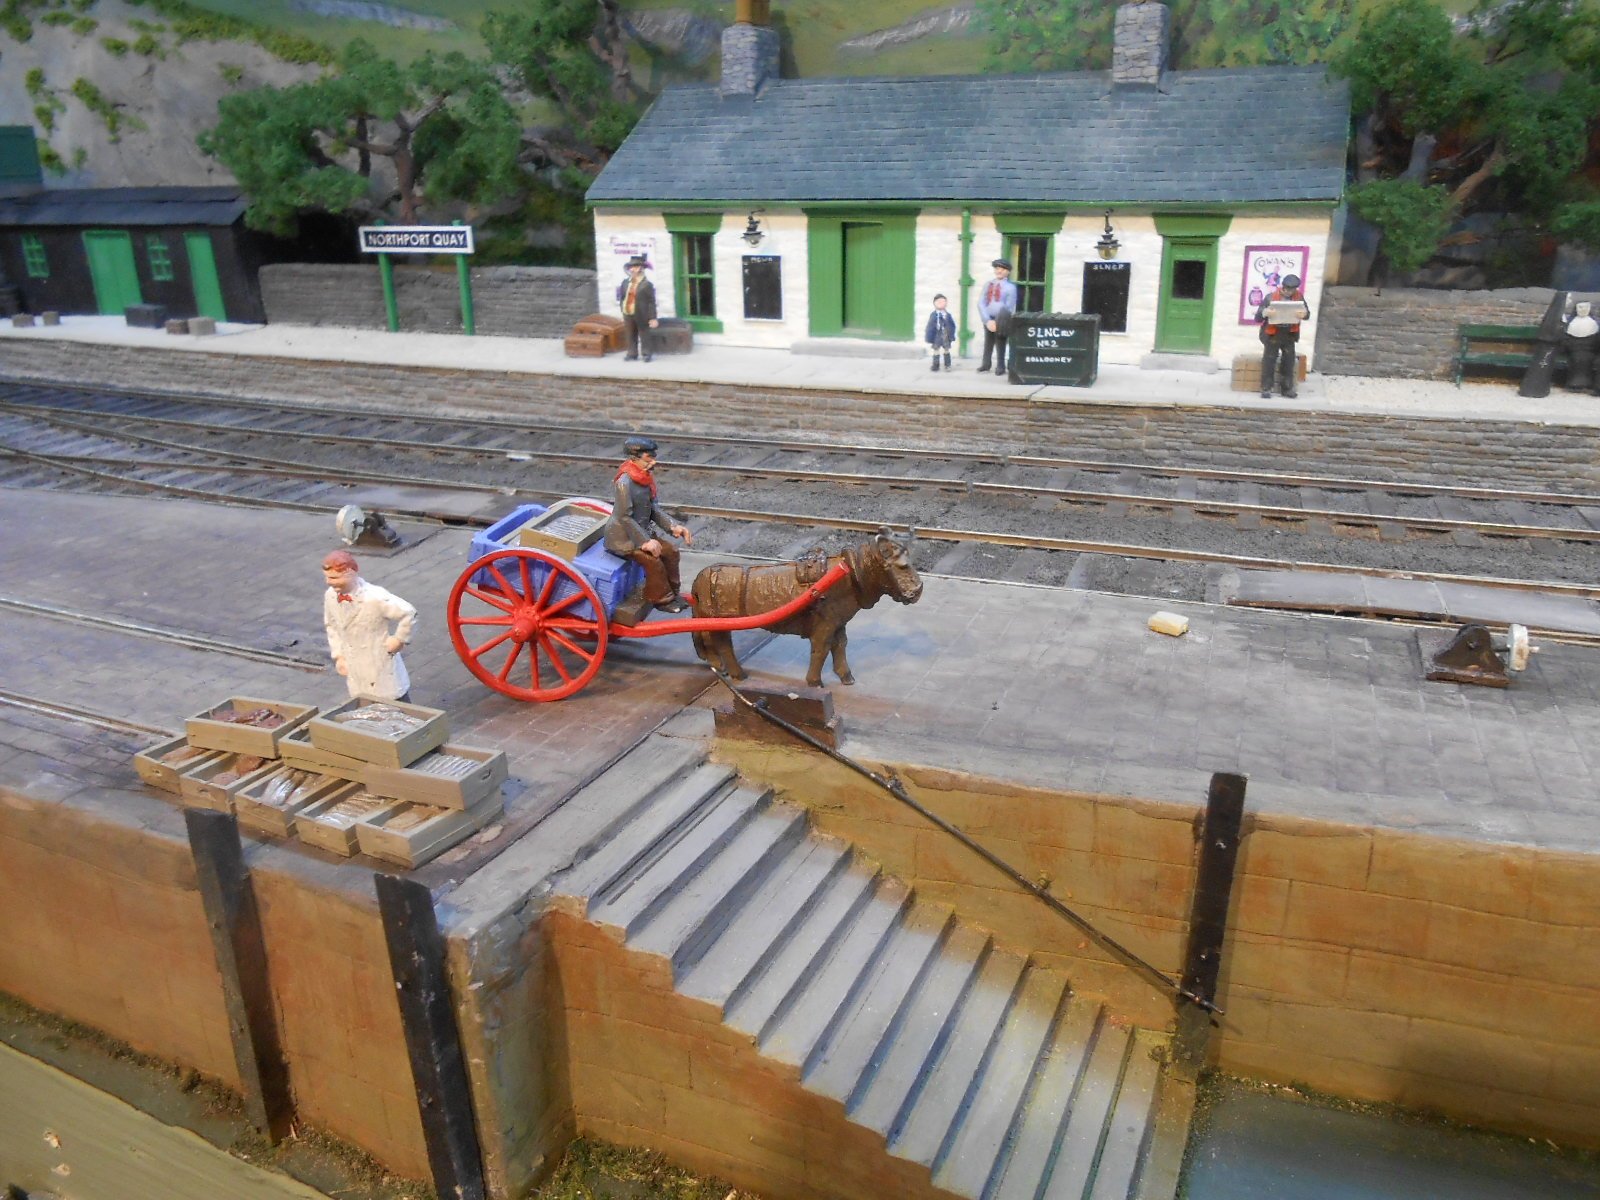
Interesting and thank you. The donkey cart is a Langley Kit and was made up as is. Always thought the shafts looked odd, so will definitely straighten them.
-
1
-
-
- Popular Post
- Popular Post
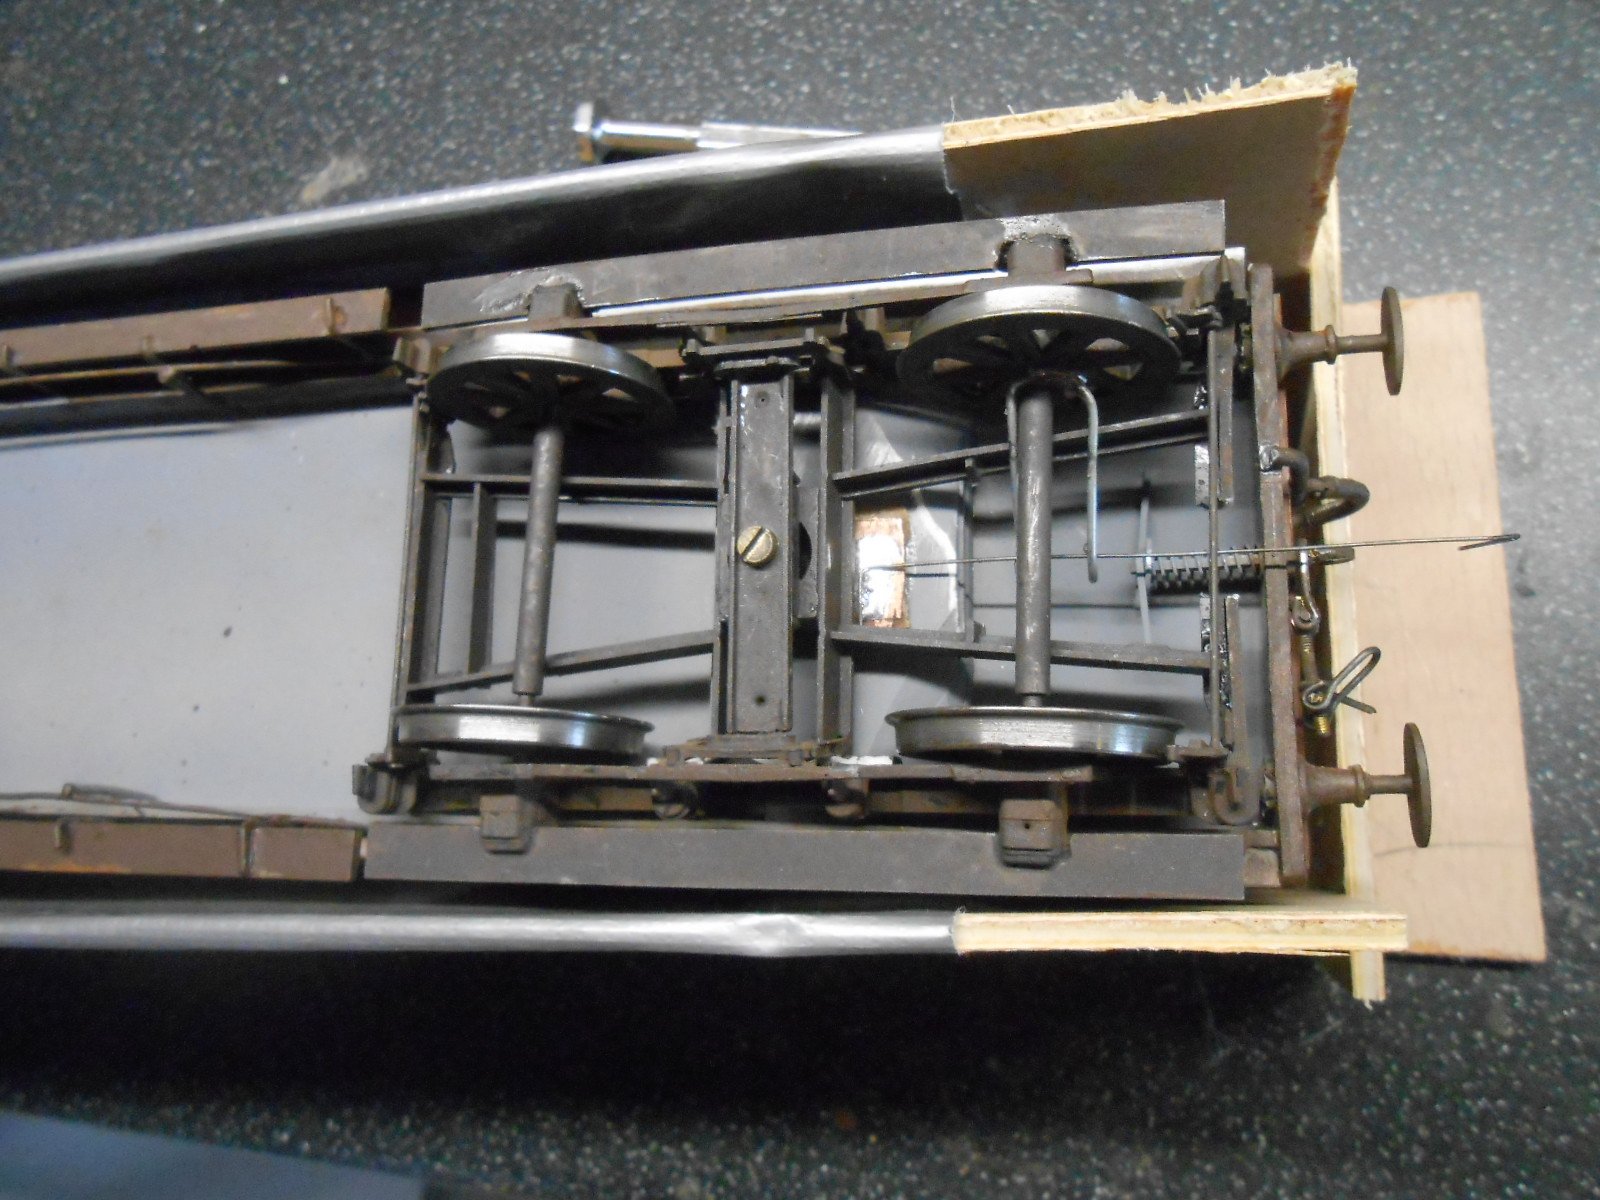
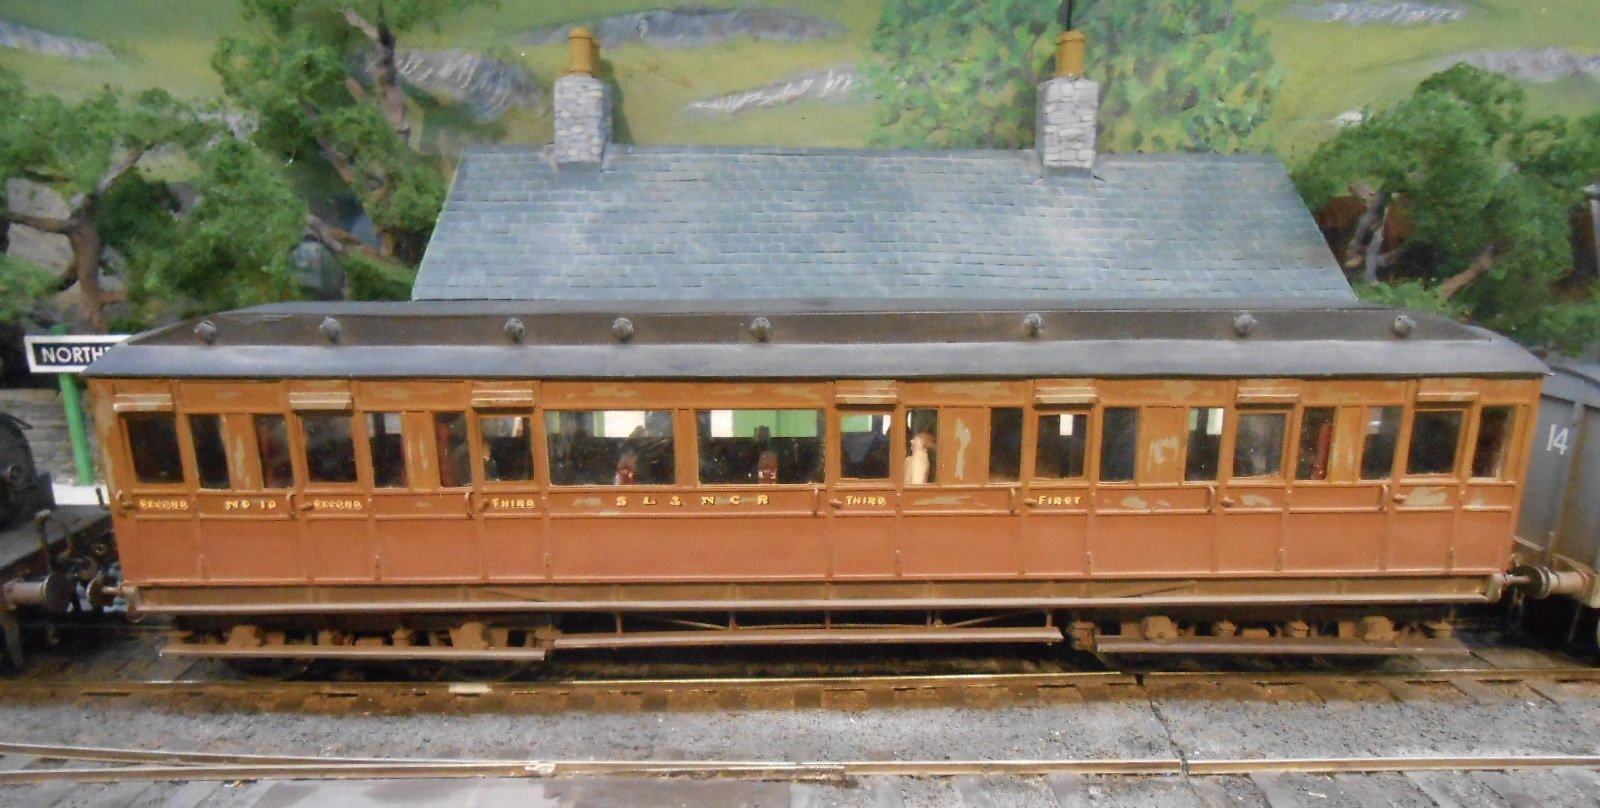
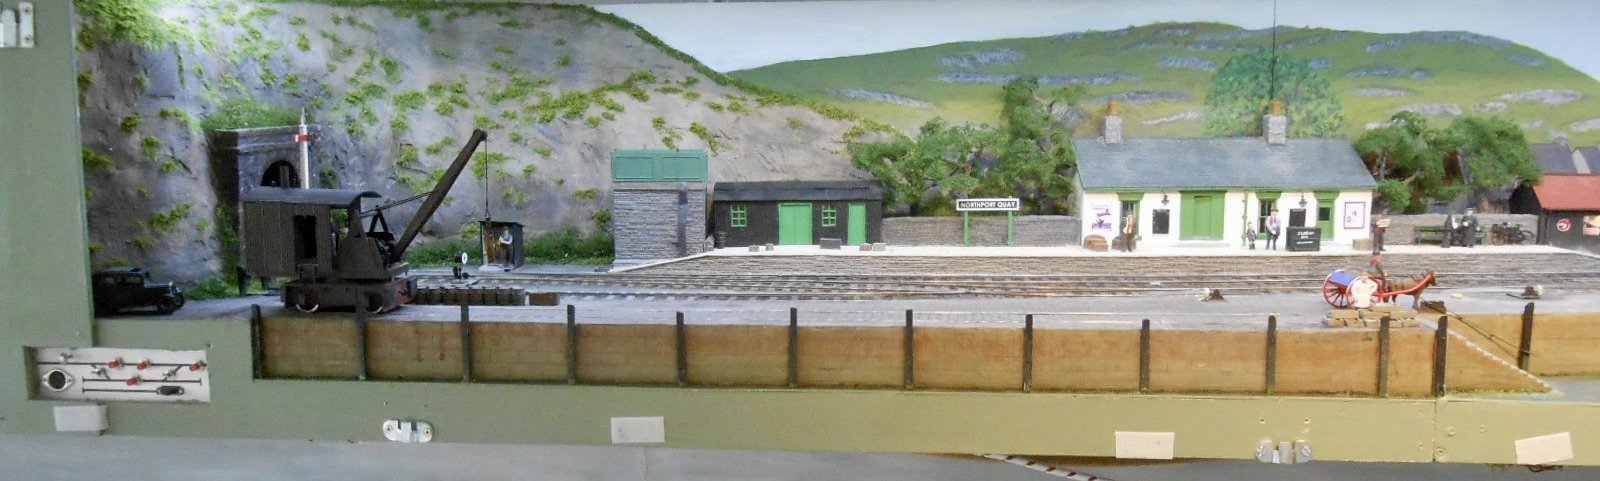
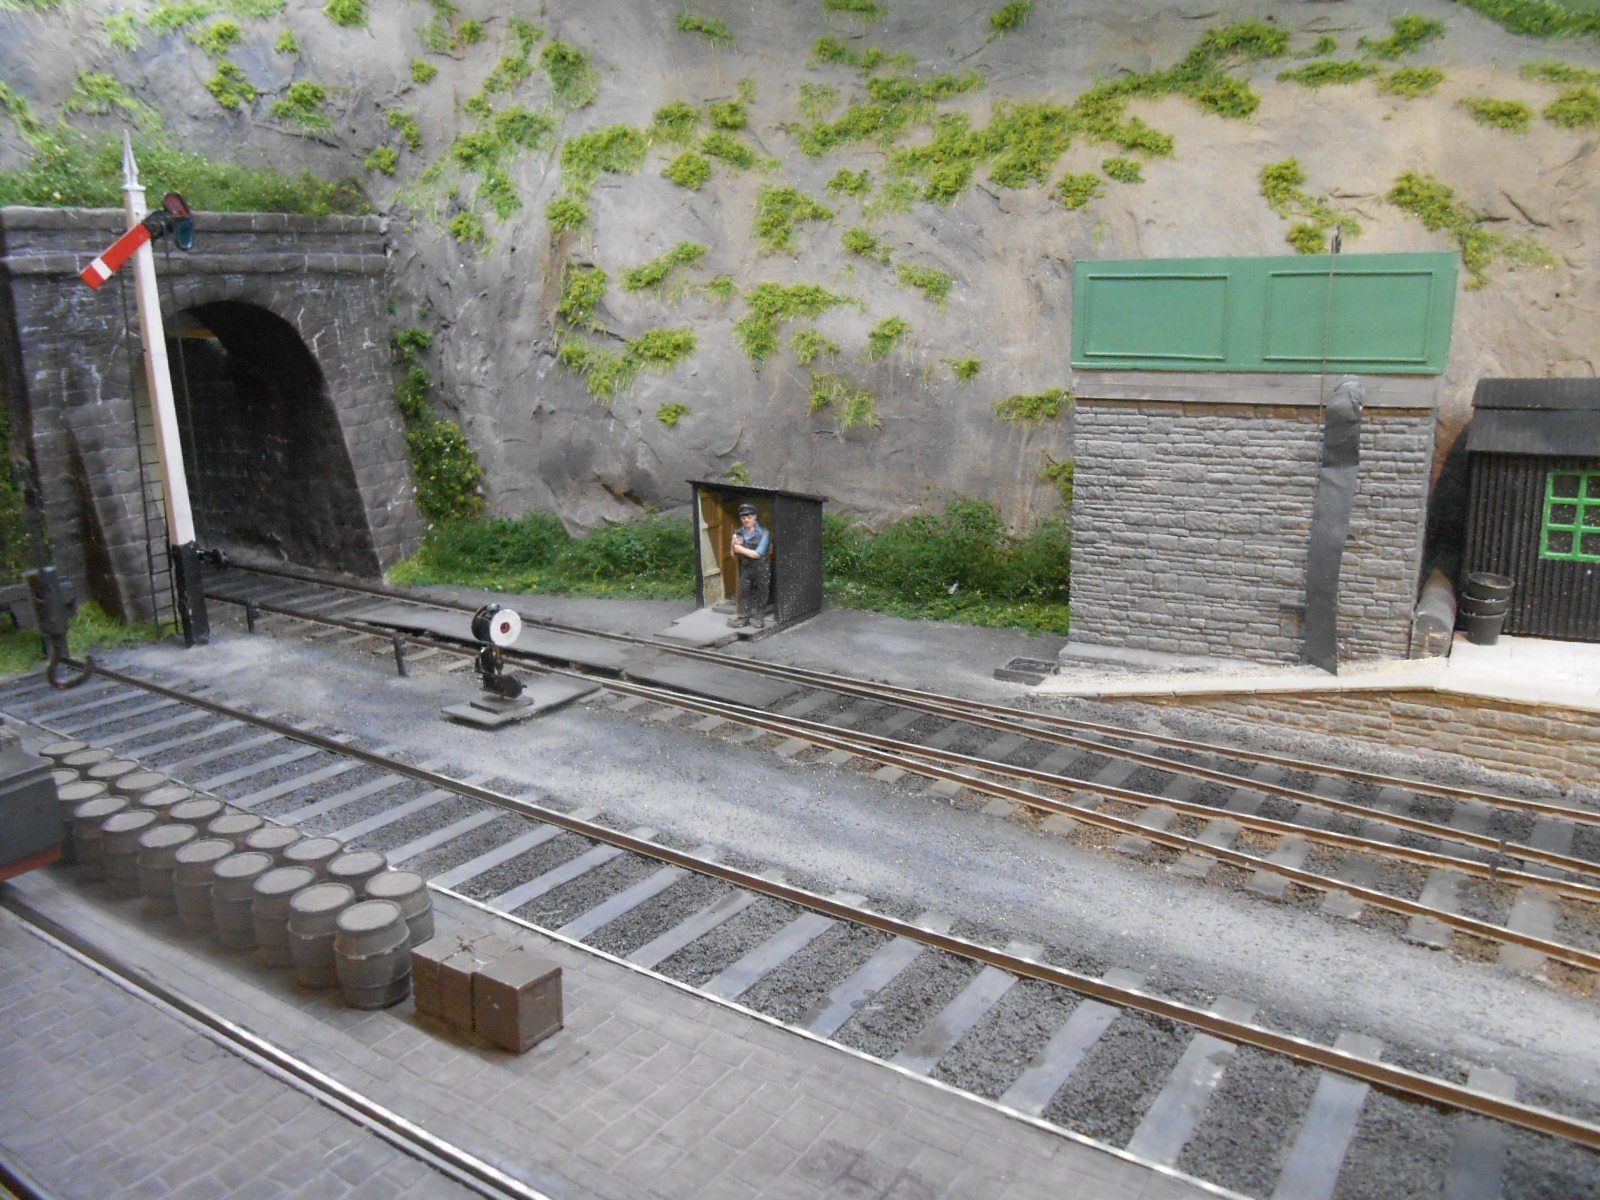
As with the layout, I've pretty much finished tinkering for now, though one final bit of work before Uckfield has been to fit AJs to SLNCR bogie No 10, the famous [or should that be infamous?] saloon which did not benefit from any internal lighting - as evidence by the lack of a cable conduit on the roof. There were three similar coaches [No9 was a brake third], built by Hurst Nelson in 1928 to replace some six wheelers damaged in the Civil War. Among their many foibles were doors that were hung on the right, first class compartments split longitudinally into smoking and non-smoking compartments, plus the archaic clerestory roof and the fact they were less than 45 feet long - the latter ideal for a small layout like NPQ. In the 1950s Brake 3rd No9 had a bit of a repaint, but No10 stayed in pretty woeful condition, so this is how I've represented it.
Originally, I'd not tried to fit AJs to this coach, as there didn't seem room on the chassis, particularly with the bogie pivots being in the way. However, another look showed it should be possible & so this has proved, though I've had to chop a couple of sections out of the bogie frames to allow the coupling wire to move up & down. The 6w brake third is currently now in reserve.
-
21
-
Finished?
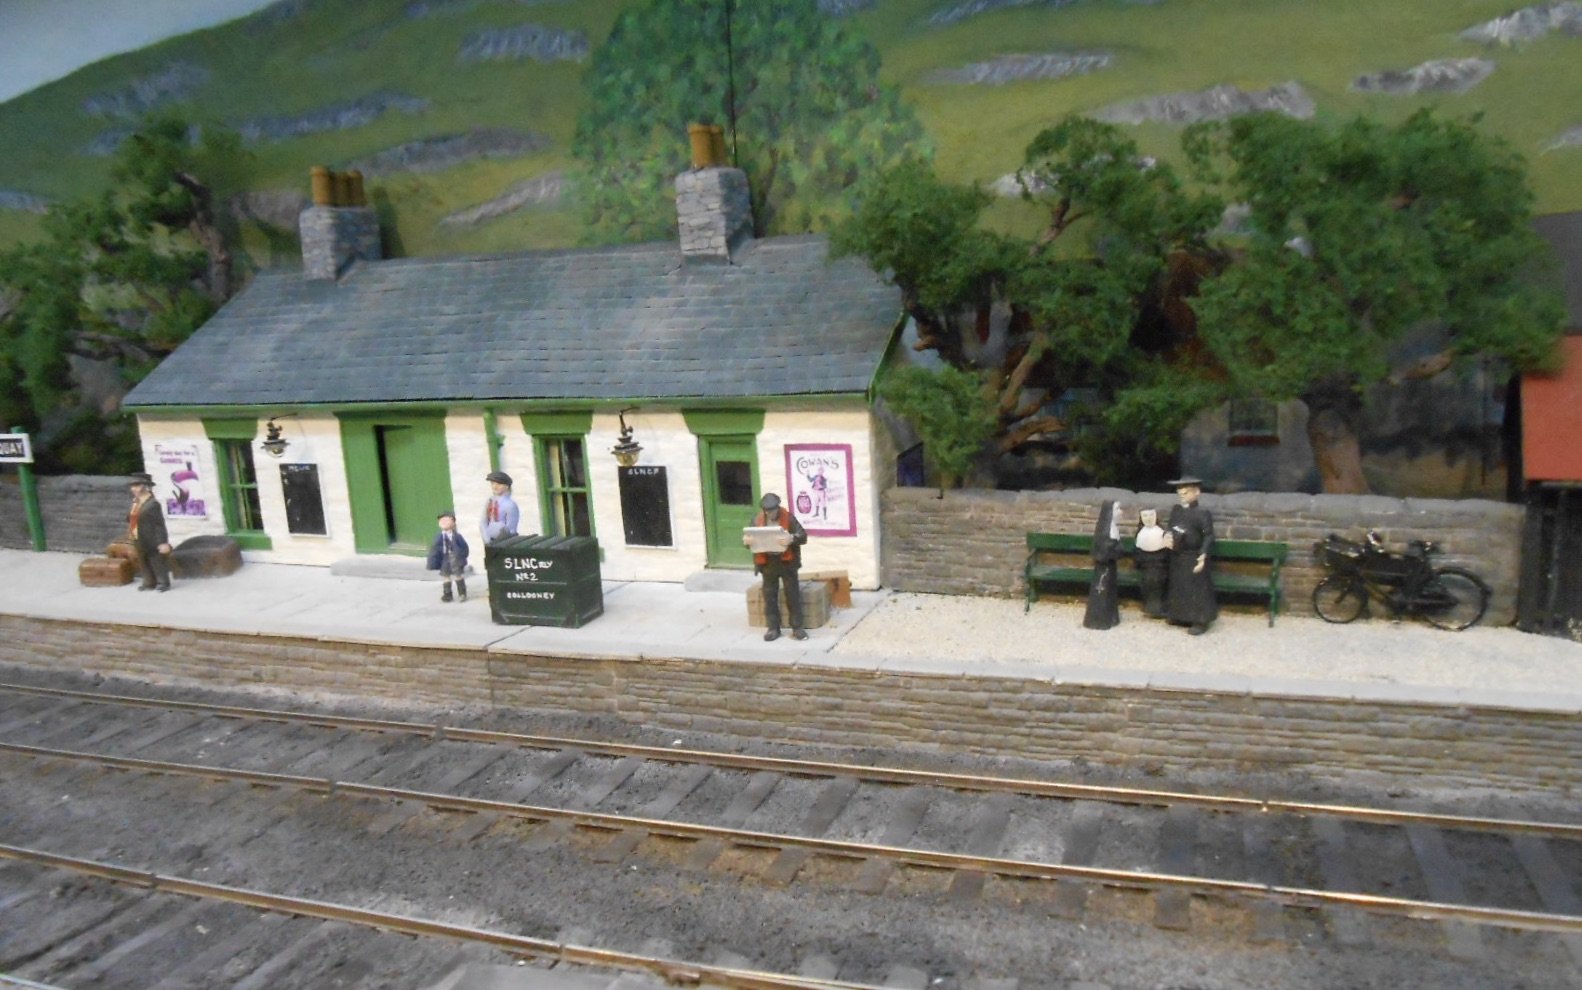
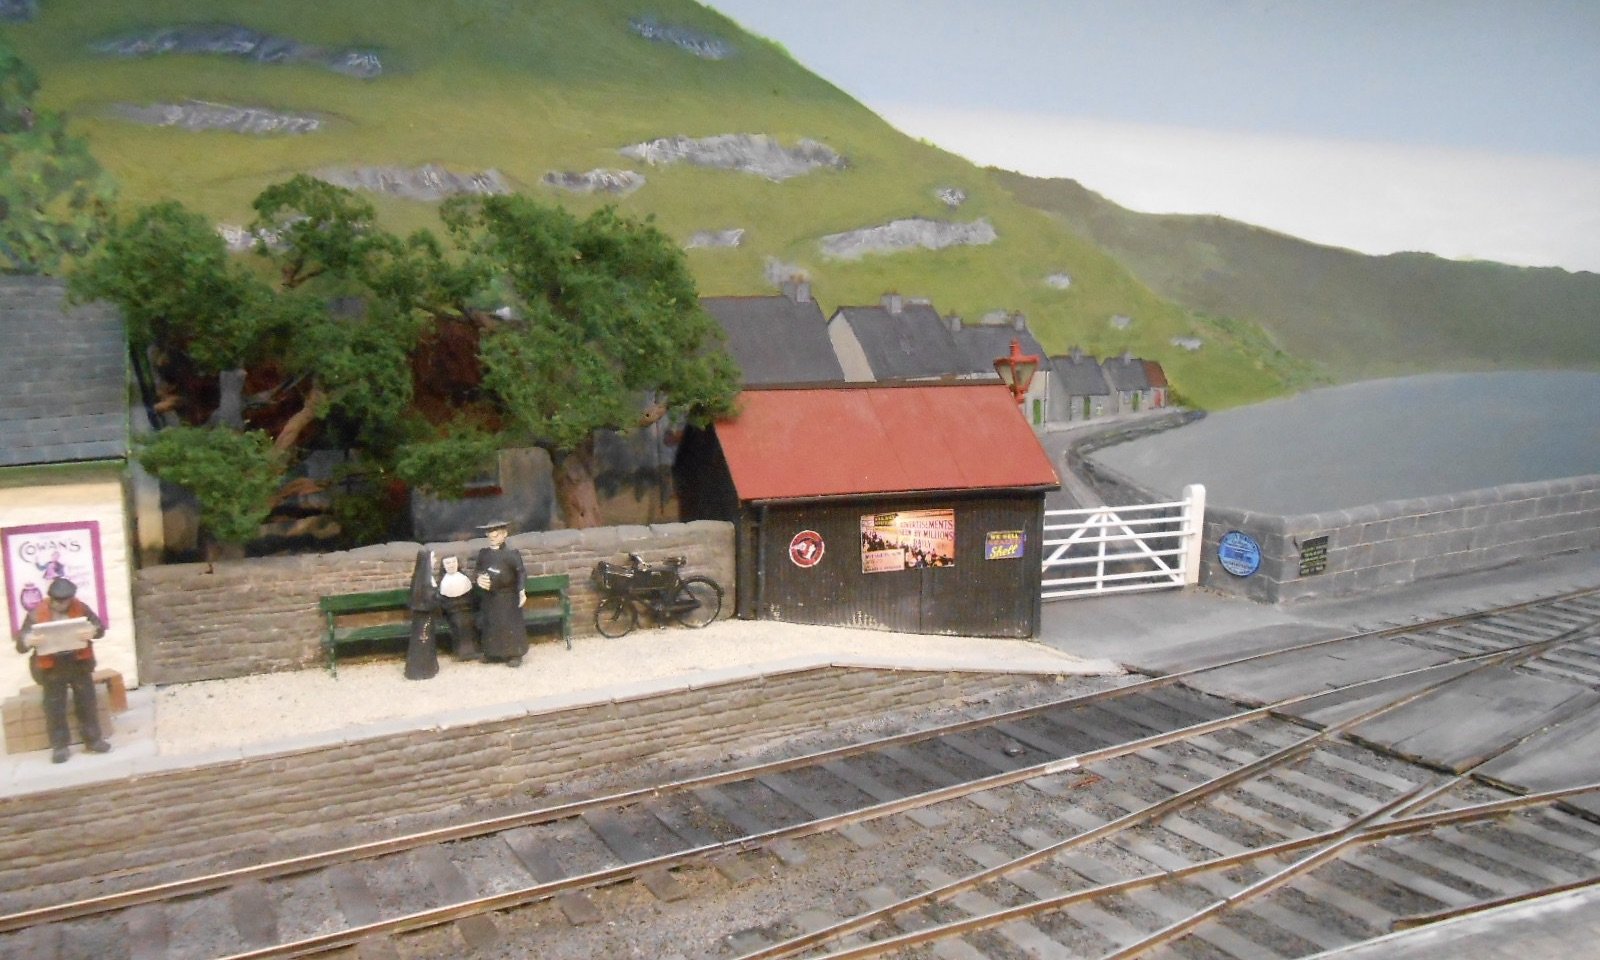
Is a model railway ever finished? Probably not, but currently am thinking this is as far as I want to take things for now, because I don't want to overload what is quite a small scene with too much detail. A few more small details have been added, plus the donkey cart is now on scene too. You can look for a station barrow, the Collooney 'dog box', a chap reading his paper and some 'enamel' advertising signs. The paint brush has been busy too, touching up here and there.
I've taken a load of pictures, mainly as a bit of proof reading to see if there are any glaring errors. If anybody spots anything, feel free to post. The Austin Seven will only be present in the 1950s period, of course.
-
14
-
4
-
-
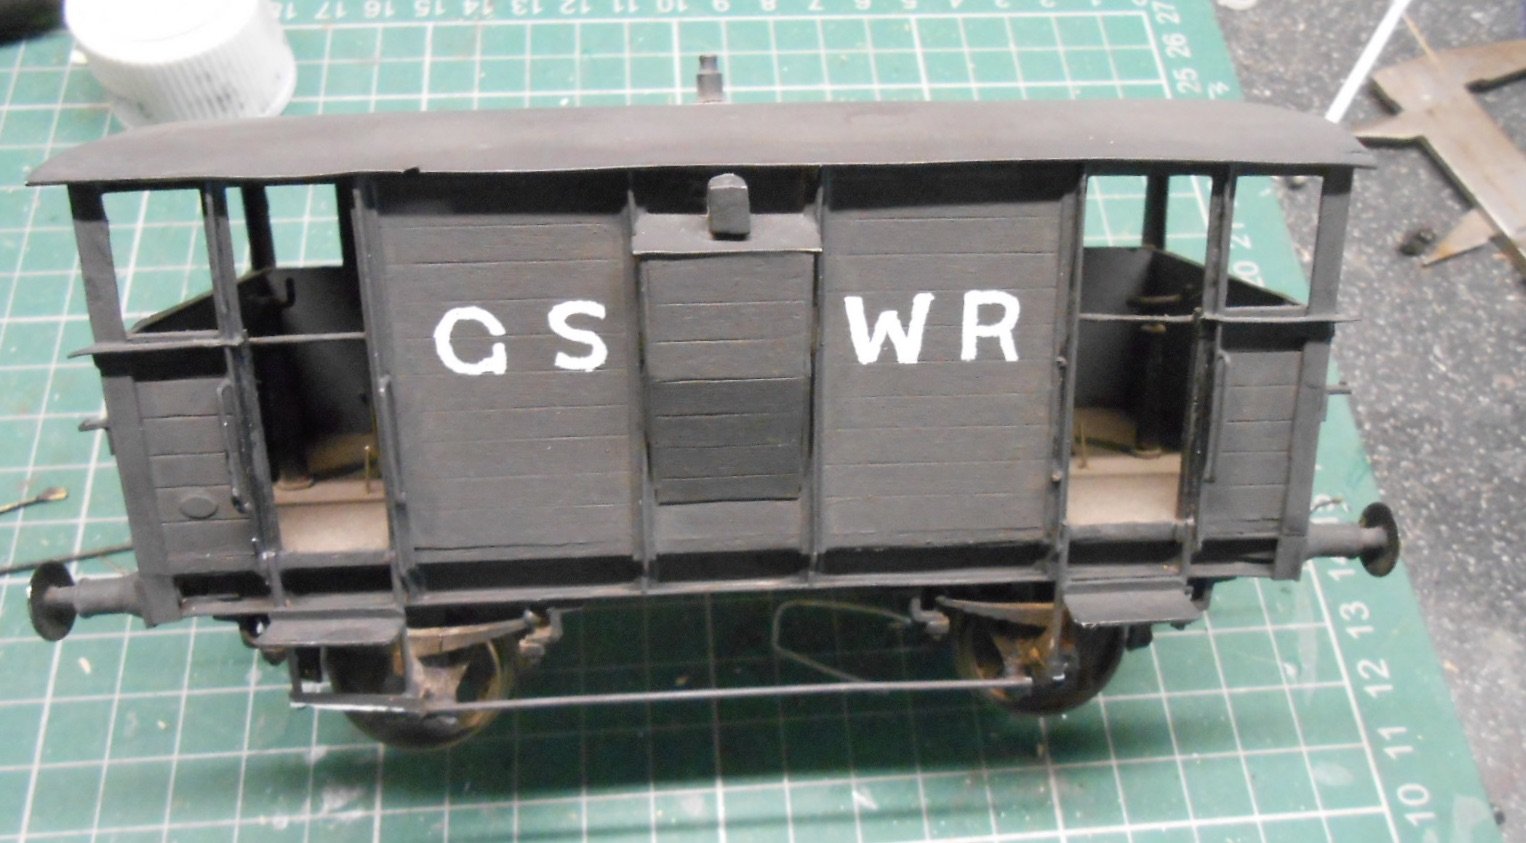
Nearly three months since my last workshop post! Main reason for this being layout work, but in amongst all the testing of stock [and in particular the Alex Jackson couplings], the last few days have begun addressing the cosmetic aspects of my stock. Some of my locos and stock are veterans of 40 shows with Arigna Town, while being the custodian of some of the late Richard Chown's stuff means these can be over 40 years old. Indeed WL&WR 0-6-0 'Shannon' is now nearly 50.
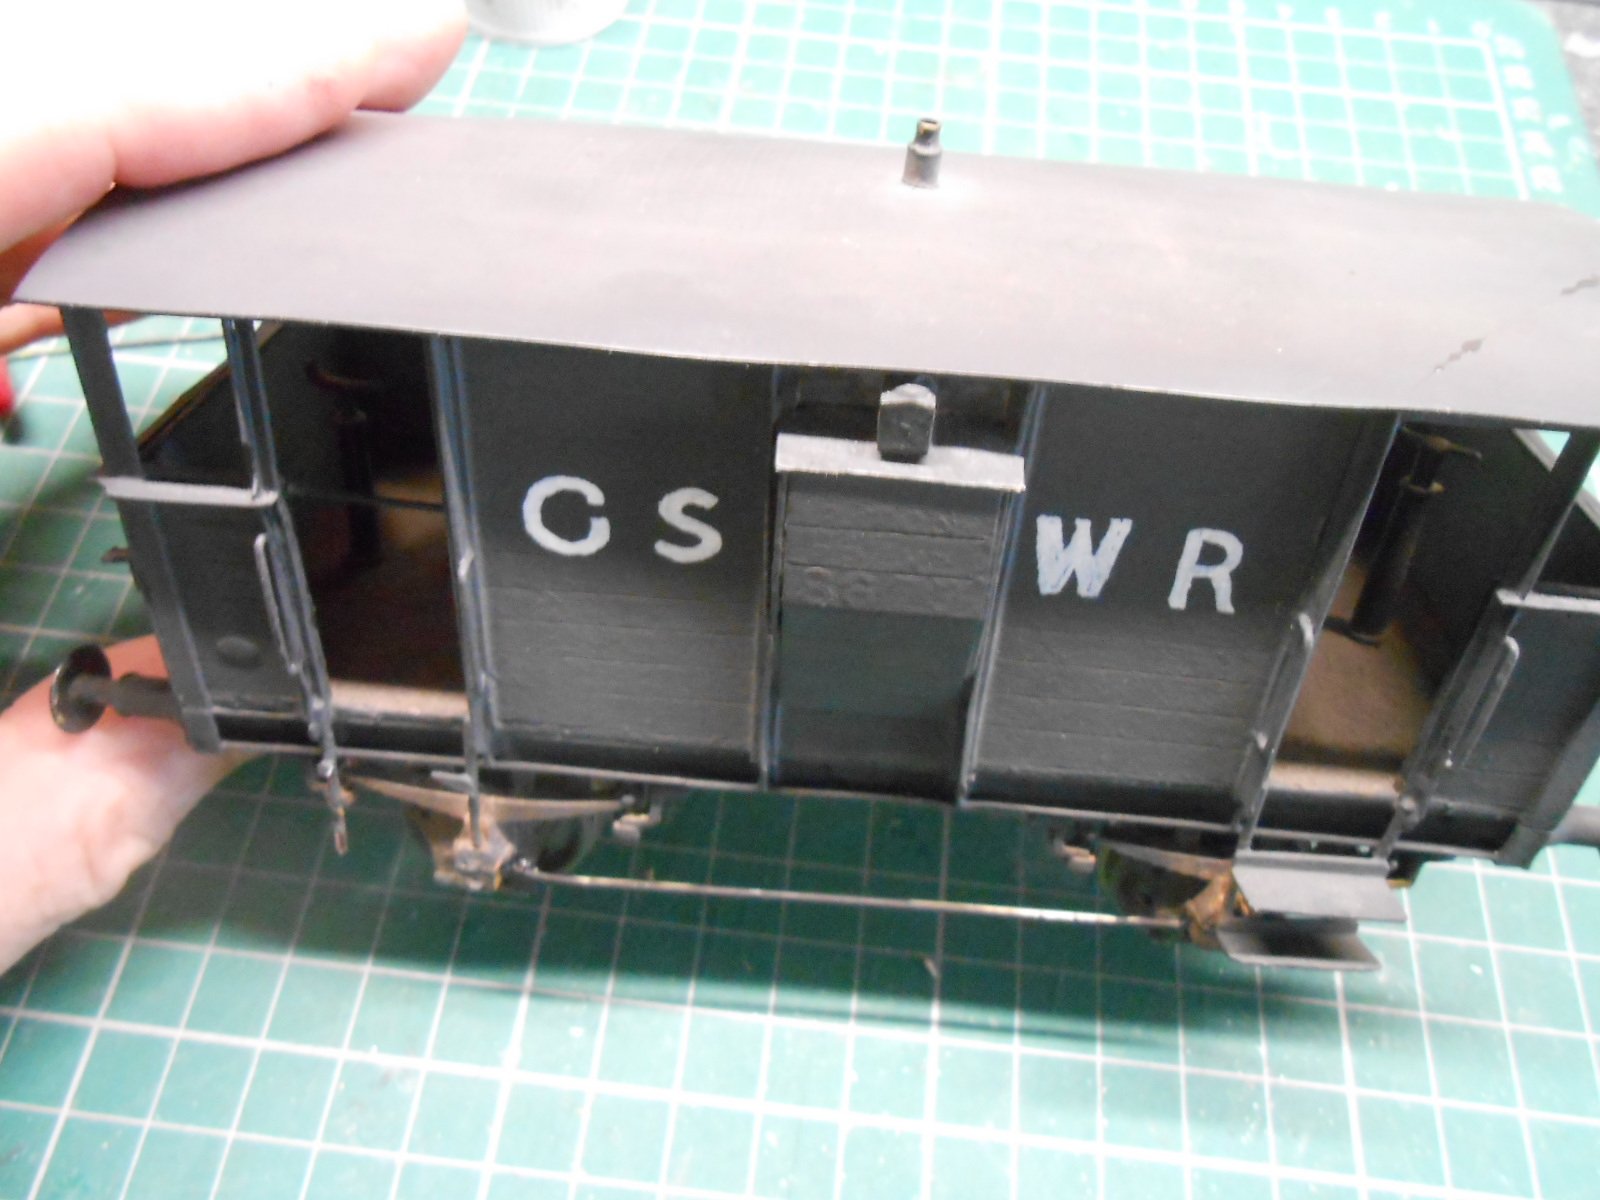
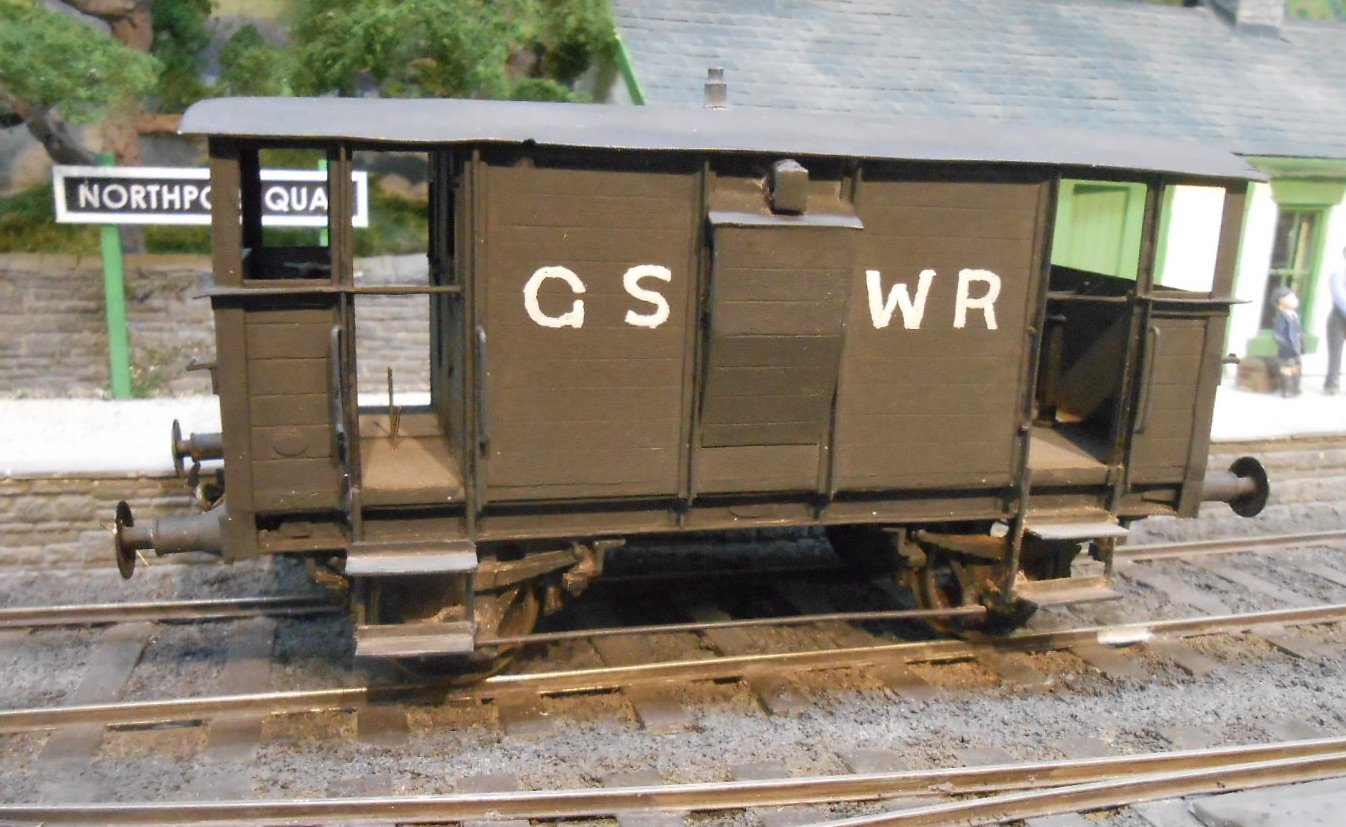
Anyway, one item certainly in need of some TLC was Richards's GSWR brake van. As can be seen from the photo below, it has certainly suffered from the ravages of time:
Mainly this was down to broken steps, plus a missing brake shoe. Stock on the vast Castle Rackrent system certainly had to work hard for its living! Construction of the brake van was very much of its time, with a piece of wood used as the floor, to which various pieces of plastic sheet were added to build up the body, plus whitemetal castings for things like axle boxes, buffers and the like.
The steps were all plastic, so I simply repacked like for like, but with the advantage of having cyano as an adhesive. A touch up of the paintwork and all now seems well again, though I really ought to add a running number, weights and so on.
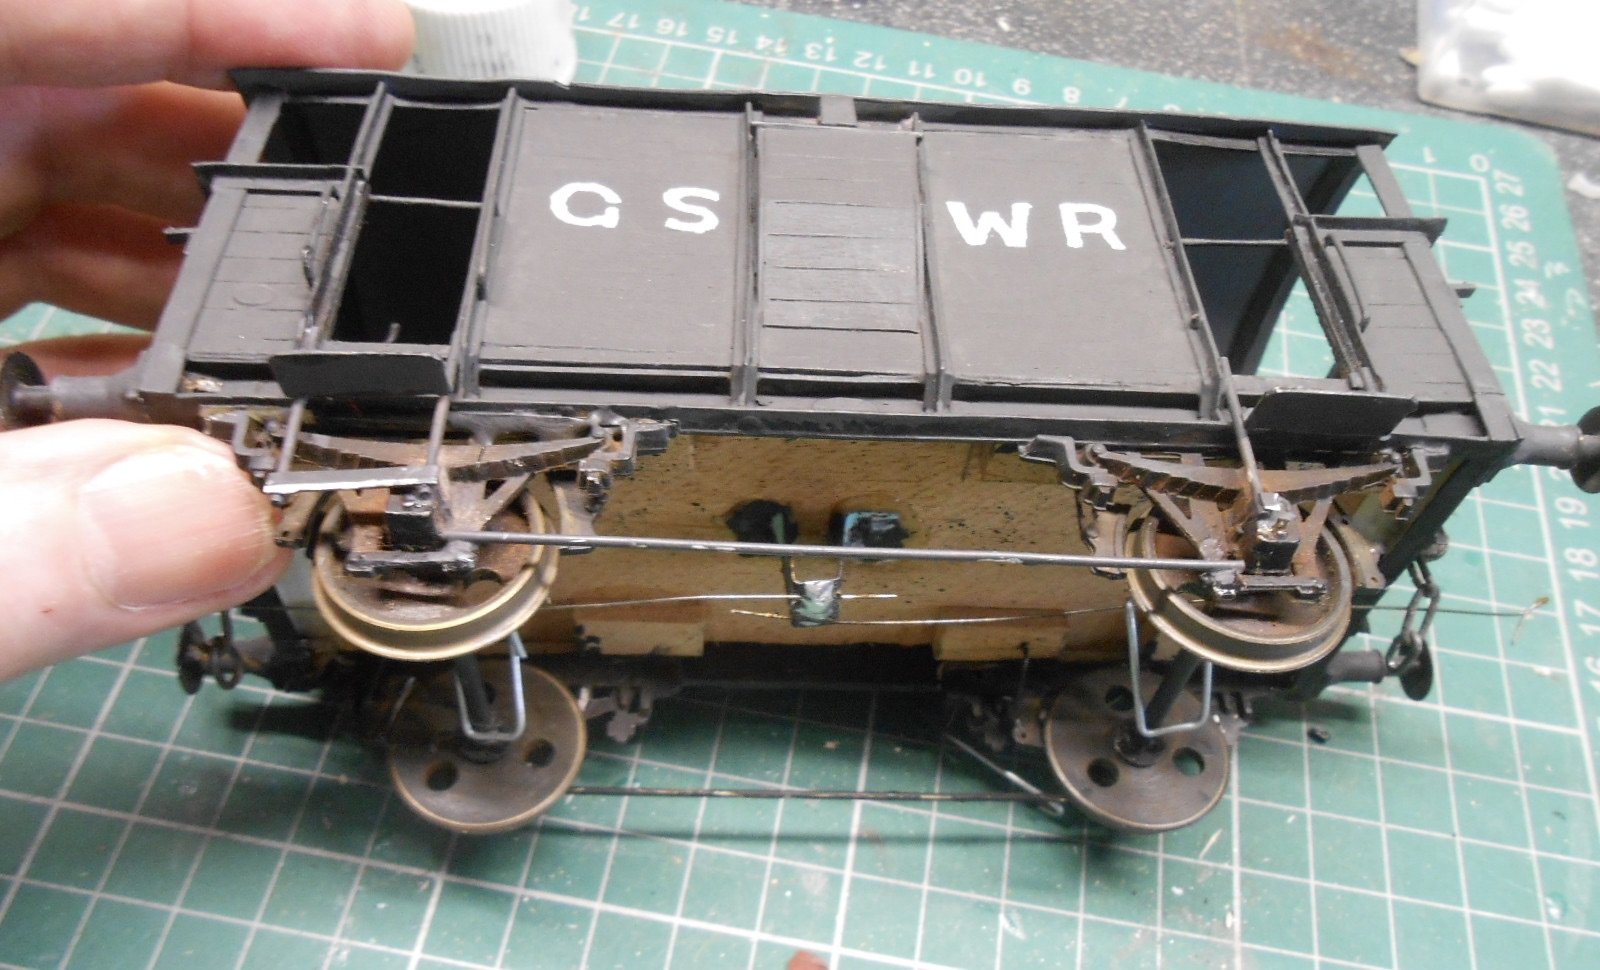
Note the fixings for the AJ couplings on the brake van. Richard seems to have favoured a U shaped piece of brass strip, screwed to the underside of the wagon, to which the coupling wires were soldered. In the last few months, I've made dozens of the things [add adjective of choice here, maybe] & have been slowly getting my head around how to make them work well.
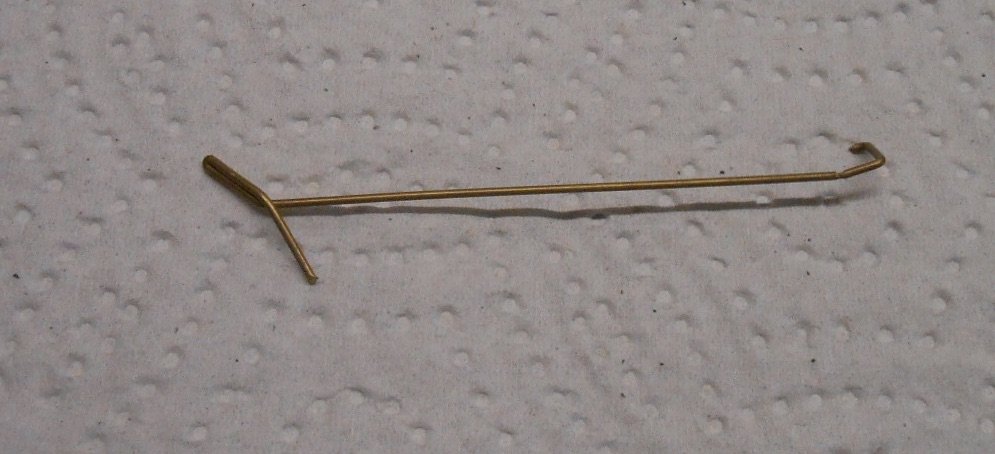
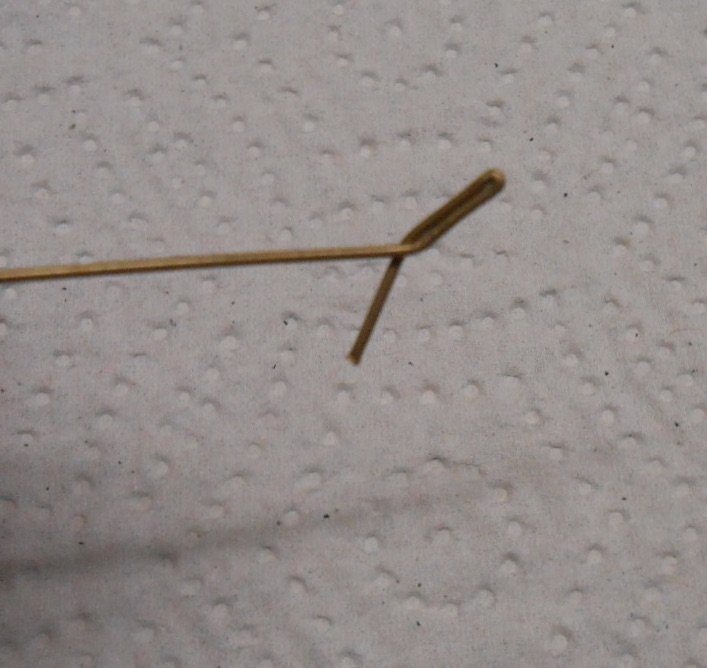
Maybe I should have bought the book [yes, there is one] and certainly could have been more analytical and less trial and error, but am at last getting there. The basic shape is shown below:
This is in 1mm brass wire [for clarity], rather than the 28swg steel piano wire I actually use. The 'nose' is the important bit, being 10mm long, with a 180 degree fold to create two 5mm arms. The top one is bent 45 degrees upwards and 30 degrees to the right. This bit keeps two adjacent couplings apart [especially once uncoupled]. The lower arm [bent at 60 degrees downwards] is the hook that couples two vehicles together. Happily, these angles do not need to be precise.
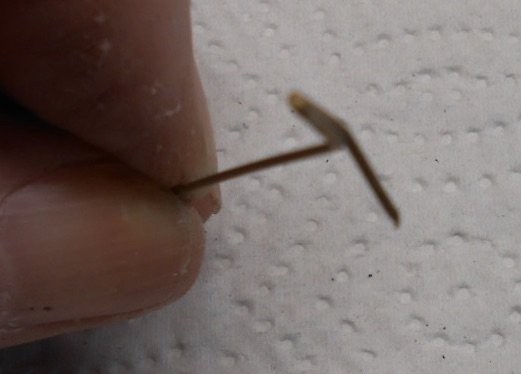
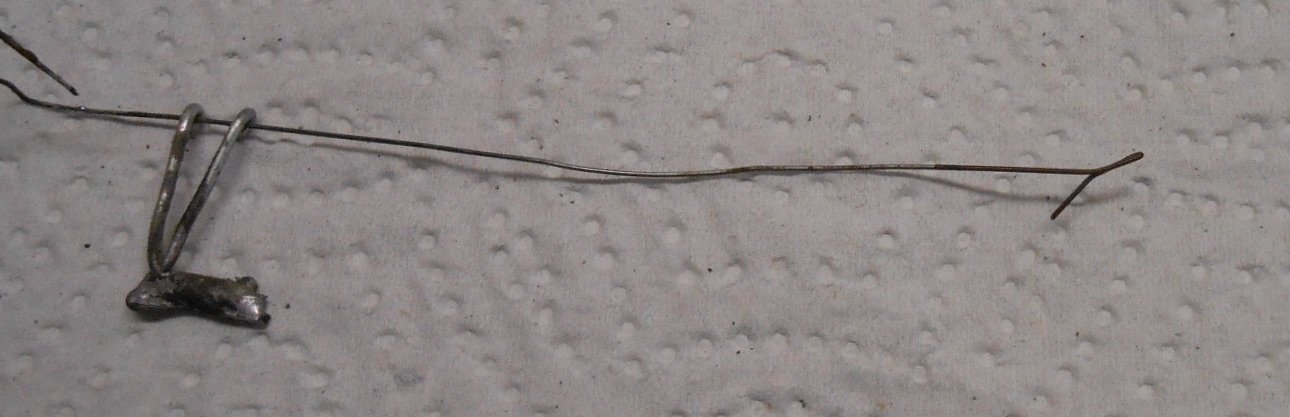
It should go without saying that the rest of the wire should be both straight and on the centre line of the vehicle - especially the part that projects beyond the buffer beam. For some reason, the one shown below had to be replaced - I'll leave you to work out why!
Probably the bit that causes me most pain is the soft iron dropper, which is used to uncouple a pair of vehicles over an electro magnet [via a push to make switch]. Getting the length of this right is critical. Too long and it fouls the magnet/shorts on the rails, etc etc. Too short and the magnet will not be able to attract it. I really ought to have managed to make a jig for the [insert expletive here] things, though by moving the arms together or apart, a degree of adjustment is possible.
The third item is a U shaped piece of wire needed as a 'stop' to prevent the accentuator being pulled down too low and catching on the track. The latter goes over an axle [apart from on locos], while the former is fitted just in front of the axle.
Everything else about the AJ coupling is simple [!] alignment. Fine if you only have straight track, but ever tighter curves start to create problems. I have at least made a simple gauge to check the vertical and horizontal alignment of the coupling wires - essential when stock is repeatedly taken in & out of storage boxes, for even a millimetre or so misalignment means the coupling will not connect.
It can all be a pain in the fundament, but when working well, the AJ is very effective and I'm glad I have persevered. Very unobtrusive, and [unlike the Dingham] not 'handed', so it goes nicely with my turntable fiddle yard. Less precision is required in terms of sighting the uncoupling magnets and AJs will even uncouple wagons on the move if you drive slowly. If I'm honest, I would still be happy with three link couplings and the hand from the sky, but this is really not appropriate for a front operated shunting layout, so AJs it is.
-
16
-
-
Over 800,000 views! Remarkable, well done.
-
2
-
1
-
1
-
-
Lovely paint job!
-
1
-
-
- Popular Post
- Popular Post
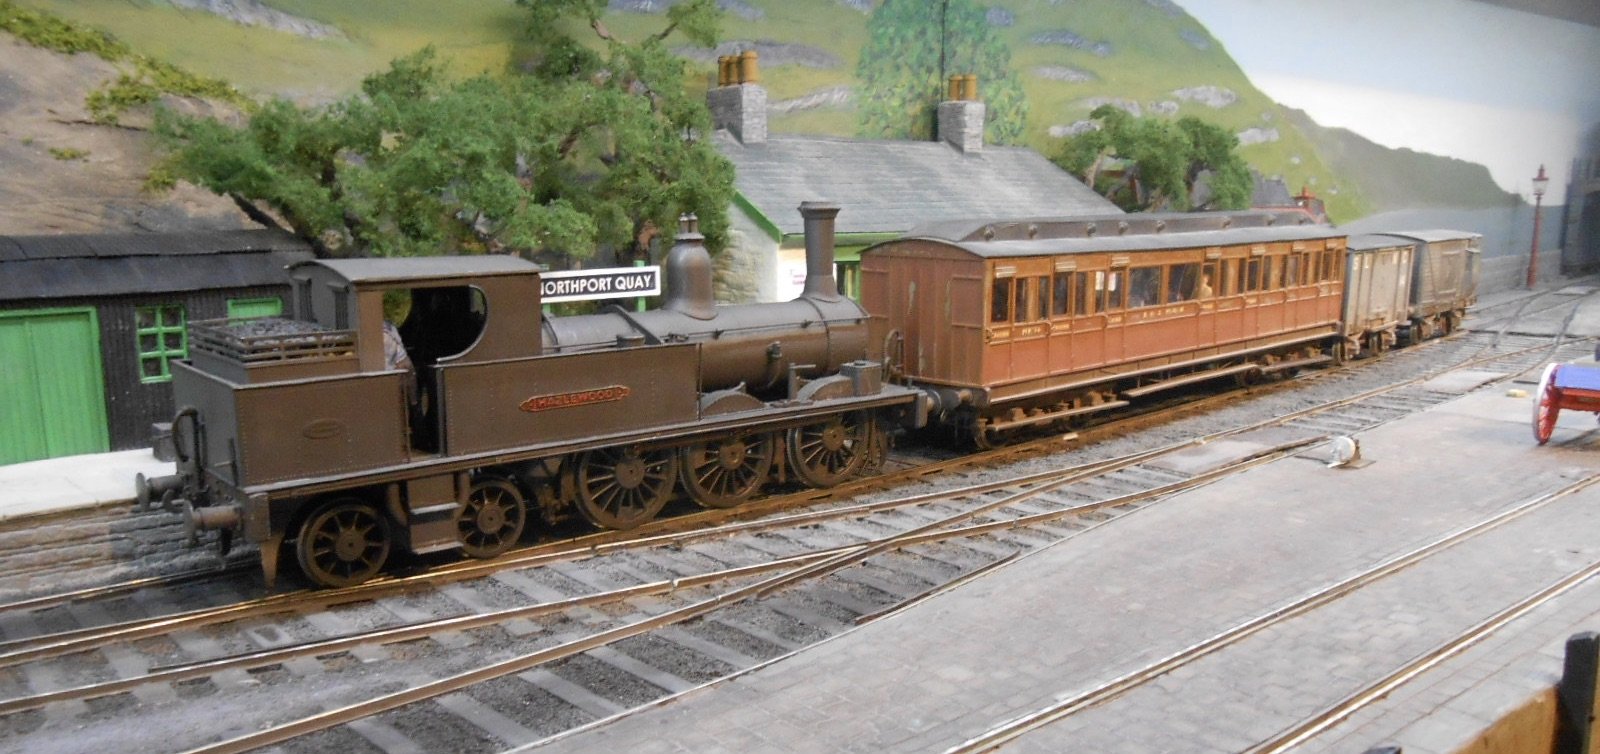
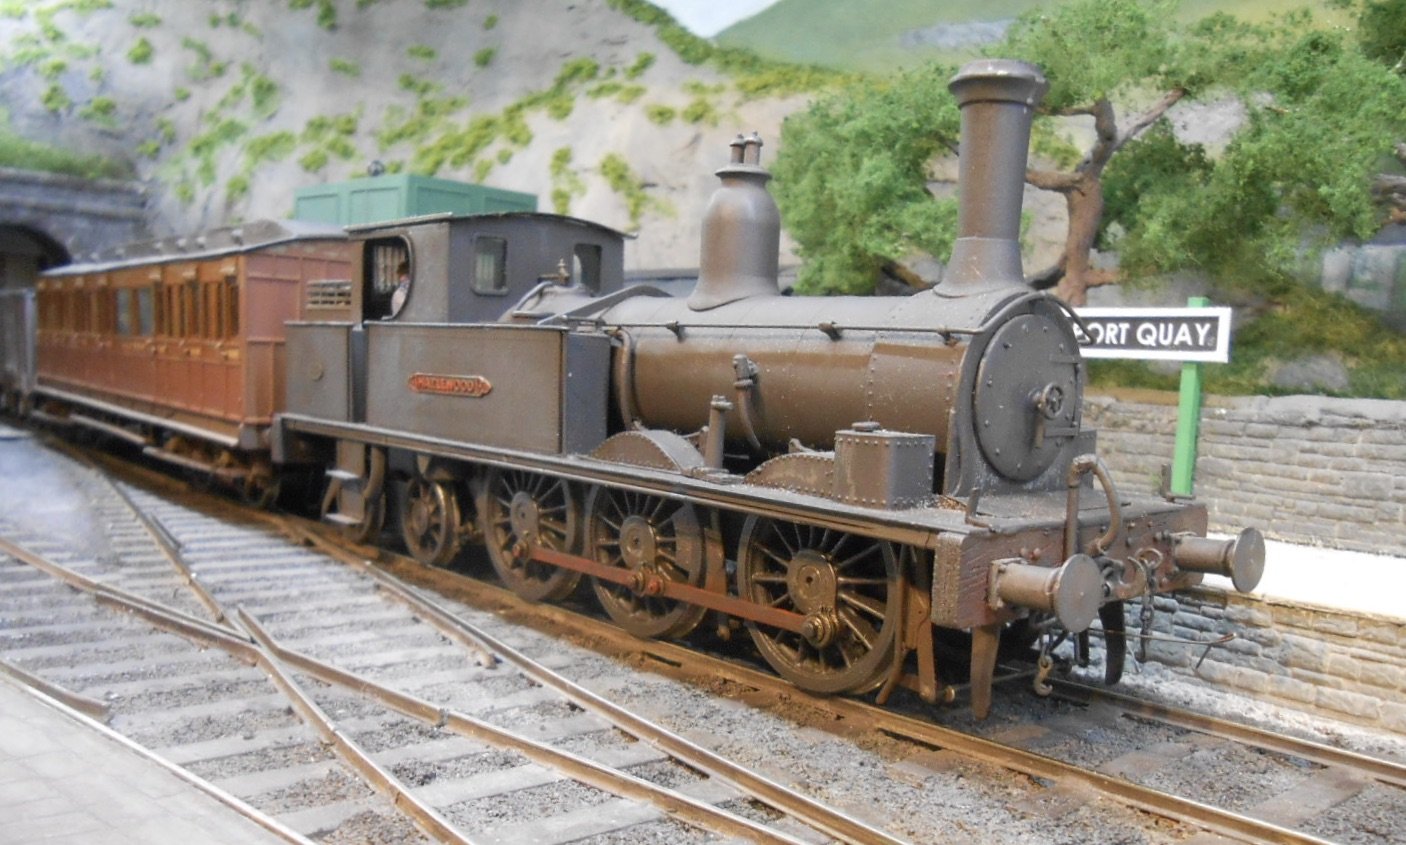
One of these days, I will get back to making something because since I completed the E class kit, everything has revolved around getting NPQ exhibition ready. At times, it has seemed that I've done little but tinker and fettle with the Alex Jackson couplings - though at least I largely understand them now, in particular, what you can get away with... hopefully [!].
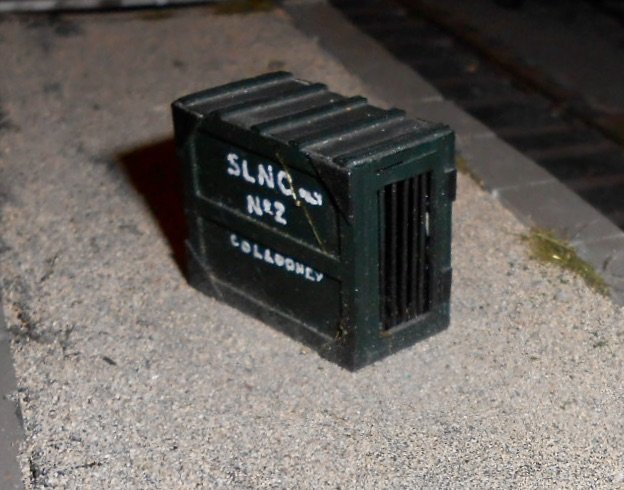
However, a tag from Galteemore & Ernie's amazing photo archive got me looking at some early Arigna Town stuff, to whit a certain dog/lion/dragon/leprechaun box on a Sligo Leitrim platform. It had caught my attention to the extent that I did indeed make a model, which still resides at Belmullet/Arigna Town. Made of plastic sheet and strip, it was lettered with a white gel pen.
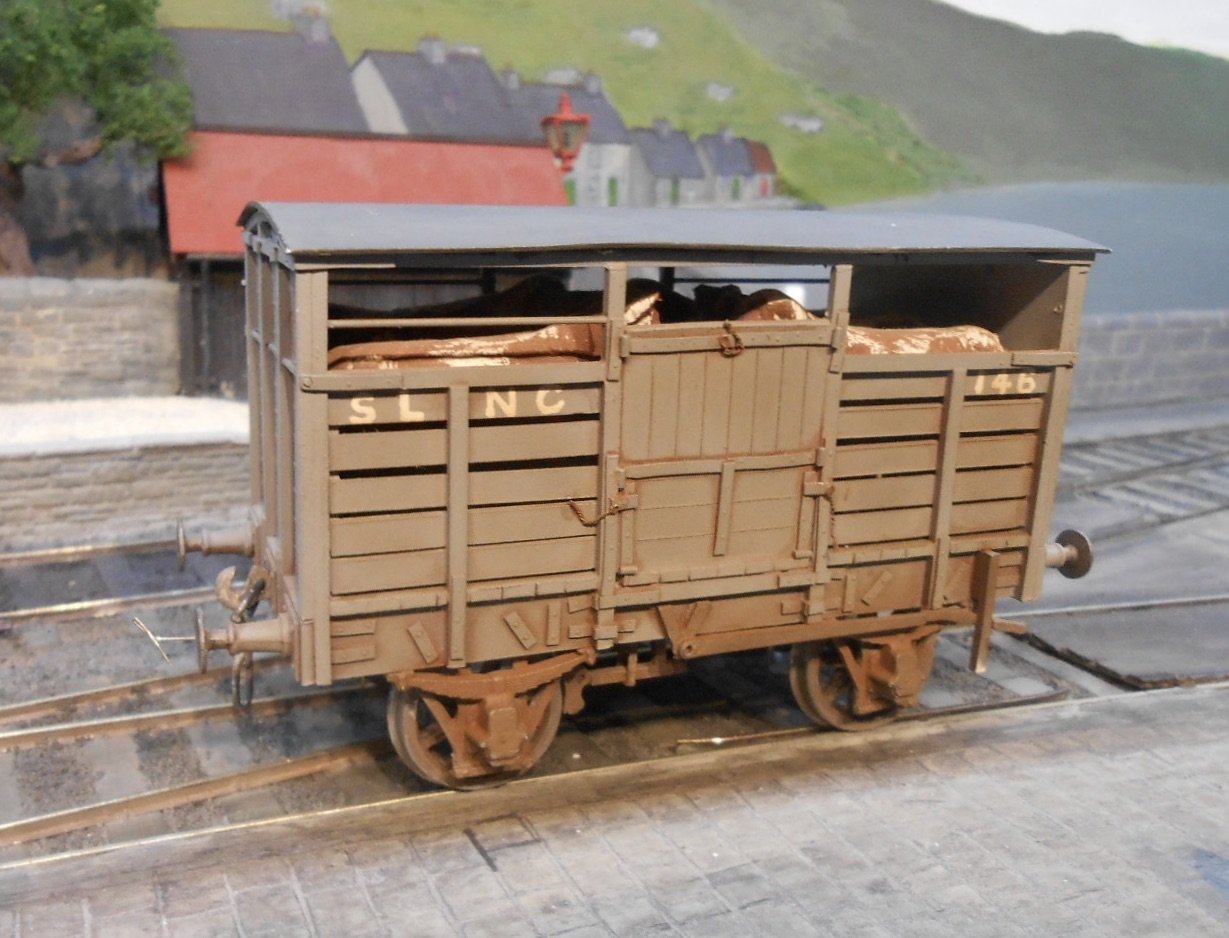
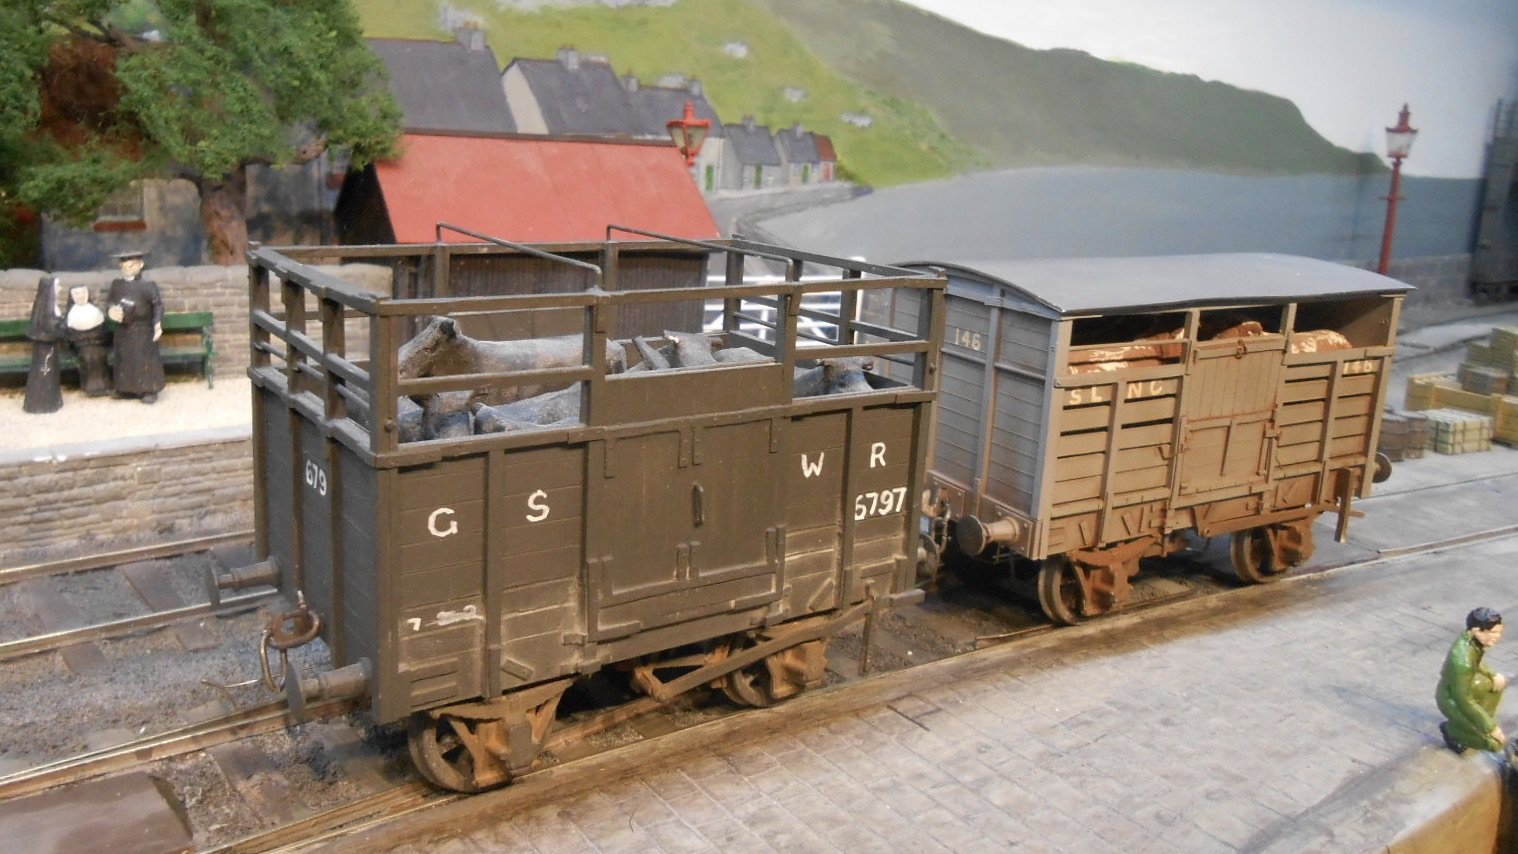
Meanwhile, going through all my stock to pick out the better/most appropriate items for NPQ, I've included a couple of SLNCR cattle vans, to go with a more recent GSWR open cattle van and a couple of horse boxes.
The Sligo cattle vans were batch built as a rake of five, though sadly, I fear they are too small, having used the Alphagraphix card kit as a drawing. However, they still look the part on NPQ, including one with a load of hand made cattle. I used DAS clay on a 'skeleton' of plastic sheet, suitably filed to shape and painted to look a bit like Irish Moyles. I cheated a bit with them as they have simple, straight legs, which can't be seen inside the van.
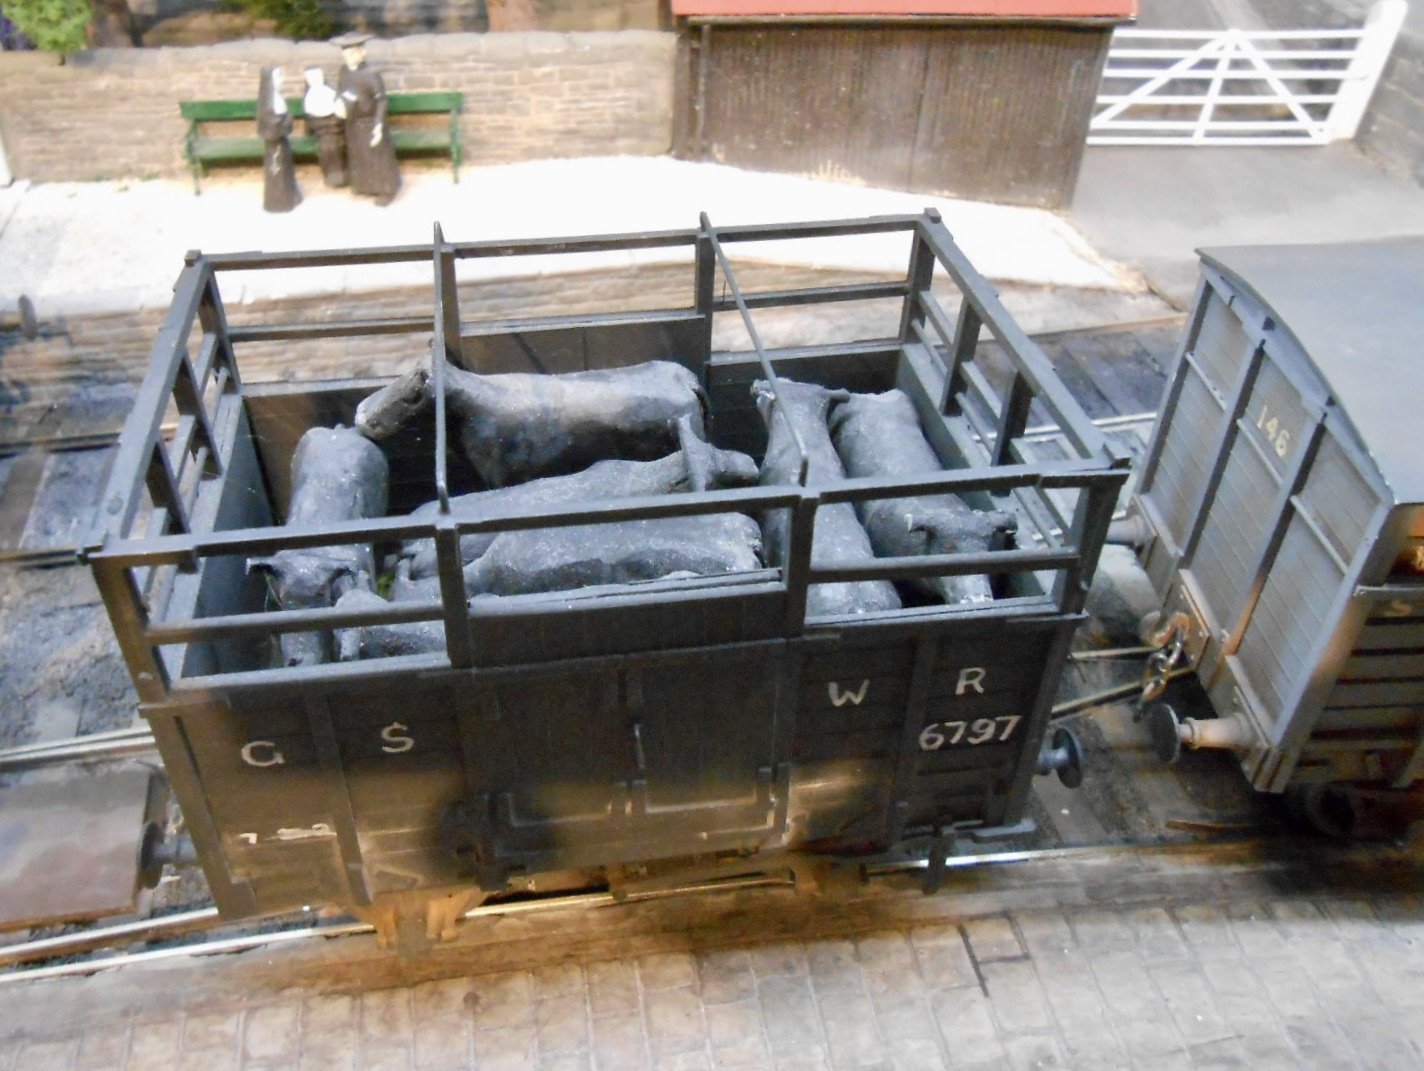
Later, I made a small herd of more detailed cattle, with properly shaped legs and painted black to represent Galloways. These have been grazing on Belmullet for a few years, but thought it would be nice to put them in the GSWR open van, as can been seen below.
-
20
-
Impressive stuff, Ken. Tricky things, turntables.
-
1
-
-
Yep, or start with something like a car grey, rattle can primer and then spray or brush your white on top of that.
-
1
-
-
Good stuff. Colour is always difficult to gauge, but that seems right - besides which the colour of concrete can change considerably depending on light, recent rain, weathering and so on.
Have yet to find a tin of concrete coloured paint that looks anything like the real stuff, but when you think about it, the composition (especially if lots of gravel included) is far from uniform anyway.
-
1
-
3
-

David's Workbench
in Workbench
Posted
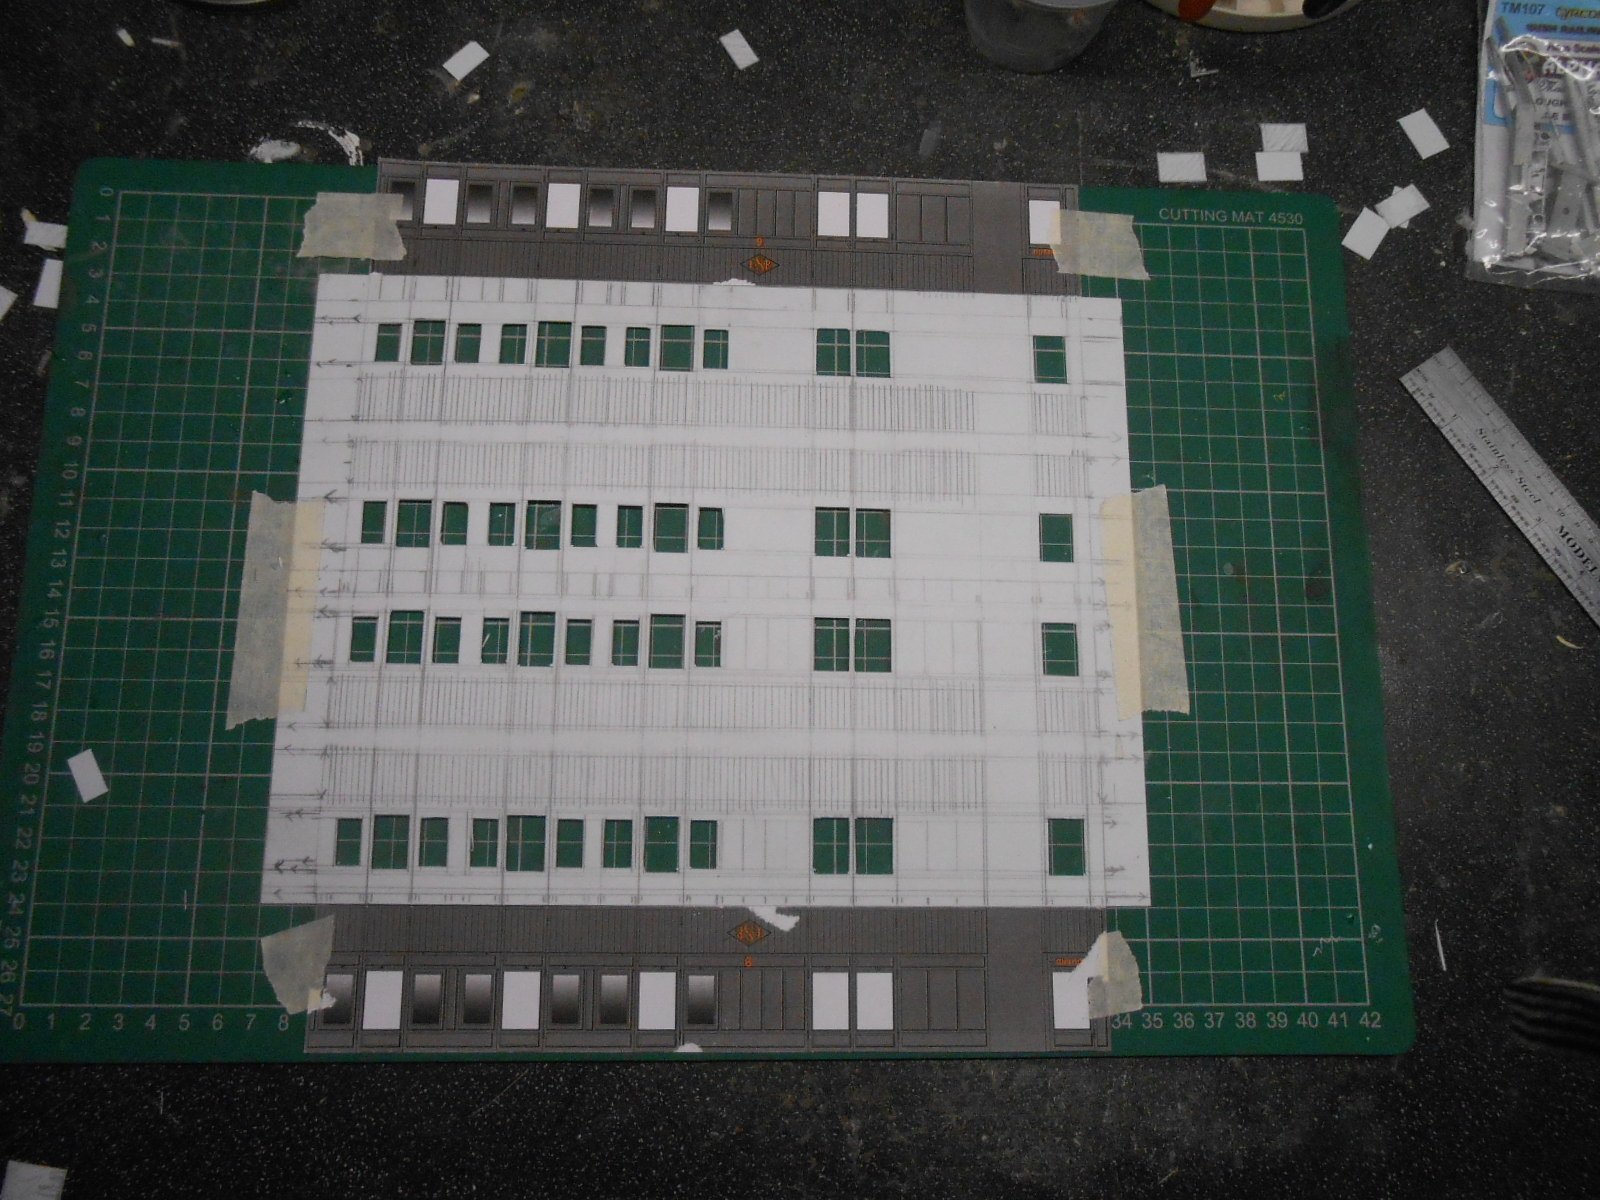
After all the concentration of marking and cutting out the sides, what follows is fairly straightforward and [relatively] quick.
First job was to separate the sides after which attention moves to making an inner shell. This is really little more than a plastic box, with openings in the sides to cover the main door and window areas. Assembly includes the ends and internal partitions to provide strength and squareness, though using 40thou/1mm sheet helps too. The picture below is from the Jenkinson book which hopefully helps explain things.
Swilly coaches had a small amount of tumblehome in the lower part of the sides, so to make this strips of plasticard are added longitudinally at the top and waist line, then once everything has set, the carefully prepared outer sides are fixed to the inner shell, starting at floor level, then carefully adding to the waist line and eventually the roof line. After this outer end pieces are cut and fixed to hide the gaps.
Thankfully, the panelling on Swilly coaches is all square corners, so this can be added using 20x40 micro strip. This is [mostly] fairly therapeutic after all the previous marking and cutting - you just need to be careful to avoid leaving smears and finger prints if you are over enthusiastic in the use of solvent - which is D-Lemonine by the way. Note too the drop lights on the doors, which are rectangular pieces of 20thou, fixed behind the outer opening.
The final bit of work thus far was to add the guard's lookout, never my favourite exercise because of the awkward shapes, but with more than a bit of muttering and grumbling, one side eventually got fitted. That will have to be that for a few days, as attention turns back to getting Northport Quay and final preparations for its debut at Uckfield next weekend.