Glenderg
-
Posts
3,487 -
Joined
-
Last visited
-
Days Won
11
Content Type
Profiles
Forums
Resource Library
Events
Gallery
Blogs
Store
Community Map
Posts posted by Glenderg
-
-
Super Job again!
 Tell uzz Anto how the hell do you do the silver trim on the coach windows? Masked off or a decal???
 -
"Everything is supplied bar paint and labour."
Classic -
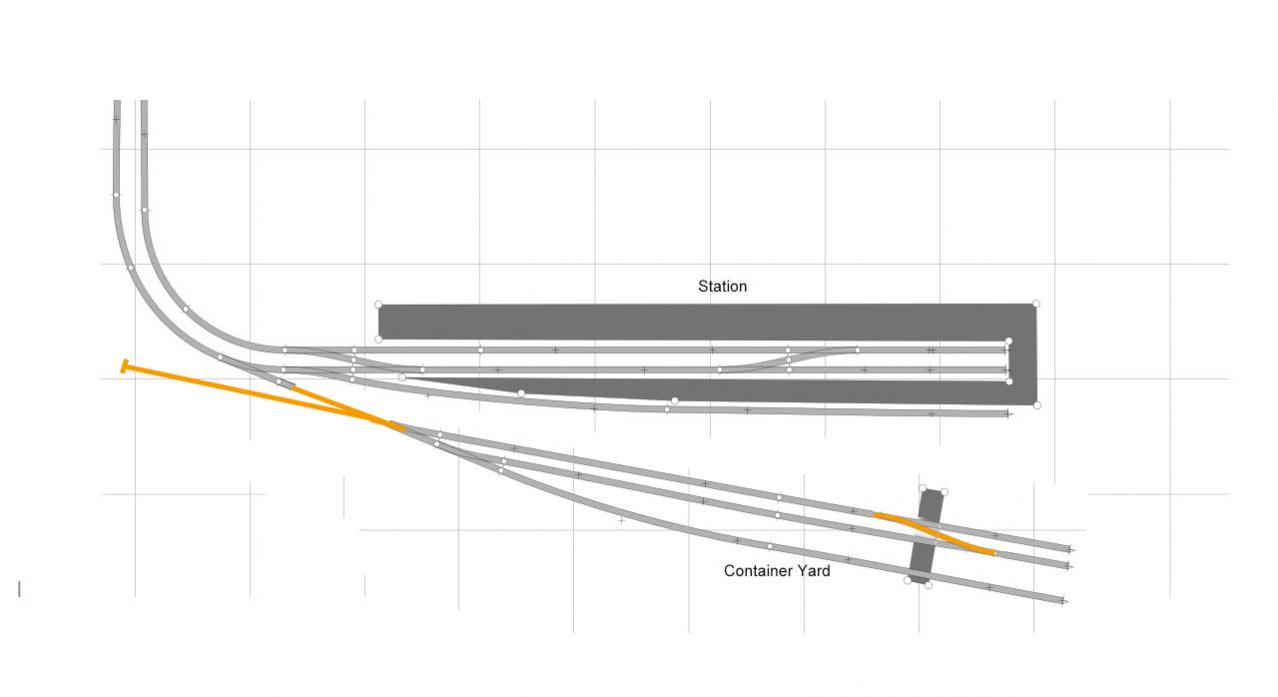
Quick suggestion. Perhaps a crossover from line 1 to 2 in the container yard, at the end, so that an incoming loco on road 01 can detach from its train, and run around road 02 to do other things. Also, the outside line, road 3, a spur off the entry road to act as check points, and a loco storage road, or it could be a refueling point for the diesels? An unused turntable at the end...? Might add a bit of shunting fun to things?
Richie
-
Fabulous, the combo looks the dogs dangly bits!
-
Steamers are just big teapots anyway.
I'll happily break out the big guns with Seamus ..... bring it war bonnet! Lol
-
I'm not sure if there is a system wiggy. My little layout is based on the quays in Dublin circa 1970's, and I've had to strip the rails from flexitrack and set the gauge manually and in fill with the gaps with 1.5 mm mounting board. Painful when it comes to points. It looks daycent though.
Richie
-
201 - cost some dafty decided to stick her on an antonov and fly it here. Nobody ever did that with BR diesels. Queen of the diesels. End of.
121 - Every time I saw her at Lmk Jct. was different, 2 cravens and jenny from lmk, cement bubbles, waiting to rescue some other bird on some other road..... Ugly duckling who never got the glory she deserved.
071 - King of the diesels, and by association his small brothers. He could of been painted white and still been king. Will outlast 201 by 70 years, in memory at least.
BCDR no D1 - a workhorse of queens quay yard, harland & Wolff, precursor to the BR 08 Class. Iconic and forgotten.
D300 class,on par with the above, except she may have lasted a hell of a lot longer shunting carriage formations around heuston, and had a bit more appreciation, except for CIE's nonsense.
Everything else is only a turf burner......Except for Maedbh 800. Why she is in cultra escapes me.
-
 1
1
-
-
Ha ha!
-
Heirflick, your passion for yellow railway stuff never ceases to amaze and amuse!
Richie
-
Was it called "Lamb" 1985, or was there a whole plethora of misery films before I was born?
-
How did I miss this?!?!?! That photo is burstin' at the seams with atmosphere, definitely going to filed under NBW!
[nice bloody work]
P.S. what's yer man up to at the grounded wagon/lineside hut? Look's like he's caught short
Richie.
-
Cheers Weshty, AutoCAD 2010 for drawing, and 3DS Max 2010 for camera matching, and a bit of Photoshop to eek the details out of fuzzy snaps!
-
..would you consider http://www.dartcastings.co.uk/mjt/2971.php as they make a few roofs and one may be suitable plus they are reasonably priced.
Regards Gareth.
That's a great idea Gareth, but the roof profile is mighty odd and the closest roof part appears to be the BR Mk1 variant. It's been slightly compressed to match other 00 carraiges.... Dart Castings has absolutely everything else though! Thanks for the link.
The only 60' coach I am aware of is an Airfix Corridor Composite, ref 54202-1Roof detail and under chassis detail look fairly similar
That's the one, similar to this one listed on fleabay
Richie.
-
http://www.flickr.com/photos/be216cd1/collections/
Buses, Aviation, and loads of Railway related stuff. Plus loads more... Goldmine...
Even shots like this and this
(Richie.
-
Afternoon all,
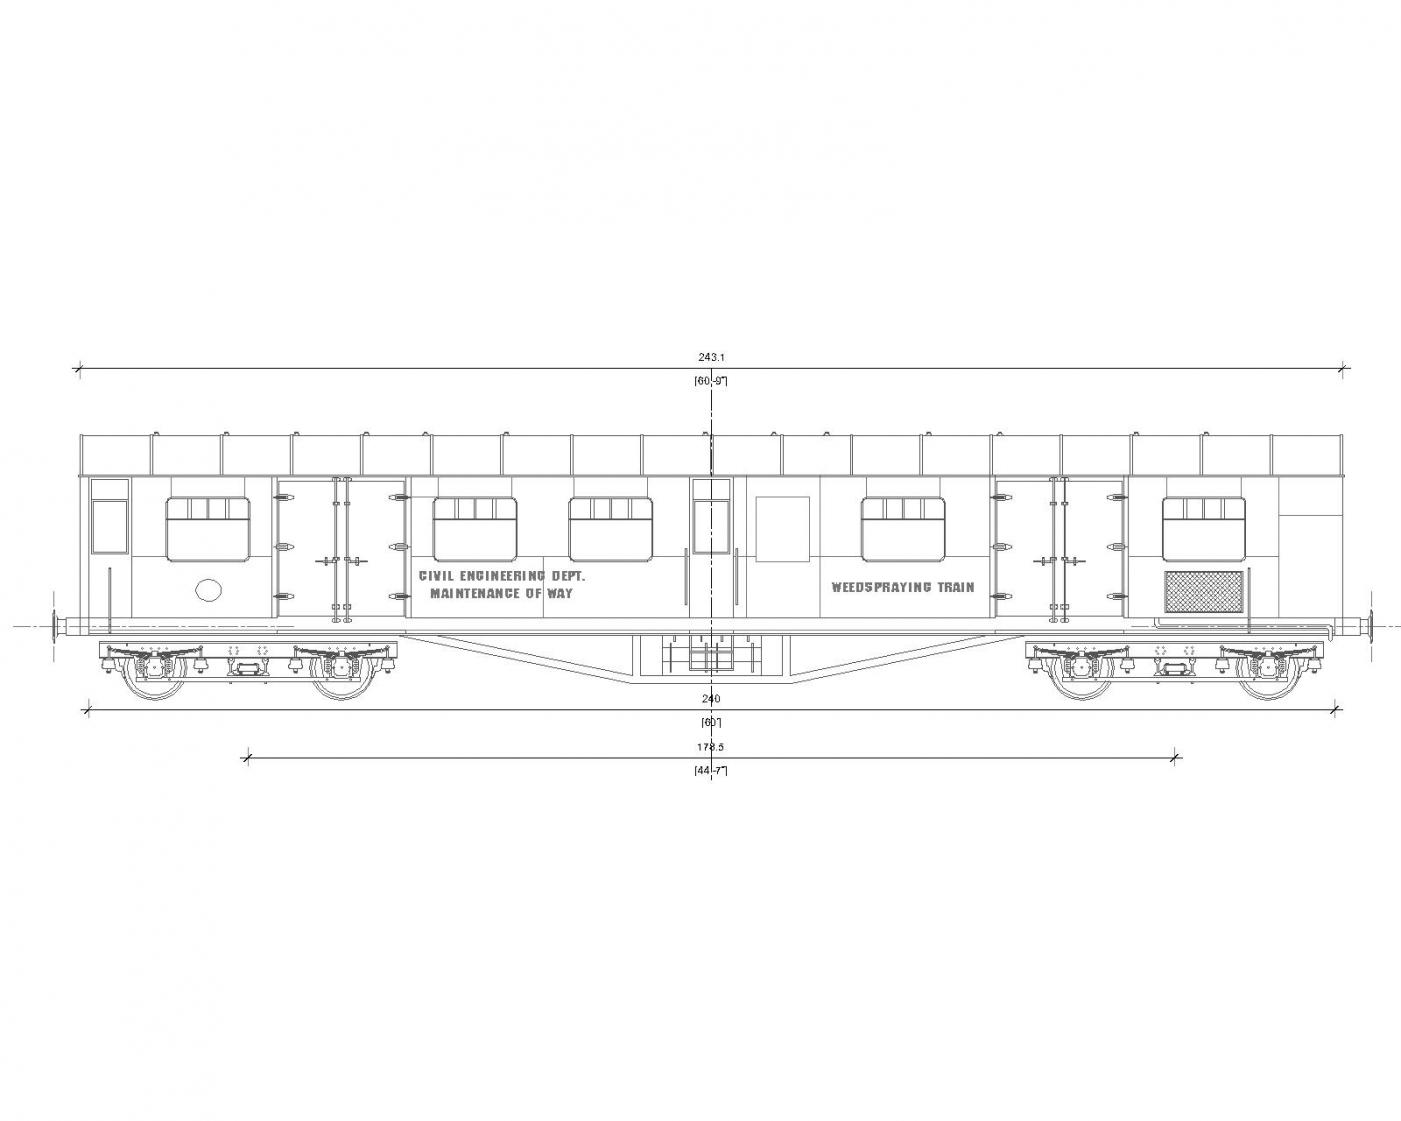
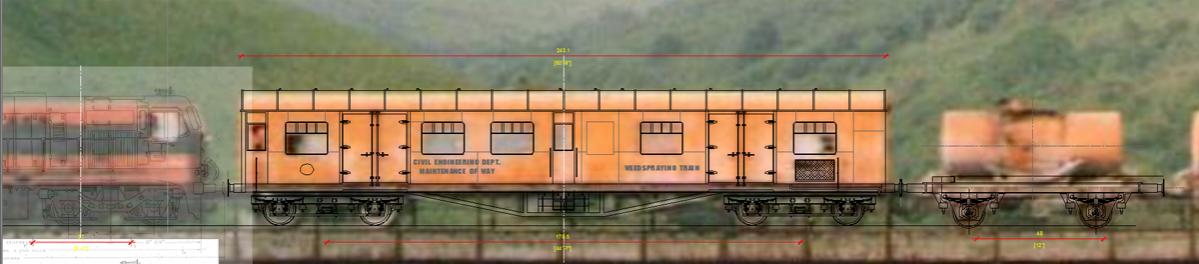
Just a quick update. This wagon had a 60' underframe, and I don't think there is a suitable donor wagon about. Mainline used to do a LMS 60' Stanier Coach, which would be the right chassis and roof, the side walls could be butchered to match. Anyhoo, here's the drawing I did, and the camera matching shots [for accuracy purposes.]
This photo is slightly stretched vertically which threw me off for a bit....
Lighter lines between windows etc. are the panel break lines. Comments most welcome, before I post the complete set. 44' 7" seems like an odd bogie centre dimension!
Richie.
-
" and somehow some stock escaped from their boxes! " Some stock? Any chance of a shot of the rest of it? Stunning collection.
-
3:55 onward is mindblowingly good!
-
Good lord john, but that's mighty impressive work. If I wore a hat, I would take it off to you!
-
Lads,
Am I on the right track thinking that the original vehicle was the bredin mail coach 2548? It appears to be either 60 ft long as 2548 http://homepage.eircom.net/~studioscale/BredV.html cheers weshty, but scaling of photos brings it to 61'6"....
des coakhams book on Irish broad gauge carriages doesn't throw any further light on this iconic vehicle. Either way me 57' lms stanier donors are not suitable and a total scratch build is far more preferable. I'll post up the drawings as soon as I can get a hint at the length!Thanks in advance.
Richie.
-
Born and reared in limerick city... reckon tipp will clear Munster once they get to know each other, Dublin to give kilkenny a good run but ultimately fail, and gal way to hang their collective hat on Canning. Anyone got any insight into the other teams, Munster especially, in the hope they'll add some spice to proceedings?
-
How's the wobble now Weshty?
will pm tomorrow re bogies -
I saw somewhere recently whereby the bogie chassis was comprised of the a three sided folded brass piece, with two holes on each outer piece, and the wheelsets slotted in, no bearings or fancy bits. The cast bogie frames were simply glued to the outside of the frame and it looked the part, no messin with alignment and wobble! I might try it out by sacrificing a bogie..... Speaking of wobble, I'm off to the boozer too....
-
The 42' flats are a nightmare. I think John Mayner mentioned working up a brass kit of it, or it's smaller brother, and I wouldn't wish assembly or design of it on my worst enemy! The underframe is super complicated, and the fact that I've made it in styrene doesn't help - no weight & plenty twist in the frame. It should really be made of brass. Plus, hornby/bachmann bogies look tiny and need to be expanded to look right, so there's a whole heap of work yet. Happy to go back to card modelling now...
-
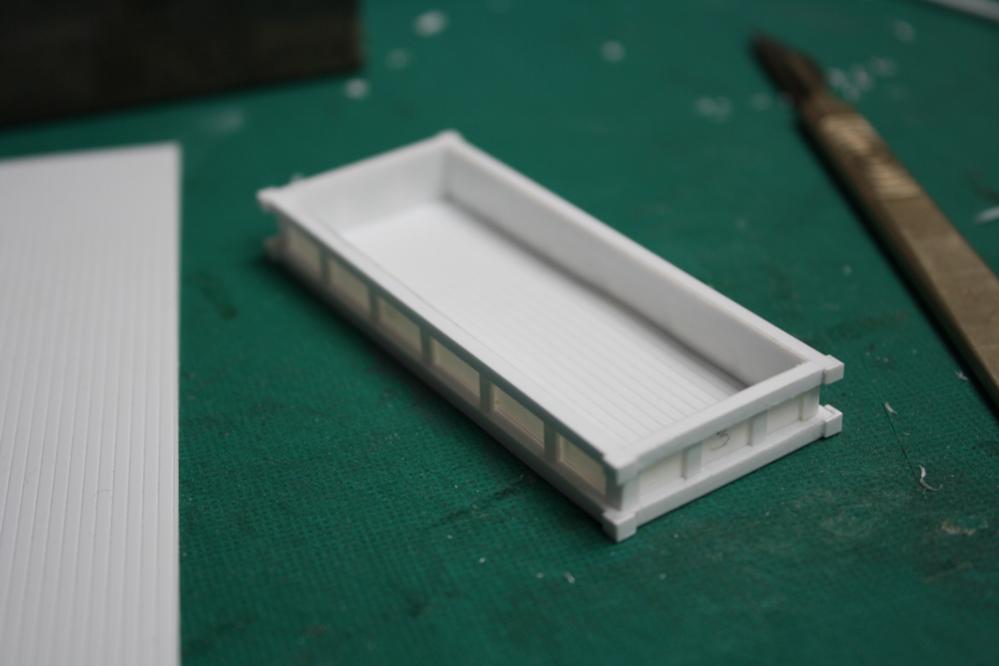
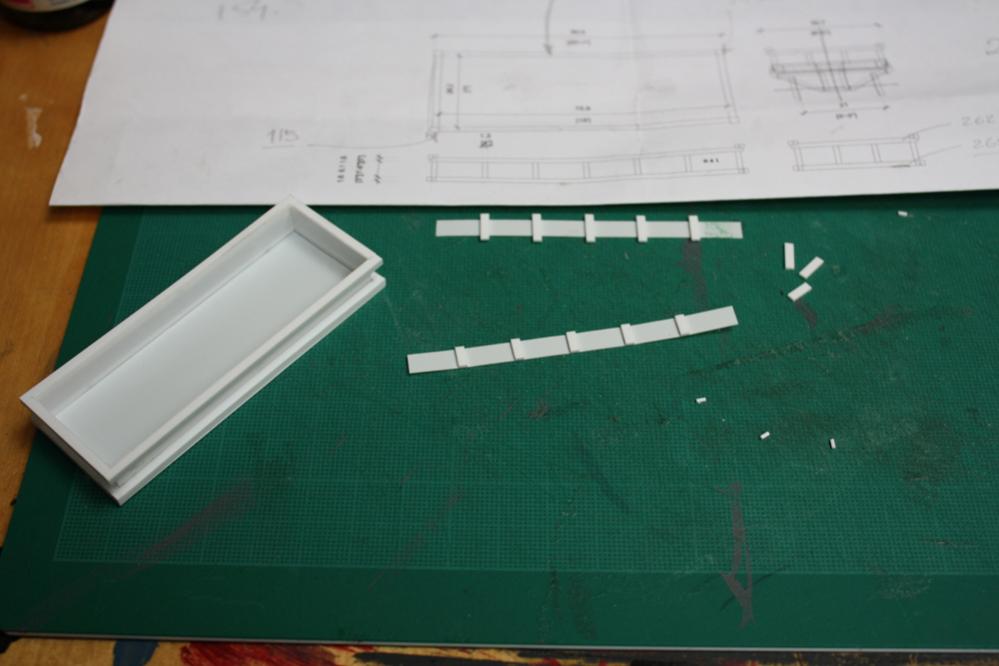
I posted a sketch of the Spoil Container a few days ago based on photos here. Seemed like a simple little build so after two screw up's and final success, here's how to make one!
Required: StripStyrene No 164 - 2.0 x 2.0 mm, No 144 - 1.0 x 2.0mm, and 193 - 2.5mm angle bracket and a sheet of the thinnest styrene, I think its 0.13 mm, total cost of €11:50. Plastic Magic glue and applicator brushes are around a fiver.
Here goes...
I cut out the floor plate to match the drawing above, and added the [164] lower long bars, leaving a bit of length to trim and sand later, then the small ones at the ends.
Cut strips of styrene in 9mm lengths, and make up the side walls. Repeat the adding of the long oversized top bars, then the end pieces. Then I cut strips to fit in between the top and bottom bars, and did a test fit on each piece. Then laid beside the drawing cut the [144] over length pieces and stuck them on to match the drawing. Trimmed them down and added to the sides. Repeated the process for the ends.
Then added [193] angle pieces to cover the joints at the corners, though they should really be [192]....
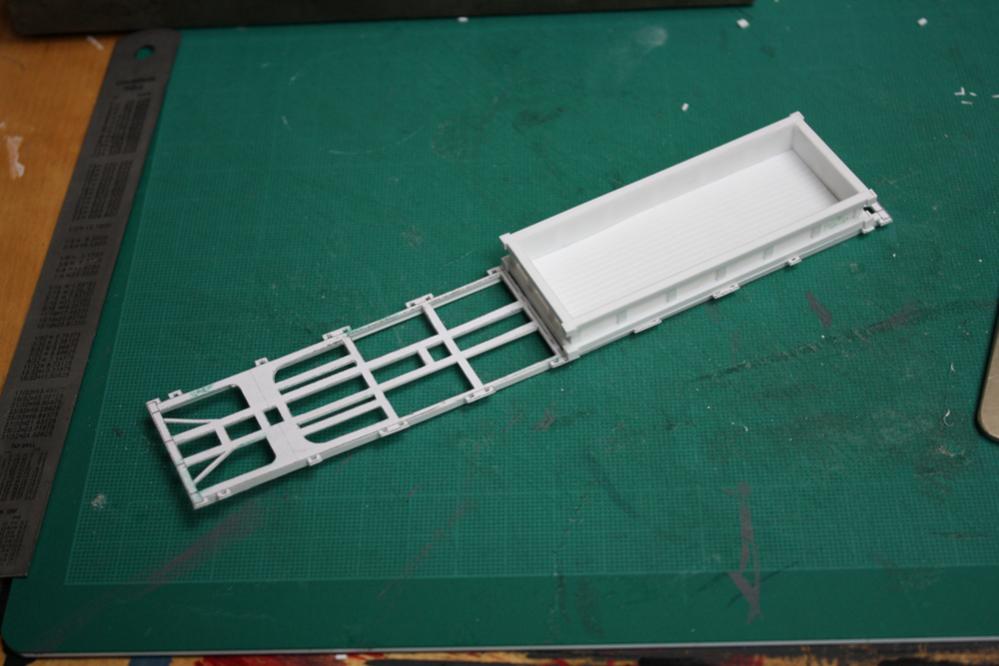
Then cut additional angle pieces and stick to the corners, don't worry about square, they can be sanded later. Lastly added a scrap piece of styrene to the lightweight base to steady the whole lot up and prevent it from twisting. I did make little holes in the corners to represent the lifting hooks after I took the snaps.Test fit on a 42'9" Flat. There's enough stuff in the packs of styrene to make about 10 of these containers, so if you have the patience, a nice little project that only takes about an hour and a half.
Regards,
Richie.
 Tell uzz Anto how the hell do you do the silver trim on the coach windows? Masked off or a decal???
 Classic


Layout Backdrops
in General Chat
Posted
It's not easy by any means. I've done a bit for getting photos of brick and stone textures for platform facing, the track side finish beneath the platform edge. Doing a canal wall suited for a eight coach train and stitching the hundred of photos together is no fun.
If you wanted to give it a go you'll need a large open space in front your subject. You'll need to zoom in too to reduce the curve of straight lines so you can stitch them together. A spot like a canal, public park is perfect and a photo needs to be taken about every 5 metres, moving in a
straight line parallel to the scene. Then stitch the photos together like this.
http://www.fantasyjackpalance.com/fjp/photos/composites/index.html for more that might suit.
Richie.