Glenderg
-
Posts
3,490 -
Joined
-
Last visited
-
Days Won
11
Content Type
Profiles
Forums
Resource Library
Events
Gallery
Blogs
Store
Community Map
Posts posted by Glenderg
-
-
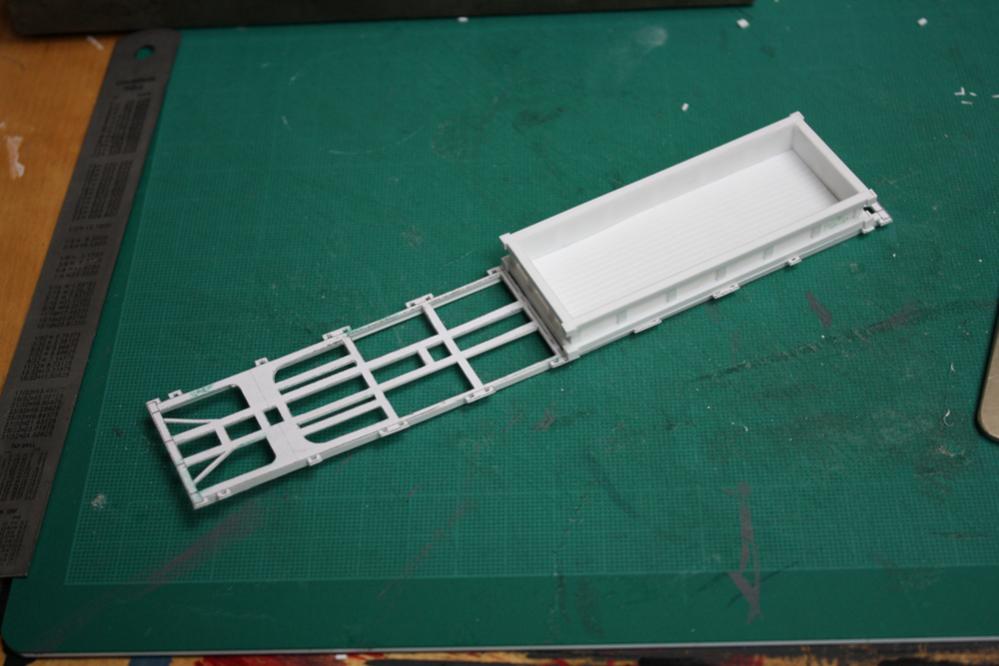
The 42' flats are a nightmare. I think John Mayner mentioned working up a brass kit of it, or it's smaller brother, and I wouldn't wish assembly or design of it on my worst enemy! The underframe is super complicated, and the fact that I've made it in styrene doesn't help - no weight & plenty twist in the frame. It should really be made of brass. Plus, hornby/bachmann bogies look tiny and need to be expanded to look right, so there's a whole heap of work yet. Happy to go back to card modelling now...

-
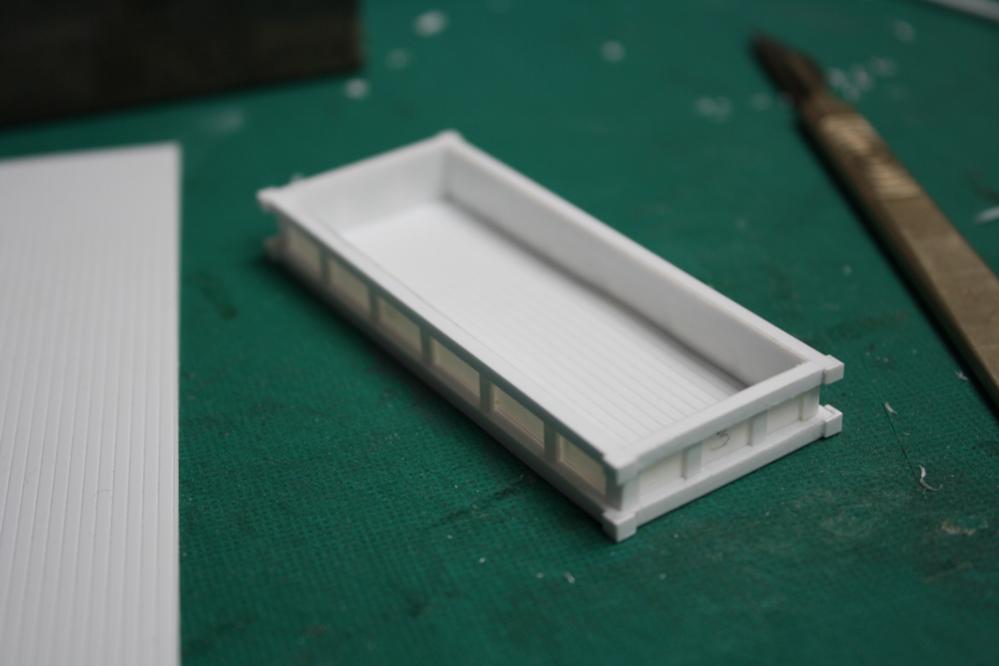
I posted a sketch of the Spoil Container a few days ago based on photos here. Seemed like a simple little build so after two screw up's and final success, here's how to make one!
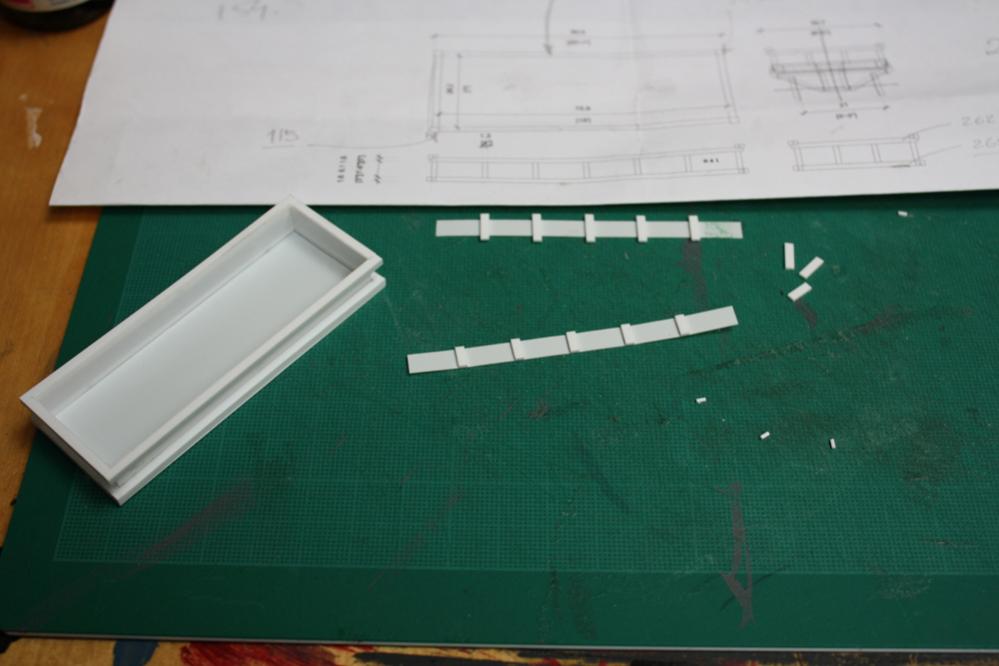
Required: StripStyrene No 164 - 2.0 x 2.0 mm, No 144 - 1.0 x 2.0mm, and 193 - 2.5mm angle bracket and a sheet of the thinnest styrene, I think its 0.13 mm, total cost of €11:50. Plastic Magic glue and applicator brushes are around a fiver.
Here goes...
I cut out the floor plate to match the drawing above, and added the [164] lower long bars, leaving a bit of length to trim and sand later, then the small ones at the ends.
Cut strips of styrene in 9mm lengths, and make up the side walls. Repeat the adding of the long oversized top bars, then the end pieces. Then I cut strips to fit in between the top and bottom bars, and did a test fit on each piece. Then laid beside the drawing cut the [144] over length pieces and stuck them on to match the drawing. Trimmed them down and added to the sides. Repeated the process for the ends.
Then added [193] angle pieces to cover the joints at the corners, though they should really be [192]....
Then cut additional angle pieces and stick to the corners, don't worry about square, they can be sanded later. Lastly added a scrap piece of styrene to the lightweight base to steady the whole lot up and prevent it from twisting. I did make little holes in the corners to represent the lifting hooks after I took the snaps.Test fit on a 42'9" Flat. There's enough stuff in the packs of styrene to make about 10 of these containers, so if you have the patience, a nice little project that only takes about an hour and a half.
Regards,
Richie.
-
Afternoon all.
I was thinking of doing a cut n shut of this using two ancient Hornby LMS Stanier Coaches. Any additional info would be most welcome, length, provenance etc. to try and put together a drawing of it. Snaps from 1979 when it was clean!
Ta in advance.
Richie.
-
Ah feck I give up! [Layout redesign imminent .....] Wonderful stuff, no surprise though given the super quality of the military dioramas in store.
-
As most here will know, the scenes were filmed at Ballyglunin, between Athenry and Tuam.
Now that is interesting, I thought it had a more GSWR look about it! [Nerd alert] Am I right in thinking that the canopy overhead is a hollywood job, since the detail is pure pants?
-
There is another one I spotted in a book where name boards on the carraige roof read French names, either one of the Pink Panthers or French Connection. Will have a look.
-
Crubeens and Shilleleaghs at the ready, shur its a fine soft day... 02:00 to about 05:00
-
Off topic I know, but Educating Rita, shot in Dublin in 1978 has a few BR repaints [though they could be real ones!] at the old westland row - starts at 7:00
http://www.youtube.com/watch?v=irCIZFbQ_6g&feature=relmfu
Richie.
-
How much are they Tom?
-
You're a diamond John, great link! :-bdThx..
-
Here's a sketch of what the spoil containers *should* be in 00, based on photos [thx to CSalem of this parish] and redrawn 42' 9" bogie flat. Not sure if the 32.7mm width ties in with the MIR version, but it can be squashed easily. I might have a go at this meself tomorrow to see what the easiest styrene sections are.
and will report back.Richie.
-
They are 20' long on 40' ft flats, according to an IRRS Journal, shouldn't be that hard to rustle up a drawing for scratchbuilding. Anymore daycent photos about?
-
Your welcome lads, enjoy those beers!
-
http://www.flickr.com/photos/irishswissernie/collections/72157626625058875/
An outstanding collection of photographs, a superb resource for wagons and freight in detail, like this
http://www.flickr.com/photos/irishswissernie/5768563264/in/set-72157626825629406
and odd formations like this
http://www.flickr.com/photos/irishswissernie/5768516720/in/set-72157626825629406
Who needs the eurowizzin when theres about 2000 snaps to go through.
.....-
 1
1
-
-
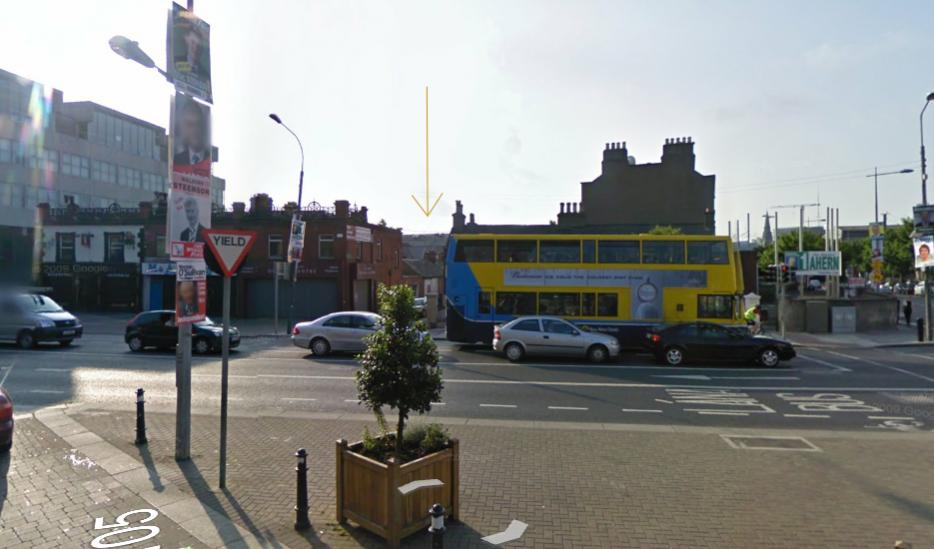
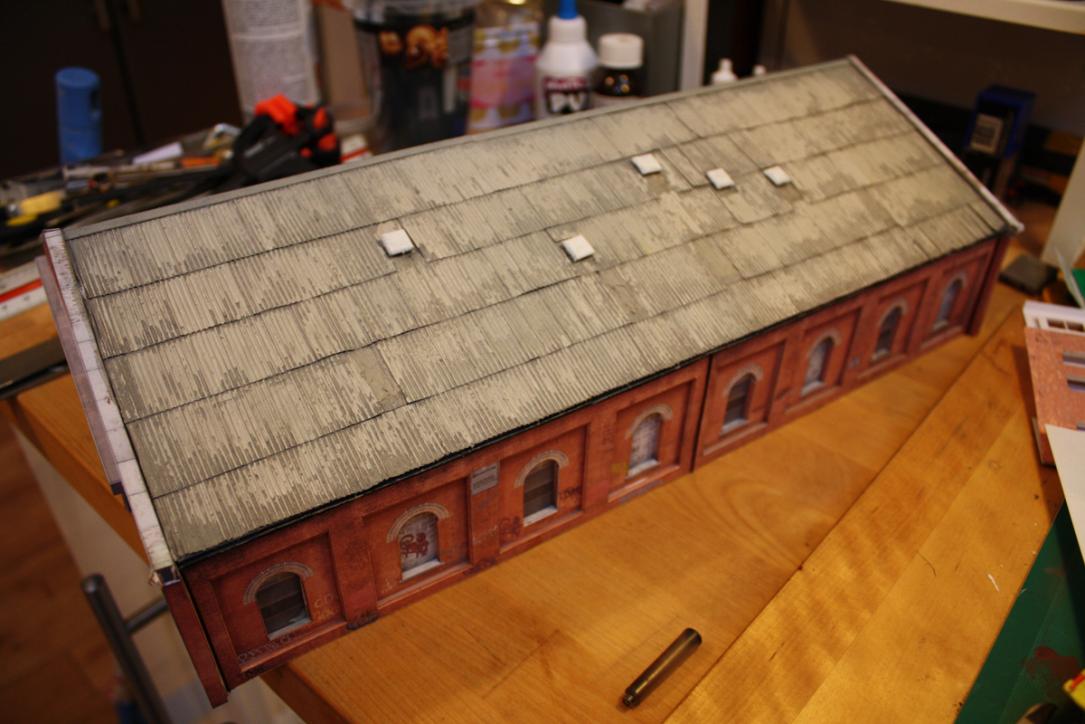
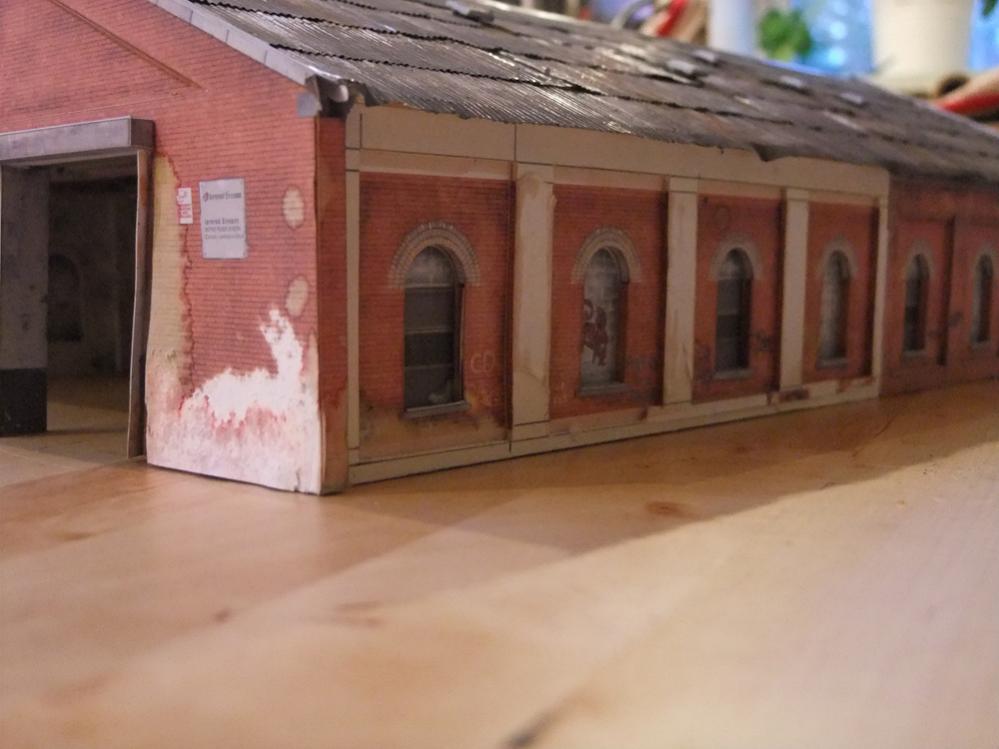
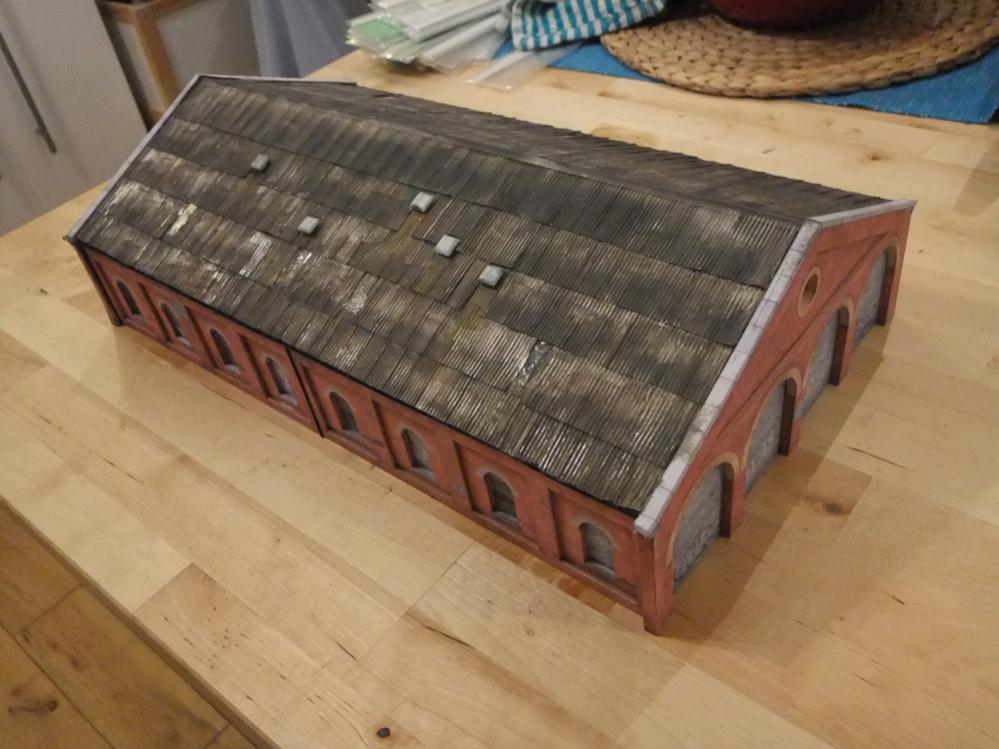
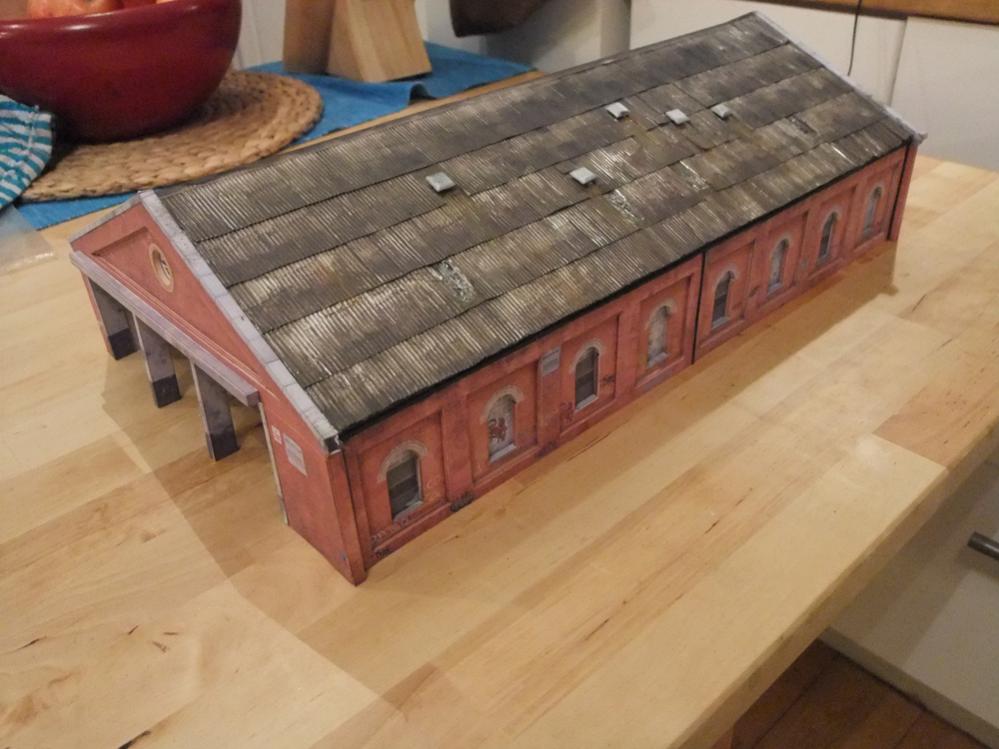
My wife and I came back from the pub last night, and she said the roof looks too crazy. This morning I walked down to the five lamps to get milk etc. and spotted the shed roof in the glorious sunshine.
- google streetview
She was right - [aren't they always...] So half an hour later with some oven cleaner I stripped the heavy stuff off. I picked up some of that Vallejo paint from the nice chap in Capel Street, light grey, and light tan, and gave the roof a light dusting, and to my mind it looks a lot more restrained, and matches the real thing a bit better.
Hope that's a bit more restrained BosK!
Richie.
-
Great snaps of the Bogies, tank ya sir.
-
Thanks lads:tumbsup:
Fantastic stuff, you finished the roof very well, did you use the oven tray foil technique or is it card, either way it looks great.Yip, totally robbed your brilliant idea! I just used 4 sheets of ordinary foil glued together with spray mount. I started making individual sheets, but it was a pain in the *neck* so i did it in long strips instead. The difference is hardly noticeable. [The possibilities of squashing foil to form things like beet wagon sides is distracting!]
And yes BosK, I totally over egged the pudding with the weathering, I'll strip it down if you want. I'm hoping a few months in an attic and the dust will soften the effect
lol.Richie.
-
Are you sure you don't have some kind of sci-fi shrink ray?
I bloody wish! I managed to screw up fairly nicely on the home stretch, but such is life.
Got the roofing on, and weathered, but I'm only fit for a small build after this! Minor tweaks to do, and she's ready for dispatch to a new home.
Regards,
Richie.
-
Agreed with Garfield. Vista does have horrendous CPU usage in comparison to Windows 7 so you could try going to start>run type in msconfig, hit enter. Go to the startup tab up top and unclick any boxes without a description, unwanted startup programs, or stuff you do not need regularly. This stops the loading of unneccesary programs on startup, and should improve startup and general performance.
http://windows.microsoft.com/en-us/windows-vista/optimize-windows-vista-for-better-performance
Richie
-
Love the first two shots with the flowing curves, bags of potential for scenic tomfoolery. It could be an urban TMD or a rural spot with sidings that disappear into the undergrowth! Liking the shed too!
Richie.
-
I paused some daycent choons for that, I feel cheated.
On the upside, I got a good laugh at the caustic/witty comments on the photos, and crackin photos they are too. [still one of Sancton Wood's best stations, despite CIE's best efforts to ruin it]
Richie
-
That is fabulous, not alone the modelling but the photography that's with it. Pin sharp, and the lighting, wow. The crow's nest shot with the 071 and bogie timbers to the left, could easily grace a rail magazine front cover. If only I could get my wrinkly tin roof , which looks like it was put together by stevie wonder,to look as well...Must have taken an age.
Richie
-
Very tasty indeed! All ya need is some weeds now... Tell uz, where did you get the little brown container from? The 20 ft [?] one.
Richie.
-
Get scratchbuilding!
Richie.


 and will report back.

 lol.
lol.


Glenderg's Projects
in Workbench
Posted
I saw somewhere recently whereby the bogie chassis was comprised of the a three sided folded brass piece, with two holes on each outer piece, and the wheelsets slotted in, no bearings or fancy bits. The cast bogie frames were simply glued to the outside of the frame and it looked the part, no messin with alignment and wobble! I might try it out by sacrificing a bogie..... Speaking of wobble, I'm off to the boozer too....