gibbo675 Posted June 21, 2024 Posted June 21, 2024 Hi Folks, This thread involves the building of a WT class form the Hornby Fowler class 4 tank locomotive. The chassis is pretty close although the bogie under the cab requires to be moved forward by 3mm and the rear bracket that the body fixing screw requires removing other than that it is good. Body shell wise: The front running plates require modification The tanks require cutting back by 3mm The bunker lengthened by 3mm The cab shortened by 3mm The boiler shortened by 3mm I stated by cutting out the running boards leaving just the mainframes and the buffer beam. With a bit of careful filing I managed to fit into place a piece of .040" plasticard under the main frames that finished flush with the top of the buffer beam. this measured 33.5mm X 14mm. In altering the tanks I cut off 4mm from the front of the tanks so that when the new piece of .040" was glued in place the front edge would be in the correct position. These pieces were 10.5mm X 13mm so that they stood proud and could be filed flush later on, I also cut a corner off so that they would fit in but that was done to suit. The cab section was removed and I cut down the sides of the tanks in line with the front of the cab simply removing 3mm. When all filed up and square it was all glued back together. The bunker required a lot more chopping about, the rear of the bunker was cut off completely as was the coal. Don't worry too much about keeping the cuts square as all that is required are spacing pieces which were three pieces of .040" cut to 22mm X 2mm. I fixed these to the ends of the bunker sides and left them to cure. Once cured I filed them flush and then refitted the back of the bunker. The top edge of the bunker was finished to 19mm from the lower edge, I then fitted a horizontal stiffener and a rear spectacle plate. The spectacle plate needs to finish 24 mm from the underside of the cab roof to clear the chassis. The inset sides of the bunker were then fitted to the horizontal stiffener these measure 12mm X 29mm and then a piece 34mm X 15mm is used for the upper section of the rear of the bunker all three form .040" plasticard. Do check the measurements to your own work should you choose this method. The sloping sides were then made from specially fitted pieces of .030" packed up against the inset sides on 1mm wide strips of .030", these were cut at 7mm X 29mm and then filed to fit as they are slightly tapered. I made steam pipes from 3/16" Plastruct tube cut and filed to shape, the lubricators require removing first though. Gibbo. 6 1
Gabhal Luimnigh Posted June 21, 2024 Posted June 21, 2024 Excellent read, I have a Fowler and thanks to you I will try this, well done you.
Dunluce Castle Posted June 21, 2024 Posted June 21, 2024 Looking forward to this one too! I will point out for anyone not aware, that the above drawing is not the most accurate, mainly the side profile of the tanks have been omitted entirely. 1
Hadren Railway Posted June 21, 2024 Posted June 21, 2024 And on that note, here is the more accurate version of the above drawing (It actually has the bottom of the tanks, would you believe it!)
gibbo675 Posted June 22, 2024 Author Posted June 22, 2024 9 hours ago, Gabhal Luimnigh said: Excellent read, I have a Fowler and thanks to you I will try this, well done you. Hi There, Wait until I've finished, that way I can make all the mistakes ! Gibbo. 7 hours ago, Hadren Railway said: And on that note, here is the more accurate version of the above drawing (It actually has the bottom of the tanks, would you believe it!) Hi There, Just the very thing, I was happy with using the other drawing with photographic reference regarding the lower edge of the tanks. Cheers, Gibbo. 1
gibbo675 Posted June 23, 2024 Author Posted June 23, 2024 Hi Folks, I've done a bit more on the WT class today, better yet working at the table in the garden as it was pleasantly sunny. The job I did was to fil in the cab doorway and the D cut outs in the cab sides. To do this I first filed off the beading around the ends and lower edges of the D cutouts, I didn't file of the top edge as the curve of the cab roof means that there would be nothing much to attach to. Then the corners of the D cut outs square and then inlaid some .040" plasticard this was easy enough to do the pieces being 19mm X 8.75mm and filed to fit neatly. The cab doors had the handrails removed and scraped off the step block under the door way and again pieces of .040" 18mm X 17.5mm were filed to a neat fit and then the whole was glued in place. The cab D cut outs filed square. The filler pieces glued into place. I also filled in a little gap around the boiler where the tanks had been cut back, this job had not been done earlier as the sections that had been replaced were still a little soft from gluing at the time. A small fillet of .060" plasticard was cut and shaped to fit into the gap. The filler piece ahead of the tanks. A detail that I hadn't noted from the previous piece was that the lip at the front of the chassis under the locating lugs requires removing so that the running plates under the smokebox fits up to the chassis correctly. The removed lip and the small fillet that makes up under the smokebox. Gibbo. 3
gibbo675 Posted June 29, 2024 Author Posted June 29, 2024 Hi Folks, I've been busy with the V class 4-4-0 this last week although things have started moving again with the WT class. The lower edge of the tanks have been altered to accord the drawing supplied by Hadren Railway (how do you tag user names ?) and I have filled and sanded flush the joints in the various cuts and infills on the tank sides. I also marked out the cab door way and the position of the cab side windows. The cab windows have beaded edges and my way of representing beaded window edges is to glue a bank onto the site of the window and when cured cut out and file out the window through the blank. When finished all that should be left is the beaded edge around the window aperture. Window blanks for both the WT and W class locomotives. The window blanks glued into place, the lower edge is 17mm from the bottom edge of the tank, the front edge of the front window is 4mm from the front spectacle plate, and the dimension over the outer edges of the windows is 15mm. The cab door way is 7mm wide and is 5.5mm from the rear spectacle plate. Gibbo. 1
murrayec Posted June 29, 2024 Posted June 29, 2024 To tag a username- type an '@' and then the user name, a menu will pop up while typing, offering usernames, you can select from that also. Eoin 1 1
gibbo675 Posted June 29, 2024 Author Posted June 29, 2024 Hi Folks, I've done a bit more with the WT class cab sides, the cab side windows have been cut and filed to shape and also the doorways cut in and filed to shape and balance pipes added. This photograph shews one window pierced and one cut out ready for filing to shape. The window blanks were filed to within about .5mm of the edge with the top corners being filed with a round file and the bottom corners with a square file. A slight mistake with the window blanks was to put too large a radius on the outside of the bottom corners, such is life. After the doorways were cut in the balance pipe for the tanks under the bunker had to be made up along with the step block in the bottom of the cab doorway. First filed away the remnants of the cab doorway reveal and then I cut a piece of .040" plasticard 8mm X 10mm gluing it in place flush with the bottom of the tanks. The balance pipes were made from .060" plasticard 10mm X 16mm with 2.5mm radii filed on two of the corners. The bottom of the doorways were blanked off with the .040" and the door reveals filed down slightly to match the thickness and the .060" piece was then glued to that so that 2.5mm projected from under the tanks. The chassis then requires 3mm X 5mm relief to clear the balance pipes. This shews the reliefs to clear the balance pipes. How it all looks so far, no front spectacle plate and no cab roof proper as yet. I had wondered about using a James the Red Engine as a basis for a model of K2 class No. 461 and then discovered how much they are on eBay. Perhaps not. Gibbo. 4
gibbo675 Posted June 30, 2024 Author Posted June 30, 2024 Hi Folks, The cab side s have been tidied up a slight and the spectacle plate fitted along with a trimmed back cab roof as the WT is shorter than the Fowler class 4. The original rain strip has been carved off and some .030" plasticard has been glued at the gutter edge of the cab roof to make up for the curved profile of the Fowler 4 shape. This will be carved back and filed to shape once cured with the spectacle plate windows being cut and filed to shape. A bit of shaping and filing will sort out the shape of the cab roof at the gutter edge, rain strips will also be added. Gibbo. 3
gibbo675 Posted August 22, 2024 Author Posted August 22, 2024 Hi Folks, I'm back from my holidays and I've given coaches and AEC railcars a break for now to progress the WT class 2-6-4. Work done in recent days has been to finish off the body work detail and to fit a fixing lug to enable the body to be attached to the chassis securely. The body work details are the top feed and pipework along with the ejector exhaust pipe. The locomotive ready for painting which has been done and is now waiting for transfers. The body fixing lug has be fitted into the underside of the bunker so that when the chassis is fitted a self tapping screw and a small washer will hold the two parts together. Shewing the fixing lug made from several strips of .040" plasticard which fit neatly in to the gap left by the cutting back of the rear end of the chassis. It has not yet been drilled to accept a screw. Gibbo. 4
gibbo675 Posted August 23, 2024 Author Posted August 23, 2024 Hi Folks, The fixing washer was made from .030" plasticard with a small self tapping screw to hold it all in place. One end was radiused so that it may be swung out of the way to remove the body rather than undoing the screw completely. The pin that locates the bogie is to be removed and a nut an bolt will eventually hold the bogie in place. Here is the almost finished locomotive. It will be sent on unlined because I don't have any lining, a poor excuse but true. All that is to do is apply the numbers to the buffer beams which I shall do in the morning. Gibbo. 9 2
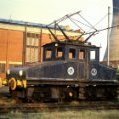
gibbo675 Posted August 31, 2024 Author Posted August 31, 2024 Hi Folks, Here is the WT class with six on. It took a while to sort this locomotive out because I didn't realise that by altering the position of the cab the back head moulding fouled the tops of the rear driving wheels as it is 3mm further forward. DSCF2447.MOV Gibbo. 3
Recommended Posts
Create an account or sign in to comment
You need to be a member in order to leave a comment
Create an account
Sign up for a new account in our community. It's easy!
Register a new accountSign in
Already have an account? Sign in here.
Sign In Now