

David Holman
-
Posts
4,163 -
Joined
-
Last visited
-
Days Won
114
Content Type
Profiles
Forums
Resource Library
Events
Gallery
Blogs
Store
Community Map
Posts posted by David Holman
-
-
Have tried all sorts over the years, Harry, but these days stick mainly to wire scrapers. 0.5mm nickel silver or phosphor bronze, depending on what is available.
Where possible, use small pieces of copper clad strip [4 or 7mm scale sleeper strip], stuck to the frames with 5 min epoxy, then solder the pick up wires to that. If I can, I arrange the wire pick ups to bear on the back of the wheels - either horizontally or vertically. On both the Sligo small tanks, the pick ups drop down vertically behind the driving wheels. On the J26, there is space to hide the pickups horizontally, so they bear on the back of the top of rear face or the tread of the wheels. Hopefully the photos show this.
Overall, have found this method better than plunger pickups. Though these are neat and tidy, I find the springs can be too strong and end up acting as a brake. Goes without saying that the more pick ups the better and cleanliness comes well before godliness - track, wheels and pickups, to enable best quality running.

-
Thanks for the help chaps. Being in 7mm scale for the last 20 years, it is easy to miss what is available elsewhere. The Branchlines chassis are compensated, so only need pin point axles at one end, while the coaches have inside bearings. Am thinking the railcar and unit (Clogher Valley) can be done in the same way as my Sligo Railcar B. The 0-4-2T instructions suggest Slaters wheels, so a small stock of 2mm rod seems the likely answer.
-
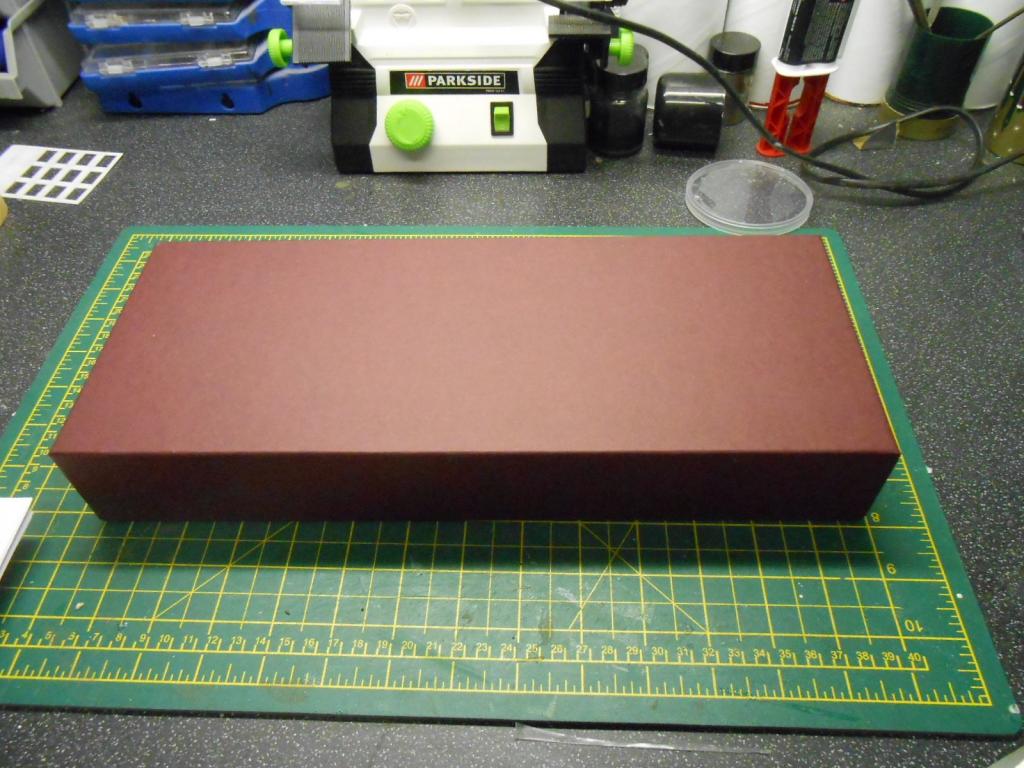
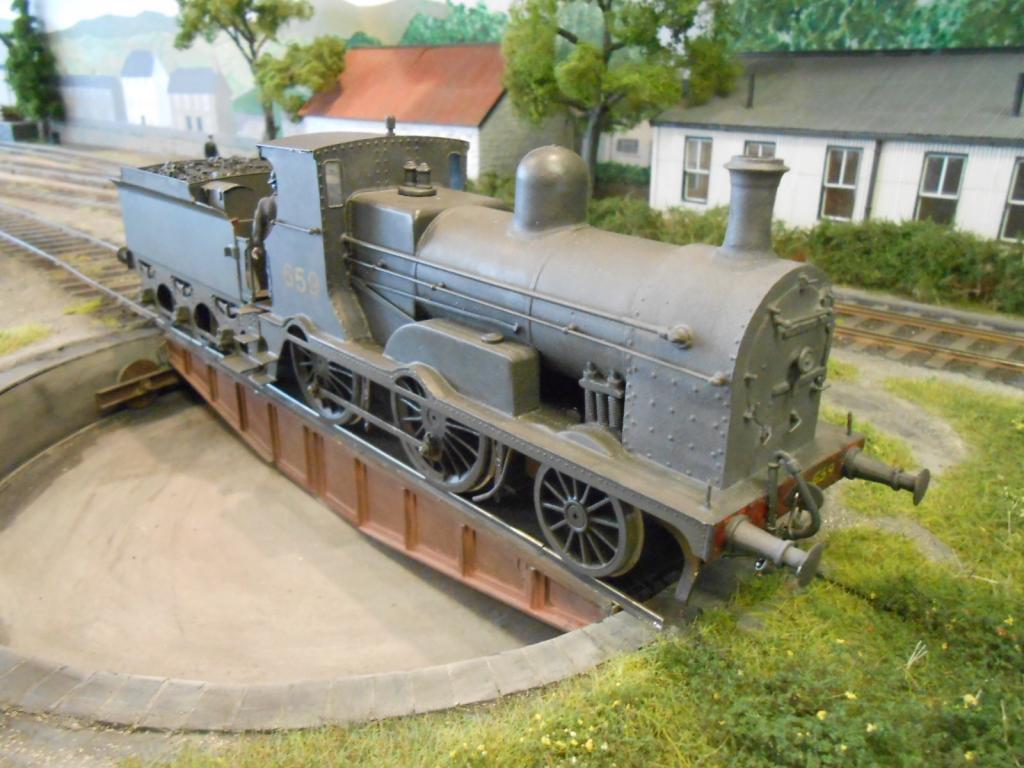
On a slightly different track, I am starting a new 3' narrow gauge project which will be 21mm gauge in 7mm scale. Branchlines do a nice wagon chassis, but am a little concerned with the idea of 26mm pin point axles as this leaves little meat on the ends for 21mm gauge. Where do you get 28mm axles from please?
-
Another idea is to put in small flat headed screws in line with the rails. Each side of the baseboard joint and solder the rails to these. After, you can cut bits of sleeper to hide the screws. Have used this on numerous exhibition layouts without any problems.
-
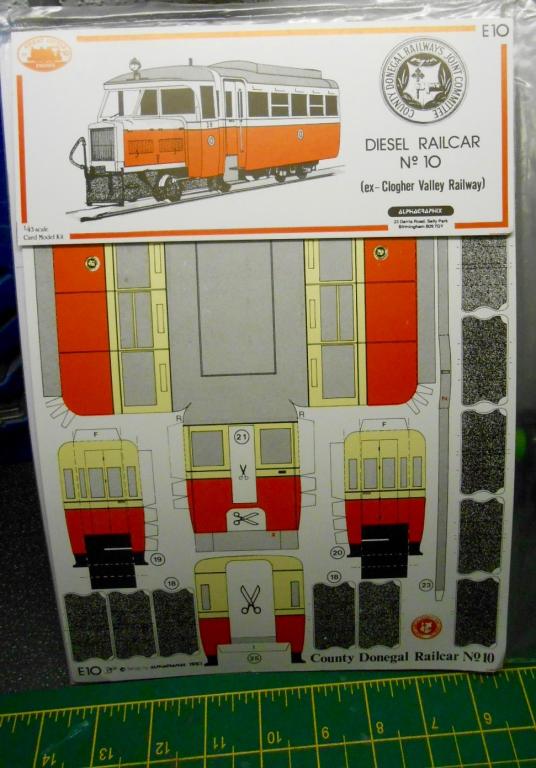
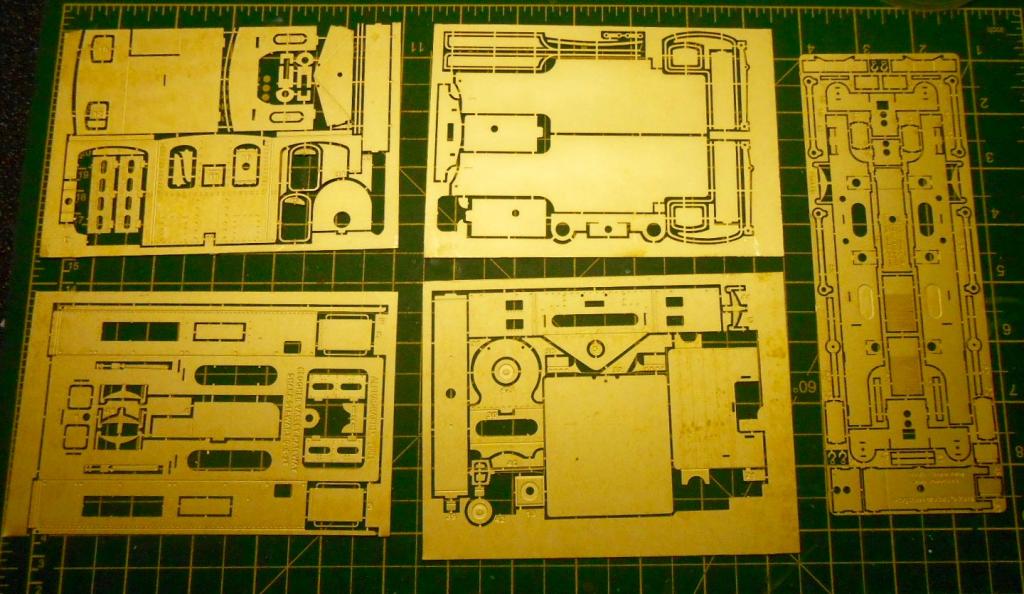
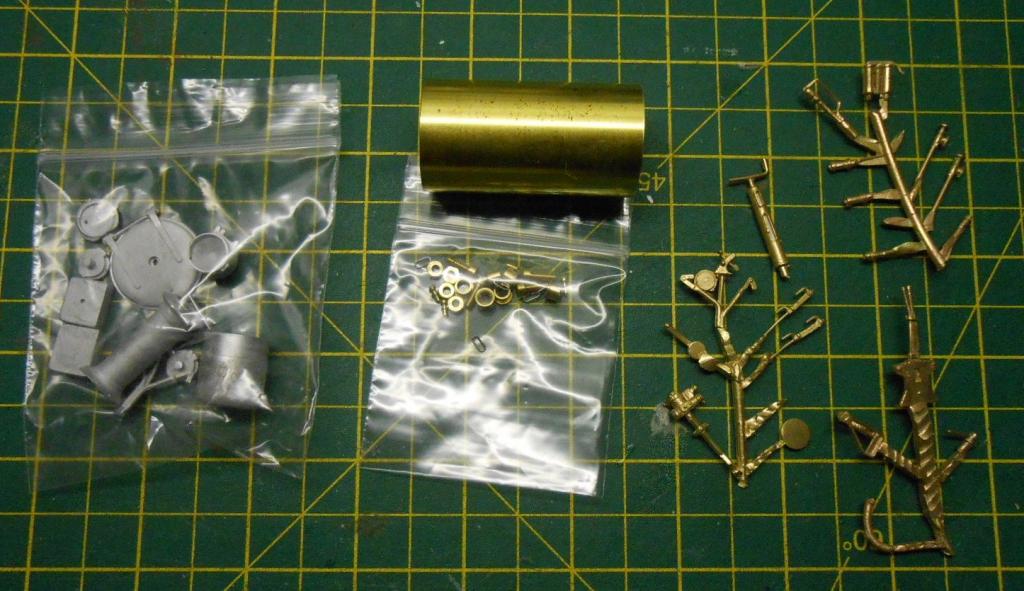
Have been hinting for a while that I am keen to get into a new 7mm scale narrow gauge project. The theme is Clogher Valley, which I would hope you folk over the water are well versed with. That said, the line closed in 1942, so anyone with first hand experience of it will be well into their 70s by now...
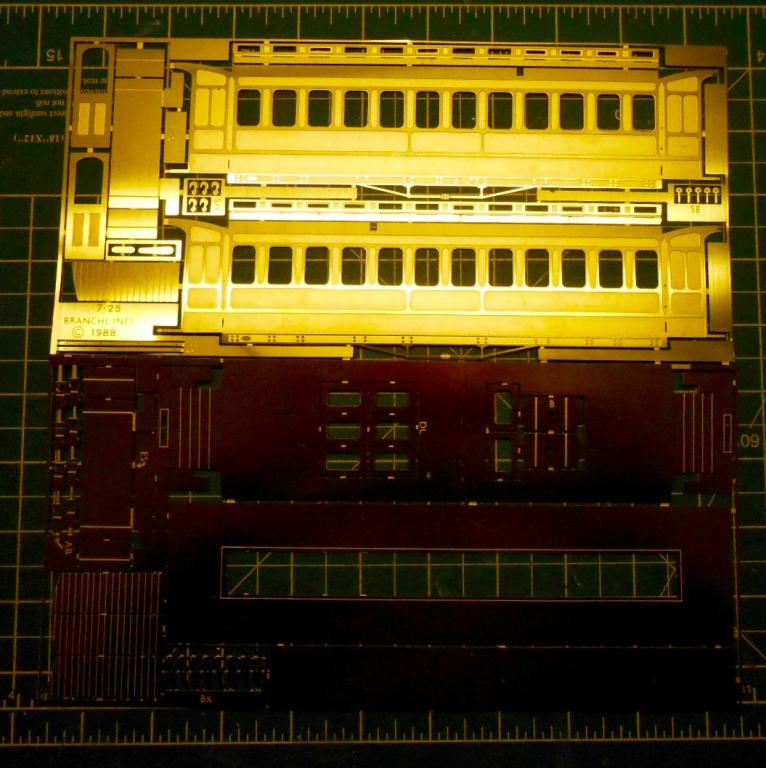
Why CVR? Well, there are a few photos around, albeit black and white, plus [like the SLNCR], there is a good book on the subject [EM Patterson], while kits are available for a fair amount of the locos and rolling stock. So, the maroon coloured box contains a range of goodies that will hopefully keep me occupied over the next few months. Hence, we have a Ragstone Models kit of a Sharp Stewart 0-4-2T, a Branchlines kit of one of the third class coaches [they do one of the first class coach too, plus a wagon chassis], while my old friend Alphagraphix does card kits of both Railcar 1 and its tractor unit cousin, which will form the starting points for scratch built models of these in due course.
They will all be done to the correct 21mm gauge [of course!] & I have in mind a small working diorama to begin with, which will cover a wayside station [with a couple of short sidings, plus a hint of roadside tramway and street scene at either end. Hopefully, it will be operable as a through line for exhibition purposes. That will be some time ahead of course, so don't hold your breath!
Pictures show the various bits I've assembled thus far.
-
Good for you, am sure you will get much more satisfaction from making something yourself than just opening a box - even though many boxes have very nice contents these days! Will look forward to seeing the model progress
-
The basic rule for good visual effect is that a train needs to have a run of three times its own length to look sensible. So, if a 10' straight is what you have, then max train length should be 30". Platform widths were a minimum of 6' in the real world, with 12' preferable.
-
Cheers Harry, do come and say hello. There are many people on your side of the water I am very much looking forward to meeting.
-
Yes it does! What is more, I learned how to do them from the master of scenics, Mr G himself. Gordon has been a valued friend for many years and his books on scenics and modelling are well worth getting hold of.
Many thanks for your kind thoughts, but if you see Pempoul, you will know it really is at another level.
-
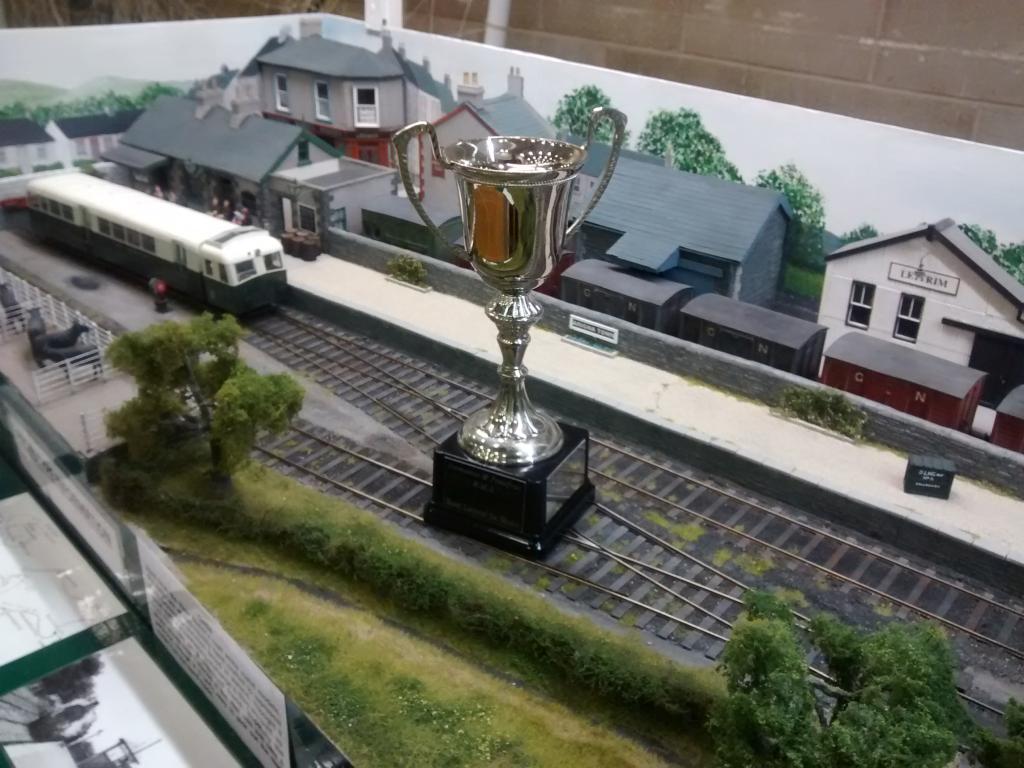
It was indeed a good show at Pontefract & Mike proved to be an excellent operator and very good company. Much to my surprise and delight, the layout was awarded 'best in show'. Given the judging was done by the Pontefract club members [rather than the general public], I feel even more honoured, as it is bit like a 'player's player' award in sport. That and the fact that other winners include none other than the wonderful Pempoule, by Gordon & Maggie Gravett - still probably one of the finest layouts around today.
-
Thanks JB. Coaches won a shield at last night's club competition, though Sir Henry was beaten by a 7mm Gresley P2 2-8-2. A case of a big green'un always beating a weathered little 'un methinks...
-
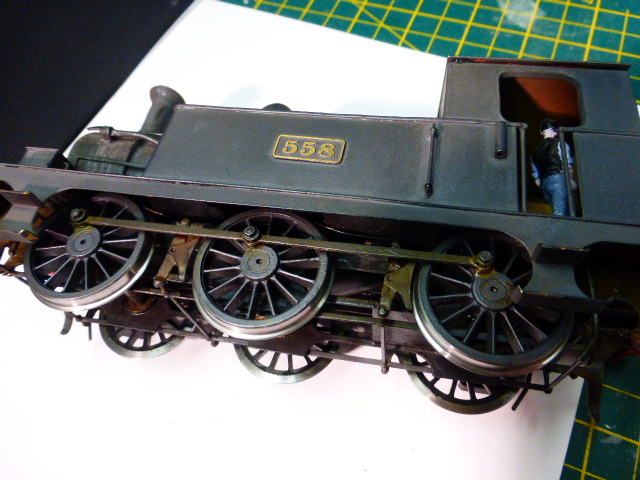
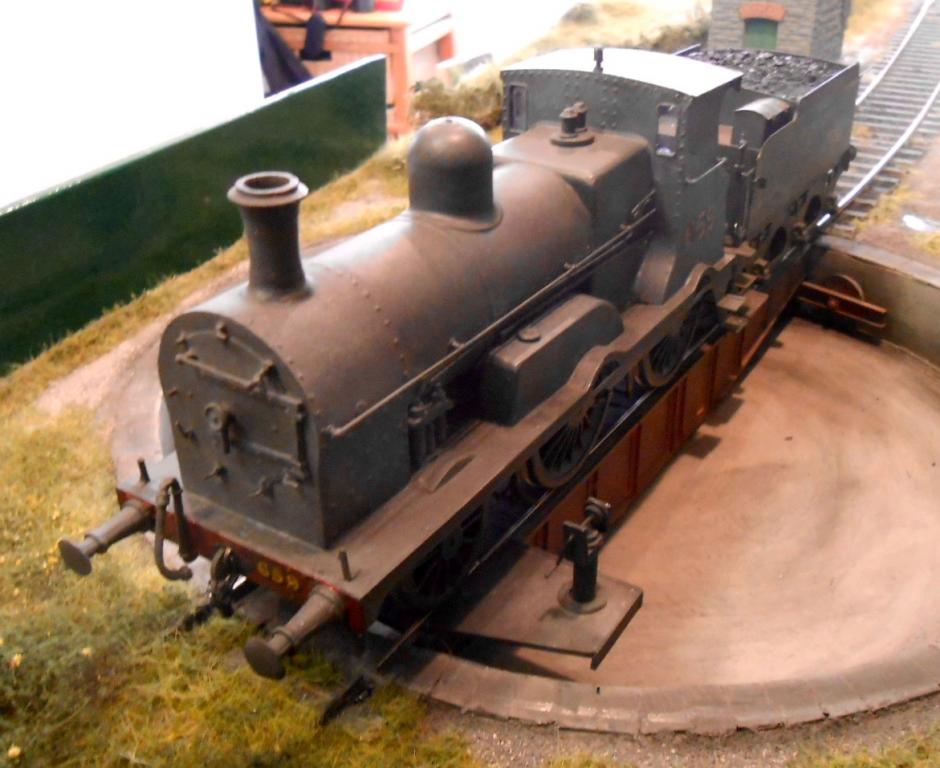
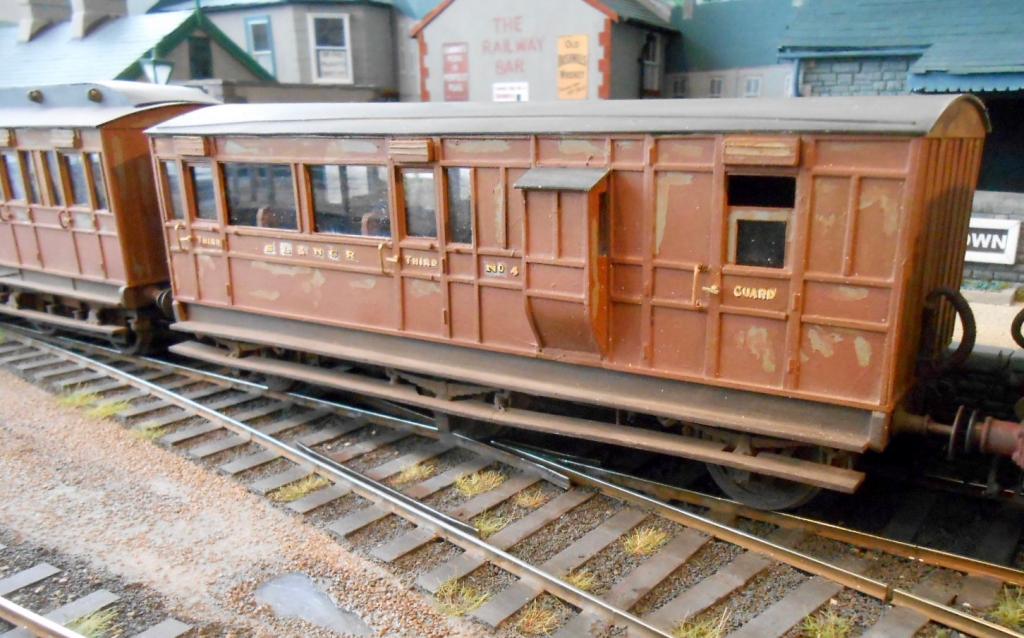
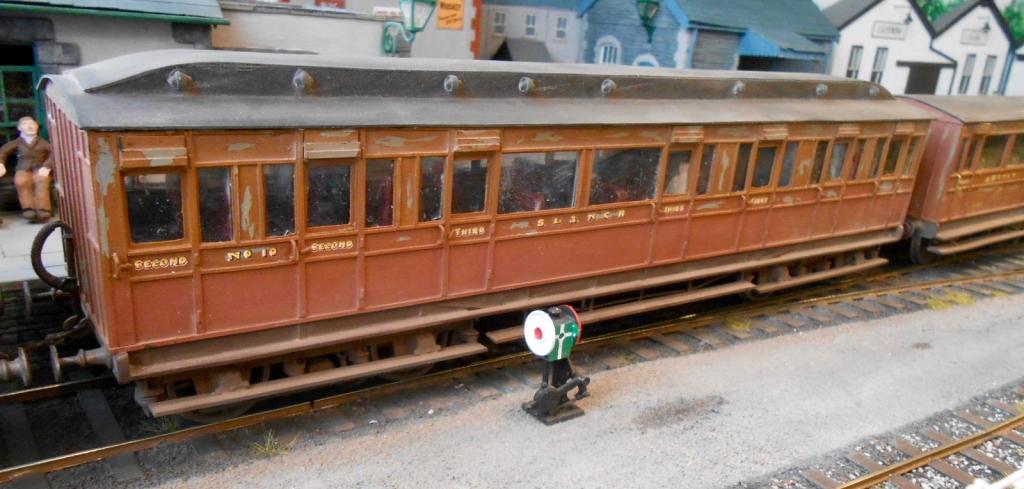
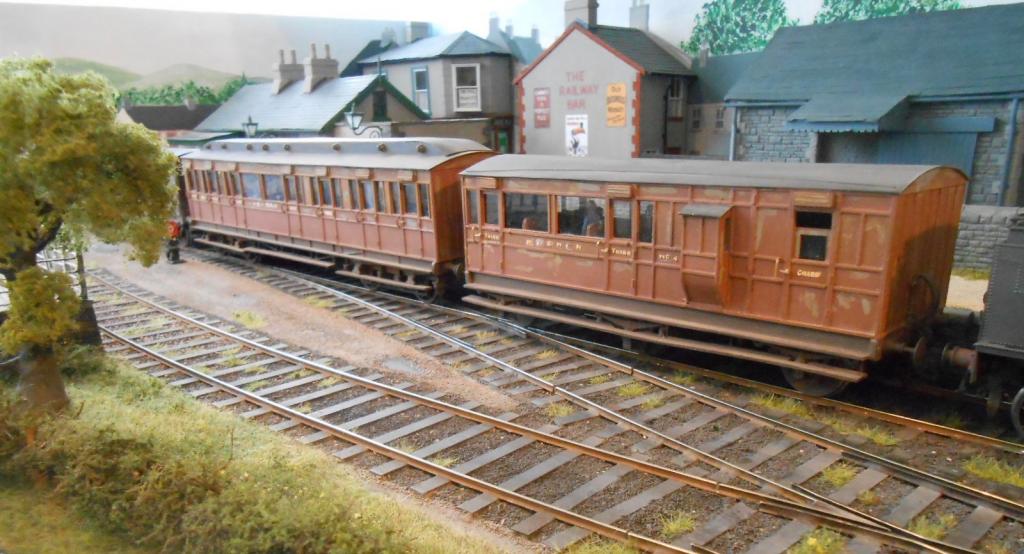
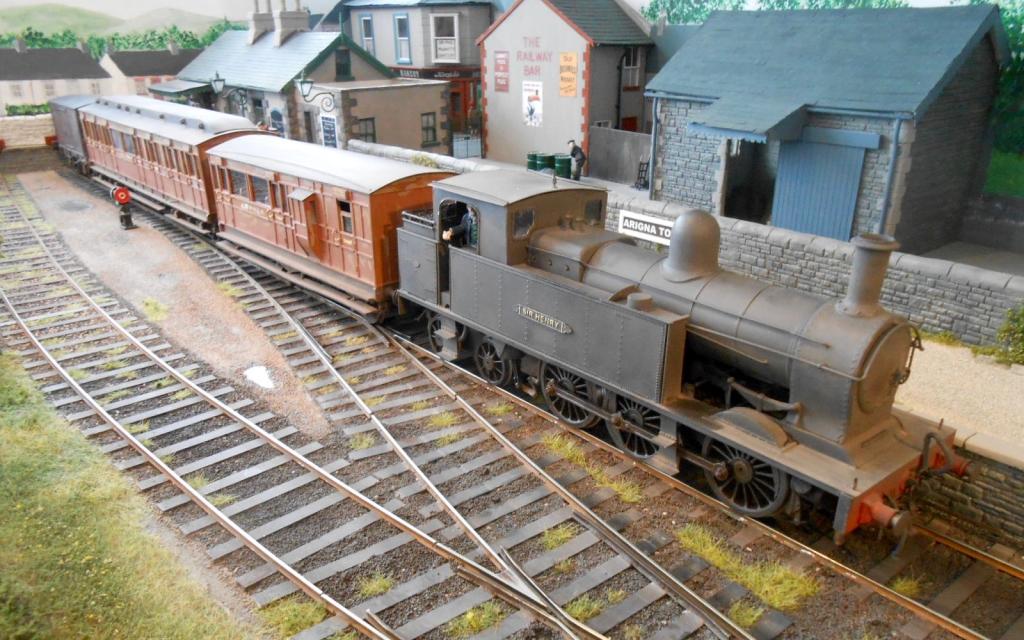
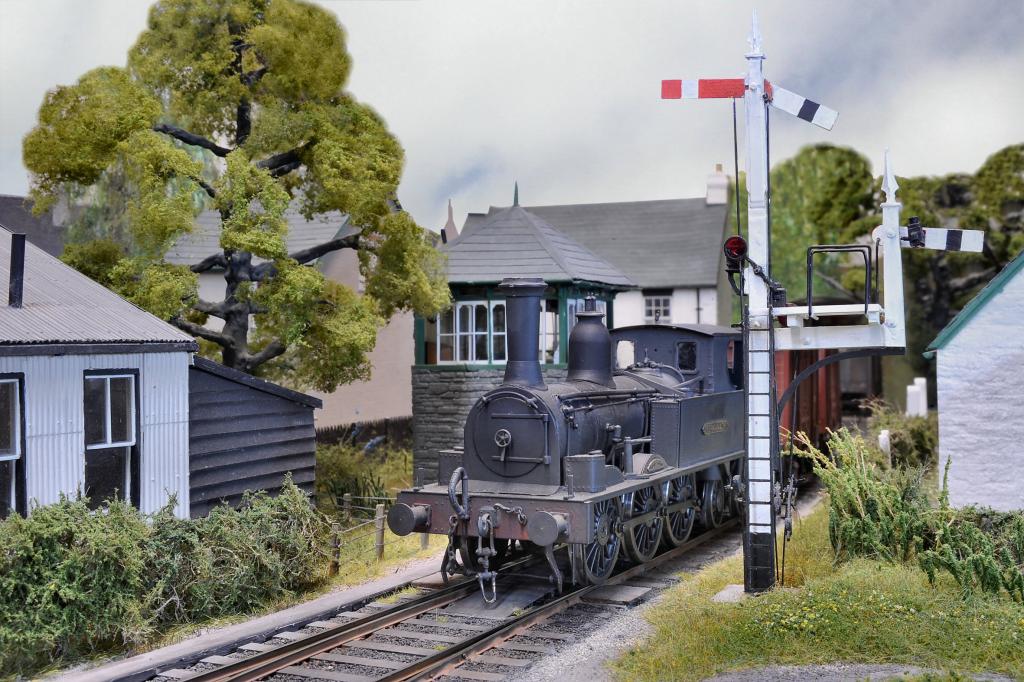
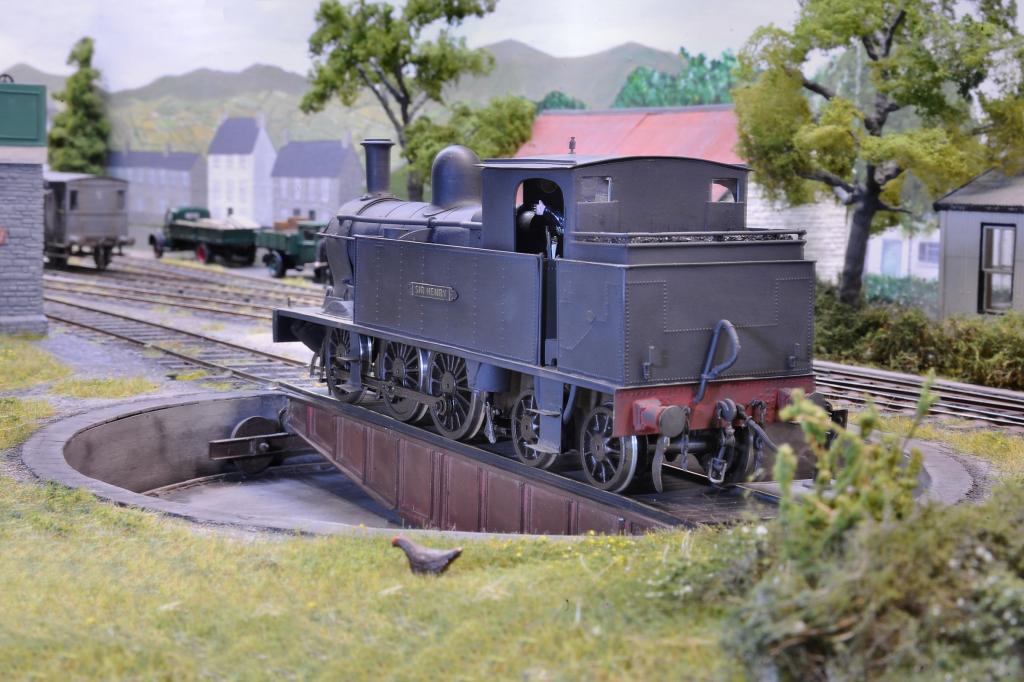
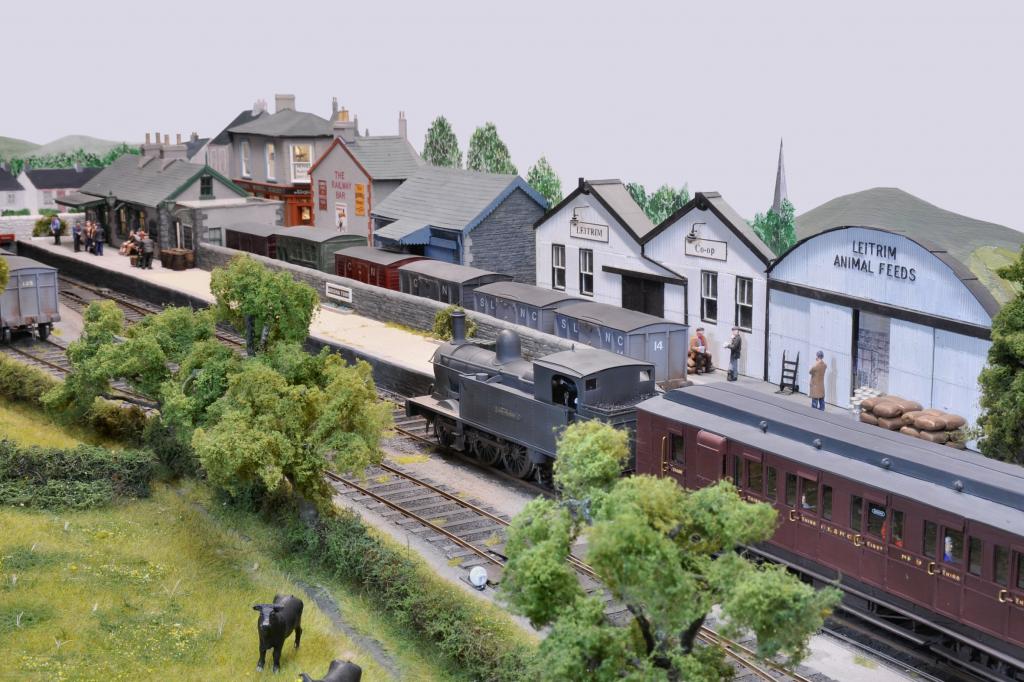
Arigna Town's fiddle yard has 7 roads, which equals two railcars and six trains. The latest addition now means it is full, as not only do we have Sir Henry, but a couple of coaches for him to pull. These are SLNCR 6 wheel saloon brake number 4 and bogie number 10. The latter is the infamous 'day coach', so called because it did not have any electric lighting.
Both coaches are scratch built in plastikard and microstrip. The 6 wheeler runs on a Tyrconnel etched brass chassis, while number 10 runs on cut down Slater's bogies. They are finished in very faded, peeling paint, as per the photograph in the Tom Ferris' second volume of Irish Railways in Colour. Indeed, several different shades of Humbrol brown were used, as the colours fade & peel more the higher up the sides you go. The peeling effect is done by first painting a base coat in 'weathered wood' [Humbrol natural wood + grey], then [when dry] Maskol is dabbed on in appropriate places. When this is dry, the top coats were put on. Finally, when this is dry, you use tweezers to pick at the Maskol & the peeling paint effect appears. Not my idea, but well documented in the painting' bible 'The Art of Weathering' by Martyn Welch - probably one of the most important modelling books every written.
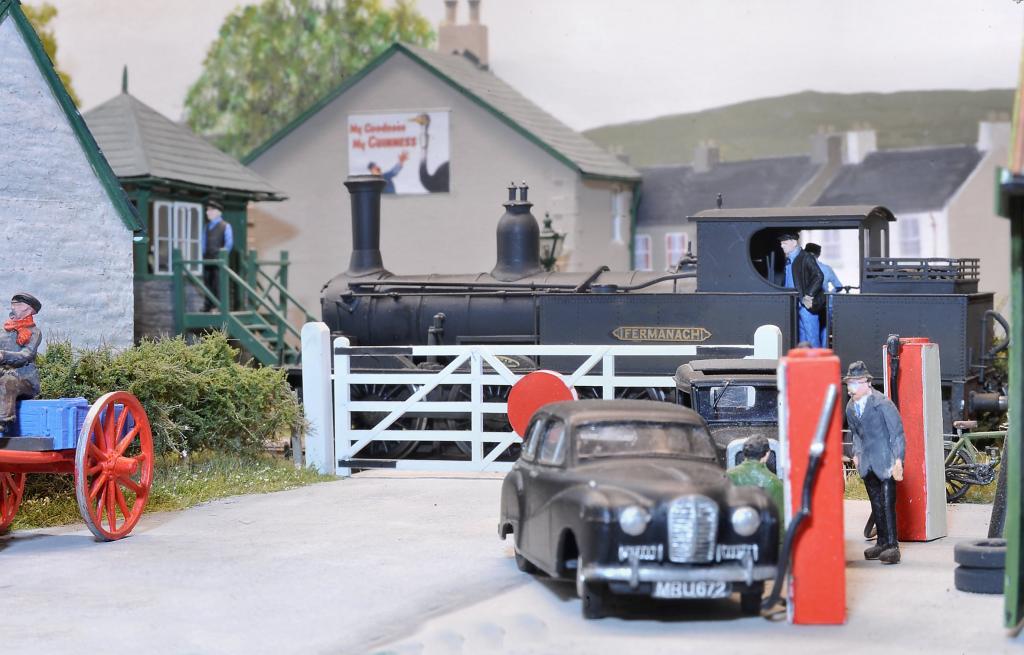
Sir Henry is shown with the train, though at St Albans last week, he/it gravitated to the mixed train, where more shunting is involved. Hence, Fermanagh will probably take over this train in future.
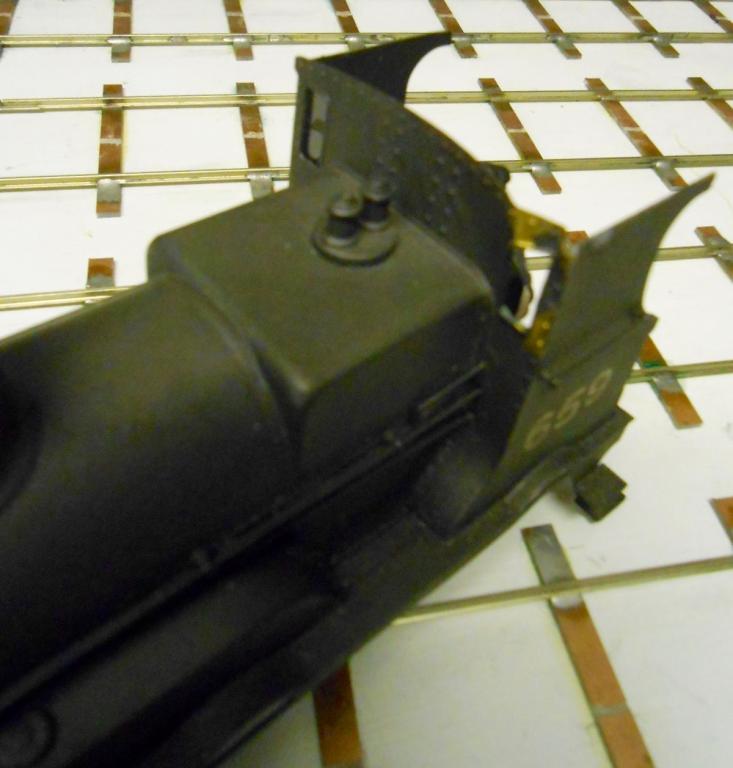
Meanwhile, the repairs on G2 2-4-0 are complete. The squashed cab was flattened with blunt nosed pliers, while the smokebox & chimney were re-attached & a bit of filler used to cover the dent. These only took a few minutes, though the painting required a lot longer. Bare brass needed masking off so primer could be resprayed, then the top coat was 'stippled' on. This does your brush no good at all, but is a useful technique for applying weathering & done carefully is almost as good as spraying.
The only problem now is that not only is the fiddle yard full, but there is little room left in the car for any more stock boxes. So, a change of direction will be required at some point. I could certainly 'go diesel', so a C and G are not out of the question [provided I can get some drawings], plus there is a narrow gauge project now waiting in the wings. Will keep you posted.
-
 1
1
-
-
My advice would be 'don't do it'! At least, not if you are planning any scenic work. On the other hand, if you are simply planning something 'train set' like, then as the others have said, HO stock will run on 00 track, because the gauge is 16.5mm for both.
The history behind 00/HO, is that HO = 'half 0'. in other words 1:87 instead of 7mm scale, which is 1:43... In the good old, bad old days, 00 was created because British outline locos, being smaller than European and American counterparts, were too small to fit in the then new small mechanisms.
The result of course is that Brtish 00 stock has forever since run on track that is 4'1" gauge, instead of 4'8.5 - which means that Irish 00 stuff running on 16.5/00 track has a gauge which is over a foot/30cm narrower than the prototype.
On the same principle, N gauge[9mm] track is only 4'6, while TT [3mm scale] track at 12mm gauge is only 4'. All this means folk have developed P4 [18.87mm] track for 'proper' 4mm scale or EM [18.2mm] as a reasonable compromise, though with wheel standards similar to 00 fine scale. As that were not confusing enough, in the '50s & '60s there was 'Trix Twin', which aimed to be a compromise & is therefore [i think] at 3.7mm/ft.
Anyone still awake now has permission to run out of the room screaming.
-
Saturday 12th November, JB. If you can make it, it will be good to meet you. Likewise any of the rest of you on the far side of the water.
-
St Albans' like York, seems to be one of those shows that generate multiple other invites, though only one new one is going to be possible this year, as the list already includes Huntingdon, Crawley, Alexandra Palace, Reading, Croydon, East London Finescale & Cultra. Have also agree to Manchester in December, then found there was an invite to Eurospoor in Utrecht in my RMWeb page... That is far too close to East London & Cultra, so will have to wait for another year, assuming they will still have me. Eurospoor is amazing - I went with an 0n16.5 layout in 1994 - & has over 200000q ft of space. Trouble is, it would be a 5 day trip, albeit a very tempting one!
Still, the G2 is almost ready for service again, while the two new Sligo coaches are also close to completion. It is the annual modelling completion at the club on Tuesday & for once, this creates a deadline for Sir Henry & his train. Hopefully will have some pictures soon.
-
I have the said book JB & a very fine piece of work it is too, including all the juicy 'might have beens' west of Sligo.
Overall, I would say Irish track plans are a much neglected aspect of the hobby & have spent many a happy hour on the Irish Ordanance Survey Website, where 25" maps are very useful for track plans. Probably where Mayner got the Westport one from perhaps?
-
The Rice plan is certainly one I've looked at in the past, along with several derivations he did over the years. Very tempting...
A MGW branch is certainly a possibility some time in the future, though for me the Belmullet/Blacksod Bay proposals offer most promise. A joint line with the Sligo Leitrim would enable me to use much of my current stock, while the idea of a 4-4-0 called Wolf Dog is somehow very tempting.
Still think Courtmacsherry offers the perfect branch terminus track plan, with harbour spur, the street behind the station providing the ideal back scene, plus the loco shed hiding exit to fiddle yard. Alphagraphix catalogue offers pretty much all the locos and carriages you need and am surprised nobody has had a go yet. Or maybe they have??
-
Many thanks chaps. The layout hasn't been worked on for over a year now. Indeed there are some bits that could do with a bit of attention after a dozen outings now. As some of you have said, a good photographer can conjure up all sorts of enhancements just by clever framing, composition and the like, so credit this time is very much down to Tony Wright.
-
A major part of the fun in exhibiting is meeting some lovely people. So it was on Saturday at St Albans, where our evening dinner table consisted of yours truly plus Gordon & Maggie Gravett, Continental Modeller Editor Andrew Burnham, Tony Wright [of Stoke Summit fame] & his wife, plus Dave Walker a noted loco builder in larger scales & pupil of the great Beeson no less. It was a fine evening's conversation, well lubricated with wine & beer!
On Sunday morning, Tony took a few photos of Ariana Town & emailed them yesterday. Happily, the files are small enough to share with you, so here are a couple of favourites. Just goes to show the effect of a fine photographer & a quality camera.
-
1
-
-
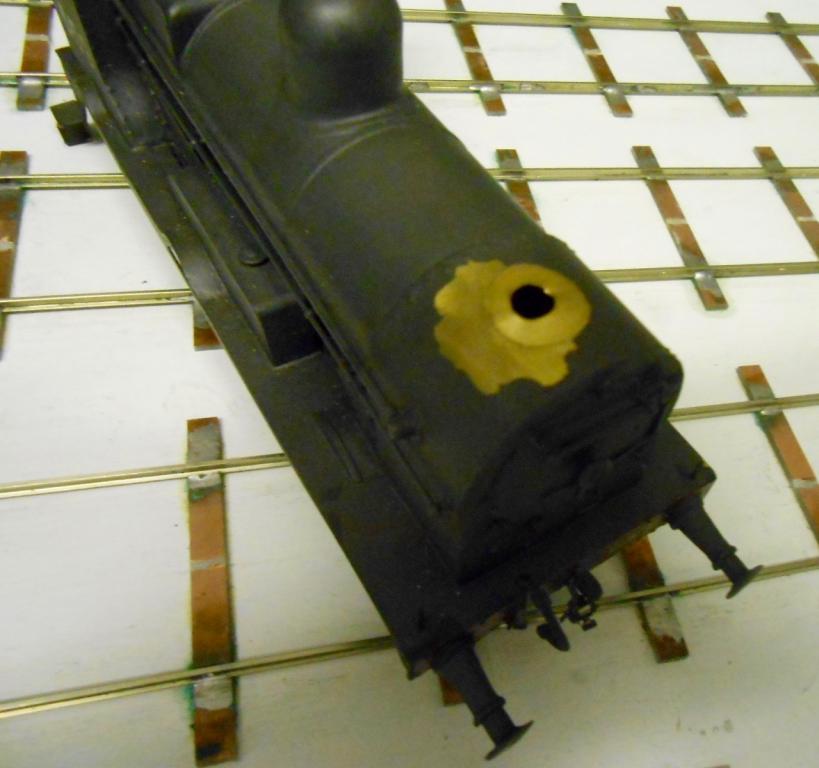
The St Alban's show last weekend went pretty well [see my blog to read more], but while packing up, I managed to knock the box containing my G2 2-4-0 off the top of a pile of 4 box files which I use for other stock & on to the floor. Not expecting any problems, I was dismayed to find the loco has suffered some significant damage. The cab roof and only recently renewed fall plate had come off, but, as you can see from the photos, the left hand side of the the cab front/spectacle plate are mangled, while the chimney was bent over with a dent in the smokebox. At the very least, a word that rhymes with what rowers put their oars in seems appropriate and plenty more besides.
Fingers crossed, the damage will not be too hard to put right [though doubt the can will go back completely flat], though a fair amount of work will be needed to match up the paint work again. Will keep you posted.
All goes to show that exhibitions can really take their toll on a model railway & the end of a show is especially dangerous...
-
Time machine over 3D printer any day JB, though wouldn't say no to both...
-
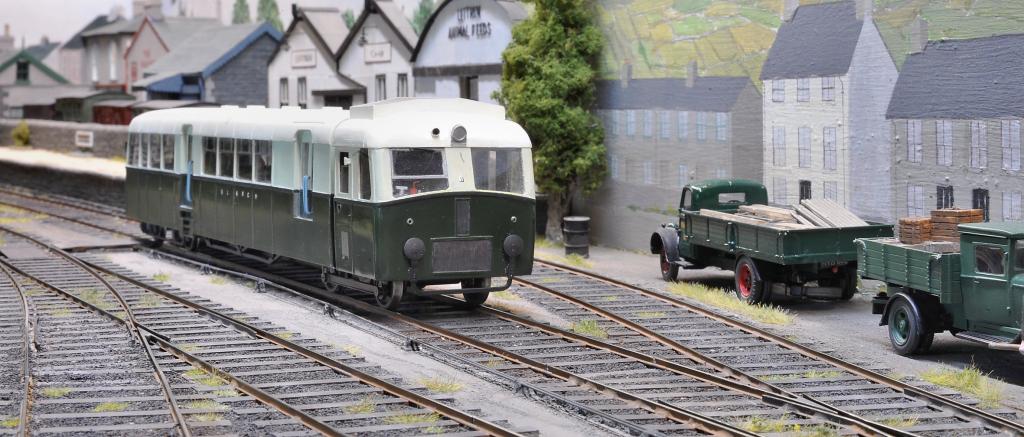
Having been pondering what is available in 7mm scale, where am thinking the net needs to be expanded to include kits, as RTR is not as extensive. Indeed the only RTRs I can think of might be the recent crop of industrials from Ixion, though there have also been two versions of the LNER Sentinels, for anyone interested in doing the Limerick Market branch! The usual Woolwich moguls, Jinty etc of course available as standard gauge kits, so like 4mm could be adapted for anyone interested.
Despite suggestions in the 'Modelling Irish Railways' book, then only wagon [from unfitted, loose coupled days] would be the Slater's petrol tank, which did make the transfer, though needed buffers moving out, as well as wheels, of course. Would be interested to know of any other options.
-
In my dreams! Would that I had the space for a 20 van cattle train. That said, I did actually build a 7mm scale tail chaser a few years ago. Trouble was only the 16' straight section on one side was scenic and though it fitted in a Transit van, a 30x15 layout with only a 16' scenic section did not endear itself to exhibition managers. Plus it was a huge thing to manage. Did appear in RM though after its one outing at Chatham in 2009.
After that decided any future layout had to fit in its entirety in my workshop. Hence 16x2 for Arigna.
When I win the lottery, it will be high on the list. Trouble is, need to buy a ticket first!
-
Many thanks folks. It is by no means perfect, but it does seem to capture the character of the prototype & also [at the moment] runs very well, which is all I ask really. I keep promising myself I will improve my soldering skills, but it is amazing what you can get away with under a coat of paint. Have now built over 50 locos in both 4 & 7mm scale over the last 30 years, so have learnt a few things in that time I suppose, even if mostly not how to do things!


David's Workbench
in Workbench
Posted
Decided the other day, that I'd make a formal start on my new project by doing something nice and simple, like an open wagon. The subject is the Clogher Valley Railway and Branchlines do a nice wagon chassis of the prototype, while in E M Patterson's book there is a very fine picture of a CVR 5 ton open wagon from 1937.
The reason for doing an open, is that [at first sight], it is a simple open box. Three planks to scribe and just five pieces of plastikard to cut out and weld together. Well, how wrong can you be!
The photo in Patterson's book [probably 4x larger than the actual model would be] showed a wealth of detail. Numerous large bolts hold the iron corner plates to the wooden sides and these looked too big to represent by using my GW Models riveting tool. So, 56 cubes cut from 20thou square strip used instead and put in individually. Then there was the iron strips fixed to the top edge of each side. Common on all open wagons, but rarely modelled it seems & probably little point in 4mm scale. However, in 7mm, I reckoned they were worth adding, especially as they are held down with 14 iron clips. Three pieces for each of these, so another 42 parts to cut, this time from 20x15 strip. Strapping, hinges and catches added umpteen more pieces of microstrip & then there are 8 cleats on sides and ends to wind the rope used to hold down tarpaulins when used. One bit of plastikard and two bits of bent 0.5mm wire for each of these.
In all estimate there are close to 200 separate pieces in this one wagon body! Am thinking how I might do a master for sides and ends so I can resin cast future versions. However, none of it was over complicated - just a bit tedious at times, so might still build each one separately. One option will be to drill the strapping and use 1mm wire for the bolts, so these can then be seen on the inside of an empty wagon [or two]. Thankfully, this project is not going to require masses of rolling stock - probably a dozen or so wagons, a couple of coaches, two locos, the railcar & the tractor/unit. Hence tempting to try and do it to the highest possible [for me] standard with a much detail as I can find. Not sure if the lettering I've done [by hand with a white gel pen], is good enough, so may have to invest in some custom transfers. That's the plan anyway, with regular reminders to myself that it is not a race!