
Horsetan
-
Posts
2,089 -
Joined
-
Last visited
-
Days Won
4
Content Type
Profiles
Forums
Resource Library
Events
Gallery
Blogs
Store
Community Map
Posts posted by Horsetan
-
-
I thin that putting new wheel sets and bogies on all the stock would be more than enough work for me. Am i correct in think that you could lay 21mm on an existing HO layout as they clearances/loading gauge would be the same. Would the spacing between the track centres remain the same?
and if so, would the points have a less acute angles or need to be longer on the crossovers?
You cannot retain the kind of sharp radius curves and angles that are common in OO, unless you are portraying something like the CSET beet factory or Guinness internal lines
For 21mm, 3ft radius would be pushing your luck.
-
I'm building my one as 552, i used cut down pieces of the garden shed sides for the higher coping and scrap brass for the back. I better get back to building it..
Are you going 21mm gauge as well?
-
It seems 552 had a high coping on its bunker( it was a regular on the T&C)
There are photos of 552 in that condition, working the Kilmessan-Athboy branch.
-
It's a pity we can't get something like the fast track base in 21mm. That would open up the gauge to many new layouts, especially bigger layouts
It would certainly cut down the time needed to lay plain track, which means you can concentrate on the pointwork.
-
Dear God. What have we started?
Hopefully a move towards 21mm gauge

-
....Dare we ask what's on the list for 2016!
A little bird tells me there might be something from the GNR(I)...
-
Other than Worsley Works, there is virtually nothing available in the kit world for the CDRJC now.
Previously, you could buy kits from Backwoods and Parkside Dundas (ex-Ninelines) and get something running.
The peak of Irish NG kit availability (in 4mm NG terms, anyway) seems to have been early 2000s. If you missed the boat, then you really missed it.
-
....last time I was in contact with the owner Pete McParin he commented that the information on the web site was out of date and no longer prepared to supply the Irish kits.....
That's a real shame.
Just as well I secured one kit to build "Drumboe" long ago. If there aren't to be any more of these kits I might as well scan the etches and do my own if I can get my head around how AutoCAD works.
-
Wondered if it was a Backwoods - 4mm scale, am guessing? Have heard that they are not for the faint hearted, as can be a challenge, but in the right hands [like this model] certainly make up into something splendid.
None of the Backwoods kits are for the faint-hearted, but there is a question mark (allegedly) over whether they are still available.
-
Would anyone be willing to put together a riveted smokebox etch for me?
Would be greatly appreciated.
I don't remember there being one in the kit. If using the smokebox supplied, then rivets would have to be individually pressed into the brass before it's rolled to shape, and I haven't worked out how many rivets the thing's supposed to have.
Might be a bit much to send it over here (London), wait, then pray the smokebox survives Royal Mail and An Post.
-
A worthwhile milestone Harry, well done.
That's not a mess either. This is (or was) rather. http://irishrailwaymodeller.com/attachment.php?attachmentid=11639&d=1391078012
You clearly haven't seen the bombsite I work in.
-
'tis but a flesh wound!
-
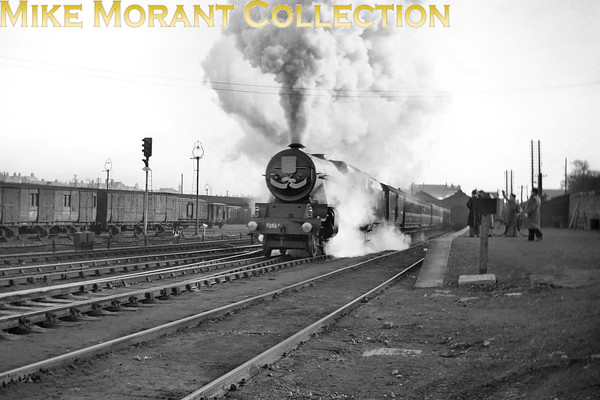
There's a pic floating around with all three 800's together in one place (Cork iirc) with these headboards and flags in place......
Here's a picture from Mike Morant's photo site, showing 801 with the headboards:
The shape of the boards exactly matches the run of the extra handrails.
There is another one of 802 in CIE markings with exactly the same handrail runs on the smokebox door. It looks as though they were applied and never removed, with the exception of no.800. 802 was apparently withdrawn and cut up by about 1957/58, so she may have gone to her grave still bearing the handrails.
-
For any if ye wondering how much £25 pound for the 6 coupled and £30 for an 8 coupled
Very reasonable indeed
Certainly seems an ingenious idea, and cheap when compared with these
10-coupled engines not catered for, though - bad news for builders of 9Fs and WD 2-10-0s, as well as German classes 44/45/50/52/58/94/95, etc.
Only thing I'd be concerned about is the lack of support below - I usually build my frames using a flat surface - e.g. small plate of glass.
-
... If ever a shade perpetuated the "70's is brown" vibe, that did.....
...along with vinyl roofs on cars, unfeasibly-wide flares on trousers, etc. And the hair! What were they thinking of!?
-
....One of the three had some extra bits and pieces on the front too for a while, but I don't know why....
I did wonder whether the vertical / slanted handrails were used as mounts to carry headboards for official visits, e.g. the Papal Nuncio. It seems to have been an expedient solution to a temporary problem, and aesthetics never got a look in.
-
The acres upon acres of grey plastered all over CIE stations in the 70's/80's was quite depressing!
But it was cheap, which suited CIE's pockets down to the ground.
-
Those extra handrails on the door of Macha were fugly.
-
I'm getting back to it shortly for the next stage. Very deceptive angles.
Currently working on Prototype Deltic (again) and Metropolitan Bo-Bo.
-
QED, Jim. Little wonder the Bredins were burned
Can yis see the McDonaghs making a film about this? I'd suppose the title would be "In Bredin"
-
Unfortunately they got rid of burning at the stake...
-
so true about the dirtbags that have nothing else to do but destroy
everything out of pure badness!!! those coaches were historic:mad:
Arson goes on everywhere, but for a while it did feel as though setting things on fire was something that went on in the North, especially the fixation with bonfires.
RPSI also lost a GNRI K15 or two to the arsonists.
-
The death is announced today of veteran actor/comedian Frank Kelly.
He went on the same day as Dermot Morgan.
A good man gone.
-
SSM j26 class
Managed to get this yoke started last night, with soldering the bearings onto the frames[ATTACH=CONFIG]23022[/ATTACH]
The kit comes with the original brass frames, and the more modern nickel silver one. The more modern one is recommended. The original one is designed for compensated frames.[ATTACH=CONFIG]23023[/ATTACH]
Bits and bobs[ATTACH=CONFIG]23024[/ATTACH]
The two types of frames are not interchangeable, as there are slight differences in wheelbase, most likely because of the etch artwork. You can't use the coupling rods from one on the other unless you modify the openings for the hornblocks.


Possible Provincial Wagons Steam Loco
in News
Posted
If you know what the GN wheelbase is, then your only problem is finding the RTR chassis to match. Modern RTR production means very uncertain spares availability, so good luck finding sufficient quantities of complete chassis. Both Bachmann and Hornby can be very unhelpful.
A 101/J15 had a 7'3 x 8'3" chassis, so technically you could use a GW Pannier or Dean Goods as a basis.