
Horsetan
-
Posts
2,095 -
Joined
-
Last visited
-
Days Won
4
Content Type
Profiles
Forums
Resource Library
Events
Gallery
Blogs
Store
Community Map
Posts posted by Horsetan
-
-
...The existence of " knock " specials allows a crazy number of passanger trains in the station at any one time ( upwards of 30 locos and 160 carriages )
That would be a shunting challenge without equal.
-
Hi all
Meant to get photos of the donor and model up.....
I'm sure they'll be worth it - and everyone will wonder why they hadn't thought of it before.
I was looking at Penbits, which makes P4-compatible sprung suspensions for diesel bogies. Next time I see them at a show (probably next April/May), I'll ask if they'd consider Irish diesels, especially for 21mm gauge.
-
.... junction extraordinaire.
It certainly was before the track layout was rationalised and everything went CTC in recent years.
There must be some sort of building plans for Claremorris in existence in an archive somewhere, otherwise it's going to have to be a case of asking IE/IR's permission to measure up the various structures....
-
I take it you've given up on doing Limerick Junction, then.

-
In other words, "Limerick Junction is the maddest thing we've yet seen."
Even the partial diagrams in this thread are like spaghetti.
-
 1
1
-
-
Two MM baby GMs went for sensible money earlier this evening. Sold from Ireland.
MM0141 http://www.ebay.ie/itm/321946279386?_trksid=p2055119.m1438.l2649&ssPageName=STRK%3AMEBIDX%3AIT €83
MM0181 http://www.ebay.ie/itm/321946290979?_trksid=p2055119.m1438.l2649&ssPageName=STRK%3AMEBIDX%3AIT €108
I had a go at the second one, but forgot about it.
-
:banana:
-
If he had a 70's CIE buffet, maybe. With the little jam pots with the cie logo on them. Always thought those were so cool, but then I was 7...
He'll build one for ye. All he needs is the info from ye.....and some money.
Pure Gold...
Kerrygold.
-
Several stands with stuff like these at the Reading Trade Show two weeks ago. They are even better 'in the flesh' as it were. Loveless, Masterpiece too & just as good, but each the price of a fairly decent second hand car. A full train would cost as much as a decent new one...
A brand-new Dacia will cost ye less than a 4mm scale engine built by Stella Artois.
-
That Rocar fella doesn't seem to have any info about ordering, or prices - does he do commissions, I wonder, or did I just miss something?
Here's his details:
Rod Cooper, The Halt, Roshven, Lochailort, Invernesshire PH38 4NB Tel +44 1687 470284
-
I'm loving that buffet detail.
Tempted?
-
and a nice kitbuilt loco to pull them I expect.....
If you can afford Rocar coaches, you can also afford to commission "Stella Artois" to build your engines. Prices start at a few grand. Something like a GSR "800" 4-6-0 would most likely cost five figures, with the decimal point after....
-
How much we talking Ivan?
Loads.
At least 400 quid a coach. But yer man puts everything into it - working gangways, curtains, carpeting.....the works.
-
....Fancy losing about a grand by torching those boxes??
Unfortunately, you need the boxes for things like that.
Coaches like that are so expensive, you'd be afraid to run them....and certainly not at a show where you'd be paranoid they'd get stolen.
Mind, though, Golden Age coaches are cheap (and not very well-detailed) compared to the ones made by this fella
-
Probably just a placeholder 'cos he has none in stock.
-
.....Here's a 1950 pic..... note original goods shed office
[ATTACH=CONFIG]21774[/ATTACH]
And one from 1960 , pen gone shed office new
[ATTACH=CONFIG]21775[/ATTACH]
Copyright o'dea collection , Nli
It looks like the shed office was extended rather than being a completely new building. You can still see the original brick/stonework and windows on the 1960 photo.
-
There'll always be some driver trying to jump the gun regardless. The only way to stop them is to shoot them.
-
Interestingly, Hollywood Foundry does sell a 21mm x 21mm motor bogie, but it's for 12mm gauge....
Interesting, but feckin' expensive.
JHB check out Cheltenham Model Center website CL 55 were £39.99 brand new & they were in stock last week -
Des does your kit contain the etched detail parts
Certainly does....
-
Yes, it is 24mm + 24mm
Excellent. Thanks to the man there.
-
Does anyone know what the wheelbase measurement of the Railroad 55 bogie actually is?
-
.....- roughly what's the cost of the Sulzer body PLUS a suitable chassis (class 55, for example)?
Assume Des will charge 75 Euro (about £54) for his "new run" body moulding.
A new Class 55 power bogie is about 44.7 Euro (£32.44), and a used one is 27.3 Euro (about £27), whilst an unpowered one is 32.4 Euro (£23.52) if you pick the current Railroad one, or 8.26 Euro (£6) if you pick the Lima one
-
-
ref the signalling diagram, That was a " reconstruction " of the pre CTC installation. and is the current one in the cabin if you visit today. The O'dea collection shows the diagram from the 60s when the burma road was in operation and in my view is a better starting place then the one shown above ( which I also photographed), unfortunately for the station anniversary the signal cabin was renovated by ex signal men, and in that regards is not a correct representation ( the signal levers etc are a bit wrong ) signals were also somewhat renumbered as advanced starters were added and some levers re-tasked ....
There's a lot of TippEx all over the left of the diagram!
If I had the space to model Claremorris, I'd be wanting to show the track layout and signalling at its peak, i.e. the '60s rather than the rationalised scheme that exists today.
....Replacing slated roof with corrugated for the sake of saving a few shekels on support and maintenance??? Now THAT is cheap and nasty.Thing is, that was a bit more widespread. The Donegal did something similar when replacing the canvas roofs on some of its wagons with corrugated sheet.

 :banana:

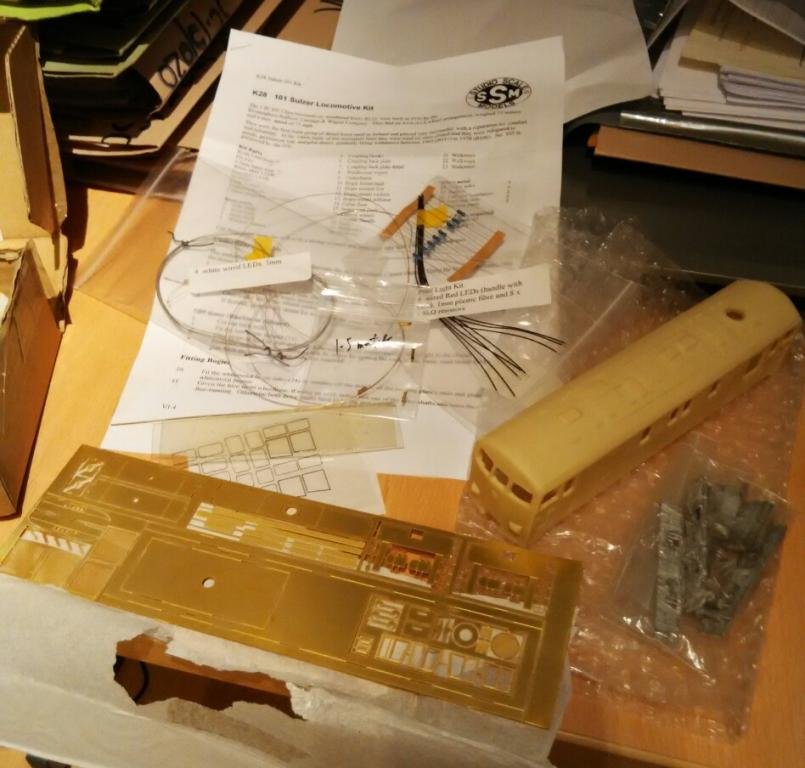

Sulzer Kit
in Irish Models
Posted
...and they work.
I picked up a kit to do the Prototype Deltic, and another for the Hymek.
The prospect of Irish diesel sprung bogie kits is surely tempting.