
Mayner
-
Posts
5,036 -
Joined
-
Last visited
-
Days Won
126
Content Type
Profiles
Forums
Events
Gallery
Blogs
Community Map
Posts posted by Mayner
-
-
Read through the thread and in some cases seemed like groundhog day or re-discovering things/problems I wrote about nine or so years ago, each day is a brand new adventure.
Anyway this mornings 'lightbulb' moment was my planning to number the supeheated J15 191, I built a model of 191 a saturated J15 based on a colour photo in Irish Railways in Colour a second glance" over 30 years ago. Looked up the 'bible" Locomotiver of the GSR and sure enough she is listed as a saturated loco. Turned out I was using a photo of 181 a superheated engine from Irish Railways "Transports of Delight" website.
Anyway almost finished soldering the main components and some detail work on 181 & 229 (apart from brake gear) before cleaning up the models for final detailing and painting stage.
Almost but not quite there todays progress with 181 & 229

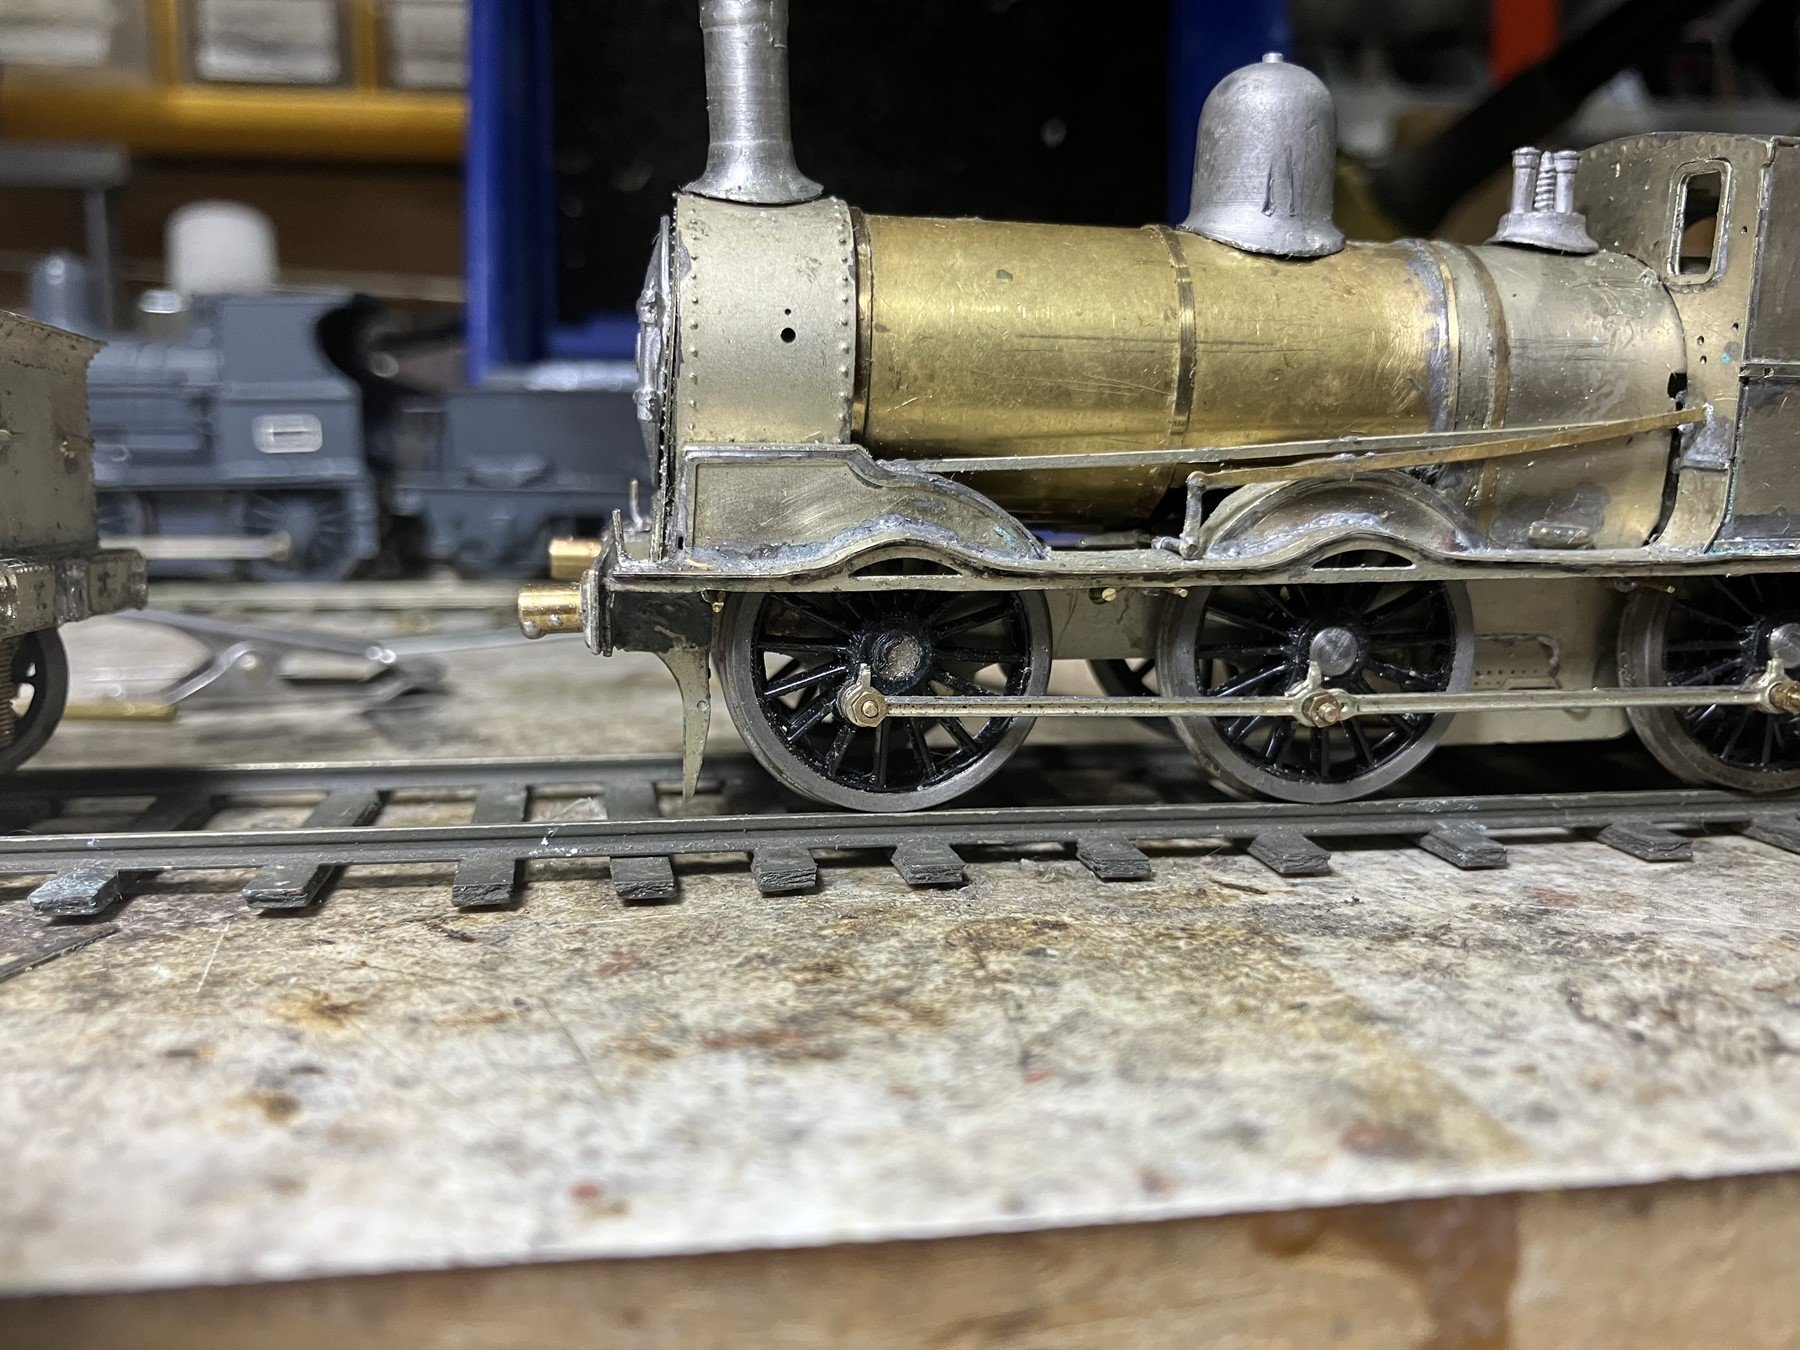
Mainframe assembly complete 191, lamp irons fitted front end both locos.
Classical TMD J15 front end, shallow mainframes, guardirons/cosmetic front frames intergral with loco body (mainframes end more or less flush with smokebox front hiden behind cosmetic frames/guardirons.
3/4 front view saturated J15, open area between bufferbeam and cylinder block/smokebox front!
J15 as rebuilt with new heavier frames and superheated boiler 1930s, some superheated J15 notabably 101 retained their original frames!. Frames & guardirons on this model are based on photos I took of 186 during a short visit to Ireland from Scotland in 1994.
Not the most noticeable feature, I have infilled the area between the bufferbeam and smokebox and modeled the franes projecting above the running board in this area.
Buffers (Markits?) just temporarily fitted after opening out holes in buffer beams with needle files/broach, but foul on tender brake hangers so possibly substitute with Alan Gibson
Thankfully I located enough crankpin bushes to complete 181 and have sufficient detail parts in stock to complete both locos.
-
 3
3
-
-
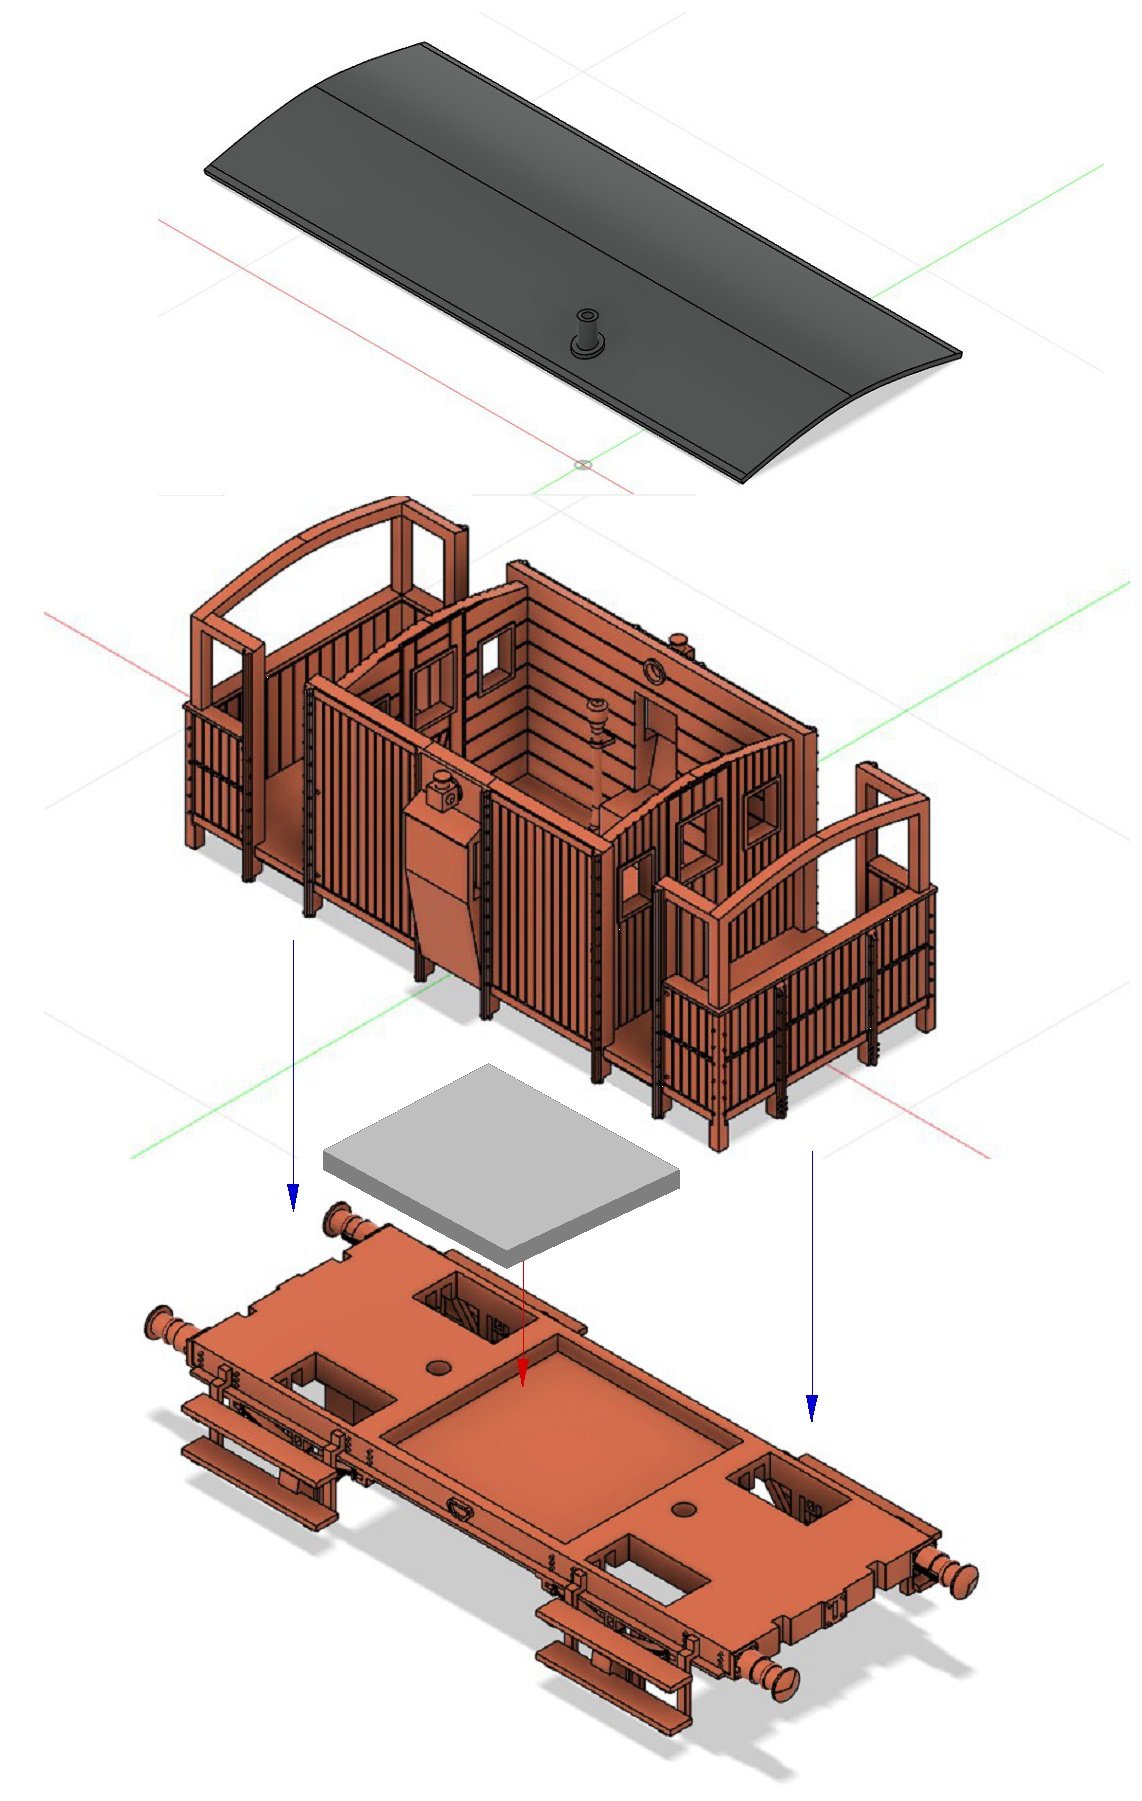
While its feasible (with a suitable choice of resin & printer) to print a wagon with separate body, chassis and roof its often simpler, quicker and cheaper to produce a wagon as a single print.
The JM Design range of wagons were printed in full size 'bottom up" printers using specialist engineering resins in print houses in New Zealand, Singapore & China. In the end our Chinese print house proved the only one capable of consistently delivering consistent high quality prints at a reasonable cost.
Interestingly packaging (card box & foam insert) was a significant cost factor, also wheelsets, couplings, decals & paint (all quantities).
Being located in New Zealand business was registered for GST (local equivalent of Vat) in order to claim back GST/VAT paid on expenses plus annual Accountancy Fees for business accounts, soo selling kits or model trains is an expensive business with hidden costs.
Enda @Past-Avenue produces a modified version of my Grain Wagon under license as it was not feasible to reliably print the original verison on his printer.
In the end I discontinued producing 3D printed wagons, with relatively low level of demand for Irish outline kits/batch built RTR items it was not worth the effort financially
-
4
-
-
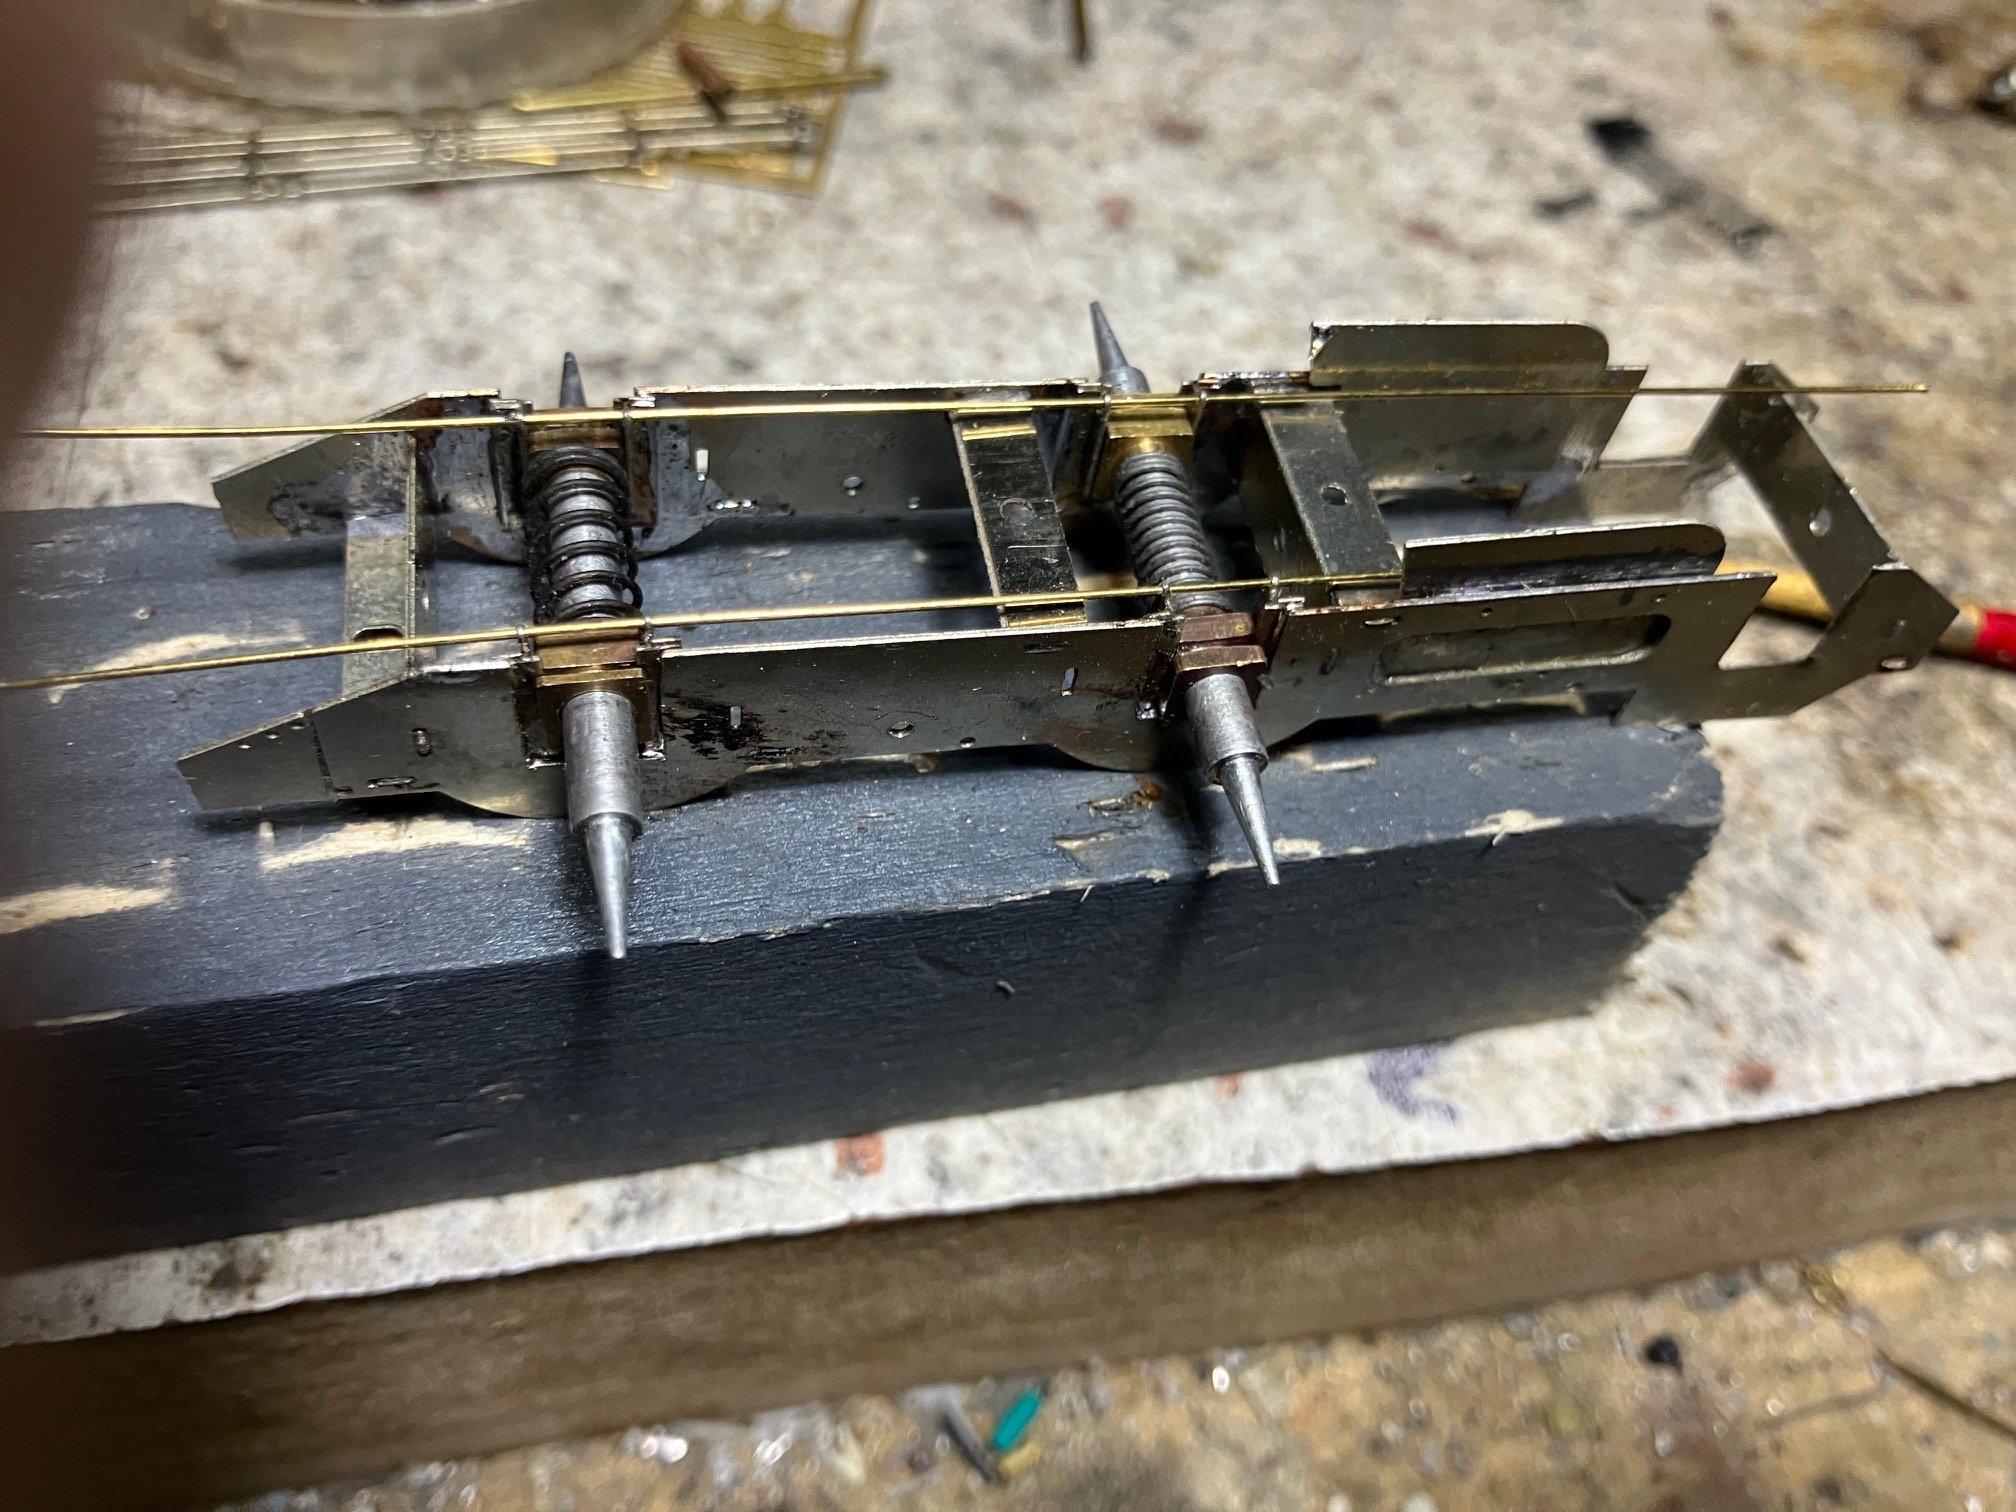
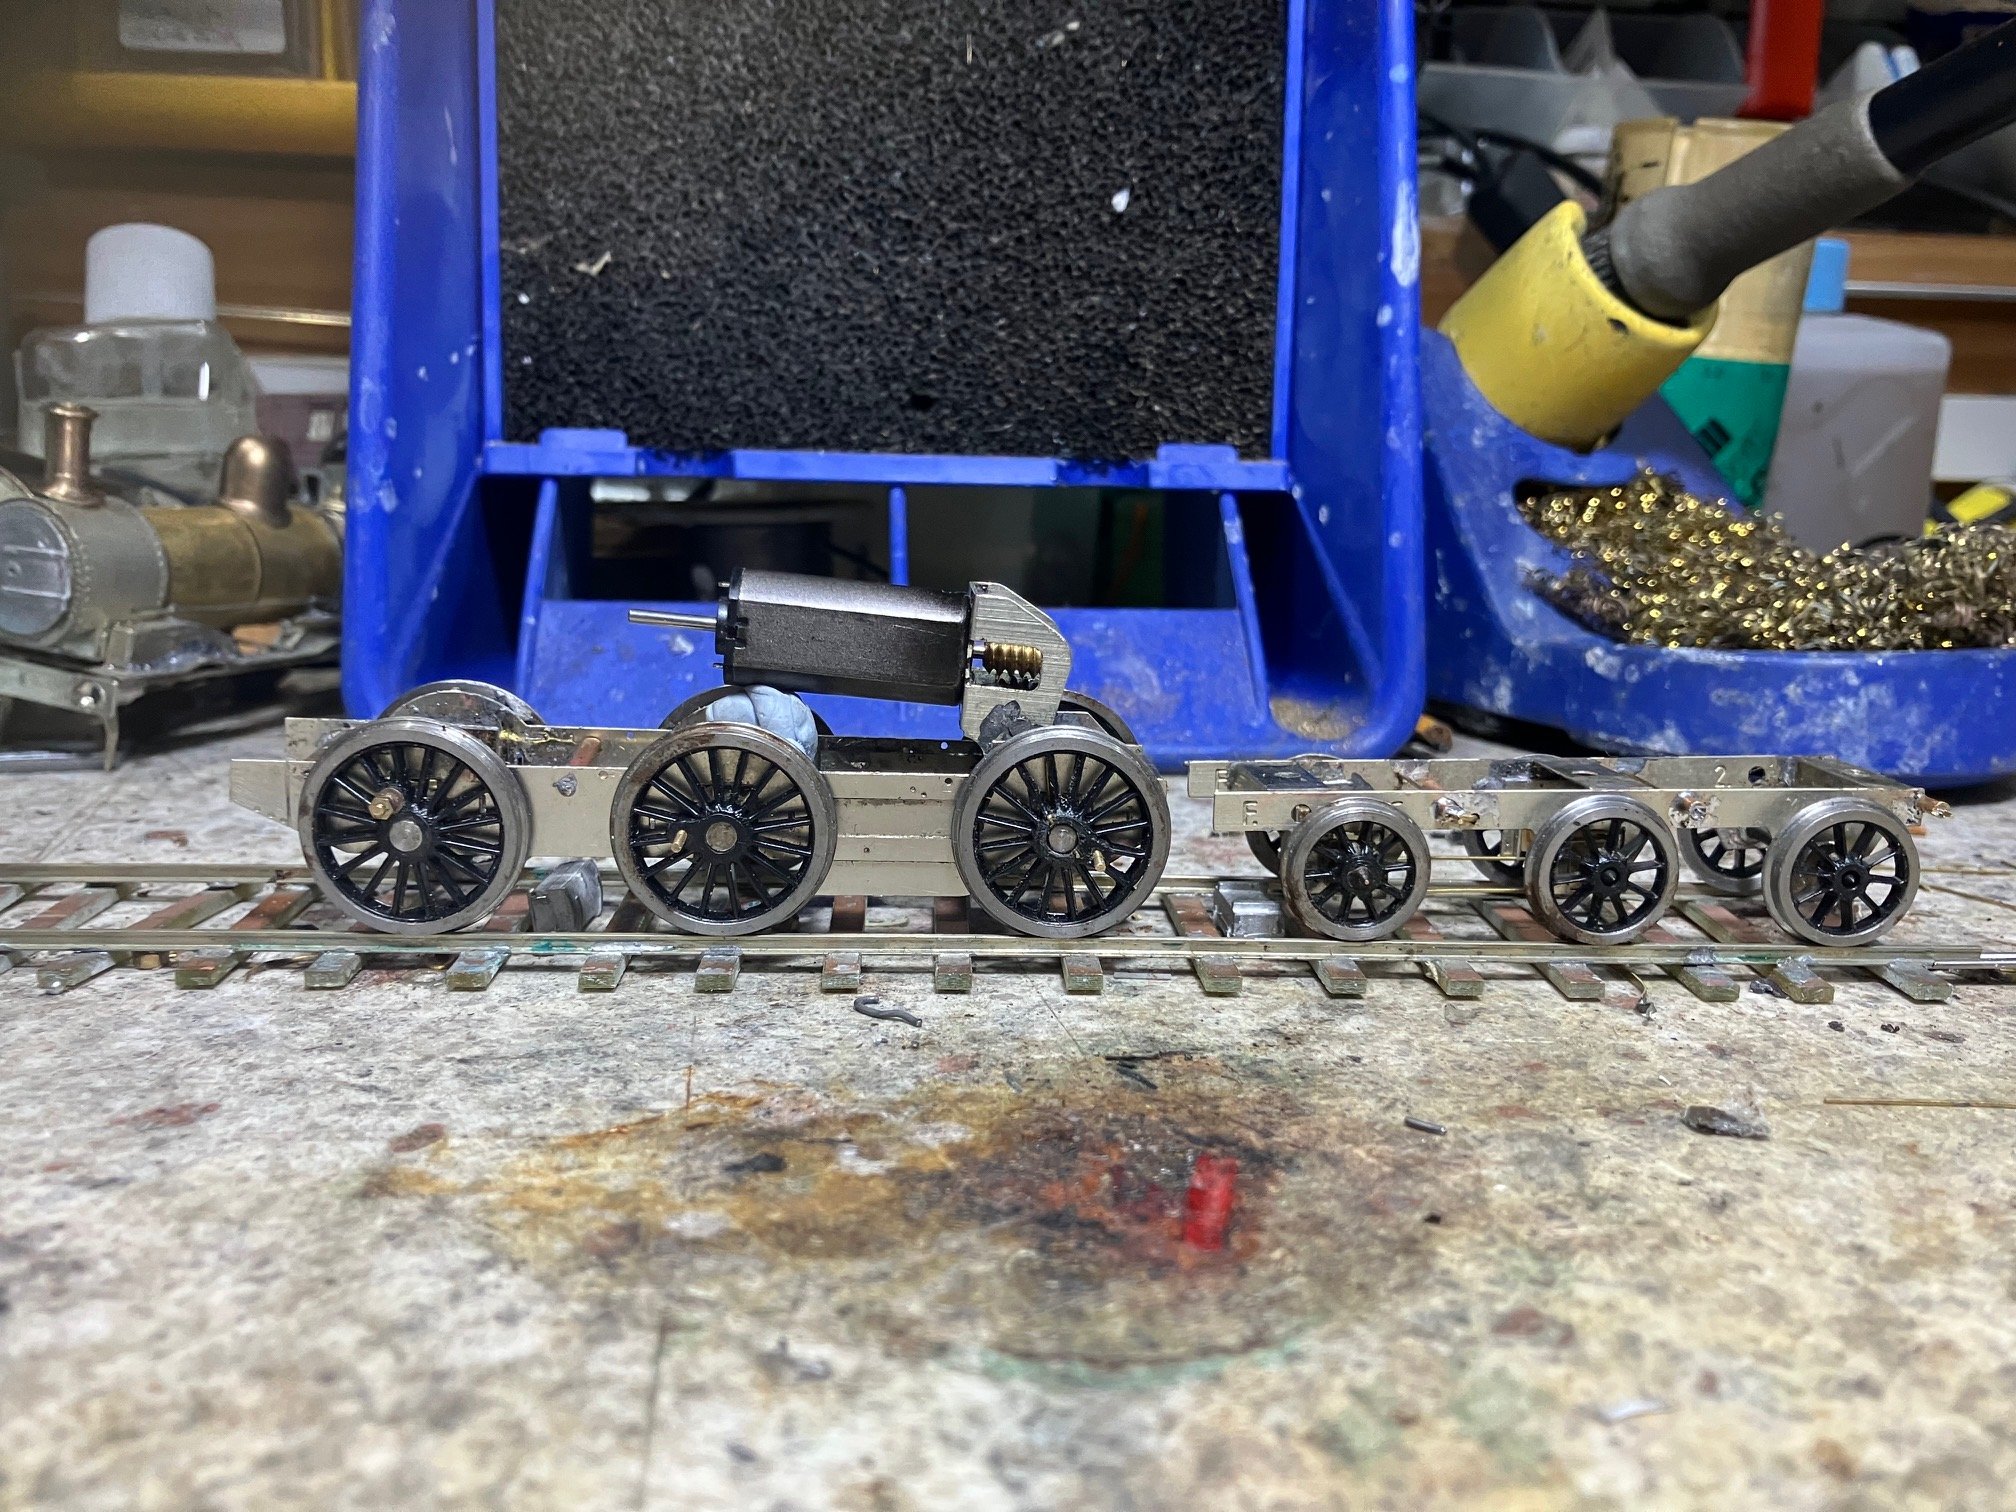
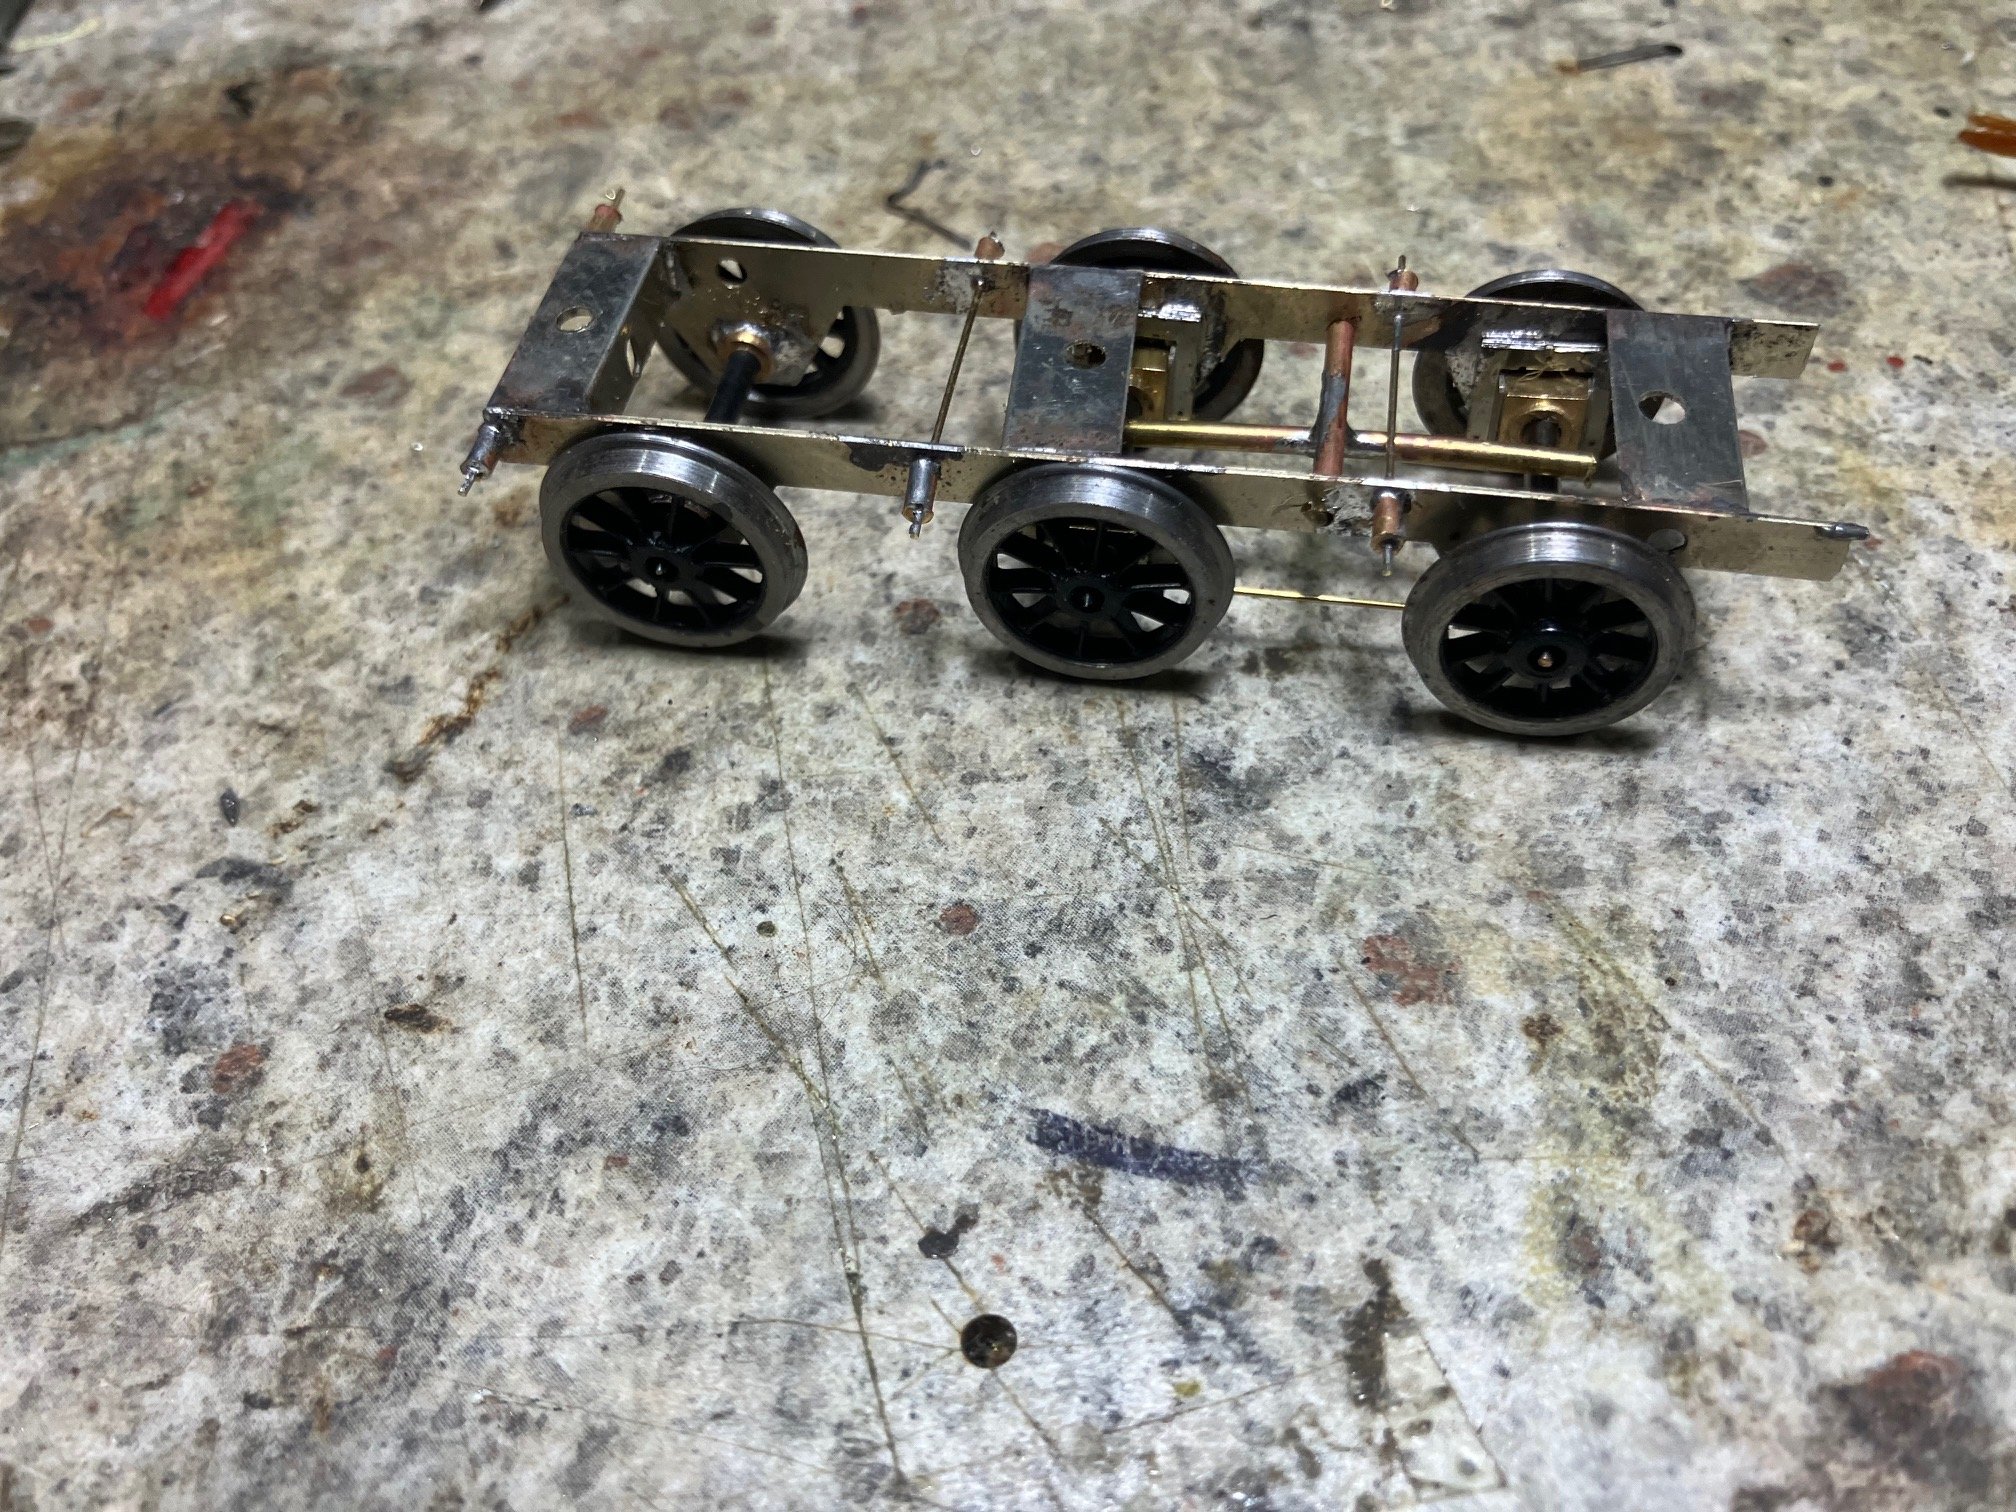
I ended up biting the bullet and replacing 191s mainframes. I originally assembled the chassis using the frames from my orignal test etch for a superheated J15 conversion and later discovered the frame spacers were a bit narrow for a 21mm gauge loco as a result of my choice of combination of gearbox and hornblocks
 . The High Level LoadHauler Compact gearbox chosen is considerably wider (11.8mm) than other gearboxes in the High Level range and my selection of a removable wheelset in hornblocks for the driven axle takes up more space (width) than a rigidly mounted driven axle in top hat bearings conventionally used with compensated or rigid chassis. I have successfully used the "narrower' High Level RoadRunner gearbox with rigid chassis in OO.
I decided to assemble 191s new (slighlly wider chassis) as a compenated chassis using High Level hornblocks on all axles, chassis is all solder construction with L shaped fold-up frame spacers with slot and tab construction to simplify alignment.
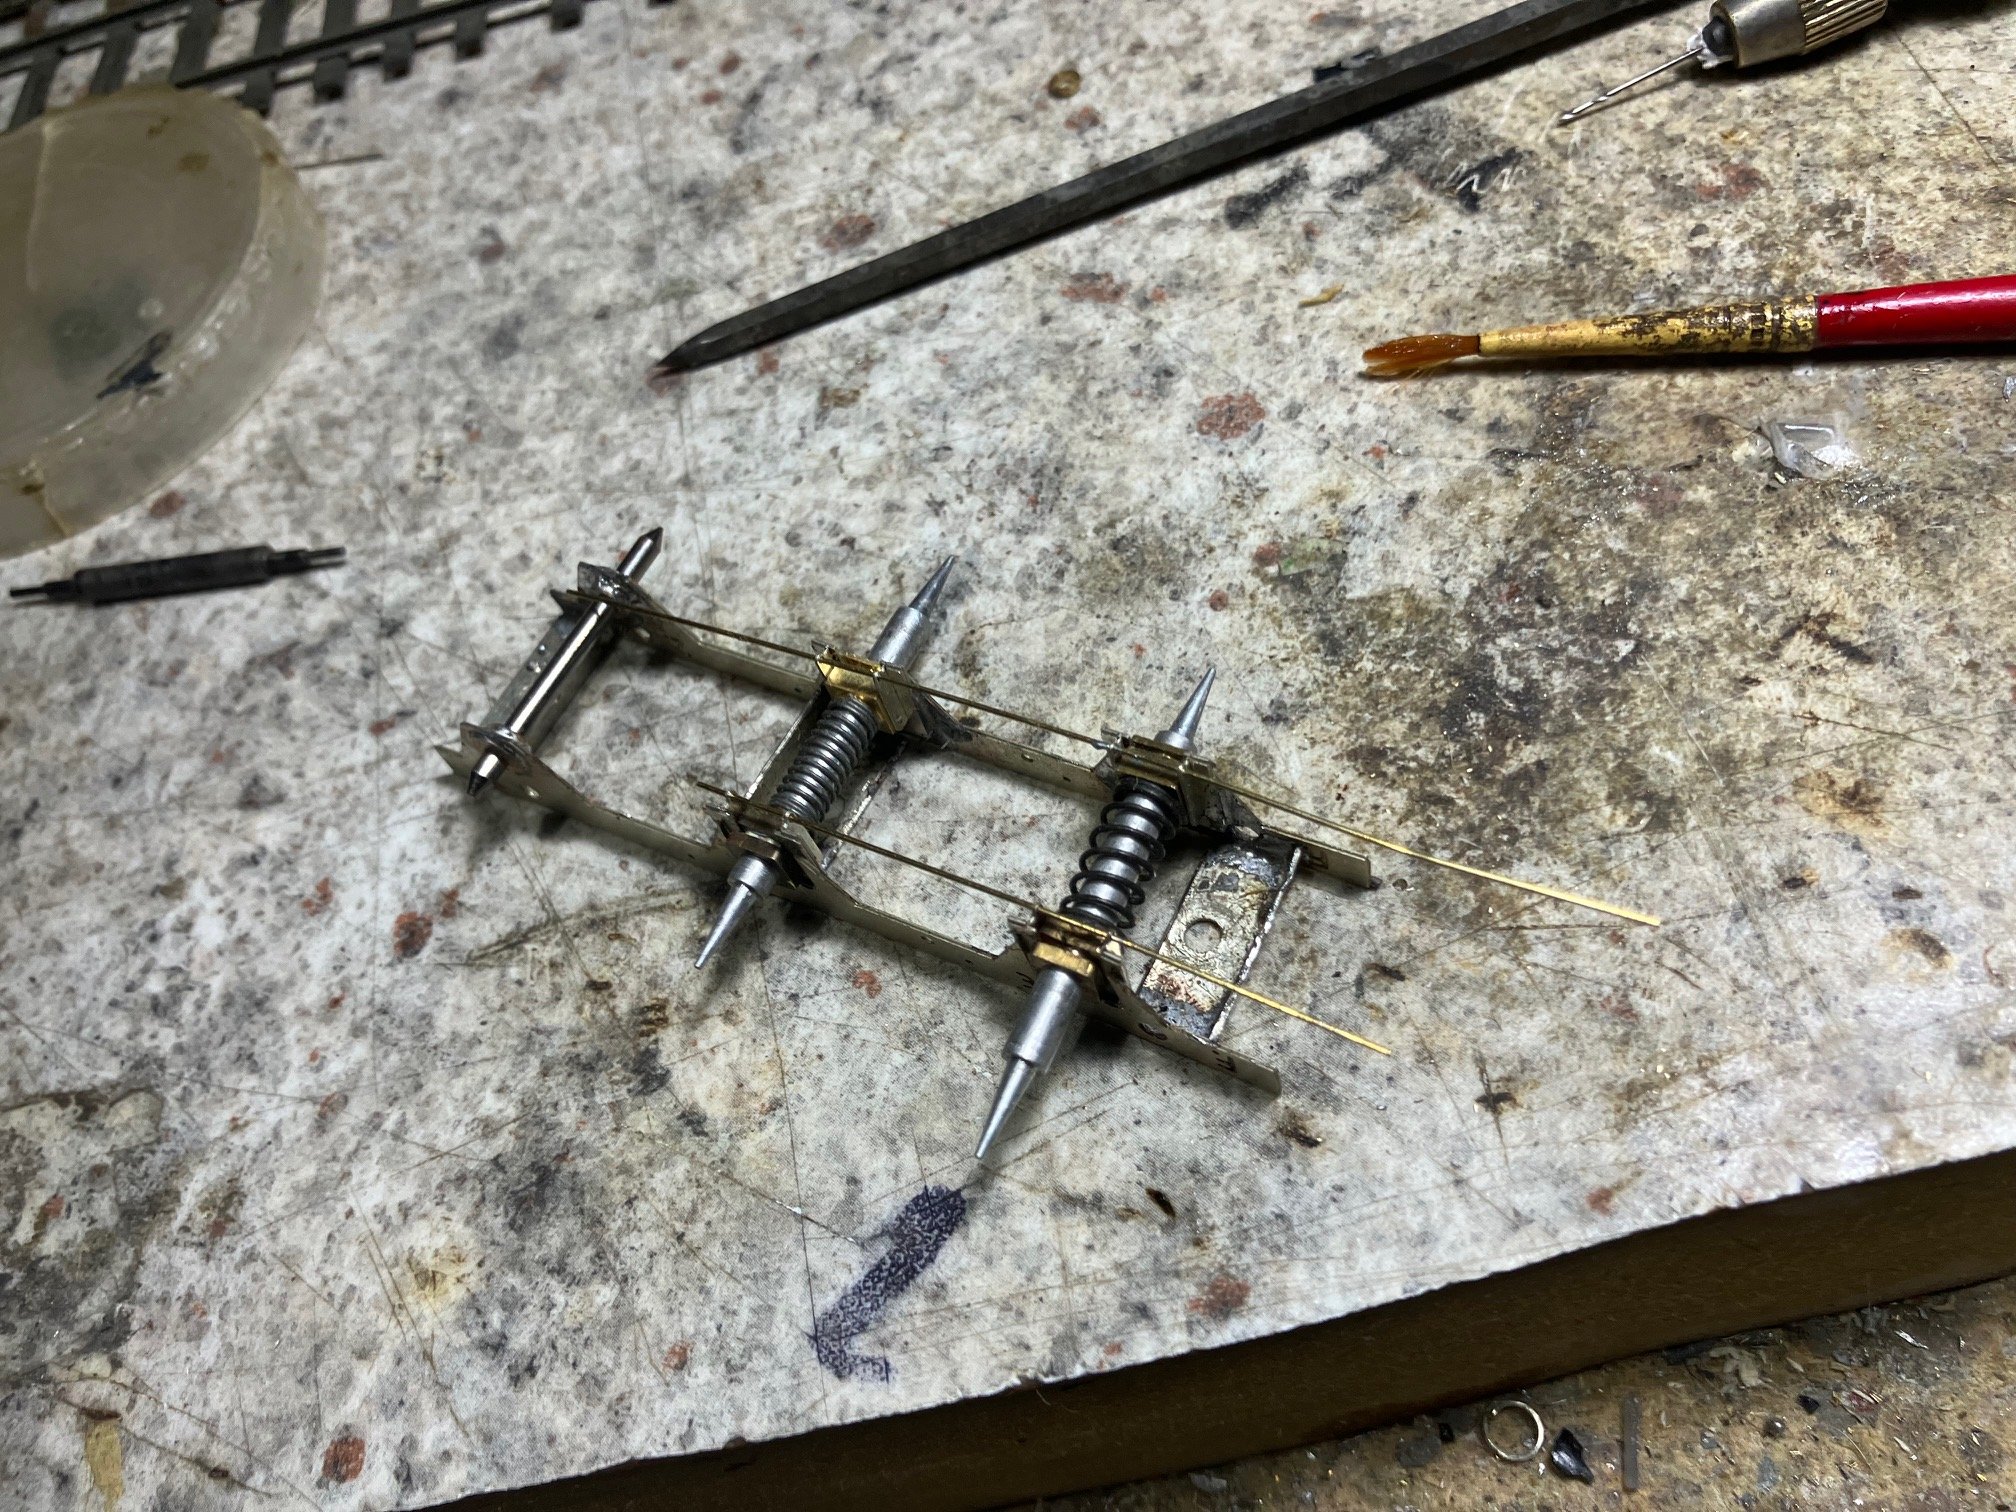
Hornblock Jig is a bit of a mess, mixture of springs and extended axles from different alignment jigs. In this case preparing to align a pair of axles at a time on an 0-6-0 having only 2 springs!
One of the advantages of the High Level hornblock is that they are simpler to set up and align than other brands. The hornblock incorporates a stop useful in setting the hornblocks at a consistent height, while the holes in the hornblock guides help maintain (all important vertical) alignment while setting up/soldering the hornblocks. In this case 0.45mm wire threaded through the holes!
Aligning the hornblocks '2 axles at a time" cause I only have 2 springs! Coupling rods have been opened out with a tapered broach rods secured temp with solder wire.
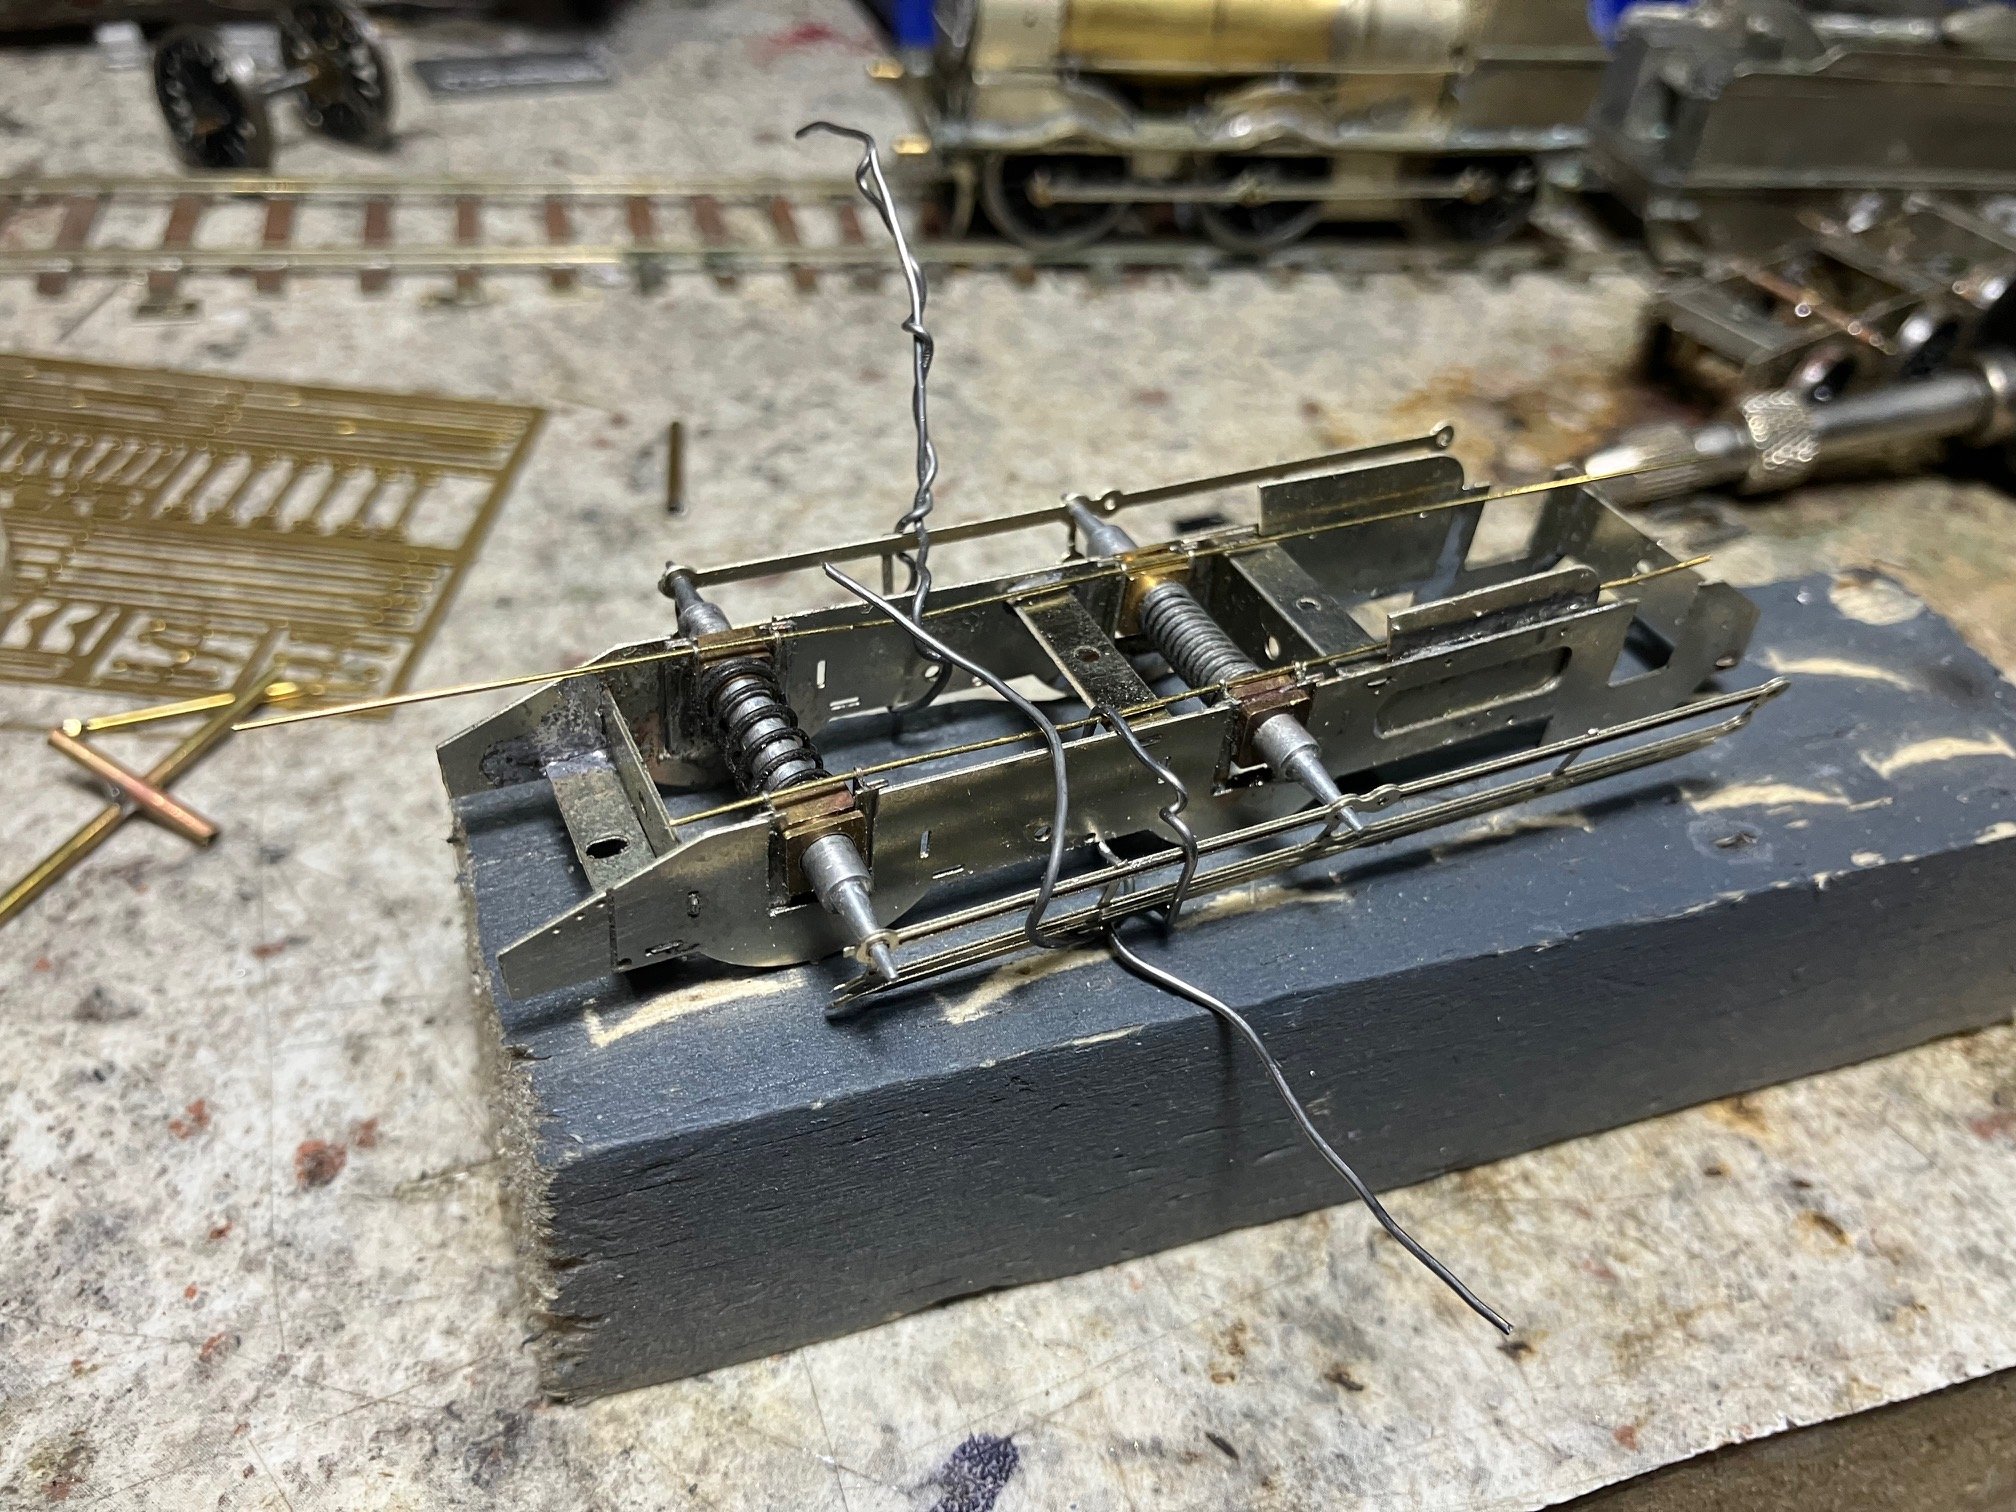
Trailing hornblocks and axle now set up, ends of jig pushed into a block of balsa. Compensation beam fitted to floating axles. Trailing (fixed) hornblocks stop/ride height app 0.5mm below floating axles.
I have began to prefer the tapered hornblock alignment jigs as the original stepped alignment jigs were less accurate, sometimes leading to binding coupling rods. The step diameter was inconsistent between different sides of the jig. With the tapered version the rod can be pressed home until it stops.
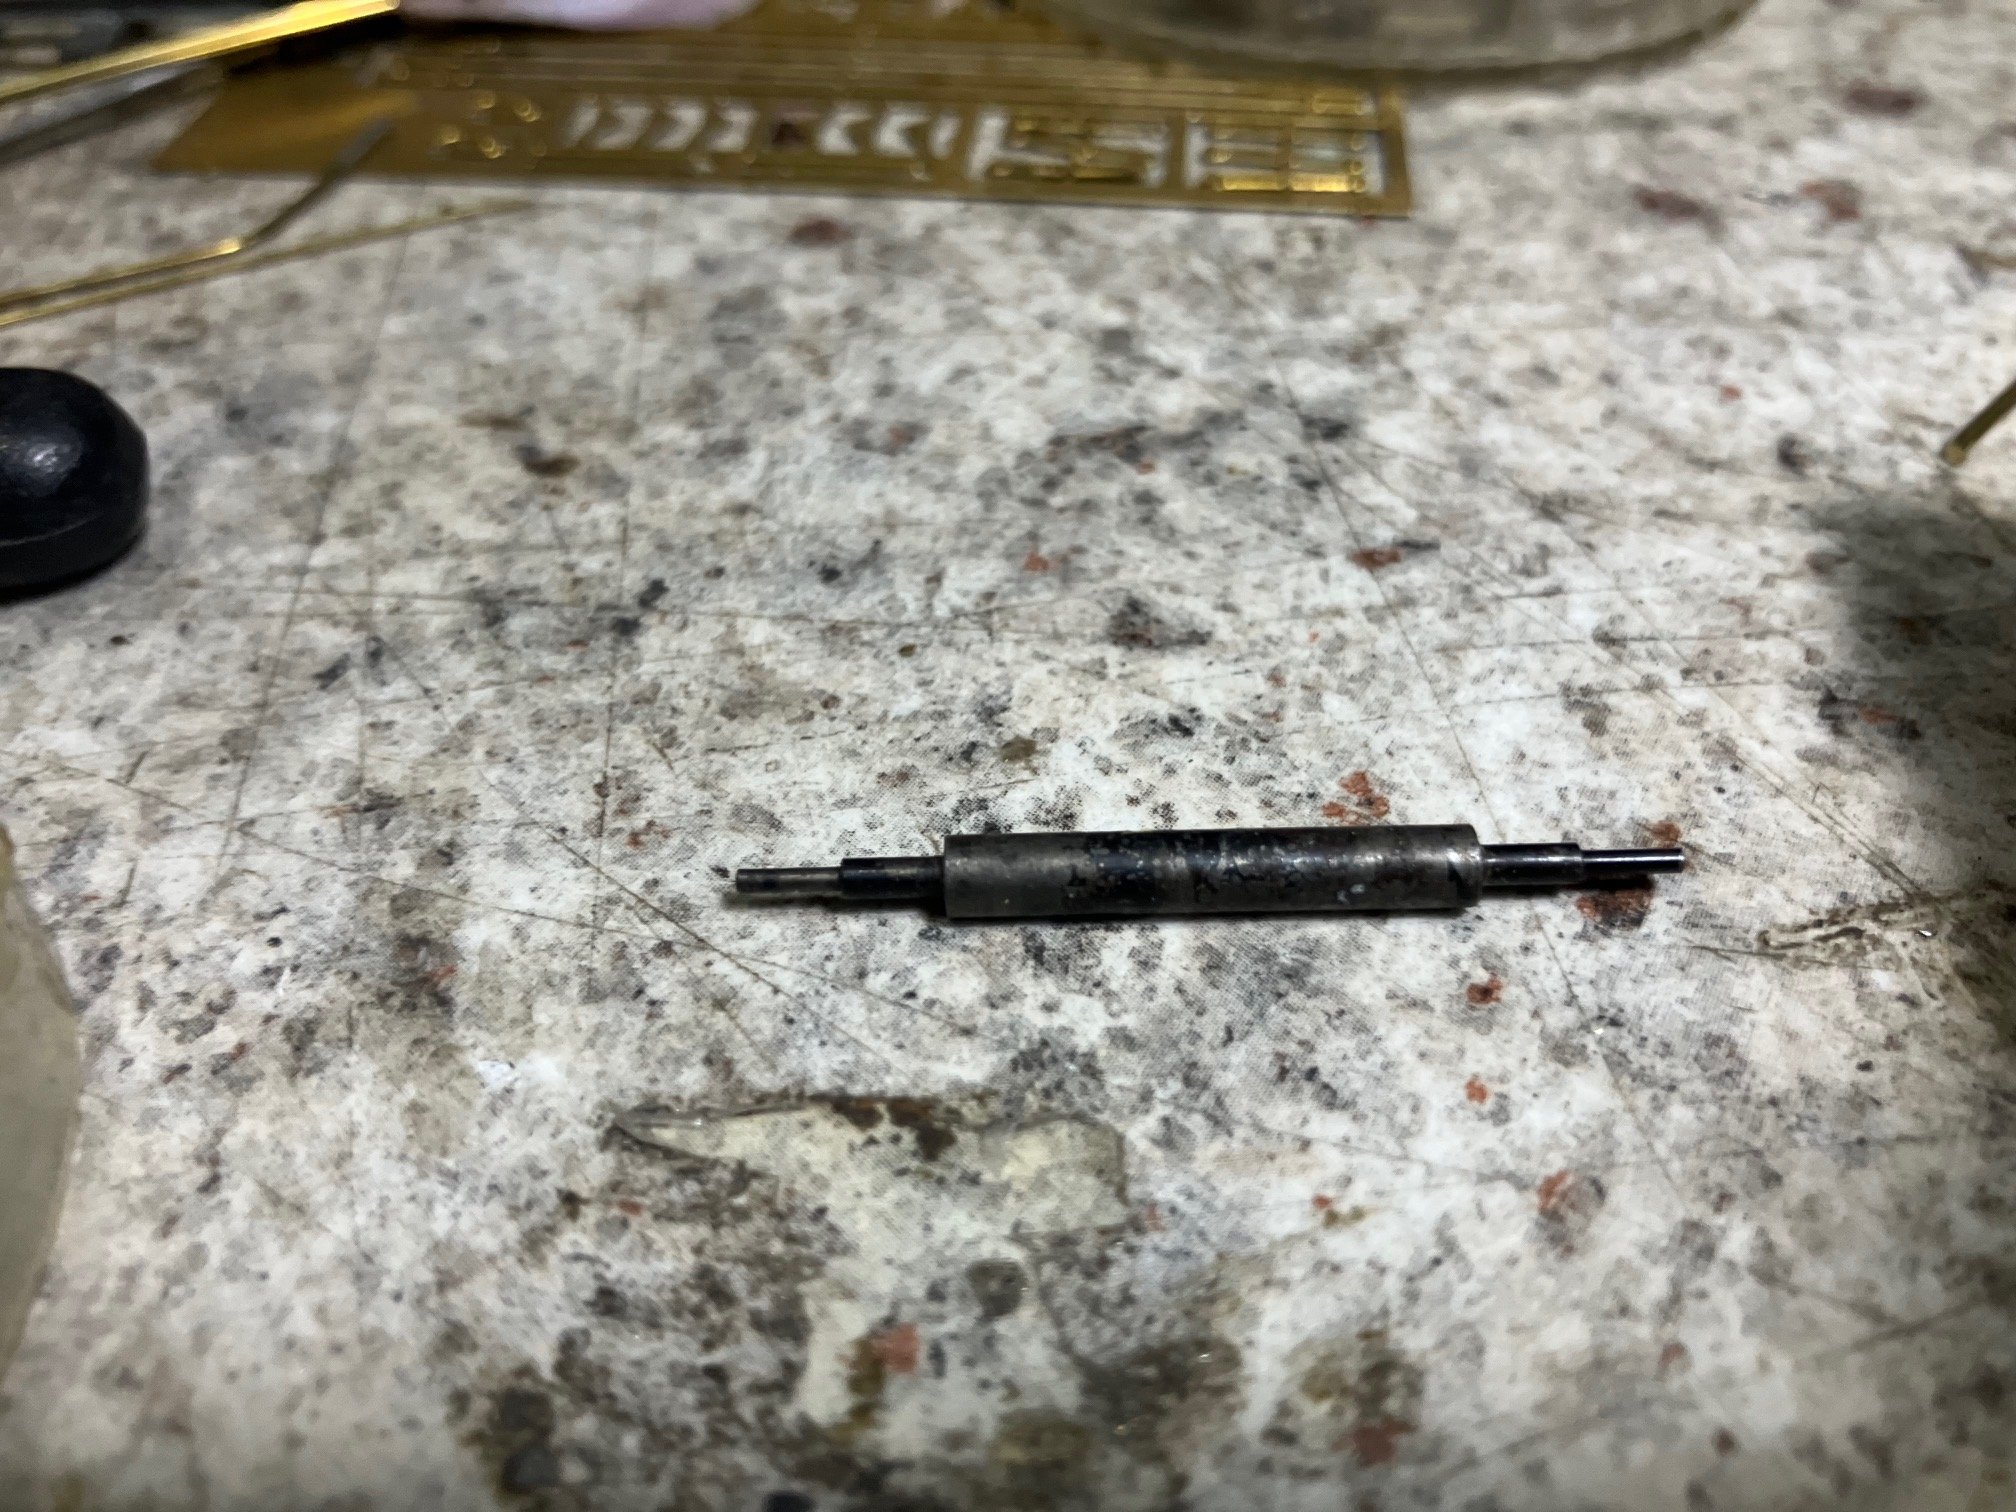
191 temporarily on its wheels. Next job laminated coupling rods, levek chassis and assemble brake gear (loco & tender) and find/locate coupling rod brushes. and hopefully test chassis.
-
8
-
-
8 hours ago, jhb171achill said:
There's one in every packet, isn't there! If I could wax lyrical on the ineptitude of various bosses I had over the years in the bank, I'd be here all night............. a few good, most adequate, a few woefully, catastrophically disastrous....
On major construction projects we used to talk about managers being promoted to the level of this own incompetency. One valuable skill set in the boom times was jumping ship to a higher paid/more prestigious role before the shit hit the fan/chickens came home to roost in your current role. I tended to end up in the 'problem solver" role cleaning up the mess, but as I got older probabably reached my own level of incompetency proving the rule.
During the 90s a good friend/drinking buddy was a highly paid 'consultant' leading an IT project with his 'team' for a major UK insurer. Client eventually became alarmed (high cost & slow progress) sacked the consultant and his team, but first gave them a glowing reference to a competitor friend managed to repeat the process a couple of time almost destroying his reputation/health, but still survives
-
2
-
 1
1
-
-
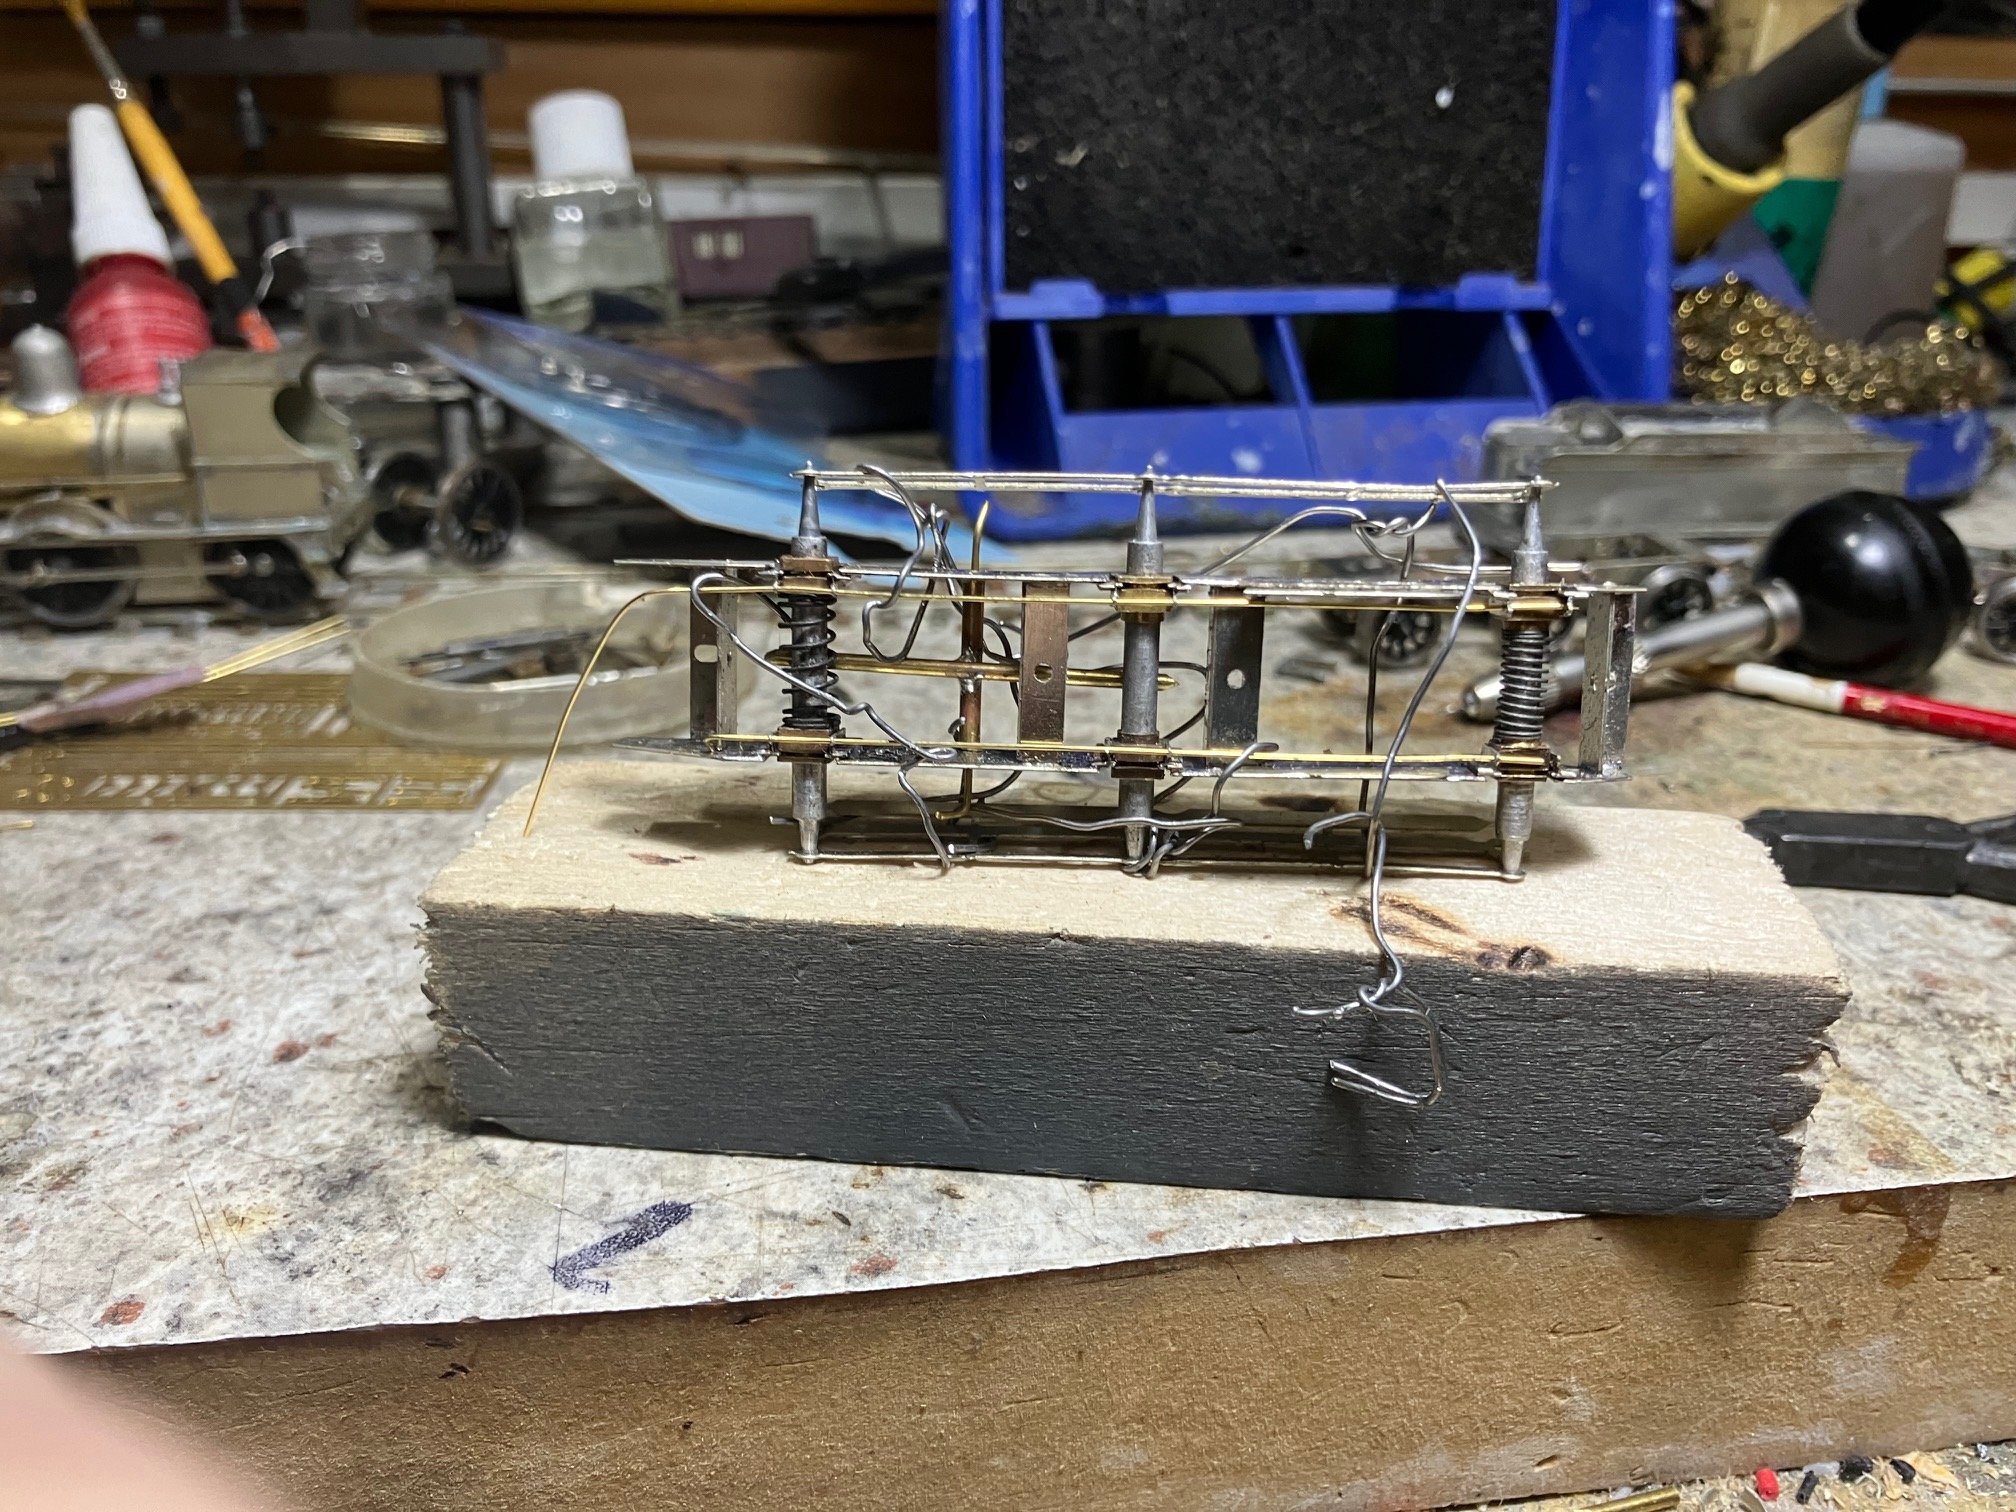
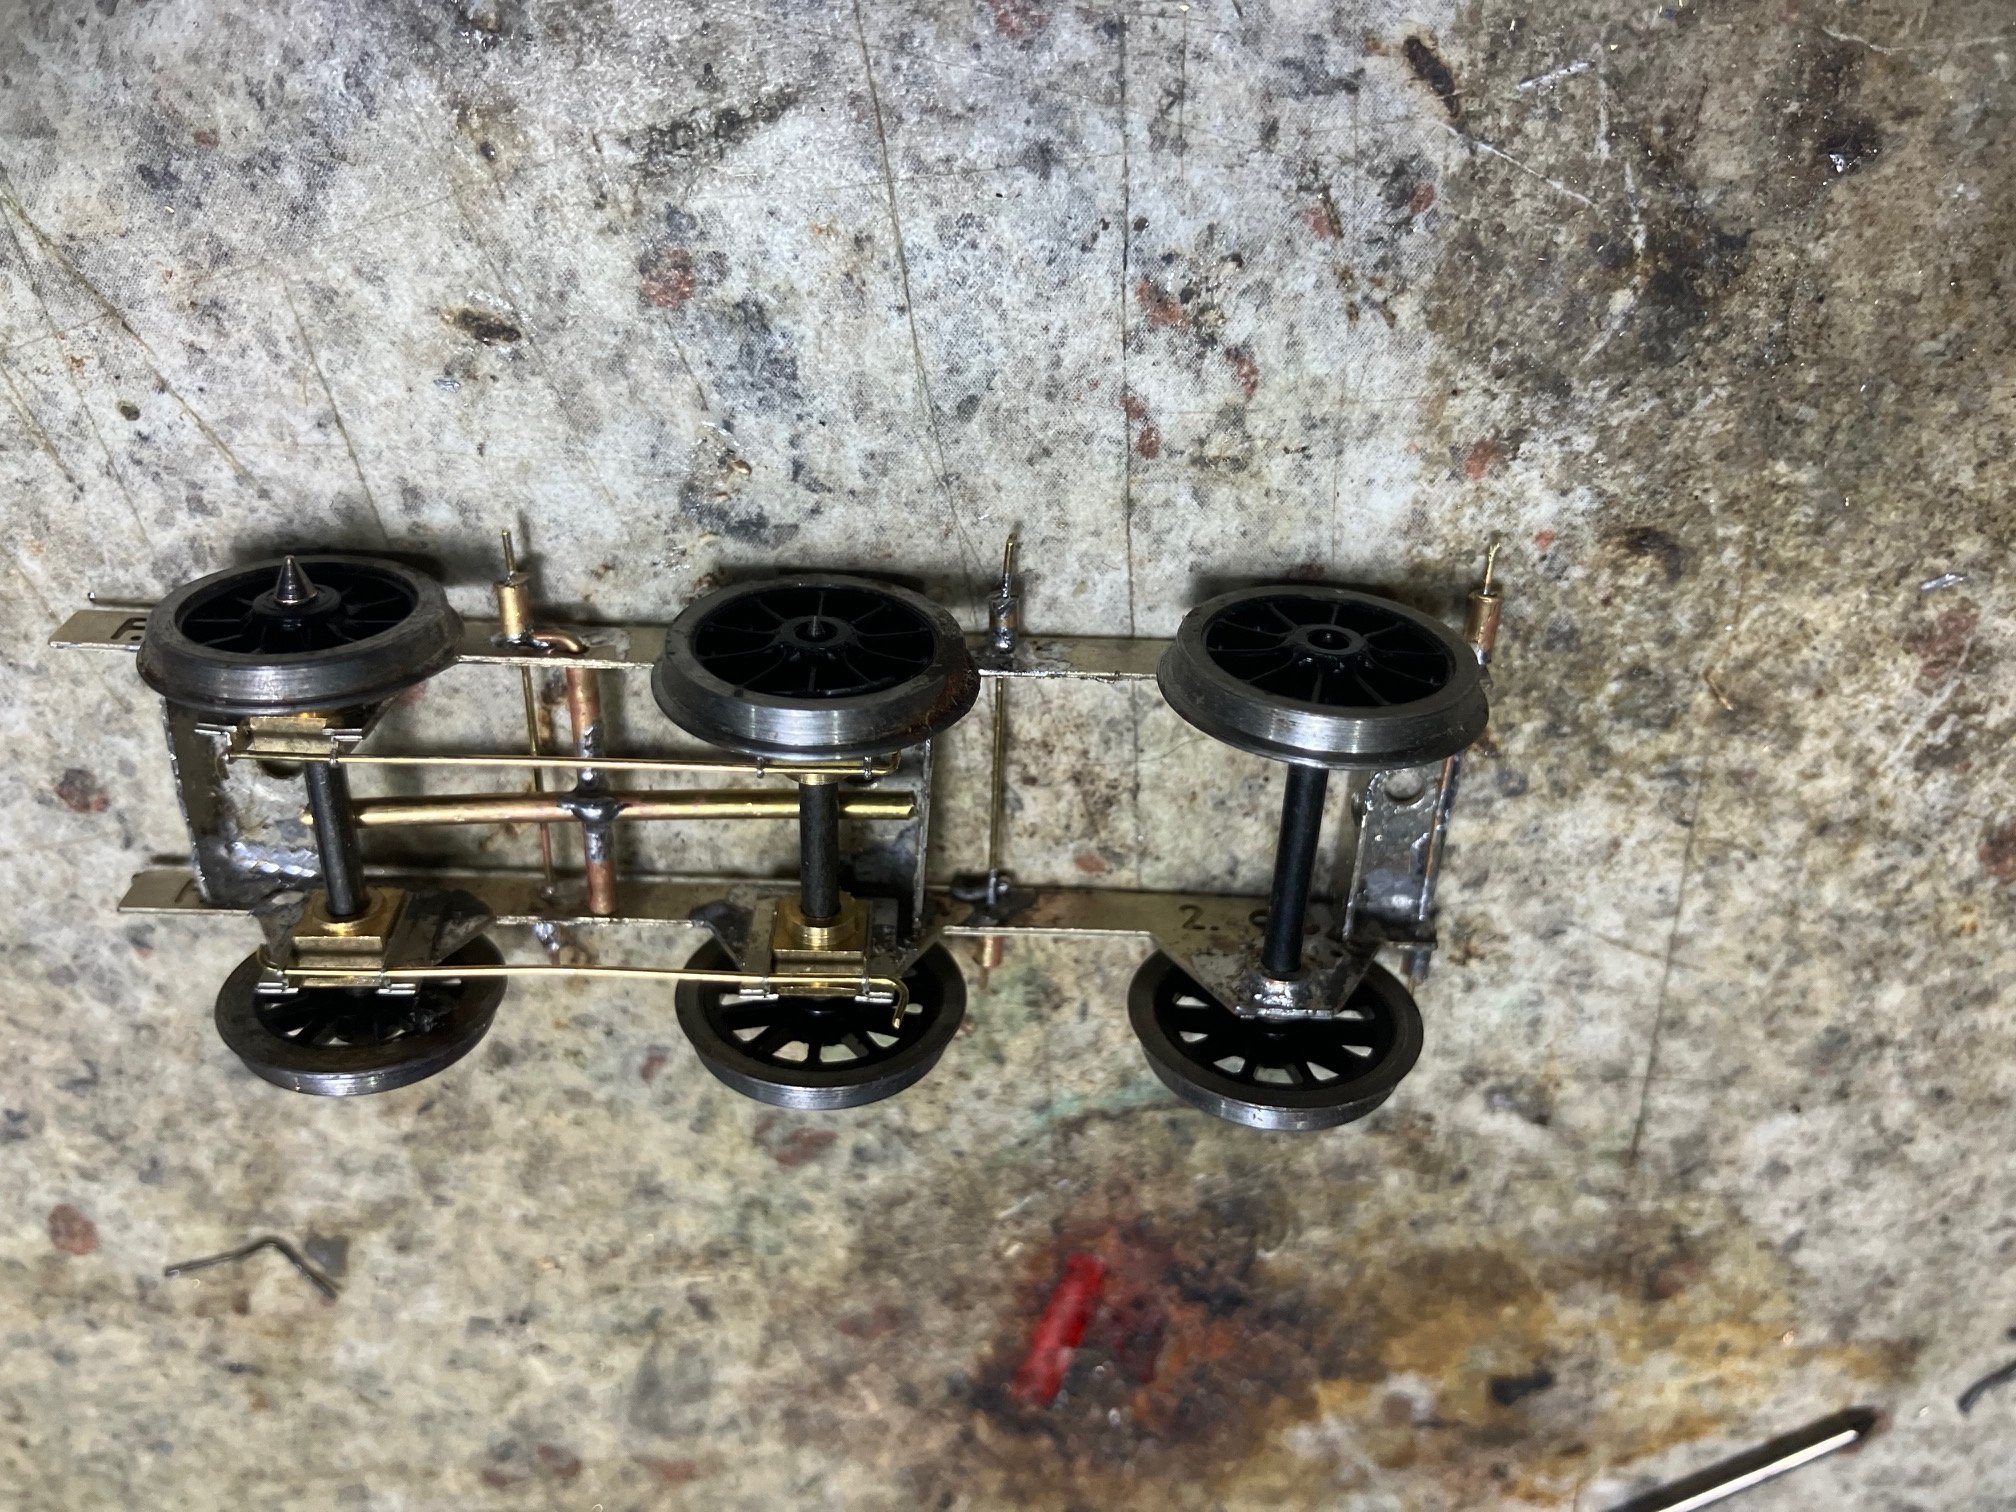
Some more progress on the GSWR Type A tender chassis.
Fitted a pair of 2mm top hat brushes to the rear/fixed axle soldered in place than reamed out to clear 2mm axle.
Fitted Hi-Level hornblocks and brushes for the compensated axles. Used 1/8" brushes and alignment jigs for setting up and soldering hornblocks. (I had the alignment jigs for many-many years '-) 0.45mm wire threaded through holes in hornguides assist to align hornbocks.
Almost a running chassis, 2mm hornblock bushes & wheels (temp) fitted, compensating beam set up and operational. Brasswire to temporarily retain axlebushes and wheel sets until chassis & wheelsets painted and finished.
Chassis from above tranverse sections of wire with short sections of tube function as hangers for removable brake gear.

-
7
-
-
On 25/4/2026 at 11:41 PM, jhb171achill said:
Yes, the earlier ones arrived in the dark purple lake. Fry’s model of one appears to carry that actual paint. The 1927 ones, though, shown above, were likely “LMS”-shade maroon from new, although the GSR did use the darker shade for a while after the amalgamation.
That interesting I was under the impression that the GSR adapted a lighter shade of purple lake in 1927 and "LMS' shade of maroon in 1934 (SSM livery notes GSWR coaches and other sources). I hope to finish a SSM 6wheeler in purple lake and a bogie coach in two the two tone scheme if I live long enough/ever get round to it.
-
On 24/4/2026 at 5:46 AM, GSR 800 said:
It's called 'ragebait', bad reviews, angry rants, etc get the views. They're rewarded by the algorithm and so they continue to do it.
I don't mind Sam's Trains for the most part, some of his antics are a bit childish but most of his reviews are fair enough.
I think its important to have reviewers to help highlight some of the absolute nonsense some manufacturers try to get away with, and also bring light to some hidden gems, but often it turns into a trope of good and bad manufacturers.
It's not limited to youtubers either, seems like many N gauge modellers are smarting over Kohlers comments regarding the scale compared to TT. I think N gauge is very much slept on recently, some of the newer models (Green Arrow) look as good as any TT scale model. American N scale (specifically steam) is coming in leaps and bounds with the likes of Broadway Limited Imports and Kato. I have a PRR T1 duplex in N scale and its probably one of my favourite models, excellent performer and comes with all the bells and whistles! A great deal more in a much smaller space.
Although I once had delusions of becoming a 'lifestyle guru'/influencer/cult leader about 20 or so years ago, there was more than enough competition and real world kept me earthed
 . These days I tend to avoid influencers and social media apart from this Board and RM Web a lot is just an echo chamber for Crap with so social media friends and some relatives simply parroting the crap they receive on social media feeds.
I guess in the end I got to find things out for myself and make up my own mind, rather than be said and lead as my father sometimes said.
Going back to N scale, I started collecting American outline N scale nearly 40 years ago because of the superior quality compared to British Outline N or even OO, with American 'manufacturers' like Atas first comissioning locos and stock from Roco, before moving on to Japan in the Mid 80s and China during the 90s. In certain respects the Japanese manufactured Atlas and Kato locos of the 90s are superior in terms of reliability and durability to the rather fragile Chinese manufactured models of more recent years.
For me I still see N as the ideal scale for building a model railway capable of running long trains of mainly rtr stock in a realistic environment in a reasonable space and 4mm and larger more suitable for model making (incl scratch and kit building).
-
2
-
-
19 hours ago, jhb171achill said:
As for liveries, they only ever carried GSR (= LMS) maroon. I don't think they had any lining. They had two GSR crests on each side latterly, though only one (as would be more to be expected) originally.
I suspect that the Sentinel and Clayton railmotors were originally introduced in the GSR purple lake livery when introduced in 1927-28. There is a 1929 HC Casserley photo in Locomotives of Clayton No 360 at Mullingar Shed with fully lined out large class numerals on the doors & 2 GSR crests on the side.
Colm Creedon's photo of 357 on the Newmarket Branch (closed to passenger traffic early 1930s scheduled goods traffic 1947?) from Westcorkrailways post apperes to be in as introduced condition with lining & 1 crest!
Photos of Sentinel 356 at inchacore (running shed and concrete coal tower in background appear to be unlined possibly Mid 1930s GSR Maroon livery with 2 crests!
Personally the main issue in using the Heljan LNER Sentinel to represent a GSR Sentinel is that it just doesn't have the low-slung appearance of the Irish Sentinel railmotors with the underframe largely hidden and buffer beam part way up the body. A bit like a Hymek or a Class 33 in CIE livery masquerading as an Irish loco
-
2
-
-
There is some useful information of the Sentinel and Clayton railmotors in Locomotives of the GSR.
Although Sentinel railcars appear to have worked passenger services on the Cashel, Newmarket and Foynes branches a Sentinel also appears to have been used between Limerick, Nenagh and Ballybrophy. I remember reading somewhere possibly IRRS Journal that Sentinel railcars were used on the Newmarket & Foynes branches because the branch good were worked by Mallow and Limerick based locos running through to the branch terminus (in UK terms a "Trip Working" or Turn) as opposed to a branch lijne loco based at Newmarket or Foynes. Its possible the Cashel 'goods" may have been worked by a Limerick Junction or Thurles loco. In its final days of operation the Edenderry Branch goods and occasionaal trips over the Meath Line to Drumree,-Kilmessan were worked by the Liffey Junction G611 Class pilot.
GSR Locomotives includes information on some unusual Sentinel or Clayton working on the Midland including: A 1928-- 11:10 all stations Mullingar-Sligo railcar which ran attached to the rear of the Cavan train as far as Inny Junction and 11:30 return from Sligo!
Day returnes from Mullingar to Athlone & Athenry 1930 records 354,355 & 357 at work in the Western District, 356 in the Southern District.
Claytons 359,361 and 362 initially tried on Westland Row-Dalkey and Harcourt St-Foxrock suburban services. Also tried Mullingar-Sligo, Cork-Macroom and Cork-Clonakilty 'but only for relatively short periods at each location as they proved markedly less successful than the Sentinel version" 1930 -358,359 and 361 Midland District, 363 in Southern District.
Problems identified tendency to run short of steam (could not cope with greades on Foxrock services and having to stop for a "blow up" and considerable periods out of service under repair. Clayton went into liquidation 1929 resulting in problems obtaining spare parts.
So potentially Sentinel and Clayton steam railmotors in 'GSR Purple Lake" livery working branch line passenger trains, short distance suburban and main-line feeder services.
-
 1
1
-
-
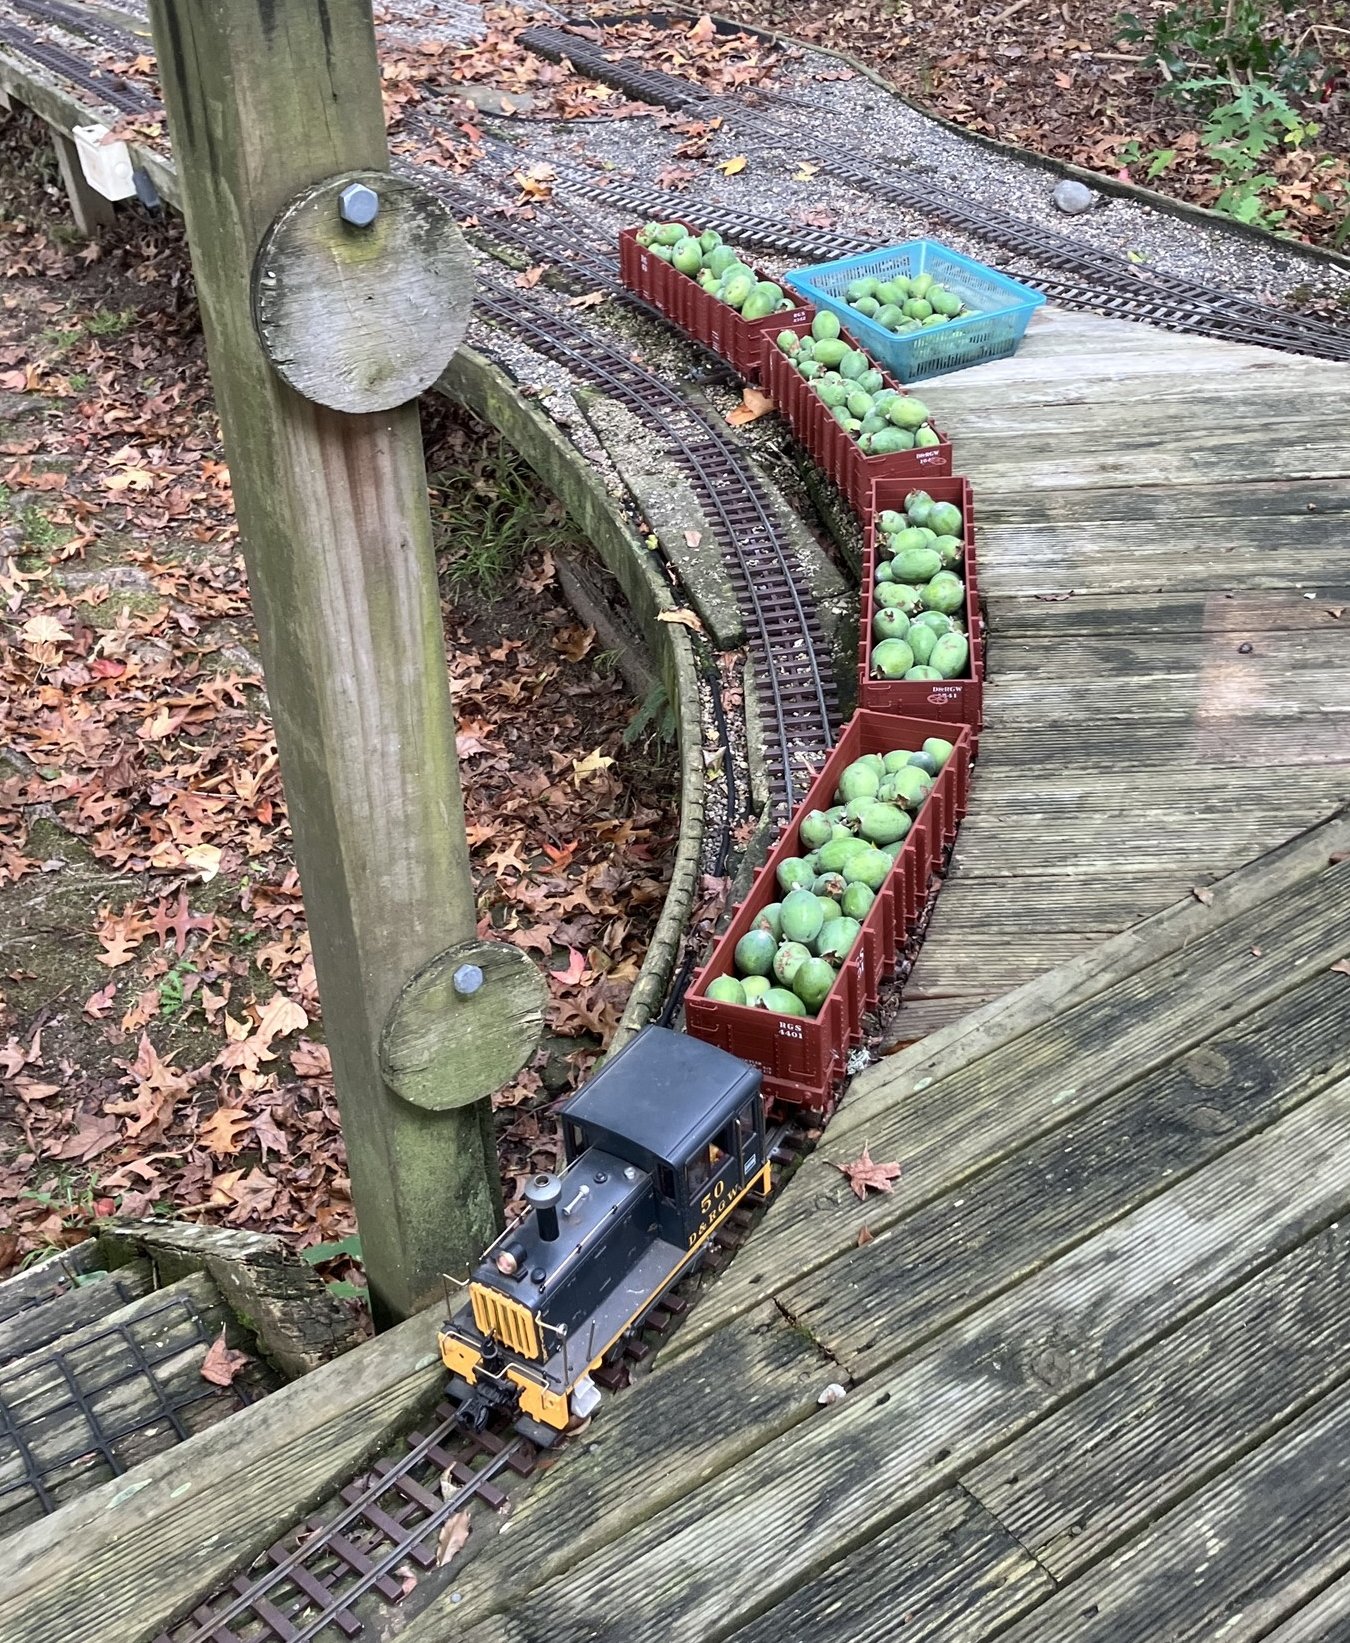
Little activity on the garden railway in recent weeks except a special on 11th April to collect fallen feijoa's before Cyclone Vaianu struck on 12th and this afternoon when I ran some trains while mowing the lawn/leaf clearing after the past couple of weeks.
LGB DRGW diesel #50 did the honours on 11th successfully7 hauling 4 gondola's of feijoas that had fallen by the line and then returning the cars to storage. We had become overwhelmed with nearly ripe feijoas buckets and baskets all full!
Like many LGB narrow gauge locos #50 is to a scale of approx 1:22.5 underscale for American 3' gauge and noticeably smaller that the Accucraft model, but a useful switcher/shunter.
Weather began to improve/settle during the last couple of days though temperatures notoiceably cooler although Winter officially begins at the end of May, spent most of yesterday mowing/collecting leaves from the front garden, with the back garden today. Maintaining the classical Kiwi ¼ acre section sure become a chore as you get older.
I decided to give the T&D inspection car a run though the pair of new "Energiser" AAA batteries did not last very long! Must replace with re-chargables Motor #6 and #464 ran nicely though.
Tried to make the best of late low afternoon Sun though its now dark by 6pm daylight saving ended at the beginning of April!
#464 and her train has already turned on the wye/turning triangle (Kiwi terminology), #463 is en-route for turning.
I am hoping/planning to convert this section to a long RGS style timber trestle during the next year modelling the trestle bents using trellis timber and plant ground cover in this area.
-
3
-
-
Seem to recall
6 hours ago, Colonel said:At least the Pay Train continues to make progress and in the case of the loco, has now been through the paint shop, following the addition of various hand rails, pipes, rear buffers and basic cab detail. Way too black at the moment, but getting there.
Either way, I can only presume that part of the coach would have been a secure compartment with, in addition, some sort of barrier/counter between the Pay Train staff and those coming to get their wages. Am also assuming that with multiple stops each day, there would have been no need for a toilet in the coach, but maybe a gas stove and a couple of cupboards for food and drink might have been useful, while comfy seats for long journeys would be valid too. The Pay Trains ran well over a million miles in service - remarkable for such a tiny loco.
So, as you can see below, I'm splitting the interior of the coach into three, with the secure section nearest the loco, the pay 'office' in the middle and the public bit at the balcony end. Would probably be further on with this, were it not for that troublesome pacific, that is where we are for now
I seem to recall reading somewhere that individual employees were expected to queue & step up to the pay hatch from one side of the balcony and step down/walk away from the other.
My mother whoes father was a GSR driver, recalled bringing her fathers 'paycheck' (metal disc with employee no) to the Broadstone pay office to collect his wages as a child during the early 1930s.
Presumabably GSWR employees had similar metal paychecks.
-
4
-
-
Overcrowding and dampy musty coaches seems to have been part of the course in GSR days also.
Interestingly Railway Magazine features on Irish railways during the early 1930s include reports of passengers experiencing overcrowding and being forced to use damp coaches on the Dublin Galway (& West Ireland) Day mail during the holiday peak.
Apparently the train was strengthened with coaches which had been stored on a carriage siding with their windows open and upolstory and floors had become waterlogged. Following passenger complaints a gang of porters were dispatched with mops & brooms to 'sweep out' the water on the coach floors.
-
1
-
1
-
-
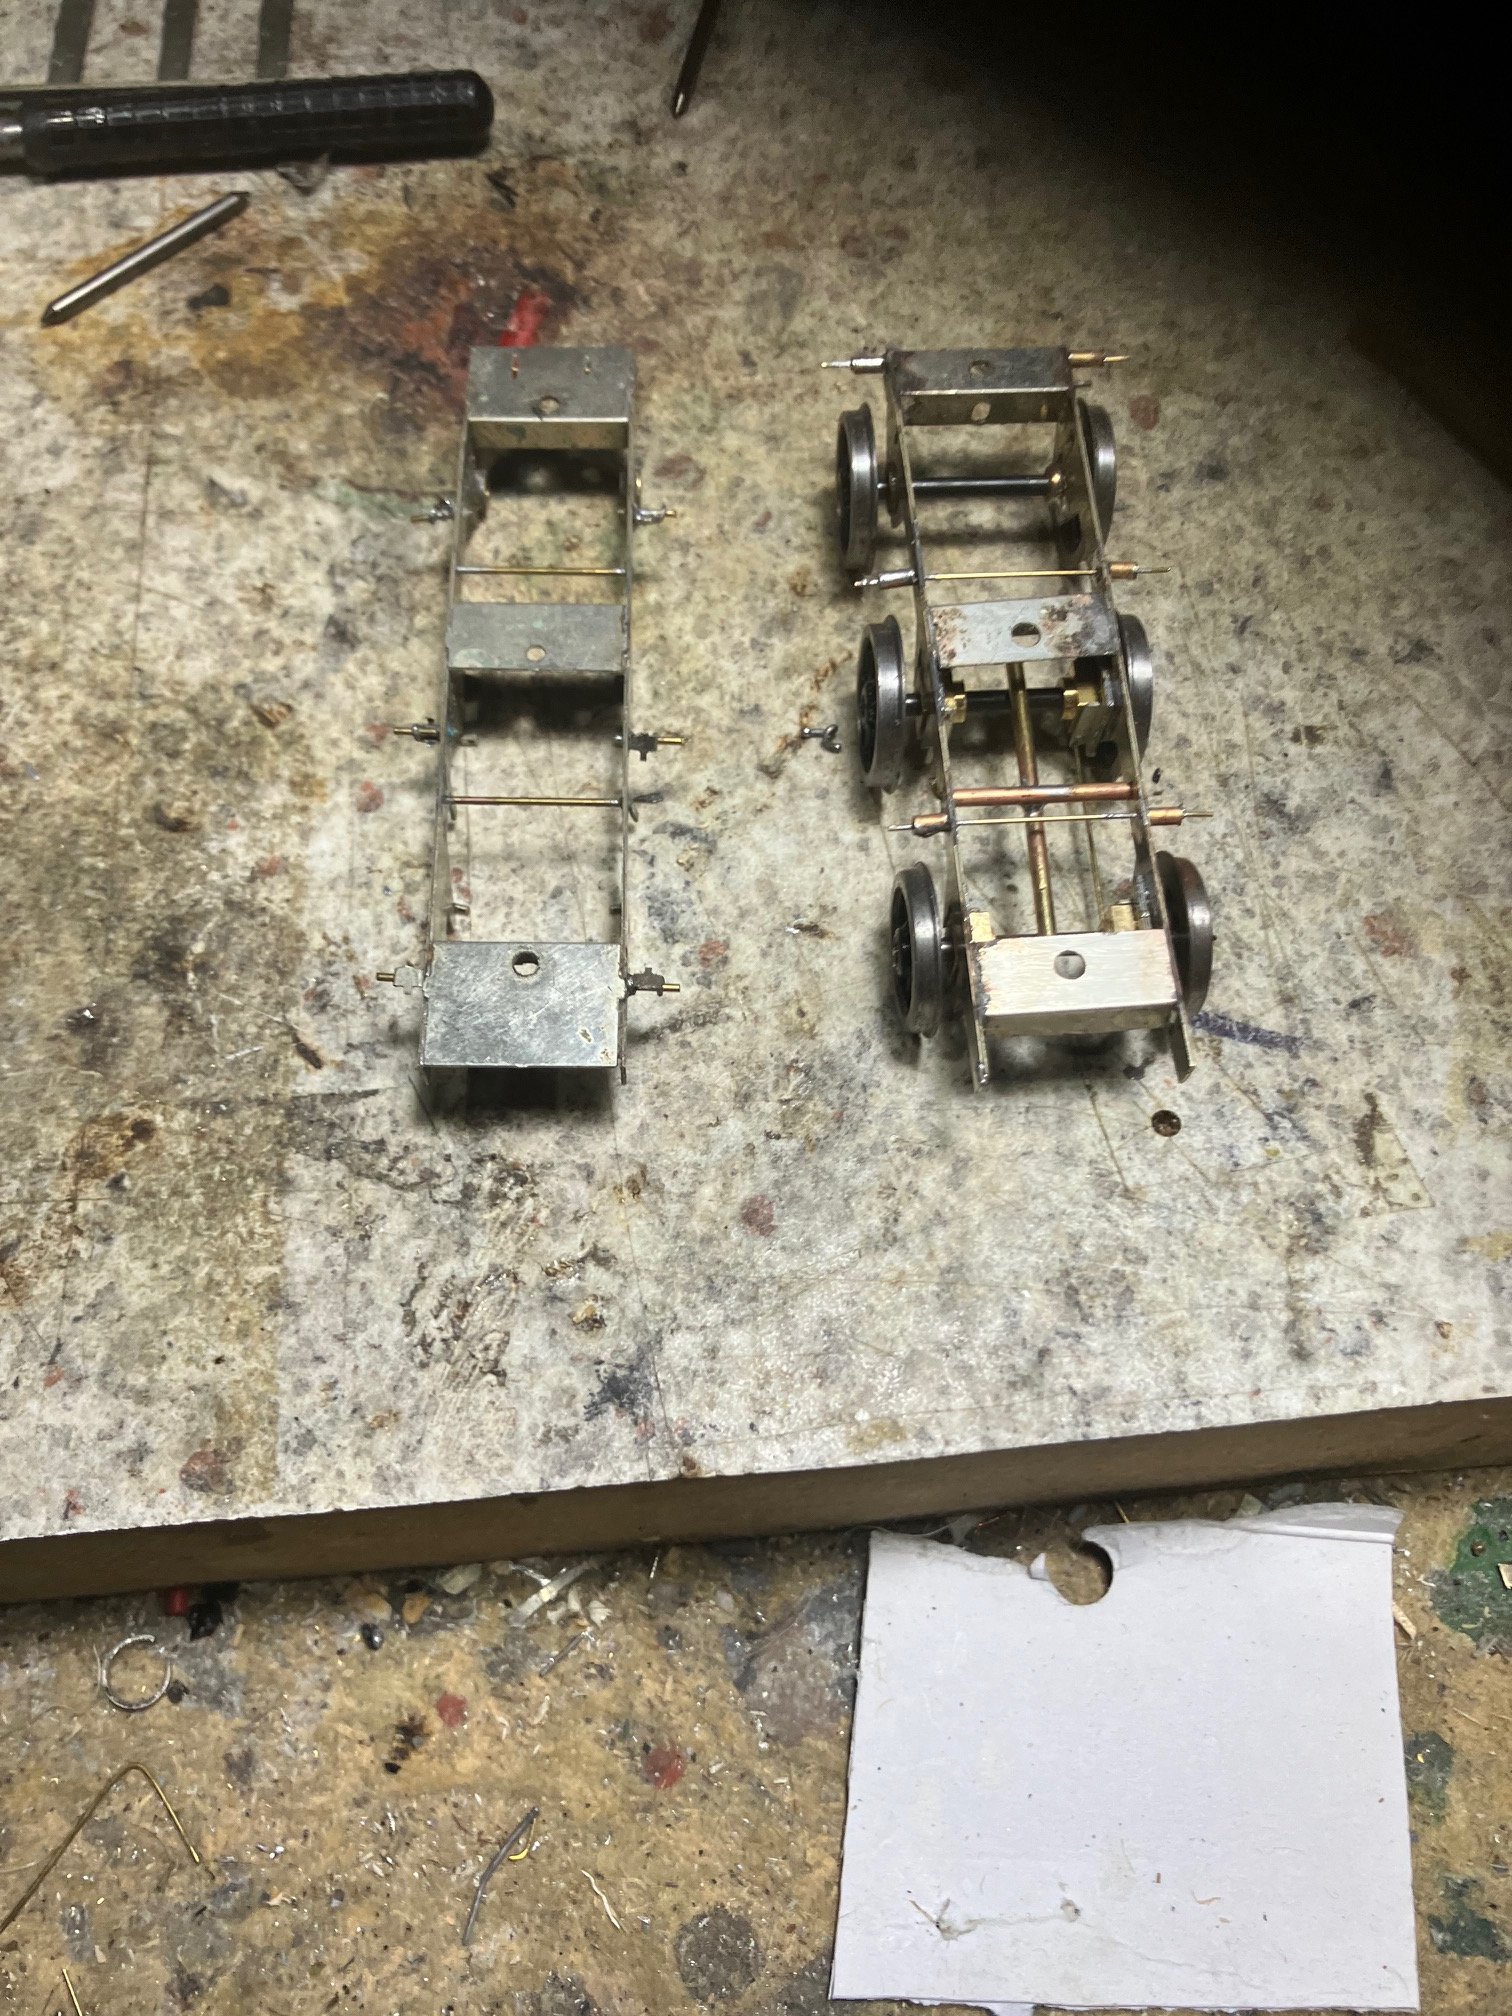
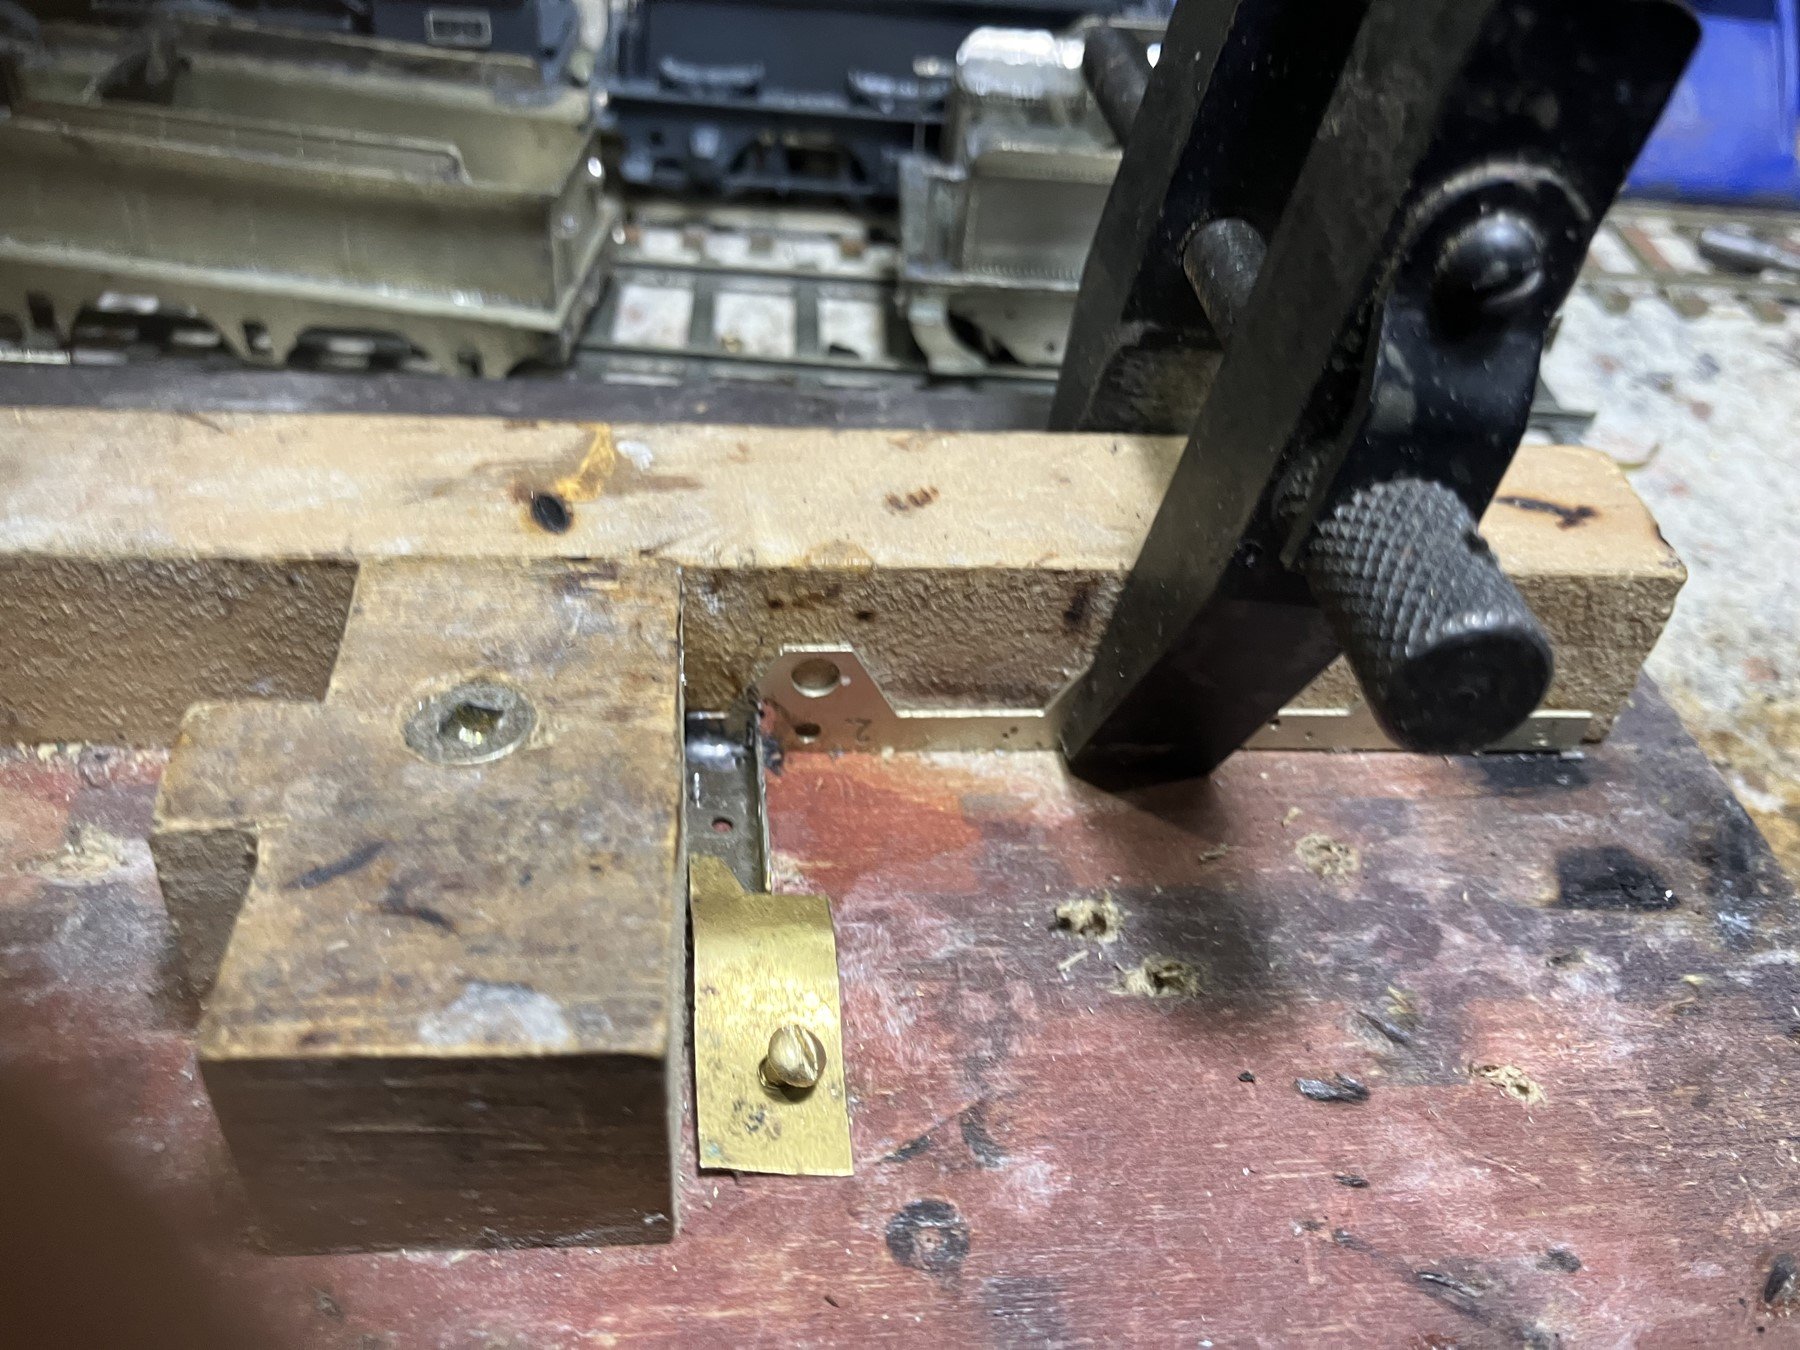
Several months ago I started to assemble a 1804gal (GSWR Type A) tender to run with 191, but had not actually got round to assembling the chassis. I wanted the tender body for a comparison photo between 191 & 229 and it was a lot simpler to assemble the tender body that the chassis!
Although I bought the 2 J15 loco and tender kits almost 20 years ago I prioritised work on the locos. one of the tenders was 'borrowed" for use with my prototype 52 Class kit and later replaced with a larger 2730 gal Type B tender to run with 229 so time to assemble the remaining J15 tender, there also should be a spare 1804gal tender supplied by SSM in connection with my production batch of 52 Class kits, life gets complicated.
I decided to assemble 191s (1804 gal Type A) tender chassis at this stage, because I needed to assemble the basic chassis before I complete the tender bodywork. I found it necessary to re-locate the fixing bolt/nut at the rear of the tender because the fixing is obstructed by the rear axle.
Comparing 191 (assembled 1994?) & 124 completed 2021. 191 tender has beam suspension on the leading axles while 124 tender the leadding axles appear to be lightly sprung with pb wire. Interestingly 124s tender appears to have retained its original brass frame spacers, with 191 L shaped spacers formed from brass. 191 retains its origonal (very fragile) etched brake gear (scrap brass improvised stretcher) 124 my own replacement etched brake n/s gear.
Anyway time to dig out my 40-50 year old piercing saw to cut out the hornblock cut outs, have High Level hornblocks in stock. Consider the option of beam compensation or a weighted tender apparrently used with 124.
Clamped the frames individually for cutting as cut lines already etched on sheet, so potentially more accurate than swetting pair of frames together before cutting.
Cuts appear reasonably neat, remaining tags snapped off cleanly.
I use a small sheet of ply and stripwood for assembling loco chassis, first soldering spacers at diagonally opposite ends of frame to minise distrotion/expansion from heat build up.
DIY clamp knocked up from a piece of brass and a wood screw.
L shaped spacers are my own and have been used before thus excess solder/mess.
Two parts of frame waiting to be joined together. Front/loco end of frame at left.
Frame final soldered assembly, everything nicely flat & square
Re-positioned body securing bolt, original in line with rear axle through frame spacer, hard to believe that the kit was designed over 40 years ago!
I used the chassis as a guide for locating the new rear fixing point after locking the front spacer in place with a 10BA nut!
I have since repositioned/squared up the centre frame spacer

I need to check my flux mix, the level of staining/discolourisation is unusual. I use an phosphoric acid based rust treatment available over the counter diluted with ionised water.
Both tender bodies substantially complete apart from cast/3D printed detail but need a good clean up.
-
9
-
-
On 21/4/2026 at 5:51 AM, jhb171achill said:
Suburban sets might typically be about five PRs plus a van, of course. First time I ever travelled on the Cobh line in the early 70s, the train was (I think) two PRs, a laminate and a 4-wheeled tin van. But many photos show 4 or 5, and also in Dublin 5 or even 6 would be commonplace on suburban runs - but - mixed in with laminates. Rarely would a train be ALL PRs. Naturally, no matter what coaches you use, a genny van of some sort needs to be in the consist.
The snack cars were not in green, as they were introduced after that livery had been replaced. Only black'n'tan.
PRs on intercity trains were a complete mixed bag. I doubt if an intercity train was ever composed of nothing BUT PRs - I certainly never saw one and am unaware of any pictures showing them. Theoretically, of course, it's possible. The various types of laminates outnumbered the PRs, and there were of course Cravens in the mix too, after 1963. Thus, any typical main limne train could have had several Cravens, several PRs, and several laminates - and up to the early 70s, one of the last few Bredins.
As to numbers of vehicles (of whatever type) on main line trains, this could vary from maybe 5 or 6 to 10 or 12; again, with genny vans.
The longest train I think I ever remember was a Cork departure which I think was about 10:30 out of Heuston. It tended to load well, and I saw it once passing Port Laoise with 10 or 11 bogies (a mixture of this and that, of course) and a van on each end. My friend Barry Carse once saw thirteen bogies and a van on (I think) a GAA special.
Loads of nine on Cork and Belfast services was commonplace, but again, of those nine, maybe only two were PRs.
Pretty much any type!
Ironically solid rakes of (refurbished) PR coaches only became common on suburban/secondary main line duties following the withdrawl of the Laminates during the e late 80s. From the 70s onwards Suburban, secondary and branch line trains tended to be made up of mixed rakes of conventional coaches rather than one particular coach type.
PR suburban coaches & Laminates were sometimes used to strengthen rakes of Craven stock on Intercity services. I travelled in a PR suburban (only available seat) from Heuston-Westport on a train otherwise made up of Craven stock on my first long distance train journey in Aug 76, 3-4 years later a group of us travelled on a Laminate coupled to the rear of a Craven st while travelling from Pearse to Rosslare (more comfortable than a Craven)
A late 70s Dublin outer Suburban service might include a mix of Inchacore built CIE timber bodies coaches (1951-4,1962-3), PR and Laminate Stock with bogie BSGV (converted from older stock.
Timber bodied stock withdrawn 1983-4 (commissioning of DART & introduction of first MK3 freeing up to PR & Craven stock for use on suburban/secondary main line services. Interestingly rakes of Craven stock (with BR van) appear to have been regularly diagramed to Dublin-Drogheda services when I worked near the line in 1985, though refurbished PRs (with BR Van) were working these services when I visited Ireland in 89/90 (expecting to see a MK3 Push-Pull.
PRs seemed to be the 'standard" IE suburban/secondary train during the late 80s-early 90s, remember travelling a rake of 4-5 Cravens w bogie van between Mallow & Killarney (Cork-Tralee train), seeing a PR + Bogie van of the Nenagh Branch train at Ballybrophy (001 rumoured to have 4 traction motors) and travelled from the Junction to Waterford and Rosslare in refurbished stock on a runabout ticket in 1992/3.
-
In the 4mm Engine Guy Williams (Pendon loco builder) recommended p/b wire soldered to glass fiber board, collecting on the 4mm engine. (White Swan & Guy Williams 1988)
I seem to have hedged my bets with my pair of Midland Tanks
556 finished most recently uses longish pieces of pb wire soldered to a single piece of pcb board mounted under the central axle, the pb wire collecting on & slightly curved around the flange. Before soldering I bend the fixed end of the pb wire at 90º and drill a shallow hole in the PCB board to pin the pb to the board before soldering. Although the finish of 556s pick-up look fairly rough when viewed from below, pick ups appear ton be reasonably effective and unobtrusive at normal viewing angles on a loco modelled with full brake gear.
553 last rebuilt about 30 years ago
uses a variation of 'top wiper pick up" with pb wire bearing on the wheel tyres soldered or bolted to short pieces of copper clad fixed vertically with superglue to the loco frames. I also seem to have used copper clad sleeper (presumably with insulated gaps) fixed traversely across the top of the frames on one of my narrow gauge locos.
Top-wiper pick up seems to be effective and unobtrusive on tank locos with the pick ups & pcb strip largely concealed behind the tanks and valences.
-
2
-
 1
1
-
2
-
-
The kit tender was based on information available at the time, a combination of a GSR diagram of a 650 Class and tender, (section or plan view unavailable) and available photographs. Decent photos of front end/interior of tenders were scarce!
Kit tender wheelbase 6'+6'.
Tank top/bottom of coal space appear - - - - on diagrams of earlier tenders without coal rails. Tank top/bottom of coal space possibly at bottom of flare in tank side/end on locos with coal rails, but unclear how that extra 400gal water was accommodeted on Class Z tenders
-
1
-
1
-
-
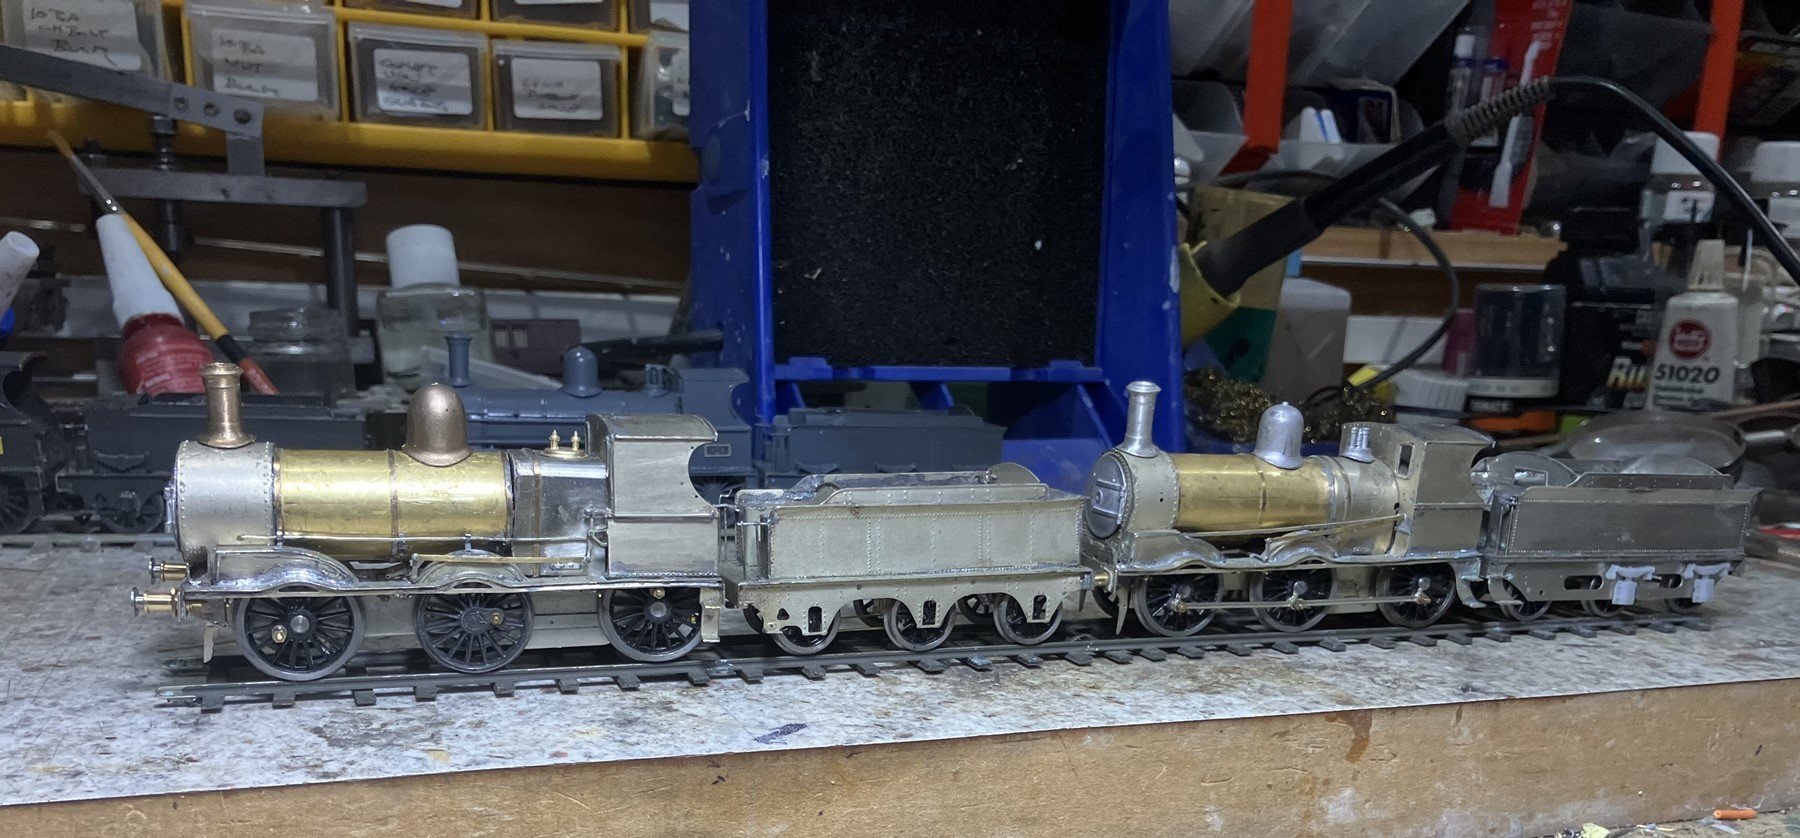
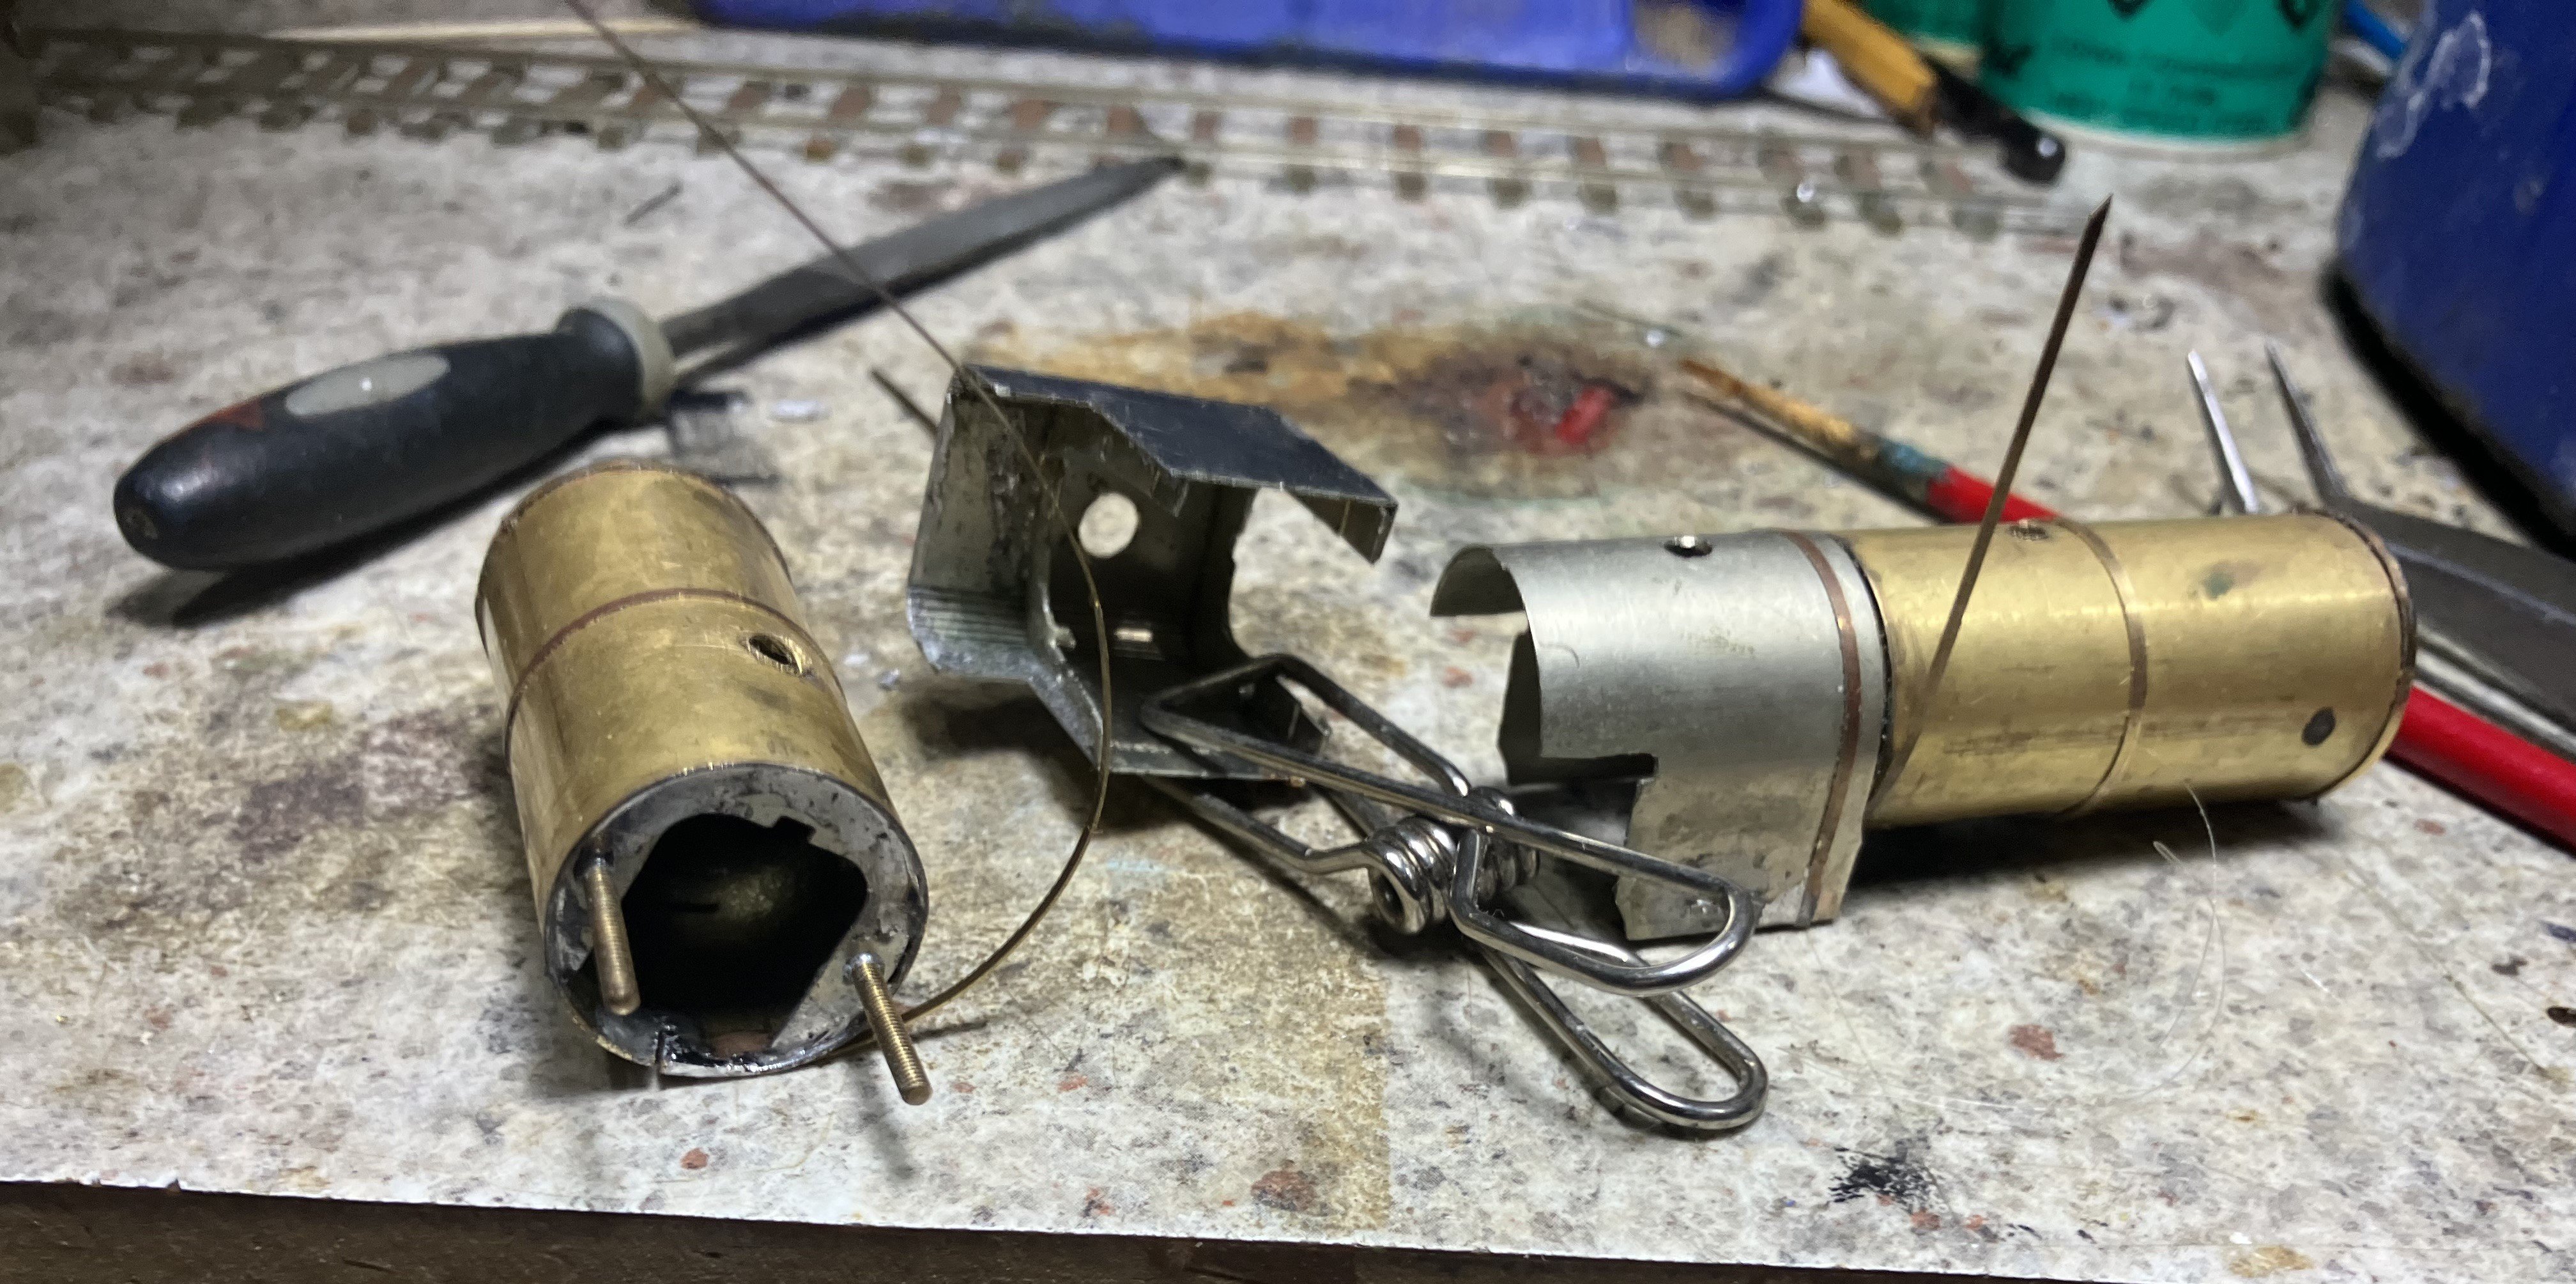
191 & 229 finally beginning to look like locos after fitting boiler fittings and more importantly locating most of the parts required to complete the locos including what appears to be 191s missing coupling roda.
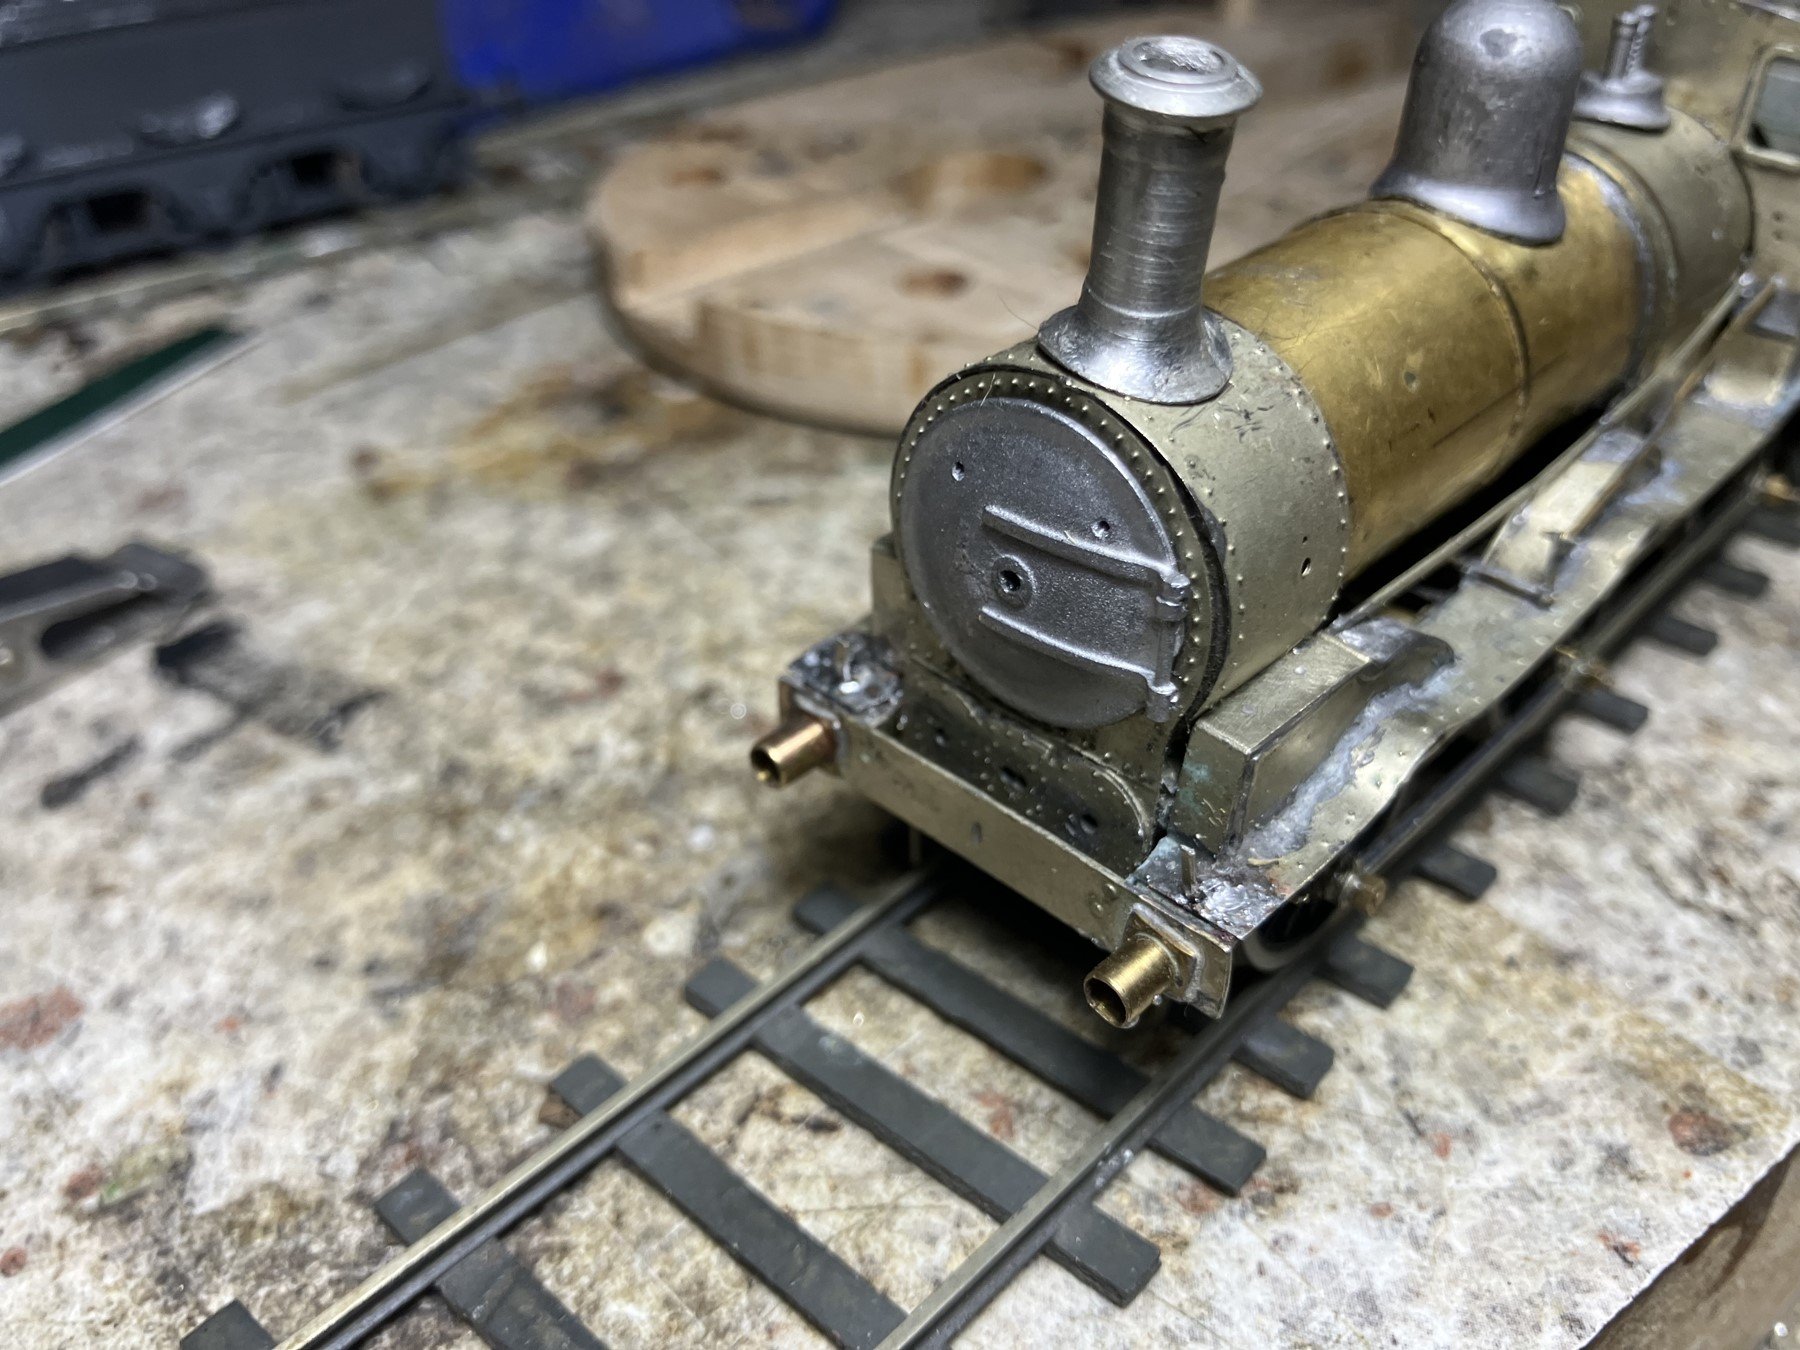
The Hako FA-400 is a soldering fume filter/extractor. I just finished drilling out cab & smokebox hand/grabrail holes 0.45mm using a ball head pin vice
Found a replacement cast brass chimney for 191. I need to remove and re-seat the chimney, I am not happy with the way it sits on the smokebox. Original pattern was made by removing shortening a GSR brass chimney cast for a 650 class!
I'll probabably do a clean up of the etched assembly to remove excess solder, verdigris, check the fit of the various sub-assemblies and fill any gaps/holes before fitting handrails and buffer shanks!
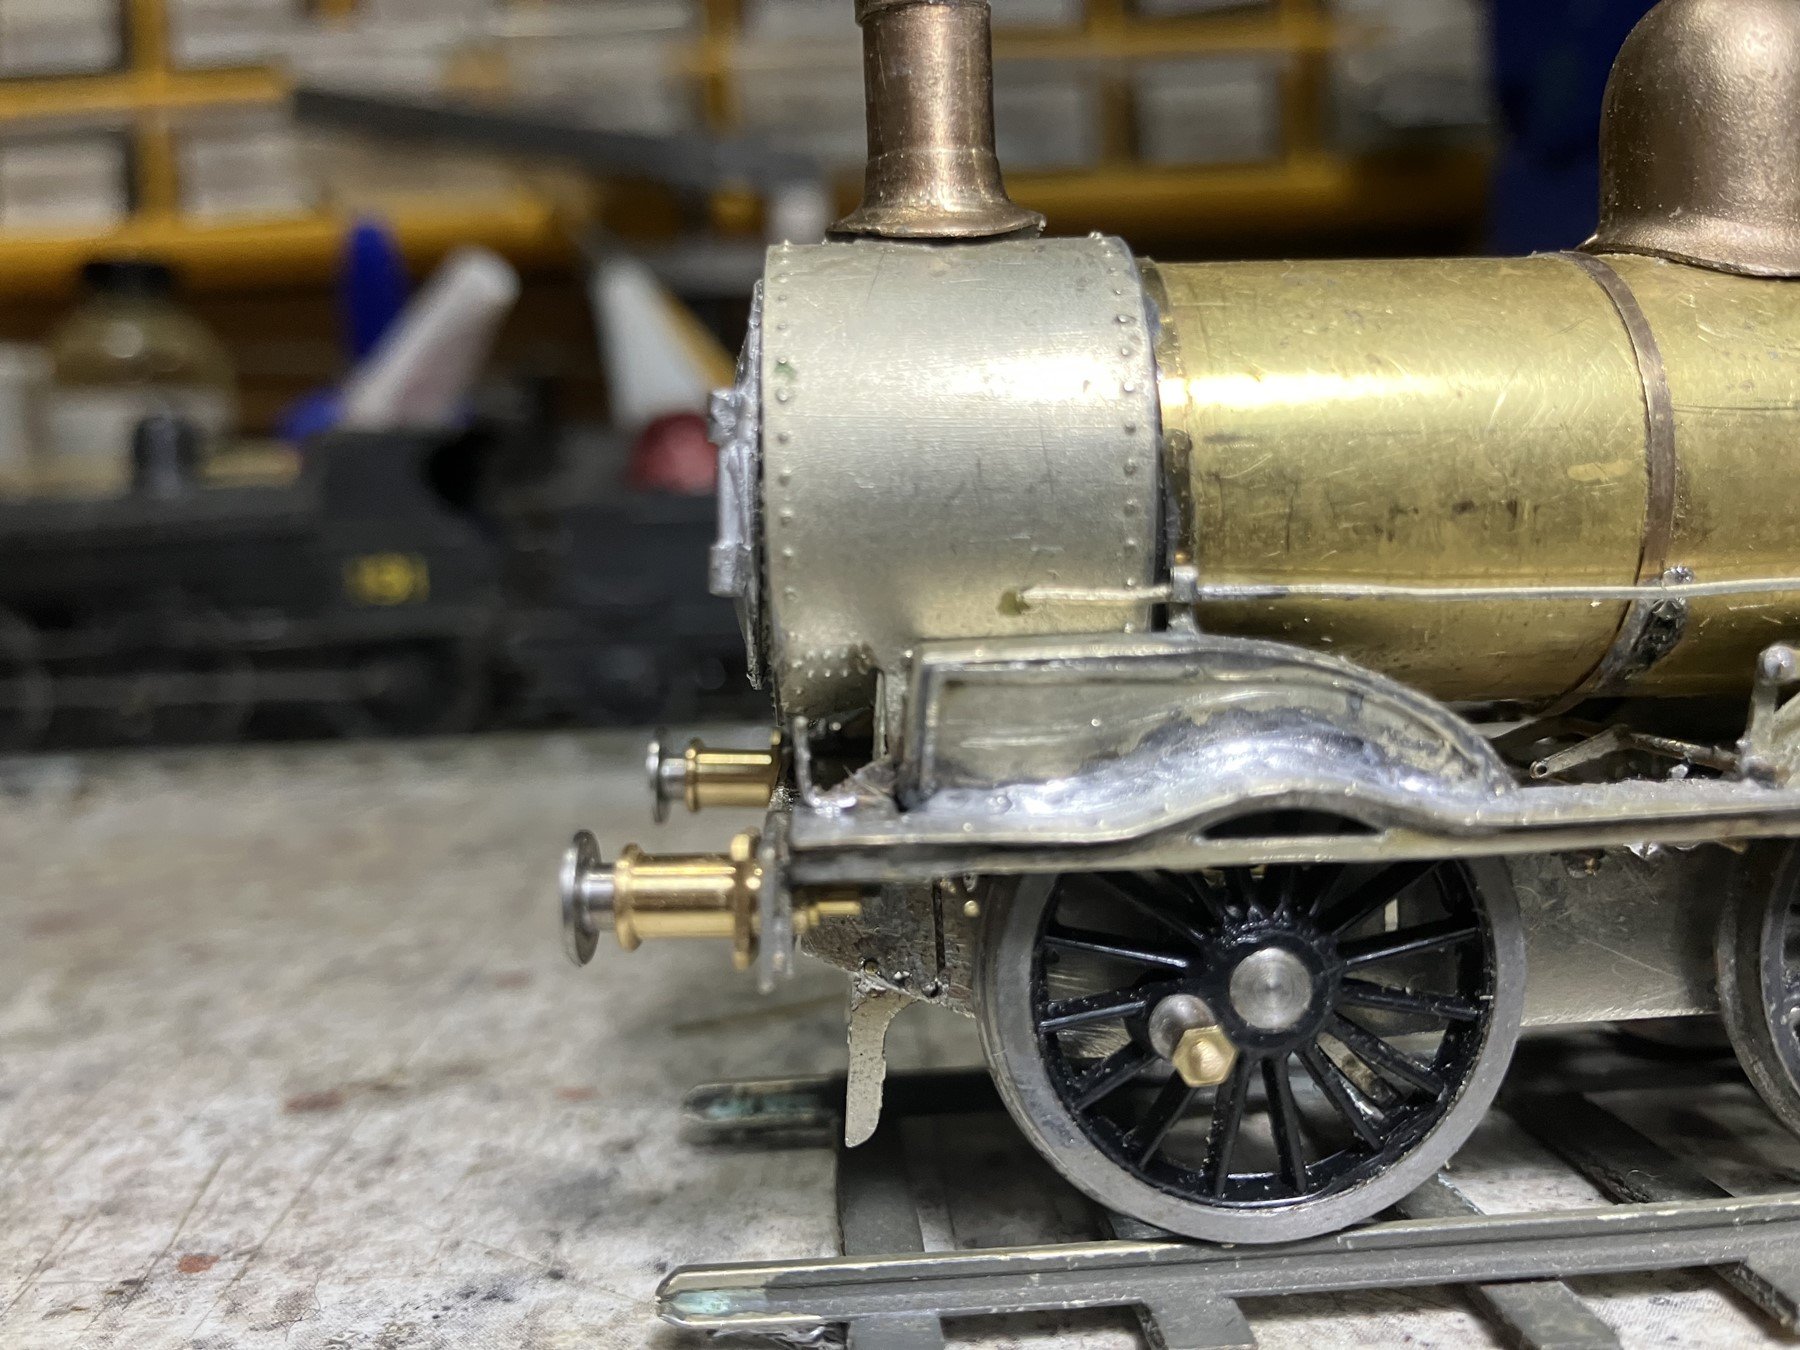
No 1/11 is now nearer to completion, I completed detailing the smokebox doors using short Gibson handrail knobs to represent handles? and handrail knobs and wire to perpesent the locking bars, but chickened out on the fine chain that secured the locking bars to the doors
. I need to improve the fit and seating of the smokebox on the running board and above all source a matt/"flat finish" that will actually result in a flat finish. The smokebox is finished with a Gunze Flat Clear topcote, both the Gunze Flat Finish and Testors "Dull Cote" that I successfully used for several years no longer appear to be available.
-
14
-
-
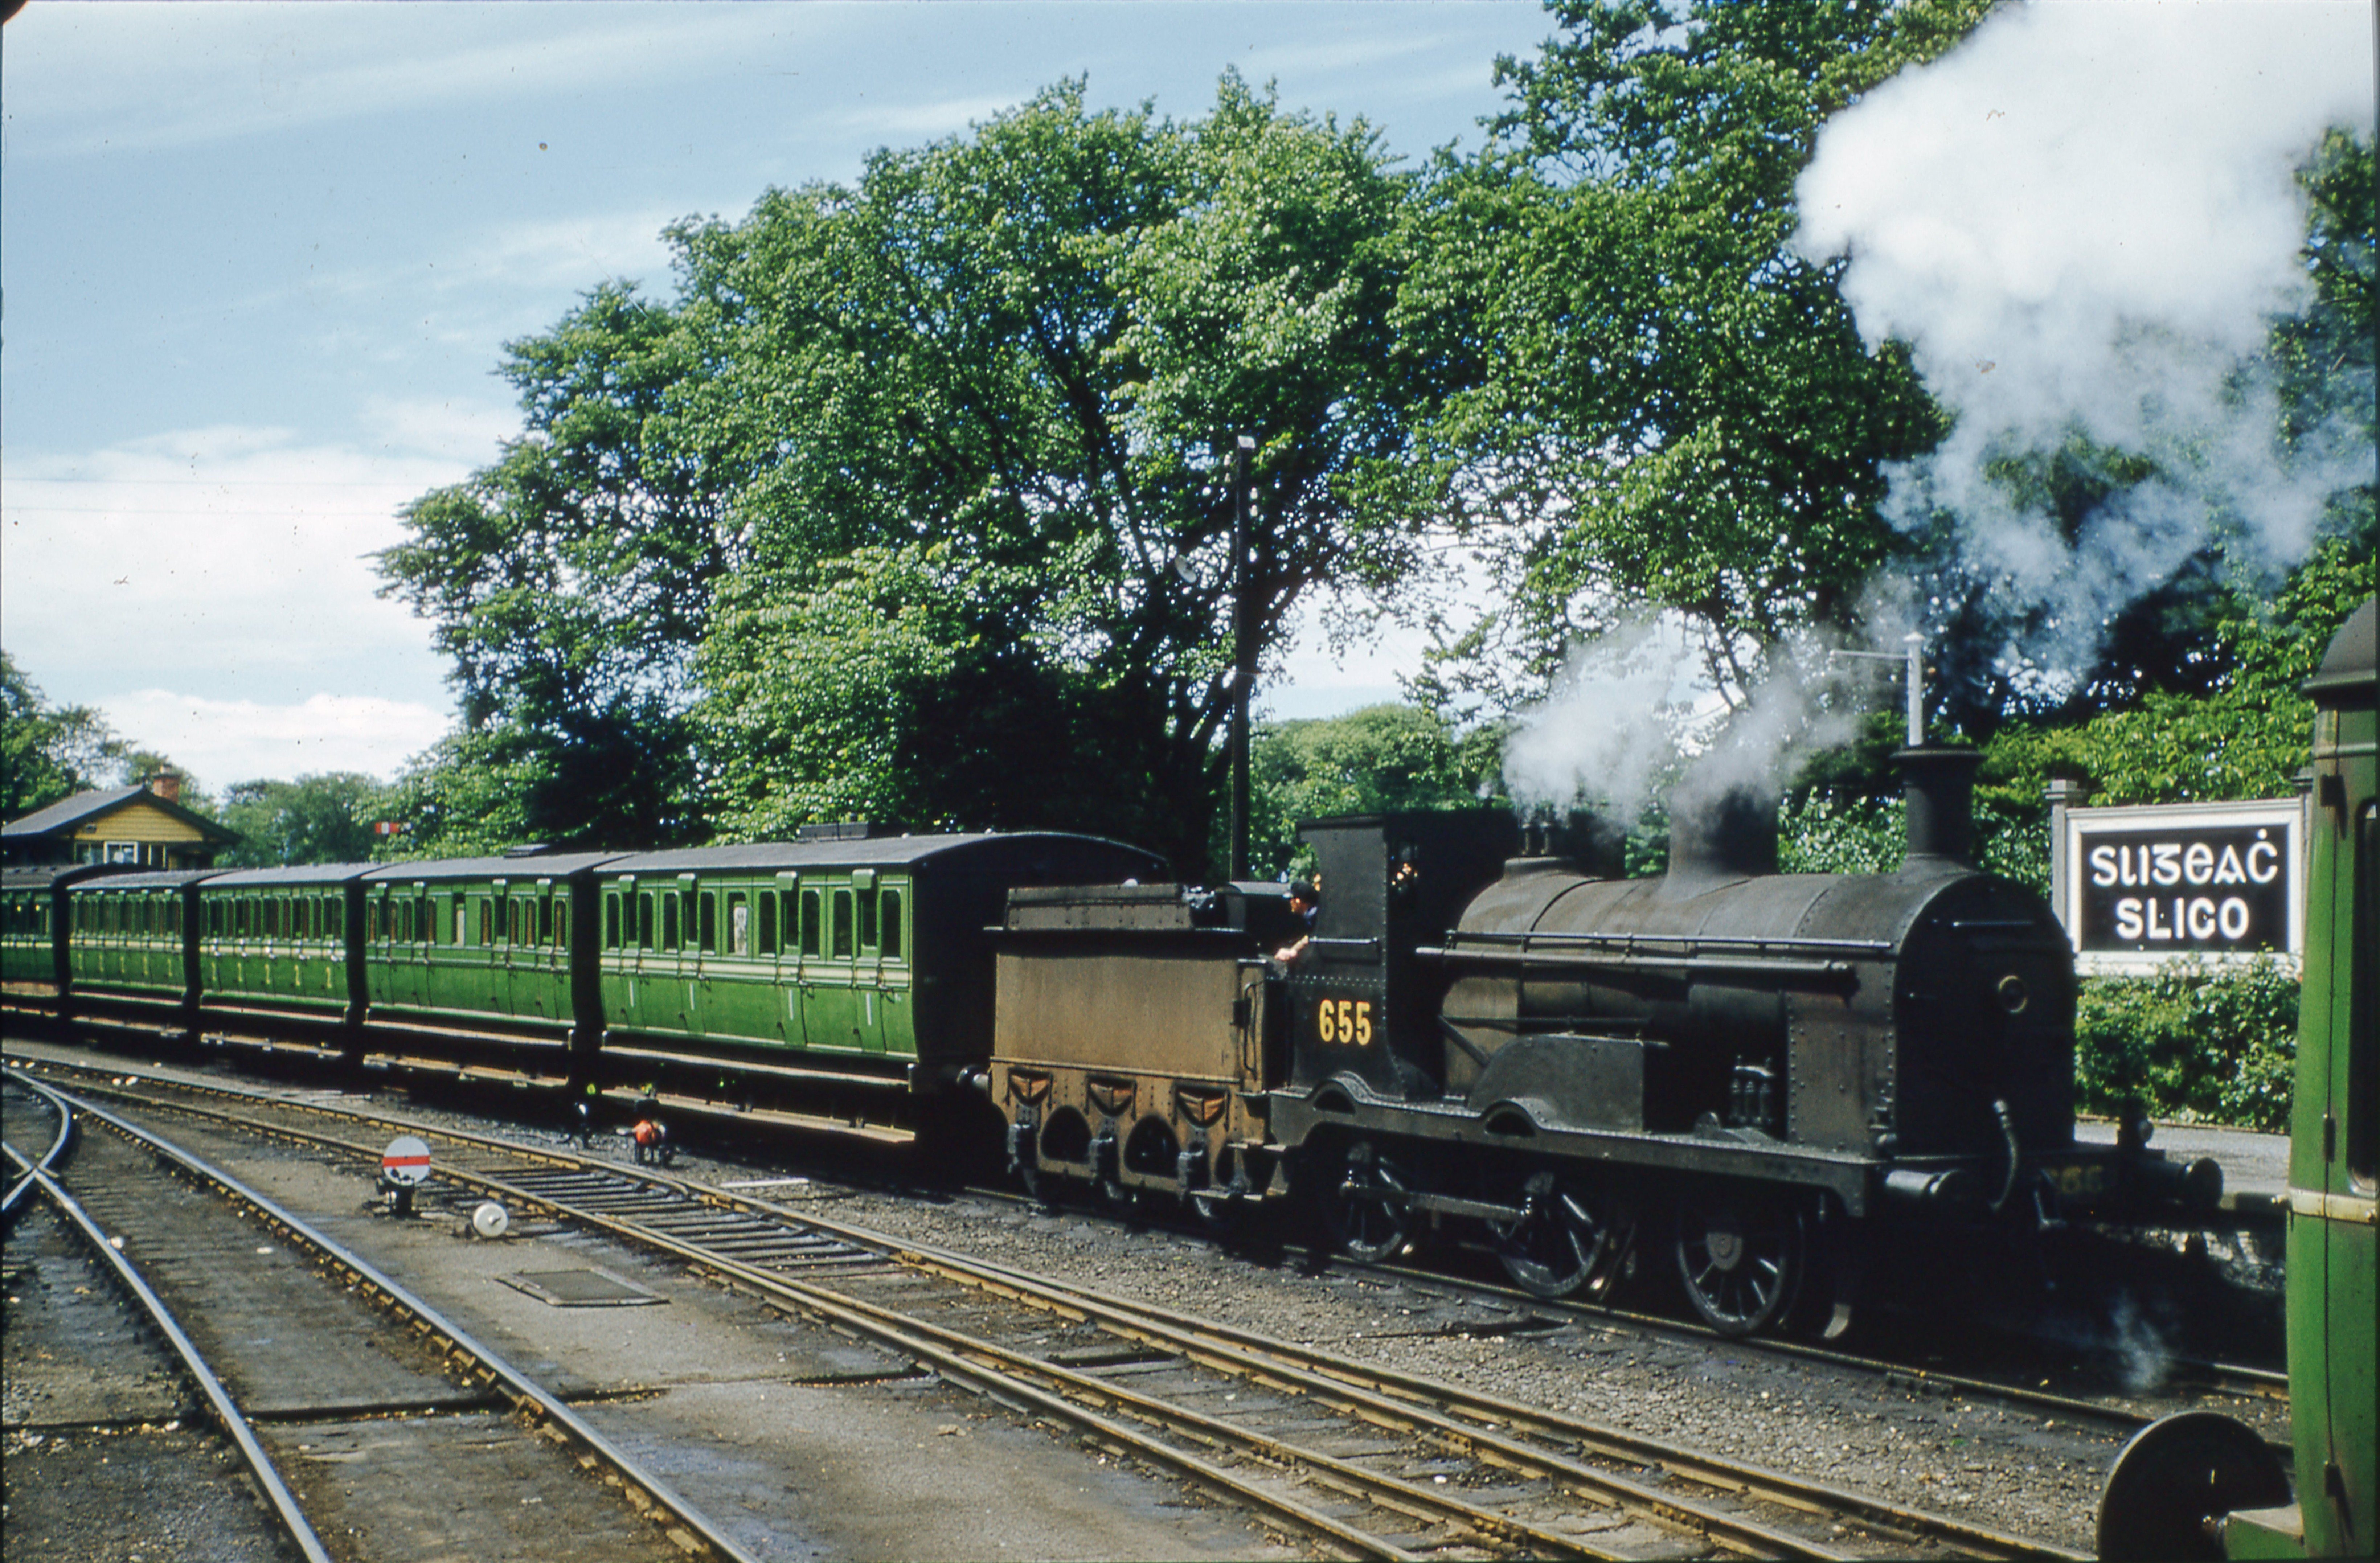
5 hours ago, Mol_PMB said:
I saw this original slide for sale on eBay and I think I must have had a couple of pints of ale inside me when I paid rather more for it than I had intended. Oops.
Still, it's a lovely photo and shows several items of rolling stock that I would like to model.
The photographer was Ken Cooper and the date was 9th June 1957. The location is obvious from the station nameboard.
655 appears to be arriving with a rake of elderly MGWR 6-wheelers - a lavatory first, lavatory second, and two seconds. Behind them is what looks like a bogie corridor second. The second coach is in plain green without waist line or class digits, whereas the others have the lining and class digits (second class, post-1956, rather than third). The shade of green looks identical though. My impression is that the 6-wheelers are all in light green, but the distant bogie coach may be a darker shade. It's a very sunny day though, which can make even the dark green look bright.
The track is a mixture of bullhead and flatbottom rail, with some points controlled from the box (just visible in the distance) and others with manual levers on the ground.
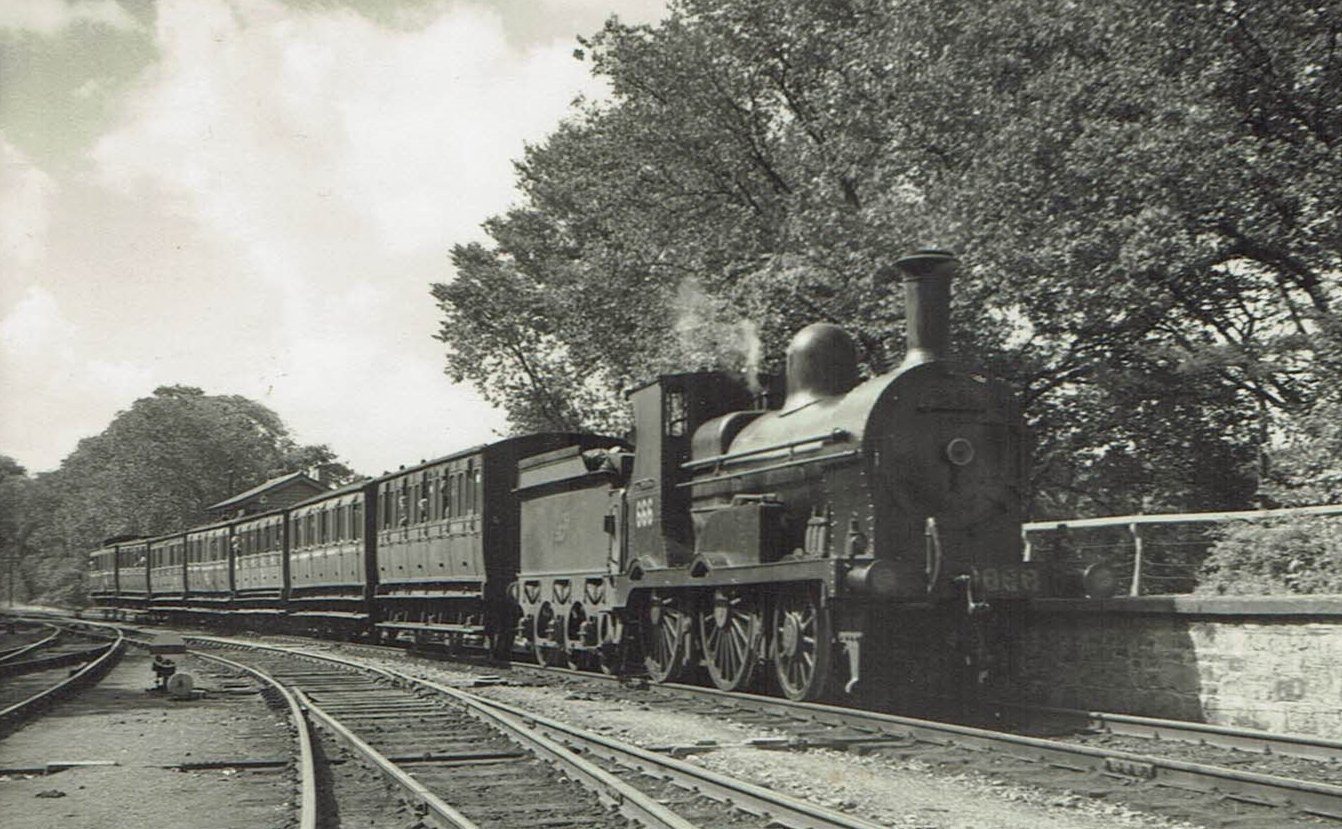
Snap!
Picked this up at a UK exhibition 25-30 years ago. No info on photographer or publisher, photo stamped10157 at rear with hand written Sligo 2-9-52 which appears to have been a Tuesday so GAA or Seaside excursion less-likely, possiby religious or education. In his late 70s/80s IRRS papers on the Ballaghadereen Branch JP O'Dea wrote about 650 Class locos working excursion trains of 6w coaches to & from Sligo on weekends until replaced by AEC railcars.`
666 "Himself"? looks reasonably clean though the tender sides appear to be covered in dirt/muck, there is a 1956 F W Shuttleworth photo of 659 shunting the Night Mail at Sligo similarly loco appears clean while the tender side and frames appears to be covered in brake dust/road dirt. The latter Atock tenders with the combination of sprong cut-outs and tender sides/flush with the frames were almost designed to throw up road dirt & brake dust & company image/external cleanliness of locos and stock was low priority on CIE.
The 650 Class are supplosed to have regularly worked the Sligo-Mullingar portion of the Night Mail until replaced by diesel during the mid-late 1950s, relatively 'high speed" duty likely to throw up road dirt/brake dust compared to similar locos working branch line mixed train and passenger duties.
-
12
-
-
Finally resumed work on the 2 remaining J15s, had initially thought of first completing saturated Coey engine 229 (introduced) 1903) before completing superheated 191 introduced 1881 as 229 was the build was more advanced, but in the end resumed work on both locos begining with the fitting of boiler bands.
I assemble the boiler/firebox of belpair boilers as separate bolt together sub-assemblies. Boiler bands are from a "Scale Link" sheet of plain and riveted strip of various widths I bought at an exhibition about 40 years ago. Scale Link was once significant supplier of sheets of etched components for building and scenic modelling and high quality vehicle (mainly pre-WW11) vehicle kits. I found that assembled Scale Link car & tractor! kits compare nicely with similar Oxford die-cast vehicles.
The boilers on the J15s bought mid-2000s were rolled from sheet brass. rather than tube in my TMD versions of the loco. I formed one end of the strip into a L or U to fit into the slot/hole/seam and soldered at one end only before forming round the boiler or firebox then forming an L/U at the loose end pulling tight and soldering in place.
Smoke boxes and boilers are again formed as bolt together sub assemblies.
Completed boiler-smokebox sub-assemblies
191 mock up with boiler fittings, safety valves possibly Markits or Wizard, dome lost wax casting from Jeremy Suter master for 650 Class, funnel/chimney lost wax casting prepared from cut-down master of Inchacore pattern chimney fpr 650 Class. I need to check if I have a replacement chimney in stock/repair the existing chimney or order a replacement from the local brass casters.
Another challenge is to finalise 191s suspension system I originally intended to trial CBS for comparison with the beam compensation fitted to my other 21mm gauge steam outline locos, but there my be sufficient clearance between the High Level Load Haulier gearbox and the mainframes/hornblock units for CBS to reliably operate.
While the majority of my loco fitted with High Level Gearboxes use a Roadrunner gearbox the wider Load Hauler gearboxes were supplied (possibly 15-18 years ago) for the 2007 pair of J15!
Other challenge is that I seem to have mislaid/'disappeared" the coupling rods I used to set up 191s hornblocks 7-8 years ago, but have several sets of spares etched from the same photo-tooling so should be OK.
-
13
-
-
6 minutes ago, Galteemore said:
Also worth remembering that such organisations as CIE were a little less monolithic in those days. There was still a little scope for employee deviancy…..this was certainly how BCDR 30 survived. The price of copper had soared and the UTA accountants wanted to scrap it. Harold Houston at York Road arranged for 230 as it then was to be hidden at Cookstown Junction shed until the copper market stabilised !
Probabably still goes on, I understand that about 30 years ago loco maintenance staff at Inchacore were severely pissed off when bogies from withdrawn 001 Class locos kept as spares were scrapped without consulting maintenance during a scrap drive. Often stopped/withdrawn locos/rolling stock are used as a source of spares, with usable parts removed 'as required" rather than removed and stored.
-
13 hours ago, Wexford70 said:
Ex-works CIÉ J4 Class 0-6-0 No. 261 emerges from Phoenix Park Tunnel with four horse boxes from Amiens St, February 1954. captured by the late David Murray/IRRS Archive. #irishrailarchives #irishrailways
The J4/257 & similar J9 351 Class 0-6-0s appear to be reasonable candidates for a 3D printed body to run on a Bachmann 3F or 4F chassis. Both classes have a coupled wheelbase of 7'7"+8'6" compared with 8'+8'6" for the British locos. The J4 257 Class introduced 1913 appear to have been highly regarded locos suitable for both goods and secondary passenger work and a popular choise for both cattle and horsebox specials (A Decade of Steam and Locomotives of the GSR). The J4 was basically an updated superheated verison of the J9 introduced 1903 first batch of J9 had a low running plate with slotted splashers similar in appearance to J15, 1912 batch J9 similar in a appearance to J4. J9s also carried out main line passenger work1951 photo of 353 (1903 batch) on Rosslare-Dublin Mail Wexford Nth Aug 1954 (A decade of Steam)
-
1
-
-
I assembled a T&D Inspecction Car kit about 11 years ago before I shifted to American outline. Bridge and baseboard framing has become heavily weathered since I took the photo.
Now little used, it still retains 'digital" control with original on-off & forward/reverse switches under the floor. Main change was fitting the railcar with a milled brass chassis and Northyard gearbox
https://irishrailwaymodeller.com/topic/2845-tales-from-the-carriage-shops/page/2/#comments
-
5
-
-
10 hours ago, lucas said:
I'm not entirely sure yet. Nothing RTR seems to have the same dimensions, plus I'll be building to 21mm gauge which further complicates things. I might well end up having to design my own chassis if I can't avoid it.
Many years ago I picked up a Q Kits C/B201 class motorised with a shortened Athearn F unit chassis, I also used Athearn trucks/bogies and drive in combination with a frame fabricated from KS brass strip and brass section for motorising MIR whitemetal diesel kits.
I don't know about current Athearn chassis, but the Athearn & Lifelike/Walthers Proto 2000s trucks of the era used a stub axle system which allowed the wheelsets to be easily adjusted to 21mm gauge.
Shortened Athearn F7 chassis fitted to Q Kits B201 The HO scale F Unit truck/bogie 9' wheelbase is reasonably close to the 8' when re-scaled to 4mm.
The original builder shortened the chassis to fit a B201 apparrently by shortening the diecast chassis at both ends, moving one of the trucks/bogies inwards (RHS of photo) with a new frame stretcher/truck pivot fabricated in brass and removing the flywheel. Bogie sideframes appear to be Q Kits with brass steps added by the original builder. I fabricated a completly new frame/chassis from KS box section and strip to motorise an MIR 141 with trucks and drive from an Athearn GP35, shortening the drive by omitting both flywheels.
A 3D printed frame possibly in metal would be an alternative to a scratchbuilt/modified rtr frame. A local modeller uses a Chines print house to 3D print gearboxes and gears/transmission parts in aluminium for O gauge locomotives.
Athearn truck/bogie with existing wheelsets pushed out to 21mm gauge. Wheels run on stub axles rectangular brass bush and steel strip is part of the pick up system.
-
5
-
-
Although modelling the Midland in GSR/CIE days, I'll probably pass go on this one as there is likely to be a certain level of overlap with existing published information particularly Ernie Shepherds Midland Great Western Railway of Ireland Book, Clements & McMahon "Lomomotives of the GSR" and the same authors "GSR Locomotives Drawing Register" IRN Sept-2014.
"GSR Locomotive Drawing Register" originally intended to be published as a companion volume to Locomotives of the GSR was issued with IRISH Railway News between Sept-2014 & Dec 2016.
Availability of MGWR diagrams.
GSR Locomotive Drawing Register Sept 2014 Issue---MGWR diagrams locos taken into GSR stock 1925. The Midland diagrams comprised a side (firemans) and end (front) end view only.
The diagram includes an Lm (Standard Goods)Class 0-6-0 but not a K Class 2-4-0 with the classical 'flyway " cab a once distinctive feature of Atock 2-4-0 and 0-6-0 classes retained on some locos into the early-mid 1930s
Midland Great Western Railway of Ireland Ernie Shepherd 1994 4mm diagrams of pre-1900 locos and stock.
Shepherds "Midland Great Western Railway of Ireland includes 4mm scale drawings/diagrams of Hawthorne-Single (Class 13) 2-2-2 of 1862 (side view only) Class D 2-4-0 No36 "Empress of Austria" beyer Peacock 1881 (Rebuilt 1900 as 4-4-0 "Achill Bogies", Class E 0-6-0Tno110 (Bat) (print quality not great) Sharp Stewart & Lm 0-6-0 No135 Kitson 1891 (standard goods).
Availability of Beyer Peacock General Arrangement drawing MGWR D Class 2-4-0 1881 (side view only)
Manchester Museum of Technology possibly National Railway Museum.
Historic sources the late Bob Clements and Padraig O'Cuimin
I contacted both while sourcing information on Midland locos and stock during the 1980s. Both appeared to have copies of the MGWR loco diagram book, but not General Arrangement drawings.
Bob provided me with a copy of a MGWR L Class 0-6-0 diagram, while Padraig provided copies of MGWR blue print diagrams of several loco classes otherwise identical to the MGWR diagrams in the Sept 2014 issue of the GSR Drawing Register.
Interestingly the K Class 2-4-0 appears with Stirling but not flyaway cab in both blue print and black on white format.
At one stage I considered producing a K Class kit with 'flyaway' cab option cutting and pasting the cab from a LM Standard Goods, but there were no takers for the origonal version of the Class with flyaway cab, but reasonable demand for both Stirling and late GSR/CIE versions of the class.
-
2
-
1
-


MGWR 7 ton van
in Irish Models
Posted
In 4mm Irish outline demand/interest has been primarily RTR with little interest (sales of) kits or scratch-building components. Our best selling 3D printed wagon RTR CIE Goods brake sold approx 100 units in 5 variations/batches of approx 20. Others types of RTR wagon varied 10-30, little or no interest in 3D models in kit form.
Etched kits tended to sell 10-20 units, though MGW Horsebox & Meat Van less than 10.
Different skill sets & types of software designing 3D models and 2D drafting (etched/laser cutting etc).
3D printing whether your own printer or a bureau, min quantity is one model, while etching involves a tooling or set up cost (min size sheet approx A4) plus a cost per sheet.
Another issue is achieving an acceptable standard of finish with a 3D print in 2mm, its challening enough to achieve an acceptable finish with a resin print in 4mm, while some processes only come into their own in 7mm and larger scales.