
Dhu Varren
-
Posts
547 -
Joined
-
Last visited
-
Days Won
1
Content Type
Profiles
Forums
Resource Library
Events
Gallery
Blogs
Store
Community Map
Posts posted by Dhu Varren
-
-
Noel, two questions. 1. What make of crossing are you using. 2. Can you provide a sketch, or photo of the track in the vicinity of the crossing.
Noel, the reason I asked what make of crossing you are using, is that I have been using Peco crossings for years with DCC, and never had any problems with short circuits caused by wheels, and I have plenty of Lima metal wheels still in use. The sketch or photo was to have a look to see what, if any, problems there might be with the track, or track layout, and try to work out a possible fix.
-
Sourcing drive gears can be a bit of a problem. I don't know of any retail source. However, the old Airfix Loco tender drive unit has four idler gears in it which are of a suitable size. These tender drives can be picked up for very little at exhibitions, or model shops that have a junk box, maybe even eBay.
Have just completed a repair to an Airfix/early Bachmann tender drive as fitted to the 2P and 4F. This type of tender drive does not have the small idler gears mentioned above. It would appear that it is only the longer wheelbase tender drive, as fitted to the Stanier type tender that has the small gears.
-
I have never been a great fan of shunting, but I have to say, shunting with DCC, and in particular, with sound fitted locos, I now find it quite enjoyable. There is nothing quite like a loco making noises which are exactly 'in sync' with what the loco is doing. A pair of sound fitted 141/181s shunting in tandem is something else.
-
DC makes the loco go back and forward. DCC makes more than one go back an forward at the same time. Can't see any reason why you'd want to do that in fairness. or install sound.
My missus keeps telling me us menfolk are not equipped with multitasking (we are DC creatures). The ladies are generally speakin the truth rich
 R
RI hate to say this, but don't knock it until you have tried it.
I have a layout that was retired in 2001 after 10 years and 25 exhibitions on the Scottish exhibition circuit, plus a visit to Warley. This large layout was DC operated for this period, and worked extremely slickly, with much switching on and off of various sections of line.
Four years ago the layout was converted for DCC operation, and the difference in operation is like chalk and cheese, with being able to carry out movements with ease, that could only have been dreamt about back then.
As for sound, well it adds a whole new dimension to operating a model railway. Unfortunately there is sound and there is good sound. A lot of sound can only be described as noise, but when you get good sound, it is brilliant.
-
I have a postcard depicting Mogul 90, and Buffet Car 90 in NCC livery. They are not photographs, but rather, an artists impression. The curtains are of a light brown colour. Must have got the idea of the colour from somewhere. Mind you, even if that colour is correct for the period, the UTA could have fitted curtains of a different colour.
-
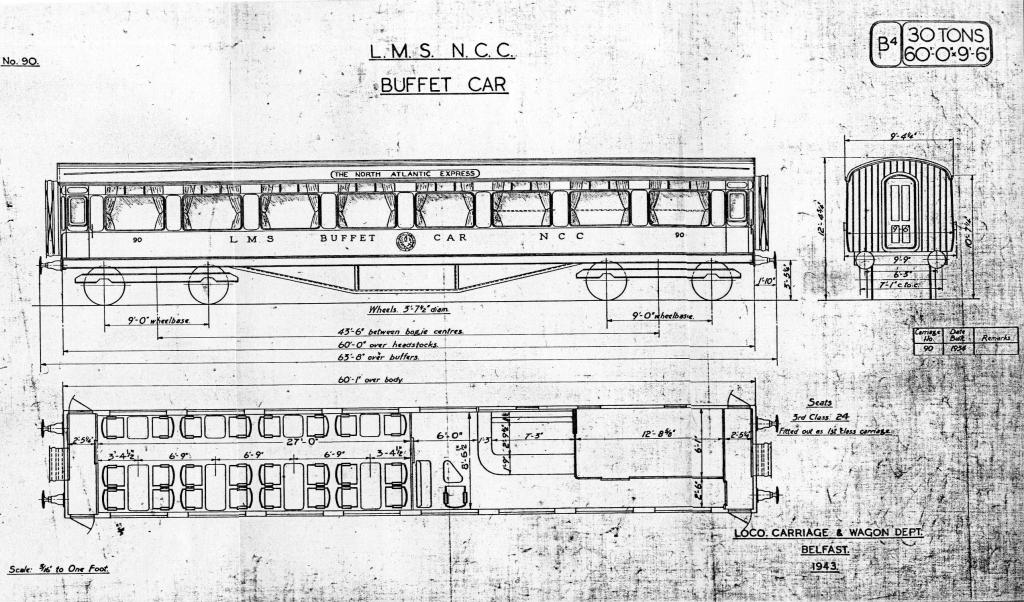
Of course, what the last drawing does not show, is the new kitchen window arrangement. I have no idea when it was done.
-
Three drawings for perusal. 1 dated 1943, 1 dated 1953 & 1dated 1957.
-
Thanks Kieran! Managed to find a drawing of 90/549, which I just emailed, tho it looks like you'll need to make some assumptions about the UTA's increase in seating, which was possibly at the expense...sharp intake of breath...of the bar!
If it is any use to you, I have three drawings of 90/549 all showing different interiors, the last one from 1957 after conversion to an MPD trailer.
-
Noel, two questions. 1. What make of crossing are you using. 2. Can you provide a sketch, or photo of the track in the vicinity of the crossing.
-
Got a 25yo BR Class 25 diesel done today, and in the middle of converting a 30yo Hornby GWR Pannier tank (TMS 9pin). Put a Digitrax 126D in the old diesel and wasn't satisfied with the running, but then read up a bit more on some of the CVs that assist older motors and wow what a difference it makes with settings like pulse frequency and BEMF - all new to me. A different loco! The more I learn about setting up DCC decoders the more I realise how very much I have to learn! Enjoying fiddling around with locos, soldering iron and wires again after such a long break. A good service and DC test run seem essential before fitting decoders. Four done, more to do! Got three cab bus sockets wired up around the layout with RJ12 crimping tool and some cable.
It is certainly an eye opener, but very satisfying, when you start delving into the inner workings of decoders.
-
The DBSOs (DVTs) were only used with the Hunslets. When the Hunslets operated the Enterprise, only one loco was used during periods of lighter traffic, with maybe five coaches, in push/pull mode. During periods of heavier demand, a second loco with extra coaches would have been added, to give a loco at each end. The two locos would then operate in multiple, thus maintaining the schedule with a much heavier train, and without having to run round at each end of the journey. The gangway on the DBSO would have been required to connect with the extra coaches, when they were added at that end.
The DBSO acquired for use with the Gatwicks, was an ex BR Scotrail DBSO which originally had a gangway to enable extra stock to be added when in 'pull' mode. This was removed when transferred to Anglia Railways, and subsequently to NIR. The gangway was never reinstated by NIR, as there was no requirement for extra stock to be added to that end.
-
 1
1
-
-
I am trying to acquire some of these in NIR livery but I think what is out there from two or three different vendors is not truly prototypical, just a respray of the nearest coach available maybe with the incorrect number of windows for the genny for instance. I could live with some minor detail disparities like roof vent design. I think I may end up trying to do this myself a long time in the future using this thread as a reference. So the DVT must have some sort of cab on one end which is hidden from view on the photos on page one of this thread when it is run in the rake and not in push-pull?
You are right about vendors spraying any old coach in NIR livery, the Generator Vans in particular. NIR never had any pure Brake 1st or 2nd coaches, they were all either Generator Vans or Driving Trailers. If you do buy any resprayed coaches, try to get then all from the same vendor, as different people put the stripes at different heights, which does not look good in a rake. Some vendors also omit the stripe under the cantrail, grey, red or yellow. Also at the bottom of the coach side, many leave off the black band. I bought a couple of coaches a couple of years ago without checking this, and found the top grey and bottom black were missing. The waist stripes had been put on too low to compensate for the larger area of grey which had resulted from the omission of the black. When put into my own resprayed rake, they looked really awful, so I resold them. I then set about doing some more of my own, and have now got thirteen vehicles, including the three catering coaches, one Generator Van and one Driving Trailer in the process of being painted, hopefully they will be completed by the end of the year.
By the way, just for the record, and please don't take it the wrong way, but the driving trailers are classed as DBSO or DBFO, depending on class of accommodation. A DVT has no passenger accommodation, and is what BR uses on their ECML electrified push/pull services.
-
The Generator Vans can be built from the Lima Brake 1st, although some modification is required, namely the replacement of the seating bay next to the guards accommodation with a new facility for the guard. Grilles need to be added to the non-corridor side of the original guards van, and, of course, exhaust detail on the roof.
The NIR 2nd Class converts from 1st Class vehicles before 1988 conversions would be the same as the Lima 1st vehicles with 7 windows.
Coach 902 was a standard Mk 2 1st coach with 7 windows.
All the open 2nd coaches built as open 2nd would have 8 windows as per the Lima 2nd . If you are a stickler for details, it is worth remembering that NIR had a mixture of Mk 2b and Mk 2c coaches. The main physical differences were different roof ventilators, and different size toilet windows. Also, the Lima 1st Class coaches have not got the correct roof ventilator detail. When NIR converted the ex 1st coaches to open plan, the original corridor roof ventilator layout was retained.
The Griddle Car. BR only ever had one Mk 2 catering vehicle which was an air conditioned Mk 2f 2nd open conversion. This was purchased by NIR and became 546. 547 was built to a Mk 2b design, like Lima 2nd, with a number of windows filled in, and some replaced by aircon type windows.
The Grill/Bar Dining car 546 is another vehicle that can be built from a Lima coach. This time it is the Lima Mk 2f 2nd open that is required. Again a number of windows need to be filled in. The Hornby, Dapol or Airfix Mk2d 2nd open would also do for the conversion, but one of the toilet windows is in the wrong position.
-
Some decoders don’t like being read by some equipment, but should permit writing.
Best thing to do, if you are sure the decoder is in correctly, is to try to run the loco under the default settings, ie Loco code 3. If that works, then the decoder is OK, if not, there is a problem.
It should not be possible to fit a 21 pin decoder incorrectly, as long as all the pins line up with the holes, unless excess force is used to fit the decoder off centre, or upside down.
I have just now tried to fit a decoder incorrectly, and it just won’t go on without forcing it. Having said all that, I do know of someone who managed to fit a sound decoder upside down, the result of which was having to replace it! Expensive mistake.
If the decoder went on without any excessive force, and is sitting flush with no sign of any pins showing at the sides, then it should be fine.
-
Noel, I think I have found a source of suitable gears. Trackside Cars do Scalextric spares on eBay, and have various gears for 2mm diameter motor shafts. I am going to send off for some to see what they are like. I will keep you posted.
-
Good pal LJM dropped over Wednesday for a look at JMRI and WiThrottle in operation. Certainly the iPhone app is way more useable especially for functions with English labels than any cab I've had a chance to play with so far. For example, how is one supposed to remember that the 8 key is for a cab light on a keypad? With the app the function buttons are labeled in English. Bye bye wireless cab sales.
Inspired by your thread, I have set up JMRI and WiThrottle to see what it is all about. Apart from a weak wireless connection, causing the iPhone to regularly drop out when moving around, which I suspect is to do with the metal foil surrounding the insulation between the roofspace and the floor below where the WAP is, the system looks promising. A WAP in the roofspace would probably sort that problem out.
I am keeping an open mind on whether I like having to look at the screen, when operating. There is something about the feel of three dimensional buttons that make operating easier, as you can ‘feel’ your way around the throttle without having to take your eyes off what you are driving. I will just have to wait and see once the system is fully operational.
As far as the function buttons being labelled is concerned, it is very nice to have, but since all my loco functions have been standardised to use the same buttons for every loco, I know exactly which buttons do what. Having said that, of course, visitors would not know, but whose railway is it anyway.
-
Yes richrua, that is a blanking plug. Just pull it straight off, being careful not to bend any of the pins. When fitting the decoder, make sure all the pins are lined up and that the blank pin hole matches where there is no pin.
-
Voting yes or no man?
Just saw this thread
Good spot as the Hornby ones usually have the recess pointing down rather than up
Any idea how they fit lengthwise?
Having compared the Hornby produced hooks with original Lima ones, they are an exact match for the original Lima ones, a direct replacement.
-
No special tools required for the wheel job, just a light hammer and an old 2mm axle to drift out the Lima axle from the wheel. The axle can be refitted with the hammer and a piece of brass over the axle, to ensure the end of the axle does not get damaged by the hammer. Just make sure the axle goes in straight. It is a shame we are so far away from each other, otherwise I could do the wheels for you.
Sourcing drive gears can be a bit of a problem. I don't know of any retail source. However, the old Airfix Loco tender drive unit has four idler gears in it which are of a suitable size. These tender drives can be picked up for very little at exhibitions, or model shops that have a junk box, maybe even eBay.
Another option is to cut the gear off an old Lima armature, in a drill, with a razor saw. The only problem there is that the hole in the gear is too big for the CD-ROM motor shaft, and would need to have a sleeve fitted to fit the shaft.
-
Noel, I have four Lima Class 26 & 27 locos, which are mechanically identical to the Class 33 loco. I have remotored them with motors taken from CD-ROM drives. The difference is phenomenal, much smoother and quieter, and no real need for a flywheel. All that is required is a drive gear for the motor. The original Lima armature and magnet are removed, and the motor secured in place. I have used small screws through the housing to allow for position adjustment of the motor for minimum gear noise. I have found that the smaller the gear is, the better, as the motor runs much faster than the original. Speed can be fine tuned by adjusting the appropriate CVs in the decoder.
Getting rid of the tyred wheels is also quite simple. All you need is two plain insulated wheels. The wheelsets are removed from the bogie, and the moulded gear is sliced off the back of the tyred wheels with a craft or Stanley knife. The uninsulated wheel is drifted off the axle, and the raised boss on the back of the wheel is filed flat. The wheel is refitted to the axle and the gear pushed on flush with the back of the wheel. The gear is a good fit on the axle, and to prevent it from spinning, I drilled a 1mm hole through the wheel and gear and inserted a 1mm brass pin, which, with luck, will be an interference fit. Fit the wheel and axle back on the bogie and fit the new insulated wheel. The reason for fitting the gear to the uninsulated wheel is that there is no room to fit a pickup on the gear side of the bogie, so the driven wheel is now picking up via the original pickup. For pickup on the other side, a piece of phosphor bronze strip is fitted to the bogie on the new insulated side. Because the original pickup is now picking up from the gear side, the polarity is now reversed, requiring the original wiring to be changed to the other motor brush.
Fitting an extra pickup to the trailing bogie is also just a case of a piece of phosphor bronze strip fitted to the insulated side, and wiring as appropriate.
I have used this method of removing tyres and fitting pickups for many years on Lima locos. The motor conversion, however, is only suitable for 4 wheel drive units, as the CD-ROM motor is much wider than the original pancake motor, and will foul the centre wheels of a 6 wheel unit.
-
Sorry Dhu Varren, we must have been typing at the same time!
Great minds think alike irishthump, but your reply is much more comprehensive than mine.
Whilst on the subject of space for fitting decoders, I have just been shoe-horning a 21 pin sound decoder + speaker + lighting circuit board + headlights, marker & tail lights + associated wiring into an already crowded NIR MV. Would really have been struggling if I had tried to fit an 8 pin and adaptor. The loco is powered by a Hornby Class 56 motor with two flywheels, driving a Hornby Class 20 drive unit. This leaves very little room inside for ballast without encroaching into the cabs. I had planned to have two drive units, but could not fit a decent motor in between the two bogies.
-
The main difference between 8 pin and 21 pin is the number of functions available through the pins. An 8 pin socket will only support 3 functions, although 4 function decoders with an 8 pin plug will have an extra 9th wire which requires connecting separately for the 4th function. 21 pin connectors will support 6 functions. If using sound decoders, an 8 pin setup will also require speaker connections, whereas a 21 pin setup has the connections built in.
I would agree with skinner75 that it is a good idea to fit pre-DCC locos with 8 pin sockets instead of directly wiring into the loco, providing there is enough space inside for a socket and a decoder.
-
A bit of information that I have just discovered. For those of you who use stock fitted with Lima tension lock couplings, and require replacement hooks, which are like hen's teeth, and can be expensive, Hornby produce identical hooks under part number X9428 for a pack of ten. The price of these hooks works out at less than 1/3rd of the the price being asked for on eBay, and even retailers etc. for Lima hooks. I obtained some from peterspares, but beware, I have found another retailer selling a different type hook under the same part number. Look closely at a picture before buying.
-
Have just checked out one of my 071s. CV294 controls the brightness of the cab at the radiator end. CV 302 controls the other end. A value between 1 & 31 is all that is required. The default value is 31. If the NCE Pro Cab supports POM, then by switching on a cab light, going to POM and entering a new value for the CV, you will see the difference immediately. Then just enter the same value for the other end. Job done. As irishthump says, it is well worth downloading the V4 manual, and then try to get your head round it.
 R
R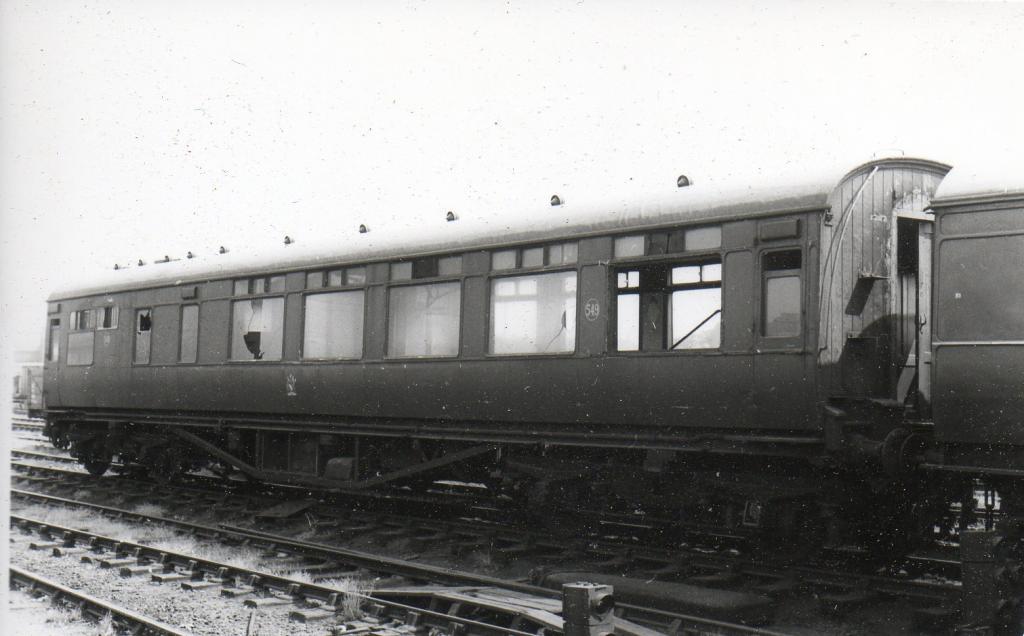


NIR blue
in Questions & Answers
Posted
Can anyone suggest a proprietary paint colour for the NIR light blue as applied to the 101 Hunslet and 104 MV Class locos. I have been using the Revell 52 dark blue for the 'Bumble Bee' InterCity livery, which is an exact match for the MM NIR dark blue. So far, I have not found a suitable shade of paint for the earlier light blue.