
33lima
-
Posts
183 -
Joined
-
Last visited
Content Type
Profiles
Forums
Resource Library
Events
Gallery
Blogs
Store
Community Map
Posts posted by 33lima
-
-
-
It's a bit dated now, from well before Murphy Models (tho before kit and accessory makers Model Irish Railways folded) but you may find some interesting tips here, including some early modelling articles by Steve Johnson, co-author of the modelling book mentioned by murrayec;
http://newirishlines.org/archive-2/
Some other useful links:
http://www.studio-scale-models.com/Index.shtml
http://www.provincialwagons.com/index.html
http://silverfoxmodels.co.uk/category/northern-ireland-railways-2/
http://silverfoxmodels.co.uk/category/irish-railways-iarnrod-eireann/
http://www.worsleyworks.co.uk/WW/Irish_List.htm
PS best places to start on this site for info and inspiration, I would suggest, are the sub-forums 'Workbench' and 'Layouts'.
-
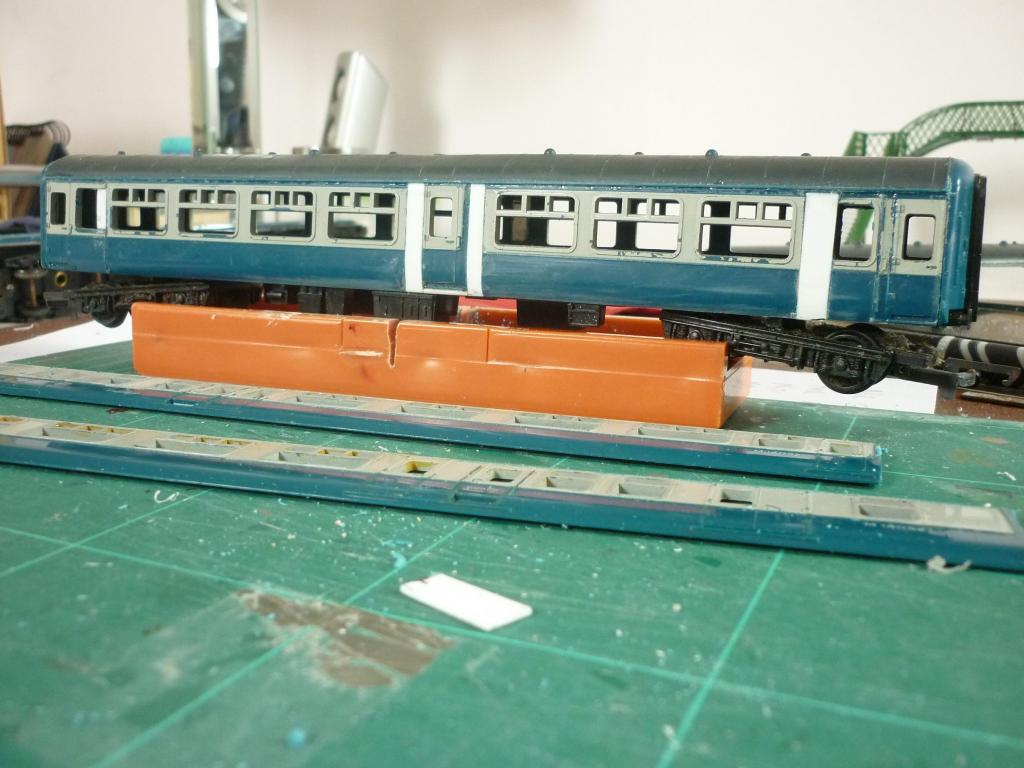
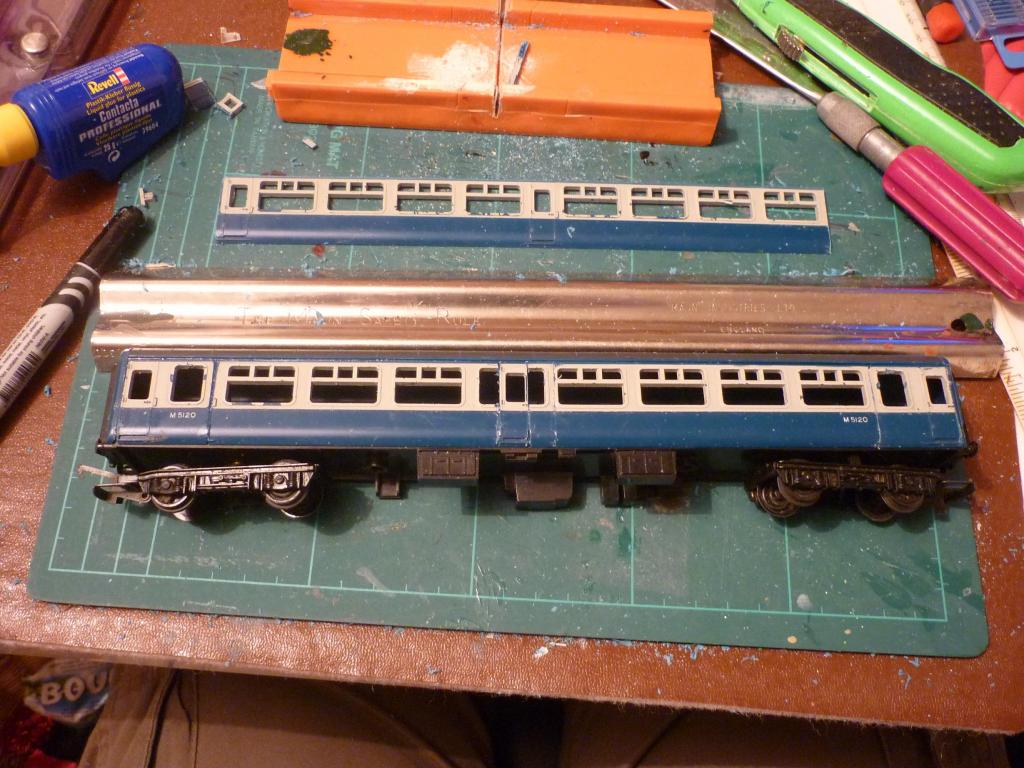
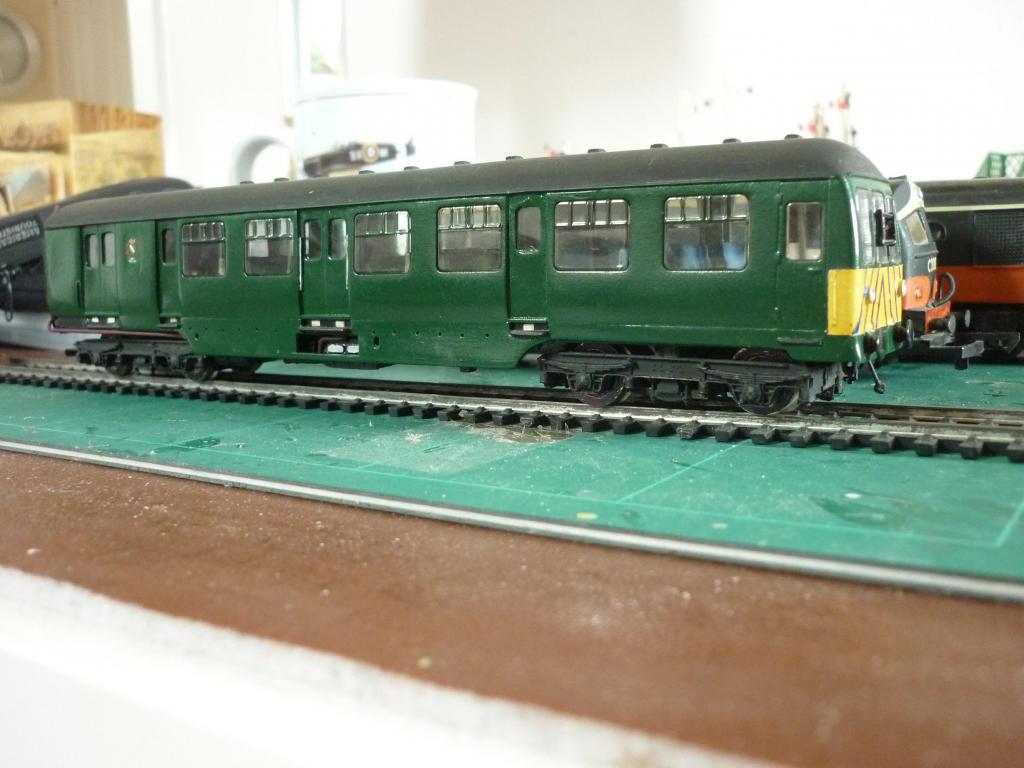
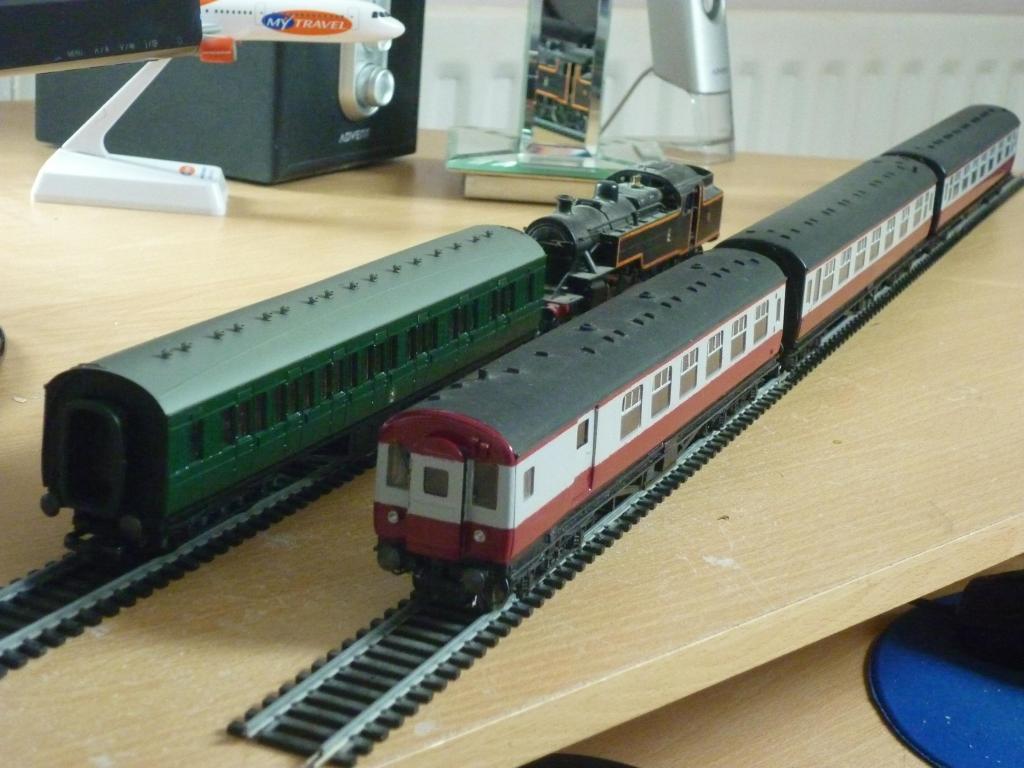
For the project I'm using two Hornby Mk2a open seconds, and one brake first. The latter needs quite a bit of work as the passenger windows are too widely spaced and need that bit more 'cutting and shutting' to get the right layout.
Anyway, here's the centre car again, from both sides, showing the 3+4 window layout with the extra door in between. When you're digging a hole in the garden you always seem to end up with a greater volume of soil than came out of the hole. Conversely, when 'cutting and shutting' a coach model, I usually seem to end up with less length than I started, if you see what I mean. As usual, some plasticard sheet filled in the gaps.

The driving trailer was next. This is similar to the centre car, except for one passenger window less at the end which has the corner cab. It needs a fair bit of surgery to reproduce the asymetrical window layouts at the cab end.
Next job will be the power car bodyshell, from the Hornby Mk2a brake first. Then I'll do the finishing and detailing on all three vehicles. Next the underframes, where most of the existing components will need removed and replacement fittings added. Interiors I'll probably leave till after that, ahead of the paint jobs.
-
About 20 years after my first attempt at these, I've recently started another set for member TrainModel.
For reference, I use mostly the pics I took in the early 1990s, of sets in red and cream 'suburban' livery, grey and blue 'intercity' livery, or the latter with 'intercity' branding removed which replaced both when the sectorisation of NIR was abandoned. To my eye, the sets looked best in these liveries. Most of these pics, I've uploaded to Flikr: http://www.flickr.com/photos/33lima/
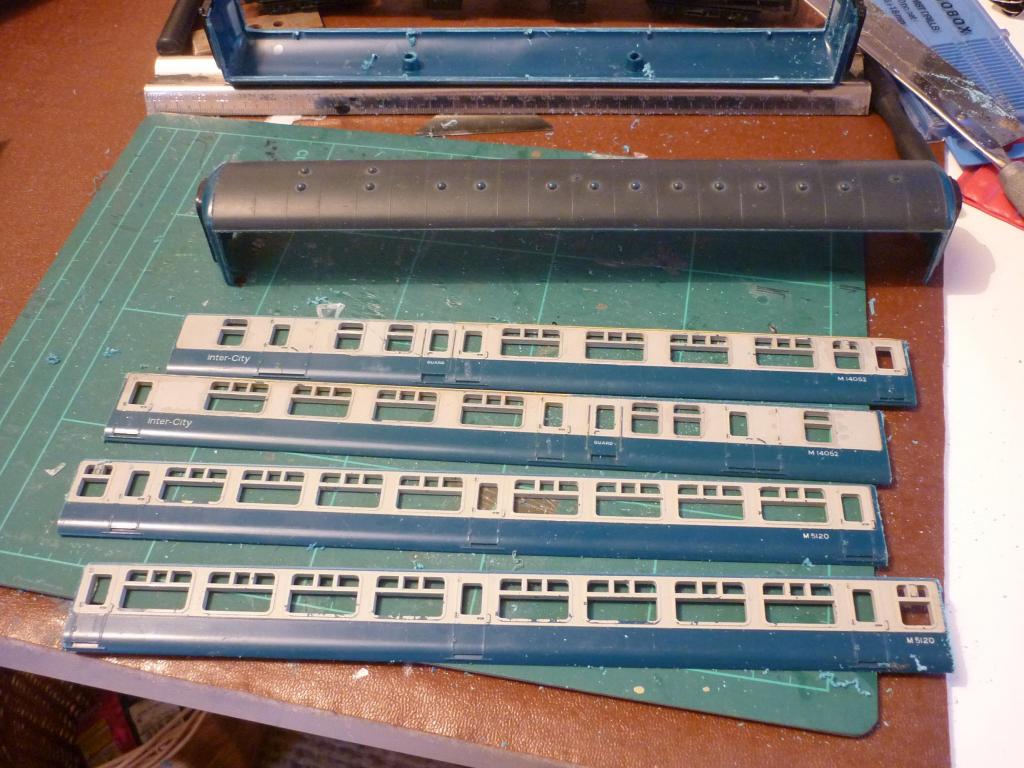
First time around, as described in 'Irish Lines' #3 (https://www.dropbox.com/s/ci3elrw2itkh88t/Irish%20Lines%20-%20Issue%203%20-%201993%20Spring.pdf ) I used Lima Mk2b coaches as a basis. This time I'm using Hornby Mk2a's, which are more readily available than the Lima second class. Tho the latter's 'wraparound' end doors are in the right position, as you need to hack the coach sides, it's little trouble to hack and reposition the doors while you're at it. The Hornby coaches have the sides and ends moulded to the roof and this provides a better basis for re-assembly of the sides after 'cutting and shutting', than the Lima coach, whose sides are moulded to ends and a false floor, with a hard-to-prise-off roof made of brittle plastic which also forms the thick glazing pieces.
I used a common-or-garden Stanley knife to slice the sides just under the gutters; repeated steady cuts, freehand but with the gutter acting as a guide. Then a vertical cut at each end, with a razor saw.
Below is the centre car, with one side re-assembled on the roof/end piece, and the remains of the other side awaiting cutting, sitting above it. Setting the underframe/floor back in place before the liquid poly was completely dry, helped keep things liked up.
-
If you don't mind using car sprays, then Austin Rover Damask Red (also recommended for BR coaching stock maroon, apparently) is a good match for the reddish NIR colour of the 1960s-1980s. Ford Monza Blue is a decent proxy for the sky blue used on the GMs and Mk2s (tho the blue used on some station signs currently is a more royal blue shade, like Humbrol French Blue).
-
Not my period really but it looks like the original grey/blue was common in the GM era so you can take your pick.
http://farm7.staticflickr.com/6182/6126271077_83c9d91bc1_o.jpg
Presumably your GM is in the original 'sky blue' scheme and not the later 'royal blue'.
-
[ATTACH=CONFIG]8802[/ATTACH]
TV ads, in Easons and many good magazine shops for about 6 EURO, and you get a nice unnumbered MK1
Thanks for the tip, Bos, I hadn't seen the ad. Picked up a few in Easons in Belfast Donegall Place yesterday, where they seemed to be selling well.
The coach is pretty good for a budget job. Biggest negative is that the underframe trussing is filled in, solid, not cut out. Body is unpainted plastic but looks quite good; the 'plasticky-looking grey' roof can easily be painted and coach number transfers added. It has spring-loaded close couplers, decent metal wheels, and flush glazing. Most detail is moulded but it's nicely done. Cheap project basis too. Overall reaction to the model seems to be mostly very positive: http://www.rmweb.co.uk/community/index.php?/topic/52594-model-railway-partwork-your-model-railway-village/
The mag is pretty 'lightweight' as you might expect but not bad, apart from some 'kiddy-speak' in places. The layout itself, tho obviously completed to a good standard for the promotional pics, actually looks quite attractive and well-designed for its intended purpose, despite the odd baseboard size. Of course as with all these part-works, the overall price will be high if you go the course (and the publishers do, to), and it's likely a long haul to get to something buyers can actually run (but anyone starting now will probably still have the layout finished before mine is!). A creditable project; I hope it gets enough subscribers to keep going.
-
This may be worth a look, if you can do it on a sunday:
http://www.translink.co.uk/Special-Offers/Sunday-Day-Tracker/
-
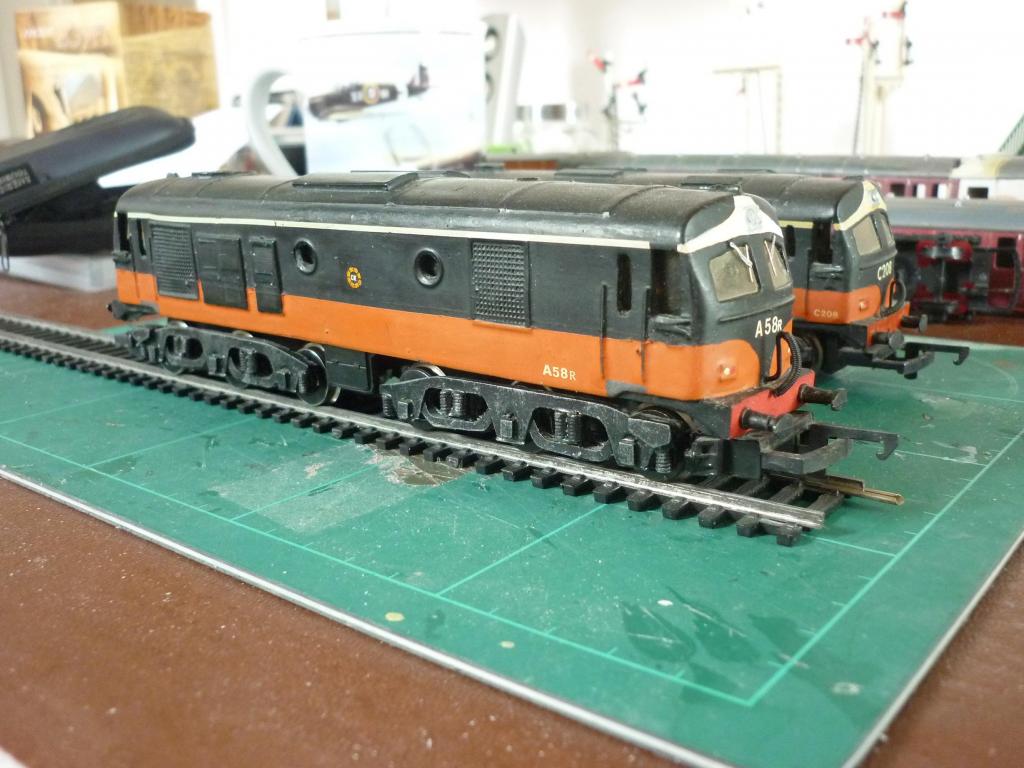
Wow! What a beautiful little replica!
-
Some pics of the two fantastic local layouts at this weekend's show in Carrickfergus.
North Down MRS's 'Ballyclare':
Tony Ragg's 'Stanfording':
Will upload the rest to my Flikr photostream thingy soon:
http://www.flickr.com/photos/33lima/
-
According to Oliver Doyle in 'Locos and Rolling Stock of IR and NIR', 3rd edition (1987), 'Following a special spoil movement contract for motorway construction in the 1960s, a number of redundant drop-hopper wagons were retained for permanent way use'.
In Jonathan Allen's '35 Years of NIR', there's a colour pic of NIR DH 2 on a rake of these at Whitehead. The caption says 'On 7 October 1974, NIR began conveying spoil from Magheramorne to an oil jetty construction site at Cloghan Point near Kilroot. In a near-repeat of the former steam-hauled spoil trains, the same wagons were used although at first NIR's DH locomotives provided motive power. Finding these units wholly unsuited to the task, they were soon replaced by one of NIR's 101 Class Bo-Bo diesel electrics.'
I have no idea what happened to the trio which I snapped at York Road about seventeen years later.
-
I've now uploaded these and most of my other pics to flikr. Still a few to come, over the next few days.
-
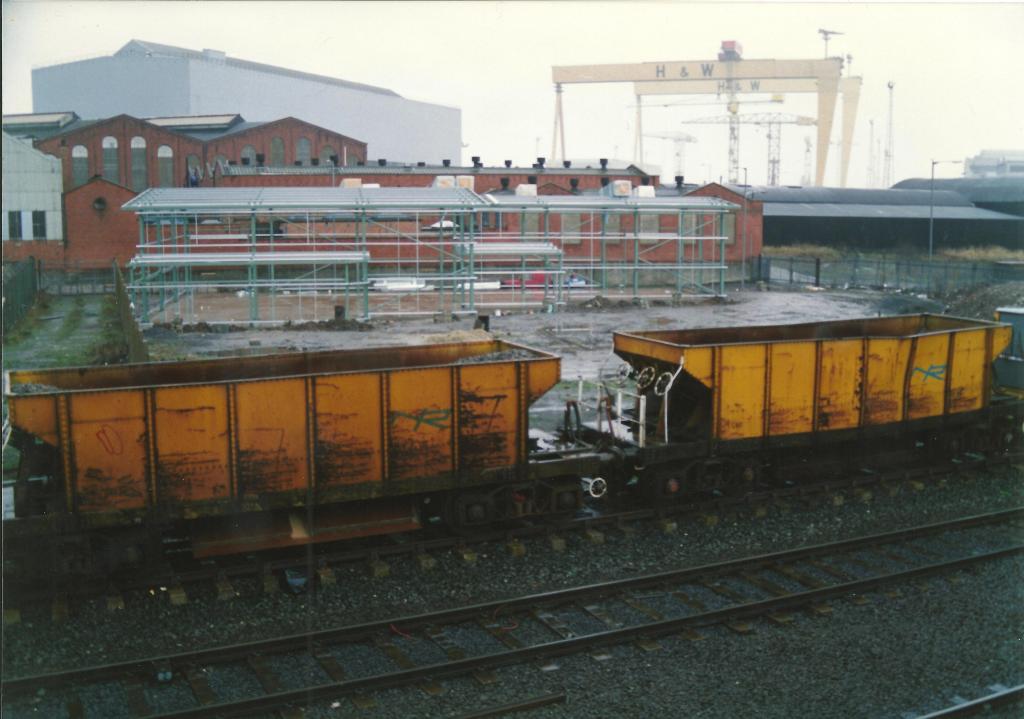
Back in 1992, I managed to get three of the Seacows in one picture - a herd, rather than a rake?
There seem to have been two variants to these, some like the last one having a deeper horizontal upper end panel; they seemed to have lacked the BR vacuum gear and some had rails at only one end.
-
...and a few more, mostly around Whitehead, 1991-93:
-
Just uploaded a few more, DEMUs on the Bangor Line plus the first of some taken at NIR & RPSI Whitehead.
-
Yes but I mean, it hasn't even got knurled wheels!
TBH I could use about four of those now but they'll have to wait for the economic upturn or the lottery win, whichever comes sooner.
-
Having found many useful pics on Flikr, I thought it only fair I should add some of my own like the one below, generally taken of NIR subjects in and around Belfast, in the early 1990s. More to follow as opportunity and inclination permit.
-
Hi Kirley
Not having had a layout to test it on, I don't know how well the pop-fastener method works, but Steve J had it fitted to an A Class and a C Class he'd built from resin kits and fitted with Hornby pancake motors, with the fastener stuck on top.
So I assume they run at least adequately, tho like the original Tri-ang top bogie mount they may be vulnerable to the bogie pitching or the body wobbling a bit. The MPD model is approaching the point where a test run will be needed so I'll report back.
My emerging layout is so far powered by a Hornby R965 (reportedly a good trainset controller with good slow-speed feedback control) and an ancient Dublo Marshall III controller which has a pulse power setting for slow running.
Corax67 posted a short guide to fitting a DCC decoder to a tri-ang motor bogie here:
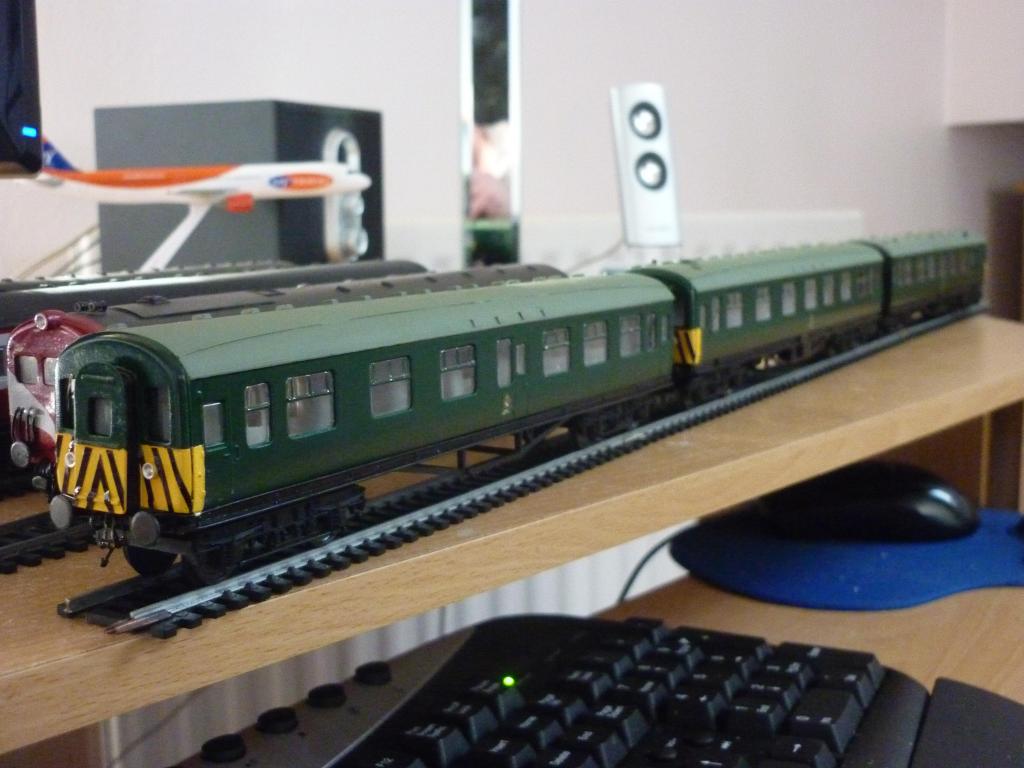
If I was starting again, I'd standardise on the Hornby SWB motor bogie as fitted to their Class 110 DMU and their HST. Power cars for the latter are widely available 2nd hand and the DMU's bogie frames are a clip-in replacement for the HST's. The powered and trailing/pick-up bogies can then be snap-fitted to the Class 110 DMU's power or centre-car chassis. I used this for my UTA green MED set. Hornby ringfield motors have their detractors but this setup gives me much less inaccurate bogie frames plus better pick-ups.
I have to confess, tho, that I'm looking forward to hearing again soon, after all those years, the distinctive and purposeful sound on the track of the knurled wheels of the Triang DMU motor bogie!
-
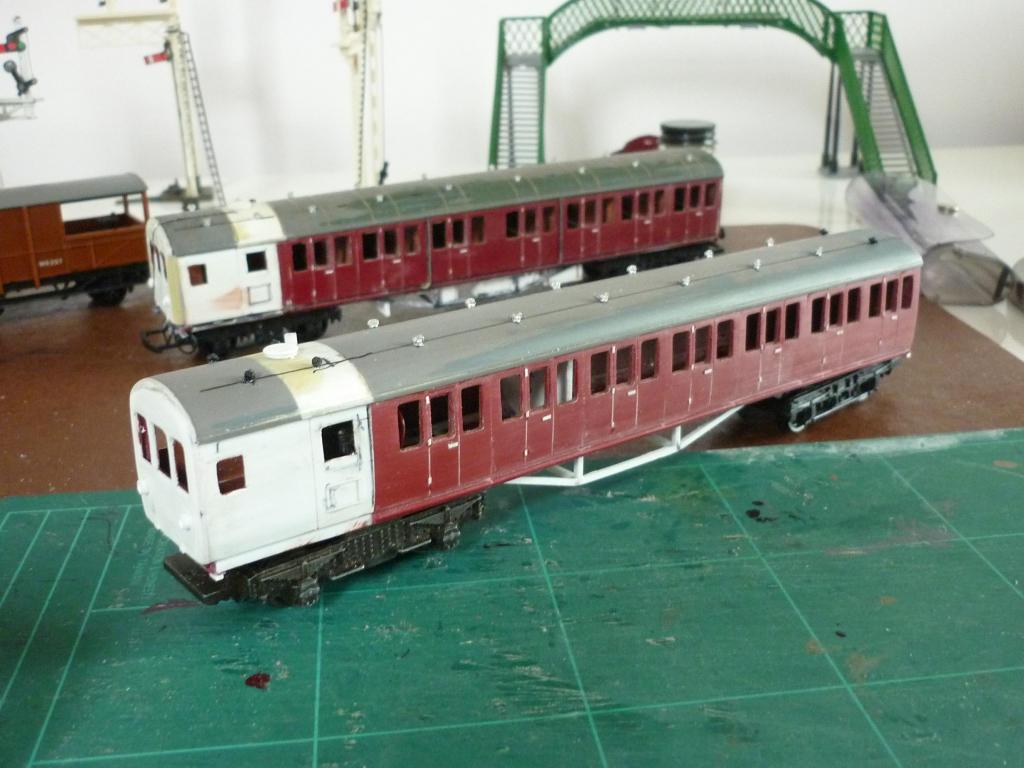
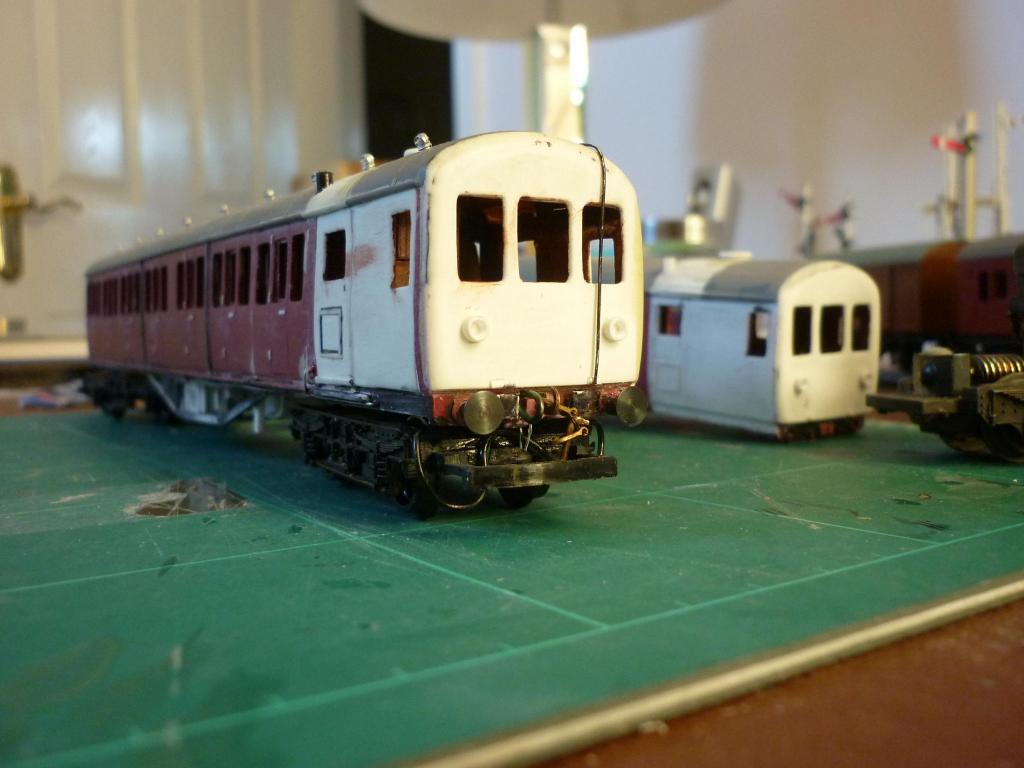
Latest progress below. The power car has now had roof ventilators, door fittings and some other detail added to the bare bodyshell. I ran out of MJT cast torpedo vents and ended up using some Branchlines (not Bachmann Branchlines) plastic ones from an old coach fittings sprue. Underframe trussing has also been fitted.
The attachment has also been fitted for the Tri-ang DMU motor bogie, using pop fasteners - a method I learned from Steve Johnson of 'Gazeteer' and 'modelling Irish Railways' fame. The female fastener was superglued to the roof underside, the other to a plastic rod screwed into the bogie's mounting block, which gave some height adjustment. I also took the opportunity to remove both cars' front buffer beams and re-fit them, as there was originally not enough overhang to the cab front.
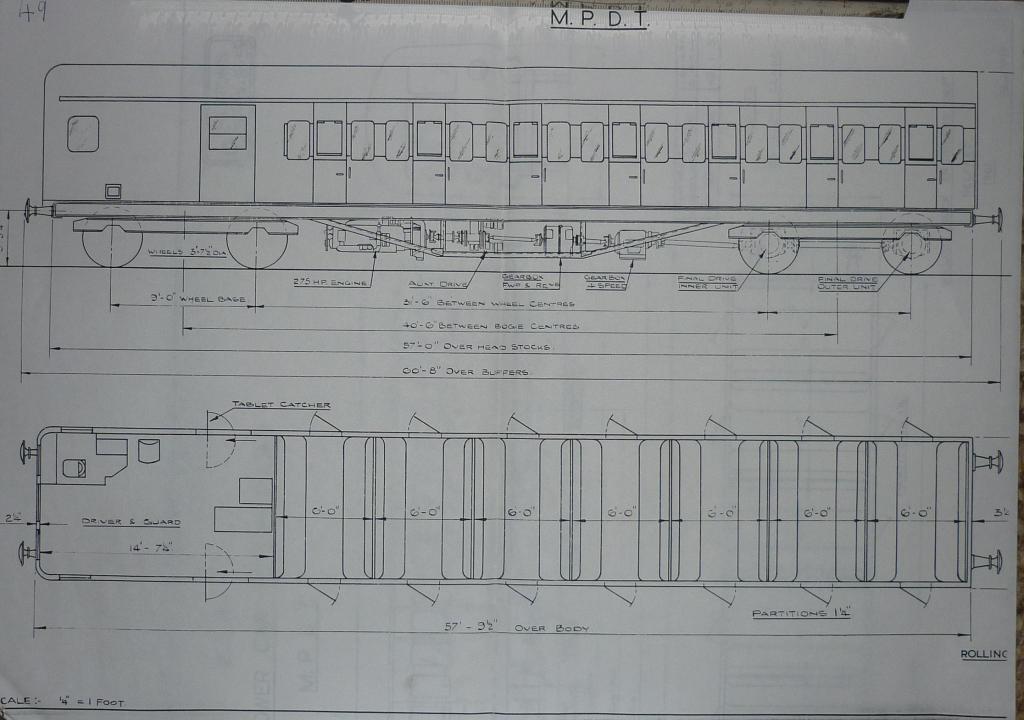
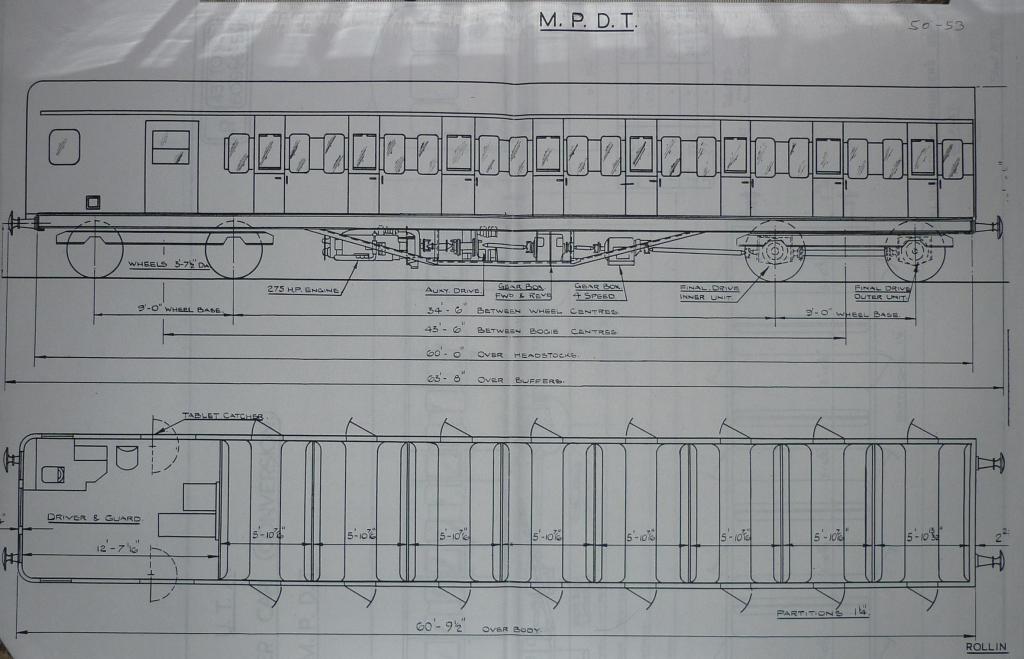
The power car is not as posted earlier a 50-53 series but 49, which has one compartment less. My guard's compartment ended up a bit short - I over-allowed for plastic lost in cutting and shutting all the original compartment sides - but he's not complaining
-
Haven't forgotten, Michael/Train Model!
-
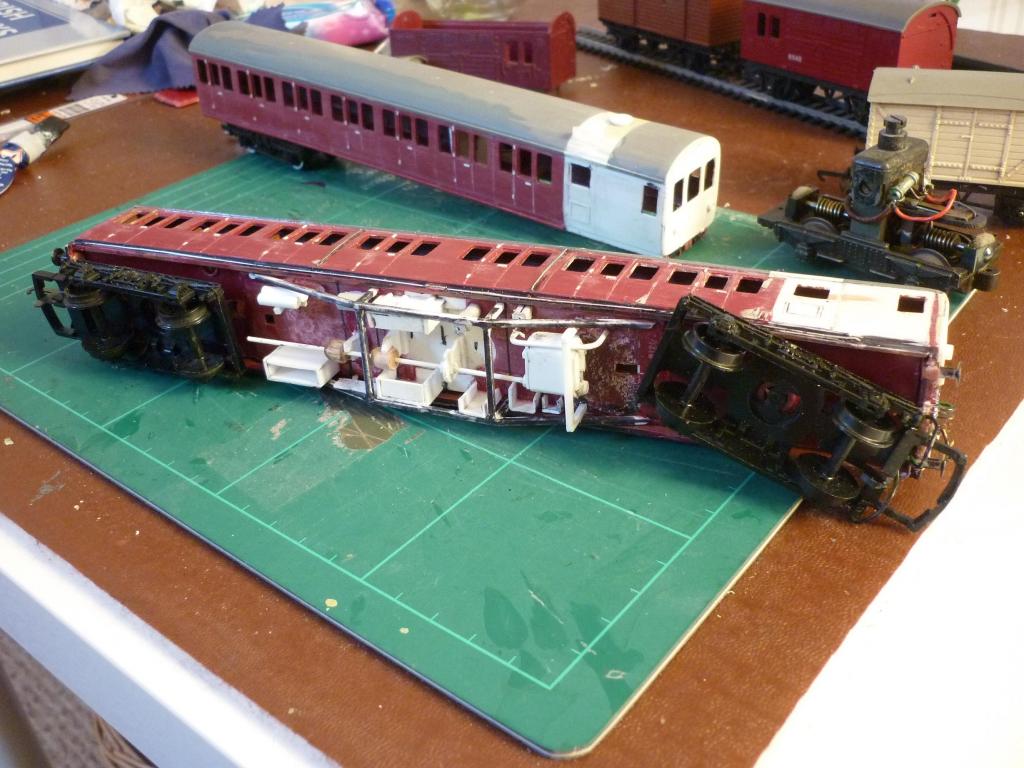
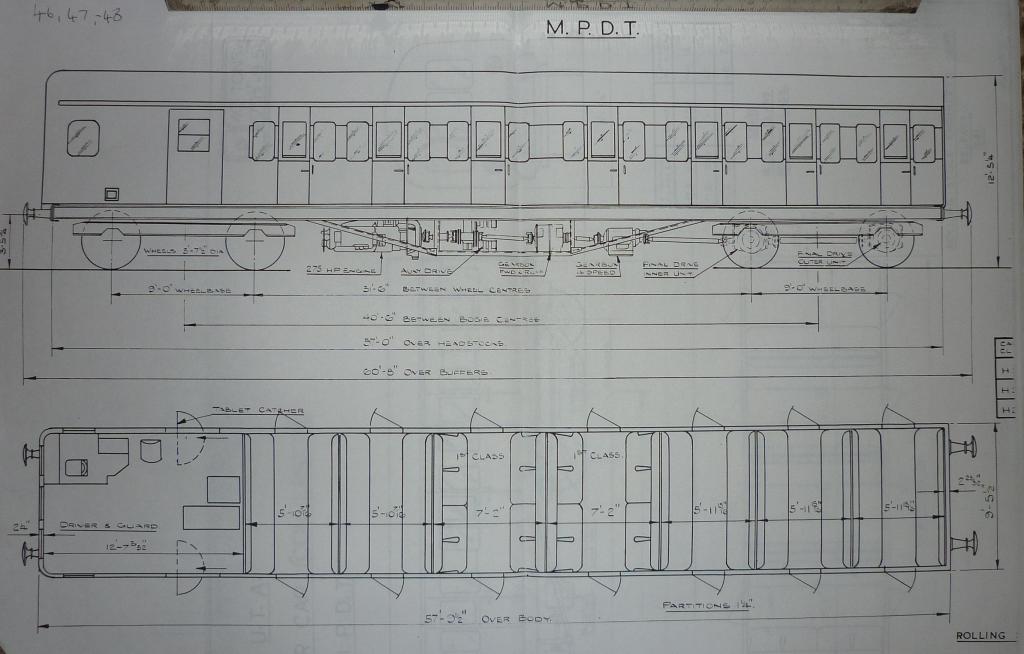
Anyhow, I had opted to make a composite from the 46-48 series and an all third from the series 50-53.
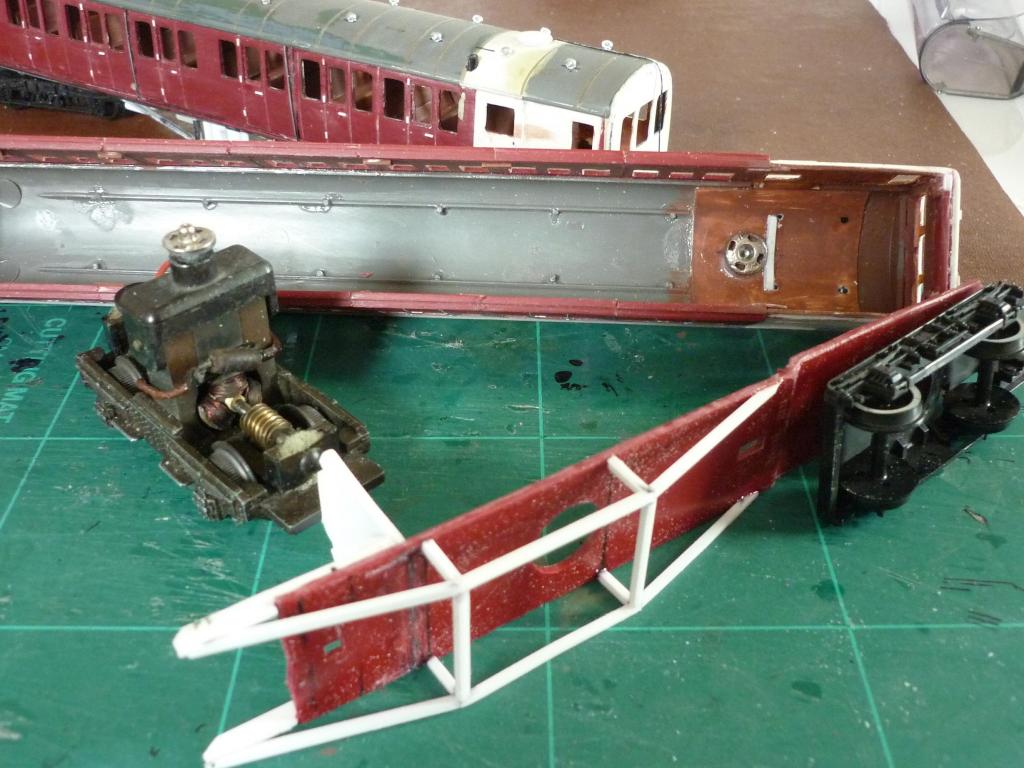
Power was going to be a venerable Tri-ang power bogie from the equally venerable Tri-ang R157 DMU. Soon I had the basic bodyshells of both cars built. I had only one interior seating unit and had to cut and shut this too, adding some extra compartment partitions and seats from plasticard. The seating was essentially rebuilt onto the former coach floor, originally moulded with the sides but now separate.
I next returned to detailing the compo. I used (MJT?) cast ventilators for the roof, supplemented by cross-straps cut from parcel tape, a circular vent common to MPDs above the brake compartment from two discs cut from plasticard, and a plastic exhaust pipe down near the gutters on the RH side. More plasticard provided lights and other fittings. I fitted turned brass buffers in home-made plastic housings and added an etched brass screw coupling to the cab buffer beam. The tension-lock coupling at that end has had its hook removed and the bar cut back a bit and I may replace this with a wire loop or remove it altogether at some point. Florists wire was used to replicate various visible pieces of pipework. Door handles and hinges were originally raised detail which was lost when rebuilding; the door lines were scribed on and hinges and handles cut from plastic strip and fitted.
Underframe trussing was from thicker plastic strip, and mechanical details were added from strip, wire and some pieces of wooden dowel. The UTA works drawings only show major components and I have had to rely on photo interpretation to sort out the rest of what's visible from the sides. Since I started, 'Diesel Dawn' appeared and features a hand-drawn layout scheme for MPD underfloor components but I am fairly certain that this is reproduced mirror image from the standard layout.
Well, that's as far as I've got to date, except that having in the interim finished (barring any final detailing) my first NCC 'brown van', I have started the process of adding detail to the second MPD bodyshell, the one that will have the motor bogie. I'll post an update when there's something to report.
As far as liveries are concerned, I plan on finishing them both in UTA brunswick green with wasp-stripes, which is how I recall these types. I was tempted to go with Eau de Nil/'Catherwood Blue' but will save that for a trailer or two for my UTA green set. Tho Derek Young in 'UTA in Colour' says that only one 'suburban' MPD was repainted in grey and maroon before they were rebuilt by NIR to open configuration, there is a pic online showing two suburban sets in maroon & grey (complete with MED-style white 'wedge' on the cab front) but I'll stick to the common dark green livery, with the wasp stripes which I believe were added after MPD 58 was written off after that argument with a car on the accommodation crossing near Bellarena in '59. Apparently the MPD - which photos show was in 'eau de nil' - ended up on its side, nearly upside-down, but more-or-less intact; but was burnt out when sparks from cutting gear during recovery fell onto upholstery and started a blaze the crew had to fight using water bucketed in from a nearby house...a losing battle as it turned out. Exit MPD 58, enter wasp stripes...!
-
Having renewed my interest about a year back I dug out all my old models and re-started work on the 'suburban' MPD set. Unlike my first two 'intercity' sets, this was going to represent a non-corridor compartment set, of which there were several varieties including power cars and 'mules' (as the unpowered MPD trailers were known). In the interval, my sources had expanded, having been joined by Colm Flanagan's excellent 'Diesel Dawn' (essential reading for anyone remotely interested in the subject) and other excellent sources such as Derek Young's superb 'UTA in Colour', Sam Somerville's 'NIR Runabout' (an excellent source fro UTA railcars in NIR days) and most recently, Derek Huntriss's 'Irish Traction in Colour', which includes a superb study of 'suburban' MPD sets at York Road.
To be honest I'd intended to run Steve Rafferty's set as it was but he'd paint-stripped it before the swap. It was a basic conversion with a trio of windows in the brake end of two Tri-ang suburban coaches (as produced in the late 1950s and early 1960s), some side windows filled in, and sliding doors scribed on. Having acquired it unpainted I decided to do a more dramatic rebuild. The brake compartments on real MPDs were quite small and took up the space of at most a couple of former passenger compartments. Also the compartment spacing was much tighter than on the Tri-ang models.
So I decided to do a 'cut and shut' job, removing the sides from the floor and razor-sawing the sides into sections which I re-assembled to give something approximating the correct compartment spacing. This was the point I picked up the work again, having to acquire a second coach - a non-brake version this time - as one of the originals could not be located.
The rebuilt sides were assembled onto a lengthened roof, and a new cab front was built from plastic card on the old coach end, with the upper half cut away for the windows. Plasticard brake compartment sides completed the picture and I thus ended up with a coach nearer the correct length than the rather short Tri-ang suburban coaches.
By this time of course I had been forcibly reminded of the stationmaster's advice to John Wayne at the start of 'The Quiet Man' about this not being the best place to start if you wanted to get to Inishfree (or build an MPD conversion) but I'd started and this time, twenty years later, I was going to finish!!!
-
Recently I re-started work on a 2-car MPD set, begun back about 1994. The immediate inspiration for this, back in the early nineties, was a Colin Boocock pic in 'Irish Railway Album', reproduced in typically 'muddy' Ian Allan 1960s fashion, showing a set at York Road in 1963; and some pics of a set Steve Rafferty had converted from a pair of Tri-ang suburban coaches. The latter came my way in part-exchange for an AEC set I built for Steve and formed the basis for this project, with a coach that went AWOL in the intervening twenty years being replaced by a recent eBay acquisition.
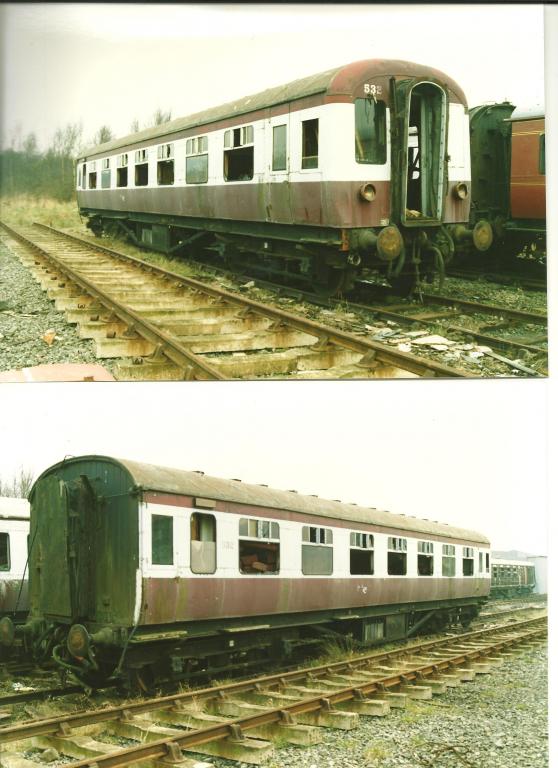
The deeper inspiration for the model was my interest in the trains of my childhood. I was never much interested in steam, if only because of regularly getting an eyeful of soot when leaning out the carriage windows, as one was wont to do in those days, on a Portrush excursion. I didn't know the correct titles of the railcars I travelled on back in the 1960s and early 1970s on the Bangor and NCC lines but they WERE 'the train' to me. MPD unreliability may have come later because I don't recall them ever letting us down. Back in the early 1990s, a resurgence of interest revealed it was too late to experience them again, apart from snapping MPD trailer 532 on an ex-GNRI underframe at Whitehead.
However, thanks to Mark Kennedy at the UFTM, I was able to acquire copies of a good many works drawings (many of which I have posted in my gallery at http://www.rmweb.co.uk/community/index.php?/gallery/member/15566-33lima/) and gradually followed up various leads and got a lot of help from many individuals and other sources, including articles in the IRRS journal and managing to arrange to meet and chat with both CME WAG MacAfee and designer Leslie Stafford (whose signature appears on many of the works drawings). Some mysteries remained - like the 'turquoise train' I recalled we used to see on the Bangor Line from Carnalea for a time in the early 1960s (was it a 'eau de nil' MPD on trial, or was it an unrecorded livery for an MED set, not just the one car recorded in cream and pale blue-green in 'Diesel Dawn'?) but many other details of the pioneering UTA railcars were revealed.
First effort at an MPD set consisted of a very limited re-work of a trio of Hornby Staniers, as described in issue 1 of the newsletter 'Irish Lines' in December 1992 (archive available here:http://newirishlines.org/archive-2/ ).
This NIR maroon set was soon afterwards re-worked to resemble something closer to real MPD vehicles and was then followed by another 3-car set, from similar base coaches but with rather more attention to detail.
...which brings my MPD projects up to the point of the current one, which I'll describe next.
-
Thanks for the positive feedback guys!
I'll post a separate thread re the MPD.


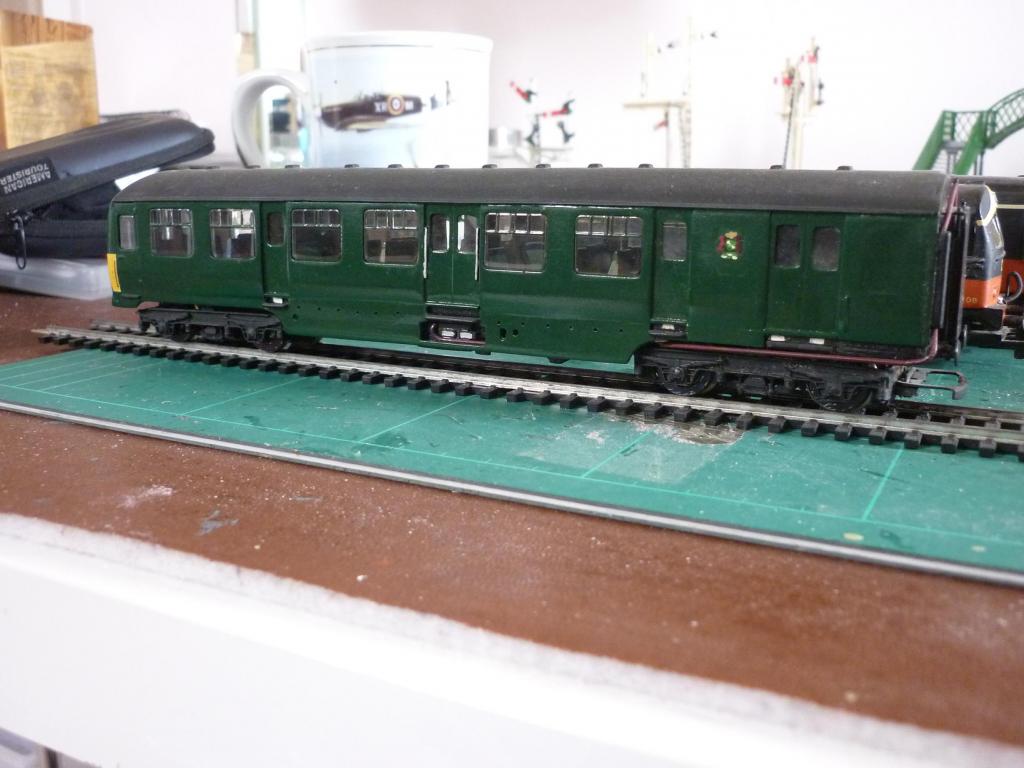
NIR 80 Class DEMU
in Workbench
Posted
Some pics of this weekend's progress, mainly on the 80 class power car.
Long job, because sides of the donor Hornby Mk2a BFK need more or less completely sliced up and reassembled. Like the centre car and driving trailer, for now this is still sitting on the original floor/underframe unit & bogies. It has had the corridor end cut away and filler applied under the inside of the roof, to permit sanding down to meet the flattened cab front roof.
Next job will be fitting the cab front itself, at which point it'll begin to look like something resembling the prototype instead of a refugee from the breaker's yard, which is always a morale-boosting point in the project!