Adrian
-
Posts
108 -
Joined
-
Last visited
-
Days Won
3
Recent Profile Visitors
2,611 profile views


.thumb.JPG.31f7904bbe5bec3b5c7c4dfd080e401f.JPG)

Adrian's Achievements
")


-
It will be George! There's about 70 of them...
-
Thank you Patrick!
-
Aw, thanks Derek, really appreciate that Honestly, I get inspiration mainly from other modellers and watching YouTube. At the moment, with all the woodwork on this layout, I'm addicted to watching woodwork tutorials and videos on YouTube and want to build everything! Motivation-wise, I try to do at least a tiny bit every day, even if it's only 15 mins or putting some bushes or grass on the layout somewhere. Of course I love getting a block of 3 or 4 hours but to me it's more important to get something done every day and that's what keeps me going Hope that helps!
-
Thank you - I've found myself really enjoying the woodwork, it helps when you buy the right tools for the job of course... Thank you Derek It is indeed 0% so I'm ok there I suppose all the hand cutting makes me appreciate the chop saw that much more And for those that prefer to watch a video, the latest update for October just dropped on YouTube
-

Depot #8 by Riverbank Railways (fictional 1980s / early 1990s depot)
Adrian replied to Adrian's topic in Irish Model Layouts
And for those that prefer to watch a video, the latest update for October just dropped on YouTube -
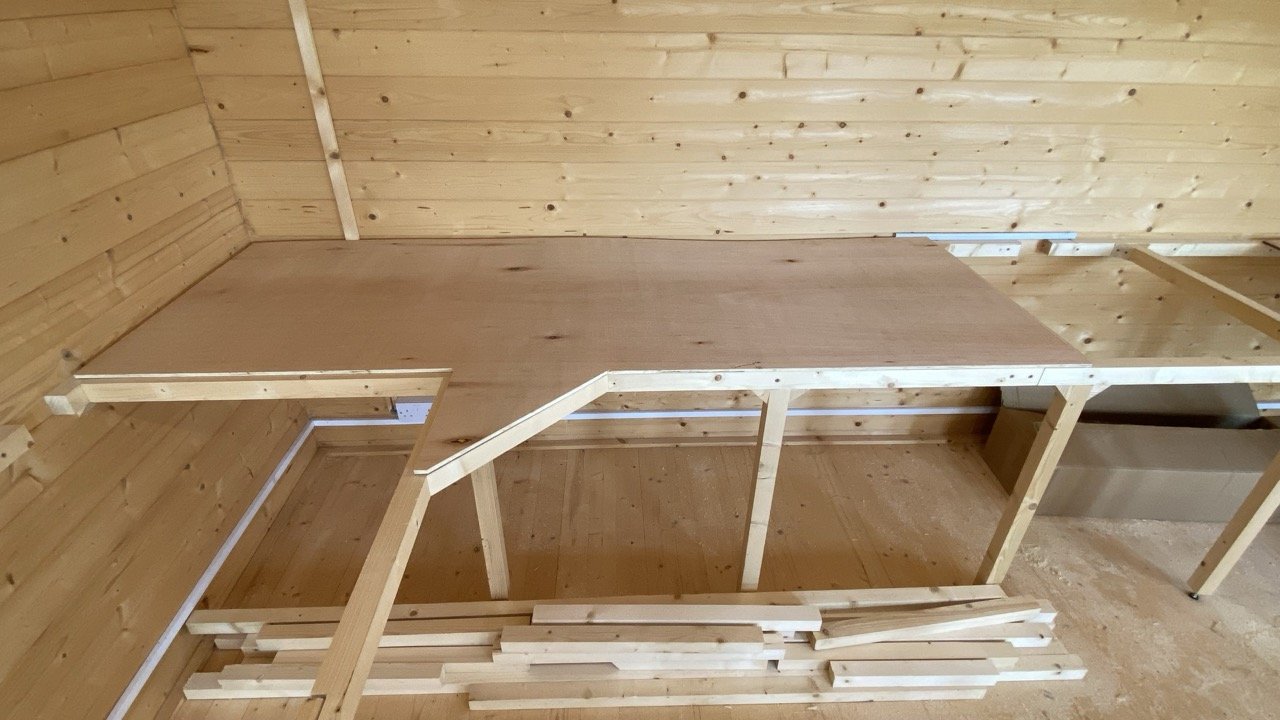
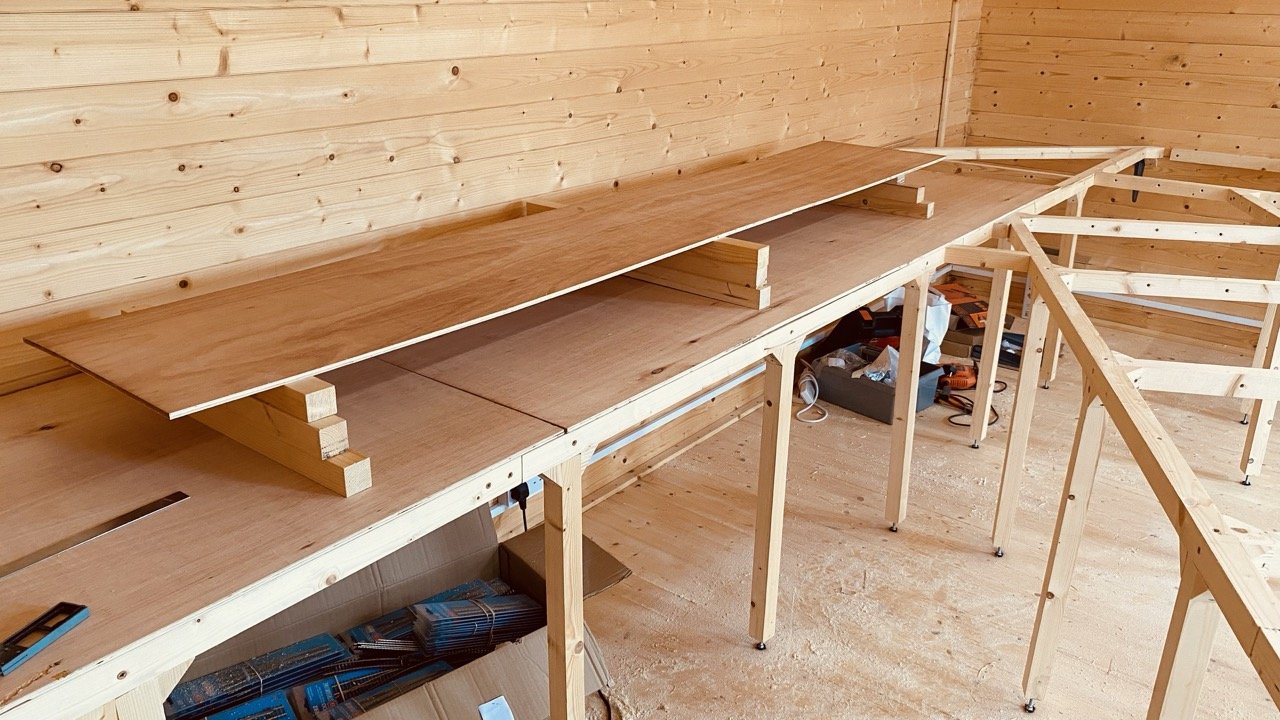
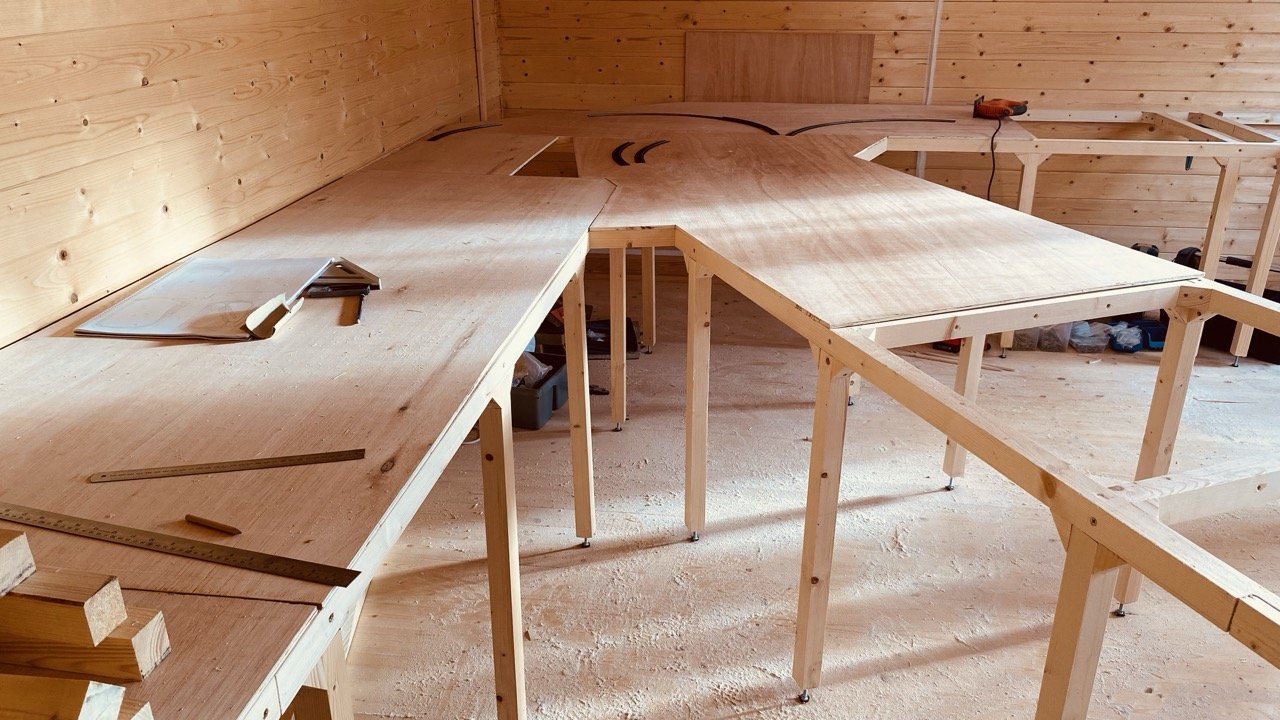
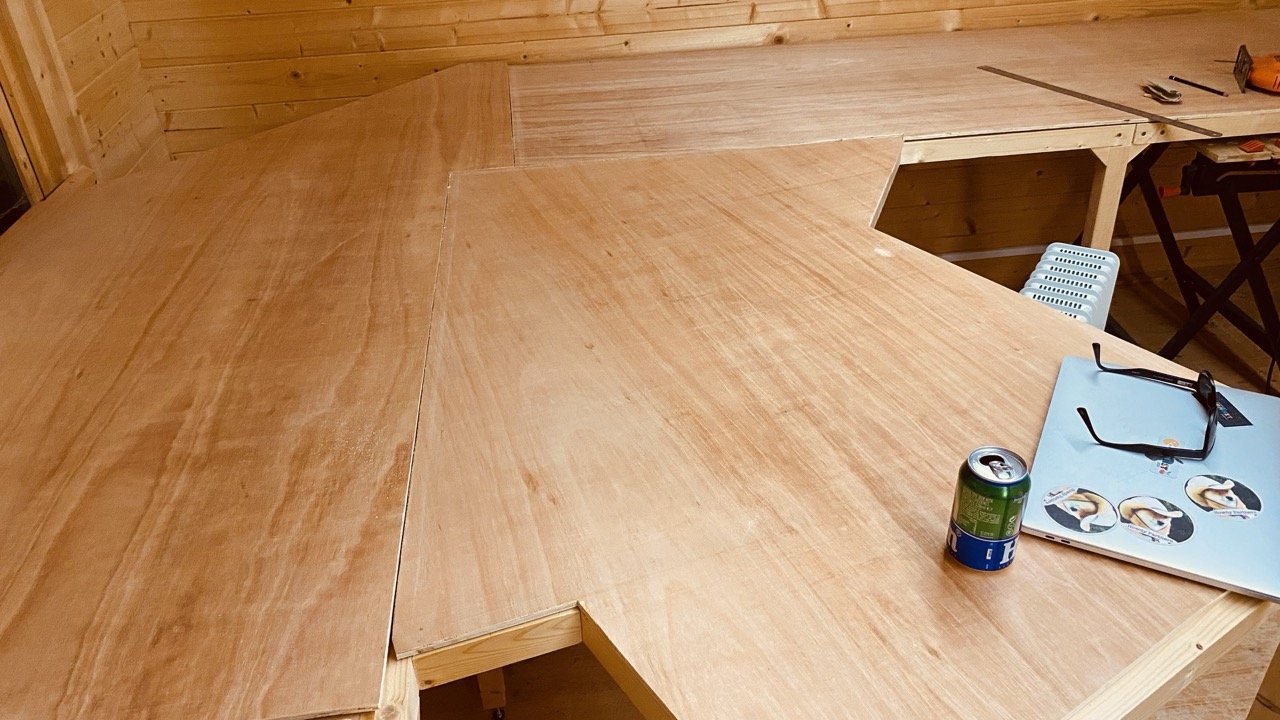
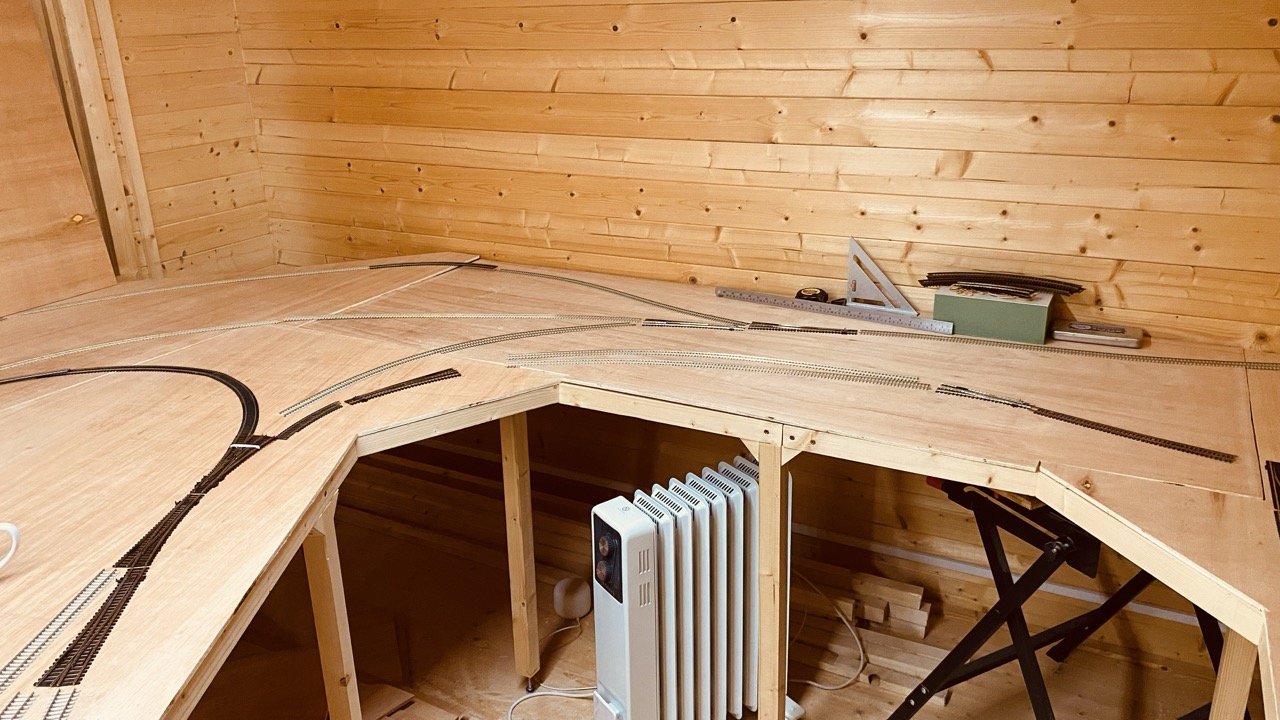
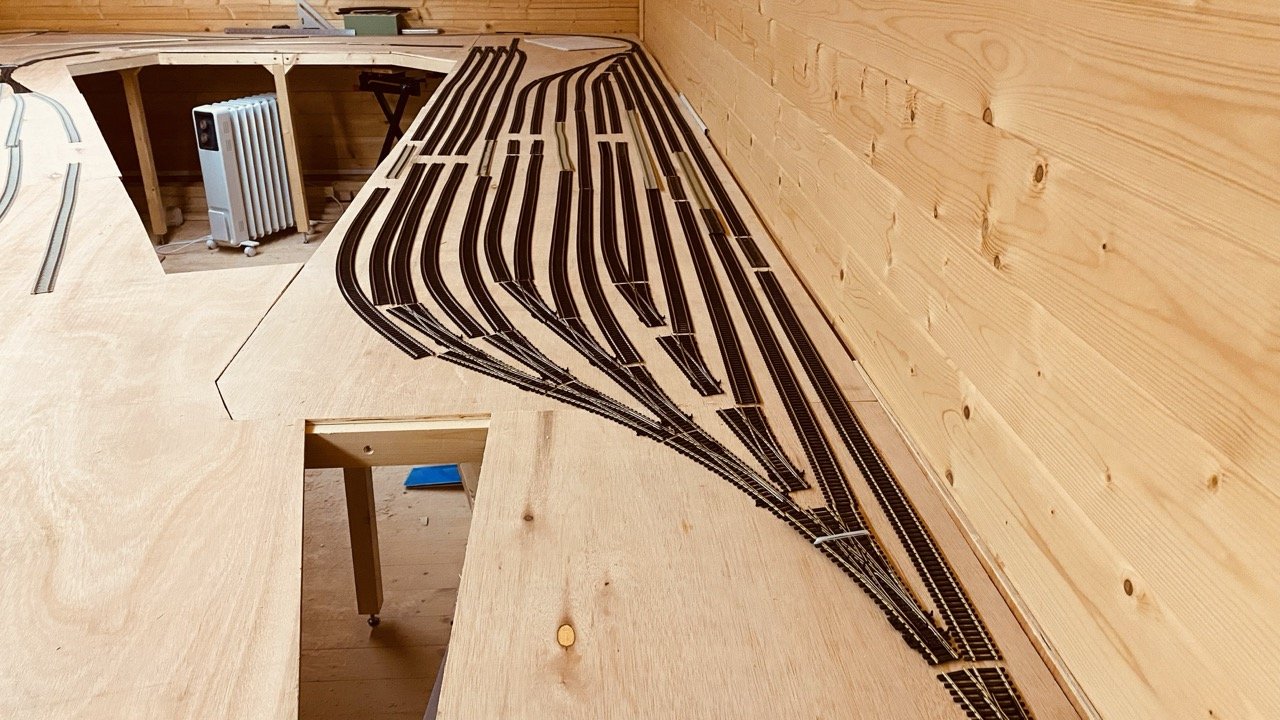
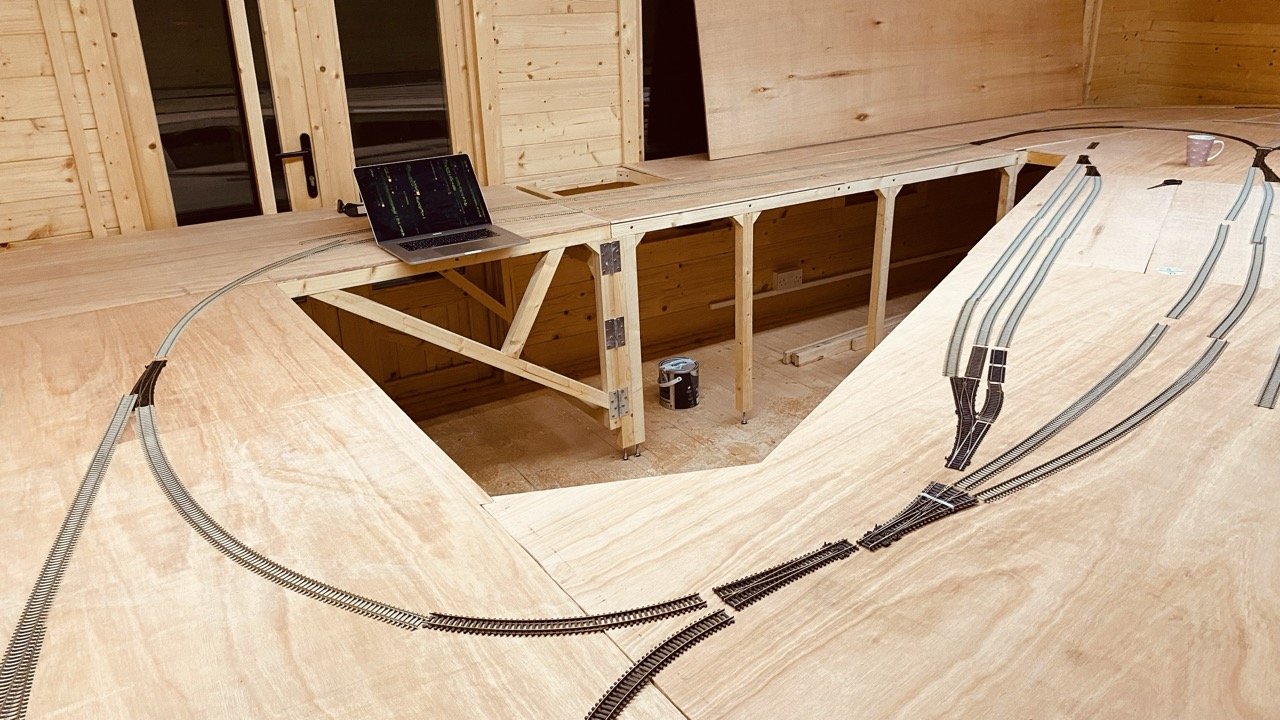
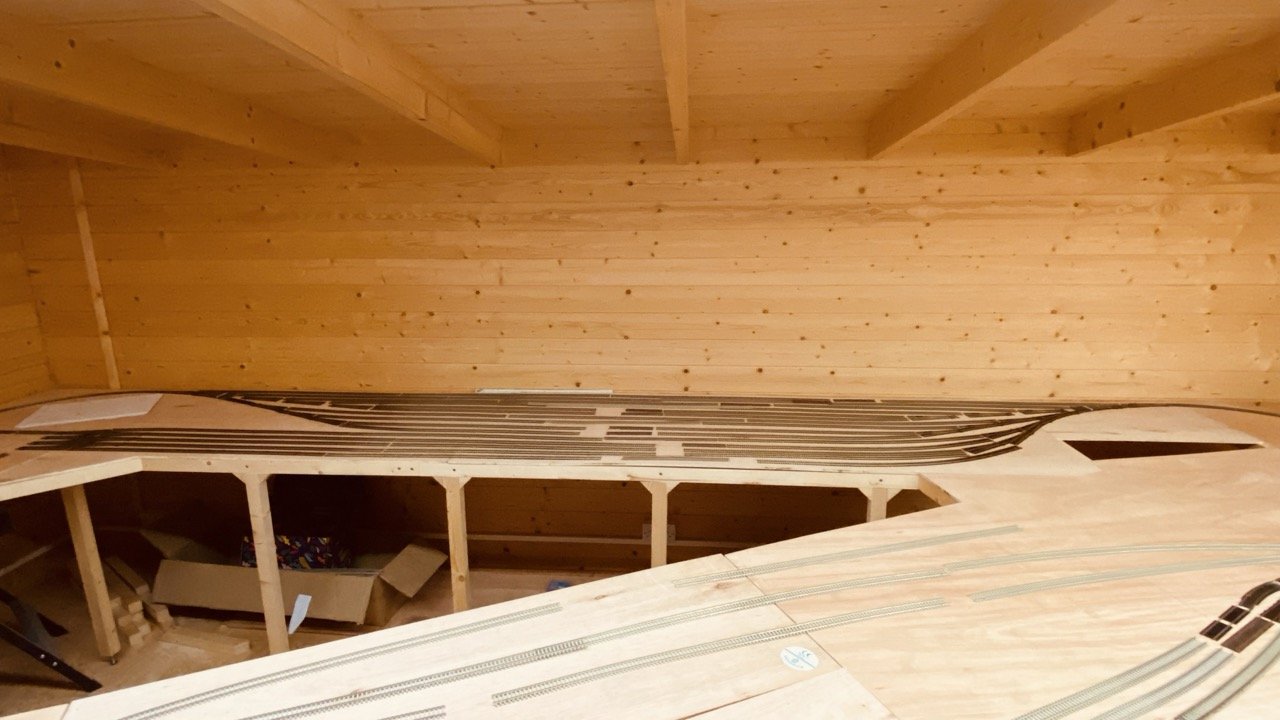
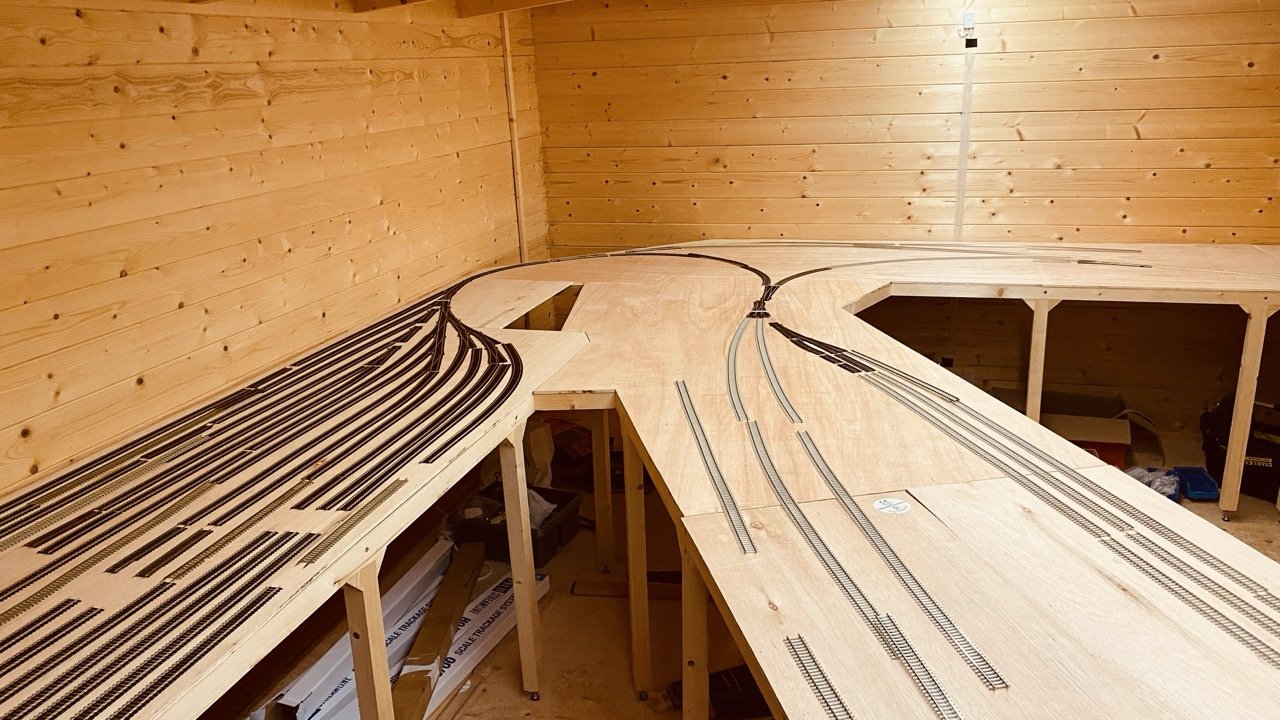
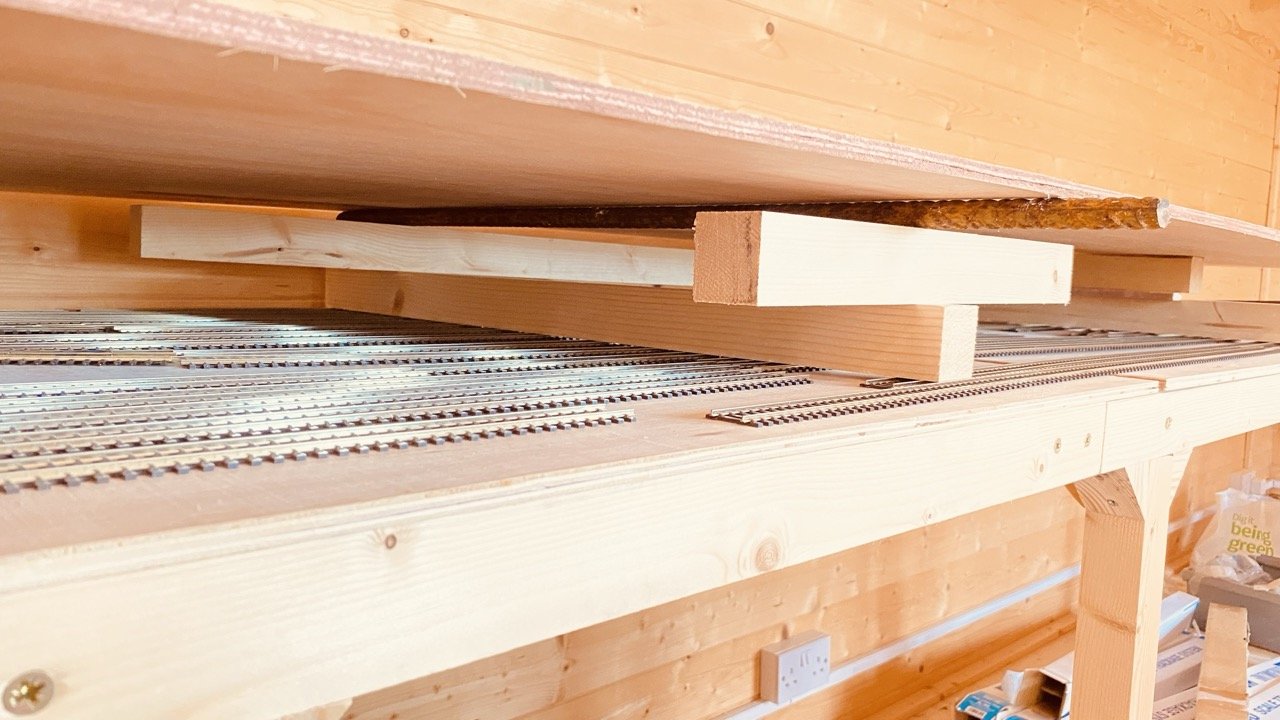
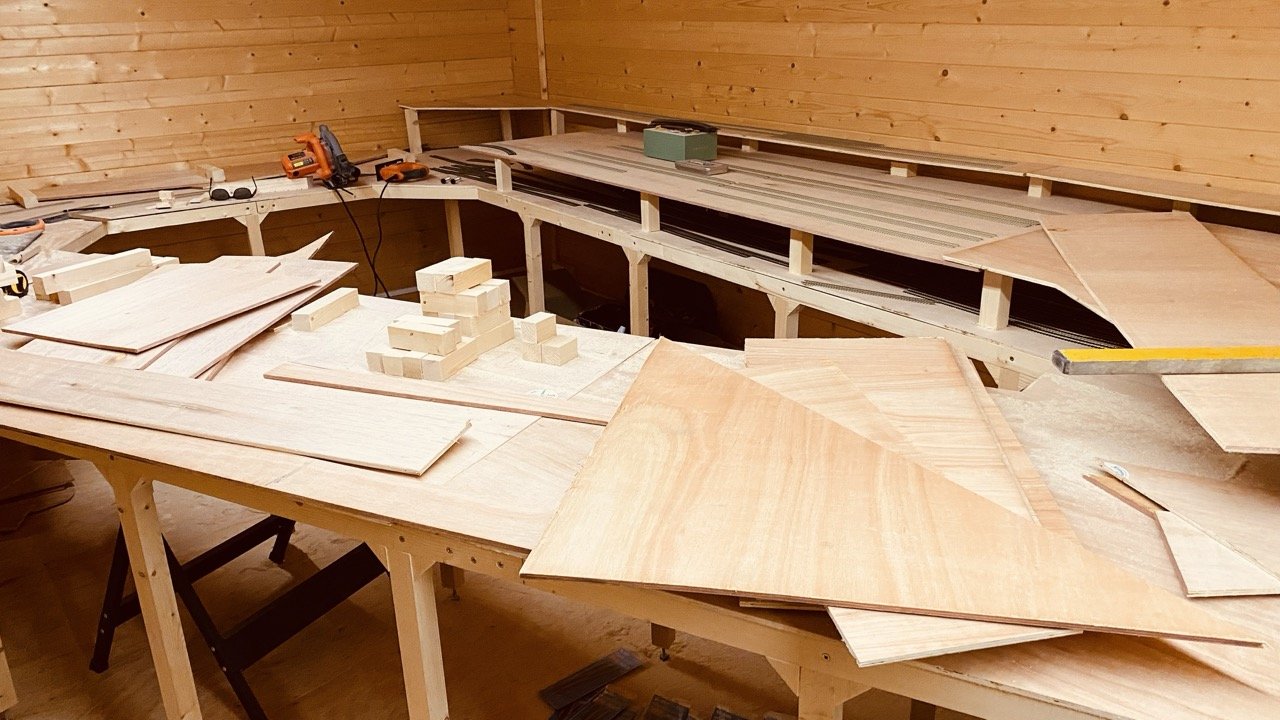
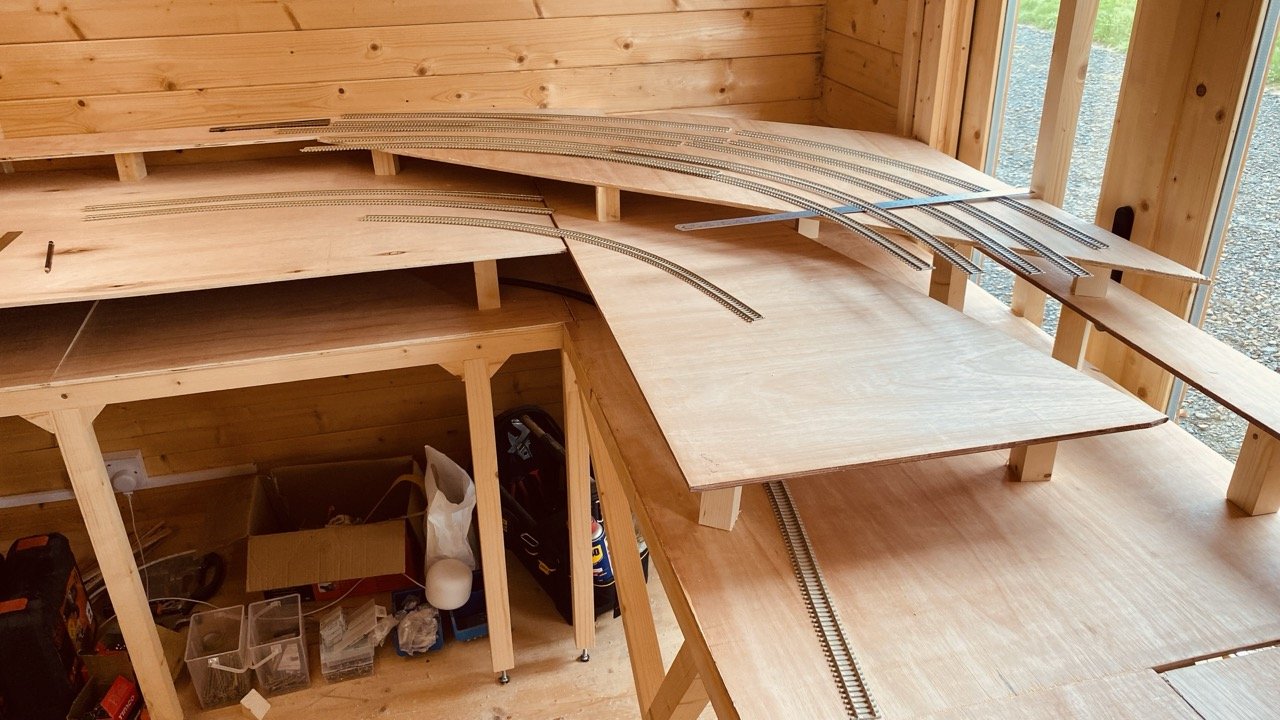
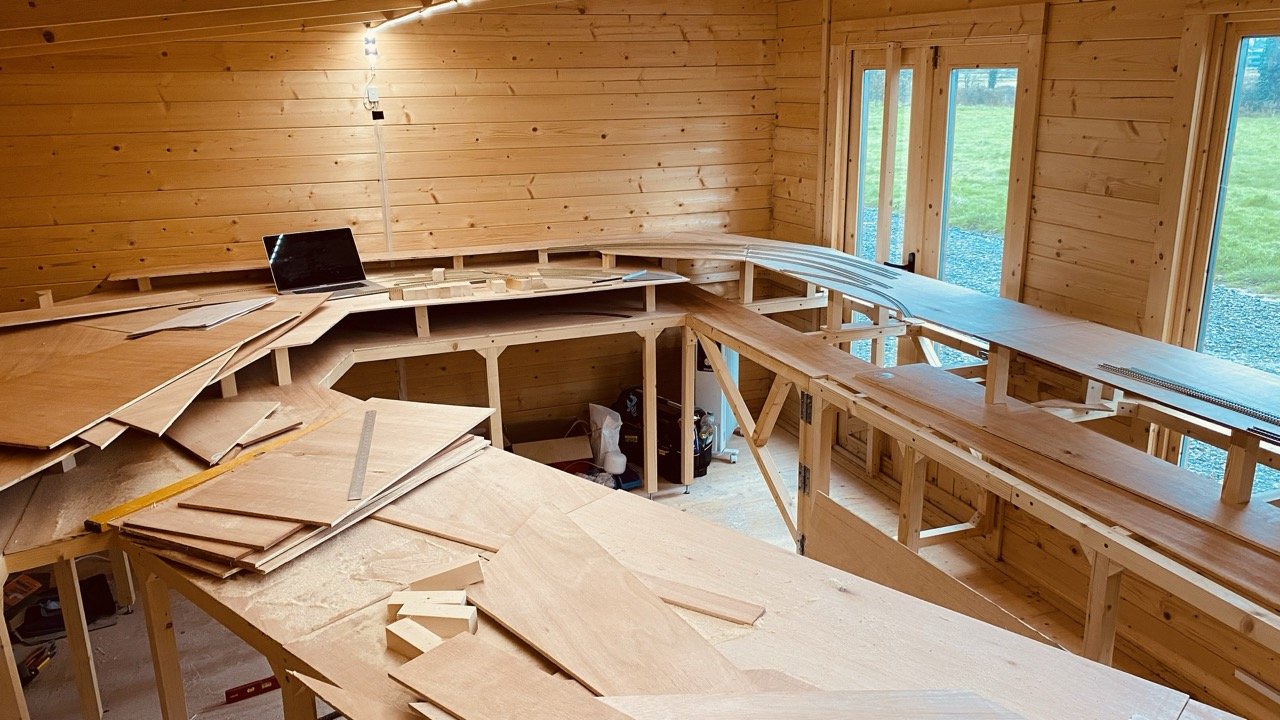
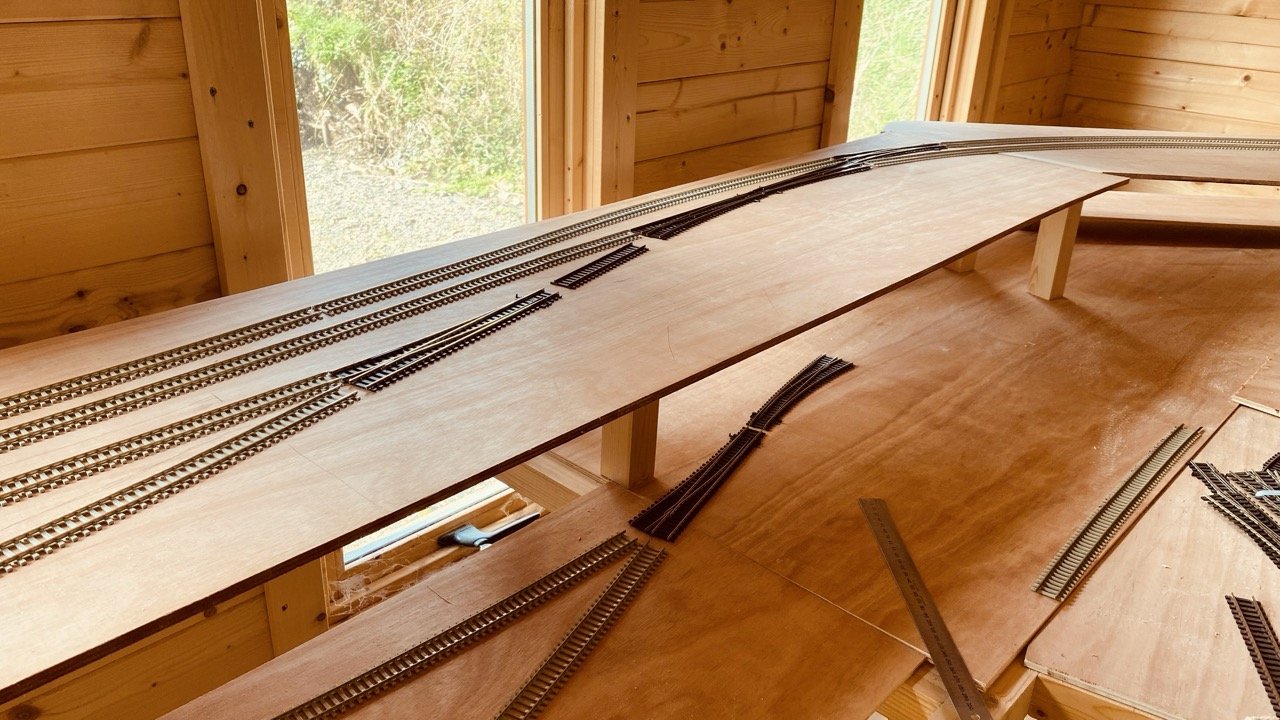
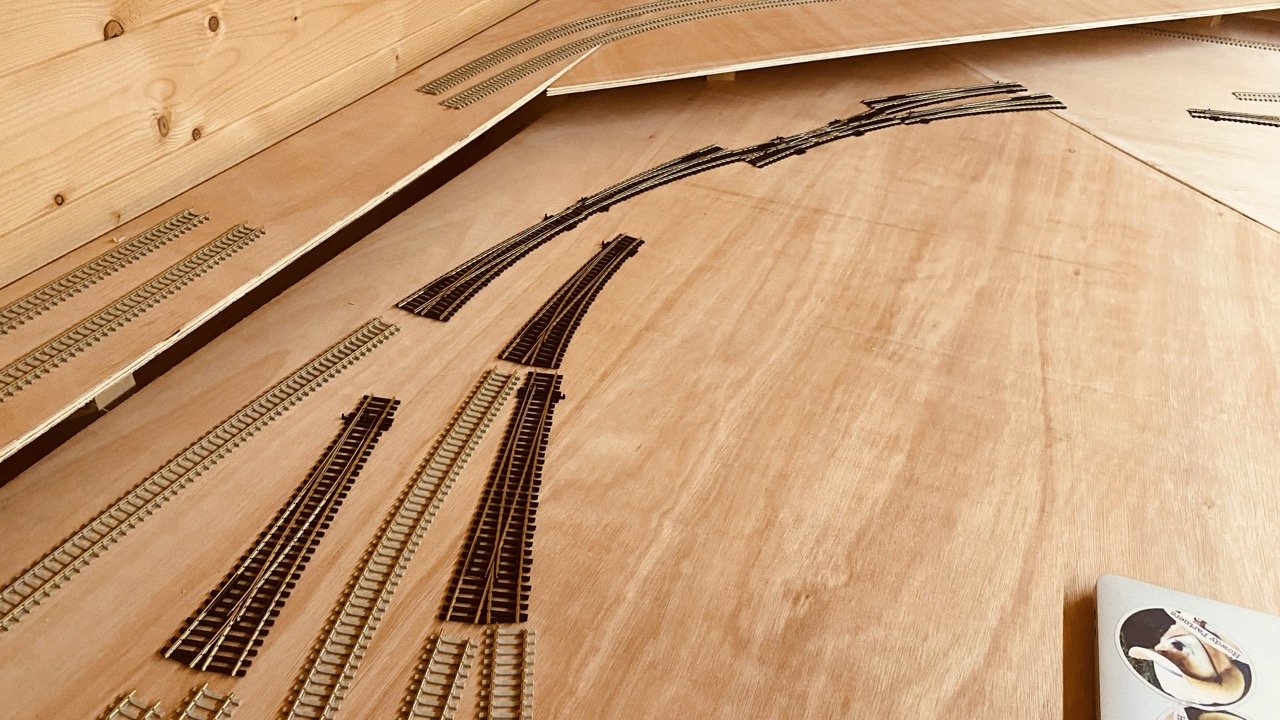
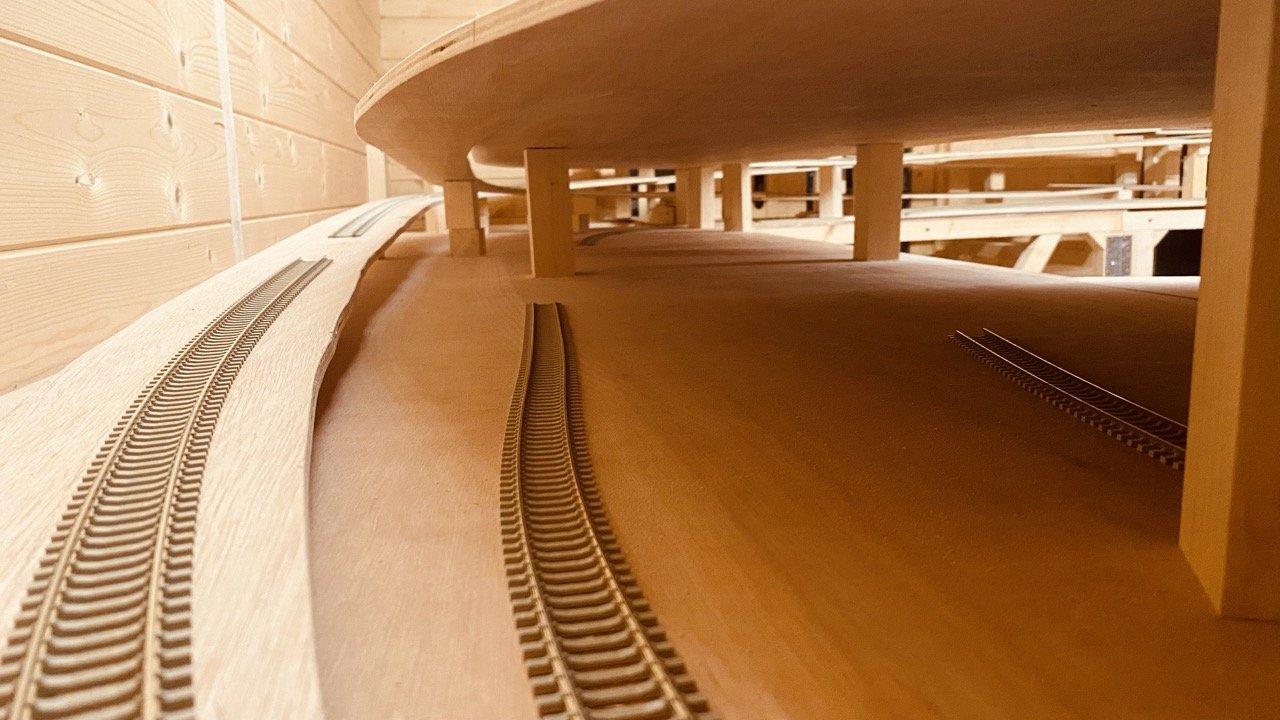
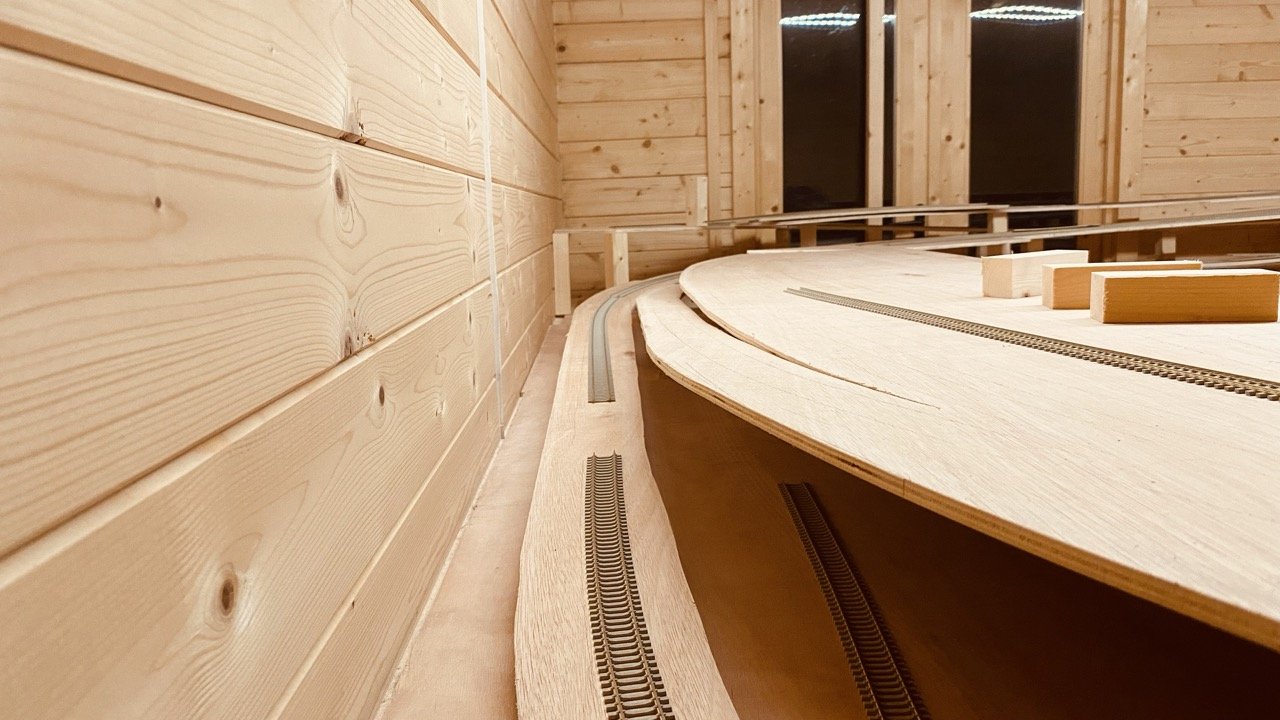
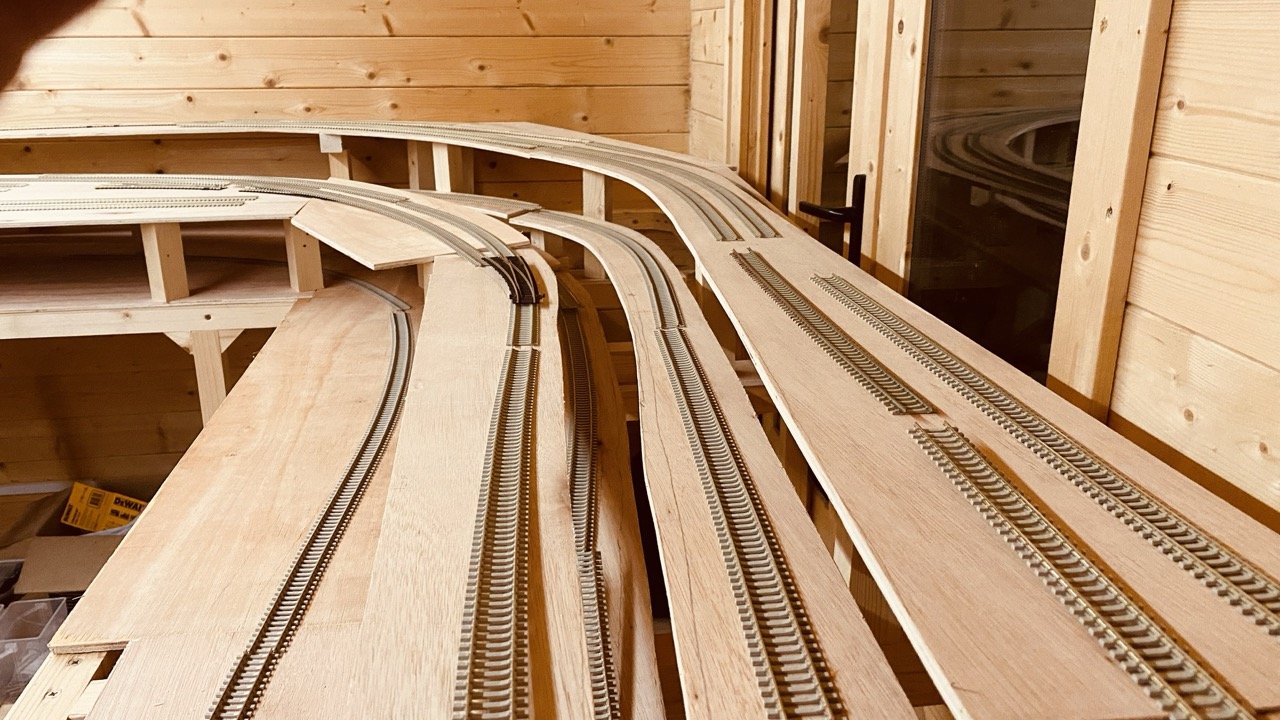
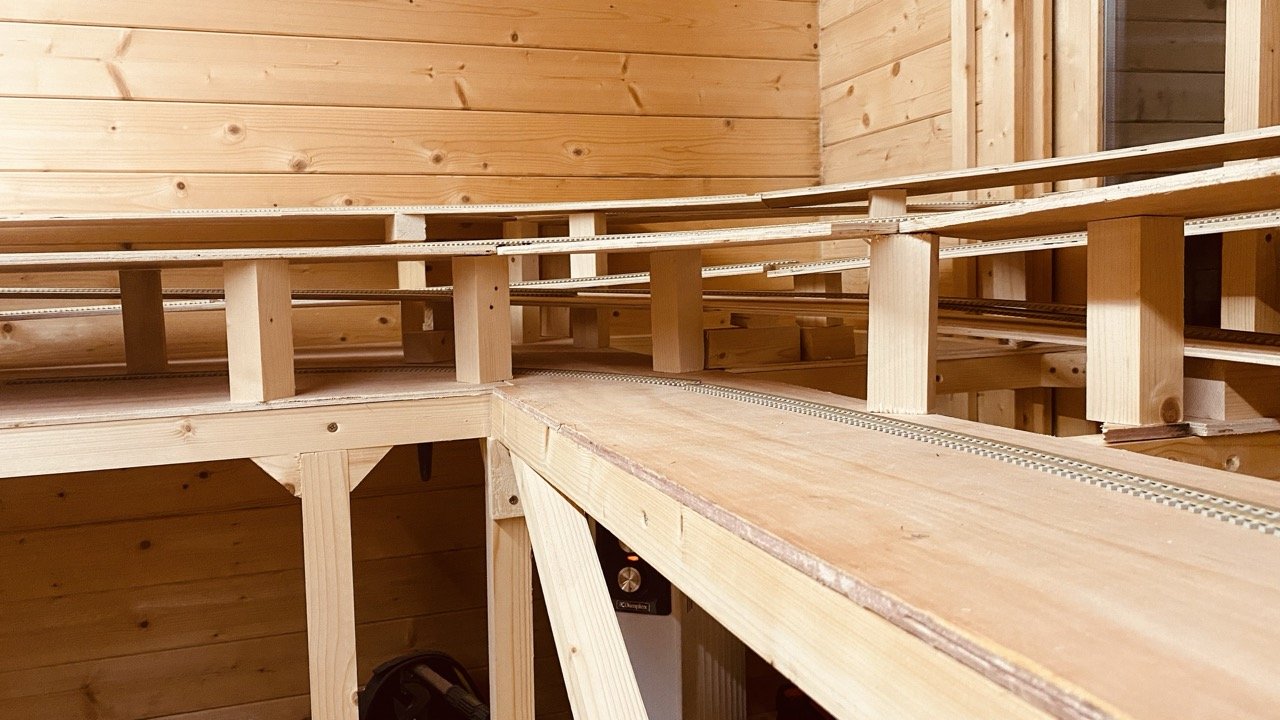
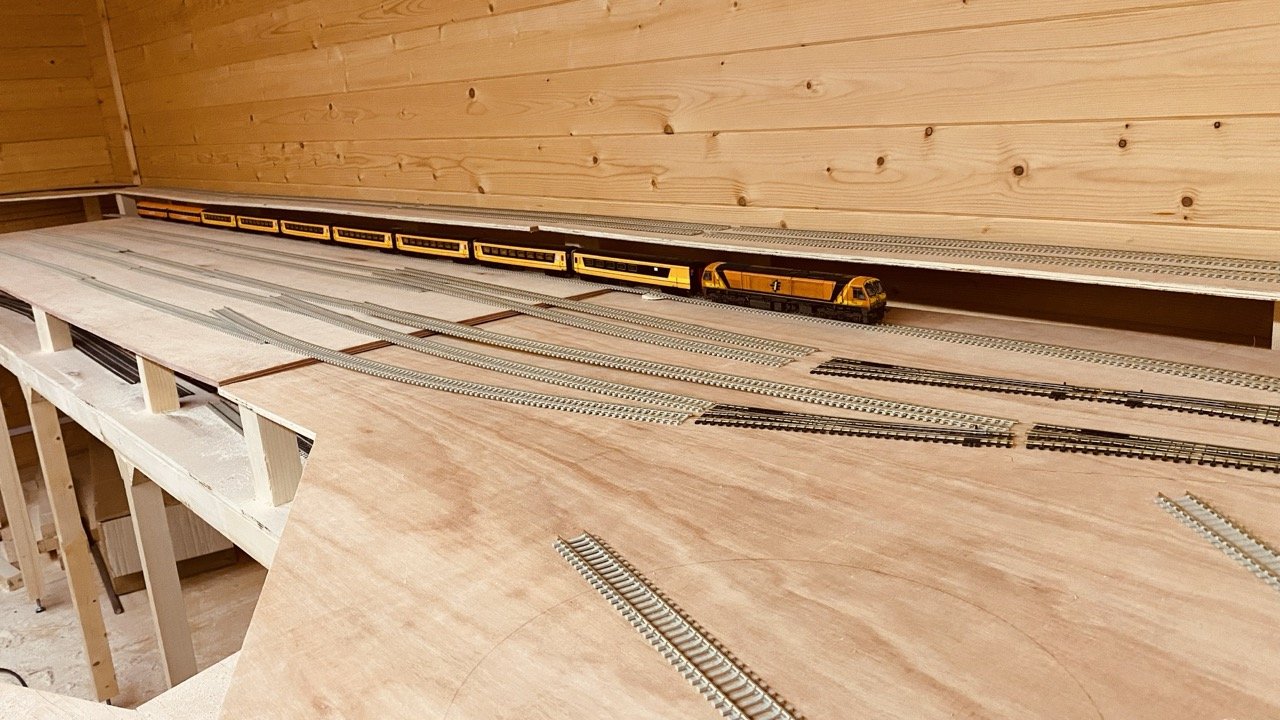
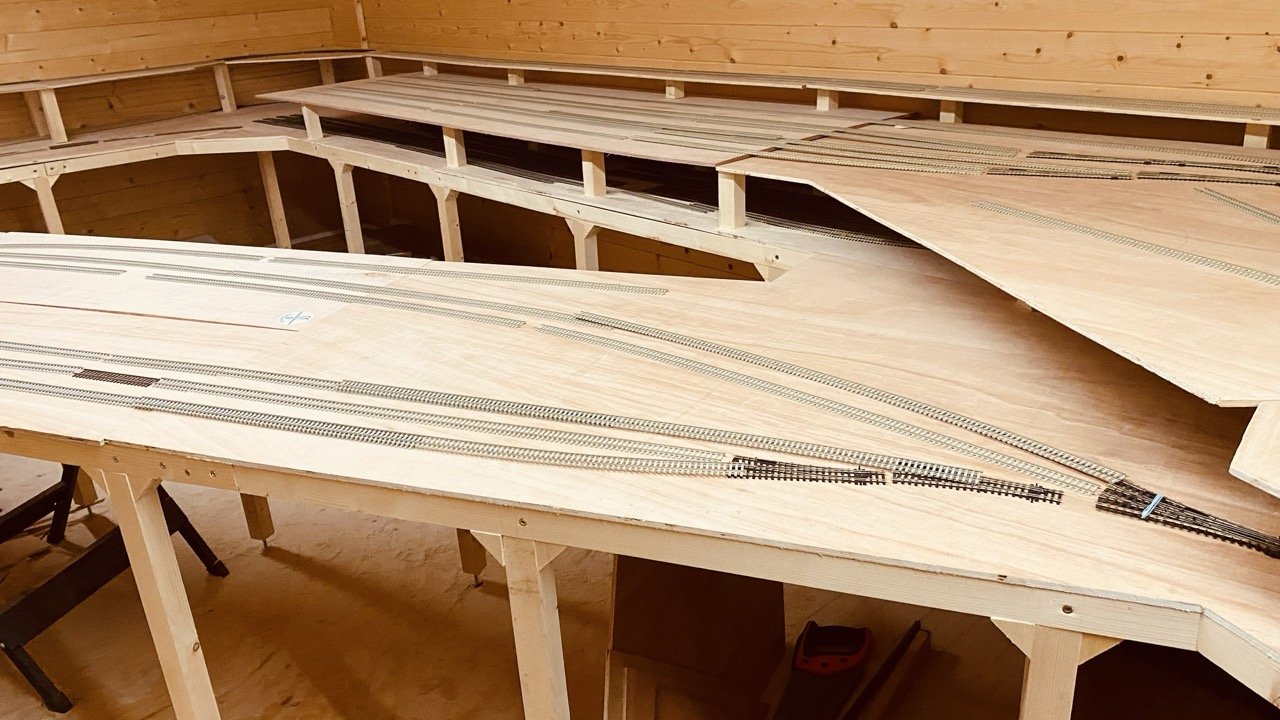
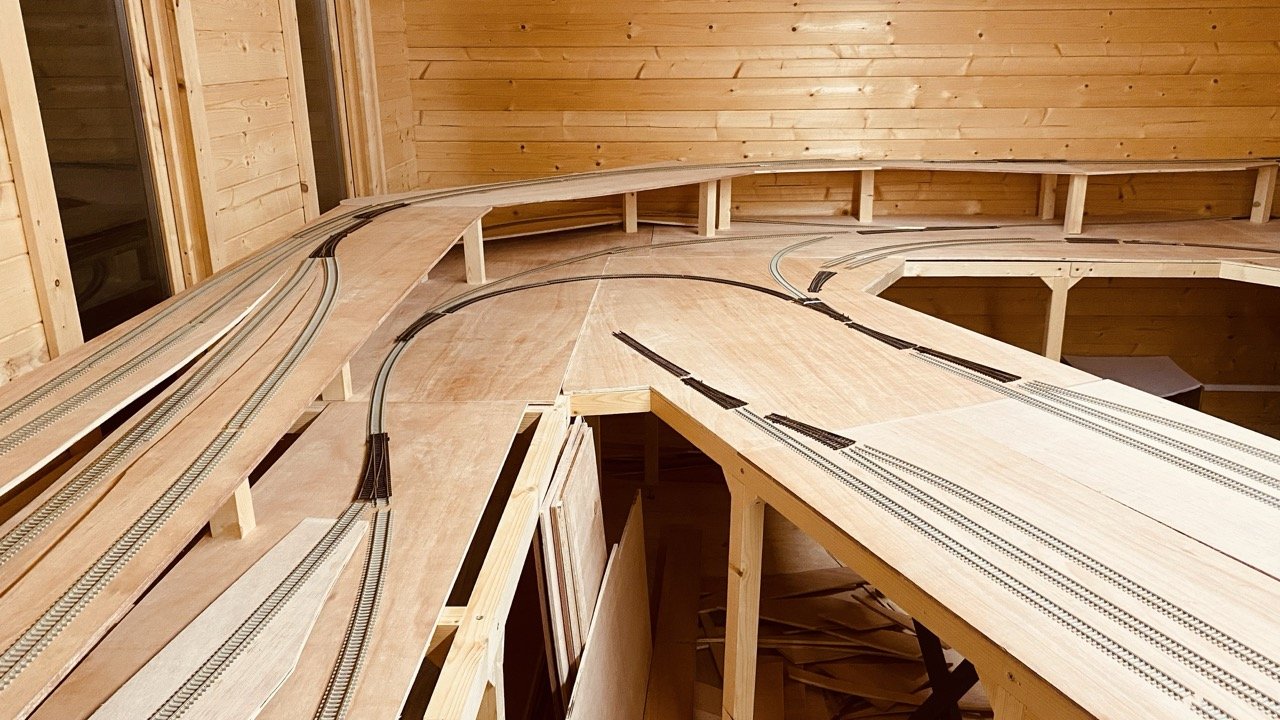
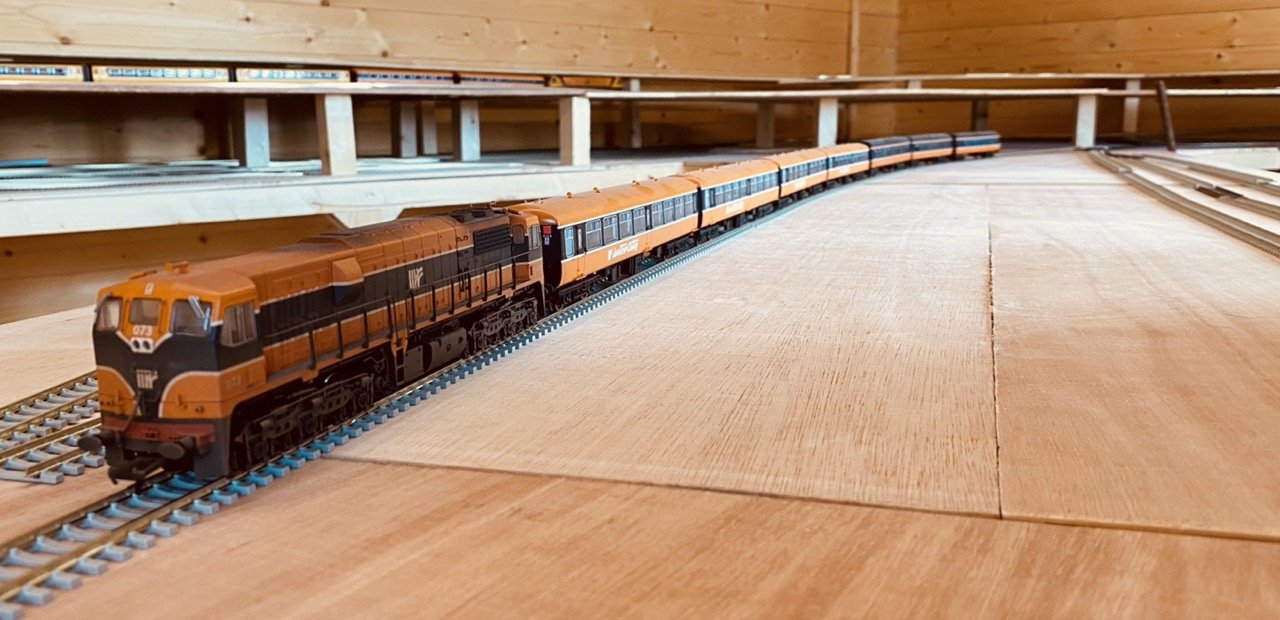
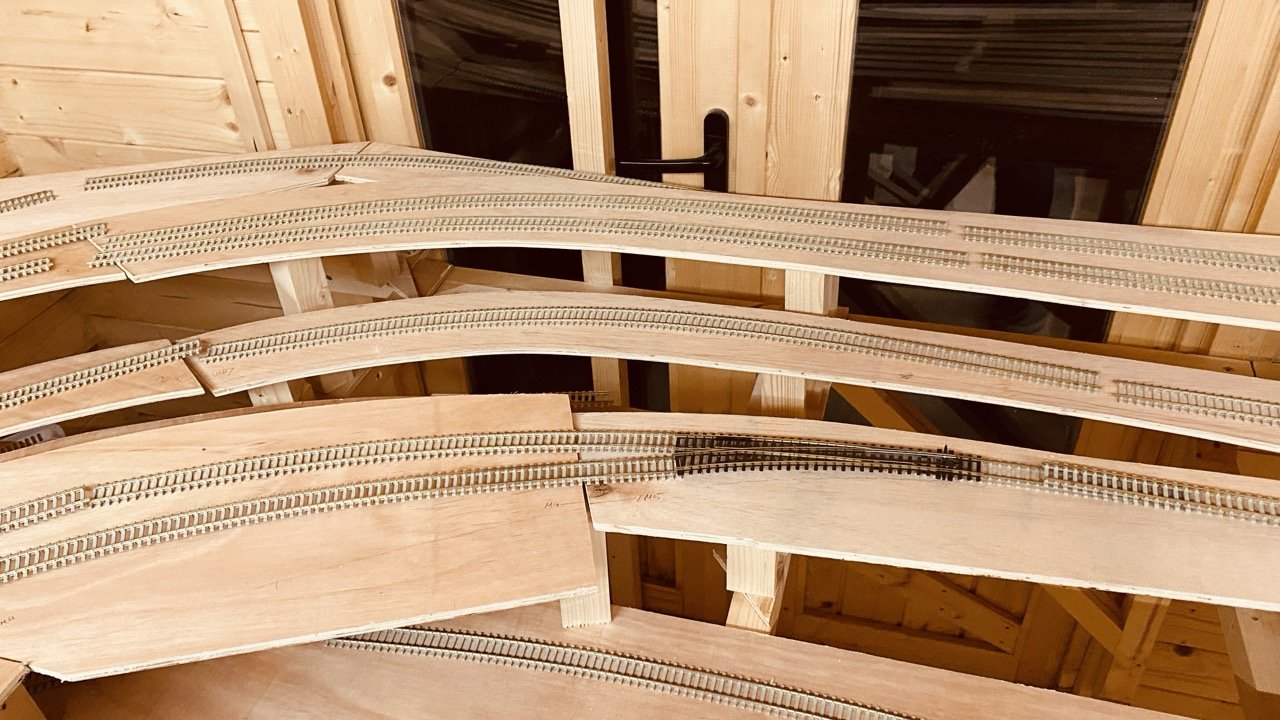
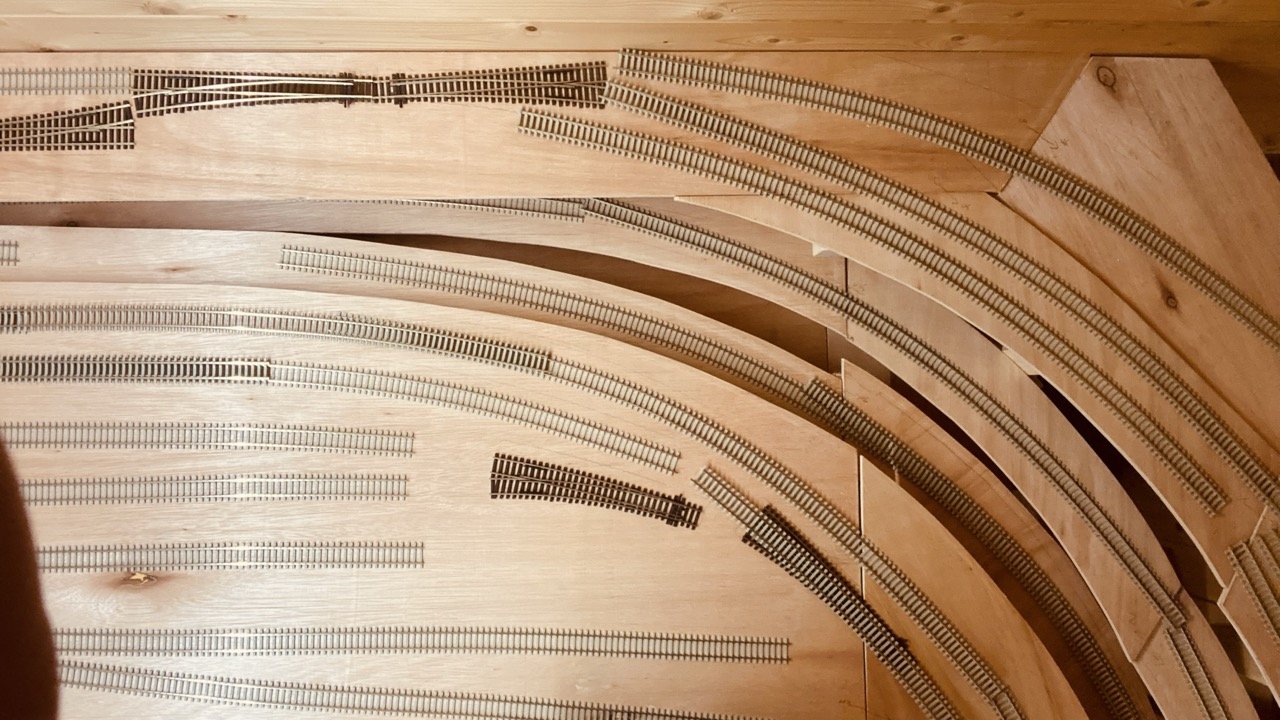
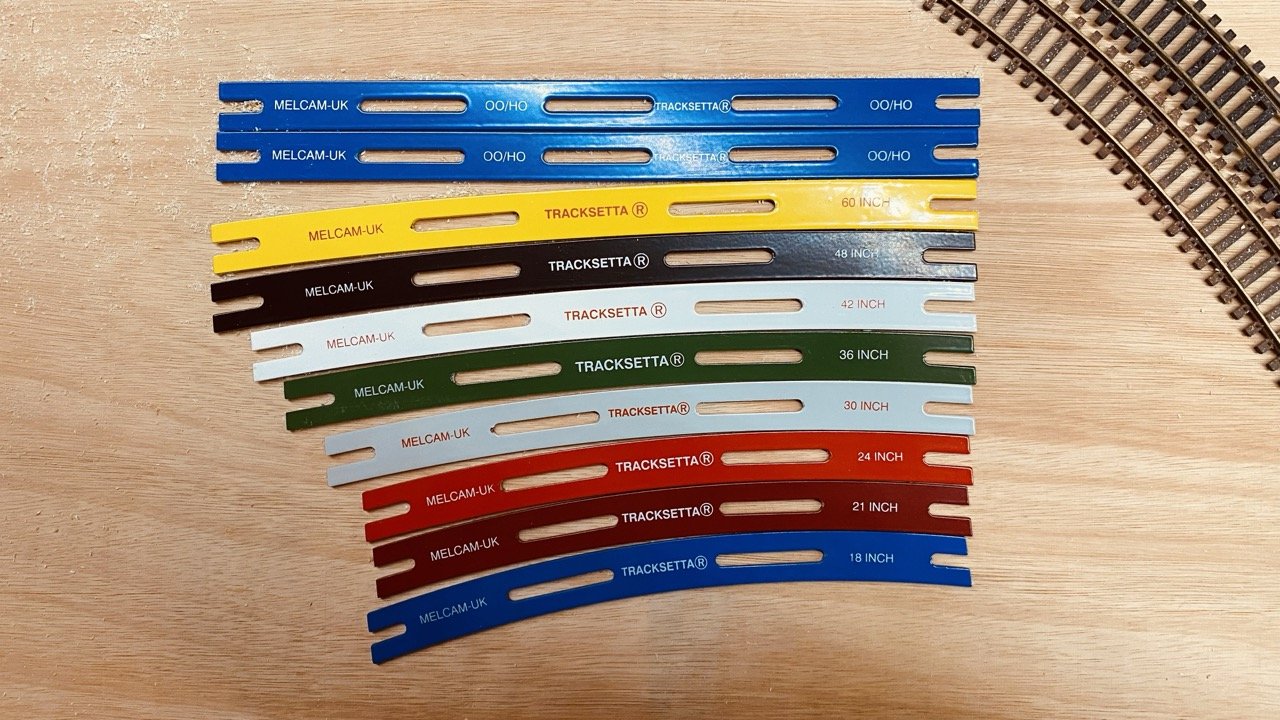
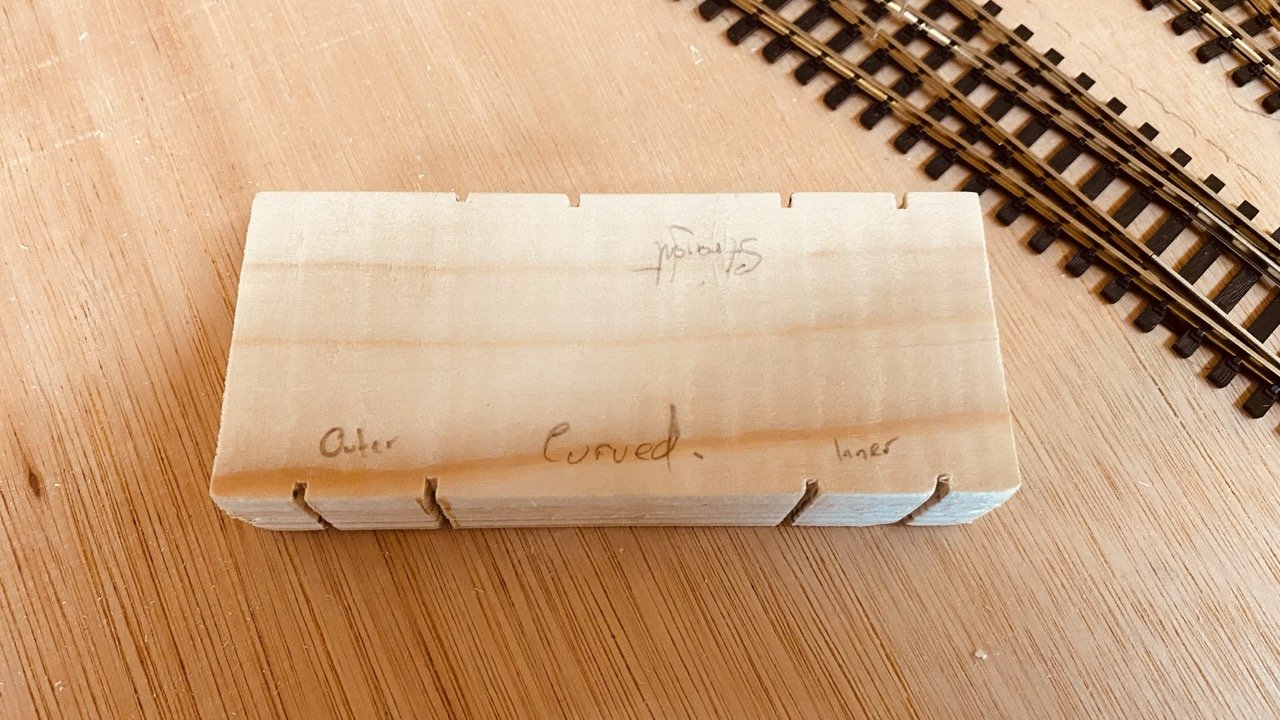
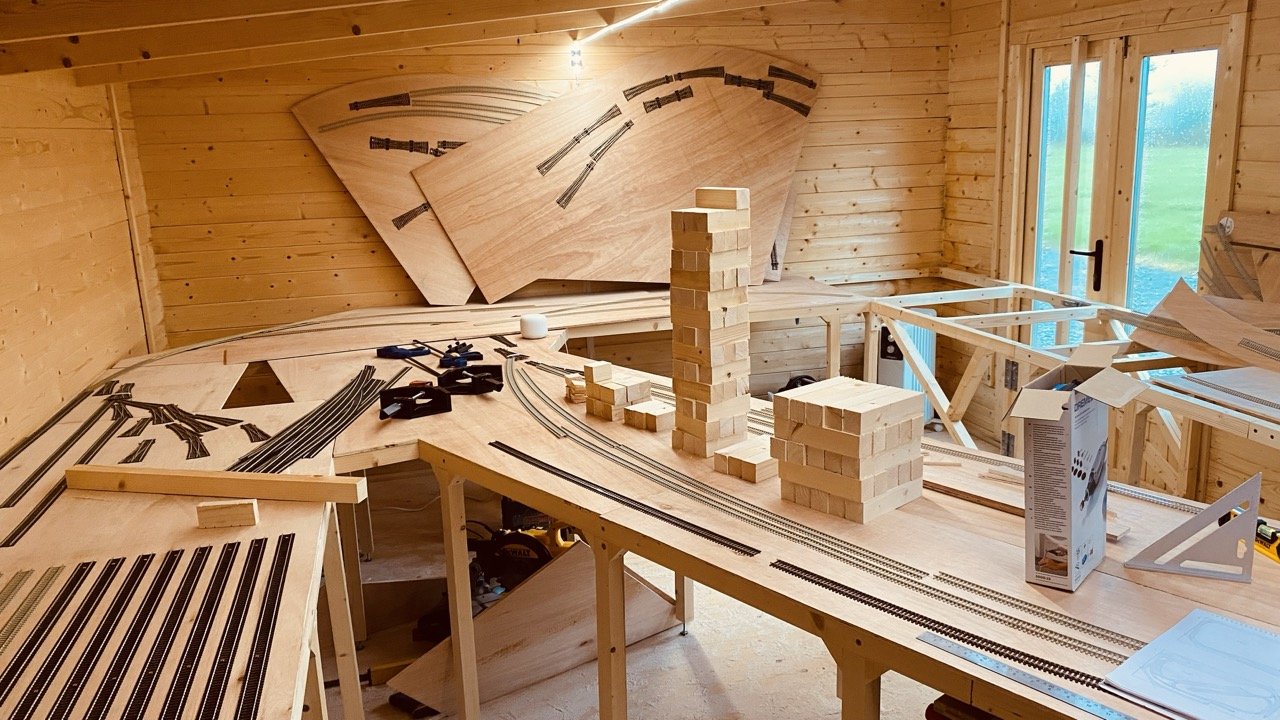
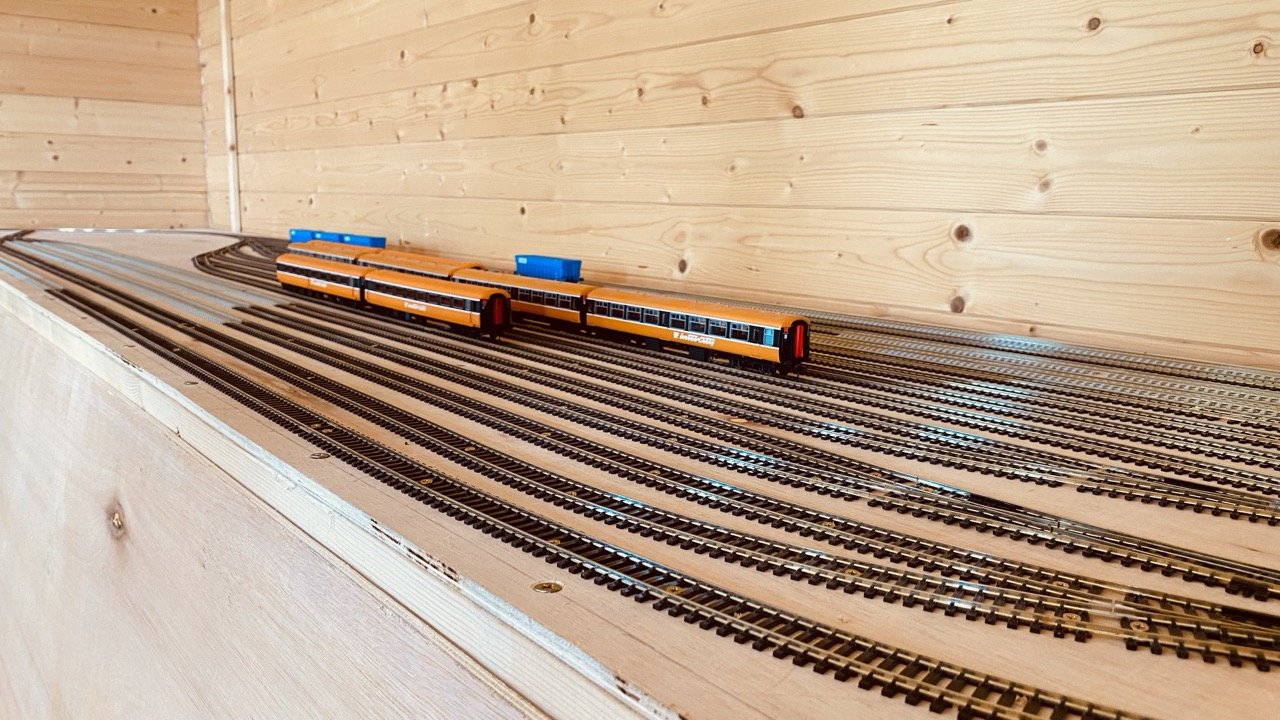
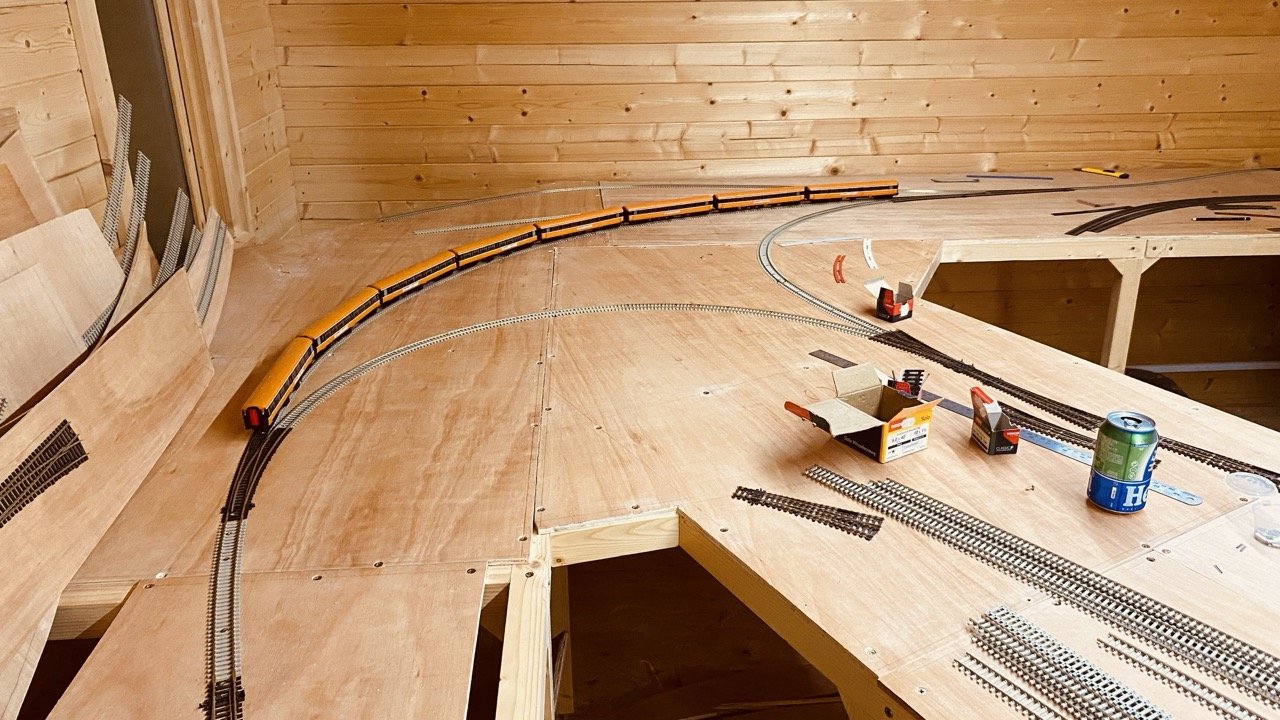
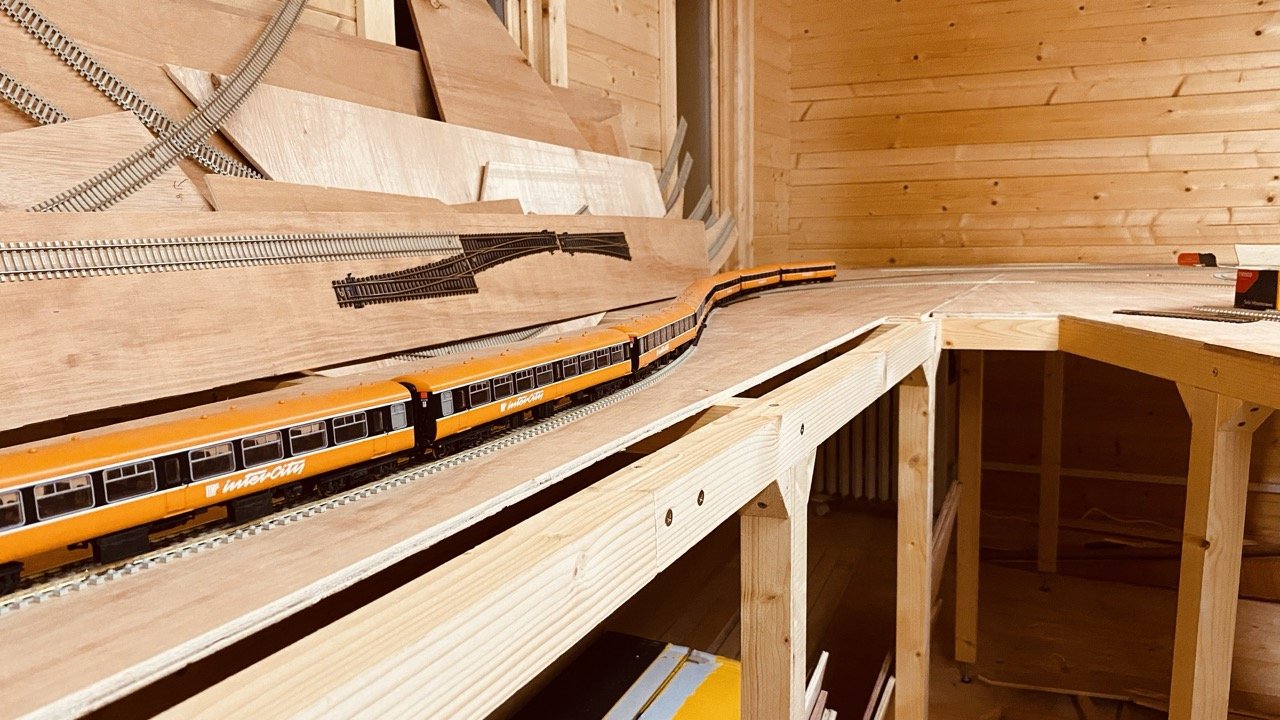
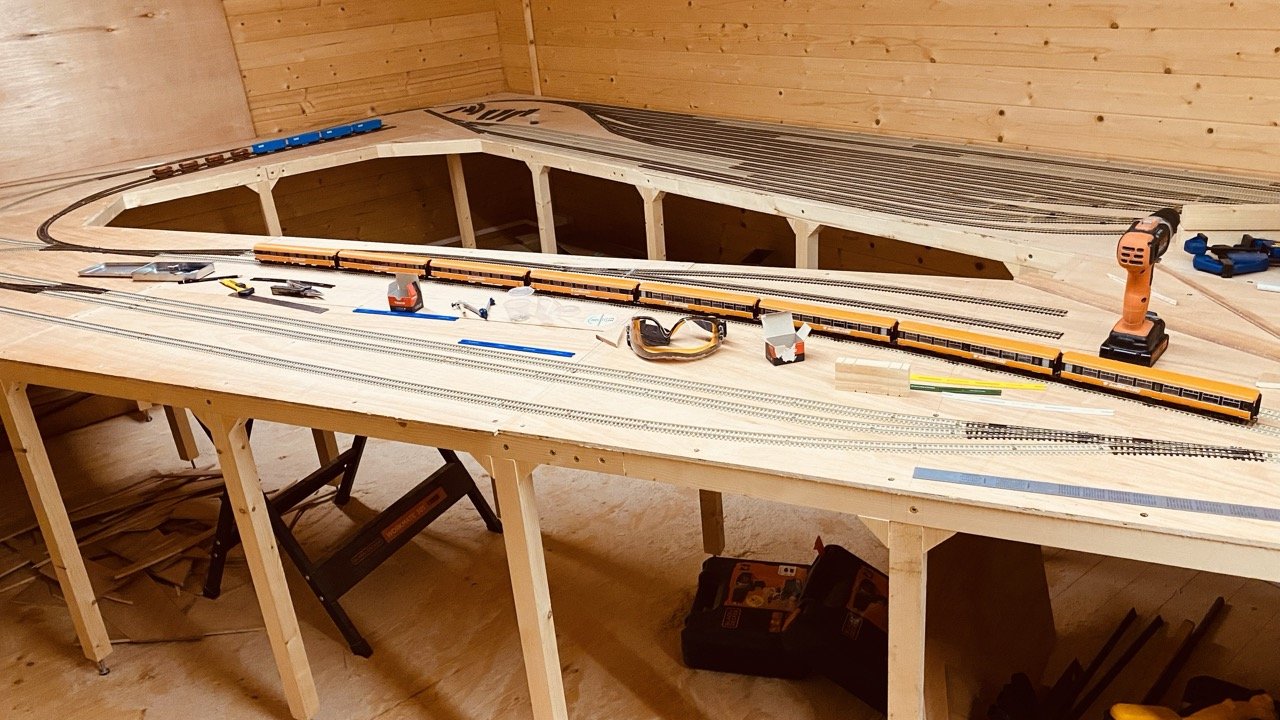
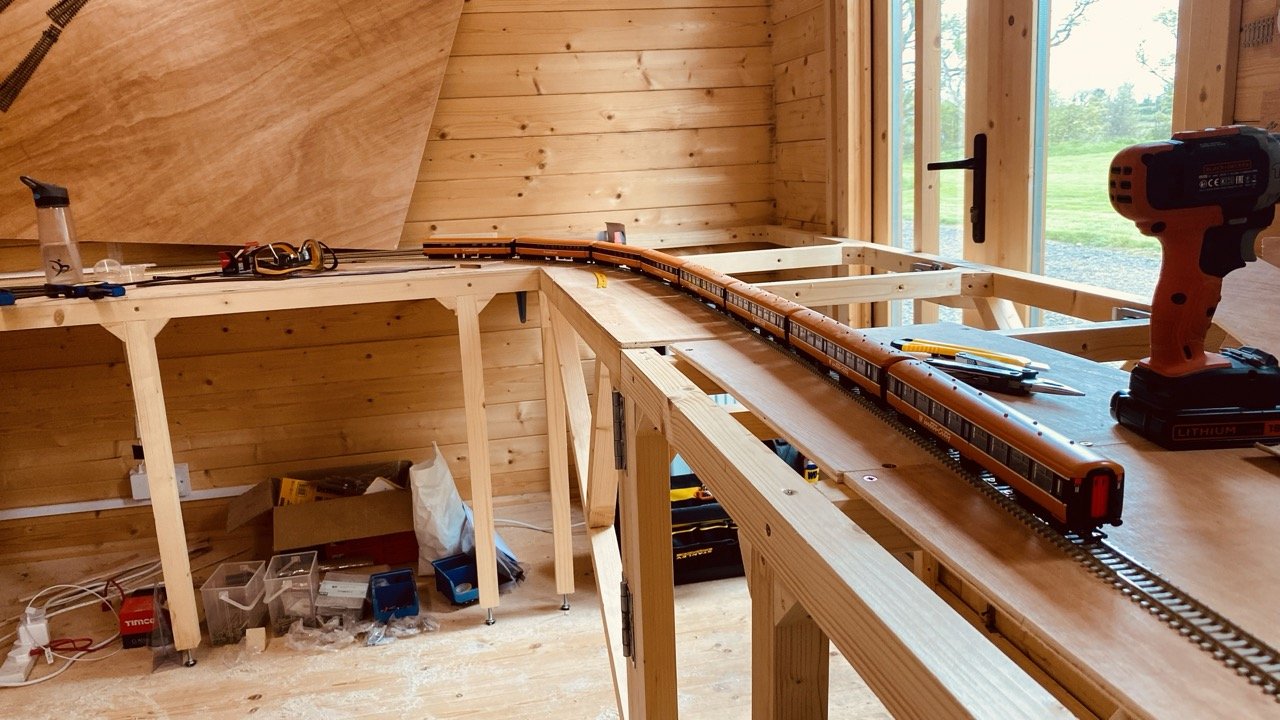
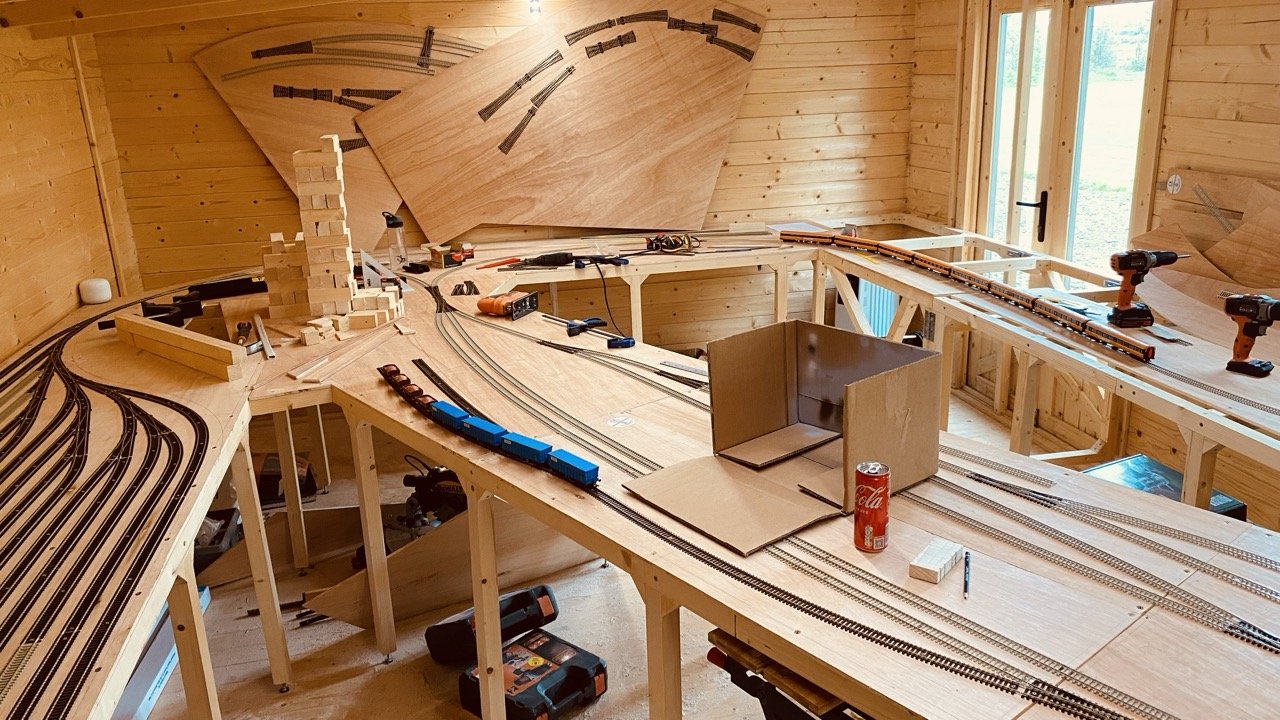
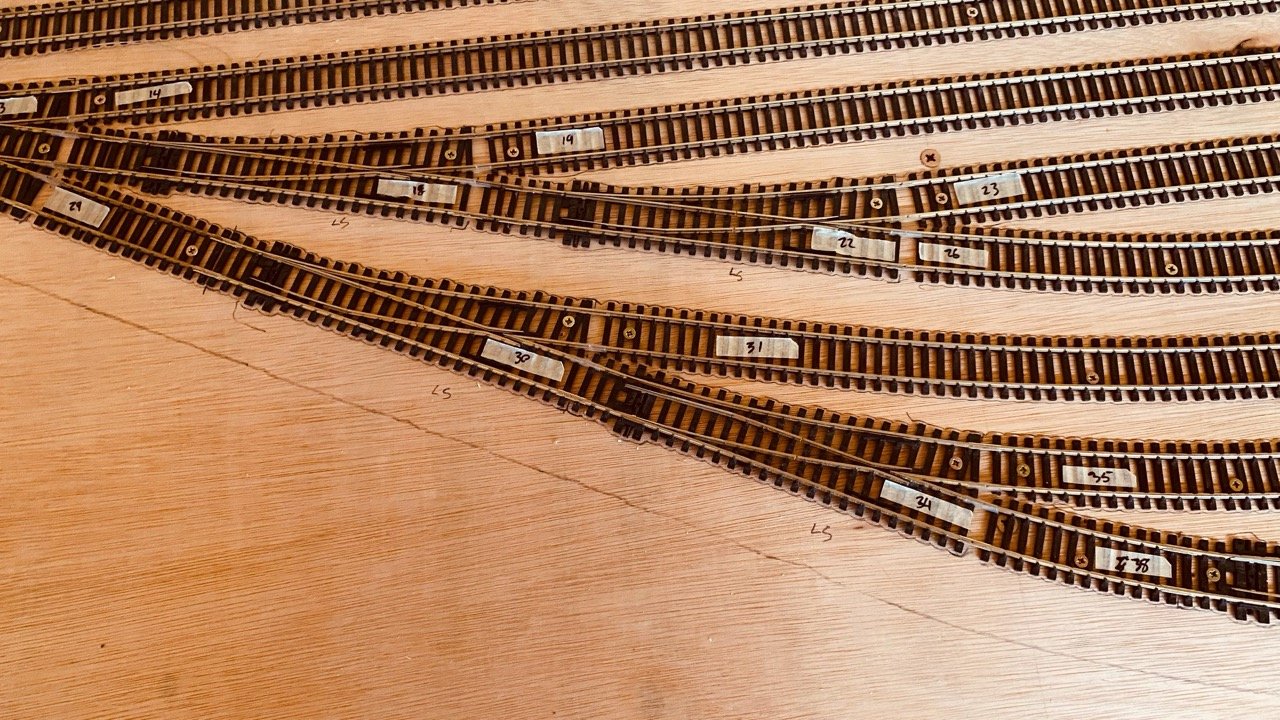
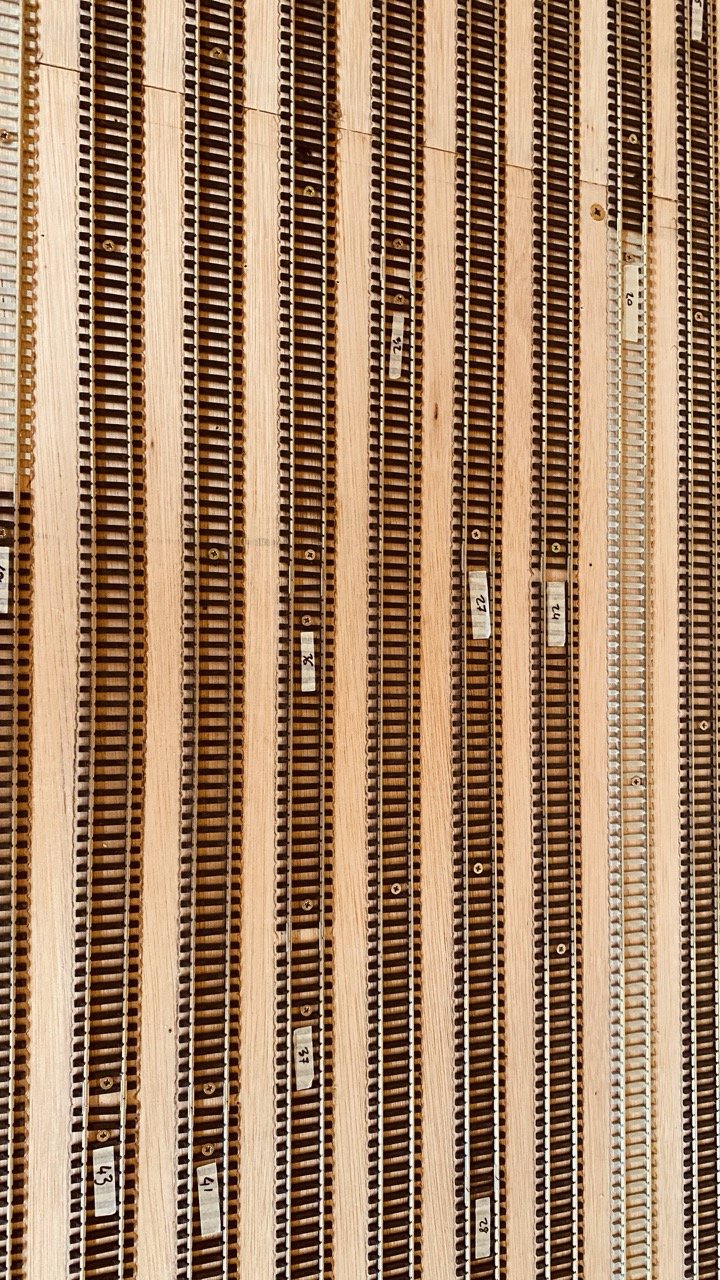
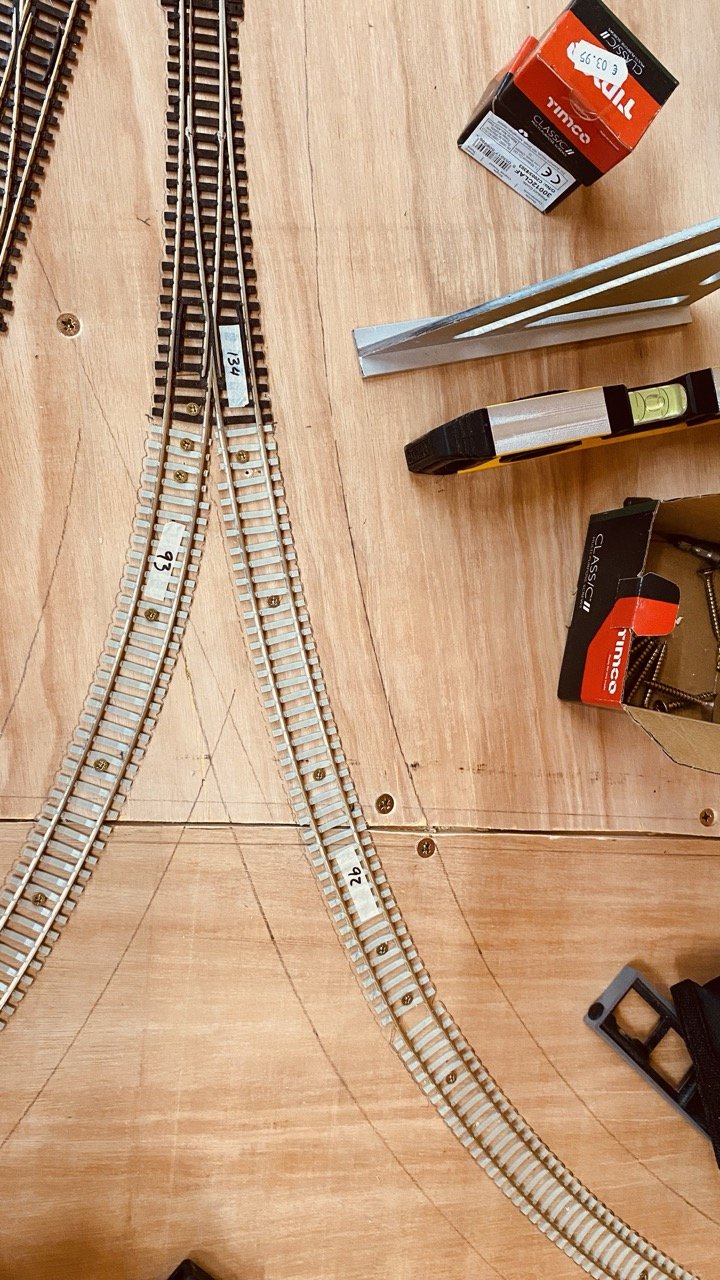
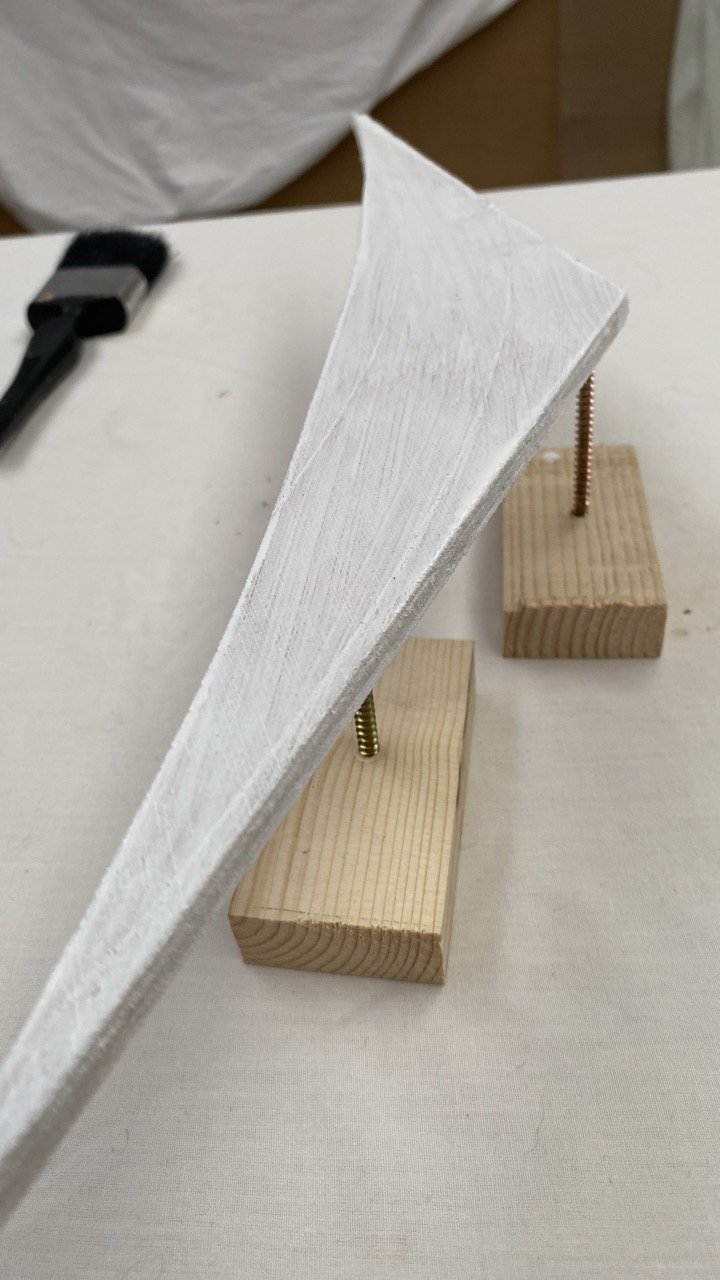
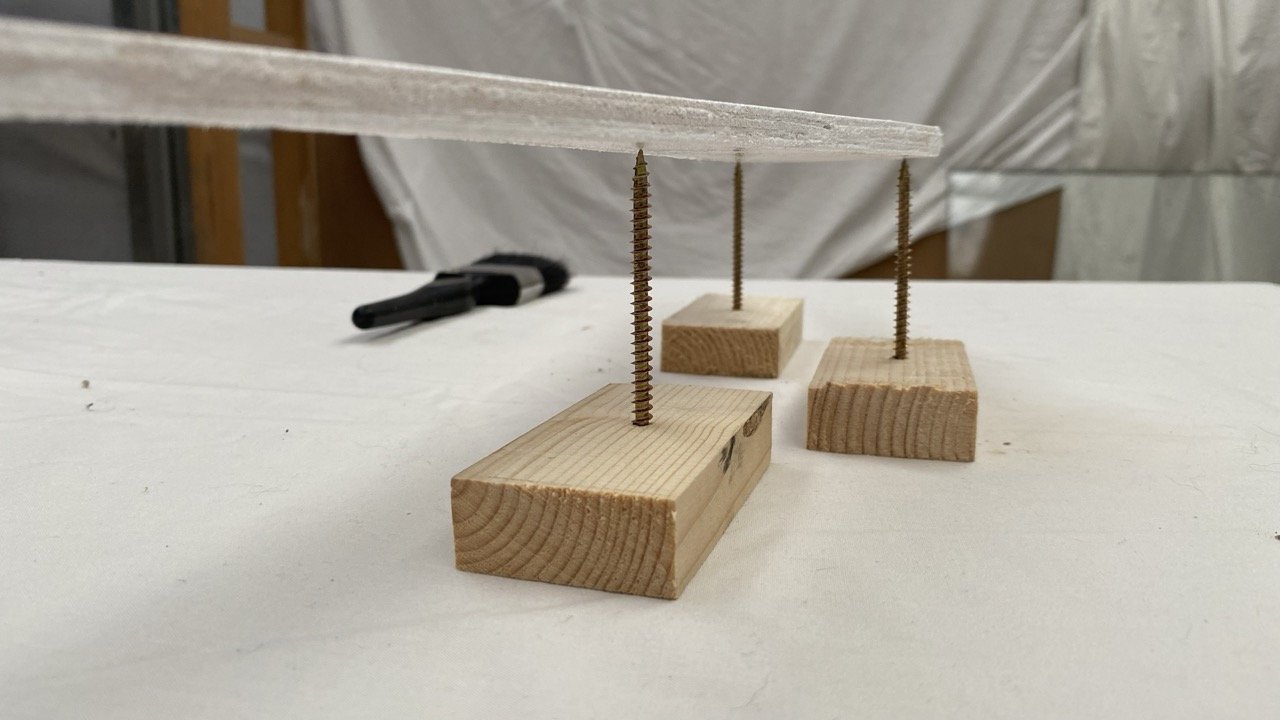
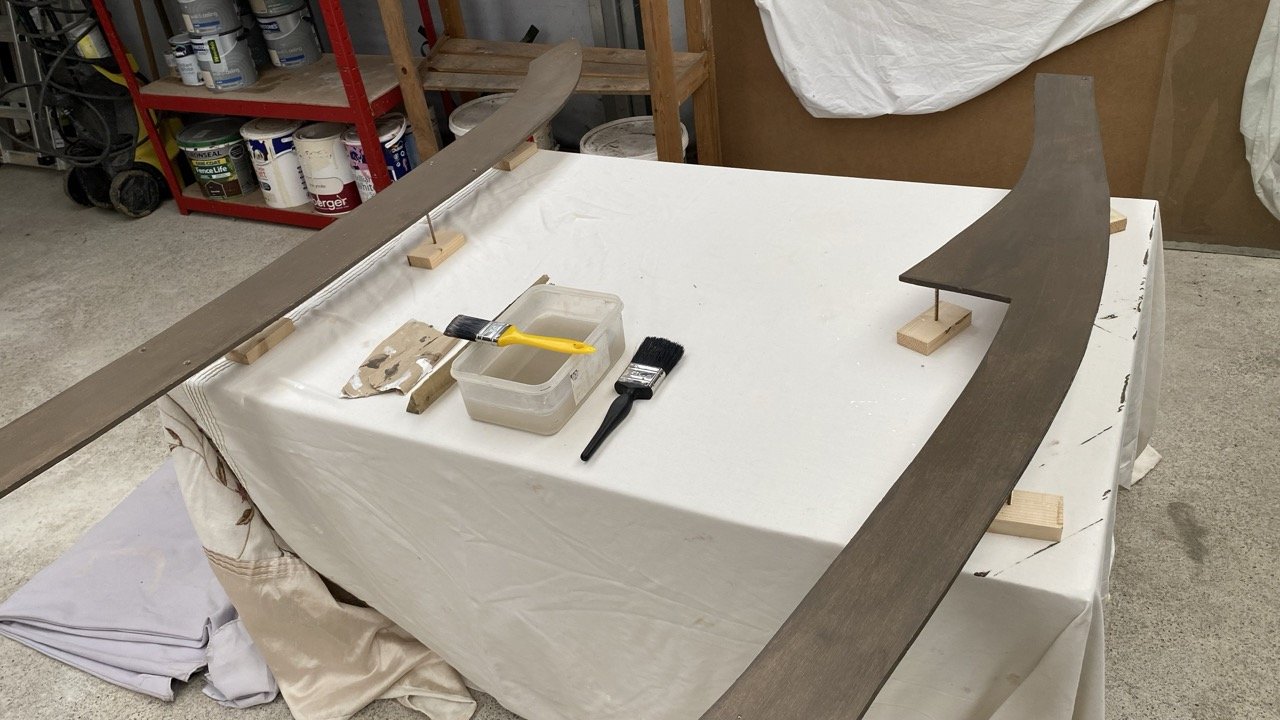
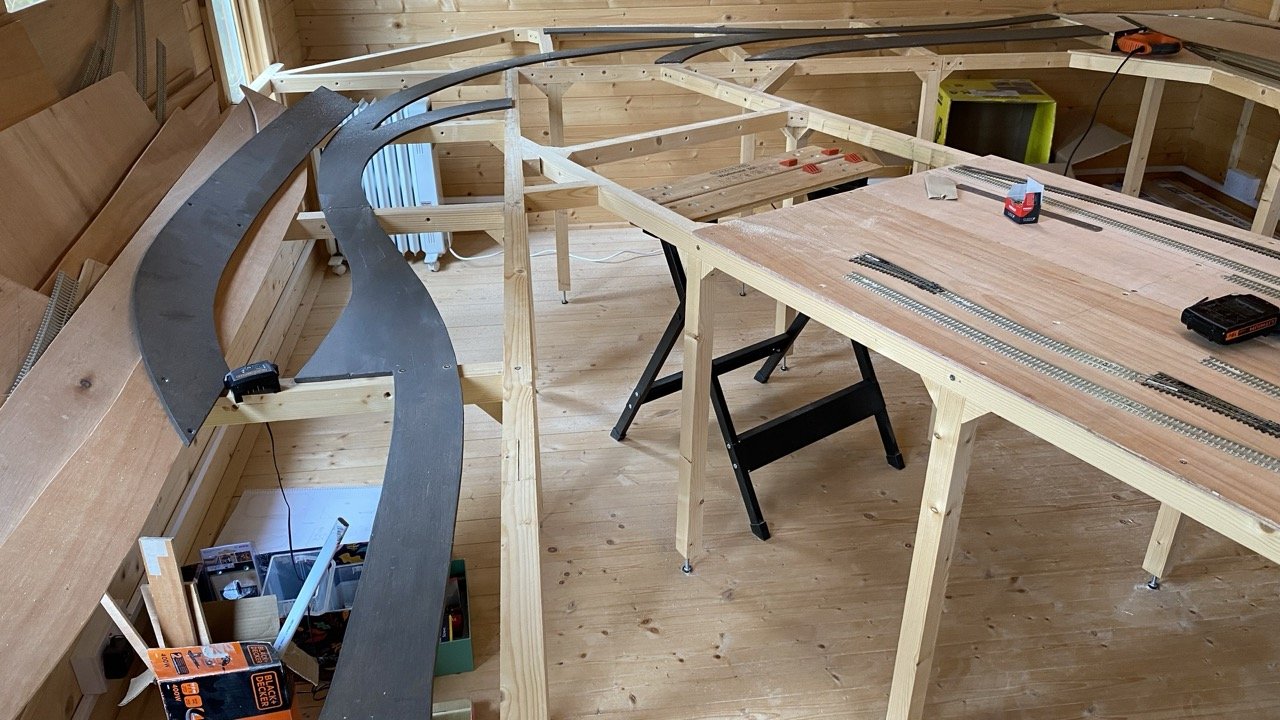
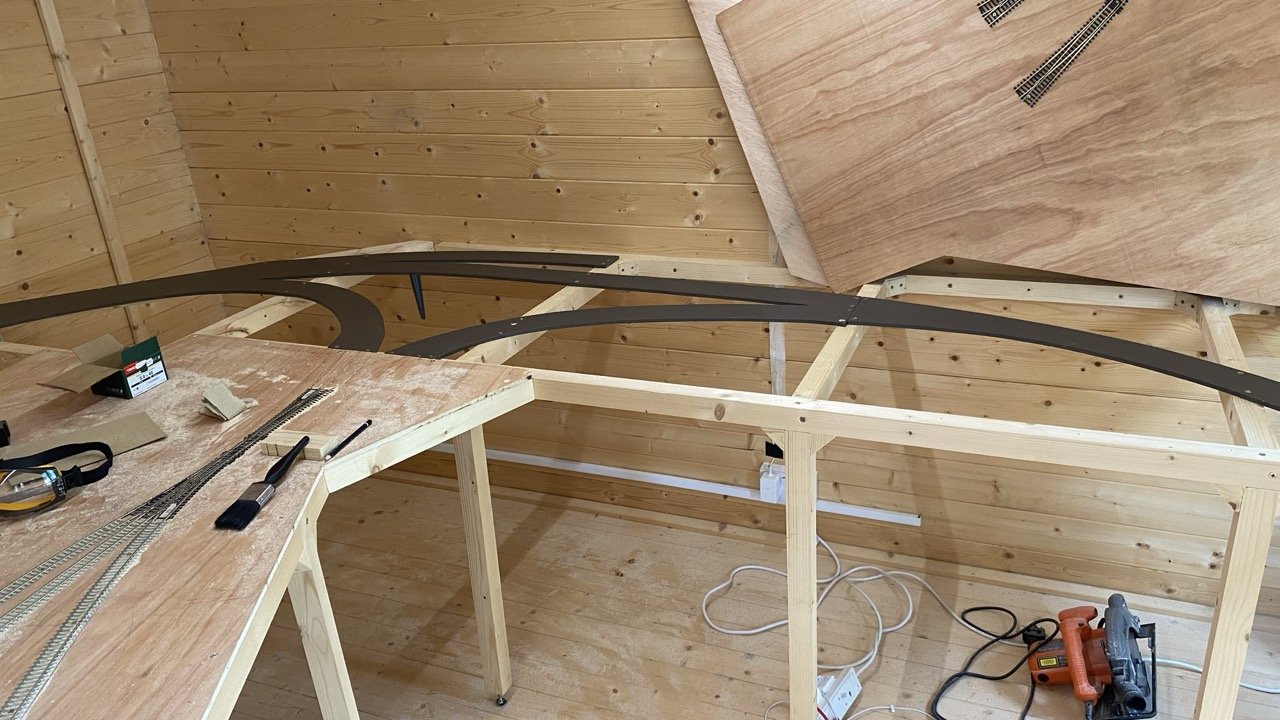
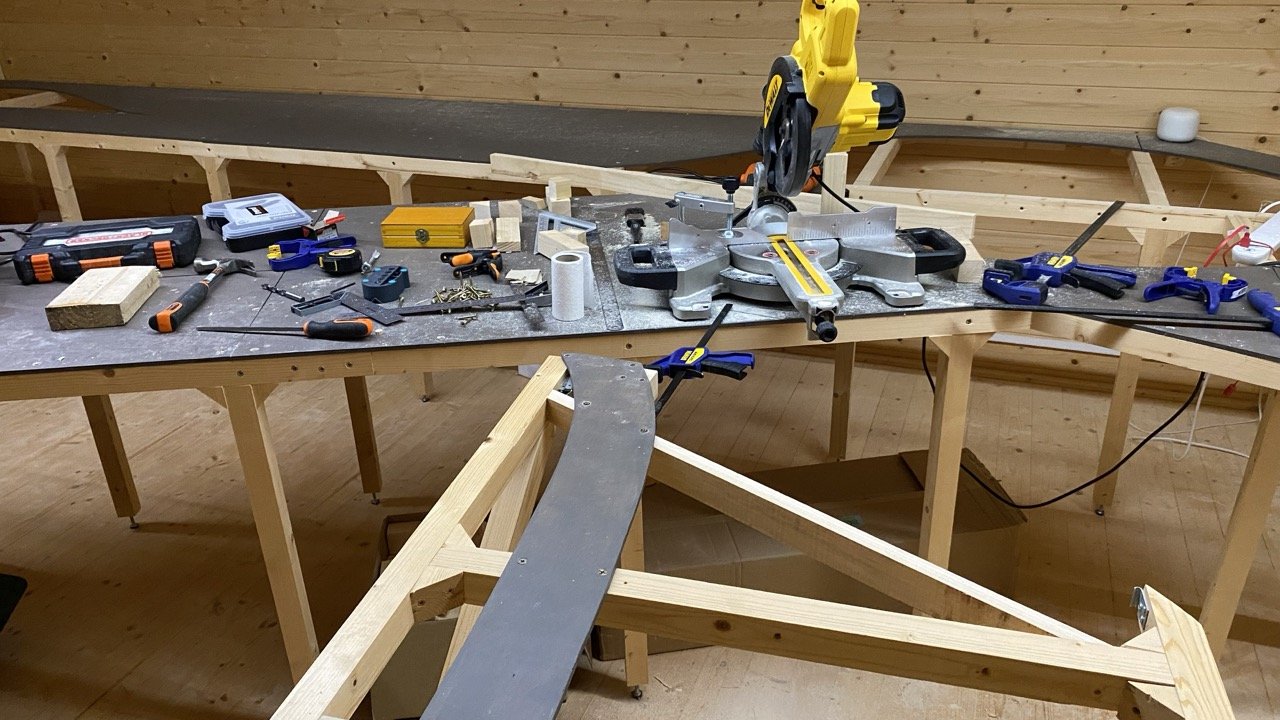
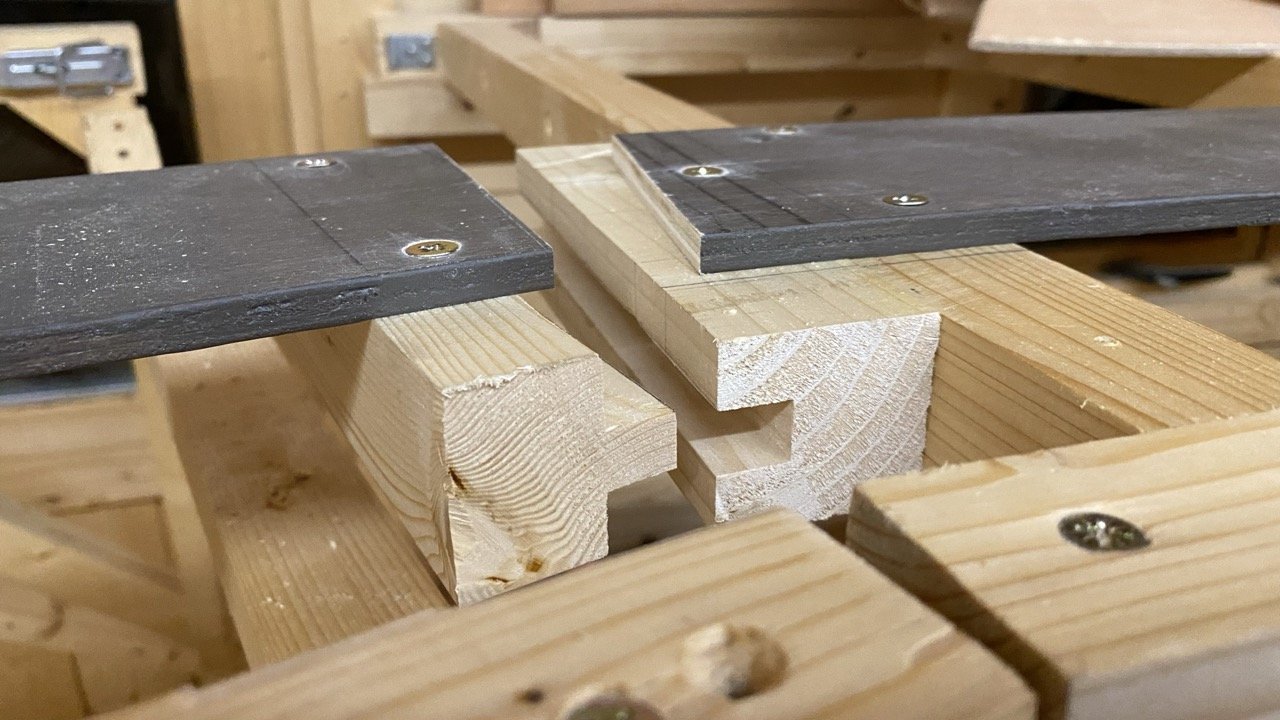
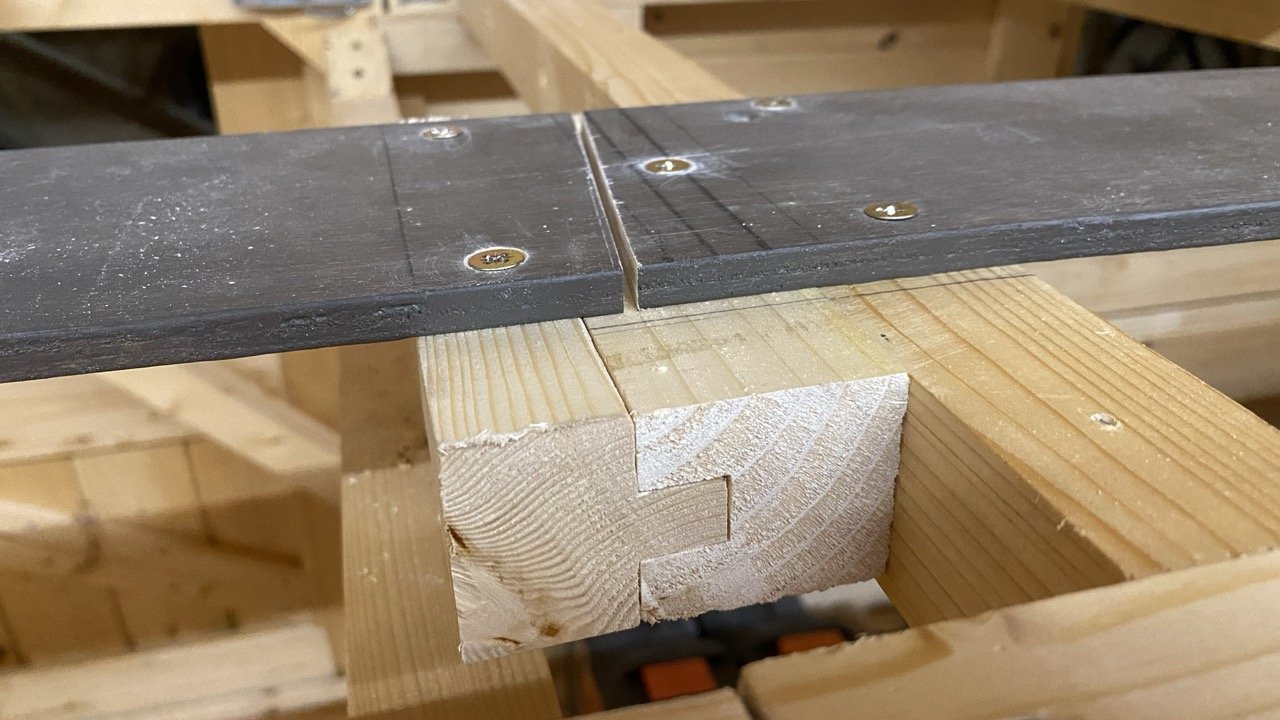
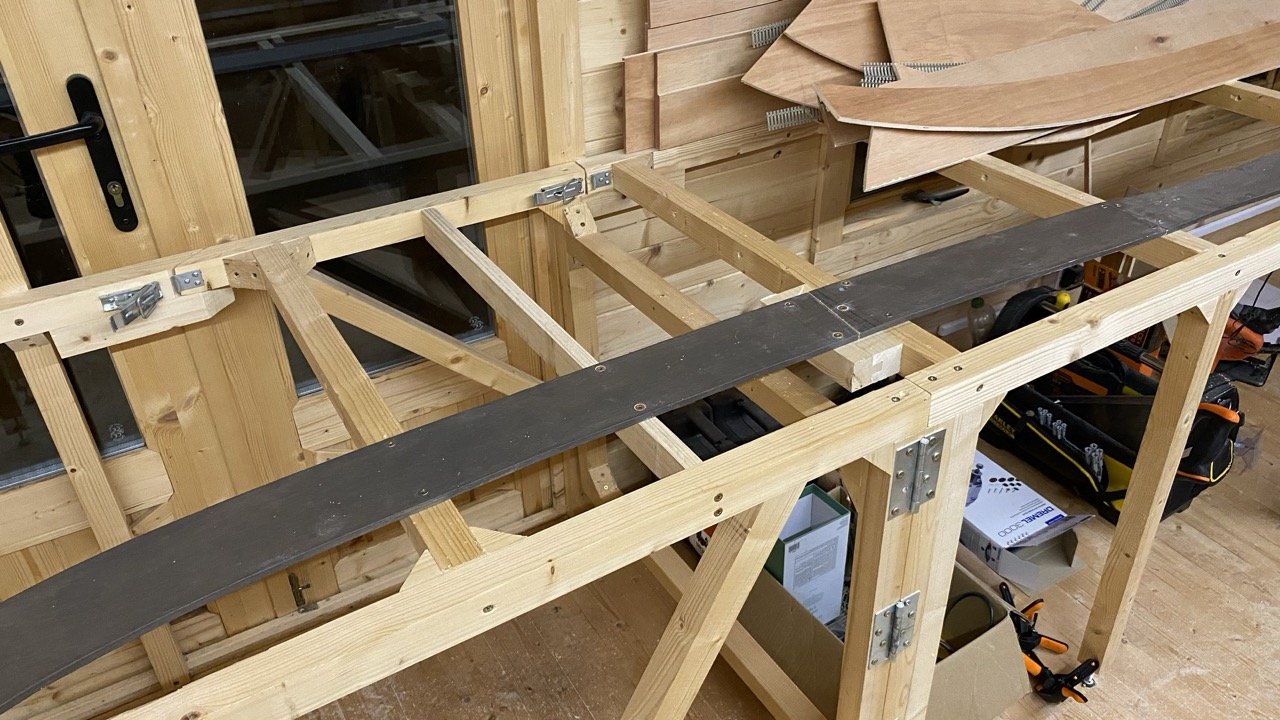
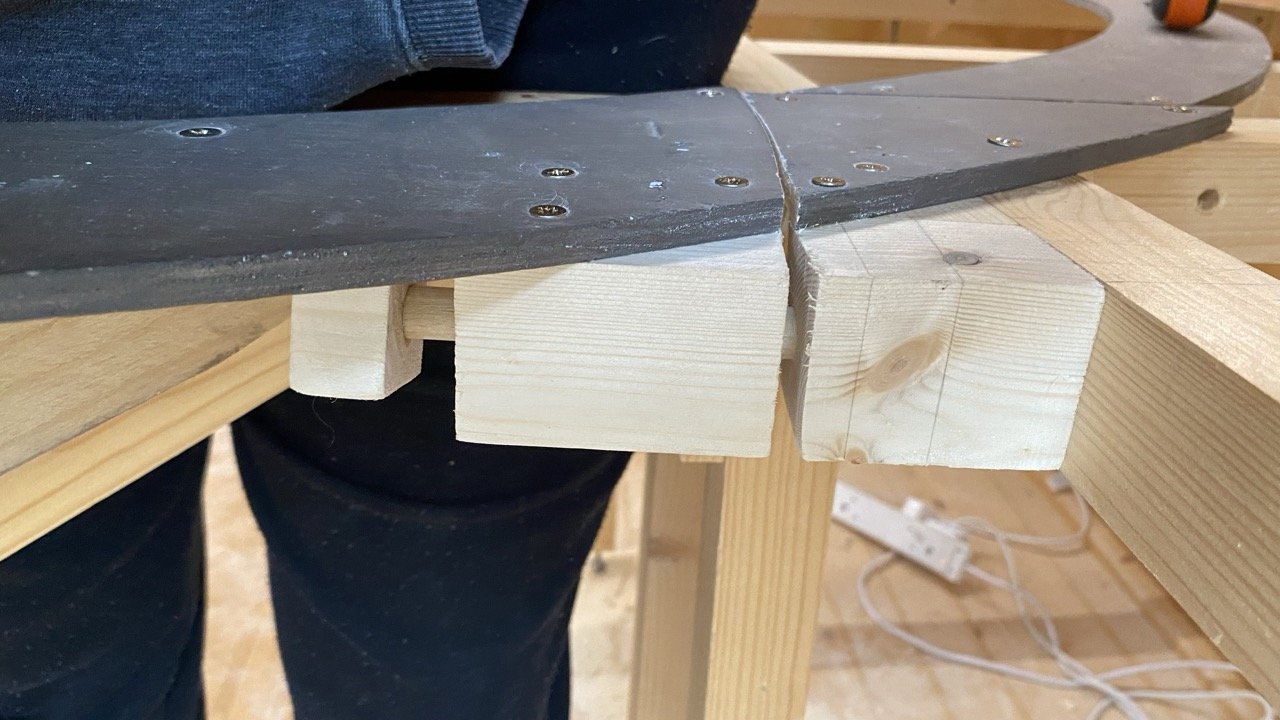
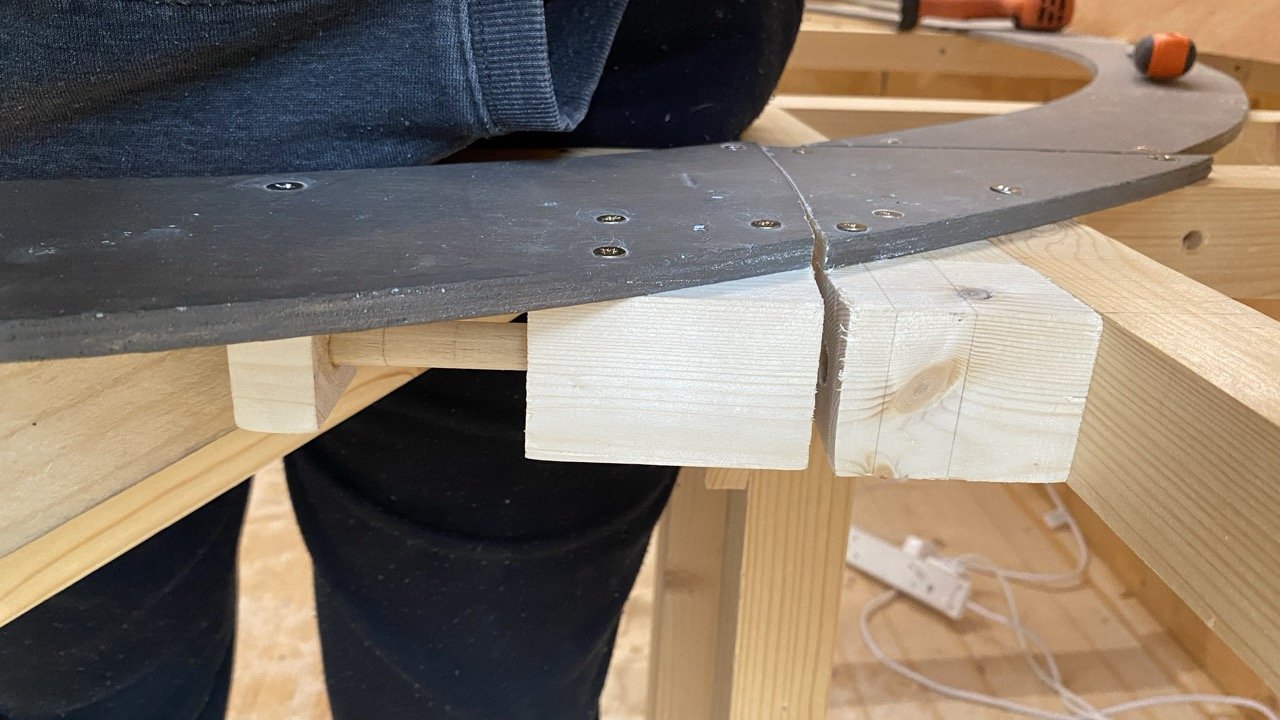
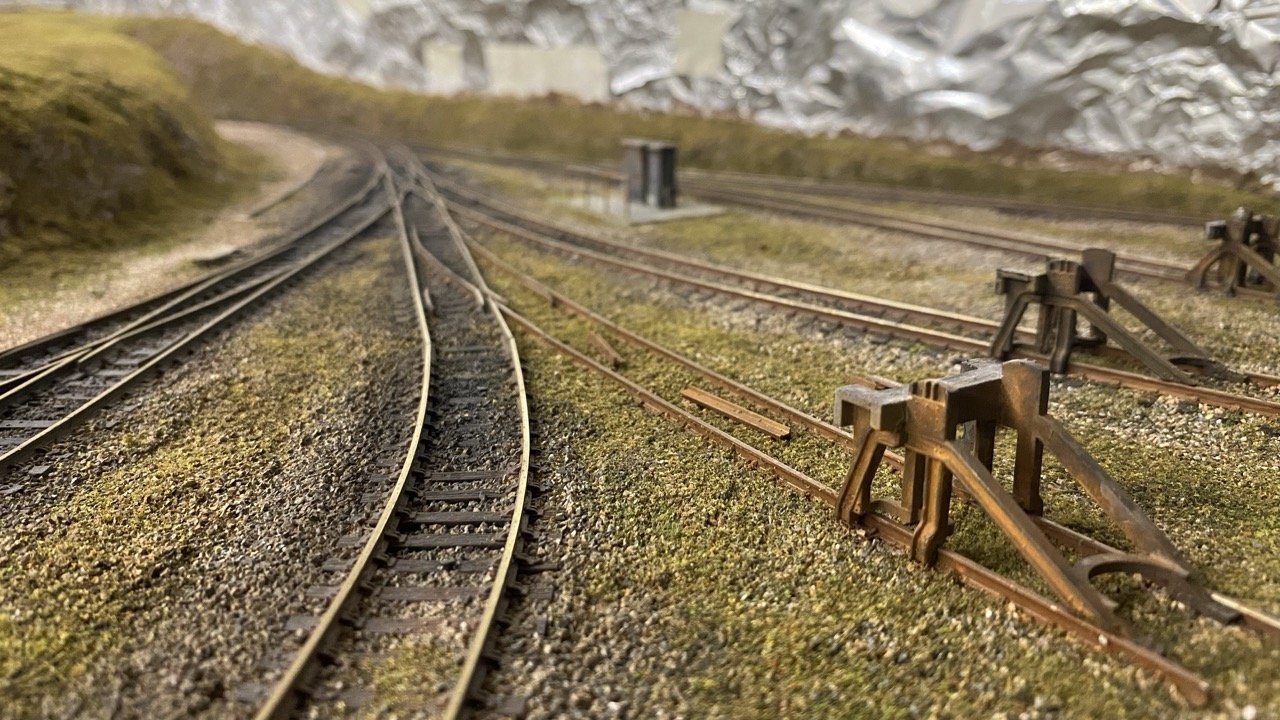
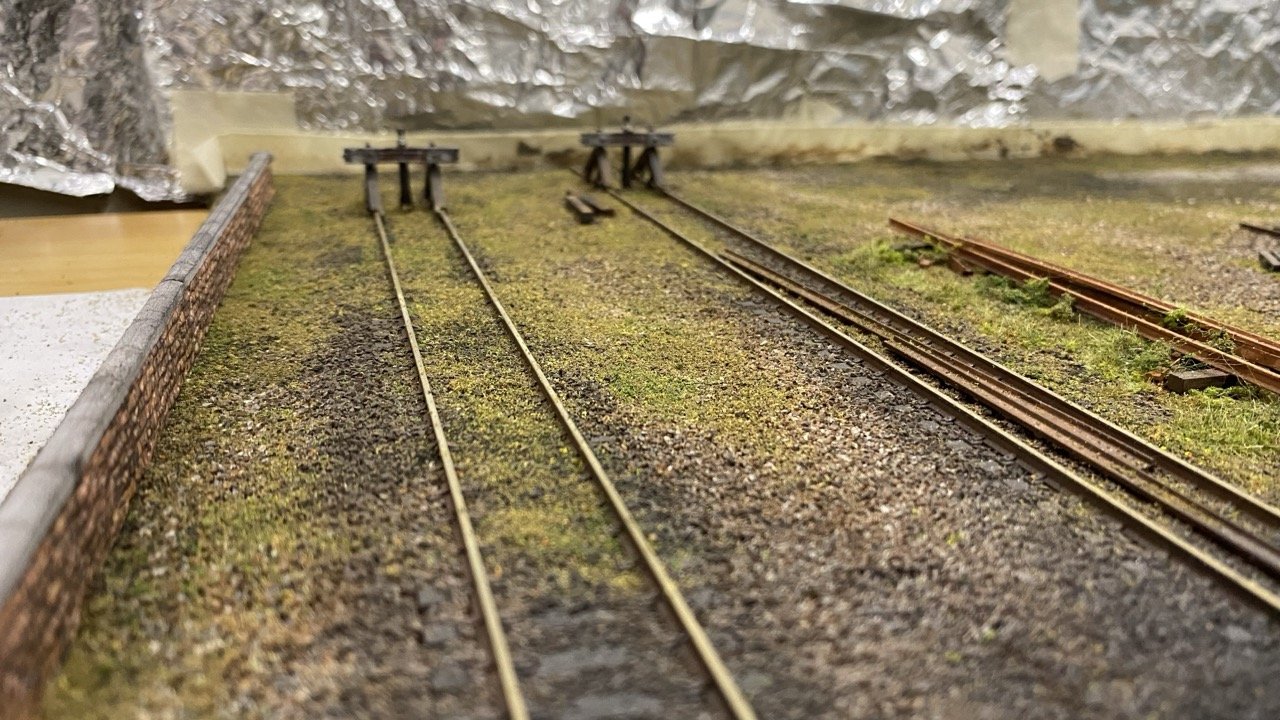
Hello all! Thank you for all the kind comments above and I'm delighted to share the progress from the last year. As you can see, the videos are posted above but I'll be able to show more detail in some of the photos below. Hope you enjoy! 1. Baseboards With the frame built, it was time to start adding baseboards. Although I had bought MDF for this and the cabin is insulated, I decided to go with 9mm plywood to reduce the risk of warping due to moisture absorption. With my trusty jigsaw and circular saw in hand I was off! The layout will be open plan, meaning once the track is laid, I will cut the baseboards around the track, instead of covering the entire frame. I'm doing it this was for 2 reasons: 1. It will make it easier to vary the height of the scenery both above and below the track level 2. There are multiple levels, with large sections of the lower level covered, so I need to be able to access the underside of upper levels for wiring, point motors and accessing derailed locos etc. This quick mock up shows where the main terminus station will sit over the fiddle yard. At this point I'm just mocking up the boards to get a rough idea of how it will all fit together. Thirsty work this, you can also see my sunglasses which were my "safety glasses". After seeing some YouTube videos with broken circular saw blades embedded in proper, toughened construction safety glasses about half an inch from eyes, I quickly replaced these with a proper pair of DeWalt safety goggles... 2. Mockups With the baseboards in place, I wanted to loosely place the track to get a sense of where it will go and confirm that I had enough track. And also to mock up the upper levels to make sure everything would flow correctly. Technically it didn't need to be done, but I really wanted to get some idea of the final picture in my head as inspiration for the long slog it will take to get back to this point The fiddle yard, 15 tracks with the longest sidings approx. 4 metres long. Here you can get an idea of the amount of free space that will be opened up when I cut away baseboard that is not supporting track. I was trying to figure out how to support the terminus station baseboard, without needing to place pillars on the lower level, which would take away storage space. The answer? 12mm rebar rods. It's strong and straight enough to support the baseboard and I can attach it to the wall on the inside, to some supports on the outer edge of the baseboard and clip it to the underside of the baseboard with steel U-shaped clips to prevent movement (You should have seen the look on the guys face in the hardware when I told him the steel rebar rods were for a model railway ) Starting to mock up the terminus station and the upper level main line that will run around the outside of the layout. The middle level here is the beginning of the entrance to the station. Where the laptop is will become the depot area on the approach to the station. You can see why I will need that access from underneath. This will be the upper scenic level curving into a viaduct / bridge across the corner of the layout. A view of the ramps leading from the lower fiddle yard, all the way up to the upper level about 5 metres away. This is why the door section will be complex. All of these tracks and baseboard will need to be cut, and then realigned perfectly when the gate is closed... A good 3D view of the multiple levels and ramps needed. This is to give an idea of scale for the terminus station - it's making me very happy! The central section will contain two long sweeping curves through a town through station. This corner section will hold a viaduct connecting the scenery across the right and left of the photo. A seven carriage loco at the town station. This top down view gives a better idea of how many tracks will run around this corner at various levels and on the ascending / descending ramps. 3. Track Laying At this point I know I have all the required track, so regretfully I started taking apart everything I had just done. The goal now is to fix the lower level track in place, exactly where it will go, including cutting the track to size where needed. I needed to do this now to get the track fixed in place, which would then tell me where I needed to cut the baseboards to create the open plan layout. If you don't have rail setter guides and you're laying track, do go out and buy them. They're fantastic, accurate and sill save you a huge amount of time and error You can buy a track spacing guide but I decided to make my own, very handy to have. Although I took the mock baseboards up, I numbered and labelled them all and left some track pieces in place to avoid having to figure it all out a second time. The fiddle yard being fixed in place. Love this long sweeping curve coming across the countryside. One of the videos on the Riverbank Railways YouTube channel shows this in action. 8 carriage train stopped at the town station. There's also room for a loco. 4. Baseboard Cutting At this point all the lower level track has been cut and screwed (loosely) to it's final location. I now have to take it all up, in preparation for cutting, priming and painting the baseboards. So I numbered every individual piece of track and took photos for when it needs to be relaid. In this photo you can see the guidelines drawn on the baseboards which will tell me where to cut. I also carved grooves into the baseboards alongside the edge of every piece of track. This was done so that when primed and painted, the grooves will remain and I can replace the track exactly where it was located, so I don't need to try and figure it out all over again. There will be cork under the track, which I will cut into strips to allow it to be placed alongside the grooves in the correct location. In the garage, each baseboard piece is primed and sealed with white sealer. And then given 2 coats of dark brown paint to provide a base colour for the layout. My nifty little baseboard holders Two sections of baseboard, ready to go. Now you can see the open plan coming together and the amount of space gained by cutting away excess baseboard. Because the support parts of the baseboard are thinner and the horizontal frame supports are about 75cm apart, there is a little give in the thin baseboard supports. This will be solved by adding 1 x 2 supports where needed. 5. The Gate The moment I was dreading for 2 years. How will I cut the baseboard and frame at the gate in such a way that the track will realign perfectly when closed with no vertical or horiztonal movement, especially given the gate rotates into place? Solution 1: For the section that is closed by the gate rotating I couldn't use a dowel or other form of baseboard connector which relies on straight movement, because of the rotation. However I figured a slot system would work. I used a router to create a tongue and groove connection. All the parts were clamped and screwed in place before the cuts were made, to ensure everything slotted back in perfectly. Which it almost did The right side of the "tongue" was a tiny bit too slim, resulting in about 1mm vertical movement. I added some Gorilla Glue to the "tongue" which bubbled up when dry. I then sanded it down to the perfect height and it made the slot connection nice and snug, with absolutely no vertical movement. Solution 2: The section of baseboard that swings freely out posed a different kind of problem. I couldn't use the slot method above, because anything which sticks out past the cut would prevent the frame from opening. I had to figure out how to align the cut baseboards vertically and horizontally after the gate was closed. The solution was to use a sliding 12mm dowel. With one socket fixed in place and the end of the dowel glued into a "handle", it can freely slide through a second socket which is fixed to the free part of the baseboard. When slid back, there is nothing protruding to prevent the gate from rotating. And when the gate is closed, the support of the baseboards is very strong. Although as I suspected there would be, there is a tiny 1-2 mm vertical movement on the unsupported side of the connecting baseboard (the near part on the left of the cut in the photo below). However once the dowel is slid into place, it fits perfectly into the hole and locks everything in place, with no movement at all. The end of the dowel is tapered and sanded to allow easy movement. and it's a snug fit My single concern at this point is that wood expansion may cause the joints to misalign - however: 1. The wood has rested in this cabin for a year 2. The cabin is insulated and the heat comes on nightly for 30 mins to prevent damp 3. The layout frame and gate has been in place for over a year and hasn't encountered a problem So, finger's crossed And if something does cause a problem, I'll figure it out. See that mitre saw on the table? Why, oh why didn't I buy that before building the frame and hand sawing almost every piece of wood and 45 degree support block Lesson learned!! Thanks for reading all, hope you enjoyed it! With the gate complete, it's now time to start adding cork, relaying track and running wires - exciting

- 60 replies
-
- 12
-

-

-
Depot #8 by Riverbank Railways (fictional 1980s / early 1990s depot)
Adrian replied to Adrian's topic in Irish Model Layouts
Thanks for the compliment!! -
Depot #8 by Riverbank Railways (fictional 1980s / early 1990s depot)
Adrian replied to Adrian's topic in Irish Model Layouts
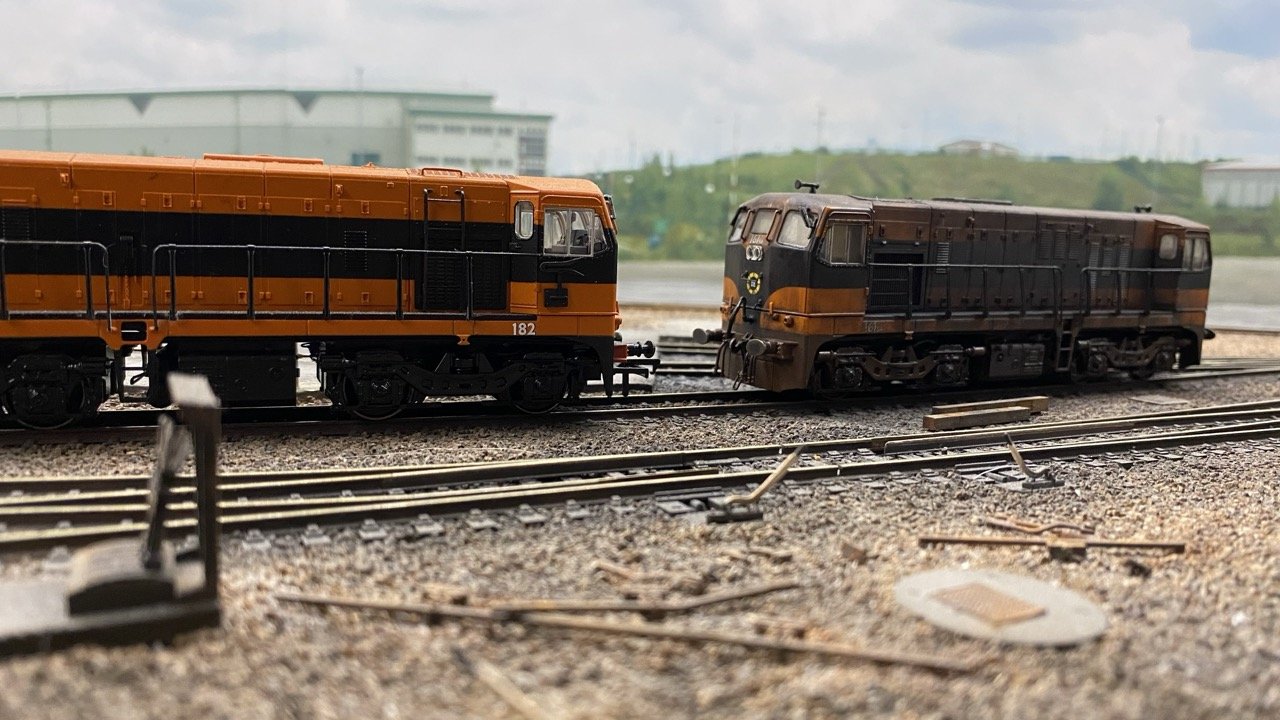
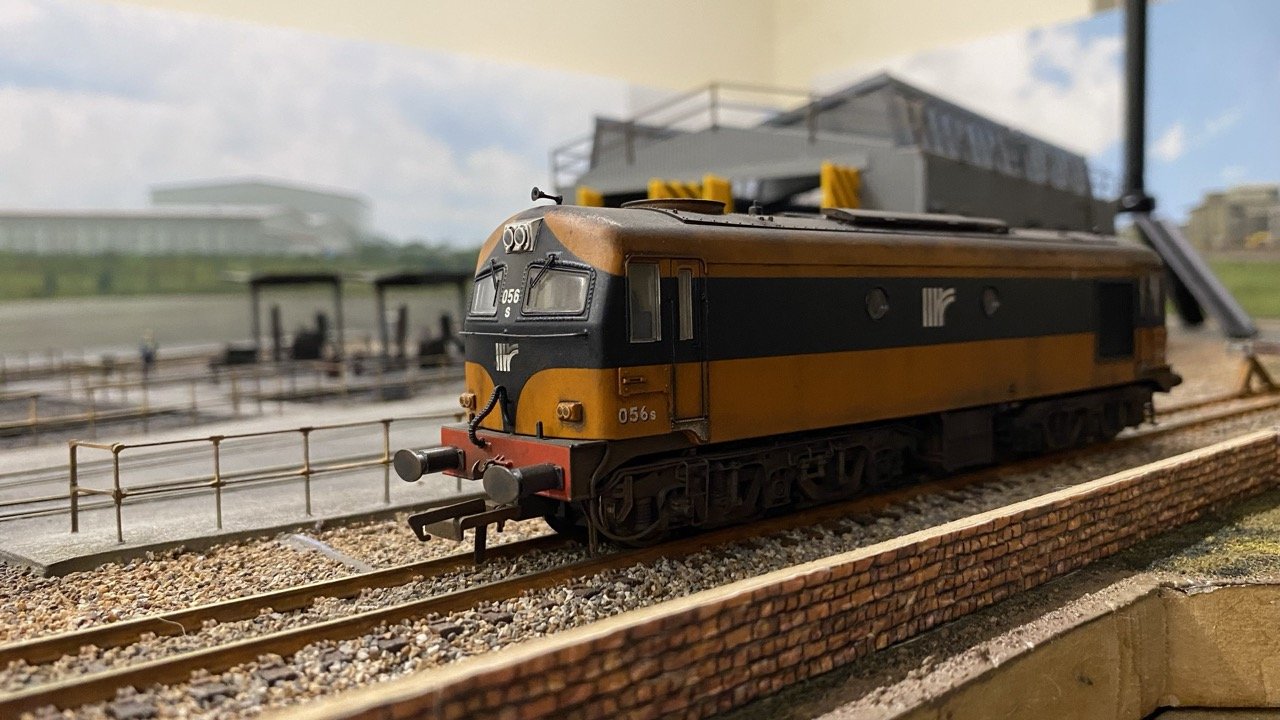
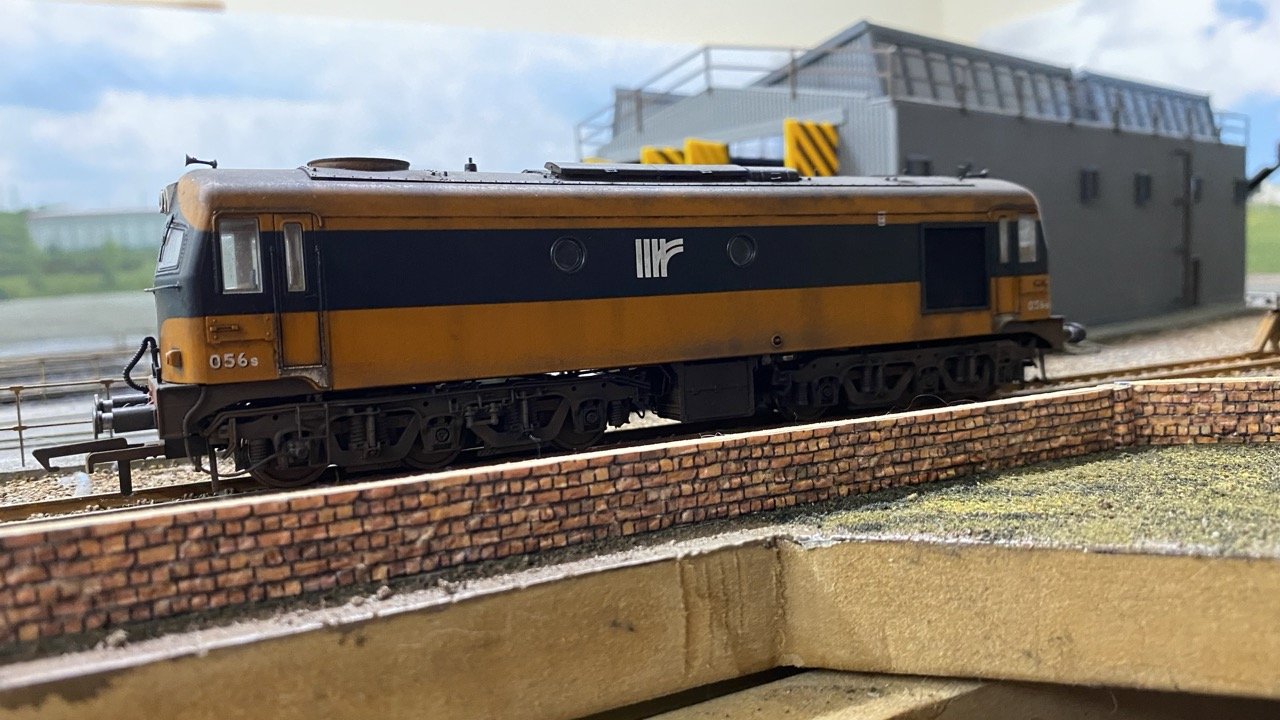
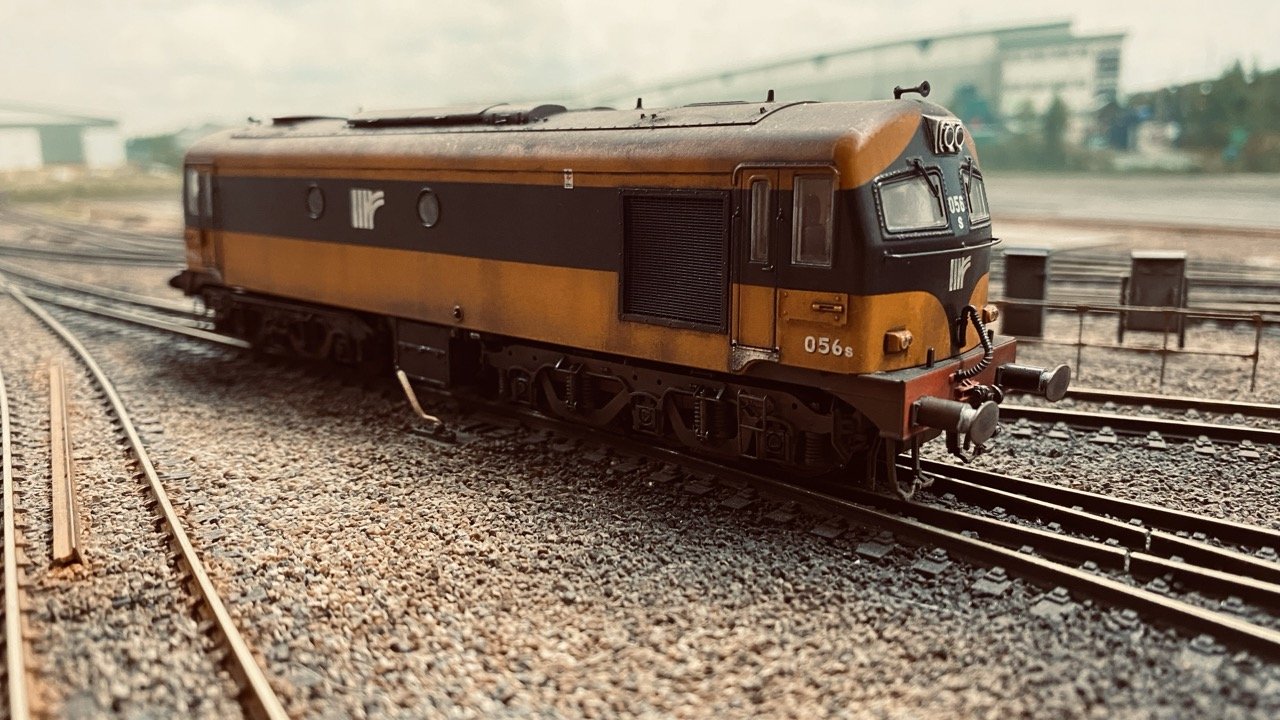
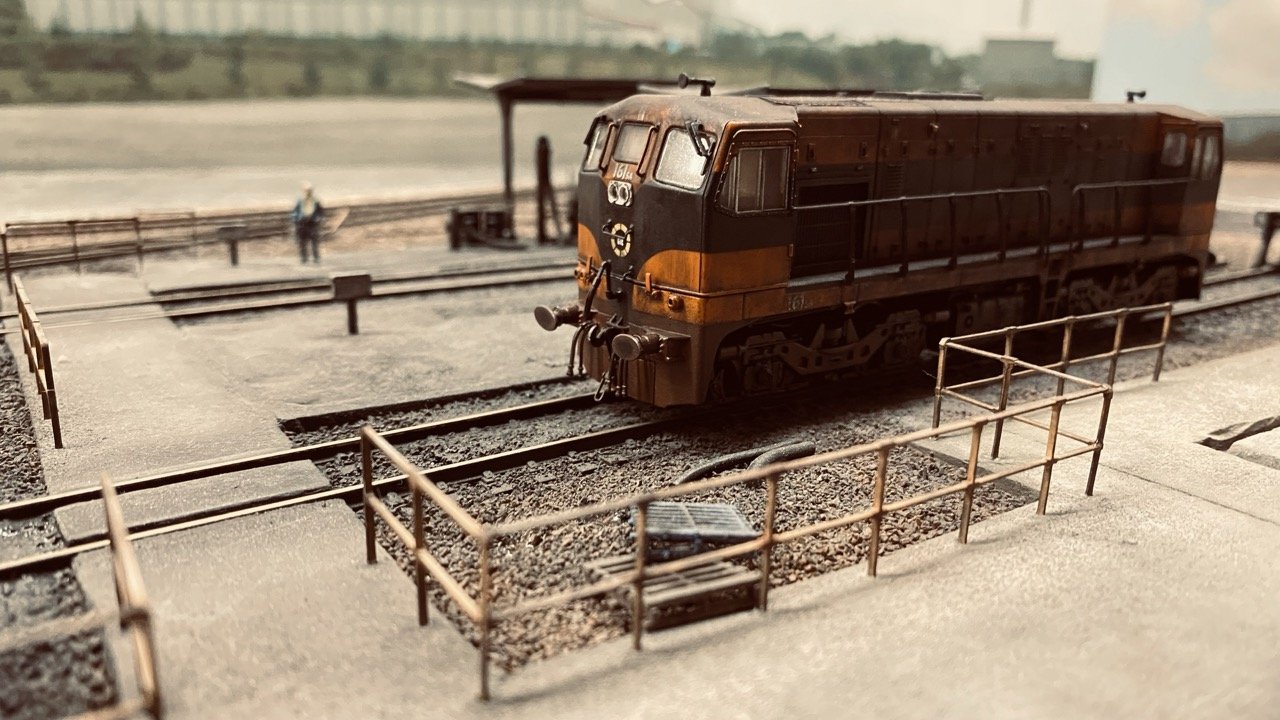
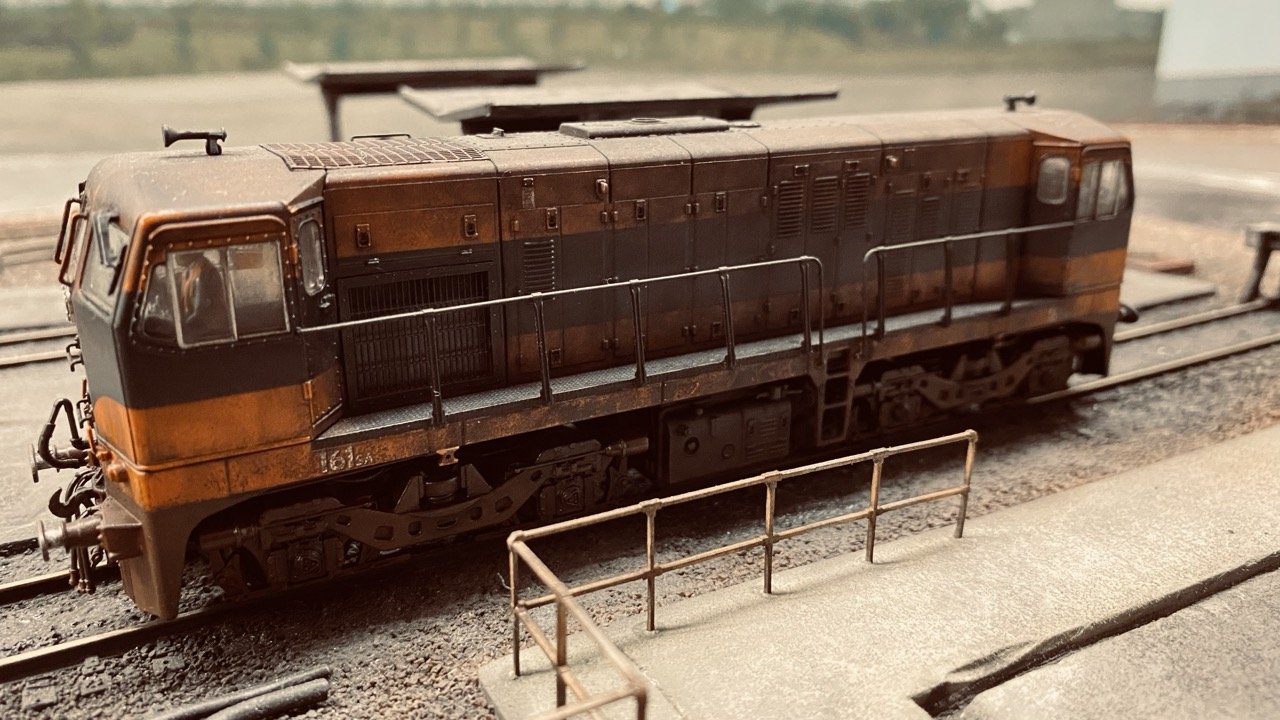
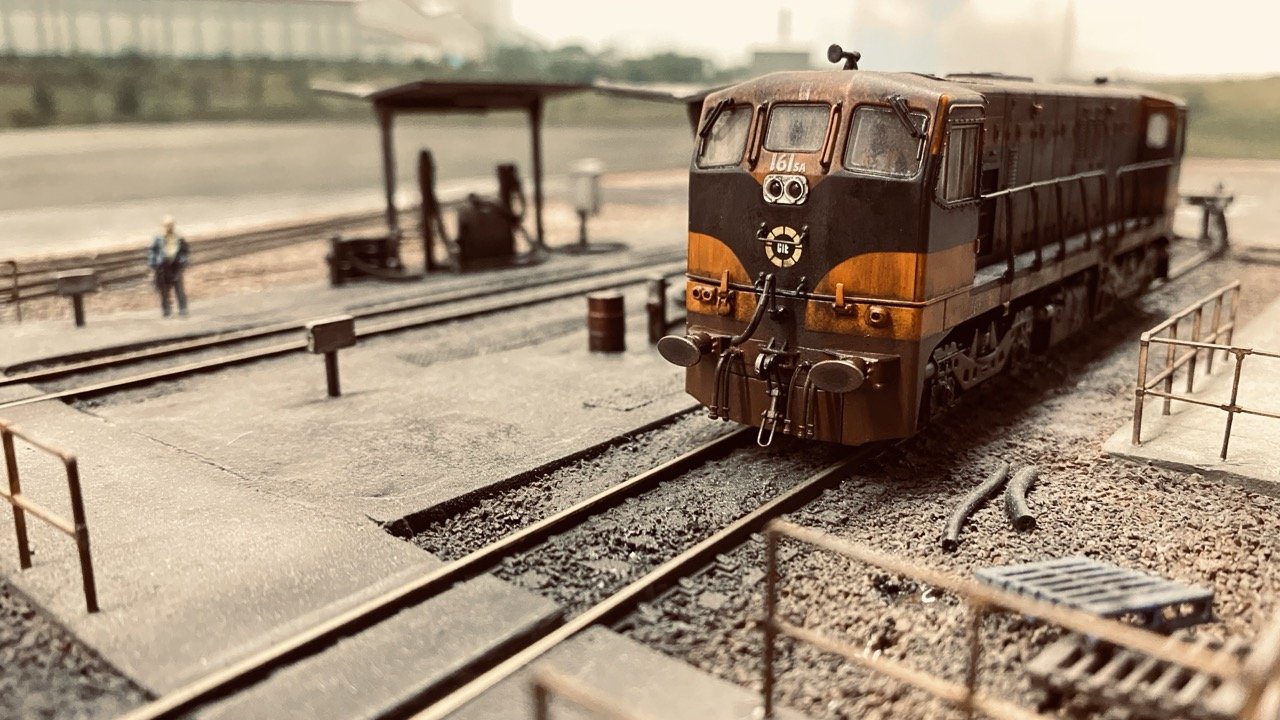
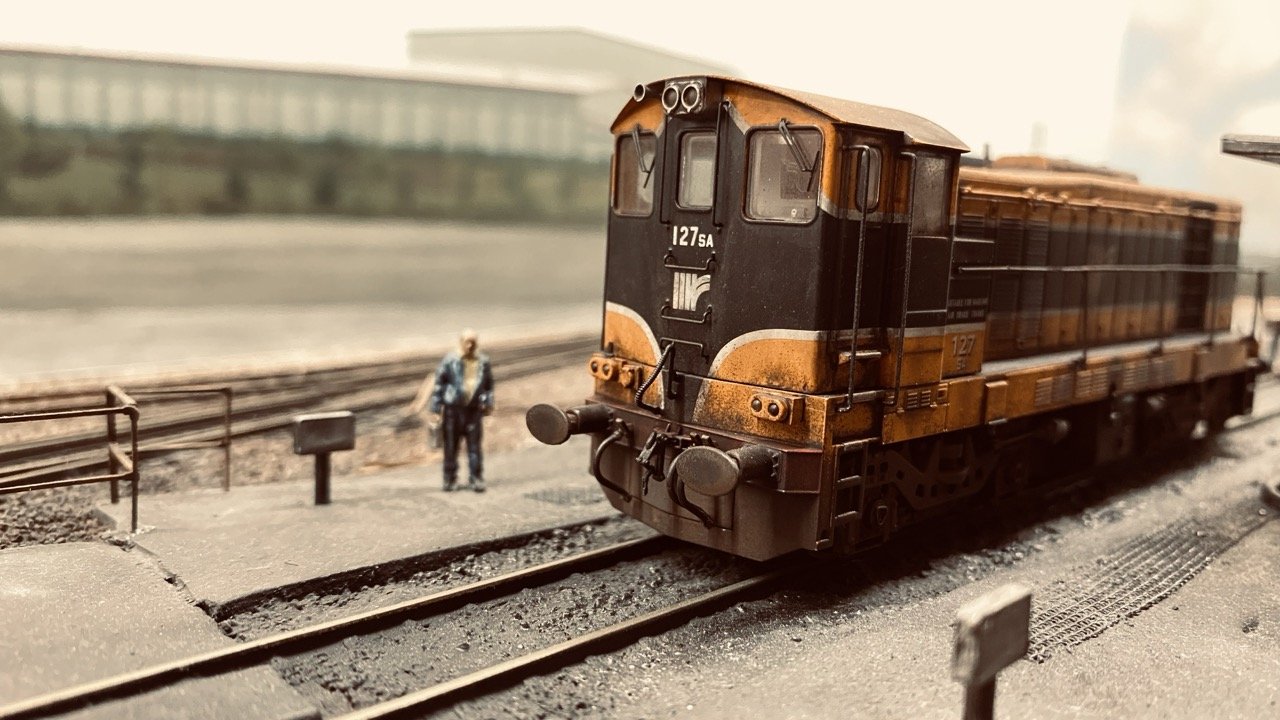
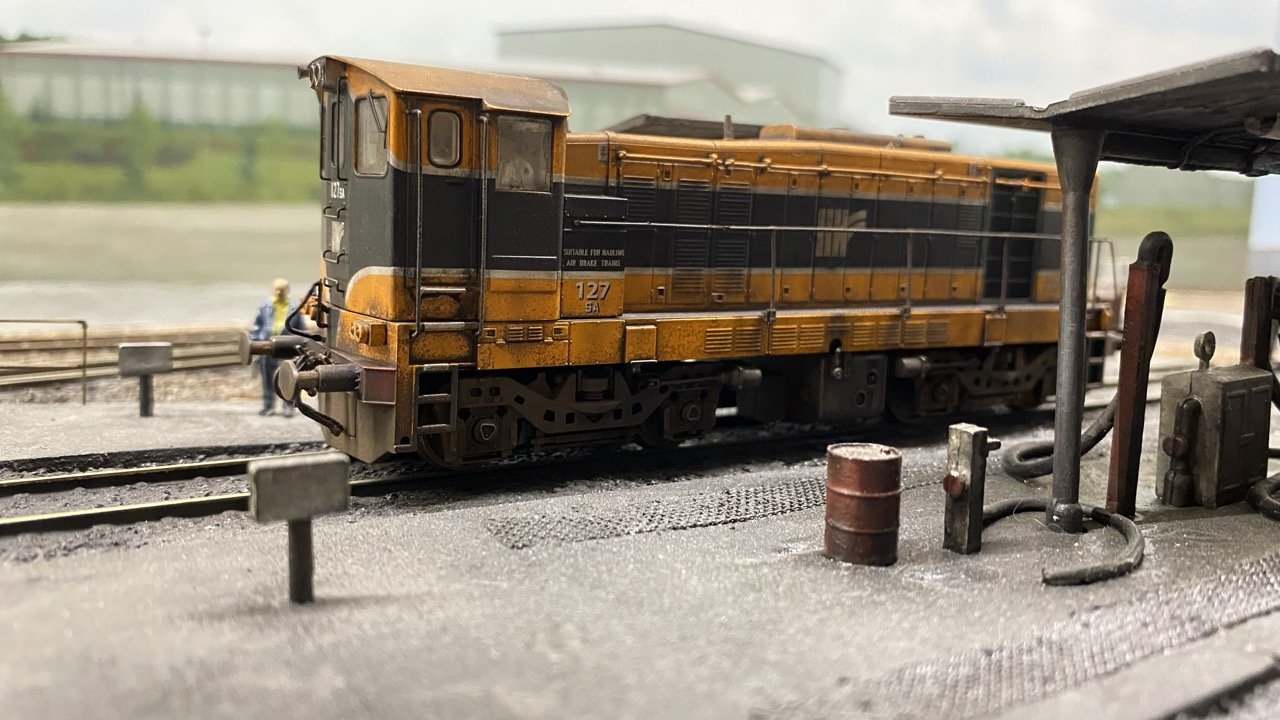
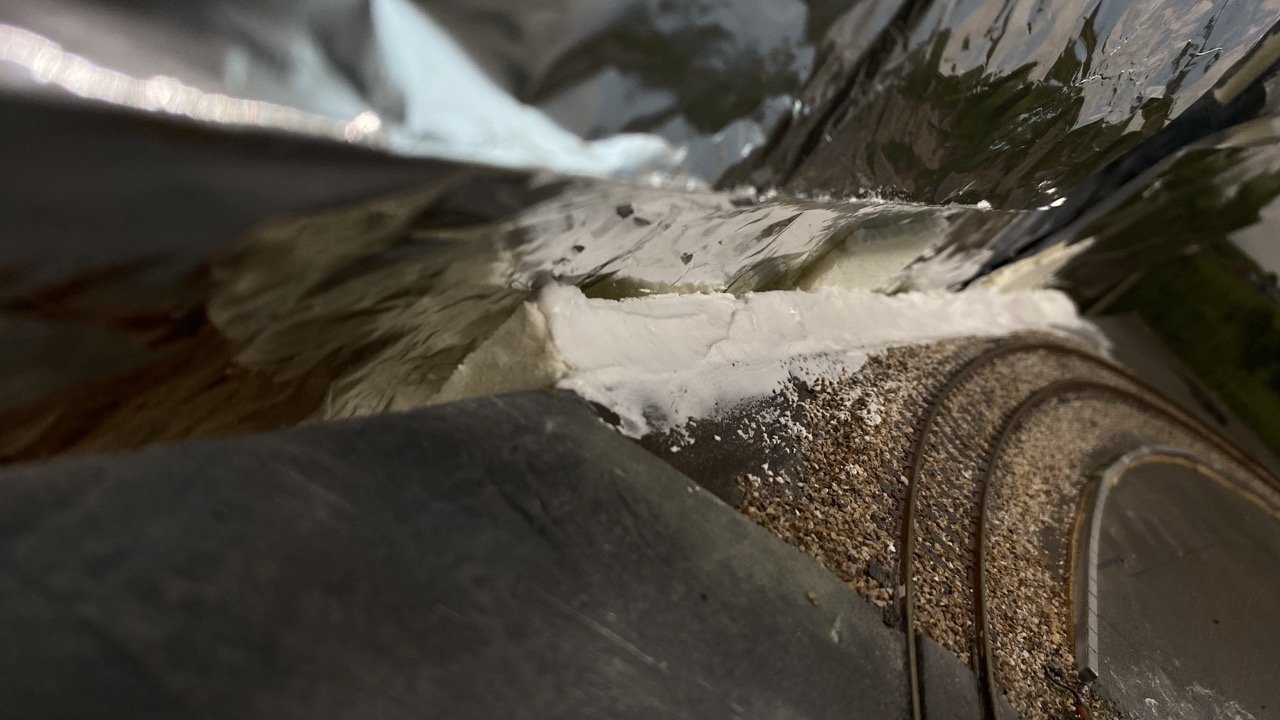
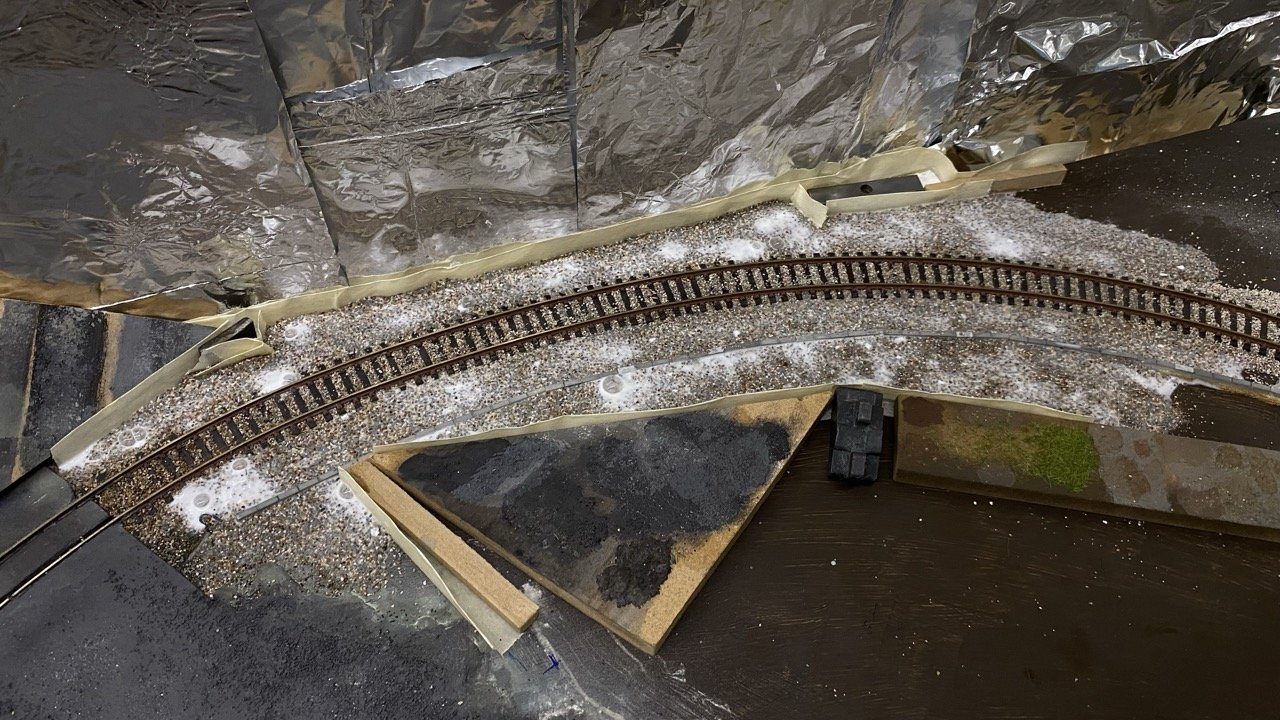
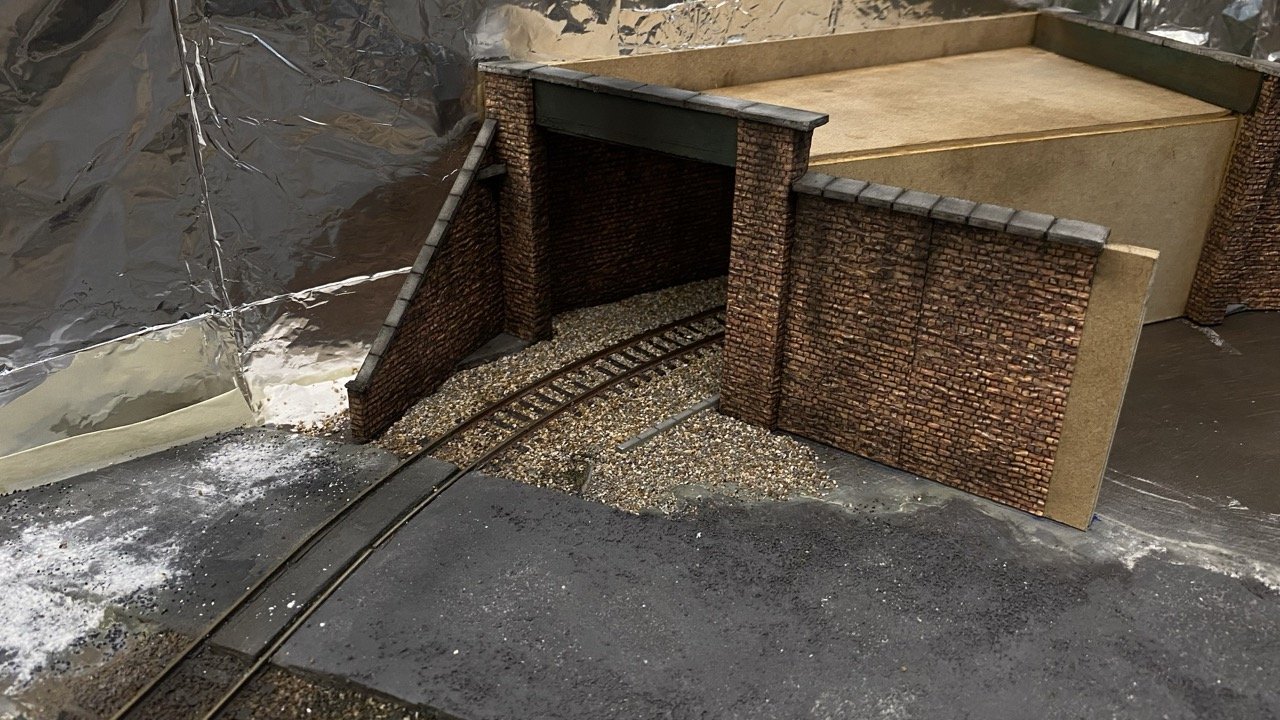
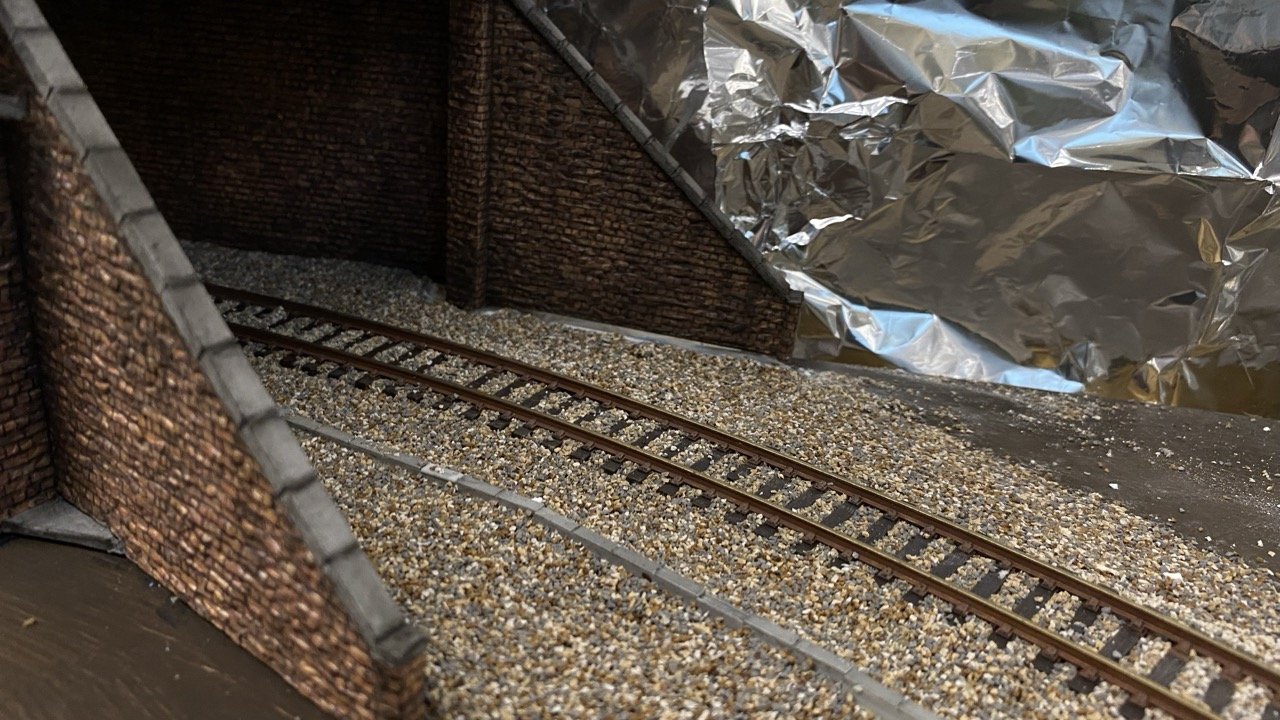
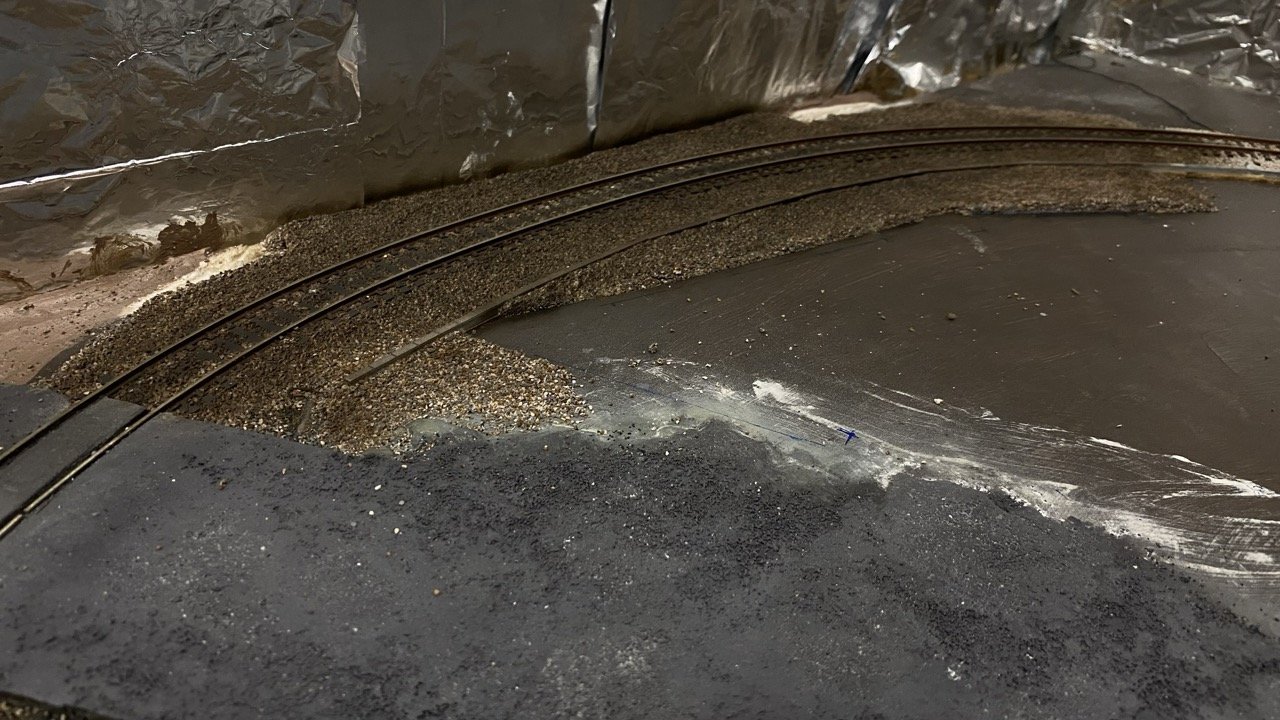
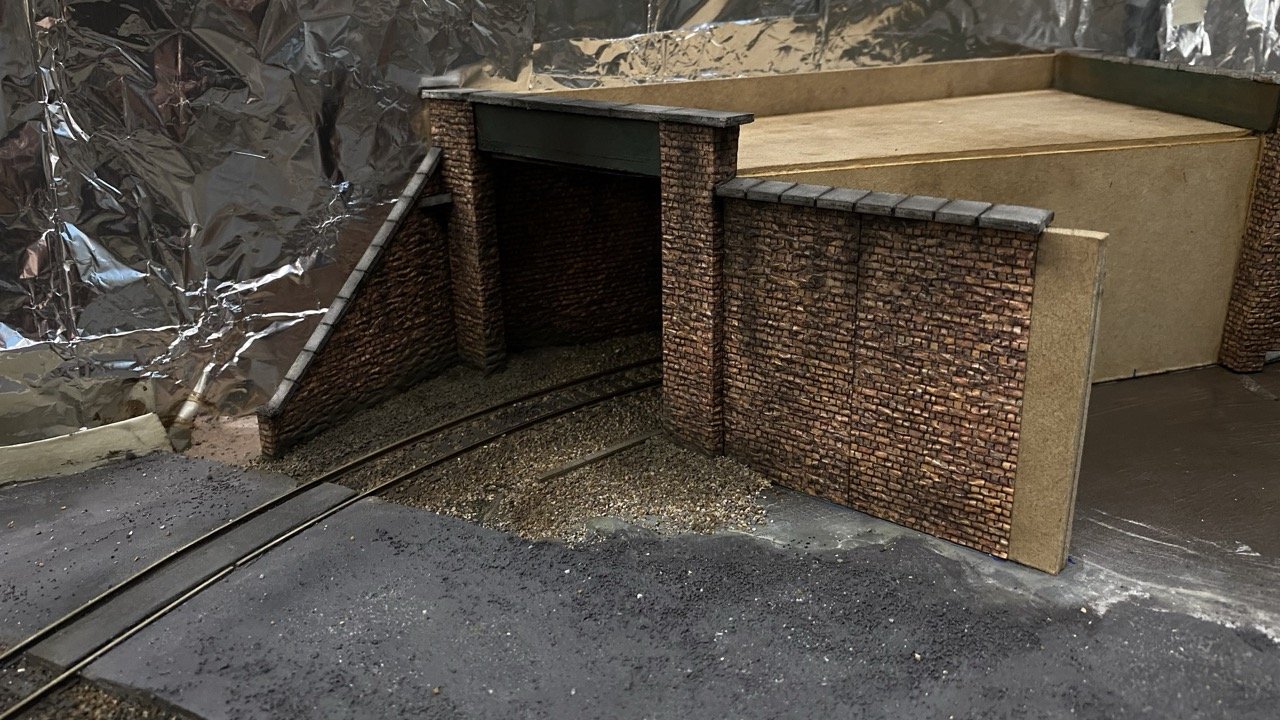
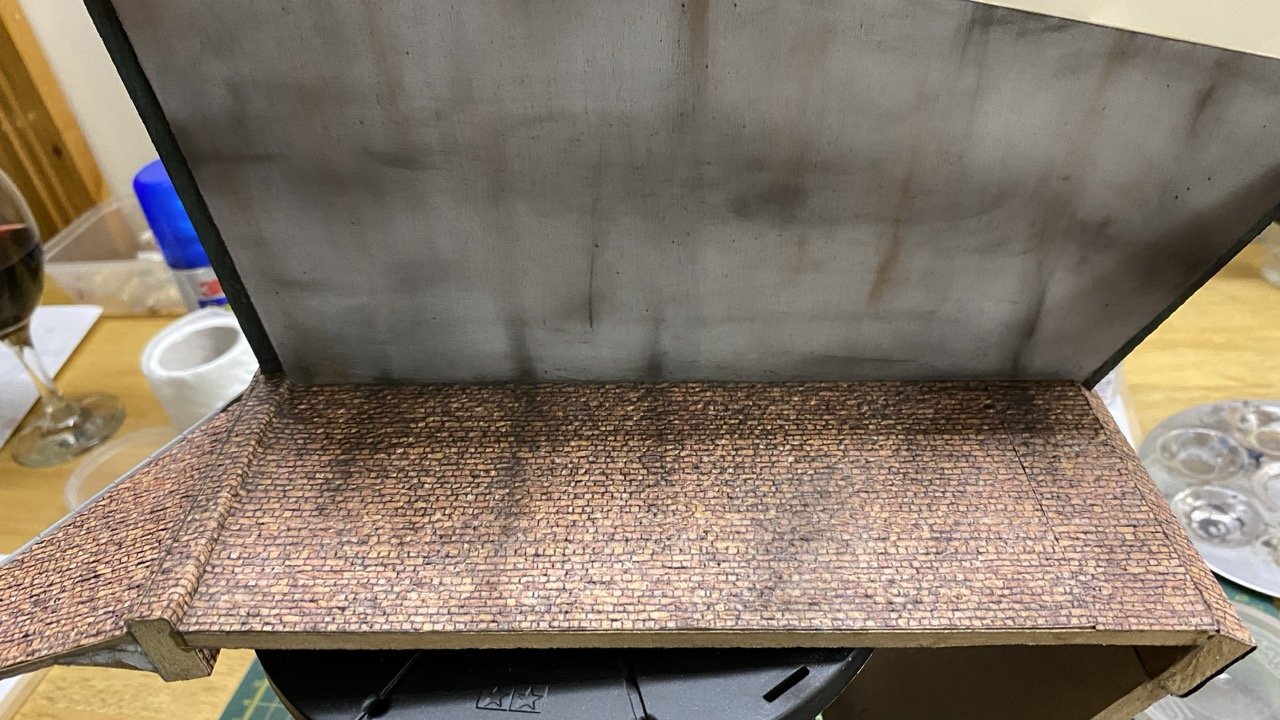
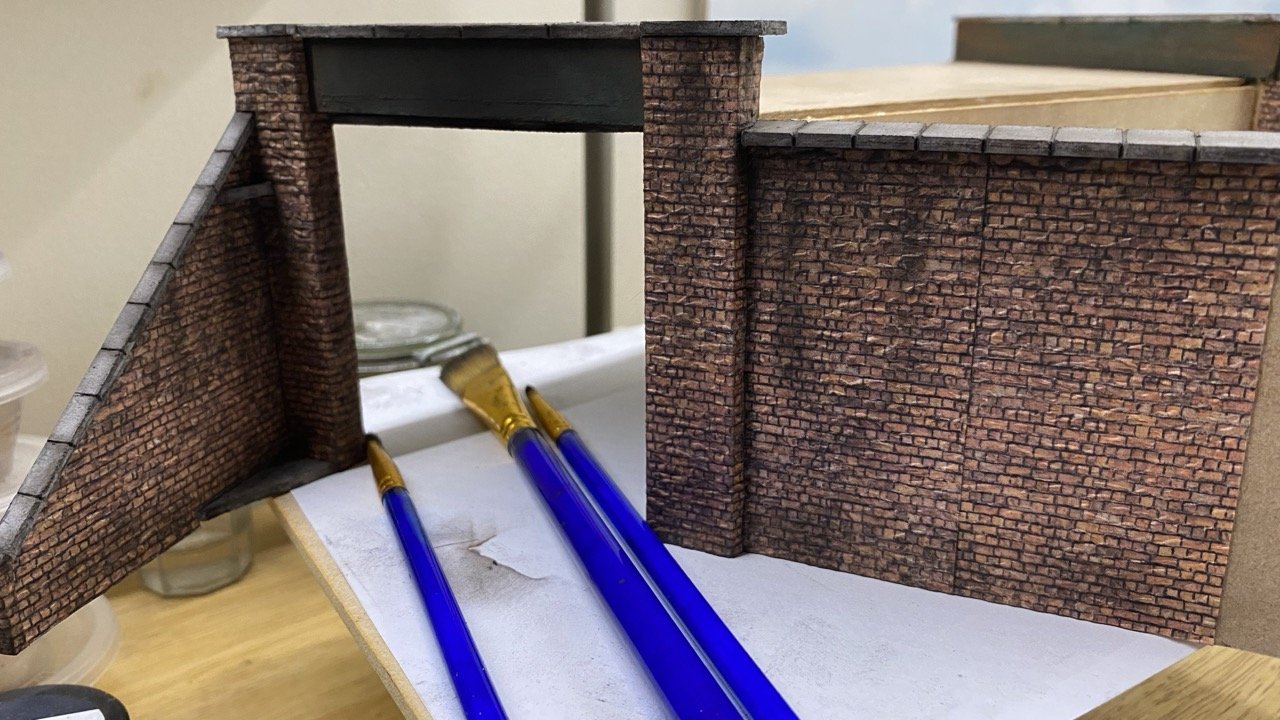
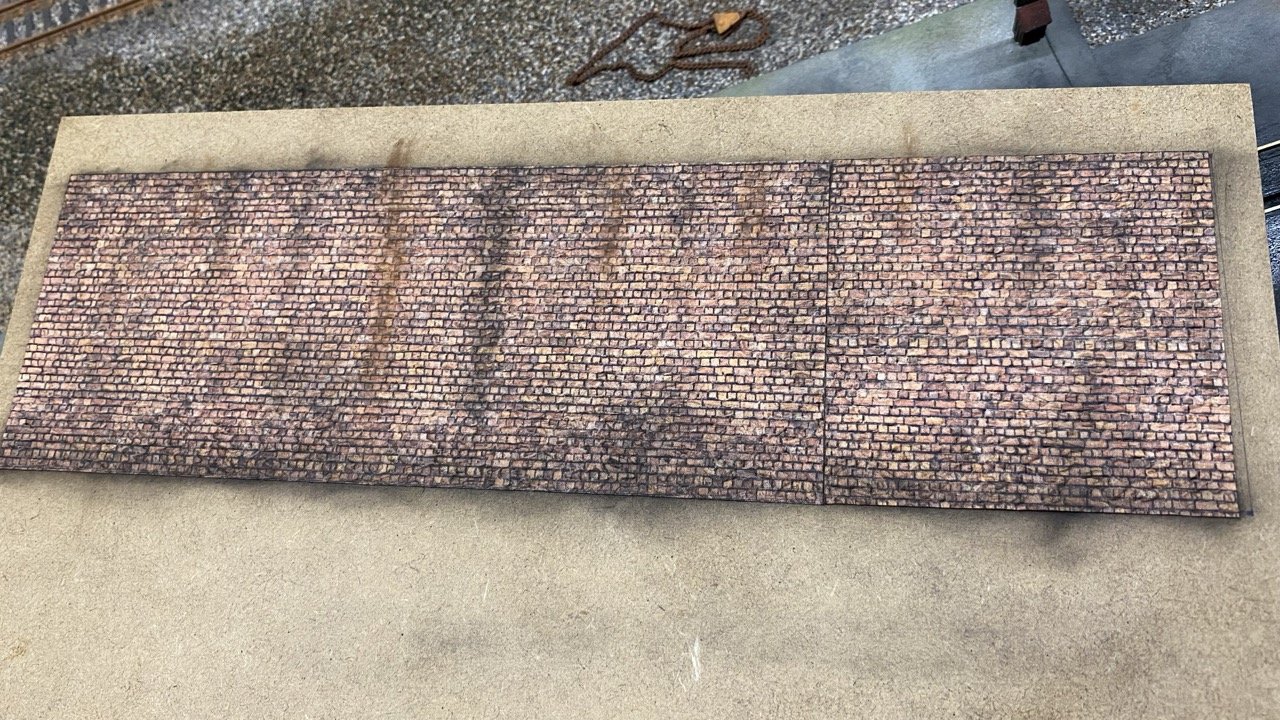
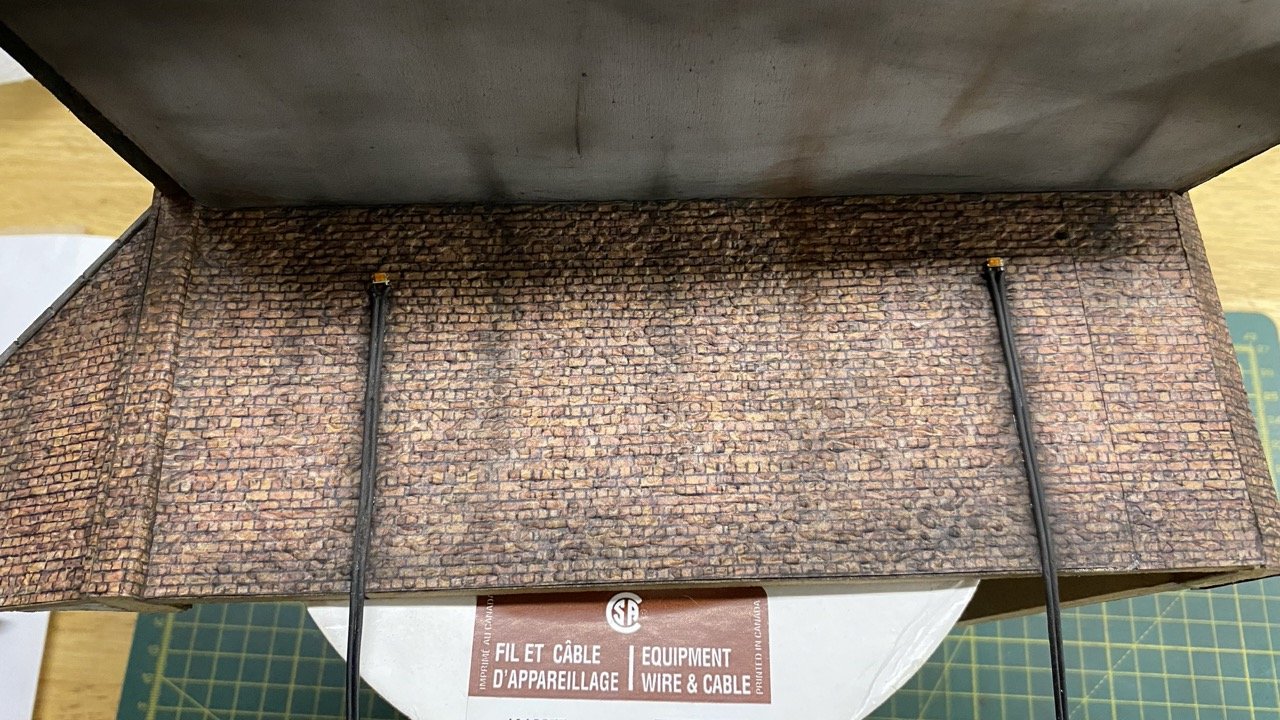
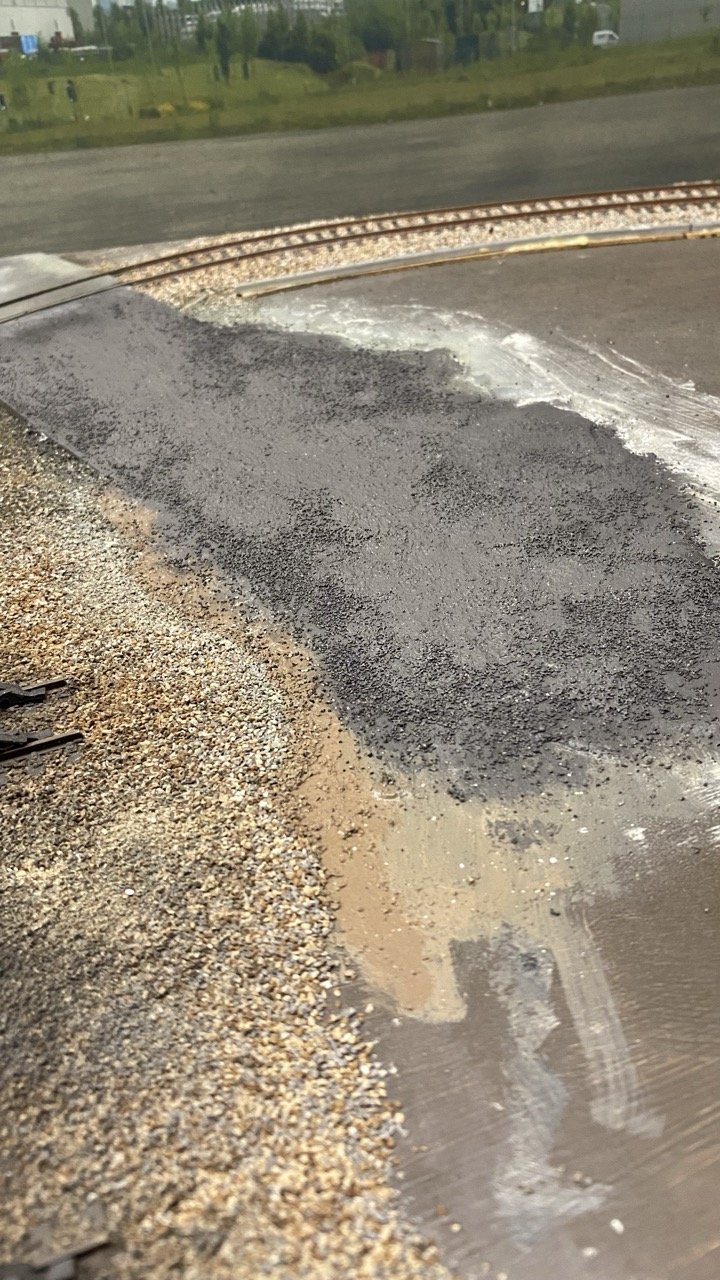
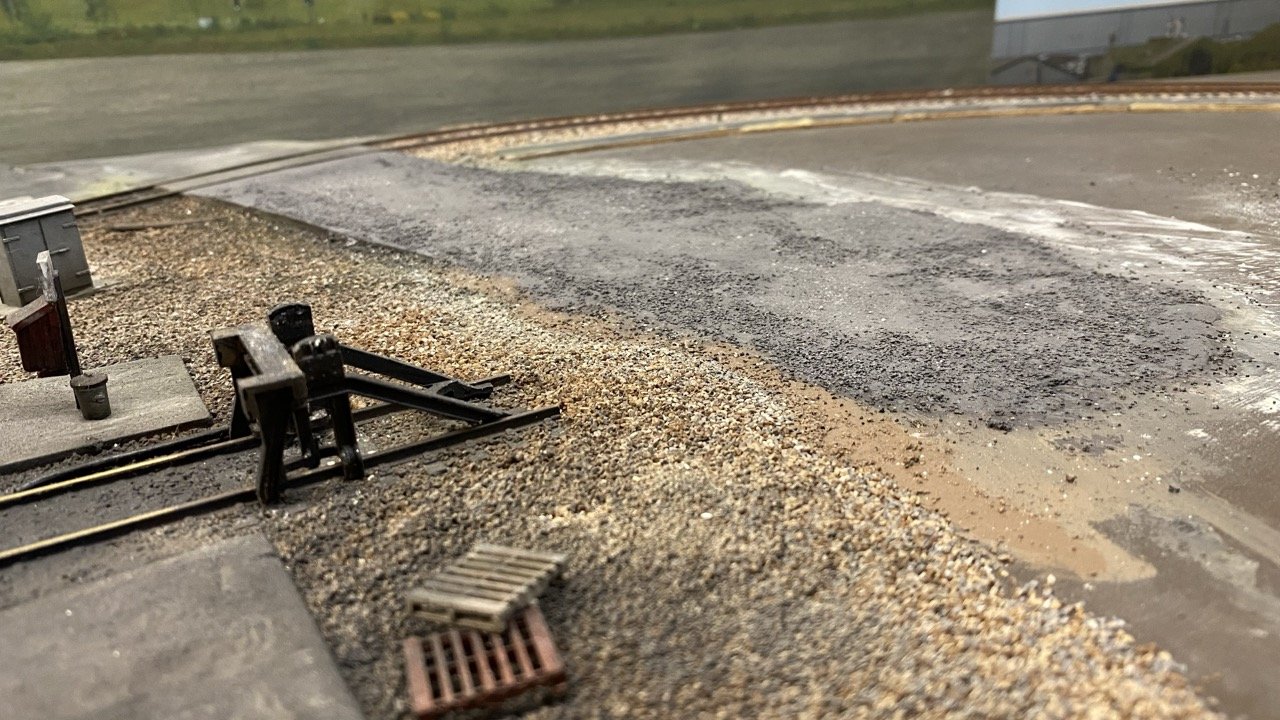
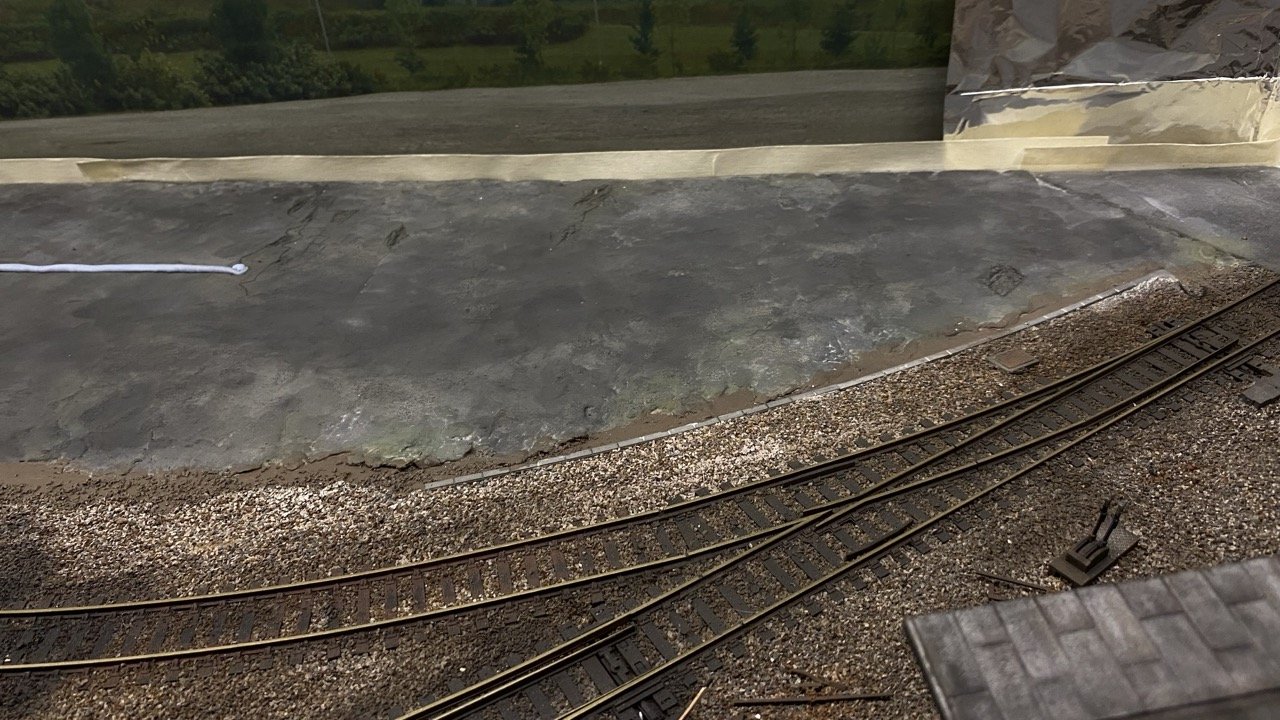
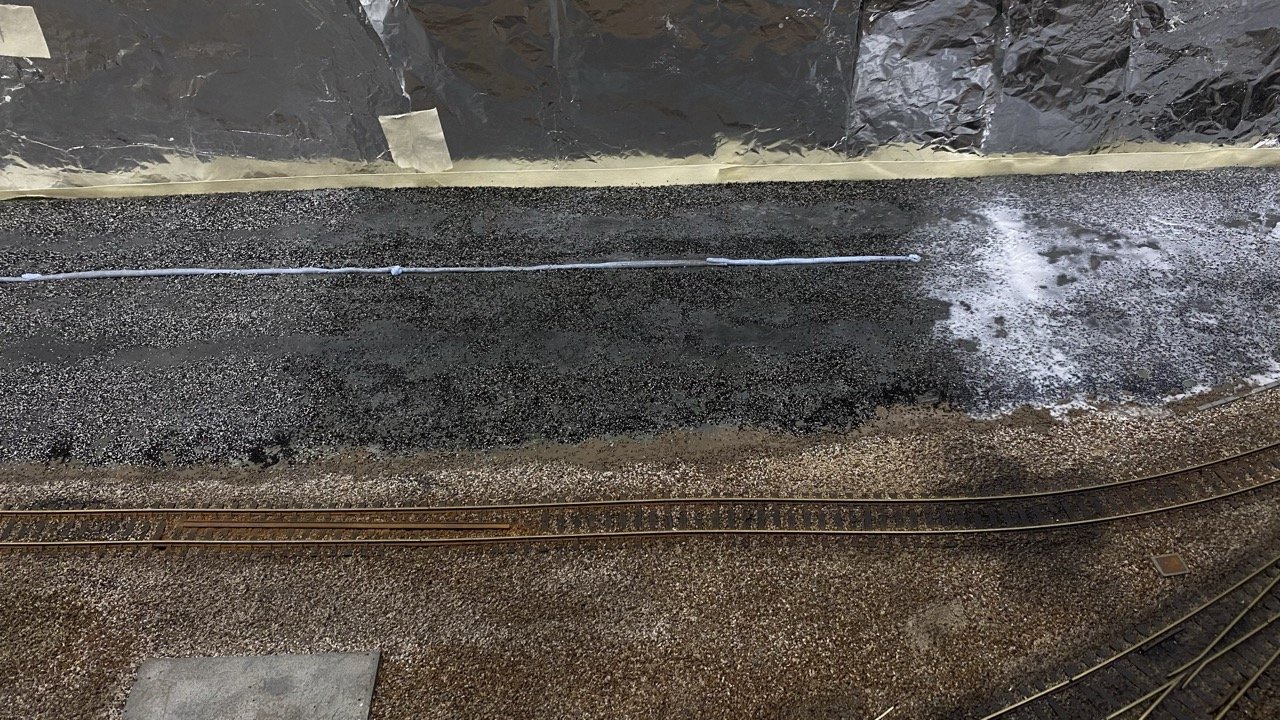
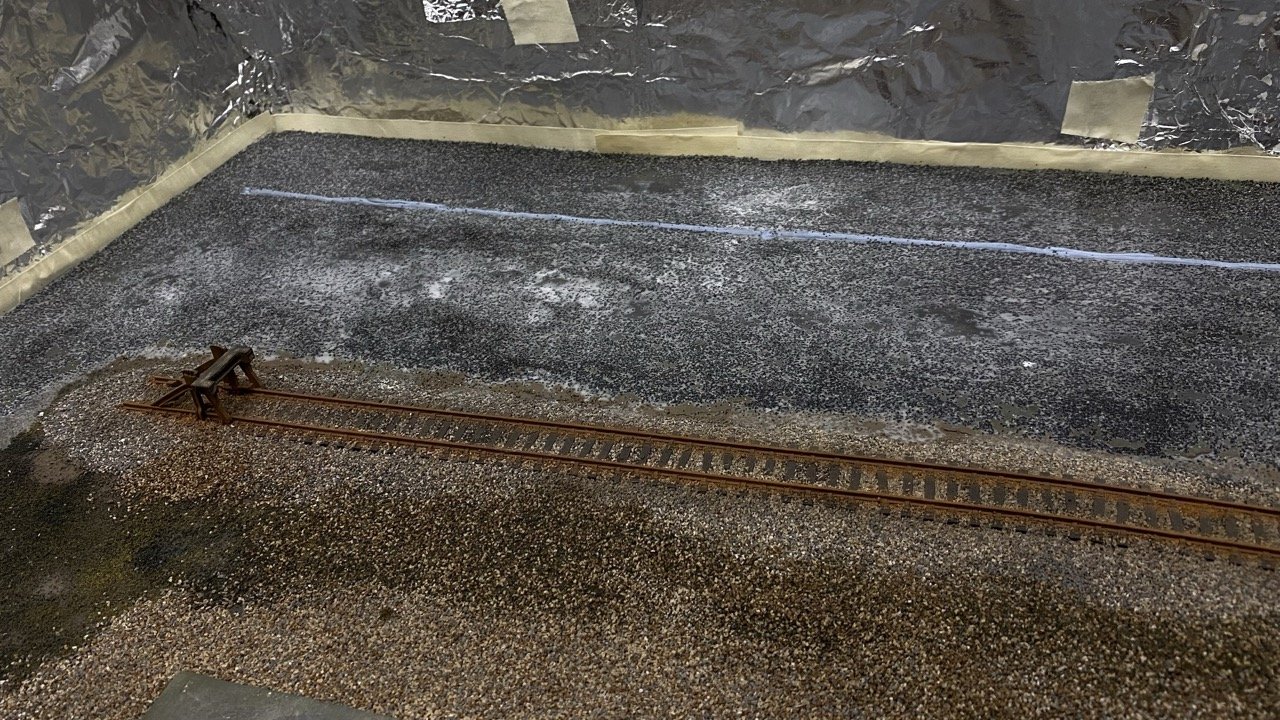
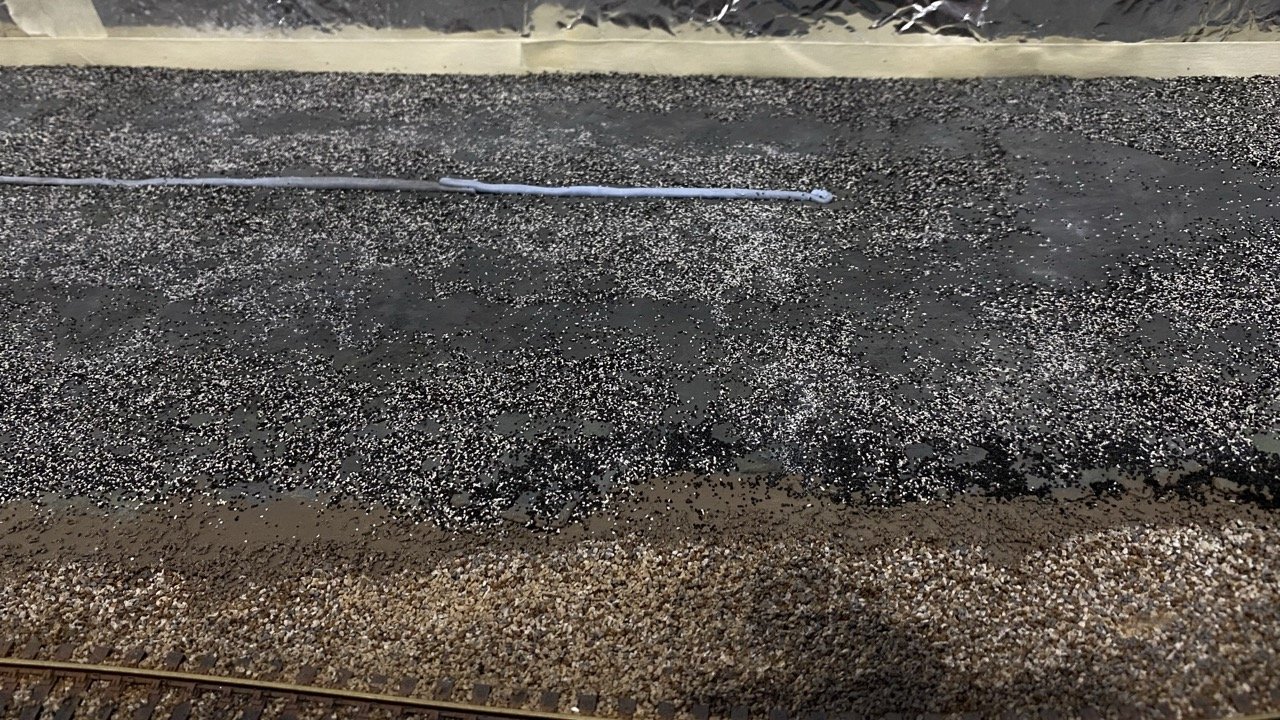
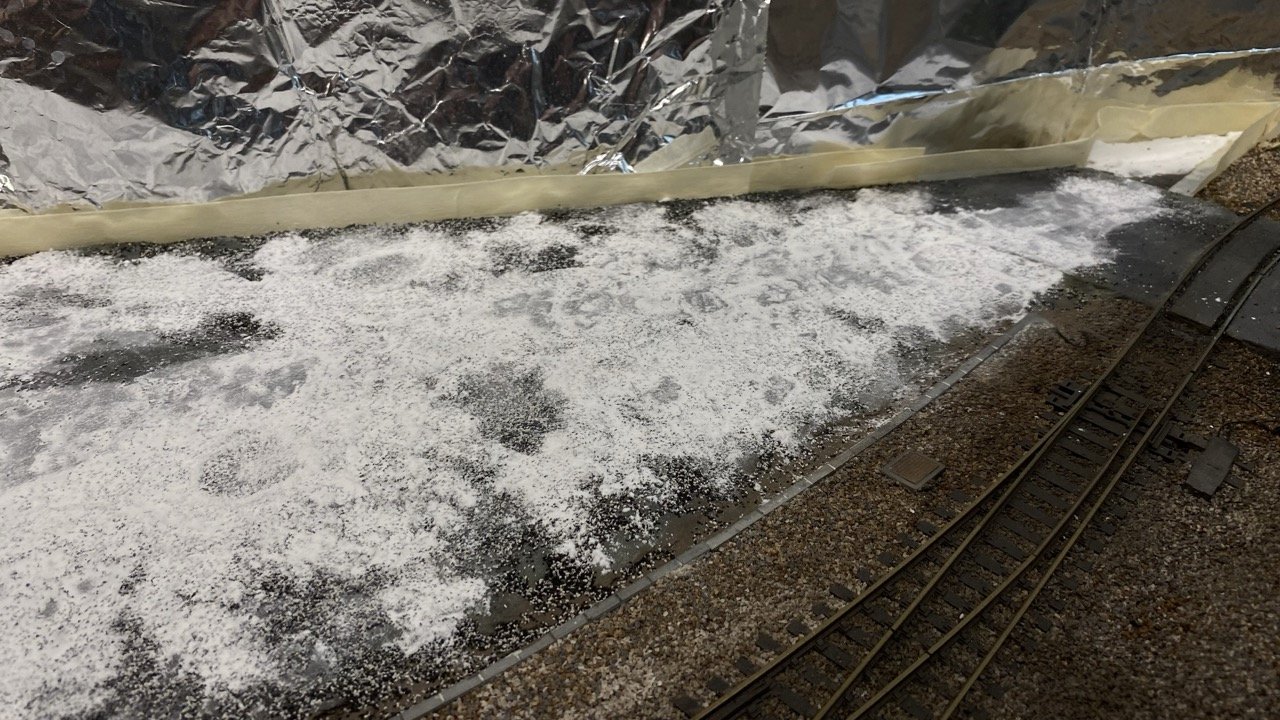
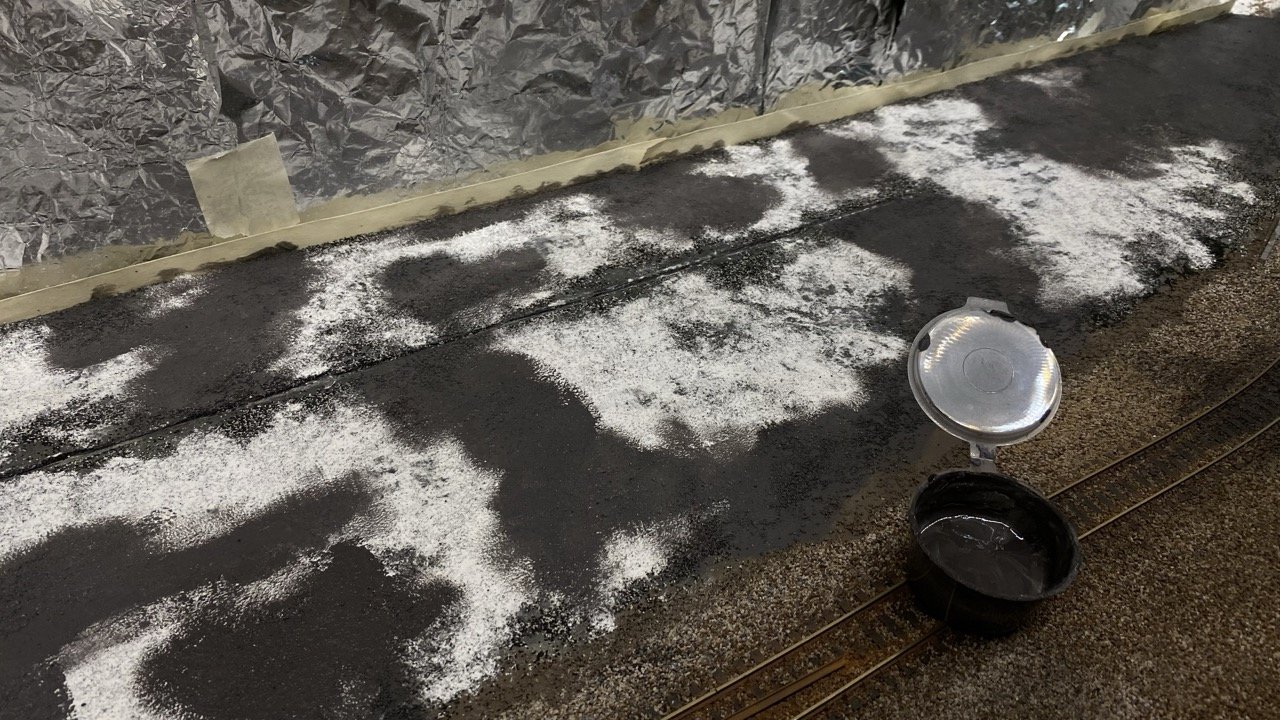
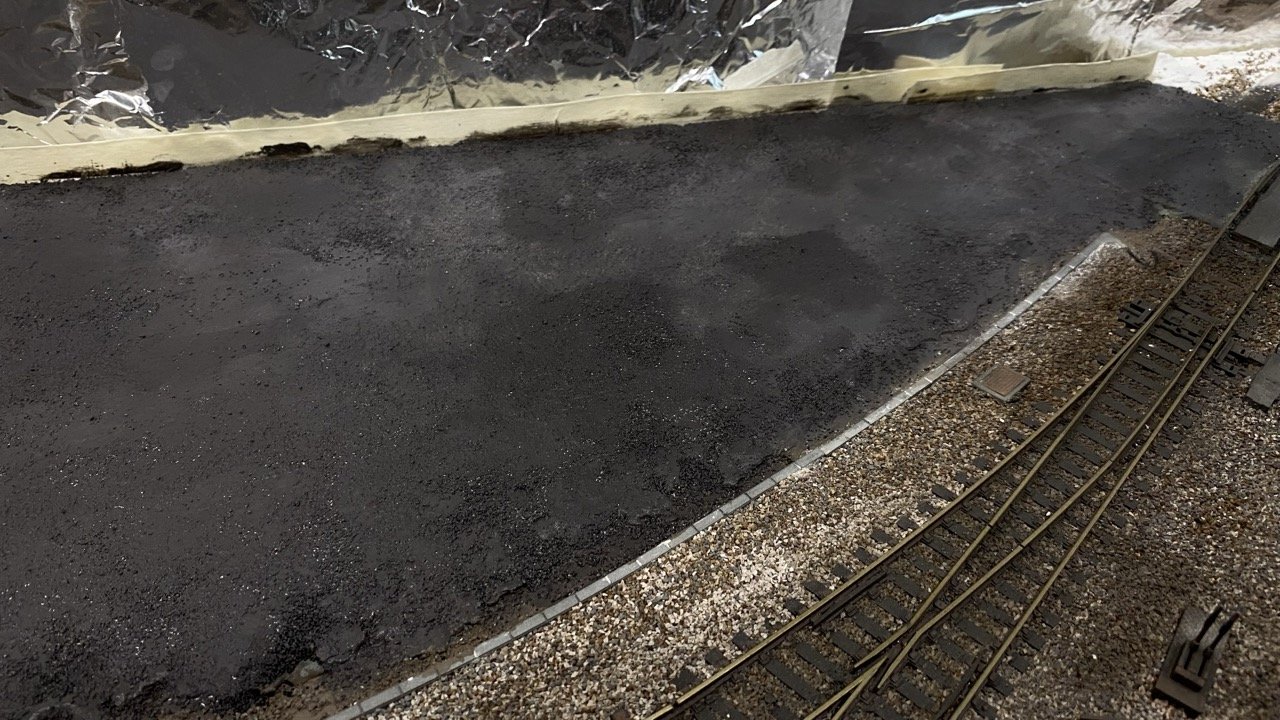
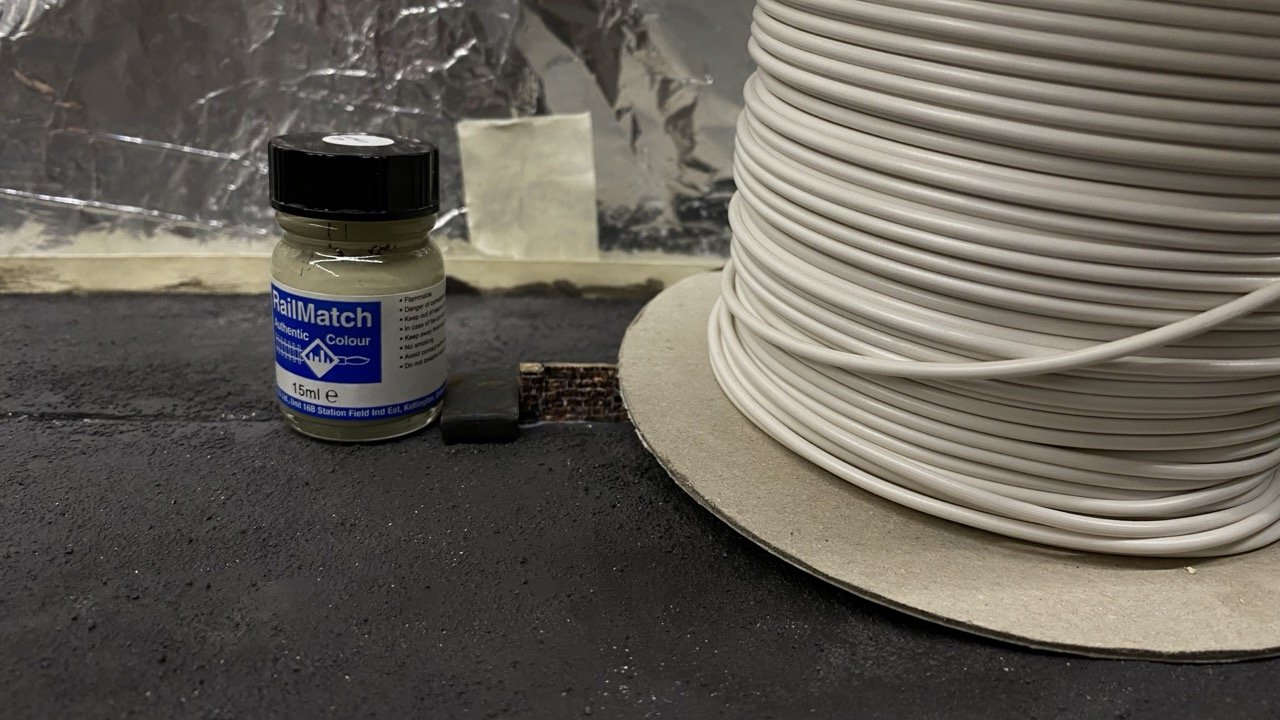
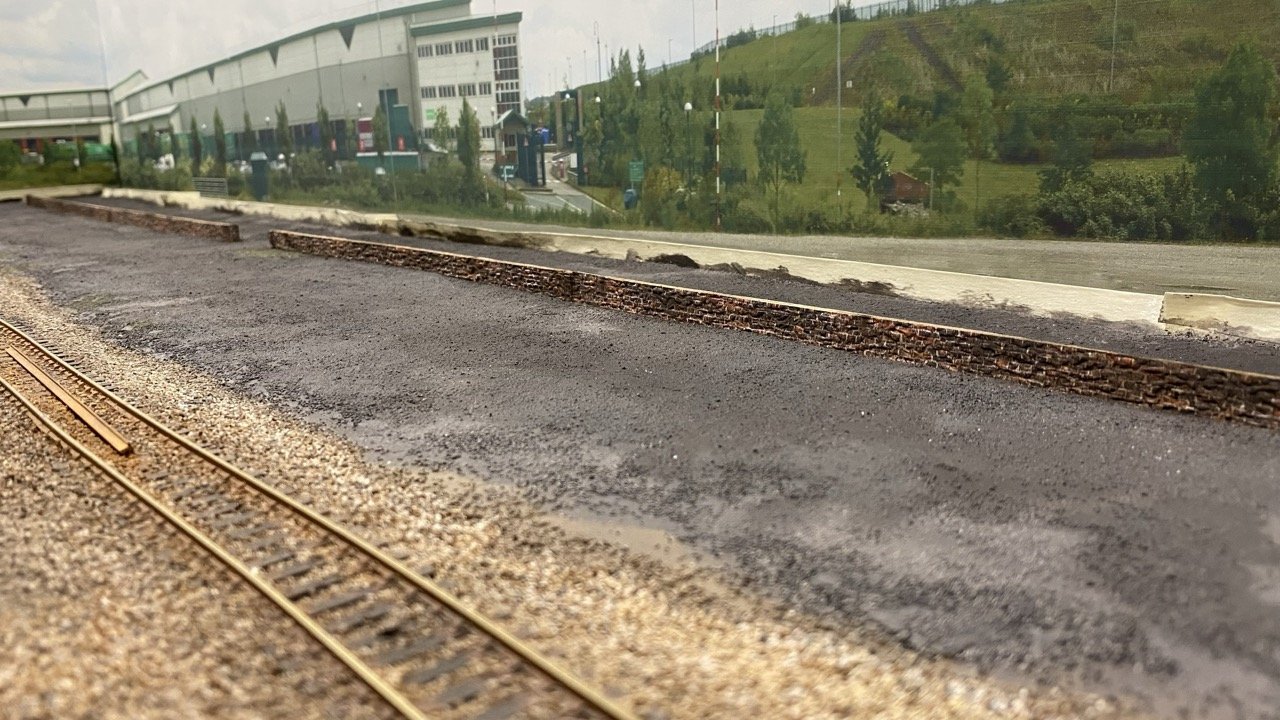
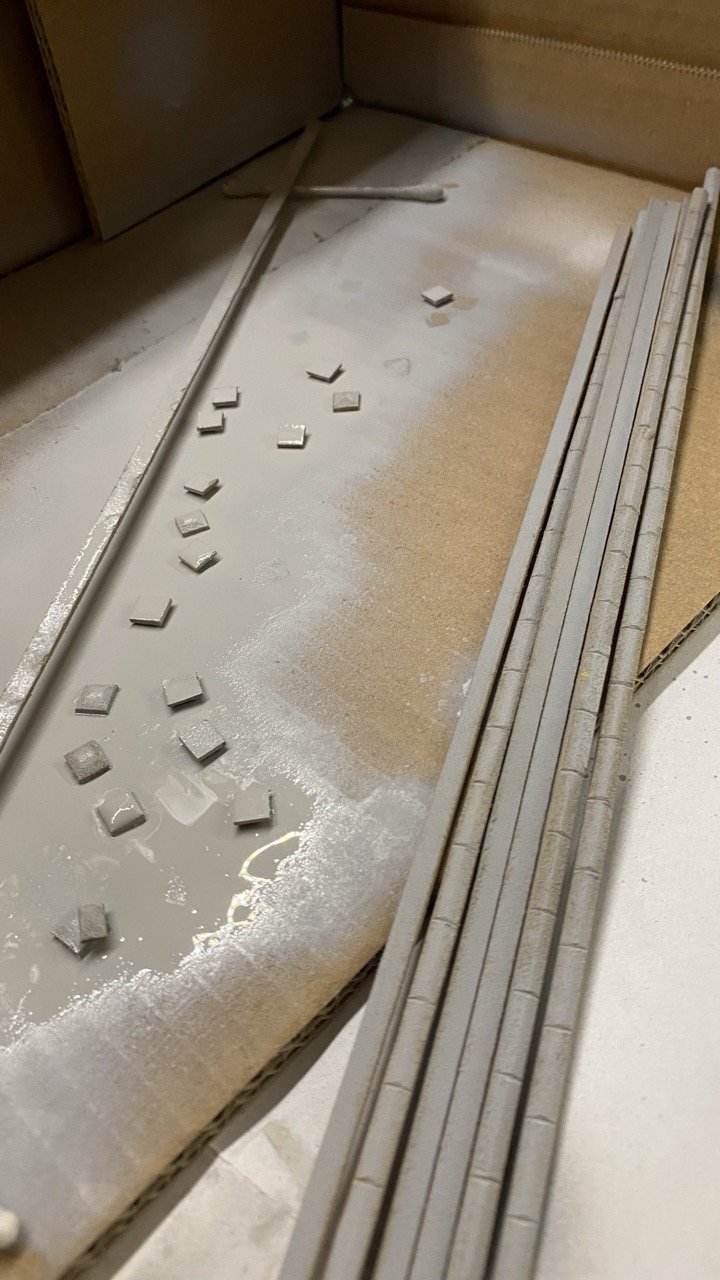
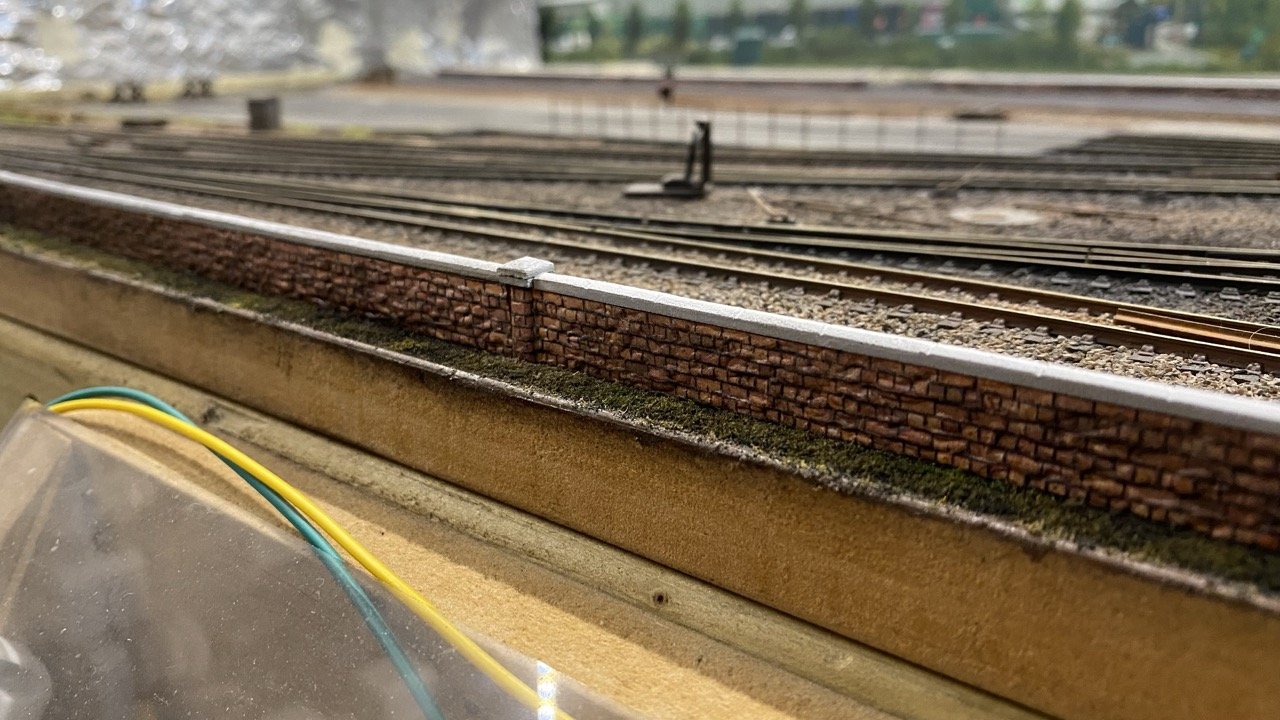
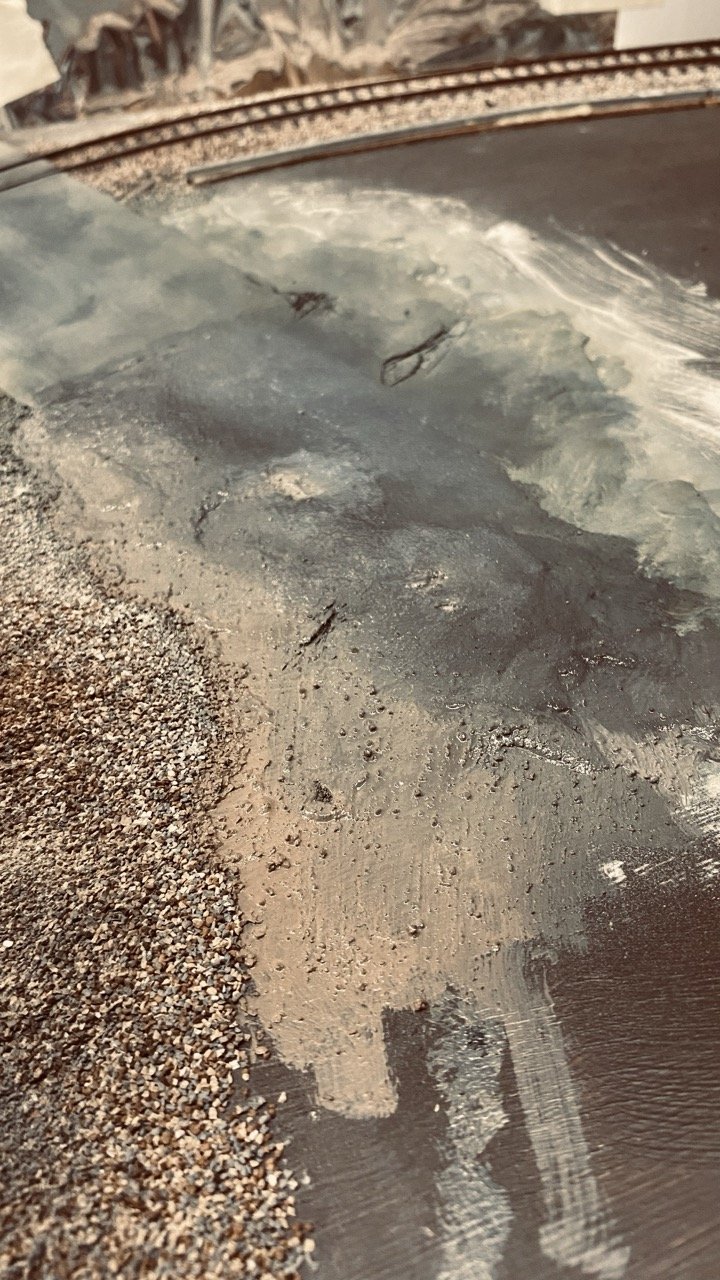
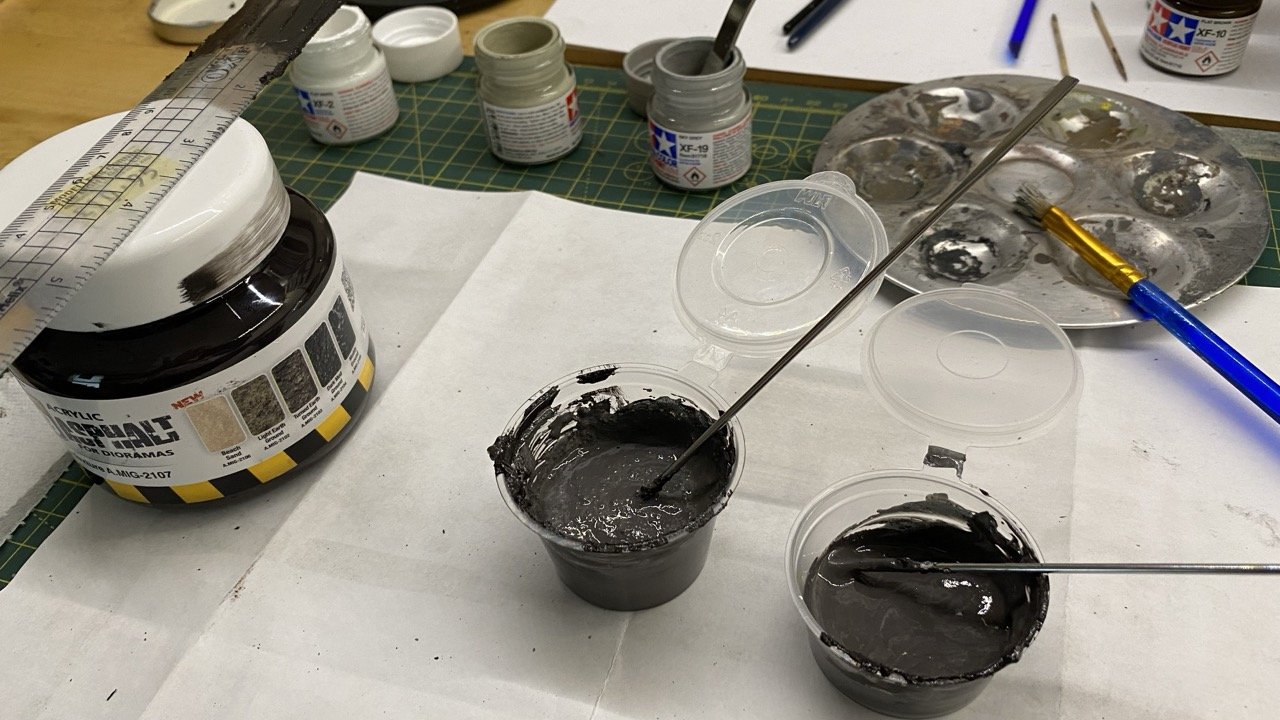
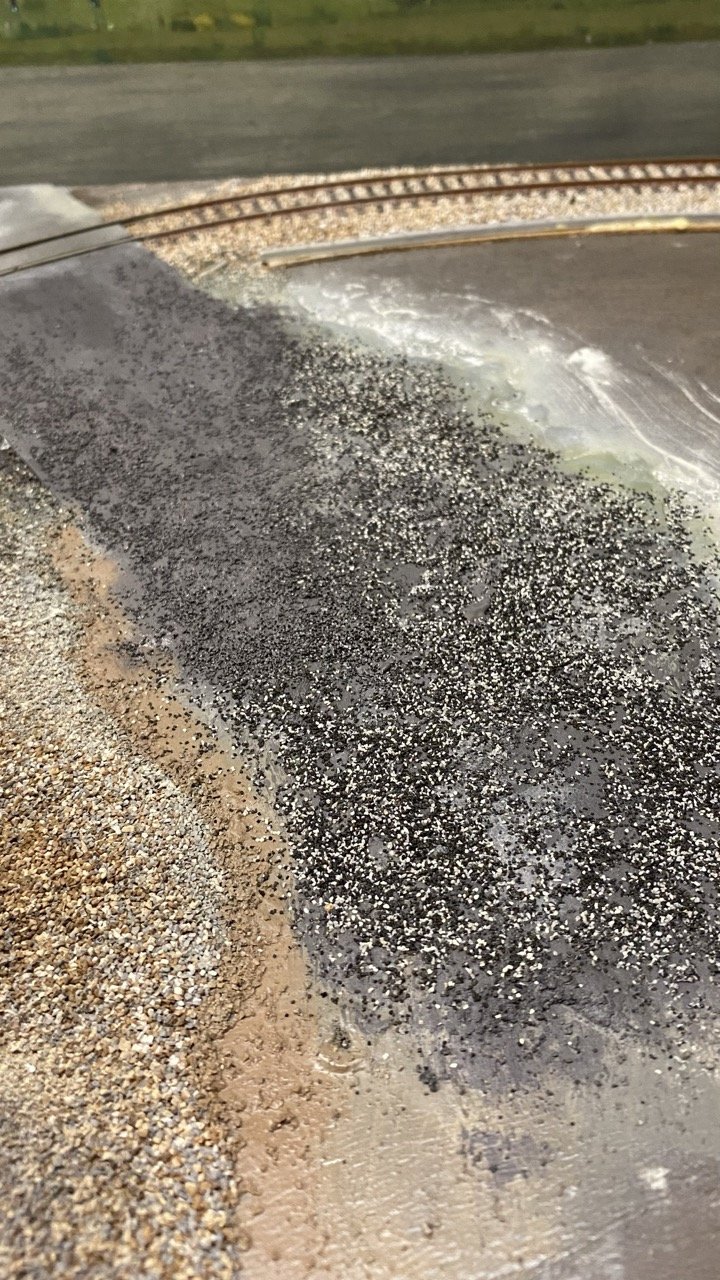
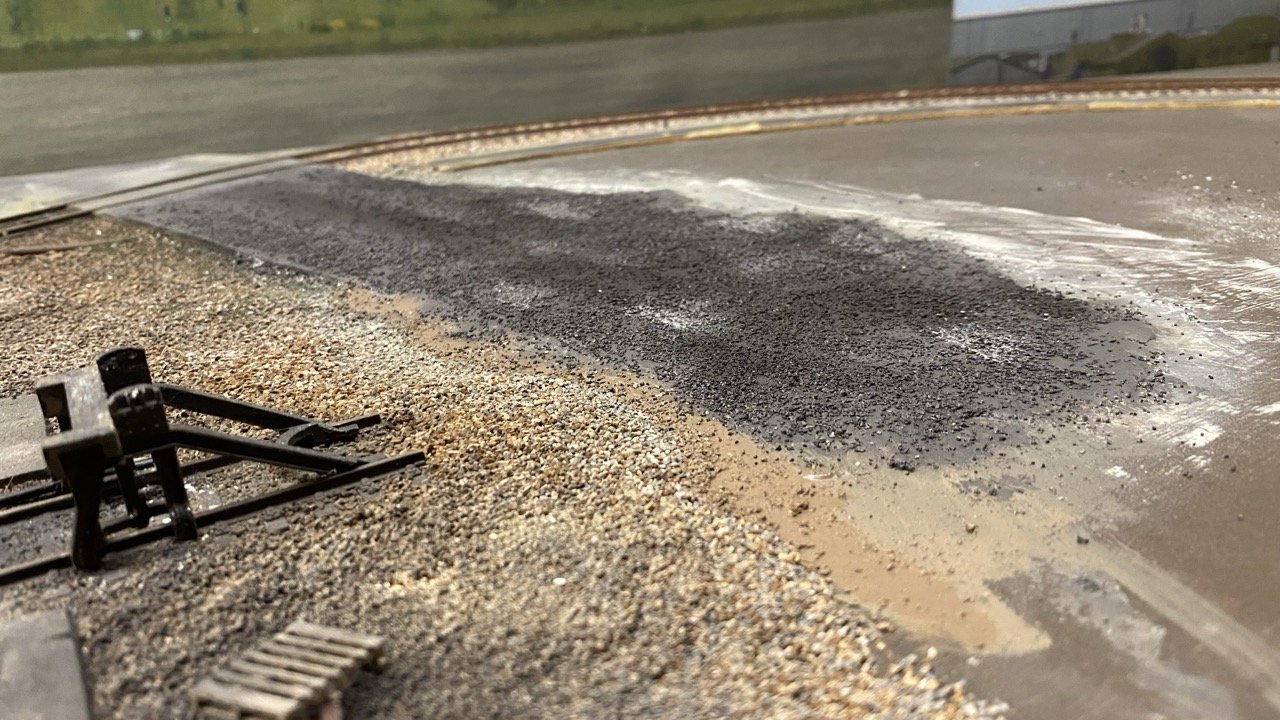
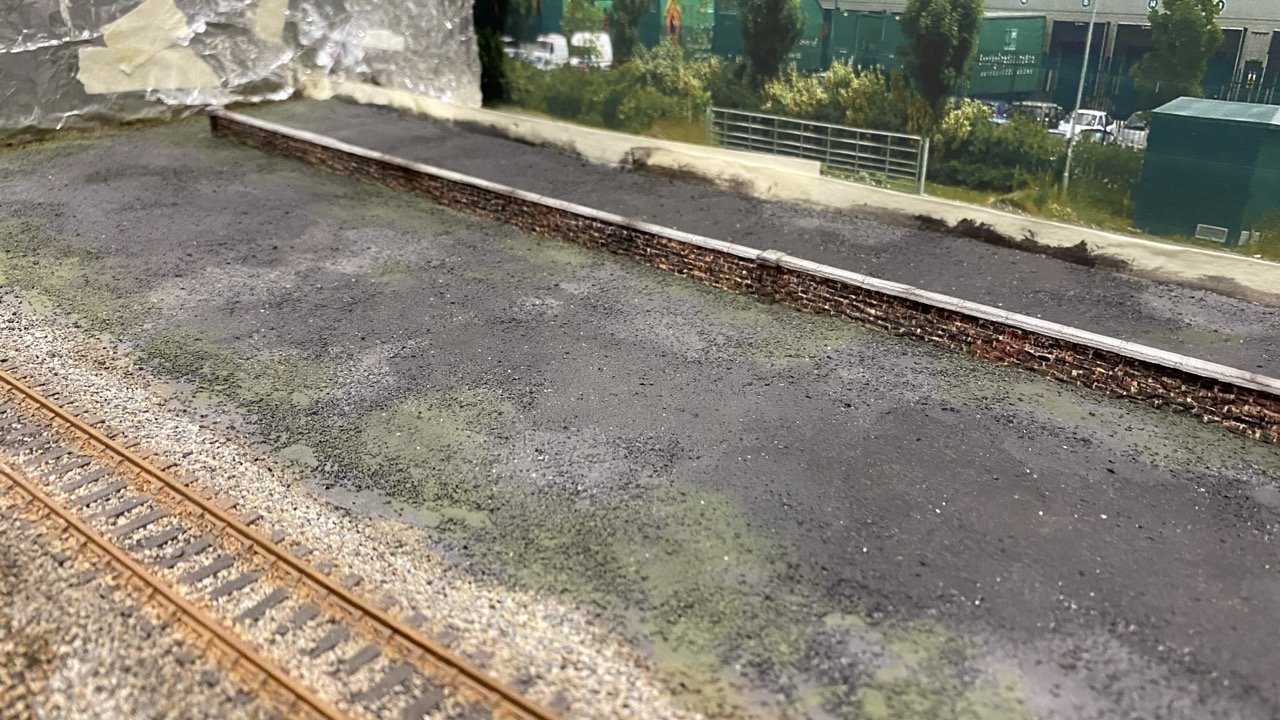
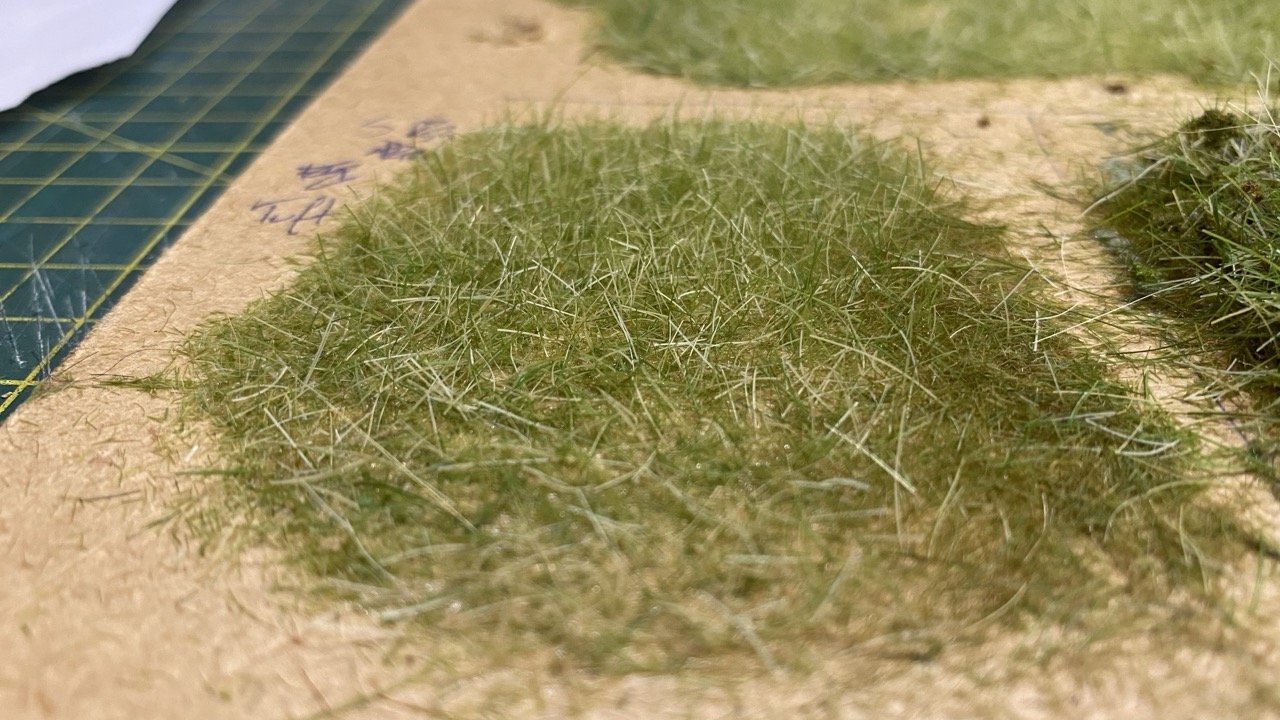
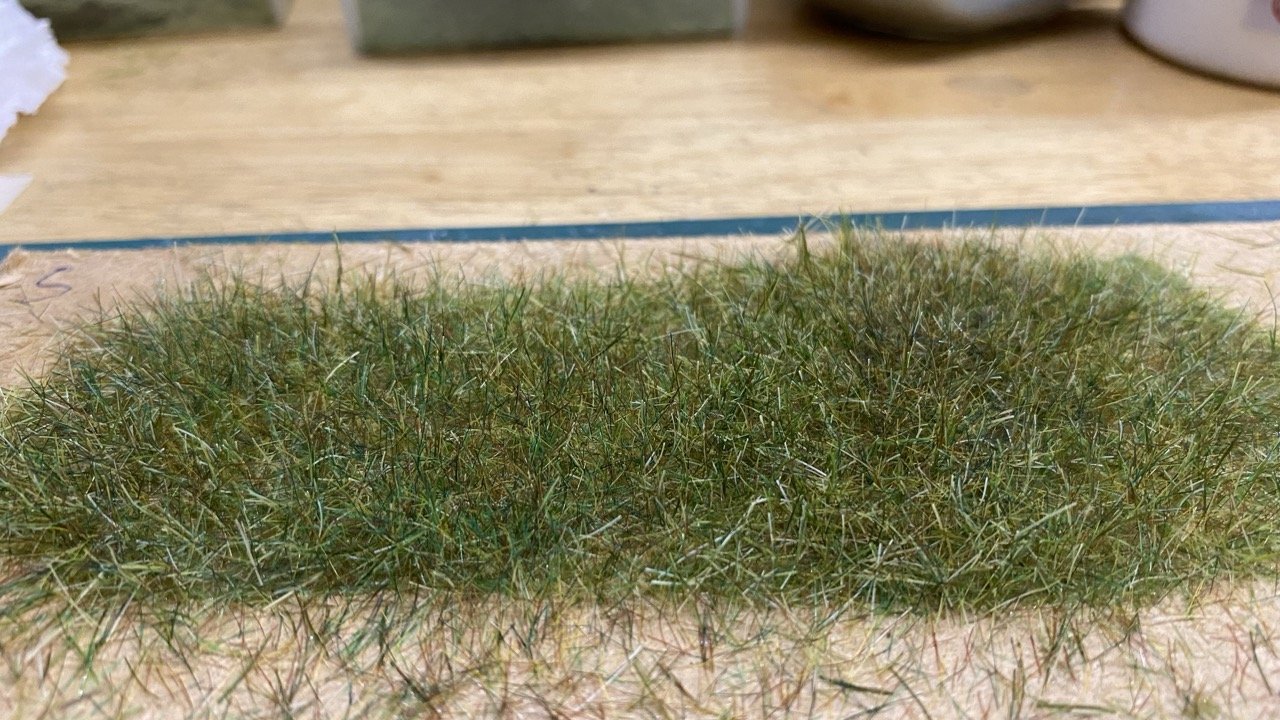
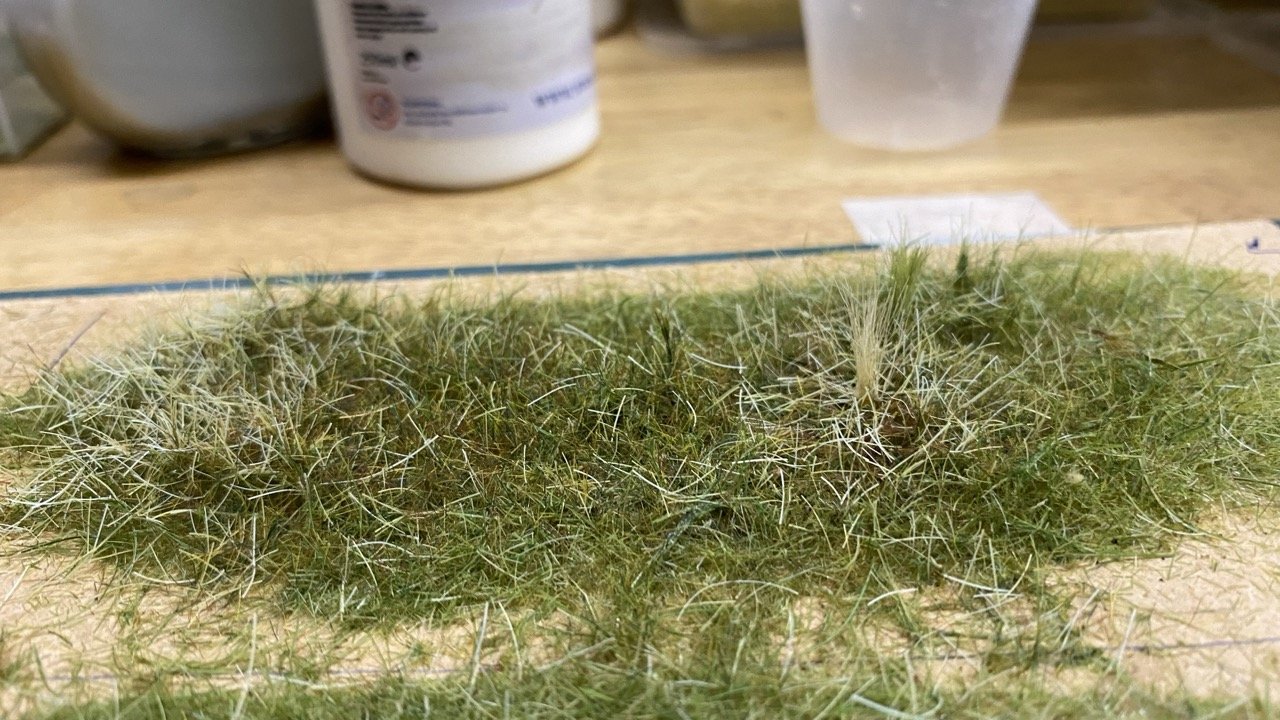
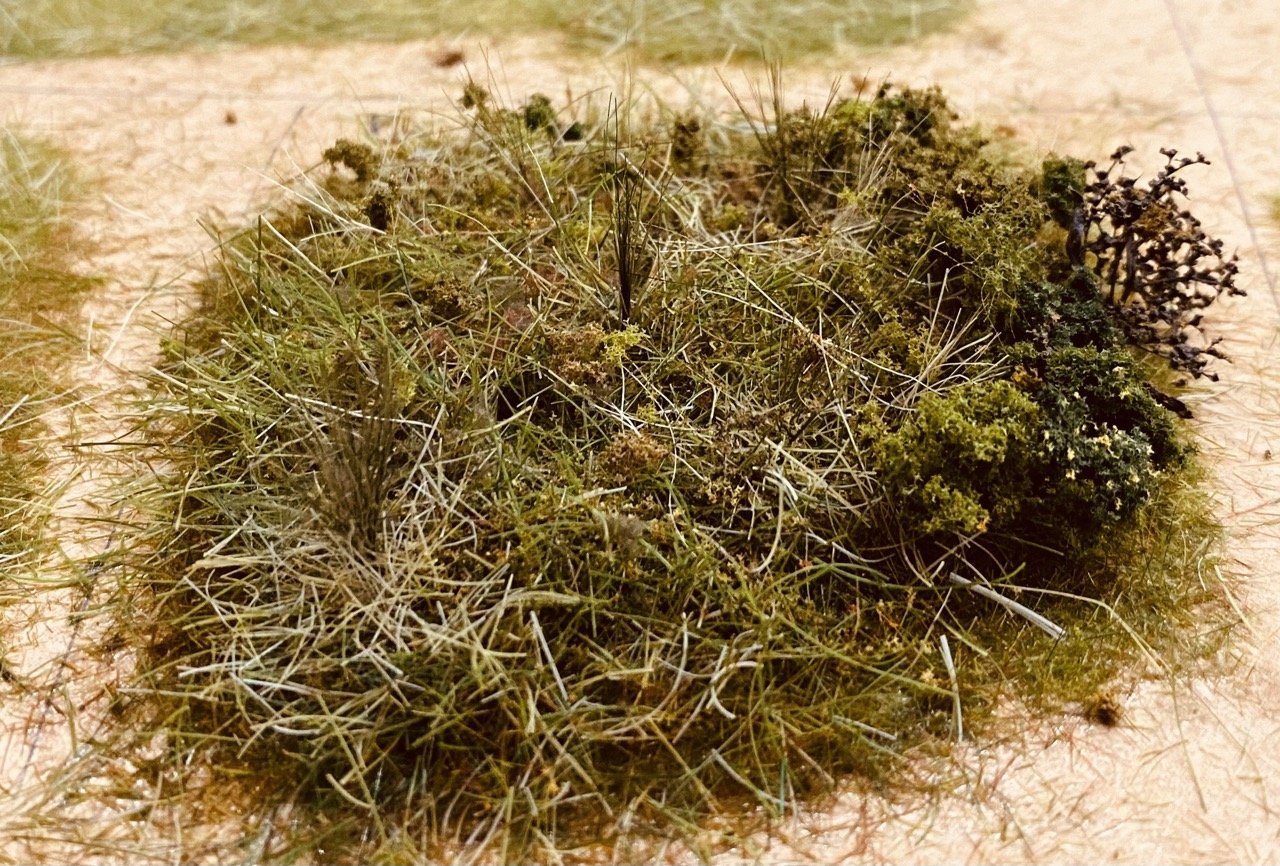
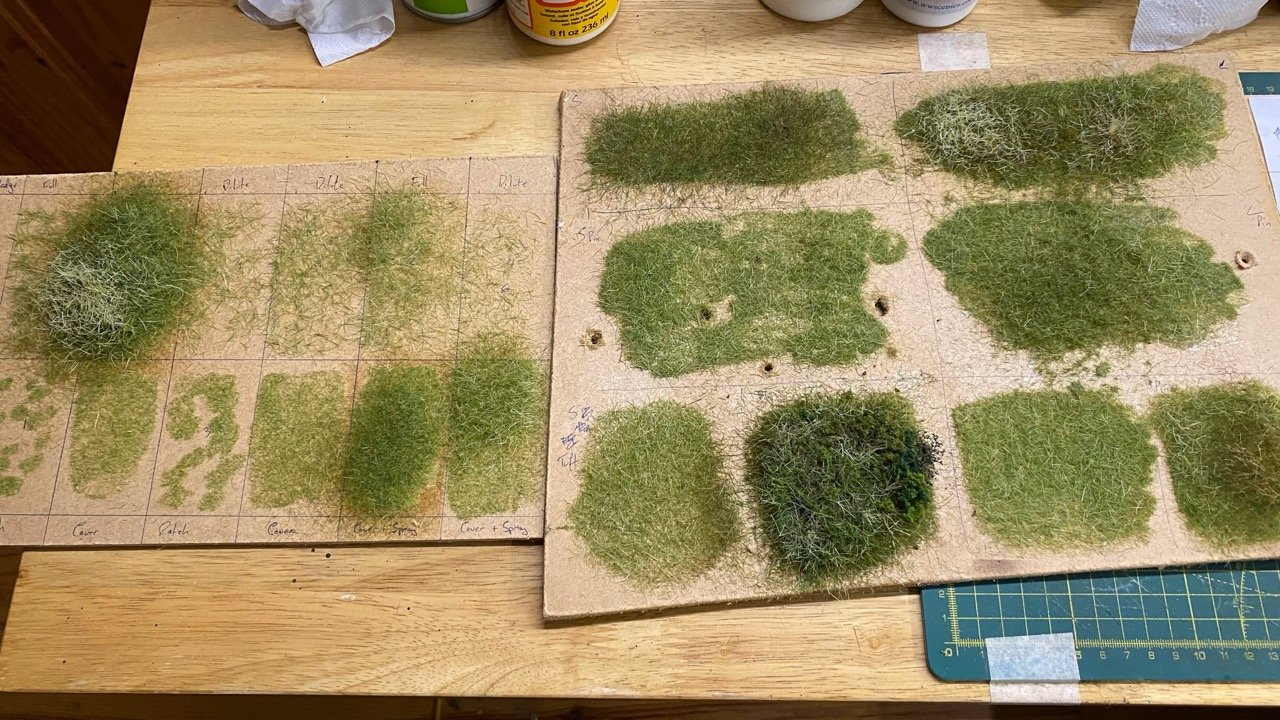
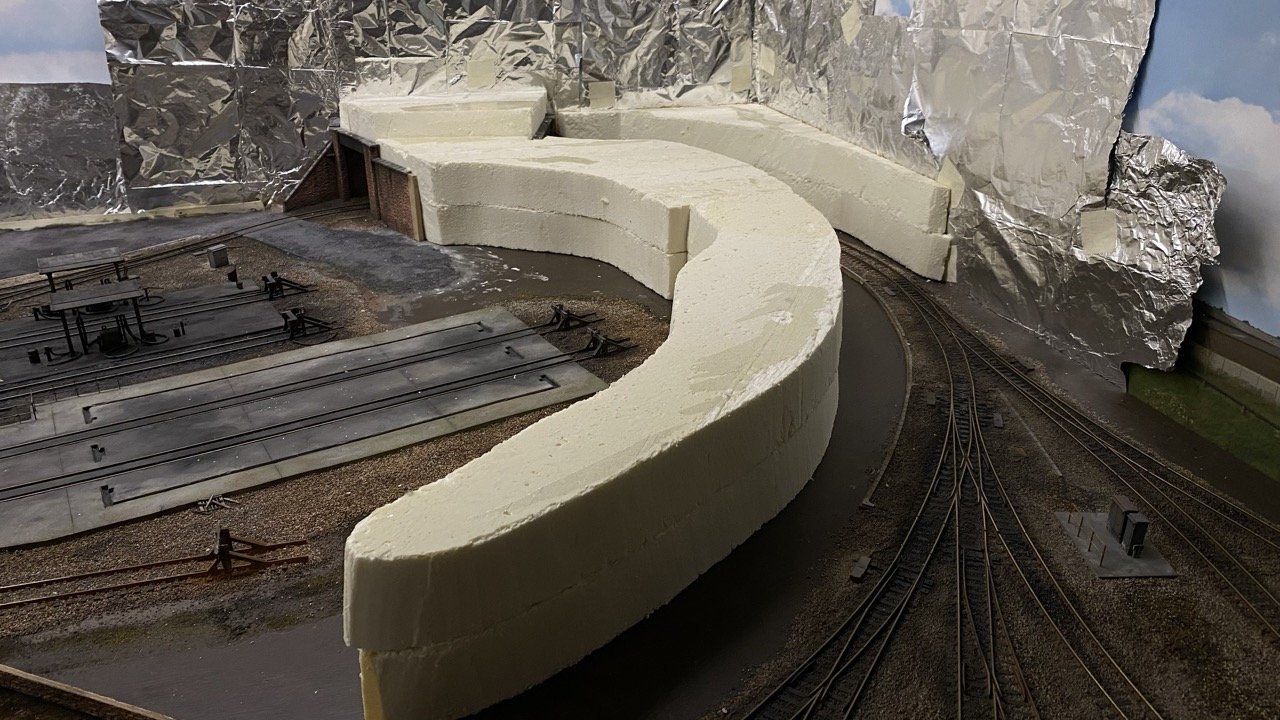
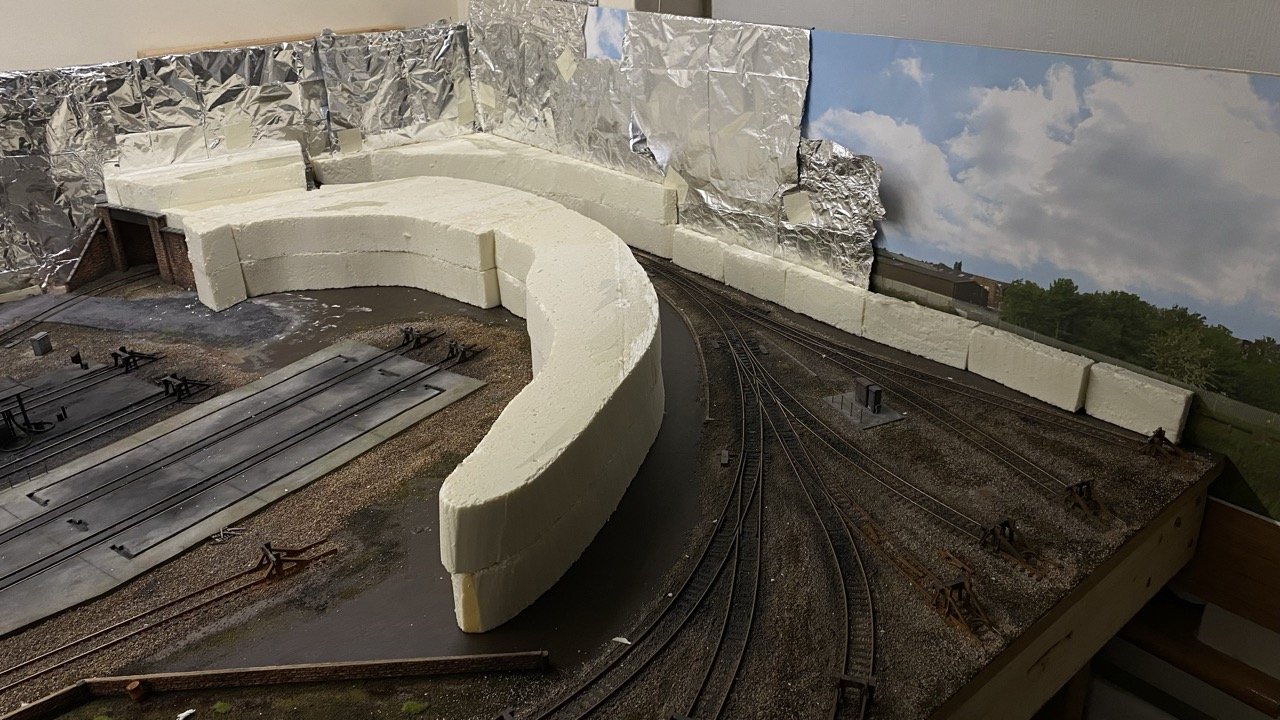
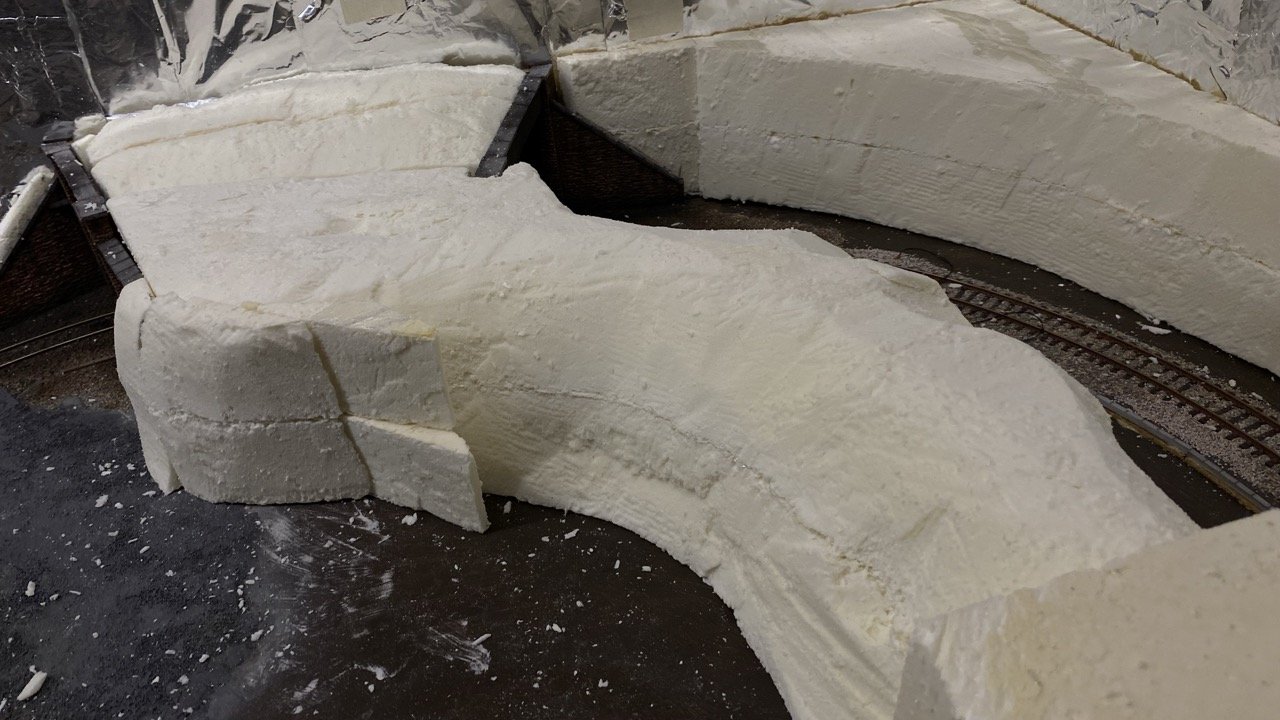
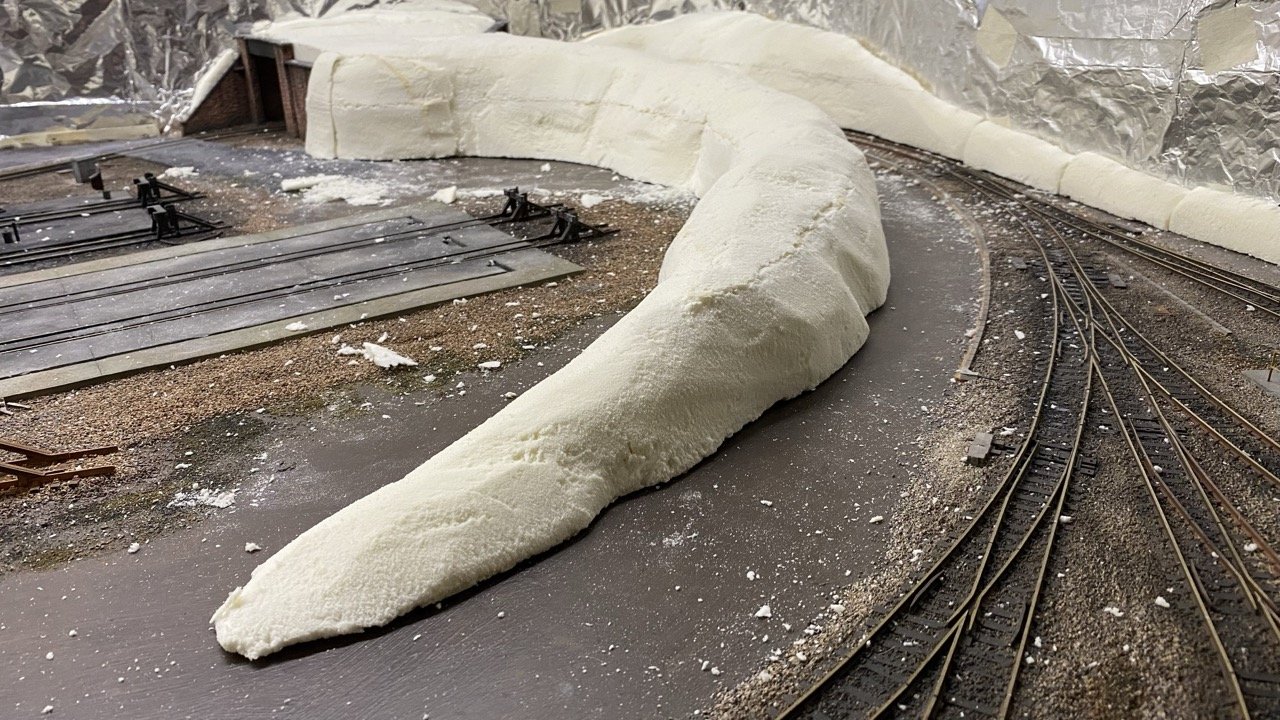
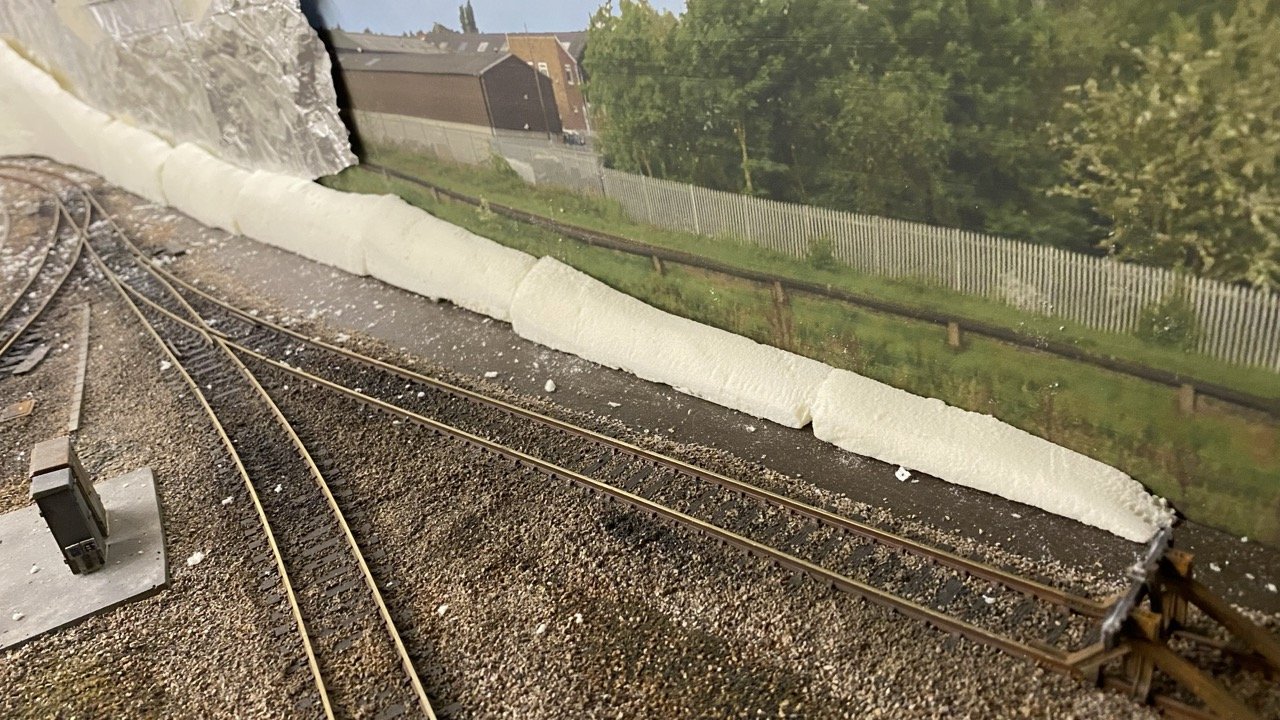
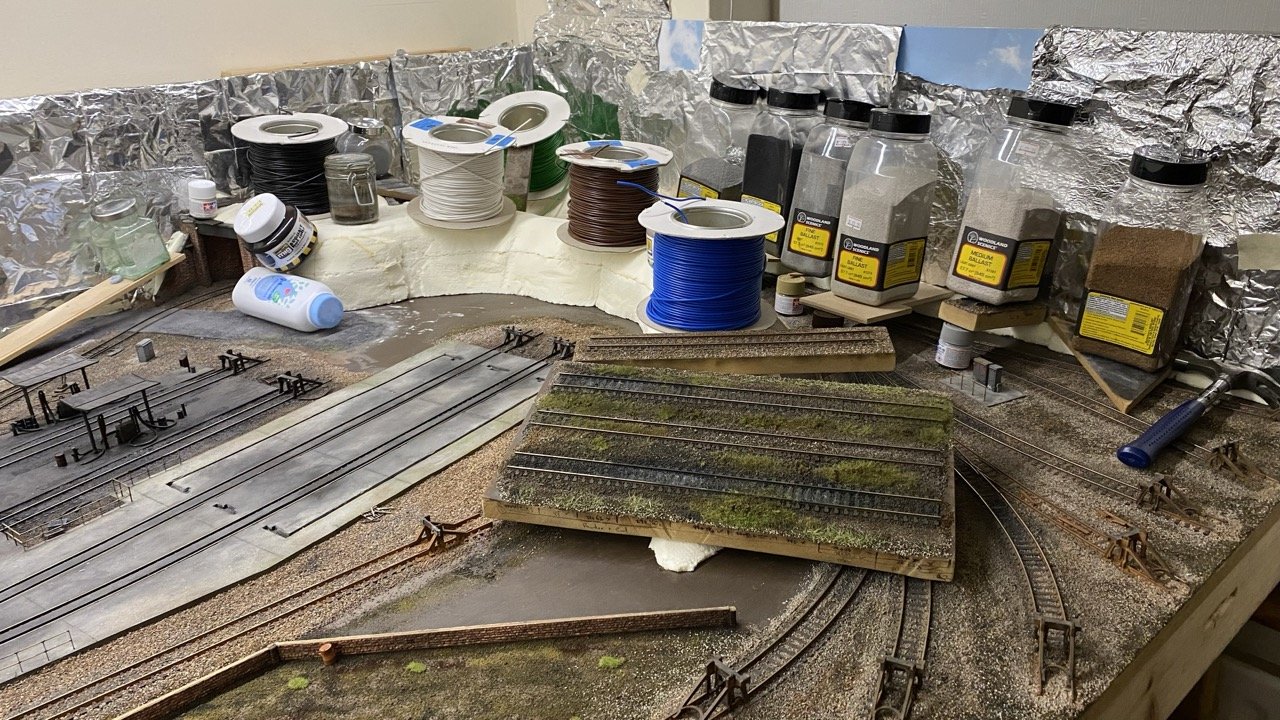
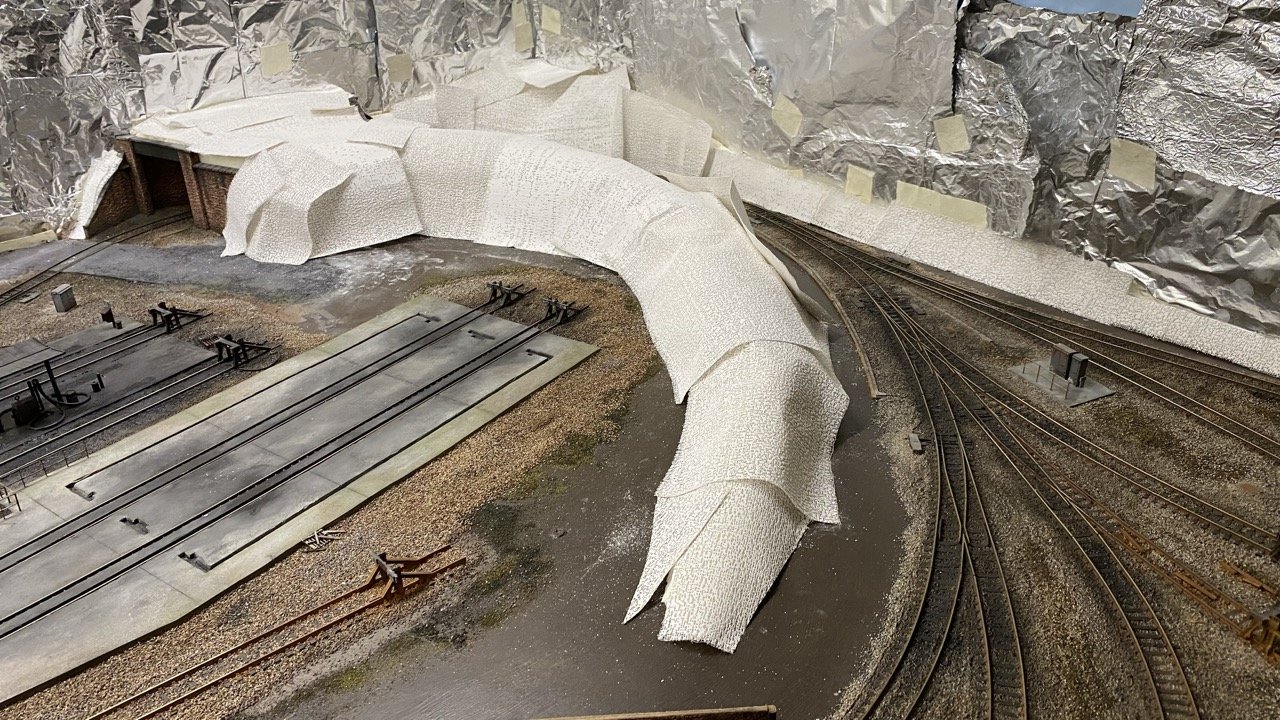
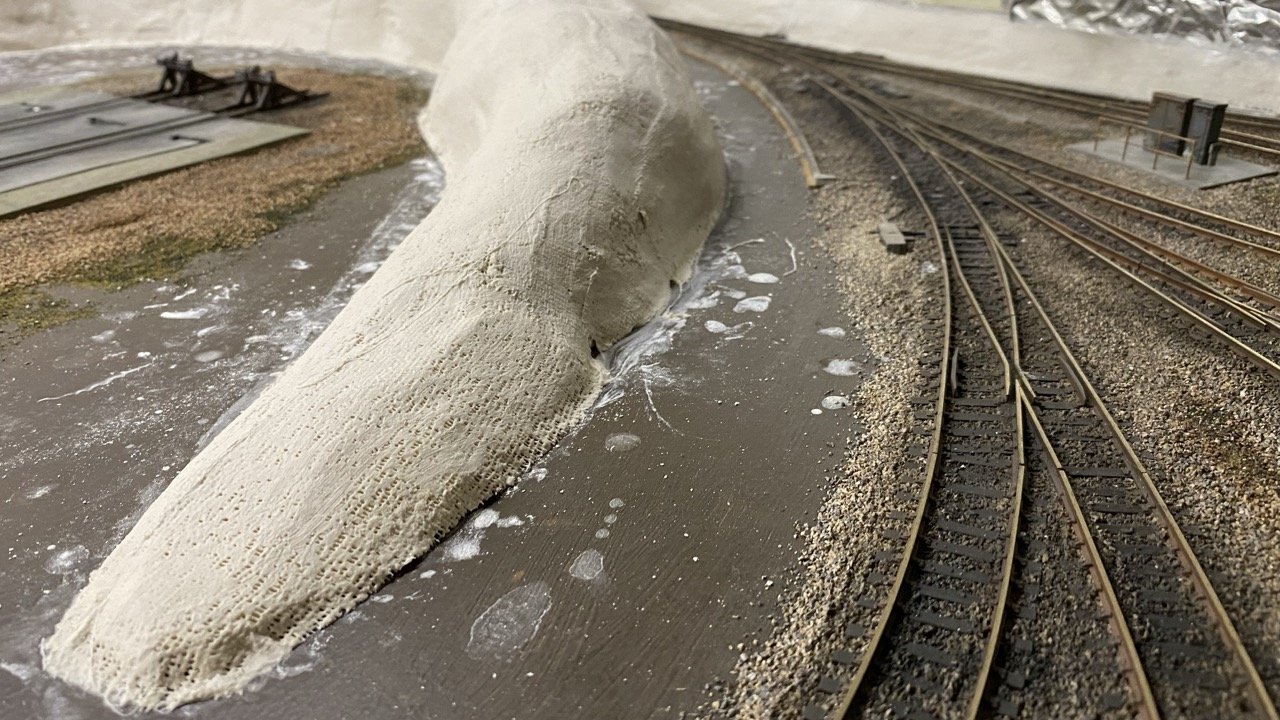
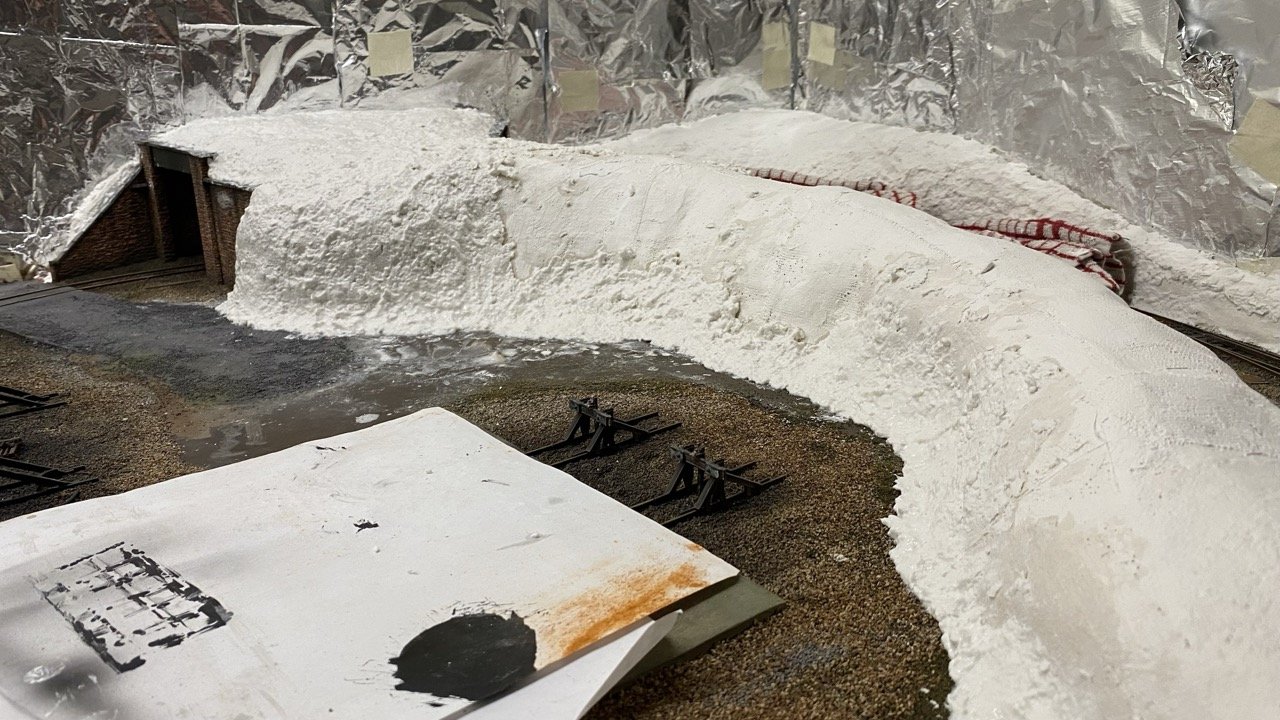
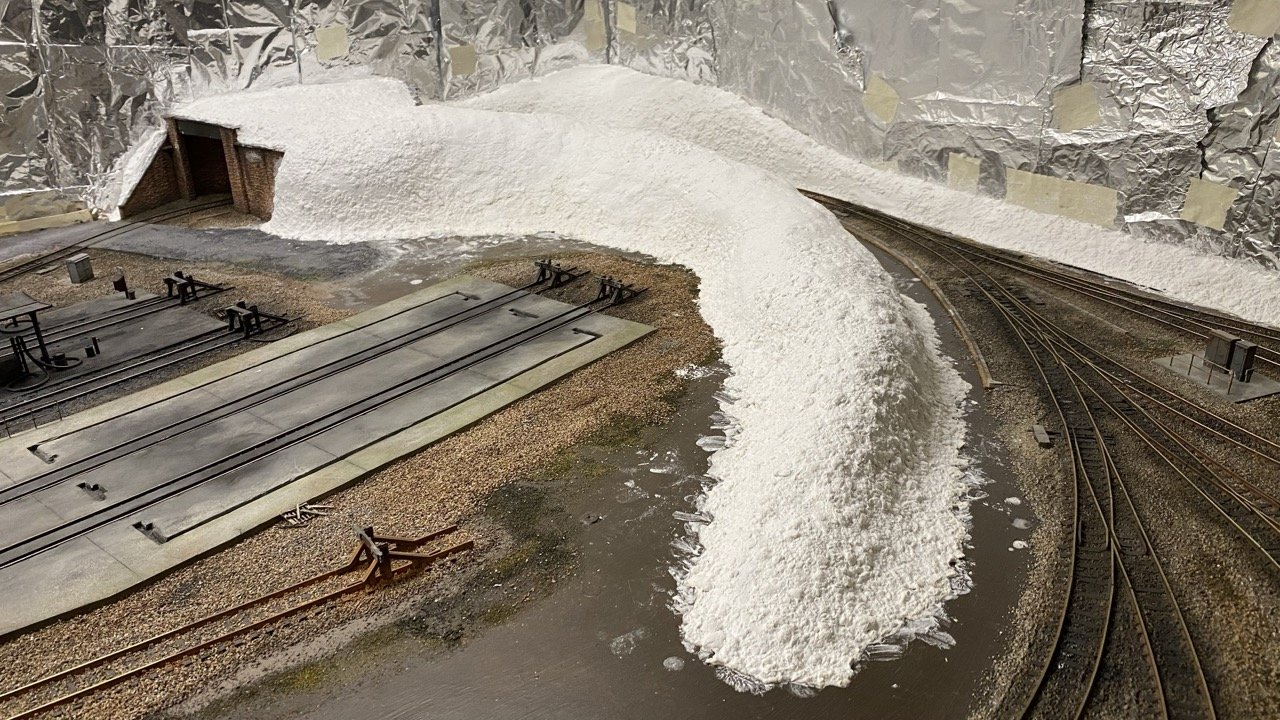
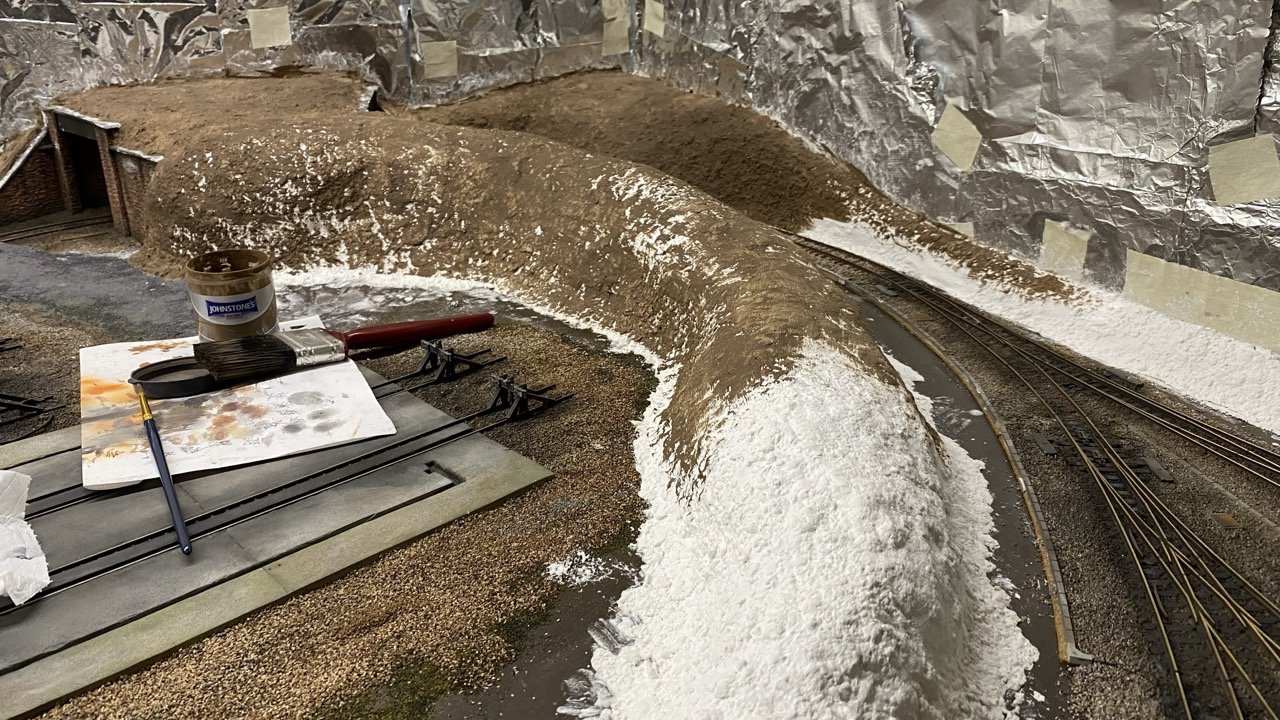
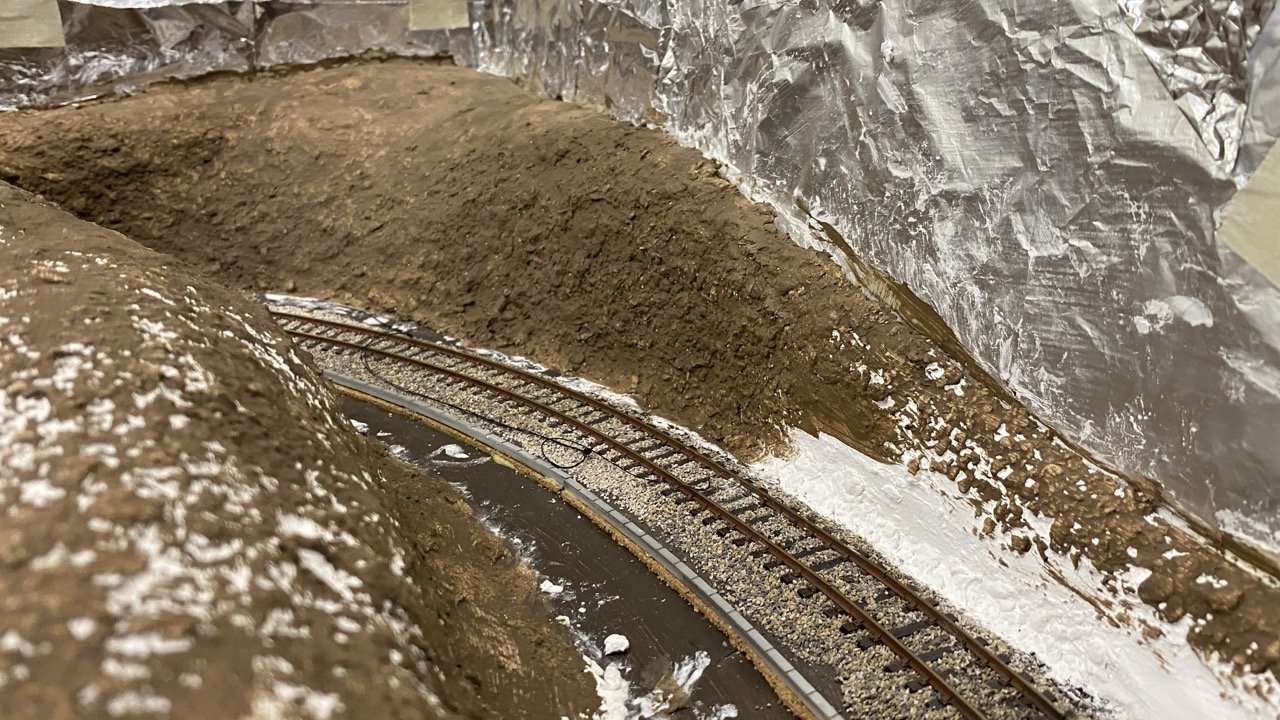
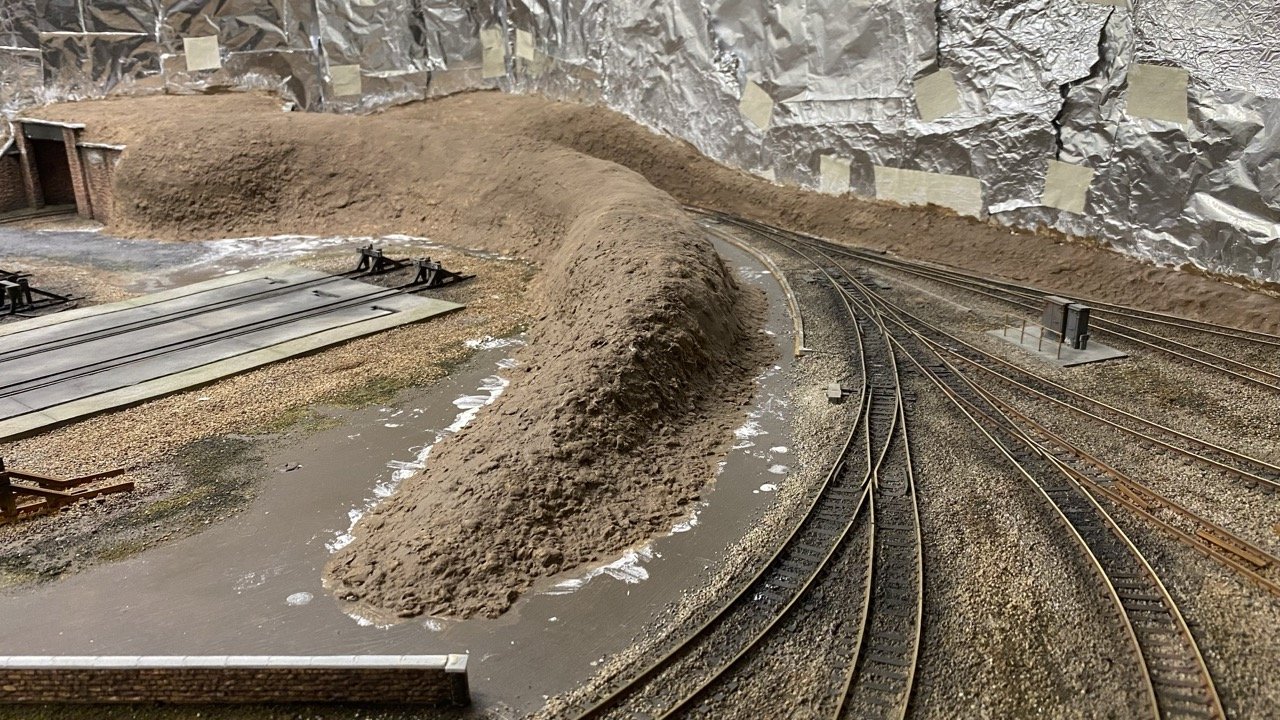
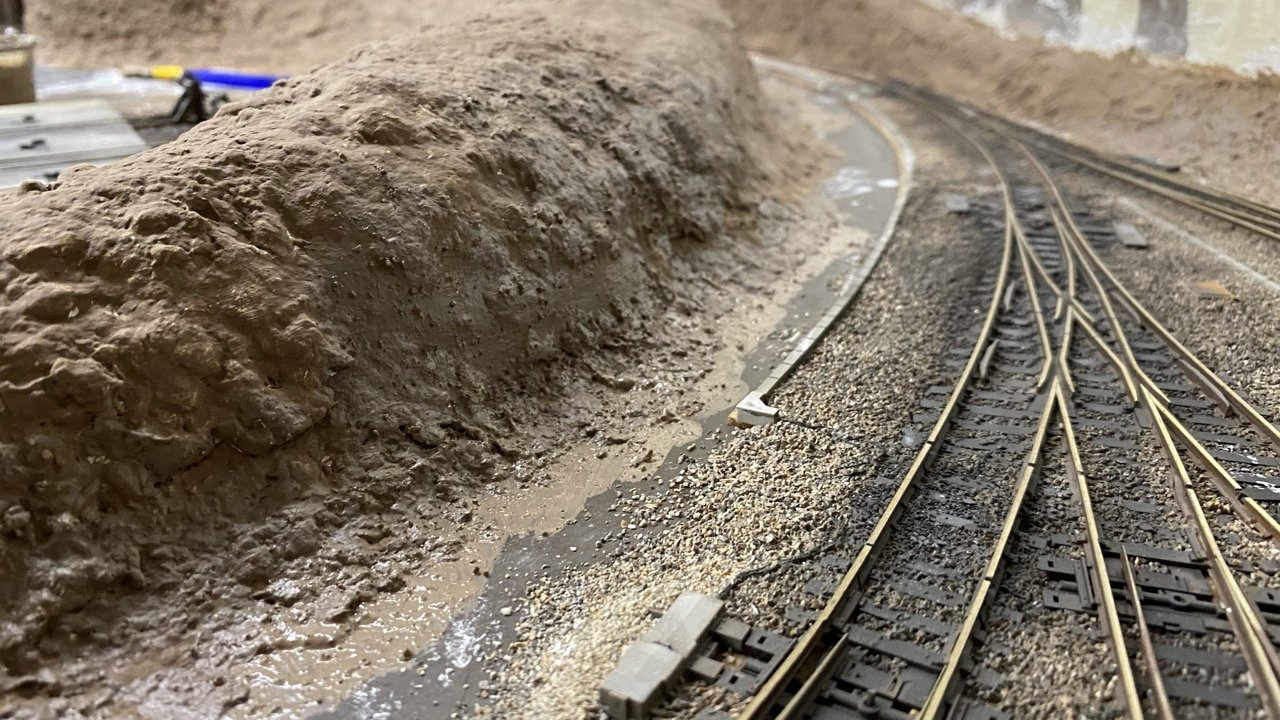
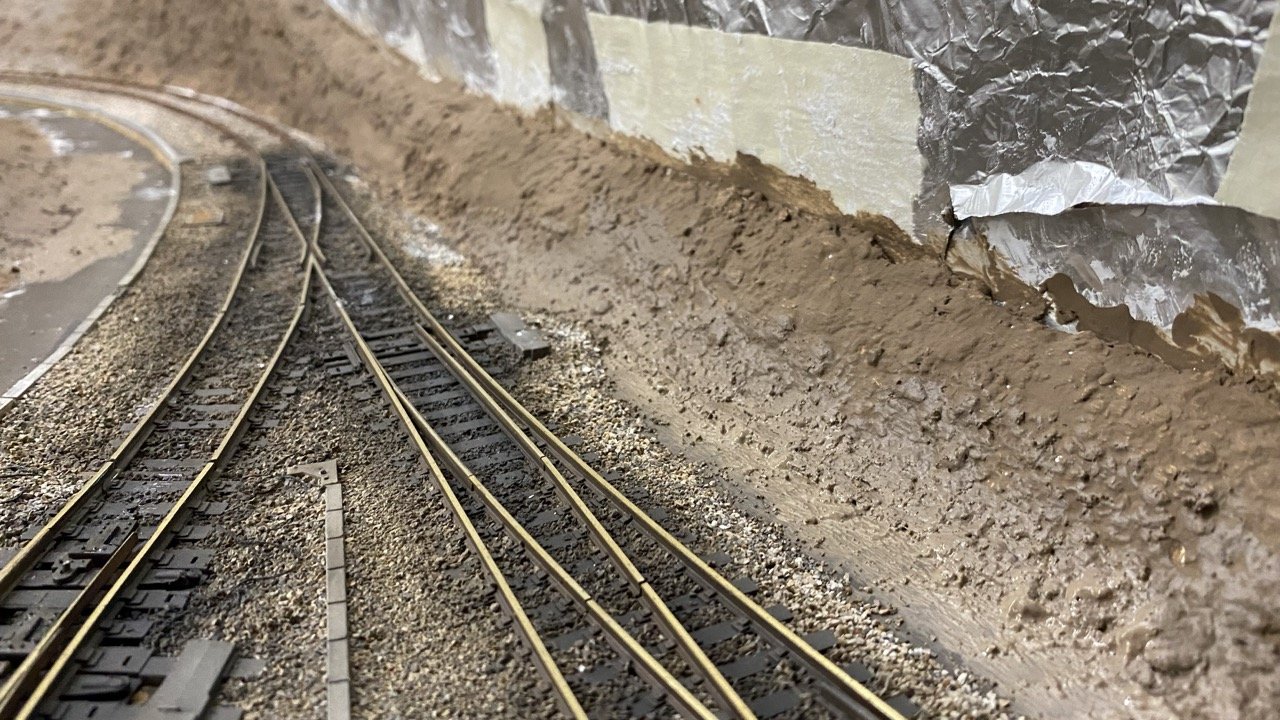
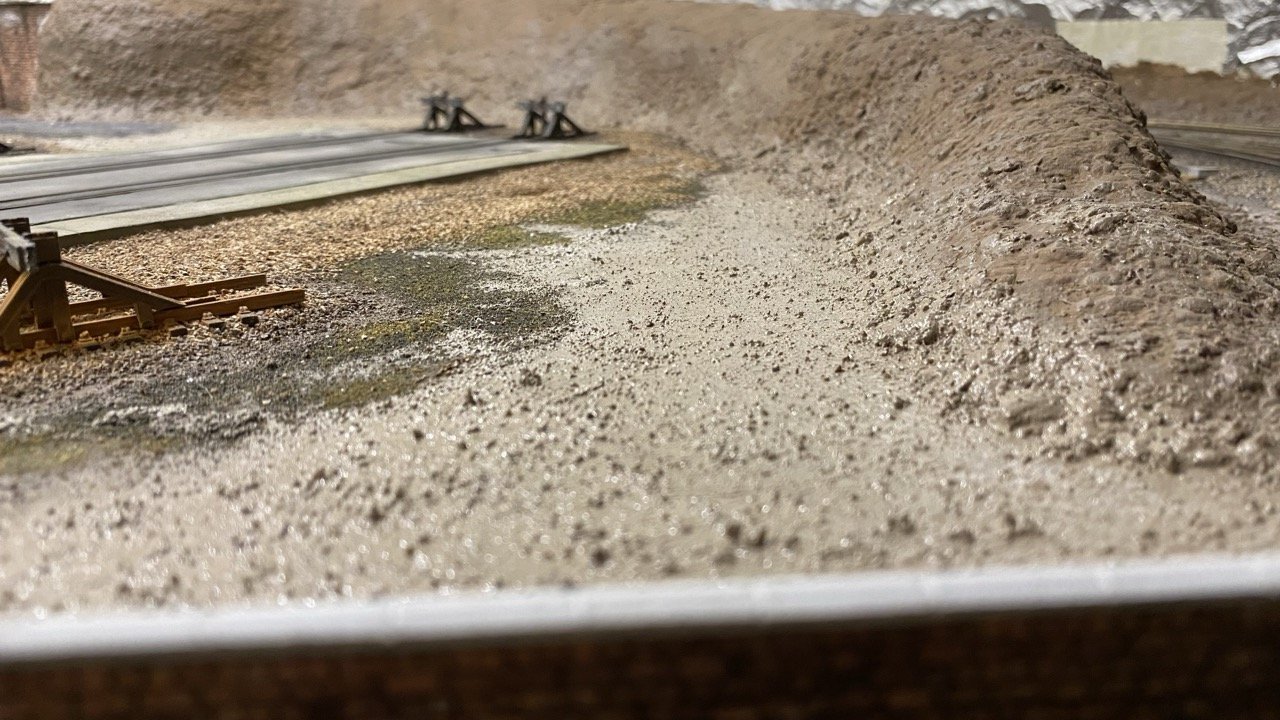
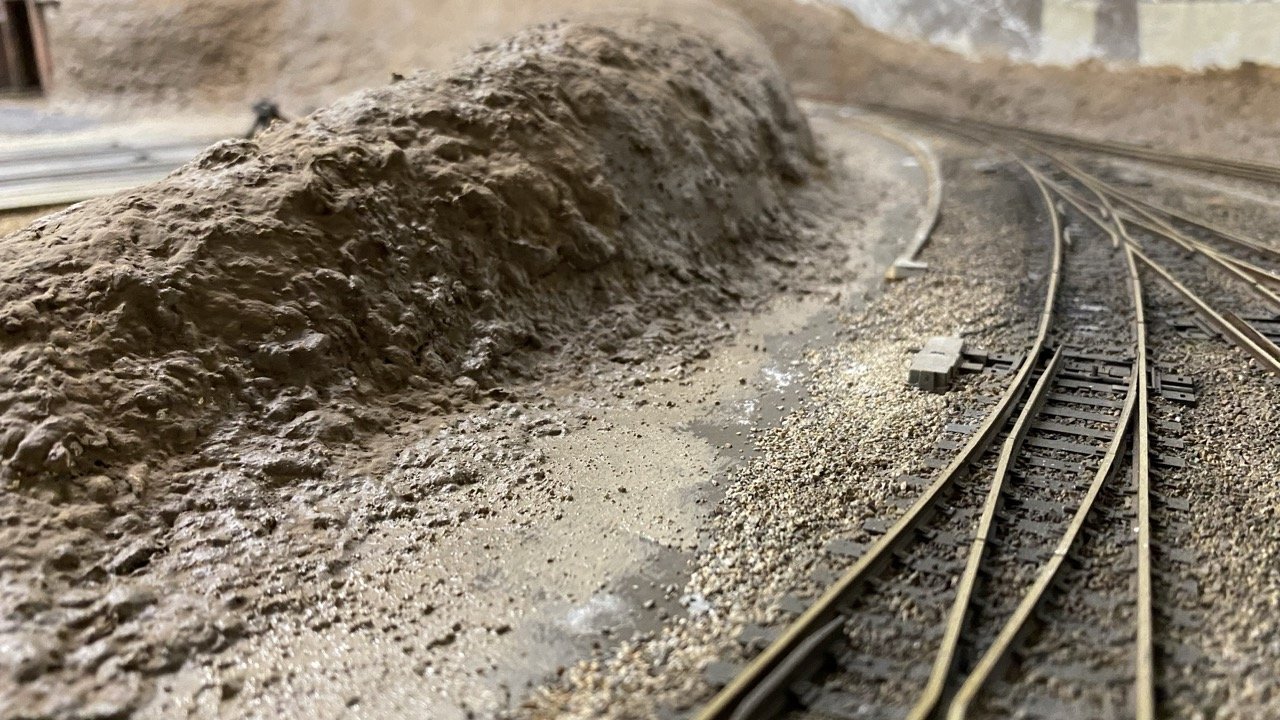
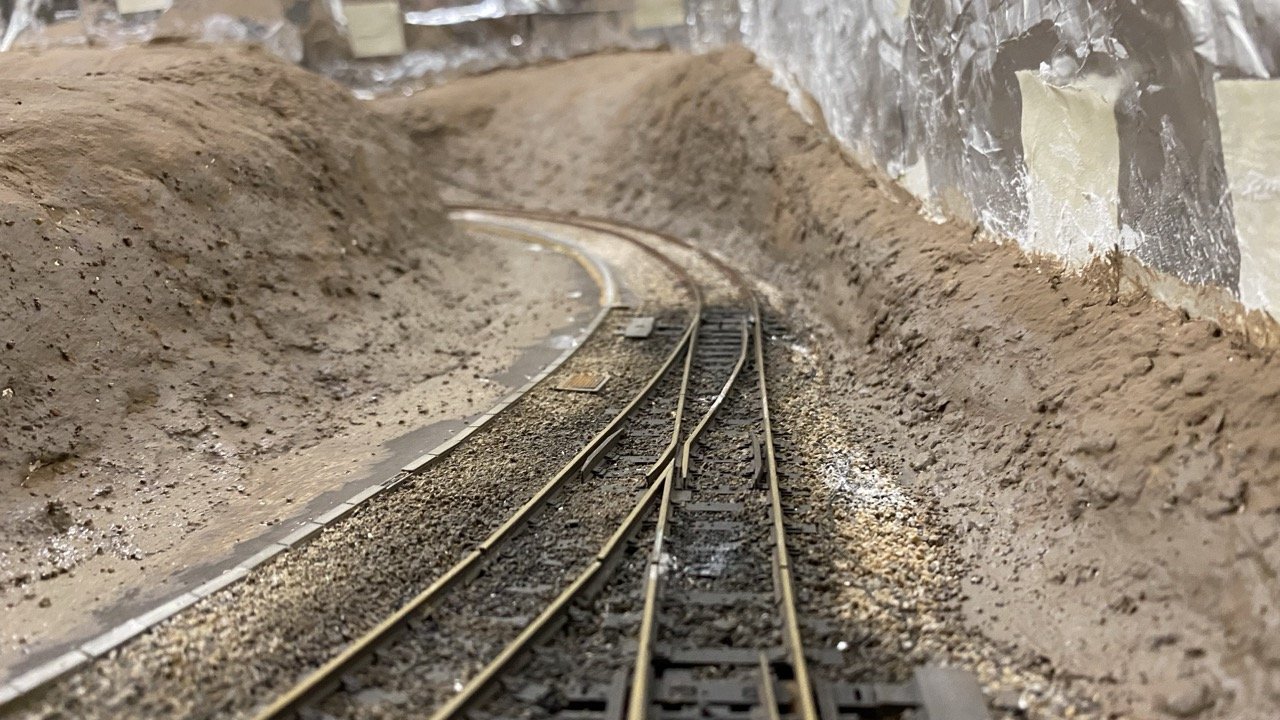
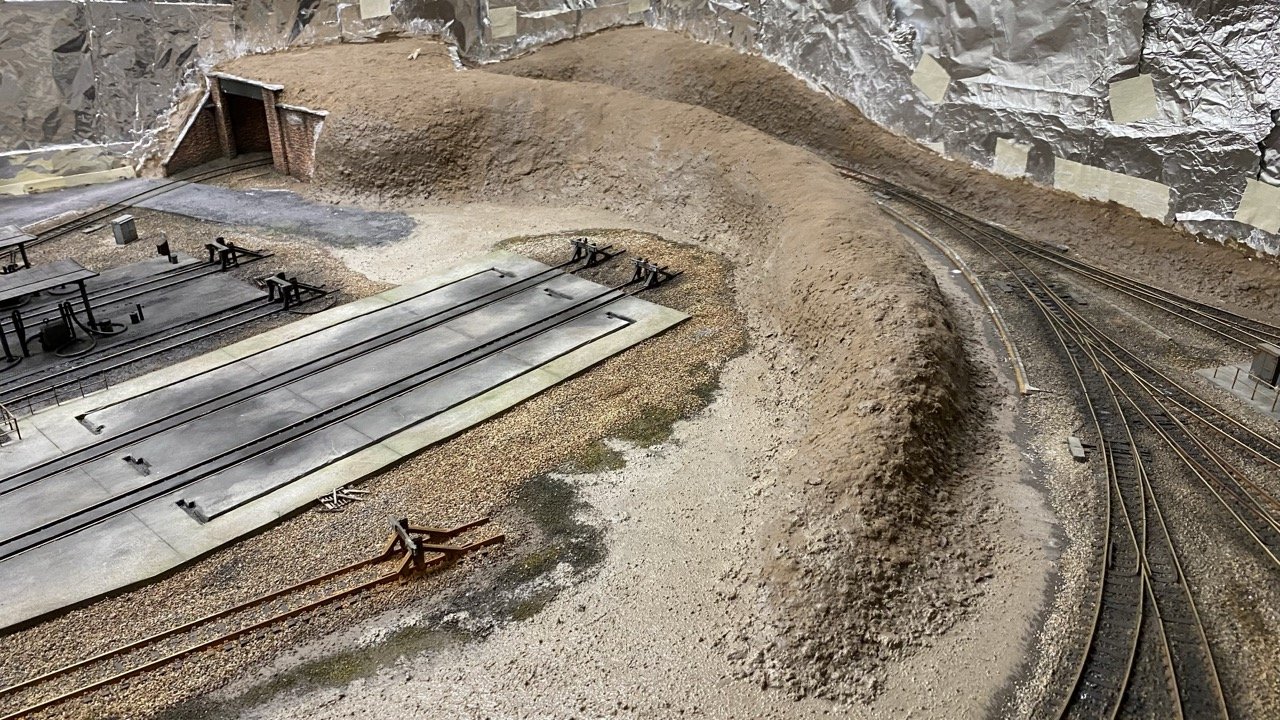
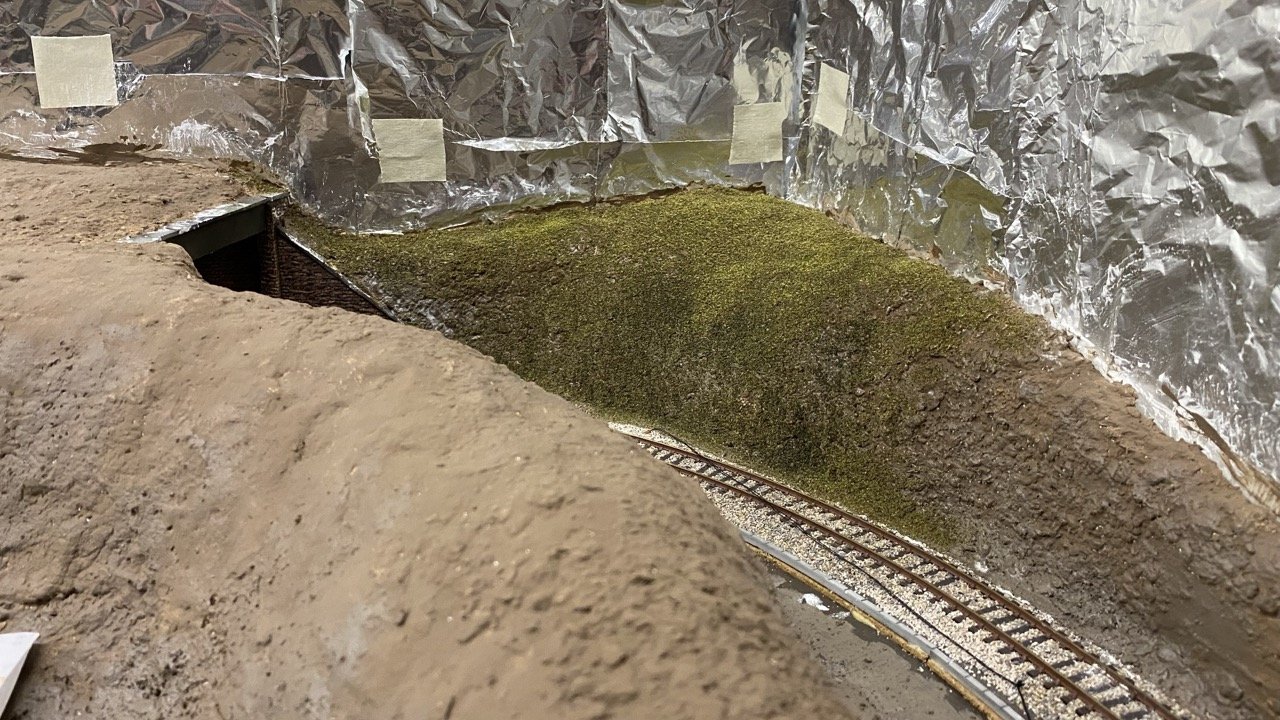
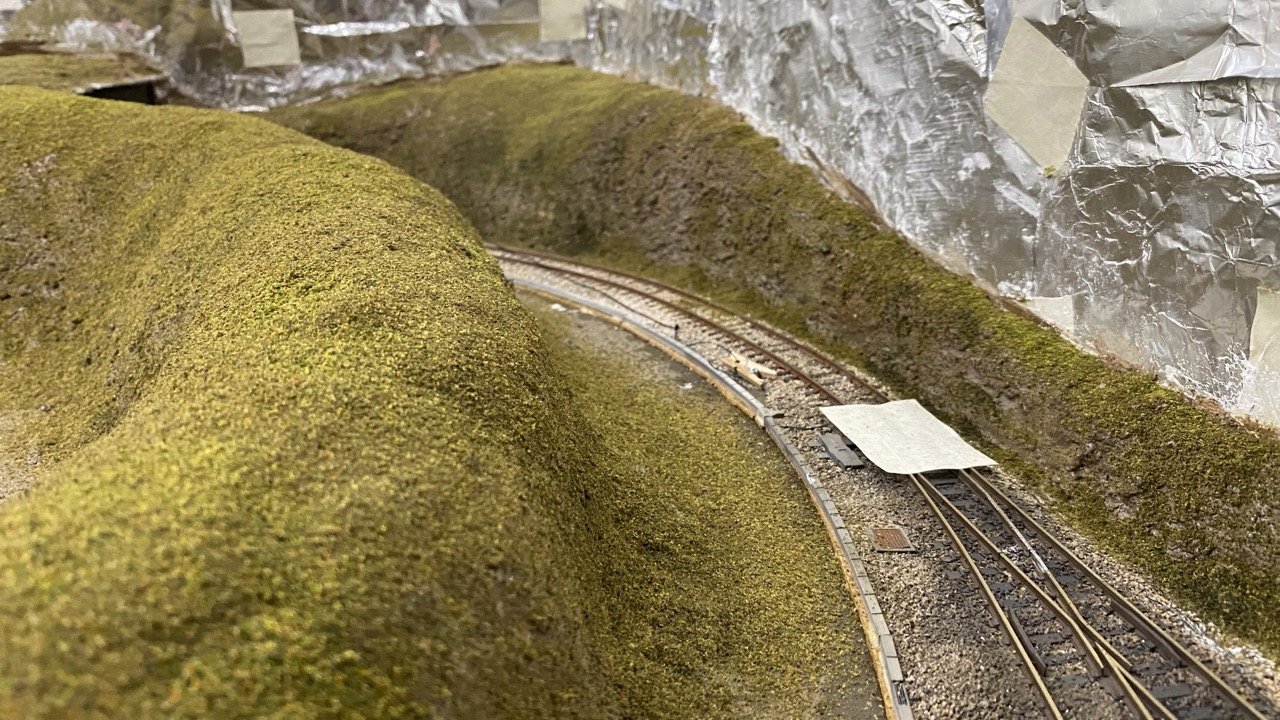
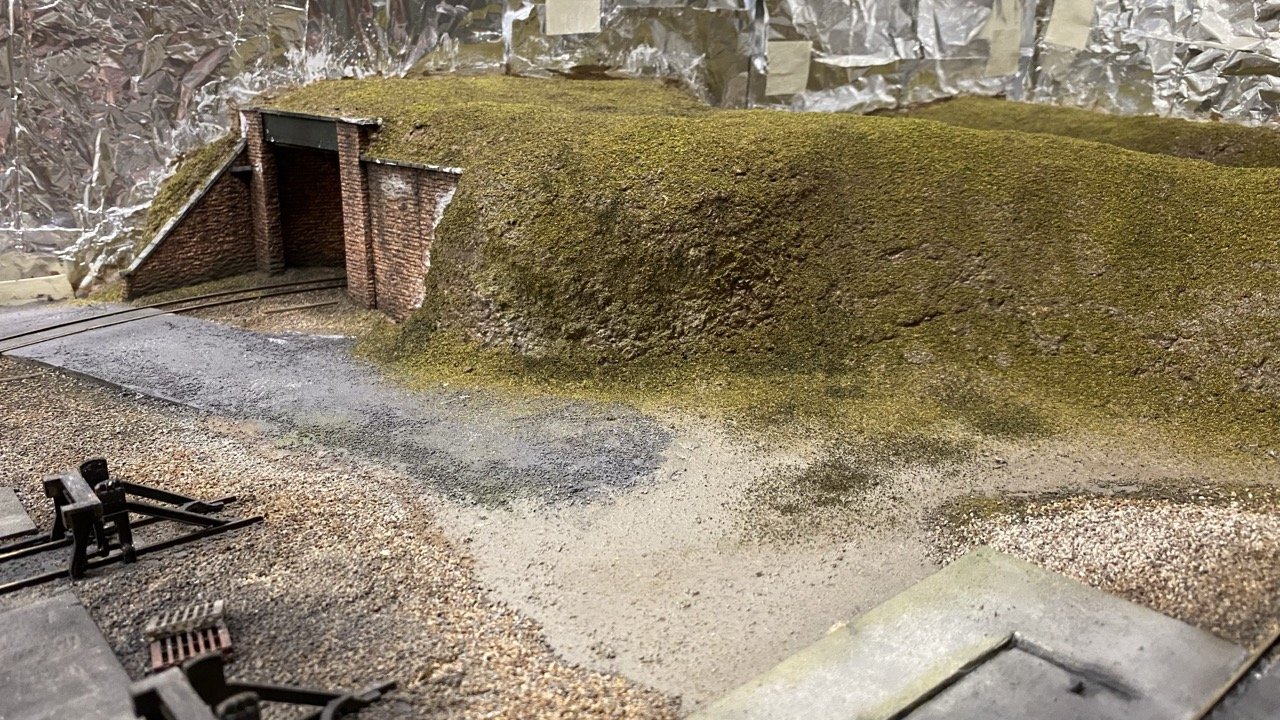
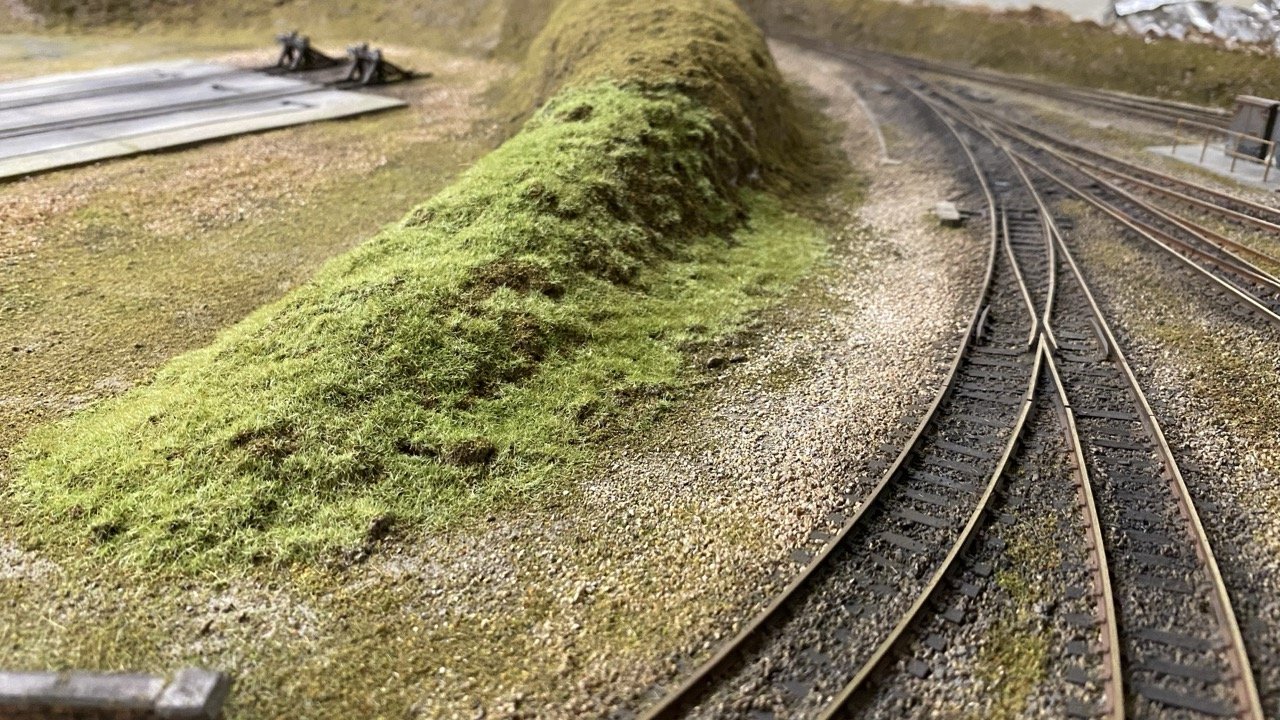
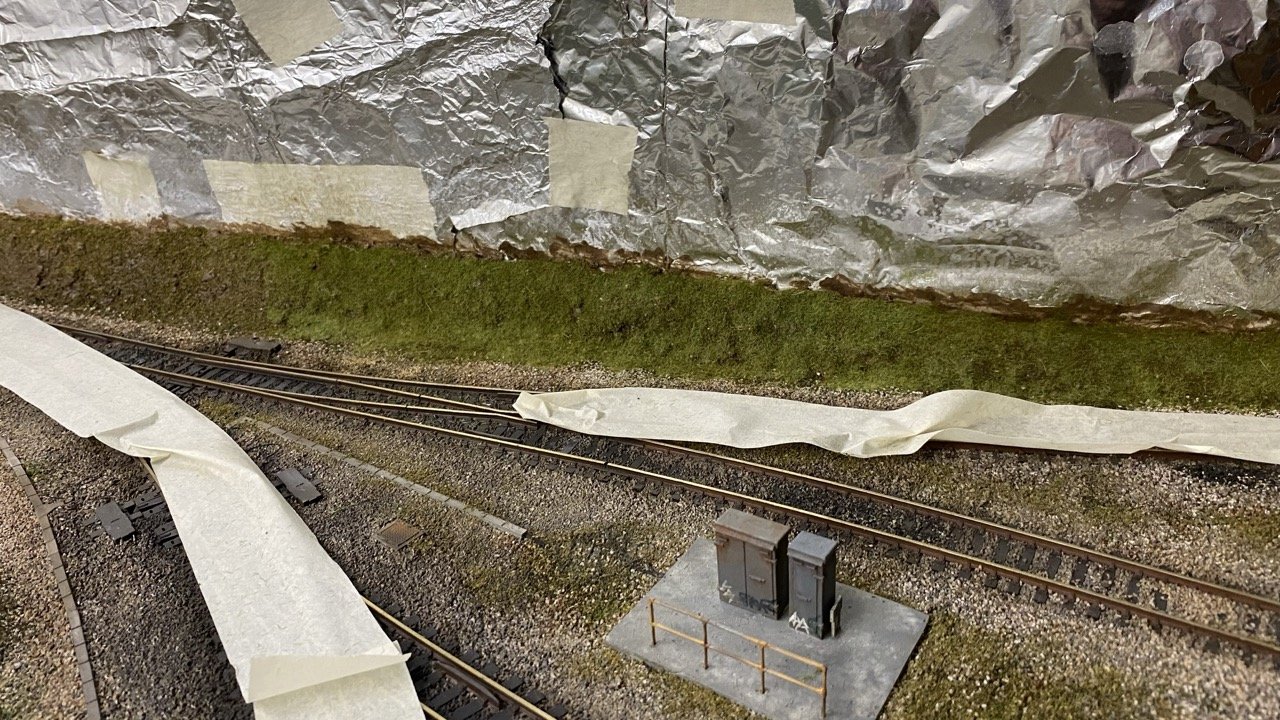
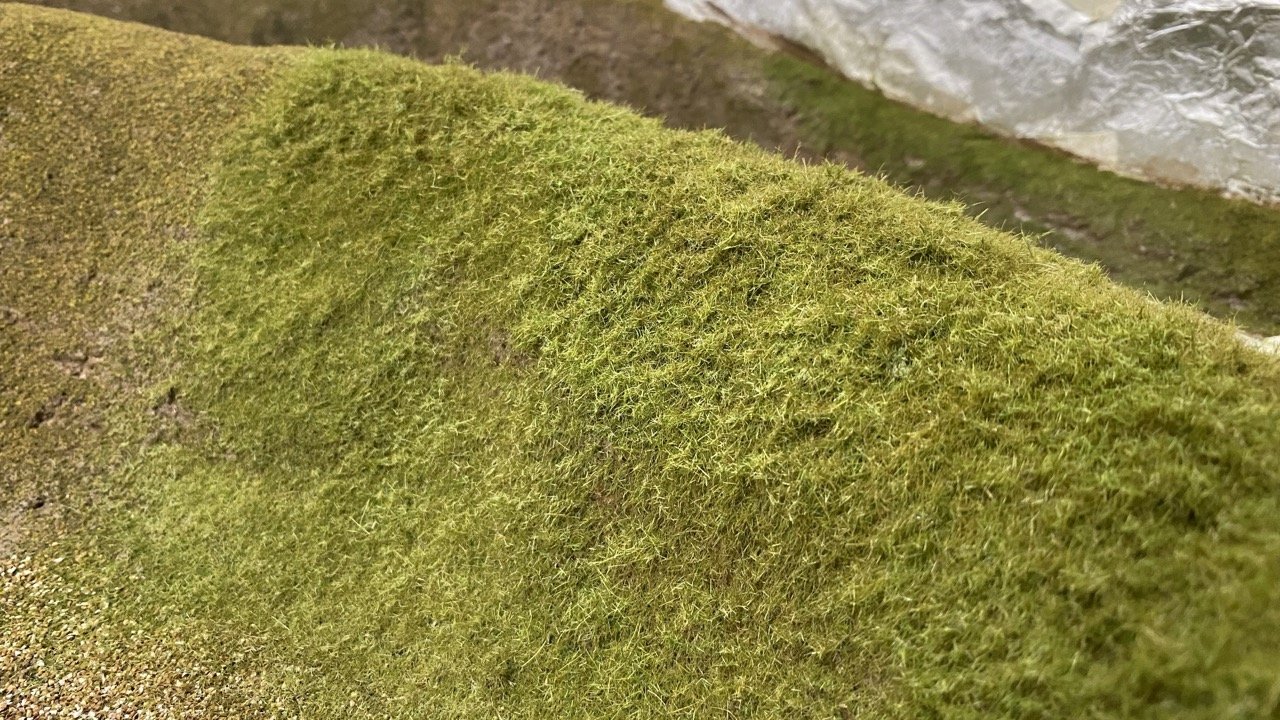
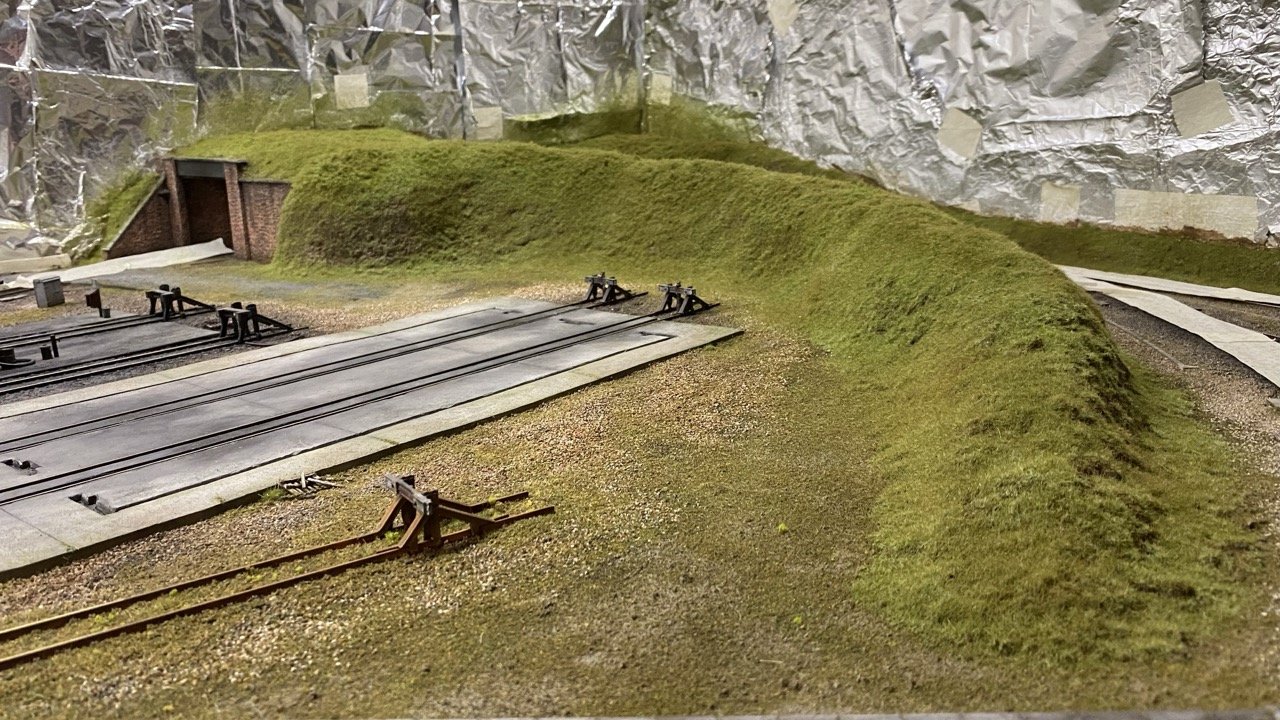
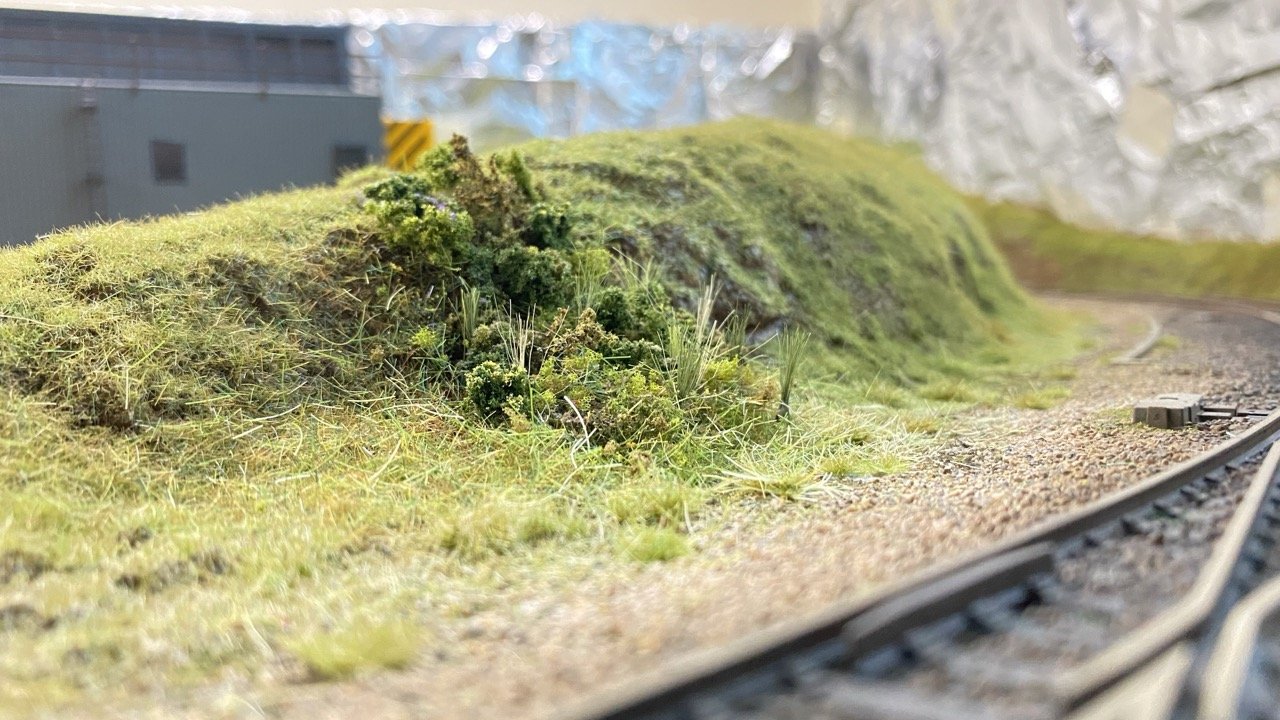
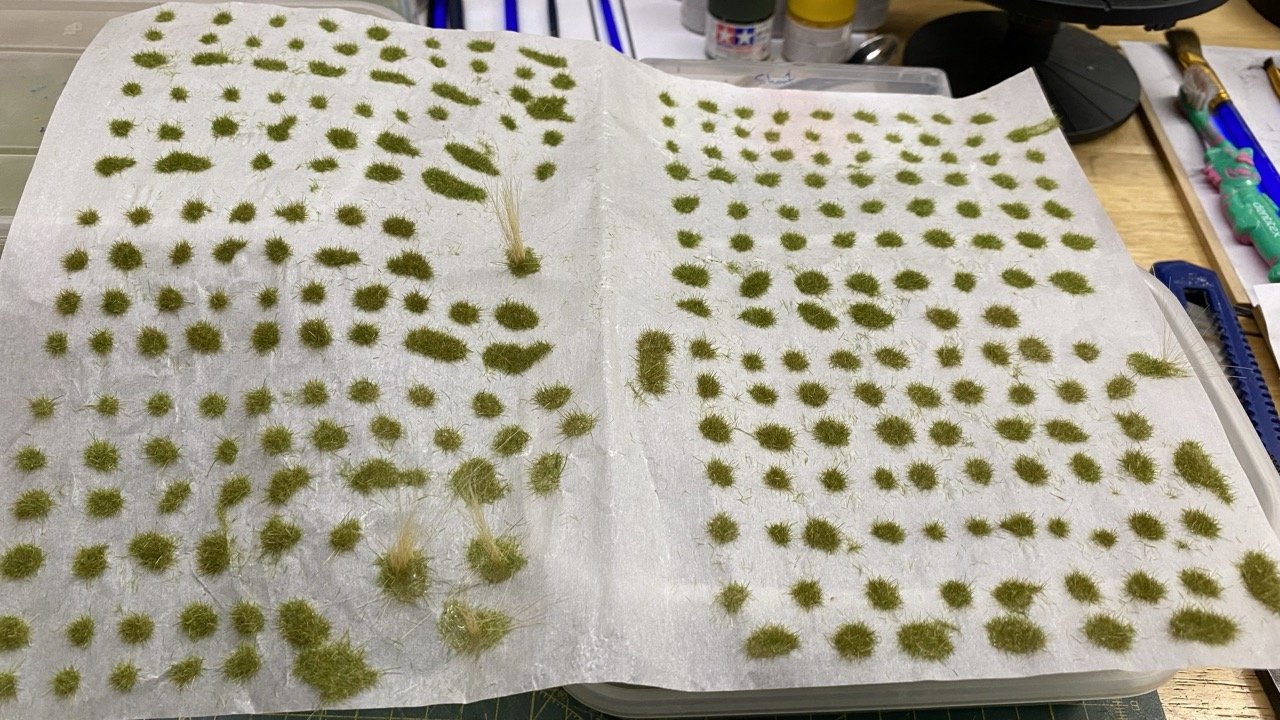
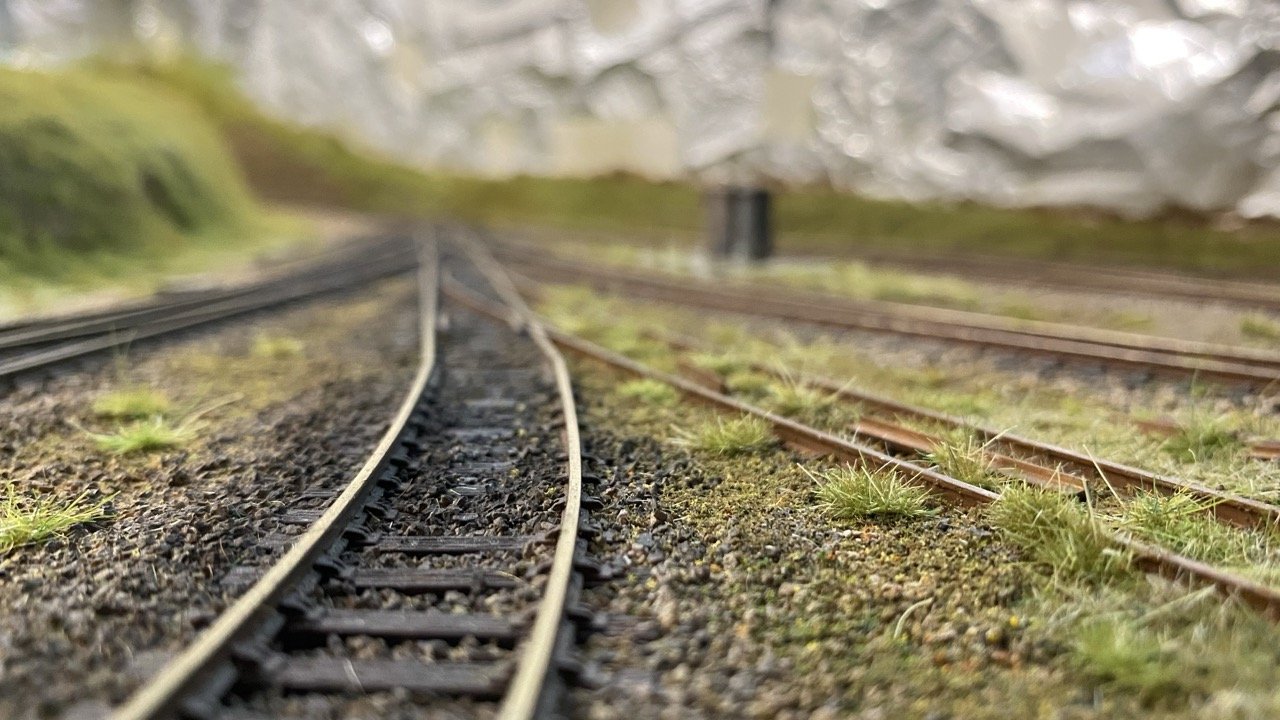
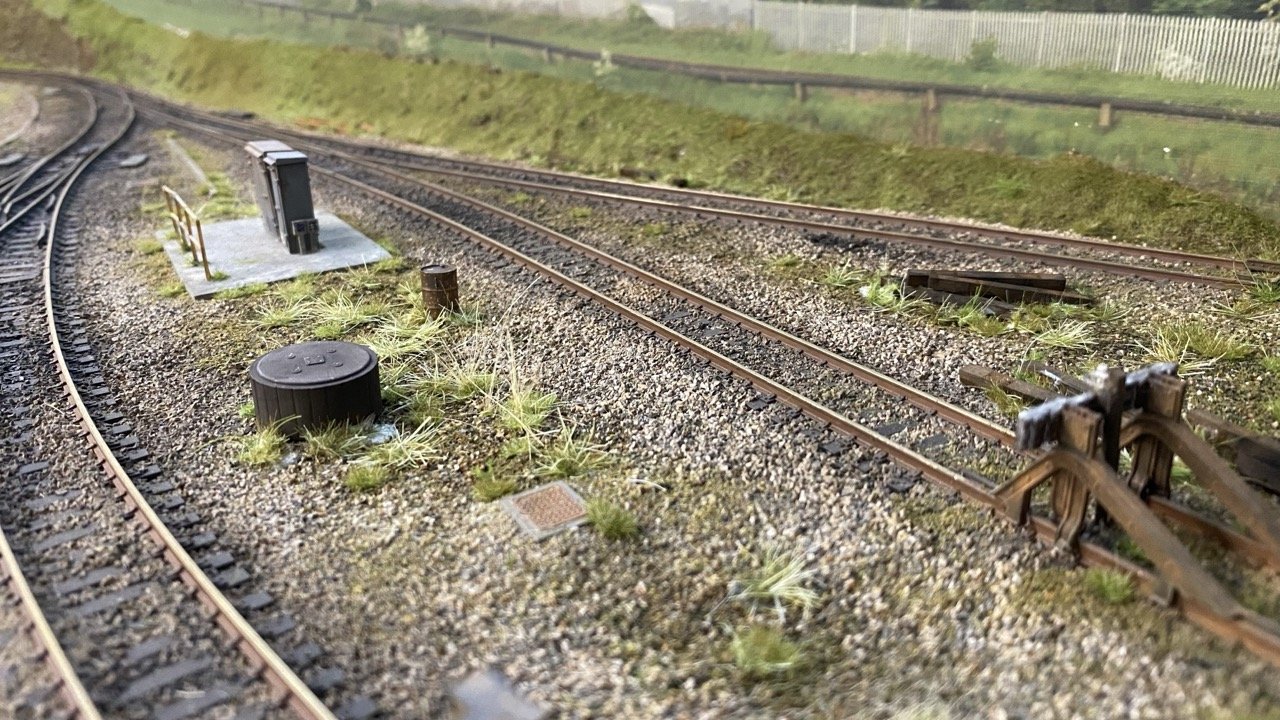
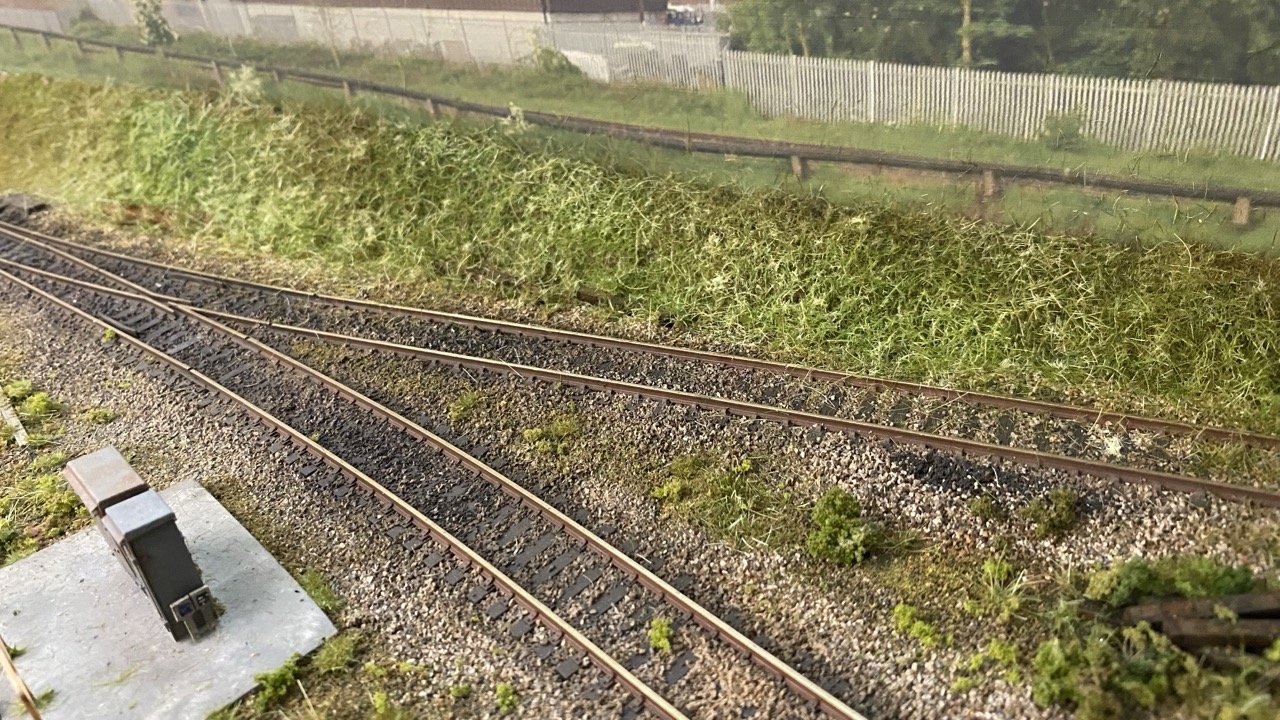
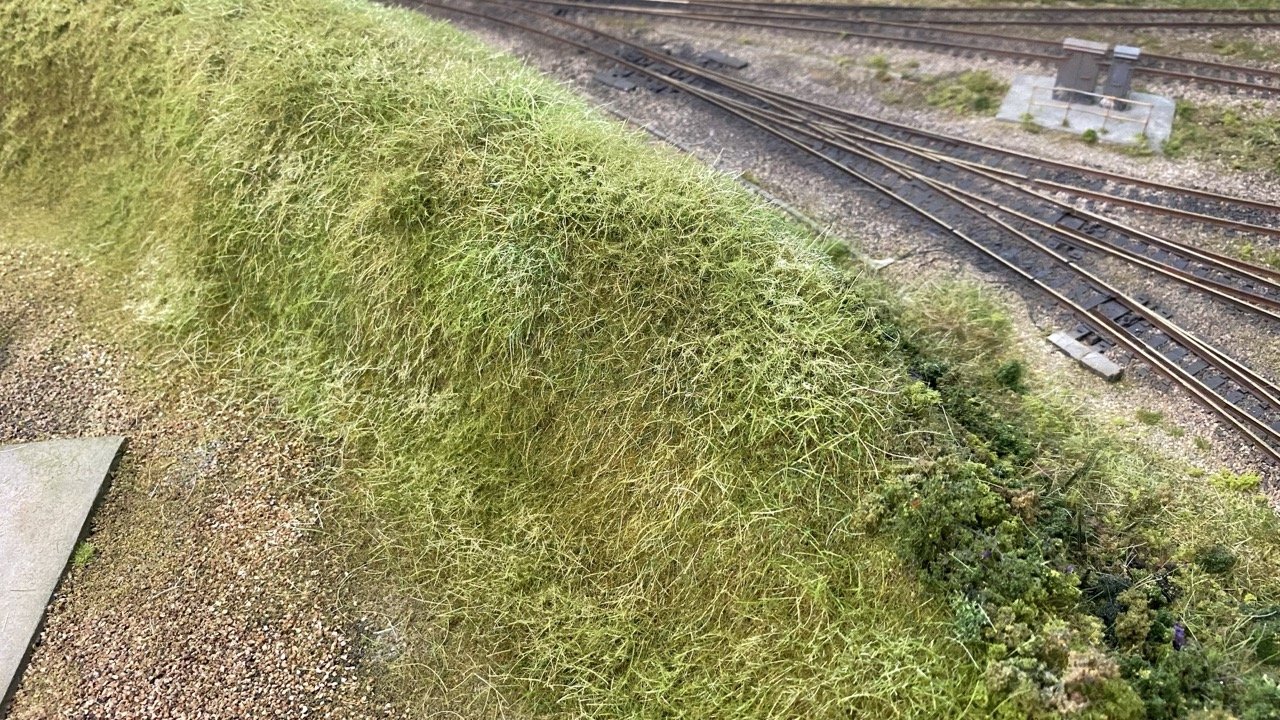
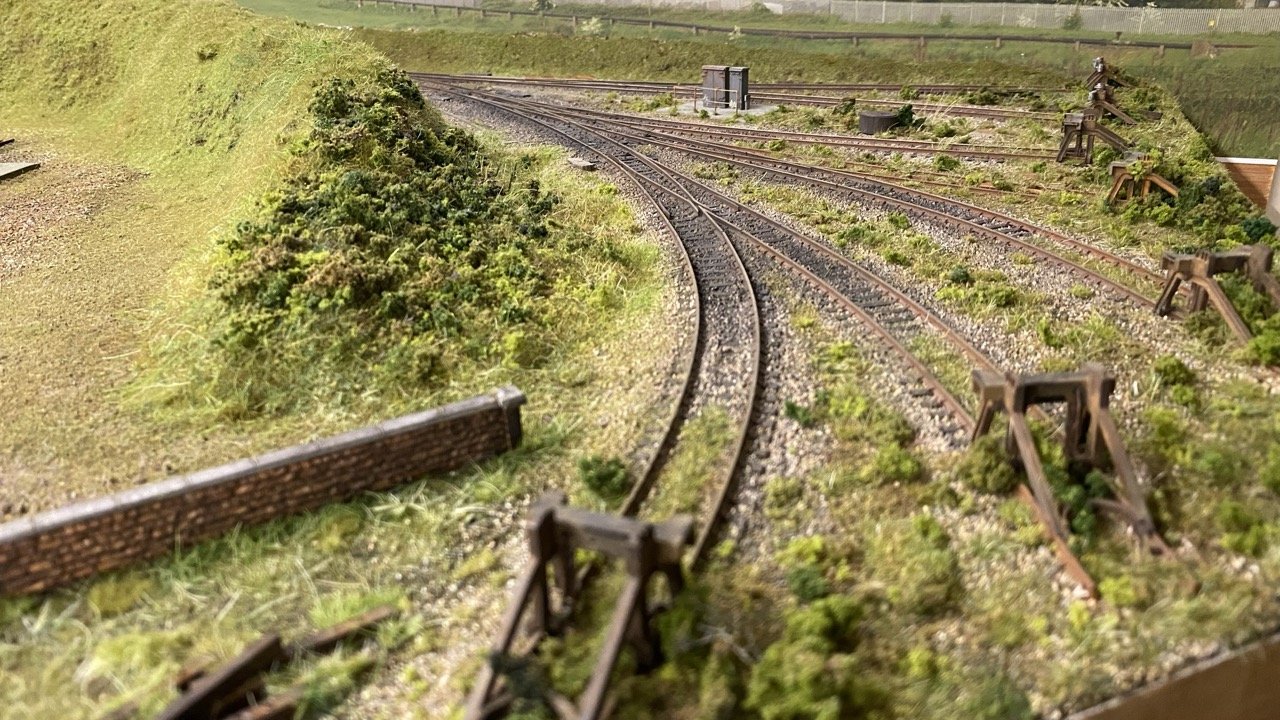
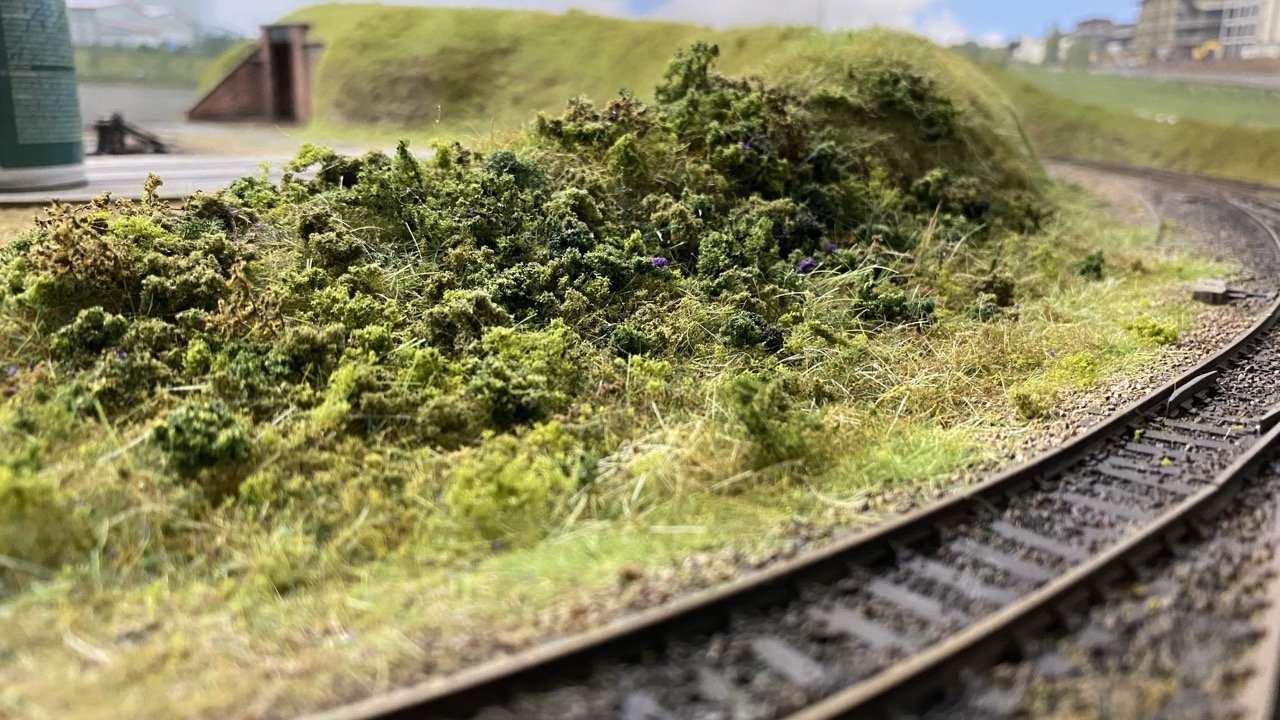
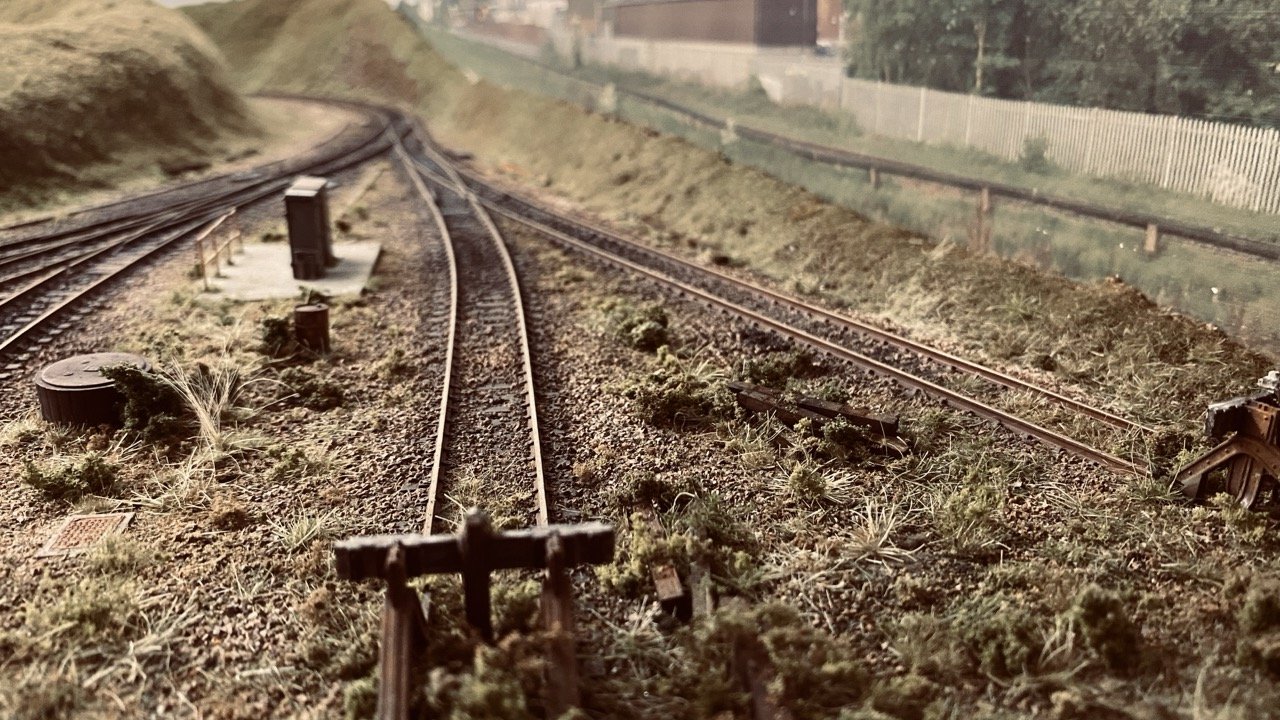
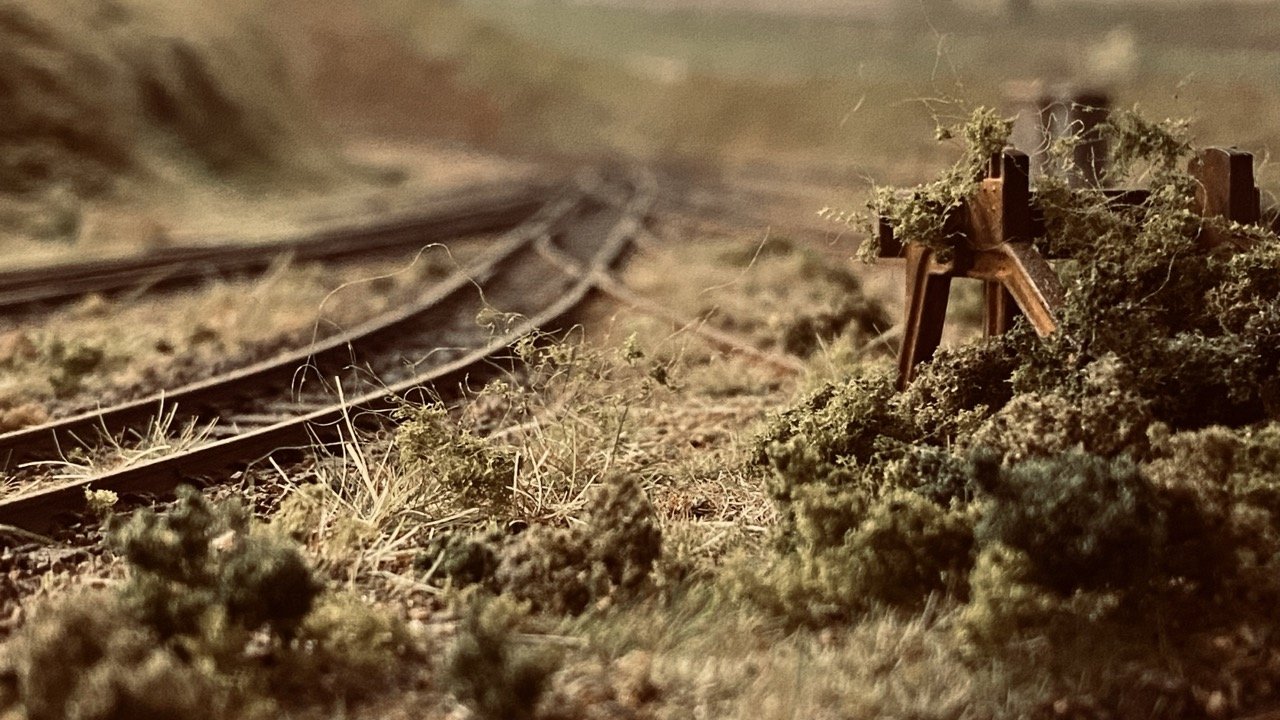
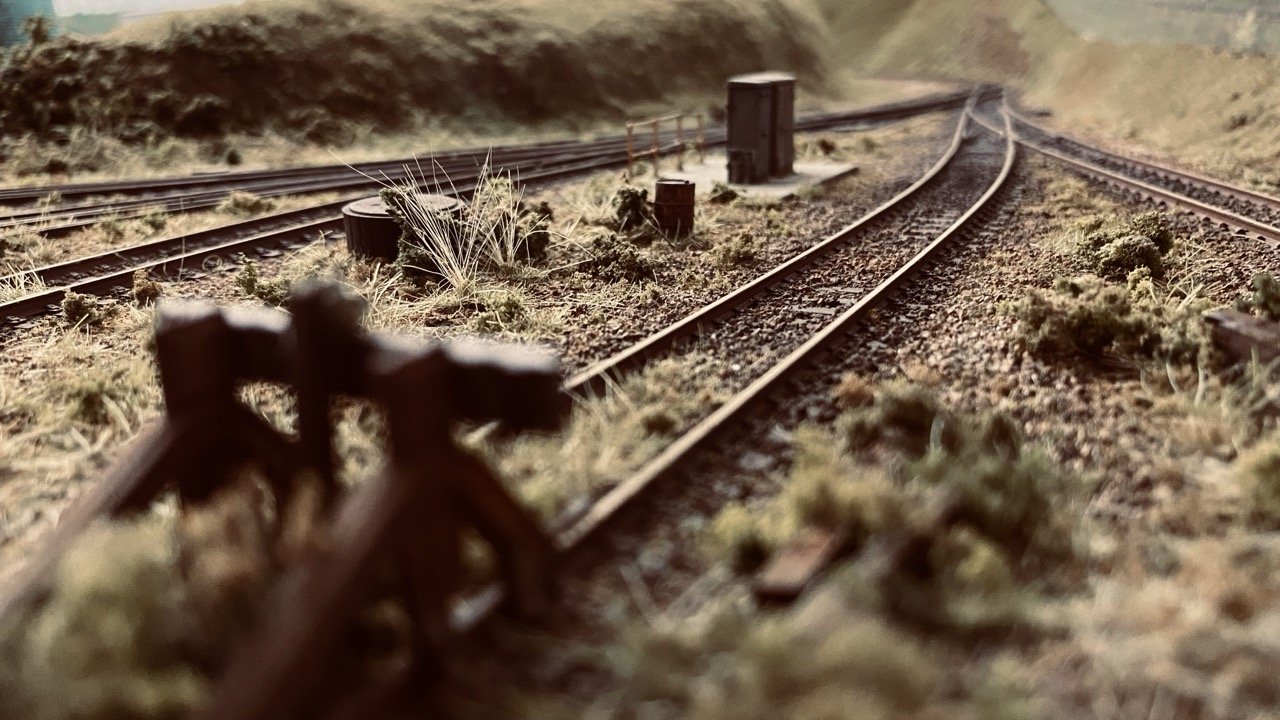
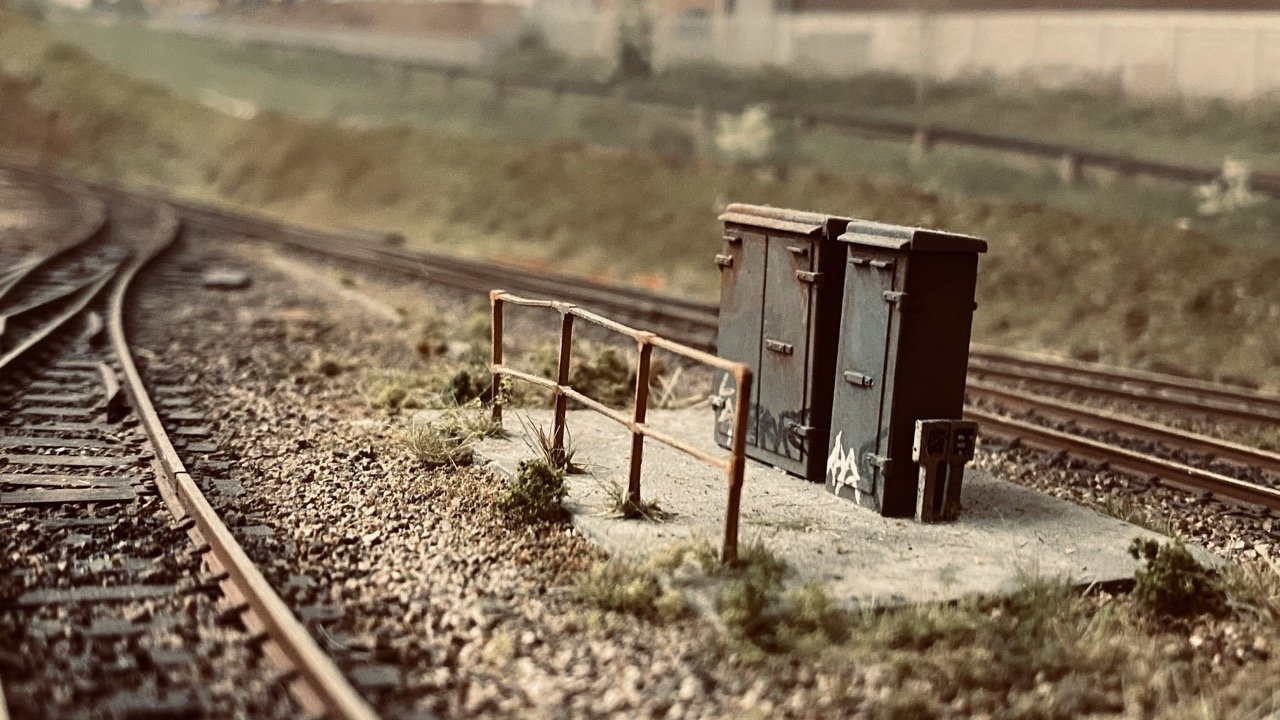
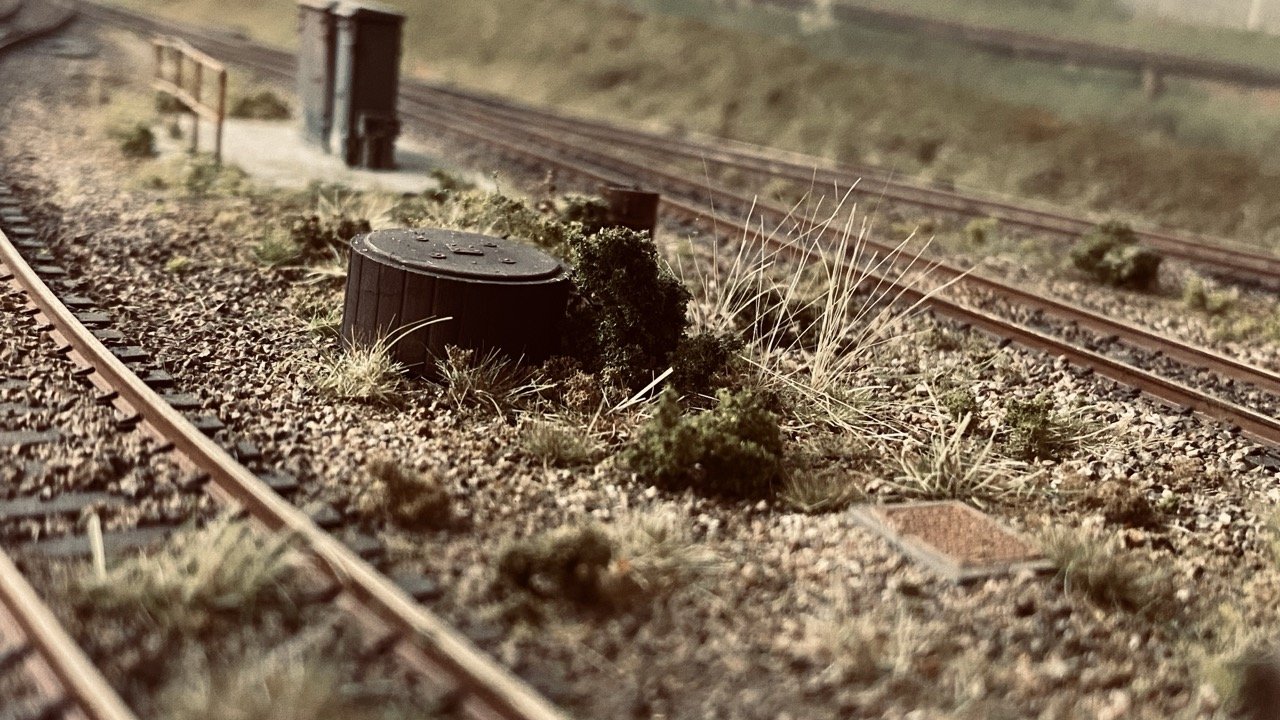
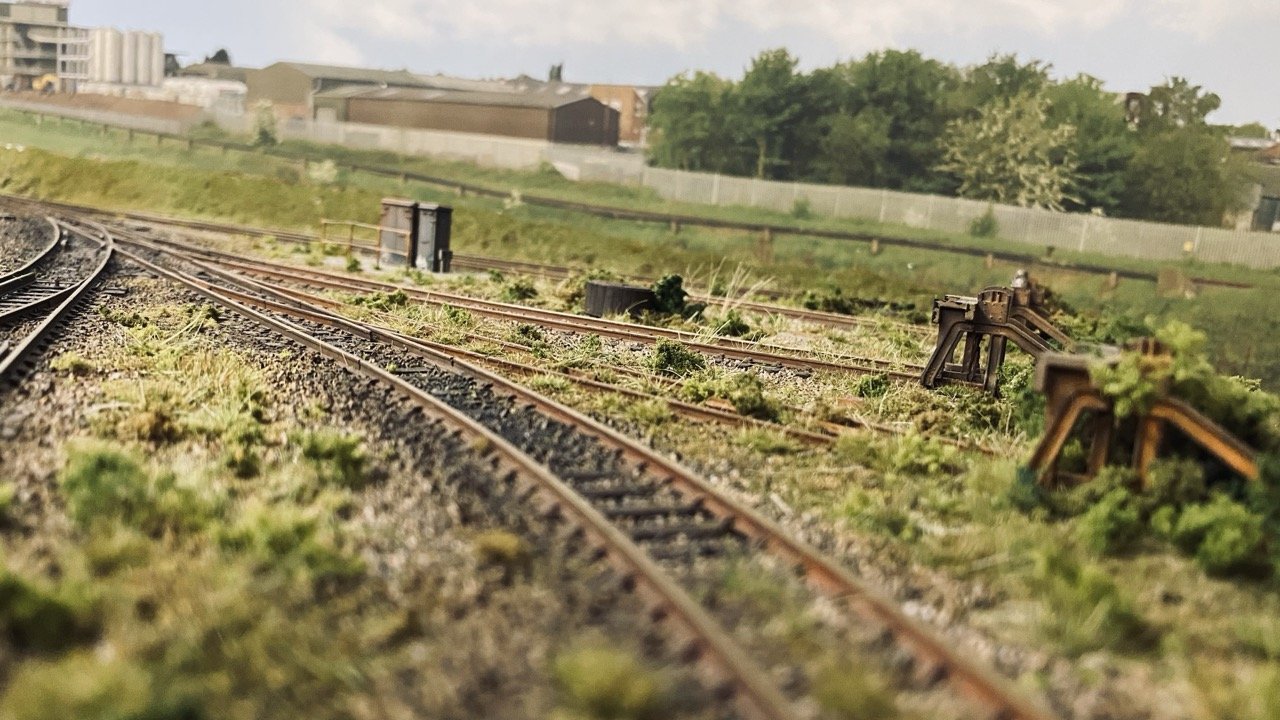
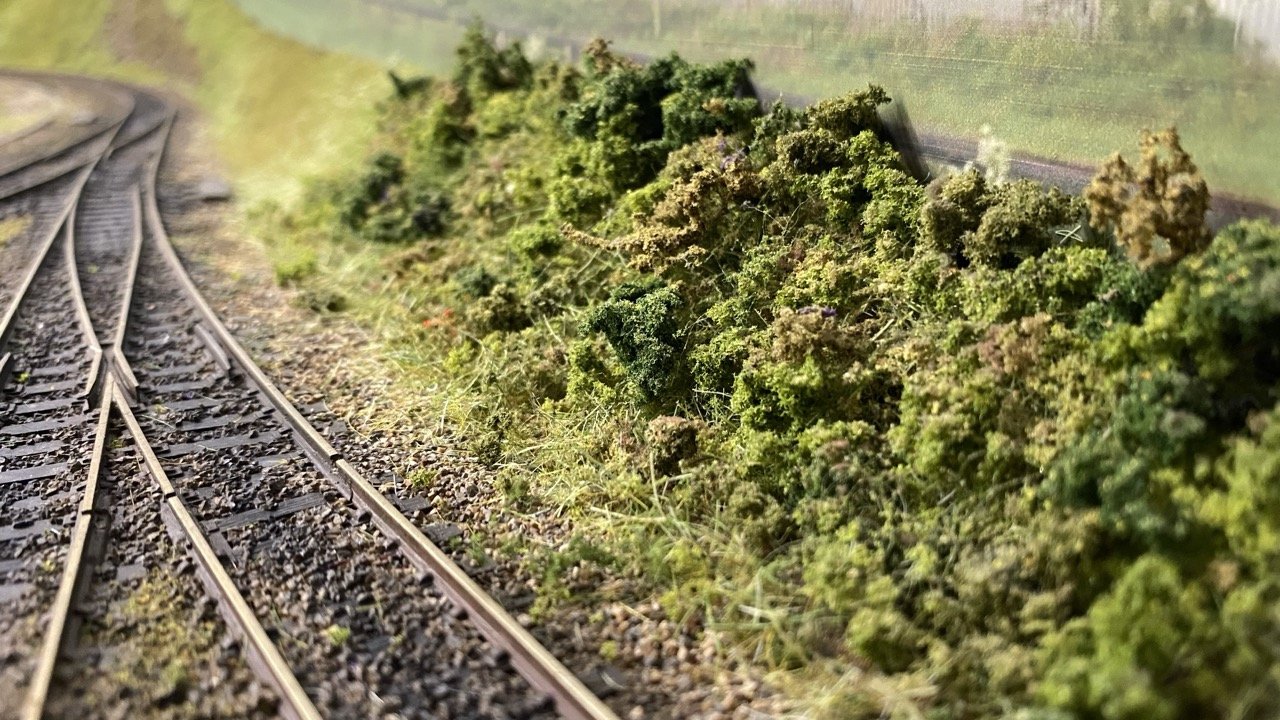
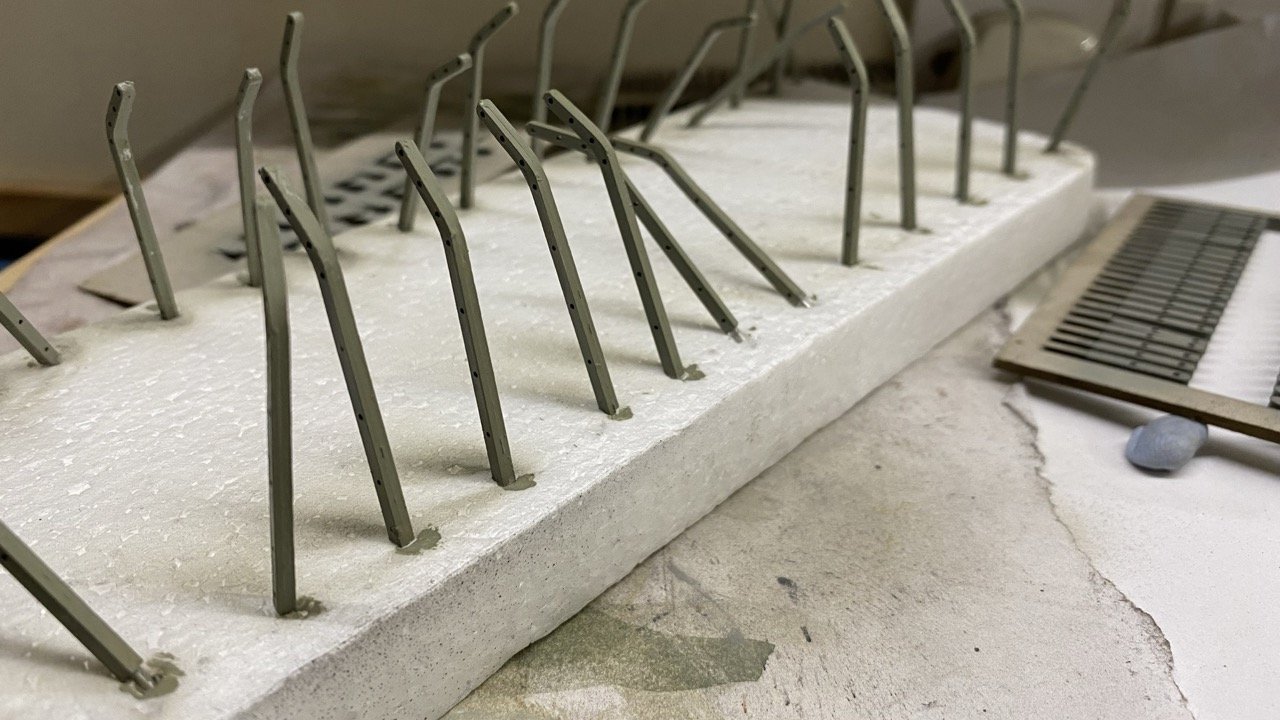
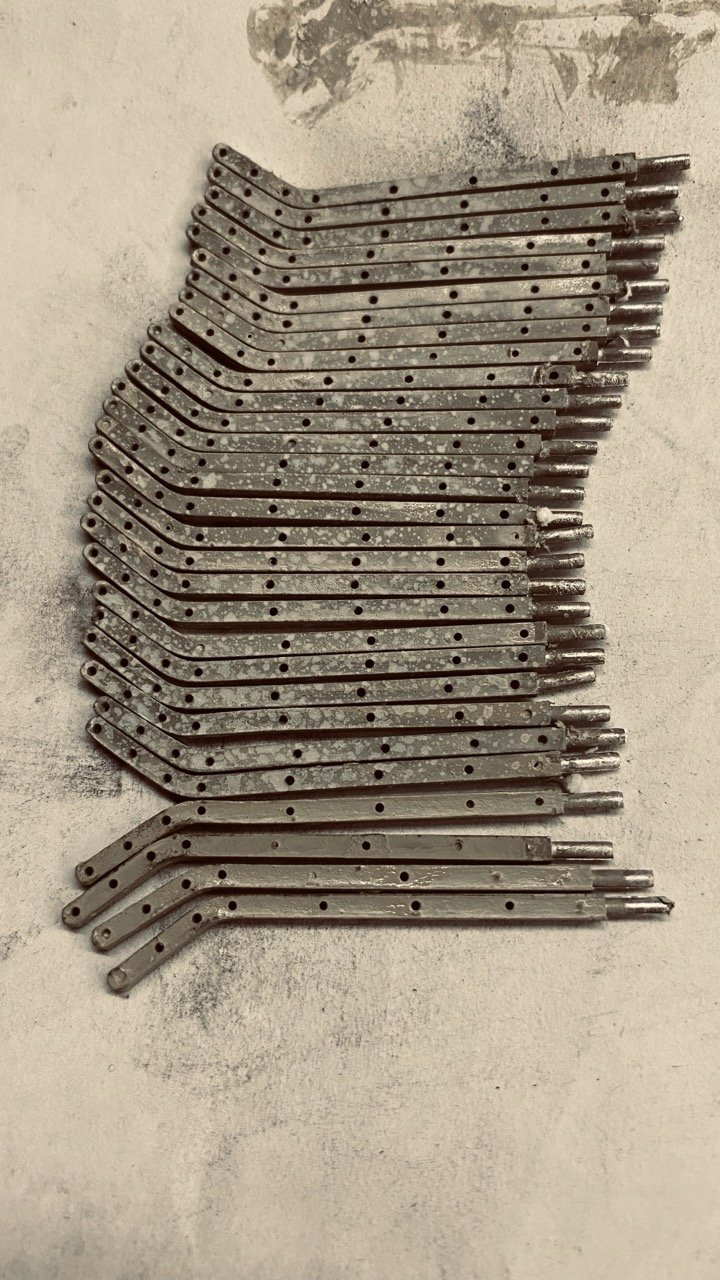
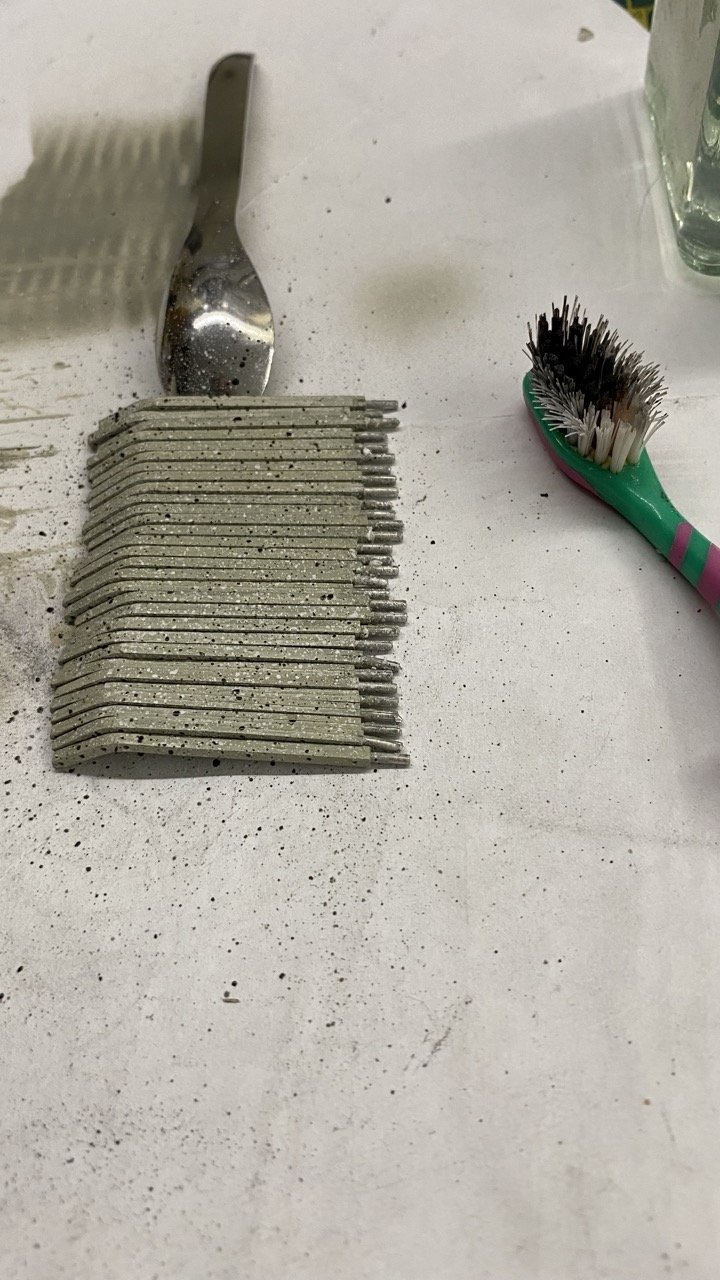
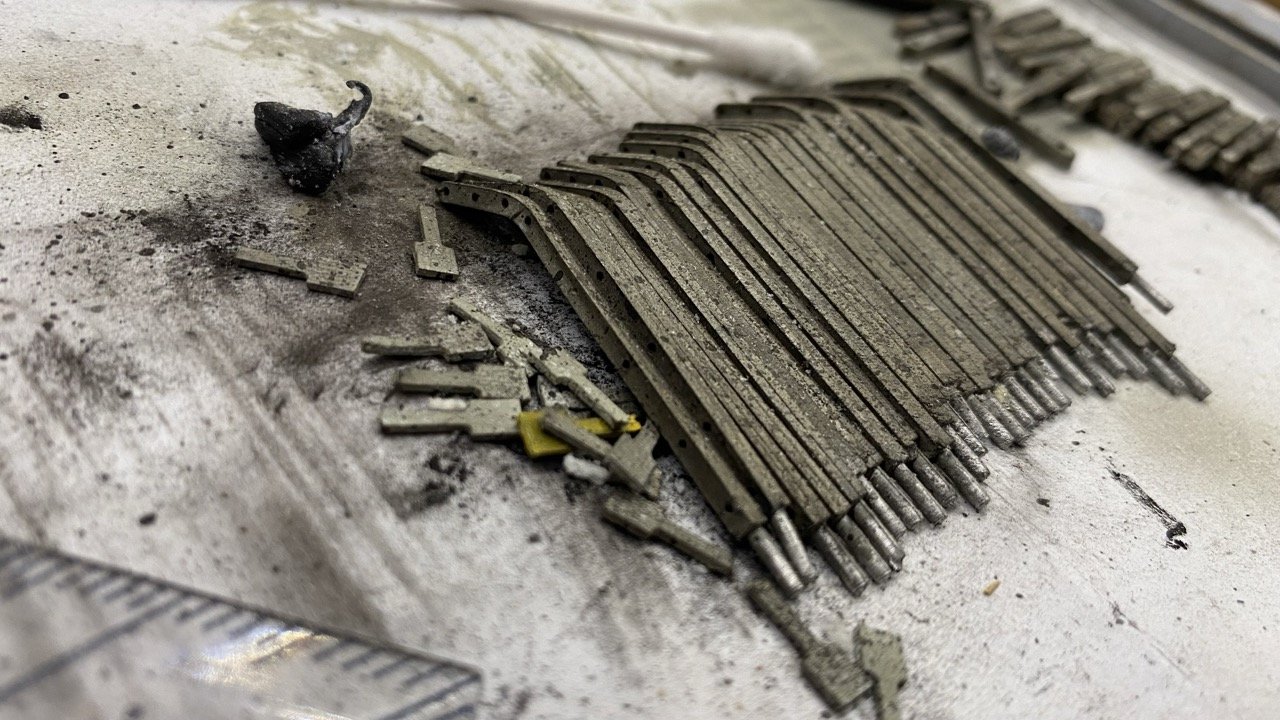
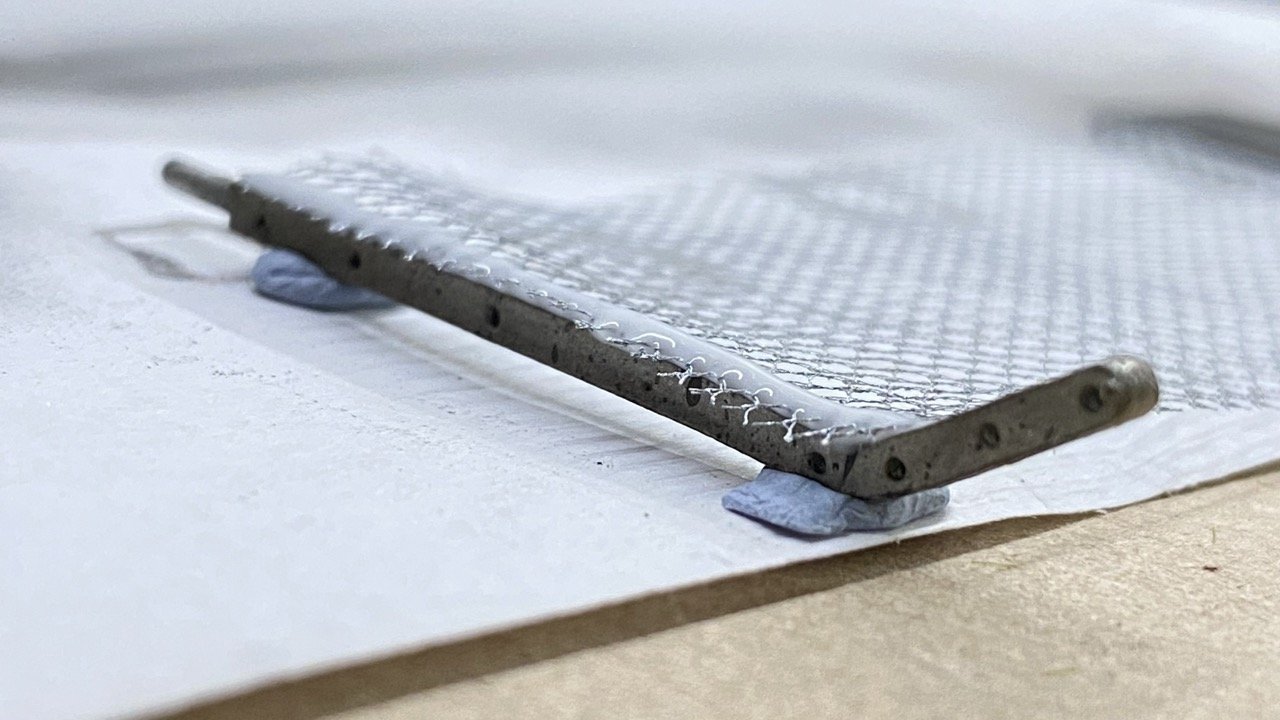
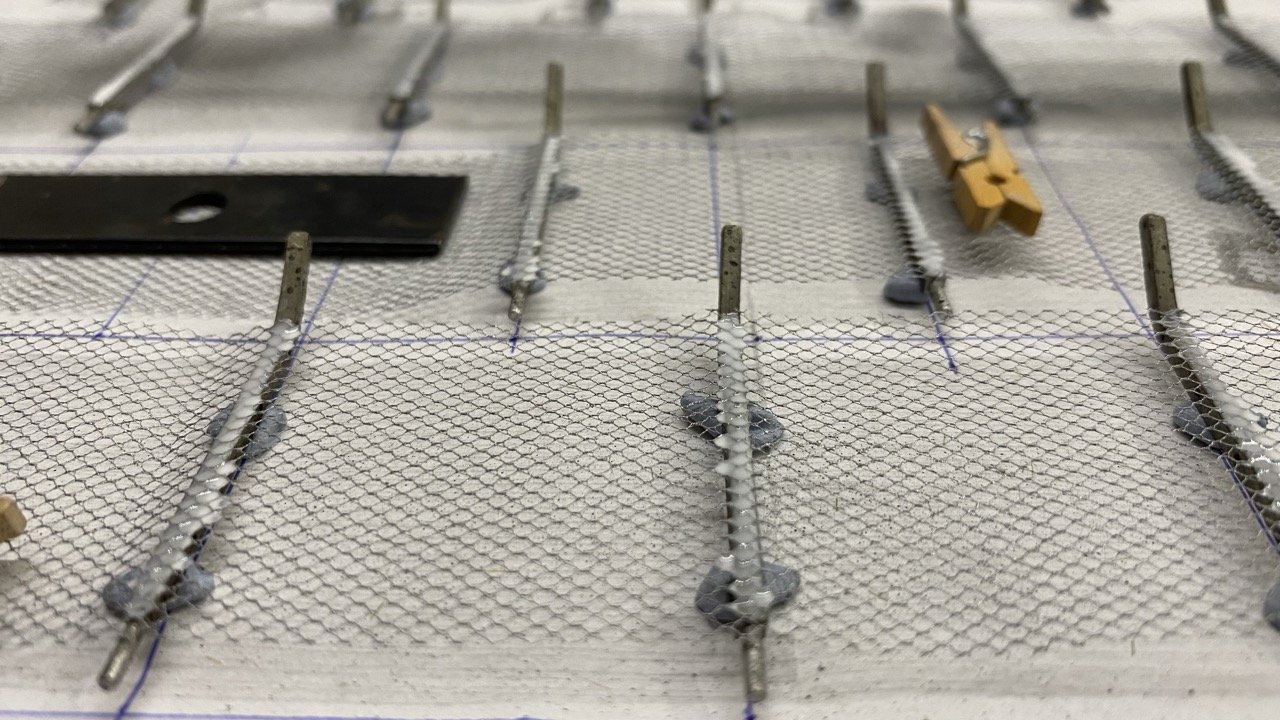
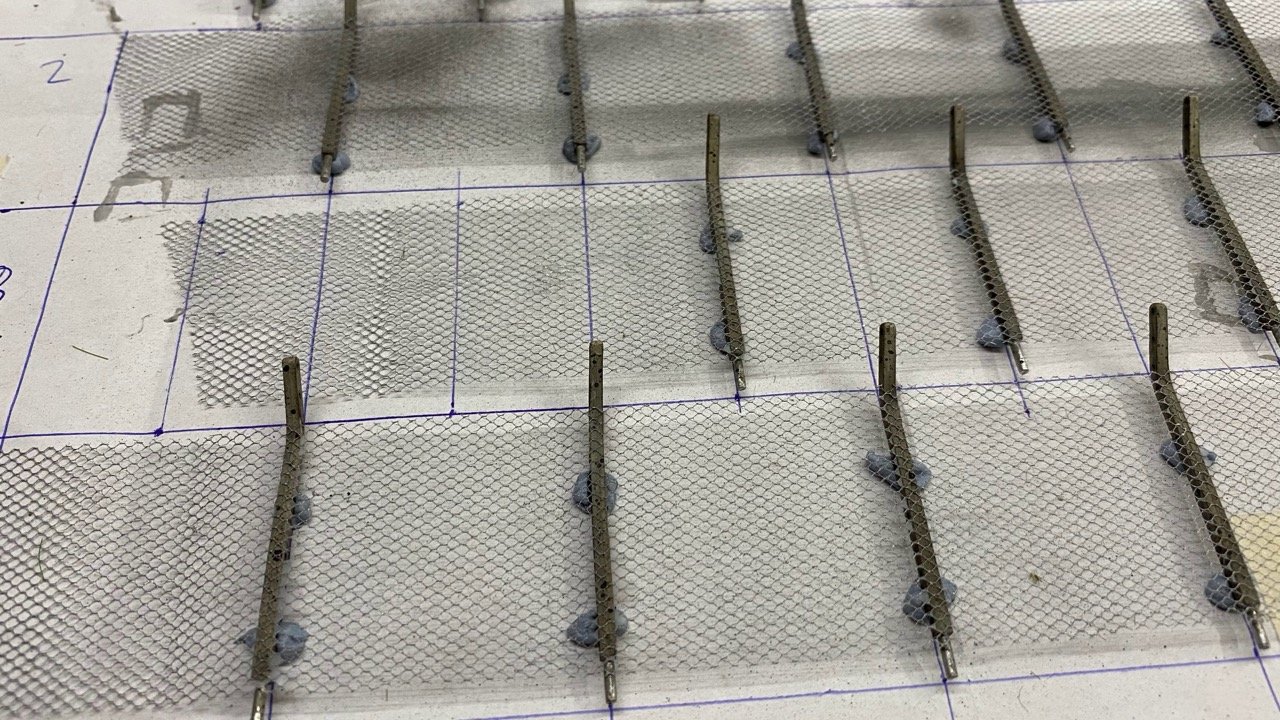
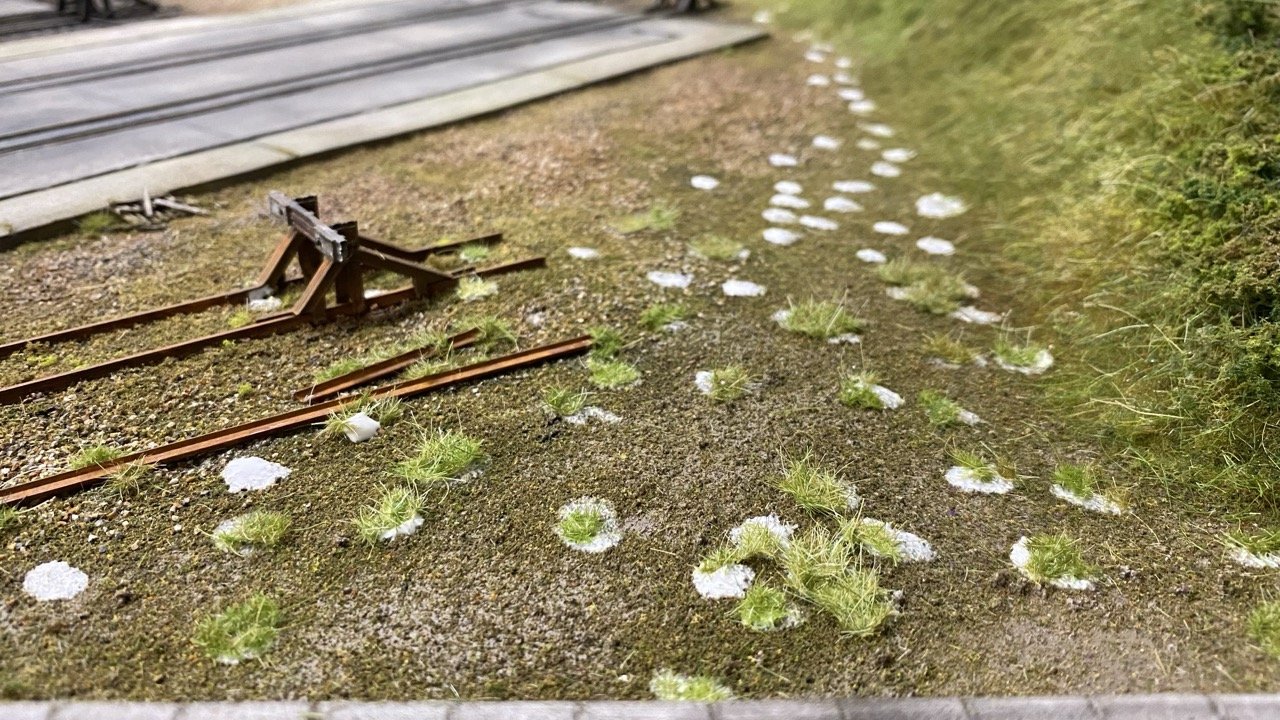
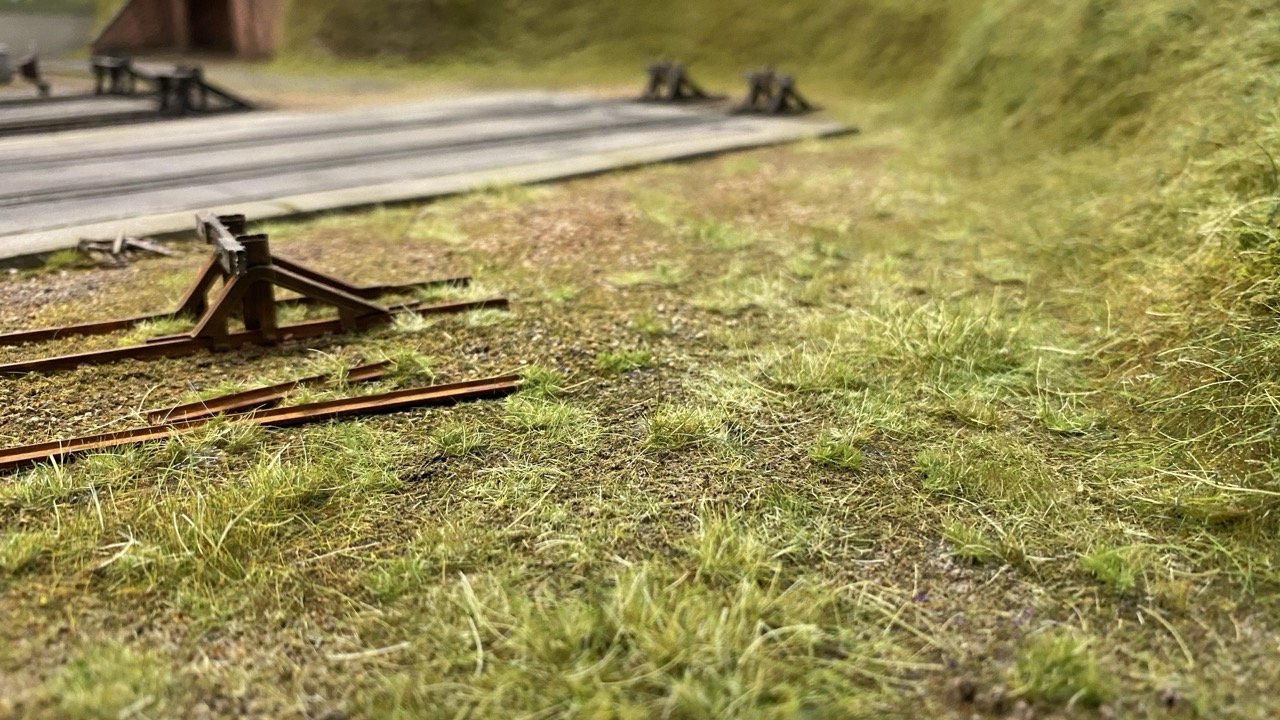
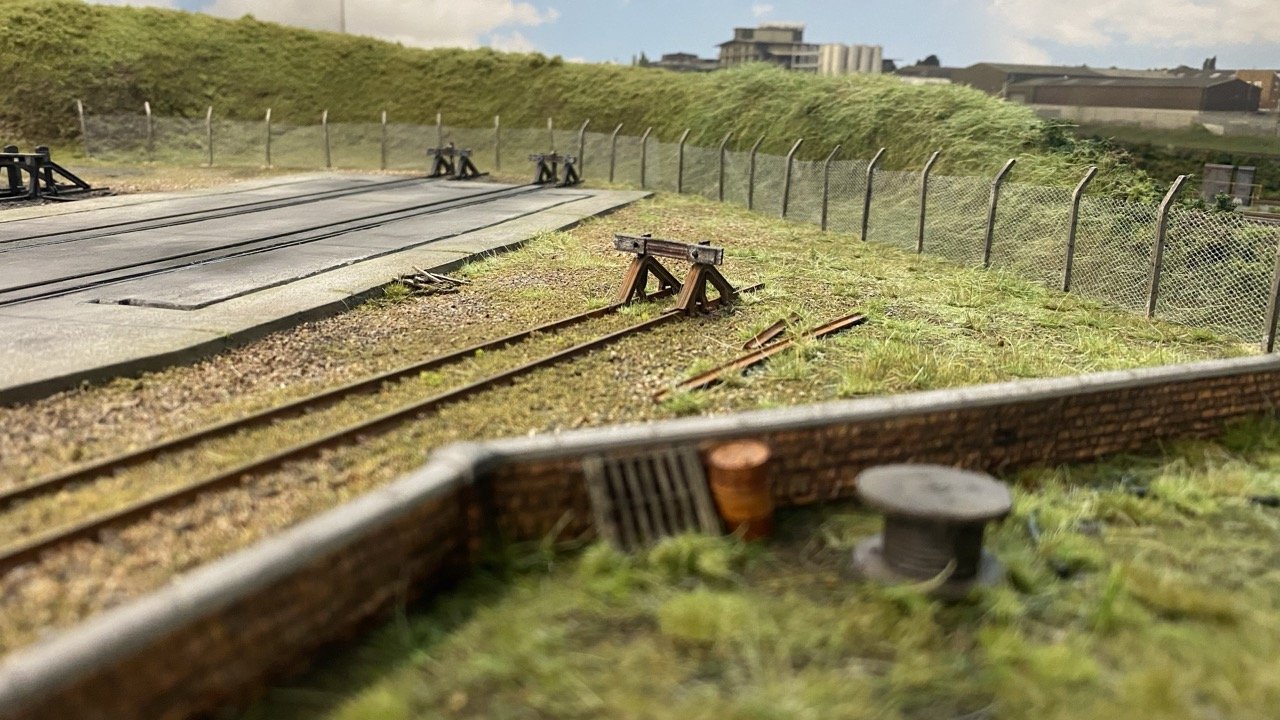
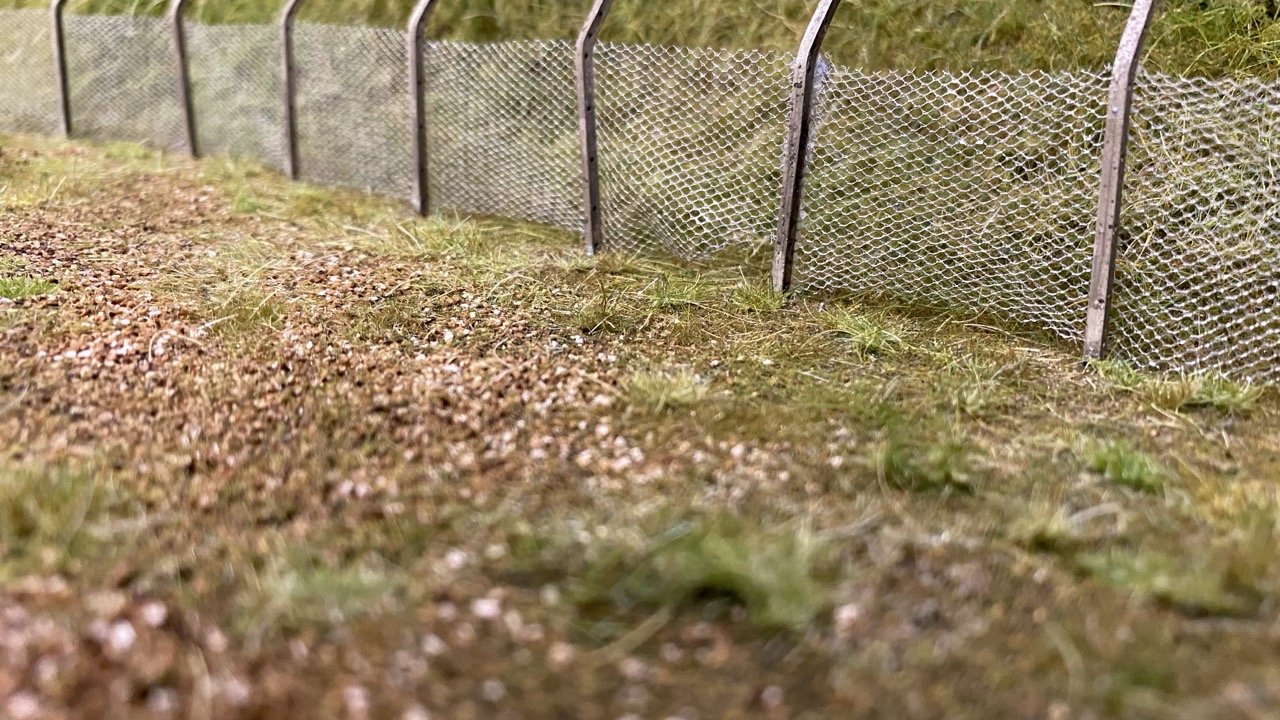
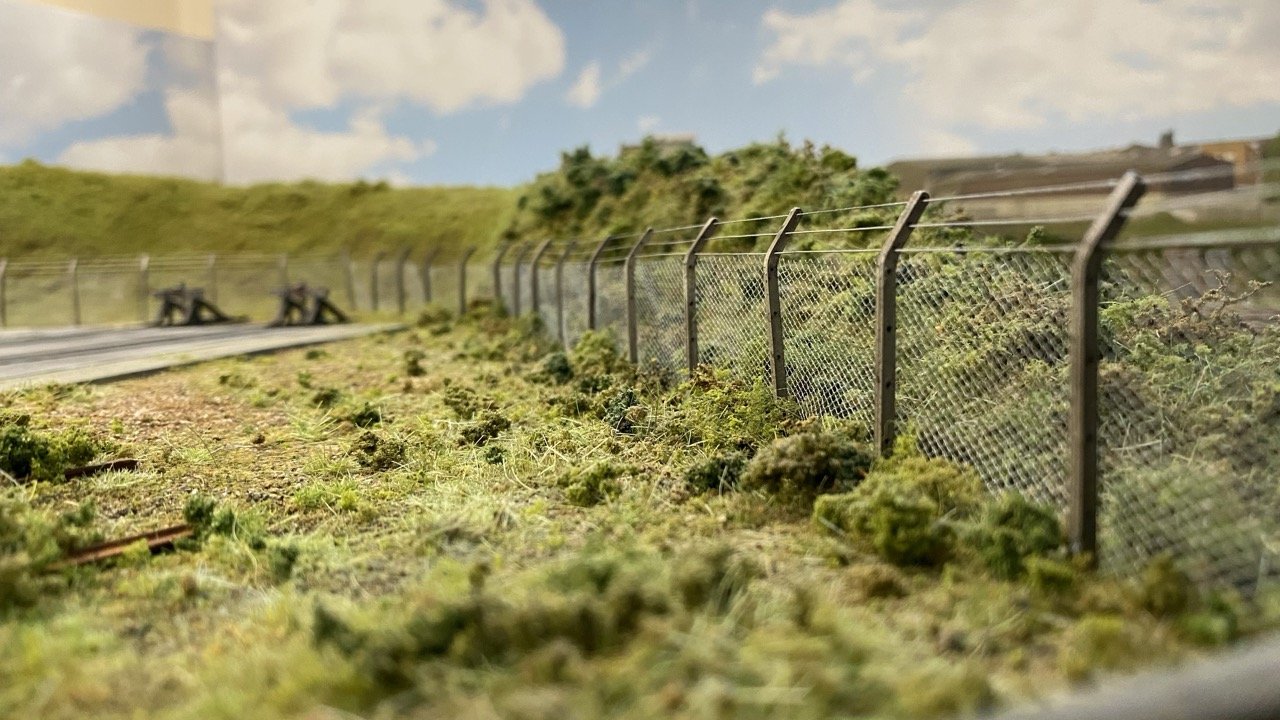
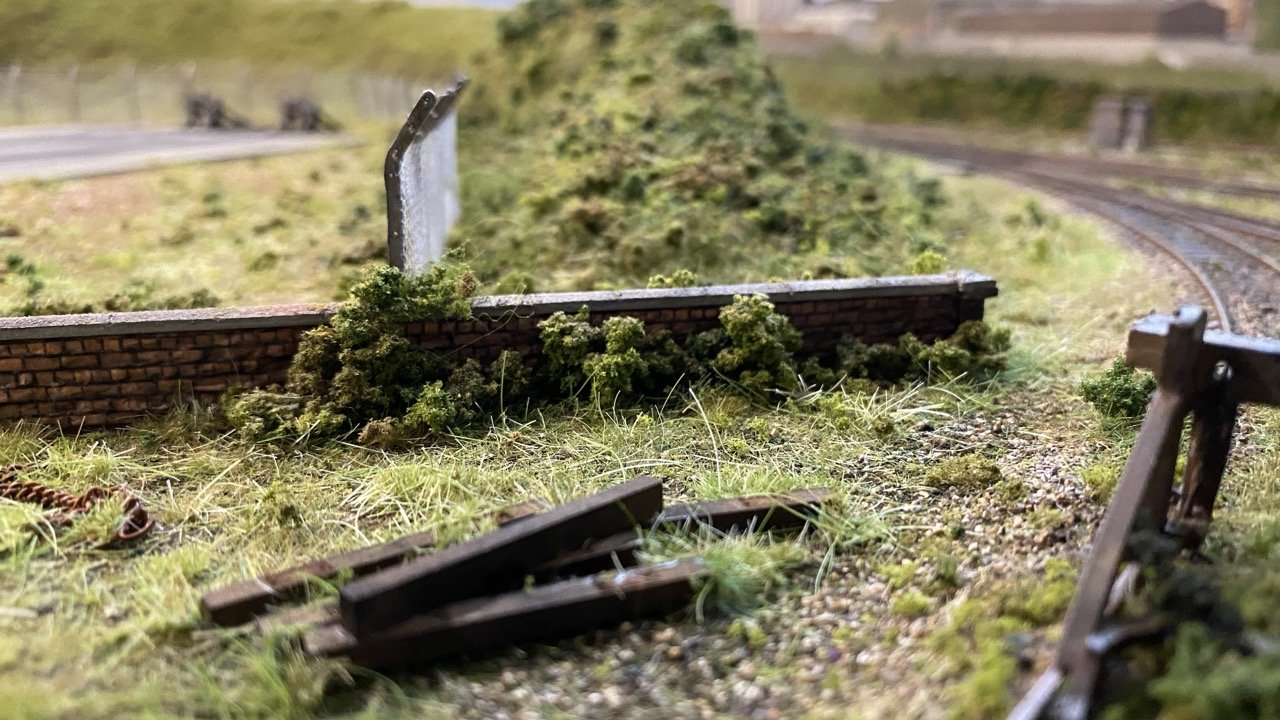
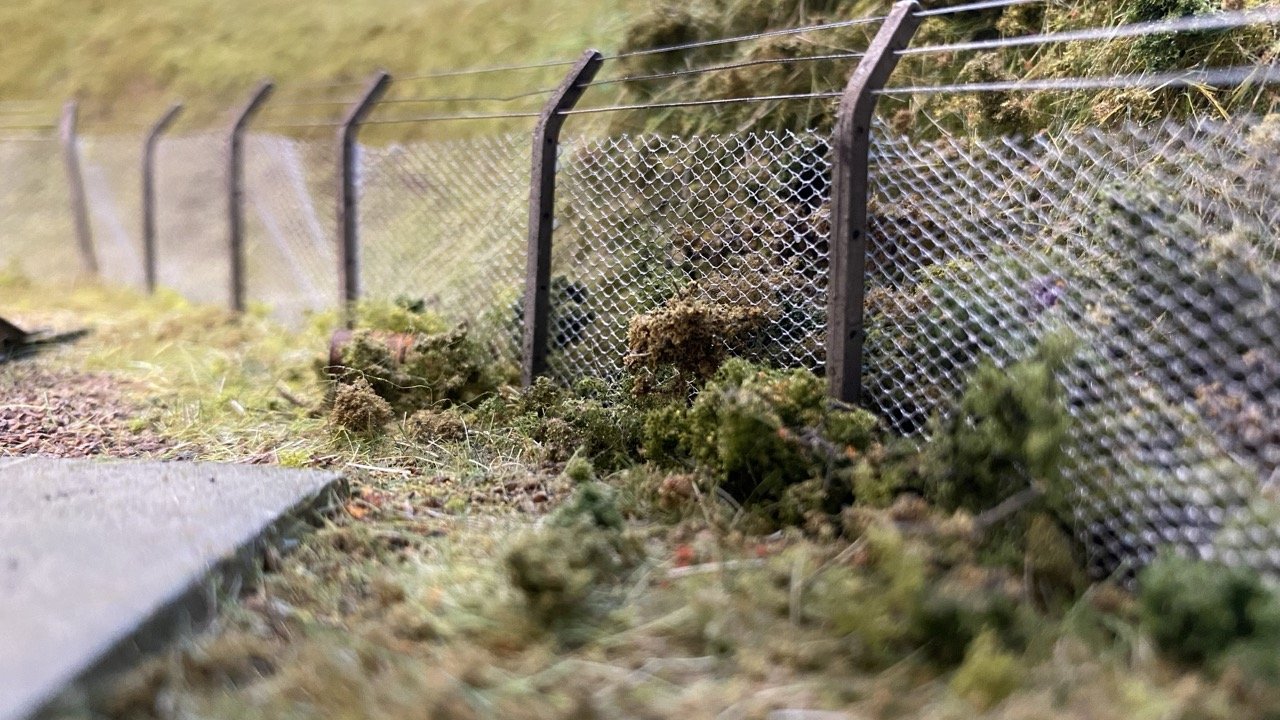
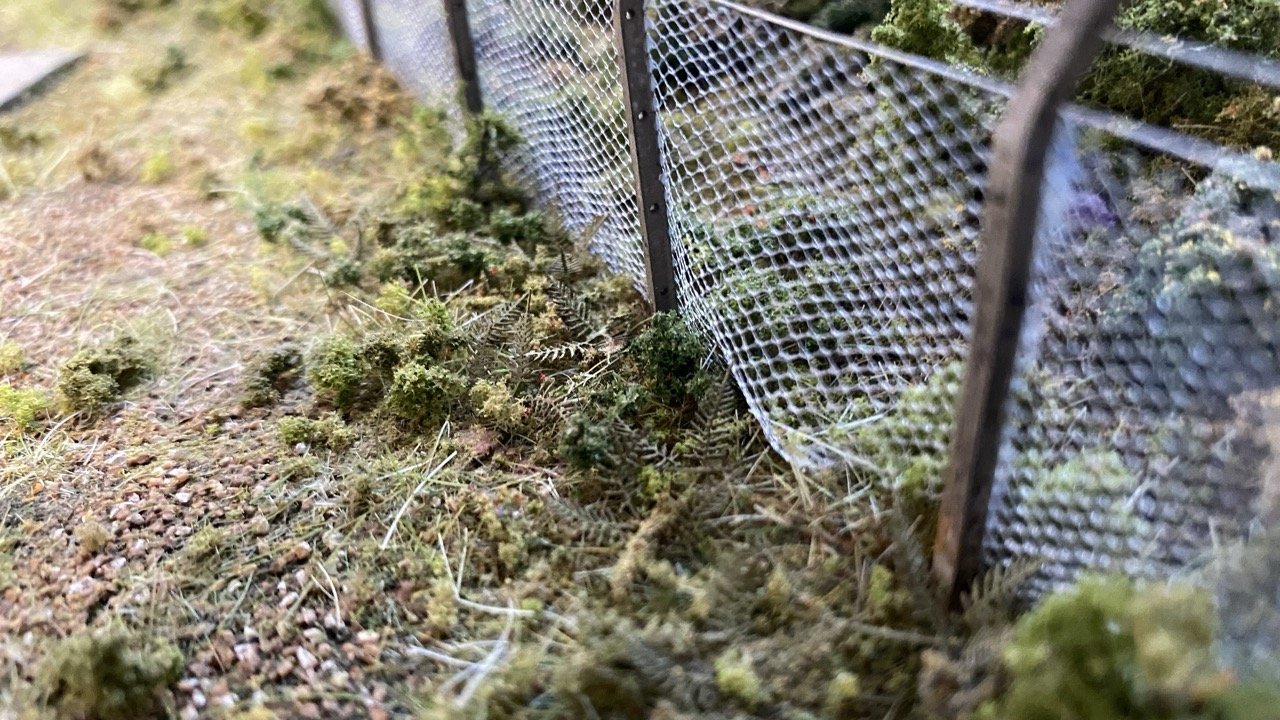
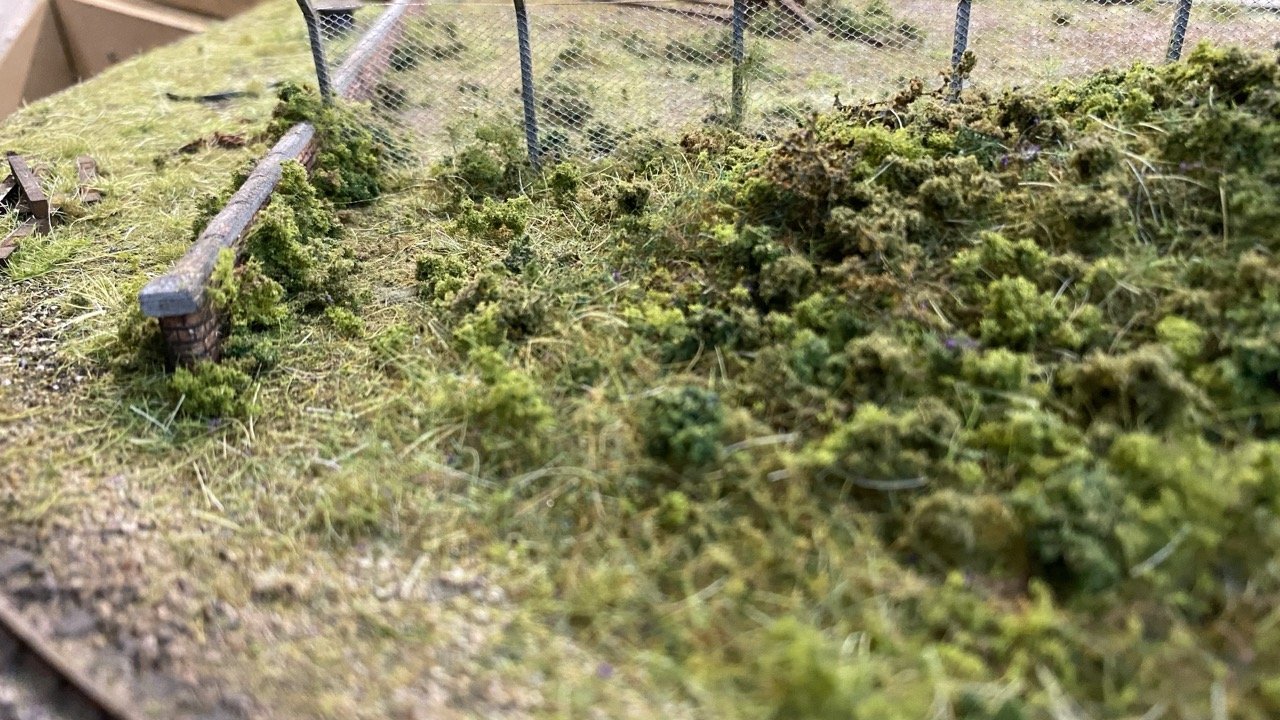
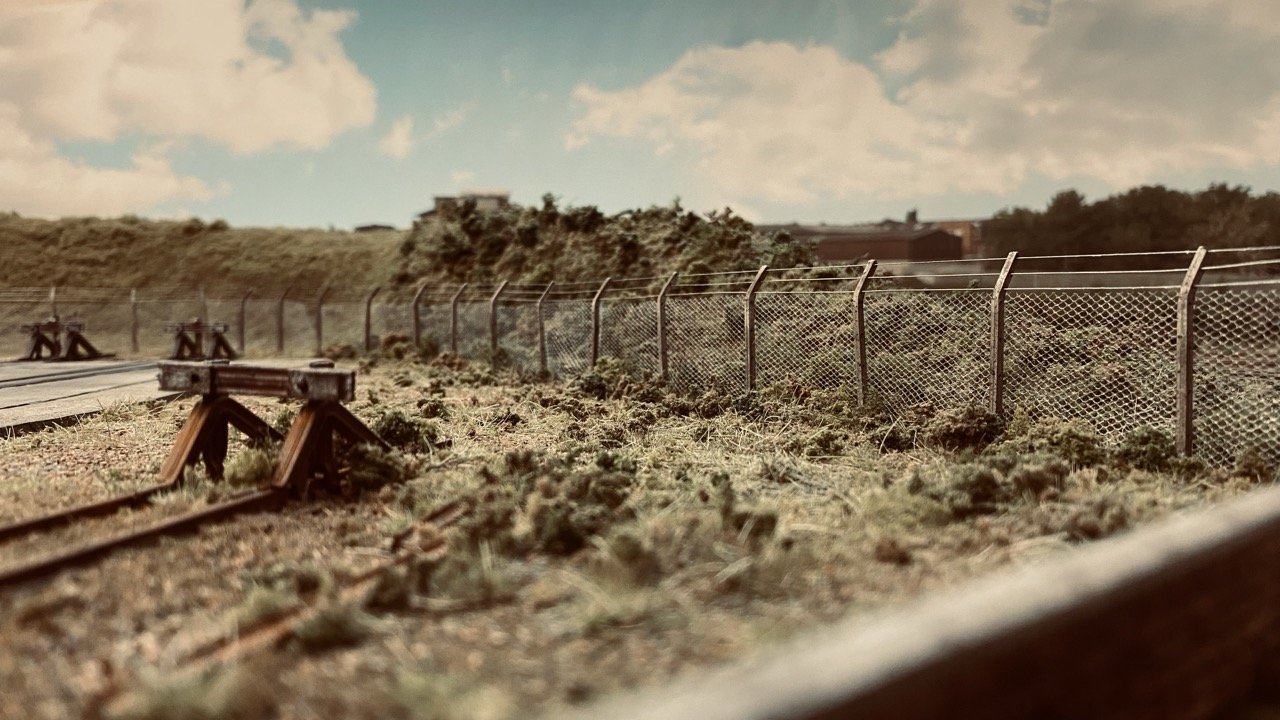
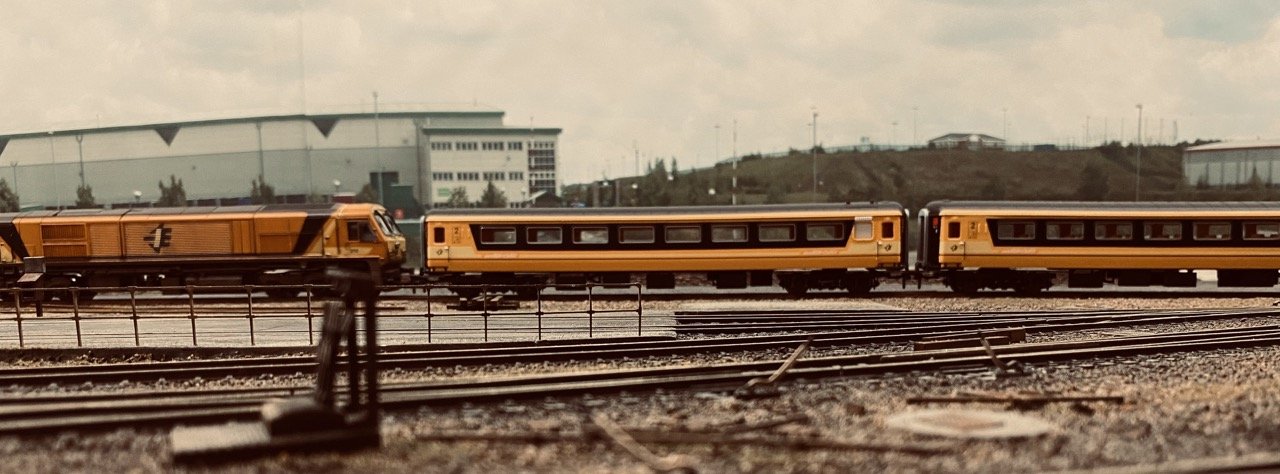
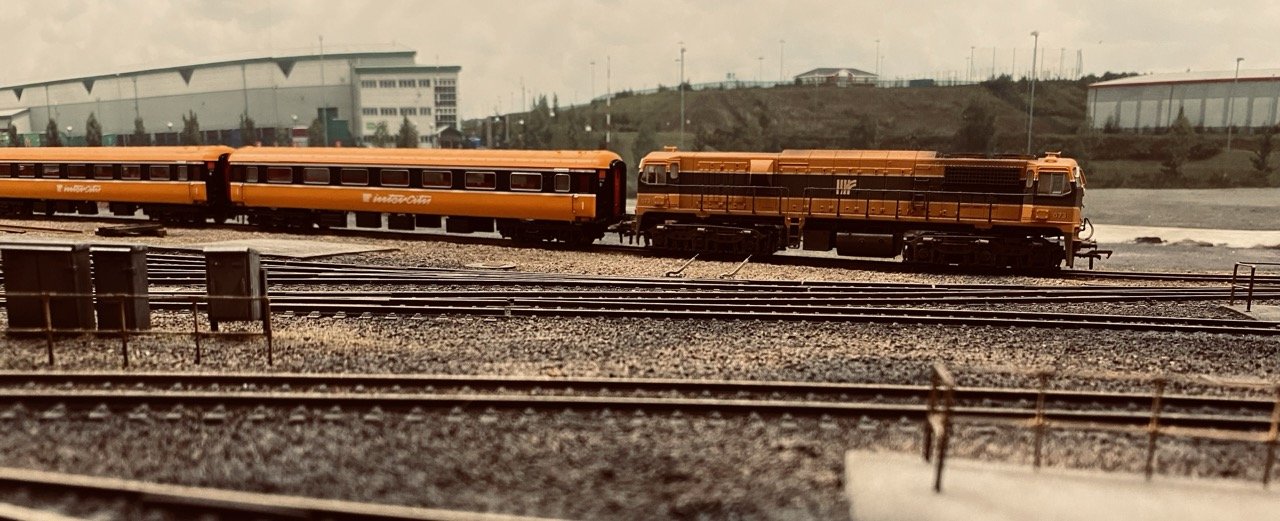
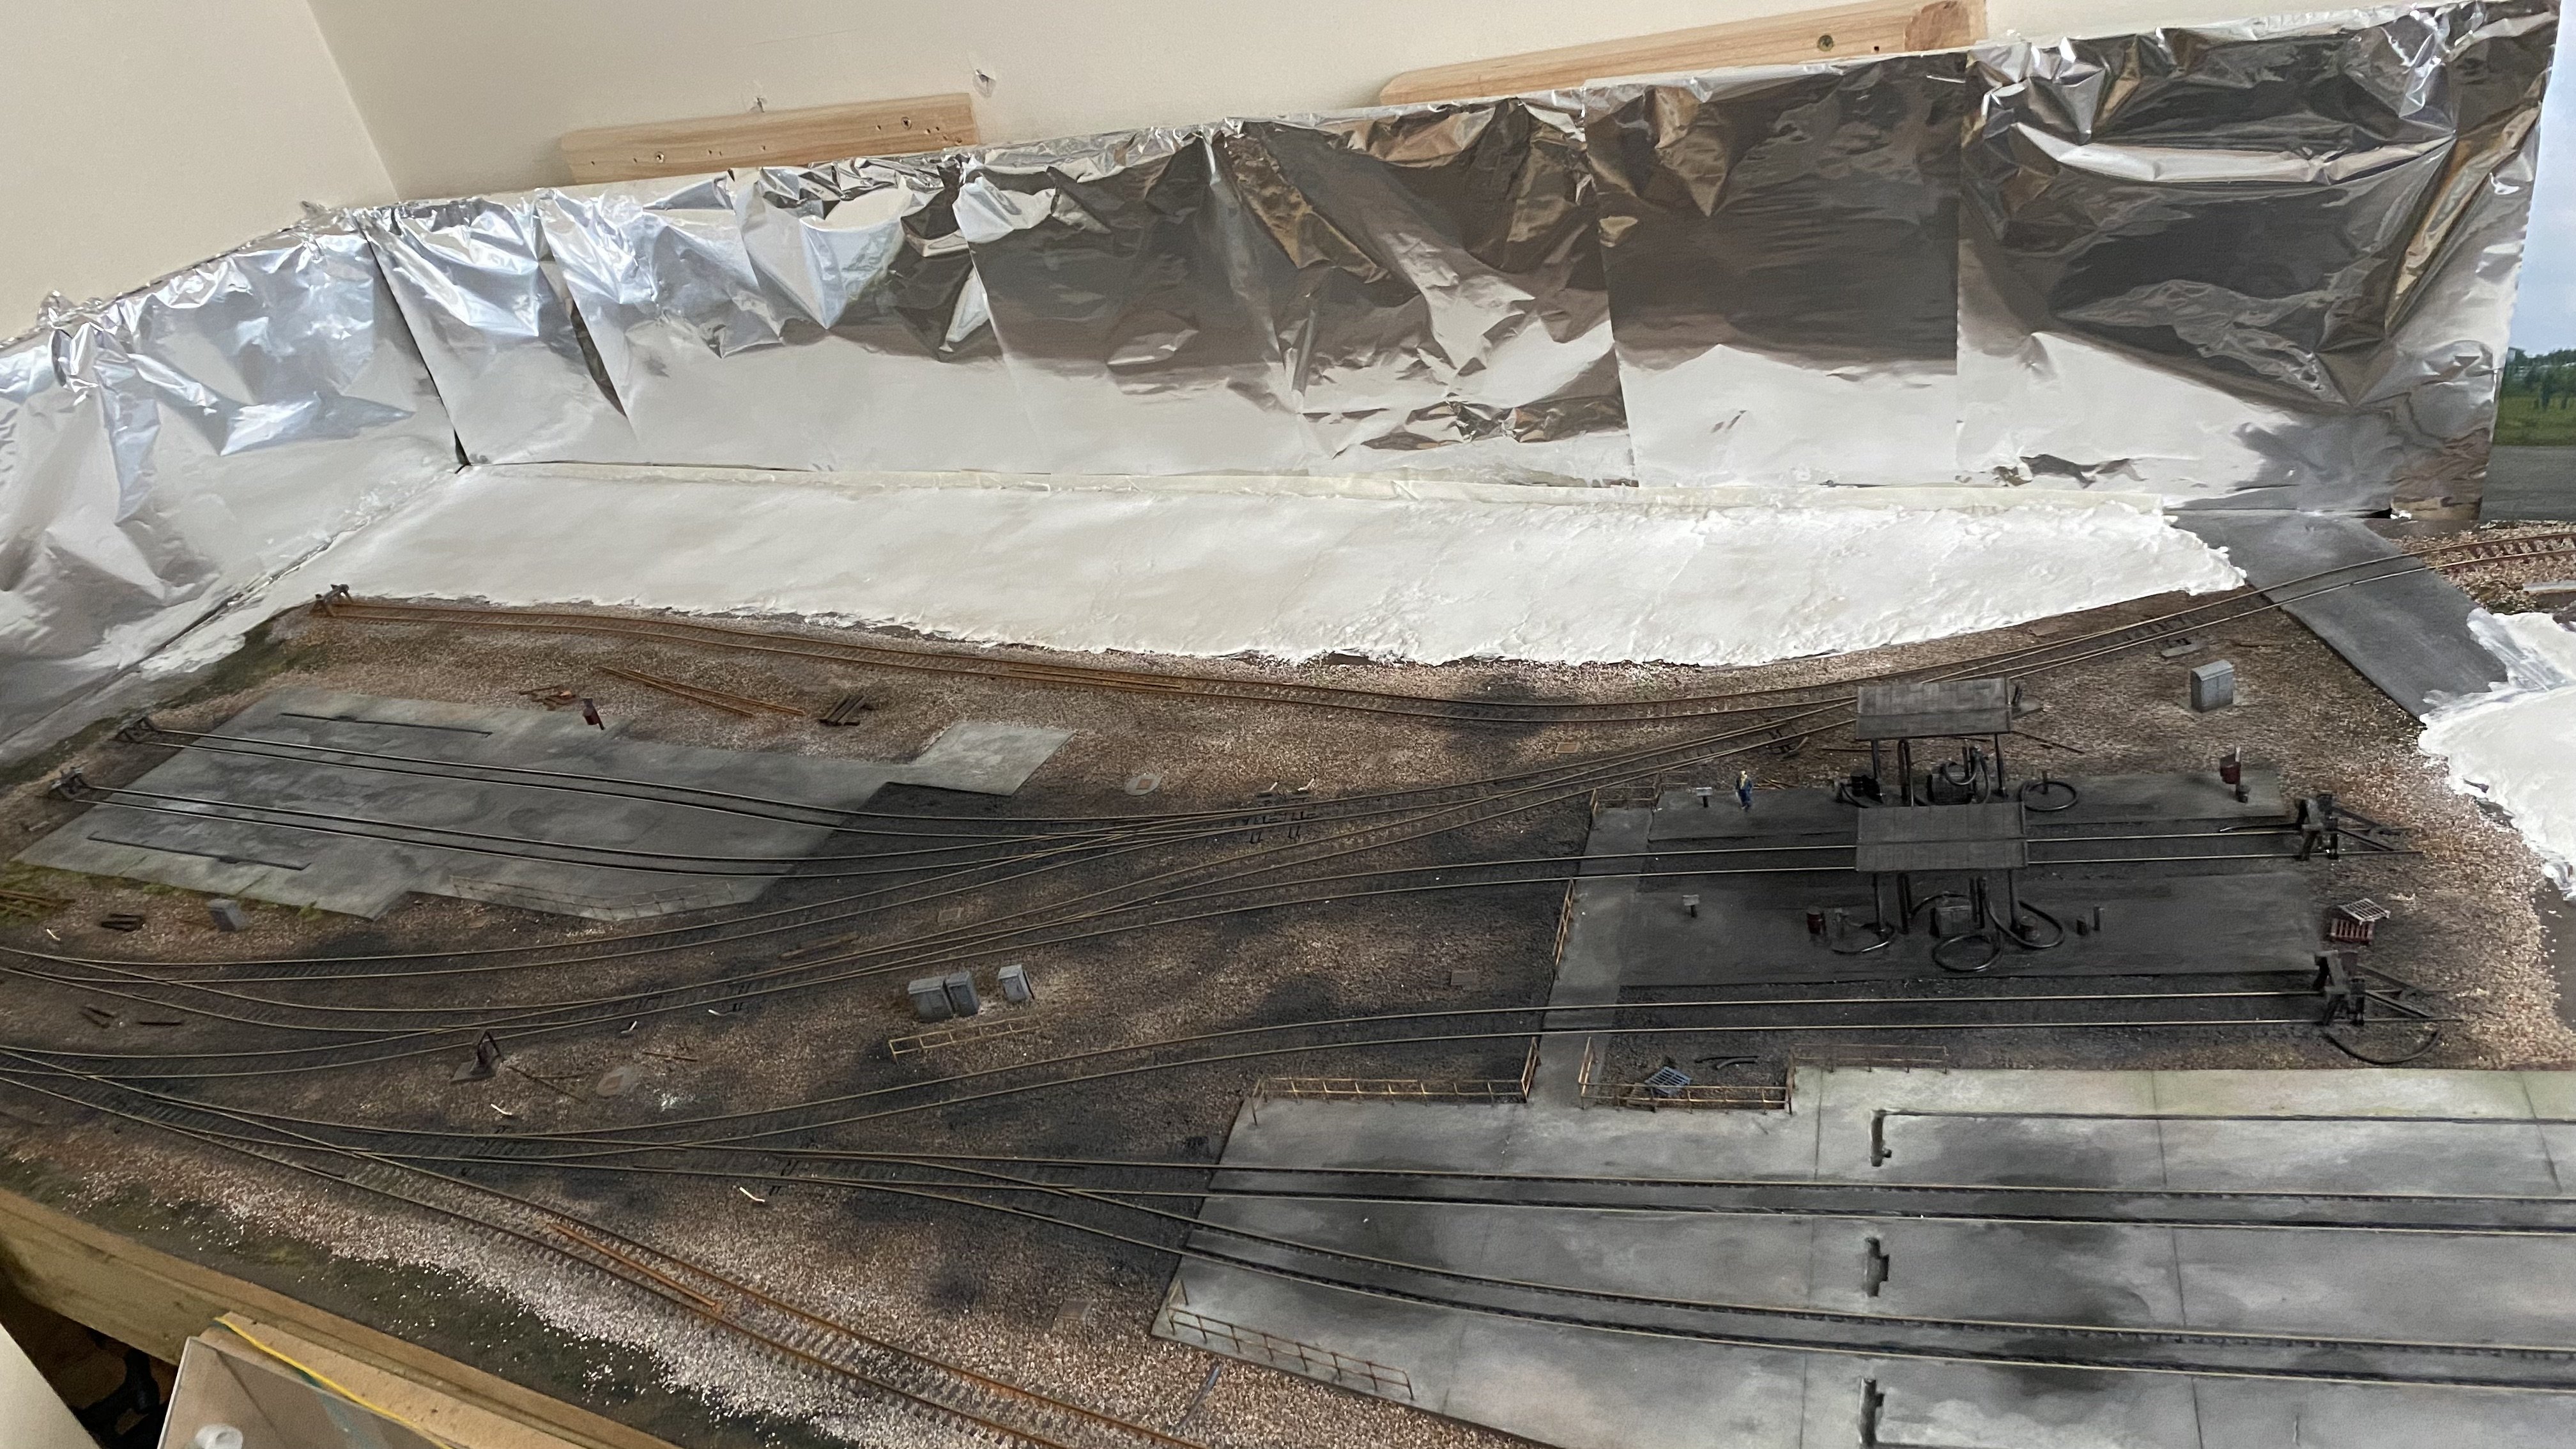
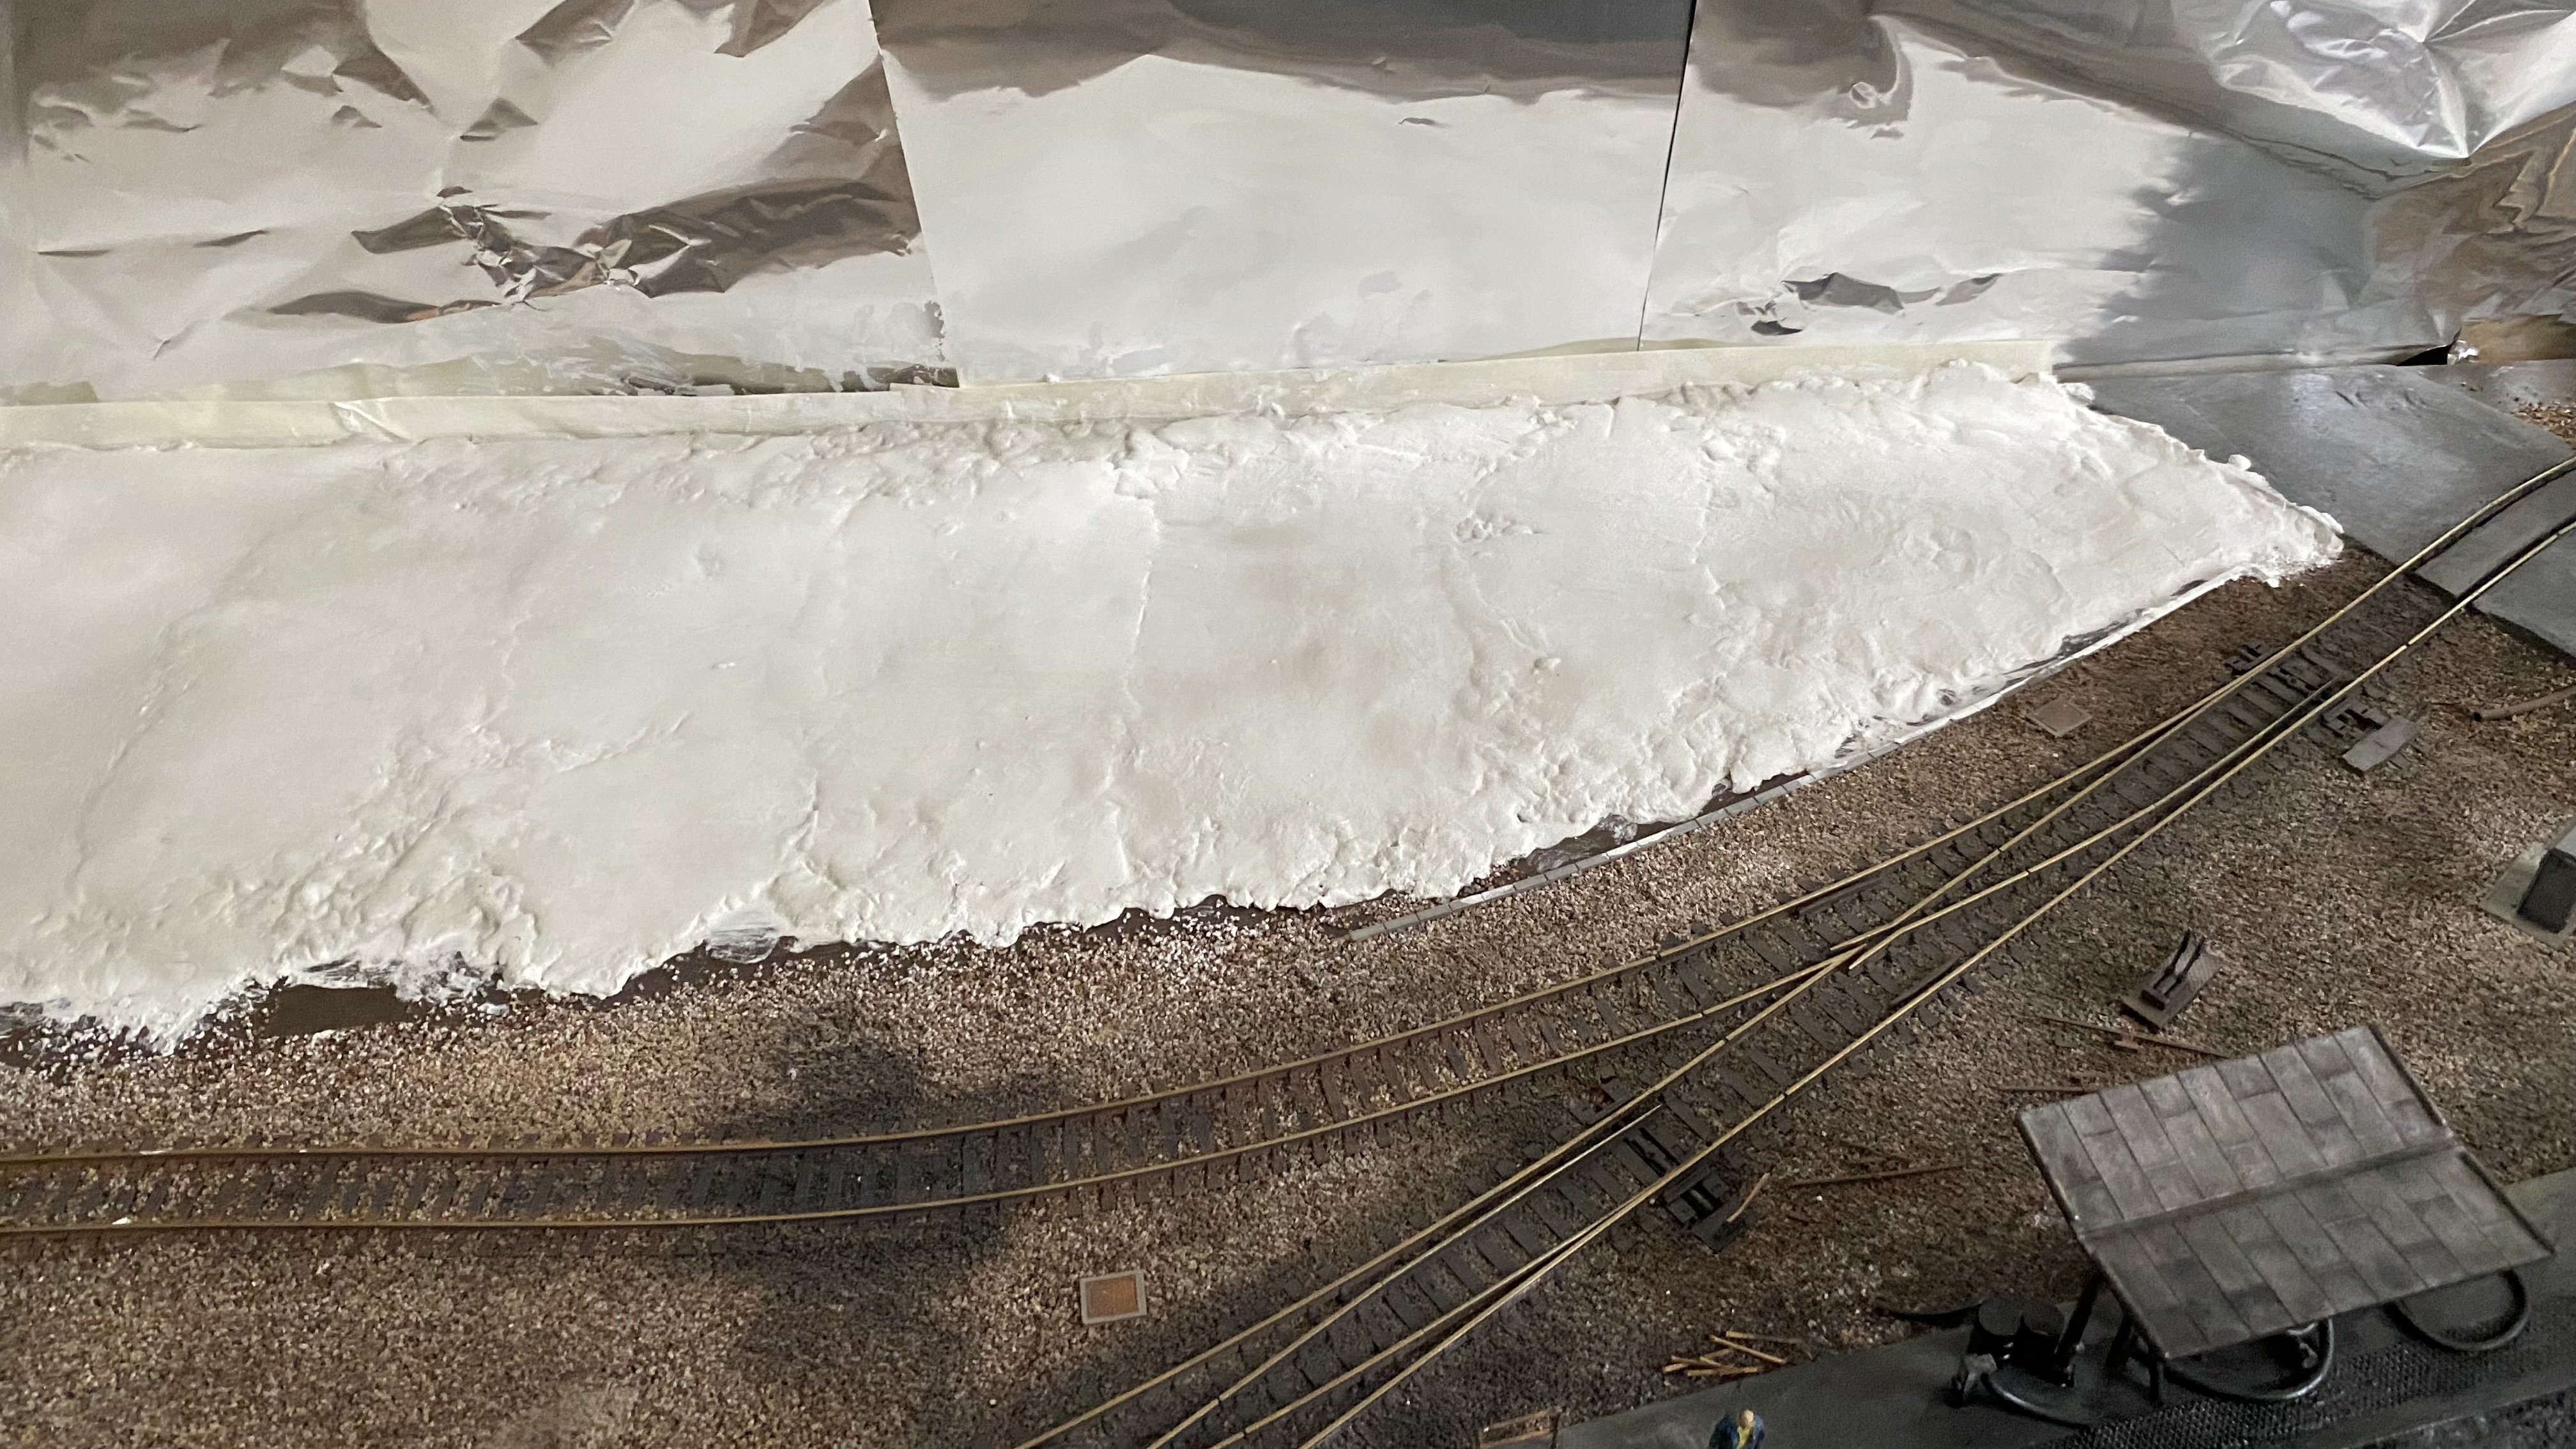
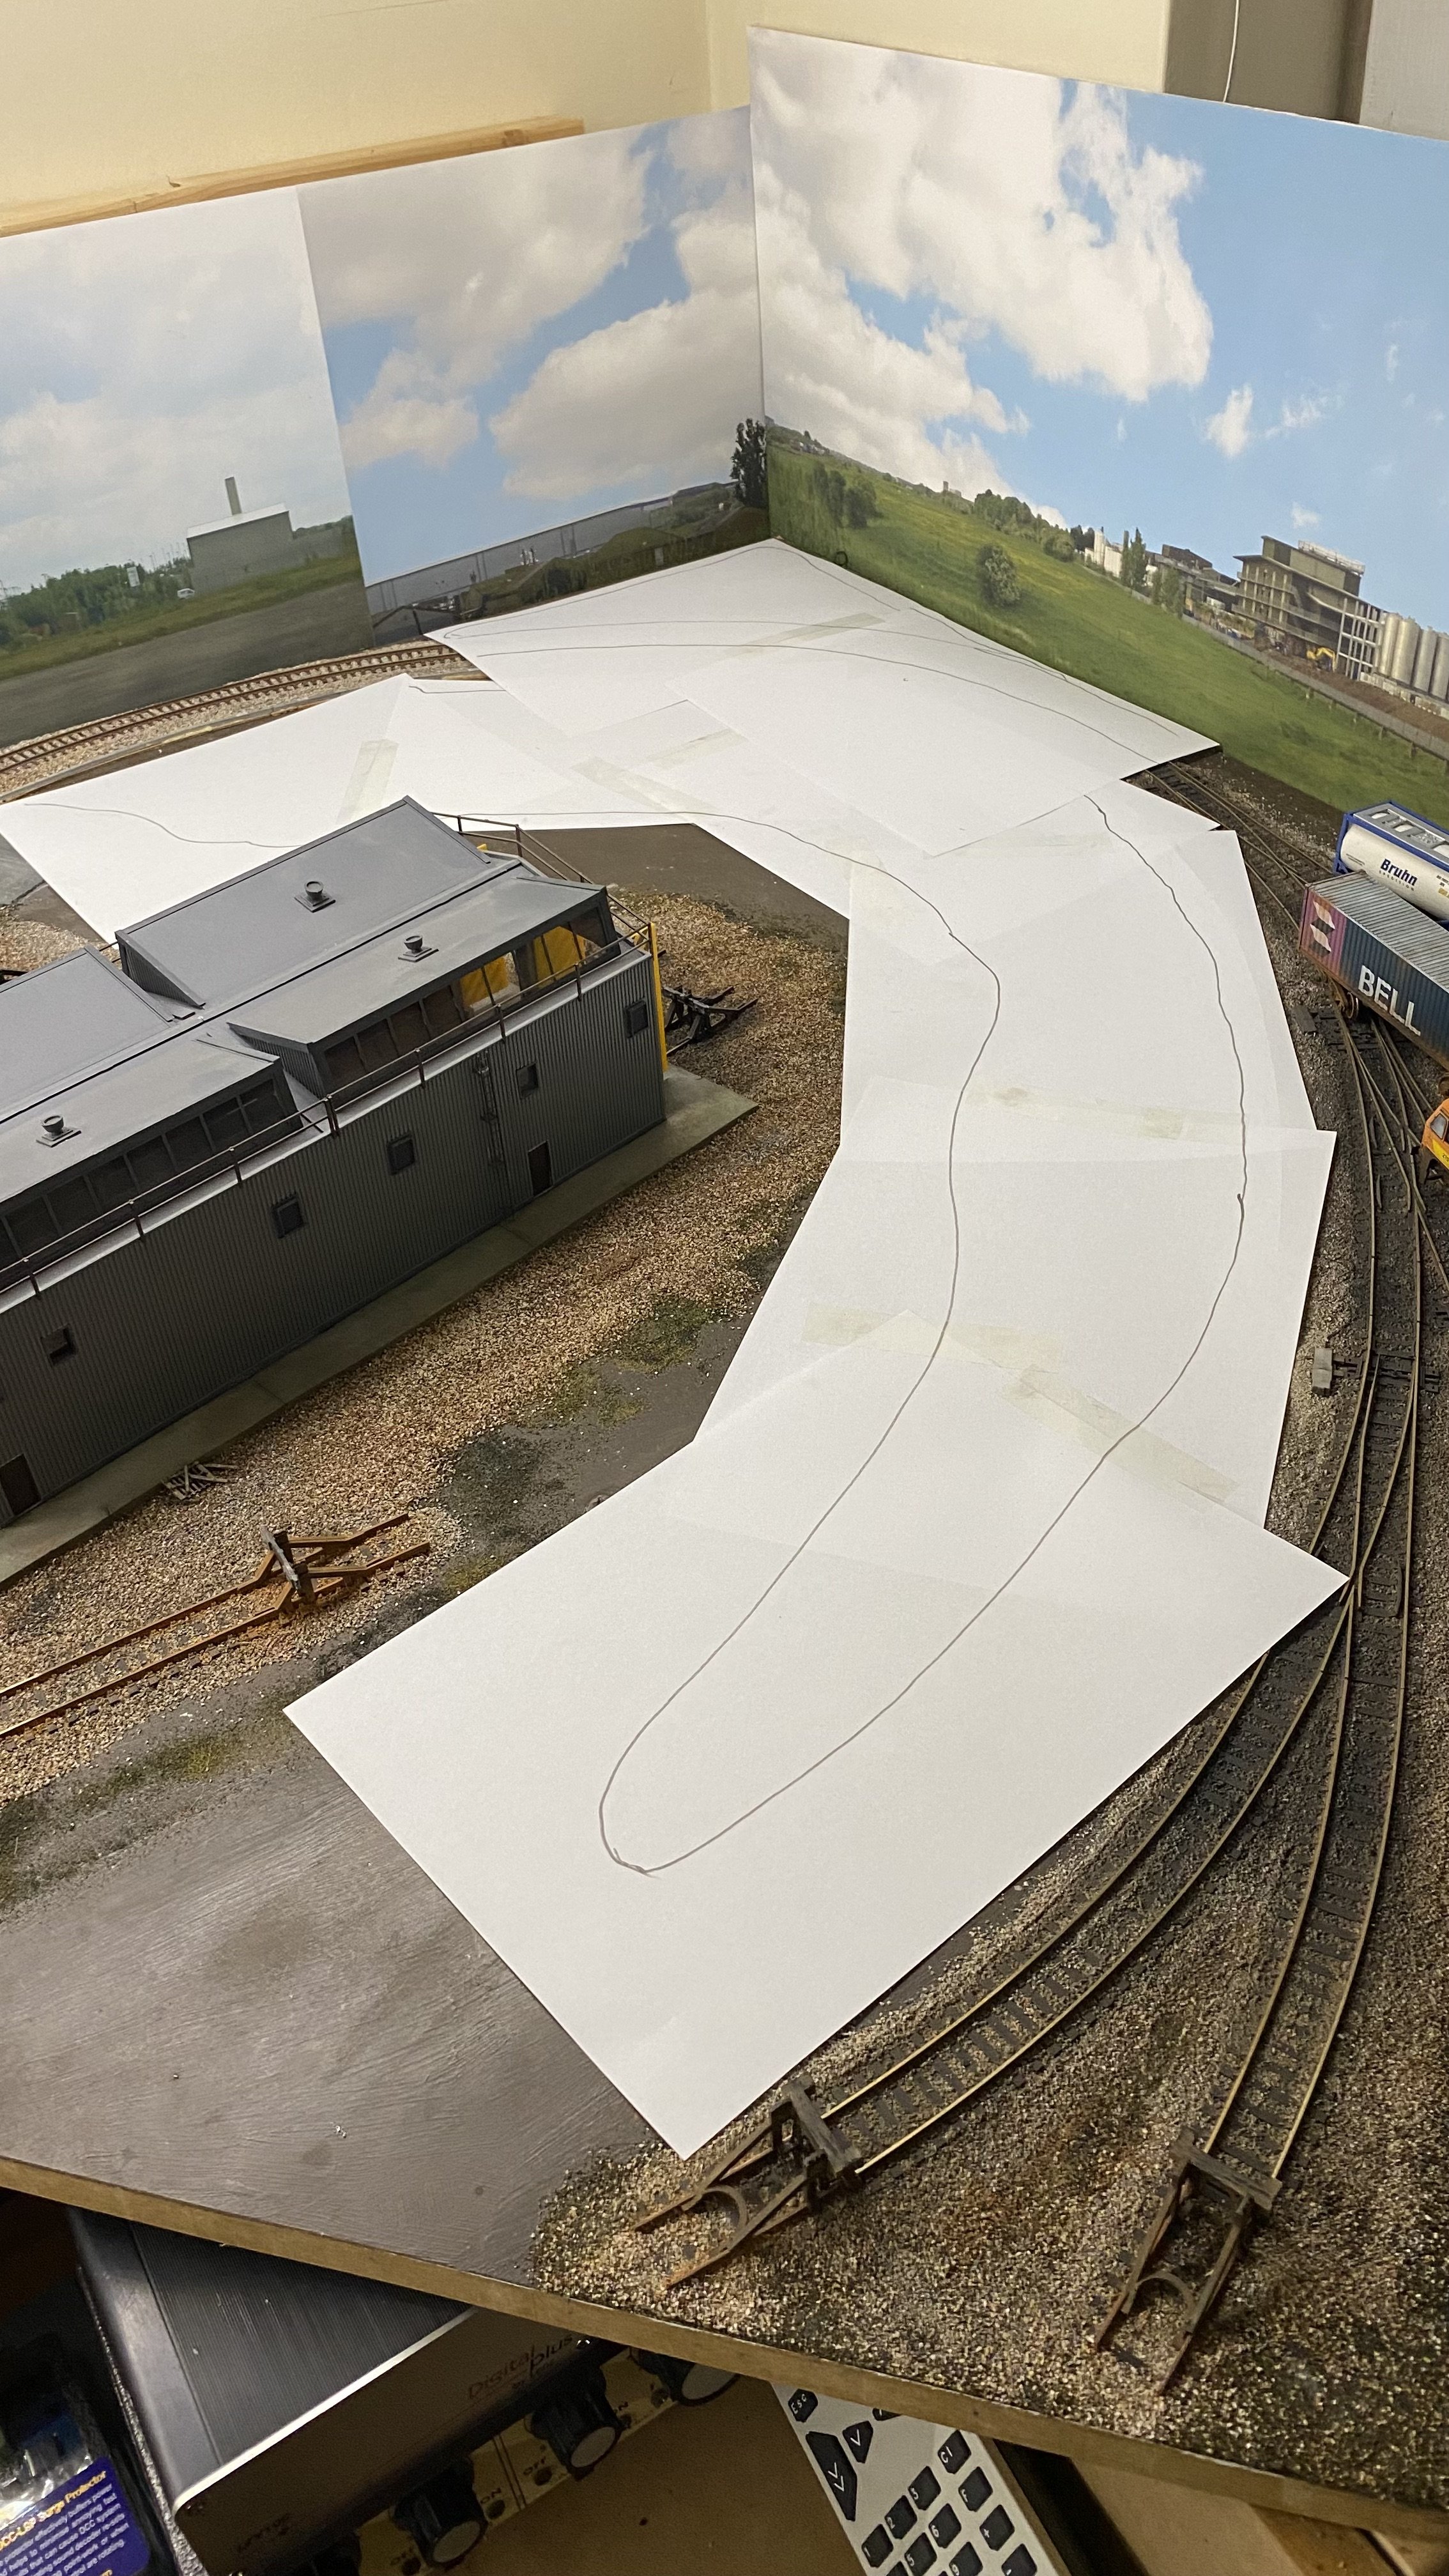
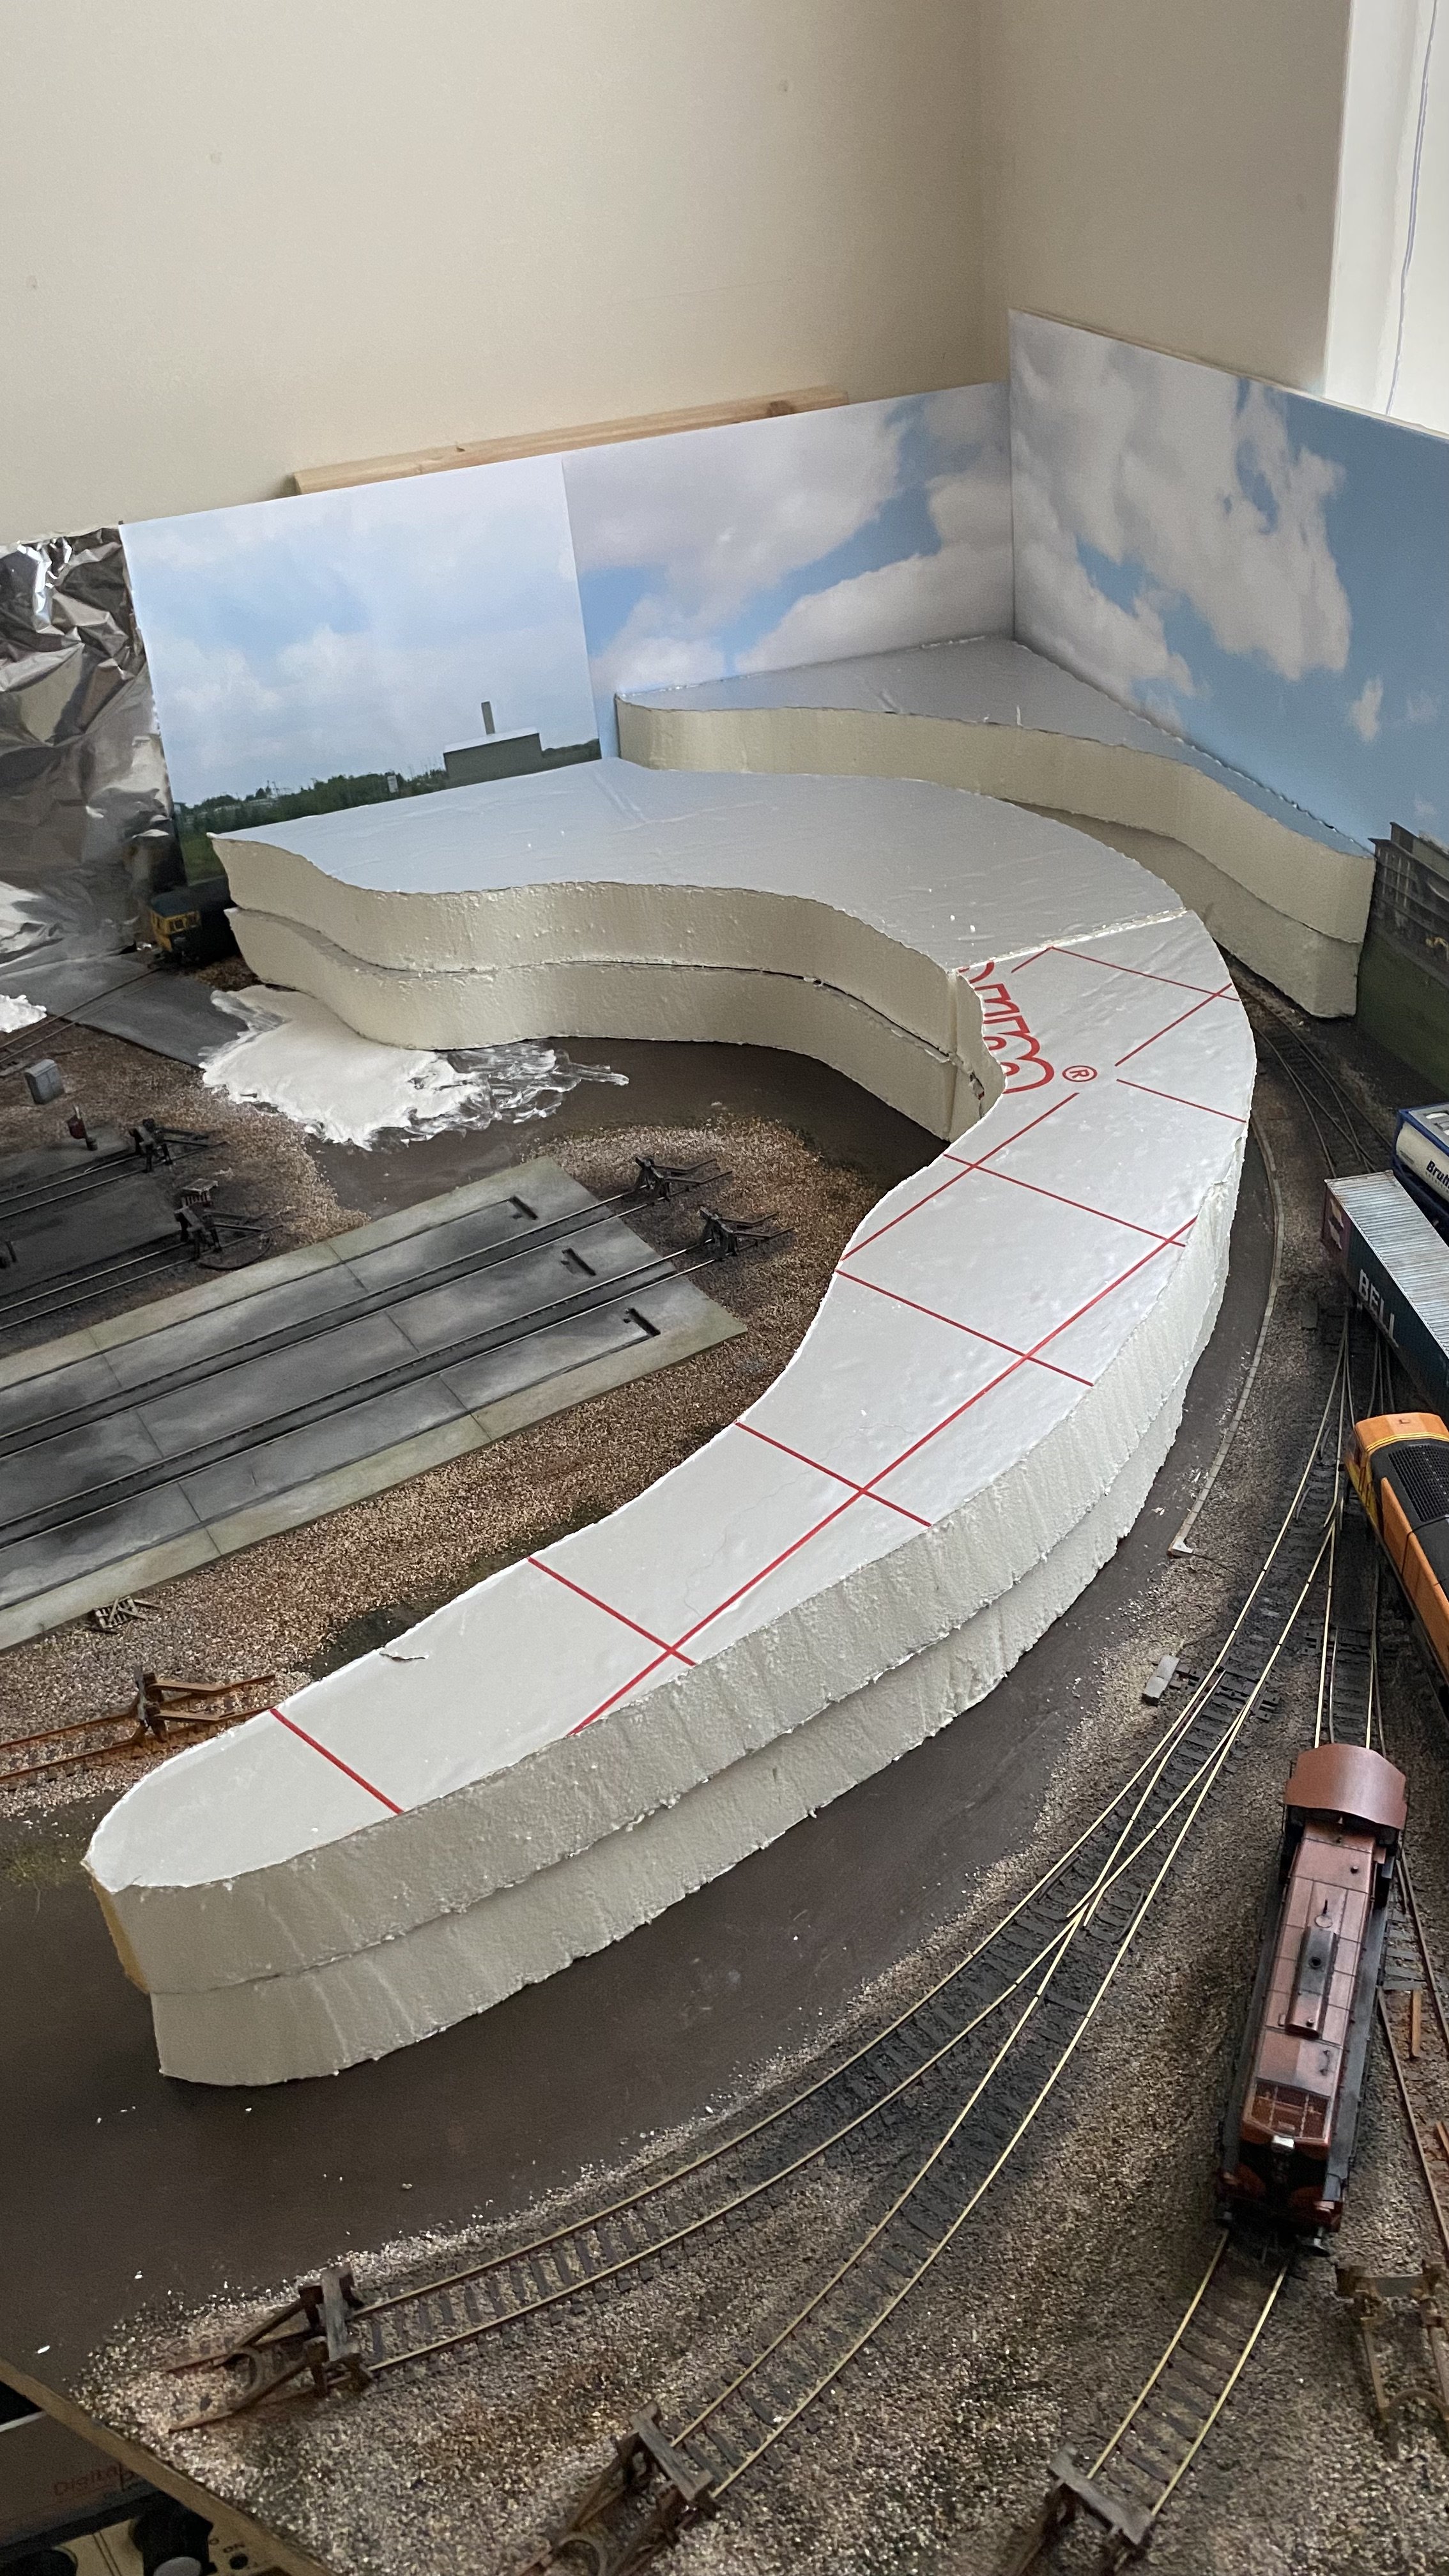
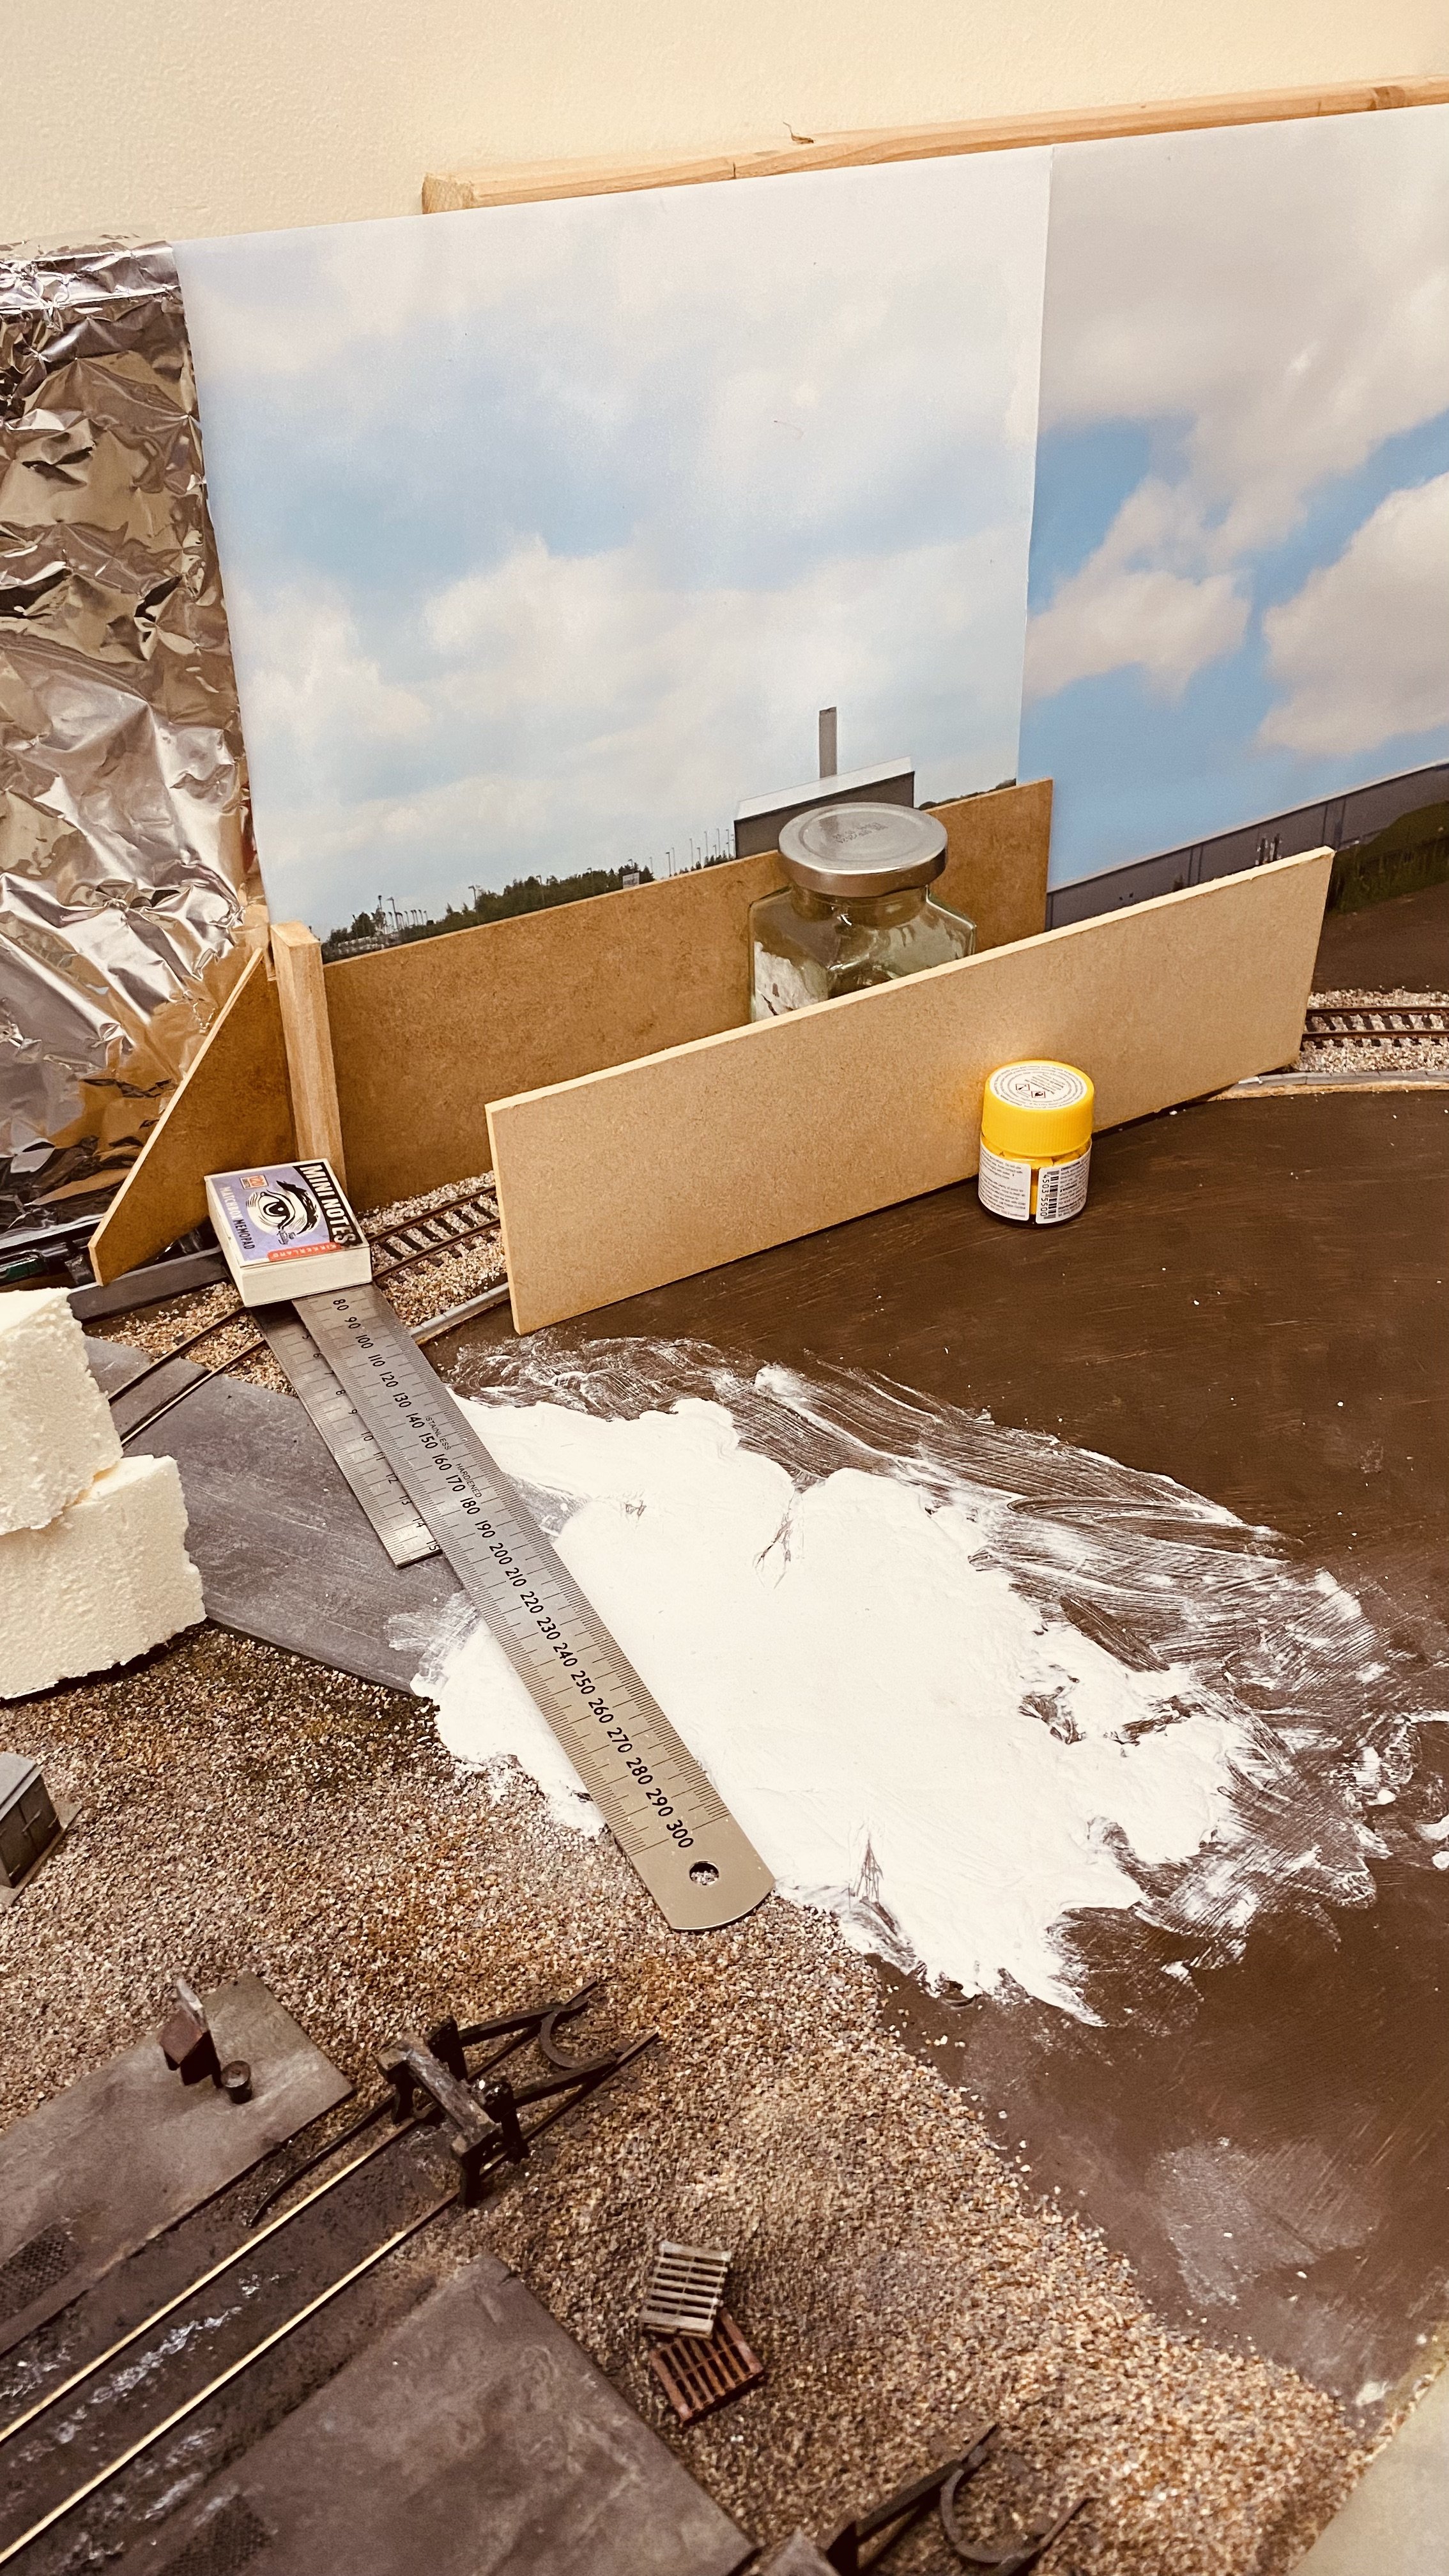
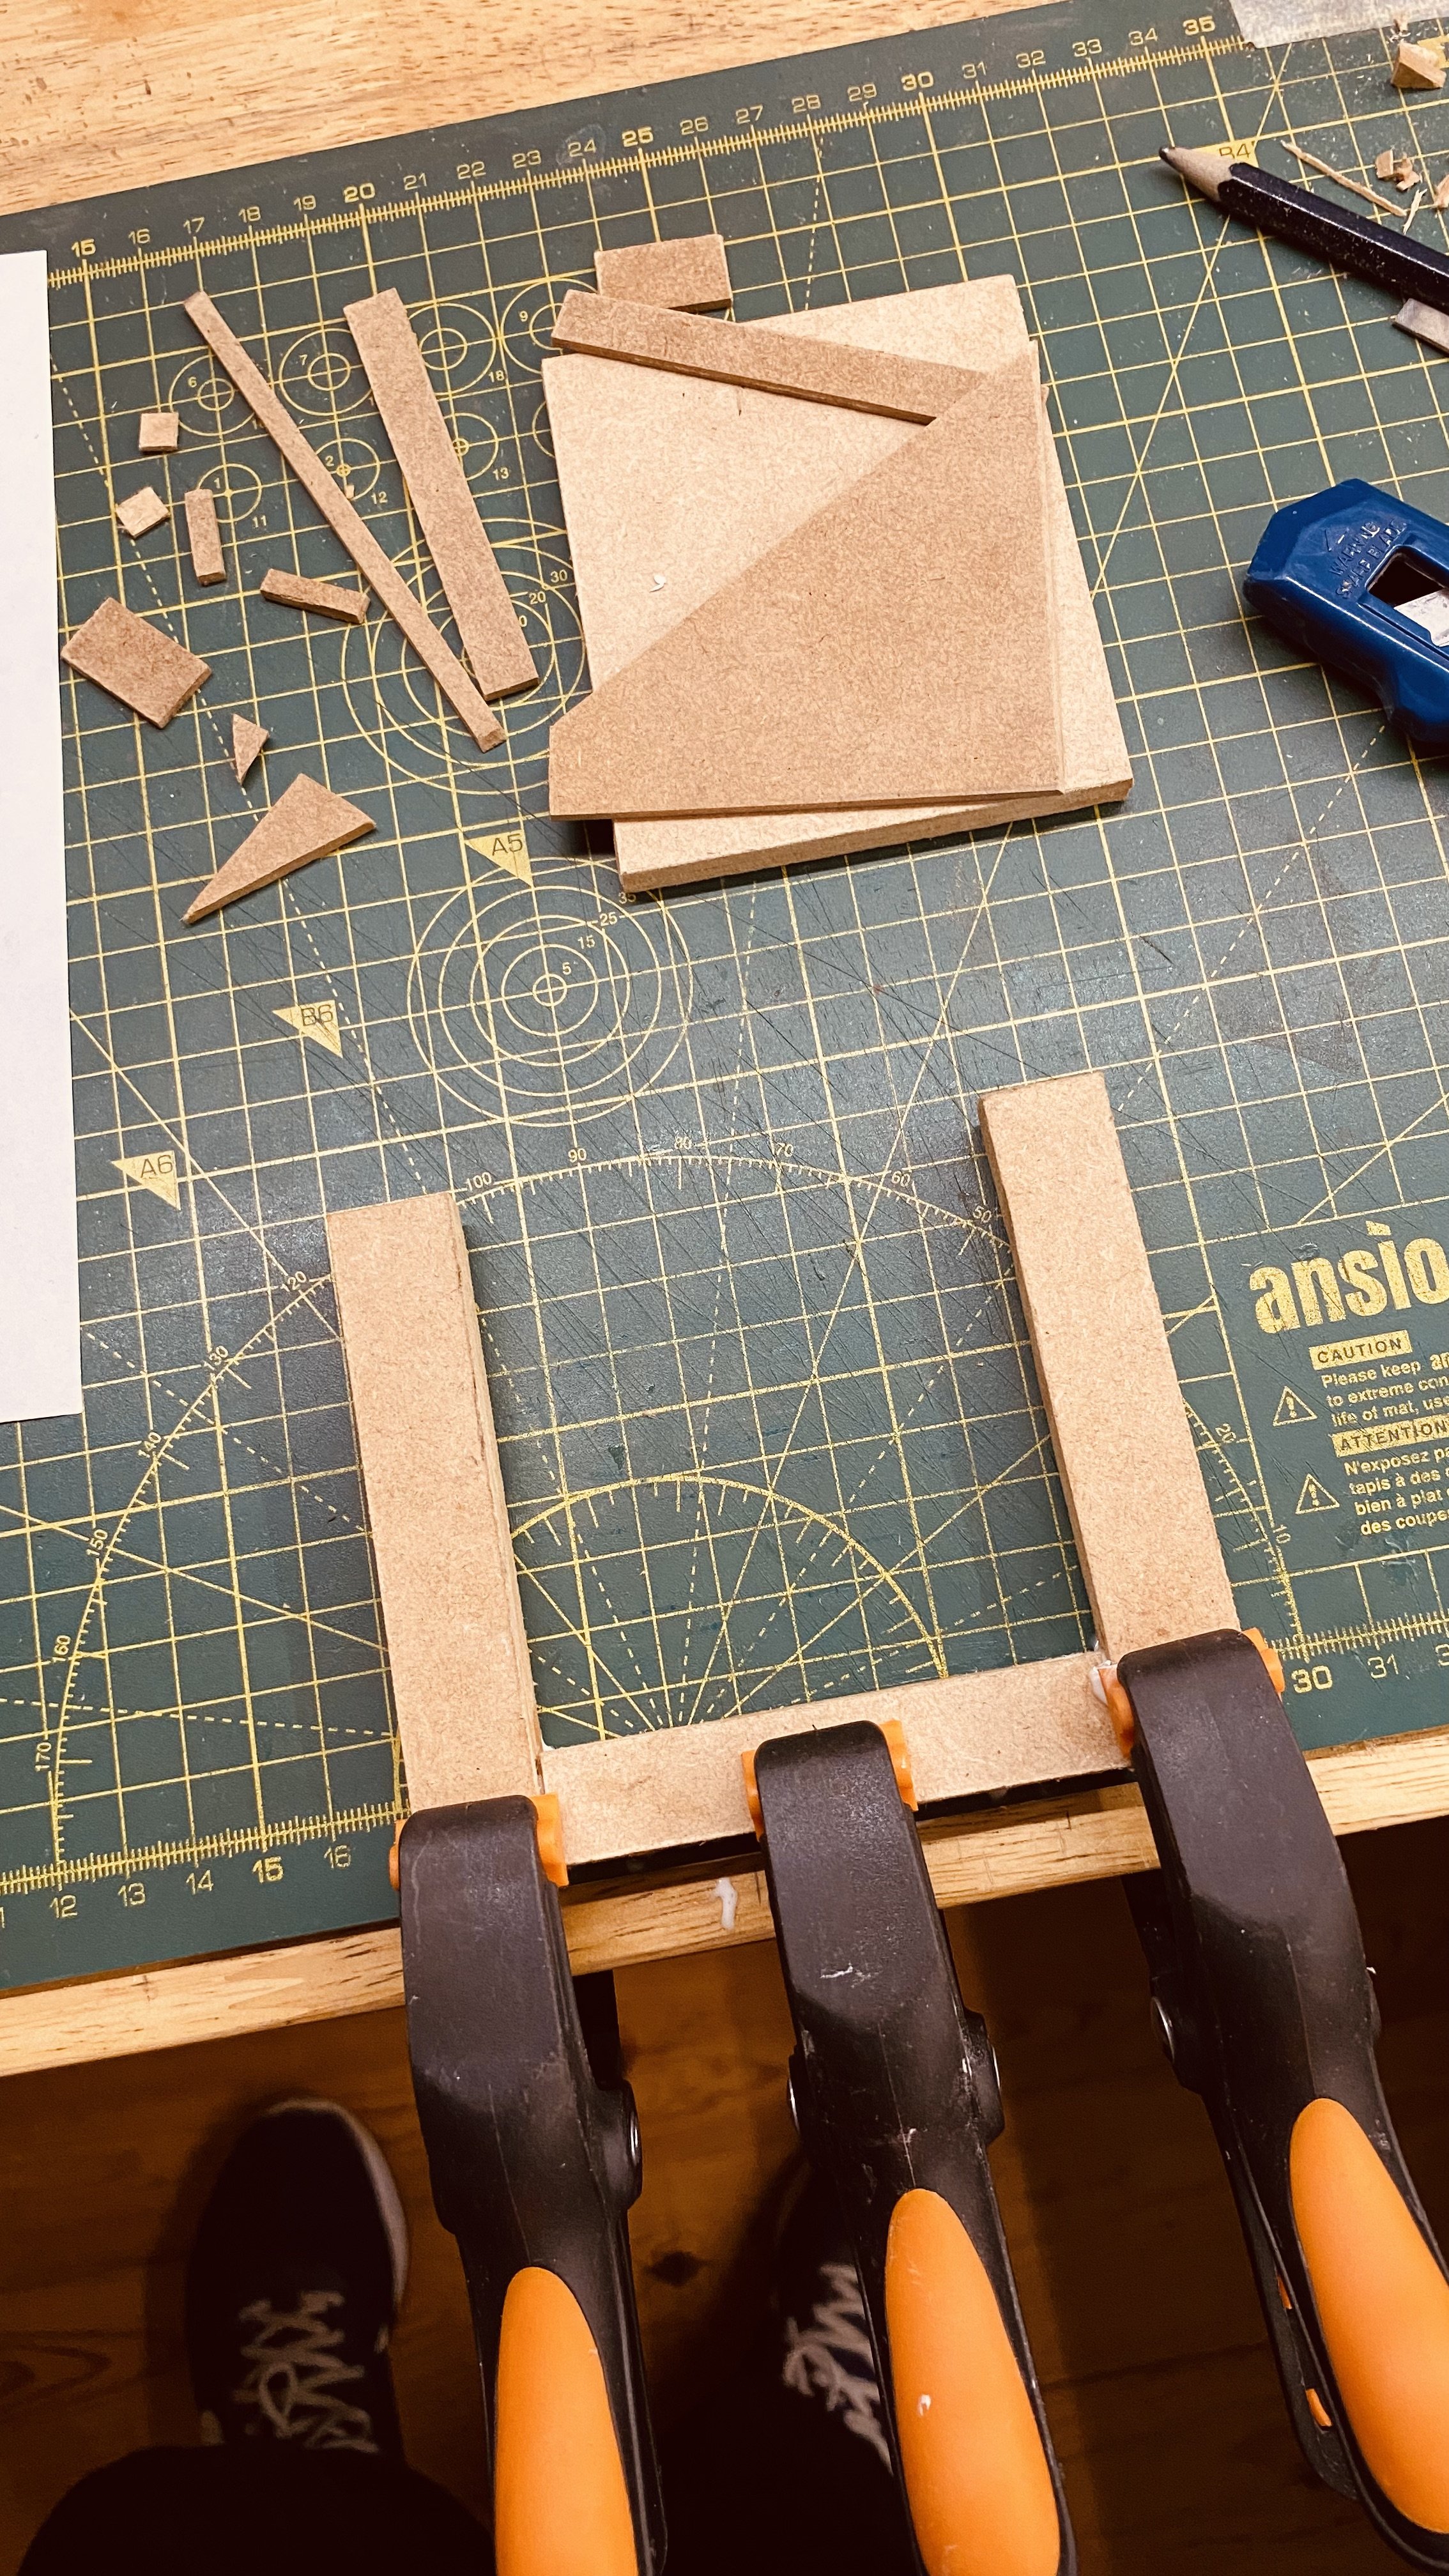
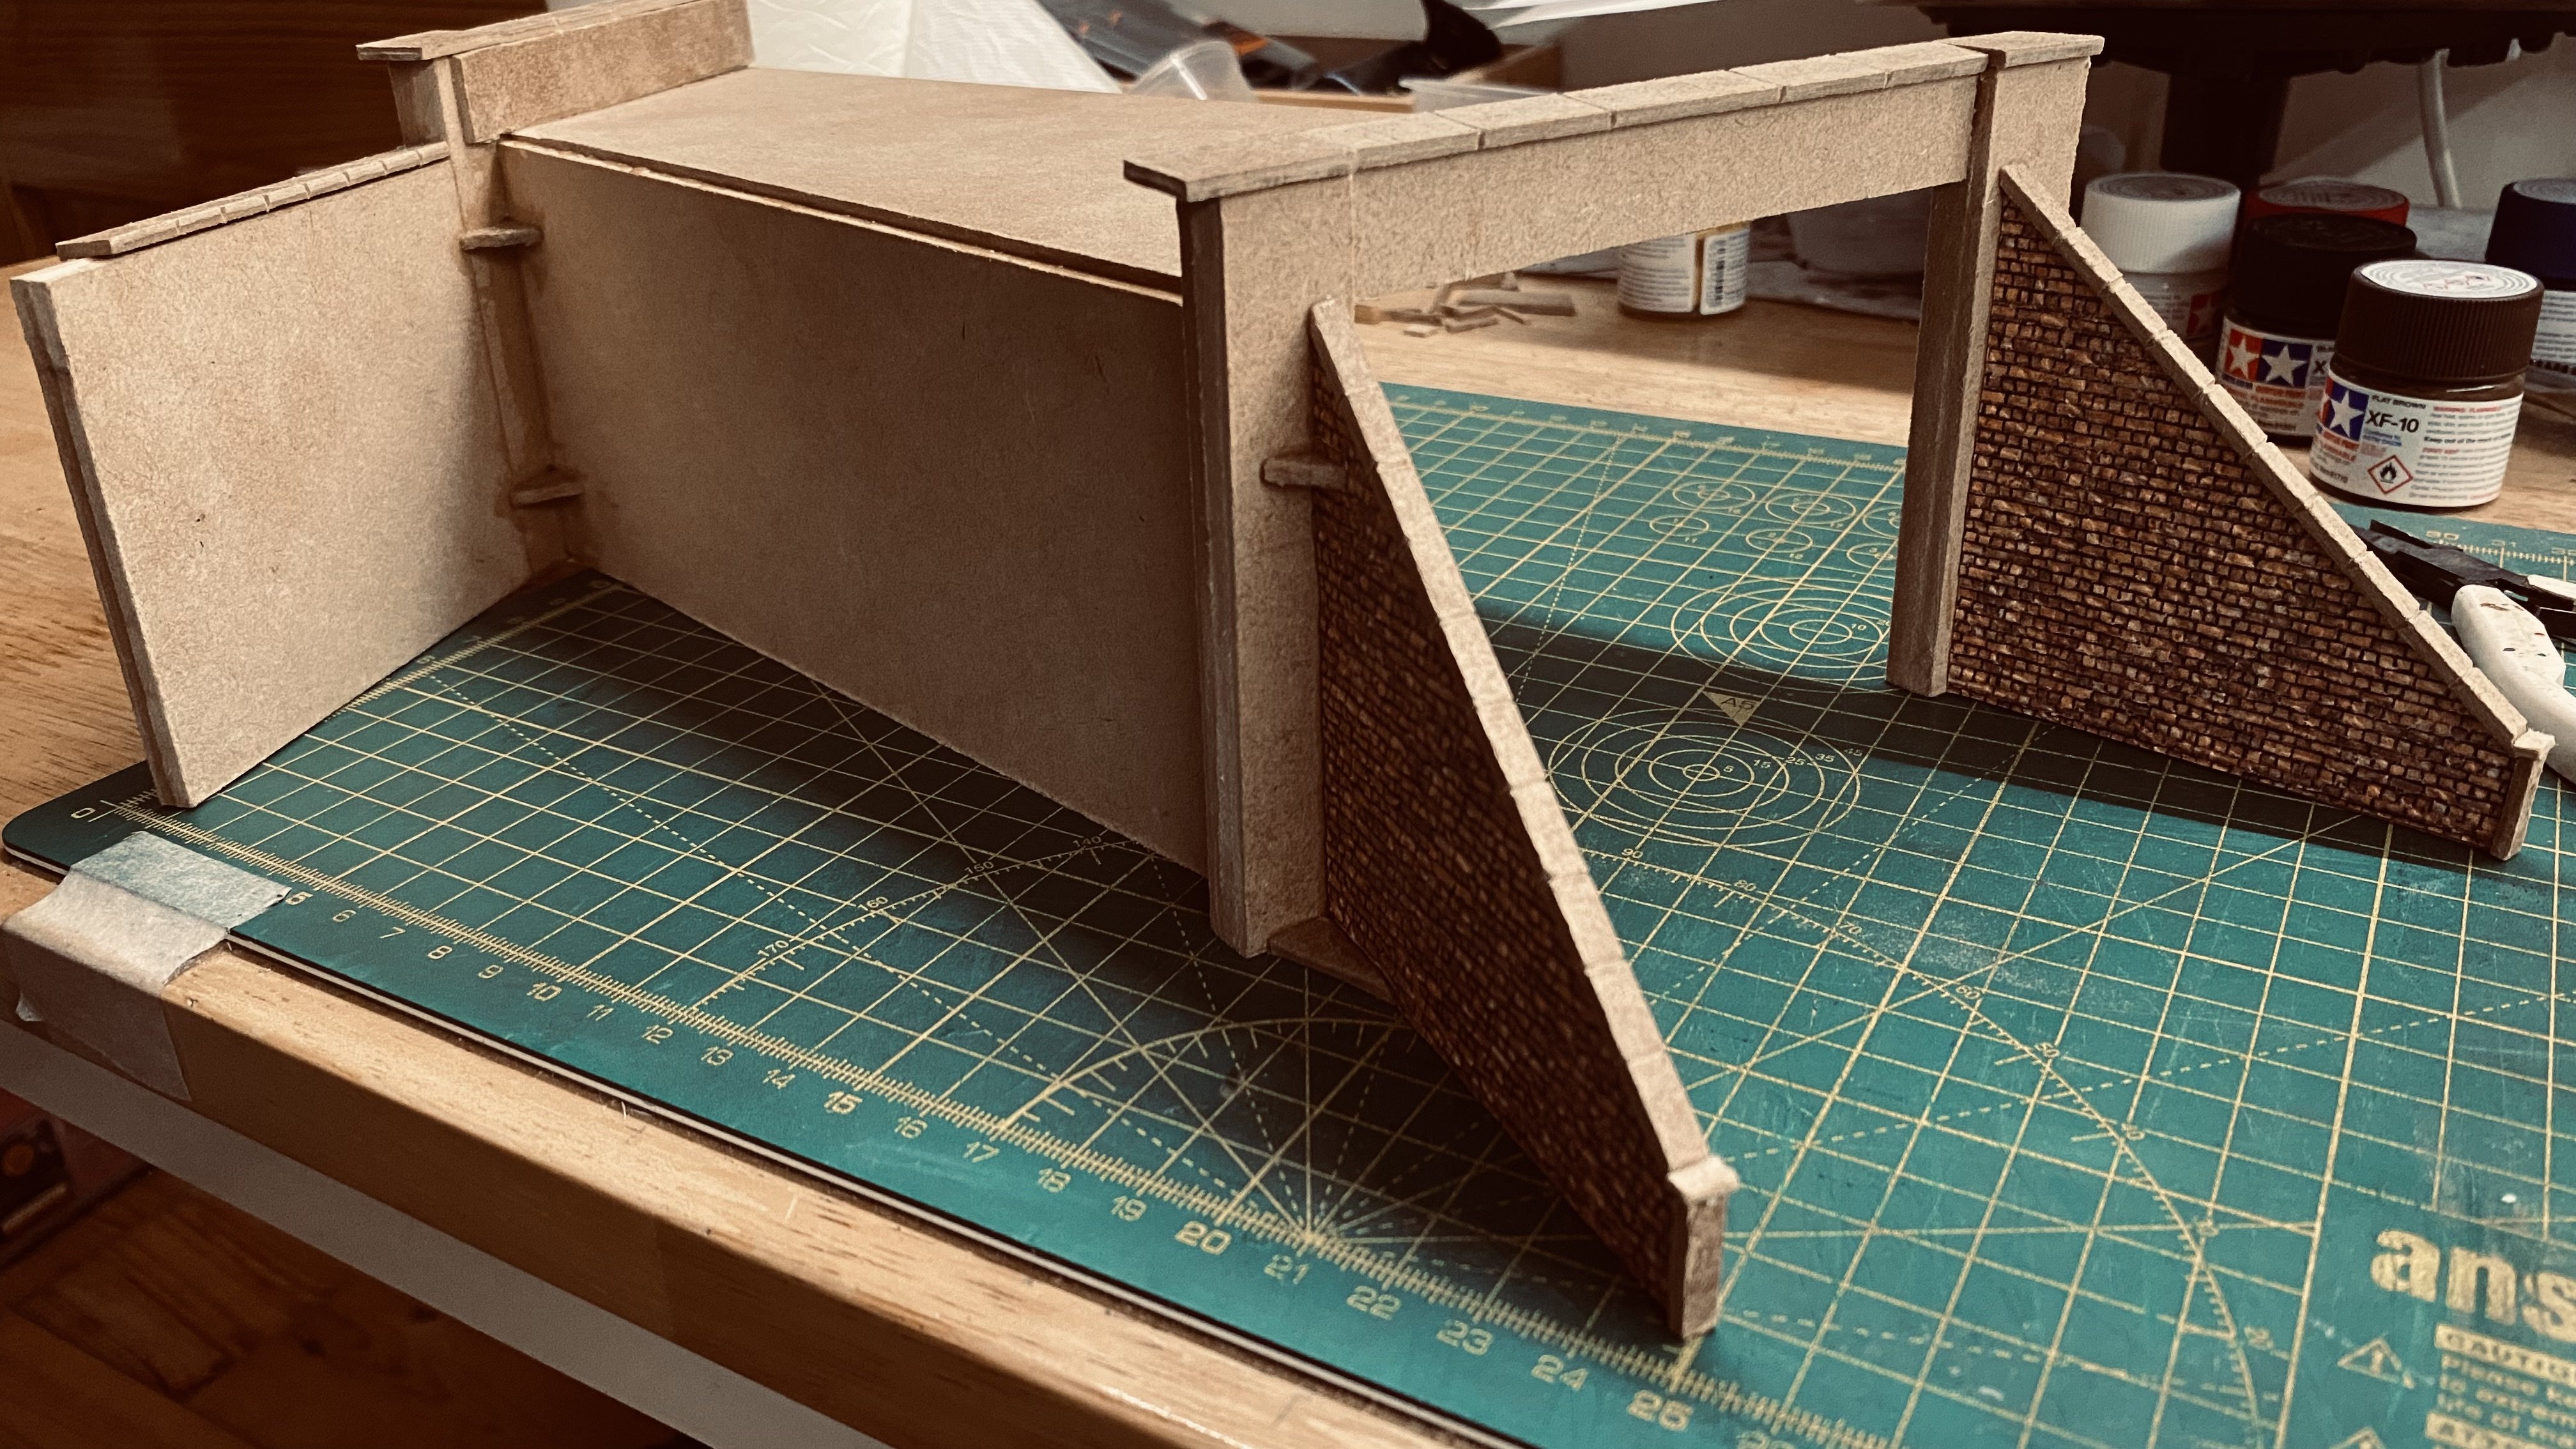
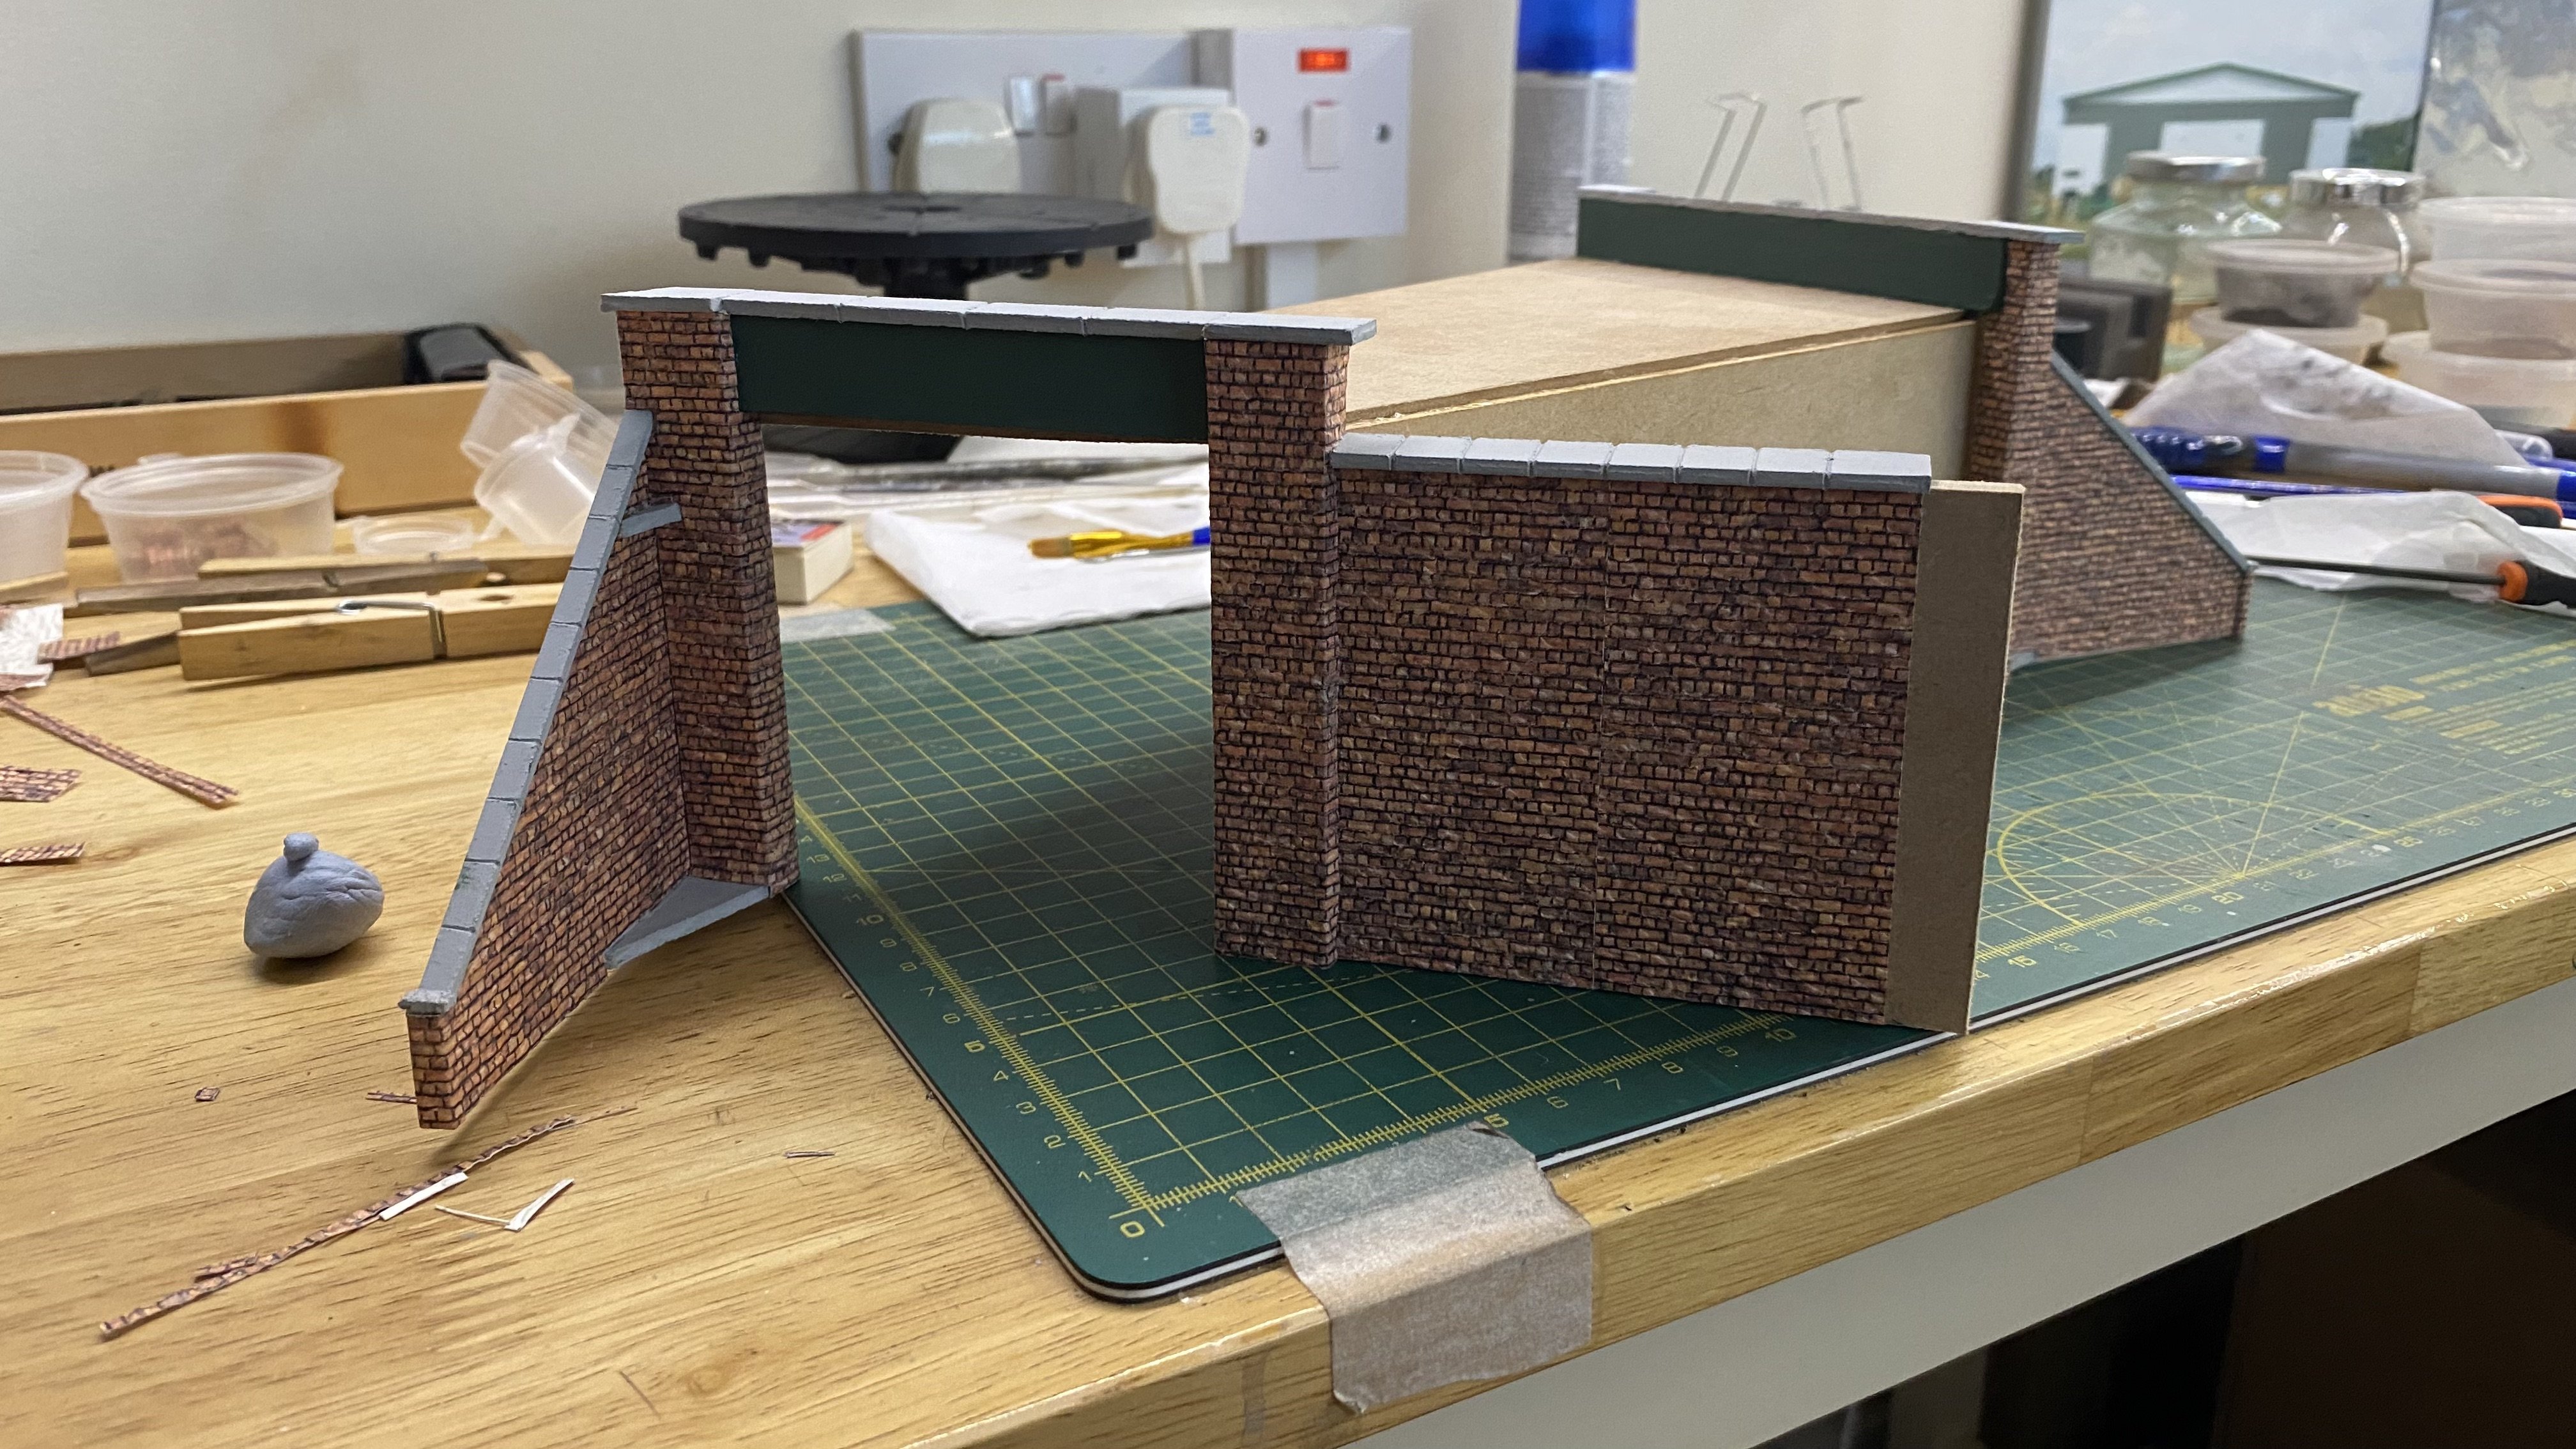
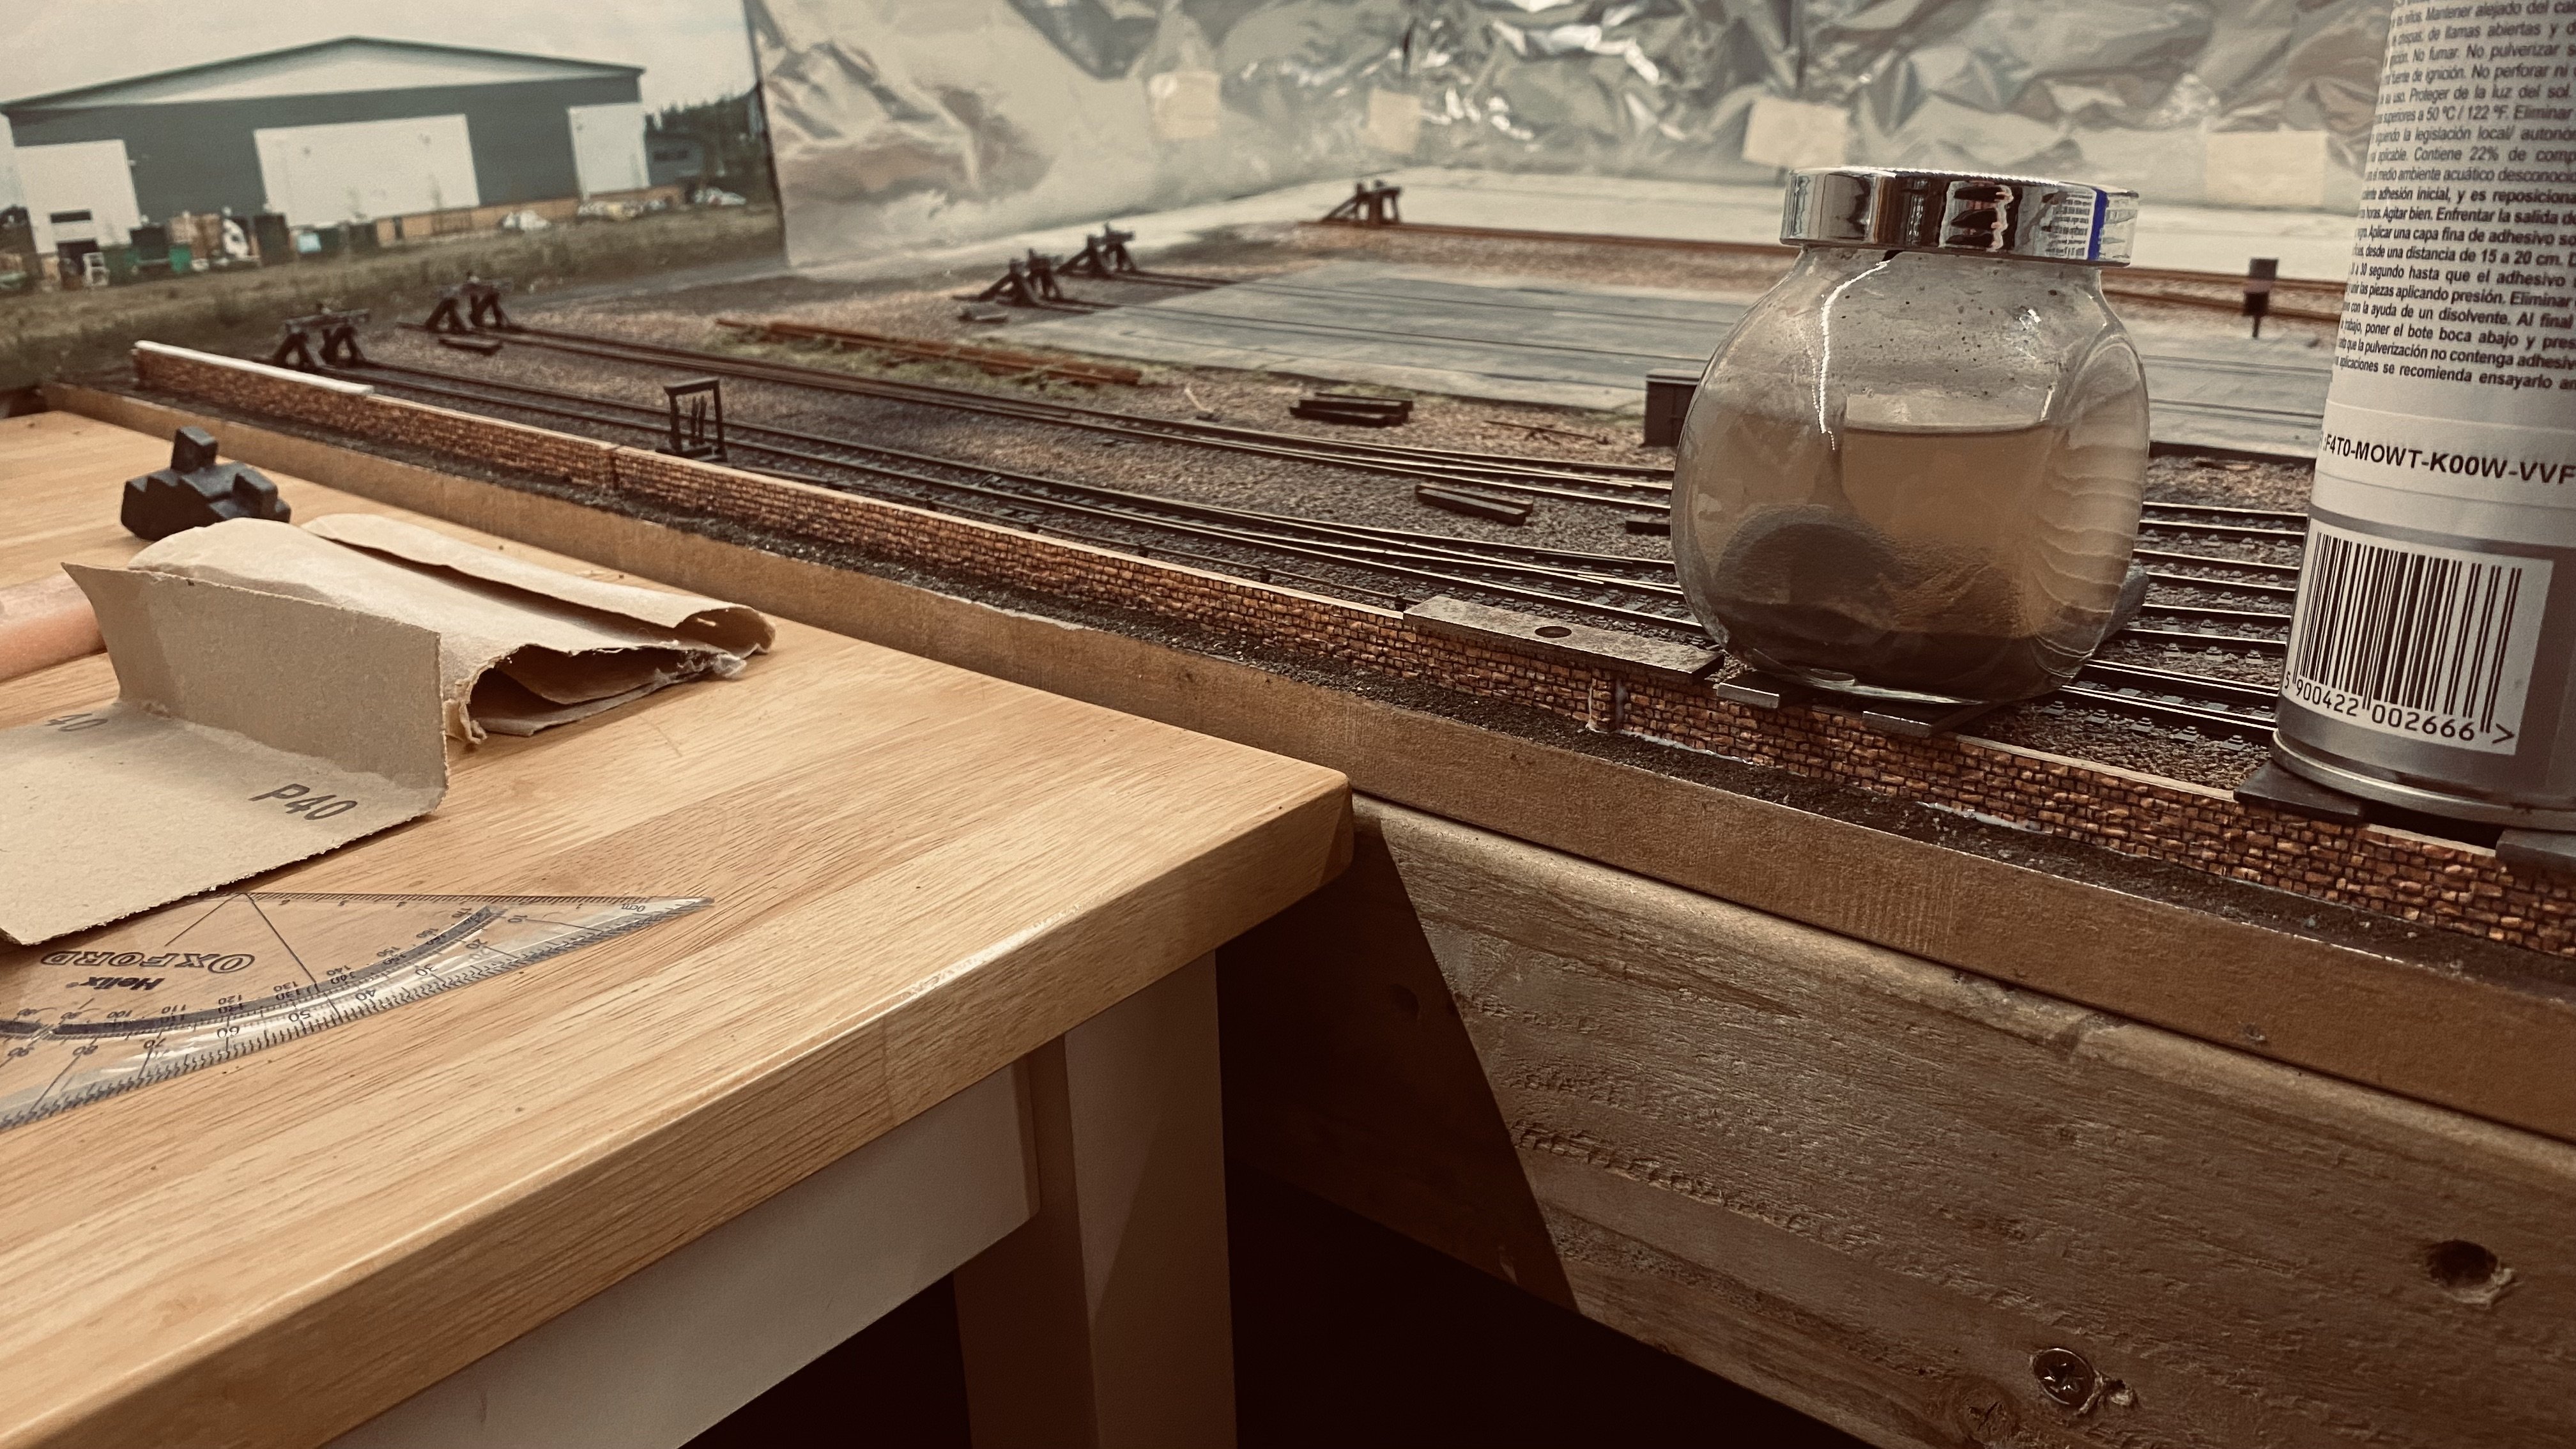
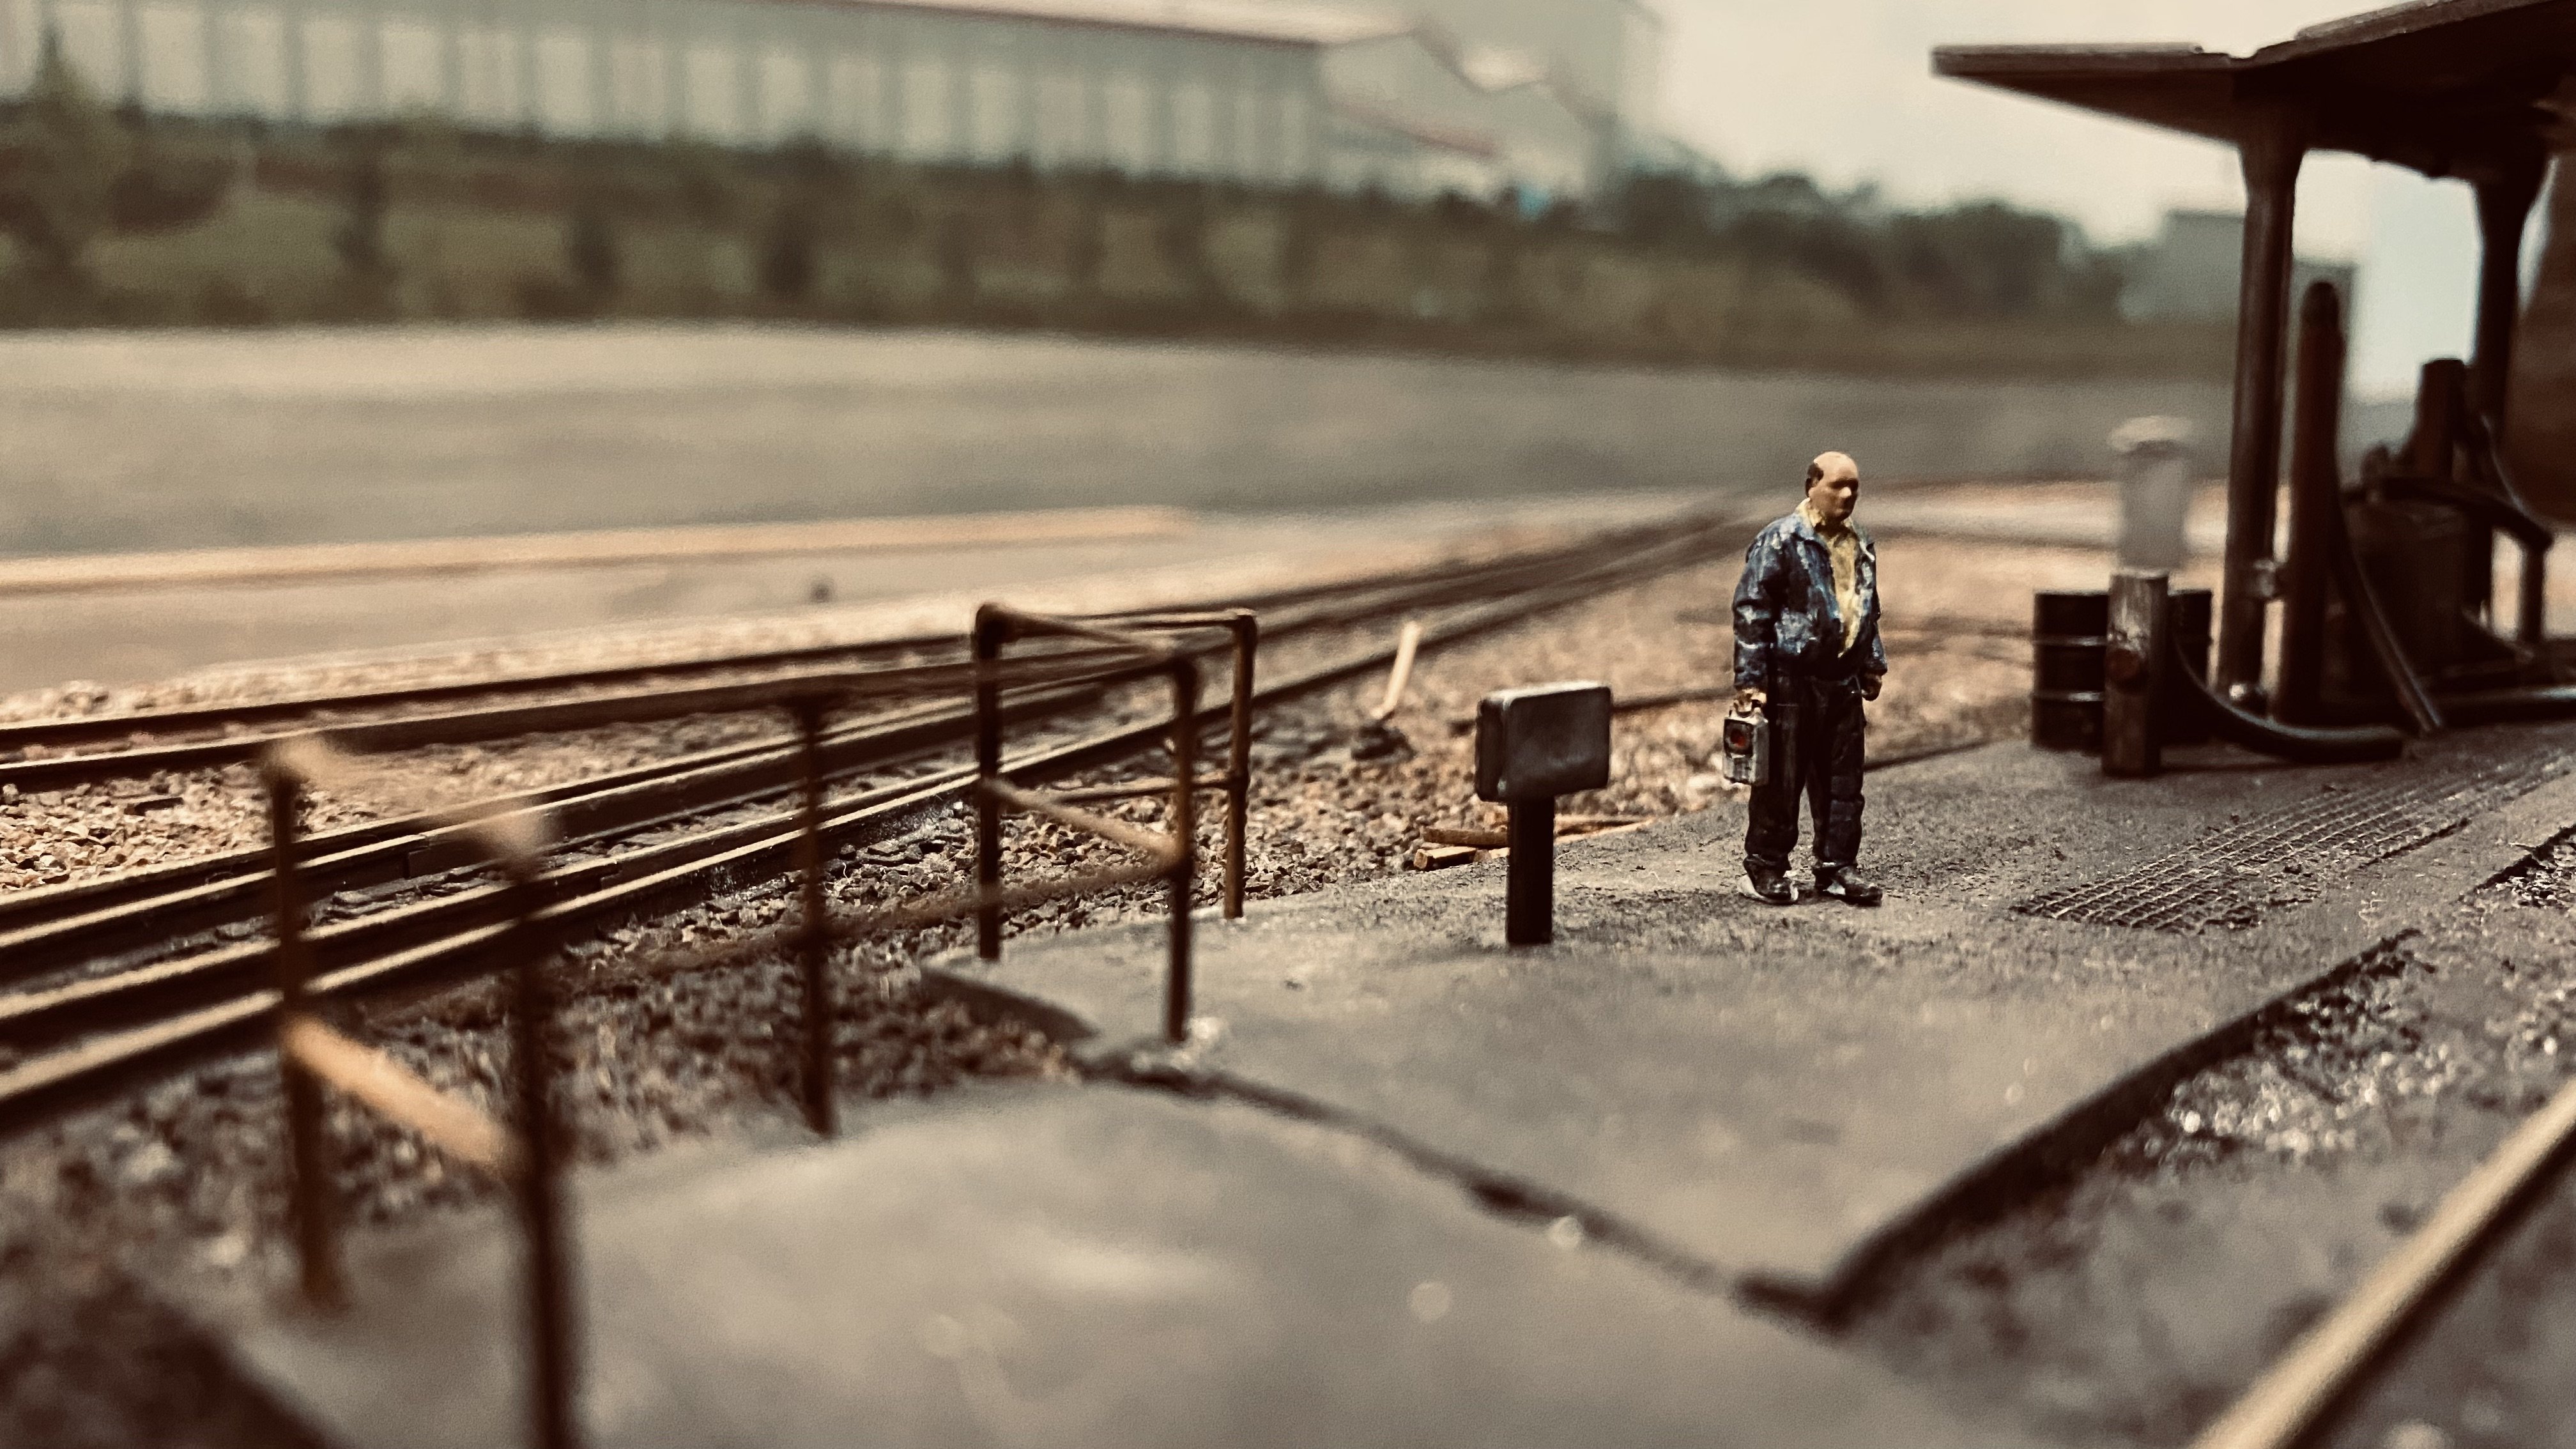
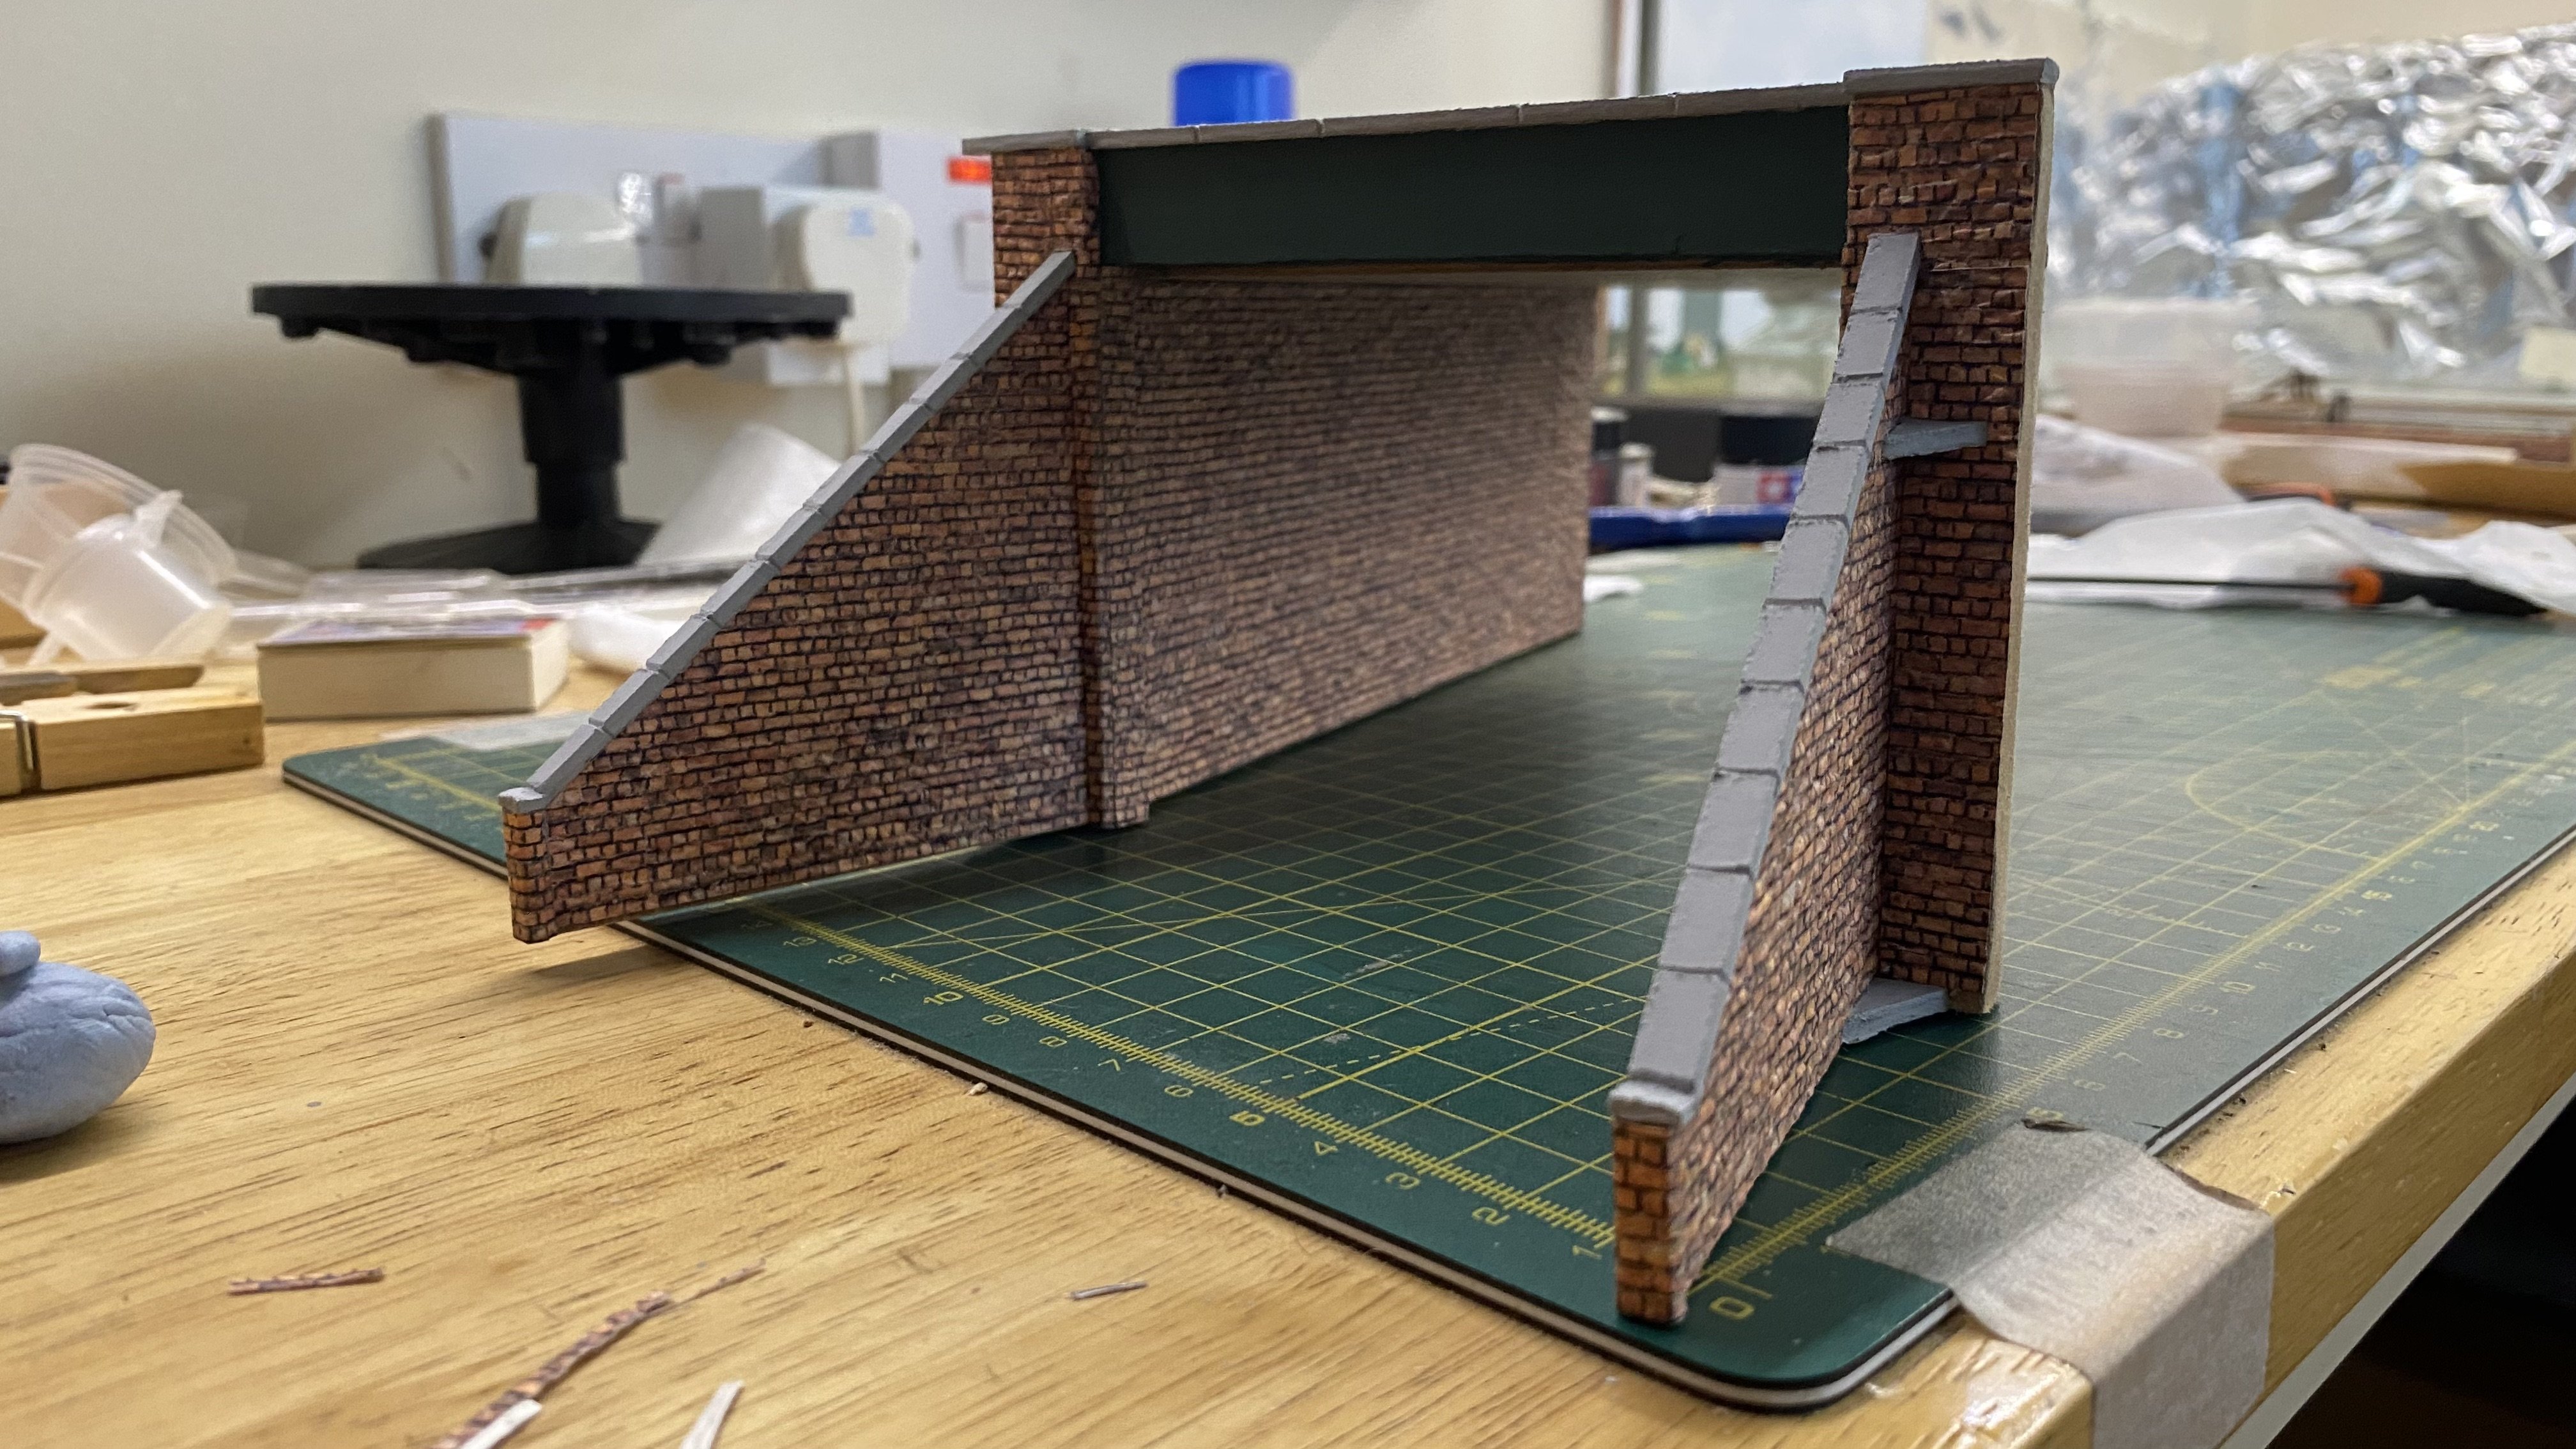
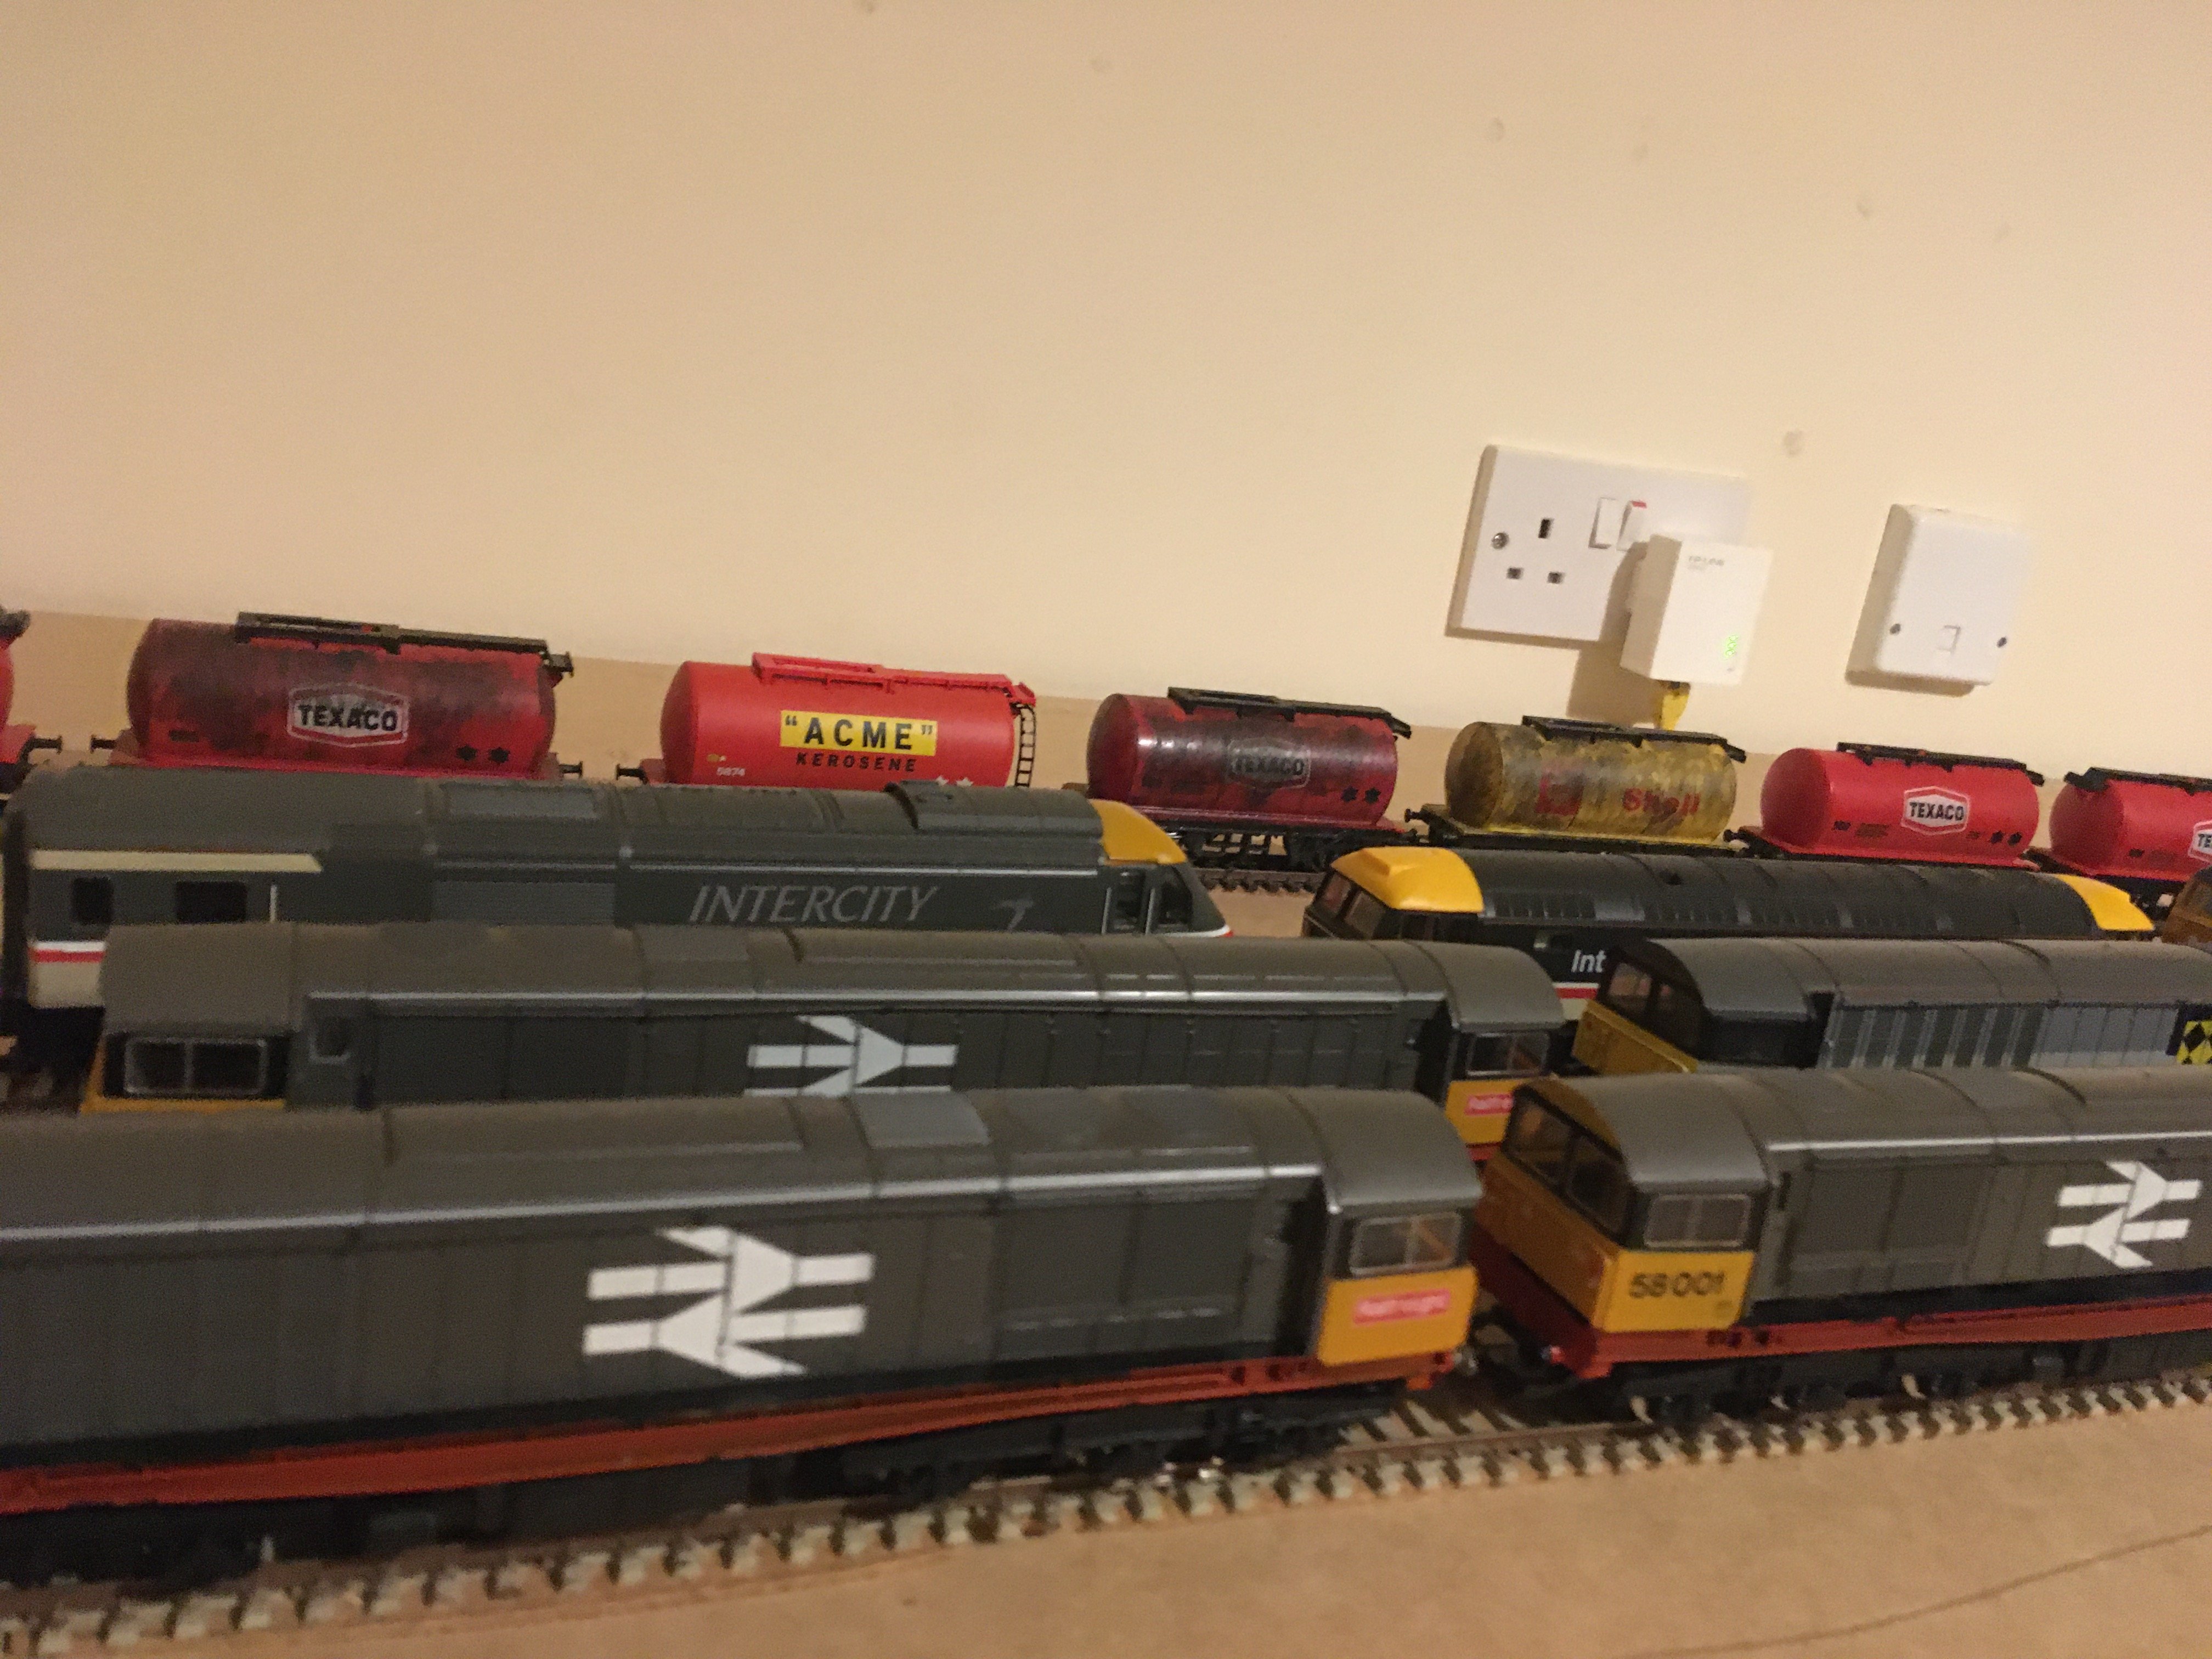
Time for what's turning about to be the annual update I love this site because it's like a blog for documenting the progress of your layout from start to finish Anyway, lots to get through so grab a cuppa and get comfortable! 1. ModelU Figure Painting I continued the figure painting but haven't completed a huge amount of them. Honestly I concentrated on the drivers so that when taking apart the locos for weathering I could add them in and not have to open the locos again. I found the 121s very tricky to get in at the cab and needed to amputate some arms to make them fit The figures are painted with multiple washes of colour instead of neat paint to allow the black and white highlights to shine through and pick up the colour. These are the three finished drivers that I concentrated on for locos. 2. Loco Weathering This is turning into one of my favourite parts of the hobby. I love taking a new model and giving it personality and history. I tend to avoid spraying as you can very easily make a mistake or going too heavy (which I did on a practice shell from ebay). I do use a quick spray of grime using the airbrush along the bottom edge of the loco when the shell is off, as well as on the bogies and under frame. But mostly I like to use weathering powders to build up layers of weathering, with coats of matt varnish to lock in layers when I'm happy with them. The main advantage being that if you make a mistake or are not happy with the result, it's very easy to remove the powder and start again, something else which I have done. Also, before starting, make sure and wipe the body shell clean with a dry soft cloth, as the weathering powders act as magnets to any finger prints. It's also good to have some form of rotating painting stand to hold the loco body shell (the Tamiya one is good). I draw inspiration from real life photos and spent a painstaking few hours building up a collection of photos of as many classes and loco numbers as I could find, to refer back to. And before the weathering powders come out, I usually draw out the detail in the loco shell by applying dilute washes of black enamel. A Class I love the dirt streaking effect apparent in this photo. Spent some time painting, attaching and weathering the buffer detail on one end. The roof was the hardest part and took a few attempts. Class 121 Comparison shot to show the full effect of weathering. The buffer detail is really good on the 121s given the size of the end of the cab end. If you squint you can see the driver, I amputated his arm but left it in there with him Class 141 Comparison shot. The weathering for this loco was based on some very dirty 141s from the eighties, I'll do some other locos with lighter weathering but was very happy with this one. 3. The Tunnel I completed the tunnel linking the depot area to the scenic break. At the last update I had completed most of the tunnel build, what was left to do was the weathering, lighting and fitting into the layout, which led to some interesting challenges... With the construction complete I started weathering the tunnel, adding streaks where rain would bring down dirt from the capstones and also adding some heavy grime over the centre of the opening, where steam trains would have dirtied it back in the day. This is the back wall, the extended mdf insert is needed to reach down below the baseboard to a support I added (more on this below) The roof of the tunnel, will be seldom (if ever) seen but at least I know it's done. Plus if I ever send a mini camera through there it will look good. And it was good weathering practice for concrete. Attaching LEDs, the cables will be unseen but even so are pretty realistic, the light is a dim yellow / orange achieved by adding a high resistor value to the cabling and also painting the LEDs with a couple of coats of Tamiya clear orange. So now the tricky bit, because of space limitations and the required curve in the track, it had to go right to the edge of the baseboard. This caused a problem with the tunnel wall because the locos would catch it going around the curve if it were flush against the baseboard. So I had to add a support underneath the baseboard (hence the long back wall above) and then some roof insulation covered with putty to act as the "ground" for adding ballast inside the tunnel. It was awkward and messy, but it worked out This was also tricky. The brick wall of the tunnel is not plasticard, it's paper. So if I put the tunnel down first and then ballasted using PVA, it would soak up through the paper and destroy the wall. At the same time I couldn't ballast everything and then place the tunnel as it would sit on top of the ballast. So I had to mark off the shape of the tunnel footprint, tape it with masking tape and support and then ballast inside that shape. All while leaning over the back of the baseboard, which gave me a good workout! But it worked out, the tunnel fit back in snugly enough with some touch ups and the few minor gaps were plugged with a small bit of ballast and neat glue, which didn't soak up through the walls. With the ballast set, I was able to take the tunnel back up and weather the track and ballast. And the end result... 4. Industrial Car Park, Wall & Railing So when we last left this the concrete for the industrial area had just gone in and had been sprayed with my normal concrete colour. The front wall had also been built but was without capstones. First job was to create capstones for the wall and pillars. These were made from thin strips of 3mm mdf, which were sanded on both sides of one side to give a raised "point" in the middle. Gaps between the capstones were then scored to give the illusion of separate pieces of stone. They were then sprayed with a whitish grey colour and glued to the existing walls. Test fitting a pillar, not a lot of fun working with mdf of this size, I can tell you After the capstones went on the wall was weathered with weathering powders to tone it down and give it some rain / dirt streaks, specifically on the inside closer to the points where locos would be ticking over. For the concrete industrial area, after the base concrete coat colour went on, it was time to start dabbing it with light and dark grey washes to break up the colour. A thick black wash was added to the cracks to bring out the detail and some green weathering powder was used to add algae / lichen growth where it will start to meet the ballast and muck. Some darker weathering was added to blend in the dabs of colour from the washes and represent more travelled areas of the concrete. I was pretty happy at this point and it was going well. However I picked up some textured paint made by AMMO by Mig at a model shop and was very impressed with the results on some test pieces. I bought a jar of the Mud and one of Asphalt the results were excellent. When I mixed the asphalt with some fine ballast it gave a texture much closer to tarmac than I has achieved with the DAS clay. At the moment I had concrete, however a more realistic industrial scene in Ireland would have been something closer to tarmac, with a darker, fine rough surface. So I took the plunge and started experimenting with different grades of ballast and textured paint to add a new surface. This first photo shows the mud texture effect where the concrete will meet the ballast. I started experimenting with mixing the textured paint with my own colors to lighten the pure black colour it came in. Adding some acrylic grey and white did the trick, giving a dark grey colour which was not black. The first job was to glue down some fine ballast over the existing concrete. This looked good but was too rough. Tarmac wouldn't have this rough a surface. The solution was to layer on some baby powder, which would raise the surface of the tarmac to match the ballast in certain areas, making it appear smooth, while also leaving some rough patches, as you would get with old, broken tarmac. In this photo the PVA has been added to glue everything down. The finished effect, well worth the gamble, It came out much better than previously, with this small patch complete it was on to the larger tarmac area. Took some guts to cover up what I had previously thought looked good! Spraying with IPA (middle section) and starting to glue (right side). There is a line of blu tack in the middle to cover the grooves cut for the walls. After the ballast had dried, I added the baby powder and pressed / rubbed it down with fingers, leaving some areas rough. With the baby powder dry, some of the acrylic textured paint mix was painted on in random areas. I painted a few patches then added some white or black to the mix to change the colour before painting the next few random spots. The result gave a patchy look to the tarmac which was perfect. Some spots ended up being painted in a kind of squarish pattern, which actually worked nicely as you see patches of repaired tarmac of slightly different colour in real life. End result... Gluing the walls in place. Finished product, was delighted with this result Now to add some moss growth in certain sheltered areas using green weathering powders. Some of these green patches look a little large, but will be covered by ground cover and moss / grass tufts. Adding ground cover where the tarmac meets the vegetation. Next job for the tarmac was to add some post and rail fencing to protect the carpark from the railway. This is a Scale Model Scenery kit. I was going for the speckled look you see on concrete posts. First job was to give them a base cost of concrete grey mix. I then speckled them with white and black paint, flicked from a toothbrush. And toned down the effect using black and grey weathering powder. Added some ground cover, then drilled 1.5mm hold for the posts, before threading through and gluing the provided wire. The surface is uneven so some posts will stick up a little, these will be covered over by grass and weed tufts. 5. Embankment and Scenery With the tunnel now in place I could continue with adding the scenery (which covers the top of the tunnel). I had started this over a year ago and had to take a break to complete the tunnel first, so I was eager to get going on it. As with everything, the first task was to practice off-layout in order to figure out the best technique and combination of grasses to give the look I'm going for. The look being the long green / yellowy grass with clumps of bushes and vegetation that you see alongside most Irish track running through the countryside. So grabbing some spare pieces of mdf, I created a grid and got testing, building up layers of static grass to see what would work and then adding the various vegetation types I have. The key is experimentation and when it's on a scrap piece of wood, you'll take risks and try out things that you wouldn't on your layout Starting to get there with this one... The finished product, exactly what I'm going for. Just to show you what I mean when I say practicing, it was well worth it. I found that the absolute key to doing good static grass was to touch the clip of the static grass application to the baseboard, not to shake too much, and to let the applicator hover over the grass for a couple of seconds after applying (especially for longer 4-12mm grass). It encourages the grass to stand upright for the few seconds it takes the glue to go off. Also, WWS make a good Basing Glue and Layering Spray, but you can also replicate this with neat Matt Modge Podge and Spray Mount from your local hobby shop, which are much easier and cheaper to get in Ireland. And so it begins This is standard roof insulation board from the local hardware. Cheap and easy to shape with a steak knife. Starting to shape the overall contours, no need to get too exact at this stage as the Sculptamold step (below) will manage that. Just need to give it some rough shape and break the right angles of the insulation board. Glued down with standard Gorilla Glue. Adding Woodland Scenics plaster bandage (very useful and easy to apply, would recommend). After drying we have a nice hard shell. Adding Sculptamold, again I highly recommend this, it give a great textured finish to the surface and you can really affect the final shape as well as blend it seamlessly into the baseboard. Notice the lumpy texture at the end of the embankment in the lower right of this photo. This was actually a mistake that worked out. The Scuptamold had started to harden and get lumpy by the time I got to this point. But...the lumps in the mold actually gave a fantastic lumpy texture to the final result Painting the ground colour, as you can see I just grabbed some small sample brown colours from Woodies for a few euro each. Notice the texture resulting from the lumpy Scultamold in this shot. Where the embankment meets the baseboard, I painted with some of the textured mud paint, mixed with some of the brown paint to continue the uneven surface to the ballast. This will give good texture and colour for any gaps in ground cover and static grass later on. More mud texture for the waste ground between the depot and the embankment. Starting the ground cover. As always, mix and match various shades and colours to randomise the colour as much as possible. I'm using fine turf, soil and earth blend. Paint the surface with PVA, scatter the ground cover and then spray with IPA to draw the glue up from the surface. While doing this, I also started adding ground cover to other parts of the layout, specific thinking about dips in the ballast, around the walls, around trackside accessories and anywhere where there may be a bit of shelter for moss / lichen to take hold. Some of these areas will then be covered by grass tufts and bushes later on. After the ground cover comes tufts of grass. I highly, highly recommend making your own. Better results and way cheaper. WWS do a specific tuft glue which works really well. Grab a sheet of baking paper, attach your static grass electrode and you can quickly make hundreds of grass tufts, vary the size, the color of the grass and the length as you please. After drying, you can peel them off and place on the layout (I usually add a dab of neat PVA / modge podge to ensure they stick). Again, you're looking for areas which are sheltered and a tuft of grass may grow, be as random as possible. For the embankment, the next step is to start adding the 2mm base layer of grass. I'm using shades of light green, medium green and brown to give variation in the cover. This looks good, and again it was tempting to leave it as is and not screw it up, but I wanted more! So I picked a spot to fully complete to see how the final product would look... Happy with this so I kept going, adding tufts around this end of the layout with the aim of fully completing the scenic work on this side. Make sure and add some trackside detail before adding the grass, as it would likely be overgrown, not sit on top of the grass! After the long grass comes coarse turf, bushes, underbrush, foliage etc. I won't go into too much detail here as the September video on https://www.youtube.com/@riverbankrailways covers the technique in detail (hope you like it). And here's some stylised shots that I love! 6. Depot Waste Ground and Security Fencing This security fencing kit comes from Ten Commandments, the posts are metal and a nylon mesh and fishing line for the overhead wires are provided. The posts were painted similarly to the posts for the industrial ground, with a base concrete coat... ...followed by black and white speckling from a toothbrush. The posts were then darkened down and the colours blended using dark grey and black weathering powder. The nylon mesh was cut into strips of the correct length, painted with aluminium / metallic Humbrol and glued to the posts with neat PVA. The posts were blutacked down to hold them in place and pegs and weights were used to keep the mesh taut during gluing. Each section contained about 8 posts, with an overlap left so they could be joined together on the layout. Preparation started on the waste ground with grass tufts randomly added. The tufts were blended together by adding small amount of static grass between them. 1.5 mm holes were then drilled into the baseboard and the posts placed, the overlapping mesh sections were glued together. It's important to do this before adding more static grass and bushes, to allow them to grow up around the fencing. Nothing in real life is perfect, and this tiny tear in the mesh will be turned into an animal passage After the posts were dried in place, the fine fishing line provided in the kit was straightened out by hanging in clamps overnight, painted using the metallic paint and (very carefully) threaded through the three tiny holes at the top of each post. A peg was attached to the ends of each wire and weighted down to keep the wires taut, and then neat PVA was dabbed where the wires joined the posts. After drying the ends were trimmed and more grass, bushes and foliages were added. Some finer details like an overgrown rusty barrel (see if you can spot it) and some rubbish (from Scale Model Scenery) - although not visible in this photo. Here's the animal passage gap I mentioned, you can also see some ferns, again a nice little touch from Scale Model Scenery. Et voila! Your Reward! It's funny. You think you haven't done much over the year until you gather it all up in a post like this. If you've made it this far, thank you for reading and I hope you enjoyed it. As a reward for reading this long post, I hope you enjoy these two lovely shots of an 071 and 201 passenger train leaving the depot...must start weathering coaches next Until next time!
-
Thank you very much for posting the videos @DJ Dangerous and for all the kind words folks! My apologies for not updating the thread, I can't believe it's almost a year since I posted, shame on me! There's a big update coming with lots of pics (even more in depth than the videos). I sometimes get lost in the modelling and forget to post updates, which is probably a good thing Chat soon
-
Those connectors don’t look great. Some of them don’t seem to touch the wheels and one of them looks a bit black where it’s touching the wheel. I would try: 1. use a small pliers to bend the connector back to touching the wheel 2. try using some isopropyl alcohol or track cleaner or Brasso (don’t let it touch on plastic) to clean the connectors 3. the wheels also look a bit dirty. I would give them a clean, personally I find Brasso does a great job of this
-
Thanks all Yeah...I'm afraid they'll have to stand It'll just be me 99.99% of the time so built with that in mind - the internet is my sofa
-
Depot #8 by Riverbank Railways (fictional 1980s / early 1990s depot)
Adrian replied to Adrian's topic in Irish Model Layouts
Thank you both - me too! -
Depot #8 by Riverbank Railways (fictional 1980s / early 1990s depot)
Adrian replied to Adrian's topic in Irish Model Layouts
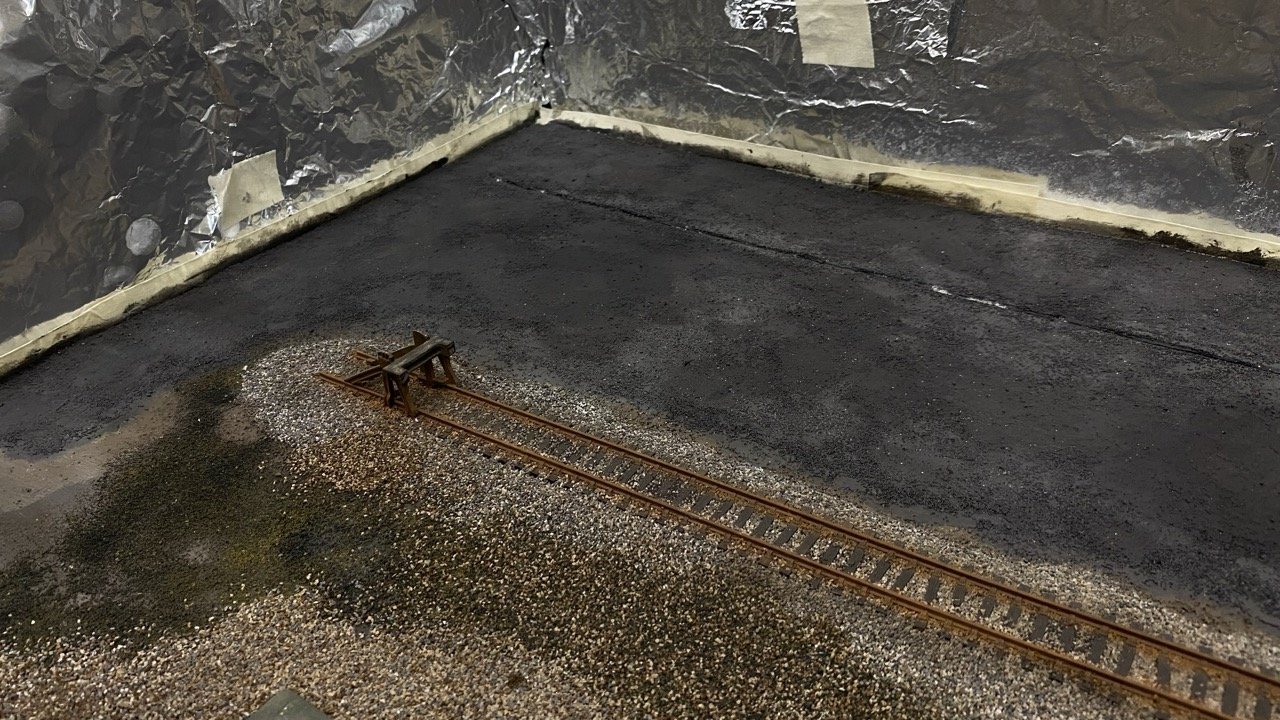
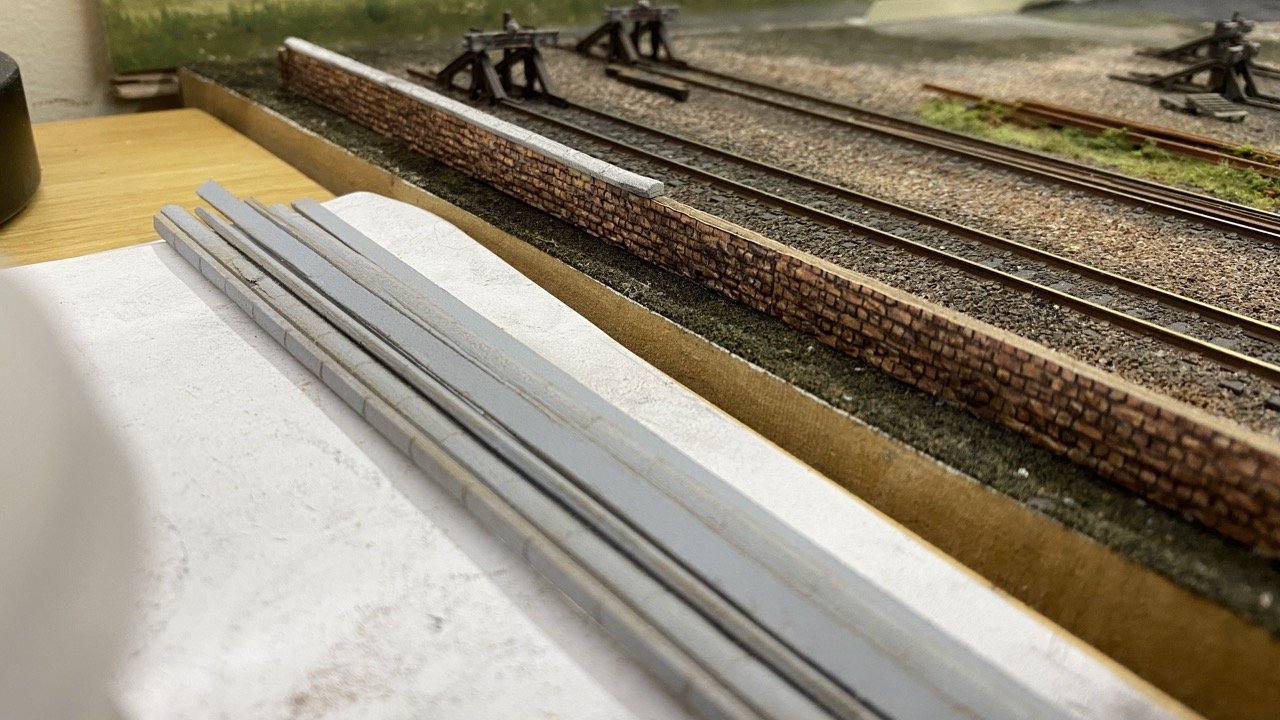
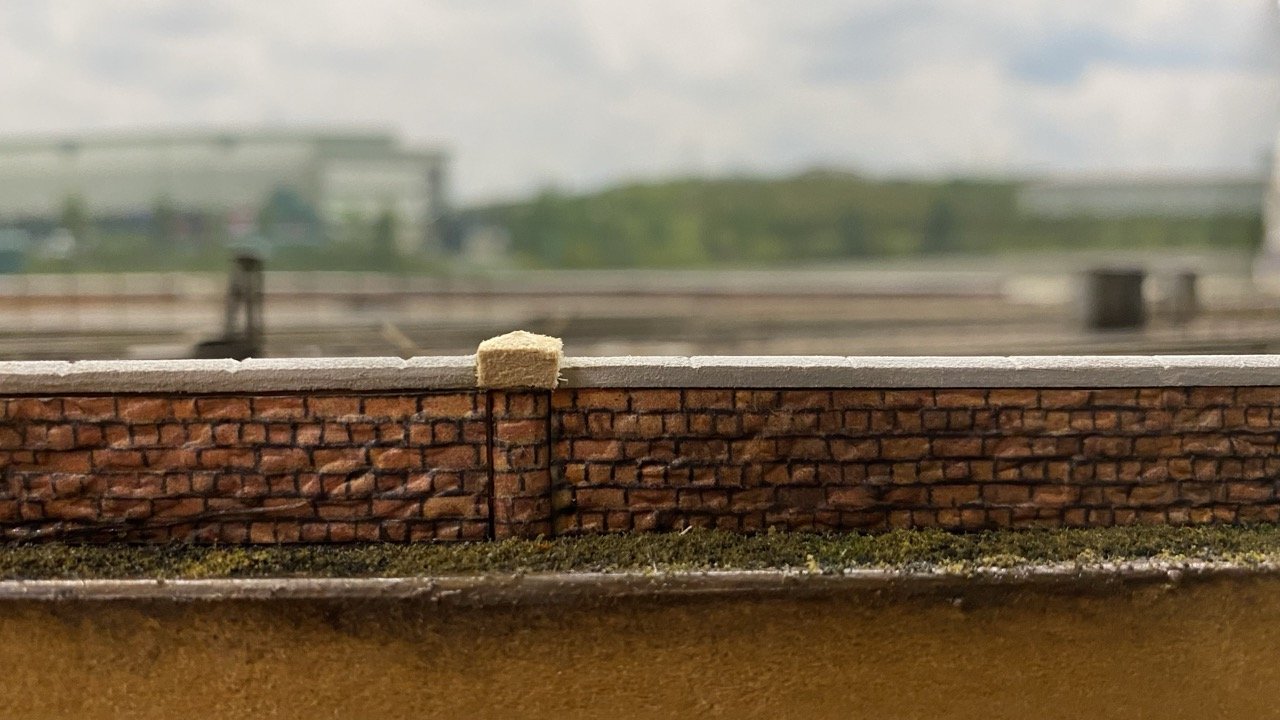
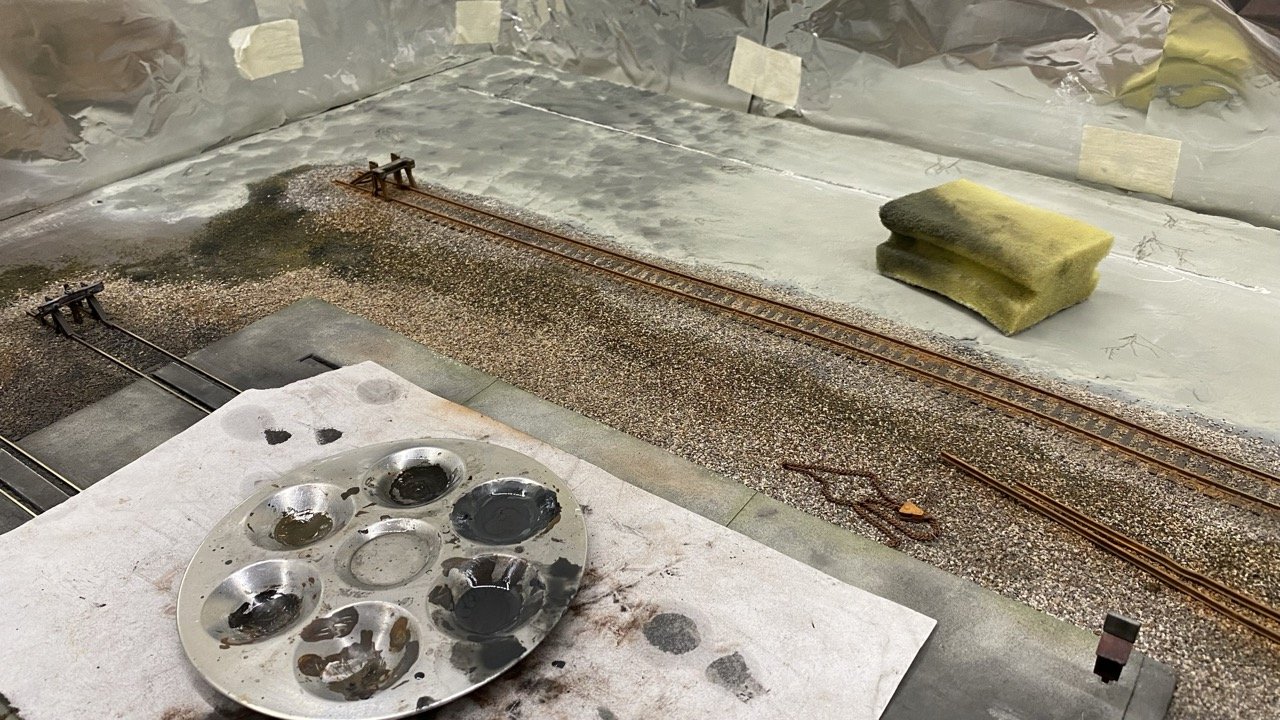
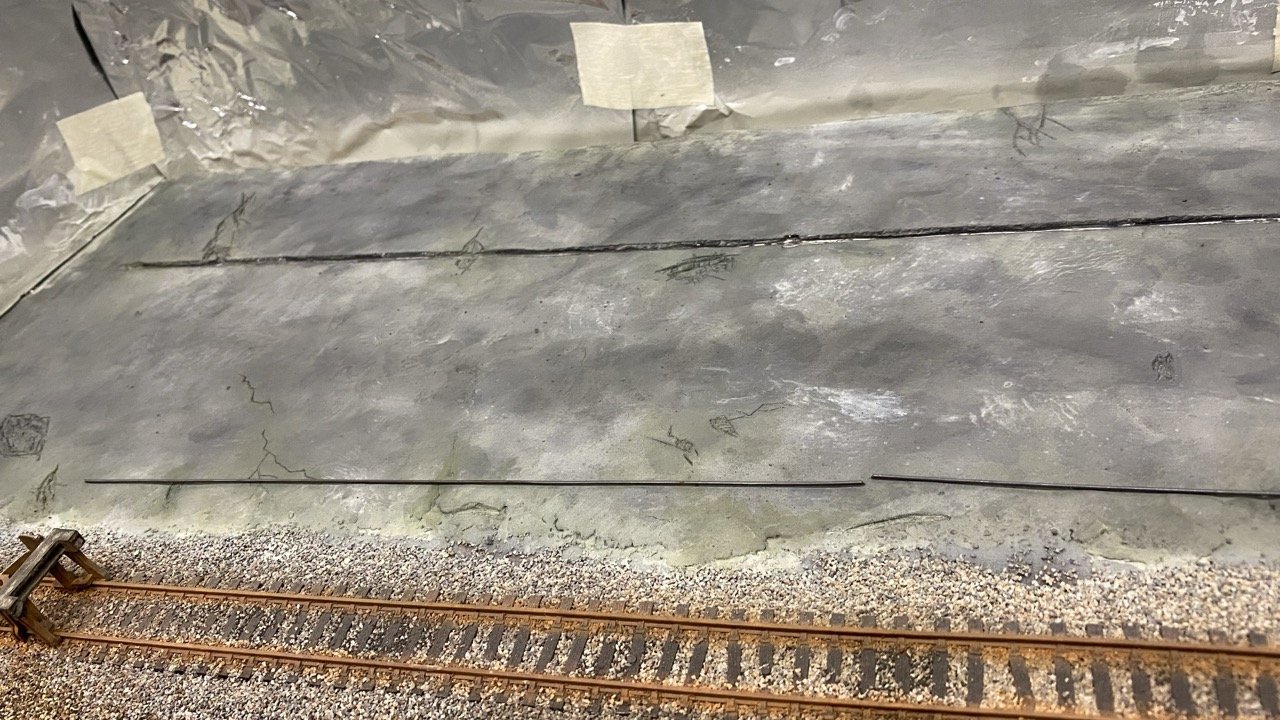
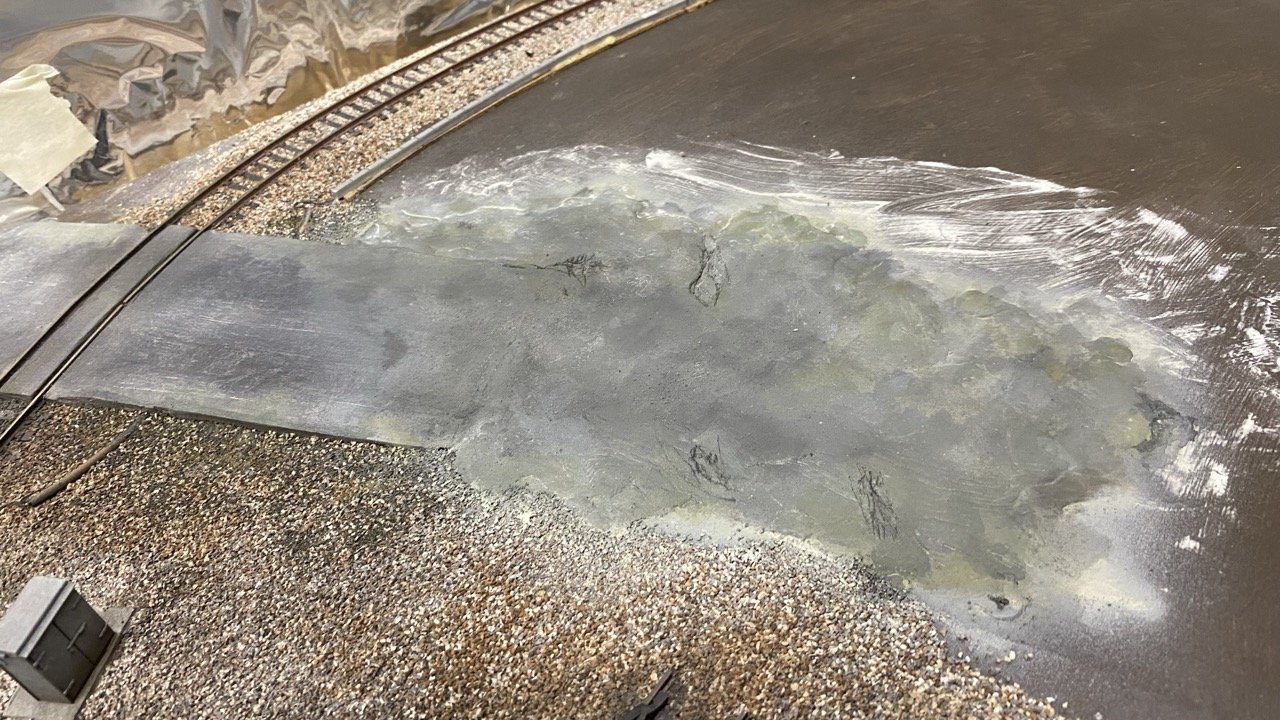
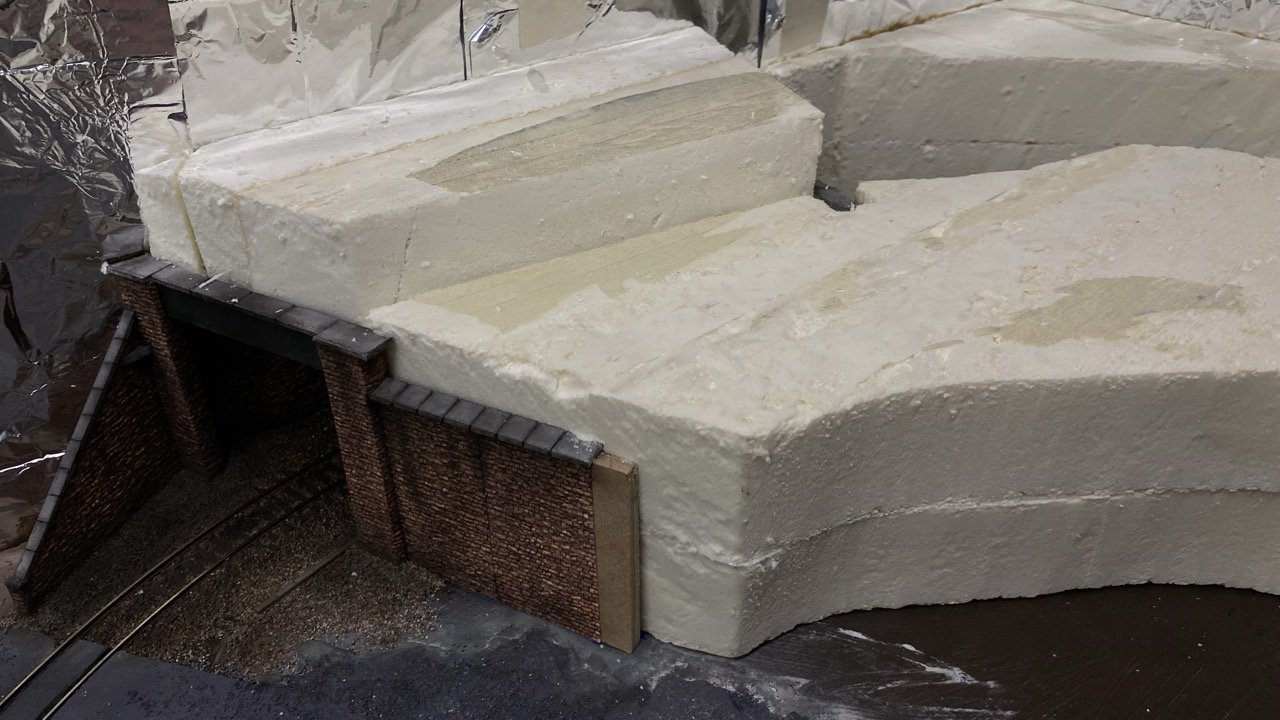
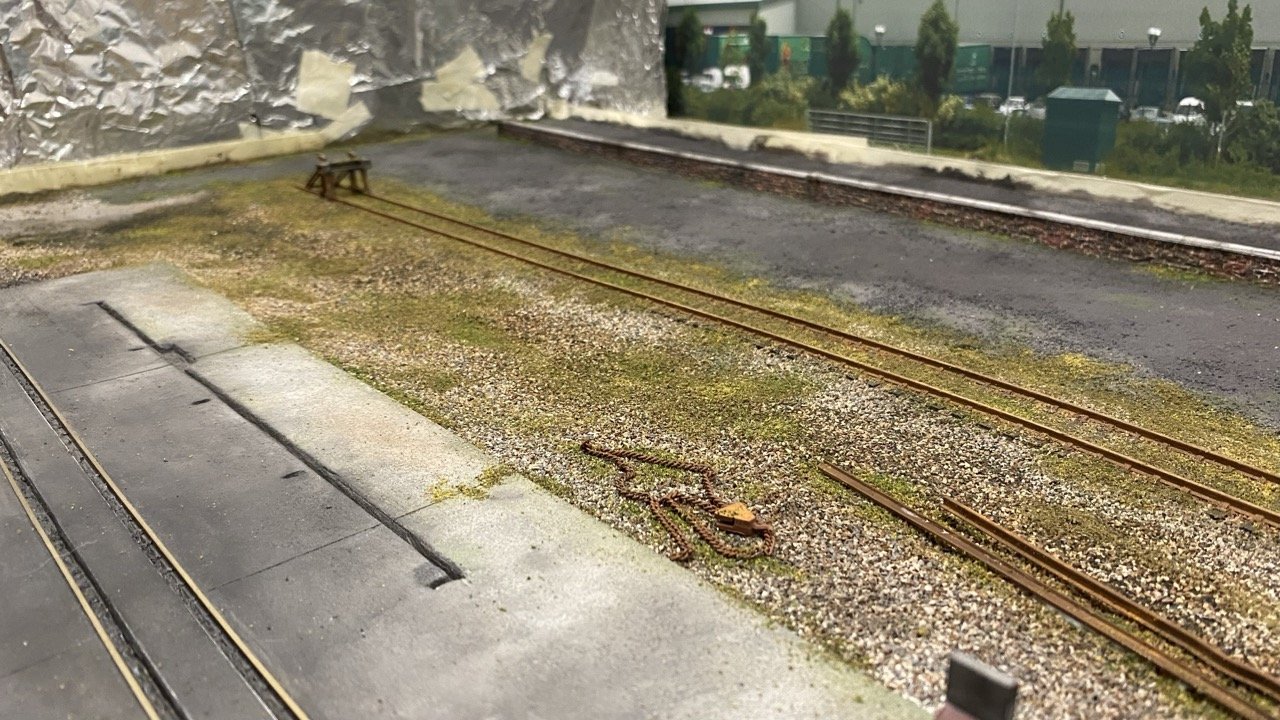
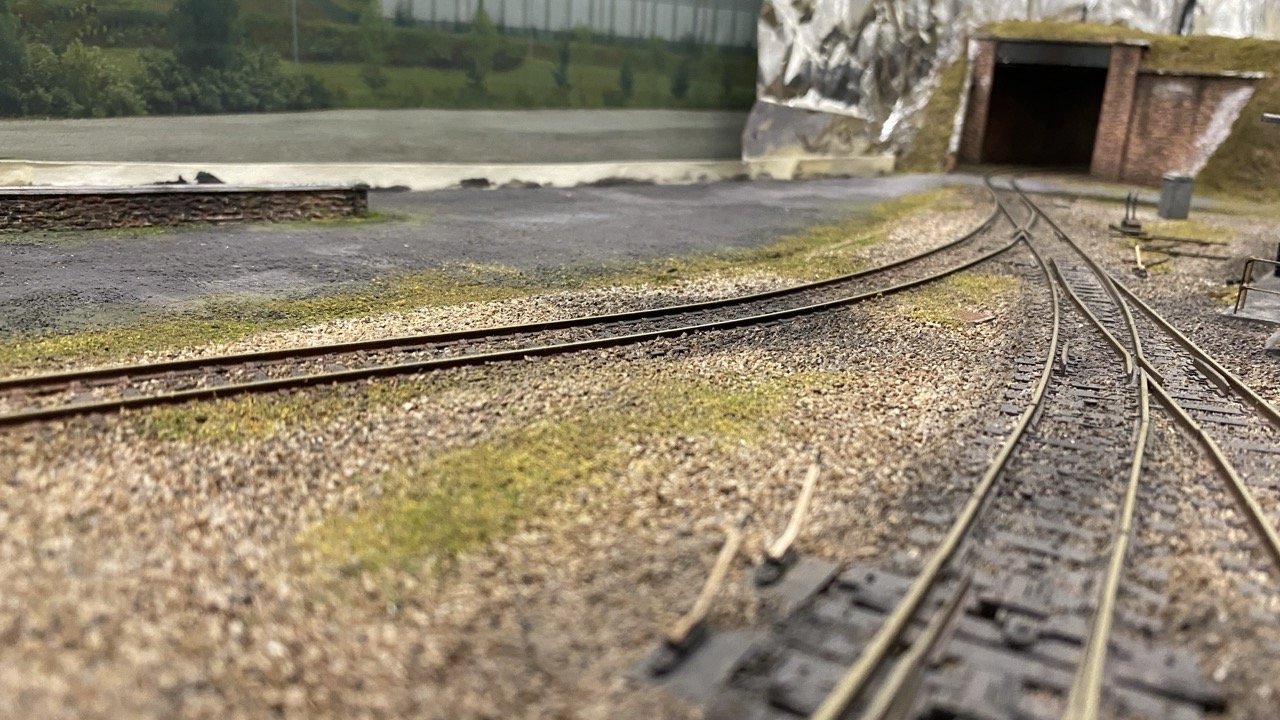
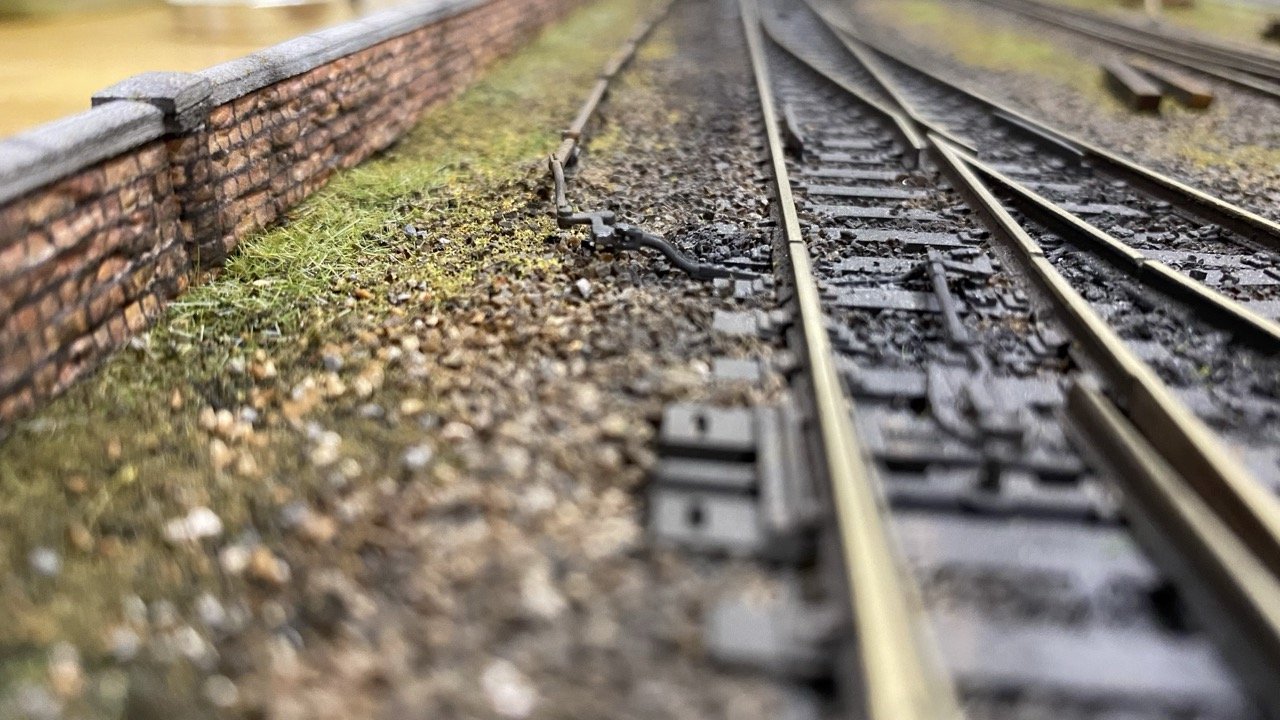
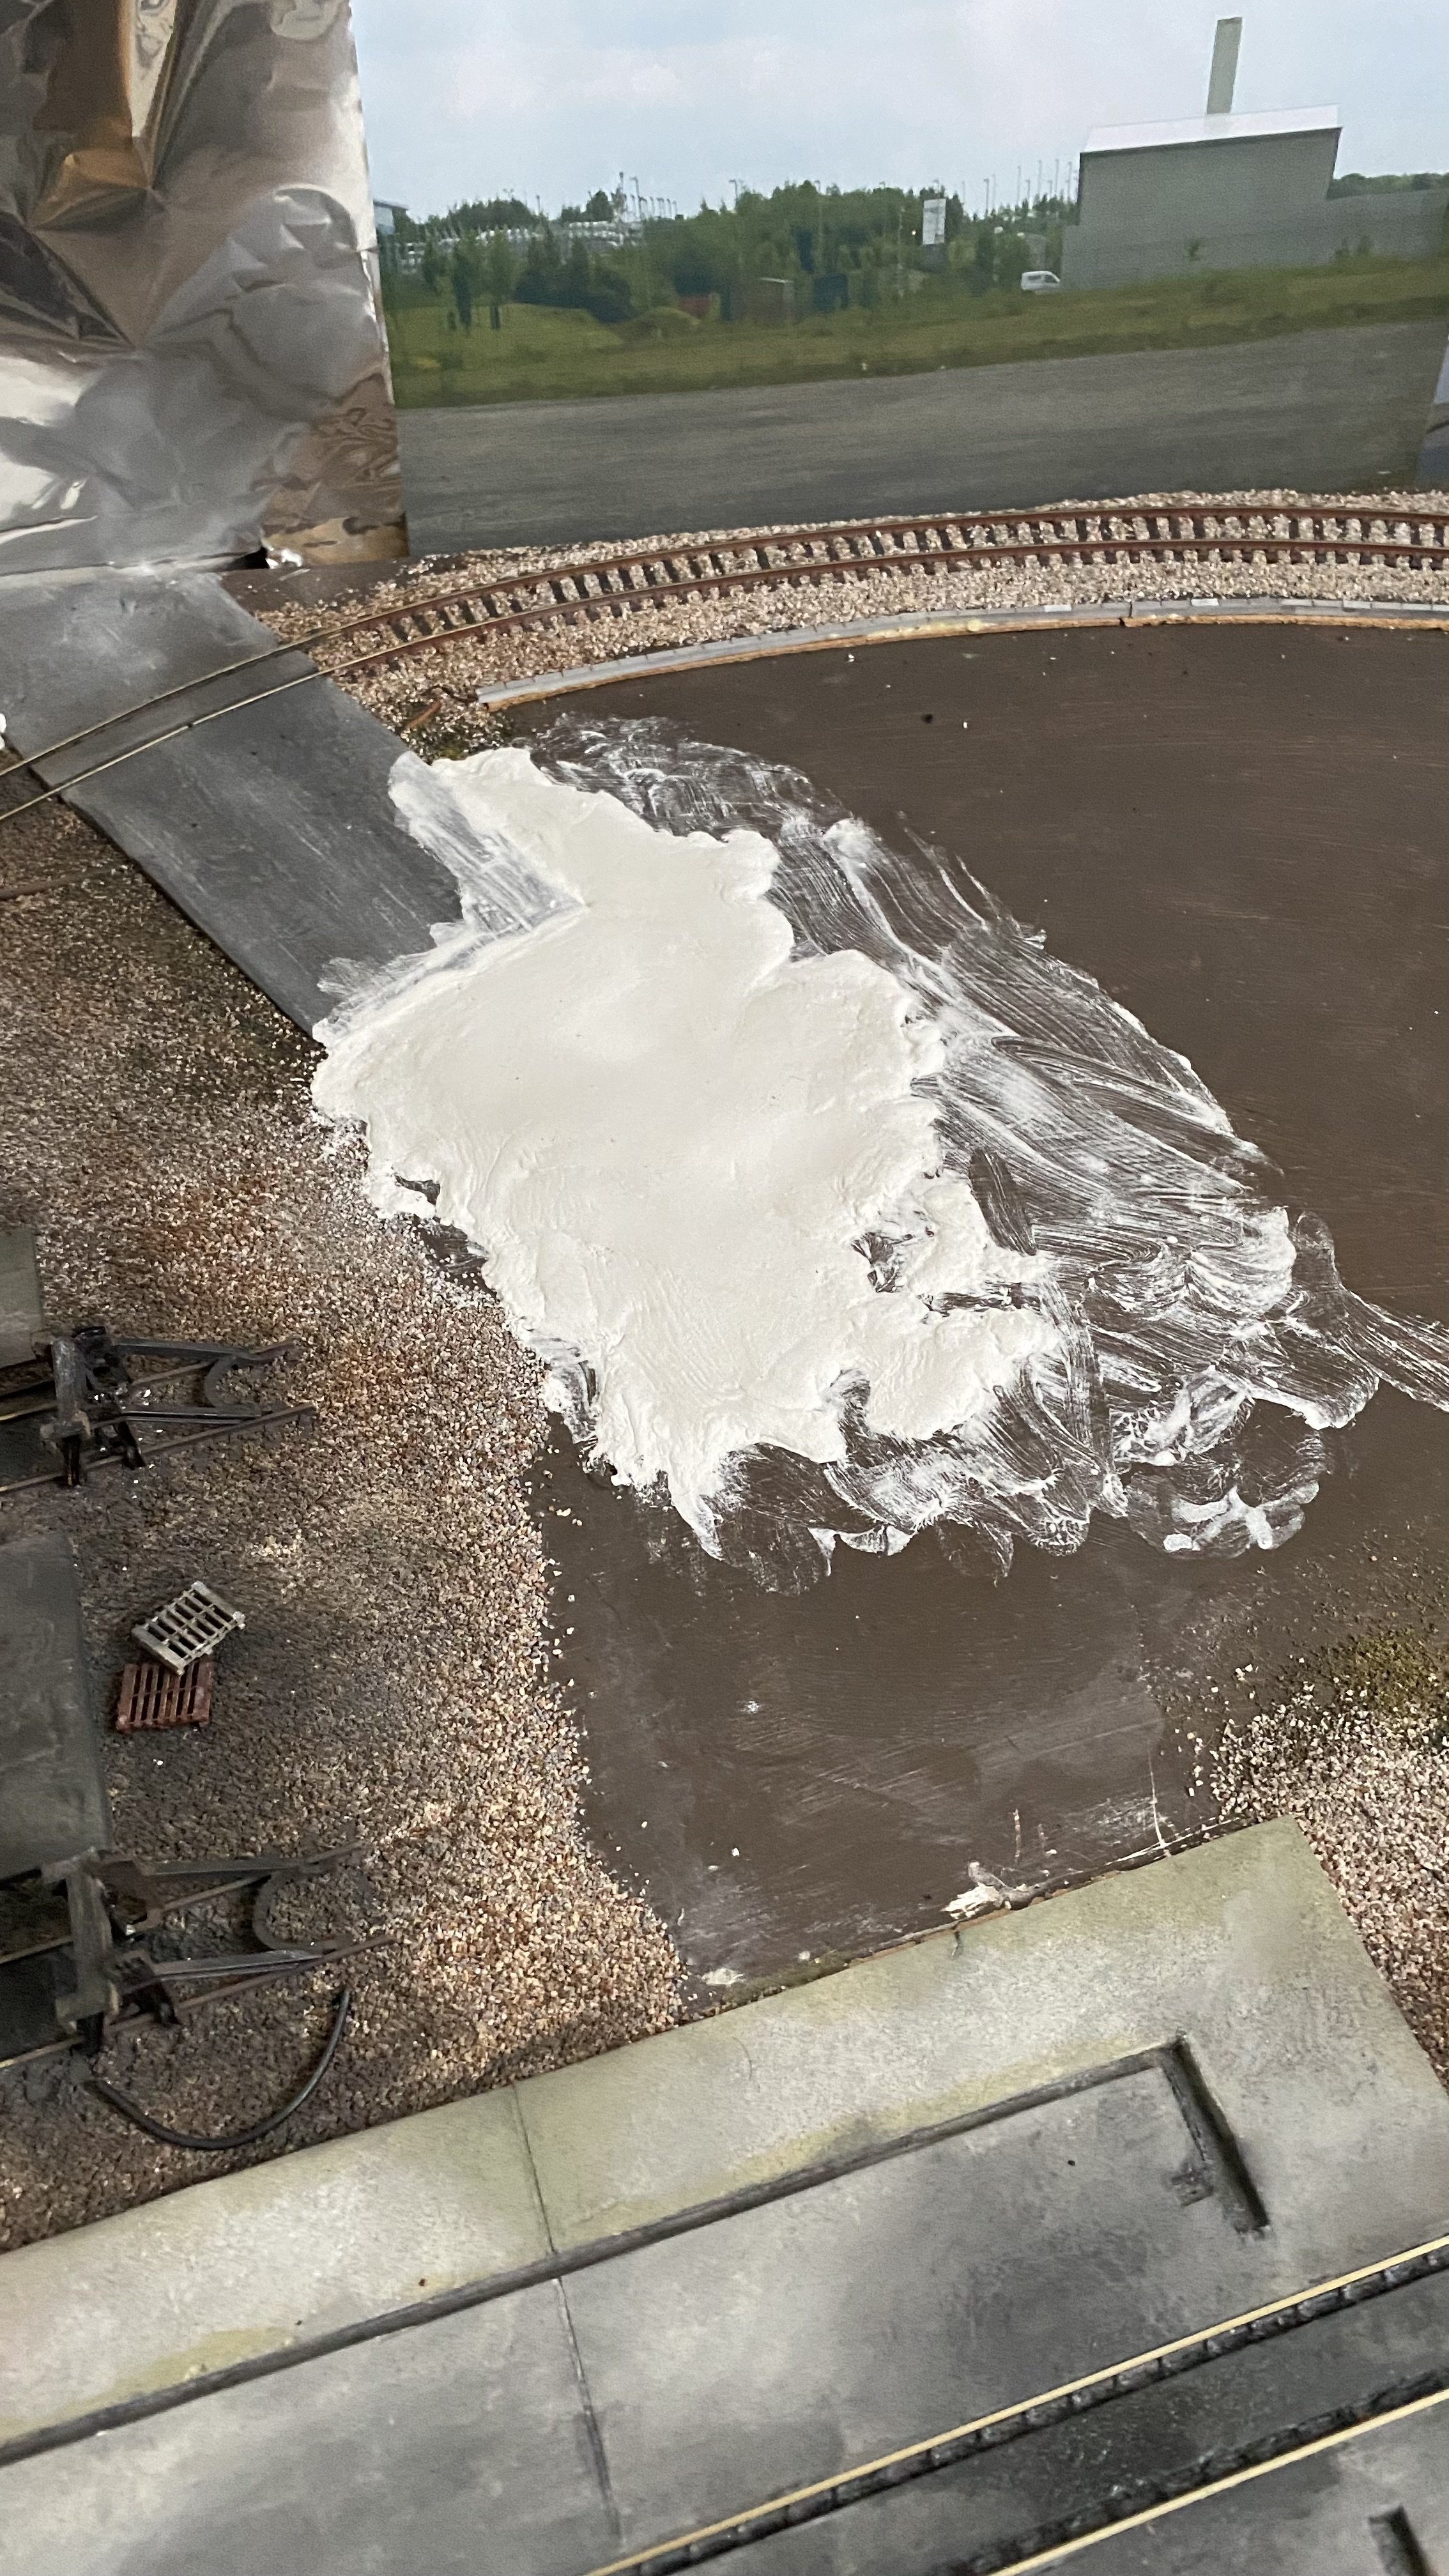
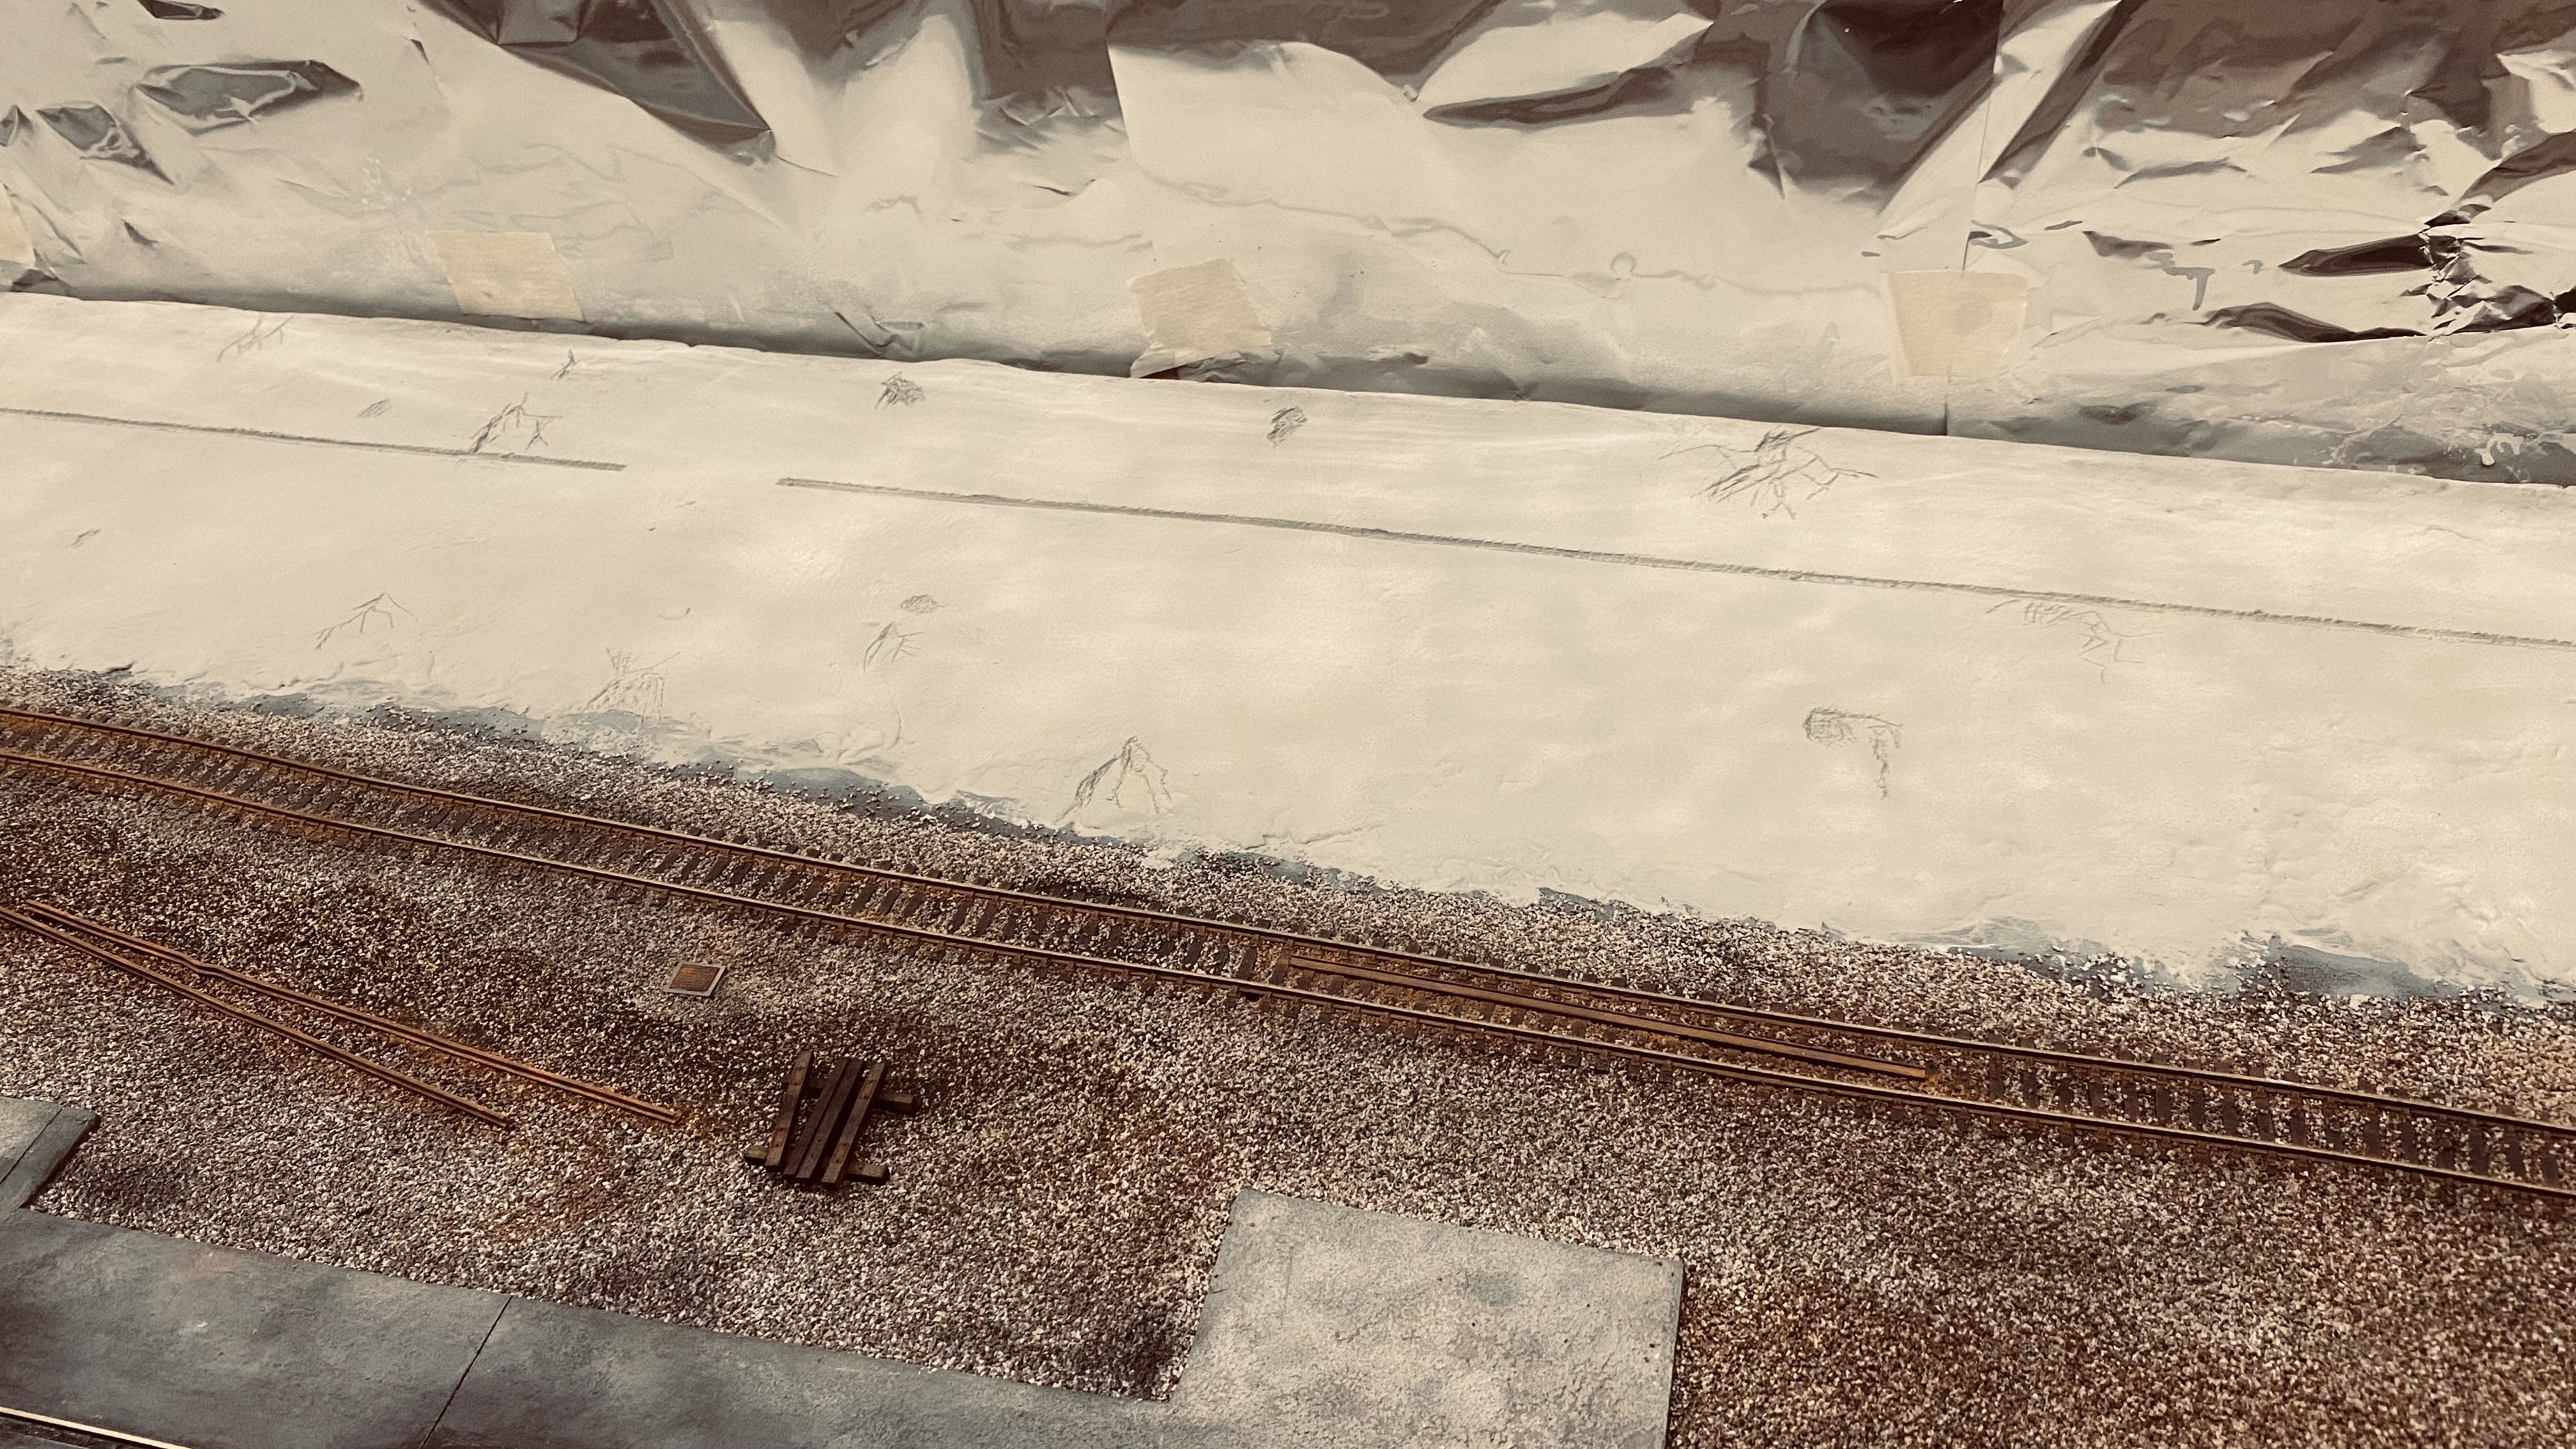
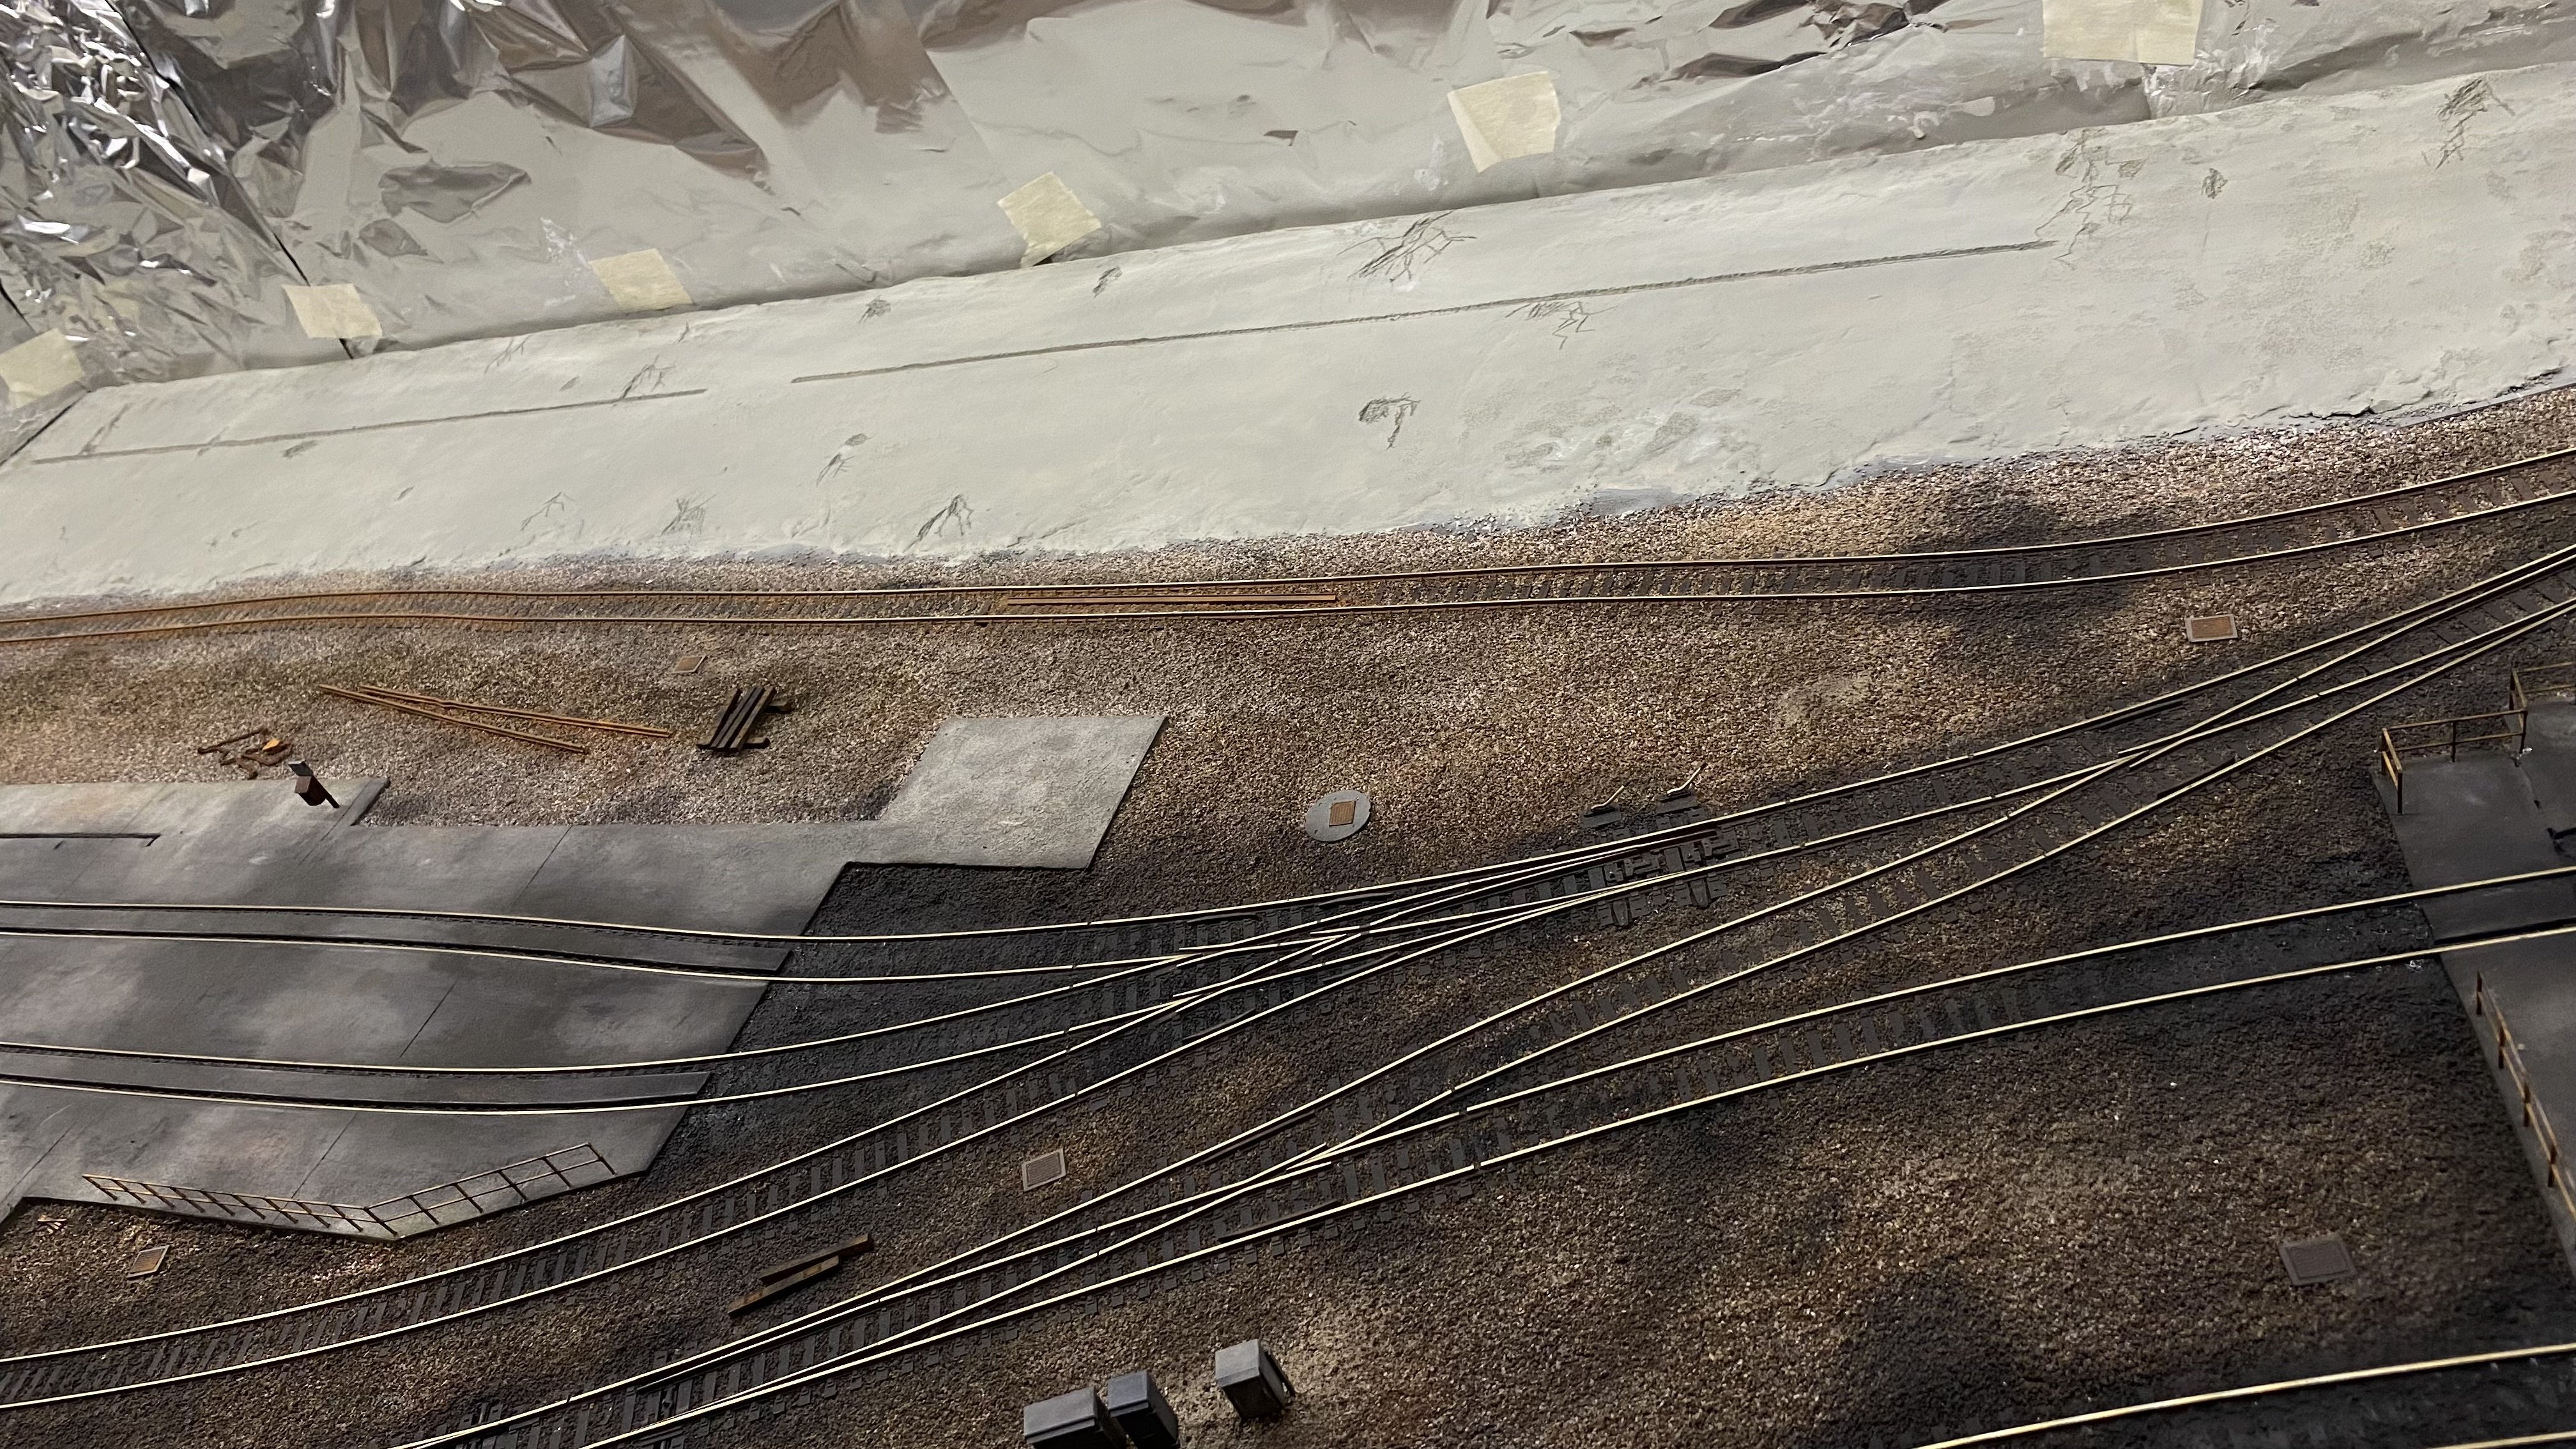
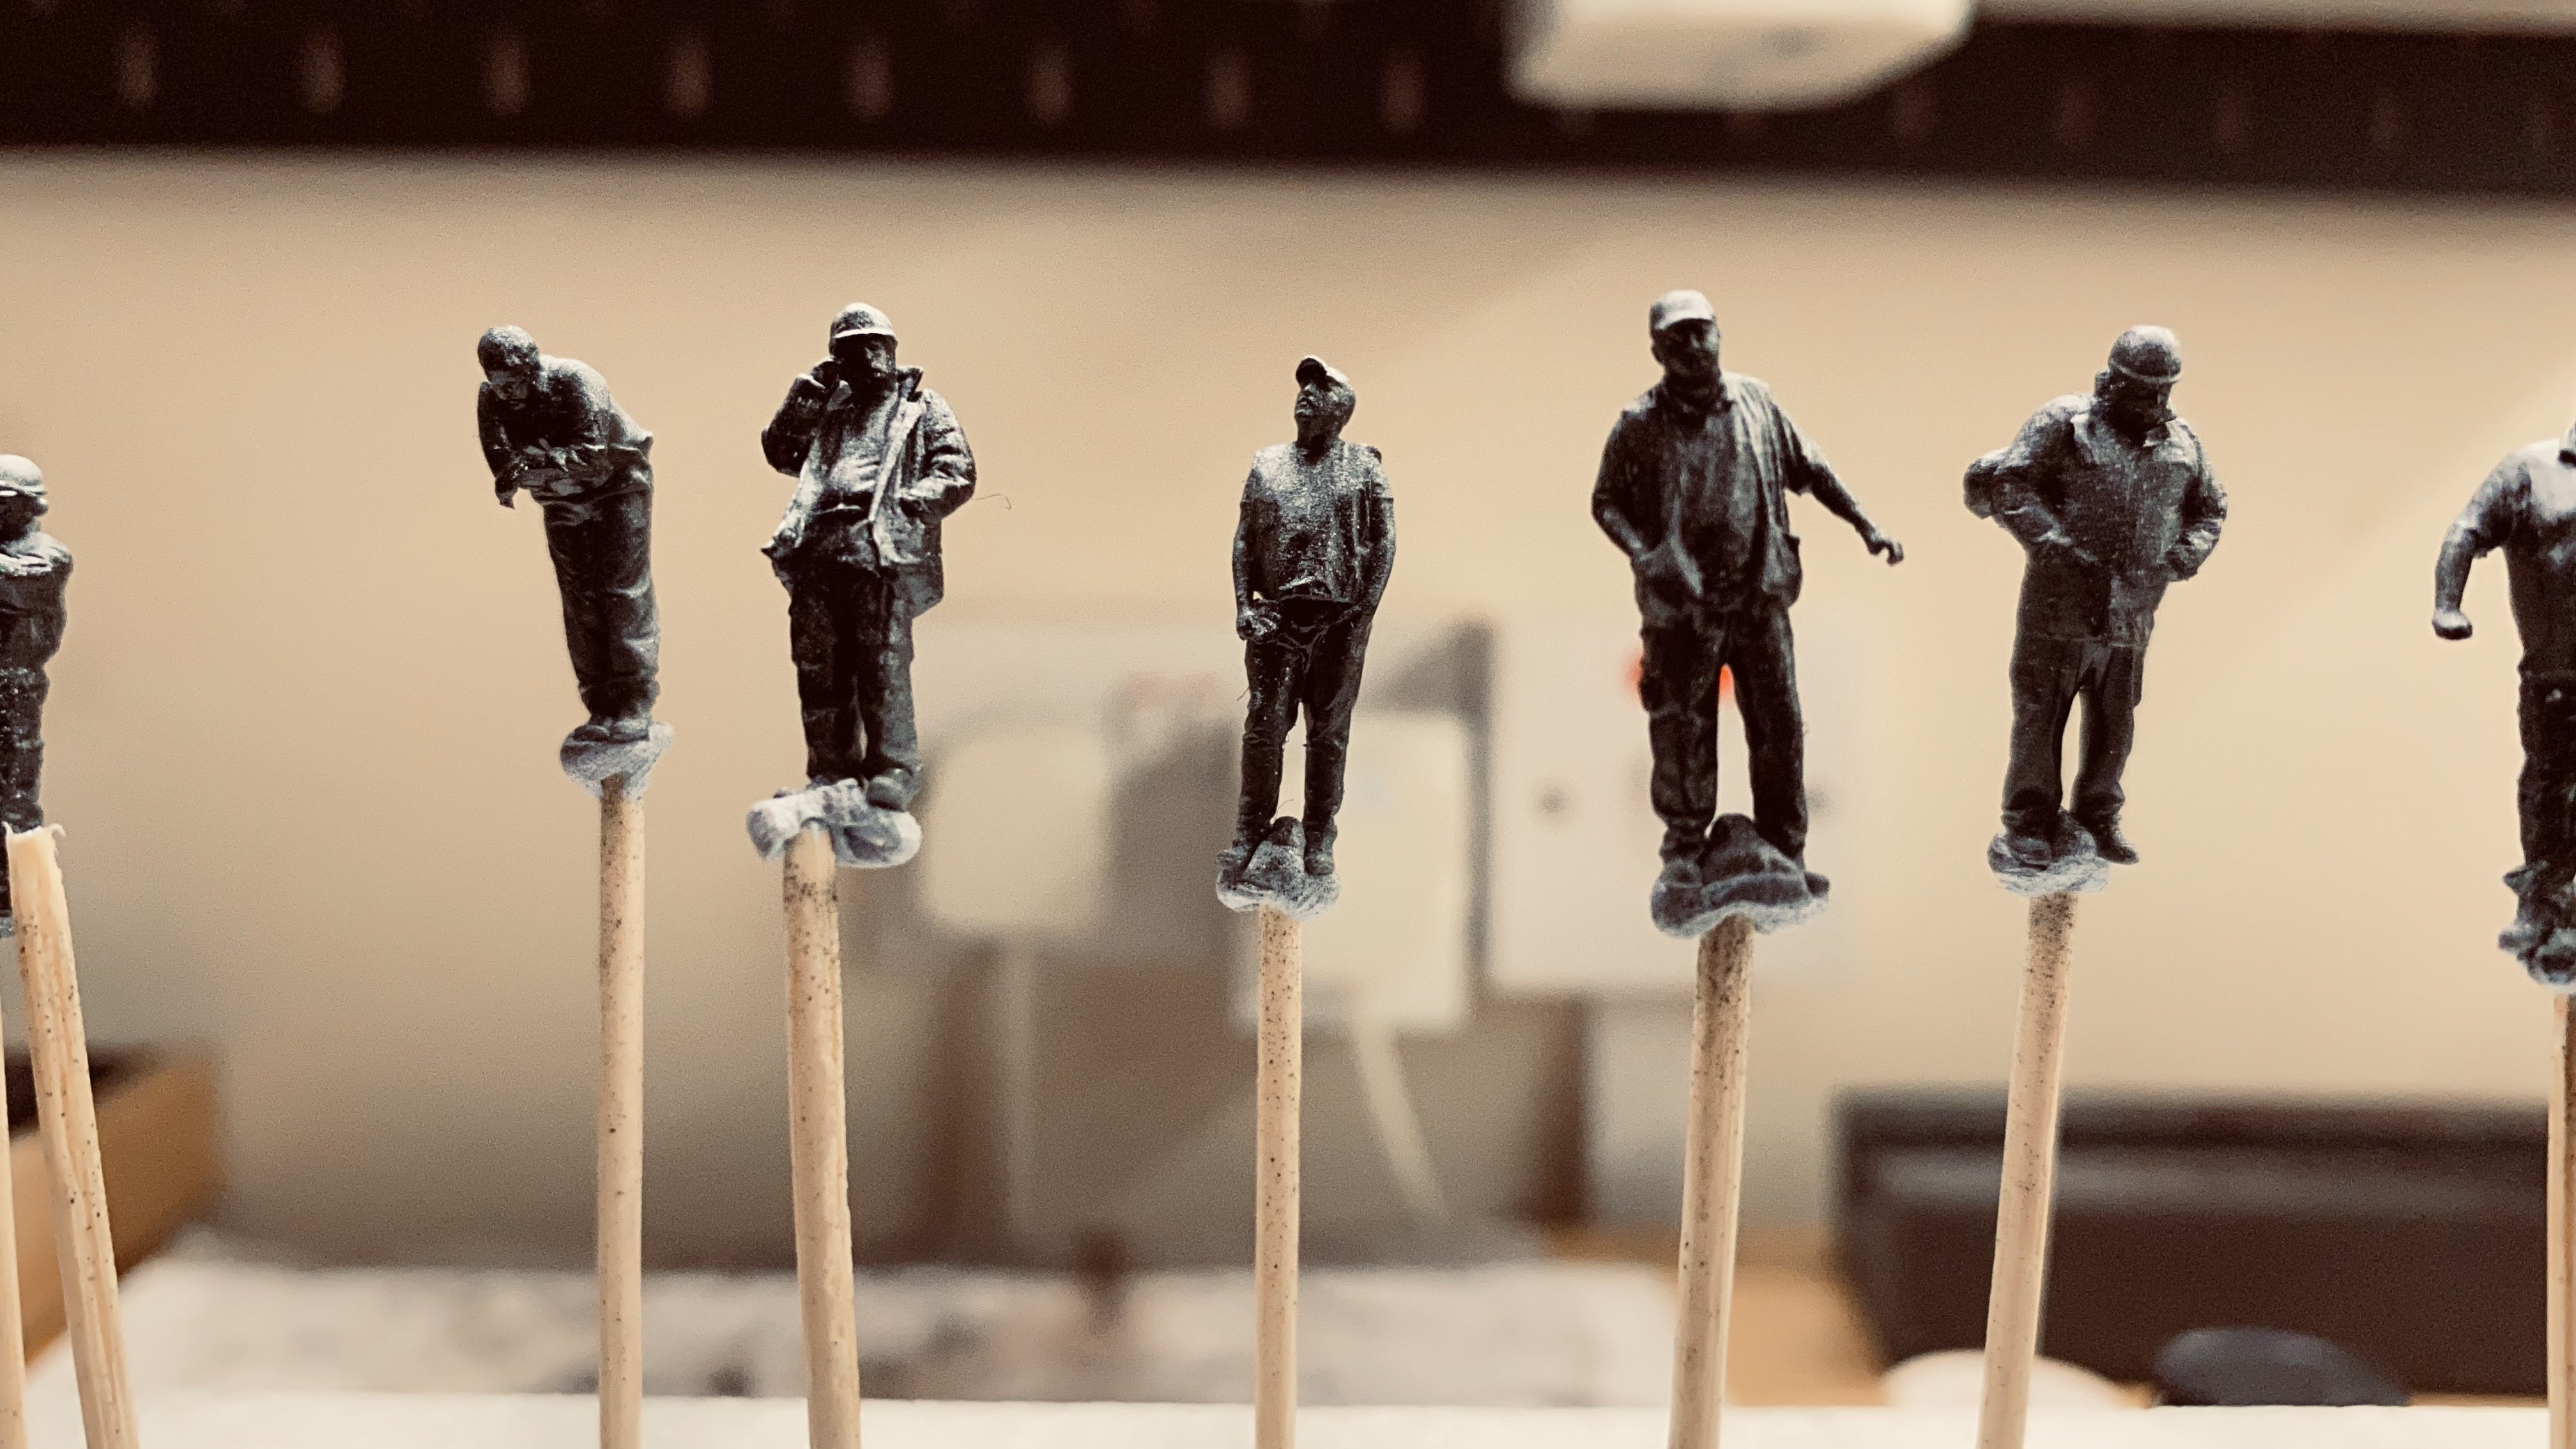
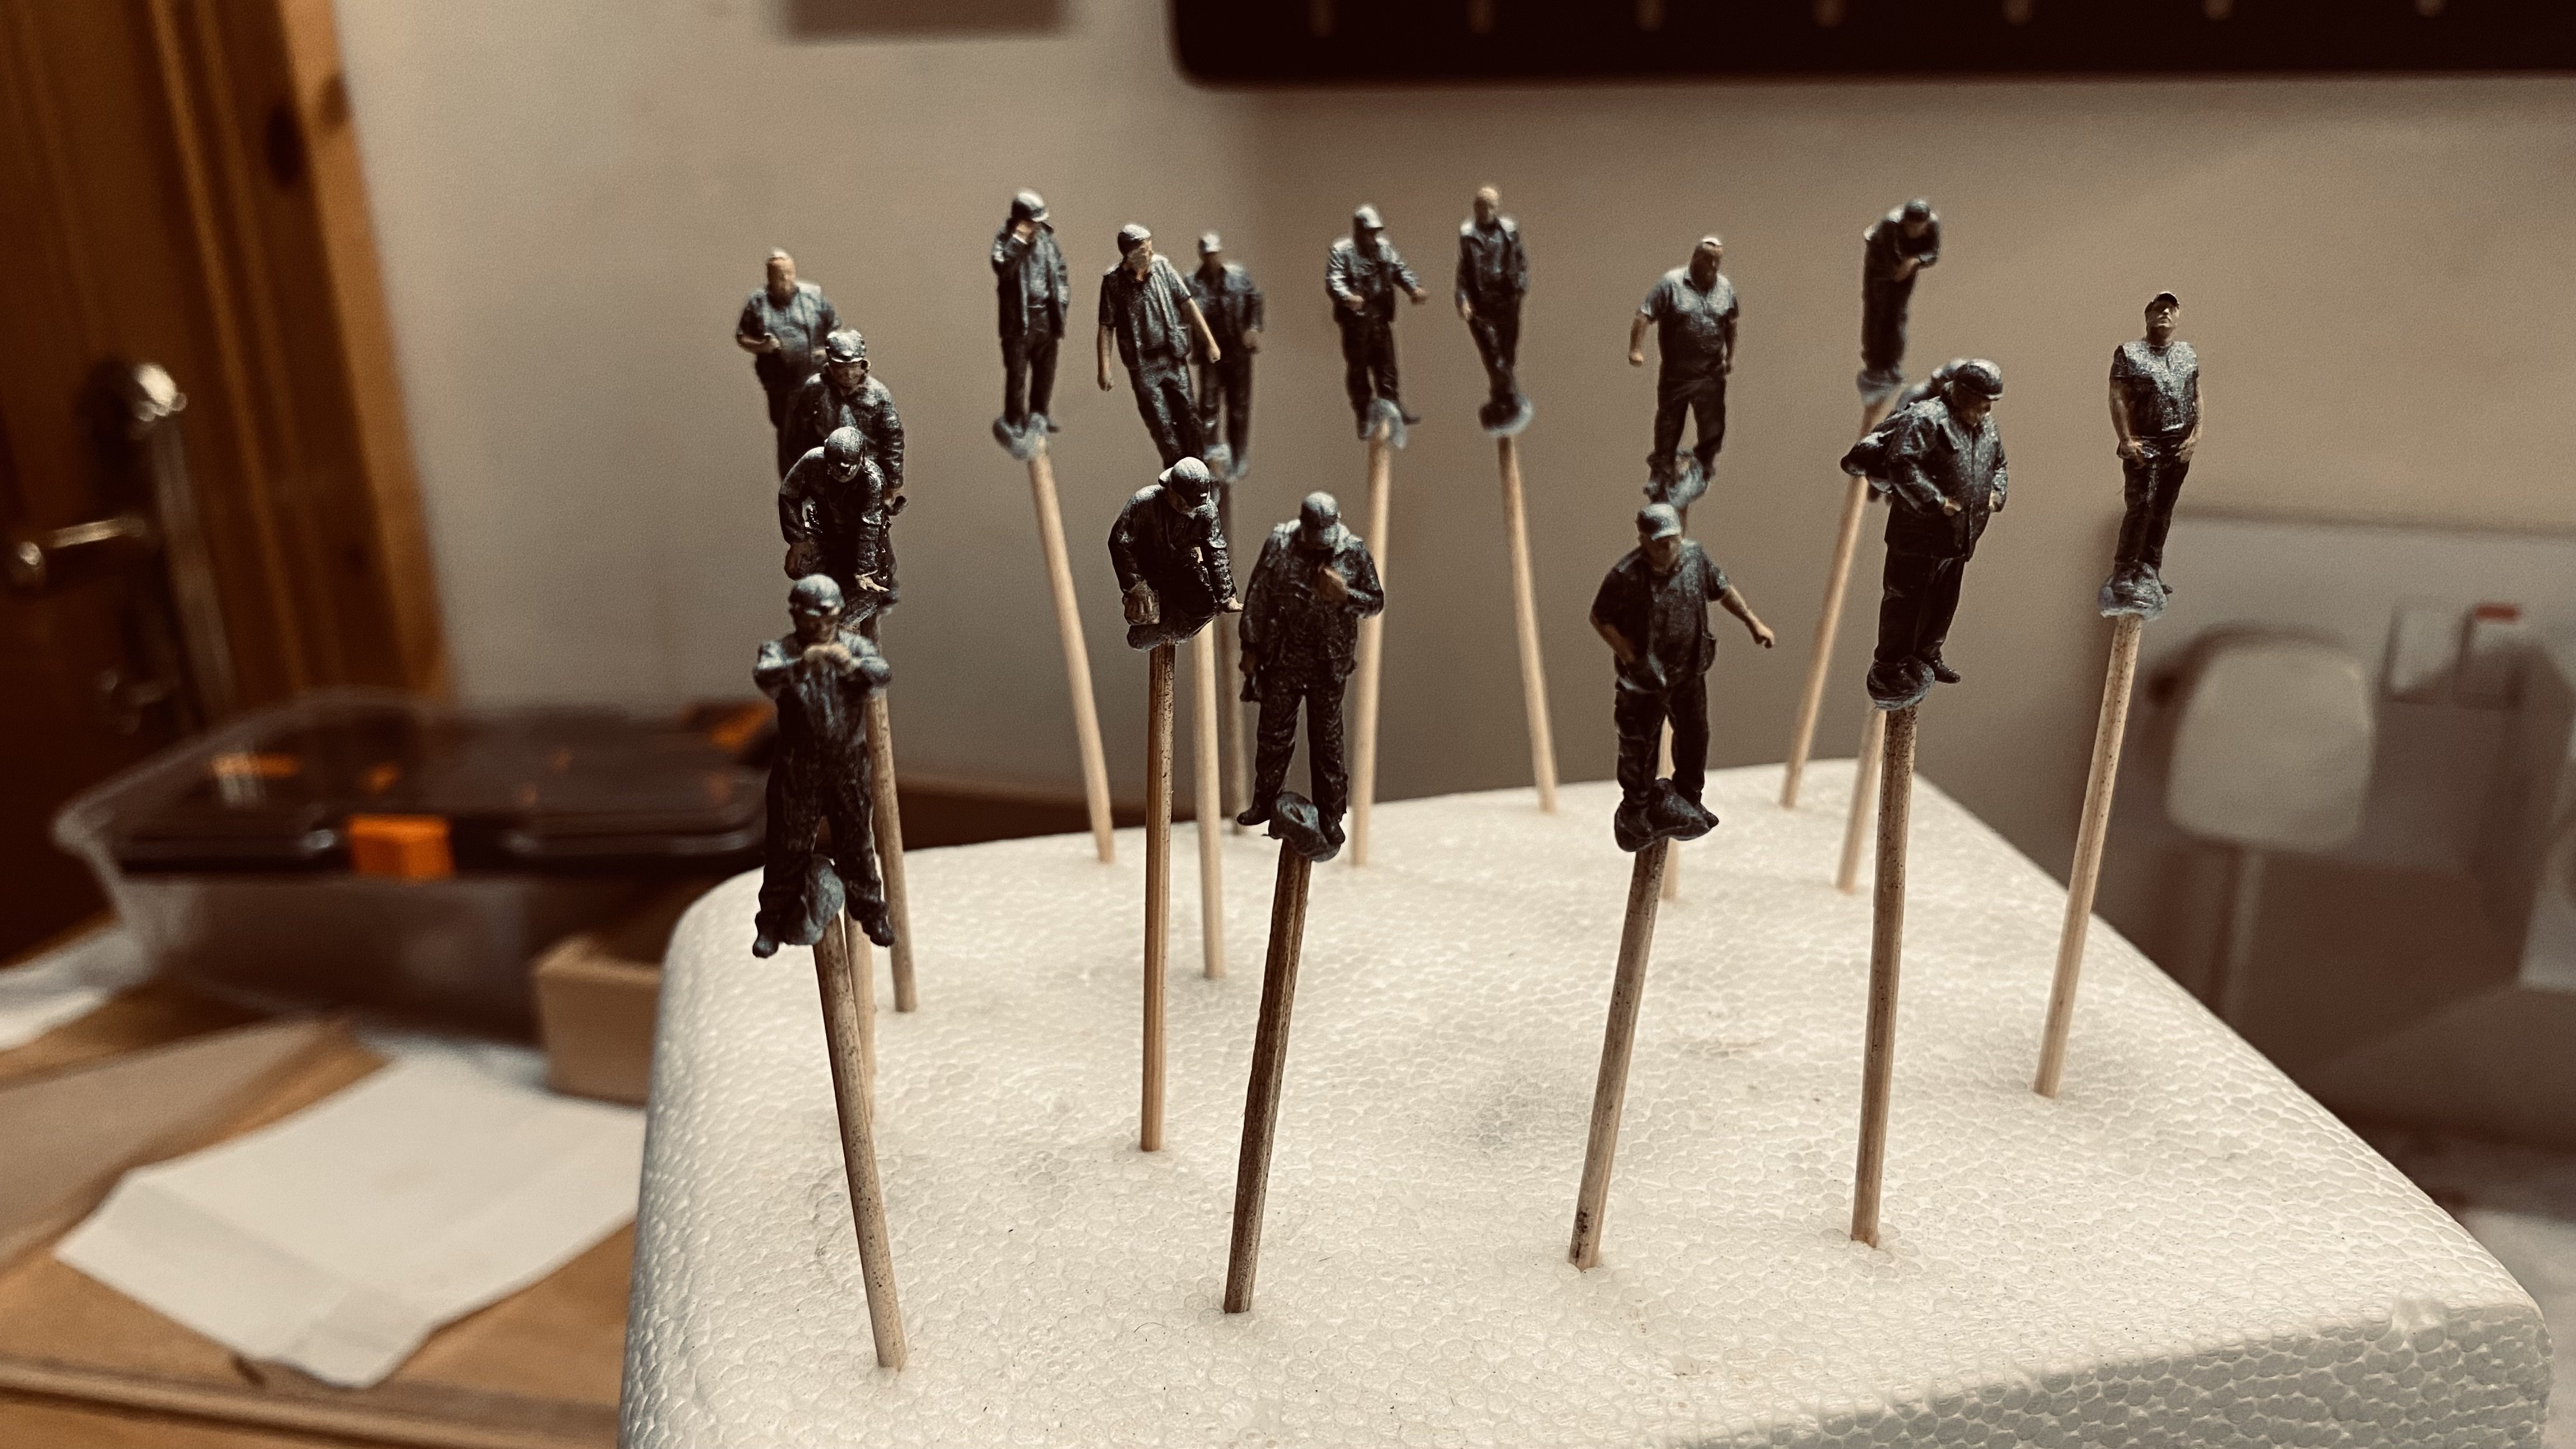
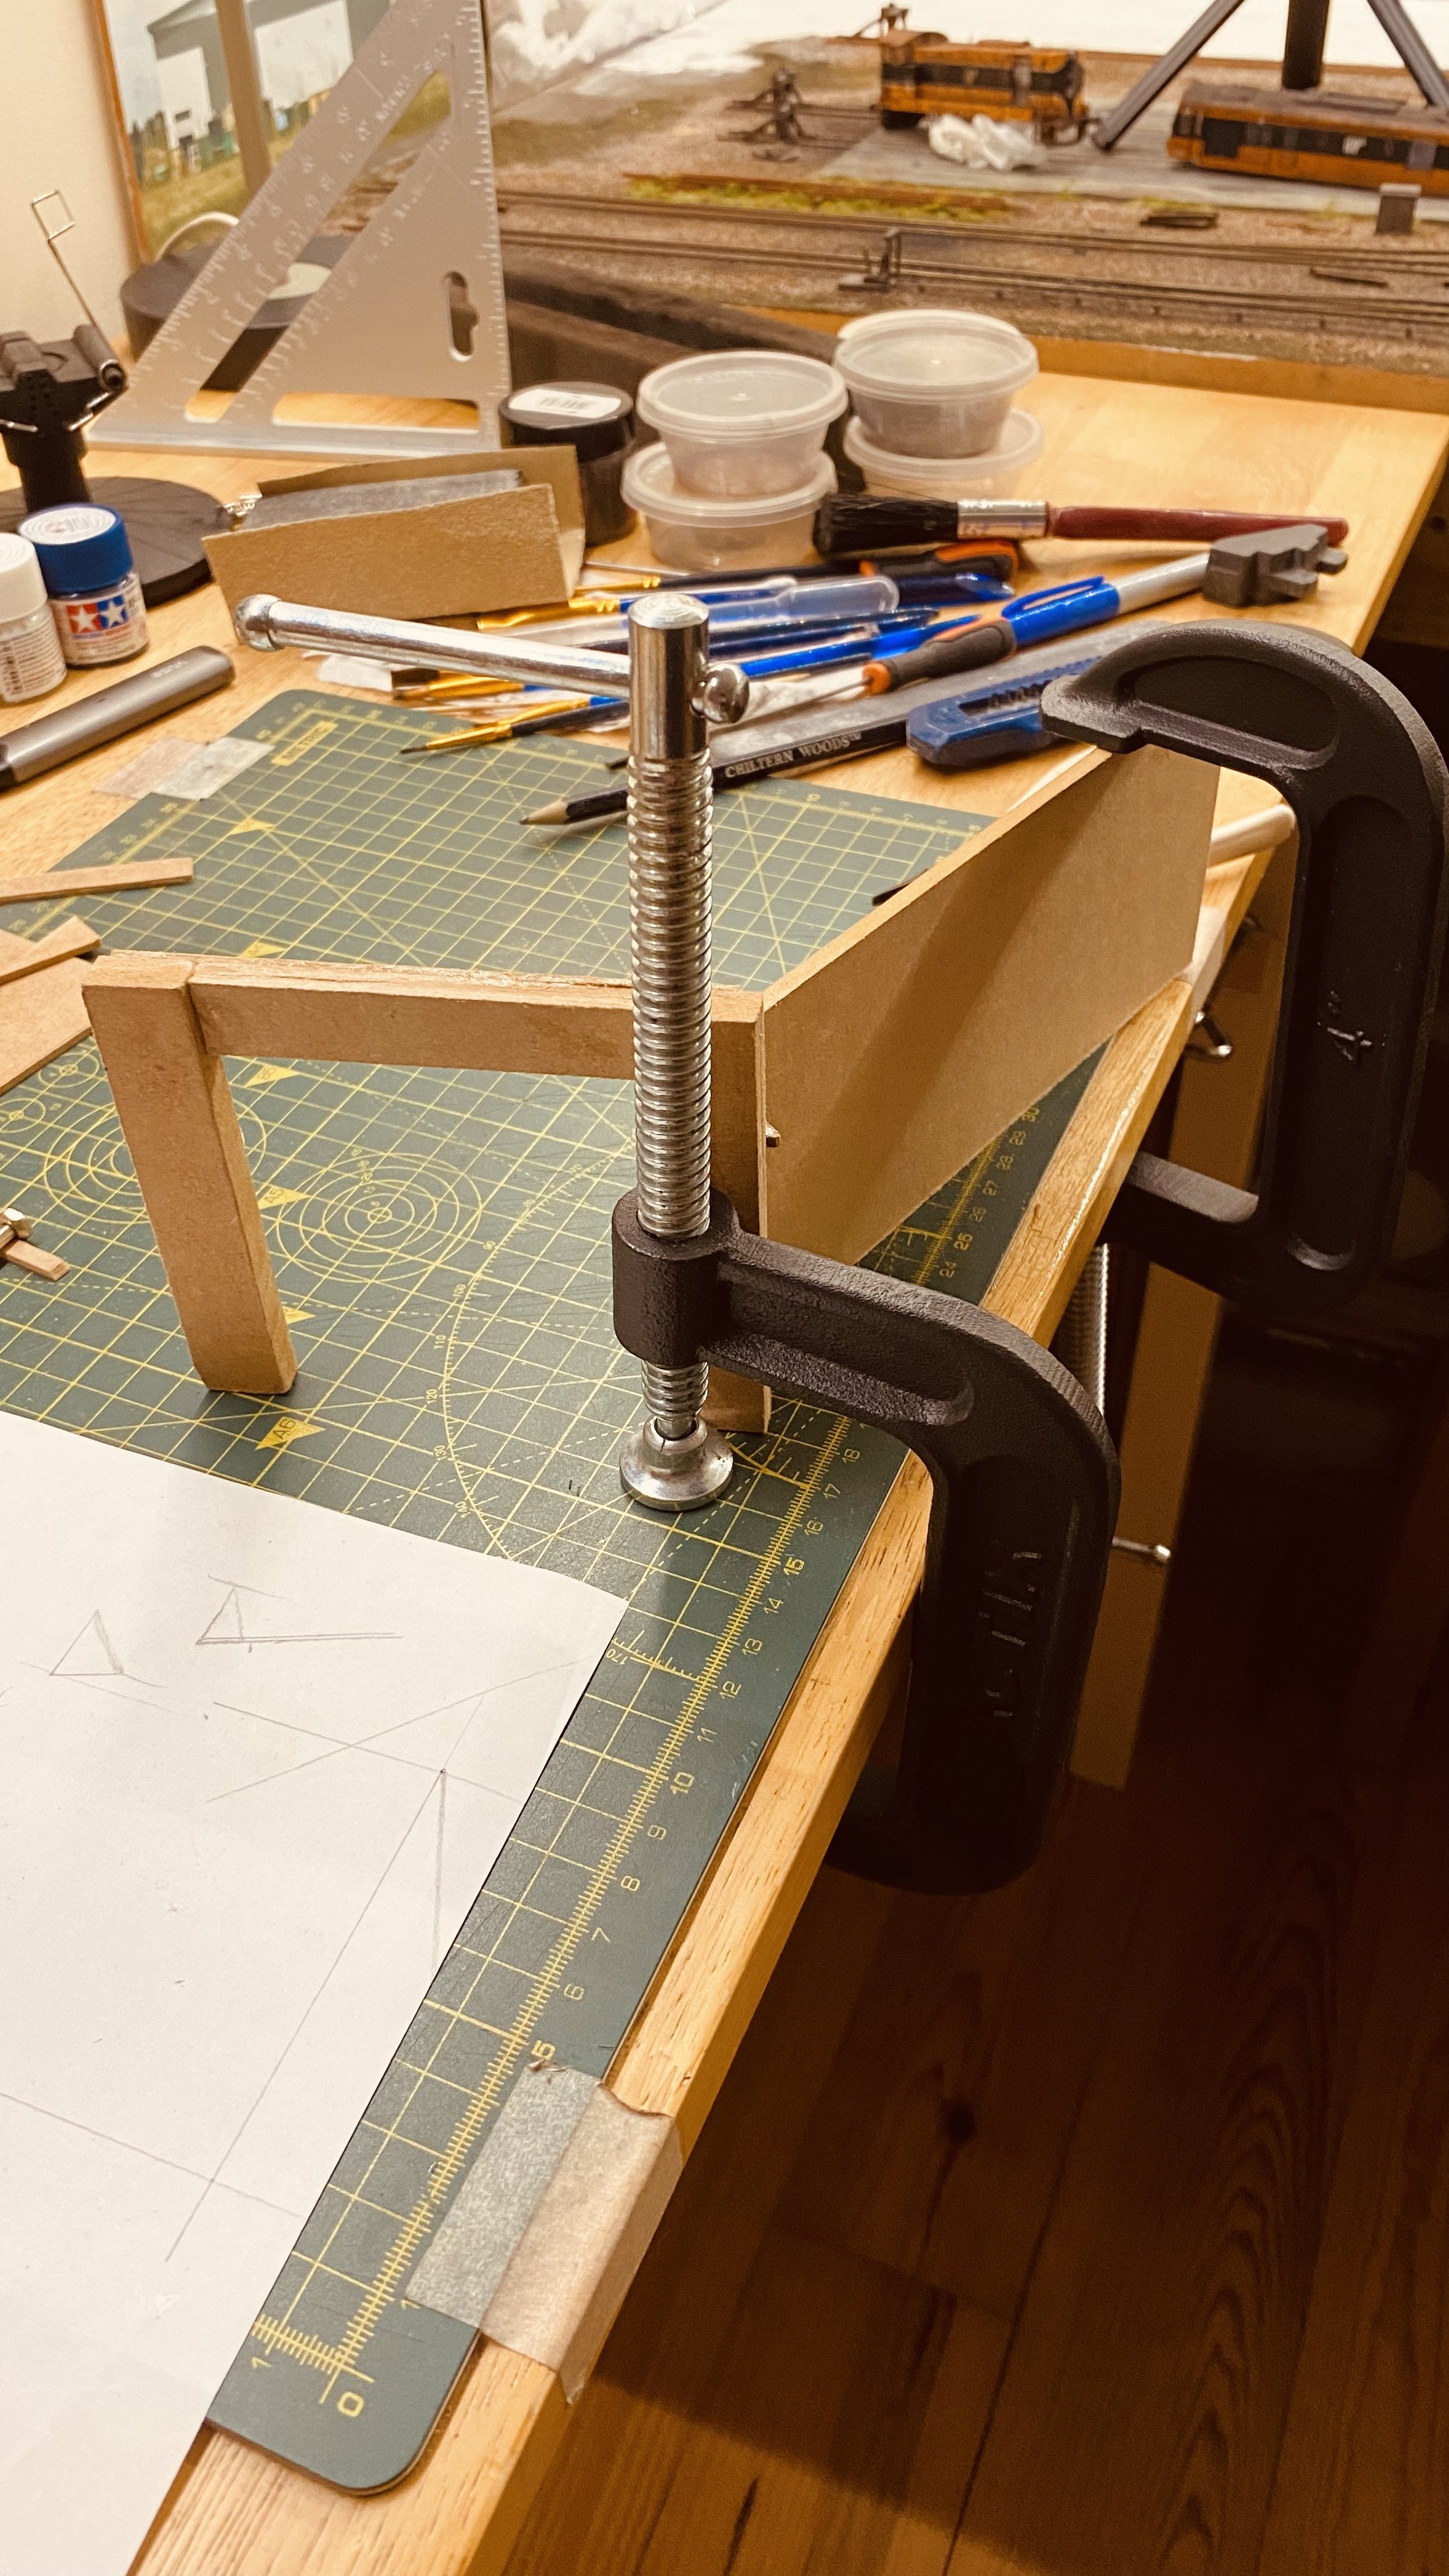
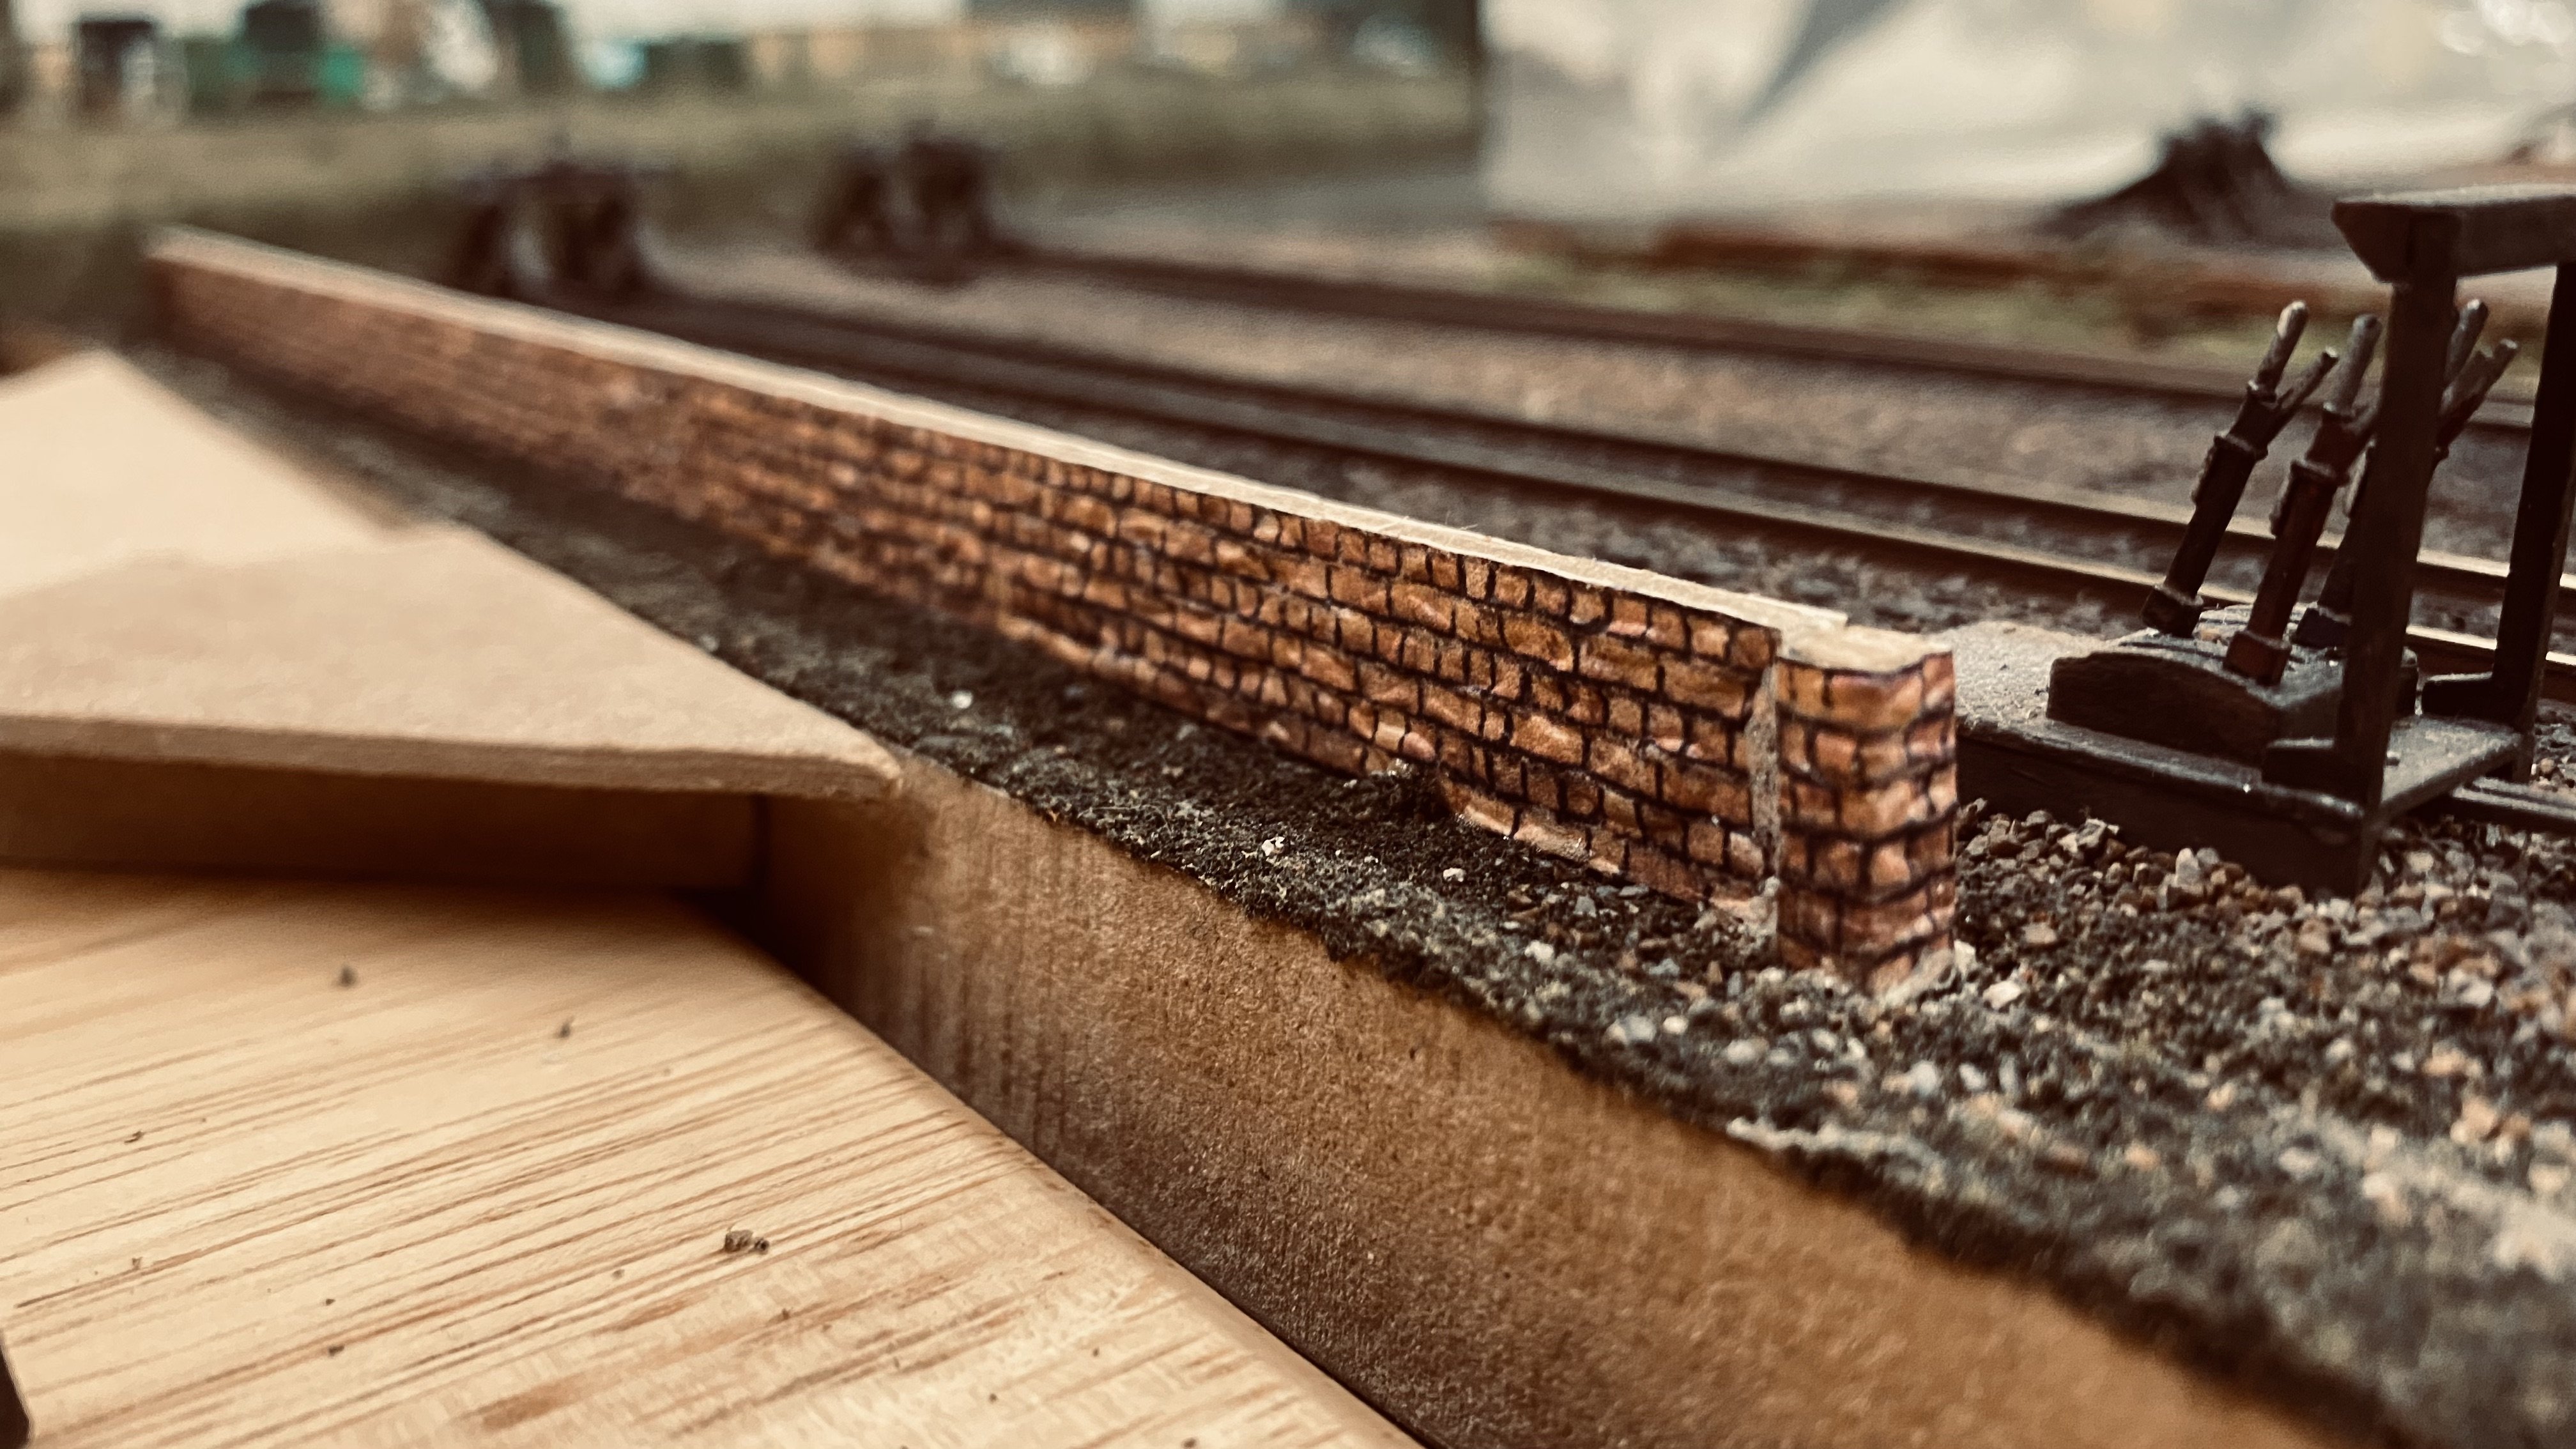
Hey all, time for an update and the various projects going on at the moment I like being able to move from one to the next and keep different types of projects on the go, keeps it interesting Concrete Industrial Yard First up is the open space between the depot and the scenery. I don't want to make this area too busy with buildings and quite like the idea of having a sort of open yard / waste ground area to tie in the depot with the scenic backdrop, which has a carp park / open area. So I got out the DAS clay and started laying it down relatively smoothly but with some relief / some texture and broken up / ragged areas near the ballast. I think this will work well when I add ballast / ground cover / grass and blend in the rough concrete This is a good shot to show the roughness, hopefully this will mimic old, worn down concrete like you'd find in an infrequently-used part of an industrial park. Cutting some cracks and potholes into the hardened DAS clay. The long grooves are for adding walls later on after painting. Spray painted with about 4 or 5 coats of my custom concrete mix If you're interested it's Humbrol Matt 27:28:121:34 in the approx ratio 2:6:6:4 and thinned 1:1 Next job to do is to use the dabbing technique to add dark and then light patches to this base, then some black wash to blend it together. Figure Painting Bought a bunch of ModelU figures for the yard and have started painting them with acrylics washes. I saw a very effective technique for this on Bunter's Yard: https://www.youtube.com/watch?v=biJWFlohnXw&list=LL&index=16. You spray the figures matt back all over, then spray matt white only from above mimicking where light comes from. This forms a base so that when you start adding thin colour washes, the dark and light will bring up the shadows through the colour. Here's the result of that first step: Then using various thin washes in shades of pink / brown for the flesh... And various thin washes of colour for the clothing, here's an example of a finished figure, very happy with this result Hills & Scenery Next up is hills and scenery, I haven't done a whole lot on this yet as I need the tunnel in place before I can sculpt, shape and fix the scenery in place. But the plan was done using paper and then the rough shape of the hills (using foam insulation) has been cut out and glued. More to come on this. The Tunnel Now this is an awkward beast! The tunnel will transition the main depot area with the hills and scenery section. Due to the limited space though, the track is right at the edge of the base board and the angles are very strange. The back section of the tunnel will also drop down to a support underneath the baseboard frame, so it can be set about 20mm back from the track and give the loco enough clearance. Starting to cut out the basic shapes and glue them together. I'm using combinations of 3, 6 and 9mm MDF. Basic frame is complete, here you can start to see the weird angles needed. With the frame complete, I've started adding the brickwork. This is embossed card with punched out texture which works really well. Got it on Etsy from Greece: https://www.etsy.com/ie/listing/1063916581/new-16-sheets-wall-00-176-scale-wall?ref=yr_purchases One thing is that we don't have a lot of red brick in Ireland, but the card takes weathering powder very well, so I'll be weathering this to match the grey / black colour we usually have in our bridge tunnels. Foreground Wall While doing the tunnel I also started adding a wall to the foreground. I saw this done on a layout somewhere and it worked really well when taking photos - instead of seeing the layout run to a baseboard edge, you were almost peeking over the wall to the railway beyond. Adding some bushes and shrubs in front of the wall should add to the illusion I think I'll be adding capstones soon as well. More updates coming soon!
- 80 replies
-
- 10
-
-
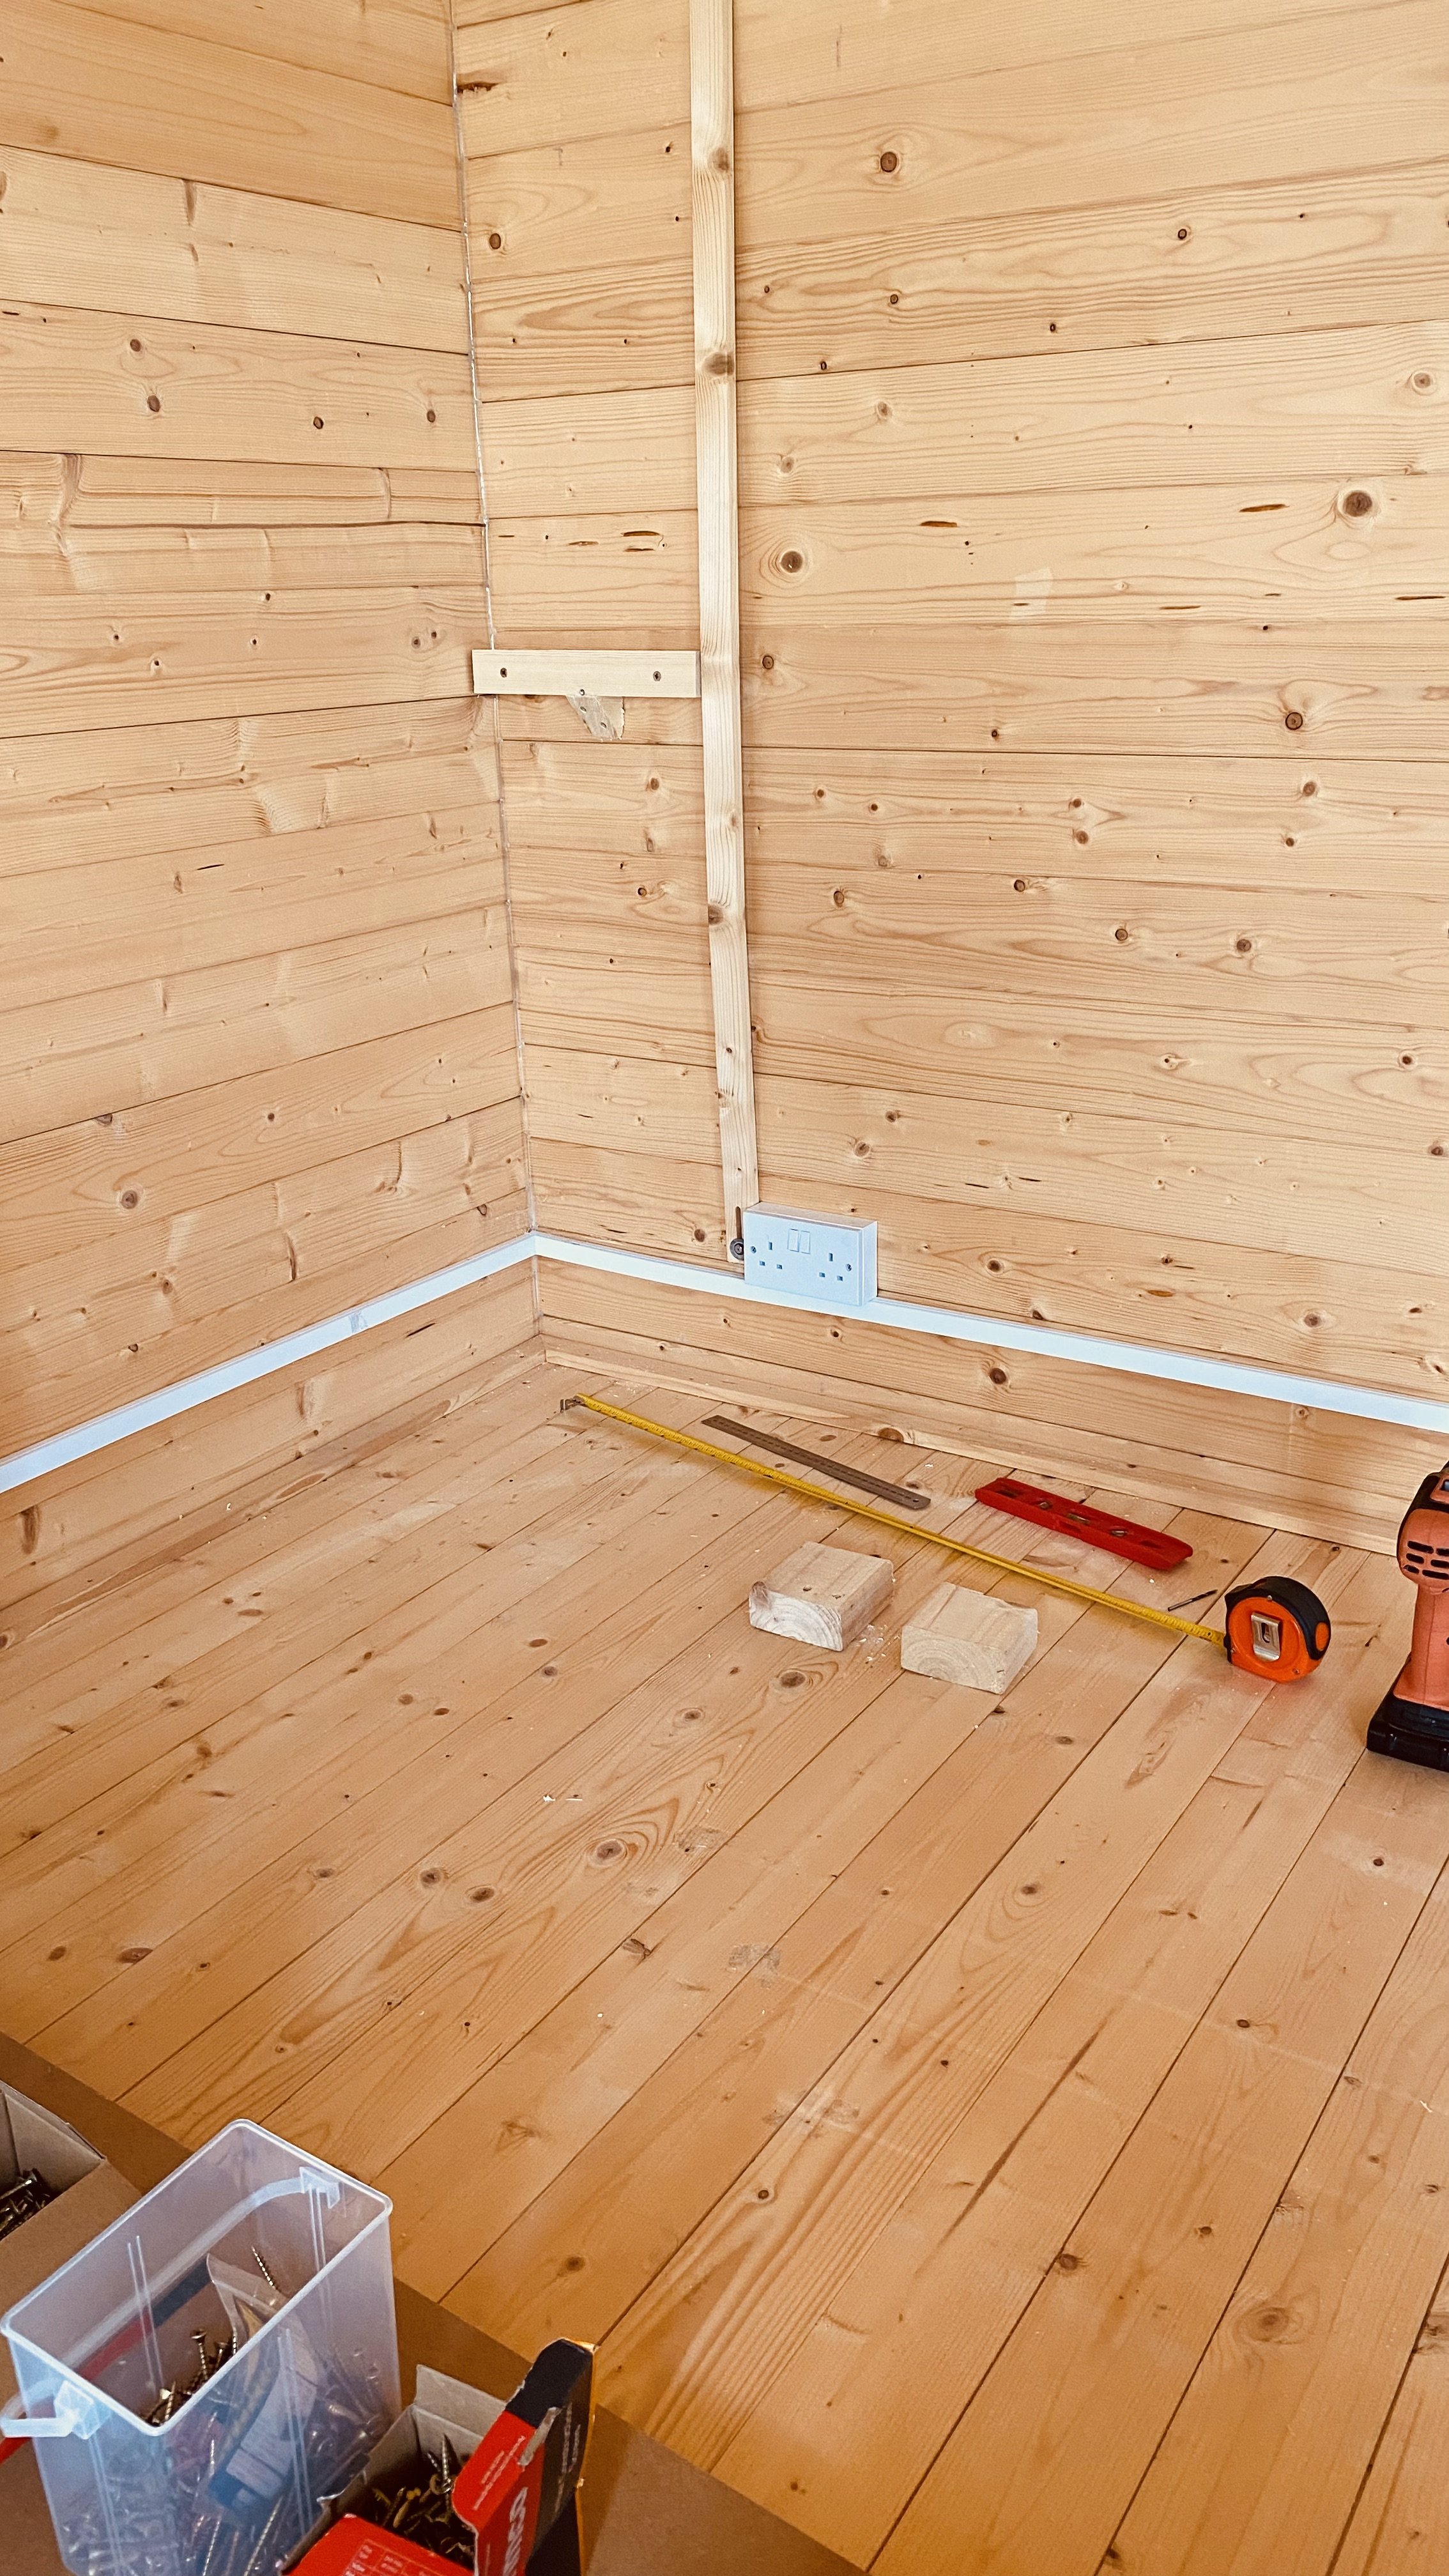
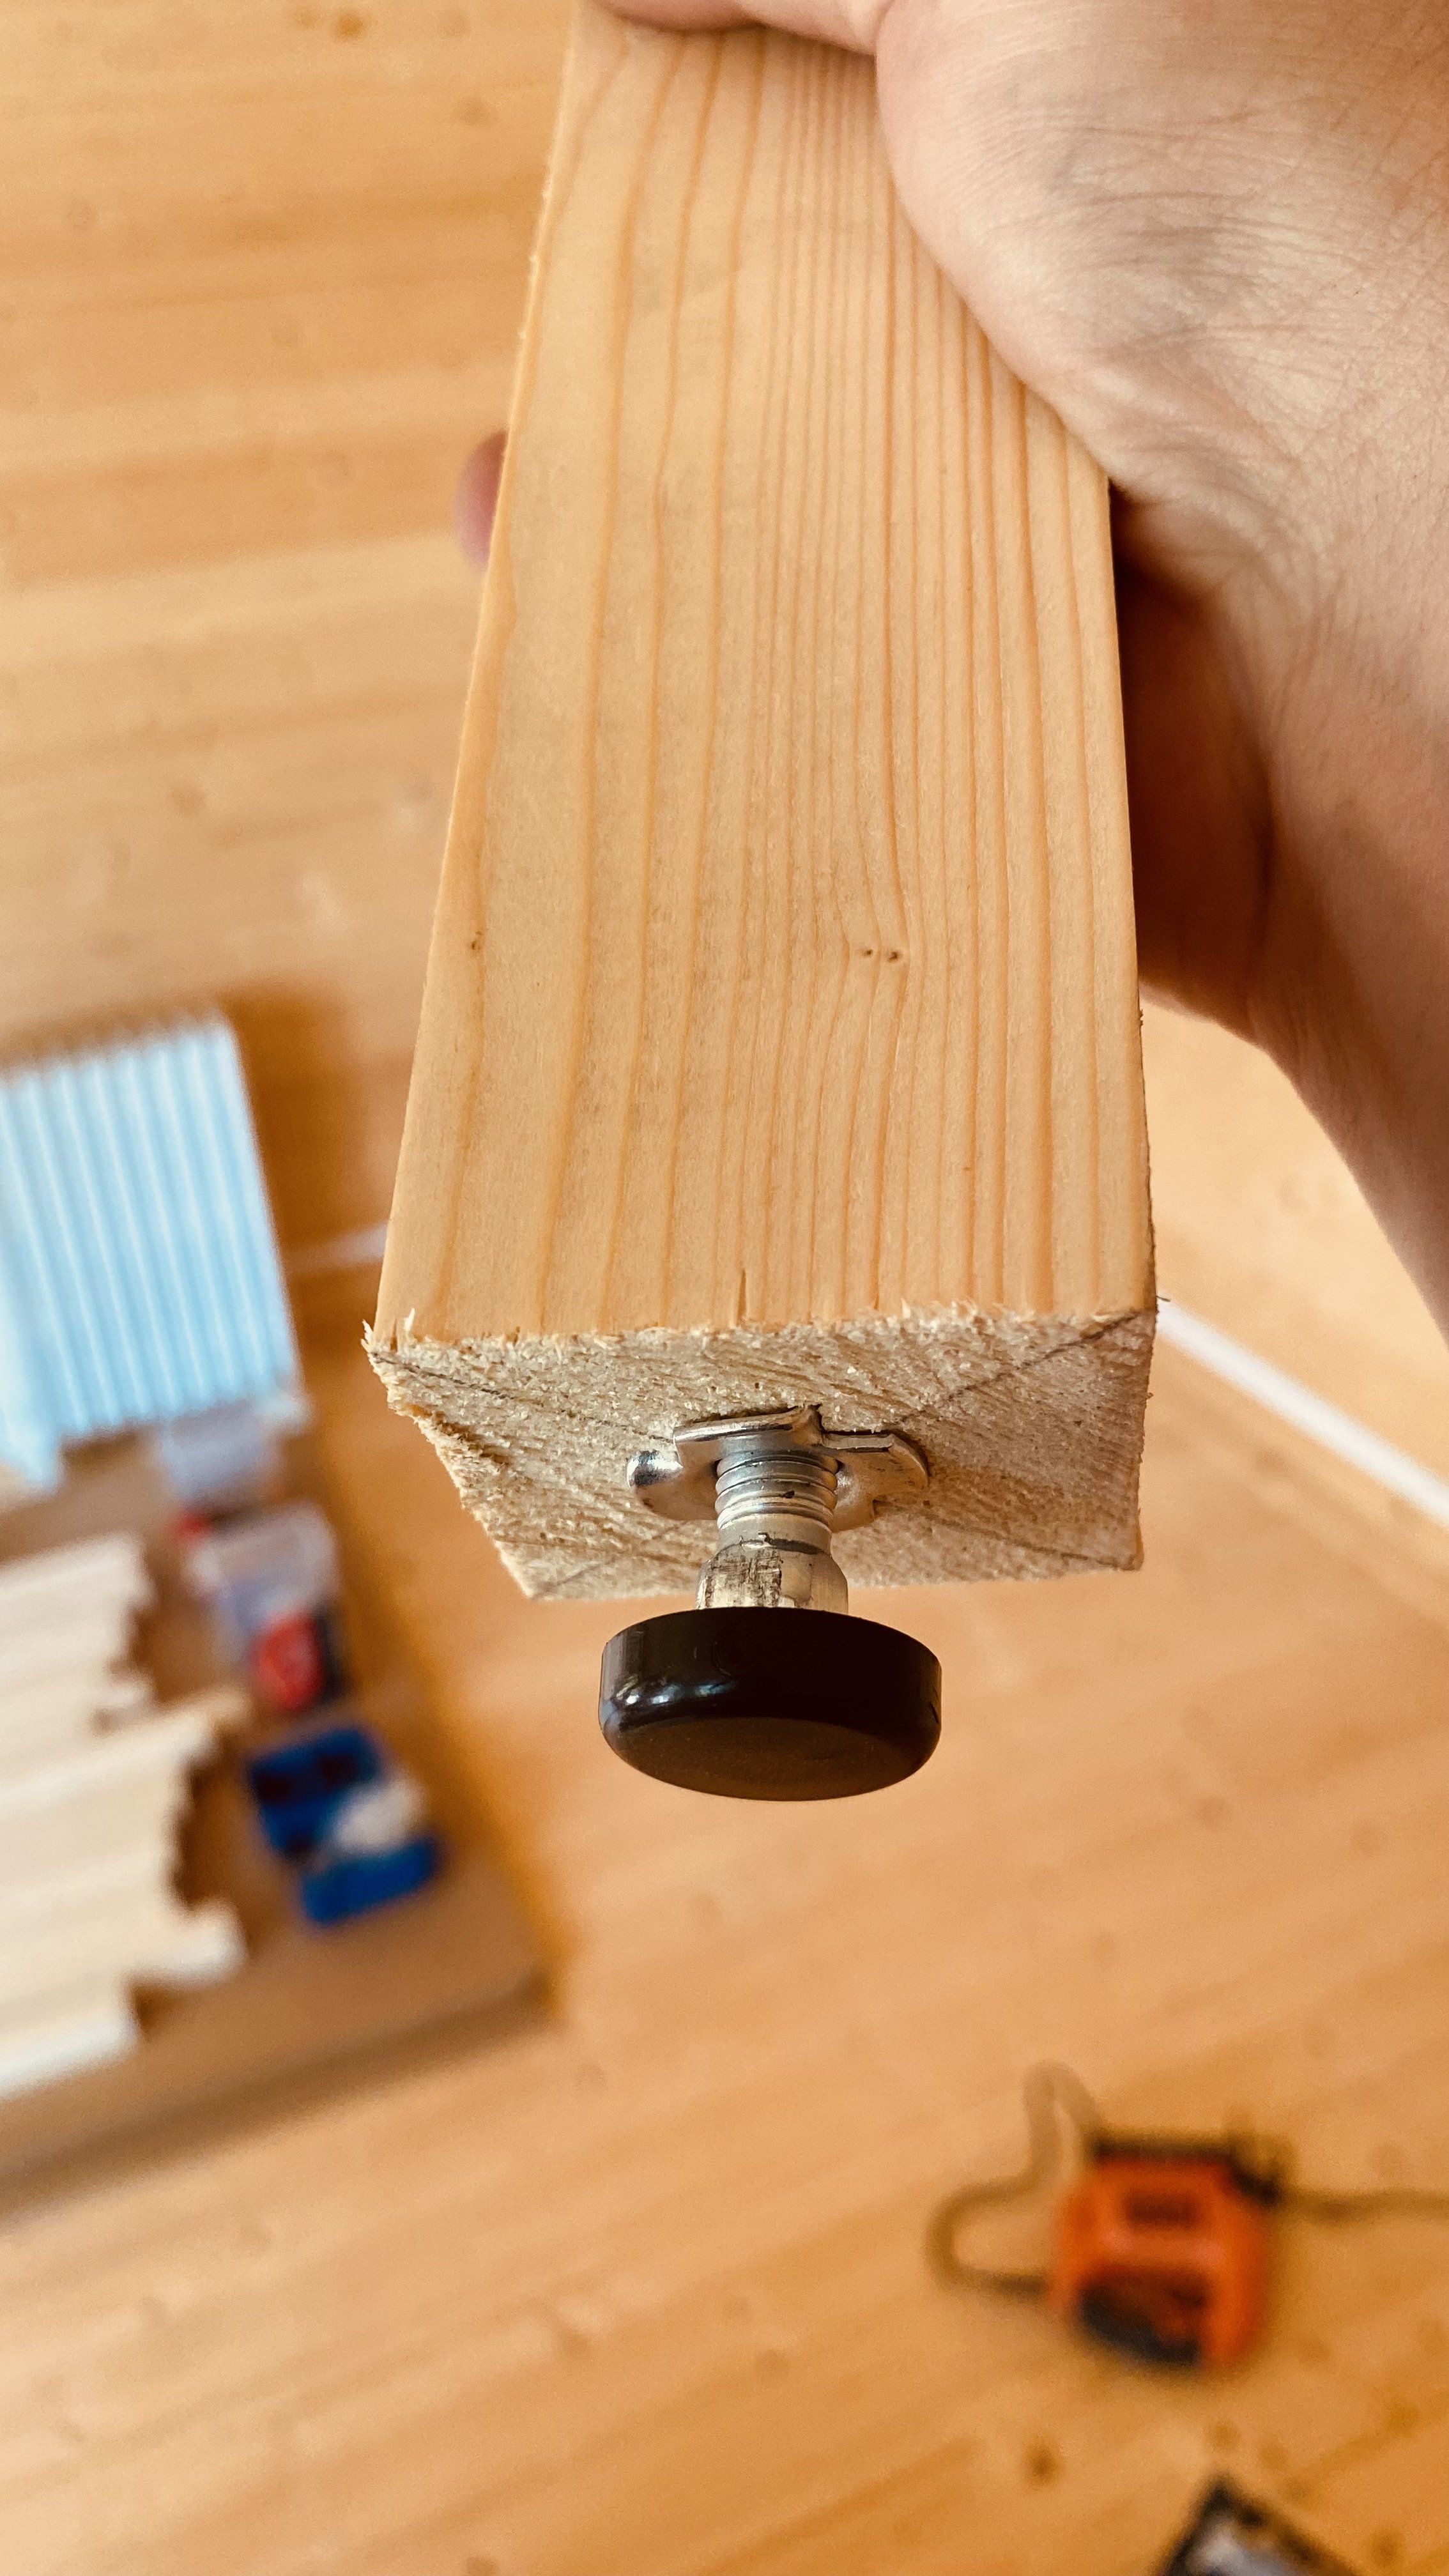
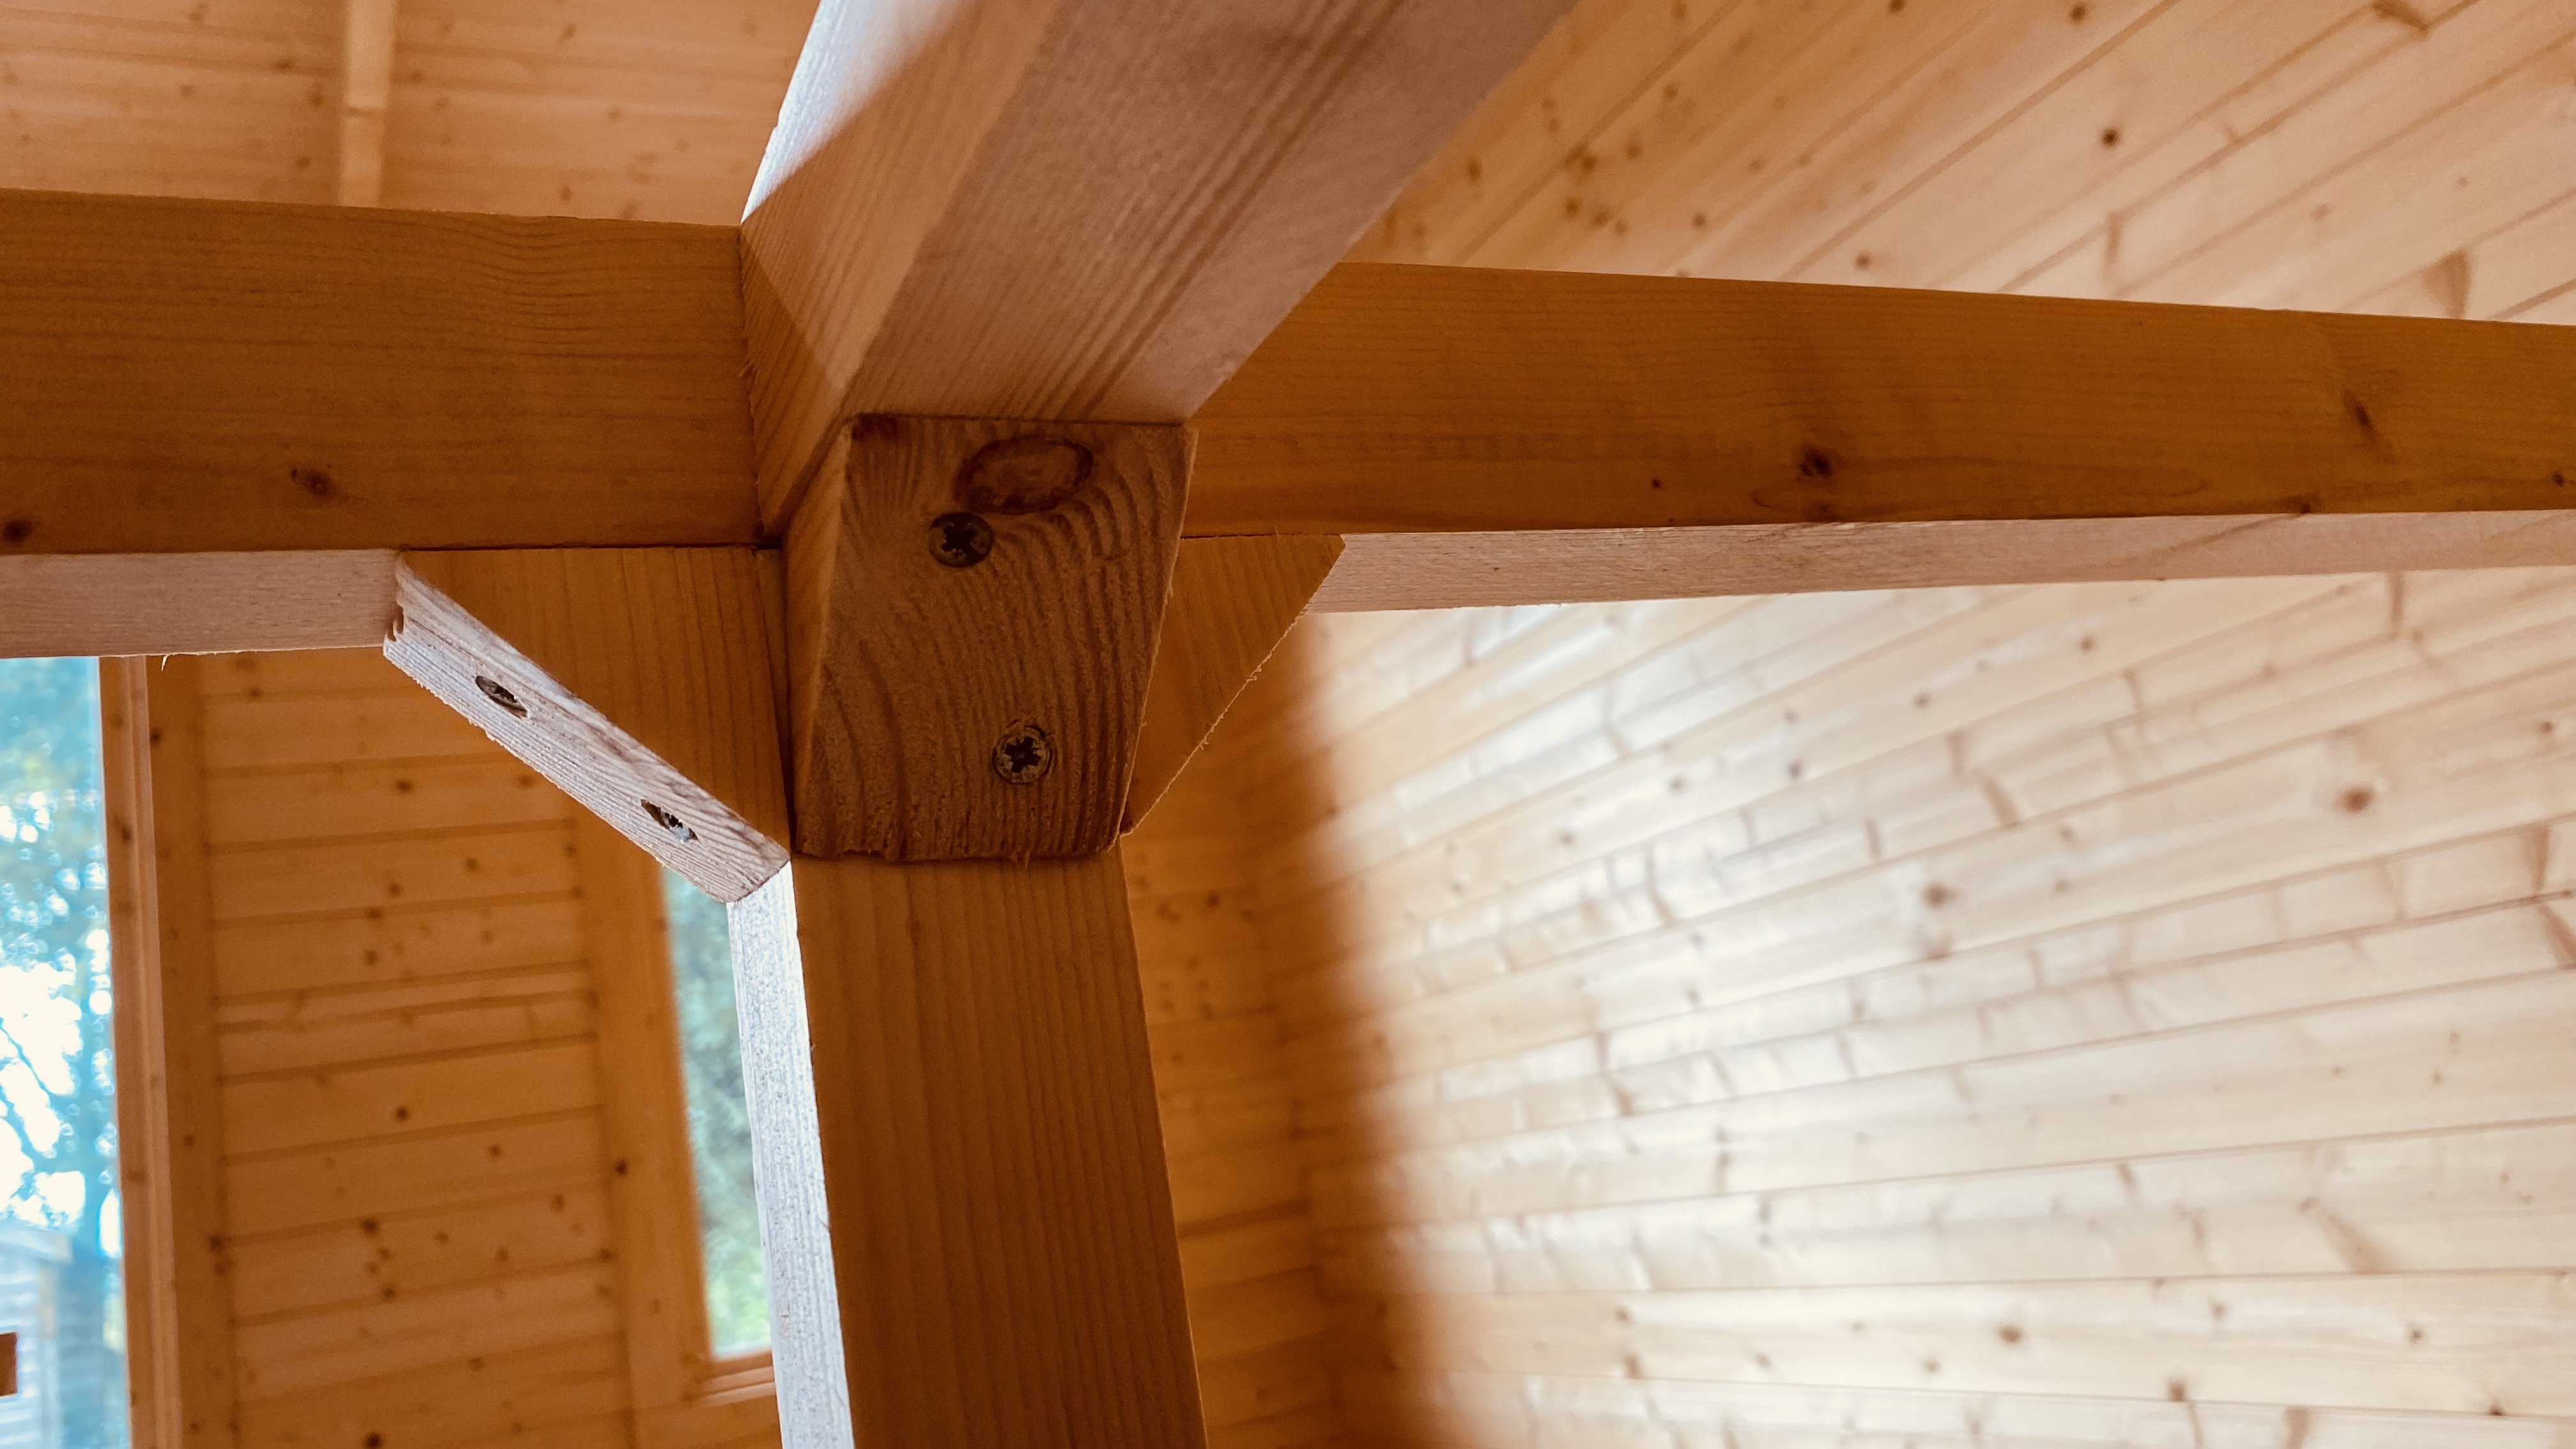
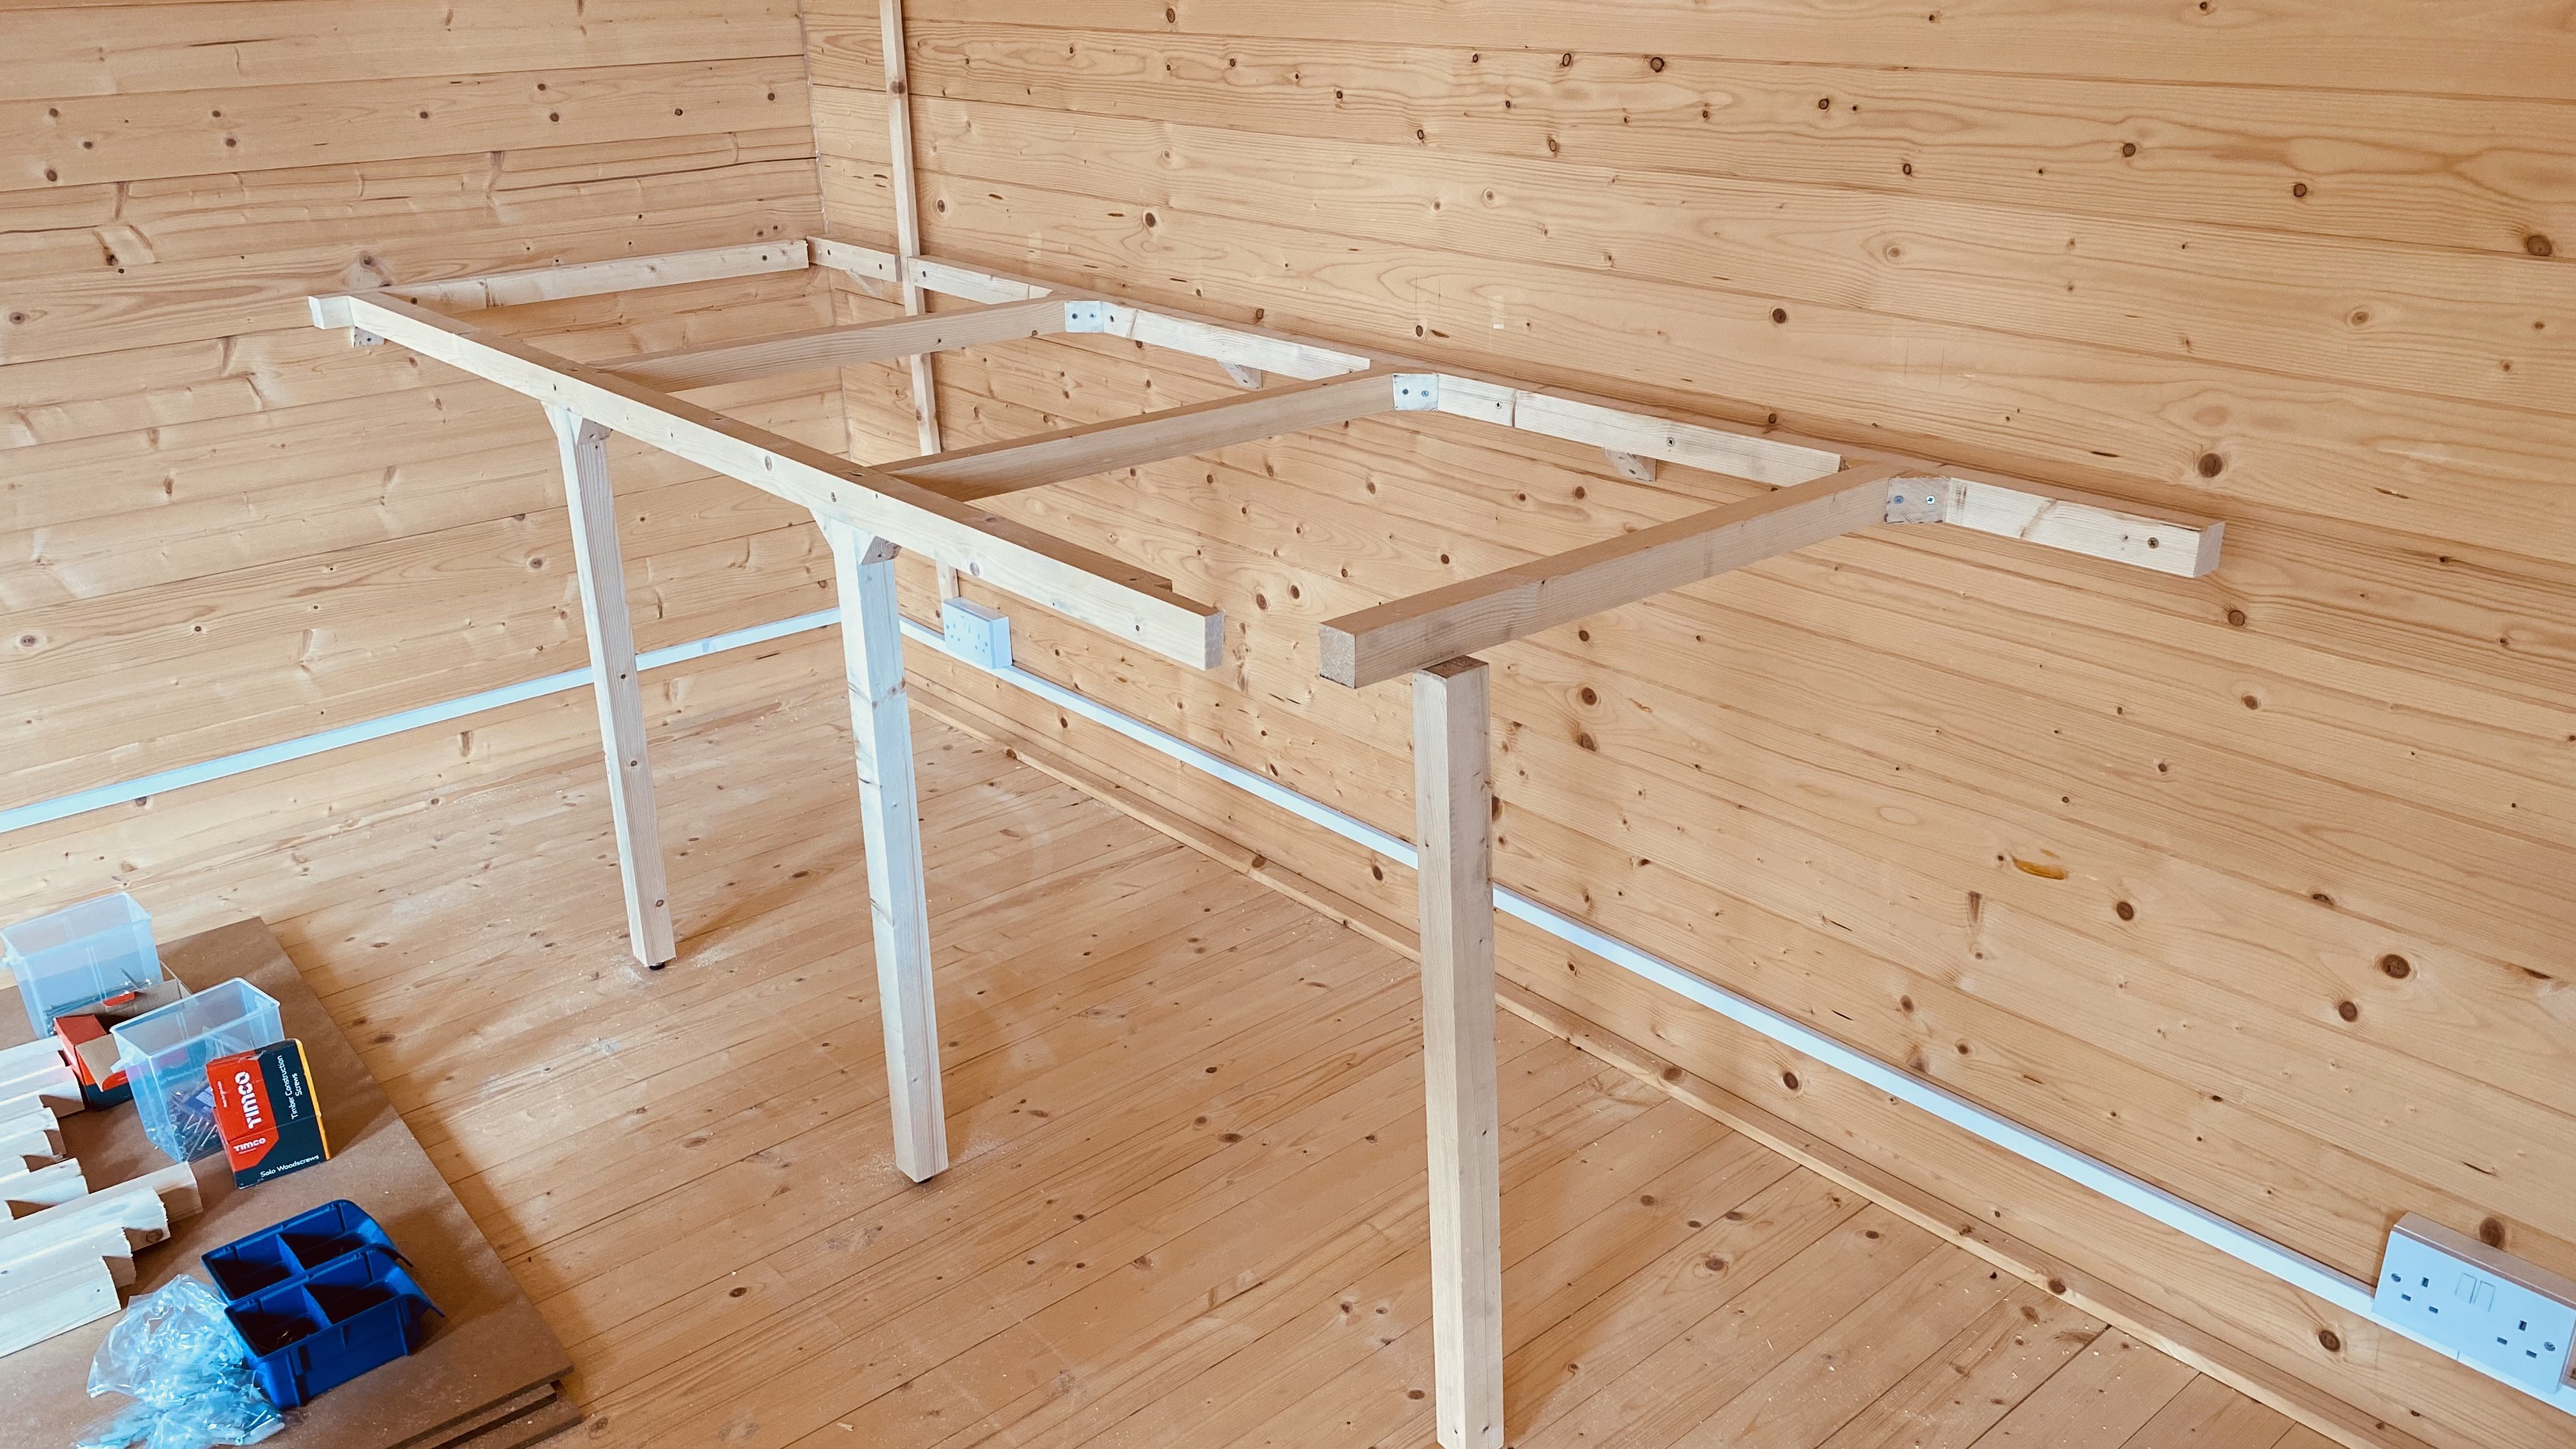
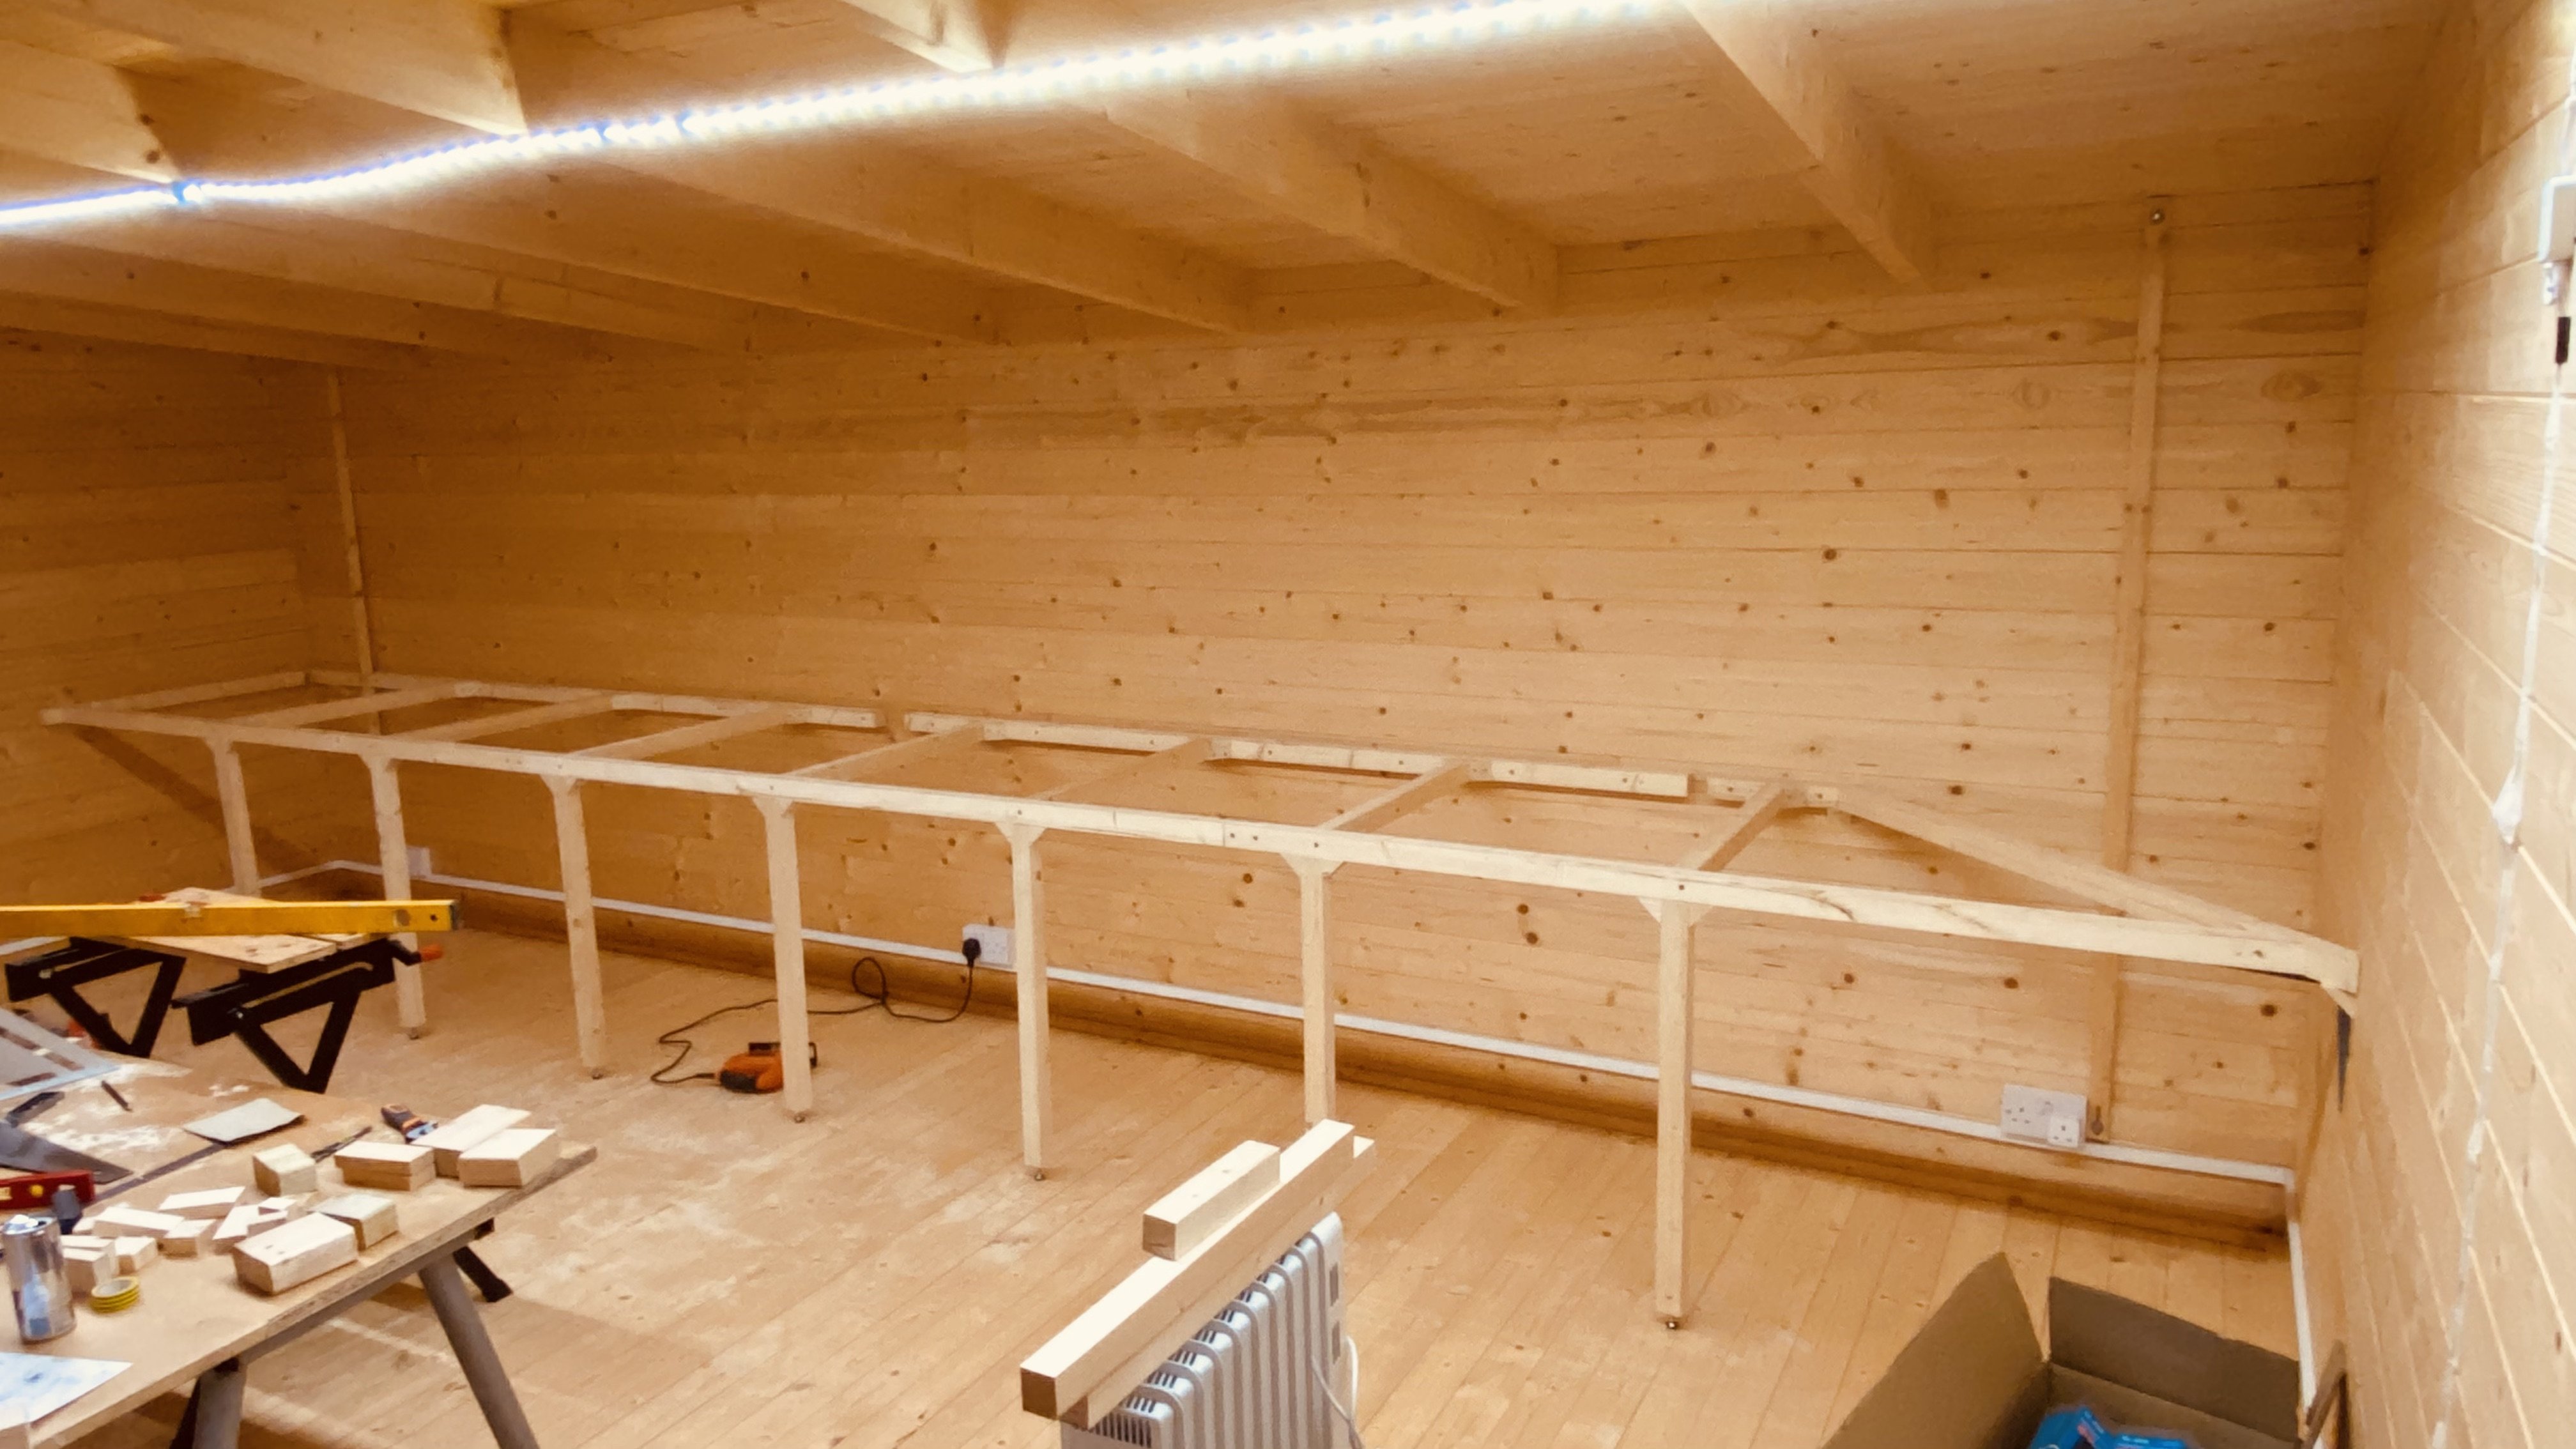
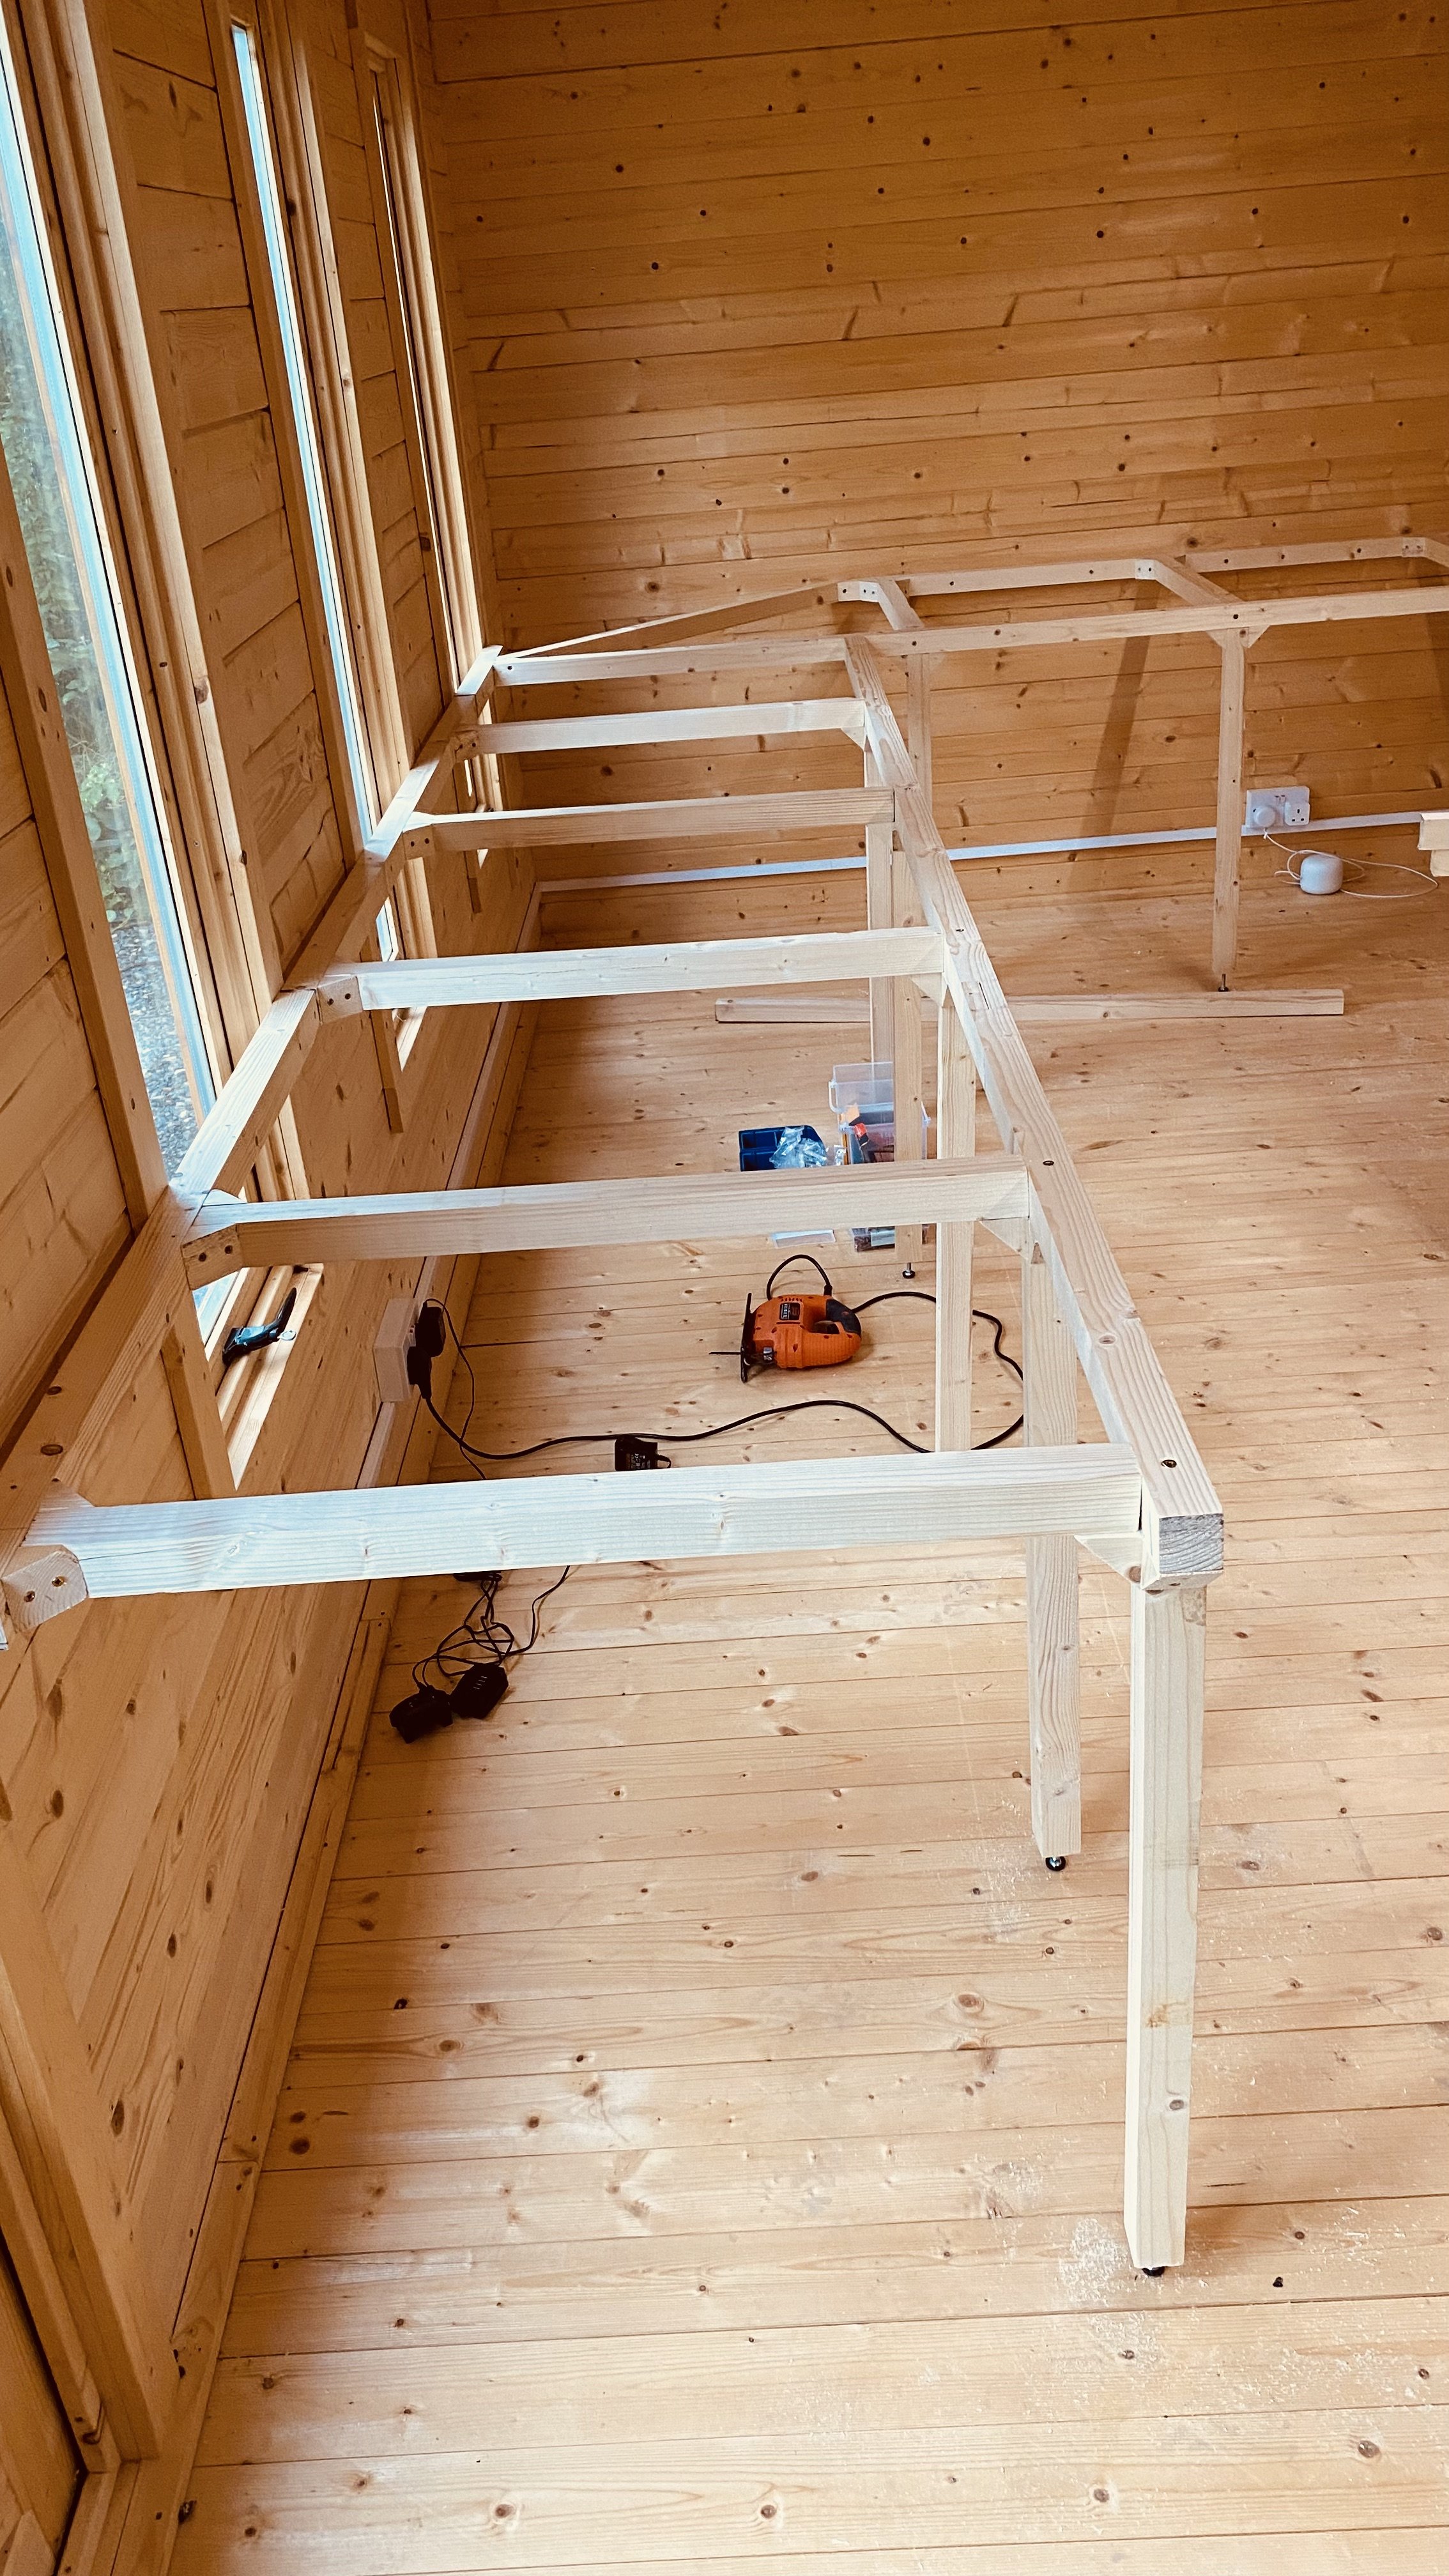
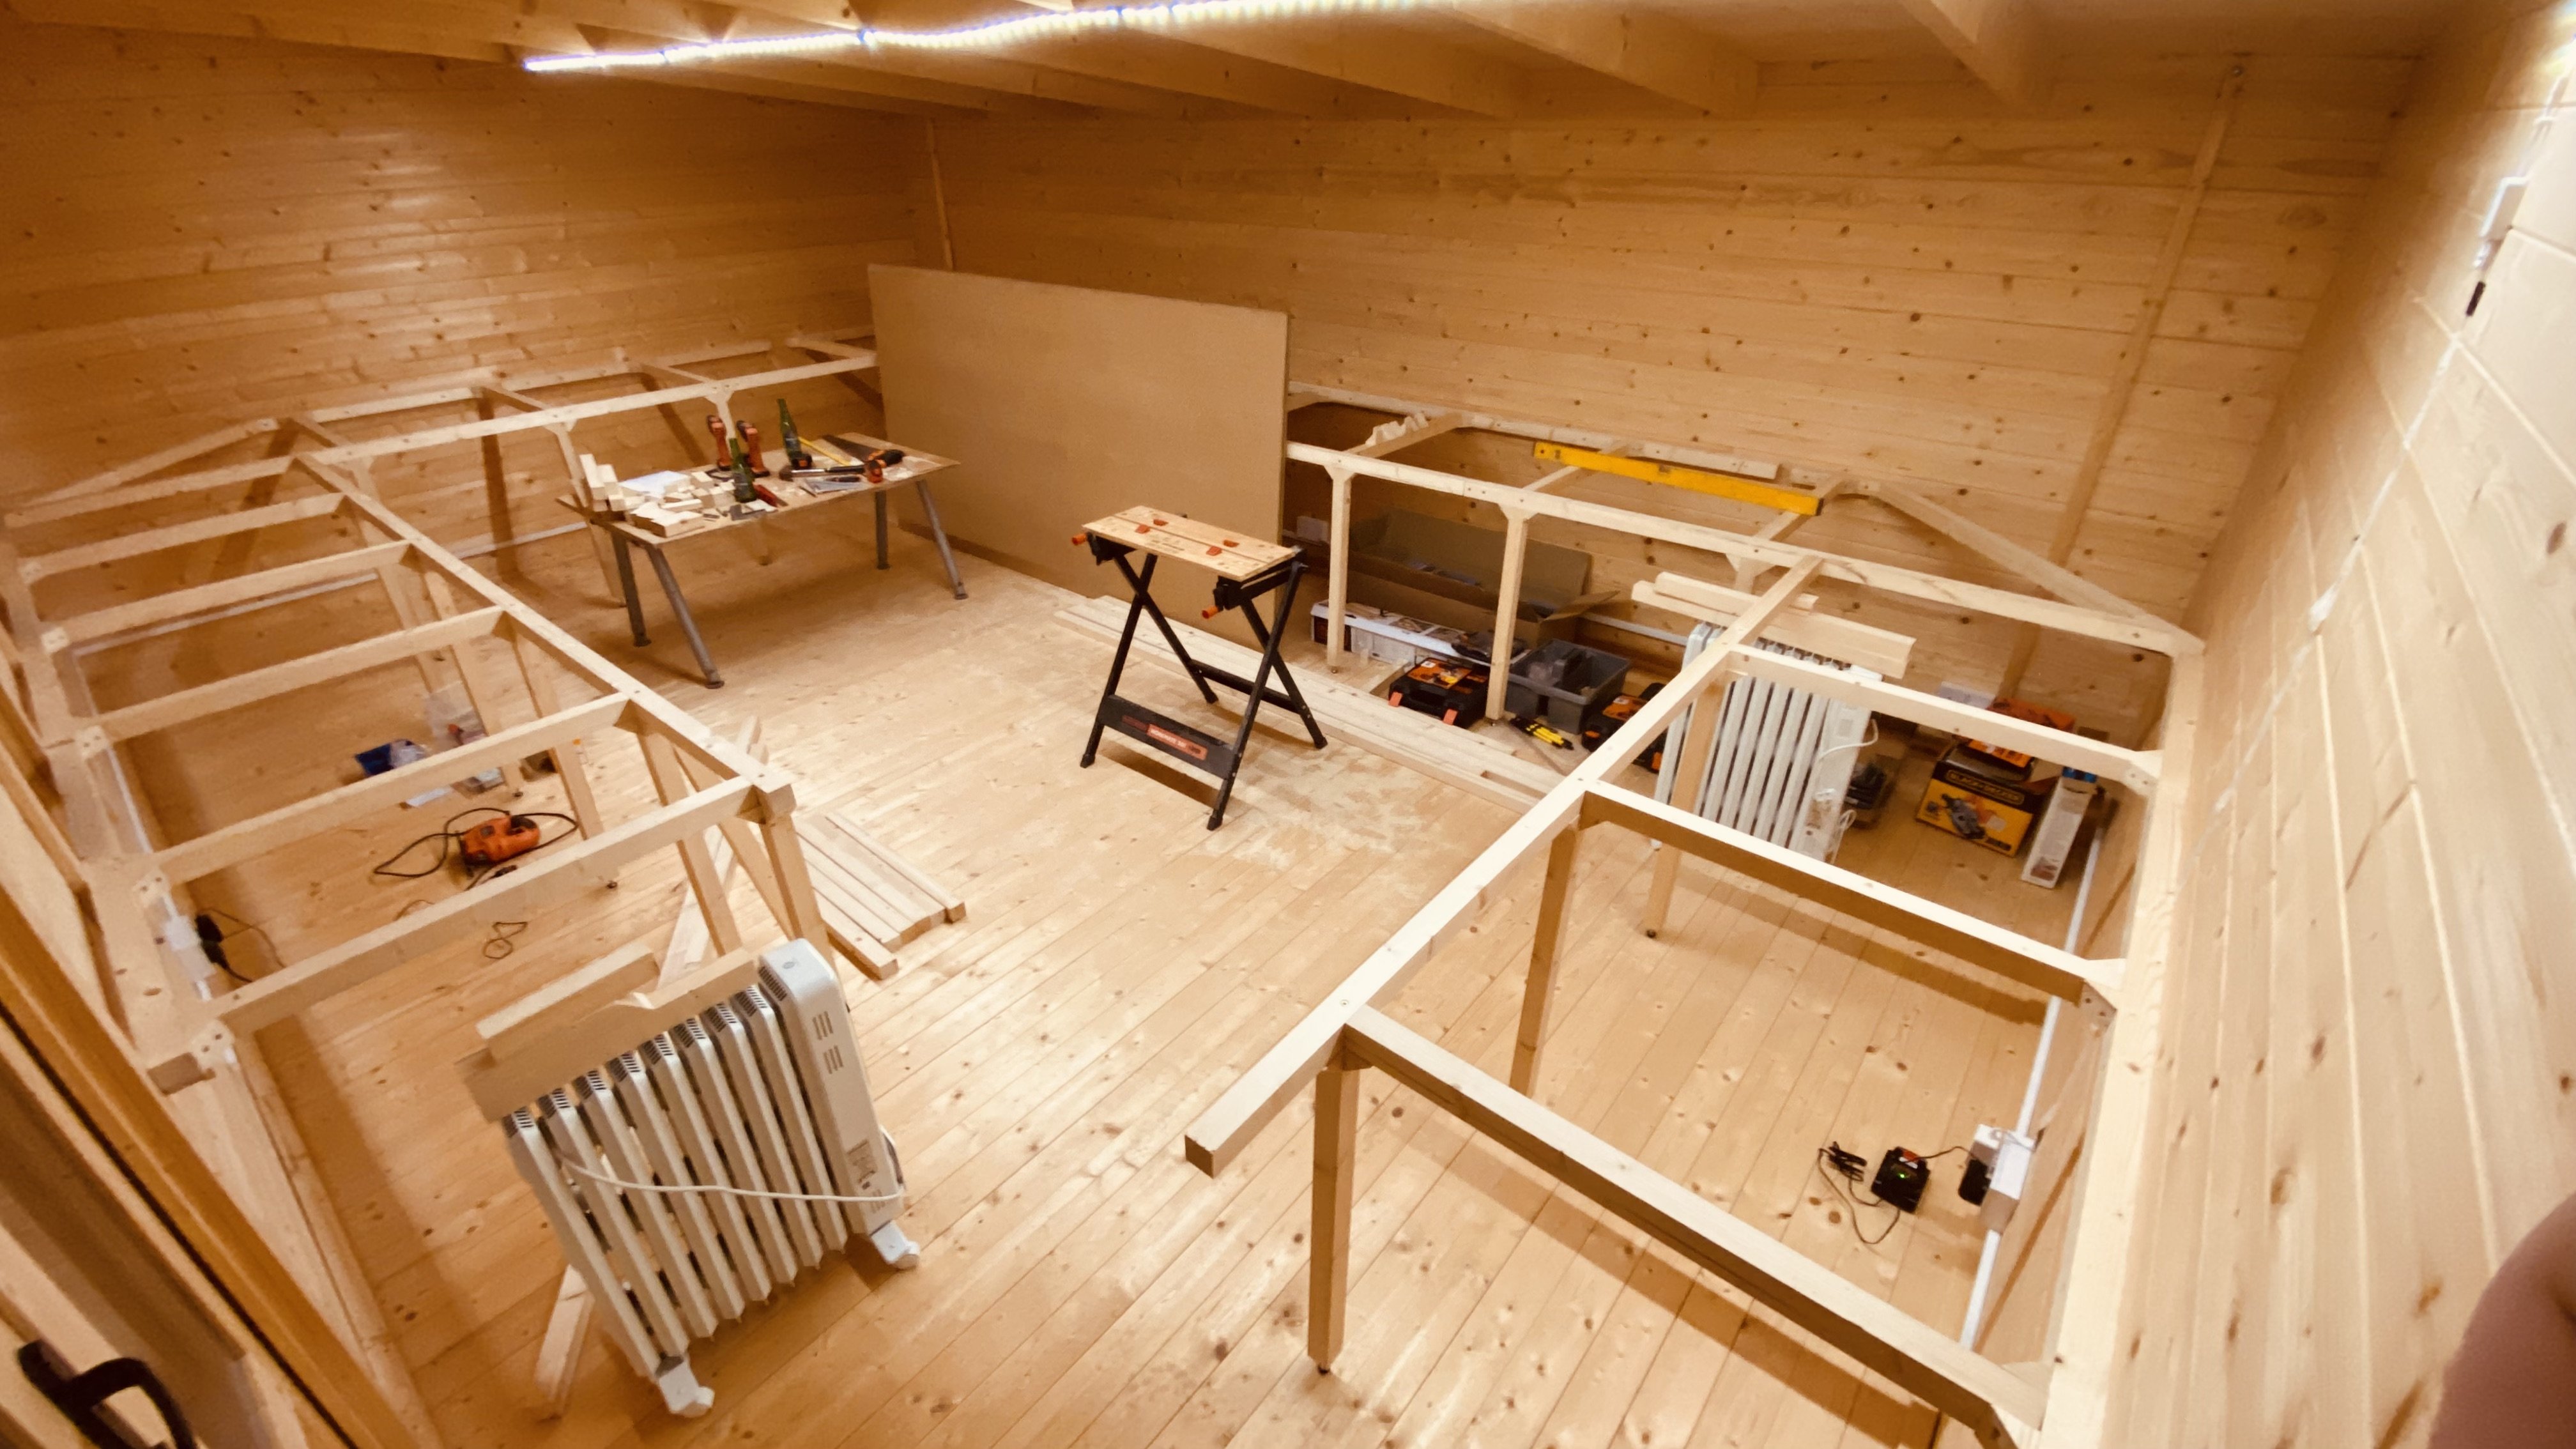
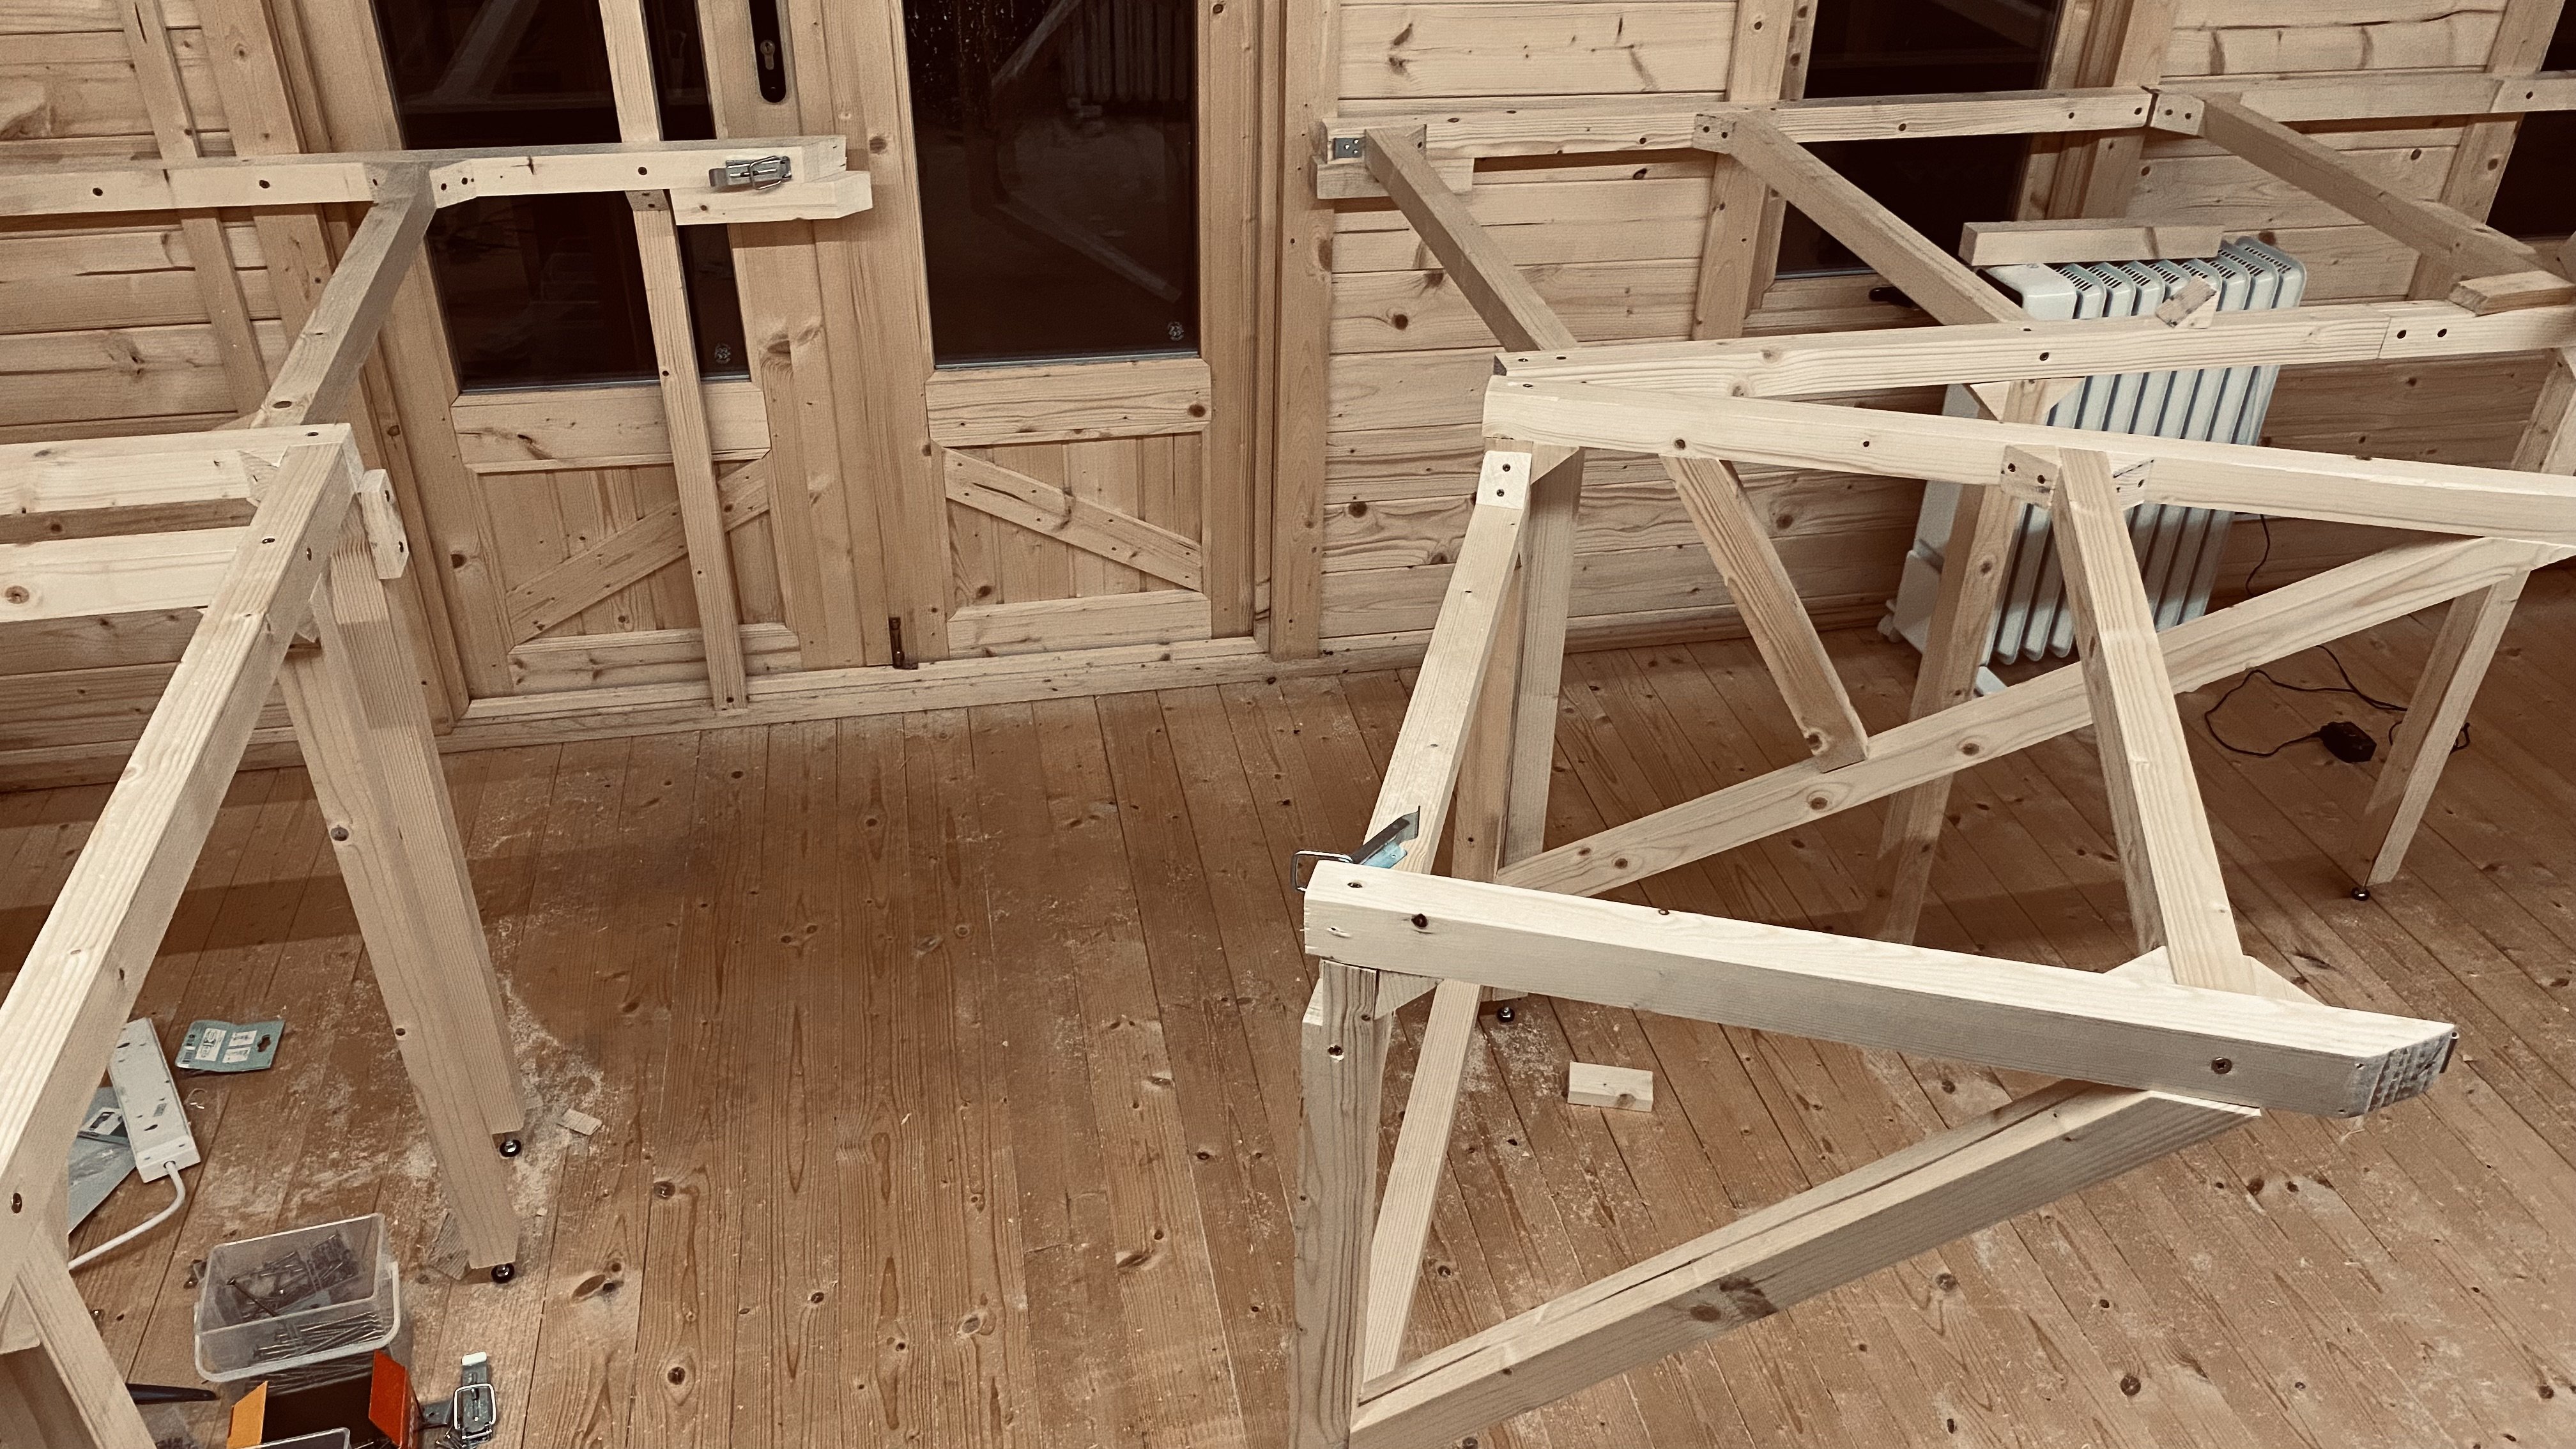
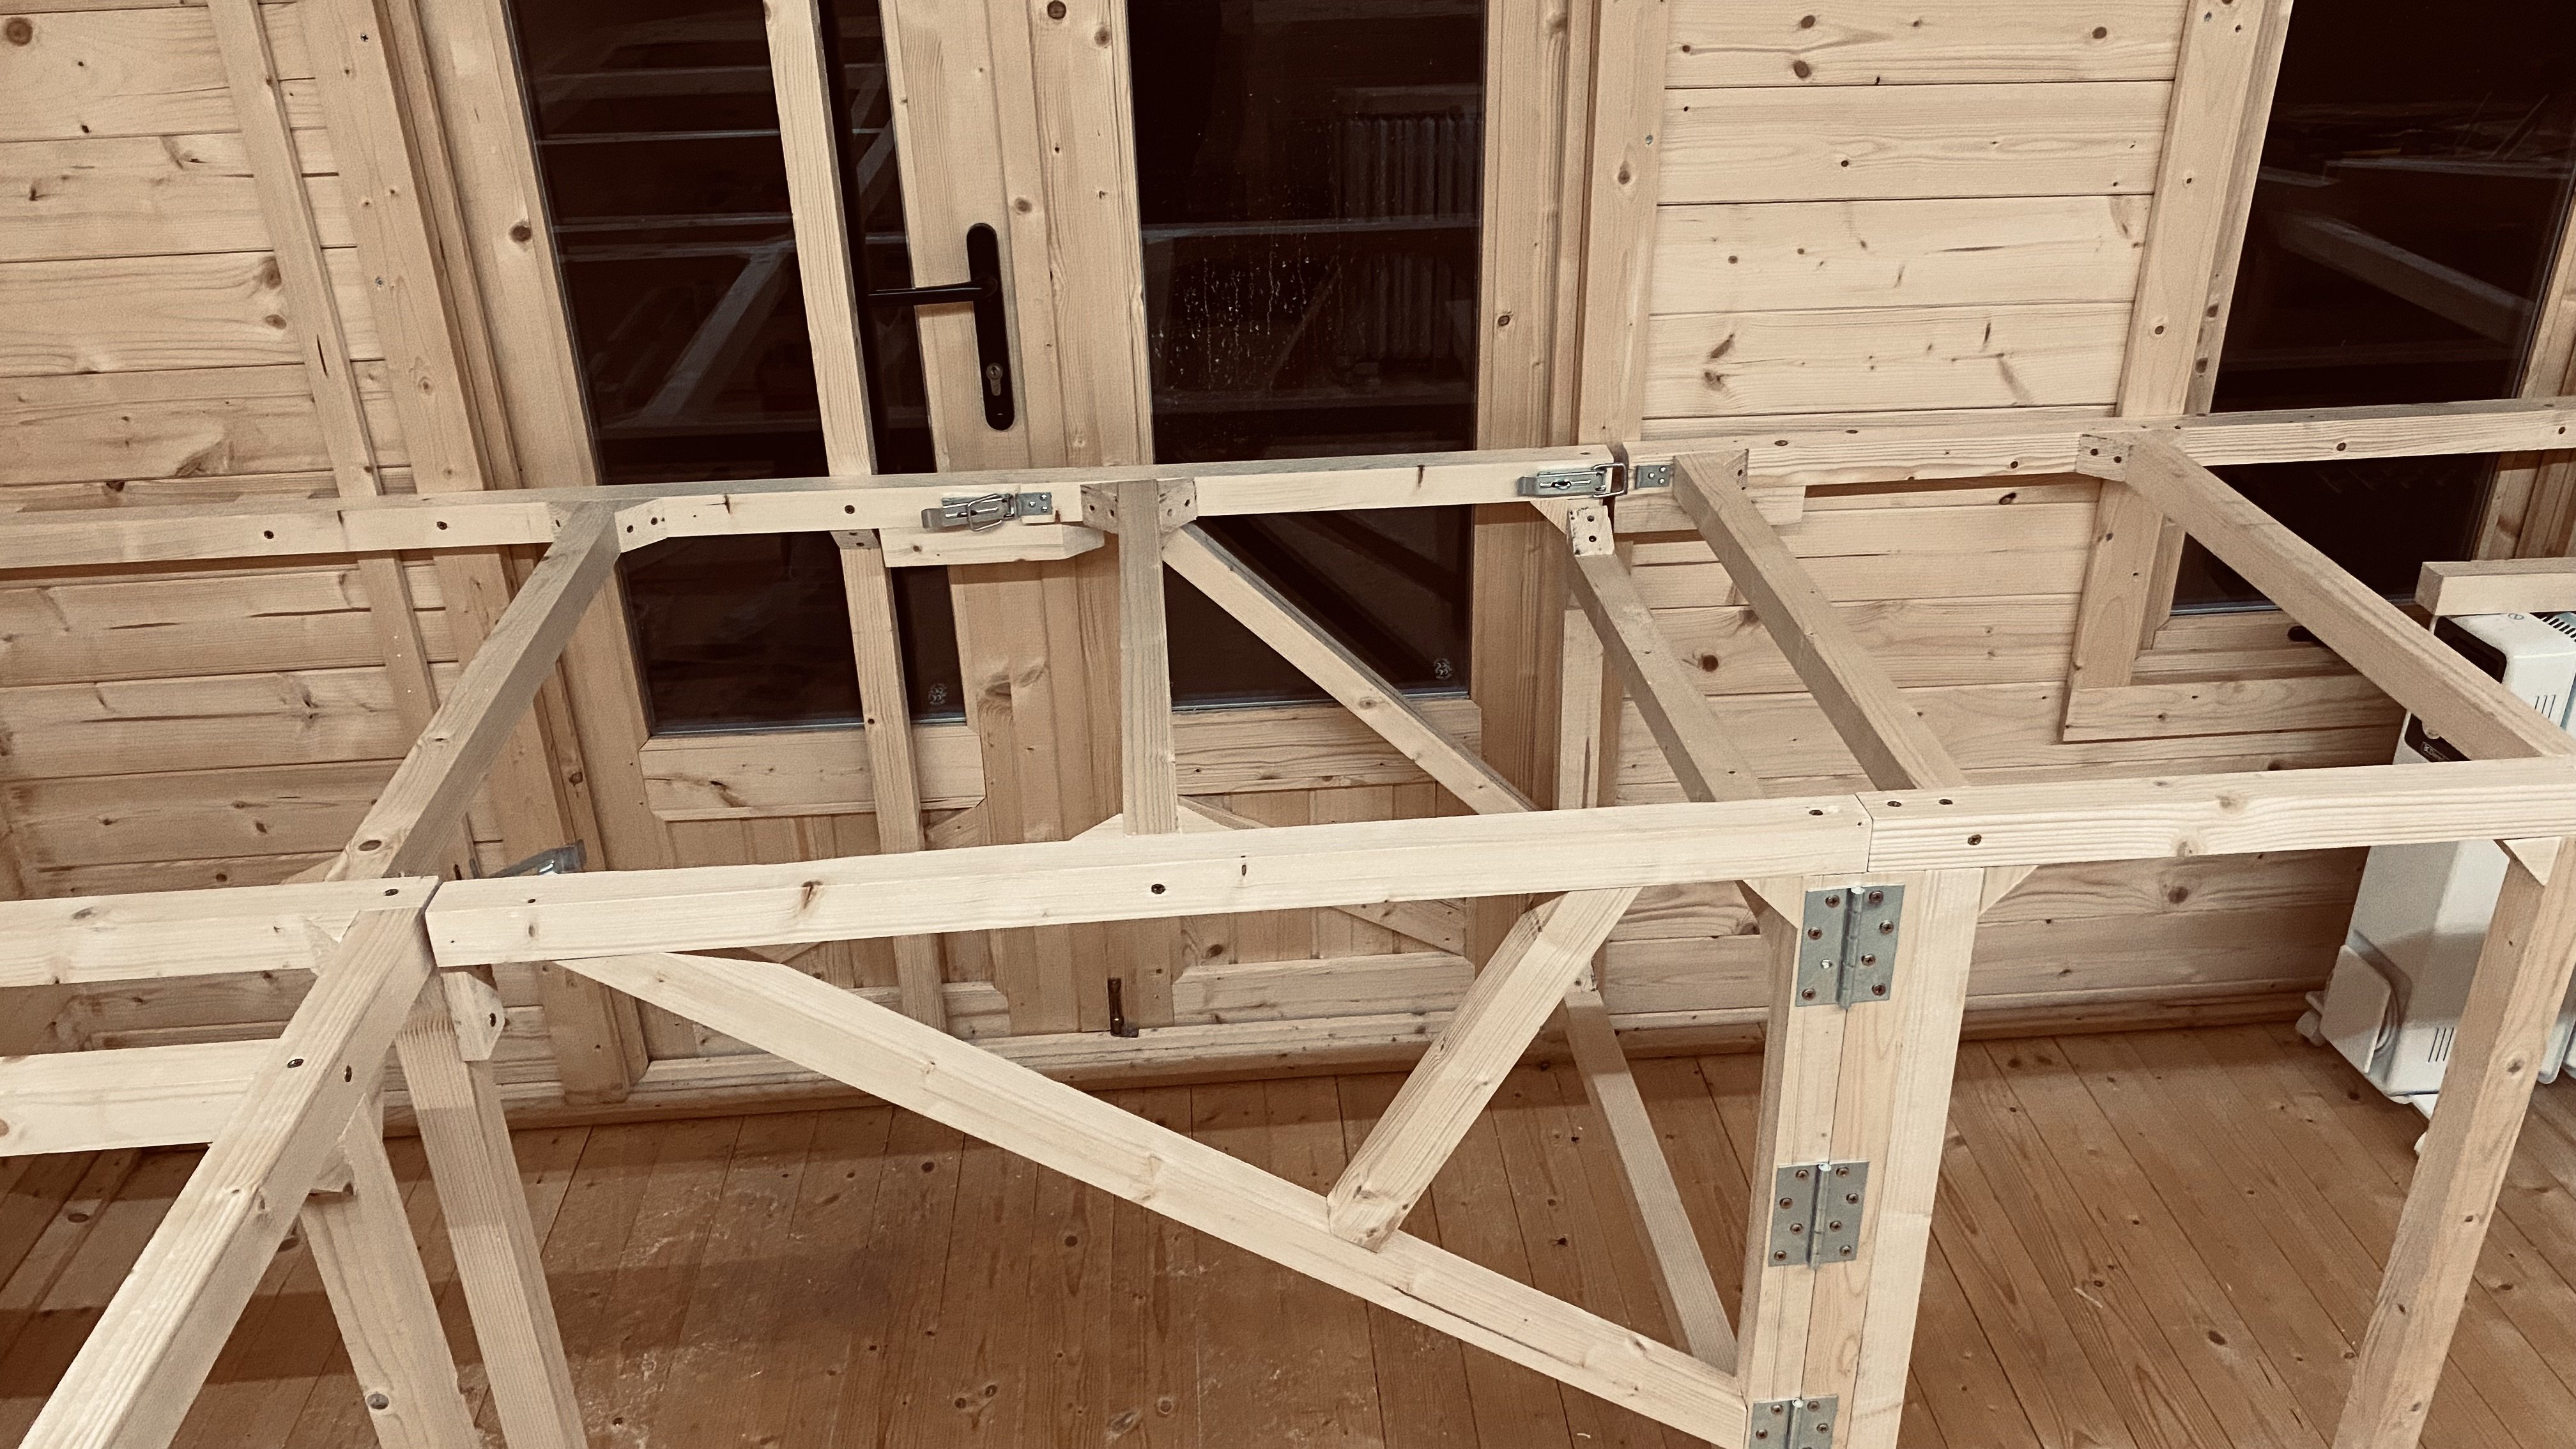
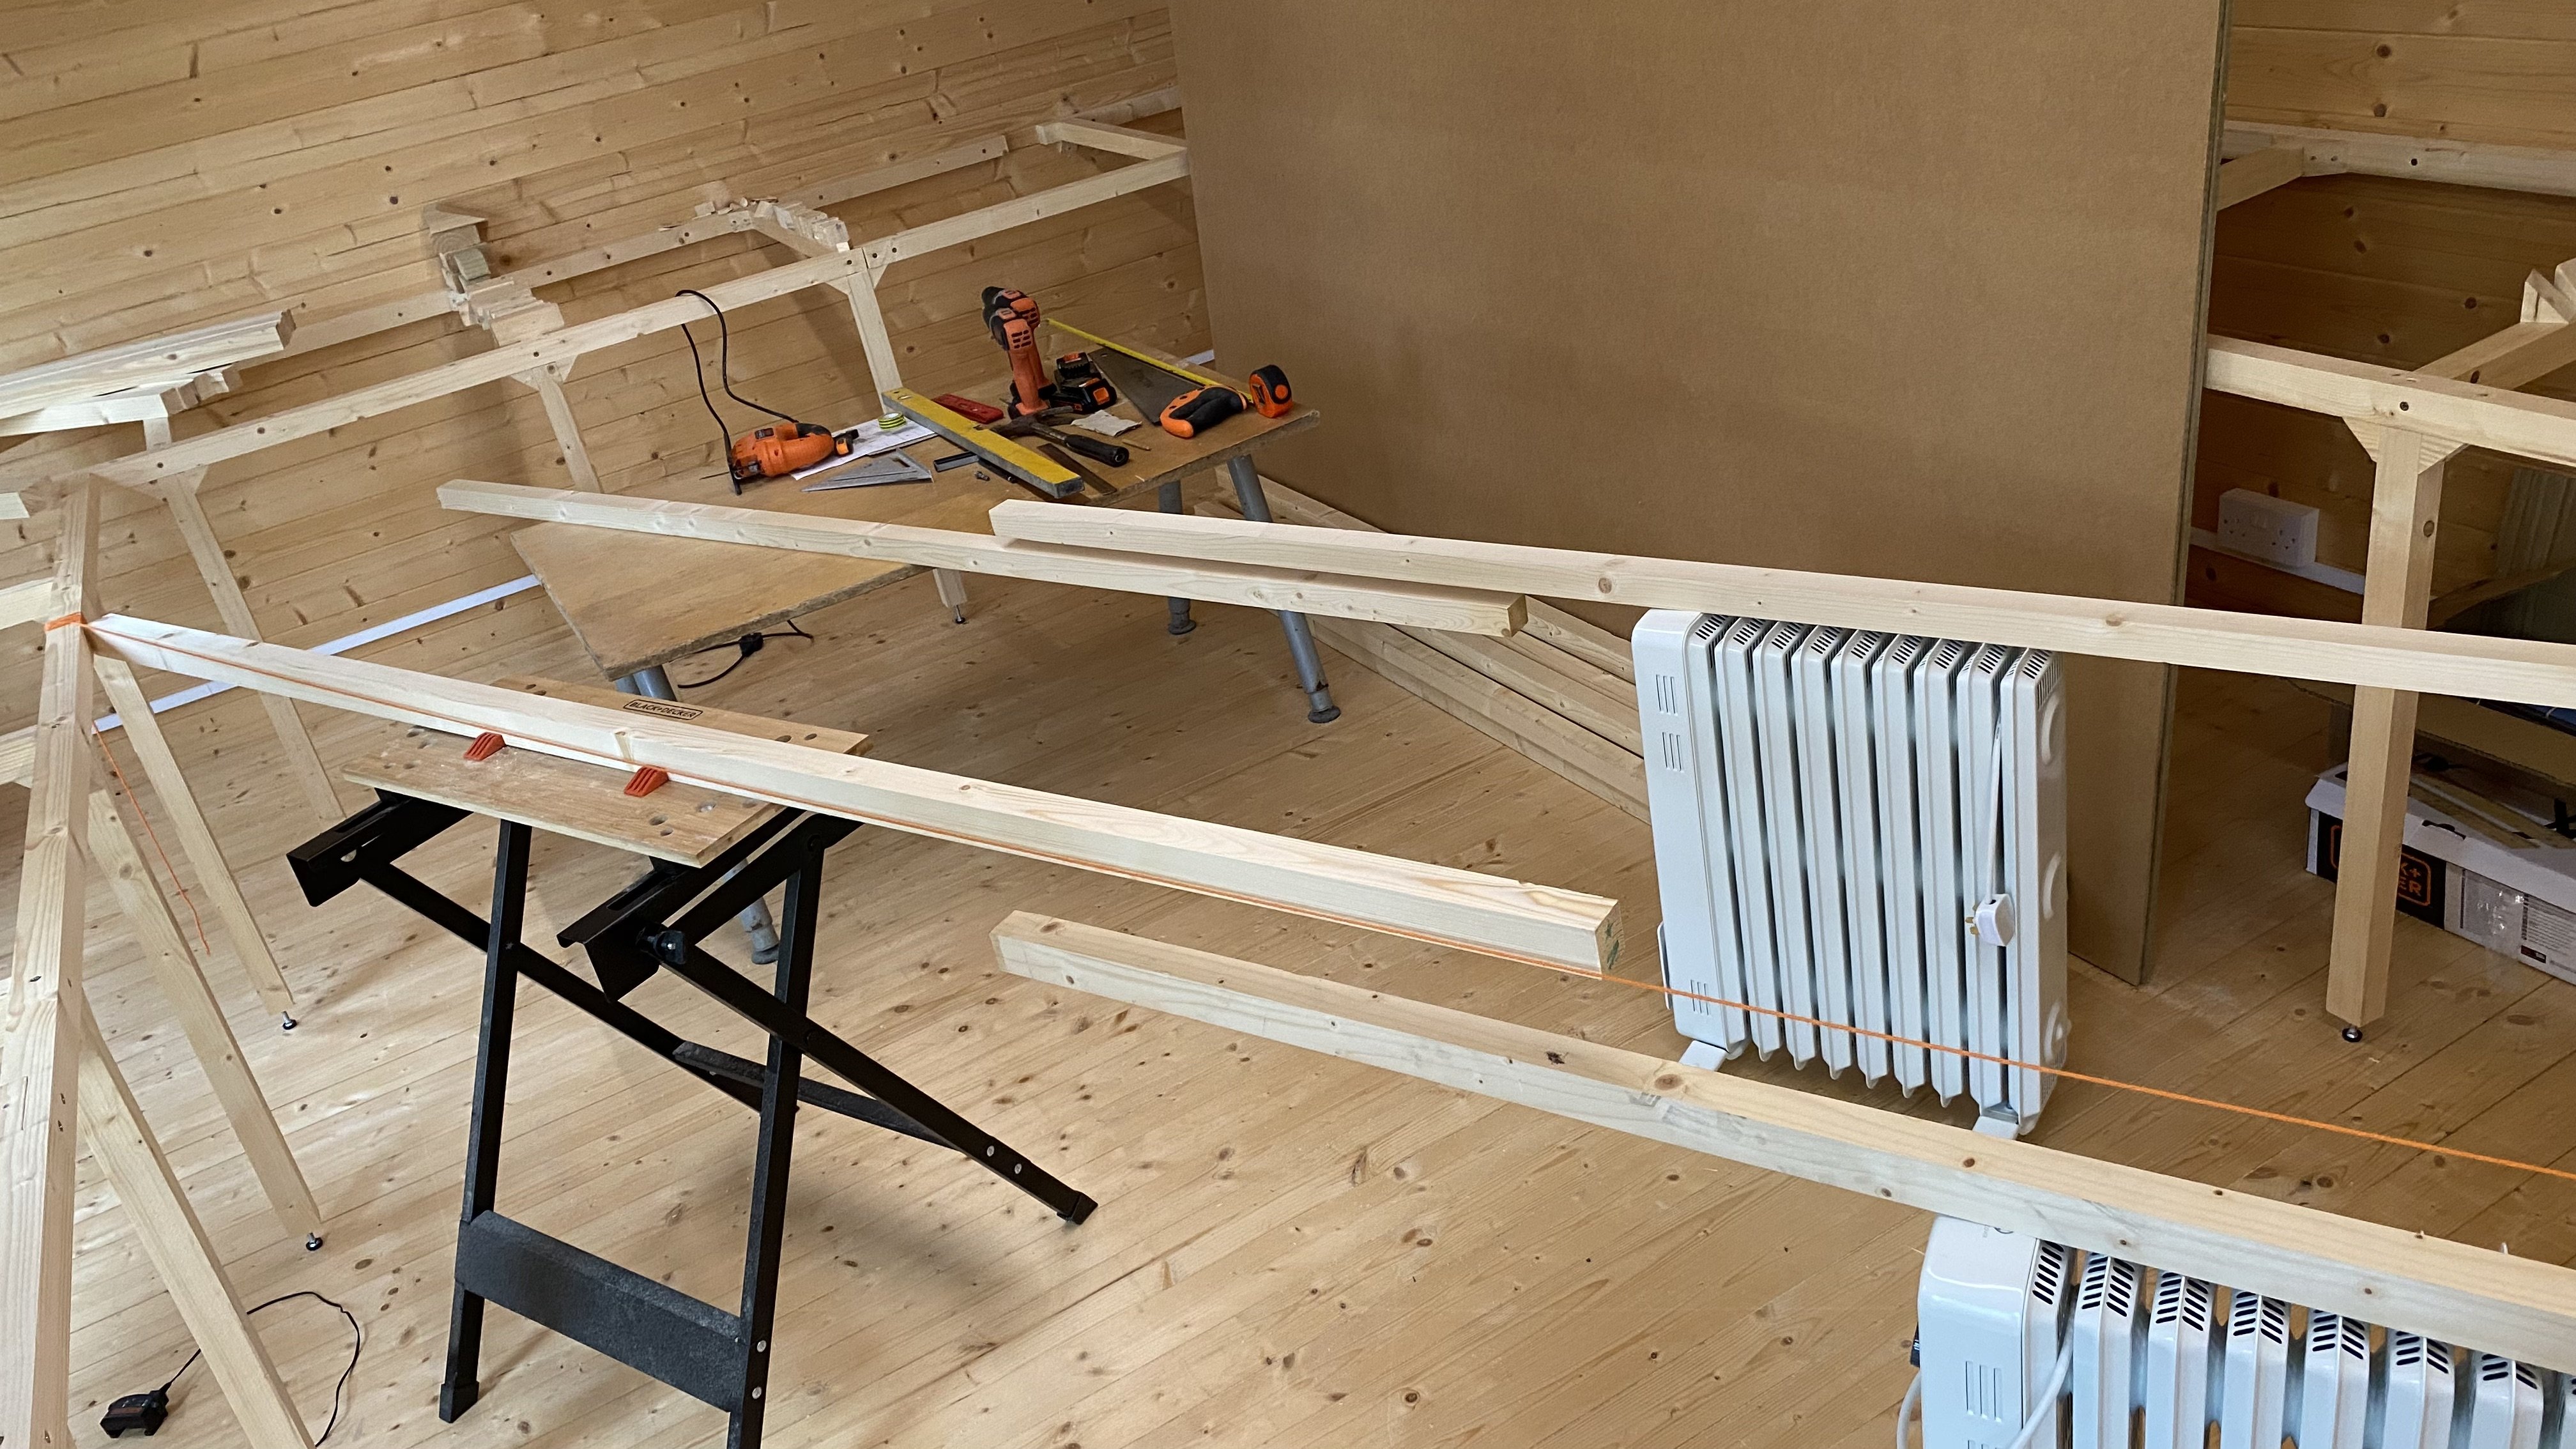
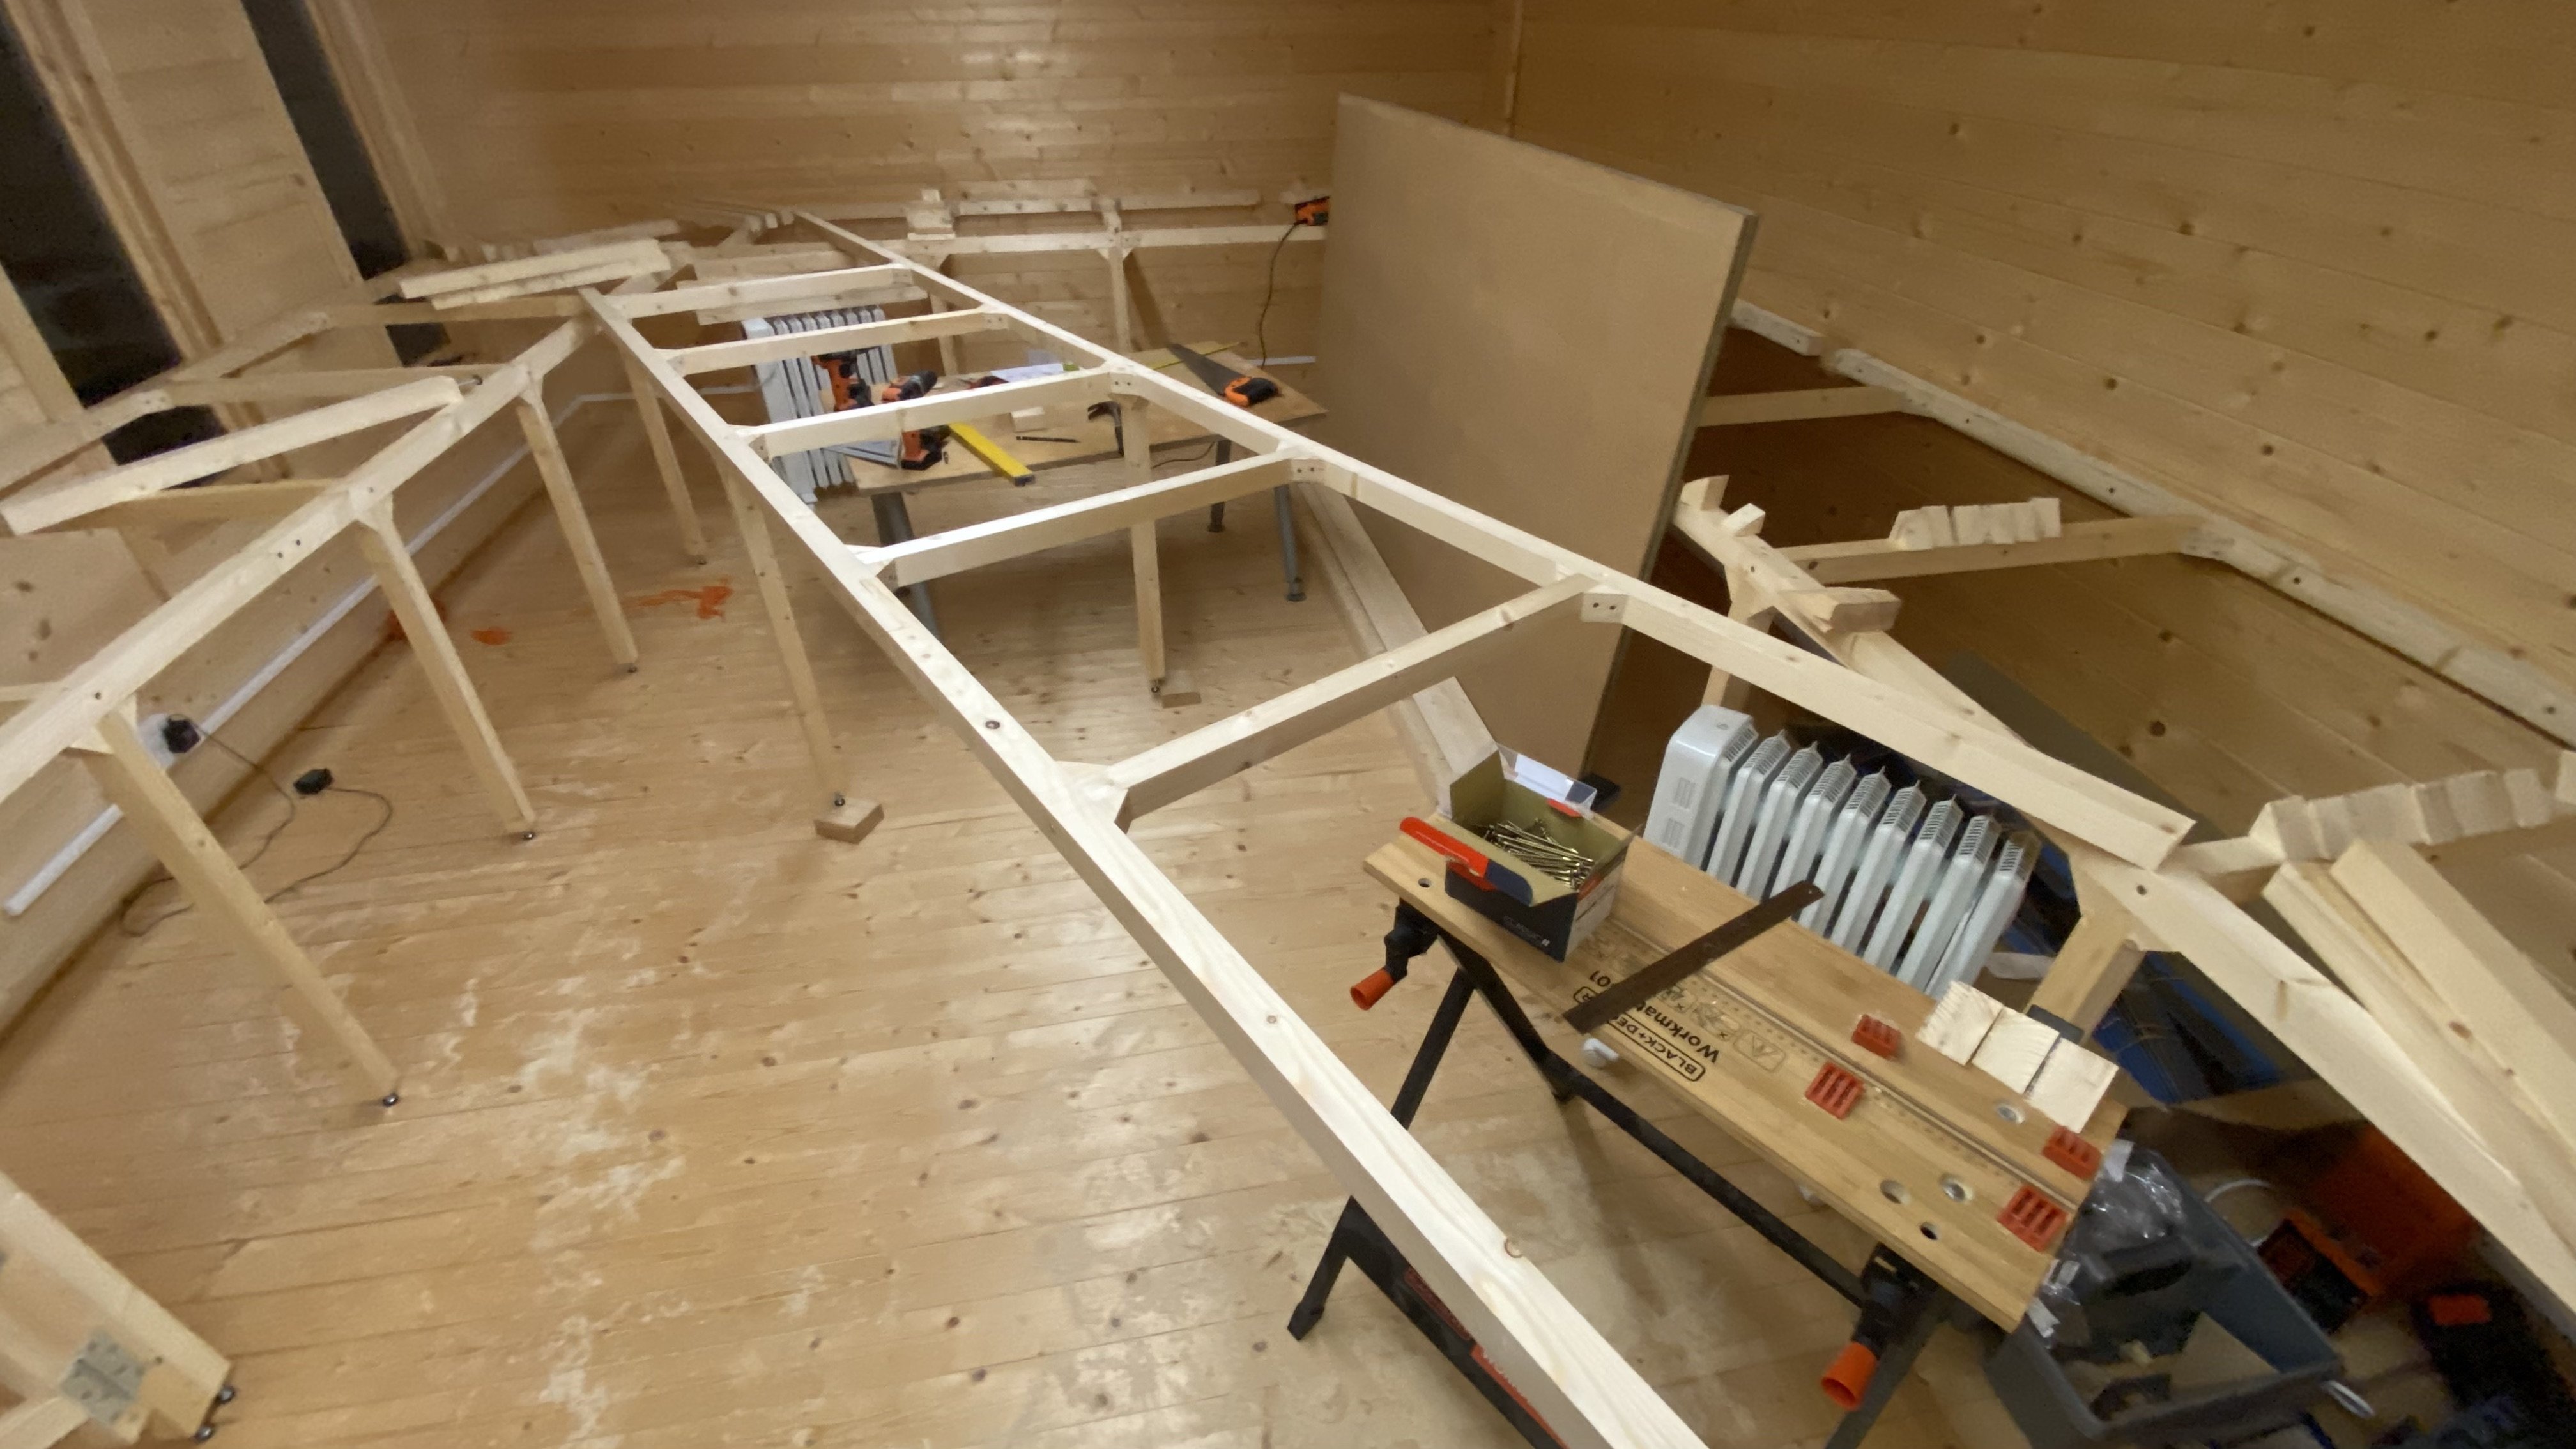
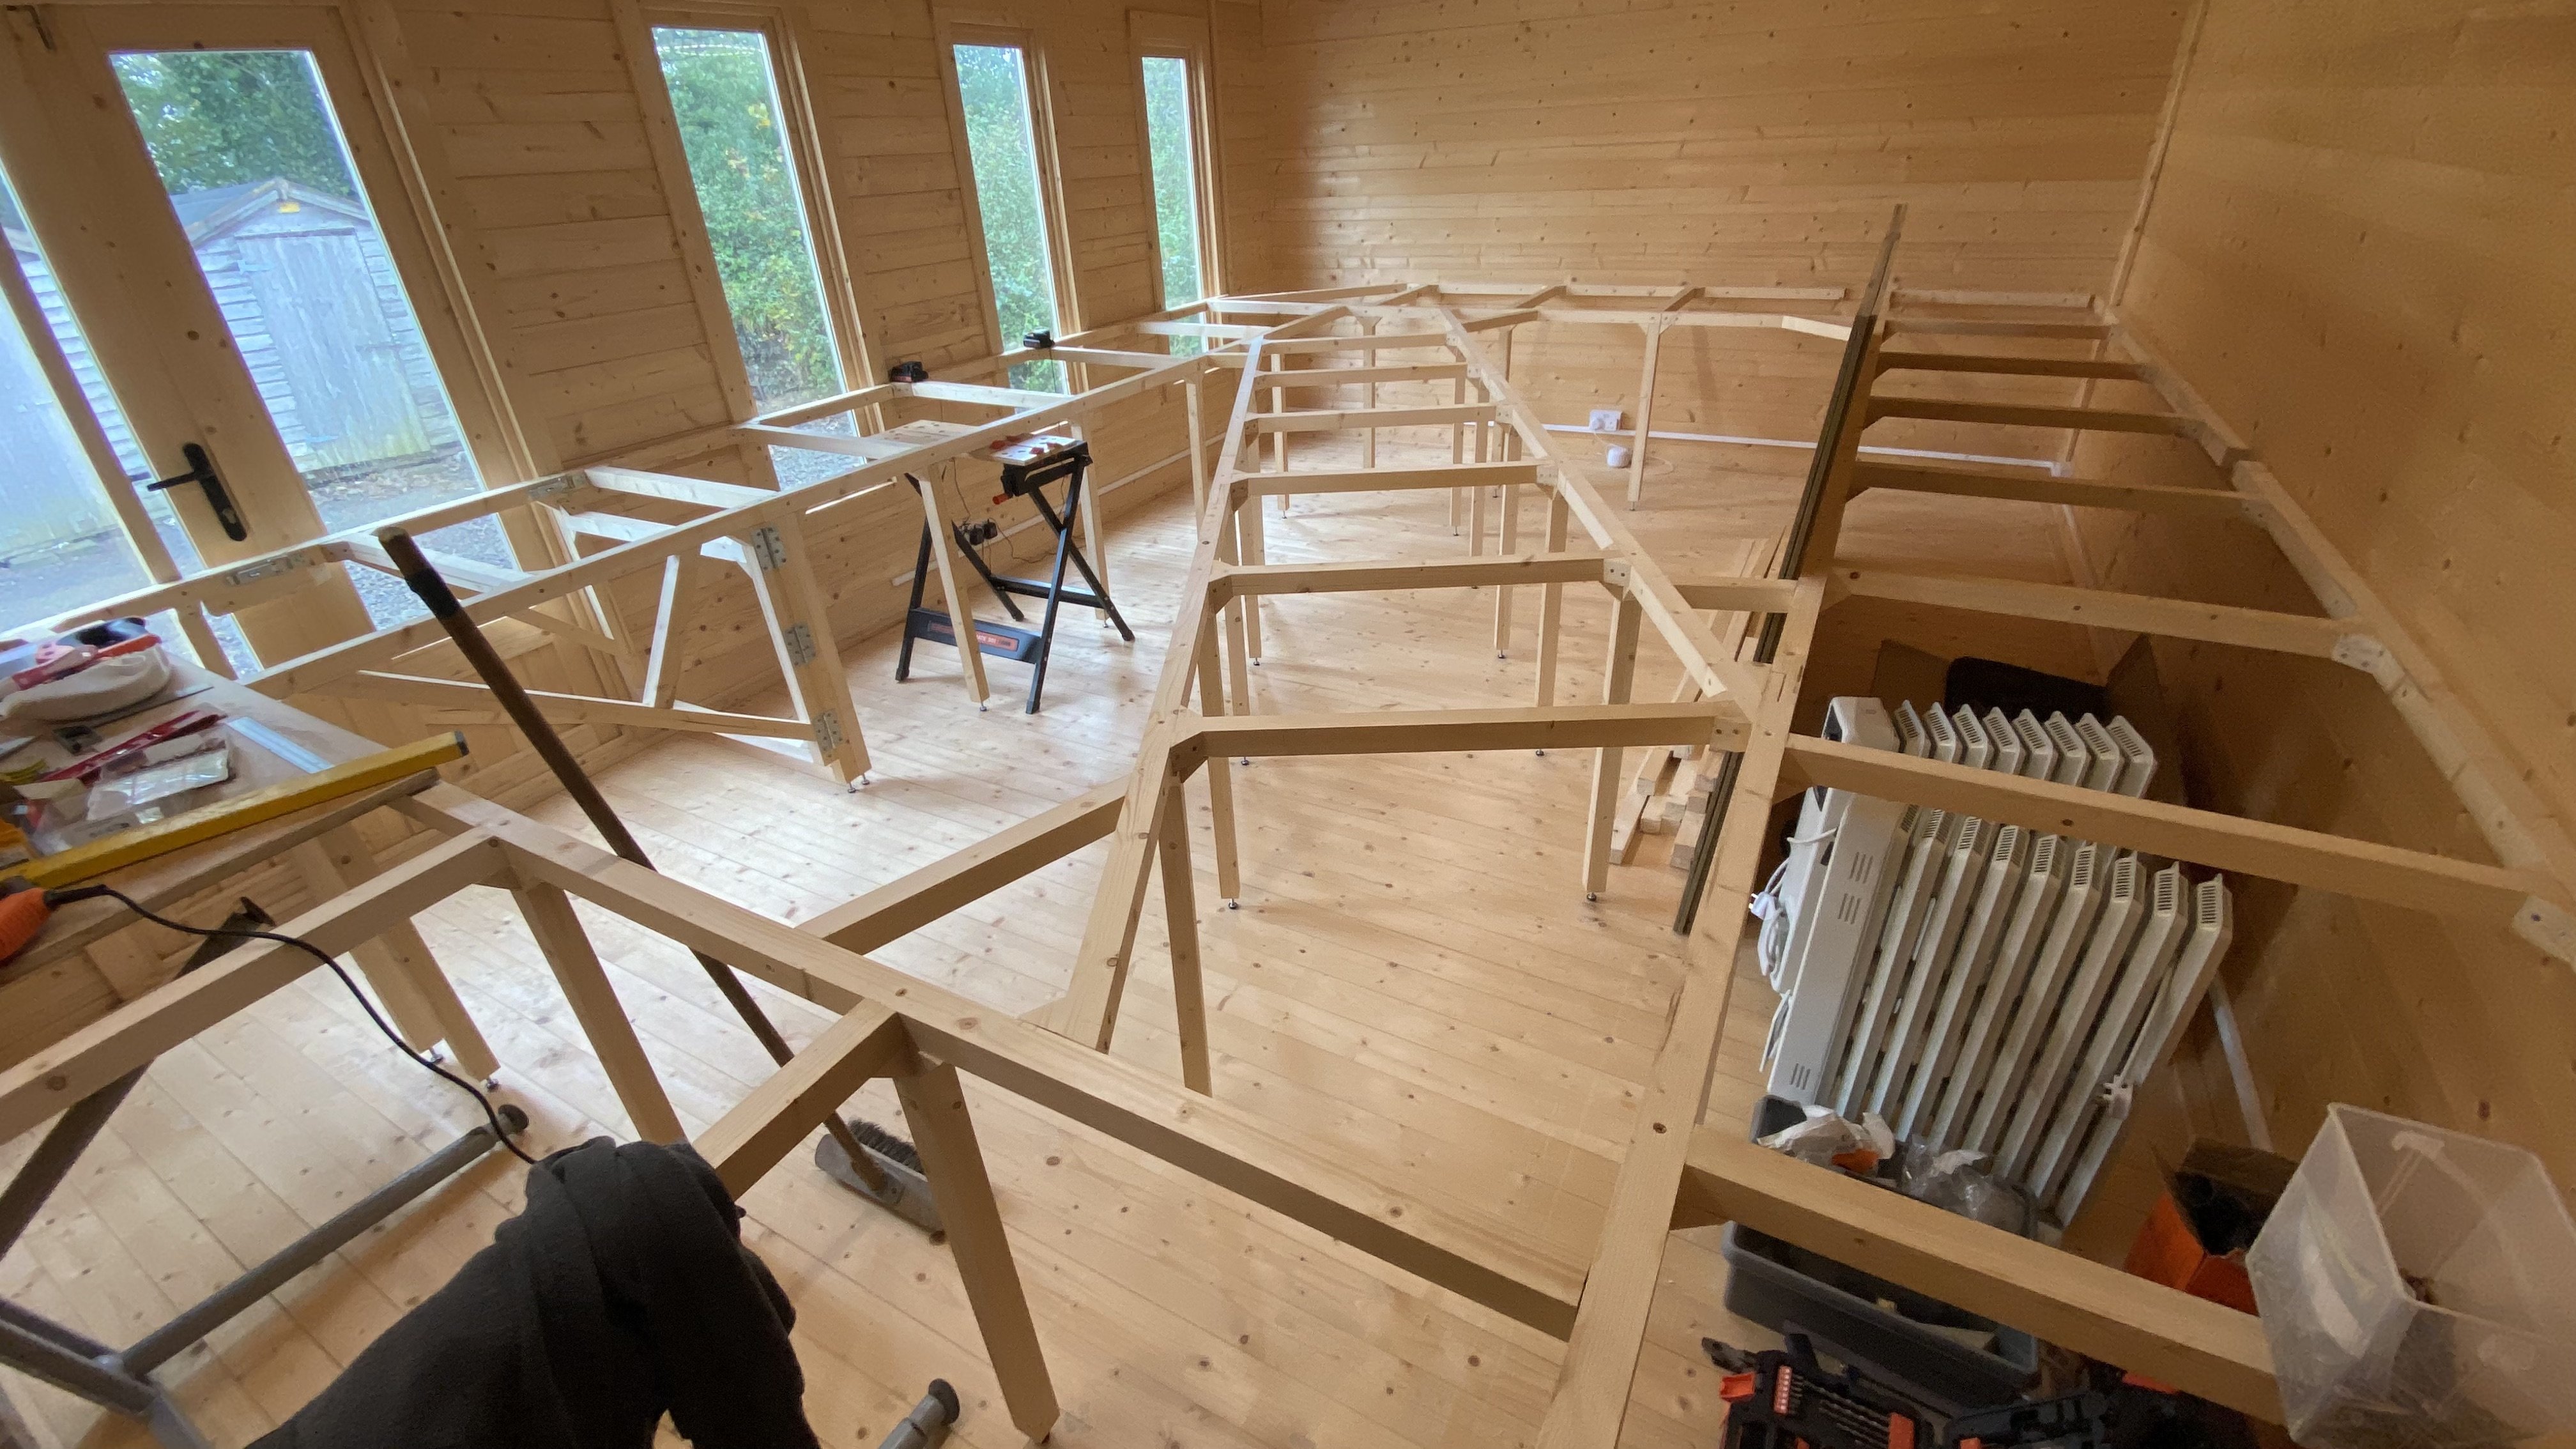
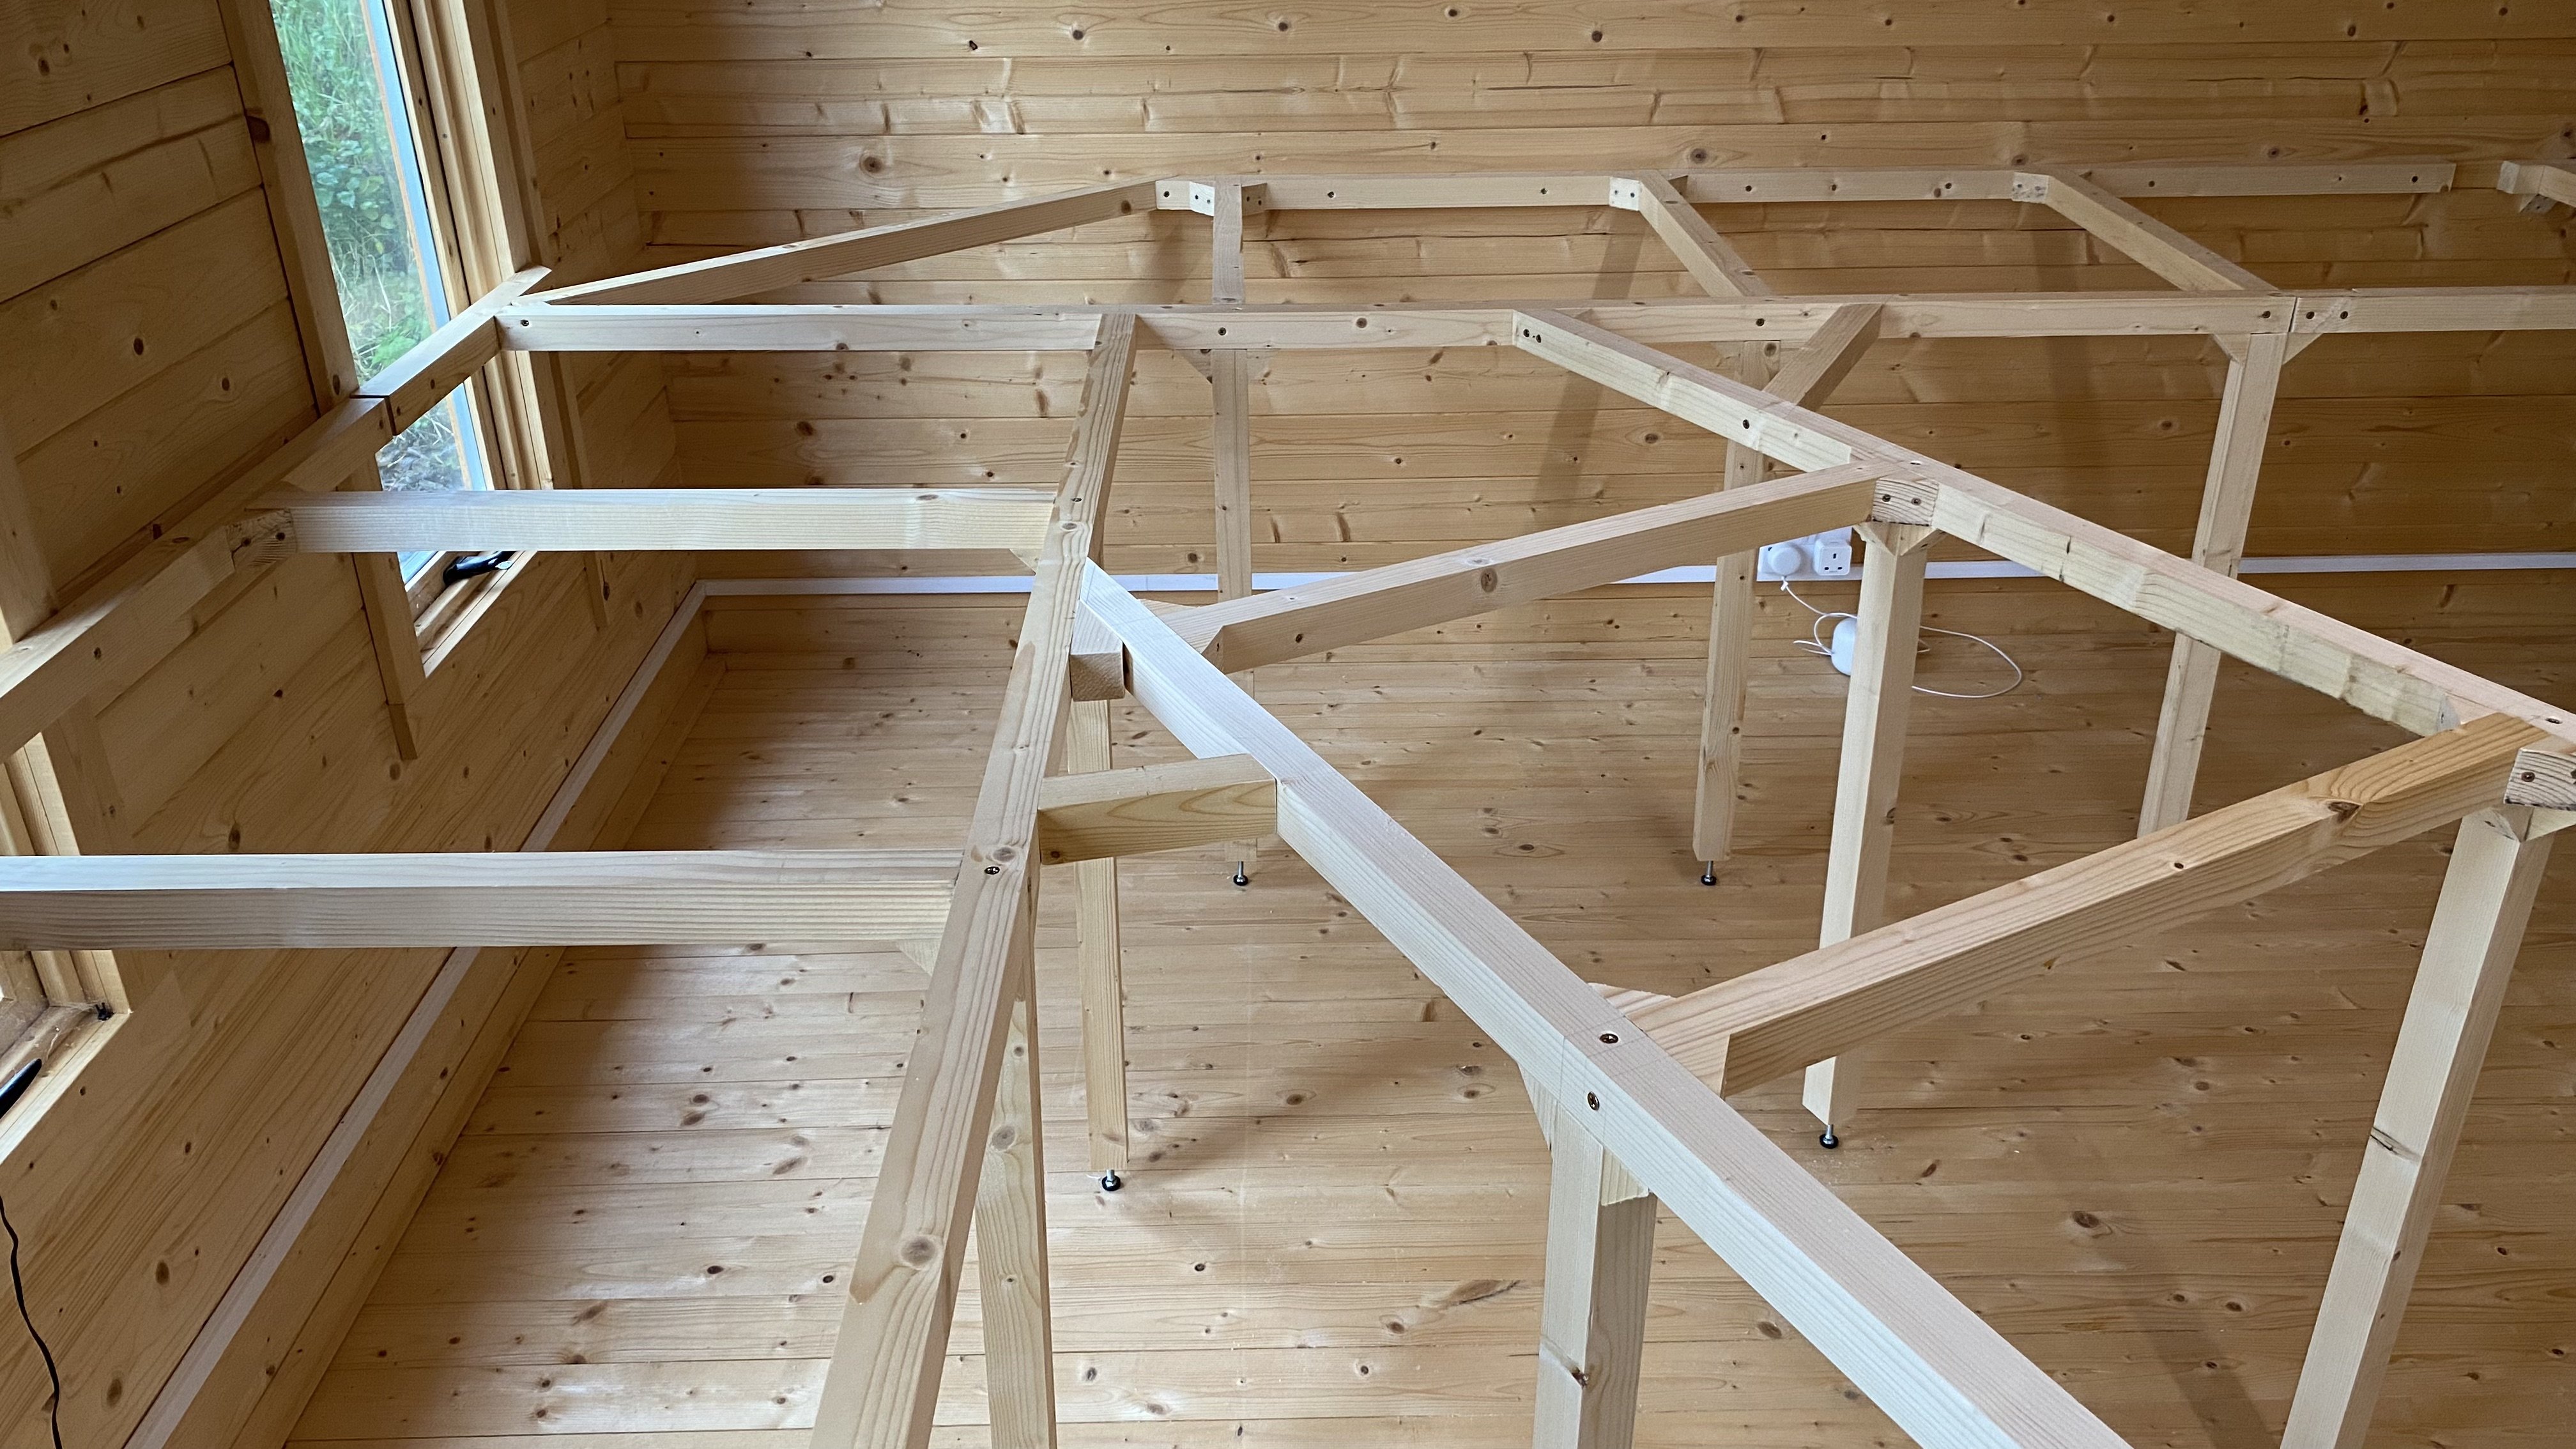
Hey all, have been working all summer in the cabin (as usual with modelling, when I get the time ) and have the frame construction complete for the layout Very happy with the result, it's solid and sturdy and given I'm by no means a carpenter it turned out surprisingly straight and true. See what you think below... Starting off with materials and technique, I'm using 2x2 pine for the frame, with 9mm MDF for the baseboard (this will be sealed). The baseboards will be open to make it easier to have multi level scenery and not lock everything into a flat surface. To keep things level, I found very effective, cheap, small feet adjusters in Screwfix. These were really good and easy to install (drill an 8mm hole about 10cm into the leg and hammer in the bracket), most feet adjusters in the hardware shops are for kitchen cabinets etc. and were way too big. Here's the link if you're looking for them for your own layout: https://www.screwfix.ie/p/suki-levelling-foot-m8-x-60mm-2-pack/838gx To strengthen the joints and keep them square, my brother (a cabinet maker by trade) suggested using 45 degree blocks, this worked very effectively (should note at this point that everything was cut by hand for accuracy, no small feat!). First piece screwed in in early June... Starting the back wall; the lower level will be a fiddle yard and the mid level above it will be the terminus station. Back wall complete and I have my technique working well, now it's just a case of rinse and repeat for most of it. The diagonal space on the right will let me in behind the layout, since this is where the diagonal cross section will come in, I'll need this spot to be able to reach parts of the layout - as long as I don't put on too much weight over the years I should be fine Continuing with the left side wall, this will be the main scenic area, likely with some sort of viaduct over a valley, which I'll cut out at some stage. Another diagonal access area at this point as well. Coming forward along the windows, this will show the three levels and coming towards the camera will be the approach to the station throat. About 60% there, now for the tricky bits, the access to the cabin door and the cross section in the middle. The right side in this photo will be the depot area and station throat. This...tested my limited skills I opted for a swing out area rather than sliding or lift up. There will be multiple levels and scenery so a lift up would be awkward, squashing scenery on one side. And sliding might result in accidents. The swing gate has enough clearance to let me in and out and will not hit the cross sections when it swings in (after careful measurement!). If you look at the doors, it's a pain in the arse but the dimensions and swinging space required that I have to use the right door to get in and out, so both need to be open. It's a small price to pay. I did look at swapping out the door handle and lock system...but then quickly chose not to do that The catches locking it in place and are nice and accurate so hopefully this will work out when it comes to laying track. If not, I'll figure something else out. The final hurdle, lining up the diagonal cross section. This long straight area will serve as a secondary station and also a way to reverse the locos direction across the layout without having to manually intervene. This is important to me as I have always wanted a train to be able to leave the terminus and then drive back in to it as in real life, without me having to lift and turn it around. Here you can now see why the diagonal access space at the back is important. Also, as I had hoped, the short cross braces / buttresses not only will allow more layout, but also made the diagonal section very strong and locked in place. There's no sway at all. And here we are, the full frame is complete in October, almost 4 months to the day. As I have a second layout and office space in the main house, I opted to maximise the space for the railway rather than working area in the cabin. I also need to crawl under to get from space to space but sure that'll keep me nimble Hope you enjoyed the update, next up is to figure out baseboards and supports for multiple levels
- 60 replies
-
- 16
-
-
-
haven't decided on it yet, I'd say I have some time to ponder before I get to it...