RichL
-
Posts
164 -
Joined
-
Days Won
4
Content Type
Profiles
Forums
Events
Gallery
Blogs
Store
Community Map
Everything posted by RichL
-
Thinking about the process, it might be best if one of us went through building a turnout step by step once you know what exactly you want to try first. I would be happy to show you my way and then let others add their own perspectives. Doing a step by step on the diamond crossing I am currently building would be counter productive as it is very complex and doesn't need point blades.
-
I forgot the pliers!
-
Does the EM gauge Society supply 21mm gauge track gauges? I really have no idea - just curious. I got mine from the S4 Society via a 'contact' As for tools for 4mm scale track specifically........... 40w soldering iron with a pointy bit. Several grades of medium length files for shaping crossing noses, cleaning up burrs etc, plus a very thin file approximately the width of the flange gap and a fine set of needle files for finishing off. Reel of thin wire solder with flux core. Mine currently is a reel of 22swg 60/40 tin/lead alloy solder solder. Definitely don't use lead free solder. Liquid flux - Carr's Green Label works well, but there are others. Solder creams etc are difficult or impossible to clean off properly. Fibreglass pen for pre-cleaning Slightly more track gauges than you could possibly imagine you need - a mix of roller gauges and triangular gauges, plus flange gauges. Some people use a jig for getting the correct angle on the crossing nose and also for the point blade filing. Others, like me get by just fine without these, but I have had a lot of practice. Saw with lots of small teeth for cutting rail cleanly - razor saw, piercing saw or similar Maybe a vice A few small devices to hold things together while you solder, like hair clips or small bulldog clips As a beginner, you should work from proper, accurate drawings - either printed templates or Templot kind of things and make sure they are exactly to scale when printed. A few of the above are optional, but for the first few attempts you really need to make things easy for yourself.
-
I've changed the title to better reflect where this topic is going
-
To be honest I think the thread had wandered quite a bit anyway, as they always do Looks like your main attention should be towards modelling weeds not track That is 1990, with a mixture of just about all manner of different track, not to mention the sheer quantity of track to model!! This topic is turning into a useful reference for anyone building track, so I see no problem with keeping things going like it is for the time being. I was going to start a separate topic for the layout proper, and for any stock I do in detail in any case.
-
It is great if I am accidentally encouraging others to try 21mm track through my own efforts. Ironically, track building is one thing I do feel reasonably confident about! For a beginner, a lot depends on previous experience of soldering, knowledge of track design and varies a bit depending on whether you are building bullhead or flat-bottomed track - and relatively modern, or very old. Once you become aware of the differences, errors become very obvious! I hadn't built any f/b track for a while, so the old brain cells are only slowly remembering the differences - hopefully before it is too late! Knowledge of Templot or access to authentic turnout plans also helps if you want to end up with a decent layout - but they are more for raising the bar once you have learnt the very basics. The track book by the 2mm Scale Association is very good, though it concentrates largely on bullhead. Rice's track book though needs to be treated with slight caution, so I am told. For example, his method of creating the bend in the knuckle of the wing rails results in a sharp bend when in reality it should be a smooth and moderately generous curve to ensure smooth running. Practice is vital. If possible, share your knowledge with local modellers who can physically help when you run into problems or even show you how, one-to-one.
-
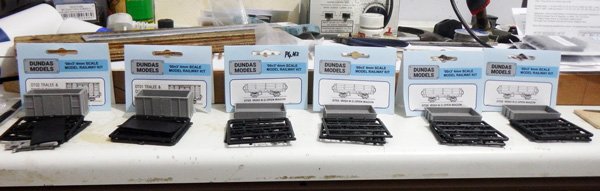
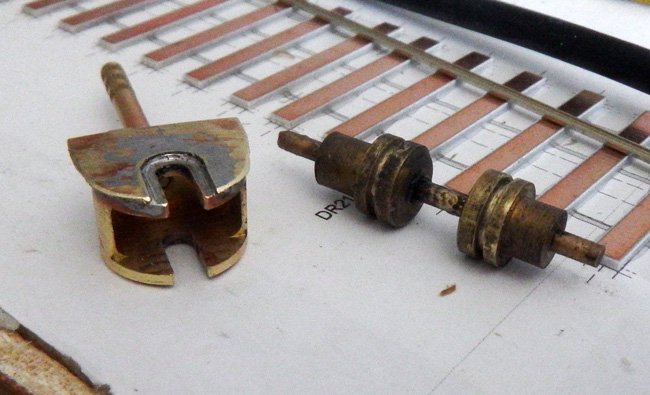
Things have been a bit quiet on here for a day or two because I have been busy building stuff rather than simply procrastinating I have made a start on laying the track on the test track. First, I cut to size and stuck down the copper clad sleepers. I decided to use some Peco code 60 FB rail which a friend gave me a while back. I don't have enough to complete the test track, but have some more on order. It is maybe a bit small for main line use, but would be fine for a minor branch line in the C19, I suspect. It is a bit yellow in colour compared to most nickel silver rail I have seen, but this is only a test track, so the colour is not really important. I have 21mm gauge track gauges that work fine with this rail. For the 12mm gauge, I bought a roller gauge from 3SMR. Unfortunately, one of the grooves is a bit tight for the rail, so I had to ease it with a file. This has made it very slightly under gauge. To get an accurate gauge, I drilled out the centre of an OO roller gauge, cut it in half and mounted the 2 halves on a short section of brass rod, adjusting the grooves to 12mm gauge before the glue set. This seems fine. My plan is to produce other 12mm track gauges in the same way, but using the first section of 12mm track to set the gauge. That way they should all be consistent. I have also adapted a 3SMR back to back gauge by soldering a piece of brass sheet to it. This comes out around the middle of the min/max dimensions required for 12mm gauge P4 standard wheels. Even when widened out to the P4 back-to-back setting, the wheels that come with the Parkside kits still seem fine on 12mm gauge track. Finally, as the initial purpose of the test track is to test various 12mm gauge wheelsets, I have started building some 12mm gauge stock. These are Dundas Models (formerly Parkside Dundas) kits - 6 wagon kits and 2 chassis kits for scratchbuilt bodies. No idea yet what railway my models will represent, or even where in the country they would be located. Most gaps in the network I have found so far would have required rockets and parachutes as standard equipment on all trains

-
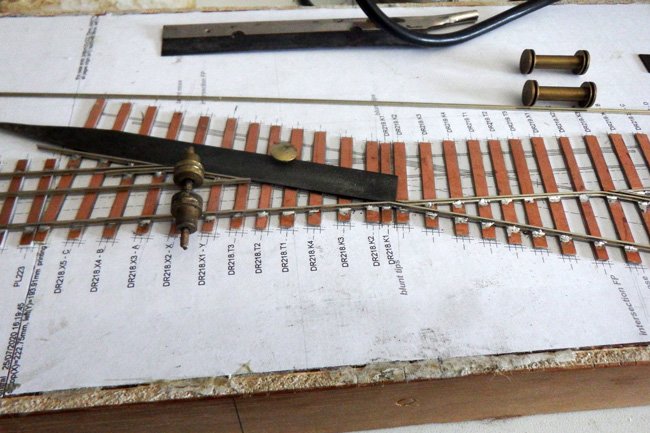
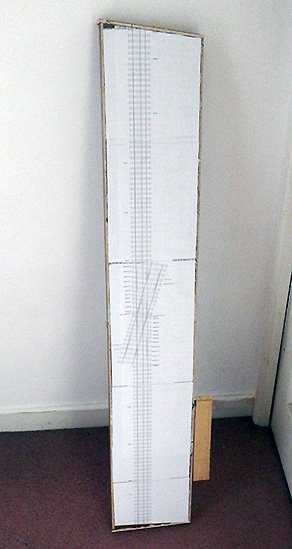
Just to add to my comment about reproducing old railways, some do look like they were made from Peco, particularly where space was plentiful. Achill is just one choice The turntable area at Waterford here would be impossible Progress on the test track - just a crude board made out of old scrap plywood with a Templot plan attached. I made it long as it may be used as a test track for running locos etc for some time to come. I decided on a diamond to start with as my initial objective is just to test various wheel sets through crossings and check rails. I have left room to add a separate track with pointwork on it later, if needed.
-
Thanks, Brendan. That's a very comprehensive answer. I particularly like your ingenious idea for widening OO track I managed to acquire a set of Scalefour Association gauges. In the long term I shall have to make or adapt some for 12mm gauge - particularly an accurate back-to-back gauge. Even in OO, I could quickly find formations that are difficult or impossible to reproduce realistically with ready-made track, so Peco would probably be relegated to the fiddle yard. A fair number of well-known OO layouts have at least some hand-built track, as do some continental and American HO layouts. Hand building track opens up a whole world of possibilities that RTR cannot cater for. Having said that, modern track looks very much like RTR to my eye - greater standardisation and simplification of real life track layouts makes modern track look more like a model. In my case, I think that hand-built track is the only way to achieve what I want. Without Templot though, it would be much more difficult.
-
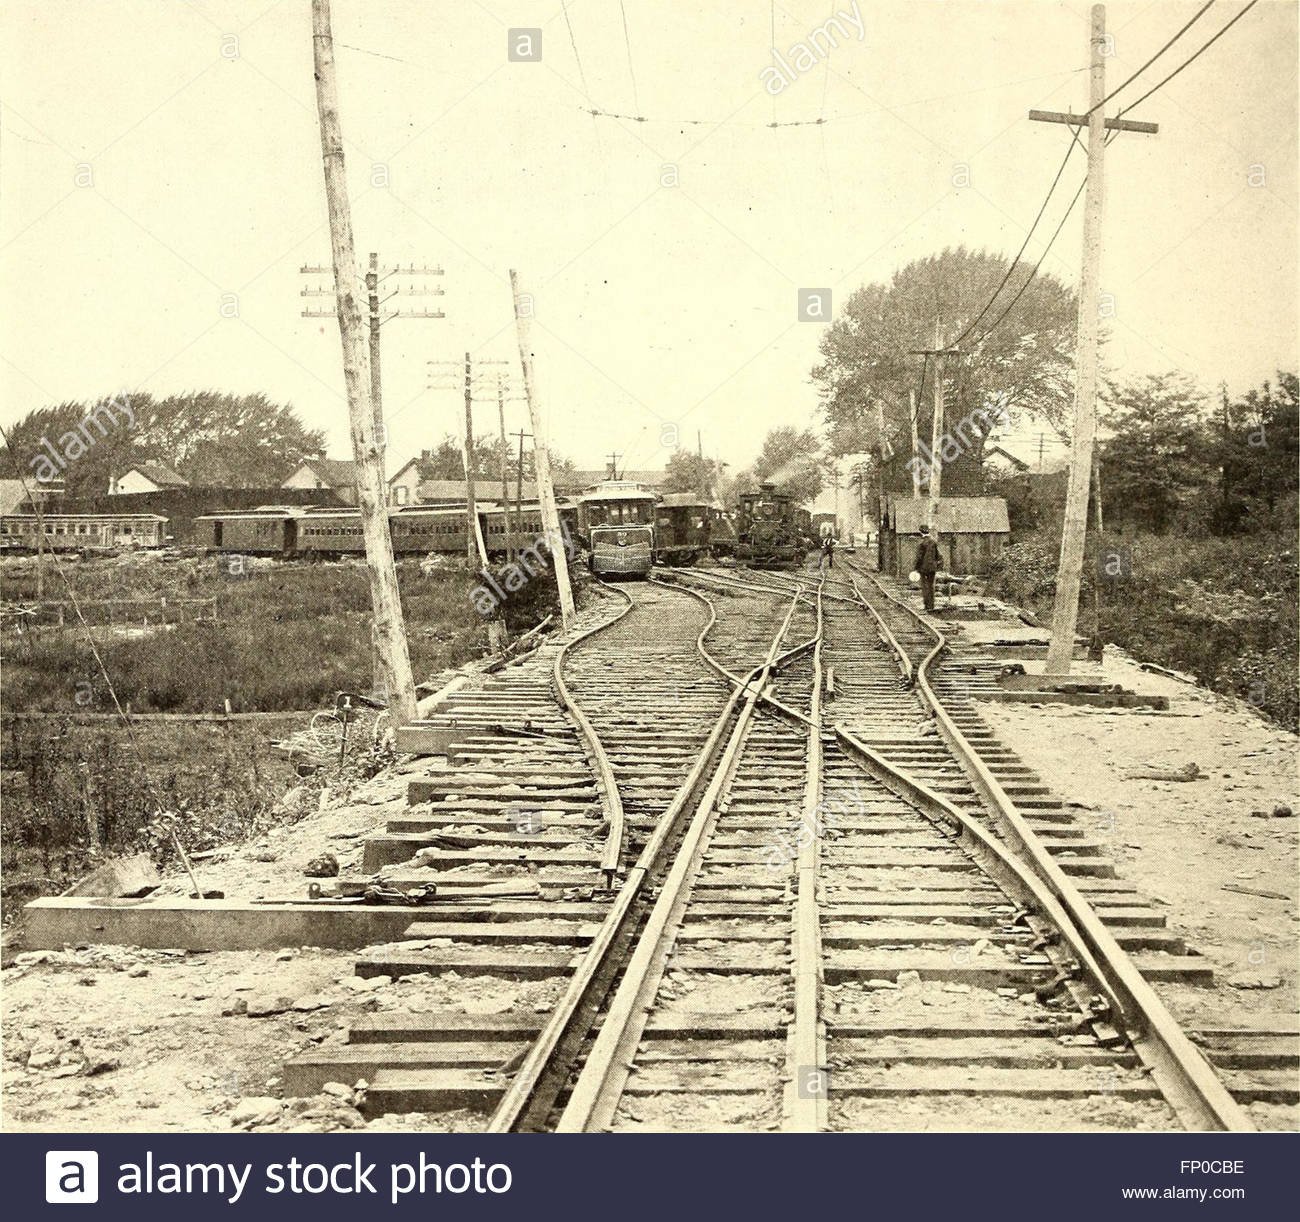
Here's the one I really like the most... 3 gauges, stub points, standard points and every other device known to man to switch trains around
-
Another line that shares gauges is the Vivarias line in France. Here is a NG train near Tournon, gently chugging down a main line where express trains reach far higher speeds. On the return journey the NG train faces oncoming expresses head-on on the same track, though hopefully only one train gets on that particular piece of track at a time!
-
The track sharing at Larne was purely for non-passenger stock, I think. It was not on the passenger lines, except where lines crossed each other on a diamond. Penzance is very different. The narrow gauge came first, as the West Cornwall Railway was not linked to the rest of the UK network at first. They were supposed to lay some broad gauge track to give the broad gauge Cornwall Railway (absorbed by the GWR) access to Penzance when it arrived at Truro, but the West Cornwall Railway never got around to it. Eventually the GWR took over the West Cornwall Railway and dual-gauged the track. It had to do this as sidings etc. off the main line were built for standard gauge stock and standard gauge wagons continued to be used in West Cornwall alongside broad gauge stock. Almost all the track in Penzance station became mixed gauge, apart from one or two standard gauge sidings, I think. My 'Penzance' will be more like the Larne situation - mainly broad gauge, but with narrow gauge access where required. For turntables, the narrow gauge track was diverted into the centre of the broad gauge track. You can just about make this out in the middle distance in the Penzance photo. In one or two Irish examples, the narrow gauge and broad gauge approached from opposite sides of the turntable, so only the turntable itself had BG and NG rails. THe GWR invented one or two ingenious track designs to get standard gauge from one side of the broad gauge rails or into the middle, including arrangements with no moving parts. Standard gauge trains often had to be switched to the platform side in stations, for example. These were very crude by modern standards and could only be traversed at very low speeds. By comparison, the NCC at Larne and Ballymena appears to have done a 'professional' job. Some GWR mixed gauge formations were amazing. There are photos of the GWR station throat at Swindon, for example, which was mind-bogglingly complex. These give some idea and one of Victoria
-
Those look great, Brendan. You must be really pleased that they came out so well! Out of curiosity, what track gauges are you using? I still feel that I should try a small test track using P4 standards first - largely because of the characteristics of the small diameter wheels I described in a previous post. That is not to criticise your decision - I may even end up following your example if my experiment with P4 standards doesn't go well! It has been a miserable day here, so I have been busy drawing up some track in Templot for my test track. I thought a diamond crossing with mixed gauge track would be the best thing for me to try, as testing smooth running through checkrails and frogs is my main concern at the moment. Getting my head around drawing dual gauge track is a steep learning curve!
-
One minor correction already! It has been suggested to me that the S in ris should be pronounced like sh in English so Rish Quay might be a more likely Anglicisation. It still conveys the tongue-in-cheek meaning, so I would be happy with that.
-
Following on from David Holman's silly names ideas, I thought up the name 'Riss Quay' late last night. According to Dinneen's Irish-English dictionary, RIS in Irish can mean 'exposed' or alternatively 'a tale'. I am of course open to correction should I in any way be mistaken. Sounds good to me, but open to suggestions!
-
It is great that you want to base your layout on such happy memories. No such recollections to inspire me, unfortunately. Something eccentric suits me best, though it would be impossible to upstage the Listowel & Ballybunnion or the Waterford & Tramore, to mention just two.
-
I've managed to find my small collection of different wheelsets. Below 10.5mm diameter, I am going to have to rely on a variety of wheel sources for my needs, mainly for 3ft gauge stock. Because of the mixed gauge track, all the wheels I use will have to be broadly compatible. I have done a quick visual comparison, firstly against a P4 wheel and then an OO/EM Gibson wheel. Dundas Models latest 12mm gauge wheels are visually close to P4 wheel standards - a slightly different curve between the flange and the tyre, plus slightly deeper flanges (possibly no big deal). Greenwich OO9 wheelsets. These are very fine, with narrow tyres and fine flanges - if anything too fine and narrow. The narrowness might cause problems, but it's only a guess. I looked at some recent Farish wheels too. These seem reasonably comparable to P4, but with a slightly deeper flange - very much like the Dundas ones. In comparison, Gibson OO/EM wheels have visually wider flanges and tyres than all the above. The guess from my very limited visual evaluation is that P4 standards might work best with all but the OO/EM wheels. Not very scientific, but good enough for now. From here, I think I can try planning part of the layout using Irish P4 settings. I have track and BTB gauges for 21mm gauge already, but will have to knock something up for P4 12mm gauge. In theory, 12mm gauge settings should simply be P4 21mm standards less 9mm - except for things like flange gaps which stay the same. I will need to alter the gauge on wheelsets before I can test them properly - with the exception of the Dundas wheels which may just need a bit of adjustment on the axles. I can then make a short section of track to see how these wheels perform on the rails. All probably far easier said than done!
-
Clearly your talents extend way beyond layout building The best made-up one I could come up with was the Abberra- Caddabragh line or variation thereon - just like any made up name, it probably sound awful to anyone speaking the local language!
-
Thanks, that is very useful. What is evident though from looking at various NG/BG interfaces is that they all take up a lot of space. I think I am going to have to discipline myself and assume that most of the facilities are offstage What I so like about the Penzance concept is that it allows the 'busy bits' to be on show, but with most of the facilities hidden from view and left to the imagination.
-
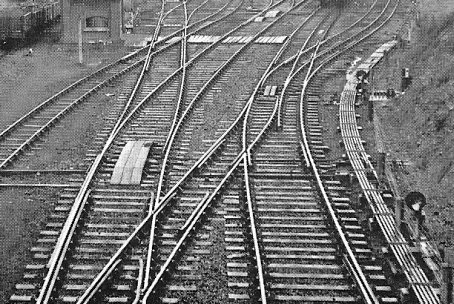
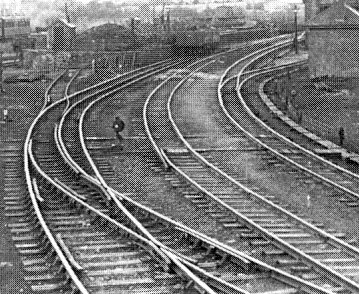
These are the most useful photos I can find of Irish mixed gauge track - both on the NCC 1. Larne Harbour 2. Ballymena They show some really interesting features, like the single bladed NG turnout in the bottom picture. There is a combined NG/BG turnout and also a combined NG turnout and catch point arrangement in the Larne photo. Also, the dual gauge track is all of chaired construction, whereas some of the plain NG track is not. One or two features I have found on dual gauge turnouts in other parts of the world are absent though.
-
Thanks for that information. As you suggest, the differences are minimal. I know from doing a bit of finescale modelling in the past that clearances for connecting rods and valve gear may be more of an issue than for wheels. Having said that, there were few Irish locos with outside valve gear and possibly none that would be suitable for a small terminus like mine. As for EM vs P4, a small concern I had was smooth running. The smaller the flangeway gaps, the less wheelsets should bump when going through pointwork. With dual gauge trackwork, I will have more gaps than normal for stock to traverse. The perceptible differences will probably be very small though. In the end, I may as well just toss a coin! The wheel availability is probably the nearest to a critical issue. I will definitely need some smaller diameter wheels than are available to P4 standards. That is why, as I mentioned in a previous post, I need to do a bit of product research and evaluation.
-
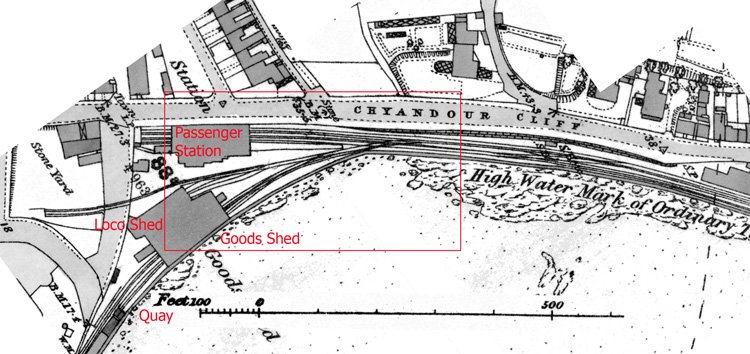
My brain is working overtime tonight! This project is a retirement objective, a completely new idea with everything started from scratch. As I have to build up some stock as well as making a layout, the layout needs to be pretty small. If I do things Iain Rice-style as a kind of cameo layout, I could probably get away with quite a small scenic area, without missing much out. Here is a rough stab at what might be possible. The goods shed acts as a scenic break on the left. A footbridge, or overhead signal cabin could do the same on the right hand side. For mixed and narrow gauge track, I would simplify things quite a bit, as shown in red below.... -mixed gauge curving to the left through the goods shed, giving access to the quay. Also a narrow gauge (only) platform to the right. The rest would be 5ft 3in gauge only, not mixed - unless I can squeeze a small turntable in to turn NG railcars. There is a turntable in the photo in the middle of the red V, not shown on the map, but an exact copy of the original would be operationally very awkward - as it must have been in real life.
-
Many thanks for the suggestion. In fact I had already just found an old thread on here ..... about mixed gauge track with info about Larne - and also a couple of photos of Ballymena in books I have, which have been scanned and are being studied carefully. A couple of images in particular are proving particularly interesting, including this one from the Mixed Gauge thread The one above is a real mine of information. Having absorbed it all, I shall have to climb several mountains in Templot competence to put it all into practice. Just the kind of challenge I enjoy!
-
As I ought to have realised, adding a turntable, exchange sidings etc. gave me a reality check, big-time. What seemed a small and manageable layout ended up bigger and more complex than Limerick Junction - well not quite, but I am sure you get the picture! I have decided to play around with a couple of other ideas instead. Genuine Irish locations are plentiful, of course, but usually occupy far more space than I would like and with limited traffic potential. That is why I am looking for inspiration from further afield. Using a real location as a starting point works best for me, even if the look and feel of the final thing will be different. 5ft 3in gauge and 3ft gauge trackwork with Irish stock is the aim for the model, whatever the original inspiration. This is a view Penzance in its early days, but would be modelled as a tiny Irish seaport. Lots of atmosphere in a relatively small space - and mixed gauge too, of a kind. It would probably fit in a corner quite neatly with a huge townscape as a backscene. I could see it suitable for a variety of stock and periods. The NG track (in my case 3ft gauge) would be more restricted than in the photo and the broad gauge would, of course, be 5ft 3in. NG and main line stock would be kept strictly separate, operated by their own engines. I quite enjoy trackbuilding. I need to decide what gauge to use though for the main line. I am not sure whether to go for 20.2mm or 21mm gauge and then whether to use P4 or EM standards. I have been through all the topics covering the pros and cons on this forum many times and still can't make up my mind! Either way, I need to use the same wheel and track standards for narrow and 5'3" gauge, as the stock will have to share several complex bits of track. What might decide things in the end is the availability of wheels. The smallest P4 wheels available these days are around 11mm diameter. For some vehicles, - particularly narrow gauge - I would need 8mm or even smaller. I have some Dundas Models 12mm gauge wagon wheels, some small diameter HO wheels bought on eBay and some N gauge wheels, so I can experiment and see what they are most compatible with, from a running point of view. A couple of short track test pieces should quickly prove what works best with what. That's my next job. I have some P4 track gauges for 21mm track construction but would have to improvise a bit for 20.2mm track or EM 21mm track. Probably best then to build a short length of P4-standard track first.
-
The First Class compartment was next to the guard's section and had a lavatory section all to itself - possibly full width of the coach, based on other LNWR coach layouts. Third class was normally six across on the LNWR. I guess that as it is for a boat train, they nominally allowed a little more space - 5 one side and 3 the other with space for access to the lavatory in each compartment. The layout allowed each 3rd class compartment to have its own lavatory, half the width of the coach. Second Class had a lavatory next to a third class one. This is detailed in the HMRS article mentioned earlier. I guess the only way to be sure about all this would be if LNWR archives can show more information.