

irishthump
-
Posts
1,817 -
Joined
-
Last visited
-
Days Won
7
Content Type
Profiles
Forums
Resource Library
Events
Gallery
Blogs
Store
Community Map
Posts posted by irishthump
-
-
I have been messing about with adding a cheapish Digitrax sound chip and speaker to my 141. The sound chip i chose has the sounds of an american SD38 loco preloaded . This loco has the same innards as some irish locos - an EMD 645 i think. not perfect but i hope to get a digitrax decoder programmer and try building a more accurate sound with correct horn etc. I forgot to fit a baffle so i will do that before i upload a recording. Here is a short vid of how i fitted the decoder anyways :
Fitting Digitrax sound to Murphy Models: https://youtu.be/wTZ7SxqlZr8
If you want to go down the route of programming your own sounds you shoulf look at the ESU Lokprogrammer. I got one myself last year and now programme all of my own decoders. Engine sounds which are accurate for Irish locos are free to download from the ESU website and you can mix and match sounds as you like.
-
Germany is the best place to buy ESU or Lenz gear as its in euro as there is no currency hike unlike via uk outlets. I have bought decoders from Kieskemper in the past and found them very efficient as well as good prices compared to uk.
He also sells via ebay as well as from his own site. Very honest guy with excellent service.
Same price here from Modelbahn Lippe but they do free shipping on items over €100 so it might be a better deal.
-
A little more work done...
As the body was too high on the chassis I filed the off the mounting lugs to allow shell to sit lower. I glued some styrene strip to the frame to allow it to rest at the correct height.

I also needed a way to fix the shell to the chassis. I drilled 2 holes in the metal chassis on opposite sides.
Then glued styrene pieces to the sides of the shell and tapped them to take screws. They seem to be holding fine, but if they wear out too quickly I can replace them with brass brackets later.
-
Just saw the weed spray train head southbound through Salthill and Monkstown station. Didn't even get a chance for a picture!
-
Nice....
I not a steam fan but those big yank locos are gorgeous!
-
I suppose a quick guide is the buffer to buffer test and on your pictures the A is higher than the two GM's.
Yep, that's a bit of a giveaway alright!
Thanks a million for the pic UP6936, just what I'm looking for! Yes the body definitely sits too high. Those measurements work out to about 50mm on the A class and 52mm for the 141 so the A class should be a shade lower which should make the buffers line up too. You can't see it from the pictures but the A class is taller than the 141.
As I said it's an easy enough fix.
-
Good and bad news here I'm afraid,
First the good news: Yes it can be done! The better quality decoders allow adjustment of the minimum, maximum and middle speed of the motor. This usually enough to speed match 2 or more locos so they can run together smoothly. The high end decoders also have the ability to set the motor speed for each individual speed step, but this is rarely needed except for the fussiest of locos!
Now the bad news... You can't do this with the Hornby Select! The select is very limited in the programming it can do, you need a DCC controller which will allow you to write CV's on the decoder. (CV's or Configuration Variables are what allows you to write information to the decoder. When you programme an address into the loco with the select you are writing to one or more of these CV's)
If you know anyone with a more sophisticated DCC system you could ask them to try to match the 2 locos for you. But bear in mind you still need decoders that allow this adjustment. If you are using Hornby's standard decoder (R8249) then this can't be done anyway.
-
As promised, here's a quick video of the chassis running:
[video=youtube;sfGFY-1XEeI]
As you can see it runs well, very good slow running.
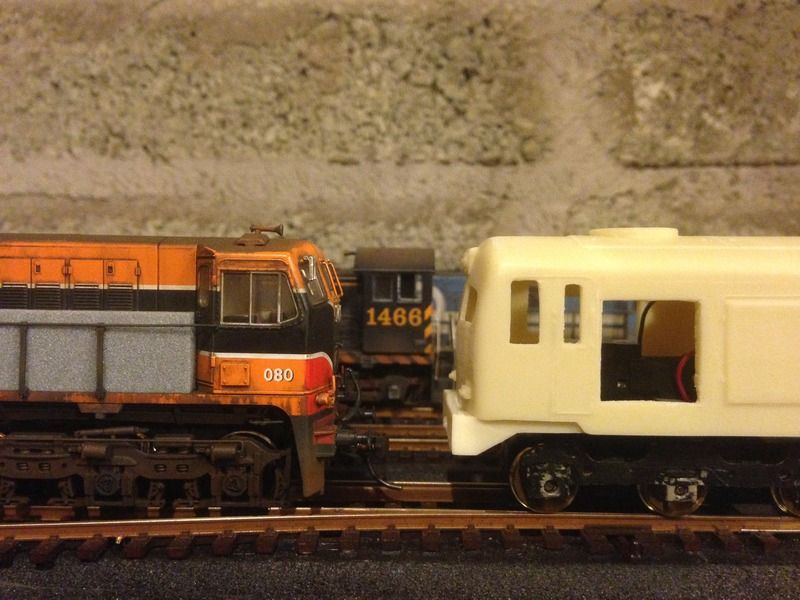
I said earlier that I think the body is sitting a bit too high on the chassis. Here's a couple of pics of it sandwiched between a 141 and a 071. What do you guys think?
I'm struggling to find pictures of the prototype next to any other locos to compare so any advice would be appreciated!
-
This is a case of keep trying until you get something to work, having to use three different American Loco chassis to get it right showing the tenacious approach you used in this challenge. Well done on getting it to work. Would love to see a video of it in action.
Thanks, Kirley. Fair play to any of you who got the 2 motor approach with the Hornby chassis to work well. I had accumulated a lot of HO stock so most of this stuff was to hand. Alos, I think this will be the only one of these that I will make, so I didn't mind pulling out the stops to get a decent running model as I will be installing sound in this one.
I will post a video as soon as I can, it is quite a smooth runner.
Here's some more progress:
One thing with the bogies on this model was the fact that the side frames hold the axles in place as well as the pickups so removing them wasn't an option.
I decided to cut them down to fit behind the resin sideframes and remove all the surface details to get a good fit.
Before...
After....
The new sideframe fits neatly on top.
Next was to try to fit the body shell. Here's another reason I went with the Athearn body; width wise is a perfect fit! It sits right down on top of the lugs.
Only issue is that it might sits a bit too high, but that can be easily remedied. As I said earlier the fuel tank is not dead center as I think it should be, but if it's a good runner I can live with it. Also gave the sideframes a coat of black paint.
I also bought Weshty's excellent brass detailing pack for the Sliverfox kit, as you can see I've been cutting out the resin shell to fit them. Since that photo was taken I've also removed the buffers as I picked up a sprung set to replace them.
-
I finally took the plunge with a Silverfox A class kit so decided to try to come up with a suitable chassis after seeing Dhu Varren's wonderful brass scratchbuilt job.
I didn't fancy building my own as I'm not experienced with scratchbuilding in brass so the hunt was on for a donor chassis. I have a Hornby Railroadclass 55 and although this is a simple cut and shut and is DCC ready I decided against using it as it wouldn't pull the skin of a rice pudding!
I have a growing collection of US HO locos so decided to look through them for a solution. According to Glenderg's excellent sticky'd thread, the RSD 4/5 is probably the best option but I found them hard to come by.
The Athearn F7 looked about the right length and chassis has a decent amount of weight to start with.
I cut out some sections of the underframe to make it more closely resemble the A class shape. I could simply attach the resin fuel tank castings when I'm ready. The fuel tank will end up slightly off centre but I think I can live with it.
Only problem of course is the F7 is a Bo-Bo but I thought I might be able to switch out the bogies. I tried bogies from an Athearn SD40 but the bogie mounts are totally different so that idea had to be scrapped. However I had picked up an Atlas U36C chassis ages ago and these are a direct fit.
I also had a spare motor and drive shafts from a Proto 1000 F3 which matched up to the Atlas bogies so I swapped this for the Athearn stock motor.
The mounting holes for the motor don't line up perfectly so I glued in a piece of thick steel plate to mount the motor and also to add more weight.
Fitted in the motor and drive shafts and attached the bogies. Not in the picture but the motor was fixed with a bead of silicon sealer.
Gave it a quick test run and it ran very smoothly. Only problem was that bogies were too rigid which caused one to lift slightly when running over points and the loco would stall. This was easily fixed by trimming away a little of the plastic on the bottom of the worm clips which allowed the bogies to pivot sideways a little.
More to follow. But progress is a little slow due to the arrival of a new family member......
-
Thanks k and thump. How do you make a wash ? Is it just diluted acrylic?
A wash is basically very thin paint usually mixed around 10:1 with water in the case of acrylics and thinner or white spirits with enamels. The purpose of the wash is to tone down the base colour and for the paint to pool in recesses and around other small details to make them stand out and to give the impression of accumulated dirt in the details.
When making an acrylic wash you also need to add something to break the surface tension and make the paint flow more freely.
Some people use matte medium or a TINY amount of washing up liquid. I find enamel washes flow much better due to the fact that the paint is oil based. I make mine with mainly Humbrol paints thinned with ordinary white spirits.
Humbrol also make washes which work well but I find them a little strong and thin them down further before using them.
Another member on the site (Glenderg I think, sorry if I got the name wrong!) uses Gouache which is also water based and he gets some lovely results.
The advantage of using a water based is that it can be removed easily if you don't like the result without damaging the underlying paint. Enamel washes have to be removed with
thinners which can damage the base coat if you're not careful.
-
That wagon kit looks great.
Give it a thin black/brown wash, that will tone down the silver and give it a lovely weathered look.
-
Fantastic!
What decoders are you using? Is that a Loksound in the 141?
-
Damn that looks nice!
Really jealous of your progress by the way!
-
Body mounting is the best way to go but I wouldn't use no.5's on a Dapol chassis as they are too short. You end up having to mount the coupler box proud of the edge of the chassis which looks a bit strange.
I used Kadee 146's (long shank couplers) on some Dapol tanker wagon kits and when fitted directly to the chassis they are at the perfect height. Also, because the 146's have a longer shank than the no. 5's they handle curves better.
-
Quite by chance I've just looked on the Shapeways website and there is now 4mm body available from Rail 3D Prints for £46.49 plus £17.41 for a set of detailing parts. The 2mm version is designed to go on an SW9 chassis, so no need to chop up a 141/181 chassis.
Stephen
Just had a look but you would really need to see one of these in the flesh to know how good it is. Good to see they have bogie sides available but I guess glazing would be up to yourself.
The cost would be around €100 without shipping.
-
Despite most retailers being out of stock, in my experience new or mint MM 141/181s are still relatively easy to get hold of with prices varying between €80-130. Probably the best Irish model chassis ever produced. And who knows, perhaps in years to come there may be limited reruns anyway.
I tell you I wouldn't have the heart to cut one up to make it fit in a 121!
-
Good idea, I mean who would want to destroy of some of Mr murphys work when something else can be used. Would the at Ahearn
be roughly prototypical in size?
The SW1500 is what's recommended for the MIR kit.
-
Is the difference in length (i.e. buffer to buffer) due to different body length sitting over the same chassis, OR actual shorter distance between the outermost two axels?
The 121 chassis is definitely shorter than the 141/181. It's noticeable in any photos showing a 121/141 double header.
-
The obvious chassis would be an existing MM 141/181.
Bear in mind the 121 chassis is shorter than the 141/181.
-
Great info, Dhu Varren. Thanks.
-
I bought the sheets off eBay back in 2012 so can't remember mate sorry. I used decal spray which I still have at home and can check the name which I sprayed on after I printed it.
No problem. I've read you can use gloss spray varnish to seal them too.
-
The method I used at the time was first to get the photos online from Google images etc that best matched my needs usually or from emergency vehicles photo sites etc.. then attach them to a word document and then trial and error printing them in b&w to get the correct size and then once happy I simply printed them to water slide paper etc..
Hope this helps mate
What transfer paper do you use? Does it need to be sealed after printing?
-
For anyone interested, Lima "A" Class - http://www.ebay.co.uk/itm/Lima-class-33-Irish-HO-/291516199035?pt=LH_DefaultDomain_3&hash=item43dfb8307b


Patricks Layout
in Irish Model Layouts
Posted
I second that motion!