

irishthump
-
Posts
1,890 -
Joined
-
Last visited
-
Days Won
9
Content Type
Profiles
Forums
Events
Gallery
Blogs
Posts posted by irishthump
-
-
-
 13
13
-
 6
6
-
-
33 minutes ago, jhb171achill said:
First time I heard “black’n’tan” was in Kildare signal cabin about 1963, even though the term didn’t come into more widespread use until comparatively recent times. It was always known as “orange and black”.
Only the IRRS, with its often oddly archaic internal vocabulary, and the old Irish Railway News, ever seemed to use the frankly inaccurate “black and BROWN” description.
Anyway; I was with Senior, who knew the signalman, and they’re chatting away. It was a very hot summer day like today.
A train sped through, an up Cork or Waterford, perhaps. The loco was a brand new 141, straight out of its Murphy models box. It had about 6 or 7 bogies on, all green bar the very last one, which was newly repainted.
Senior: “Is that one of the new engines!”
Signalman: “Yes, you’ll see them a lot now” or something to that effect….
Train swishes past…
Senior: “and they’re painting the carriages to match…”
Signalman: “Yeah, ye’d think we’d seen the last o’the black’n’tans by now!”
True story.
Black and amber was how I've also heard it frequently described...
-
1
-
-
12 hours ago, jhb171achill said:
The final livery of 102 with black round the windows and the darker blue was short-lived, and she only wore it in her last days shunting Adelaide yard. Many of the fittings had been removed from the front by then, as well as the nameplates. So no trains were ever hauled by that livery, which was designed by the then loco engineer in York Road.
I saw it daily at that time. At this stage, two trains came in from Dundalk each morning, with "pairs" up front usually, sometimes a single 141. One was cement, the other Guinness. I think the fert stopped in the latter days. As far as I recall, but I'd need to check, one of the "pair" shunted the yard at least to some extent, while newly-painted 102 sat forlorn at the back; while the other went back to Dundalk. I recall a pair of 121s struggling there with what for those days was an uncharcteristically heavy load one day.
Mind you, I also recall steam locos shunting in that general area too! (GVS, Lisburn)...
Seeing this video of 102 shunting cement wagons in Adelaide Yard gave me enough modeller's licence to buy a Hunslett, even though I ended up buying a different livery version of Falcon!
Lots of videos on this guy's YT channel. Including this one of a wonderfully disheveled 102 shunting Guinness kegs...
-
1
-
-
1 hour ago, DJ Dangerous said:
Not justifying abuse or hate, but blaming influencers etc falls flat on it’s face. They are part of the scene and are here to stay, while they can make money out of it.
Yeah it's a sad reality though. These influencers can also downplay their part in things by hiding behind the screen of "I'm just giving an honest review." While all the while using clickbait title cards saying things like "I'm so angry about this model!" or "worst loco EVER!" and gleefully putting the boot in when there are problems.
It's not helped by the fact that some of these "reviews" are shaky at best.
-
1
-
 1
1
-
-
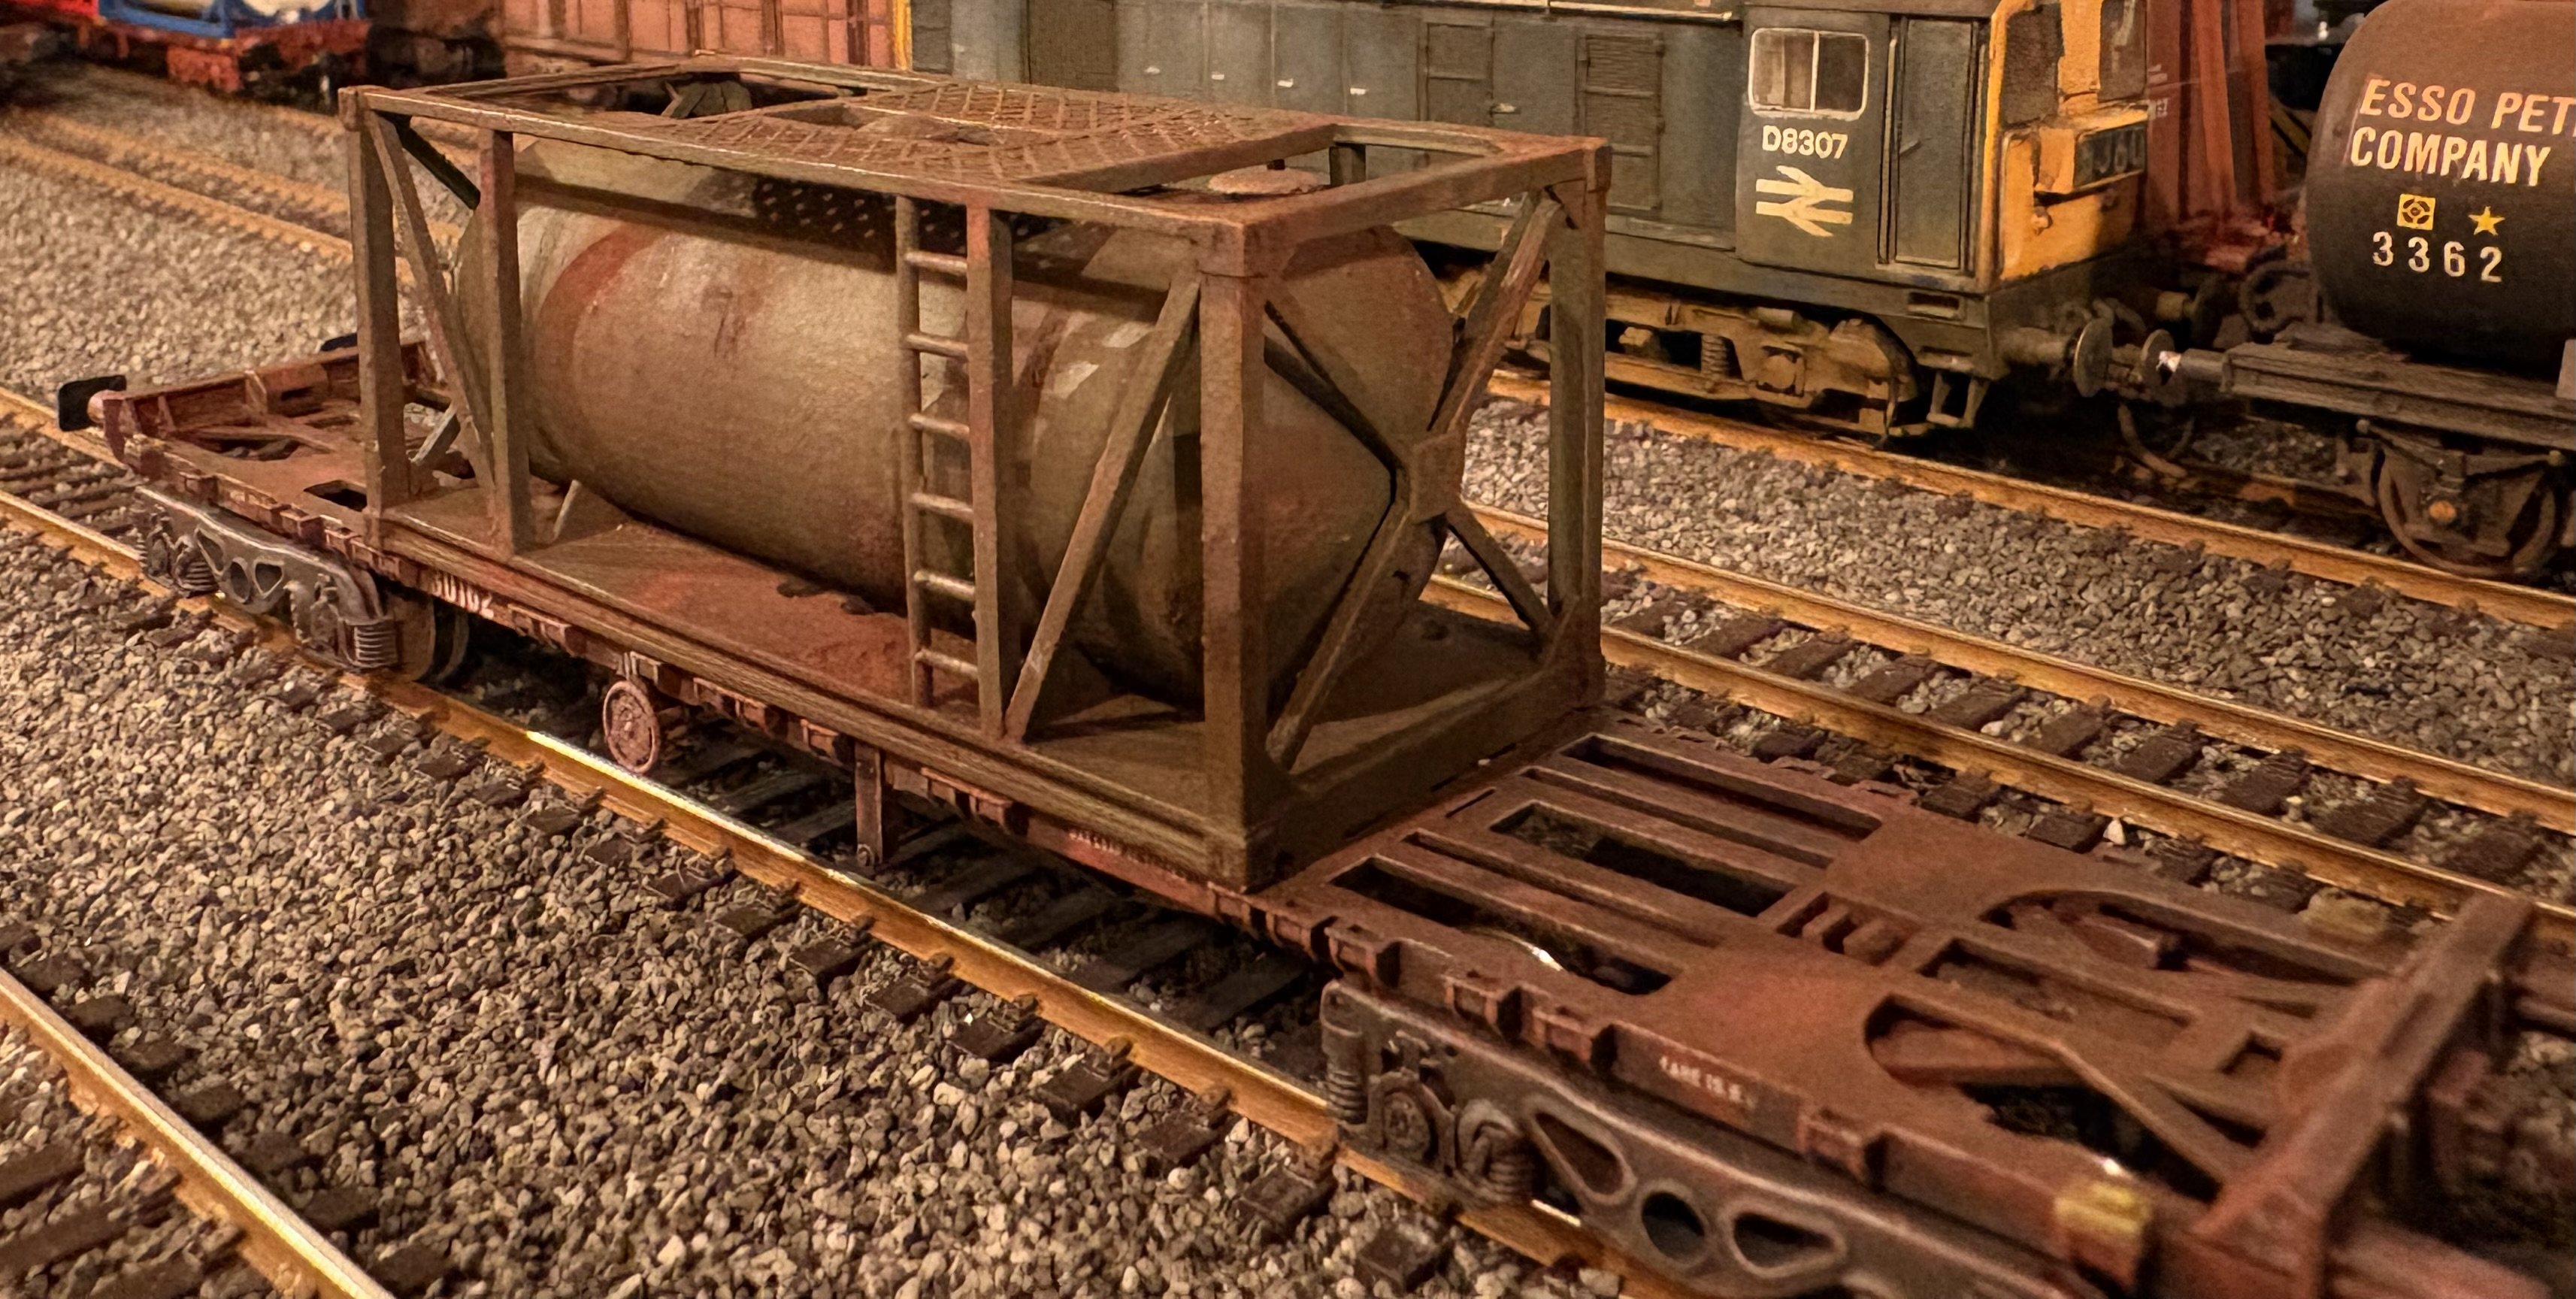
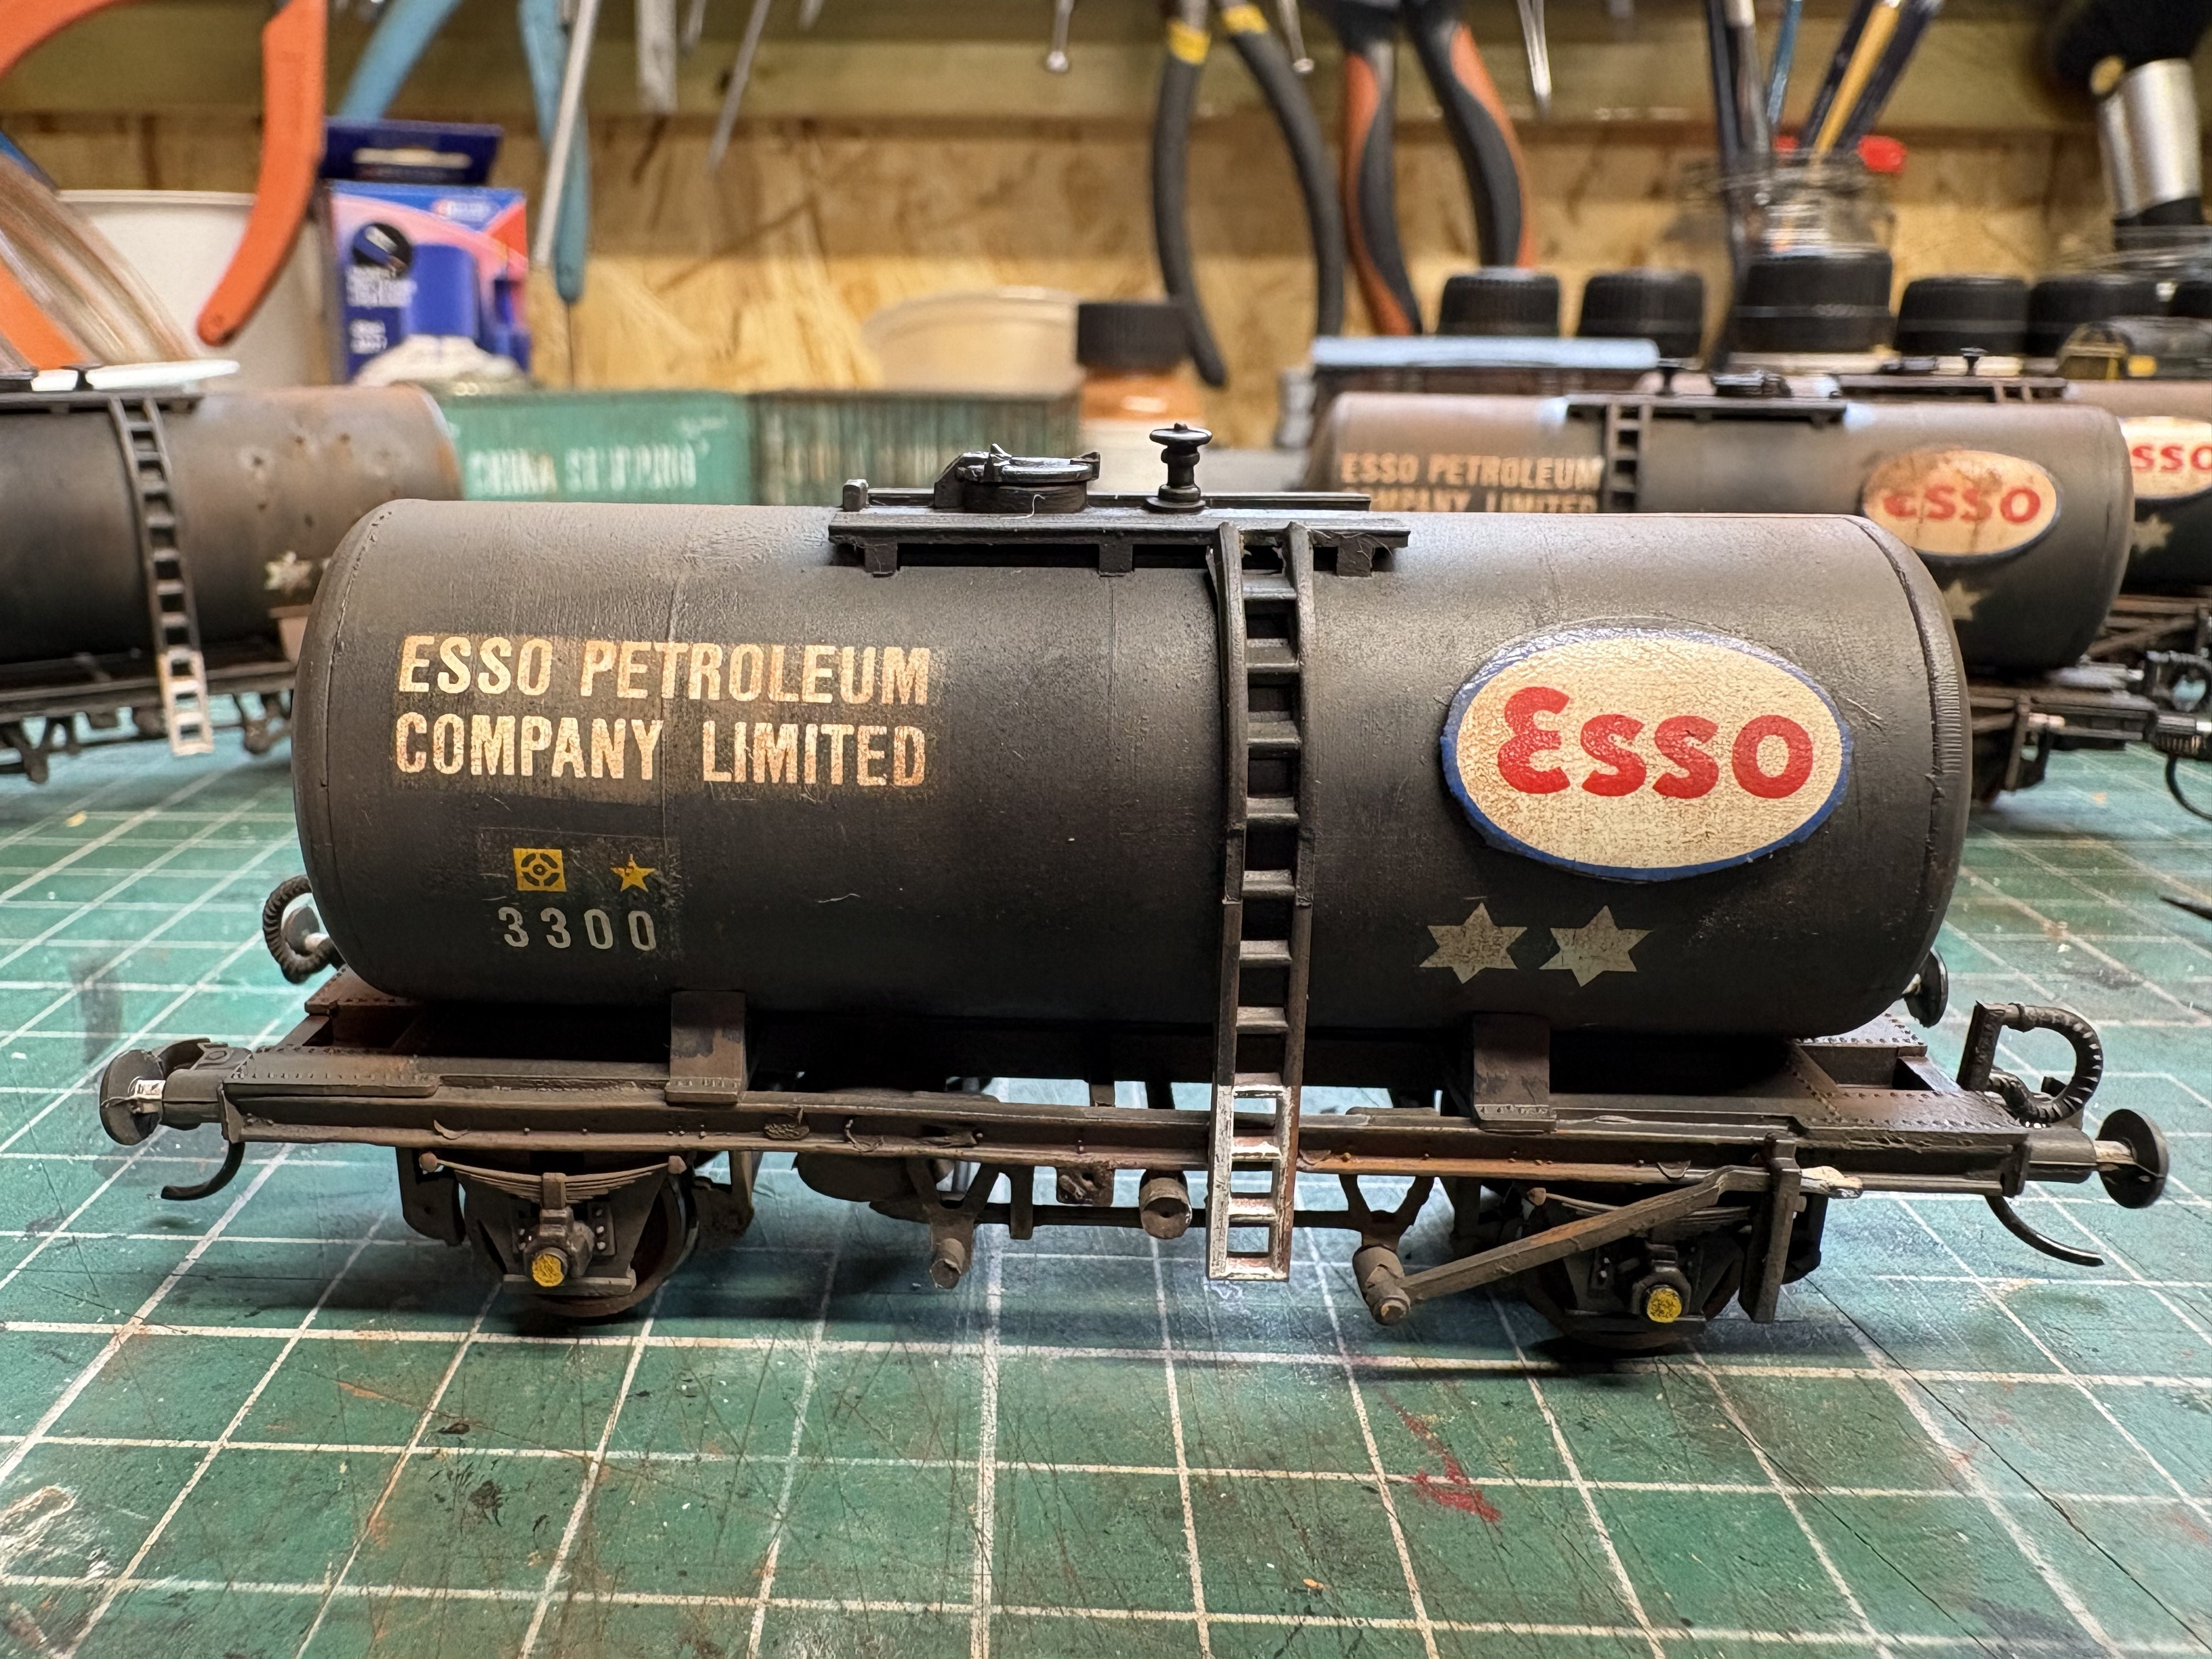
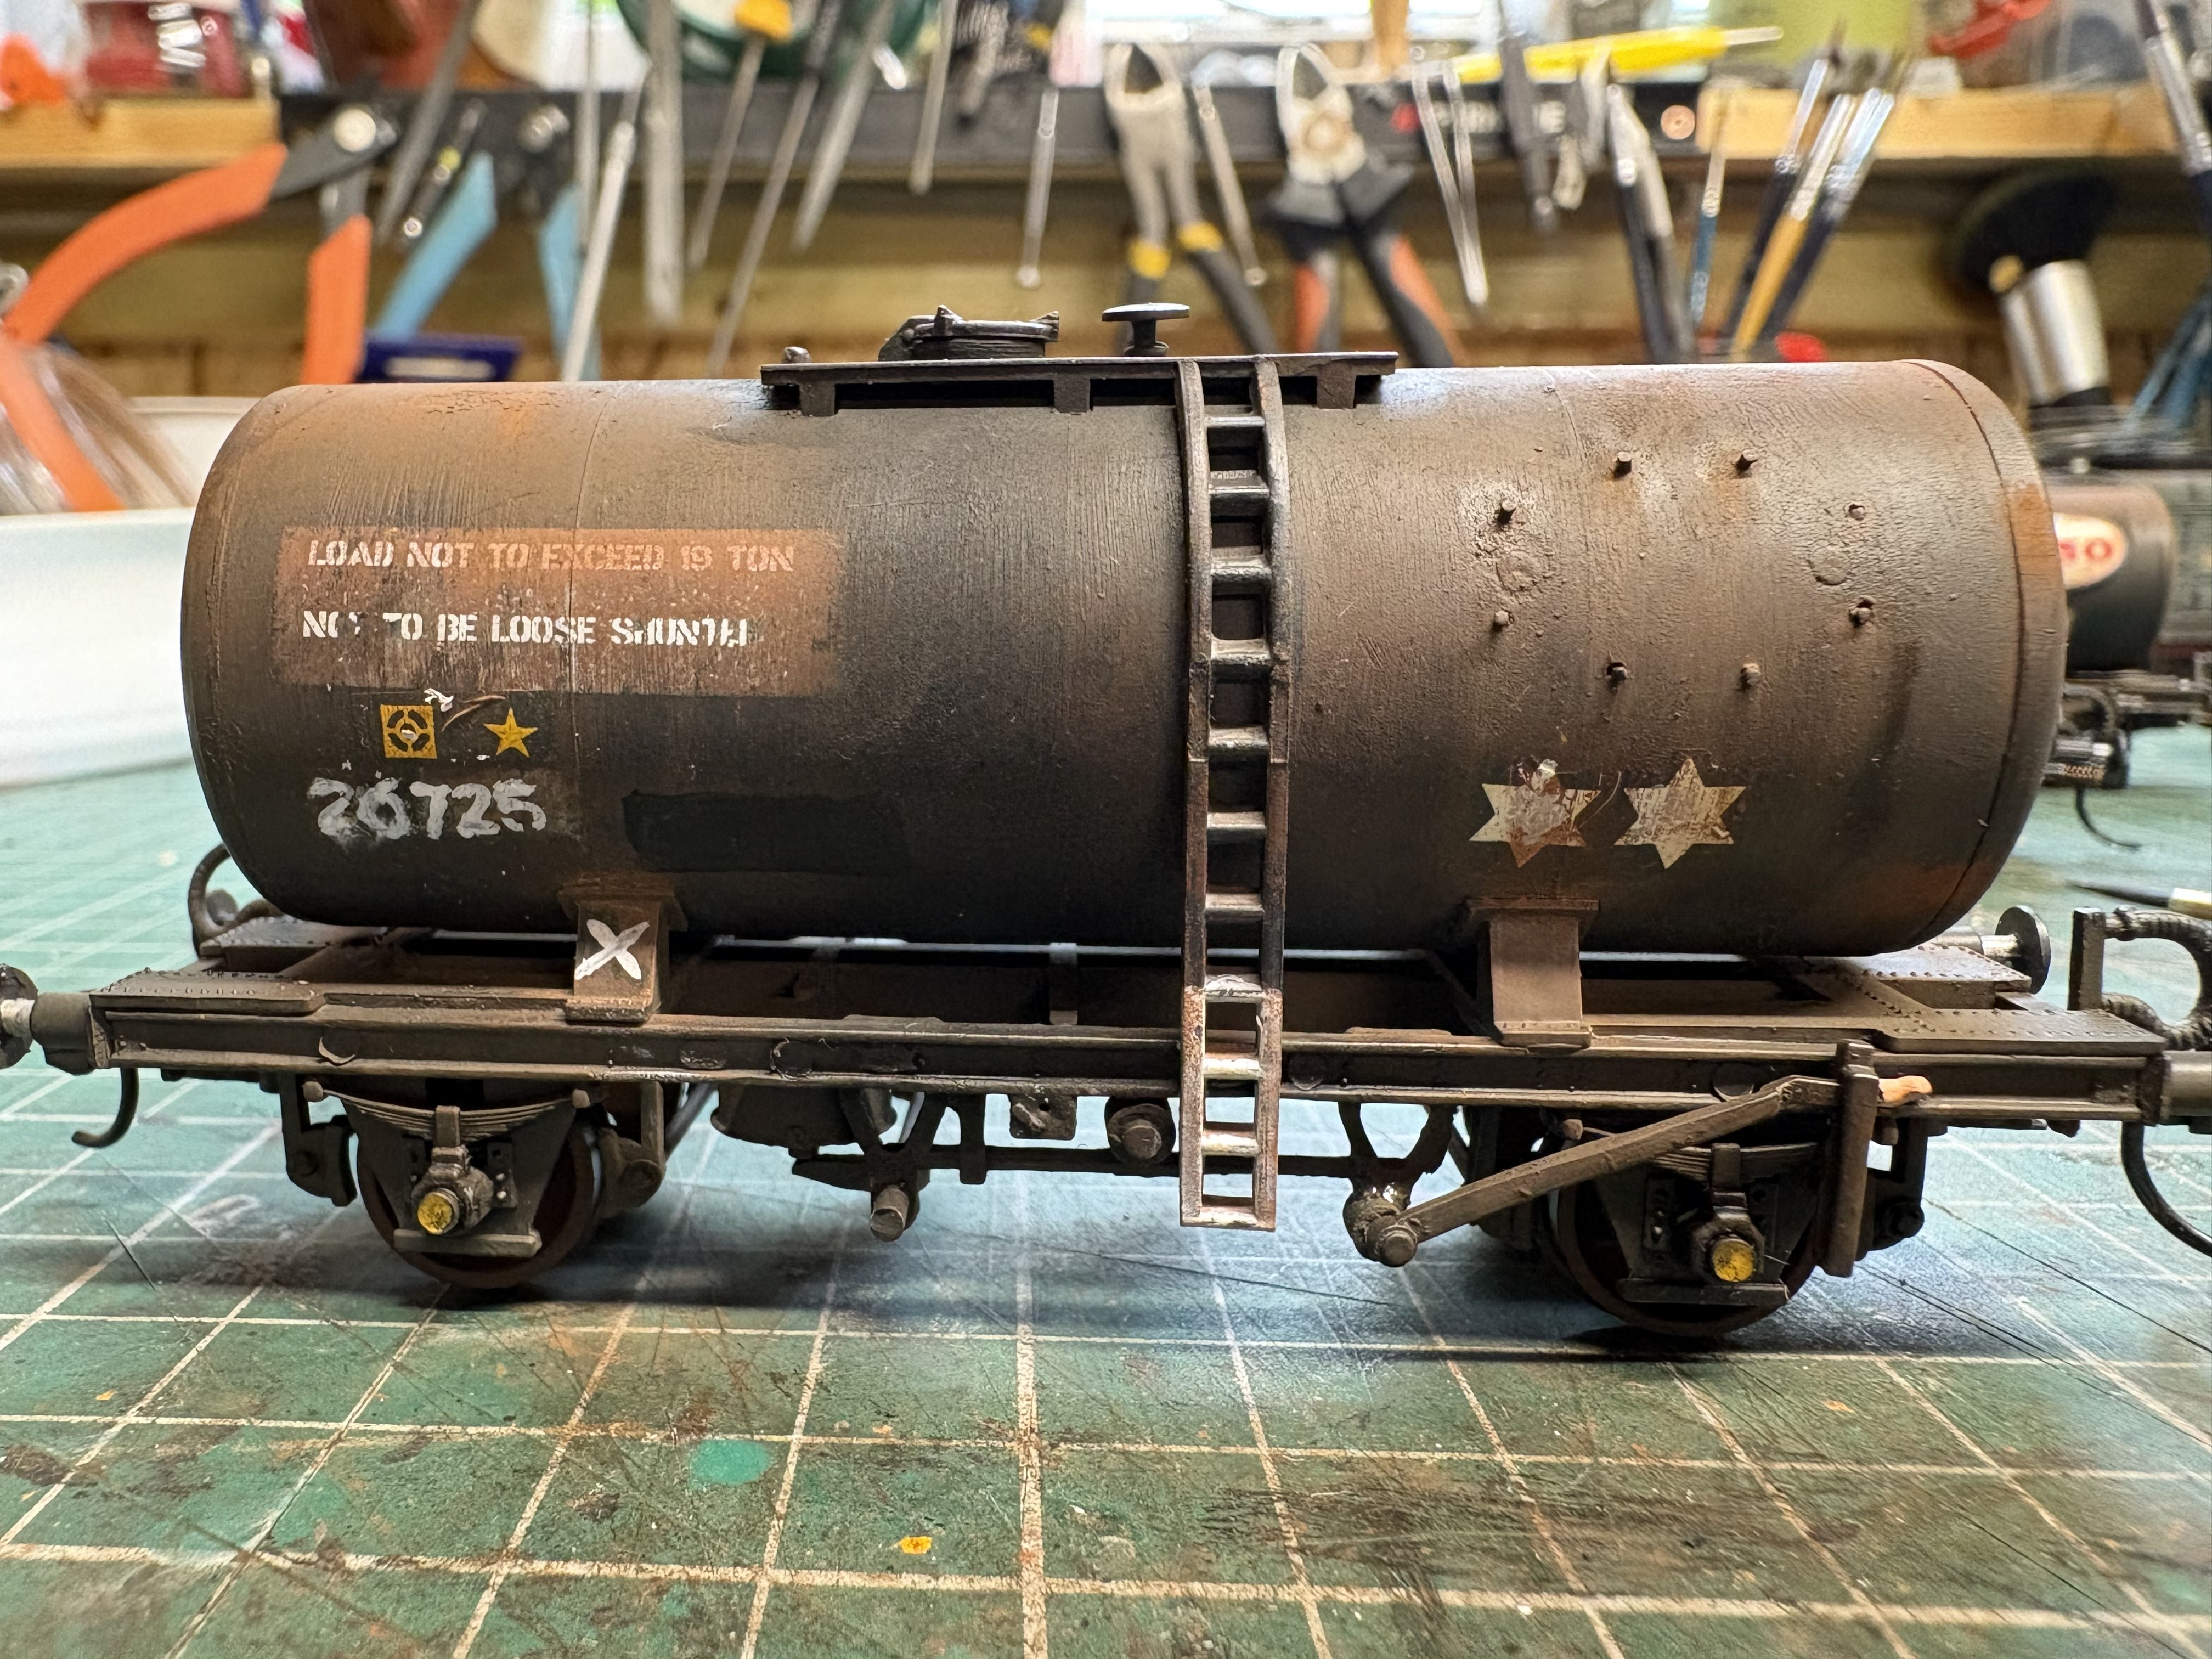
One of @Past-Avenue’s 3D printed barrier wagon tanks after being painted, weathered and perched atop an IRM 42’ flat wagon.

-
11
-
-
4 hours ago, glenn19 said:
I tried my other one, same issue.... On the curves the bogey is hitting the back of the coupling

When the coach is the right way up the coupling should clear the bogie and the bufferbeam. Check that nothing has come lose on the coupler.
-
1
-
-
My three Park Royals were delivered yesterday and my Hunslet came today! I only had the chance to give them a quick run this evening, but I don't seem to have any problems over curves or points when pulling OR pushing. All my track and points are Peco Streamline.
On a side note I'm really impressed with the design of the pickups on the bogies. There is no drag at all on the wheels, nice job!
-
1
-
1
-
 1
1
-
-
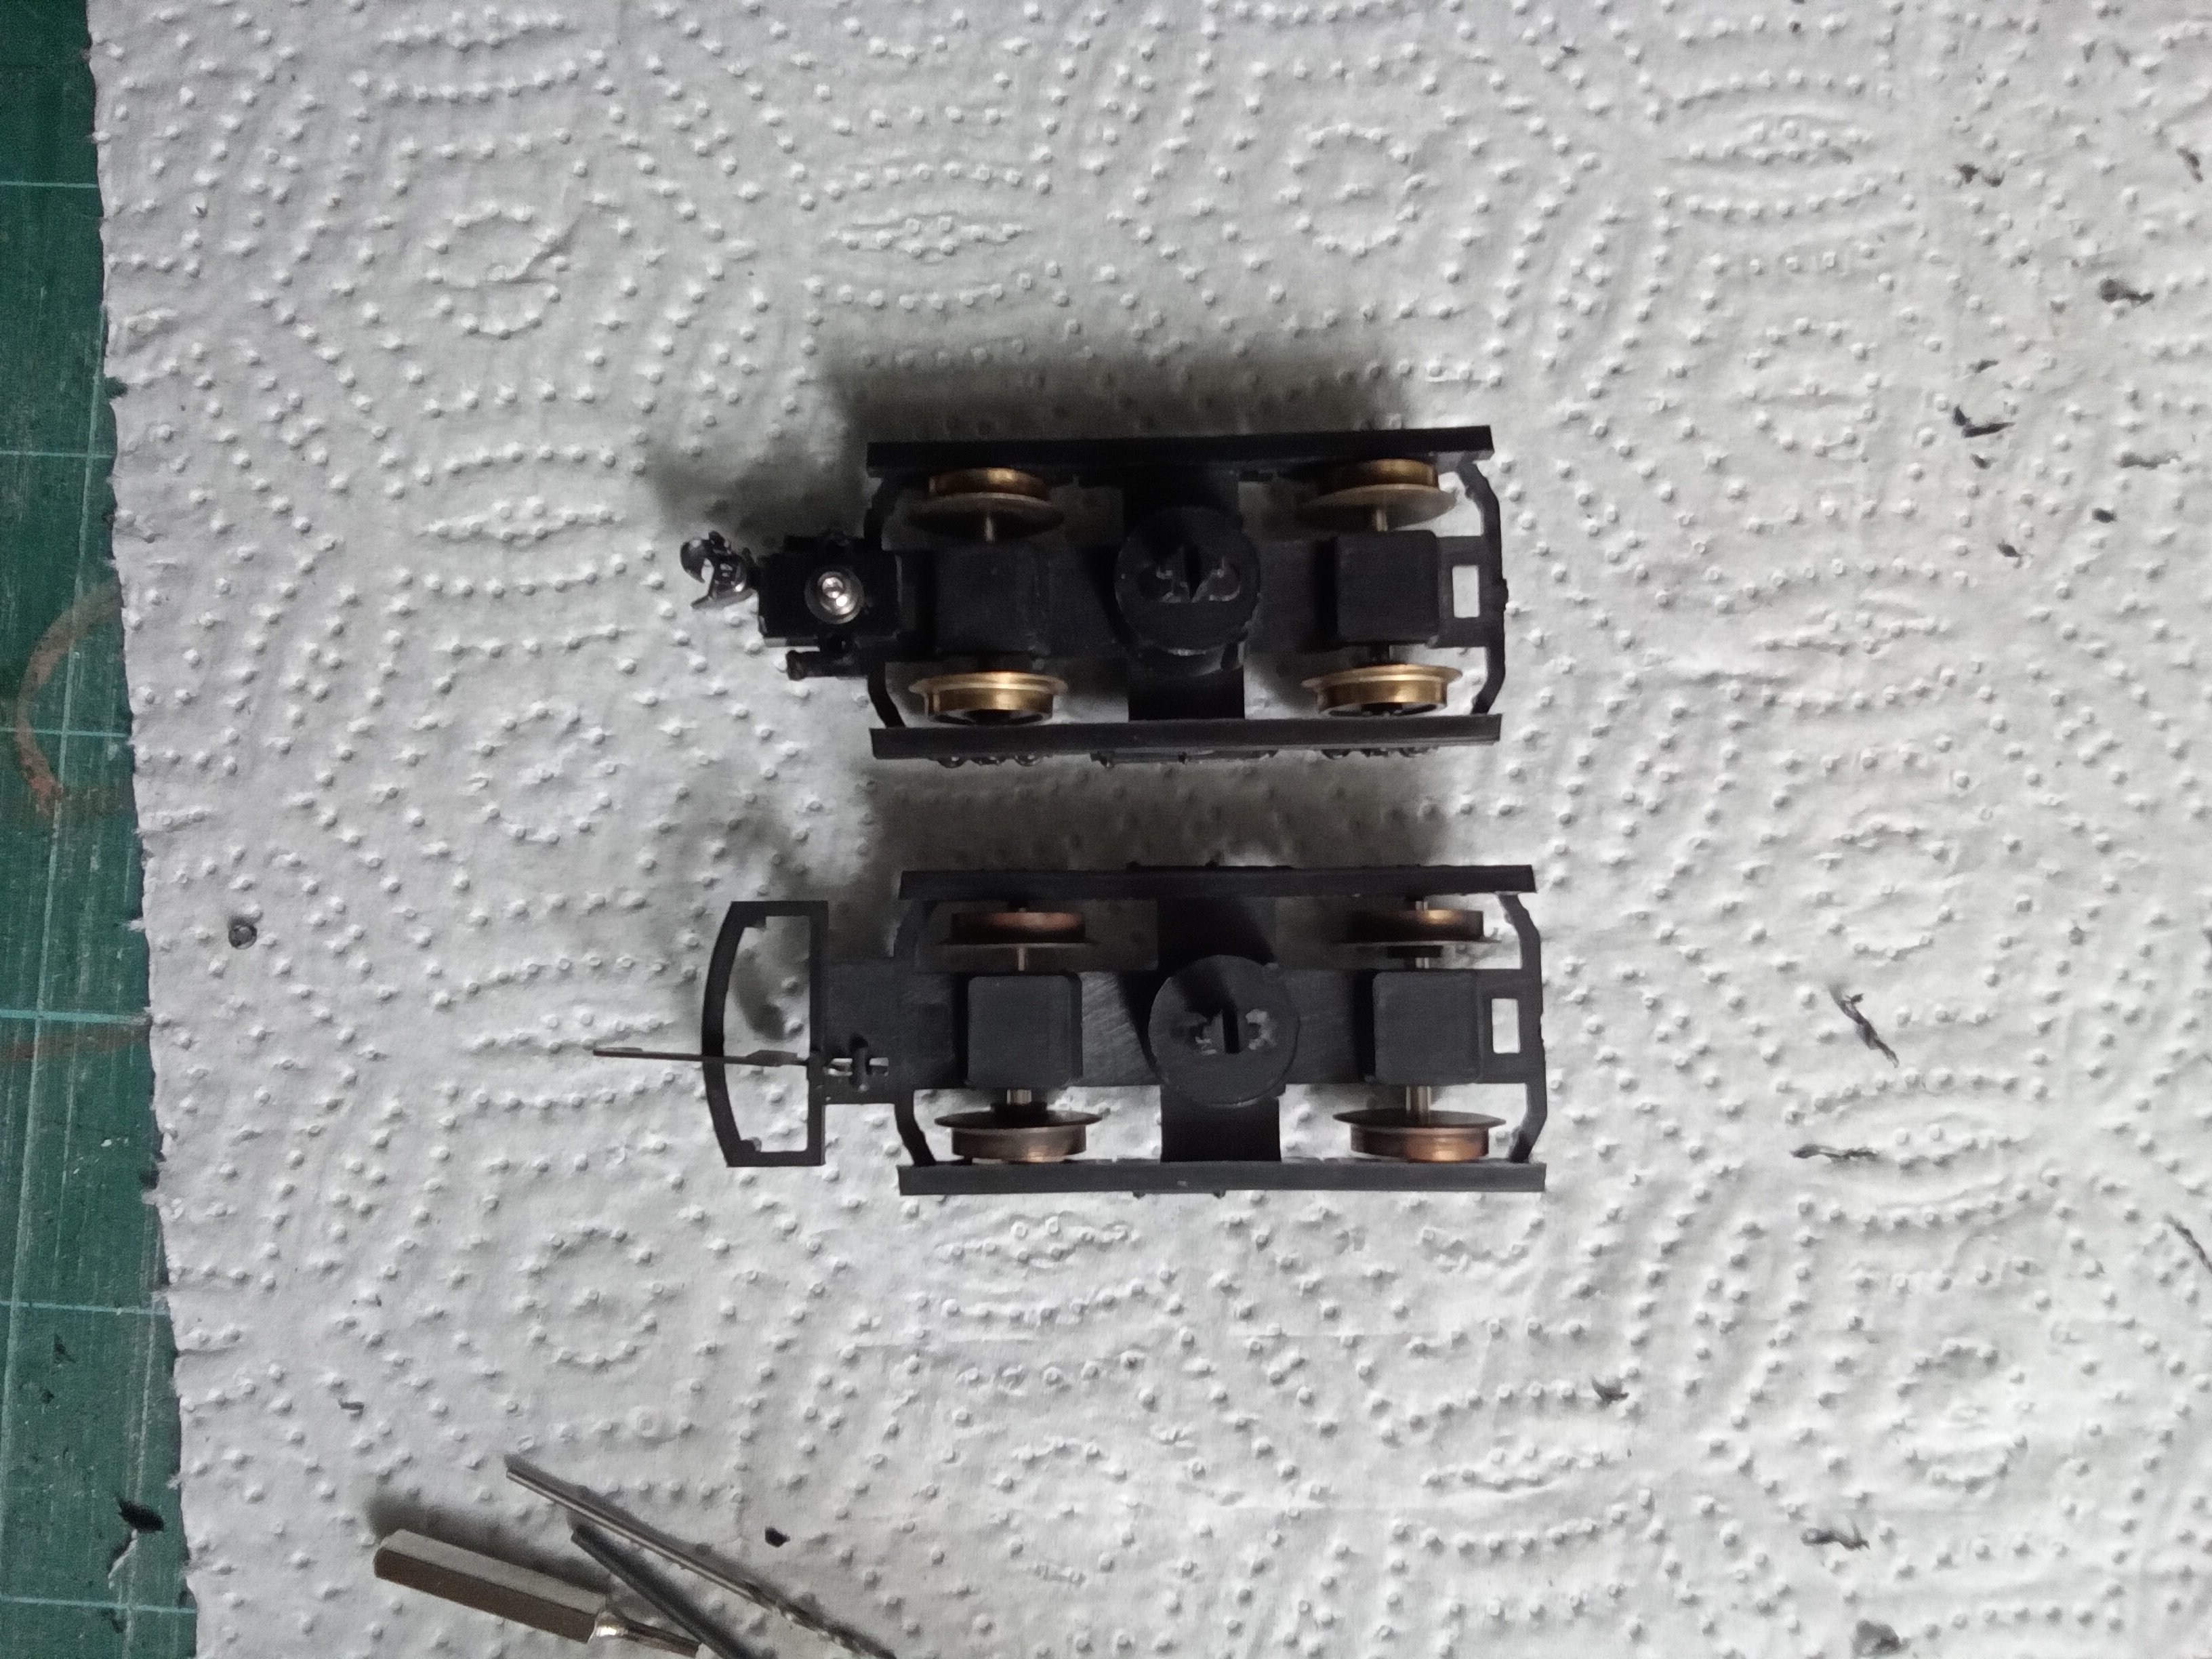
20 hours ago, Horsetan said:
Interesting. I remember using Loctite, which proved unable to hold on.
Sanding the plastic really is the trick to it. Sanding both the spot on the bogie and the Kadee coupler box gives a really good bond.
-
2
-
1
-
 2
2
-
-
9 minutes ago, Horsetan said:
Plastic Magic didn't exist when I had Lima items in the 1990s.
Roughening the surface didn't work for regular superglues, and the plastic was also resistant to solvents like Mek-Pak and Daywat butanone. Araldite would hold for a while but the bond was quite weak.
I attached all my Kadees and NEM pockets to the bogies with Superglue (cheap stuff) after abrading with sandpaper. That was about 10 years ago and they're still attached!
-
1
-
-
18 hours ago, Horsetan said:
Lima were quite fond of that weird grade of bendy plastic that they used in their bogies and associated parts. It was virtually impossible to glue anything to it.
Newer adhesives like Plastic Magic from Deluxe will work. Also, if you roughen the surface with fine sandpaper or a file superglue works very well.
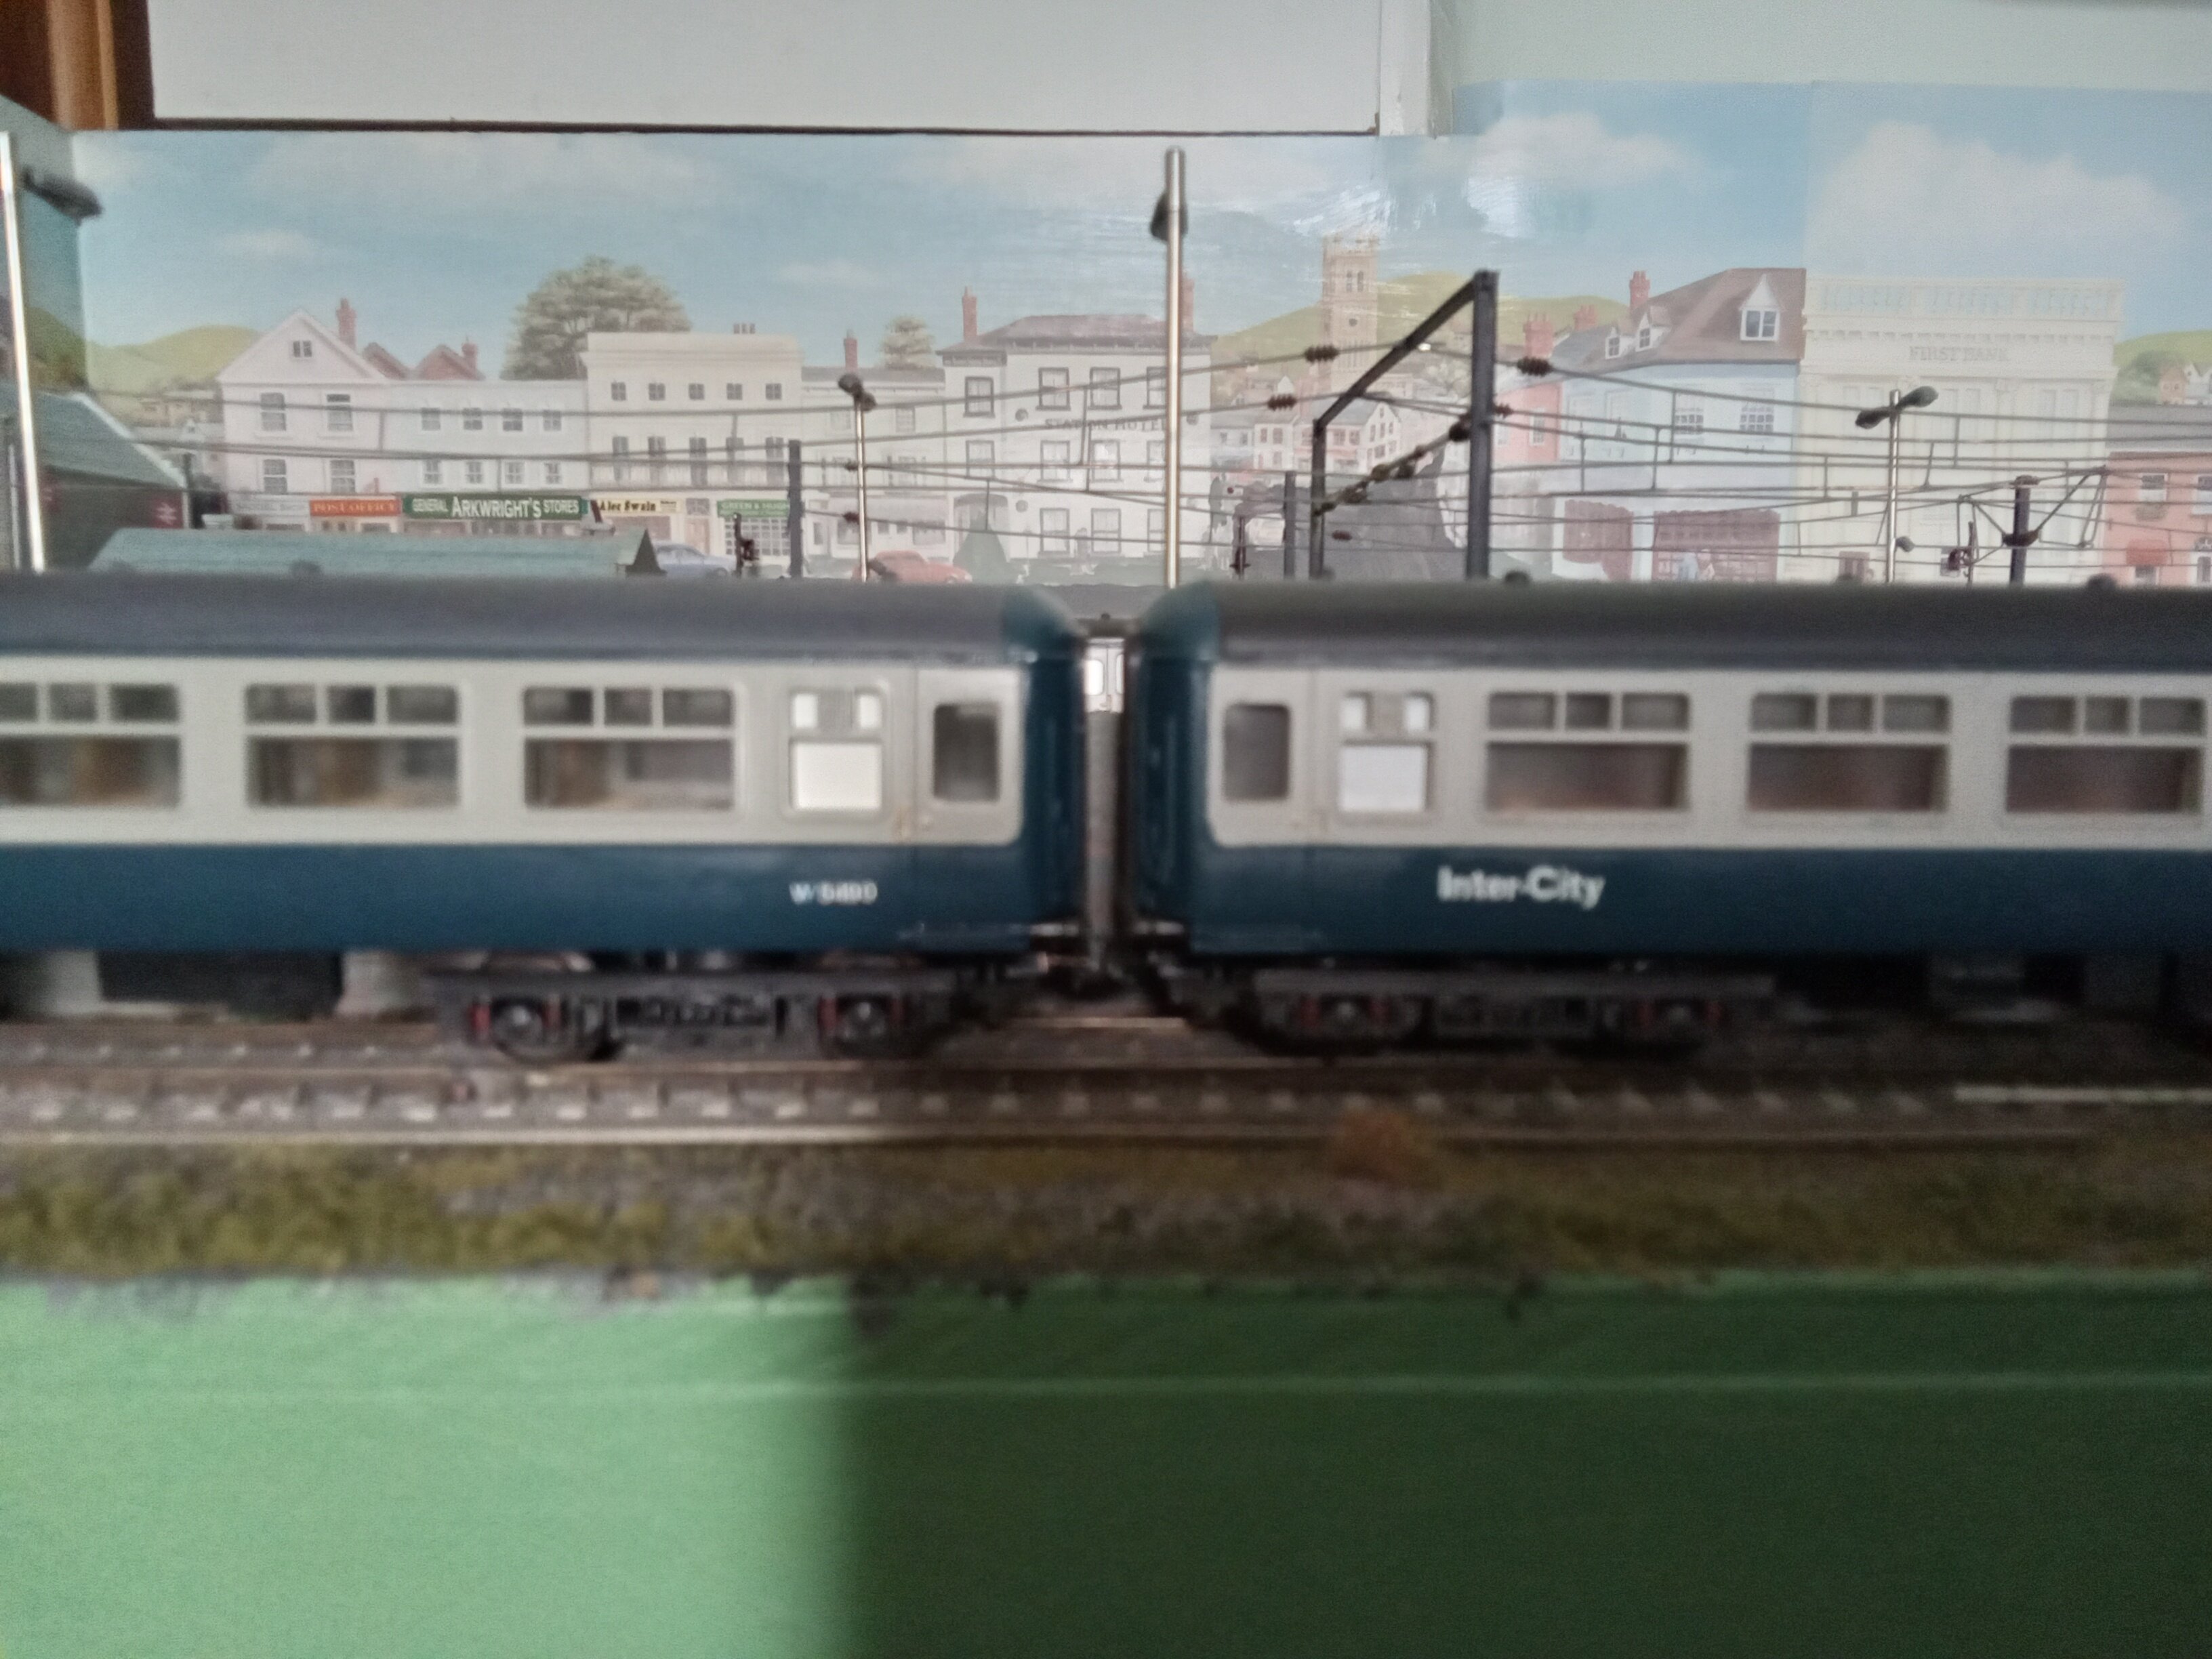
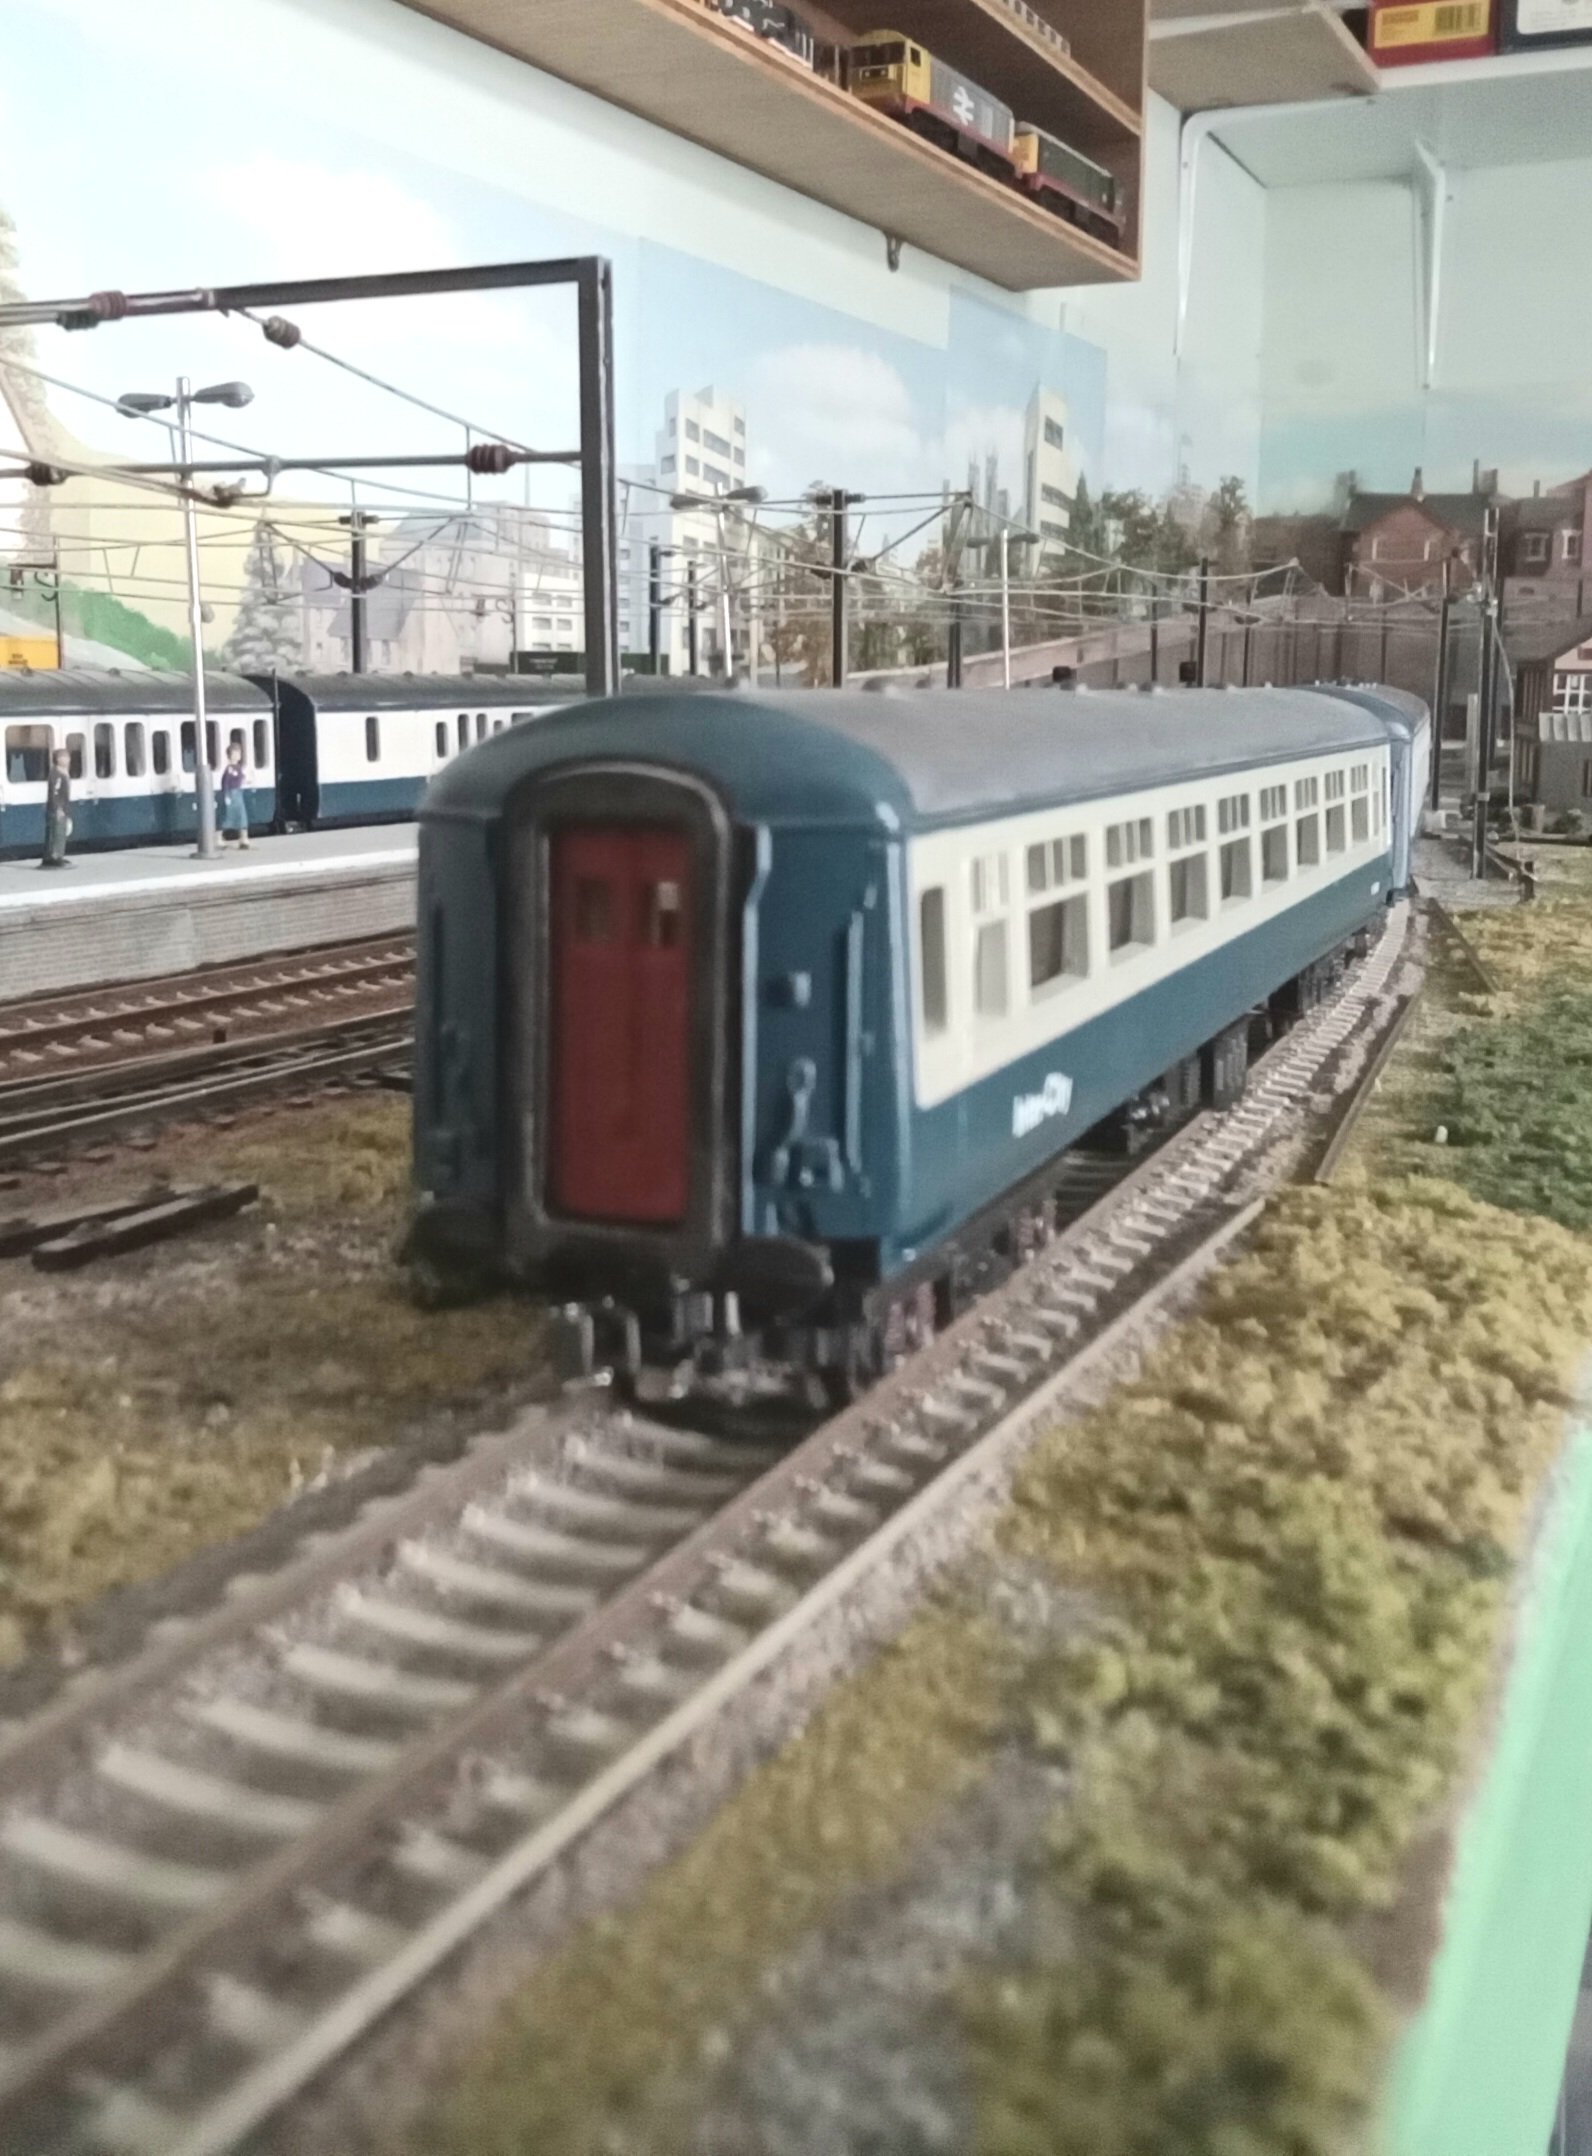
19 hours ago, irishmail said:Here are the pics of some of my Lima MK2 modifications. There is a before and after image. I have also modified the end corridor and painted the end doors red. I have a rake of 5 SO's and have renumbered them, also have an FO and BFK to do.

They look very good! I don't think I could be that brave with the close coupling space on my layout!
-
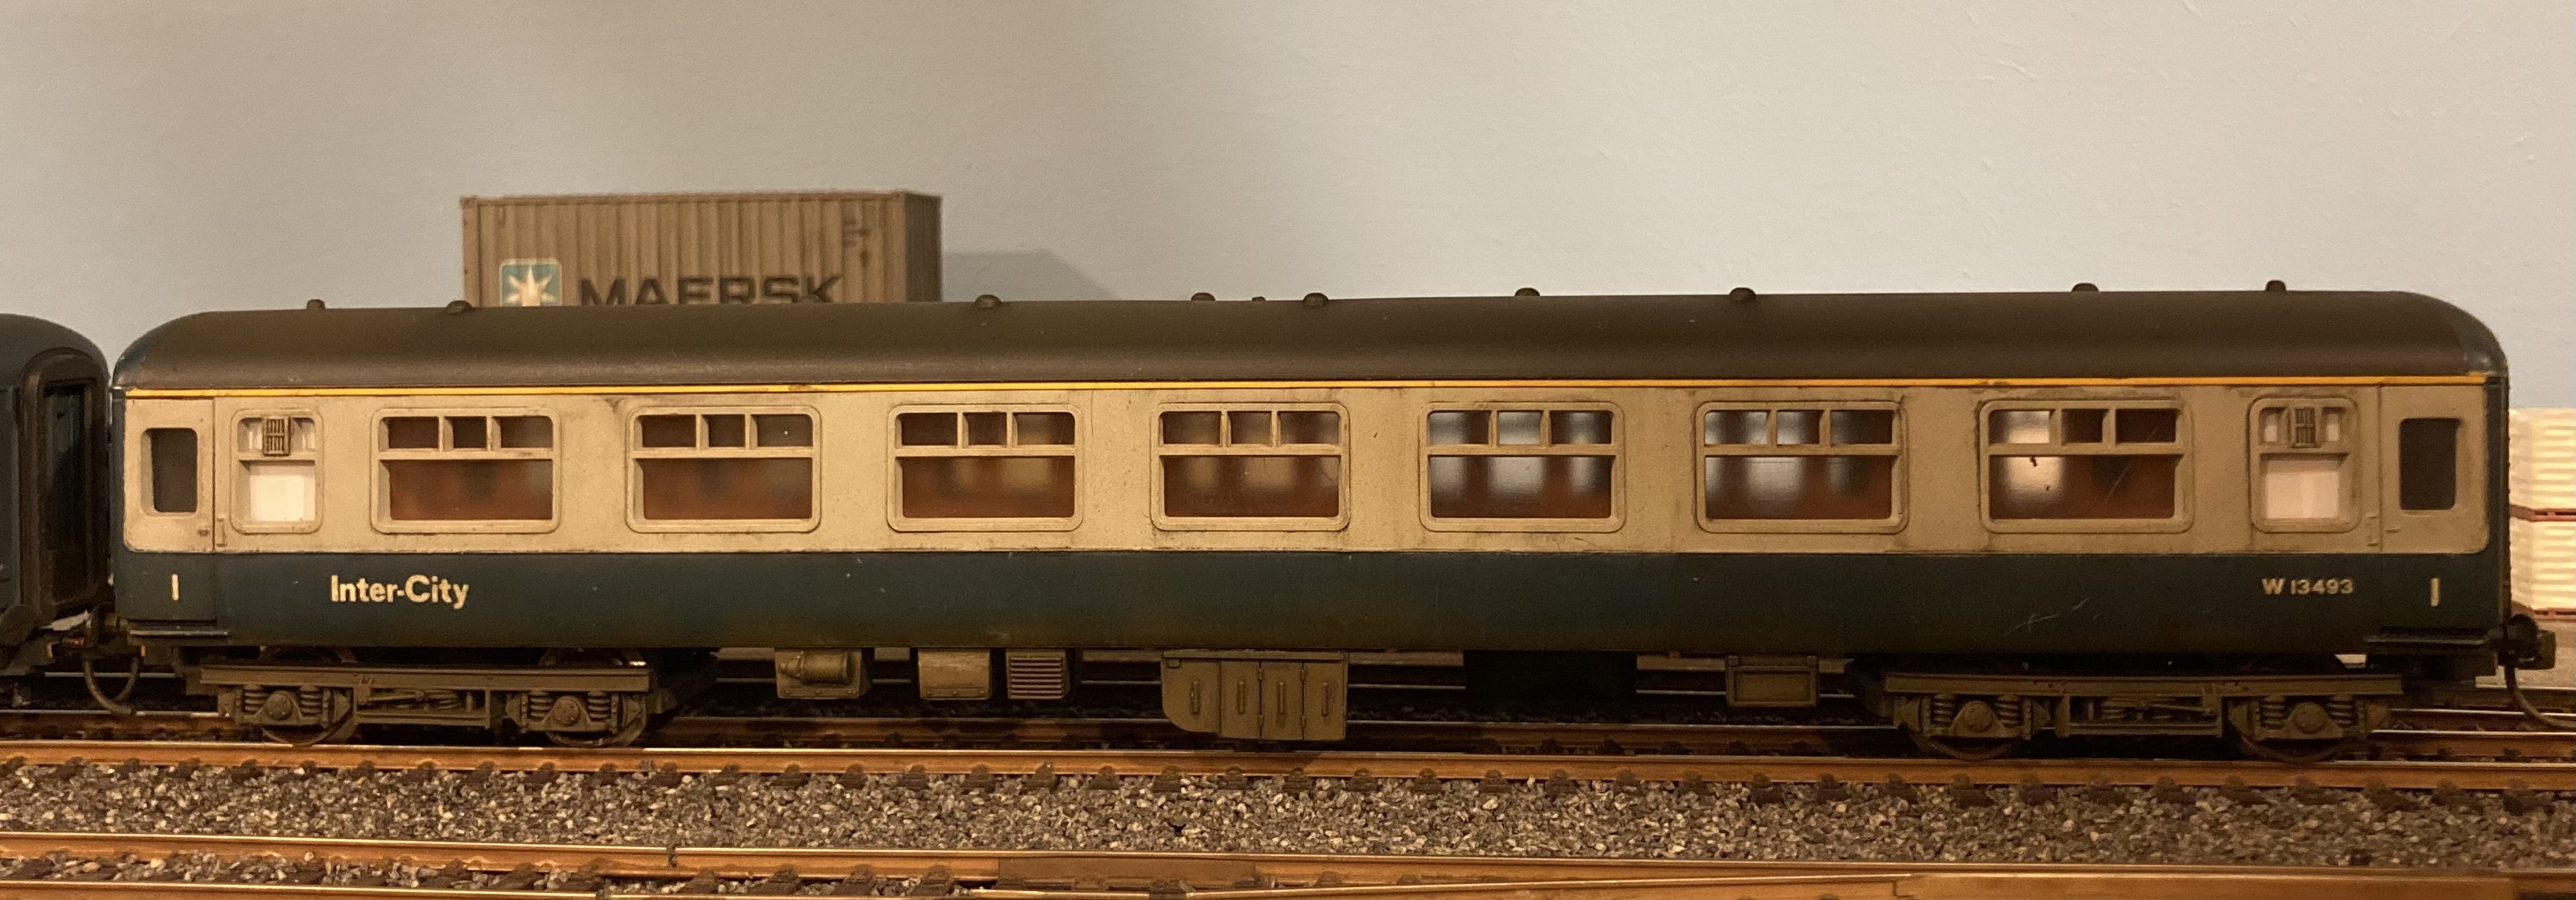
For when they were made the Lima coaches are fine. They have better details than they’re given credit for and can be made to look even better with detail parts.
I have quite a few in British liveries and they happily run behind my modern locos. My layout is all code 100 so the wheels give me no problems and I have switched all the couplers for Kadees or magnetic ones.
Although they're obviously not the most detailed models they can be made to look pretty presentable and they run very well.
-
5
-
-
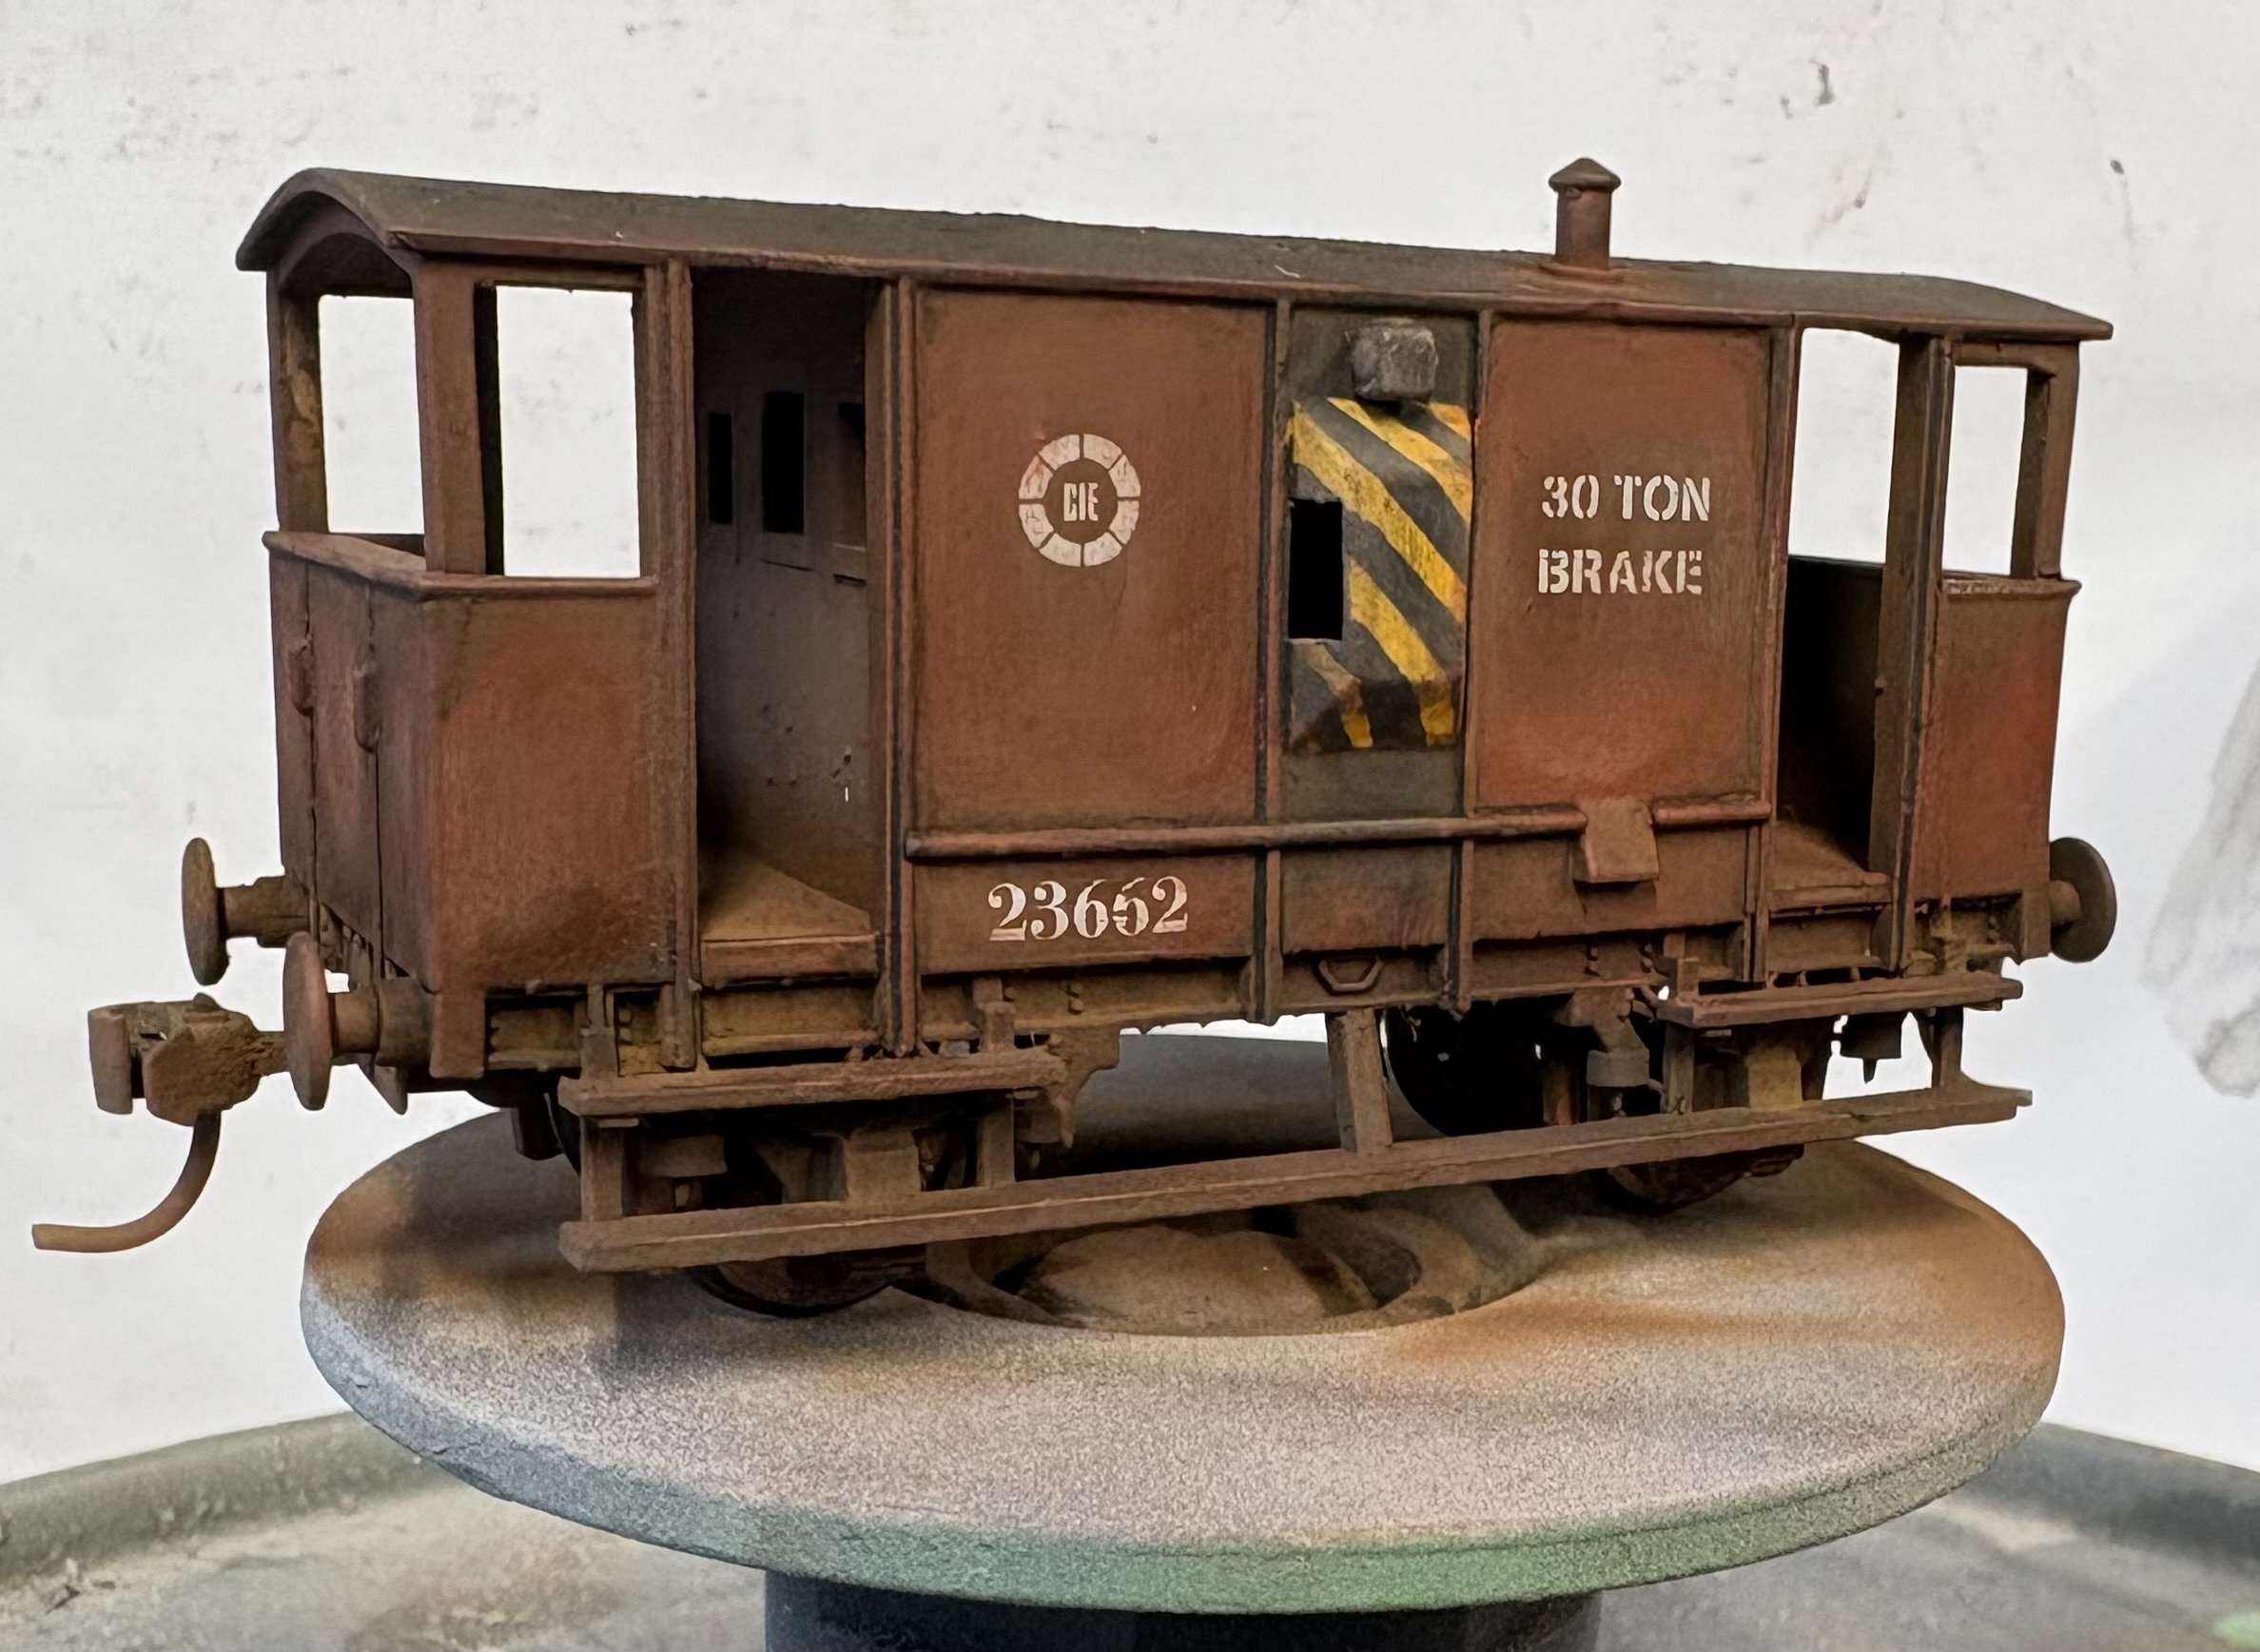
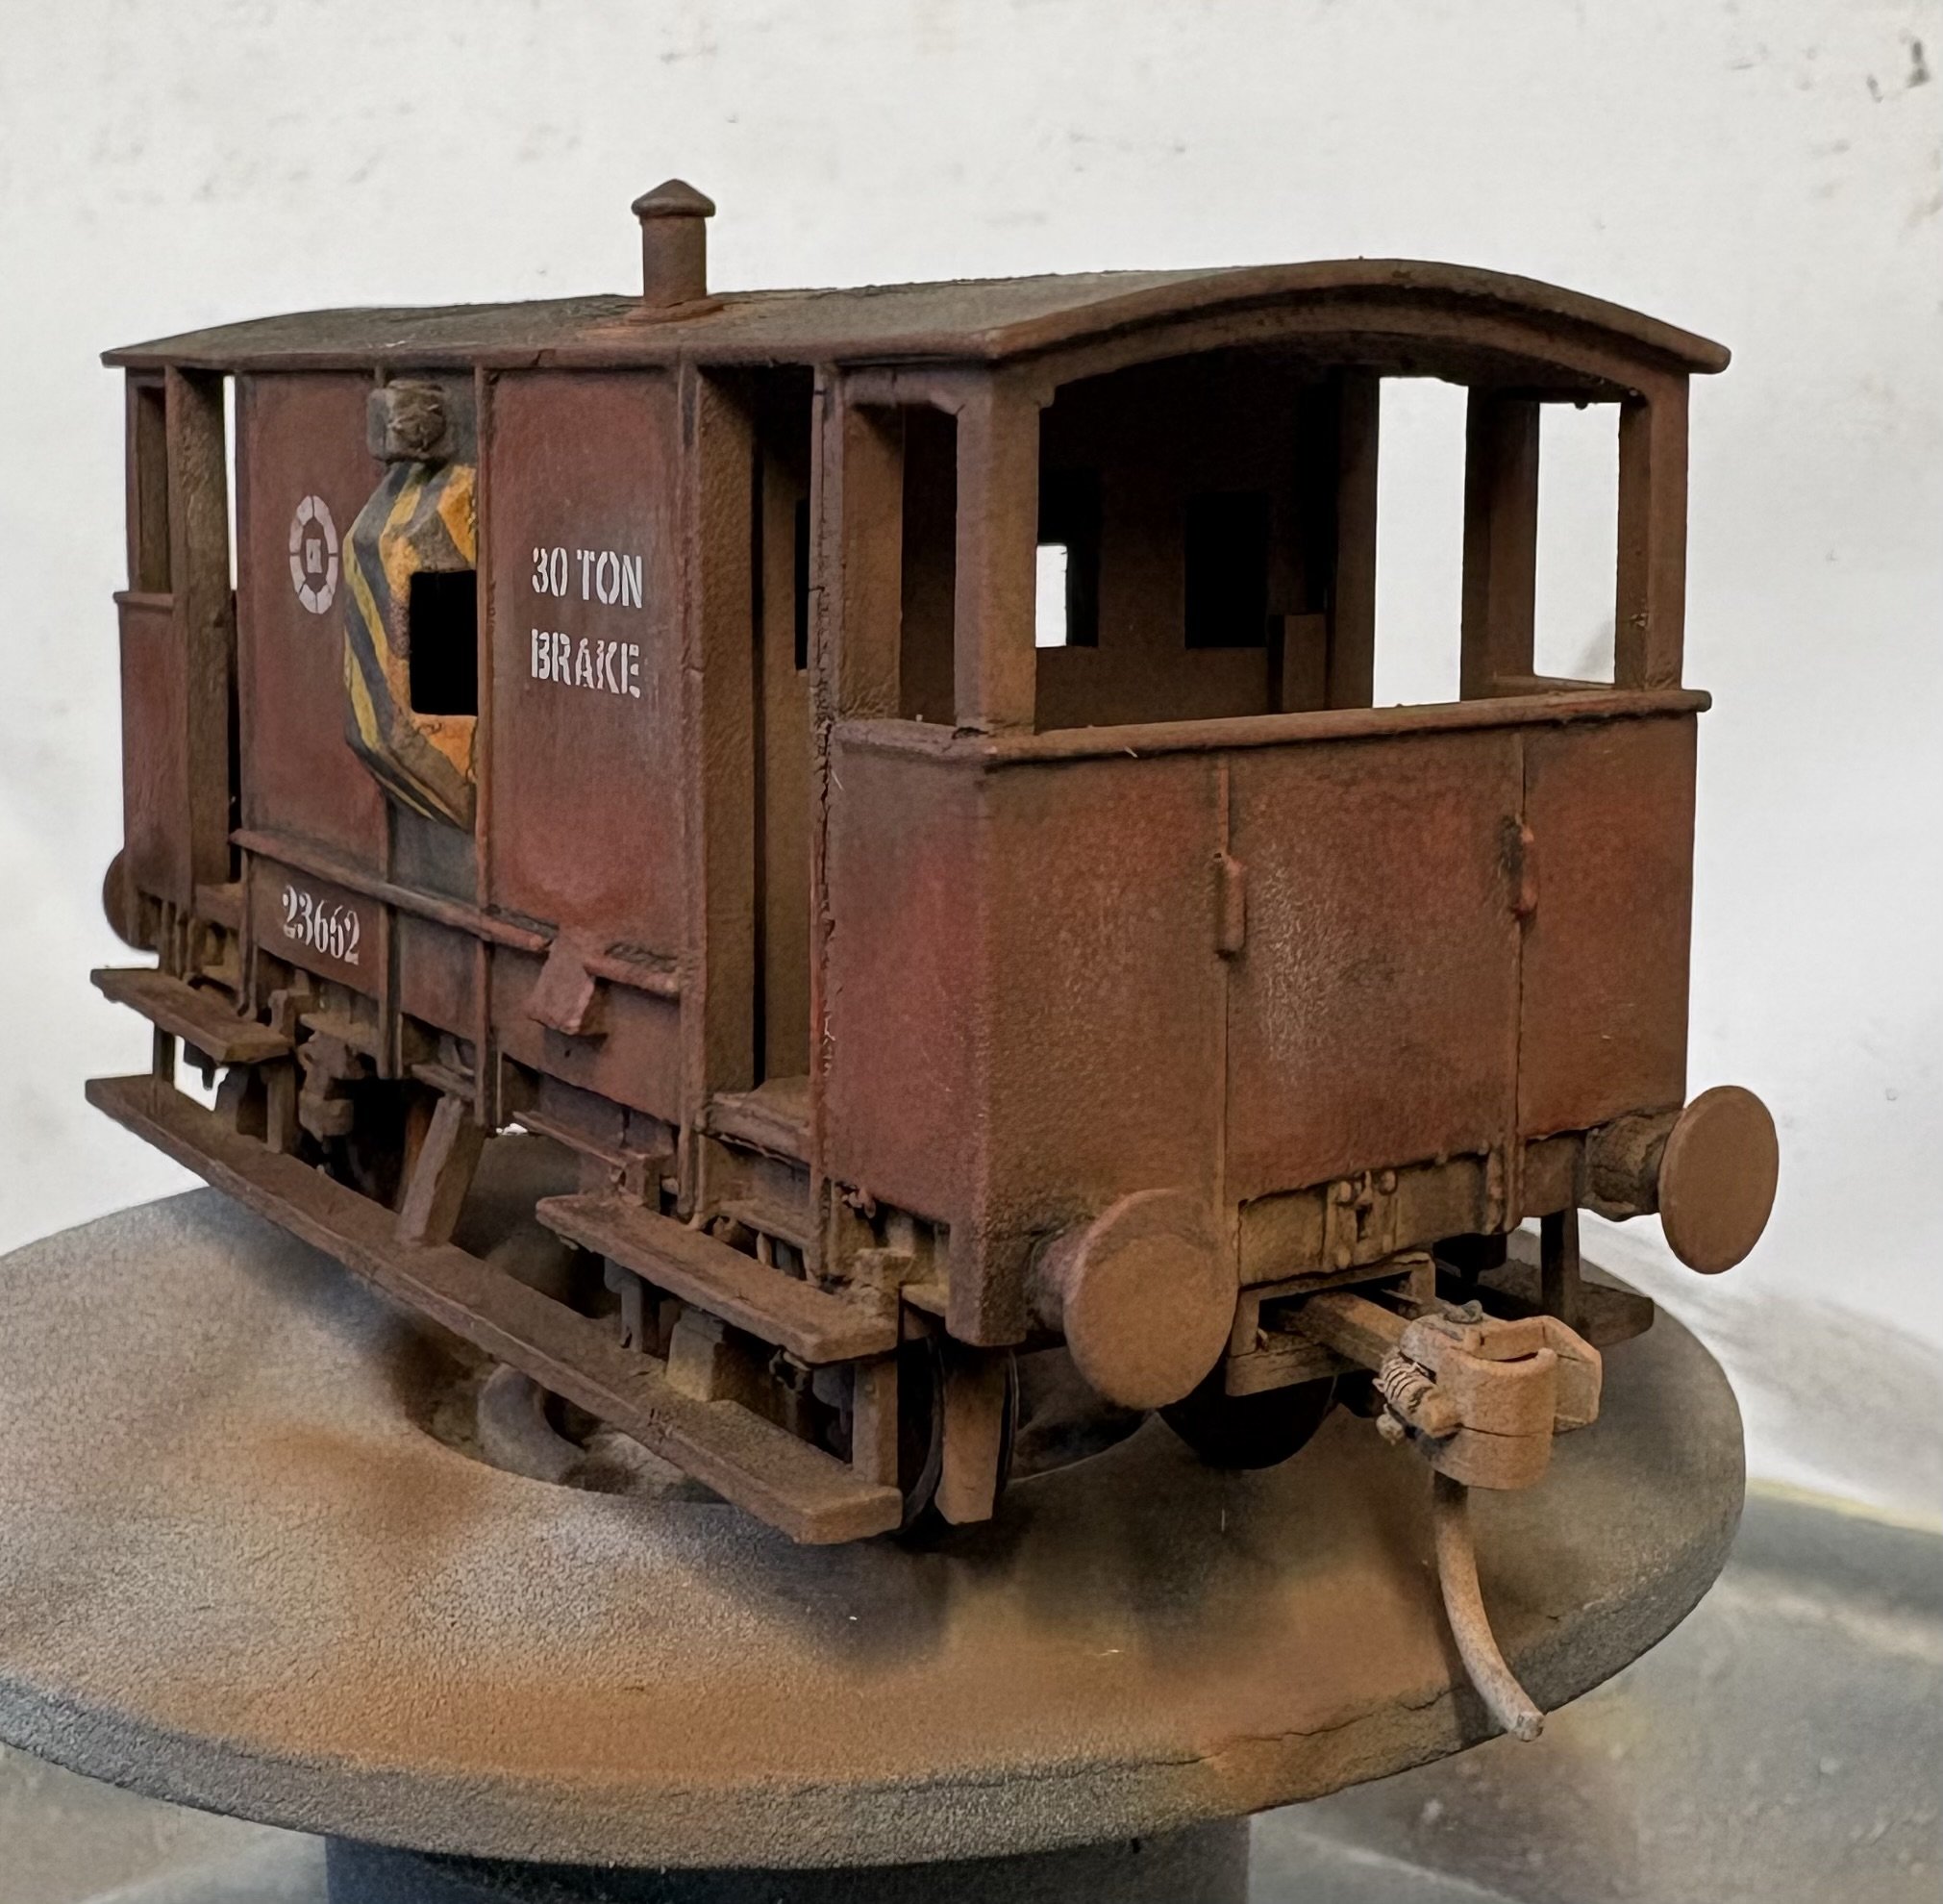
Dug out 4 Dapol Tank Wagon kits and got them assembled, painted and weathered over the weekend.
Happy with how they look although 2 of them are not good runners! Think I’ll have to investigate but I’d say the culprit is a warped chassis.
Also got some silvering of the decals but I don’t think that looks too bad and adds to the ramshackle look! Besides, some more weathering would cover that….

-
10
-
-
A tired looking F7A unit near the end of its life….
This is an Athearn Blue Box unpowered unit, although I did fit it with a decoder to power lighting. I also fitted flush glazing and wire handrails.
Weathering was mainly MIG and AK washes with some airbrushing using Tamiya paints.
-
12
-
-
25 minutes ago, cudf said:
Hi, @irishthump yes thanks, I went ahead and tried the #19, but I did need to bend the pin up quite a lot in order to get it over the magnets. Seems to work ok now.
Is the NEM pocket at the correct height? Also sometimes the Kadees droop a little in the pocket and that can be helped by inserting a small shim under the coupler.
-
16 hours ago, Horsetan said:
He just likes buying loads of stuff and showing it off.
Not as simple as that. He's looking for engagement on Youtube, and that's it. His ragebait thumbnails are proof enough. Now I know that's part of the game for content creators but his reviews are pure pants. He's always glaringly ignorant of the prototype being modelled, and his barely-contained glee at finding a problem with the product being reviewed is grating. His standards also seem to shift from model to model, and I'm sorry but I refuse to take seriously a review of any loco that has been ran on that layout of his. I don't care how many times he says he hoovers the carpet, it's still track poorly laid on carpet with loose ballast all over it!
End of rant.
-
2
-
 1
1
-
-
47 minutes ago, Warbonnet said:
Well I can confirm that it did absolute wonders for the sales on heljan.com, as it really brought the news of Heljan going direct only to the masses, who then checked out the site an saw the prices on offer. Oh, and the reasons why.
We were delighted with it, TBH.
Cheers!
Fran
Good to hear it! Treated myself to a class 47. Delighted with it.
-
2
-
1
-
1
-
-
On 3/4/2026 at 10:40 PM, DJ Dangerous said:
Surprised to see Jenny Kirk ranting and rambling so much:
Although, she did try worming her way out to some extent in a subsequent livestream, but just comes across as desperate to support her previous rant:

Yeah, I watched the original video and I was cringing by the end of it. I actually like Jenny Kirk's videos, she produces pretty decent reviews of rolling stock and other products, nothing like the crap Sam's Trains vomits out on a daily basis. But that video devolved into nothing more than a rant.
-
1
-
-
On 15/4/2026 at 6:06 PM, cudf said:
Hi @Noel @irishthump
I've been looking up this thread and wondering if you have added Kadee couplings to the Hattons (now Accurascale) Genesis 6 wheel coaches and what type did you use
Hey cudf, sorry for the late reply. I don't own any Genesis coaches myself, but from what I see they are fitted with kinematic NEM pockets, so any of the standard NEM Kadees (size 17-20) will do the job. The exact ones you use will depend on how close you want the coaches to be coupled and how tight your layout curves are.
-
1 minute ago, lucas said:
Here it is sitting on top of my Murphy/Bachmann 181. The distance between the bogie pivots and the overall length are each too long, so it would need a ~10mm slice cut out of the middle. The bogie wheelbase and wheel diameters are both <1mm off, so it could work. But then again they are a bit of a pain to regauge (I've been putting off regauging this 181 for a while).
OK. I must have mis-remembered that one!
-
3 minutes ago, lucas said:
This is good information, thank you John!
To be honest I'd been looking mainly at UK models for a donor chassis without really considering much else. I reckon I'll need to take a closer look further afield before deciding what to do.
I seem to remember at least one poster here who used the MM 141 chassis under a Silverfox body, personally I would'nt have the heart to butcher a 141!
In the past I used an Athearn F7 body with Co-Co trucks from an Atlas loco under an A class body. I think one of the small shunters like the SW1500 might be a good fit, and as was mentioned easy to convert to P21.
I have a few spare Athearn parts floating around at home, I could look through them and see if there's anything of use to you if you like.
-
1
-
-
Wonderful finish on the print! It certainly looks the part.
What are you planning to use for the chassis?-
1
-
-
13 hours ago, Ironroad said:
Nostalgia, is not going to serve or save the hobby.
This is an important point.... which I will develop into a bit of a rant!
Model Railways IMHO has always suffered from its older demographic being reluctant to move forward and embrace technology. I mean look how long it's taken DCC to be as widely adapted as it is now. I think a big part of its more widespread acceptance is the likes of Accurascale offering premium light and sound on their locos. Fear of missing out has resulted in many diehards dragging themselves into the 21st century. My point is the hobby, or more specifically those in it, need to adapt as best it can under the circumstances, ALL retail is moving increasingly online and model railways won't be able to resist it for much longer. Also, we can deny it all we want but the hobby is in decline to a certain extent when it comes to the sheer numbers of hobbyists.
-
4
-
1
-
-
8 hours ago, Mayner said:
Wondering whether West Clare Wander and Irishthump actually read the RM Web treads on the Accurascale acquiring Heljan and or the "Independent Retailers" campaign, my impression from reading both threads is of a balanced discussion/sharing of opinion on the Accurascale take over of Heljan, pushback from the major boxshifters and its potential impact on the hobby in the UK. Majority view appears to be supportive of Accurascale acquisition of the Heljan British Outline range and critical of the major boxshifters in particular Rails for their treatment of Heljan and throwing a tantrum at Accurascale switching Heljan to a direct sales model.
Not sure how this relates to 'know it alls telling everyone else what's really going on" or being a 'pretentious bunch", personally I found the RMweb mens mental health group friendly and supportive while I was going through a difficult time during the last few years, or maybe I have spent too much time as an Irish man living and working in the UK and further abroad and I have learned to appreciate people who 'speak their mind".
d
As a matter of fact I read both threads in their entirety. The original thread was locked because of several snarky, completely off topic comments from exactly the sort of people I was referring to. The second thread IS a balanced discussion, but I'd say the mods will have to keep a close eye on it.
The "pretentious" sort of course make up the minority (thankfully) but it doesn't take too many bad apples to make things unpleasant, and there were plenty of them putting the boot in without knowing the full facts, calling for boycotts or Accurascale and Heljan products, throwing the baby out with the bathwater type bullshit, especially at the start.
-
3
-
1
-
-
6 hours ago, west_clare_wanderer said:
Ha. Everything 'over there' seems to descend into petty minded squabbling. With know alls telling everyone else what's really going on. I do find it somewhat amusing.
I find them a pretentious bunch over on RMWeb. I browse it a lot but steer clear of engaging them.
-
2
-
2
-
1
-


Graham's Workbench
in Workbench
Posted
And the last of my 42’ Ferts are also finally finished. That’s the full rake of 8!!!