daryl43068
-
Posts
59 -
Joined
-
Last visited
-
Days Won
1
Content Type
Profiles
Forums
Events
Gallery
Blogs
Everything posted by daryl43068
-
Hi Noel, trick of the light. My light tends to wash out colours when you photograph models. The darker side is more true in real life. Cheers Daryl
-
Thanks for all the positive comments guys, really appreciate it! Cheers Daryl
-
Hi All, Sprayed the orange today, and with the black and the white stripes, it seems to have 'calmed down' (excuse the bad light) I have also picked out the door handles and grab rails in black along with the window bars in silver, along with the gangway door handle, And I have also weathered the roof. The silver patches are where the Maskol was. The rusty effect was created using Humbrol weathering powders (Iron Oxide, Rust and Dark Earth). I then gave the roof an overall dusting of Smoke weathering powder, with the odd stray Rust/ Dark Earth getting in creating some variation. Next step is to gloss the bodysides ready for the transfers. Cheers Daryl
-
Cheers Enniscorthyman!
-
Fantastic work there!
-
Hi All, Not been able to do much recently, but managed to do a bit today. First up was to create the peeling paintwork on the roof. Humbrol Maskol was applied in various patterns to create the missing bits of roof paint. I really struggle to do 'random' patterns but this photo on Flickr helped. I haven't been ale to find a photo of 3188's roof in service, but as the coach is modelled near the end of its working life, the roof will be peel a bit but not excessive. The roof was sprayed Railmatch 261 Virgin Grey, so its not pure black. The white stripes were masked using Aizu 1.0mm x 5m Micron Masking Tape. The bodysides, ends, under frames and bogies were sprayed with Humbrol 33 Matt Black. The Humbrol paint is absolutely awful, creating a really odd finish. I have googled problems with the paint, and numerous people have reported various problem with the paint so pretty confident its not my airbrush/ me. I've flattened the overspray on the side where the orange will go, and was quite surprised how easily the paint came off. I'm hoping the finish of black will calm down after varnishing but am tempted to sand it back and re-do it with Railmatch 205 Black. Cheers Daryl
-
The 350 has a gangway on the front. Not familier with the 29000s, so a quick google search of them, and I would suggest a Hornby Class 466 'networker'. Closest you could get without surgery, doors are close, window arrangement not far off. Downside is the coaches are too long, so will have to cut and shut for a scale length, and the Newtorker only comes as a two car, so you would need two sets for a 4 car, but possibility of using the middle cut out bits to replace the cab ends to create the centre coaches. Link for Hornby Class 466 (Just using the website/ item as a guide, not saying buy this etc...) Hope that helps
-
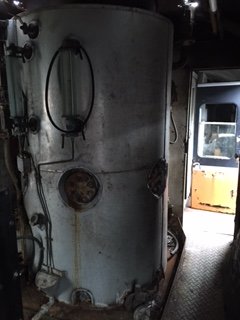
Hope I've got the right colour, started painting my boiler silver! Not that it stands out much... I've took the plunge to add the gangways now, before the coach enters the paint shop. The inner edge of the gangway is painted Railmatch Weathered Black (412), with the floor painted Railmatch Oily Steel (415). I will mask over the end of the gangway before spraying. This evening I attempted to model the suspension arms either side of the gangway, but I couldn't neatly and accurately reproduce them. Therefore, I think it would look better without them, than something there that looks odd. Cheers Daryl
-
Hi All, Many thanks to UP6936 for allowing me to post his photos!

-
Thanks very much! I would, but there not my photos, but will ask
-
Thank you all for the kind positive comments! Cheers Daryl
-
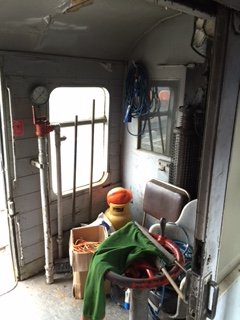
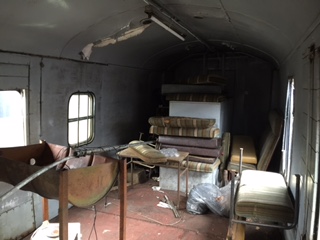
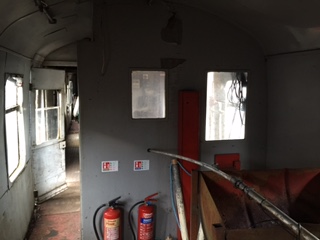
Hi All, I've modelled a basic interior, I've not gone to town on it as won't be seen much. Many thanks to UP6936 for some interior photos, and those who have uploaded to various sites, I've very crudely 'mashed some bits into a sort of engine shape' from bits in the scrap box. The boiler is a wooden dowel wrapped in thin plasticard sheet. If you get the right angle, you can make out the engine inside. If I come across a toy tractor with a salvageable engine I will swap it, but for now, not going out my way to find one. The through air pipes. Had to make a slight compromise, instead of the pipes hanging down, they are glued to the underside of the solebar. I've used .64mm plastic rod, which glues to the solebar better, but wont hold its shape as well as metal wire. And an overall shot. I've cut a bit off the gangways, so they stick out less. They aren't glued on yet, held in place just long enough for a photo with a bit of masking tape folded over behind. Cheers Daryl
-
Hi All, Nearly all of the details added, with the buffers going on this afternoon, One thing about the gangway, it seems to stick out a fair bit, so might have to trim it down a tad, as compairing to the real thing, the buffers are level with the gangway. Cheers Daryl
-
Looking good George!
-
Hi All, Little progress due to work, but managed to add a few more details. Behind the bufferbeam is a box of some sort, I assume because the buffers are spaced wider apart. I have also stated to add the through air pipes that dissapear under the solebar, but I accidently knocked one off, so will have to rethink on how to add those, or use plasic rod indead of metal wire. The moulded buffers have been removed, ready for some white metal versions modelled in the extended position. Cheers Daryl
-
http://irishrailwaymodeller.com/showthread.php/5462-124-167-and-186-the-final-days-of-the-Irish-railway
-
Just had a look at them, many thanks for posting! Nice shot of an ex-works GSV in there. The orange looks quite bright in your shots, so think I will go down that road and tone it down with weathering.
-
Interesting, that ex-works GSV looks like it has Mk3 window frames on the doors, never seen that before.
-
Hi All, A bit more progress, the sides have had a quick waft of white primer before spraying with Humbrol White (34). The Humbrol was only sprayed where the two while lines will be, it doesn't photograph well! The ends of the coach has had the gangway doors masked of before spraying the white. I was unsure whether the white and orange wrapped round onto the ends or not. This photo of 3188 by The Wanderer shows how I'm modelling the coach, and the stripes don't seem to wrap around, but I have found further photos of 3188 in the UK, with wrap around stripes. The roof has been sprayed a silver colour. This wont be the final colour, as I've ran out of Railmatch Falcon Grey, which is a very dark grey, almost black, as flicking through photos, the roof does seem a different colour to the bodyside. Some GSVs seem to have suffered worse on the roof than others. This photo by metrovick shows this nicely, the first GSV having a patch roof, the second looking in better condition. Unfortunately, I haven't found any photos of 3188's roof, and undecided whether to make it patchy or not. Hopefully, the photo of the test coach will make it clear why I sprayed the roof silver. The patches were created using Humbrol Maskol, a vile smelling liquid that dries to a rubbery finish, to create a mask. This blobbed onto the roof and then sprayed over with the final colour and peeled away gives the impression of peeling paint. Cheers Daryl
-
Hi Harry, which undercoat was the bottom one (attachment 23315)? Looks quite close to the craven on my screen.
-
Hi All, Been playing with the test coach again, this time trying various undercoats to see if it makes a difference. I tried White, Grey, Brown and Black. Took photos outside with the DSLR, Black Brown, White, Grey, I personally cant tell much between them, maybe the brown or the black. While spraying the orange, only the white stood out as different on the 2nd coat, and at a 3rd coat there is not much different. Back to the GSV, the door lines have been added to the 'new' doors. I used a scalpel and a set square to get the lines, and to define them a tad more, used the corner of a square file over the lines just to enhance them a bit. And door hinges and handles have also been added. That wonderful colour for the gangway doors has been applied, from an aerosol. For reference it's Plastikote Fluorescent Red. And the gangways themselves have been made up, they are Comet Models LMS Suspended Gangways. My plan is to stick the gangways on after painting, to avoid any missed bits. All being well tomorrow, will start spraying the white for the bodyside stripes. Cheers Daryl
-
Thanks for that DiveController, I should have pointed out that my 071 is MM0077, in IE livery. I've brought a humbrol wash today to try and tone it down a bit. Will play with the test coach and have a go. Cheers Daryl
-
Cheers David, Fortunately my paint coach had some grey primer already on it, so this is the grey side, Thanks Popeye, I was planning a weathering wash. I have been looking at various pictures of Irish stock in the mid 2000s, and it seems every coach is different. The orange does pretty much match a Murphy 071. It must be one of those things, peoples interpretations, how the camera takes the picture, computer screen etc. Cheers Daryl
-
Hi All, Many thanks for the background information, always nice to know background knowledge about a project! Not been able to do much recently, but a trip to an automotive paint supplier today means I got some orange mixed into an aerosol can. It's RAL 2011, which is the shade used on the Mk3s, not sure if its the same shade on the GSV or not. I've tested a bit on my scrap coach I use for testing paint etc. Its applied to a white primer and is positioned next to a Murphy's Craven. It looks a tad bright to me, hopefully will tone down with a bit of weathering, unless I've got the wrong shade! And I do apologise for the terrible light. I should point out I'm modelling the coach around 2005, so the last few years of mainline service. In other business, the coach has been through various stages of filling and sanding, and should hopefully be ready for paintig in the not so distant future! Cheers Daryl.
-
Thanks very much for them Popeye!