
2996 Victor
-
Posts
348 -
Joined
-
Last visited
-
Days Won
2
Content Type
Profiles
Forums
Resource Library
Events
Gallery
Blogs
Store
Community Map
Posts posted by 2996 Victor
-
-
9 hours ago, jhb171achill said:
The weathered version.

Superb!
-
 1
1
-
 1
1
-
-
35 minutes ago, Tullygrainey said:
I used bits from an MJT wagon compensating fret
Thanks, Alan, that's ingenious- I've got a few of those frets so I might have to give that a go!
Cheers,
Mark
-
 2
2
-
-
2 hours ago, Tullygrainey said:
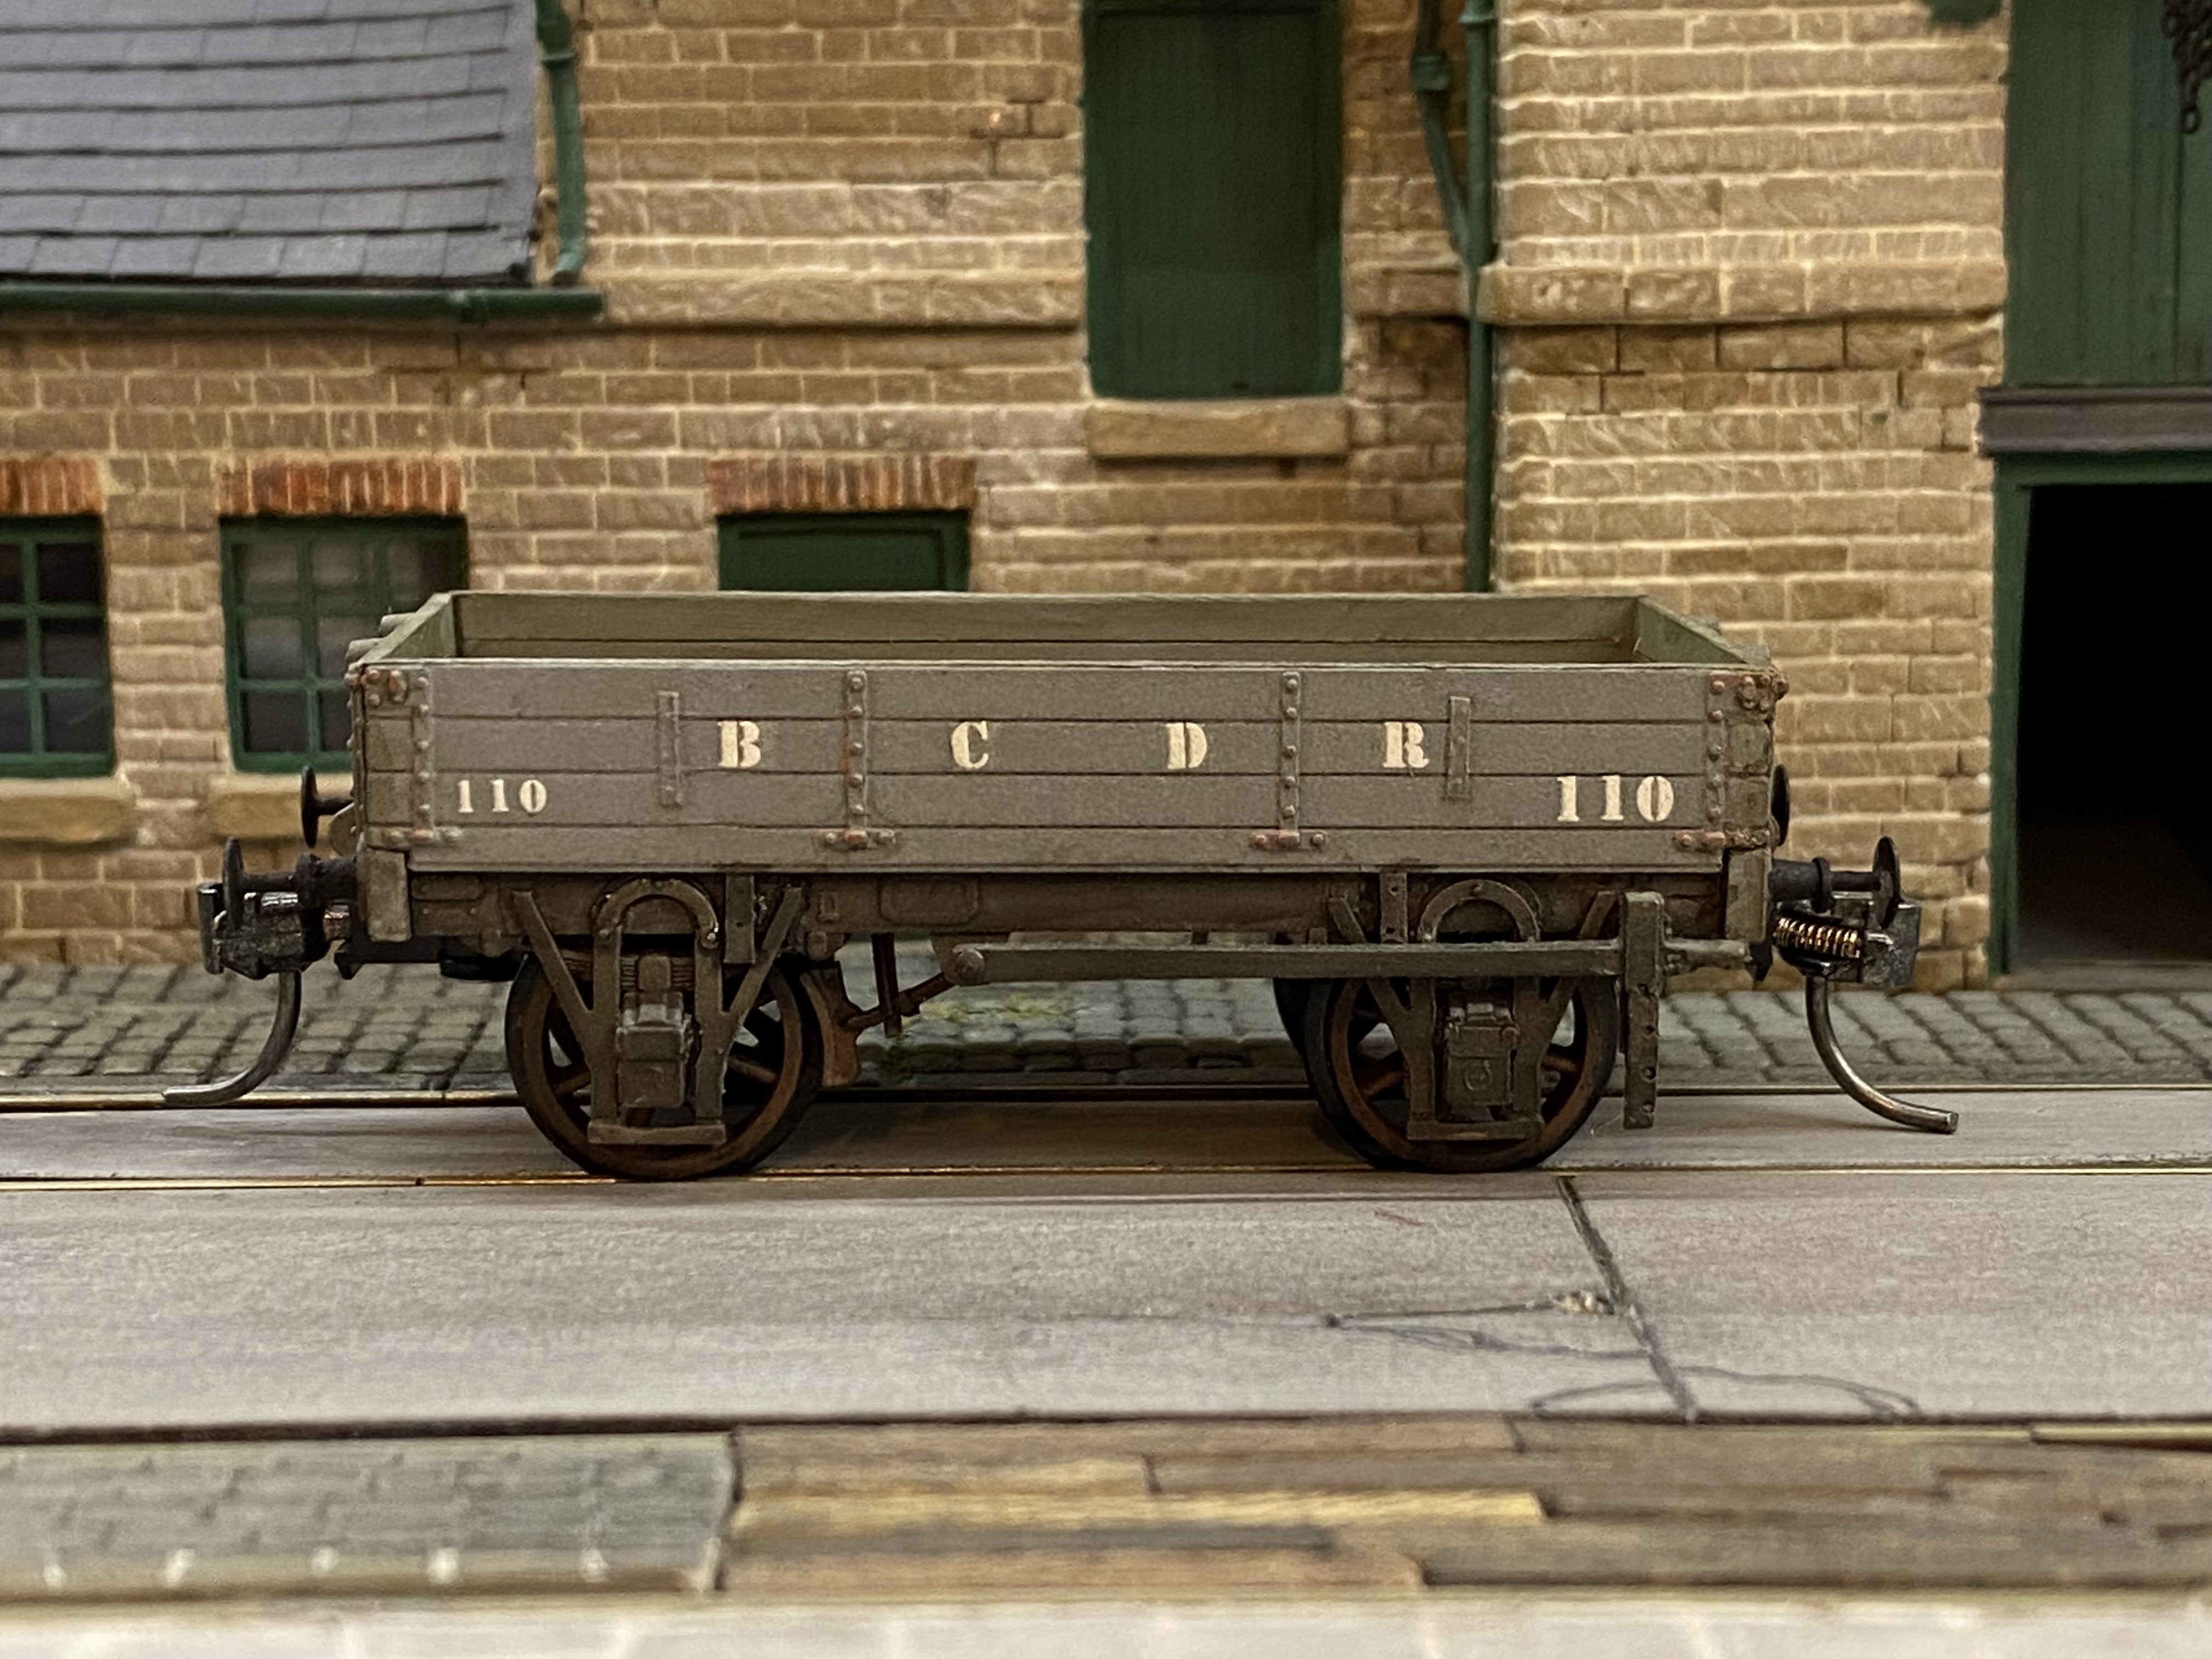
I'm enjoying this thread. Using the Slaters 4mm kit for a MR 8 ton 3 plank dropside and working from a photo in Des Coakham's BCDR book (Colourpoint, 2010, pg 207), I had a go at a BCDR 8 ton open
BCDR 8 ton.HEIC 821.18 kB · 3 downloads
Whoops, not sure what happened to the pic there
Excellent - that's a fantastic result! How did you create the typical BCDR outside axle guards?
Cheers,
Mark
-
1
-
-
7 minutes ago, 2996 Victor said:
I wonder if their MR box van has any milage in it for converting. Admittedly, it's an assymetrical design so you'd need two kits to splice together, but the heavy outside framing is in character.
Maybe not as the door is X-braced!
Slater's kits are back in production, their website is here bizarrely about twenty minutes down the road from me!
The MR large cattle wagon might be cut-down-able, though!
Just now, Galteemore said:I built one years ago for a UK outline layout and it does have a vaguely Irish vibe - especially at the ends.
Interestingly, one Lot had roof doors!
-
2 minutes ago, jhb171achill said:
it’s an old Slaters kit. I might get another and put vertically-planked doors on it - that would better resemble what it’s meant to be an approximation of. But it’ll do for a quickie job!
I wonder if their MR box van has any milage in it for converting. Admittedly, it's an assymetrical design so you'd need two kits to splice together, but the heavy outside framing is in character.
Just a thought!
-
1
-
-
18 minutes ago, jhb171achill said:
My attempts at hand lettering would be somewhat inferior to putting a spider in a pot of light green paint and having it walk across the wagon side!
 I know what you mean! I used to be able to hand-letter quite passably but dimishing eyesight has, I suspect, put paid to that!
 ")
Excellent use of the (Derby) Midland wagon kit - Slater's, I'm guessing - it really does look the part with the tarp.
Cheers,
Mark
-
1
-
-
Excellent work there, if I may say so - the wagons all look resplendent in their grey as does the carriage on its green. For lettering, are you going to use transfers or hand lettering?
Cheers,
Mark
-
1
-
-
3 minutes ago, jhb171achill said:
Got sick of seeing this little DWWR beauty unpainted, so out came the brushes tonight! So here’s its last time sans paint and grubby weathering….
Looking forward to seeing the results, Jonathan: you've beaten me to it as I've run out of my chosen shade of grey! Plus I haven't got any wheels yet.....
Cheers,
Mark
-
1
-
-
Fantastic work on the quayside inset track, David, and the harbour wall! Scribing in the stones is quite cathartic, but as you say best done in chunks
Cheers,
Mark
-
1
-
1
-
1
-
-
20 hours ago, jhb171achill said:
Yes - this was commonplace in makers’ photographs, to provide contrast. While it was seen amongst a number of British liveries, it was very rare in Ireland for any type of wagon to have black ironwork unless the wagon was black itself, as many early GSWR, DSER & Donegal Railway ones were.
The rule on Irish railways was almost always that ironwork was body colour. There were very few exceptions.
Same with makers photos of locos with white connecting rods, or white rims on carriage wheels - they didn’t run like that.
With no colour photography, black, white and numerous shades of grey were necessary on official works photos to show detail. Once photographed, the item concerned would be painted in its “proper” livery before delivery to its new owner.
Thanks, Jonathan, I thought that would be the case but in all things, "ya never know!"
particularly, as you say, when it was not uncommon among British companies - the Somerset & Dorset Joint Railways and the Cambrian Railways spring readily to mind.
All the best,
Mark-
1
-
-
23 minutes ago, KMCE said:
there are some good photos on your Mount Bellew page 5
Oops! I'd forgotten that.....
 24 minutes ago, KMCE said:
I think it would be reasonable to assume a similar size for the convertible which should just fit between the uprights. Their lettering was quite large, so I would err on the larger size - ref page 104 Shepherd & Beesley for an image of the "Hurst Nelson" open wagon in DWWR livery.
Thanks, Ken, that's great - I'll go with that.
The Hurst Nelson wagon seems to have black-painted ironwork - would you say that was purely for photographic purposes? I've not come across any mention of it otherwise.
Thanks again and best regards,
Mark
-
1
-
-
10 hours ago, KMCE said:
Many thanks for the comments, and even I have to admit the wagons look good - well done Mark.
They do seem to improve with a coat of paint - somehow it helps to highlight the details.
With regard to the buffers, those short buffers you have would work well on the convertible and open wagons as they would have had shorter buffers due to the dumb buffer look to the headstocks - I use the shorter buffer for these, with the longer buffer for the cattle and Ashbury.
As to livery, I recall you mentioning your era was around 1900 to 1915? - if so, slate grey with lettering in white and plenty of weathering.
Hope that helps.
Ken
Hi Ken,
Credit where it's due!!! The models are superb. But a coat of paint certainly makes the details pop!
Thanks for the suggestions for the buffers - I've fitted the short ones to the convertibles and they do look good. I've also given those two a coat of grey, although looking at your pic - great two-planker, by the way - I think it's a bit pale.
My preferred era is 1905 give or take a few years either way, so I'd guess there's be a mix of DW&WR and D&SER lettering. How high do you reckon the lettering would be on the convertibles?
Many thanks once again and best regards,
Mark
-
2
-
-
The hernia surgery is healing up nicely, which has allowed me to make a little progress with the warehouses at the back of the layout, with the back halves added from 2mm mounting board to the end wing, and small extensions added to the back wing to bring the ridge tiles away from the backscene. I've done the same for Nos.4 and 5 Steampacket Terrace at last.
Hopefully more soon!
Cheers,
Mark-
4
-
-
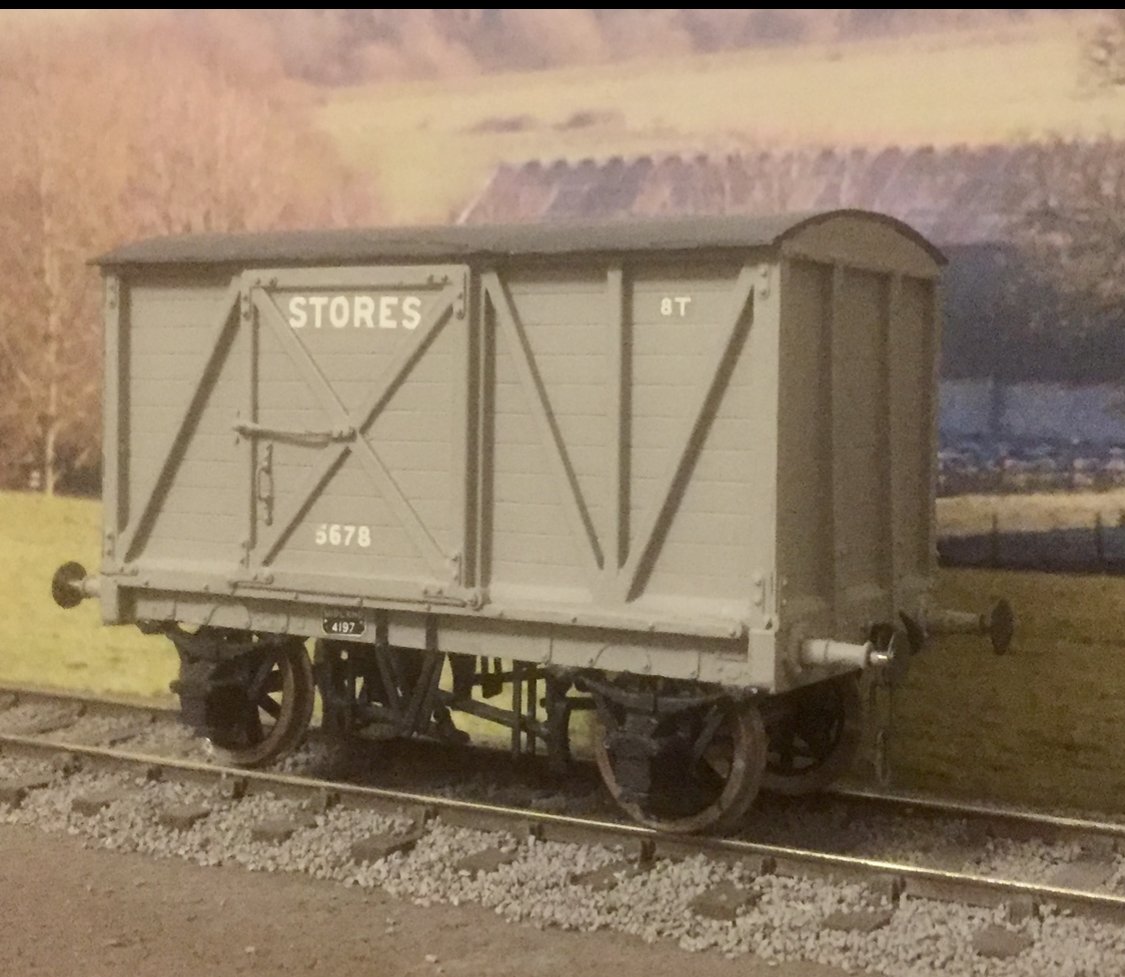
I chose to have the wagons without buffers and source some myself as I wanted to fit sprung buffers. I've got a stack of MJT steel buffer heads and springs and some Bill Bedford/Mousa Models 3D-printed housings, some Midland, some GWR. Here you can see a set of Midland round-based housings sitting in the headstocks of one of the cattle wagons:
Hmmmm, a bit short methinks! Comparing these buffer housings in the Ashbury Van with photos, definitely makes them look a bit short, so I've got some GWR carriage buffer housings on order to see how they look.Thinking a bit more about livery, Shepherd/Beesley barely touches on the subject of wagon livery saying only, "In later days wagons were painted slate grey with the company initials applied in large white letters". I presume this applies to both the DW&WR and D&SER eras? Any ideas?
Thanks for looking in,
Mark-
5
-
-
Interesting. Three or four years ago I used DecalFix, bought specially, on some Cambrian Railways wagon transfers from the Welsh Railways Research Circle - it was a disaster. The transfers wouldn't adhere let alone conform to details. Not sure who the decals were printed by, though, but they responded far better to MicroSol. The DecalFix left a nasty sticky residue as well, and I haven't used it since!
I do realise it's a case of what you get on best with!
Cheers,
Mark
-
1
-
 1
1
-
-
2 hours ago, Noel said:
Superb
1 hour ago, David Holman said:Well done Mark and we'll done, Ken!
8 minutes ago, the Bandon tank said:They really look fantastic. Have to get some of them.
Thanks, chaps! The accolades need to go to Ken @KMCE really - he's the real craftsman!
Cheers,
Mark
-
1
-
1
-
-
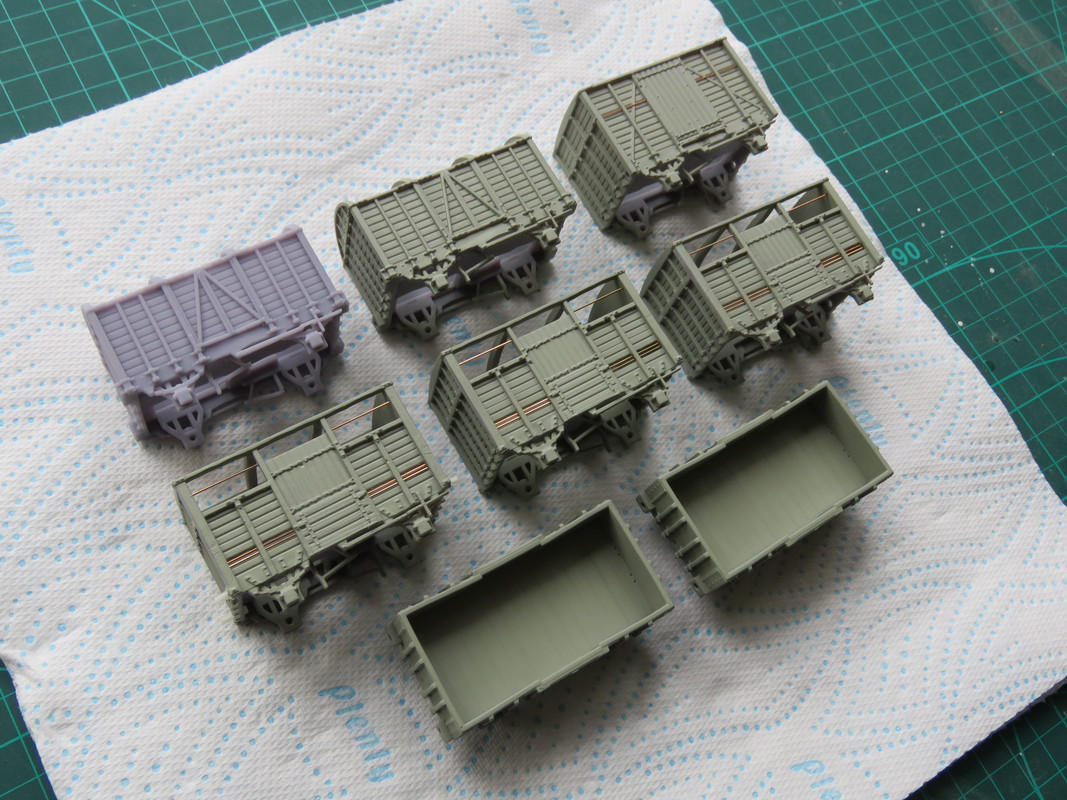
Hi everyone! Welcome to my new Workbench thread which will be focusing on DW&WR/D&SER wagons.
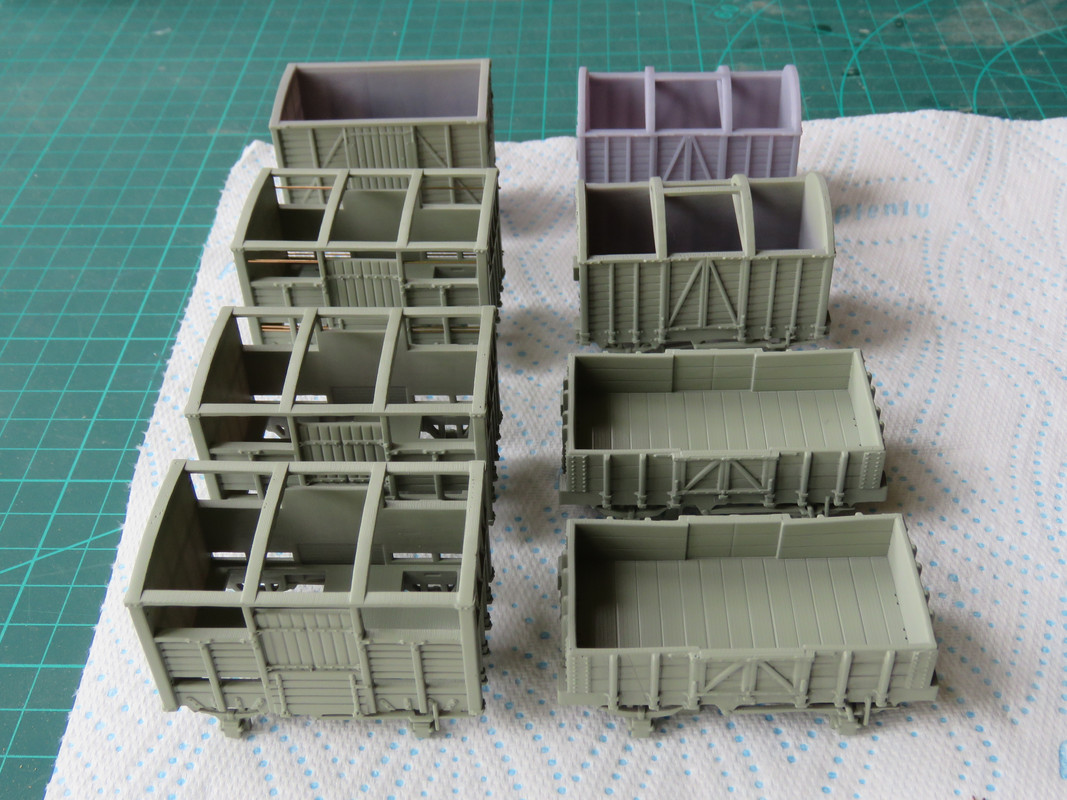
I was recently delighted to receive from @KMCE of this parish some of his rather excellent 3D-printed wagons, namely three cattle wagons, two convertibles, two opens and one Ashbury box van. The plan is that these will be 21mm gauge/P4 standards, with sprung buffers. I still haven't decided on couplings.....
Ken has done a really superb job on these wagons, and if you haven't got any yet then I'd really recommend them.
So, as a preliminary, they were all washed using fairy liquid and gently scrubbed with an old toothbrush, and then thoroughly rinsed off. The water was kept to a tepid temperature to avoid the risk of distortion. Here they are drying off:
Nice, eh?
Following this, most of them were treated to a couple of thin coats of my favoured primer/basecoat, which is Tamiya's AS-29 IJN Grey-Green in a rattle can. I think it makes an excellent base wood colour. Unfortunately, as you can see I should have bought two cans.....
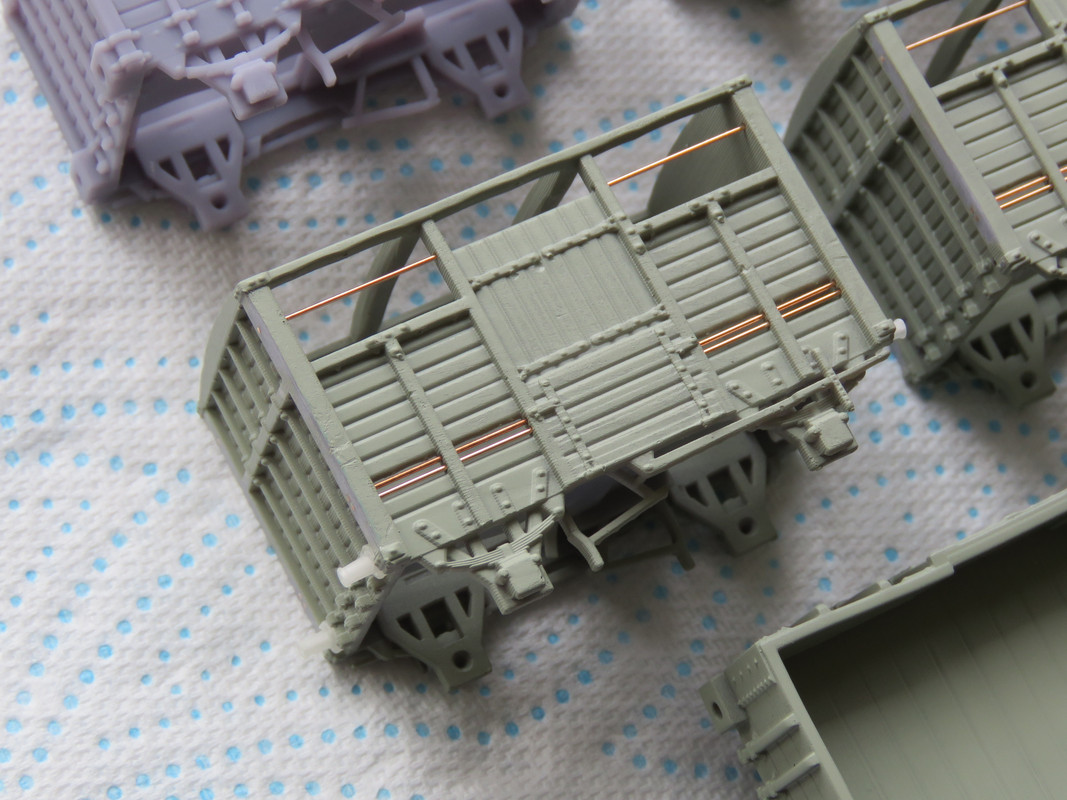
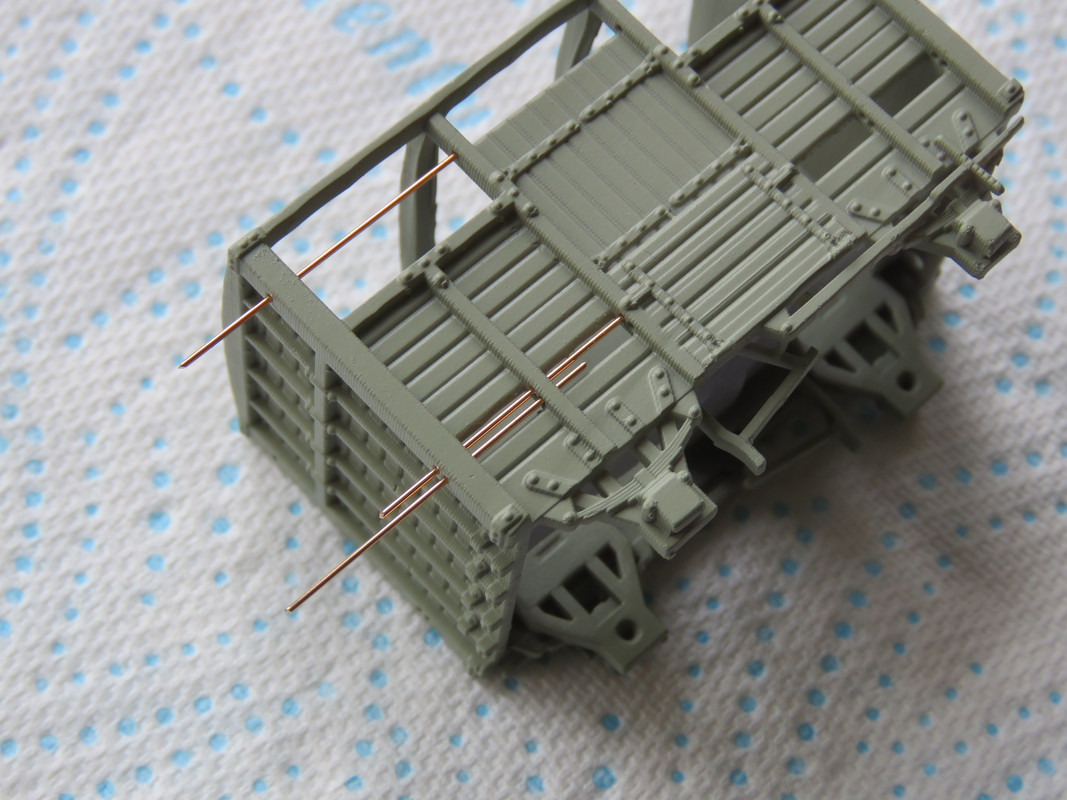
The eagle-eyed among you will notice I've already put the bars into the rearmost cattle wagon. Which brings me to:The bars in the cattle wagon are from 0.020" phosphor-bronze wire, and the printed-in holes needed just a little help with opening out:
Following which, the PB wire bars could be inserted:
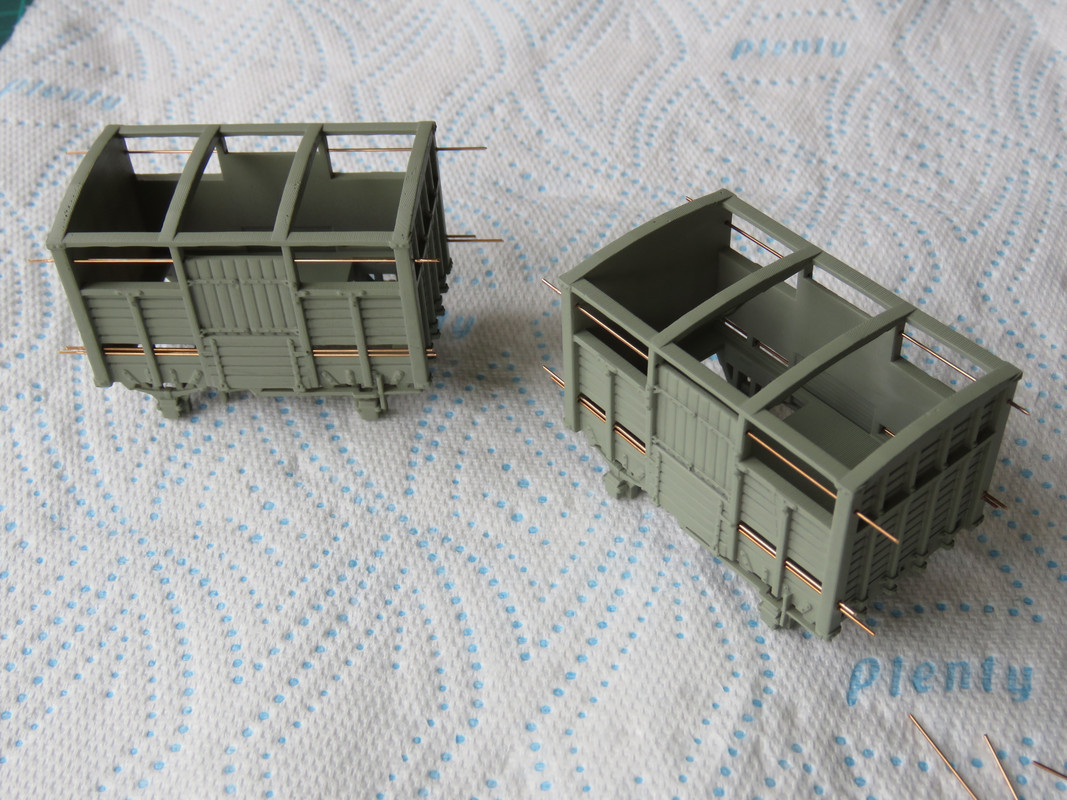
The cut inner ends located nicely in the printed-in holes so they didn't need any work.Once all the wire bars were in place, a tiny dob of extra thin CA glue was used to secure them:
And once the glue had cured, the excess wire was trimmed back with a set of side cutters, and then carefully filed flush with the wagon framing.Here is the set again, with the cattle wagons and the Ashbury Van (top right) having received their PB wire "bars". In the case of the latter, 0.015" wire was used.
That's all for now. As soon as I can get buffer housings fitted, it'll be time for painting and lettering. The choice of shade of grey is, as always, perplexing in the extreme!
Cheers,
Mark-
13
-
 4
4
-
-
Splendid! Perhaps an interior light to show off your work, perhaps not too bright as would befit a gas mantle?
Cheers
Mark-
1
-
-
4 minutes ago, Killian Keane said:
In Model Railways August 1978 there are drawings for two different MGWR 6 wheelers, I can scan these in if they'd be of use
Hi,
Yes please, that would be incredibly helpful, thank you! I'll PM you my email address.
Cheers,
Mark
-
1 hour ago, Galteemore said:
In terms of Shapeways, my own experience has been similarly mixed!
1 hour ago, Andy Cundick said:Quite agree about Recreation 21 their MGW brake 3rd hangs above my workbench as an awful warning about how bad things can be better approach is probably resin cast bodies.The North British Railway Study Group have done several wagons which need nothing in the way of tidying up afterwards just adding w irons and brake gear.Similarly Cam Kits do some Cambrian Locos with the main body in resin which exquisite.(just lining and lettering an "Albion" 240 ready for Expo EM),Andy.
I'm actually quite relieved that it's not just me.....! I've also had some great stuff from Shapeways, notably Coastline Models Cambrian stuff, and several other suppliers. Our own KMCE's DSER wagons are superb.
1 hour ago, Galteemore said:If you are looking at a cottage industry approach, might be some mileage in offering silhouette cutting or similar of the elaborate MGW coach side panels to use as overlays in the Jenkinson style of ‘panel and box’ build. By offering such panels, a huge amount of work would be saved, as the actual construction of the coach carcass is a fairly simple task.
This is one approach I'm looking into. I've had a look at silhouette cutters and they certainly have some uses, although as I understand it they're not really suitable for materials over 1mm thickness. But the layering approach has a lot of mileage in it for elaborate coach panelling and even outside framed wagons.
Cheers,
Mark
-
2
-
-
28 minutes ago, Northroader said:
On the coaching stock side, you could have a look at the 3D prints on Shapeways/Recreation 21 site.
Thanks - I'm aware of these, but I've had a few items from there and, while I don't like to berate a fellow modeller's efforts, I was really quite disappointed. Some wagon bodies were significantly in error when compared to known dimensions, and the print quality was rather poor. I recently ordered a couple more items but the print quality wasn't improved.
Best regards,
Mark
-
3
-
-
3 minutes ago, Mayner said:
Both the 60:1 and 80:1 gearbox and High Level 10x20 FE or 12X19 C (both 17,000rpm) motors should be suitable for a loco like an E on a fiddle yard to terminus layout.
80:1 should result in a slightly lower top speed than a 60:1.
108:1 is only really suitable for a shunting loco like a Pug, 03 or 08 diesel
Brilliant, thank you!
-
Dear All,
this is a tentative enquiry of my fellow modellers, and nothing may come of it. However, I'm thinking in terms of typical 6-wheel carriages and full brake, and 4-wheel goods wagons such as an open, a cattle, maybe a convertible, and a goods brake. I'm thinking primarily of 4mm/1ft scale with 21mm gauge, but of course if the designs prove feasible and can be scaled up or down, then that's something to consider as well.
I'm considering the various options for making these, 3D-printing being an obvious candidate, but also laser-cut wood similar to the freight car kits from America from manufacturers like LaBelle, Bitter Creek and Leadville.
All quite vague, I know, but at this stage I'd like to know if I'd be going it alone or if I might be over-whelmed with folks who could be interested.
Let me know!
Mark -
1 minute ago, Noel said:
Making trees is kind of addictive. Mix of plastic armatures augmented by seafoam fine branches and leaf material scattered on top after hair spray type glue. A light spray of brown before applying leaves gets right of any bright spots on the branches. Lots more to try more to learn, but its enjoyable. The risk is of overdoing it with too many trees
After scattering leaf material onto armature branches augmented by seafoam extensions
Sprayed with hairspray type of glue prior to sprinkling leaf material on
Seafoam branch extensions added to Woodland scenics plastic tree armatures. This could almost pass for a winter tree.
Very effective! More, please!
Cheers,
Mark-
2
-


Brookhall Mill - A GNR(I) Micro Layout
in Irish Model Layouts
Posted
Sitting on an old crate, perhaps!")