-
Posts
2,731 -
Joined
-
Last visited
-
Days Won
70
Content Type
Profiles
Forums
Events
Gallery
Everything posted by murrayec
-
Hi Dave I reckon they would only be run separately - analogue or digital. Computer scheduling is a good idea and probably the only way to set up timetable and keep an order to the system. DCC control systems should comply with the most compatible system over the different makes - we will have to look into this? The Royersford Modular Club Rules pdf document I posted earlier has a section on this- refer to pdf. murrayec
-
Hi Walter No, have not been back to it- building 7 DARTs at the moment, 4 on the go and 3 waiting for parts murrayec
-
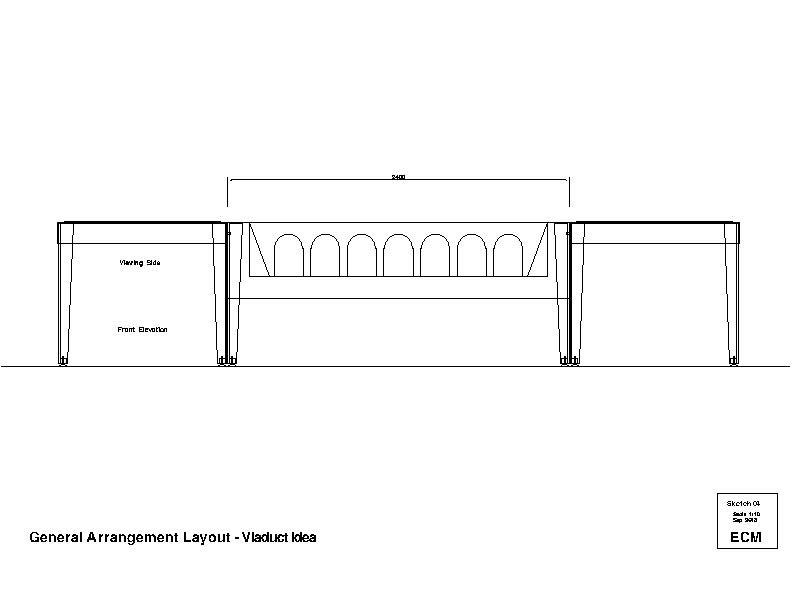
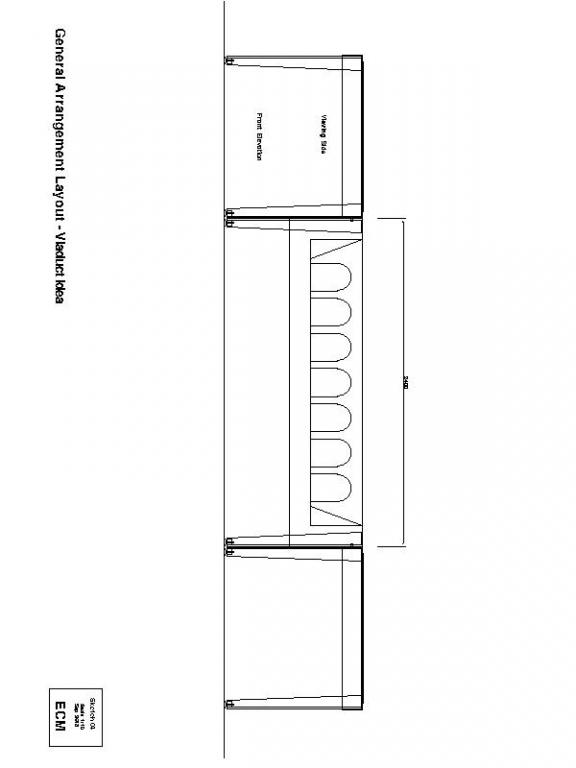
Hi BosKonay I just did a calculation on an 8 coach DART;- it is 2157mm long so going on this a station platform would be over 3 boards to allow for trains of 8 coach and the engine. Here is a sketch idea for a Viaduct and this design could be used for the Dalkey Hill Tunnel- the lower section would be the beach! The sketch is over two boards in this example. murrayec
-
Hi All Here is the Royersford Club Rules in pdf format;- Royersford MMR Club Rules-00.pdf These guys have it quite well worked out, this document refers to running trains and the methods they involve to do so- very helpful. Note; I have not done any editing on this yet Have a read and post your comments murrayec
-
Yes Walter When I saw that diorama in Parks Hotel I thought of modular system- it also spurred me on to get at the Martellow Tower thingie! murrayec
-
Hi irishthump Most modular systems seem to be running them by DCC. This will have to be discussed with the modellers that get involved- I think it would be great the have a dual system so that analogue could run to- there is a lot of analogue users out there. I know this might cause a lot of difficulty and discussion but we should at least look at the possibility and the problems. murrayec
-
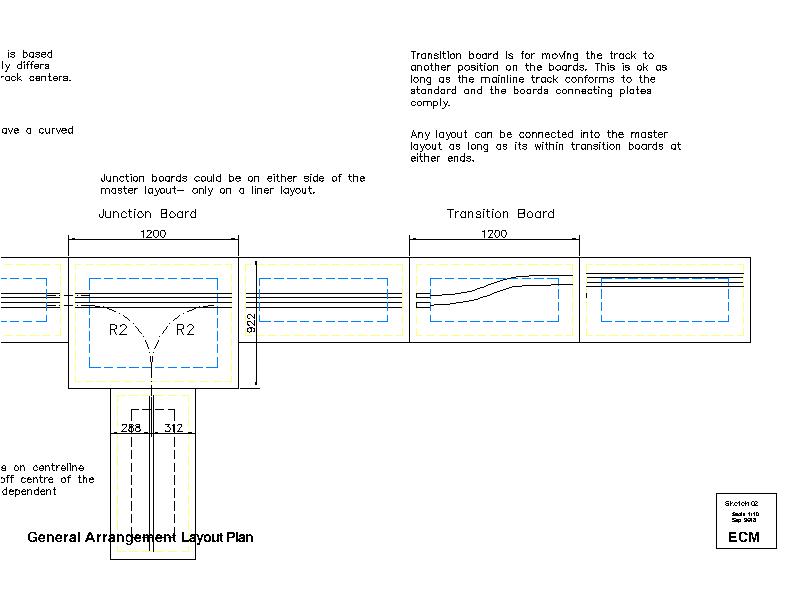
Ah just worked it out pdf drawings and spec sheets Modular OO Layout-00 Sep 13 2013 Prelim Drawings.pdf Free-mo Standard-00.pdf IRM NMRA 00 Modular Layout Spec - Prelim Sep 2013.pdf murrayec
-
Hi All Here are a few sketches and extracts from NMRA & free-mo for discussion;- Anyone know how to attach a pdf to a post? - I have the drawings and thinned out versions of the NMRA & free-mo specs in pdf format. murrayec
-
Hi Walter Looks excellent, your up and running already murrayec
-
Slightly bigger scale, though it is up country where some of our mythology stories are based 'Launches for Giants'... murrayec
-
I love planes, I have a few, remote control Spitfire and a trainer Bobcat. And loads of kits in boxes, not made yet and Boats- live steam launches murrayec
-
Now your talking; get the aviation thread boys on board? murrayec
-
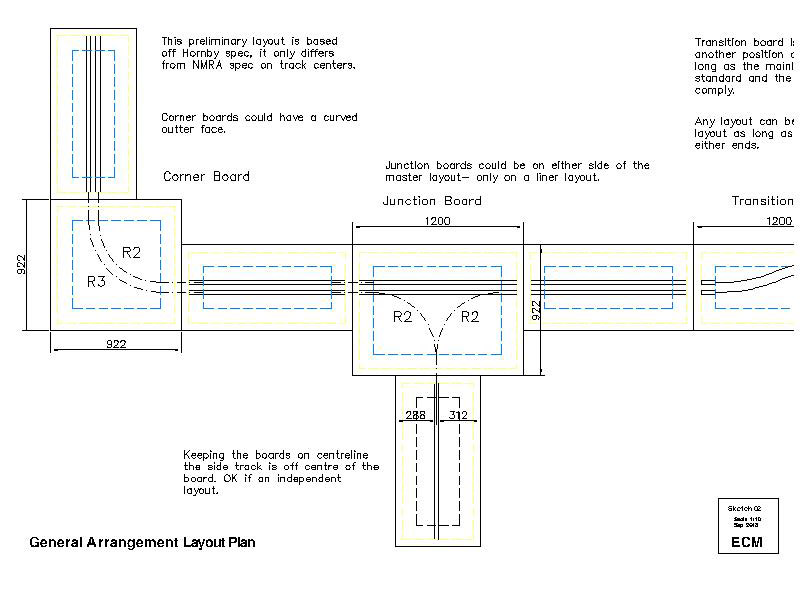
Not complicating the issue at all, more difficult means that there has to be a system in place for a circuit which involves the community track boards where a liner set up can be just modellers creations. A circuit layout will fit into small display space easier than a liner one. I should have a few preliminary layouts to look at and return comments. murrayec
-
Oh I got an enquiry from a non posting member asking if he built Kilkenny station could he connect up and see the DART run through on a special excursion!! murrayec
-
Hi Dave I'm committed- I cant wait to put the Martellow Tower on a 12x6 and to complete my drawings on Dun Laoghaire station I think it is a bit early in the planning stage just now for some to grasp what's is involved as the spec is not yet agreed. Also we should allow a bit more time for members to find this thread and come on board. Though no problem doing head count along the way murrayec
-
Hi Broithe That's a good point on the board abutments- length does not matter on a liner layout and will always work regardless of who turns up to show. A circuit has the problem of- for each modeller's creation their has to be an equal size creation or community track to close the circuit- a little more difficult? murrayec
-
Hi IrishModelRail I'd love to see that one of Donabate with the two estuaries, I'd love to see all your suggestions. You have the same problem I have, and I think most people into this idea- I want to build them all!! Move over to 'Modular OO Layout' thread in Irish Model Layouts and input your ideas Deadly we are up to Drogheda now- huge! murrayec
-
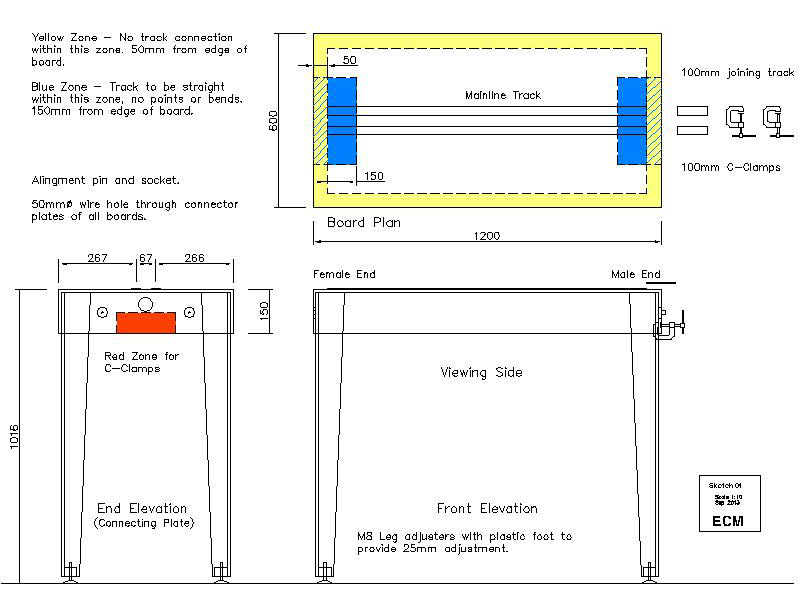
Hi Dave I going through the NMRA Module specification and think this is a good idea;- The track is left short 50mm at each end of the board, when the boards come together a short length of track of 100mm is inserted and fish-plated up- this means the track joins are 50mm away from the board joins. Insulated fish-plates would be the ideal to use for this, easy to slide in position with a tweezers. Legs should also have height adjustment bolts to level the boards What do you think? murrayec
-
I saw a youtube video of the first two DARTs sitting in the depot - I had the idea of a model of the shed with one side open with this scene and another of a DART under service or re-painting! Some say Dort in the south but the most I hear is Daaarrt! murrayec
-
Hi That other link BosKnoay posted - take a look at the photos on the page and read the text to the side. I think their simple concept is good? http://royersfordmodular.org/Modules.html murrayec
-
Hi Rich The point about board standard- this would be part of the specification and modellers would have to comply for it to fit in? I was talking with a fellow modeller this morning about the idea and we thought of this;- 'Bring your Train' to get the public aware and support the concept, we invite people to bring their trains along to the show to run them. The trains are put into a queue, hooked up to rolling stock and then run through the layout! This is really no different to us running our trains on it, plus it gets everyone involved. murrayec
-
Hi Rich Yes I mention that in a previous post- we would have to set-up some community boards;- A. 90Deg bends B. A few standard boards with straight through track c. Fiddle yard- table with cross-slide multipal track for loading up trains If we have this facility then small to large layouts would work if someone does not turn up! murrayec
-
Hi All Good link BosKnoay, everyone into this idea should have a read of this page;- http://www.free-mo.org/standard They have some good ideas and this could give us a text template to work with. The sketches I have set-up so far, are very close to this. It doesn't really matter what the boards are made of, they just have to be sturdy, same height and fit the specification for track joining. The free-mo.org idea of using C-clamps under the board on the down-stand to join tables is a good idea- nothing sticking out the sides! Though pin & socket locators should still be used, metal ones can be the electrical connections between the boards? I will hopefully finish the drawings for discussion over the weekend Again anyone have a network layout? Hey, Walter where have you been- its good to hear from you murrayec
-
Hi Dave I have a number of sketches set up on the track connection between boards, still needs work though but will post it up for all to comment soon. Code 100 track- that's 3 votes up so far. I agree if someone wants to build 1, 2 or 20 boards its OK, though we cannot let it get to big so that it wont fit a display area! More discussion on this is needed. If people build with a home layout and the group module layout in mind, I hope not- but if it should stall there is no loss to the builder. murrayec
.png.c363cdf5c3fb7955cd92a55eb6dbbae0.png)


