murrayec
-
Posts
2,731 -
Joined
-
Last visited
-
Days Won
70
Content Type
Profiles
Forums
Events
Gallery
Everything posted by murrayec
-
It is a great idea, but it will have problems- the main one is how can a producer of a 3d model control how many prints are made from the 3d file! CJ Ward quote for producing a 3d model, if I remember correct its about £300.00 to do this and then they will quote for printing each model. ShapeWays buzz is printing for you from a file and you pay for each print- copyright control by holding onto the file, just issuing prints. Some clever programmer will come up with an interface program that a purchaser of the file can only print what's paid for and then the file is deleted or locked. murrayec
-
Excellent Glenderg Every time I see photos like that, I think how scarce paint was in CIE! murrayec
-
Cool garfieldsghost I must get the kits down out of the attic and I'll be ready... murrayec
-
Hi purple How's it going with your machine, have you anything to show us? The other thread came to an end! I trained people in 3d modelling, most had 2d drawing skills to start with and it took them about a year to hone the skill. Key thing is been able to see the thing in 3d in the head and then translate it into a 3d model on the computer with the sometimes non intuitive tools of the program their using. murrayec
-
Nice one Fran Nothing wrong with those modelling skills, when I saw that post first I bought a few of the kits, stored for a DARTless day of making! What exactly needs to be done with plastic card and a craft knife to make this kit Irish? murrayec
-
Yes Glenderg There is the main point- constructing the 3d model, not all can do this and probably only a very few. What good is a 3d printer for modelling engines and wagons if one cannot computer model it Even digitized info will need editing, calling on computer 3d modelling skills. murrayec
-
Yes Nelson It's not there yet, purple has a printer set up and printed this;- http://irishrailwaymodeller.com/showthread.php/2165-Desktop-3D-printer?p=33913&viewfull=1#post33913 Also on this thread are examples of buses printed, I saw them in the flesh at the blackrock show and they need a lot of filling and sanding. murrayec
-
Yes I saw a youtube vid of a digitizer working- a person stands in front and is digitised, then sometime later a action man size print is handed to you. Though it was slightly out of shape but stunning to see it's at this level. murrayec
-
Hi I agree there BosKonay, though the MakerBot is a good entry level. One thing I remember is the MakerBot had a much higher price tag in the past! I wonder what happened? murrayec
-
Hi cg Solder does a better job than glue, glue sometimes lets go on brass kits after time! Brass can be hard stuff to glue, main thing is that it has to be very clean! Though do use low melt solder- 75deg. 145deg. & 185deg. and a temperature adjustable soldering iron- Maplin do a electronic unit that's not to expensive and well worth it if you plan to do more etched kits. It goes down to 150deg. The idea of the three solder temps- this gives you 3 soldering stages, first at 185deg. then turn down the iron, second at 145deg, and third 75deg. great temp for soldering white metal parts. If you plan out the soldering steps carefully and use the three different temps you should have no problems soldering on parts without previously soldered parts falling off. Phosphoric acid based flux is the best if you can get your hands on the acid- dilute it with water- 1 acid to 2 part water. Carrs do flux in small green or orange bottles but will cost far more than the acid idea Eileen's Emporium for the solder Soldering tips;- After cutting out the parts, use the leftovers to practice before you attempt soldering the model. Clean all parts with fibre pen or emery paper thoroughly, do not touch the faces to be soldered. Make a few small timber right angle jigs to assemble the parts on, and hold in place with thump tacks, pins n the like Sweat solder everything where possible- apply flux to parts, melt a small blob of solder on each component at their joint faces first, try to get it even, apply flux, then bring the parts together and hold fast with clamps or pressure from a hand held stick, apply the iron briefly to melt the solder, remove the iron, hold in place until you see the solder solidify, hold for a few more seconds- done. Work in stages, let the work cool down, wash thoroughly with water-n-washing soda and your off again. If things are not sticking- stop, clean the parts, flux again, and start again. If you do go to Maplin, pick up a couple of their heat sink clamps- they can be very handy when soldering close to small parts already soldered on. They are aluminium and will take the heat away very quickly. murrayec
-
Hi rebelrail here is the platform n station I was thinking of;- http://irishrailwaymodeller.com/showthread.php/67-Tara-Junction?p=47193&viewfull=1#post47193 murrayec
-
Hi rebelred Nice collection of orange and black stuff, cool To run trains all that is needed is track end to end, like your display board (but I don't think you have enough room to run a train- maybe the engines though, back and forward) or in a loop- but a loop is not mandatory. Regarding ends and a platform- yes go for both, I'd do tunnels at one end, then a picture at the other end of track running off in the distance, and a platform and thin station buildings- take a look at http://irishrailwaymodeller.com/newreply.php?do=newreply&p=49254 for some clever use of thin buildings and photograph backdrops I know you have done a fair bit of work on the display board, but maybe you should take a look at the thread 'Modular 00 Layouts' we are trying to get going! at;- http://irishrailwaymodeller.com/showthread.php/2465-Modular-OO-Layouts?p=37052&viewfull=1#post37052 This idea may suit you to run your trains when the system is up and running?? murrayec
-
Thanks Tom Its done in Autocad, just solids extruded from the drawing with autocad colours. Autocad has a basic rendering facility, its not to complex if you don't get into mapping materials, playing with lights and cameras. 3D Studio Max is the one for that... I cant wait to start cutting foam and get the boards set up... murrayec
-
Hi Dave Its looking really great, a lot of hard work in that, well done. I love the fold-away control systems- innovative or what! murrayec
-
Hi Well done on the award, the layout is lovely, worth the award. The extension is looking pretty neat so far, great workmanship on the timber structure murrayec
-
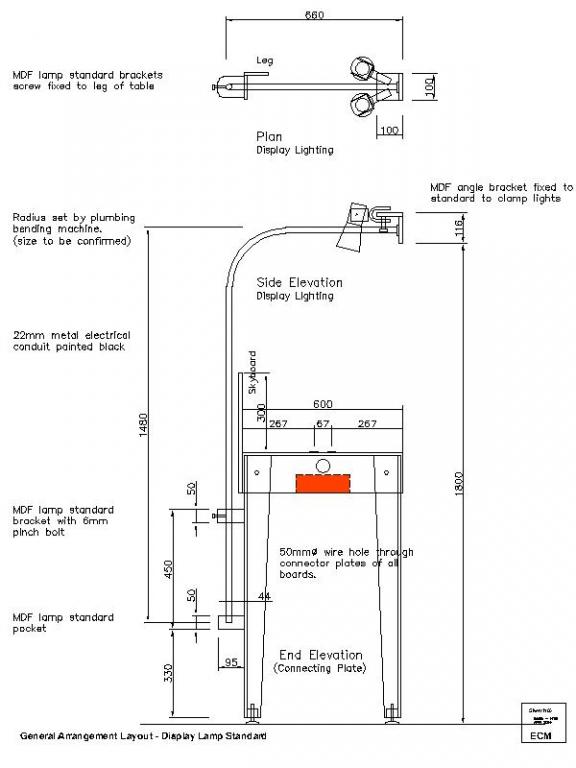
Hi Richie Great, the dim is approx 900mm from the baseboard top to the MDF light mounting bracket. murrayec
-

NDMRS Exhibition 12/13 April 2014 - Please note venue will change!
murrayec replied to steventrain's topic in What's On?
Hi Dave I hope it show went well for you, I like that combined steam thingie. Little steam engines are cool murrayec -
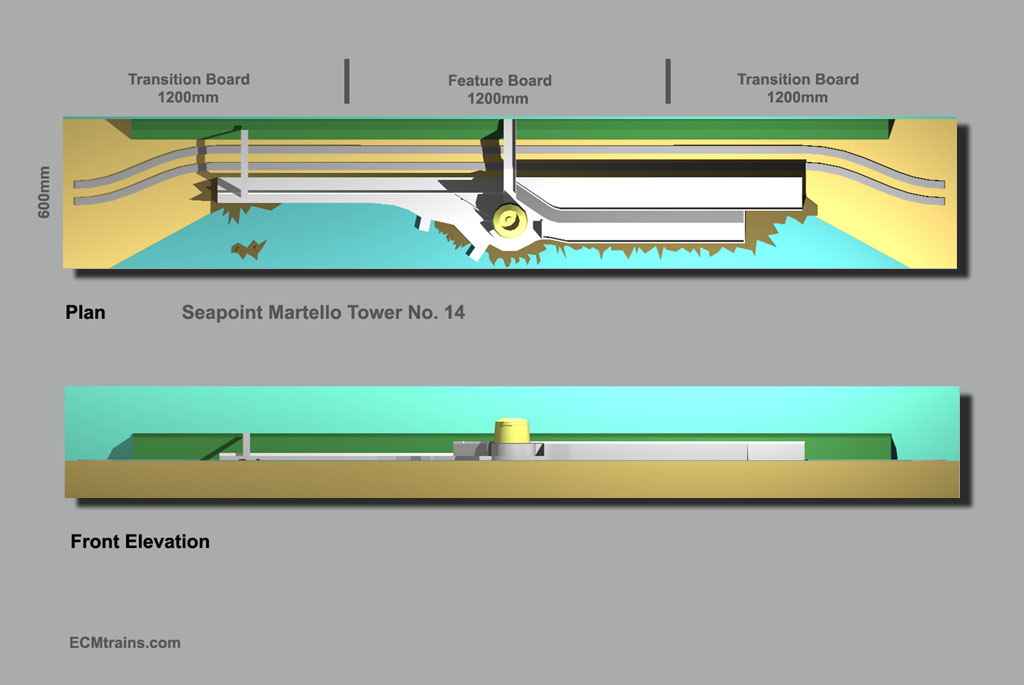
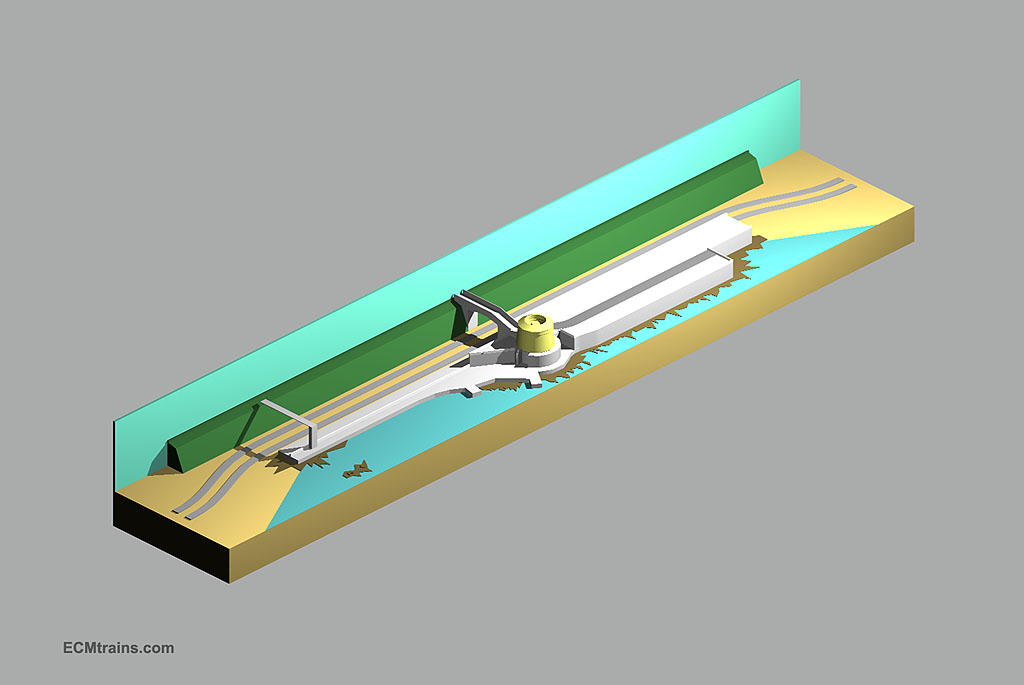
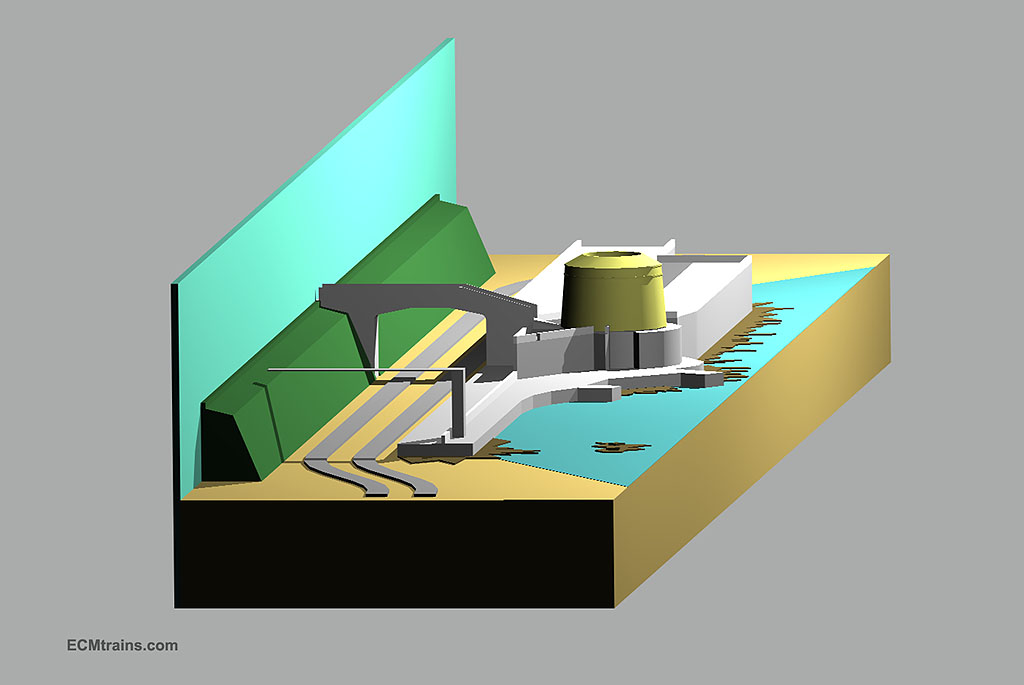
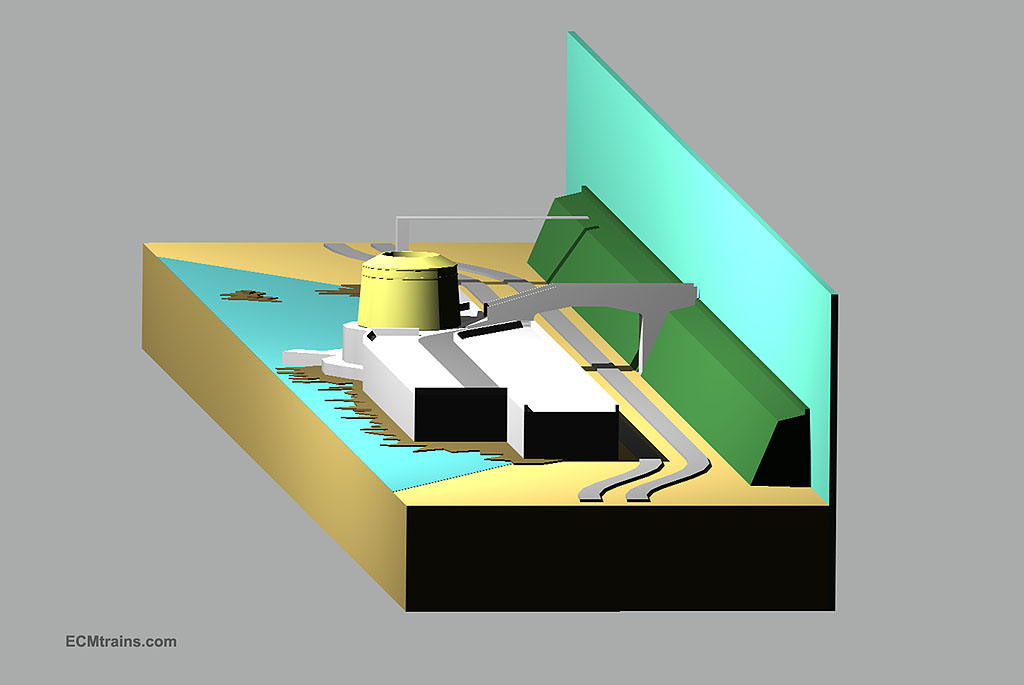
Hi Dave Excellent, I've posted up some views of the Seapoint Martellow Tower on my workbench thread - http://irishrailwaymodeller.com/showthread.php/2346-murrayec-s-Projects?p=49204&viewfull=1#post49204 Here is a taster... murrayec

-
Refer to Volume 1 at; http://irishrailwaymodeller.com/showthread.php/2346-murrayec-s-Projects?p=34623&viewfull=1#post34623 Hi All I have been developing up a baseboard layout drawing for the Seapoint Martello Tower, its not yet complete but I thought I would share some images on the layout because its based on the 'Modular Baseboard System' see thread; http://irishrailwaymodeller.com/showthread.php/2465-Modular-OO-Layouts?p=37052&viewfull=1#post37052 The layout runs across three 1200x600mm boards, two transition, and one feature boards, though the transitions have some of the feature on them. The two main line tracks move to the back of the feature board to allow for Seapoint features and the tower to fit, incorporating 4th radius curves to do this. This design complies with the Modular System. As you can see I have a lot to sort out, this is why I prepared these renderings from the drawing- sometimes its easier to see things in a mass model than line drawings. (no, heirflick that's not a religious dancer) The Tower stands to high but I don't have enough space to get the ramp over the Ordinance Bridge longer to lower the tower. I may look at lowering the embankment and bridge- though the bridge is set up for catenary! Another idea is to have a front extension to the board to give a bit more space but dont really want to do this, I'd rather stay within the 600mm module. As I have said before, this is a truncated Seapoint layout but I think there will be no doubt as to the scene location..... murrayec
-
Hi Dave Thanks, I thought there was something funny about it as it came in as text! Scoot back a page and see murrayec
-
Hi Thanks guys for the comments closetmodeller- an electrical pick-up pantograph would be great, but both the track and the catenary would have to carry power which adds more complex matters to peoples layouts. So far all DARTs sold run on tracks without catenary- though I could be corrected on this. Some intend to install it. I looked at powered pantographs and they have their problems with their springie joints and the like. The best ones are the diamond type as seen on the German models but so far I have not seen one like a DART murrayec
-
Hi All We have been very busy over the last few months and not had a chance to progress things, so here is one.... David Holman, in his blog today was discussing layout display lighting, its something I was thinking about on the Modular System and he prompted me to do this. Here is a sketch of a lighting standard system that could be used. I do not think it should be mandatory, up to the modeller to decide. The idea is a post up from the back of the layout and out over the layout with a bracket fixed to take clip on lighting. I reckon only one is needed per board, as two lamps can be fixed to it. I did a quick search and found Ikea have a clip spot lamp 'Lagra' (no bulb) for €3.50, the lead is 2m long and it can take an LED bulb. The standard is fairly simple construction with off the shelf parts- MDF, 22mm metal electrical conduit with fittings to suit, and screws n bolts. Fire back comments if anyone has ideas.. I am just completing a drawing for my Seapoint Martello Tower layout, which is based on three boards- two transition boards and the feature board. The transition boards throw the track to the back of the feature board so that the Tower and a bit of water can fit to the front. I will post up a drawing when complete murrayec
-
Hi That's very well done- 'A handy man with a bit of Dirt' murrayec
-
Hi On the Hibernia... Here is a slide show motion study of the Bell-Crank and Drive Rod. Prepared from screen captures of the drawing for the loco model. It was prepared to prove the crank and rod would not foul the chassis. [video=youtube_share;PfJLEgPB4Ho] It's a mad looking thing- one of the main features that attracted me to the locomotive. murrayec
-
Ah! There yea go murrayec