

Horsetan
-
Posts
2,272 -
Joined
-
Last visited
-
Days Won
4
Content Type
Profiles
Forums
Events
Gallery
Blogs
Store
Community Map
Everything posted by Horsetan
-
Interesting. Is your proposal RTR or are you going to be putting subtle pressure on SSM to design a kit? Chassis for 461 would - on the face of it - be simple; no visible valve gear, but plenty of space between the frames (in 21mm) to have working cranks and inside motion. My name's already down for NCC "WT"/Jeep no.4, which Worsley Works have been quietly slaving over for a little while!
-
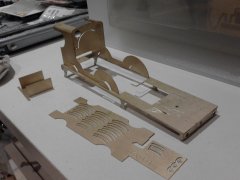
A bit more work on rolling the cab roof eaves has been reasonably successful, and they now look like this: The whole point is to get the roof profile to match that of the cab front, which is why I said earlier that the thing wasn't as easy as it looked! We are almost ready to start soldering the cab and splashers to the footplate, so that means the central section carrying the nameplates can be sawn out. The instructions say that on the inner rims of the footplate have half-etched "ledges" for the cab and splashers to sit on, and they are visible in this shot: You'll also spot that the right-hand/offside "ledge" is far better defined than the nearside one, which doesn't give enough room for the nearside splashers to rest on. This is likely to be a flaw in the etching process, which allowed one side to be more exposed than the other. The original artwork should have both sides equal - perhaps Des / Weshty can confirm that the artwork he inherited does in fact look that way? Here we are for tonight, and it's begining to look a bit more like no.171 in the Erecting Shop:
-
Nameplate section removed from footplate. Cab and splashers in position.
Horsetan posted a gallery image in Member Albums
-
-
-
.....which is what I was after.....
-
Would this be a Tree Series?
-
The Ballykay landmark buildings are spot-on. If I close my eyes, I could almost be standing in Avoca. Hendley's stands out, 'cos when I walked out of the shop, I forgot the steps were there and almost fell down them Irish model architecture has clearly gone from famine to feast in a very short space of time. For years there was virtually nothing on the market, and then "Glenderg" comes out of nowhere with his work and everyone's suddenly spoilt for choice! Any chance of Ennis or Claremorris stations appearing in the Glenderg range? "The money was just resting in my account...."
-
Thanks very much for that. I did a search through the RPSI's current stock list, and couldn't find no.9 / 1909. Reason why I asked whether a K15 was still extant is because I'm looking for a suitable excuse to buy a kit to replicate a preserved one....if there was one preserved.
-
Might be worth asking Shawplan if they would consider covering Irish classes, including those made by SSM.
-
If you do a search for Shawplan / Extreme Etchings, you will find that they produce glazing kits known as "Laserglaze" for various engines and rolling stock. They are light years ahead of vacuum-formed stuff, and are the closest thing to glass that you can get without actually being glass.... Click here for sample Would you not be wanting to rephrase that?
-
lol
-
I wonder if the insurance cover was adequate!
-
Rapid!
-
K's 00 scale white metal locomotive kits (1970s)
Horsetan replied to jhb171achill's question in Questions & Answers
The man behind Autocom recently retired, so Autocom NuCast is no more. If you have to be blunt, they were years behind the game yet the kits cost an absolute fortune, and there was no money to re-tool or improve the range; the future in Irish steam outline, by contrast, is with SSM and its brethren. -
Living statue?
-
I seem to recall that RPSI also lost both surviving GNR(I) K15 coaches. Or is there still one left?
-
I did wonder whether Irish preservation sees more arson attacks than anywhere else.
-
I'd put that in the bin; it may be decomposing.
-
I'm with ye there. Is there a "facepalm" smiley? I've a feeling I'm going to be needing that one.....
-
Modelling the Irish scene has historically presented a challenge, particularly if you're doing it in Ireland. It is only in the last 15-20 years that things have become easier in terms of stock, kits and all the rest. For that we have the Internet to thank - it's that much easier to order what you're after, and information about what's available is more accessible. I remember first coming to Dublin back in 1988, during an unemployment peak, and only ever seeing one model shop (Murphy's) in the whole place. It sold British-outline stock; I don't remember seeing anything in CIE/IE/IR livery there at the time. My parents took me around much of Ireland that year, and I never saw another model shop. The economic situation back then focussed people's minds on emigration, not modelling. I think TMD kits (now SSM) existed back then, but actually getting hold of any was a challenge. They were not very well publicised in Britain, if at all. Today, things are that much better materially, thanks to the Celtic Tiger, even if it did have a propensity to prowl around on quicksand. The very fact that this Forum exists to showcase what's being done demonstrates how much Irish modelling has developed out of almost nothing. I'm just after turning 41. I've been in model railways in one form or another since the age of 5; dead-scale Scalefour since 1990, but modelling 5'3" (21mm gauge) only started this year. Just after realising that if/when I finish this "S" class, I'll have no 21mm gauge track to run it on Since I no longer have youthful good looks, I resorted to radical plastic surgery and now look like this:
-
Wonder if that could be converted to 21mm gauge.....hmmm.......
-
'tis all about getting the time for it. In reference to what you wrote about the younger modellers losing these skills to build - well, in the same way, there are skills that I would have loved to have learnt, such as being able to use a lathe and turn my own fittings or make my own wheels. But there are a good few capable young engine builders out there - do a search for Tom Mallard, who I think is at least seven years younger than me, but builds engines with the maturity and self-assuredness of someone who has spent a lifetime in the craft. And he charges accordingly - I think he'd be around two grand-plus(that's sterling, not Euro) if you wanted him to build something like no.800 Maedhbh for you. I call him "Stella Artois", because he's reassuringly expensive. I'm just after having some Talisker at teatime, even though I'm more of a Jameson's man meself.
-
The takeover is underway but, as some people predicted, it's taking C&L a lot longer to merge the Exactoscale stock into C&L's existing systems. They thought they'd be up and running by the first week of November but that's gone by the board now due to staff shortages, etc. Click here I think it will be the New Year before you'll be able to order anything.
-
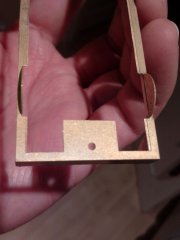
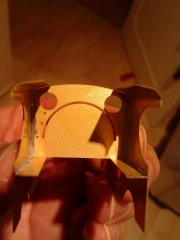
The "S" class has a very Edwardian wrapround roof, and these are a total swine to form cleanly, as brass and nickel-silver will distort in all sorts of unexpected ways. SSM/TMD try to make the job easier by making the roof eaves half-etched, but there is so little material above the cabside's curved cut-out that the whole lot will deform. The instructions say that you should bend the top of the cabsides, using a 2mm rod to get the right sort of curve. This isn't quite as easy as it looks: I tried to attain a clean curve by using a steel rule at the back: ....but the grade of brass in this old kit was a bit mad, and I found the task difficult to control properly. The following photo shows the extent of the problem: As you can see, the offside roof eave is almost there, but the nearside shows signs of distortion, and it will need more work with the 2mm drill former to correct. At this point, I felt a bit like that episode where Father Ted is contemplating his "repair" work on the dent in the car that the Diocese gave for the raffle to raise funds to fix the Parochial House roof....... "Ye know, ye're too much of a perfectionist, Ted...." I call it the Eejit Guide to Building - 'cos when you read it, you can avoid the mistakes this eejit made