

Noel
-
Posts
7,476 -
Joined
-
Last visited
-
Days Won
149
Content Type
Profiles
Forums
Resource Library
Events
Gallery
Blogs
Store
Community Map
Posts posted by Noel
-
-
Good Evening All,
The list of stall holders in attendance is as follows:
Allocated to: Product Type
Brian Collins Enterprises (Die-cast Models)
Phil's American Outline (American Outline)
Myles O' Reilly (Diecast Models)
M+M Models (Die-cast Truck Models)
Ray Elliott - Diecast Models 4 U (Die-cast Models)
Irish Transport Books & Models - Dirmud Byrne (Transport Books & Railway Kit Models)
Sean Ryan (Railway Models)
Motorama Models (Die-cast Models)
Decs Model Garage - Declan O' Reilly (Dioramas & Code 3 Models)
Kieran Nolan (Soldiers Figures)
Noel Sharpe (Die-cast Models)
Martin O' Hanlon (Die-cast & Railway Models)
Woodcreations - Patrick Burke (Display Cases)
Author Maxon (Die-cast & Railway Models)
Peter Scott (Die-cast Models)
Walter O'Berle/Kinvara-Model-Train (Railway Models)
Owen Kelly (Die-cast Models)
Michael Dryhurst (Die-cast Models)
Tony Gallagher (Old / Retro Toys)
Dave Bracken (Railway Models)
Edward White (Model Railway Scenery)
Model Rail Baseboards (Baseboards)
Clifton Flewitt (Books & Railway Kits)
Collector Toys (Die-cast Truck Models)
Noel, I hope this give you an overview of who's attending on Sunday?
Many of the traders in attendance like myself, are registered business.
Thank you,
Brian Collins
T/A Brian Collins Enterprises
Thanks Brian. Might see you there Sunday if I get finished early.
-
Ok got back to 'split chassis' DCC conversion this evening. All that remained to be done was connect the decoders red and black wires to each side of the chassis!!! Hmmm - that was not the easiest as there is nowhere to anchor the wires, and not a 1/2mm spare between the chassis and the loco body, so couldn't sandwich the wires between the chassis with insulators on one side and could not run the wires back inside the body as no room above or either side of the chassis which completely fills all space inside the boiler.
Solution was to file a small front section of both chassis sides clean and drill a hole in each chassis half into which I could directly solder the wires.

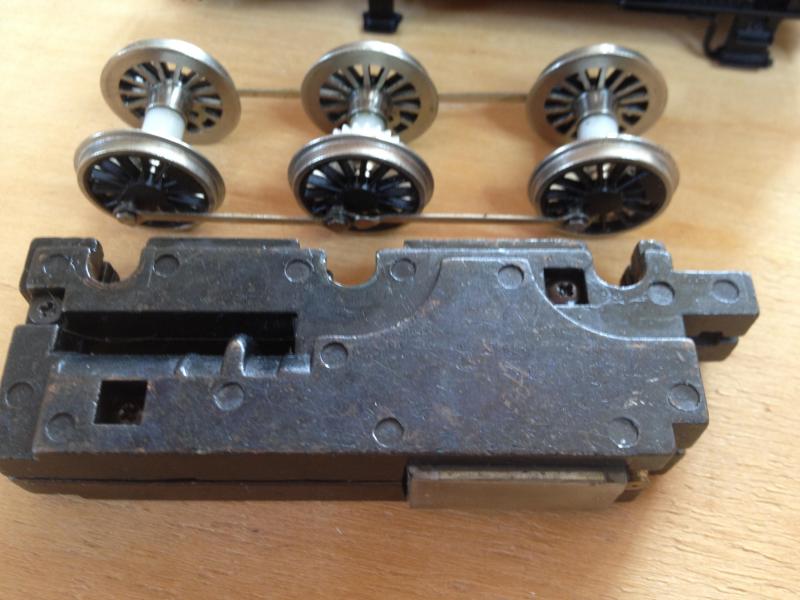
It took two attempts to successfully solder to the chassis sides and I had to use the big soldering iron to create enough heat so that the solder was taking to the chassis metal in the hole. The hole was about 3mm deep. View of the rear of the chassis halves. These ends will be in the loco cab with the wires running to the decoder in the coal bunker. WARNING - When soldering to the chassis halves remove all other heat sensitive components (i.e. the motor, plastic insulator grommets, spaces, and the white screw lugs).
Putting the chassis sandwich back together again is fiddly but with care positioning the three plastic separating insulators and the two white screw anchors. Three screws hold the chassis halves together. These screw into the plastic isolators which go through a plastic shim. The three shims theoretically separates the two chassis halves at the exact distance to allow smooth running of the gears.
Temporarily hooked up the chassis halves to the rails via clip leads to test the smooth running of the motor and gears before final reassembly. This is where the three chassis screws may need a little loosening to barely widen the gap between the two chassis so that the motor runs freely. This bit was trial and error until I got smooth running.
I made the mistake at first attempt to put the wheels back in the chassis and screw back the under plate before I had reinserted the chassis into the loco body. It was much easier to fit the bare chassis back into the body and feed the four decoder wires aft into the cab without the wheels and under frame on.
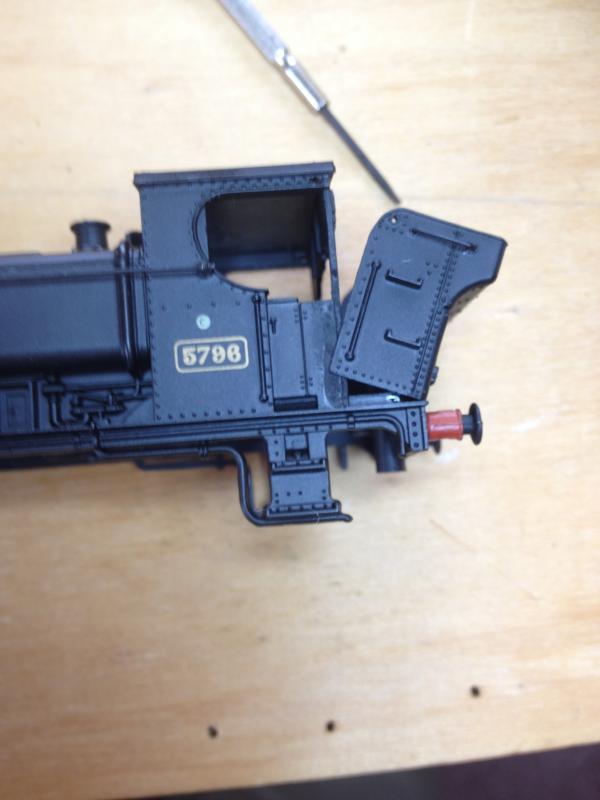
A little detail. Two small notches cut in the cab floor so that the new solder joints to the chassis do not get pulled out when refitting the chassis into the body.
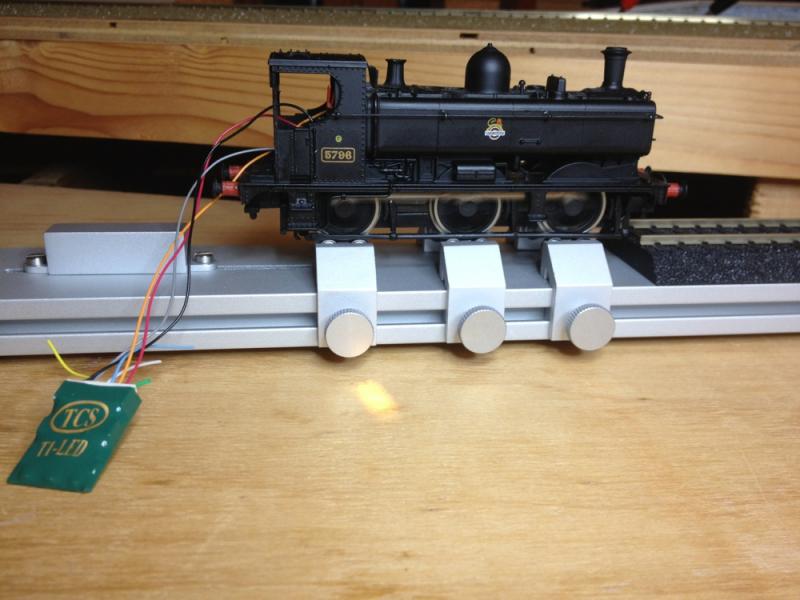
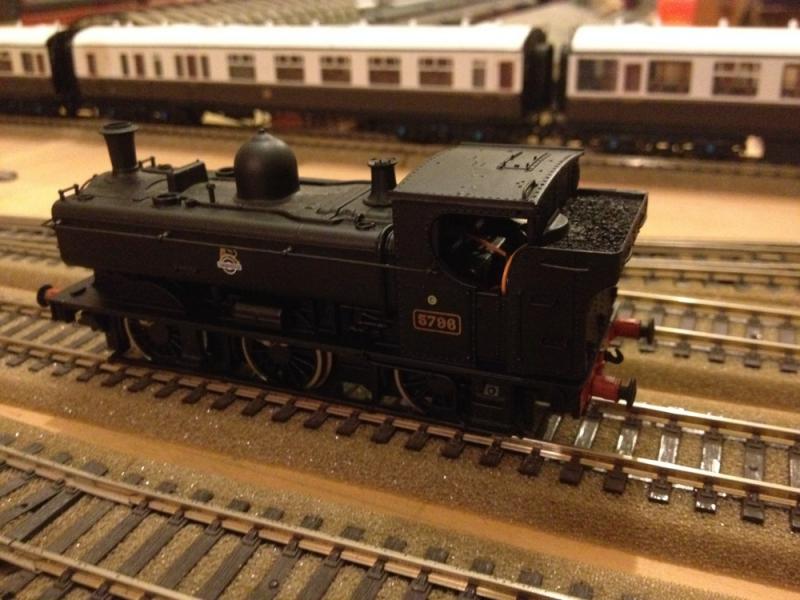
At last done - put 5796 on the rolling road for a test run. These split chassis Bachmanns do not like to be disturbed, and I had to make one more small adjustment to the chassis screws before she would run freely again. Effectively though this loco will need to be 'run in' again.
Finished - BR (ex-GWR) 5796 Pannier tank loco with TCS T1-LED decoder. Needs a final bit of tidying up by painting the visible wires inside the cab black.
I have to say it was quite a lot of bother, and trial and error, probably because it was my first attempt at a split chassis tank loco, and I nearly got fed up with it. Hopefully as I learn more about the different loco chassis/body combinations future conversions will take less time. How anybody puts sound decoders and a speaker into a 0-6-0 tank loco is a mystery to me unless they are watch makers!
I think I will pass on that one. There is actually enough space to put a small speaker in the cab but it would be partially visible.Anyway she is running well, but needs another 45mins running in time to really loosen her up. I had greased the gears and lubricated her before putting her back together.
What have I learned about fitting DCC to a non-DCC ready split chassis Bachman?
- Ensure the loco is a smooth runner on DC before conversion - DCC won't make a poor runner any better
- If a new loco, run it in for an hour on DC before conversion
- Recommend using a decoder that comes with a removable harness (e.g. 9pin harness). Saves wires breaking off the decoder and means you only have to feed the decoder plug through gaps in the loco during assembly (i.e. rather than the decoder)
- Ensure the motor is 100% electrically isolated from the chassis and track. Only the orange and grey wire should connect with the motor pickups.
- Be patient and very very gentle when taking apart. Make a note of where different length screws were used on the chassis.
- When soldering to chassis ensure you don't melt any plastic components on the chassis (i.e. remove all plastic bushes, lugs and spacers). Using an Iron hot enough to solder to the chassis metal generates a lot of heat in the chassis.
- Test the decoder on your DCC test track (i.e. see if it can be read). If you made a booboo with the wiring the decoder will not read, but at least it won't be fried if you use the test track (i.e. it uses low power).
- At stages of reassembly test the motor and gears are running freely before putting the wheels and body back on
-
Buy DCC ready locos in future.
Next up another 0-6-0 Bachmann 5700 tank loco, but the next one is not a split chassis model so it should be a lot quicker, but I expect I may have to cut away a piece of the chassis if I want to locate the decoder completely out of sight in the boiler (i.e. not in the coal bunker with wires through the cab). Alternatively I might do one of my 20yo Hornby tender drive Princess class. Good Night.
- Ensure the loco is a smooth runner on DC before conversion - DCC won't make a poor runner any better
-
Any news Brian, trading as Brian Collins Enterprises?
Been out of touch for years with these sort of shows and events, what are these shows/fares like? Are they worth a visit? I don't want to waste my time going to a 'car boot sale' type event where folk are just selling common second hand toy train items, but would be interested if there were good trade stands selling collectable model railway kit.
-
Superb photos. Thanks for posting. How did you manage to keep getting ahead of the train so much to take intermediate shots?
The EGV looks a bit worse for wear - a bit like a health and safety hazard about to dissolve into rust. How are the four coaches utilised? Looking through the windows it looked like the PAX use the two new livery coaches while the other RPSI blue coaches seemed service vehicles (i.e. onboard staff and supplies). We are planning to do a trip like this one day on the Scottish western isles, preferably behind a steam loco. I hope the venture proves successful for the folks behind it. How many PAX are on board the train?
-
Excellent work there Noel, just one point, the warranty is void on the chip when you cut the plug off. But given the very tight squeeze in that loco you would have no other way of doing it. Looking forward to seeing it finished.
Thanks Dave et al. That particular TMS decoder comes with a wires only harness, no plug at the loose end only the 9 pin plug that mates with the decoders pcb socket. AAMOI I bought a few extra 9 pin harnesses so I can wire more locos to the harness before committing them to a specific chip, and so I can swap decoders to match the motors in different locos. Many of the main decoder vendors seem to have variants of their decoders with 9pin pcb sockets.
-
Somebody having a bit of fun with an experiment. It is interesting that he managed to balance the effort of the 9 locos which avoided derailments due to wagon compression on the tight inner radius curves, or tension on the wide outer curves pulling wagons towards the centre of the circle.
I remember over 40 years ago on a club layout trying to see how many coaches we could pull behind a single loco. The contest was won by a Hornby Dublo 'Castle' class loco that managed to pull a rake the length of the full orbit of the small layout bar one coach length. Can't remember how many coaches but it seemed like about 20-25 which was one heck of a deal back then with old and heavy coach technology with plastic wheels.
-
OK two simple old Hornby’s converted to DCC so far (Pannier Tank + Class 25), now to tackle some of my more difficult Bachmann steam locos. Most are about 20 years old and none are DCC ready. So I have decided to start with the most difficult:
A Bachmann 31-901 BR Pannier Tank loco with the awkward split chassis. Space is tight and the split chassis is grounded to both rails!!!
Power pickup on all wheels due to split chassis
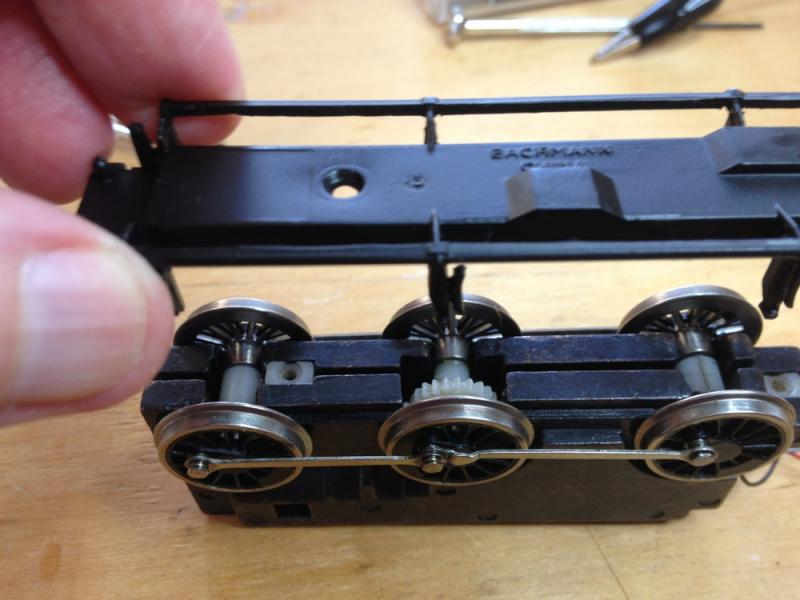
Bachmann split chassis have a clever arrangement where the split axils transfer power separately to each side of the split chassis. Each chassis half connects directly to the motor bush on the same side using a sprung metal tab the connects one side of the motor with the opposing chassis half.
Chassis sandwiches the motor with power pick up on all wheels via split axils
There isn’t a millimetre spare between the chassis and the inside of the loco body, and no part of the chassis that can be cut off without destroying it’s functional integrity.
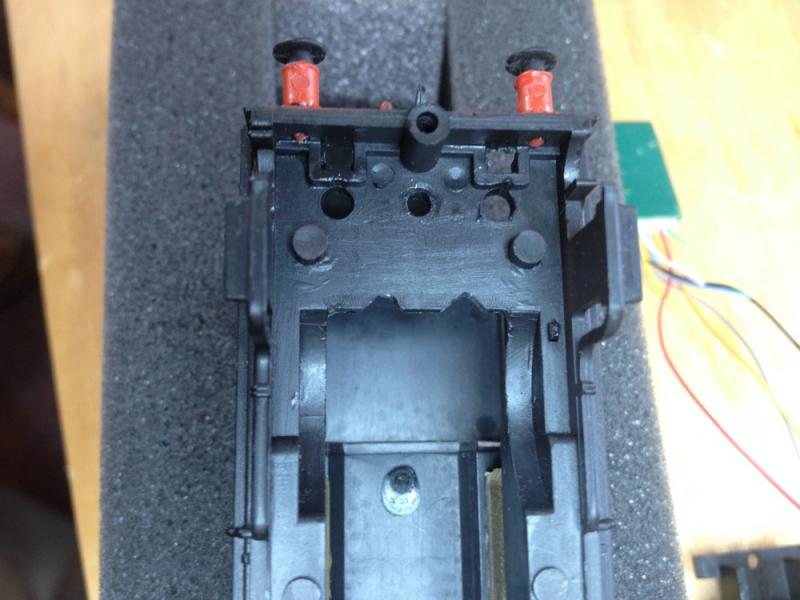
1st task is to establish where the decoder might fit. There is no space inside the boiler area and no metal I can cut off the chassis to squeeze it in, but there will be plenty of space in the coal bunker once I remove the coal bunker from the rest of the model and extract the cast iron weight that fills the bunker space.
The coal bunker that contains a weight comes off the back. Carefully remove a metal railing the connects the removable aft coal bunker to the roof section before pivoting the bunker backwards.
Remove the cast iron weight to make space for the decoder
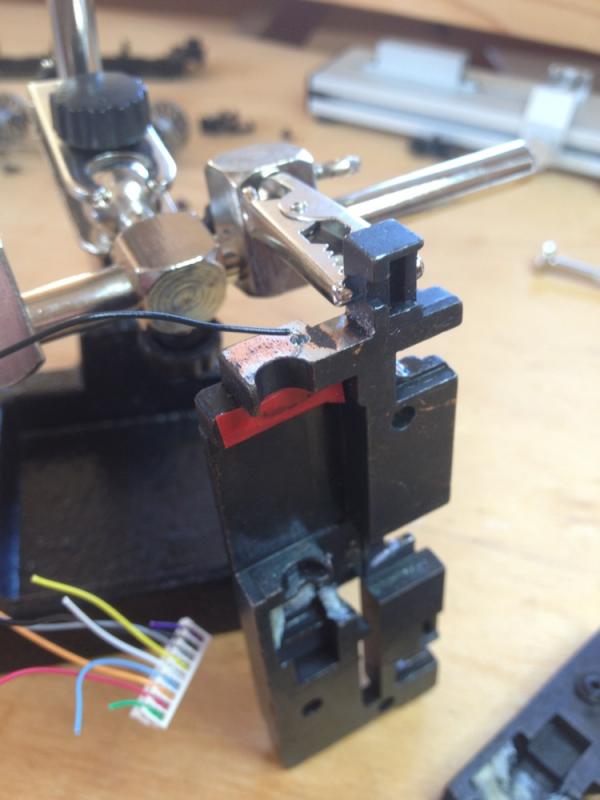
Next is to explore how these split chassis locos are built. Basically the motor is sandwiched between the two halves sides of the chassis that are electrically isolated from each other by plastic bushing separators. Three screens into plastic receptors hold the two chassis halves together. There are NO wires, the two motor bushes touch each side of the chassis with a sprung metal strip. These have to be isolated from the chassis for DCC.
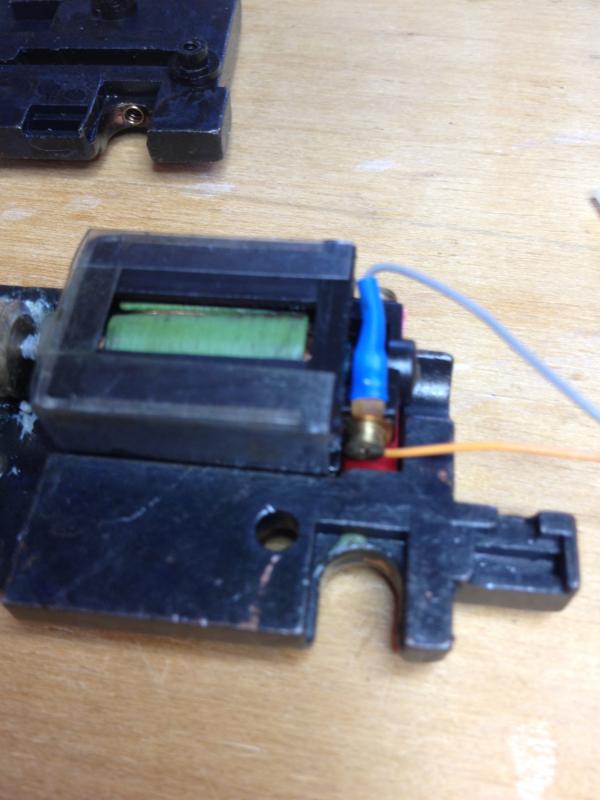
On RHS side of motor you can see the metal sprung tab the would contact the missing chassis half on this side. This has to be isolated and soldered to decoder.
You can just make out the sprung metal strip at the bottom of shot that normally connects the motors bush to one side of the chassis.
Motor removed. Bend sprung tabs inwards and solder grey/orange decoder wires to each using heat shrink and insulation tape for added measure to fully isolate the motor pickups from the live chassis.
Solder decoder grey/orange wires to the two motor bush contact strips
Use heat shrink plus insulation tape to ensure motor is totally isolated from both chassis sides.
Motor soldered to decoder grey/orange wires, sprung contacts isolated with shrink wrap, and some insulation tape added for good measure. Ready to attempt to reassemble the two chassis halves
Motor connected to decoder grey/orange wires reinstalled in the chassis sides. It was like putting a swiss watch back together with all the plastic bushes and separators. Careful not to over tighten the screws or the two halves will compress the motor too much leading to binding.
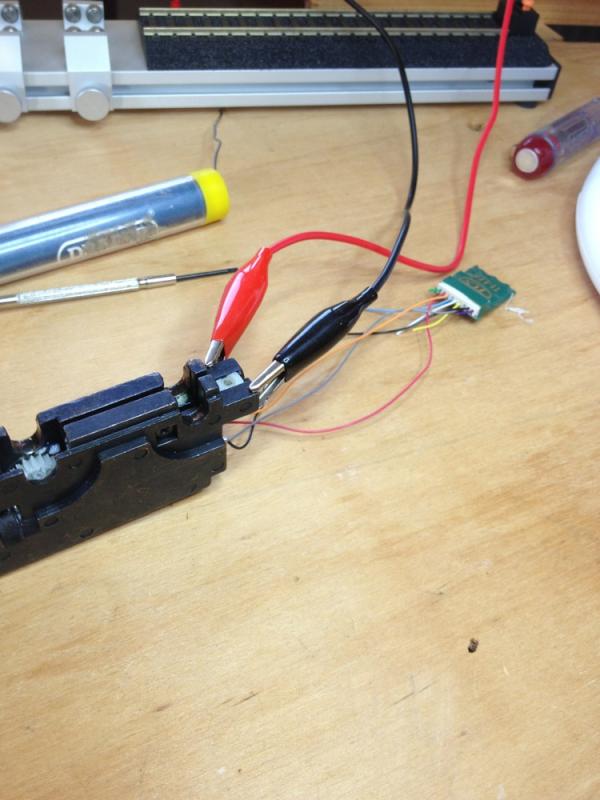
First I connected the decoder to the test track using jump leads to verify the connections to the motor were working ok. Then I had to do a test run of the motor back inside the chassis adjusting the three chassis screws so the motor and gears could run freely (ie not compress the two halves too close together).
Final step tomorrow is to connect the decoder’s black and red wires to each half of the chassis. I have elected to do this using sprung contacts squeezed between the gap between the chassis sides isolated using a piece of plastic card. I don’t have the tools to drill and tap the chassis for screws to solder the red and black wires, and they will not solder directly to the chassis block. More to follow as soon as I get the contact strips installed between the two chassis sides . . . TBC
This is all very fiddley but enjoying it
Good night
-
That's a sliverfox model noel, either rtr or kit available. Boxcar willie has just completed a kit build with mousa overlay brass etches - another option. Richie
Thanks Richie. I have a rake of very old Lima Mk1s in original CIE livery. I'm wondering if I could or should attempt converting two of them to EGVs, or go for Silverfox. Neither my eyesight nor my hand coordination are what they were 10 years ago, not sure my modelling skills would be up to it. Reading the other thread of Boxcar Willie's with interest.
-
Need recommendation for a source of replacement wheels.
I have a rake of old 1970s Hornby early BR MkIIs. They won't make suitable donors for repaint to CIE or IE colours due to the window frames and extra doors. The wheels are metal rims over plastic wheels and square axils, but they are gauged too narrow for Peco points. Probably fine on old 1970s Hornby set track but not Peco 100 points. I'd like to try and salvage them for nostalgia reasons as I've had them since I was a youngster.
As a matter of interest, any idea why BR and NIR mk2 stock had the split window frame panels, whereas the CIE/IE mk2 stock had single window panes (i.e. like BR mk3s)?
-
Cravens - Vac braked and steam heated, needs Mk1 Steam van or original Dutch van.
Hi BosKonay
Was reading over some interesting old threads. Do you mind me asking the source of this model? Was it a Silverfox, RTR, Kit, or a self build or modification?
Thanks
Noel
-
How does the Parcel Motel work then? Do you put their address in the delivery info & they tell you when its dropped off at the nearest machine to you??
1. You register an account with them
2. You specify your local pick up location
3. Use their address as your delivery address BUT with your registered ID number on 1st line of address (1 above)
4. When they deliver to your local pickup location you get an SMS and an email with a pin number
5. You goto the pickup point enter your phone number and pin number and hey presto one of the doors opens with your parcel inside
-
Not only that, the money that was donated to Fingal County Council on the basis it would be built and housed there will have to be given back.
Wonder if the terms of Mr Gaffney's will facilitate the returned funds being used to put the collection back into use at another venue, or if they were specific to that venue and hence lost to the project.
-
Noel,
It won't be going ahead in Malahide, they don't have the space for it. It is currently in the hands of Dublin tourism who are doing nothing about it. But there is a group of people taking action.
That's a pity. Sorry to hear. I did wonder looking at the media pictures of the proposed new Malahide venue yesterday if it would fit.
-
Just catching up on some old treads including this one on the Fry collection.
Really glad to hear it will reopen next year. It was about 6 years ago I took my Son to see it in Malahide. That was were I first came across Murphy Models 141/181 class in the little shop they had there. Even though my hobby had been dormant for nearly 12 years I had to buy a 181 on the spot and only unboxed it two months ago when it revitalised my interest in the hobby and stirred me to restart work on our old new layout!
Tara's palace 'dolls house' collection which was also hosted at Malahide castle found a new home at Powerscourt in Enniskerry. There was a brief possibility the Fry collection might have found a new home there too but it didn't work out. Malahide seems its natural home. I guess they may take the opportunity to adjust and update the layout to suit the space available in the new venue. It is really positive to hear they are planning to reopen next year. It re-activated my interest in this great hobby.
-
... Price per pack is €58 and a power supply will be €15. The DCC chip is €19
They are expensive, but they are a premium quality product.
Just my uneducated tuppence. Look nice specs but personally I'd prefer under board motors rather than surface mount. Very expensive though and probably not feasible for large layouts with 50+ points. I like the idea of manual switching rather than rely on DCC. There is something informative about looking down at a bank of levers which give instant feedback as to how a road is set, rather than fiddley DCC display one accessory at a time. I am about to embark on fitting 30+ point motors and feel that cabling to under board motors direct to banks of lever switches is both cost effective and very functional. Just personally speaking, I don't like the idea of DCC for controlling point motors on a 'play' layout. I can appreciate how useful it might be on commercial and exhibition layouts though.
-
WAP now installed in the roofspace. No longer any problems with iPhone dropping out and losing control. Still in two minds as to whether I prefer a using a controller with buttons and an extension lead, or a wireless touchscreen. Certainly, unless going for a good operating session, then for quickness in starting up, the old fashioned wired connection has the edge.
Good to hear. Yes the tactile feel of buttons v wireless walkabout can be a compromise. However what makes the difference for me personally is the smartphone app is far simpler and superior at controlling sound functions than hand held cabs with only 10 buttons labelled 0-9. On the app each function is clearly labeled on the touch screen buttons in english rather than having to remember which function is which sound and also negating the need for a shift button to access functions above 10 which is a common need with sound decoders. The other aspect of the phone cab I like is the visual feedback of the current speed setting which many of the wired cabs do not have.
I regret recently buying an additional NCE 06P cab and I have to say IMHO it's a total piece of 1970s junk with its pathetic information display and rotary knob the size of a ferris wheel on steroids. It reminds me of the 'valve' based radiograms my parents used to listen to the radio on (then called a wireless).
It's hard to believe NCE are the same company that produce the very usable Pro/Power Cabs and also the Jurassic 06 cab. It's old iPhones from here on as additional cabs. I may stick JMRI on Linux on a dedicated older laptop as a permanent fixture on the layout with instant on/off capability, rather than my former Windows 7 laptop. As a relatively recent Mac convert I have become totally intolerant of any Windows startup delays. -
a few interior carraige pictures for anybody interested
Fabulous. Great job RPSI. What First Class rail travel used to be like many many years ago!
Much better than the soggie microwaved baps from a trolley with junk instant coffee in a paper cup on the Cork inter city nowadays. -
Noel, thanks for posting the pic. Nice track layout. My first thoughts were that the slips could be the problem. Unfortunately, I don't have any slips on my layout to examine, as I try to avoid them where possible, although there are some in my local club. However, I am going away for two weeks, so I can't do anything until I return.
My second thought was that perhaps there are wheels on some of your vehicles that have not got the correct back to back measurement, and are causing a short by the back of the wheel touching the switch rail. I know it should not happen, but even new vehicles can be incorrect. A friend of mine bought a new Bachmann loco recently which continuously kept derailing at certain places. He blamed the track on the layout, even though all other locos ran fine, and got a little upset when I asked if he had checked the back to backs. He eventually did check, and lo, the back to backs on a number of wheelsets were incorrect. Opening out the wheels just a fraction cured the problem. I always make a point of checking the back to back on any wheels, from any source, that I fit.
Thanks Dhu Varren for both replies. I will check the wheels and the BEMF settings. On the TCS T1 decoder there is a setting CV182 to adjust the BEMF to suit 3 pole motors which I will also try. I swapped the TCS with a Digitrax for a test run as they use the same 9 pin harness but not much difference, so I am going to focus on the wheel pickups. There is no doubt the Bachmann 0-6-0s are in a different league to the Hornby 0-6-0s as regard mechanical build quality and decent electrical pickup on all 6 wheels. I'm just fond of my 25yo old GWR pannier tank, but won't even attempt to DCC my 37yo 0-6-0. If I get the wheel pickup working better I may change the X04 to a 5 pole motor I salvaged. The Bachmanns are split chassis so I need to get a few tools so I can tab screws into either chassis metal halves for soldering the red/black decoder pickup wires, and then insulate the enclosed motor from the chassis.
PS: Re the terminus track layout, preliminary tests with MM 071 and MM 141 have proved successfully running over the point work and double slips at crawl speed. Again a problem may be outsides metal wheels on some rolling stock as you suggest. Some of my ancient Lima BR Blue/Grey have very deep flanges and may need rewheeling with plastic or shallower flanged metal wheels.
-
List price for MM's Mk 2's is €44.99
And I hate to think what the price of the Super train ones coming out for Christmas will be, probably nearer to €60!
I thought it was €49.99. That's what most dealers are listing at. Most sterling sites had them listed at £44.99 (i.e. GBP), but sterling and the Euro have drifted significantly apart in the past four months. Glad I collected my GWR, LMS, BR and LNER coaching stock 20 years ago before todays high prices.
-
Its funny what you learn all the time. Nearly gave up on an old X04 Hornby 0-6-0 Panier Tank DCC conversion. Had a TMS T1 decoder installed, but very shaky running, in fact worse than I remember on DC. Put it back on DC but it was running quite well for it's vintage. So did a full decoder reset and now its running as well on DCC as it had on DC. Bizarre. The only settings I remember changing 1st time around after I fitted it were standard CVs 2,5,6,3,4. I guess the BEMF somehow modifies its algorithm based on these CVs and it didn't suit the old X04 motor. Might try another decoder in her to see if that make a difference even though she is well enough ok now for an old chassis.
Any words of wisdom or suggestions for those who have already been in these 'pot holes'?
-
Just seen the price of them 35.99!,paddy's coaches @45 come on now.
In fairness while the dapol are nice coaches, I don't think they are exact scale replicas of any particular prototype that ran in Ireland, rather approximations, whereas MM Cravens are exact replicas and have features like sprung buffers, so all in all the price of the Dapol coaches seems about right. Btw, I haven't had to pay more that €40 for any MM coaches so far this year from a variety of vendors. Now if I could find a source of nice RTR CIE laminates/Bredins at sensible prices!
-
Hi Noel,
Your terminus has very complex trackwork with lots of crossovers and double slips etc. if I remember correctly. You may want to post a shot of this for Dhu Varren and consider what the solution is for the whole layout, just in case (say) rewheeling everything solves your problem here only for it to recur when you hit the terminus conversion. Just a thought
HI DC
Thanks. Yes the double slips and cross overs may pose a problem unless adjusted for DCC, but I will do some test runs over it next weekend with various rolling stock. It was wired for DC block sections 19 years ago so I may just have to leave all sections switched on for a DCC test. I was about to start scenery filling this weekend (i.e. foam + plaster) but have put that on hold until any wiring adjustments needed for DCC have been completed (i.e. 1st fix electrical).
Noel
Pic as requested. Track work approaching terminus platforms.
-
Rebelred i may have one in the spares box.
Putting it simply there is no comparison, the later mm 201 is way better excellent running, more power than the lima and more controllable.
The lima ones can be gti'd on dcc but the wheels, mechanism and the detail on the loco will always let it down incidently Gerry Byrne of this parish done a very good article on dcc conversion including sound on the lima 201 in model rail a few years back.
My lima 201 never ran well and is destined to be a shed dweller on my layout.
Thanks RS. I was thinking of buying one 201 class in one of the later liveries just to have one for posterity. My interest in Irish railway stock stopped with the 'orrible fischer price livery of the MkII super trains. We all have our own favourite period probably due to the era we personally travelled most on Irish trains. For me it is the 1960s and 1970s era especially in black livery pulling black and tan laminates, park royals, and non-breaked loose coupled goods wagons, I tolerate the modernistic cravens, but not interested in day glow orange roofed mkIIs and IIIs. It's funny because in real life the eye line viewing mk2/3 was such the the orange roofs didn't seem so stark, but with models overhead view one is looking down at them and all you see is orange plastic!!!
Suppose roof weathering would help, but they are also very long. -
Noel, didn't you get some good results when you converted older locos to DCC. Maybe older 201s would still be acceptable compared to their newer siblings rather than scrapping them if you already own them. If you're going to purchase, then going with the MMs would probably be far superior
Thanks DC. I'm only at the beginning of a long road to DCC part of my loco collection. Mixed success so far, but that is mainly because the older locos simply don't have enough reliable wheel pickups and when on 12v DC I used to have guagemaster electronic track cleaners wired through the system which had an amazing effect on some of my 'poor runners' due to limited wheel pickups at low speeds crossing points. Effectively I have decided to retire my old Hornby 0-6-0s fleet (mainly GWR panniers) to static display because two axil wheel pickups (i.e. due flat wheeled middle axil) just don't cut it. Whereas the Bachman 060s of the same vintage are far superior with their all wheel sprung pickups and run over points at low speeds quite well. I have added extra wheel pickups to three Hornby 2-6-4 LMS Fowlers on the rear trailing bogies which has made a huge difference to them. The pair of Lima class 33s in CIE livery don't run great at low speed over points, nor does my 1970s class 37 and class 25. These have old style ringfield motors with pickups on only two wheels on opposite sides of each bogie with traction tyres on one side of the power bogie, so would need significant work to re-wheel and add all wheel pickups to get smooth running.
It looks like all the Bachmann steam locos will run well when converted to DCC, but the work especially with the split chassis models will take time. My 20yo Hornby tender drive steam locos should be OK. Enjoying working at a workbench again, but boy my eyes are not the same as when I last did anything like this. I'm going to have to get a pair of 'modelling' glasses (i.e. as well as reading and driving glasses)
If buying locos in the future I will limit the choice to all wheel sprung pickups and drive on a minimum of three axils for steam and all wheel both bogies for diesels (i.e. like MMs and newer Bachmanns I've seen).


Replacement wheels for old Hornby BR early MkIIs
in Questions & Answers
Posted · Edited by Noel
Thanks Magpie. That is very informative especially the mk2 history which I was not aware of. Now do I re spray them CIE, or keep them in BR livery for childhood nostalgia and run behind a 40yo Hornby CL 37. On balance I think I'll just rewheel and keep the old blue/grey livery. Cheers
Noel