
Glover
-
Posts
144 -
Joined
-
Last visited
-
Days Won
6
Content Type
Profiles
Forums
Events
Gallery
Blogs
Everything posted by Glover
-
Colin, at the risk of being accused of blowing my own trumpet, you might want to take a look at my workbench thread: Glovers Workbench. It covers a number of coach (and wagon) projects built from what were originally British stock. Cheers, Glover
-
CIE Laminate Coaches - Worsley Works - ECMbuild in 4mm
Glover replied to murrayec's topic in Irish Models
As Capt Mannering would say, ' I wondered who would be the first to spot that'. You are right. I'm reasonably good on the male:female bit; it's just the rockers, bolsters and upside down bits that confuse me! I'm actually working on Plan B but don't wait up. Many thanks, Glover -
CIE Laminate Coaches - Worsley Works - ECMbuild in 4mm
Glover replied to murrayec's topic in Irish Models
Many thanks for your kind offer of assistance Eoin. I think I'm getting there: trial and a lot of errors! I'm scratchbuilding ( in plastic) a GNR J4 brake/compo for my reproduction of the Bundoran Express. When I contacted Worsley Works, Allan advised me that this particular coach wasn't available (so, I bought two other GNR coaches from him; see the most recent entries in Glovers Workbench, in the Workbench section). I'm using the MJT 8' Fox bogie sides, as they appear to be the closest approximation to at least some of the Fox bogies used by the GNR. To those intimidated by brass (and that most certainly includes me!), you might want to look at my workbench. I won't bring down the tone of this thread by talking about my agricultural methods..... Again, many thanks. Glover
-
CIE Laminate Coaches - Worsley Works - ECMbuild in 4mm
Glover replied to murrayec's topic in Irish Models
Jealous!! All that equipment and, more importantly, the ability to use it. I've built four Worsley Work coaches at this stage; not easy work. I'm currently building a set of the MJT rigid frame bogies. Maybe I'm thick but I'm struggling to get them done. Your photos will be very useful. Cheers, Glover -
Back in April of this year, I wrote about my conversion of the old Hornby LMS Stanier coaches into a 1953 build CIE brake/standard. I noted that I wasn't happy with the roof profile. These coache roofs were almost flat across most of their width but then turned sharply downwards on each side; I'm sure there's a proper geometric term for such curves. I had another go, using the same Geoff Kent method but with the benefit of practice, I think it has turned out better. I also renewed the corridor connectors and fixed a de-railing issue . Before and after photos below. Now, back to the hammering and banging on the workbench as I work on my Q4 project. Cheers, Glover I note that the corridor connector is a bit askew in the second ('after') photo; it's fine when it's buffered up to other stock. Glover
-
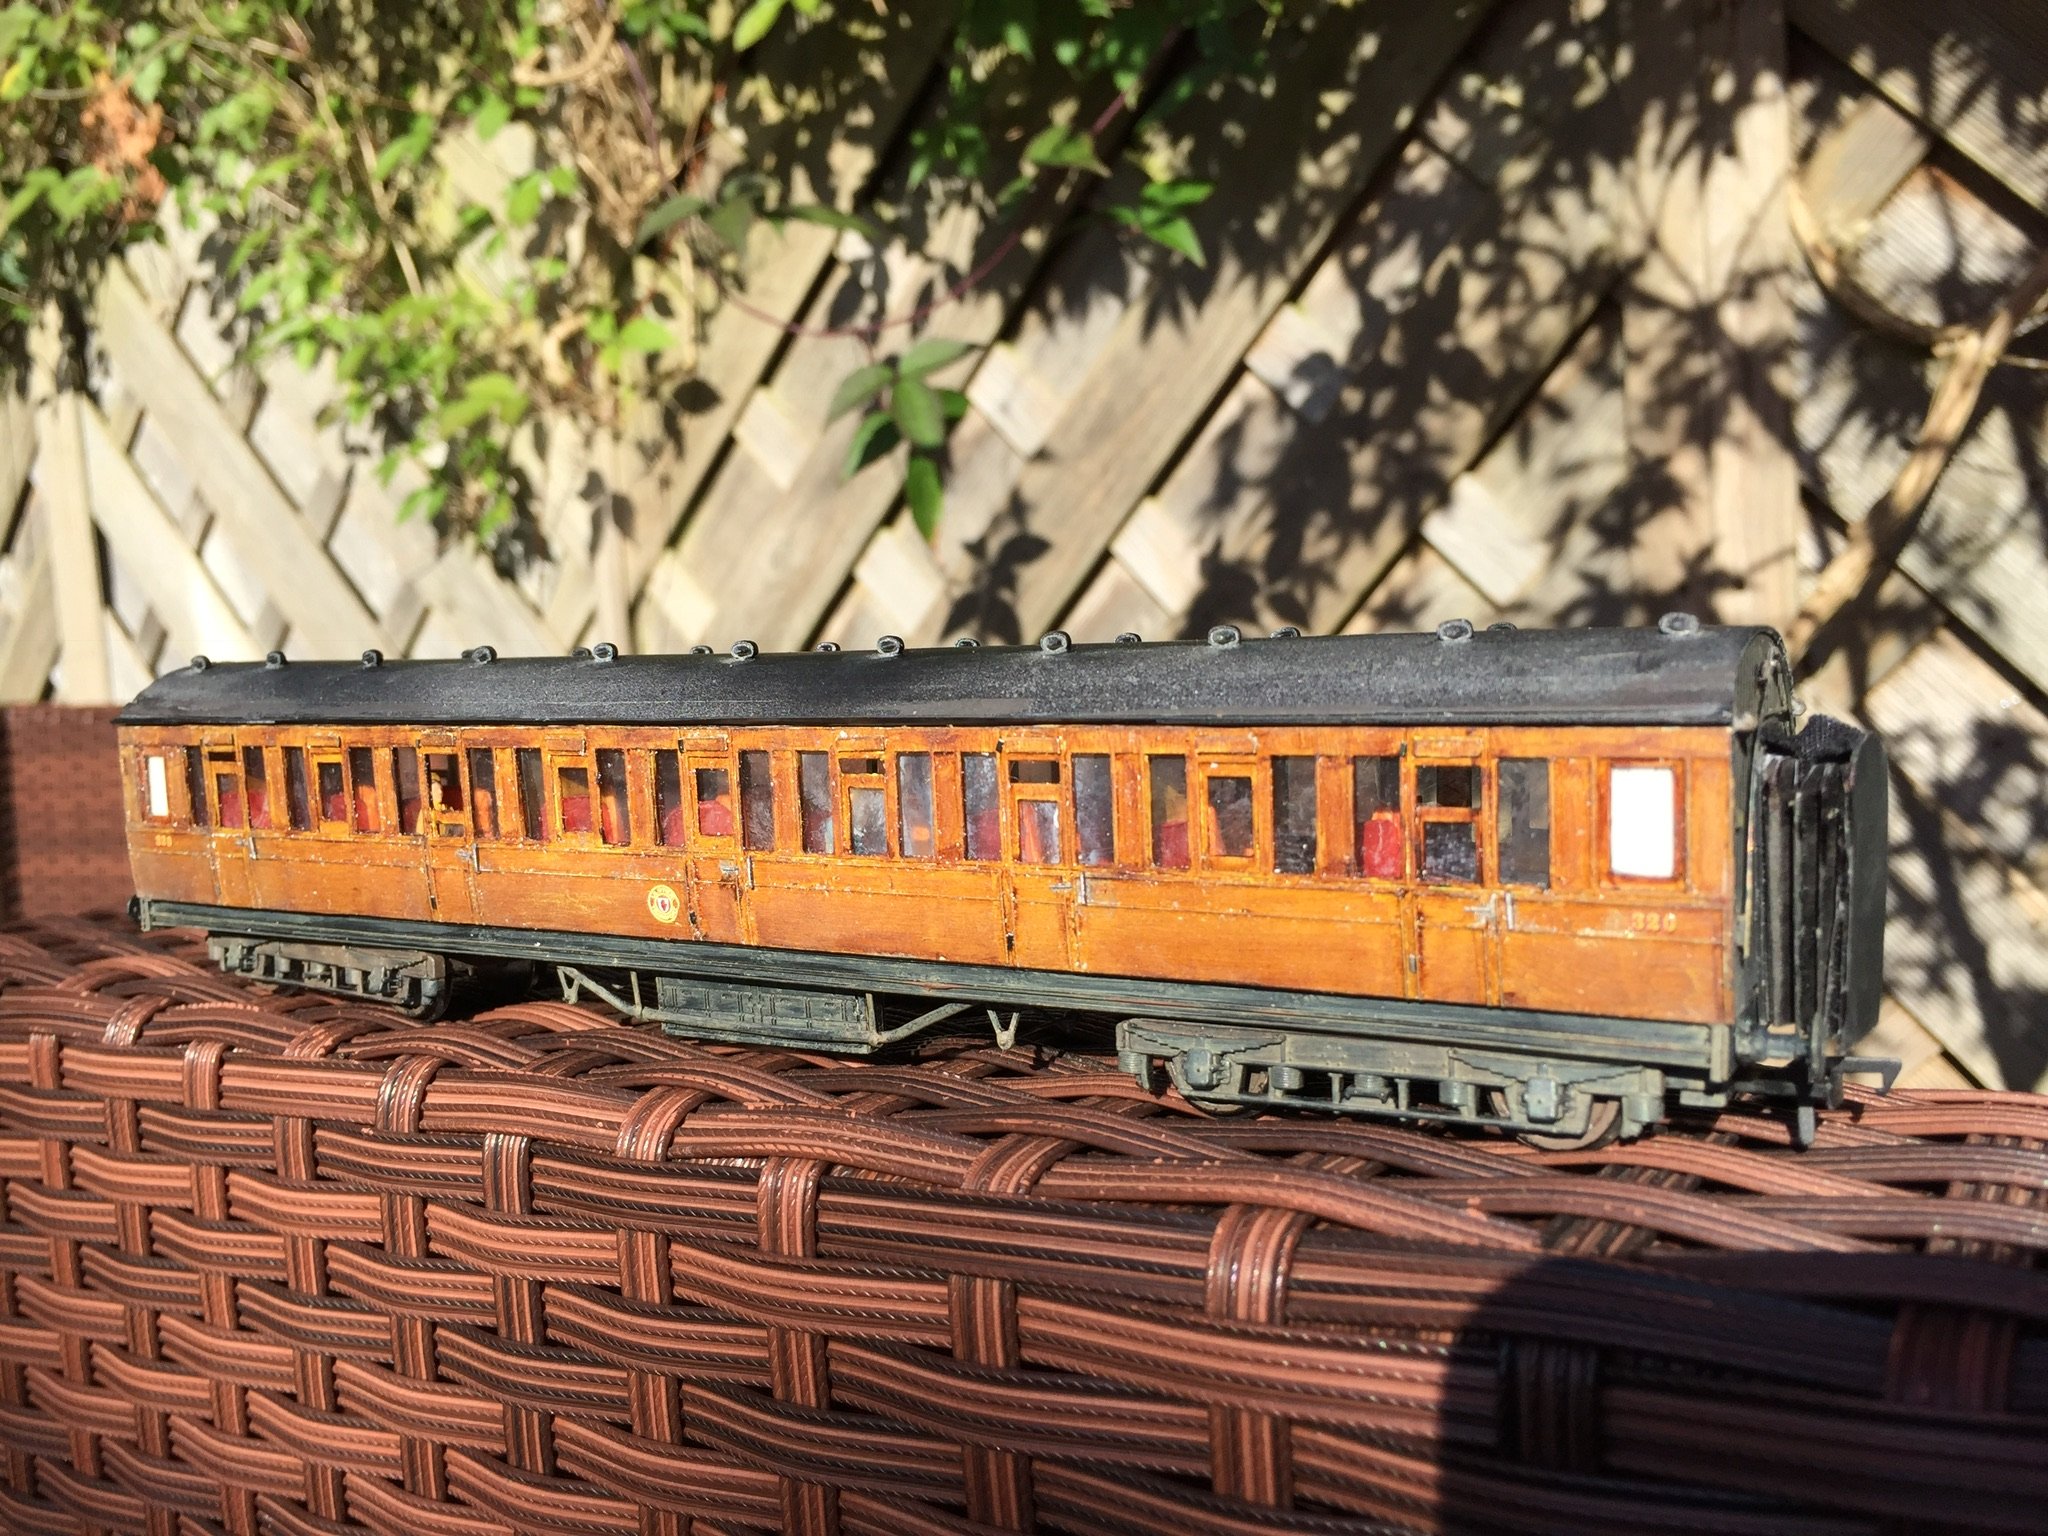
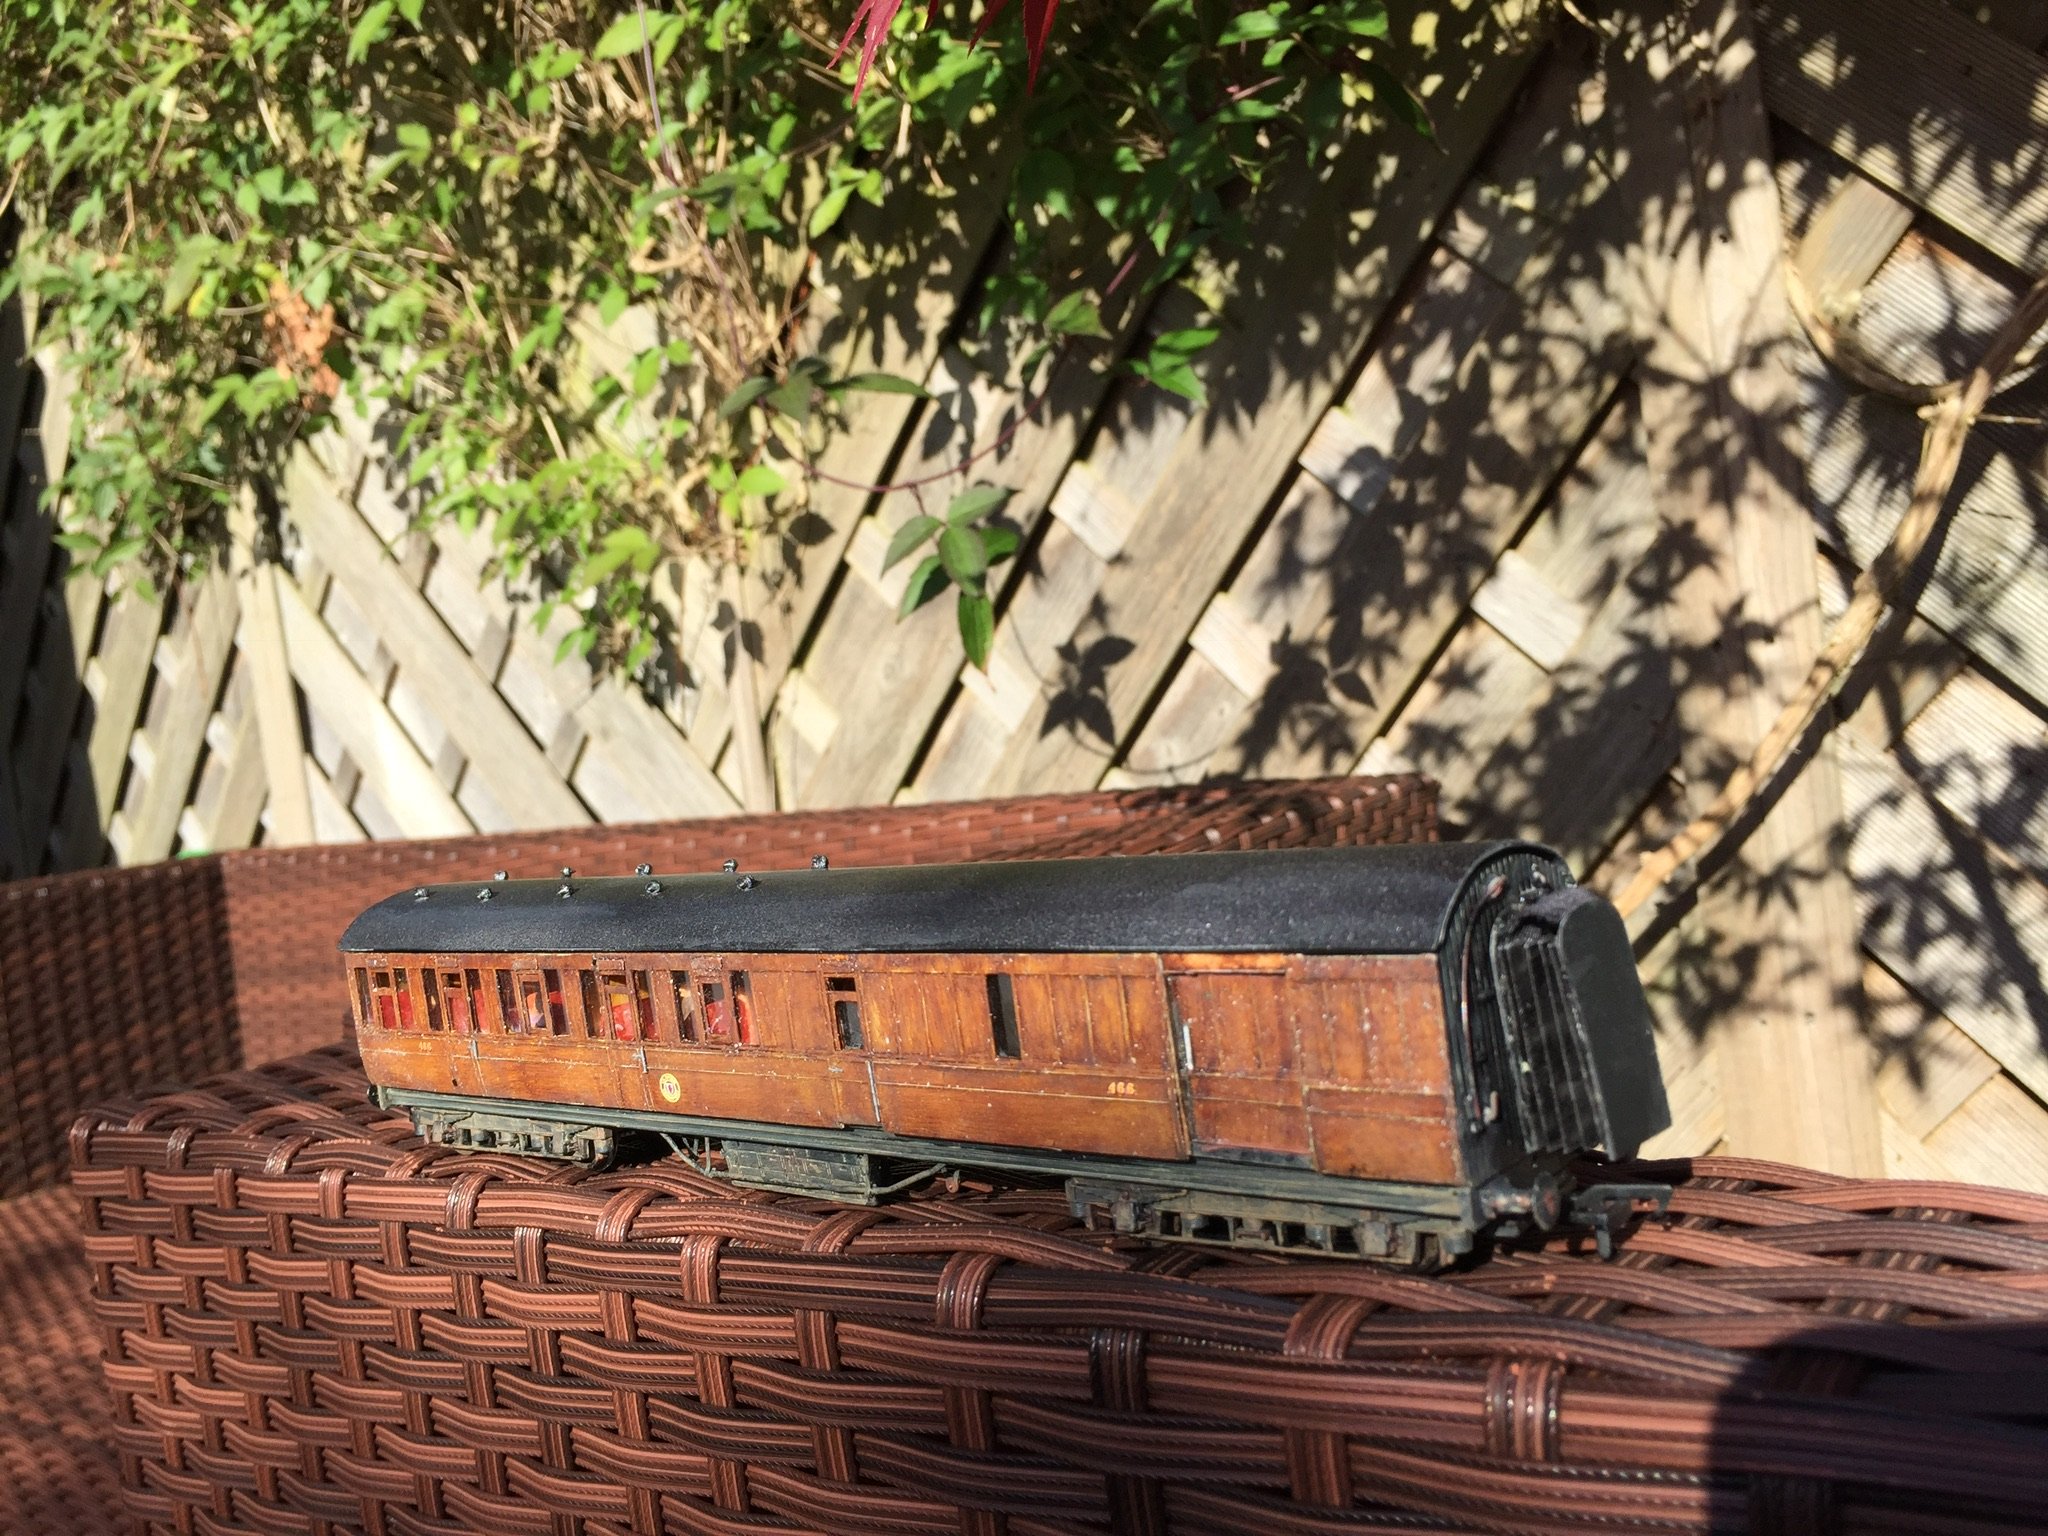
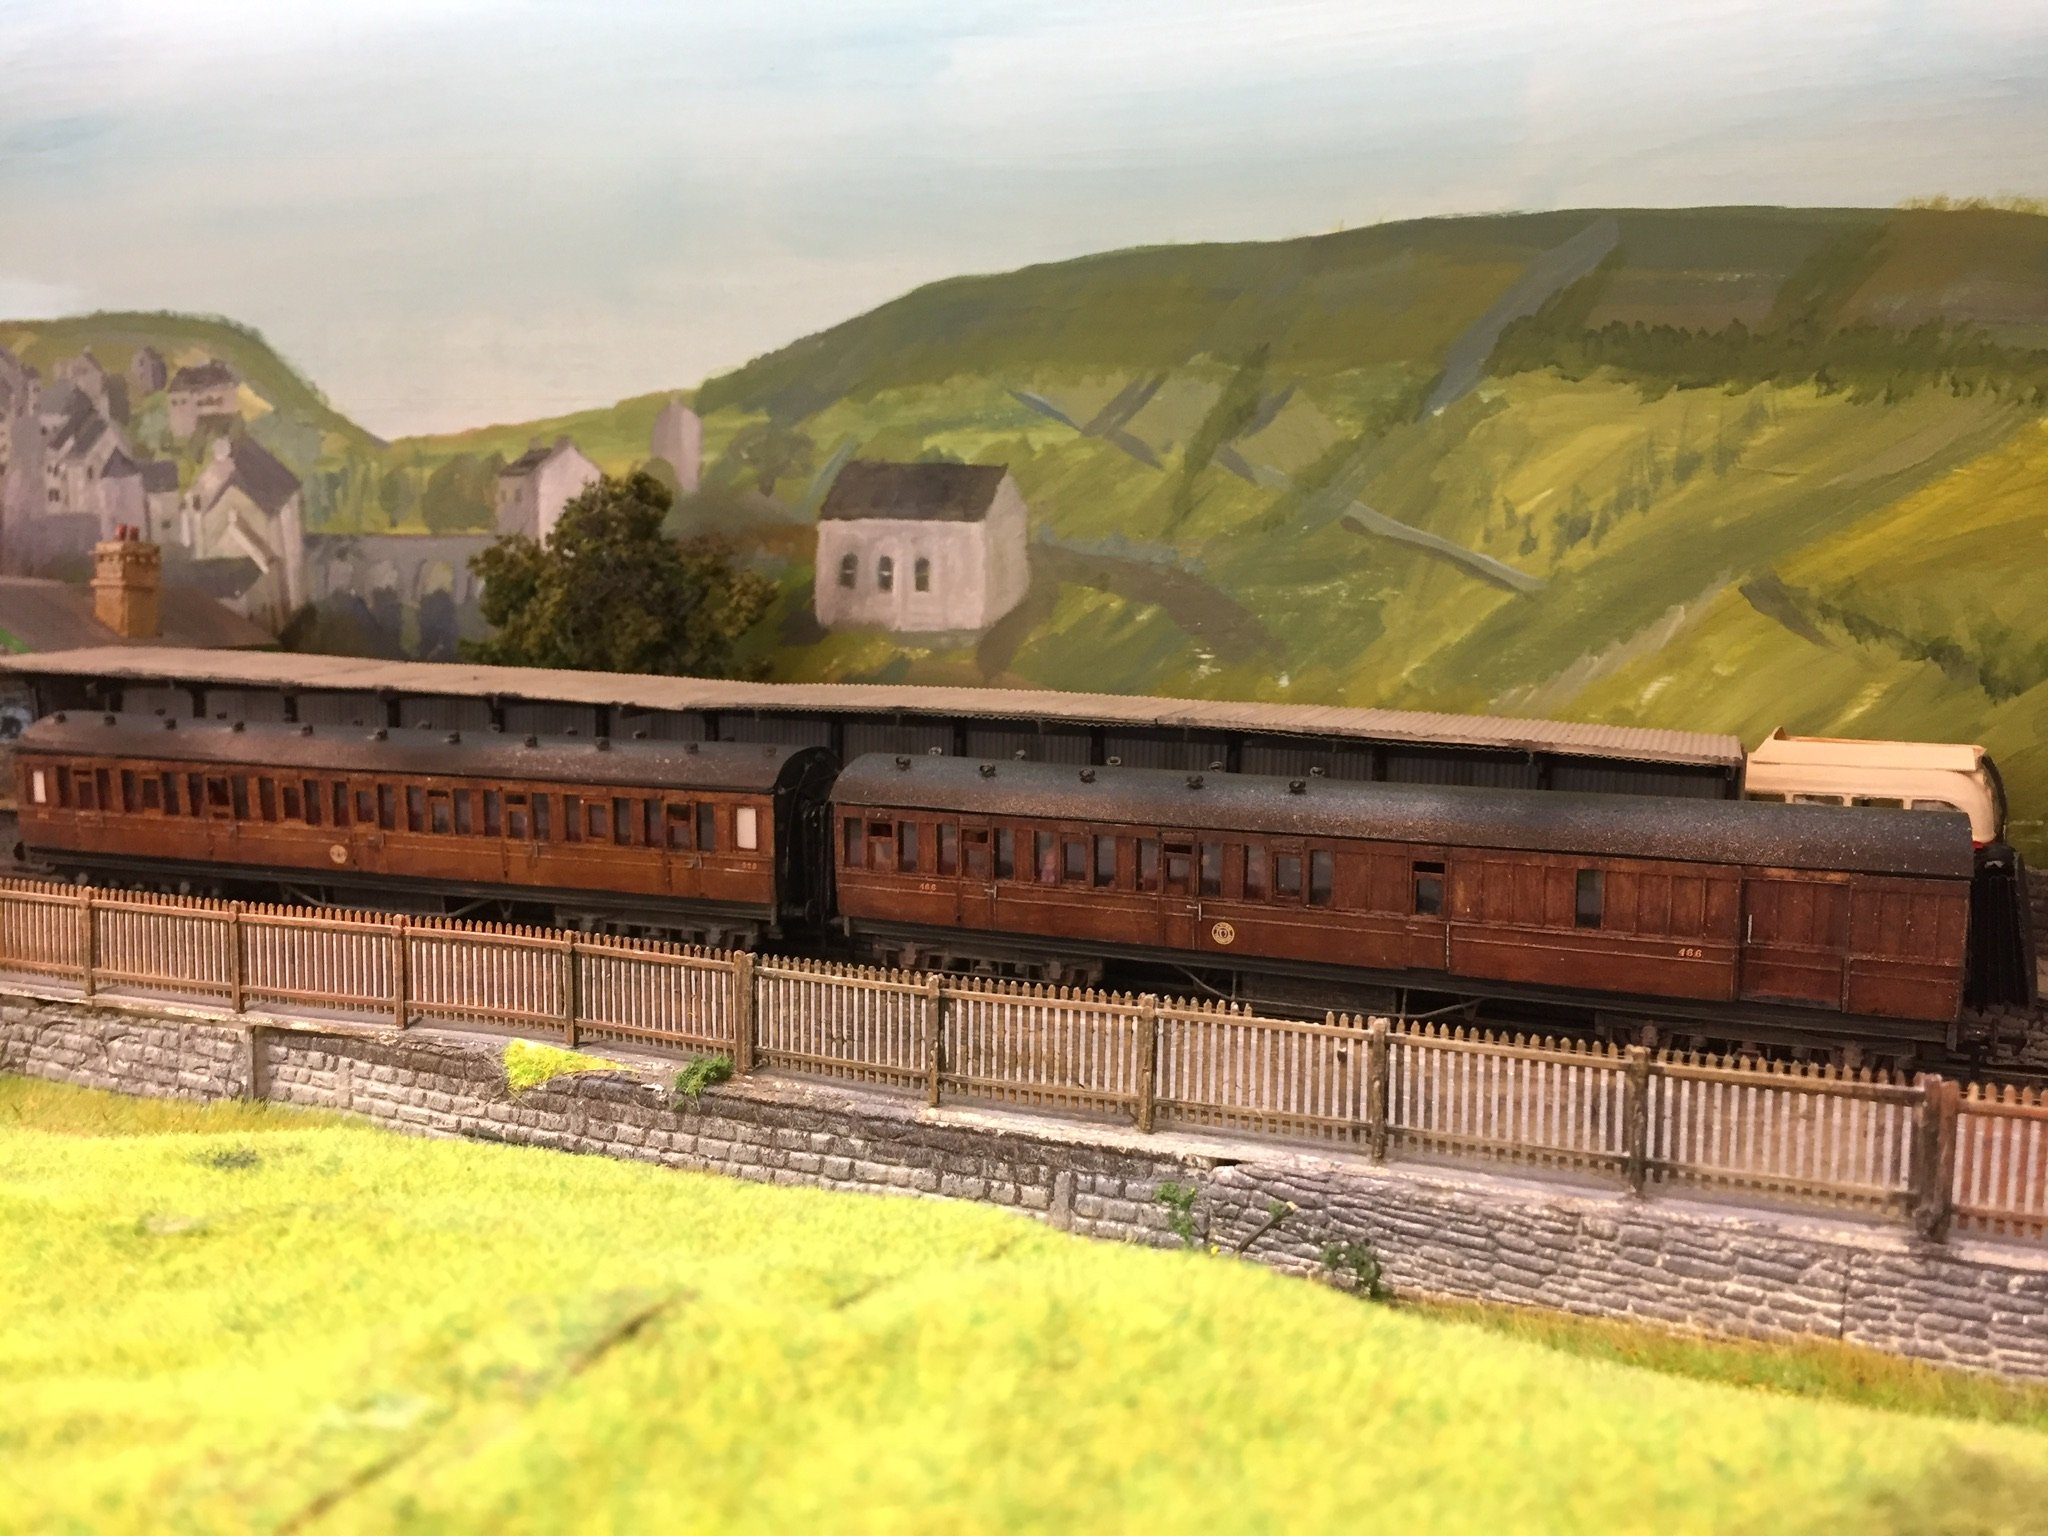
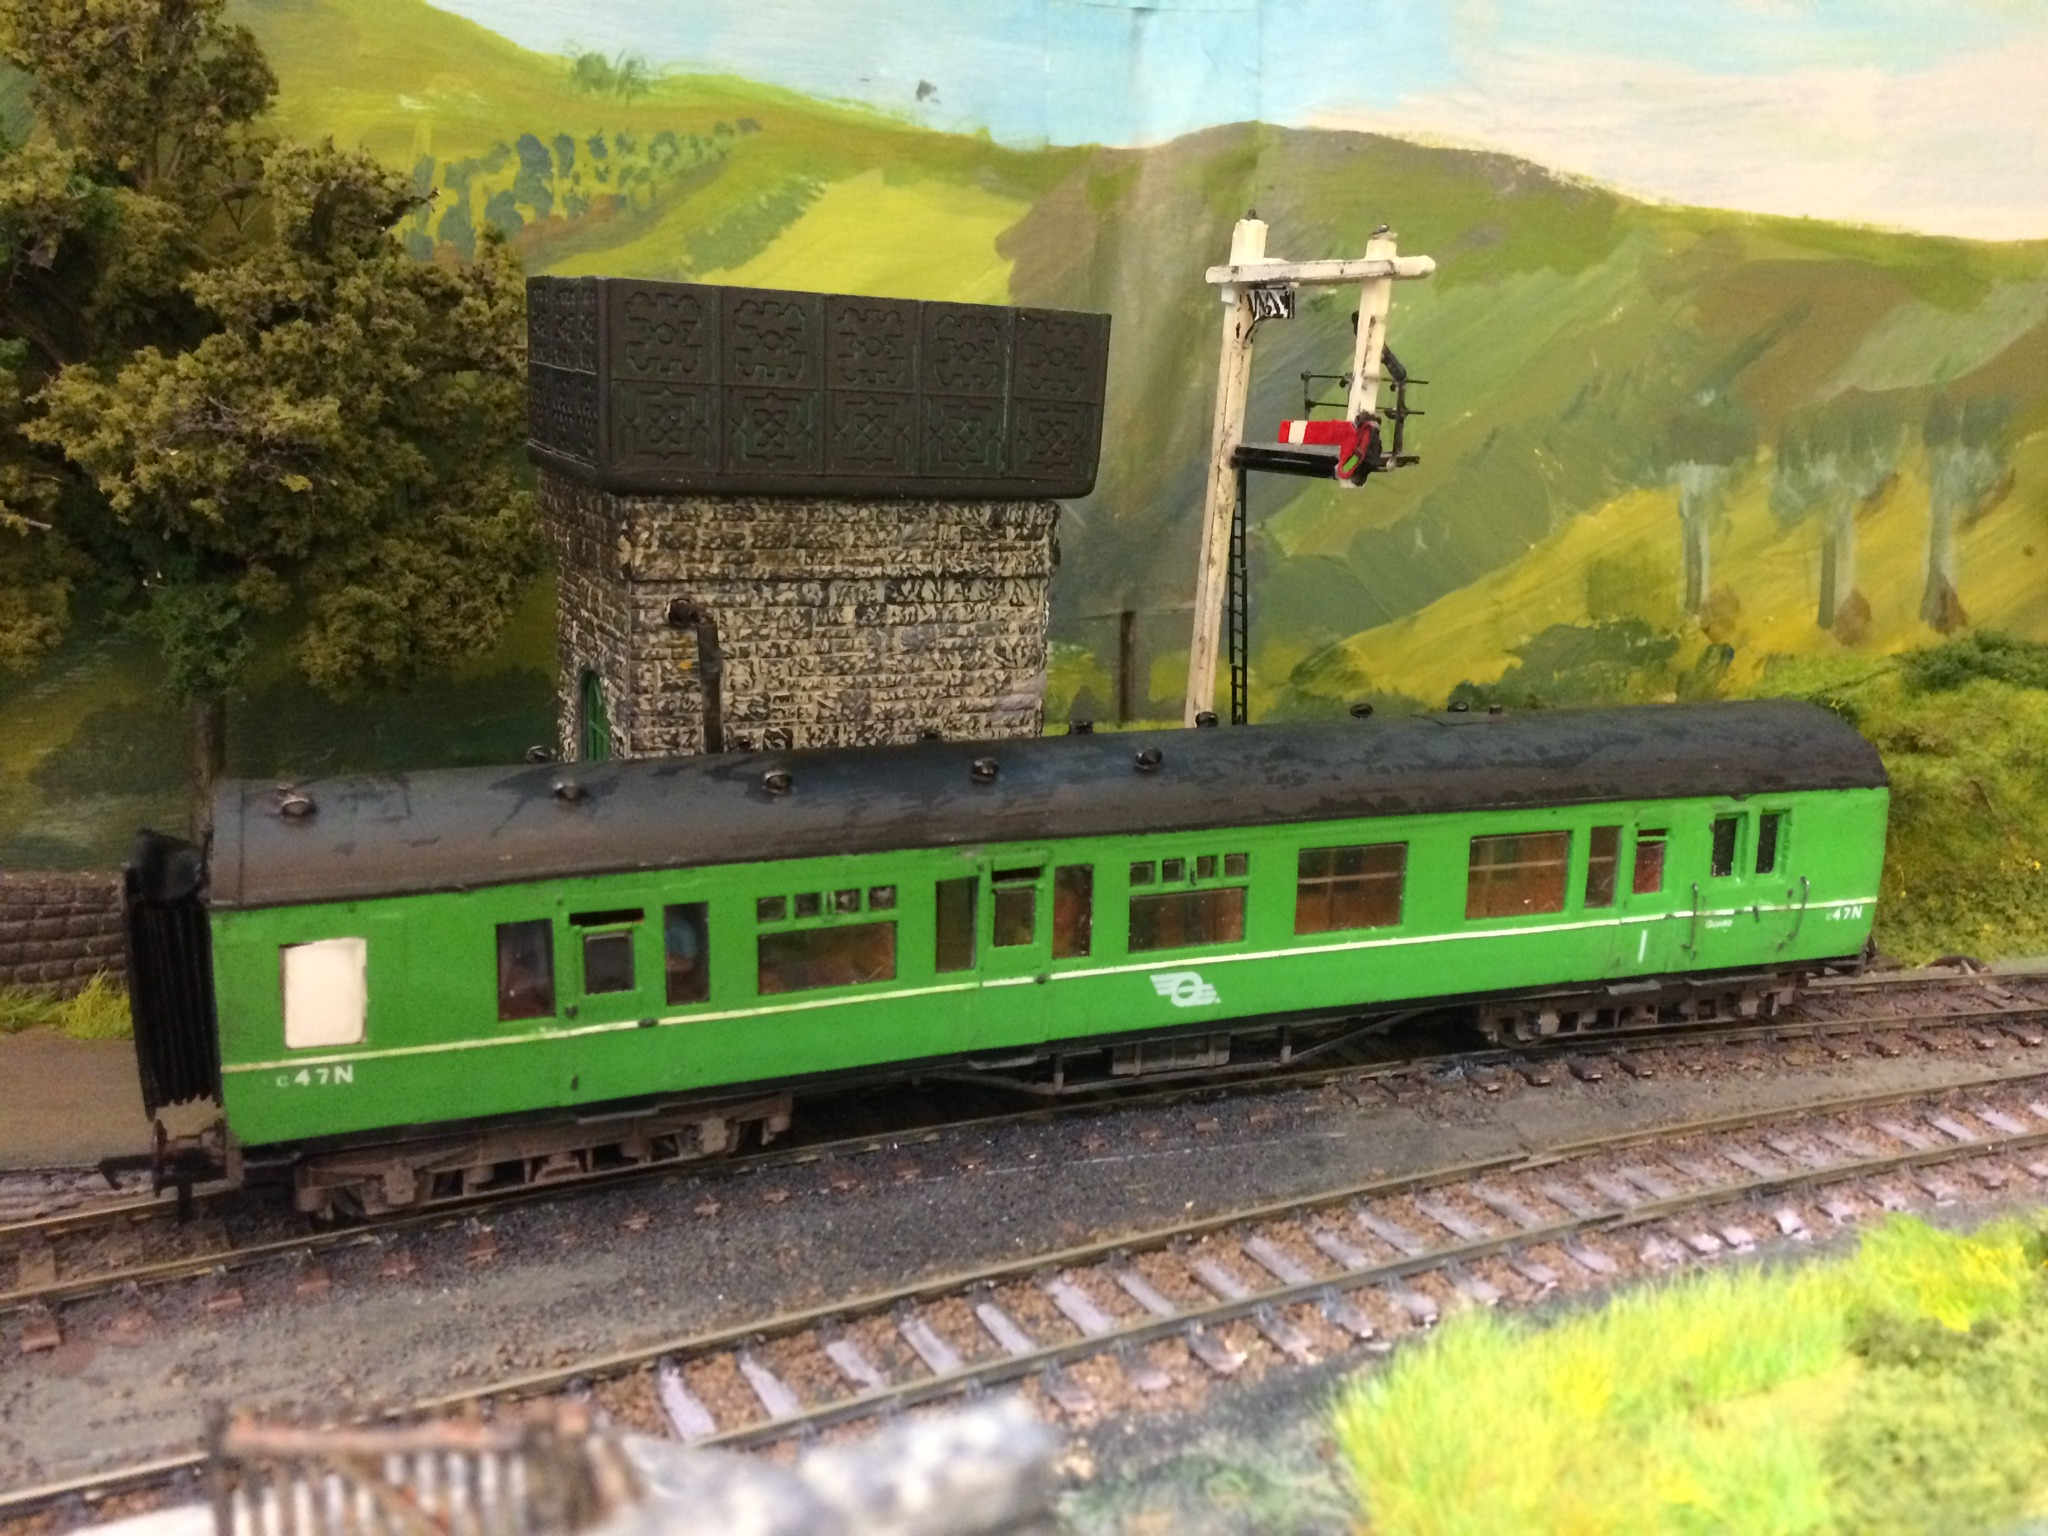
I took some photos outdoors as it shows the livery to good effect. The K8 open third was numbered 326 , by the UTA, on the green side (built 1917, withdrawn 1967). Previously it was numbered 357 by the GNR. On the teak side, the UTA number is 320 (GNR number 18). This was withdrawn in October 1963 (built 1915) and therefore it is reasonable to assume that it never received UTA green. I have used the UTA Red Hand logos on the teak side. The L9 ( brake/third) was given the UTA number 466 on the teak side and 464 on the green side. I can now run them as a both teak or both green combination or a mix, which might be more typical. Or I could if I had an appropriate loco........ A long term project.
-
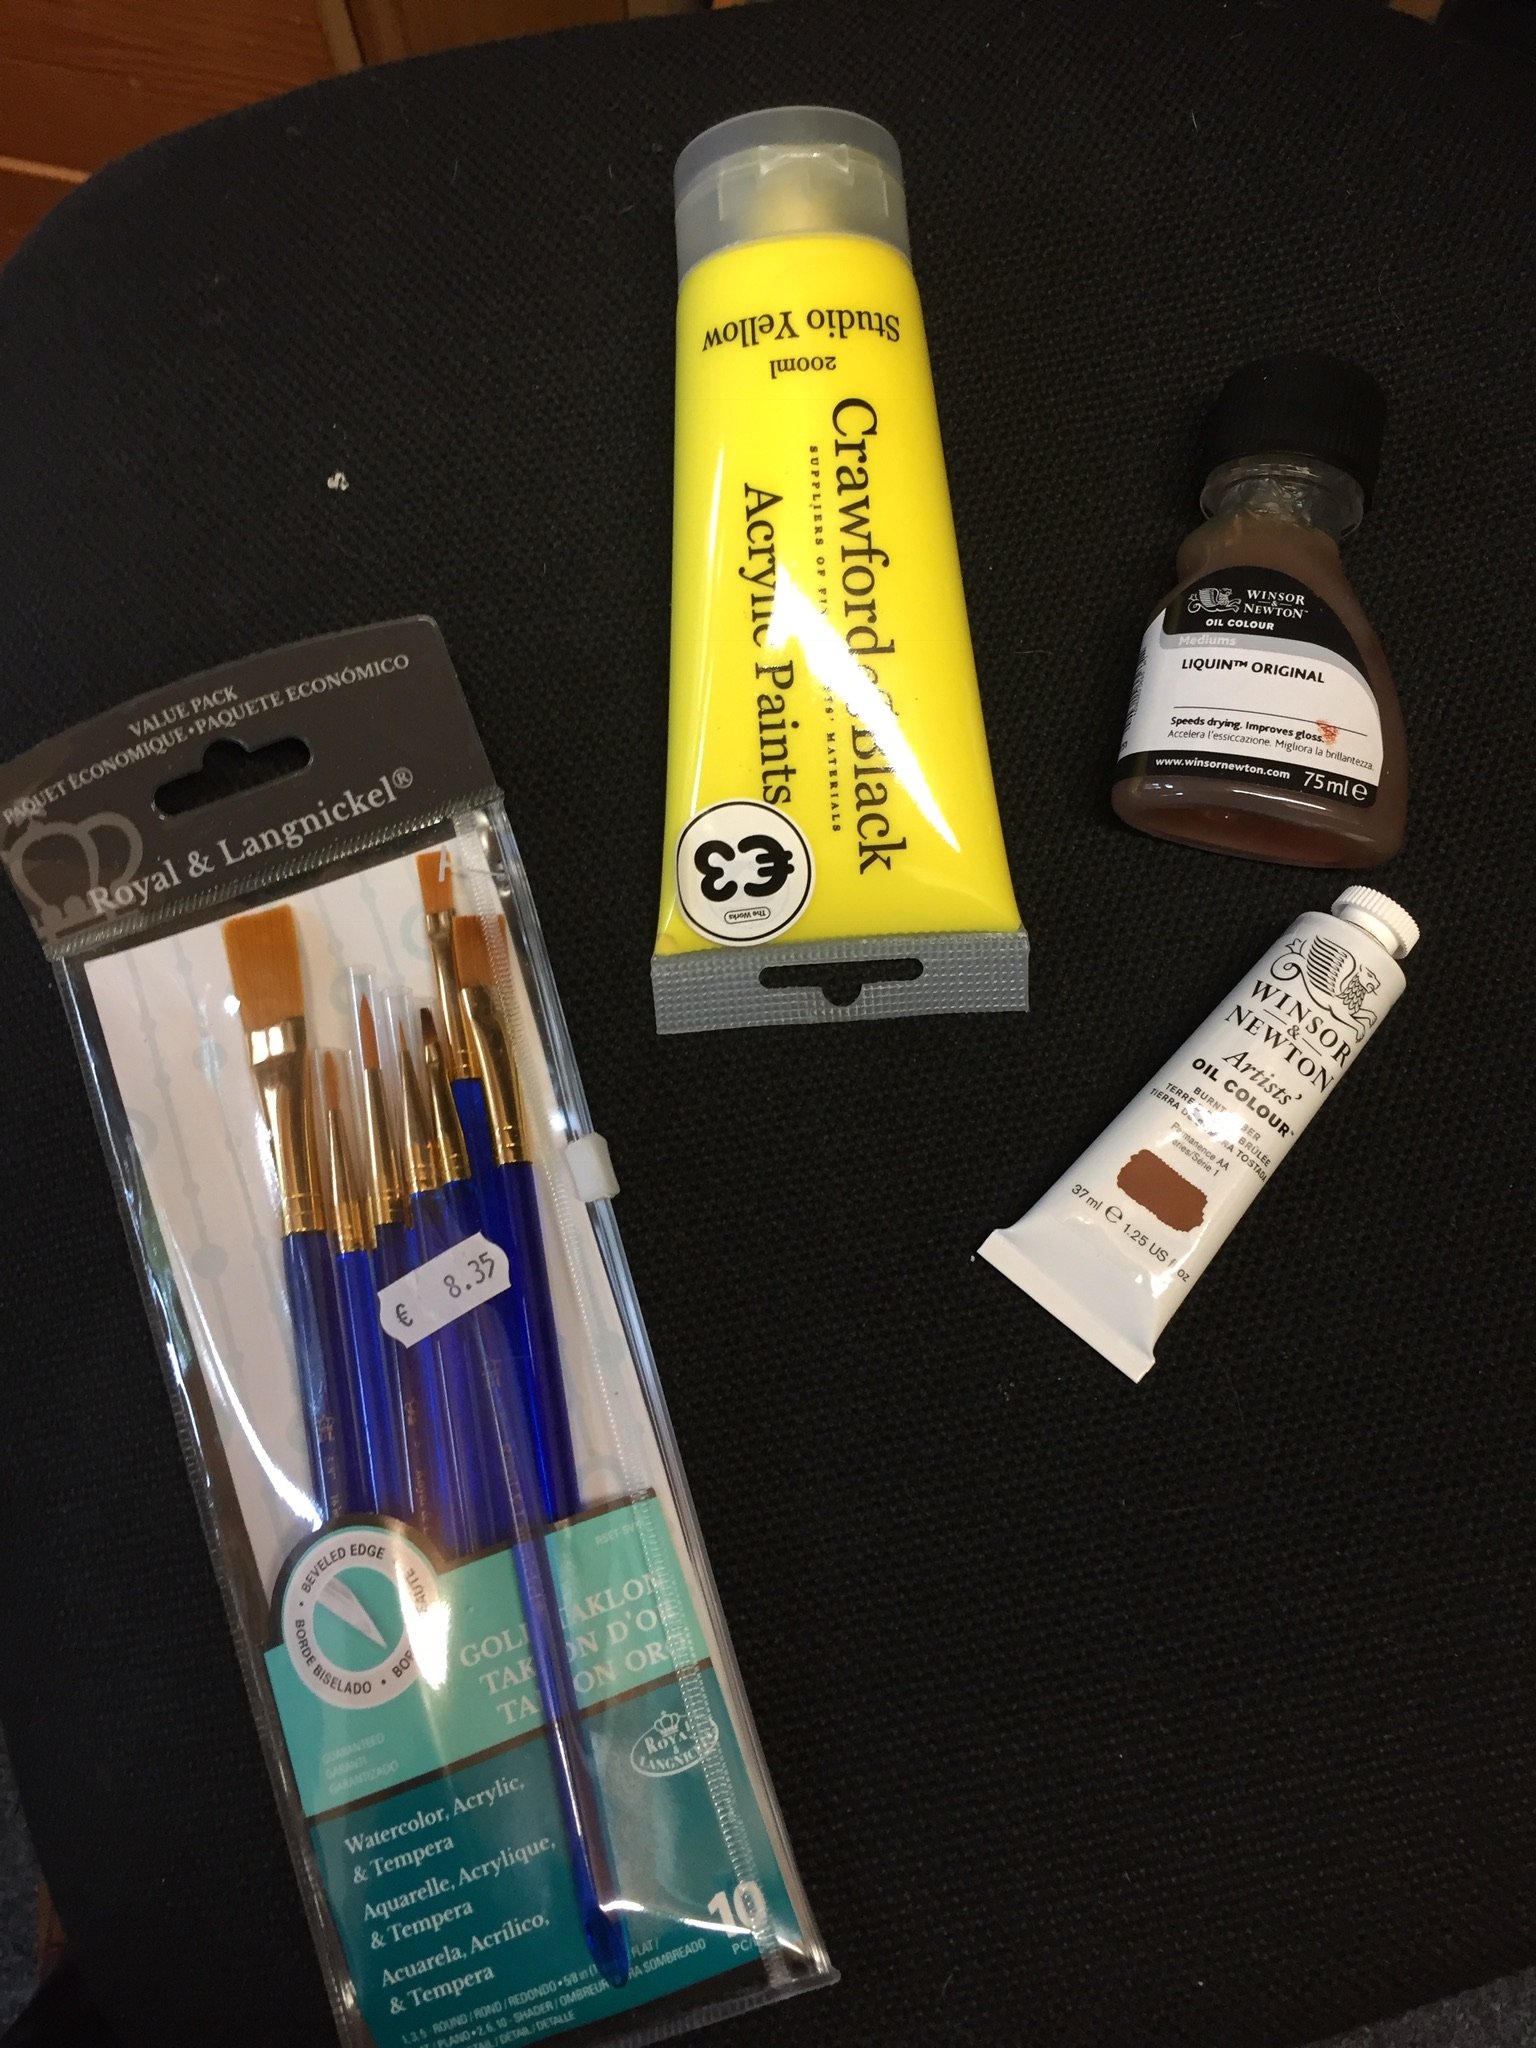
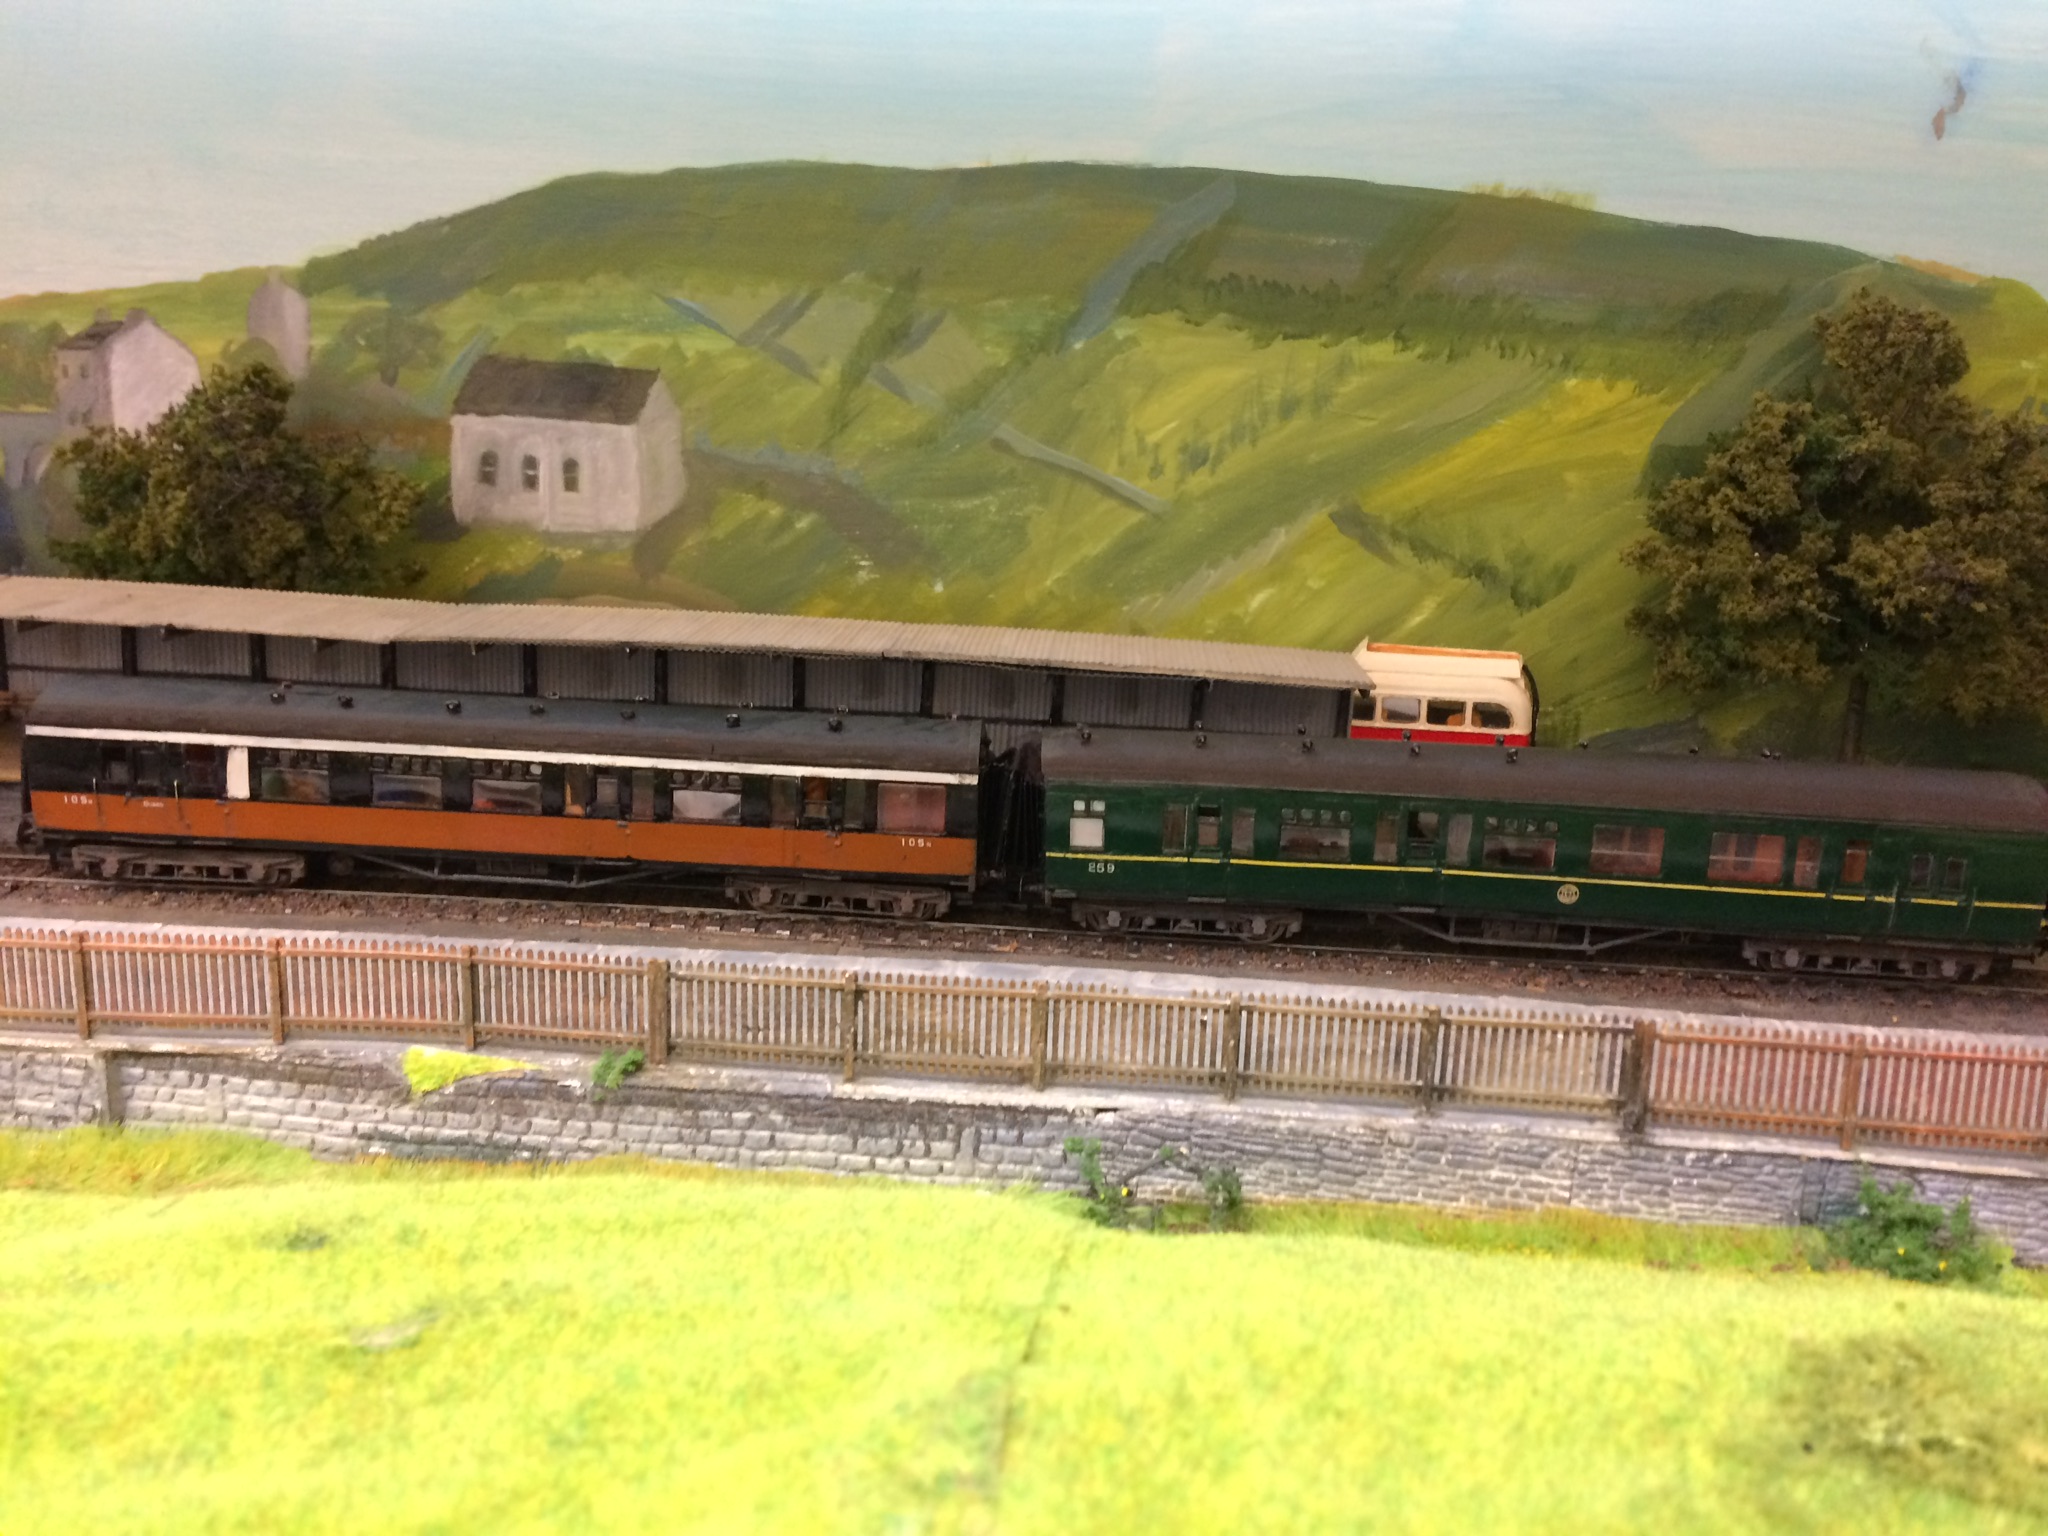
This is most certainly a first for me. The varnished wood livery was achieved thanks to a piece on RMweb by Mike Trice. Google 'painting LNER model coaches' or something similar. Essentially, apply a white primer and then a base coat of cheap acrylic paint in a colour like orange or yellow. Then a mix of burnt umber (artists oil) and something called Liquin Original, available in art supply shops. Apply this mix with Golden Taklon brushes. Finally, varnish to taste. It's actually as simple as that and I have to say that I am well pleased with the end result.
-
When the GNR Board was disbanded in 1958, the UTA immediately set about repainting the more modern, flush sided coaches into their green livery. Older wooden bodied coaches were not a priority and thus GNR coaches in their old varnished teak livery could still be seen in UTA service in 1963. There are a number of photos to support this. Therefore.......
-
How did I miss this?? One reason is that I assumed that Class 458 referred to some sort of modern DMU. Also, it's not in the Workbench section ('wags finger'). Superb work; way above my pay grade but it is comforting to know that there are people modelling Irish railways to such a high standard. Thanks for sharing it with us. Regards, Glover
-
Thanks Popeye. The roofs are scratch built, from plastic. I used the method described by Geoff Kent in the Model Railway Journal number 228. Roofs, in my experience, are one of the most difficult items to model. Irish coaches were generally wider than those in Britain, so pre-formed roofs designed for British stock are not really suitable for Irish coaches. Geoff Kents method is a bit complicated and rewards practice. I'm working on another project at the moment and will, if I remember in the heat of battle, take a few snaps of the method but we're a few weeks away from that stage. There are no rainstrips on the roof. These are noticeably absent from many GNR coaches. I'm looking at a high level photo taken in 1963 which shows five GNR coaches around Newry; only one appears to have rainstrips. Possibly they were not replaced when coaches were re-roofed. Saves a job anyway! Cheers, Glover
-
I had thought originally that I would build the two coaches as consecutive projects but then decided that there might be some efficiencies in build them together, especially at the finishing and painting stage. By and large, that proved to be true. Anyway, here are the pair, in UTA green. I have applied the post 1959 UTA logo or armorial device as I believe it was called. I have to say that as a company logo, it is singularly unimpressive. A Chairman's decision? I do hope I haven't offended the UTA fan(s)! They should be mounted on Fox bogies, 8 foot wheelbase I think. The nearest equivalents I could find were in the Dart Castings/MJT range but when I added up the cost of all the various elements (basic bogie structure, cosmetic side frames, coupling attachment etc), the cost was heading for more than the basic coach kits cost. Therefore, I have used the ever reliable Bachmann LMS bogies. The roofs are painted to represent something between black and very light grey; colour photos of UTA trains show a remarkable variety of roof colours. I mentioned previously that I often paint my coaches in a different livery on each side. Given that 1963 was a transition period, especially on CIE, I think that's a reasonable approach. This is the UTA green side; more maybe tomorrow..........
-
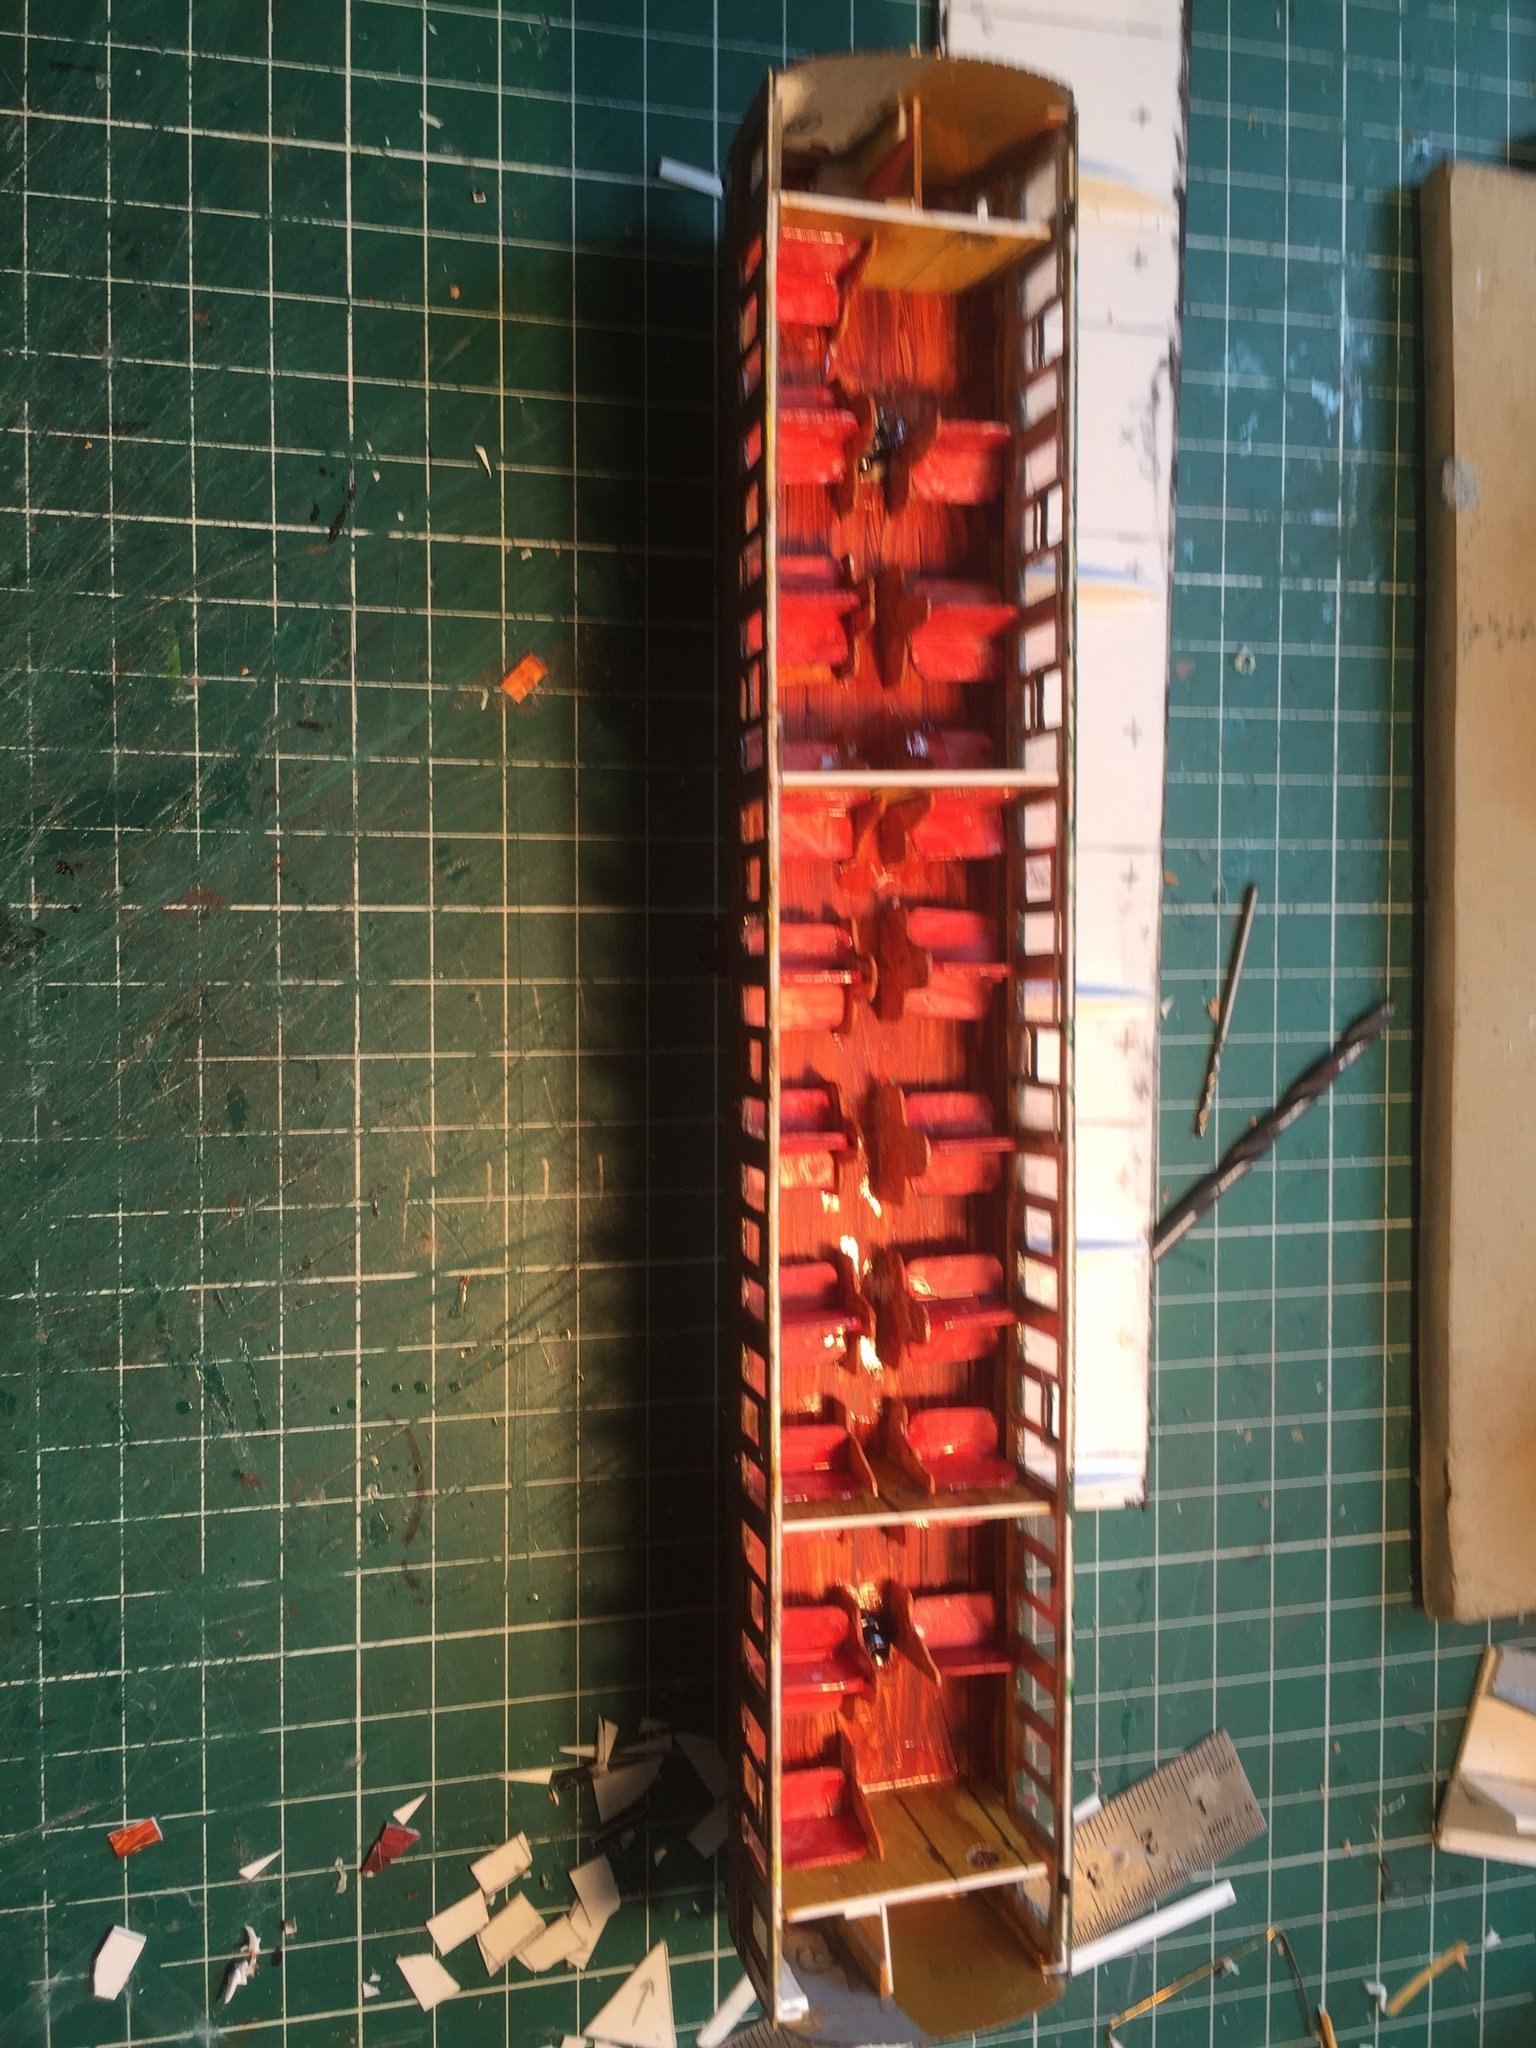
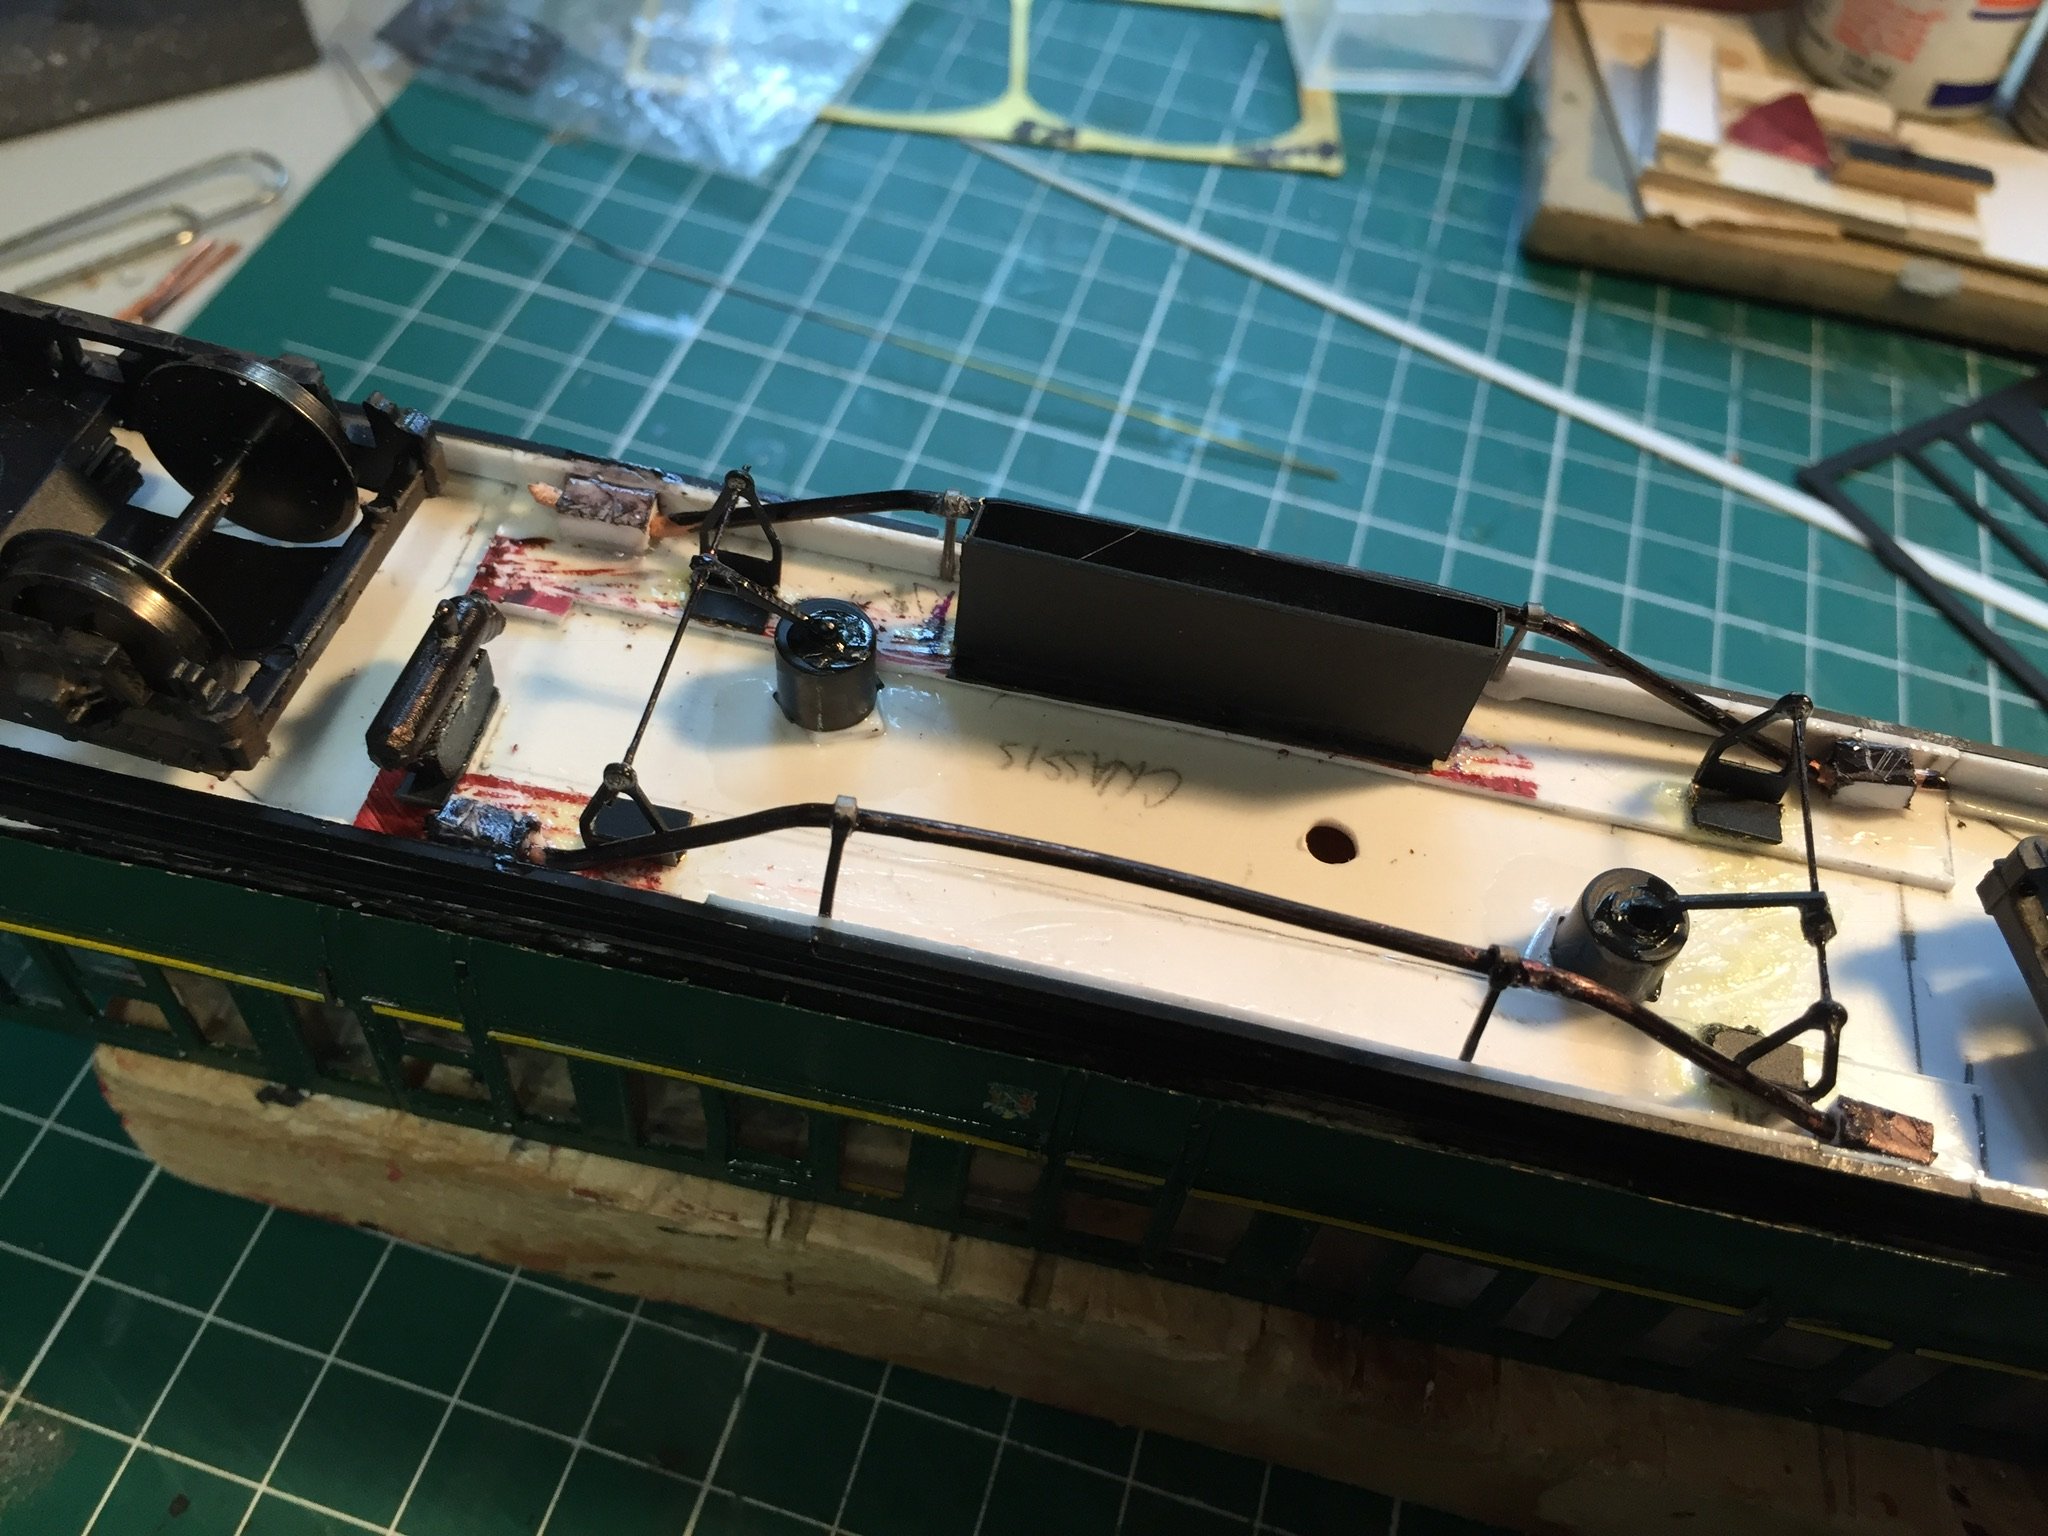
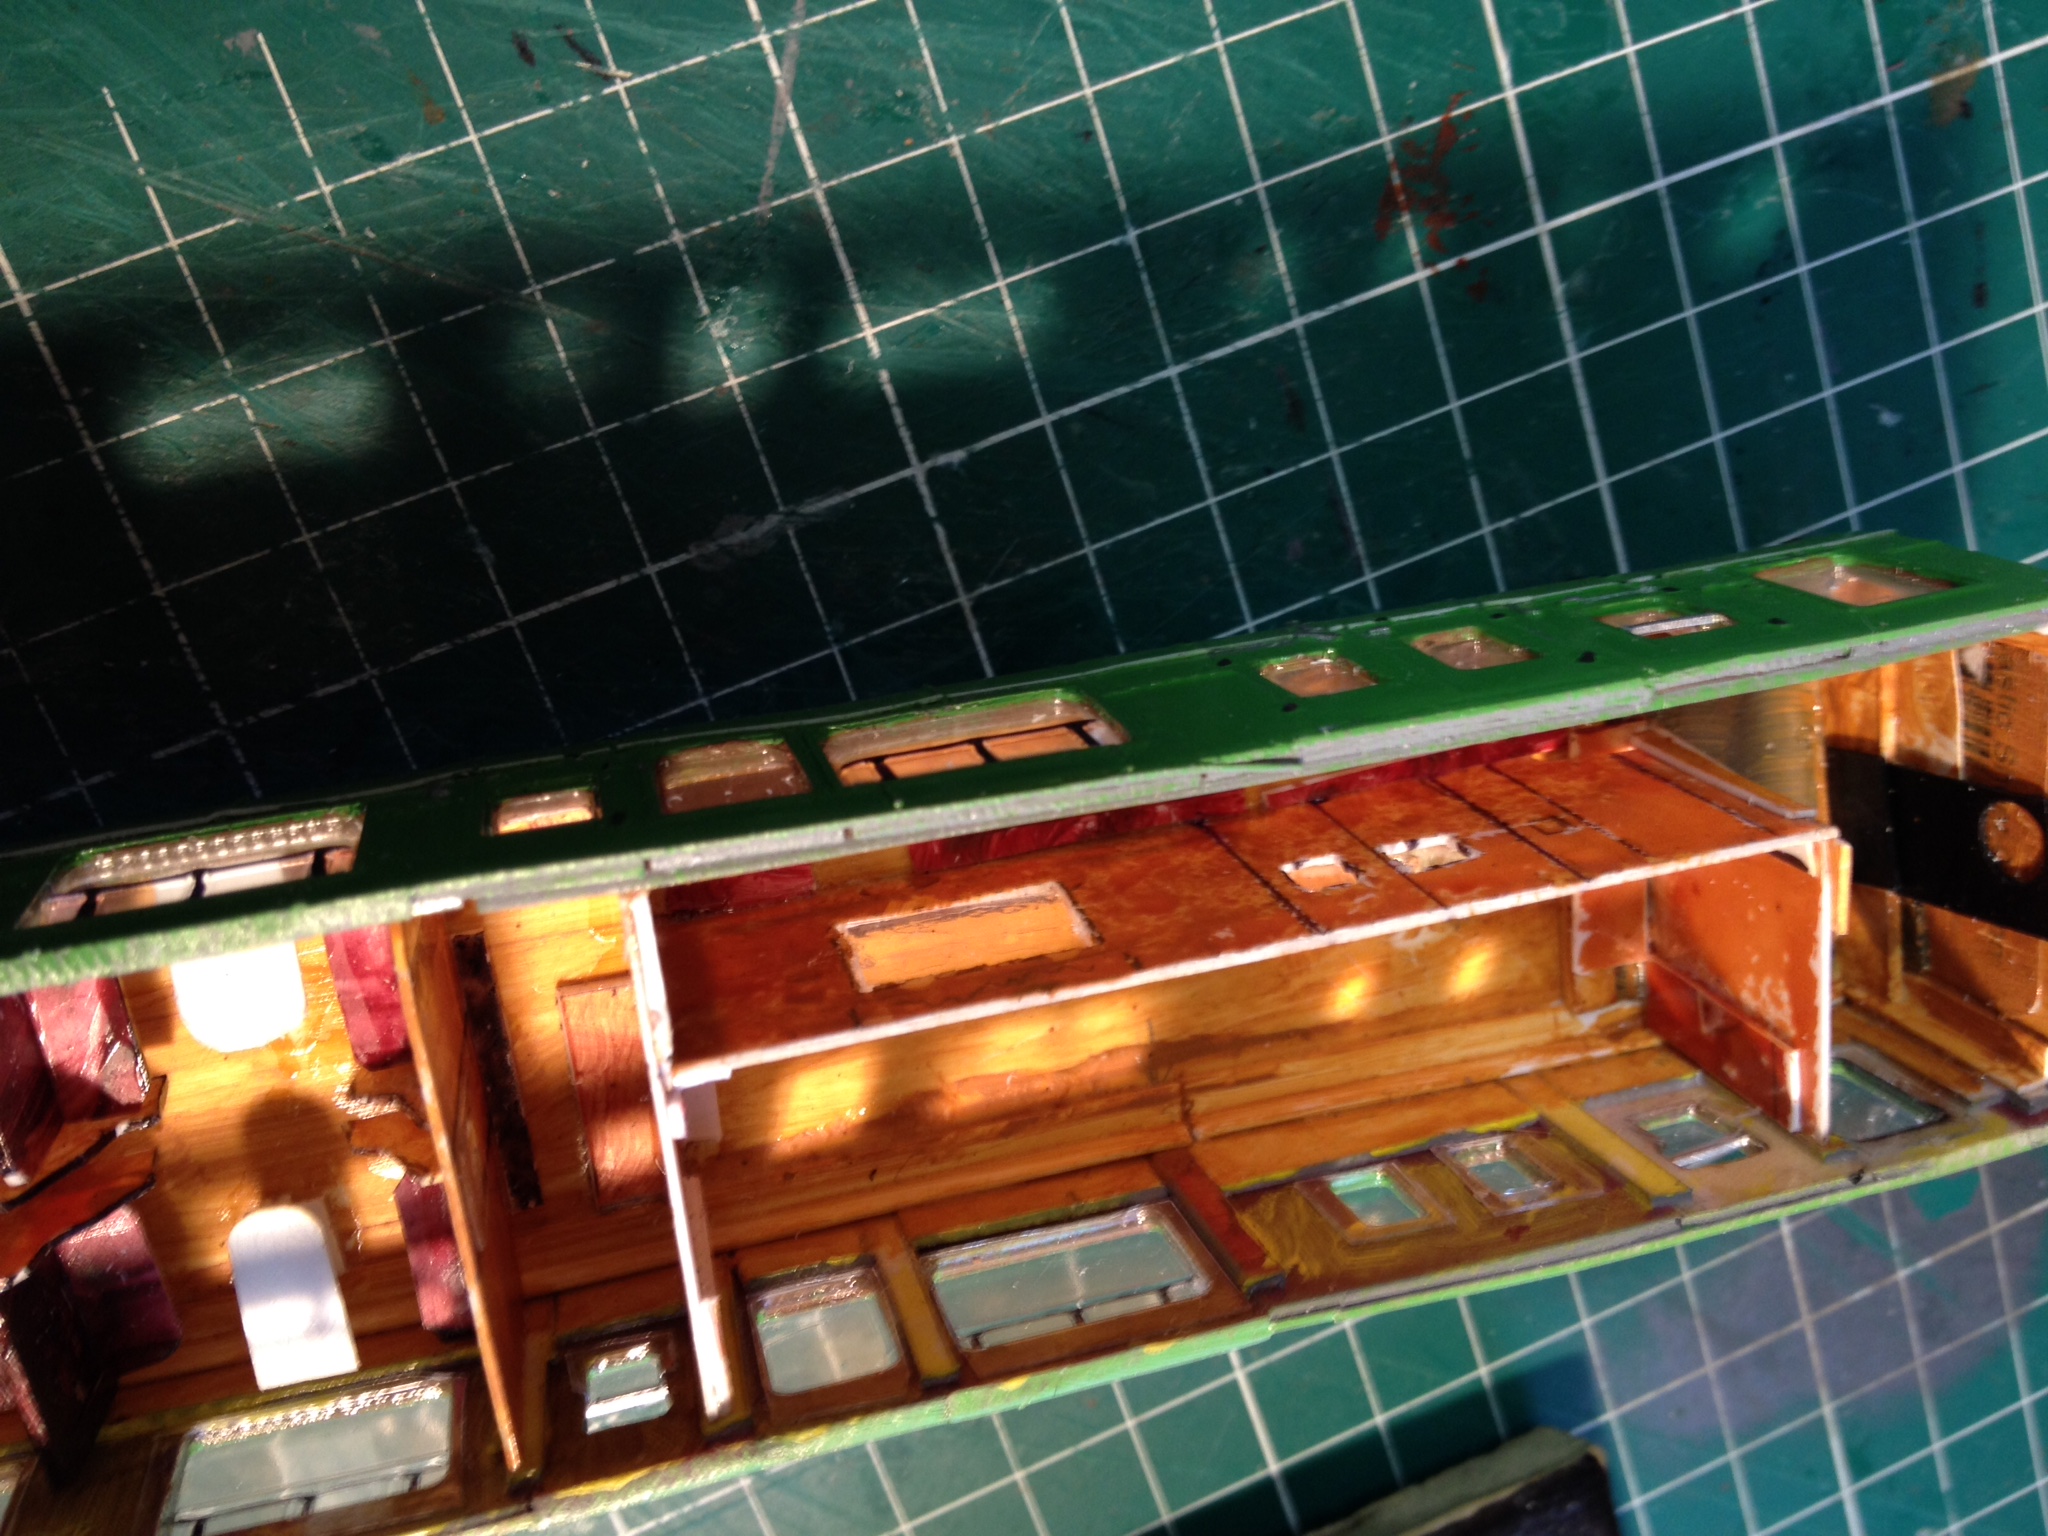
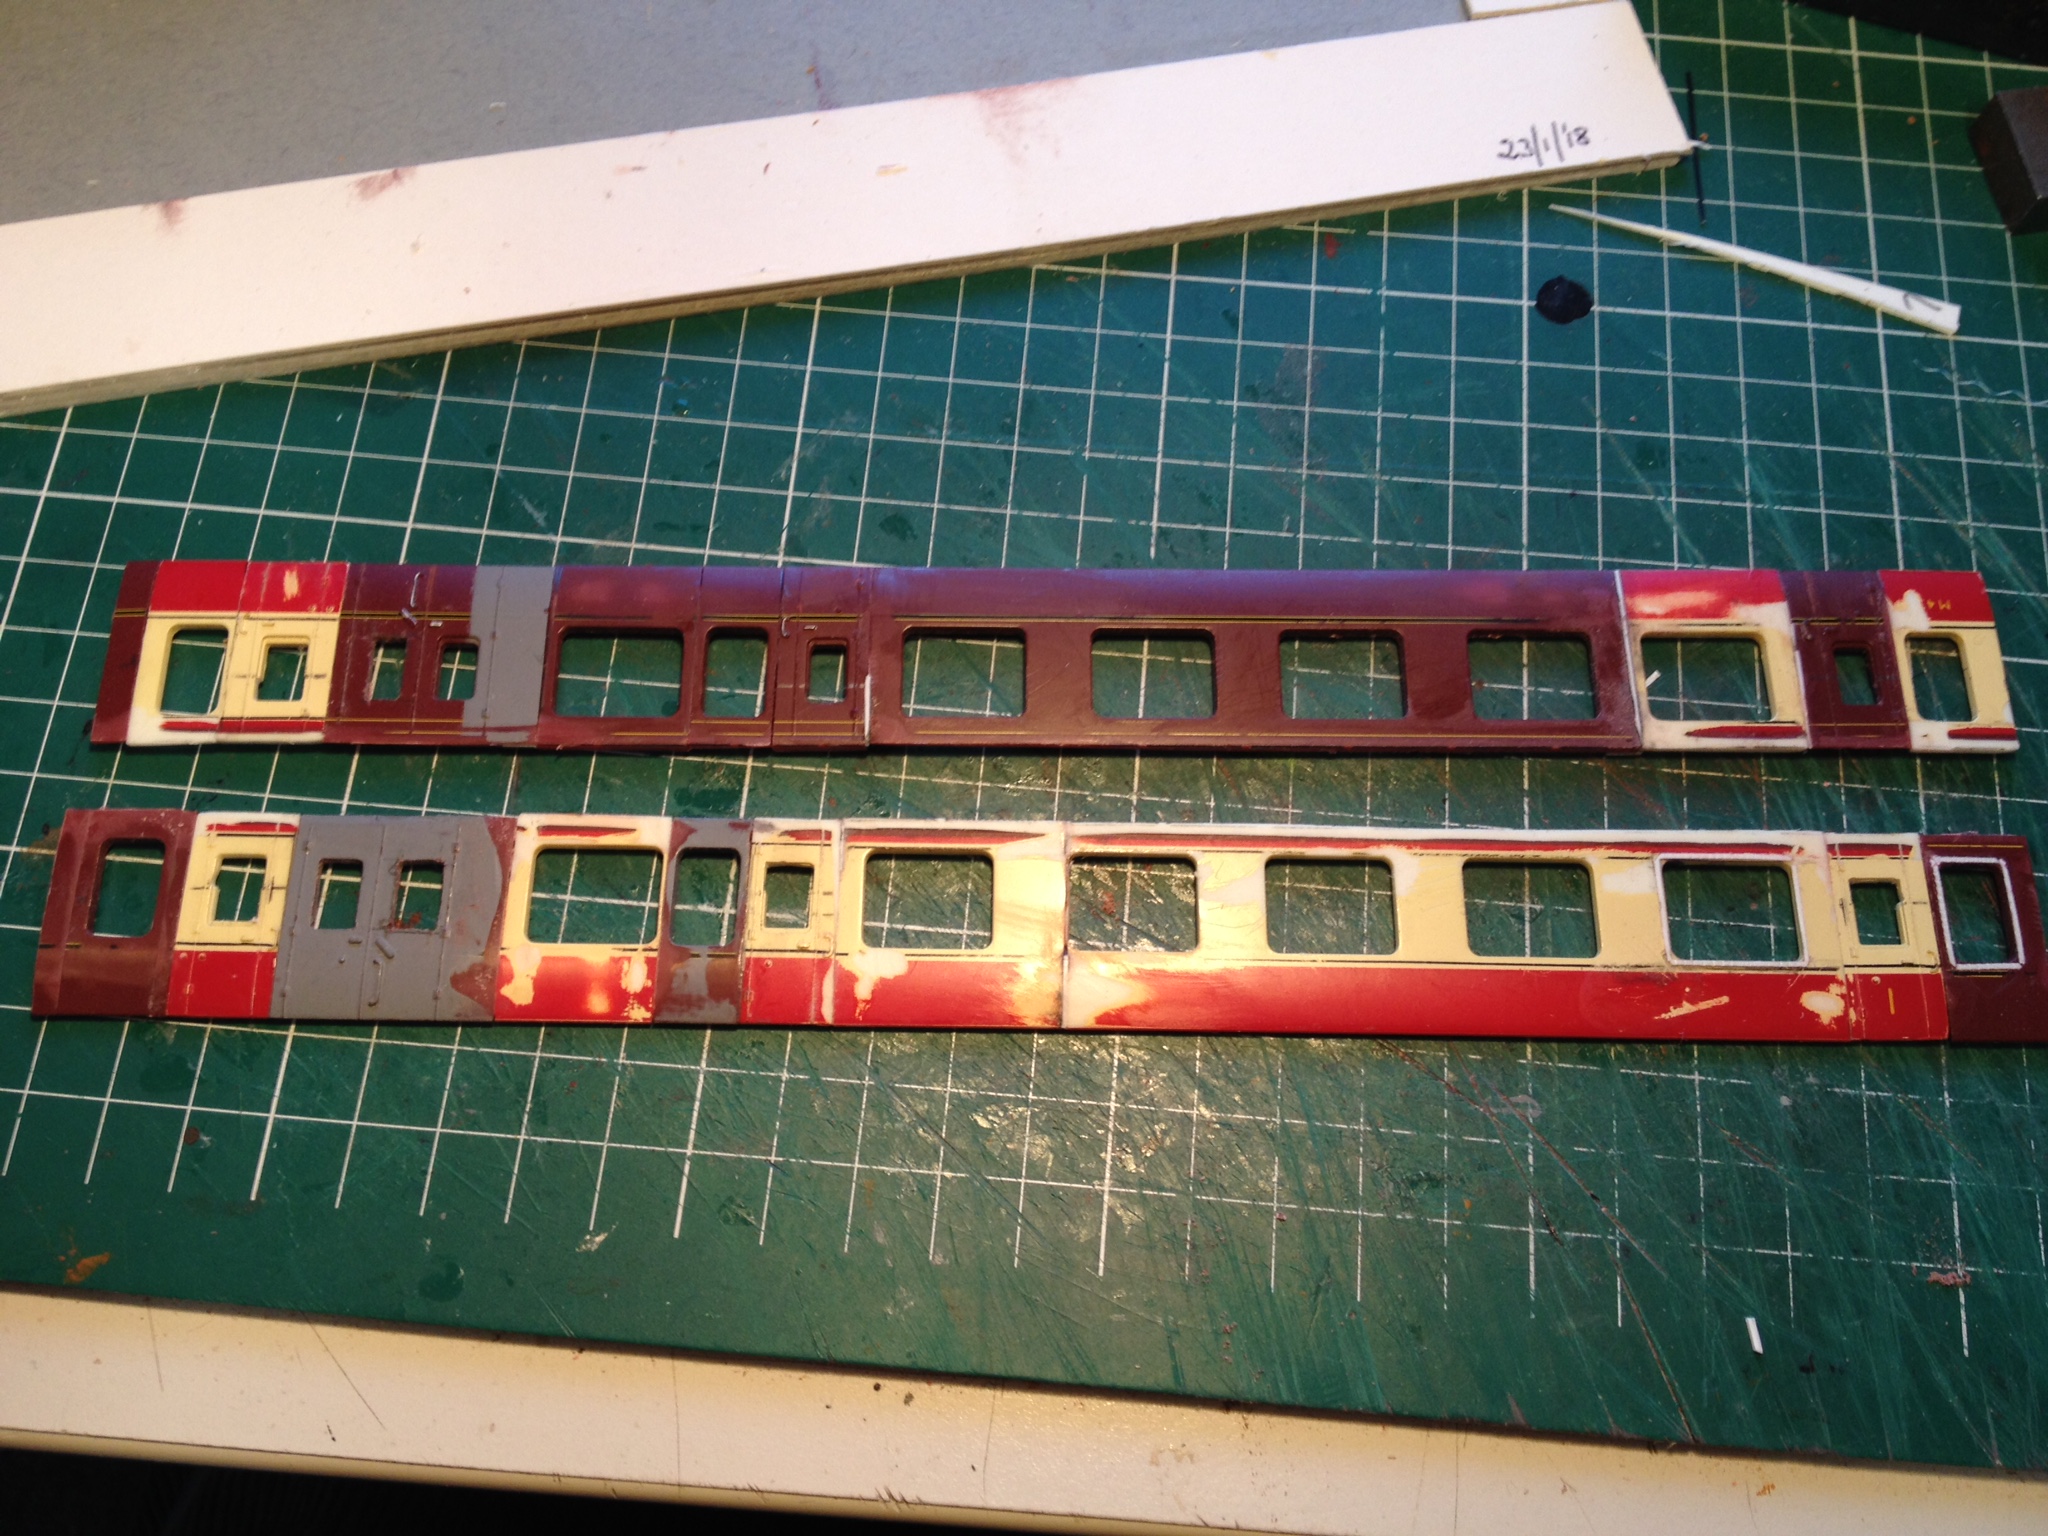
One significant change I made was to use a plastic floor/chassis rather than the brass one in the kit of parts. In previous builds, I used it but in my view, you end up with a coach which is too heavy. Besides, plastic makes it easier to attach the various bits and bobs to the chassis. I aim for an impression of 'things' underneath. Note that the under frame trusses are the old fashioned wire or metal bars rather than the later angle iron. I used paper clips to represent these; real 1960s Railway Modeller work! The interiors are scratch built ; surely the most tedious part of coach modelling. Cutting up mountains of plastic to represent seat backs, cushions etc is enough to drive anyone mad. I did eventually build a crude cardboard jig, which helped with the assembly phase.
-
Now, I am not 'metal man'; plastic is very much my material of choice. I have built two other Worsley Works coach kits but, and I know this will disappoint/outrage some but I glue them together.........There're still holding together. In simple terms, I superglue strips of plastic to the metal at joints and thus the joints are essentially plastic to plastic, using the usual plastic glues. Forming the tumblehome, or turnunder if you prefer, in brass proved not too difficult: just keep comparing it to the ends. While working on these, I read an article in an old copy of the Model Railway Journal where the writer notes that brass sides were ideal for more modern flush sided coaches but on older vehicles, the glazing should be set back to reflect the thicker sides of wooden bodied coaches . Therefore, I glued plastic strips around the windows to achieve this effect.
-
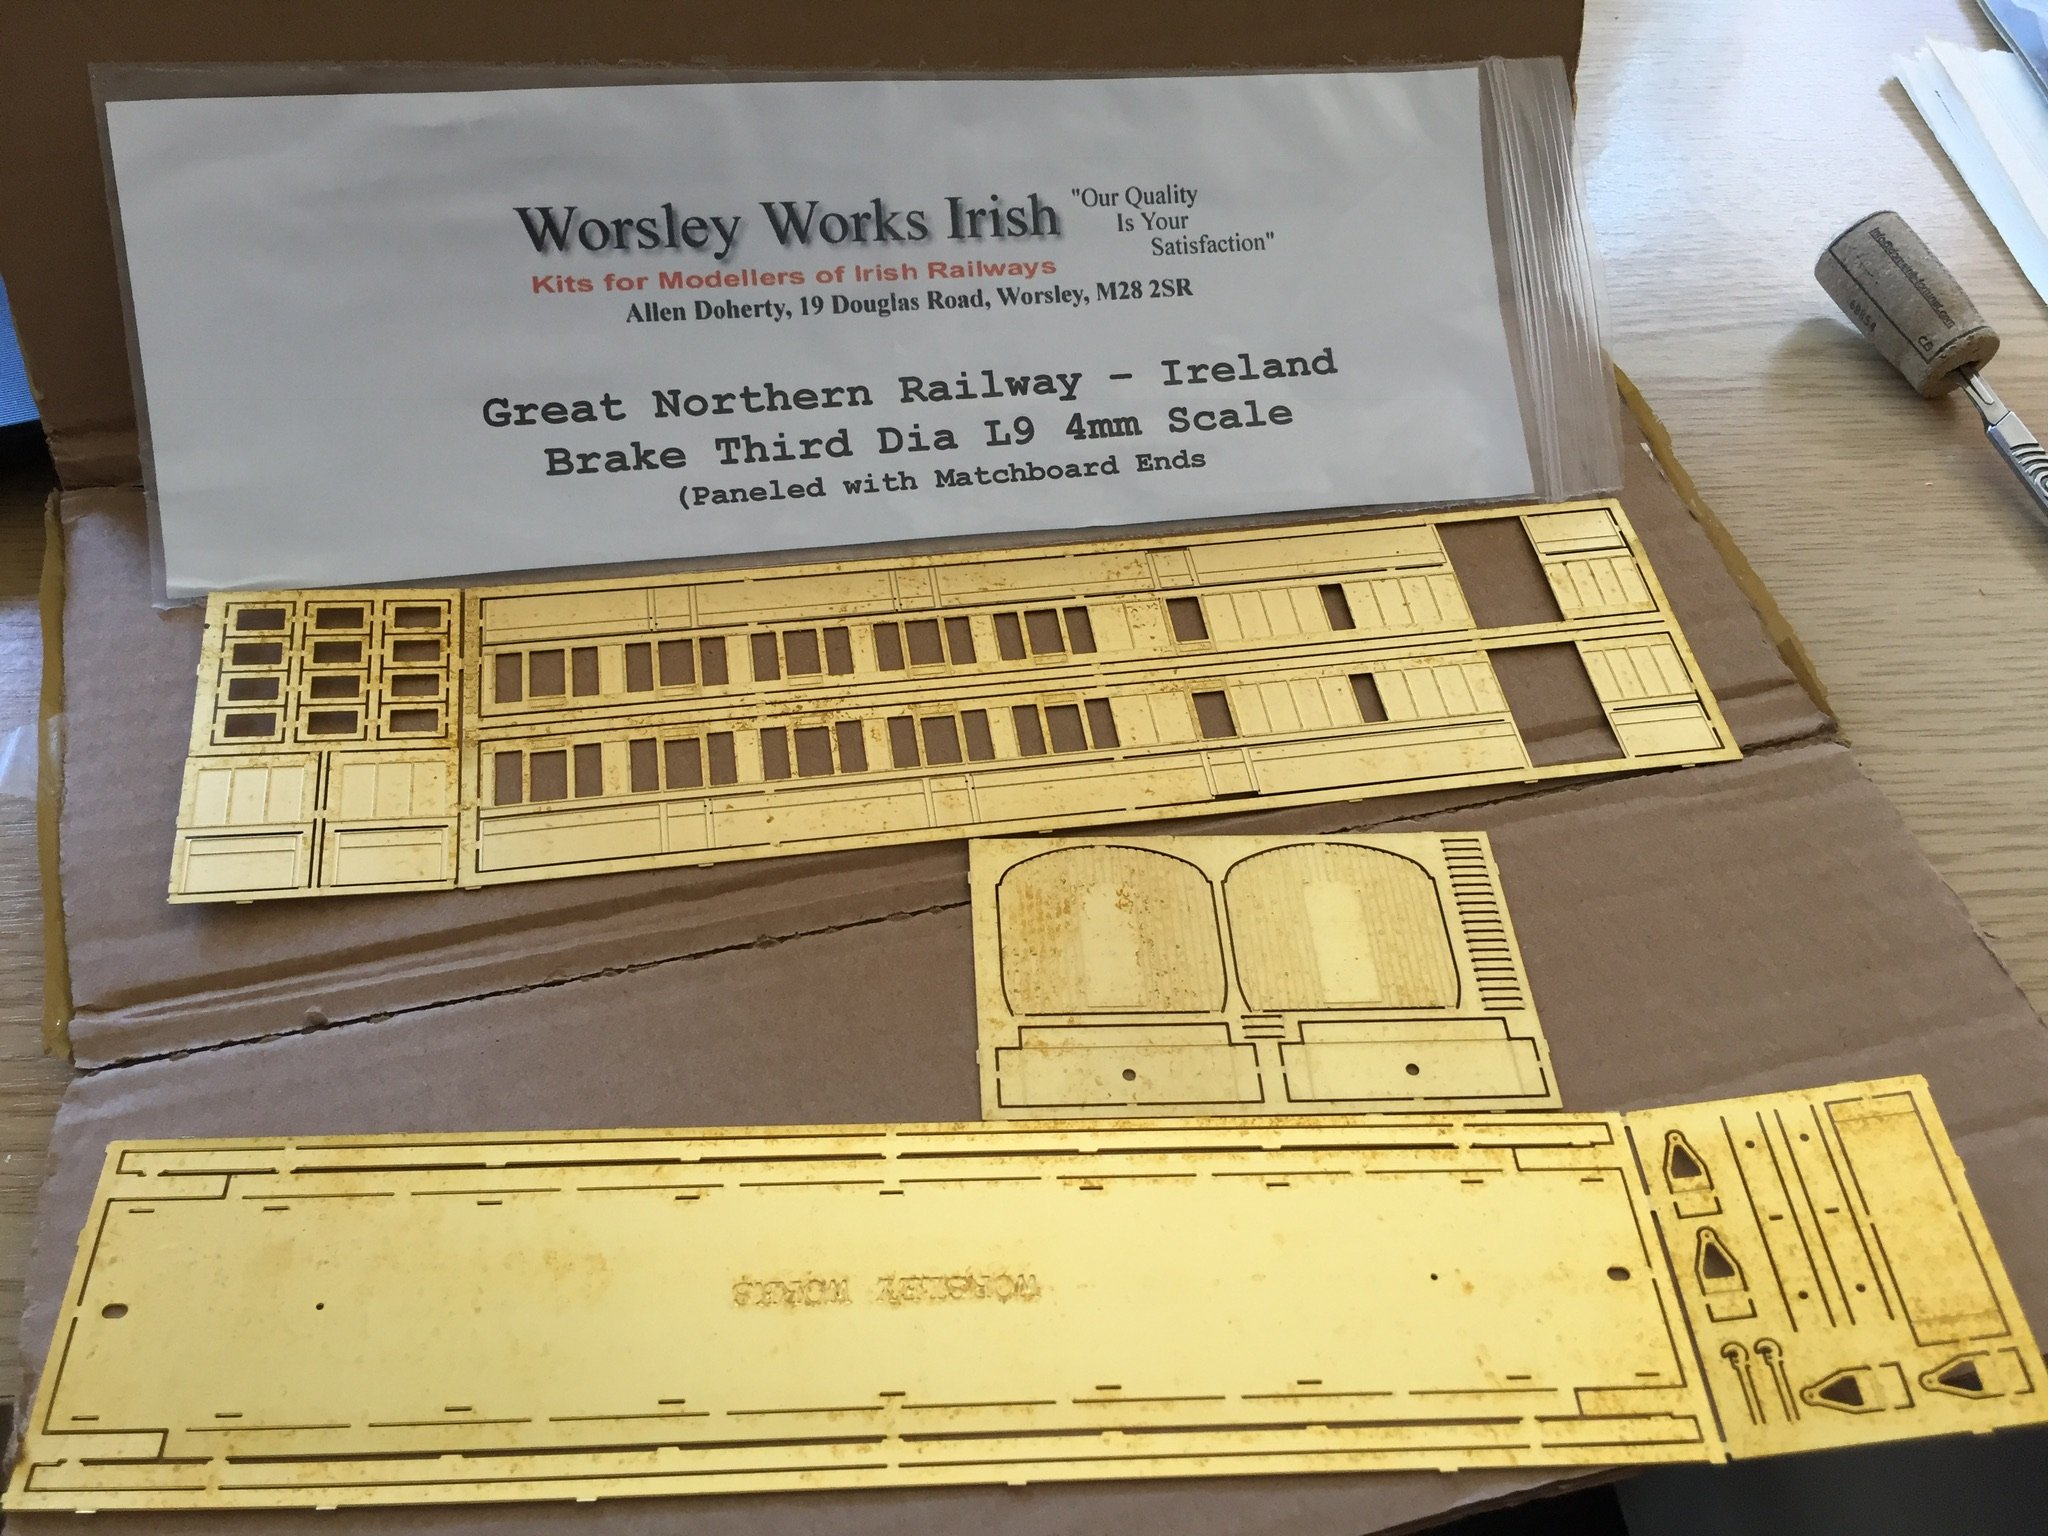
Note that both coaches represent wooded bodies vehicles with panel long on the sides and match board ends. The K8s were built between 1915 and 1928 with the last one being withdrawn by the UTA ( or Northern Ireland Railways as it was then) in 1969. The UTA inherited 6 of them on the break up of the GNR. I don't know how many CIE had but given that the rolling stock was divided 50:50 between CIE and the UTA, it's quite possible that CIE took a similar number into their stock. They appear to have had a fairly short life in CIE ownership whereas the UTA kept such old stock in service for many years, particularly for summer excursions . The UTA inherited two of the L9 brake/thirds, which were possibly among the last wooden bodied coaches to be built at Dundalk. One was built in 1928 (withdrawn March 1969) while the other was constructed in 1932 and withdrawn in June 1971. I must credit Steve Rafferty who wrote a very well research article ("The 1958 UTA rolling stock renumbering scheme") in the November 2016 issue of New Irish Lines . Glover
-
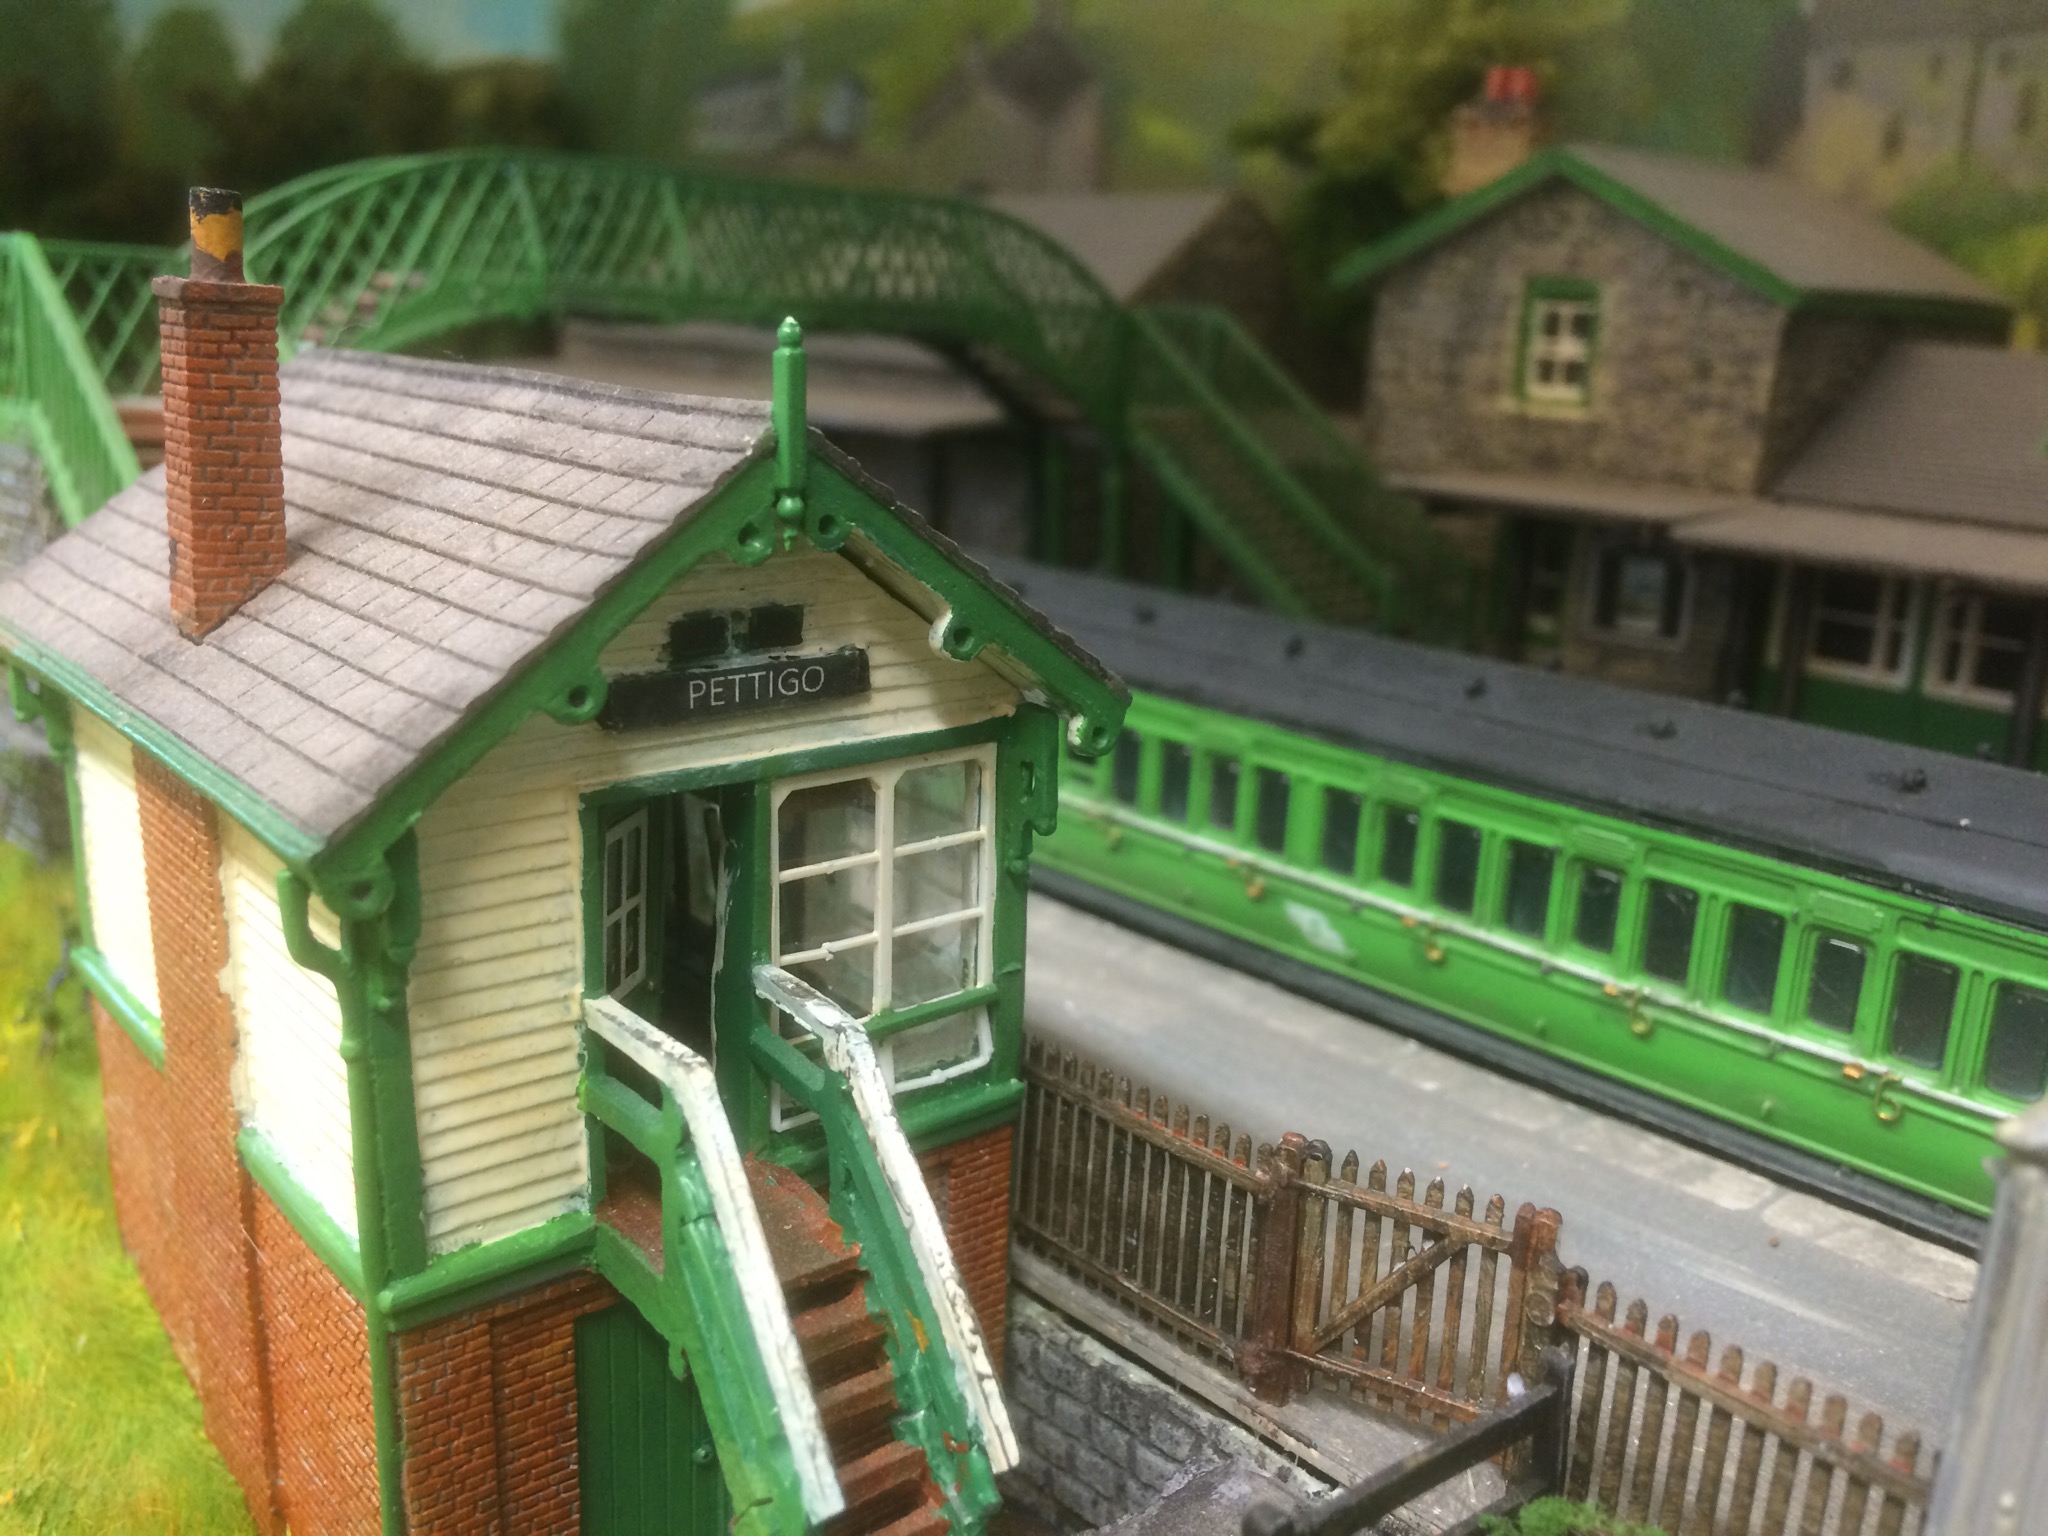
If Quarter 2, 2018 was a period of low productivity, then Q3 was, by my standards, positively 'foot to the floor'. However, it didn't turn out quite the way I had planned. The objective was to build another brake/passenger to serve as a through UTA coach from Belfast, to be attached to the Bundoran Express at Clones. Remember that I am modelling Pettigo on the Bundoran branch as though it, and other relevant lines, had stayed open until 1963 as a joint CIE/UTA operation. i had in mind one of those more modern (1930s onwards) GNR coaches with the recessed sliding van door. However, the choice appears to be quite limited as many were converted to run with the BUT railcars, which had no guard/luggage accommodation . Looking through the Worsley Works listing, I decided that a J4 brake/trio (3 classes) was appropriate. There are a number of photos of these coaches in service on the old Irish North West lines. On contacting Allan Doherty to order one, he told me that it was not currently available and might not be for the foreseeable future. He did however offer me a L9 brake/3rd, at a discounted price. I did some research and noted that the L9s were characterised by a very large luggage area, which didn't seem appropriate for a single through coach. I did a bit more thinking and decided that I would bump another project up the list: a representation of the 1.35 PM local from Pettigo to Enniskillen, which followed the Up Bundoran Express but served all stations to Enniskillen, all of them bring in Northern Ireland. My thinking is that this would be a UTA service. All photos show this as a two coach train. So, another look at the Worsley Works website suggested that a K8 third would be a suitable companion. So, back to Allan who agreed to sell me both the L9 and K8 at a discounted price. And this is where we start.....
-
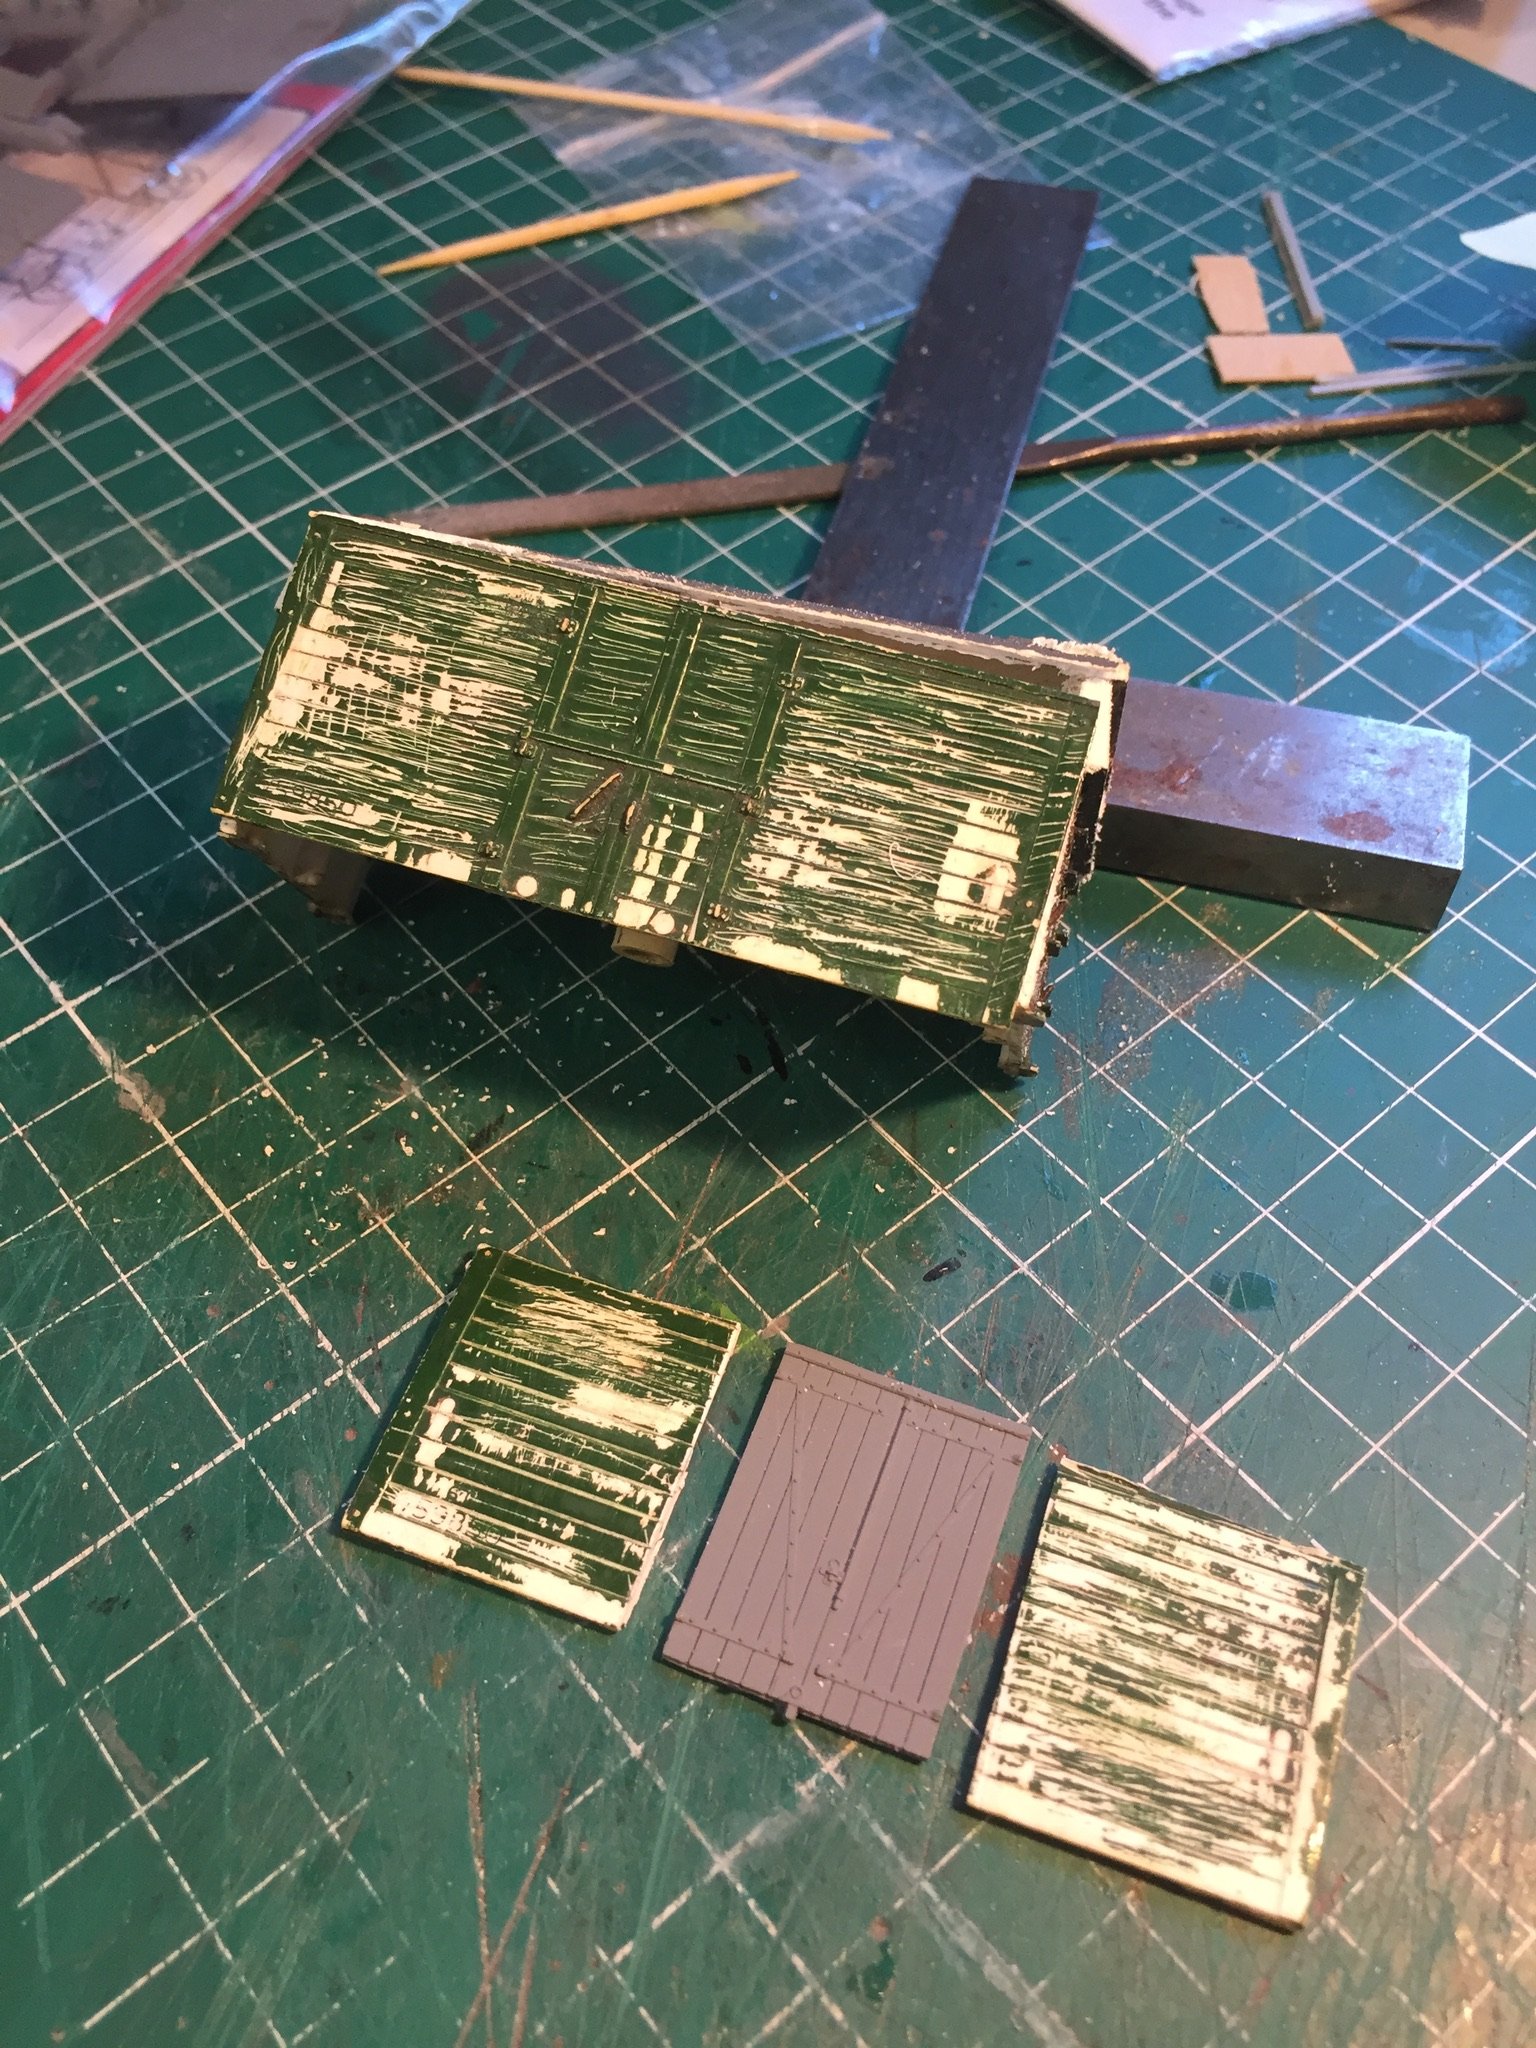
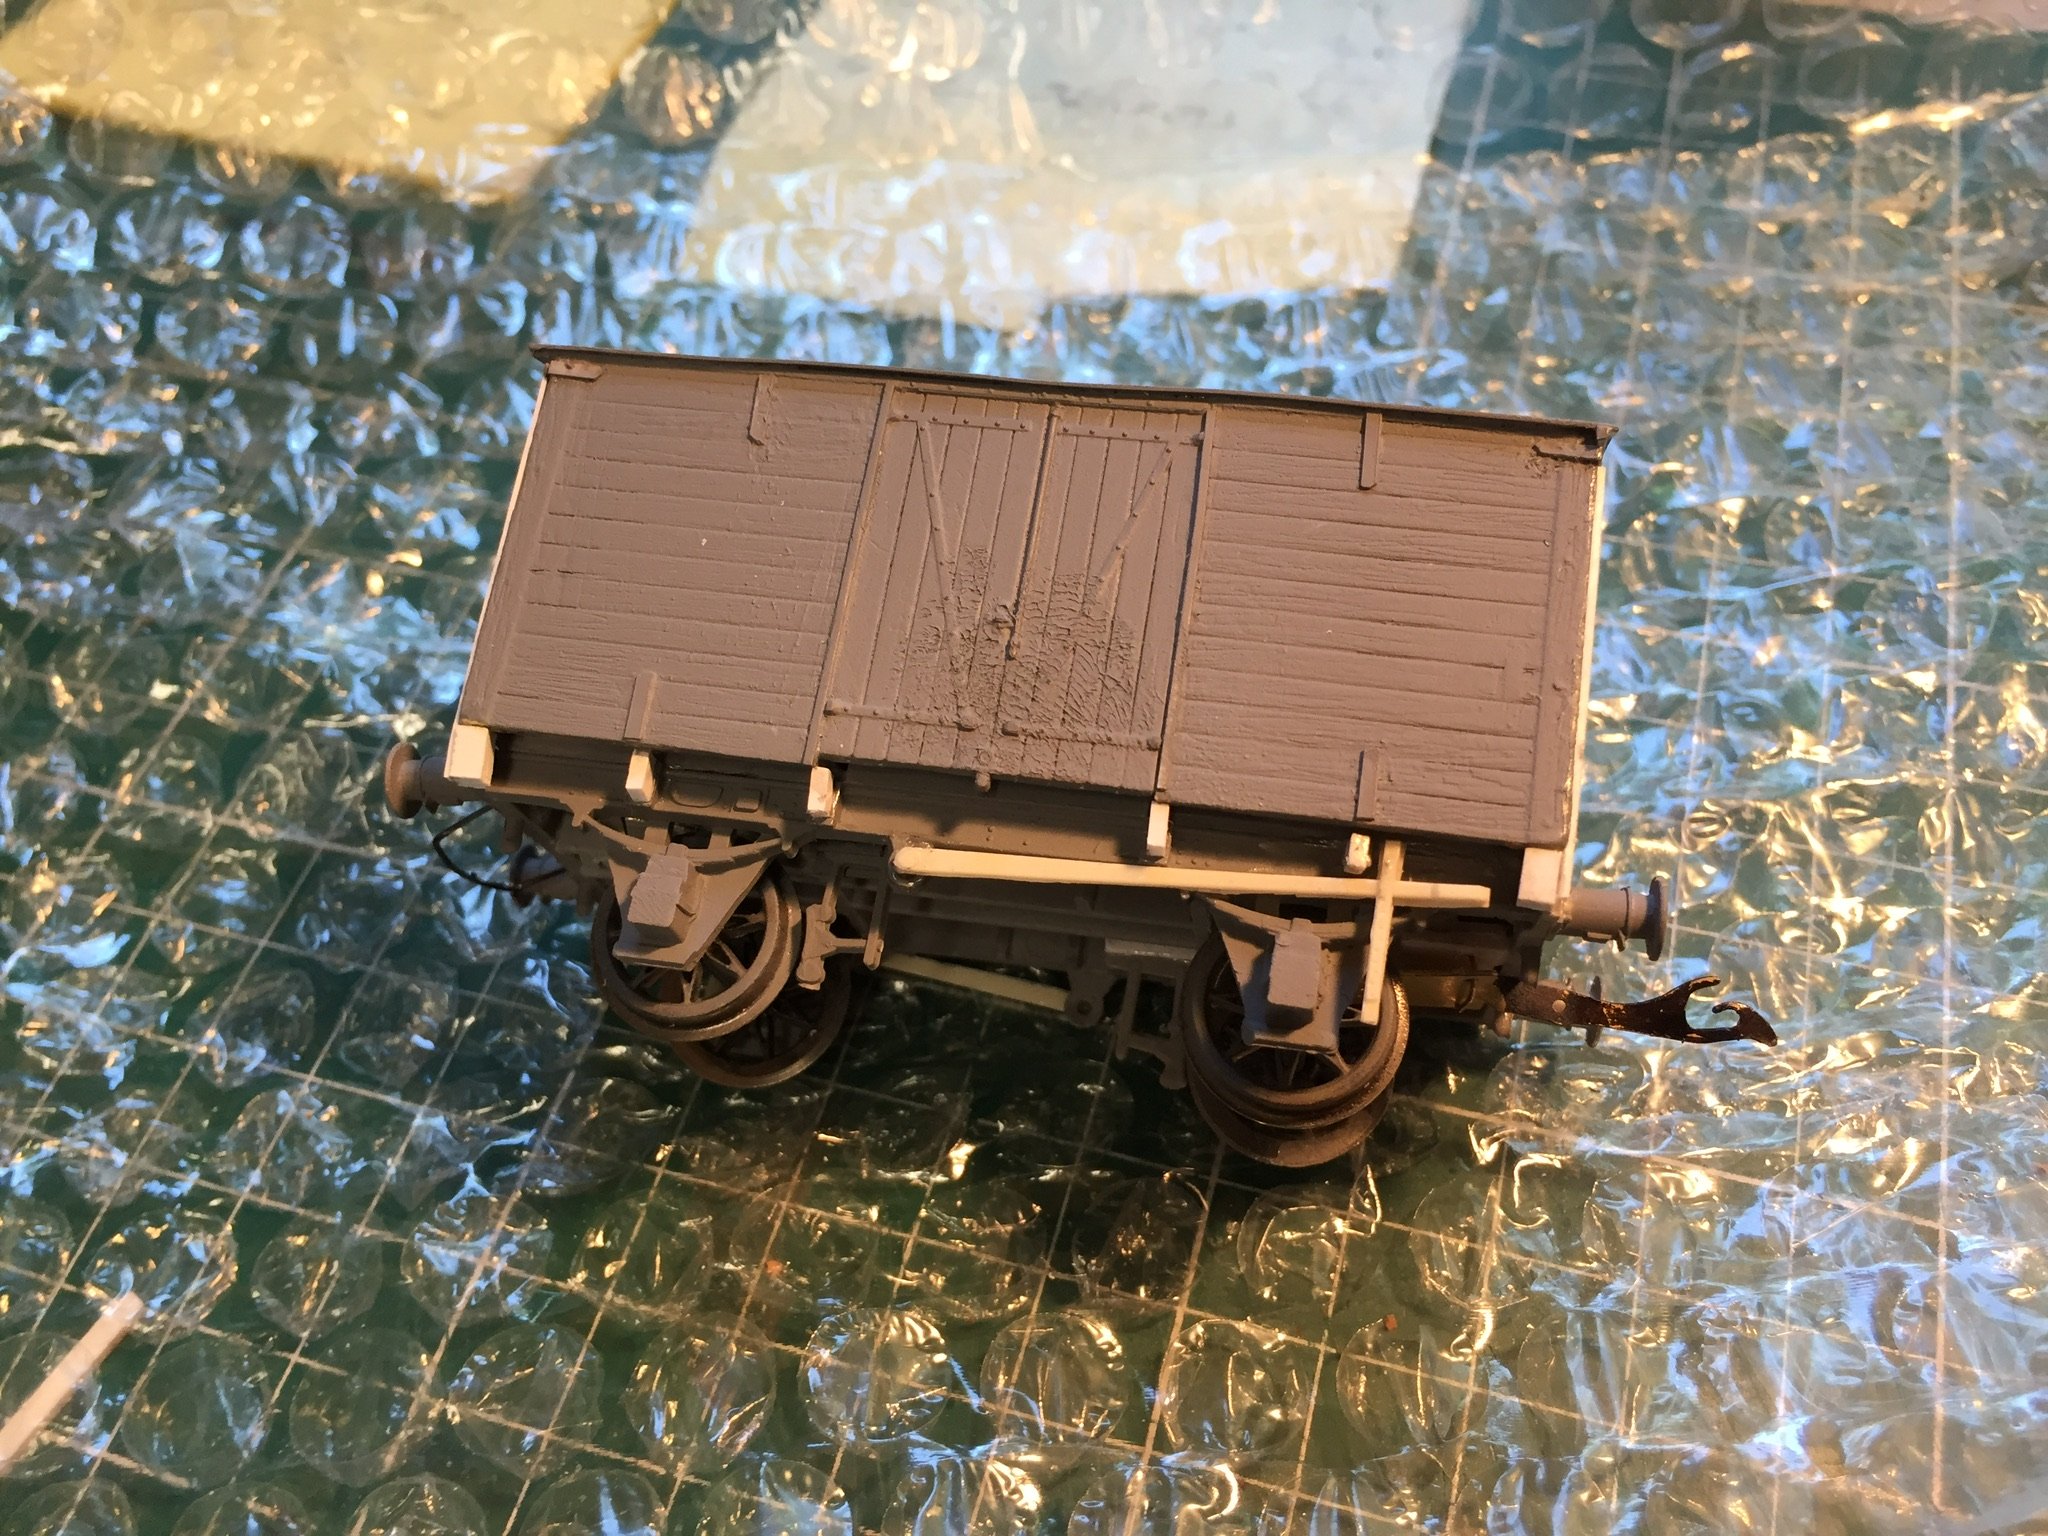
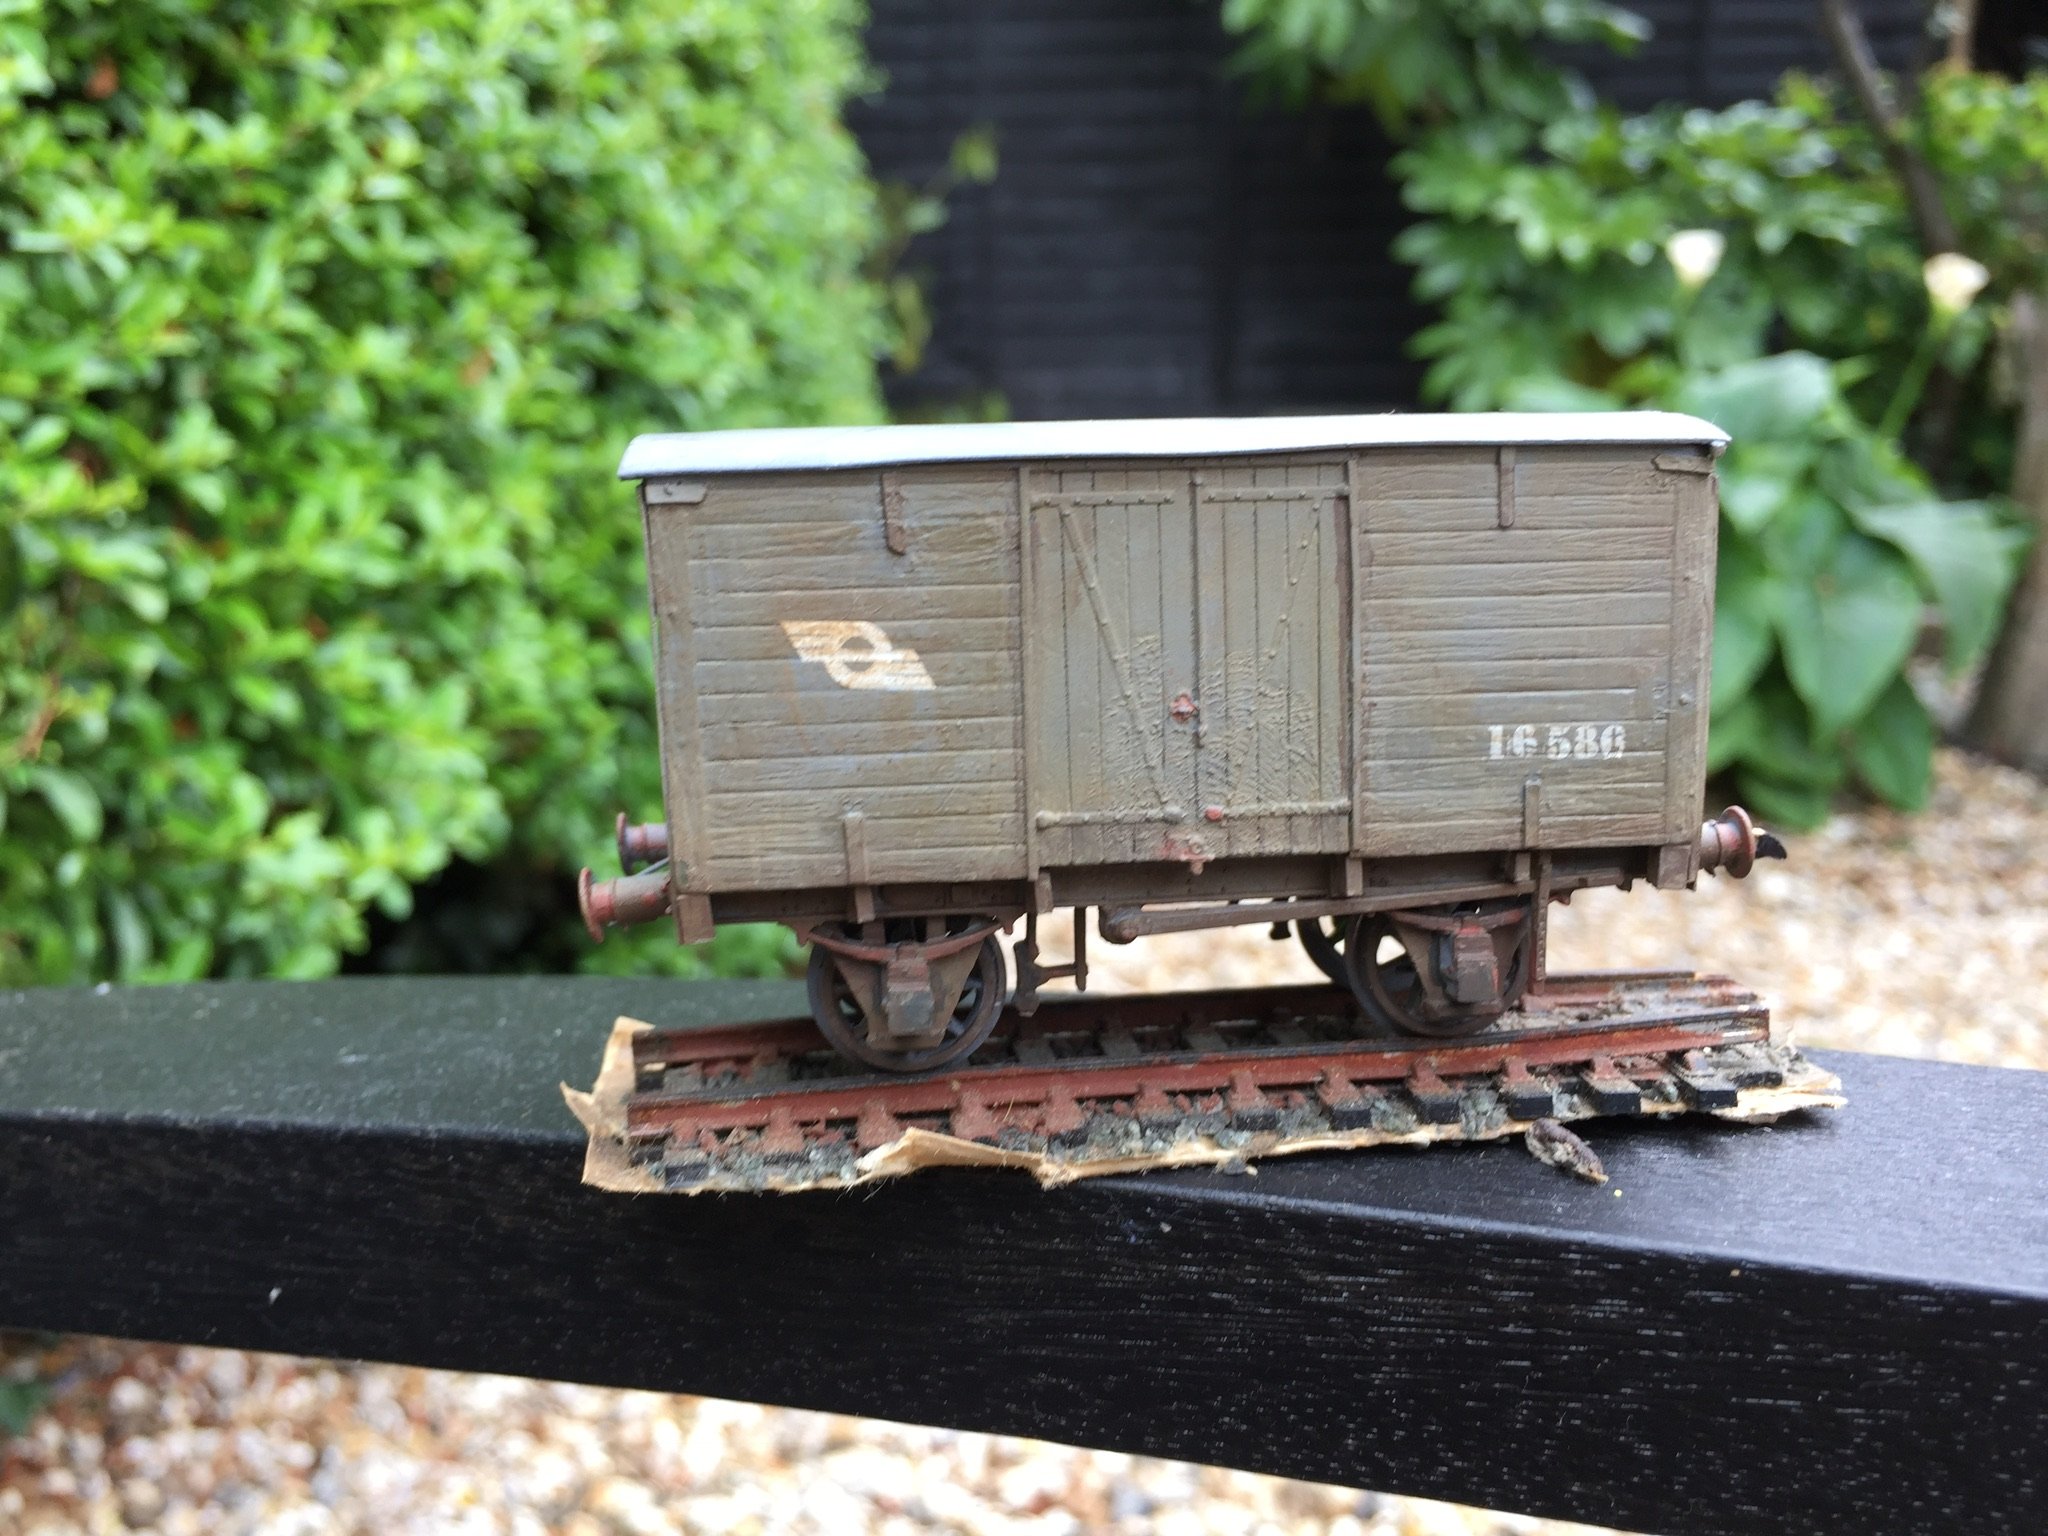
It's been a while...... Anyways, I keep a quarterly record of work I have done but Q2 (April-June) was a very lean period due to a lot of travelling and the snow in March (remember that?). In order to get something on the record, I did a quick wagon project at the end of June. Really, two things came together: seeing a photo on a Flickr website put up by a Brian Flannigan ("Irish Rolling Stock") which features a range of, mostly, wagons. The photos appear to have been taken in the early 1970s. One shows a covered van, number 16586. Two things interested me. One, the planks on the sides and ends are horizontal ( doors are planked vertically), which I suspect is quite unusual. Furthermore, the van appears to be in good condition and is painted in the then fairly new brown livery. It would seem that the van was still considered serviceable and worth keeping in traffic. It follows that it must also have been in service in 1963, the year in which my model of Pettigo, on the GNR Bundoran branch is set, although I think we can be certain that it was grey in that period. So, that's the prototype bit. In my spares/scrap/don't throw it out box, I had the body of an old Hornby-Dublo GW insulated meat van. It was originally white but I painted it green, maybe 40 years ago or more. In the 1960s, CIE painted a number of H vans green to run with AEC railcars, on routes such as Dublin to Wexford/Rosslare. The planking on the Hornby-Dublo vans was horizontal. Therefore, combined with some spare Parkside van doors plus scratch built ends and mounted on an Airfix chassis, I was able to reproduce a rather unusual CIE van. I actually have a very old notebook, which records the seed and breed of the rolling stock I had as a youngster. The original was bought for me by my parents in Helys on Dame Street, Dublin, for the princely sum of 5/3......that's five shillings and three pence. Ask your grandparents........ Some might consider this vandalism ( destroying an old Hornby-Dublo model) rather than modelling but I like to think of it as recycling. Glover
-
One further question relates to the toilet window. I think there may have been three versions of this, at different times. One as modelled ( a solid pane of whitened glass). Another , just visible in the corner of one photo I've seen, shows an opening pane at the top while a third variant was a metal panel with just a sliding vent window at the top. Anyone sitting on a lifetimes research on CIE toilet windows that they would like to share with us......... While talking about windows generally, I should point out one mistake I made. The SE Finecast replacement flush glazing have the sliding top lights embossed. I painted these black, without thinking, but they should of course be the same colour as the body. While in confessional mode, I have to admit that the roof is not a success. I followed Geoff Kents method in MRJ #228 but it has not come out anything like the real thing. I might give it another go: there is a guy over on RMweb (trading under the name Gobbler) who is building them almost as per the prototype ie 'planks' of plastic running the full length of the coach. We'll see.
-
The interior is scratch built but it does raise a question which someone may be able to answer: was there a side corridor running past the luggage/guards section? I have a vague memory of such, from the days when we would walk from one end of the train to the other, to count the number of coaches. I also remember those odd compartment coaches, built in the early/mid 1950s ,which had the toilets in the centre of the coach with the side corridor running on opposite sides from the toilets to the end of the coach ( I know what I mean anyway.....). i have modelled it as shown below. Note that the seats are finished in a sort of maroon colour. An Irish Railfans News from the early 1960s said that maroon upholstery was the CIE standard colour for second/standard class and green for 1st class. This info was culled from the time when the RPSI had a full set of this journal on its website; hopefully this will be restored sometime. Glover
-
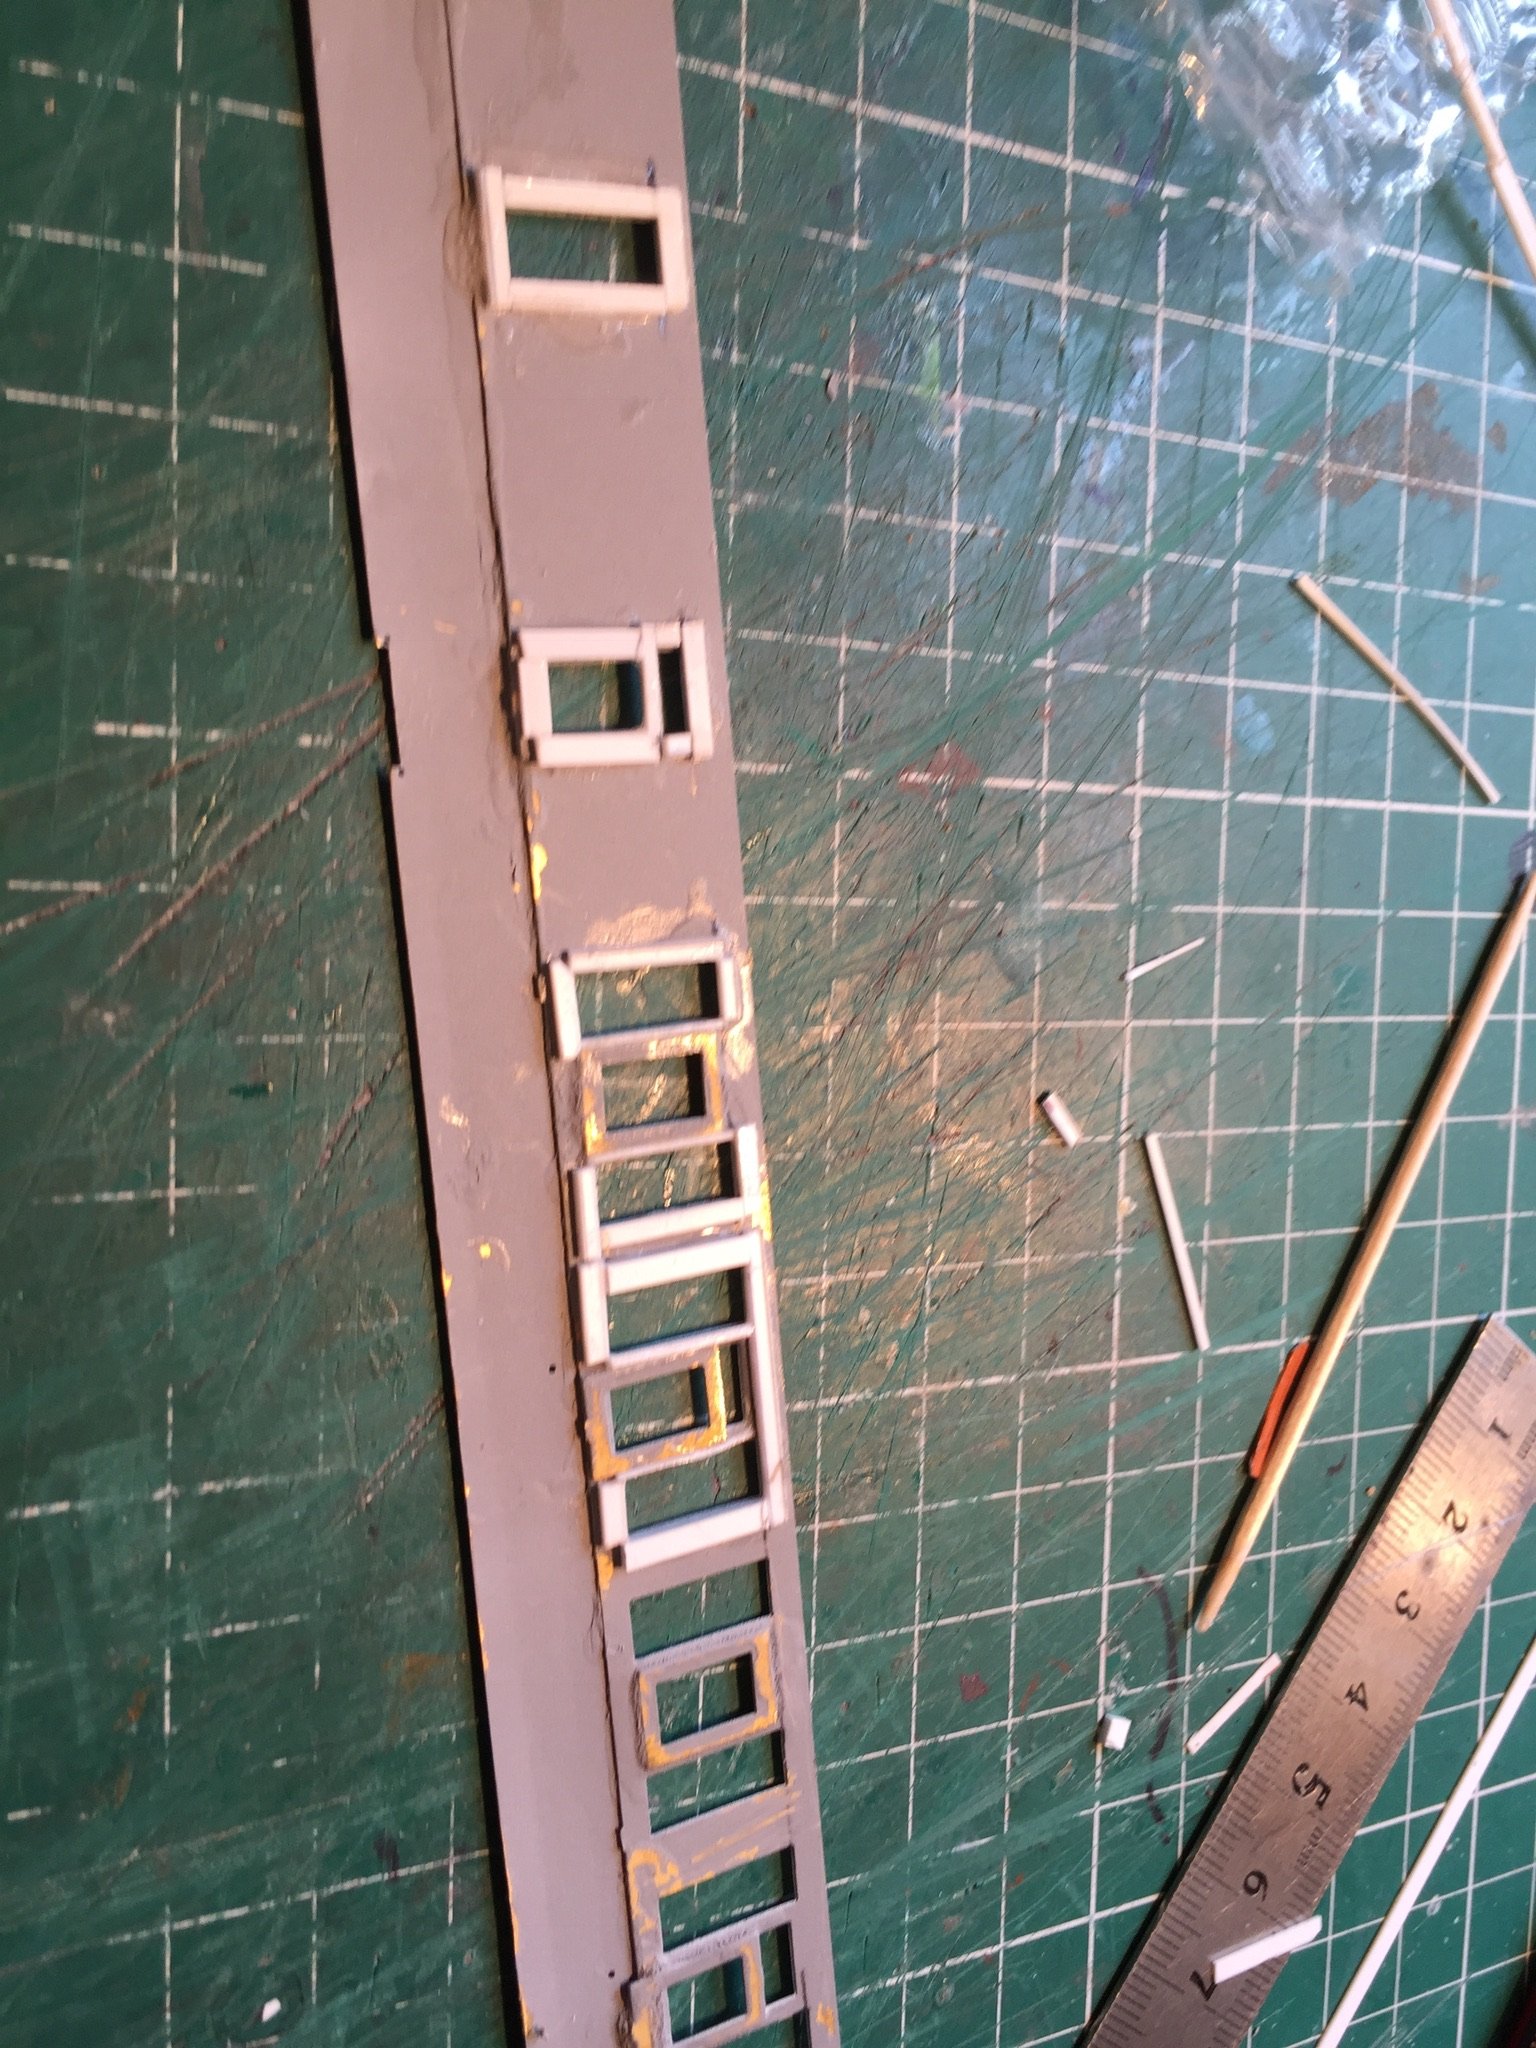
No sign of the missing post, so here goes, again. A characteristic feature of these earlier CIE coaches was the rivets joining the metal panels on the side. I have represented these using tiny slivers of corrugated plastic (bought years ago, no idea where). I also formed window frames using thin Evergreen strips, #110 , representing the rivets by rolling a small screwdriver with a serrated handle over the plastic. Same technique used to form the prominent roof strapping. Together with SE Finecast flush glazing ( and painting the window reveals brown), I think these changes really do transform the old Hornby moulding. Glover
-
I did write a further note but it appears to have gone up in smoke! Just in case it reappears, this note talks about two features at the ends of the coach: buffers and corridor connectors. The latter are made as per Geoff Kents article in the Model Railway Journal issue number 228. Essentially strips of black paper formed into a corrugated pattern are sandwiched between two shaped pieces of plastic. I used Indian Ink to colour the paper. They are somewhat fiddly to make but in truth are easier than the more usual method of interlocked card. The buffers are a bit of a cheat. They are BR heavy duty wagon buffers (from MJT) with paper buffer faces, cut out using a normal office paper punch. To my eyes, CIE coach buffers were characterised by a fat body and a large head (apologies to those who might fit that description!) but I'm not aware of any similar buffers available on the UK or Irish market. Glover
-
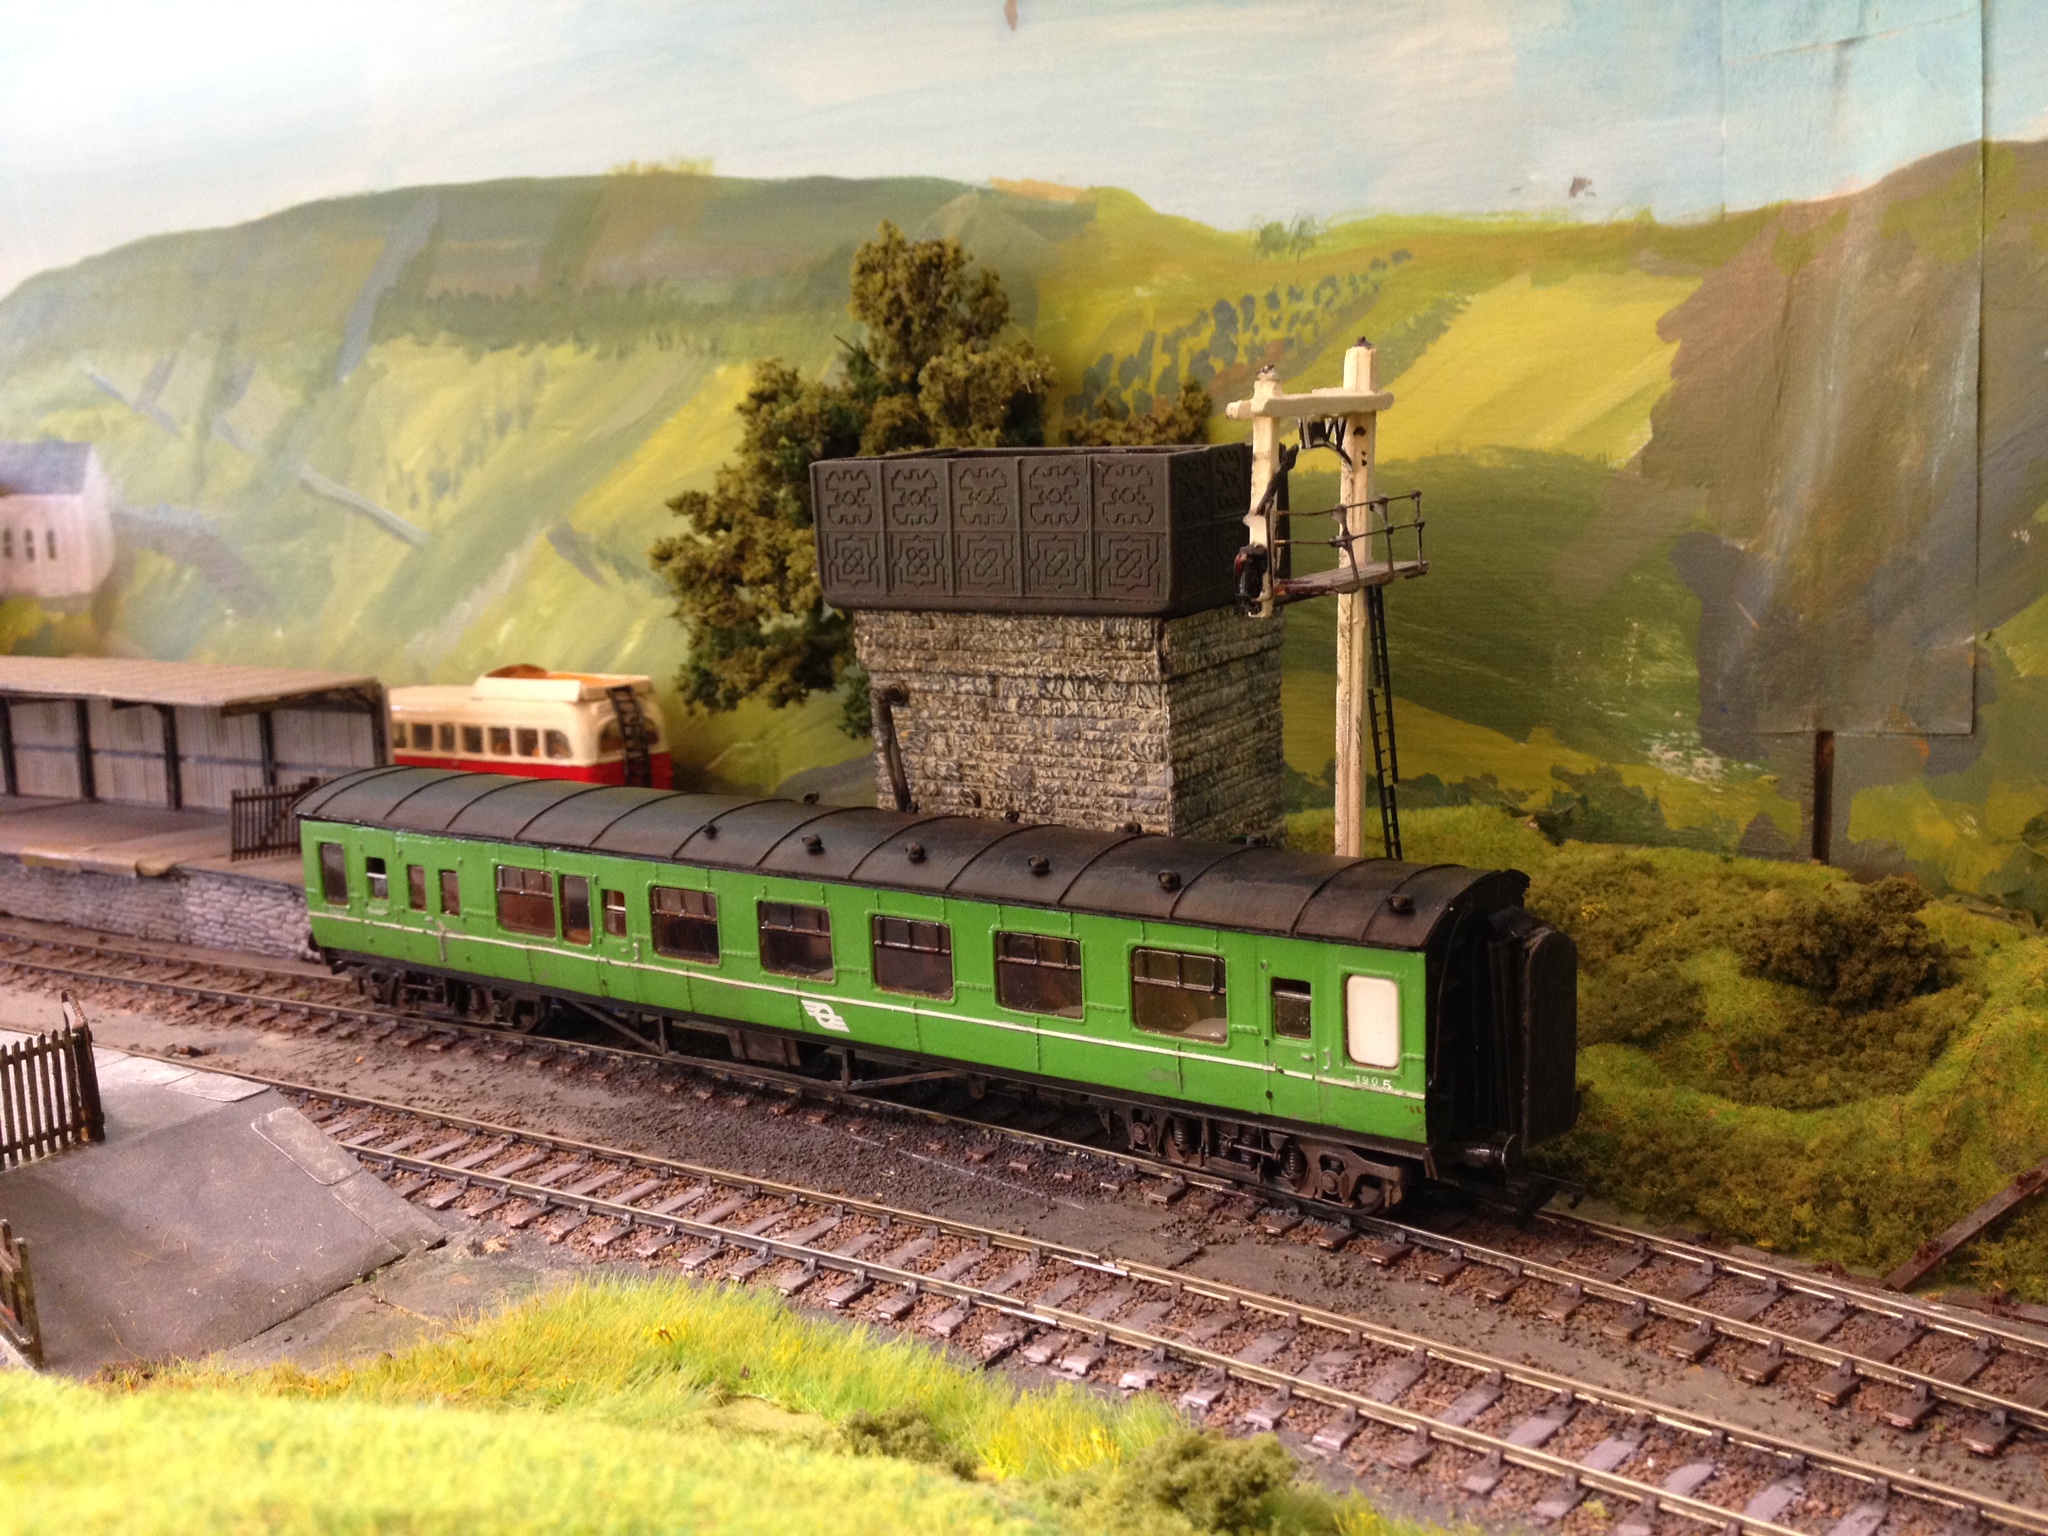
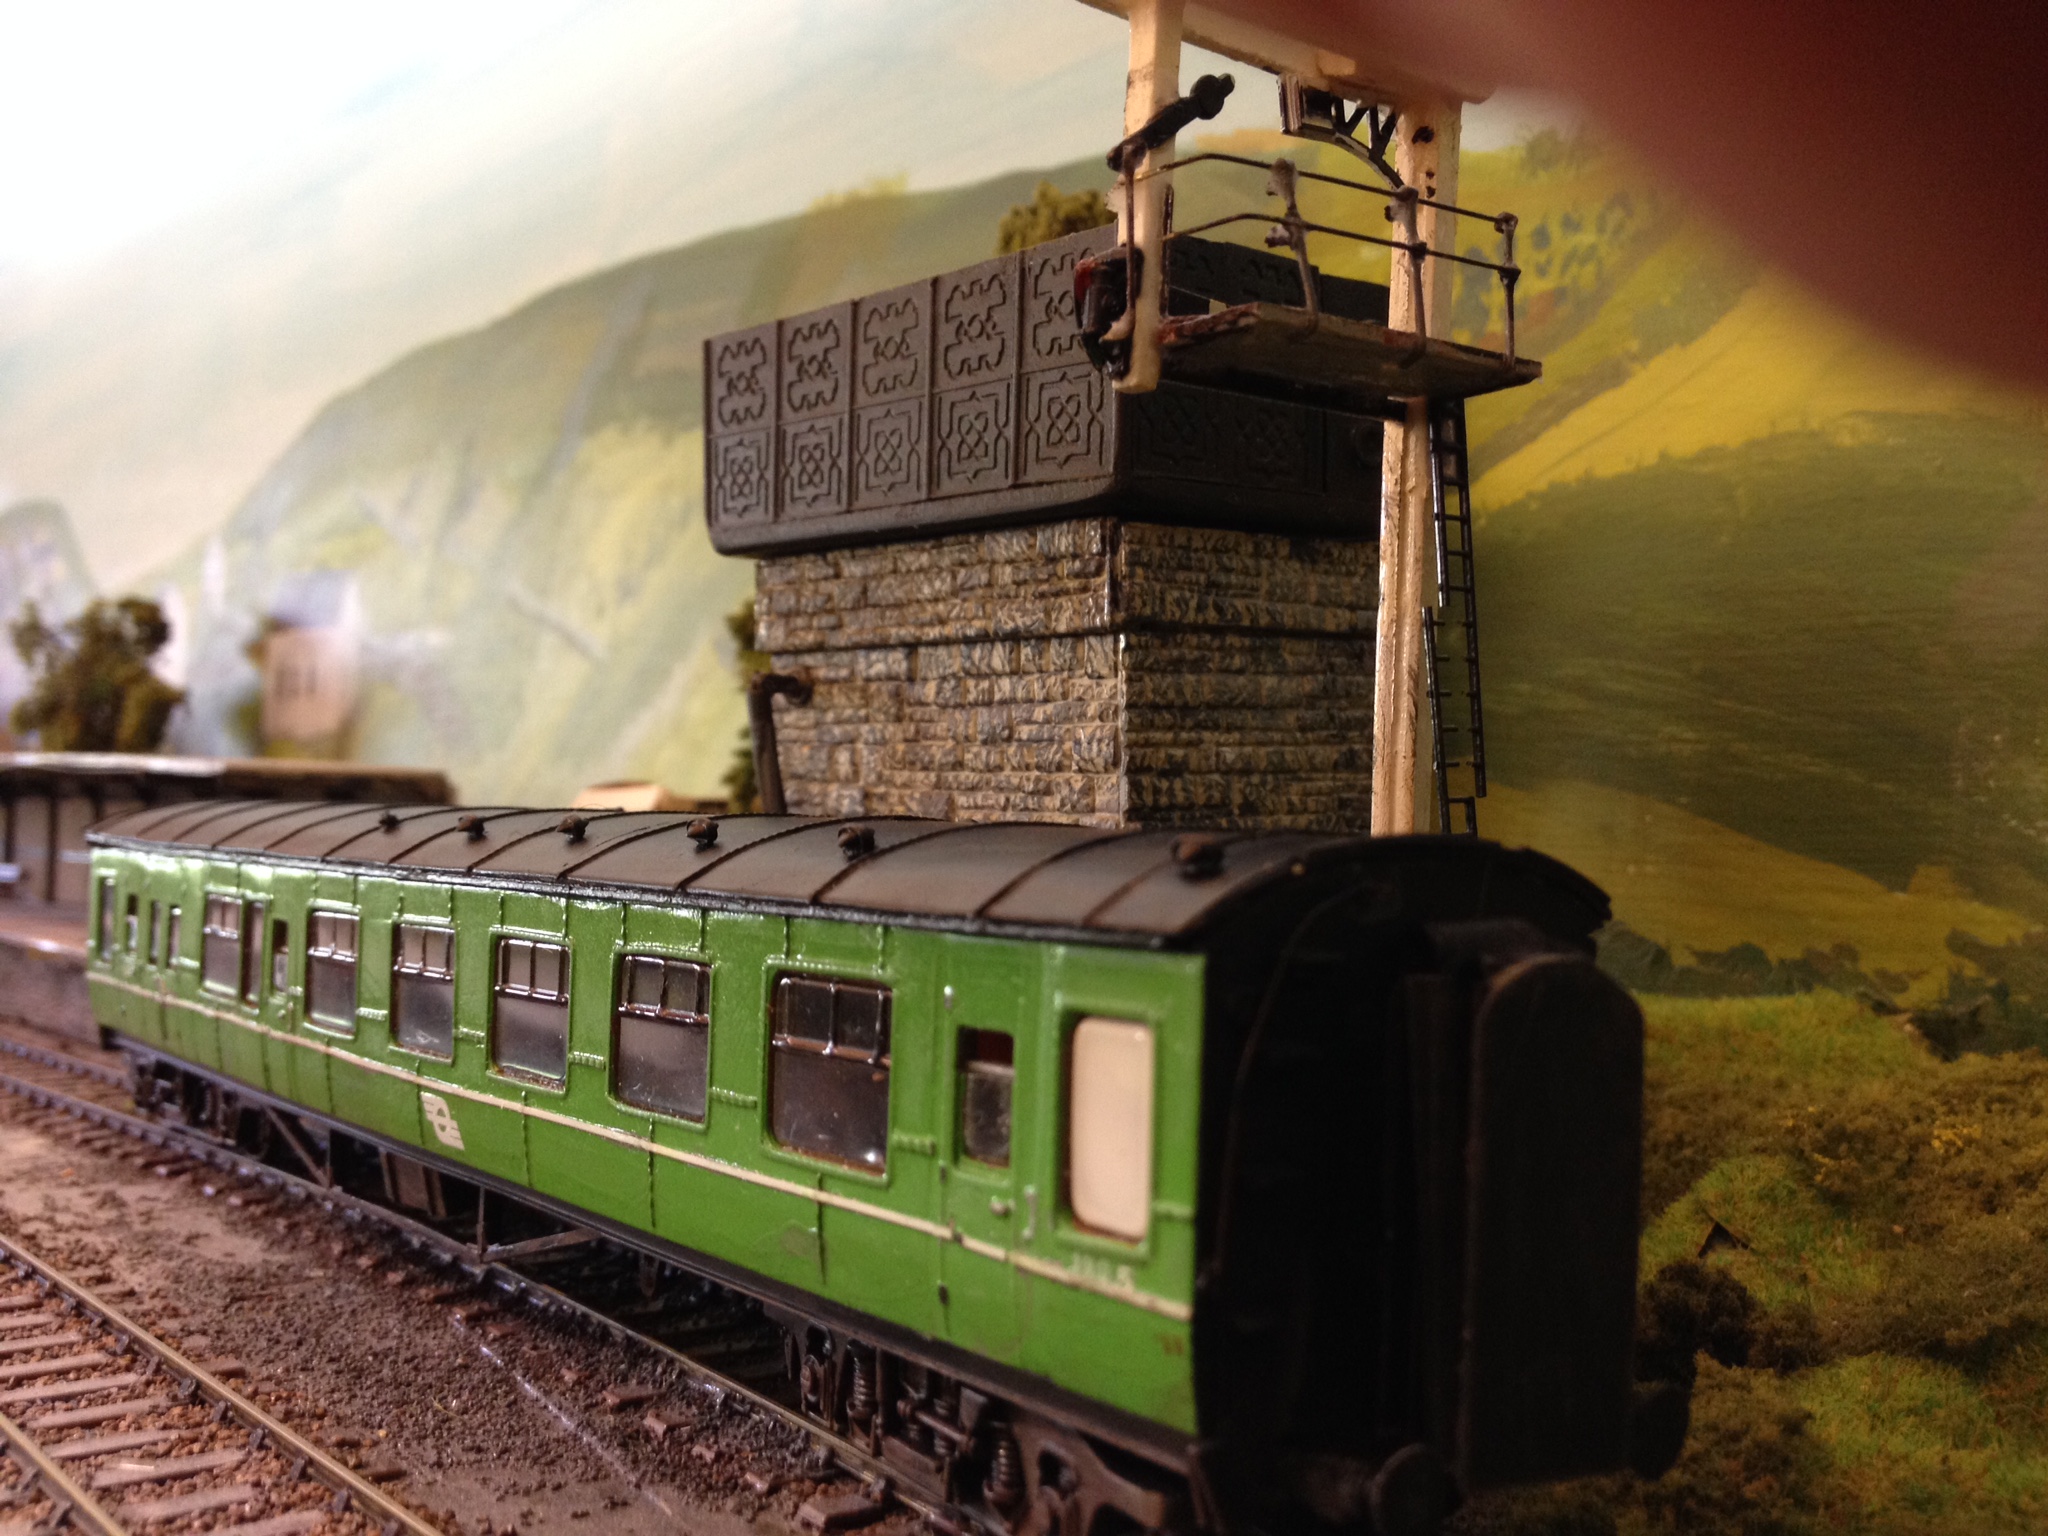
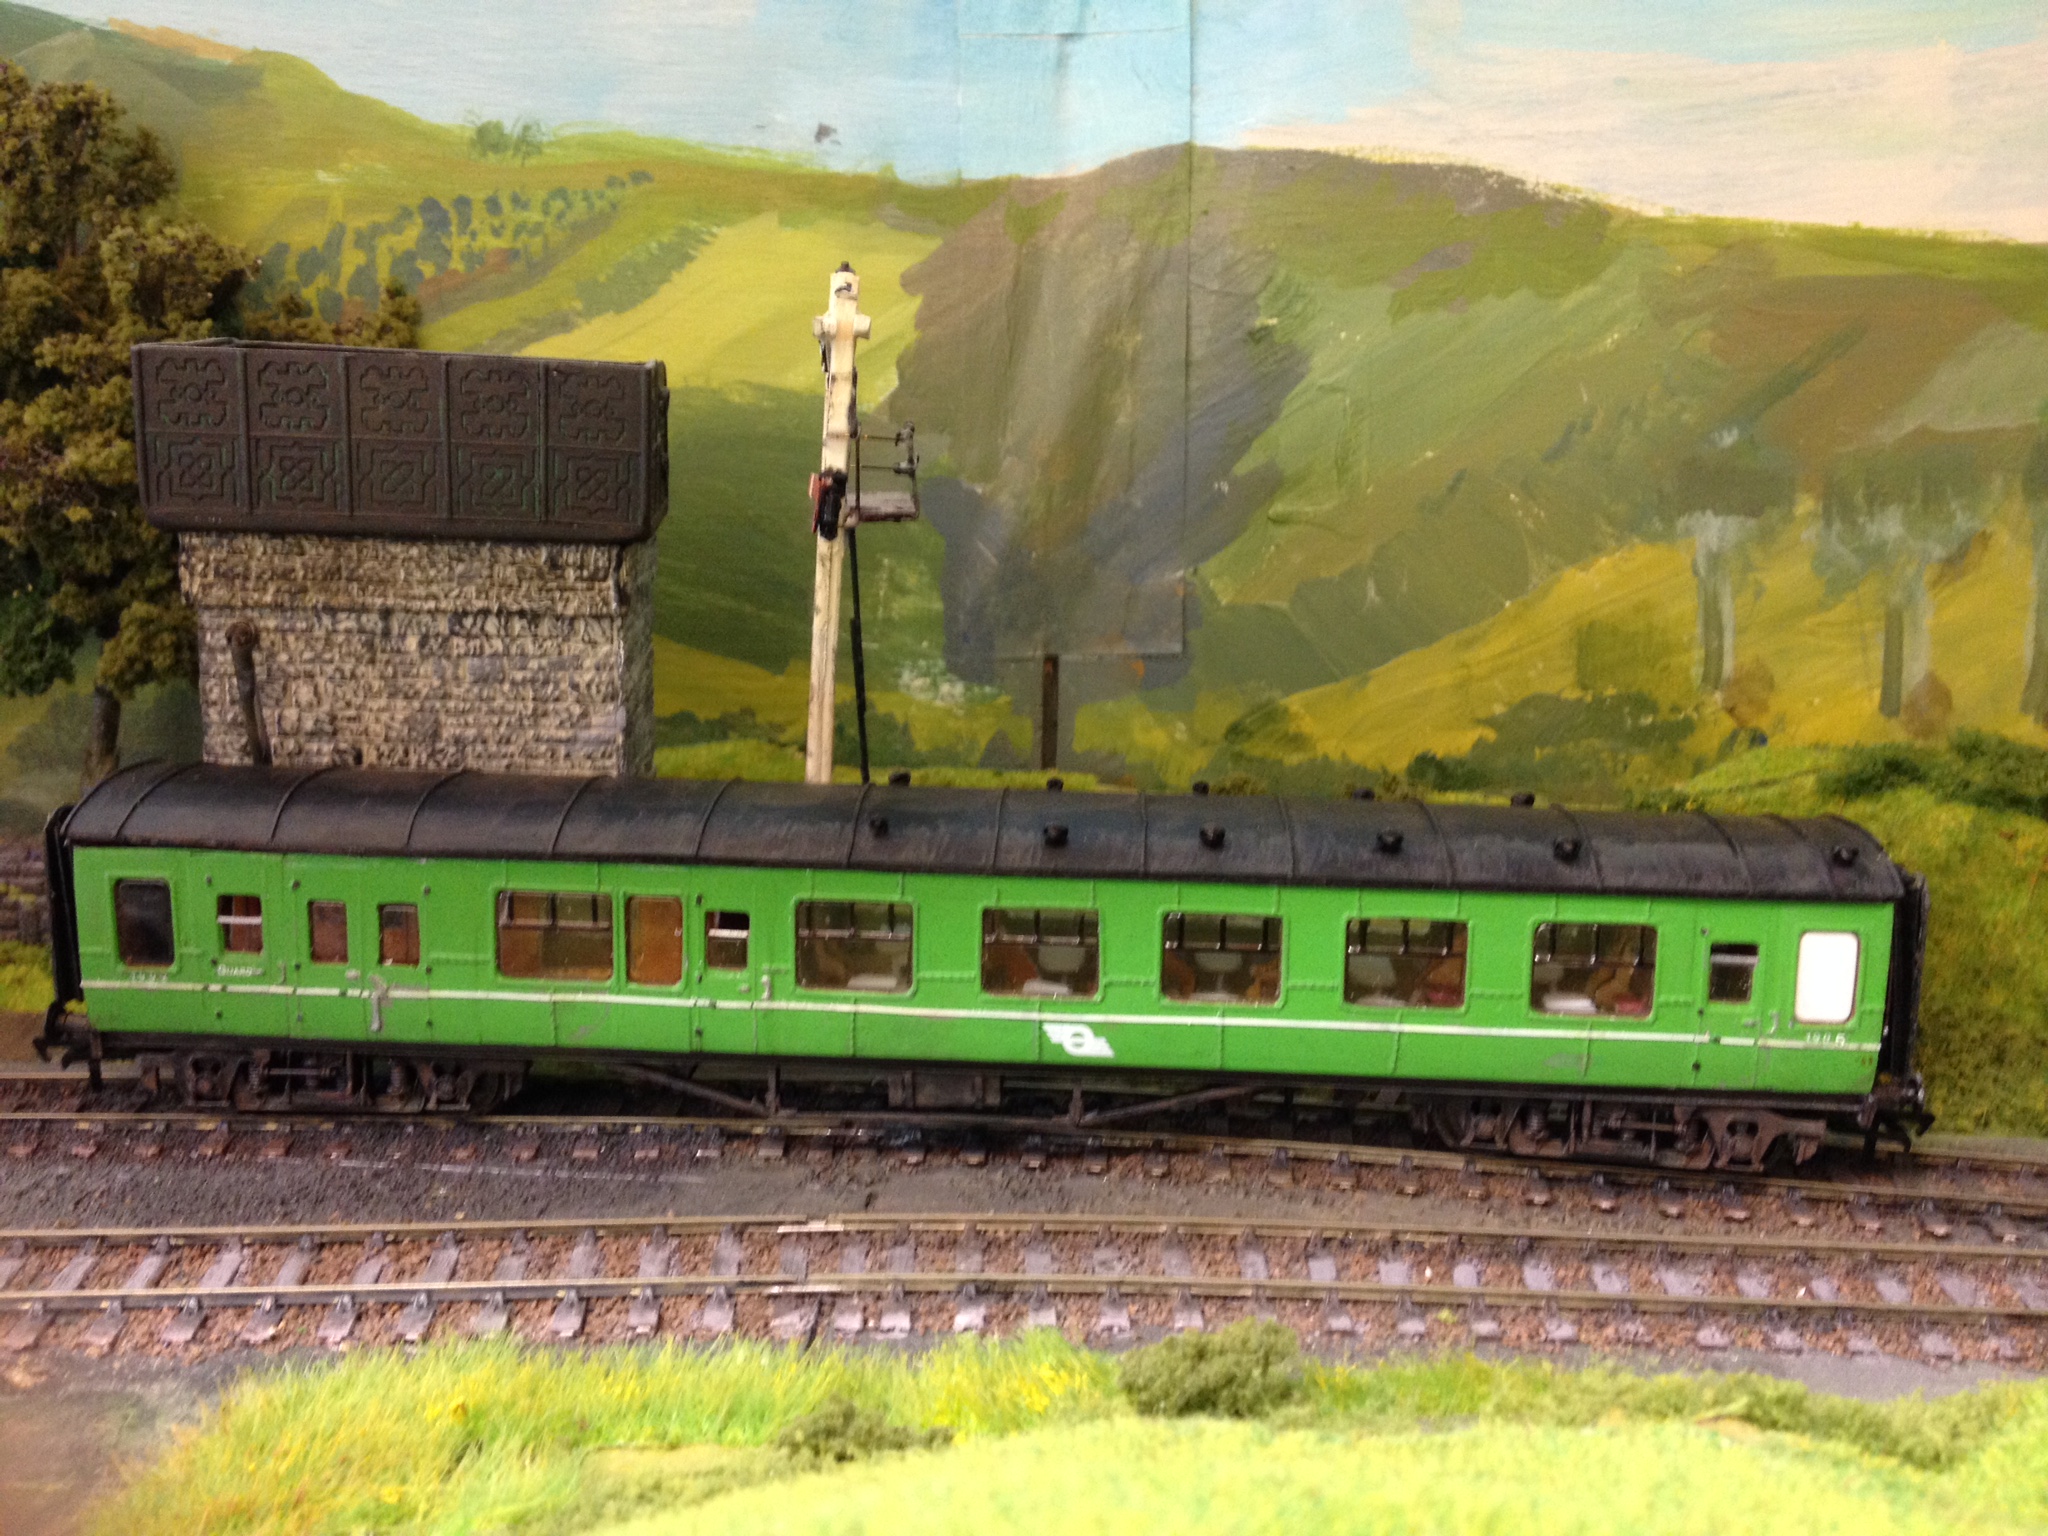
The third of the planned five or six brake/passenger coaches for service through Pettigo on the Bundoran branch is now finished. It represents one of the brake/standard's built at Inchicore in 1953 and numbered 1904-1908. The old Hornby LMS Stanier coach has been used by many modellers to represent earlier CIE coaches but, in my view, it needs to be lengthened to the CIE standard 61'6", widened and with a different roof profile. In short, only the sides of the original Hornby model are actually used, everything else being scratch built. The body profile is a fair match for these earlier CIE coaches which were almost vericle in profile with just a lower turn under. I know that Mayner offered these as part of his JM Designs range but I think these were intended to fit a Dapol coach and were thus a little short in length and perhaps not quite as tall as the prototype's. In order to add some height to the sides, I filed off the representation of the gutters on the Hornby model and thus increased the space between the window tops and the point where the roof joins. Anyway, hear is a snap to get us going; I'll follow up with some specific notes which may be of help to others. Cheers, Glover This conversion requires two Hornby coaches; I used a composite and a brake/third. I also cut Windows into the guards van doors. The attached photo shows the basic cuts required. As with the previous GNR coaches, I constructed a basic jig, from cardboard, in order to ensure both sides were the same length. Glover
-
Posted off my renewal sub on Friday. Publication dates (2 issues per annum) are a bit 'flexible' but it does build up to a useful resource over time. Glover
-
I have painted the coach in CIE green on one side and black & tan on the other. Given that the layout is set in 1963, this I think is reasonable. I have also given it a different number on each side and attempted to replicate the CIE practice of placing a small 'c' in front of the original GNR number; CIE did not renumber GNR stock. I have now started work on a CIE brake/standard but don't wait up: it will be some time before the dust settles on that project. Glover And, as a good night from me, here are the two sisters together.
-
Thank you David for your kind comment. I did mention that I had a lot of spare parts left over from the UTA model...... Now, the GNR built 3 of these coaches. On the break up of the GNR, one went to the UTA while the others went to CIE. Both lasted to about 1970. It might be the sign of advancing madness but I deciðed to build another one. One improvement I made over the UTA coach was to build up the lower part of the door windows while extending the top, which does I think help to give it a more GNR appearance: see photo. Glover
-
John, I like the idea of what I would term a 'meandering' layout; well suited to the Sligo-Limerick, especially the northern end, the Burma Road. Can I suggest that stone walls are an absolute must! Glover