LARNE CABIN
-
Posts
228 -
Joined
-
Last visited
-
Days Won
1
Content Type
Profiles
Forums
Events
Gallery
Blogs
Everything posted by LARNE CABIN
-
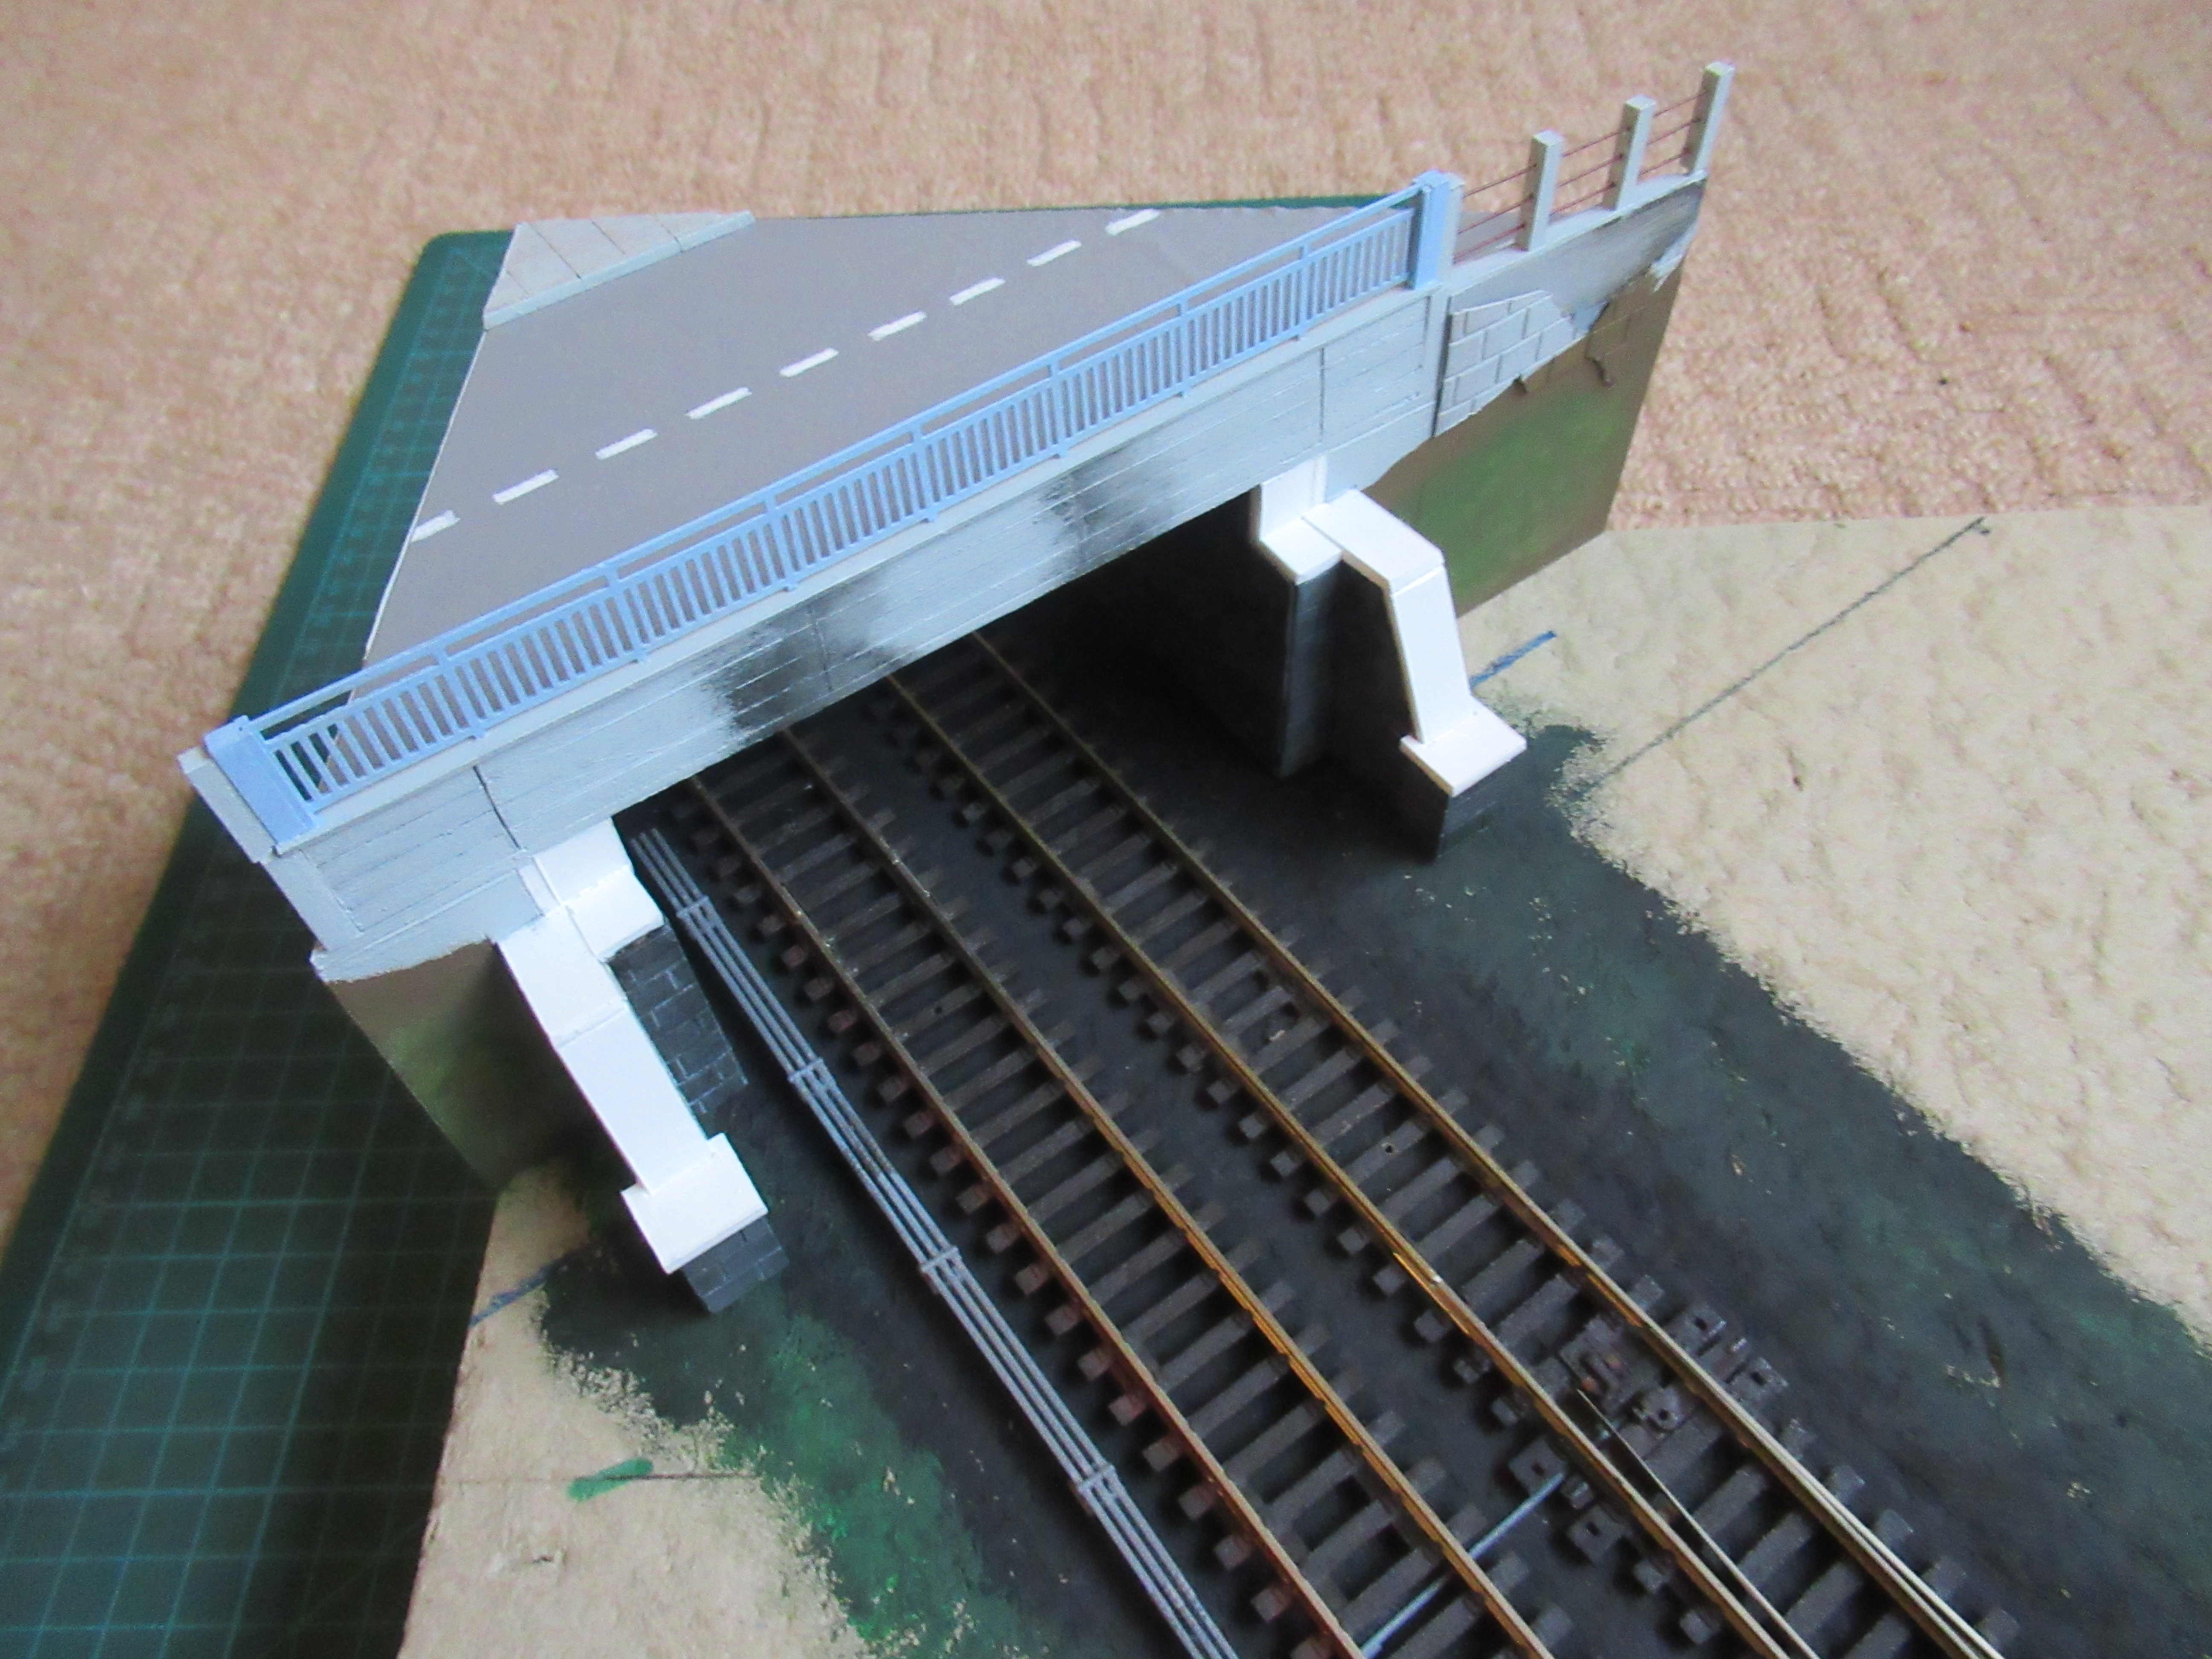
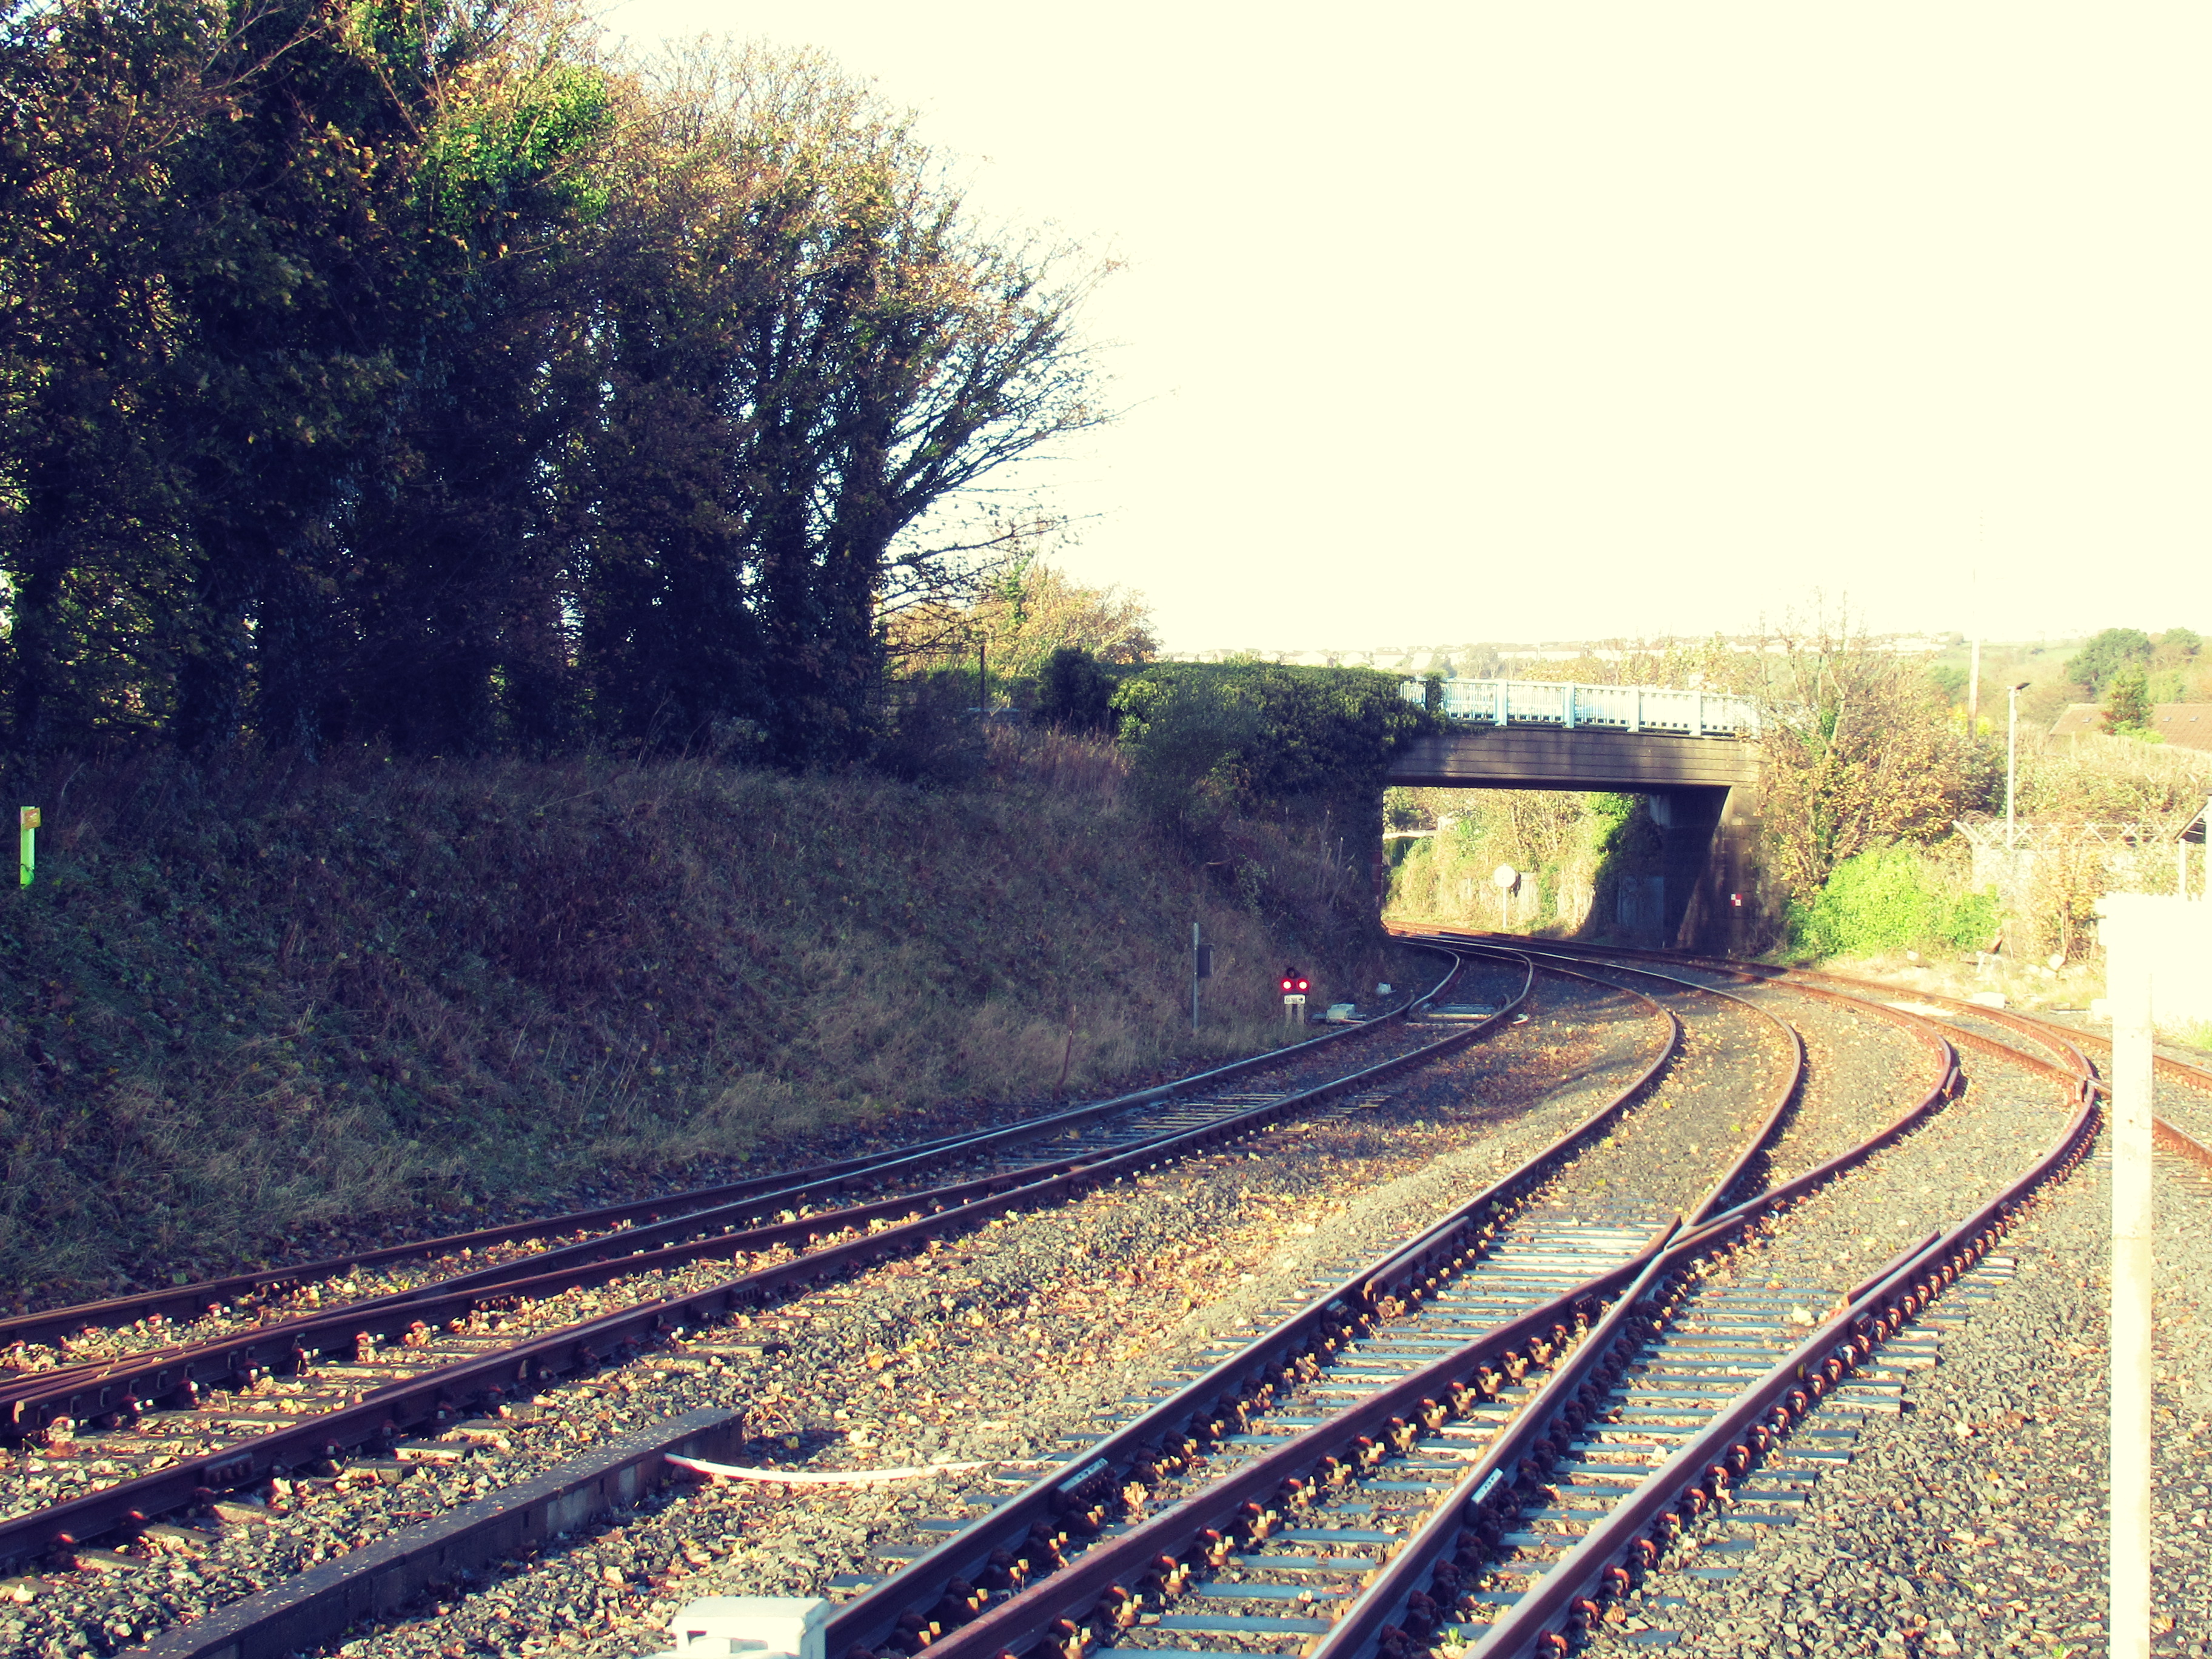
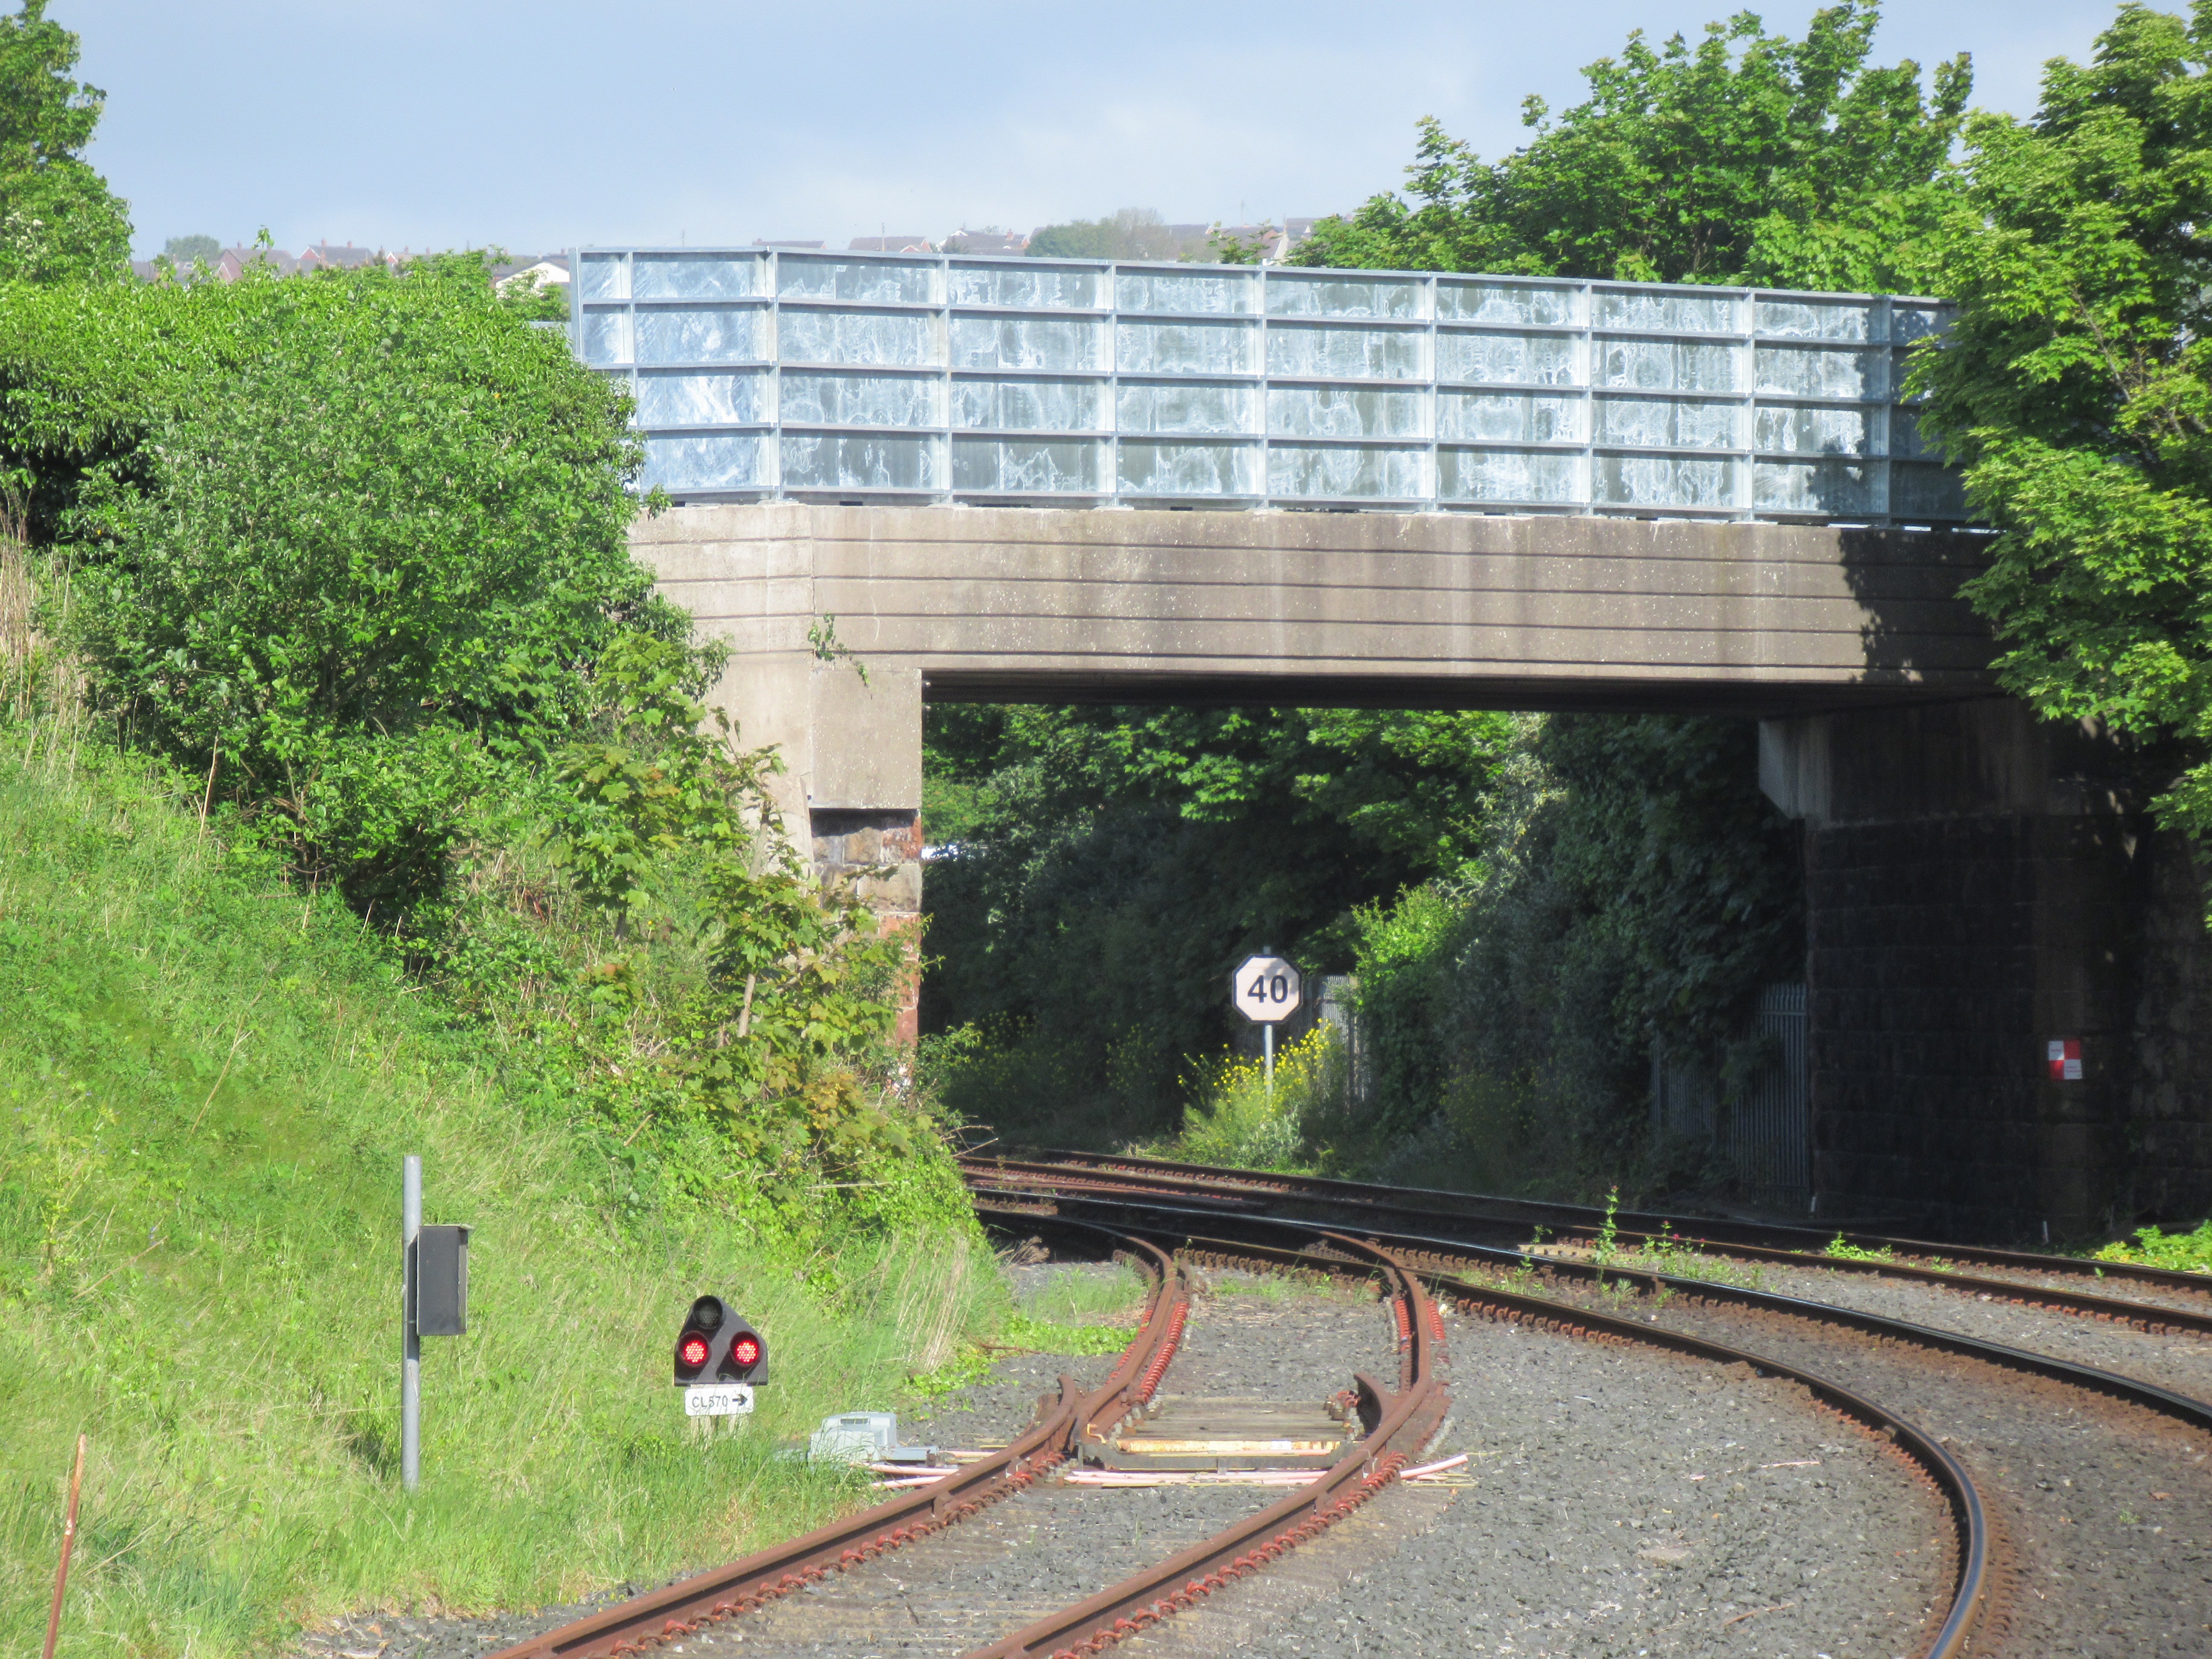
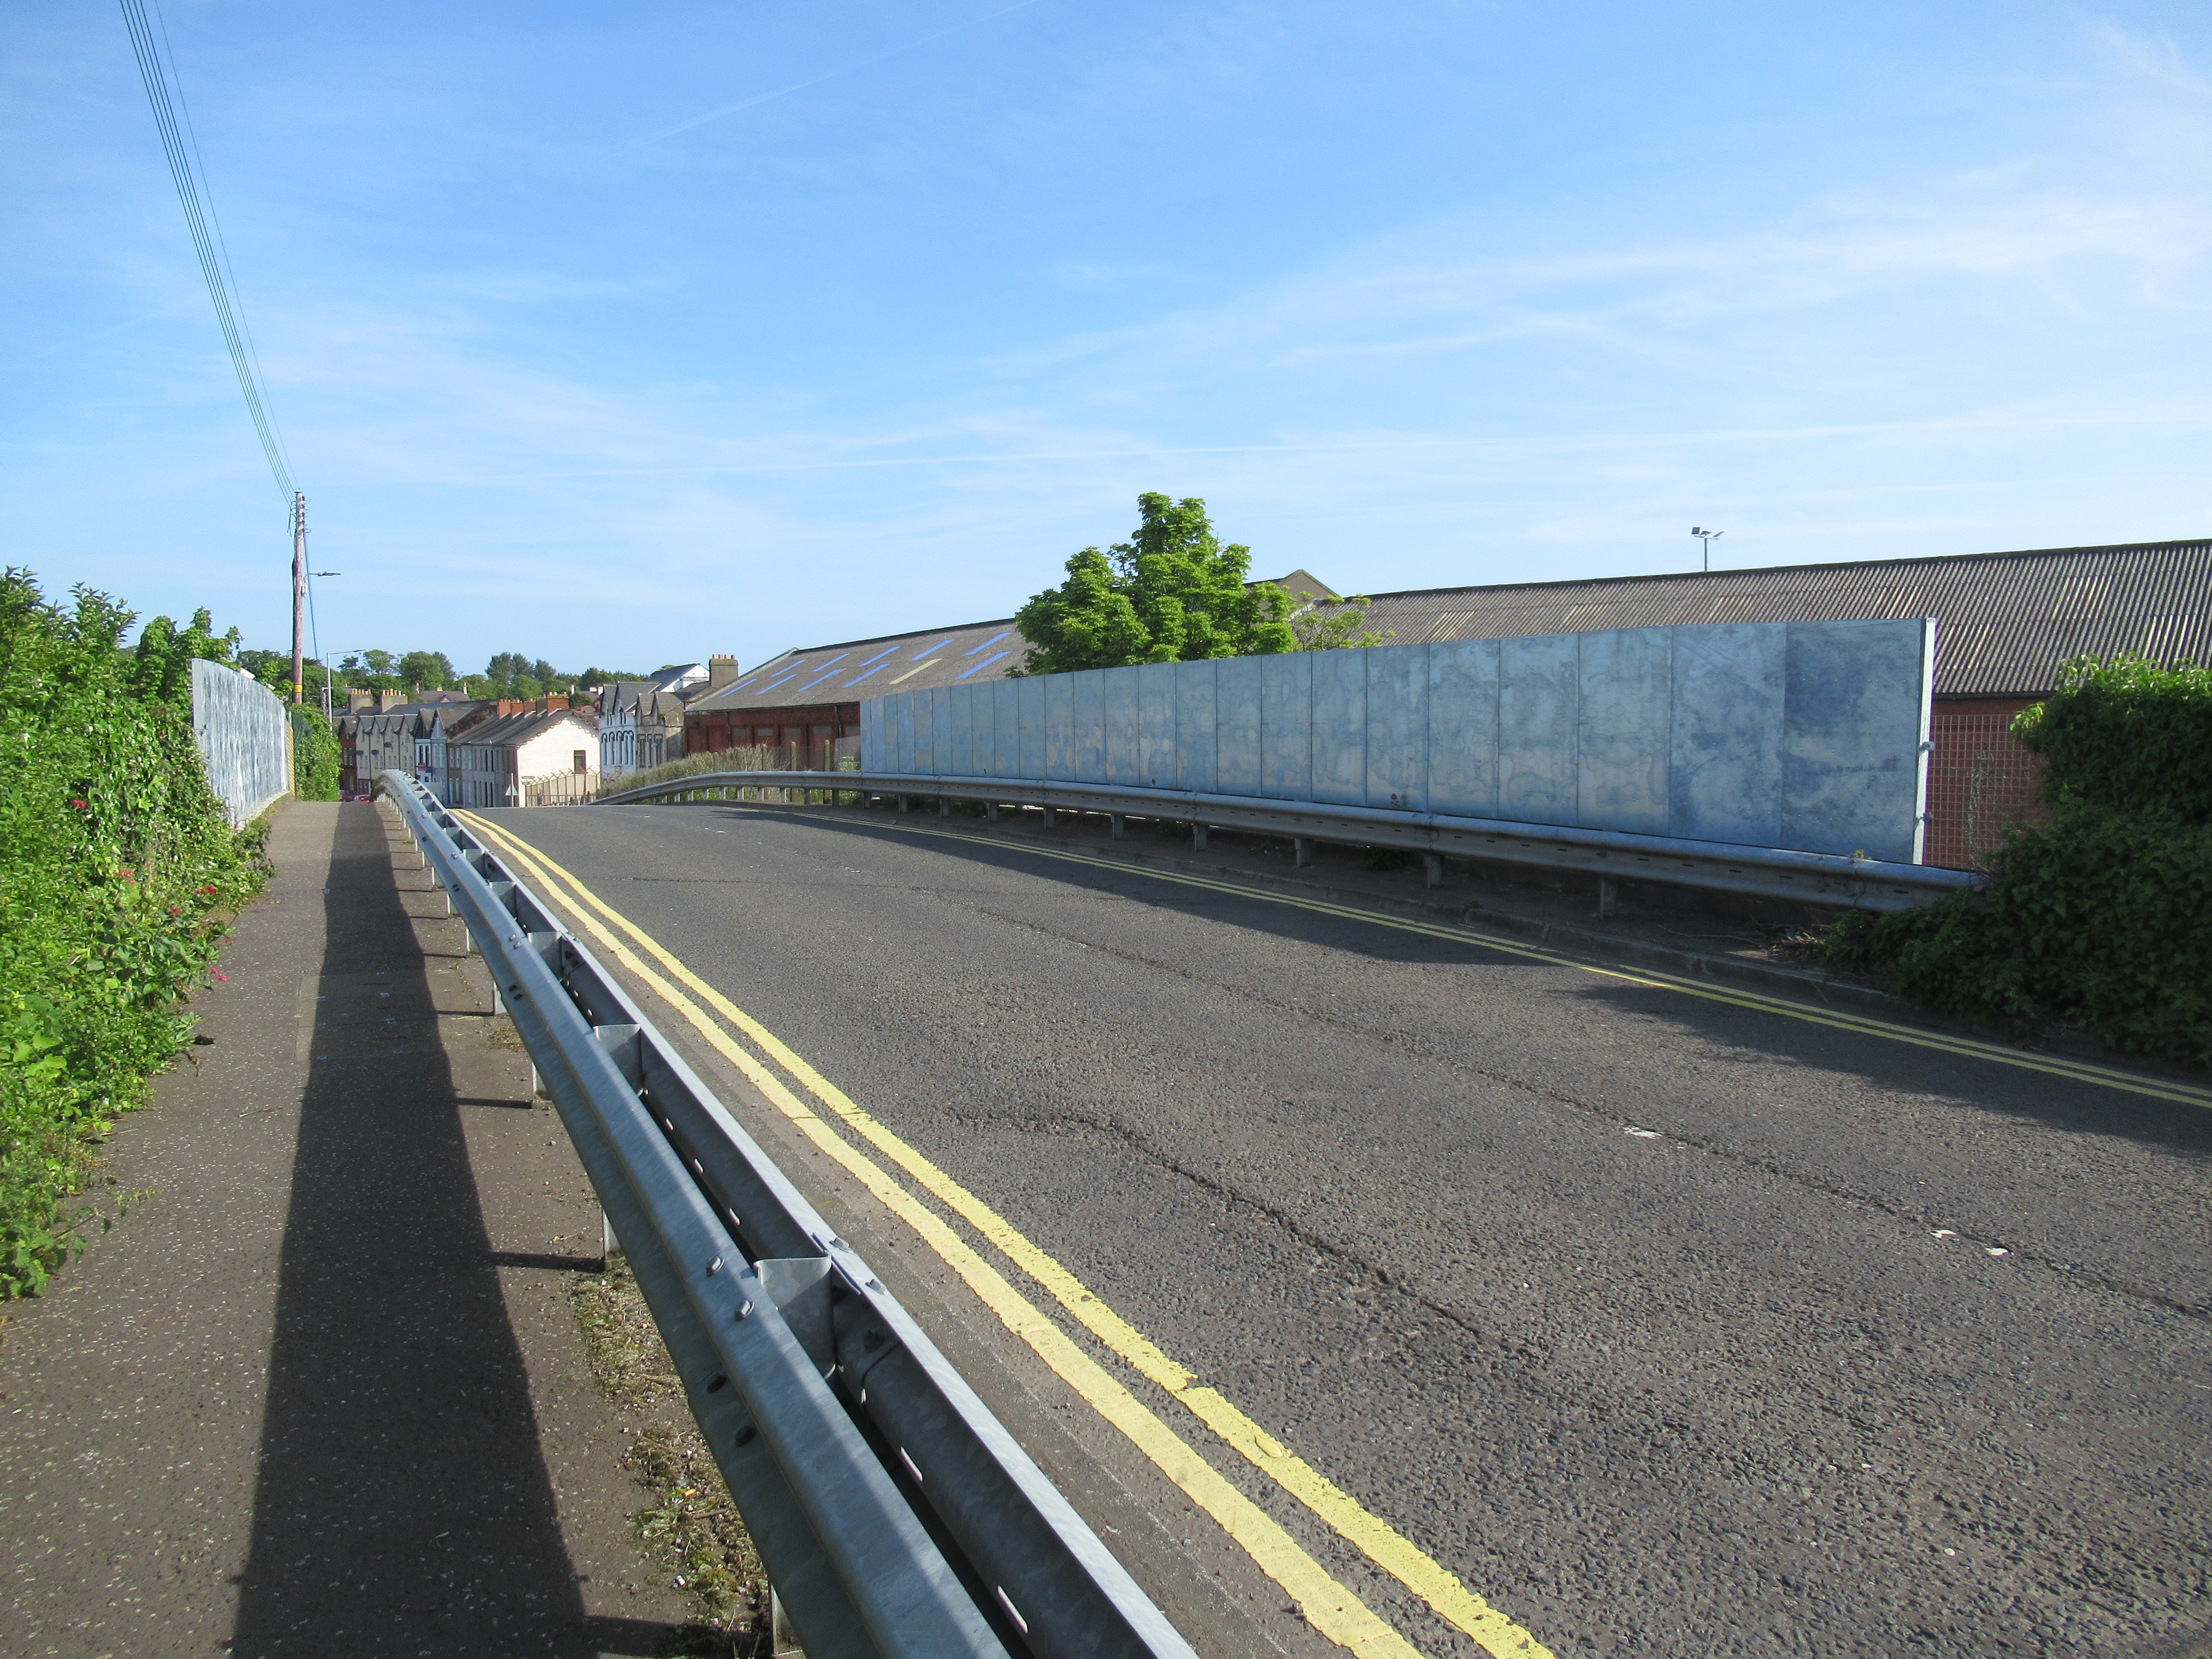
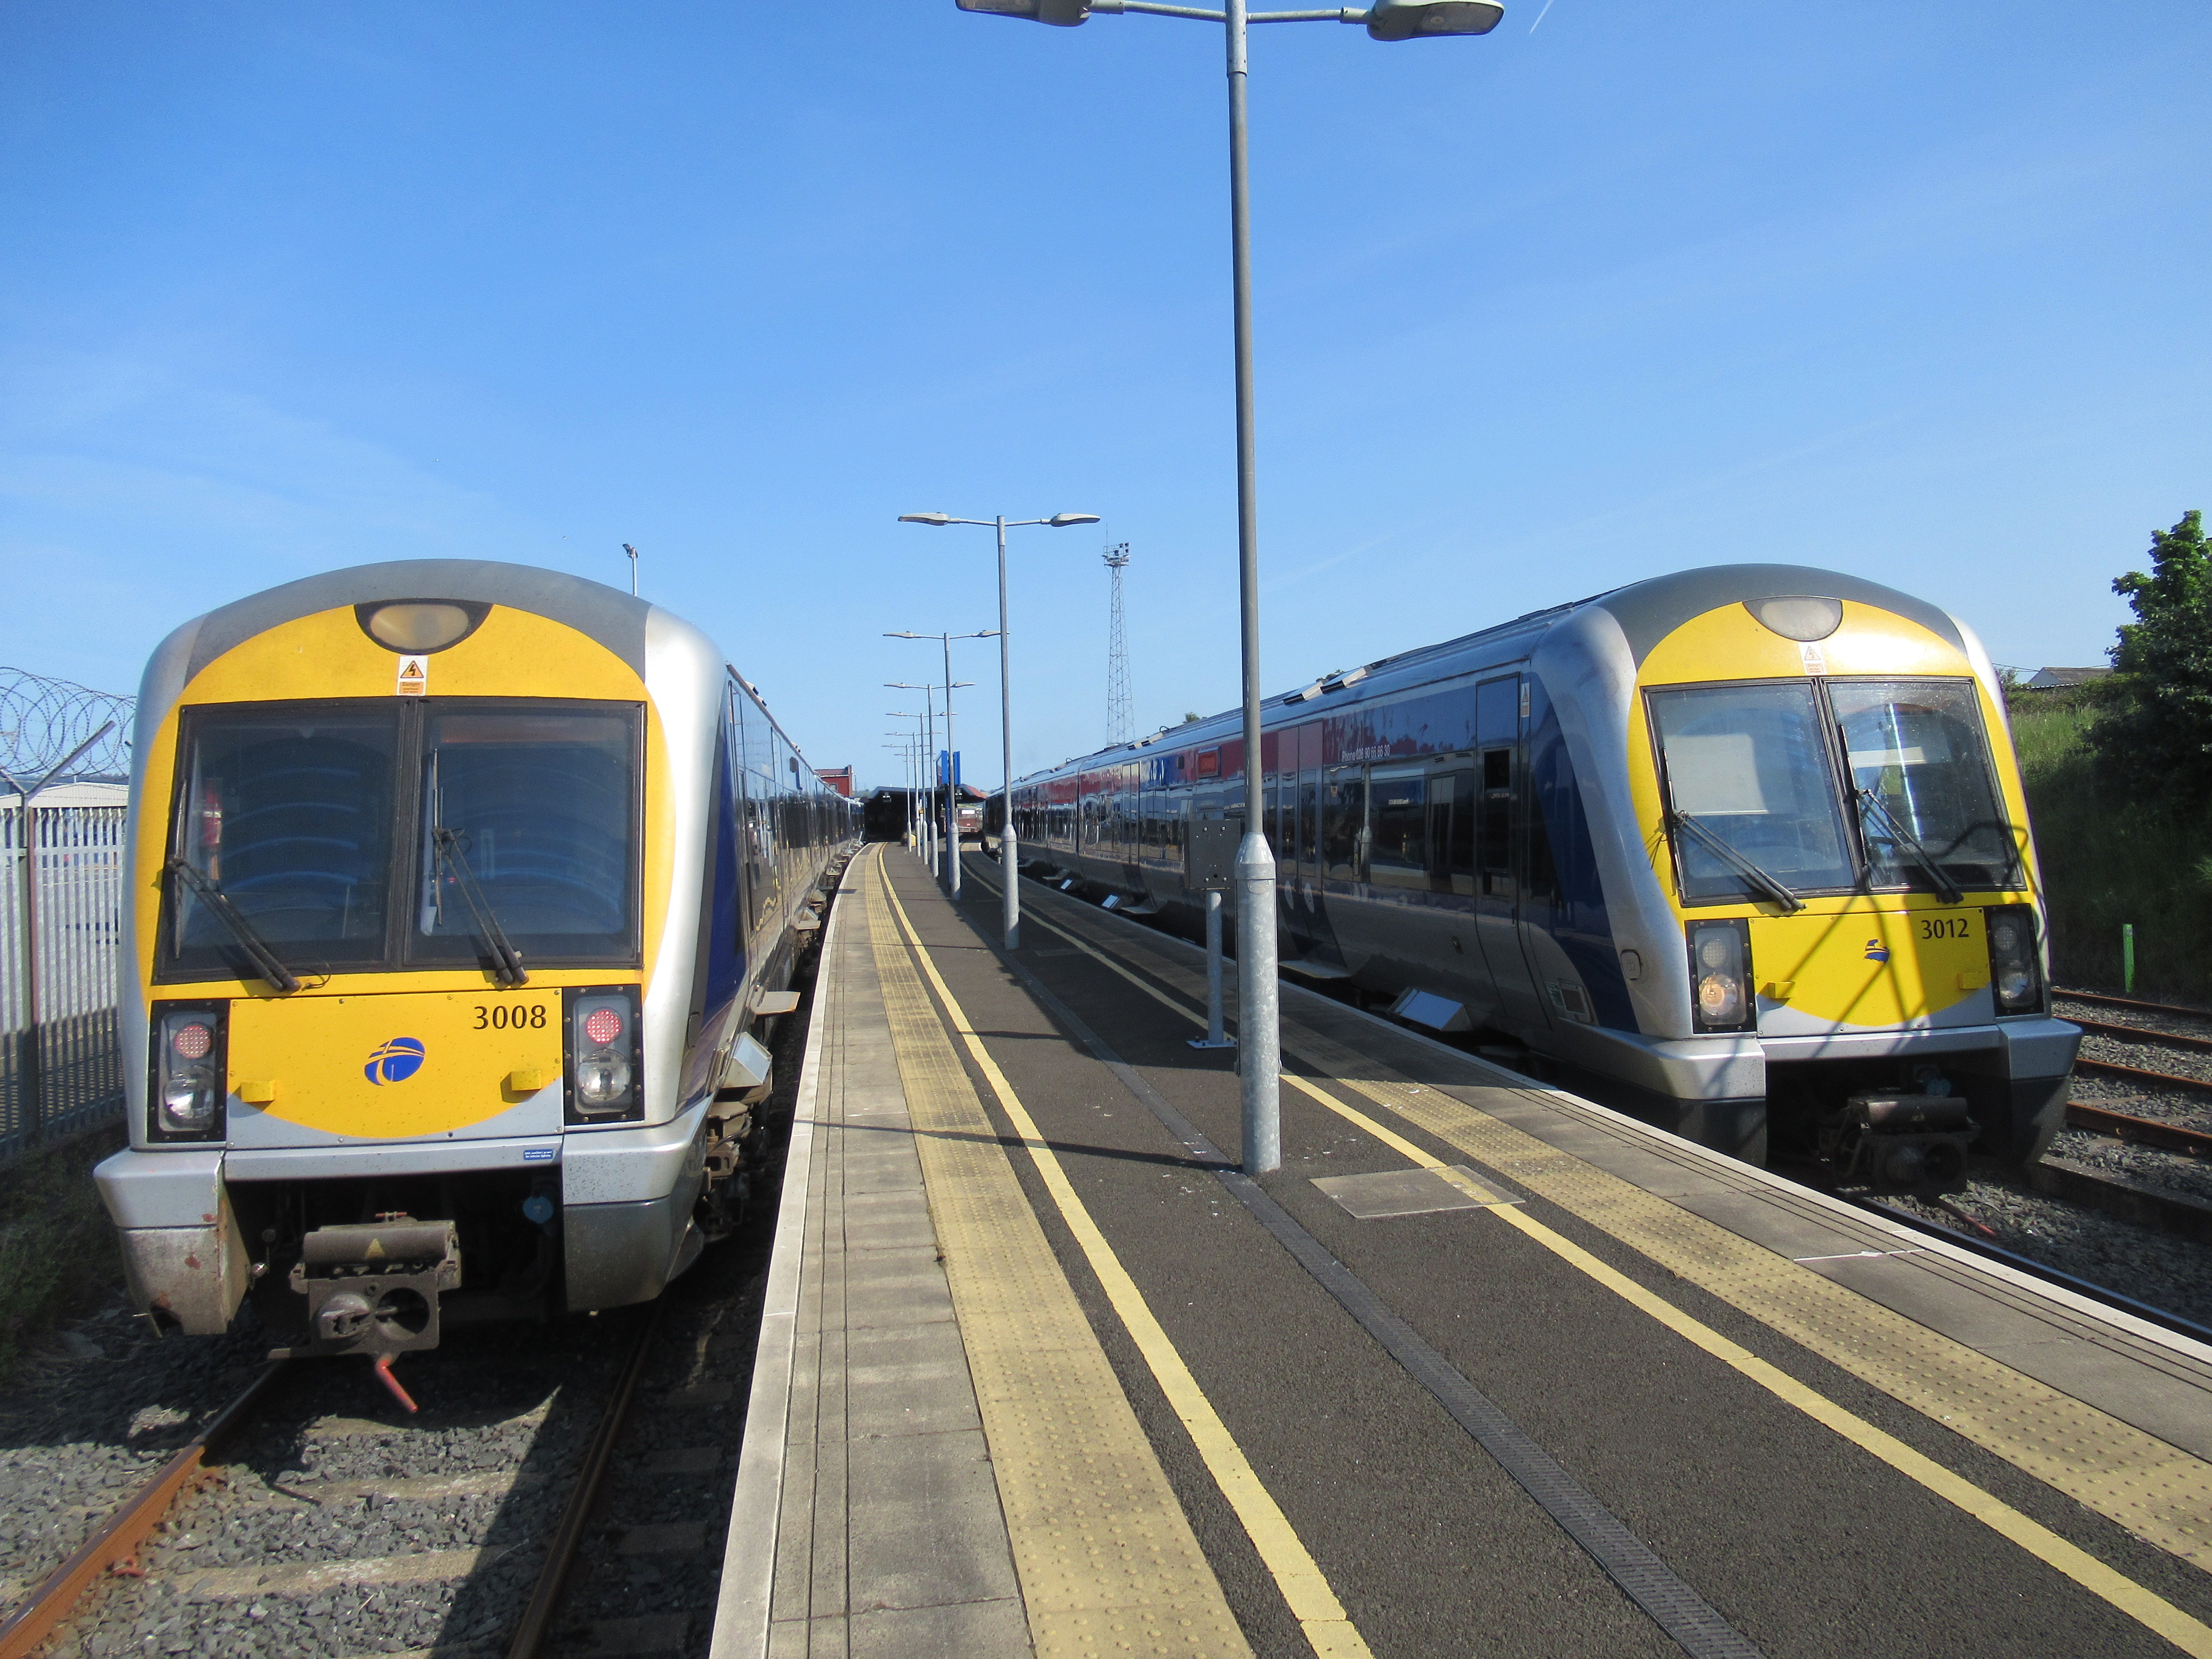
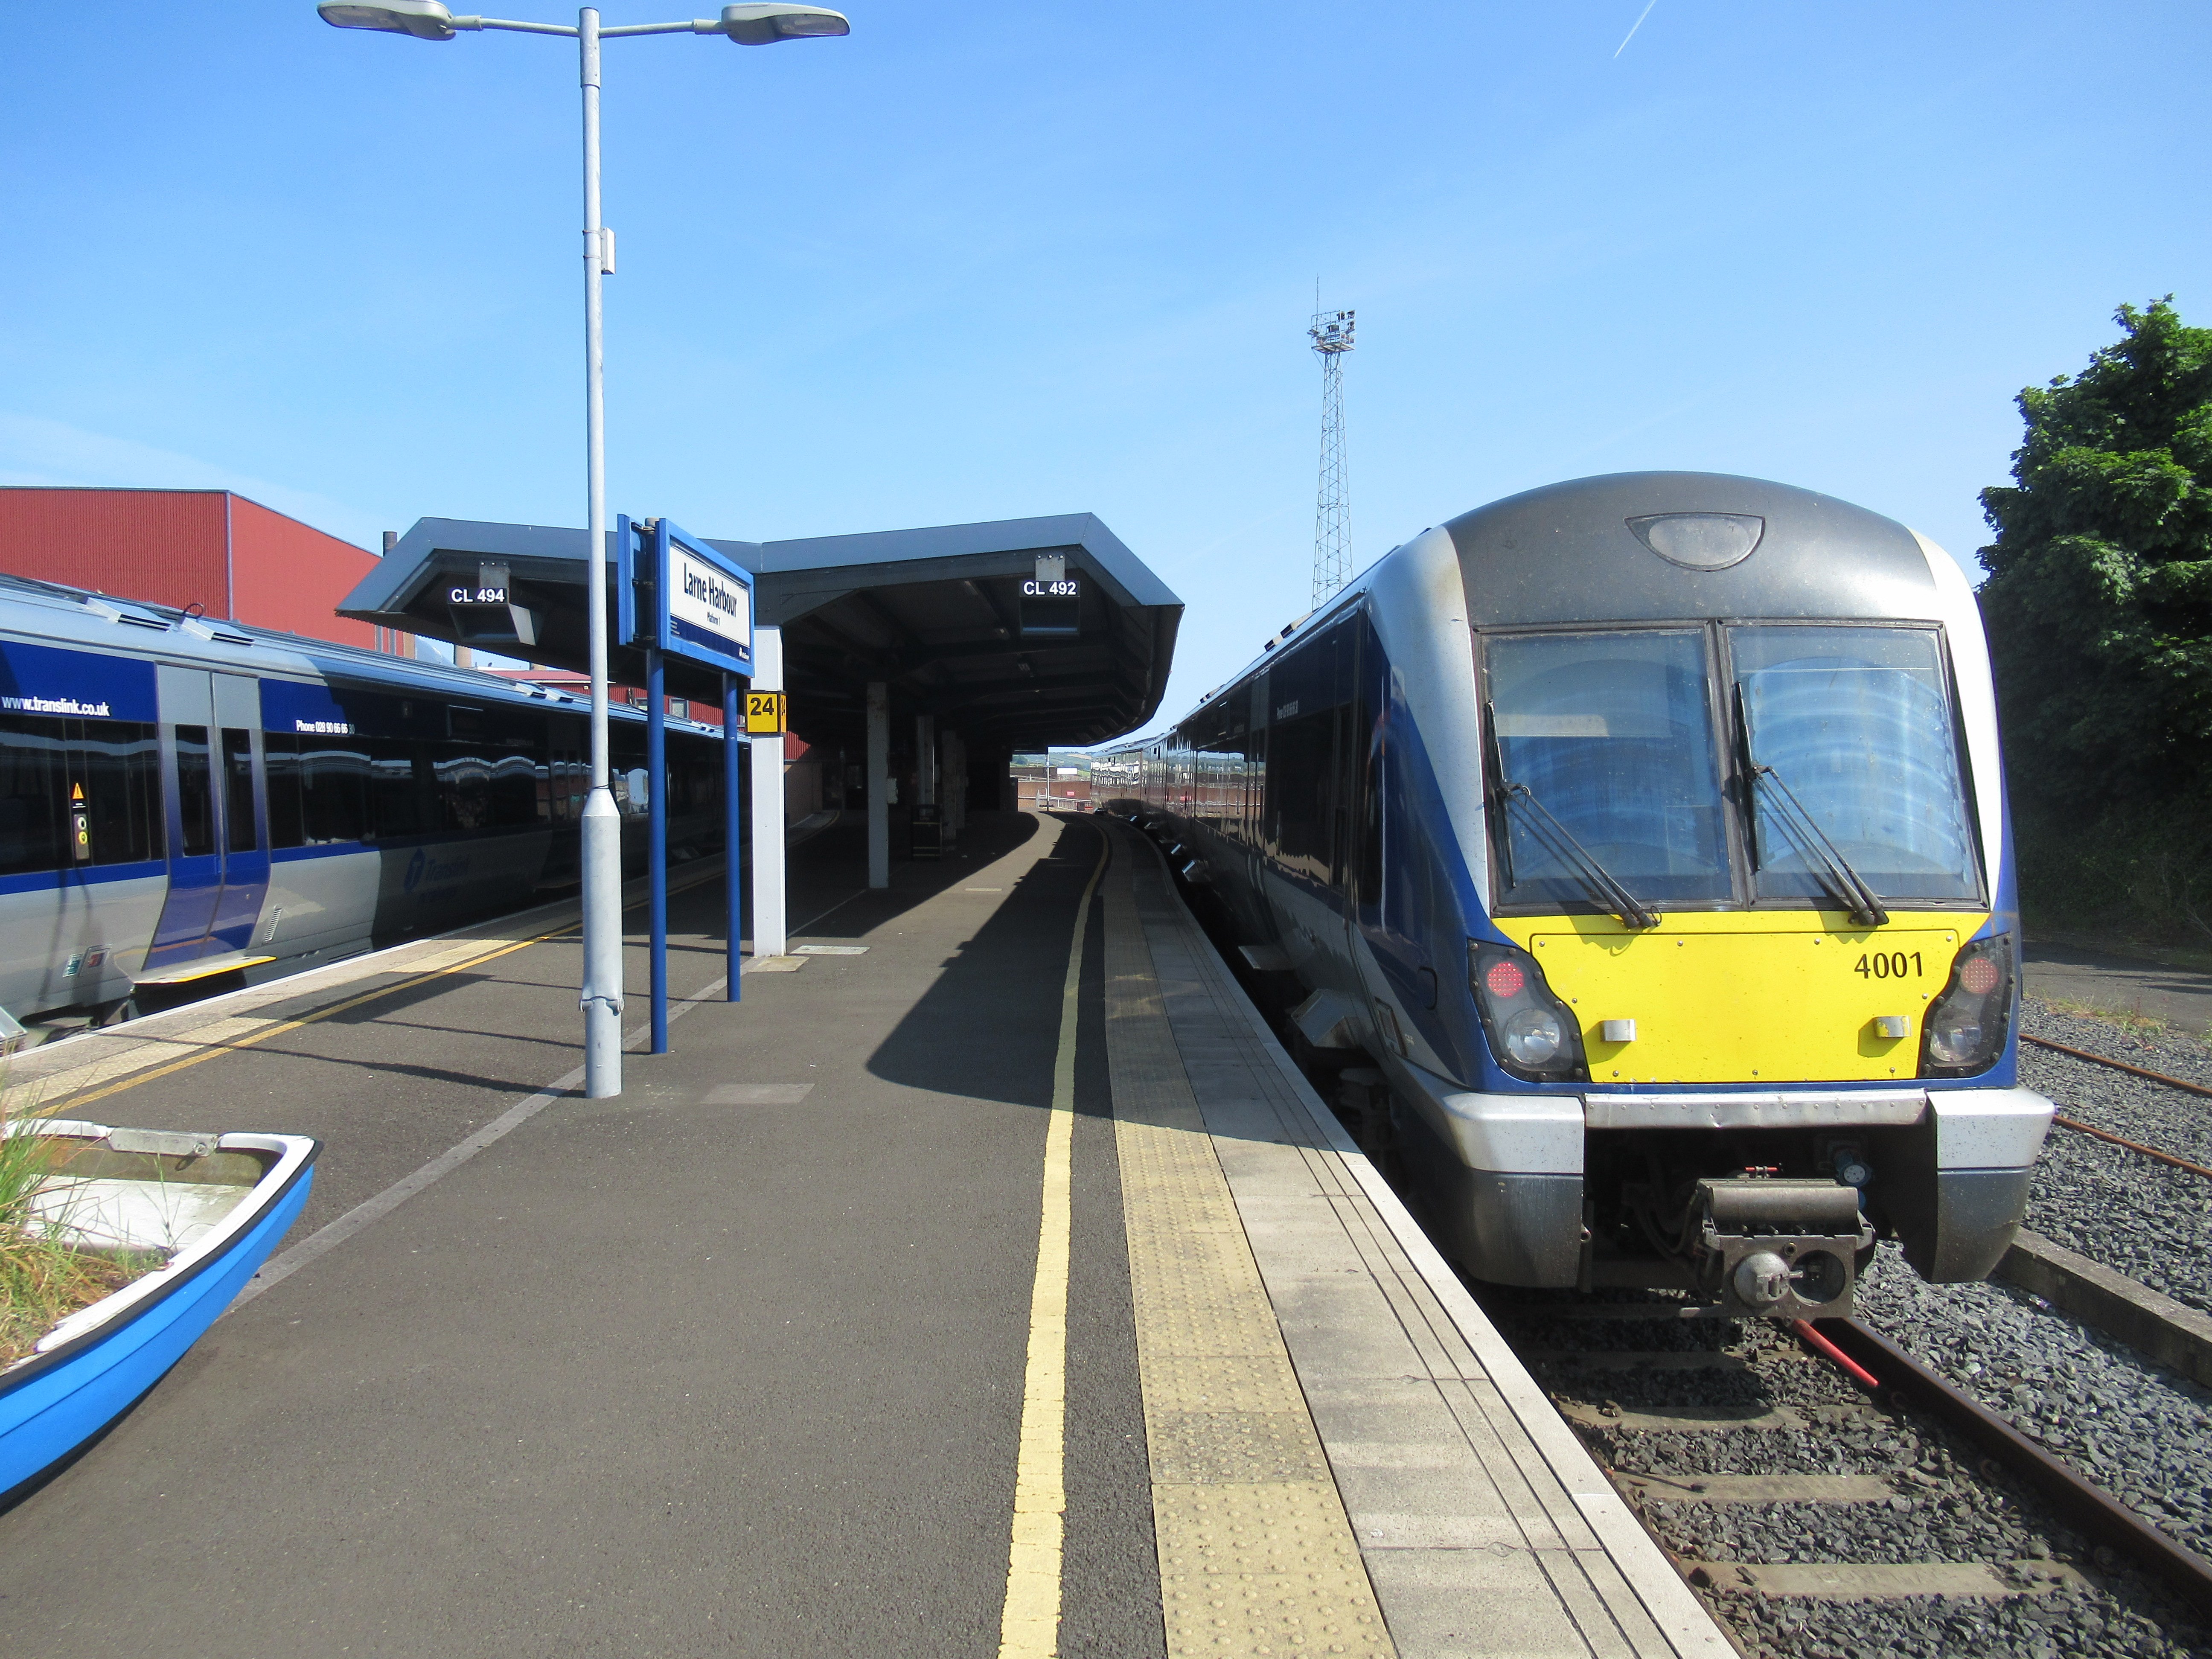
A little indulgence, again away from modelling, just to keep any current changes documented, with a quick fast forward to June 2023. I used Ernie's 1960's photo as a guide for building my model of the Olderfleet Road Bridge. ... and in November 2022 I took and posted this photo... ... to show that apart from vegetation growth, the bridge had changed little from the 60's. Just in time, fast forward to June 2023 and the blue railings have gone to be replaced by a six foot high metal screen... A sign of the times, presumably as a deterrent to vandals throwing things over the bridge unto the line! I've noticed similar structures at a number of road bridges. Staying with 2023, the Larne Line, like the rest of the network, apart from the Enterprise, is worked by CAF DMU Sets, usually 3 Car Sets, comfortable to travel in, but boring for the railway enthusiast. The only variation is the 17:05 ex Belfast, Great Victoria Street, arriving Larne Harbour at 18:02. This is a CAF Class 3000 DMU 6 Car Set. It arrives at Platform 2 and stables there overnight to form the 07:33 Larne Harbour to Belfast, Great Victoria Street. Other services use Larne Harbour Platform 1. The Friday 17:05 stables at Larne Harbour over the weekend to form the Monday morning 07:33. Here, on Sunday 4th June, 3008 (3408 + 3508 + 3308) coupled with 3019 (3419 + 3519 + 3319) sits in Platform 2, while 3012 (3312 + 3512 + 3412) leaves with the 16:55 Larne Harbour to Belfast, Great Victoria Street. You can just about make out 4001 (4401 + 4501 + 4301) further up Platform 1 which will form the first train out of Larne Harbour in the morning, the 06:05 to Belfast, Great Victoria Street... ... and a closer shot of 4001.

-
Keep the Irish Railway books, Bob. They're a great source for relaxation for me, and every time I scan through a particular book I see something new! If you can find a little space, keep them.
-
All best wishes, Bob. Health comes first, but hopefully you'll improve and be able to enjoy some modelling, if even on a small scale.
-
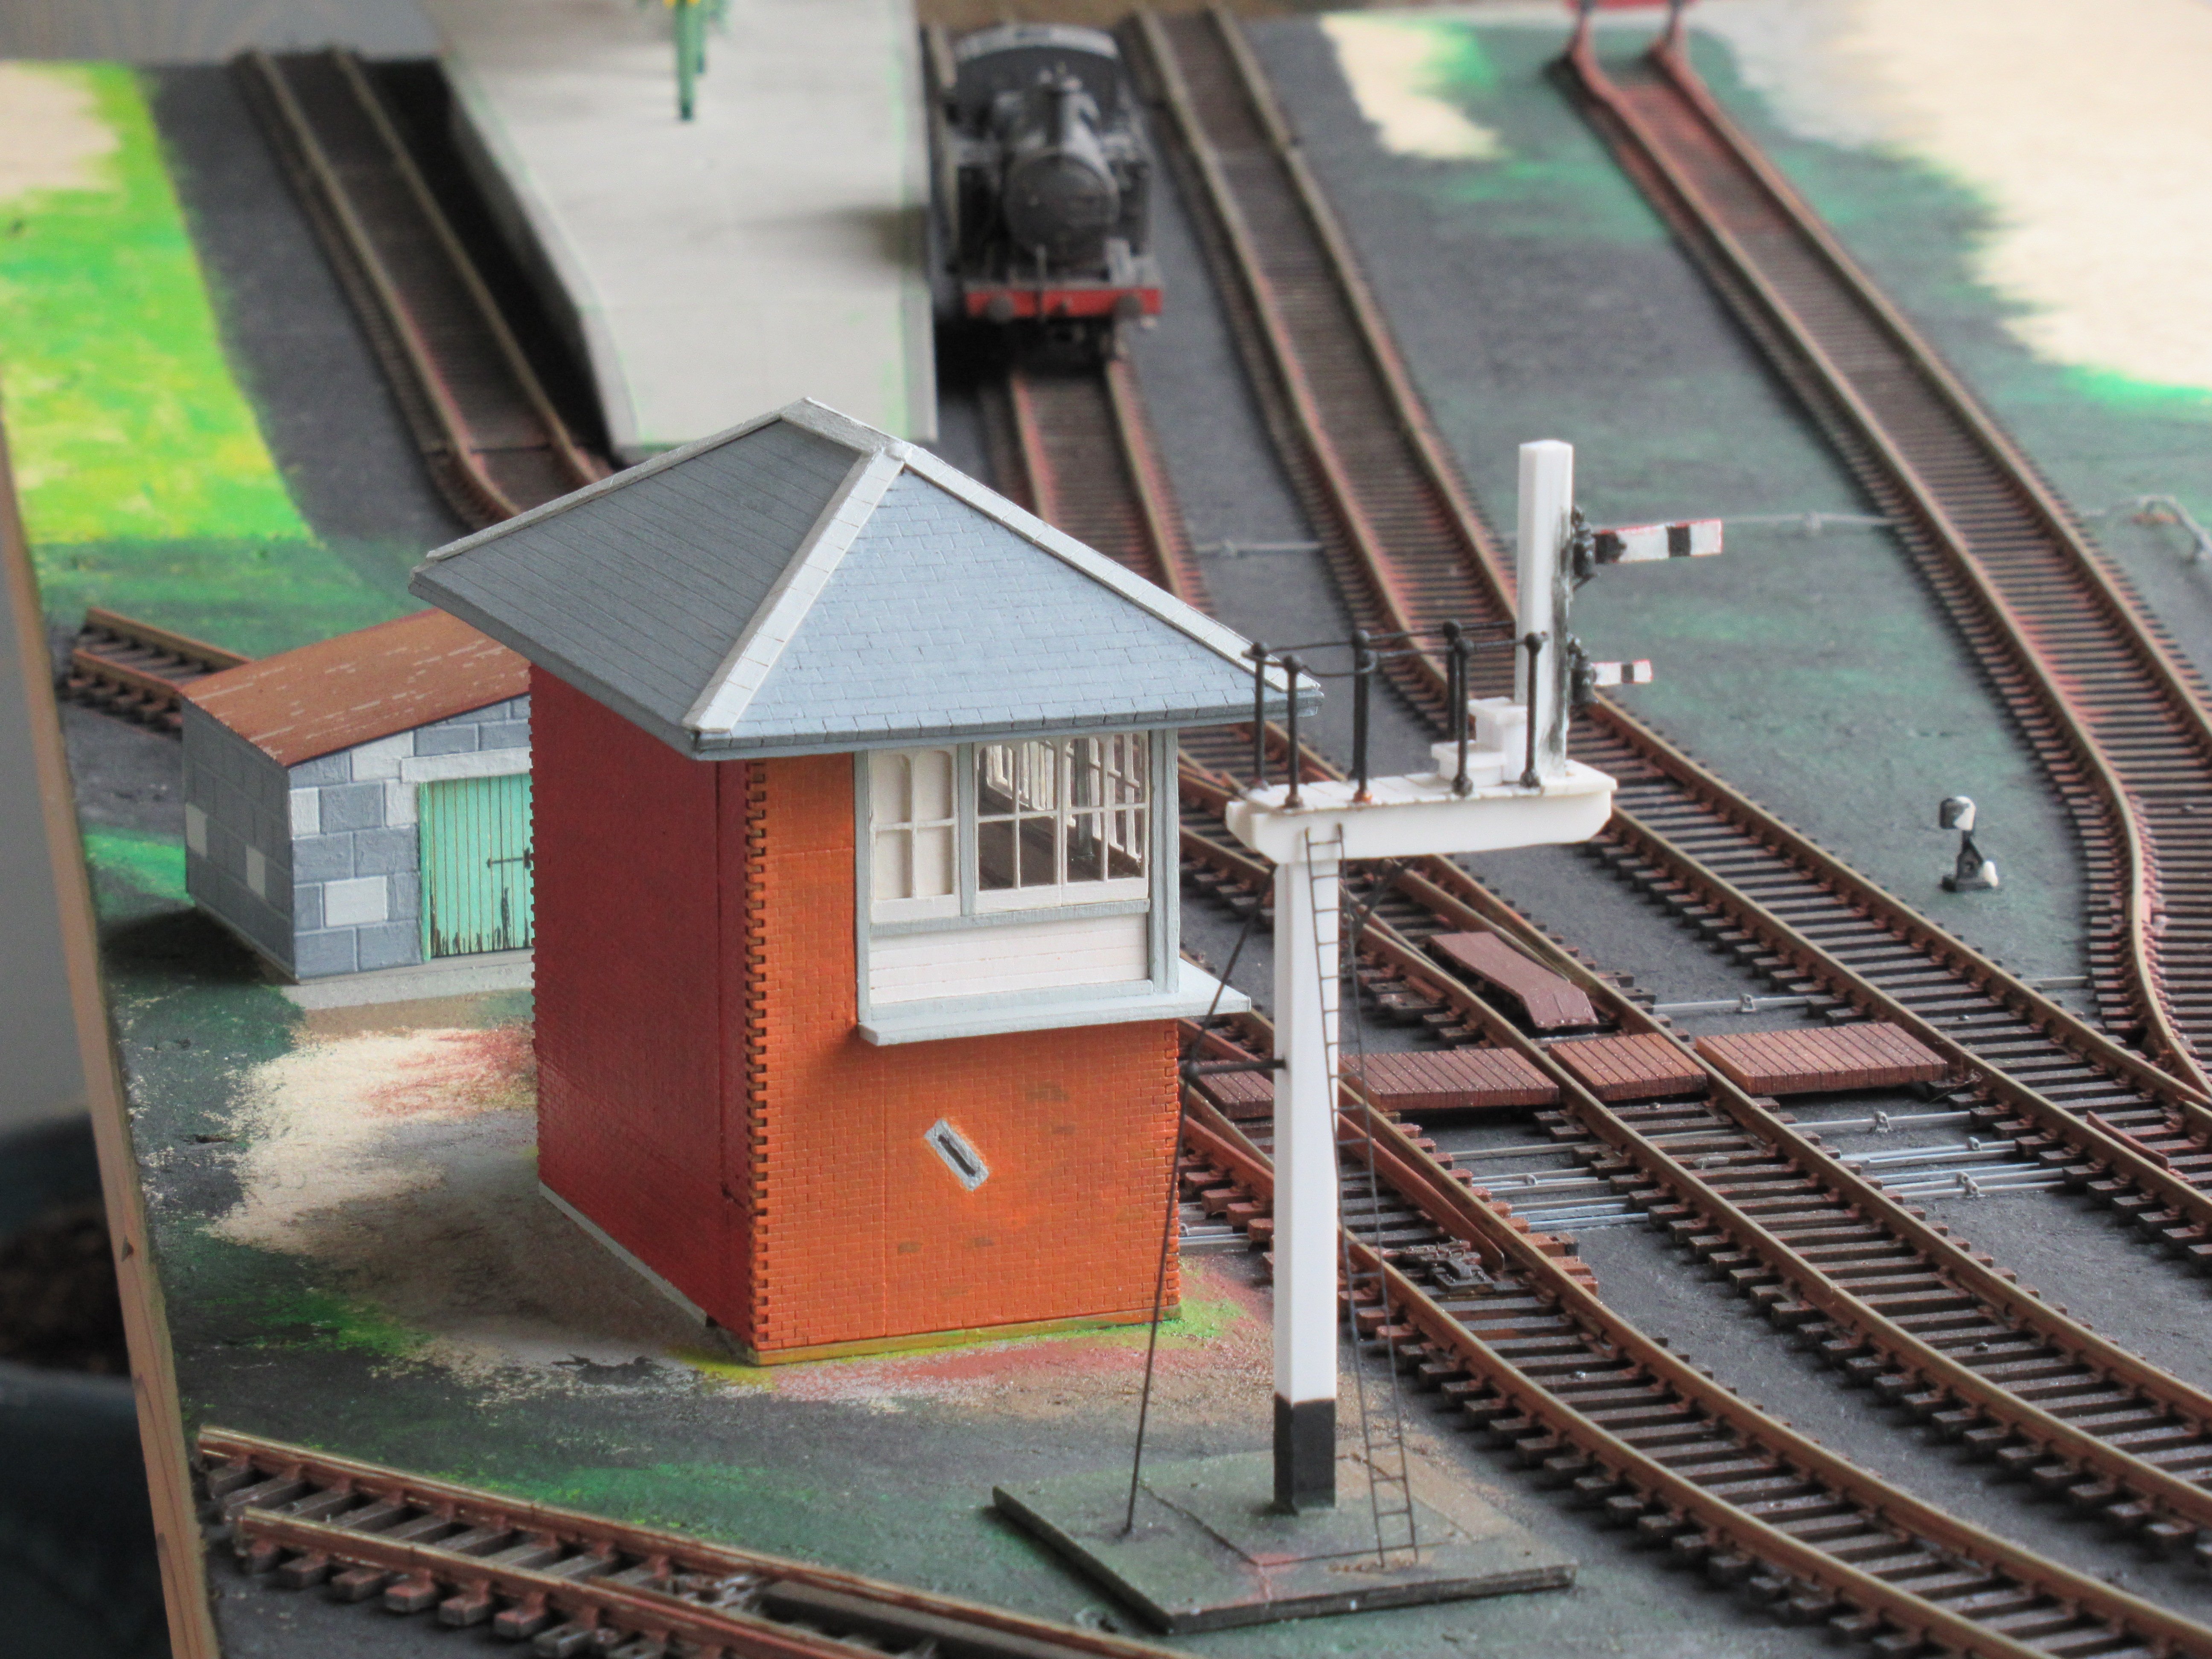
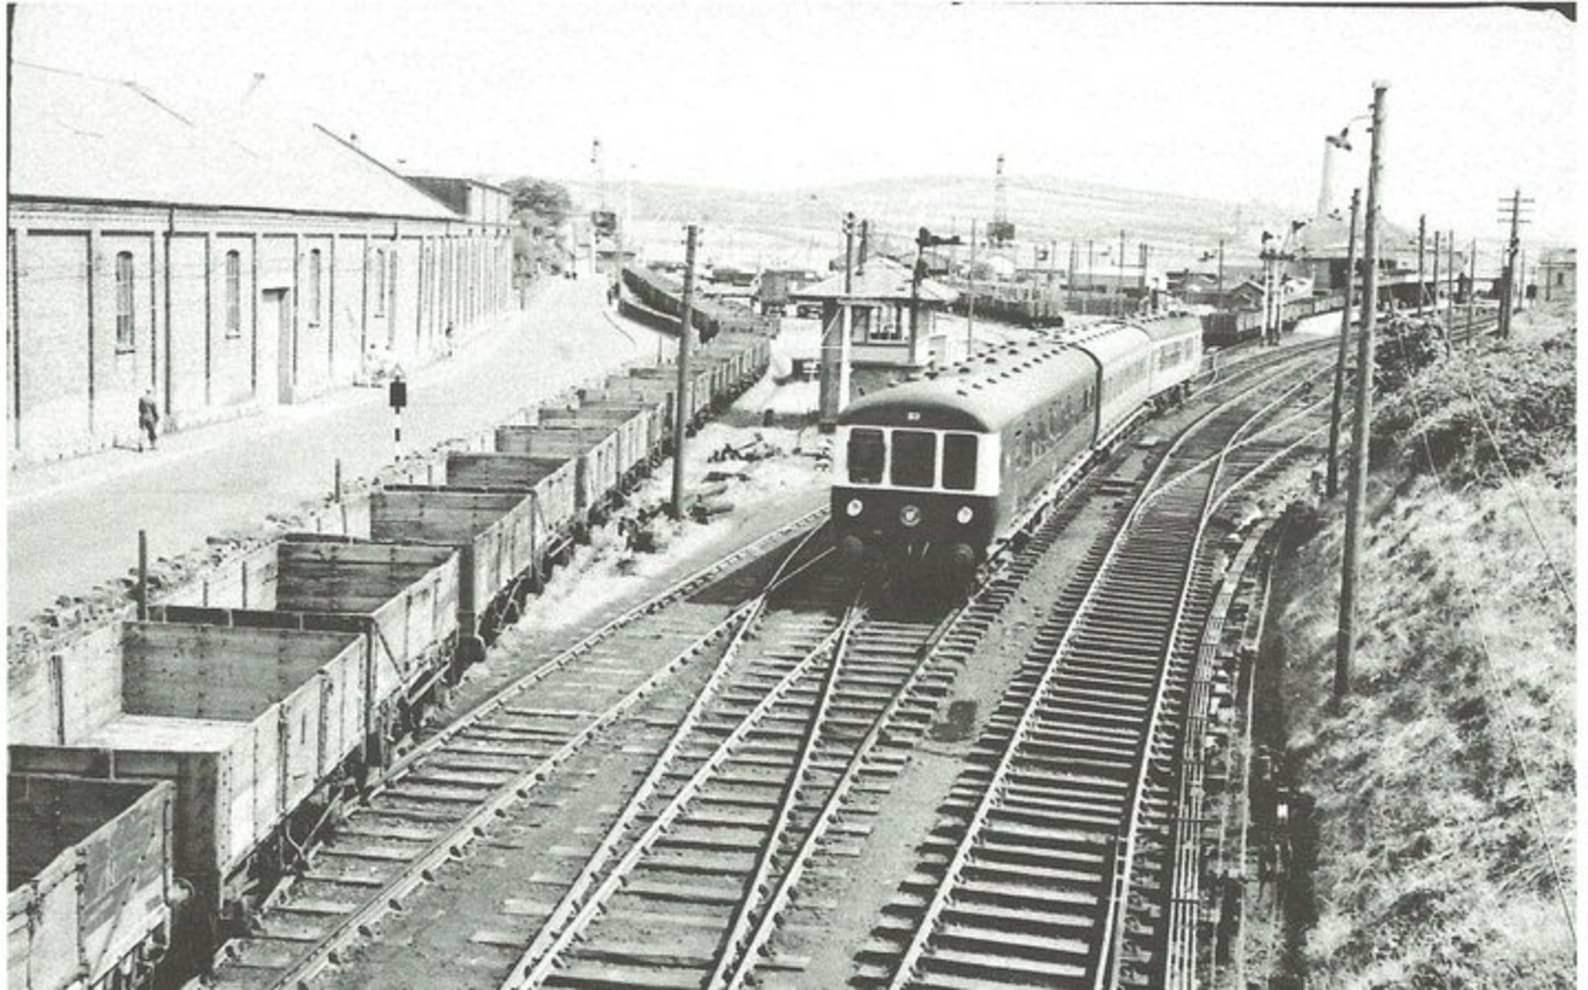
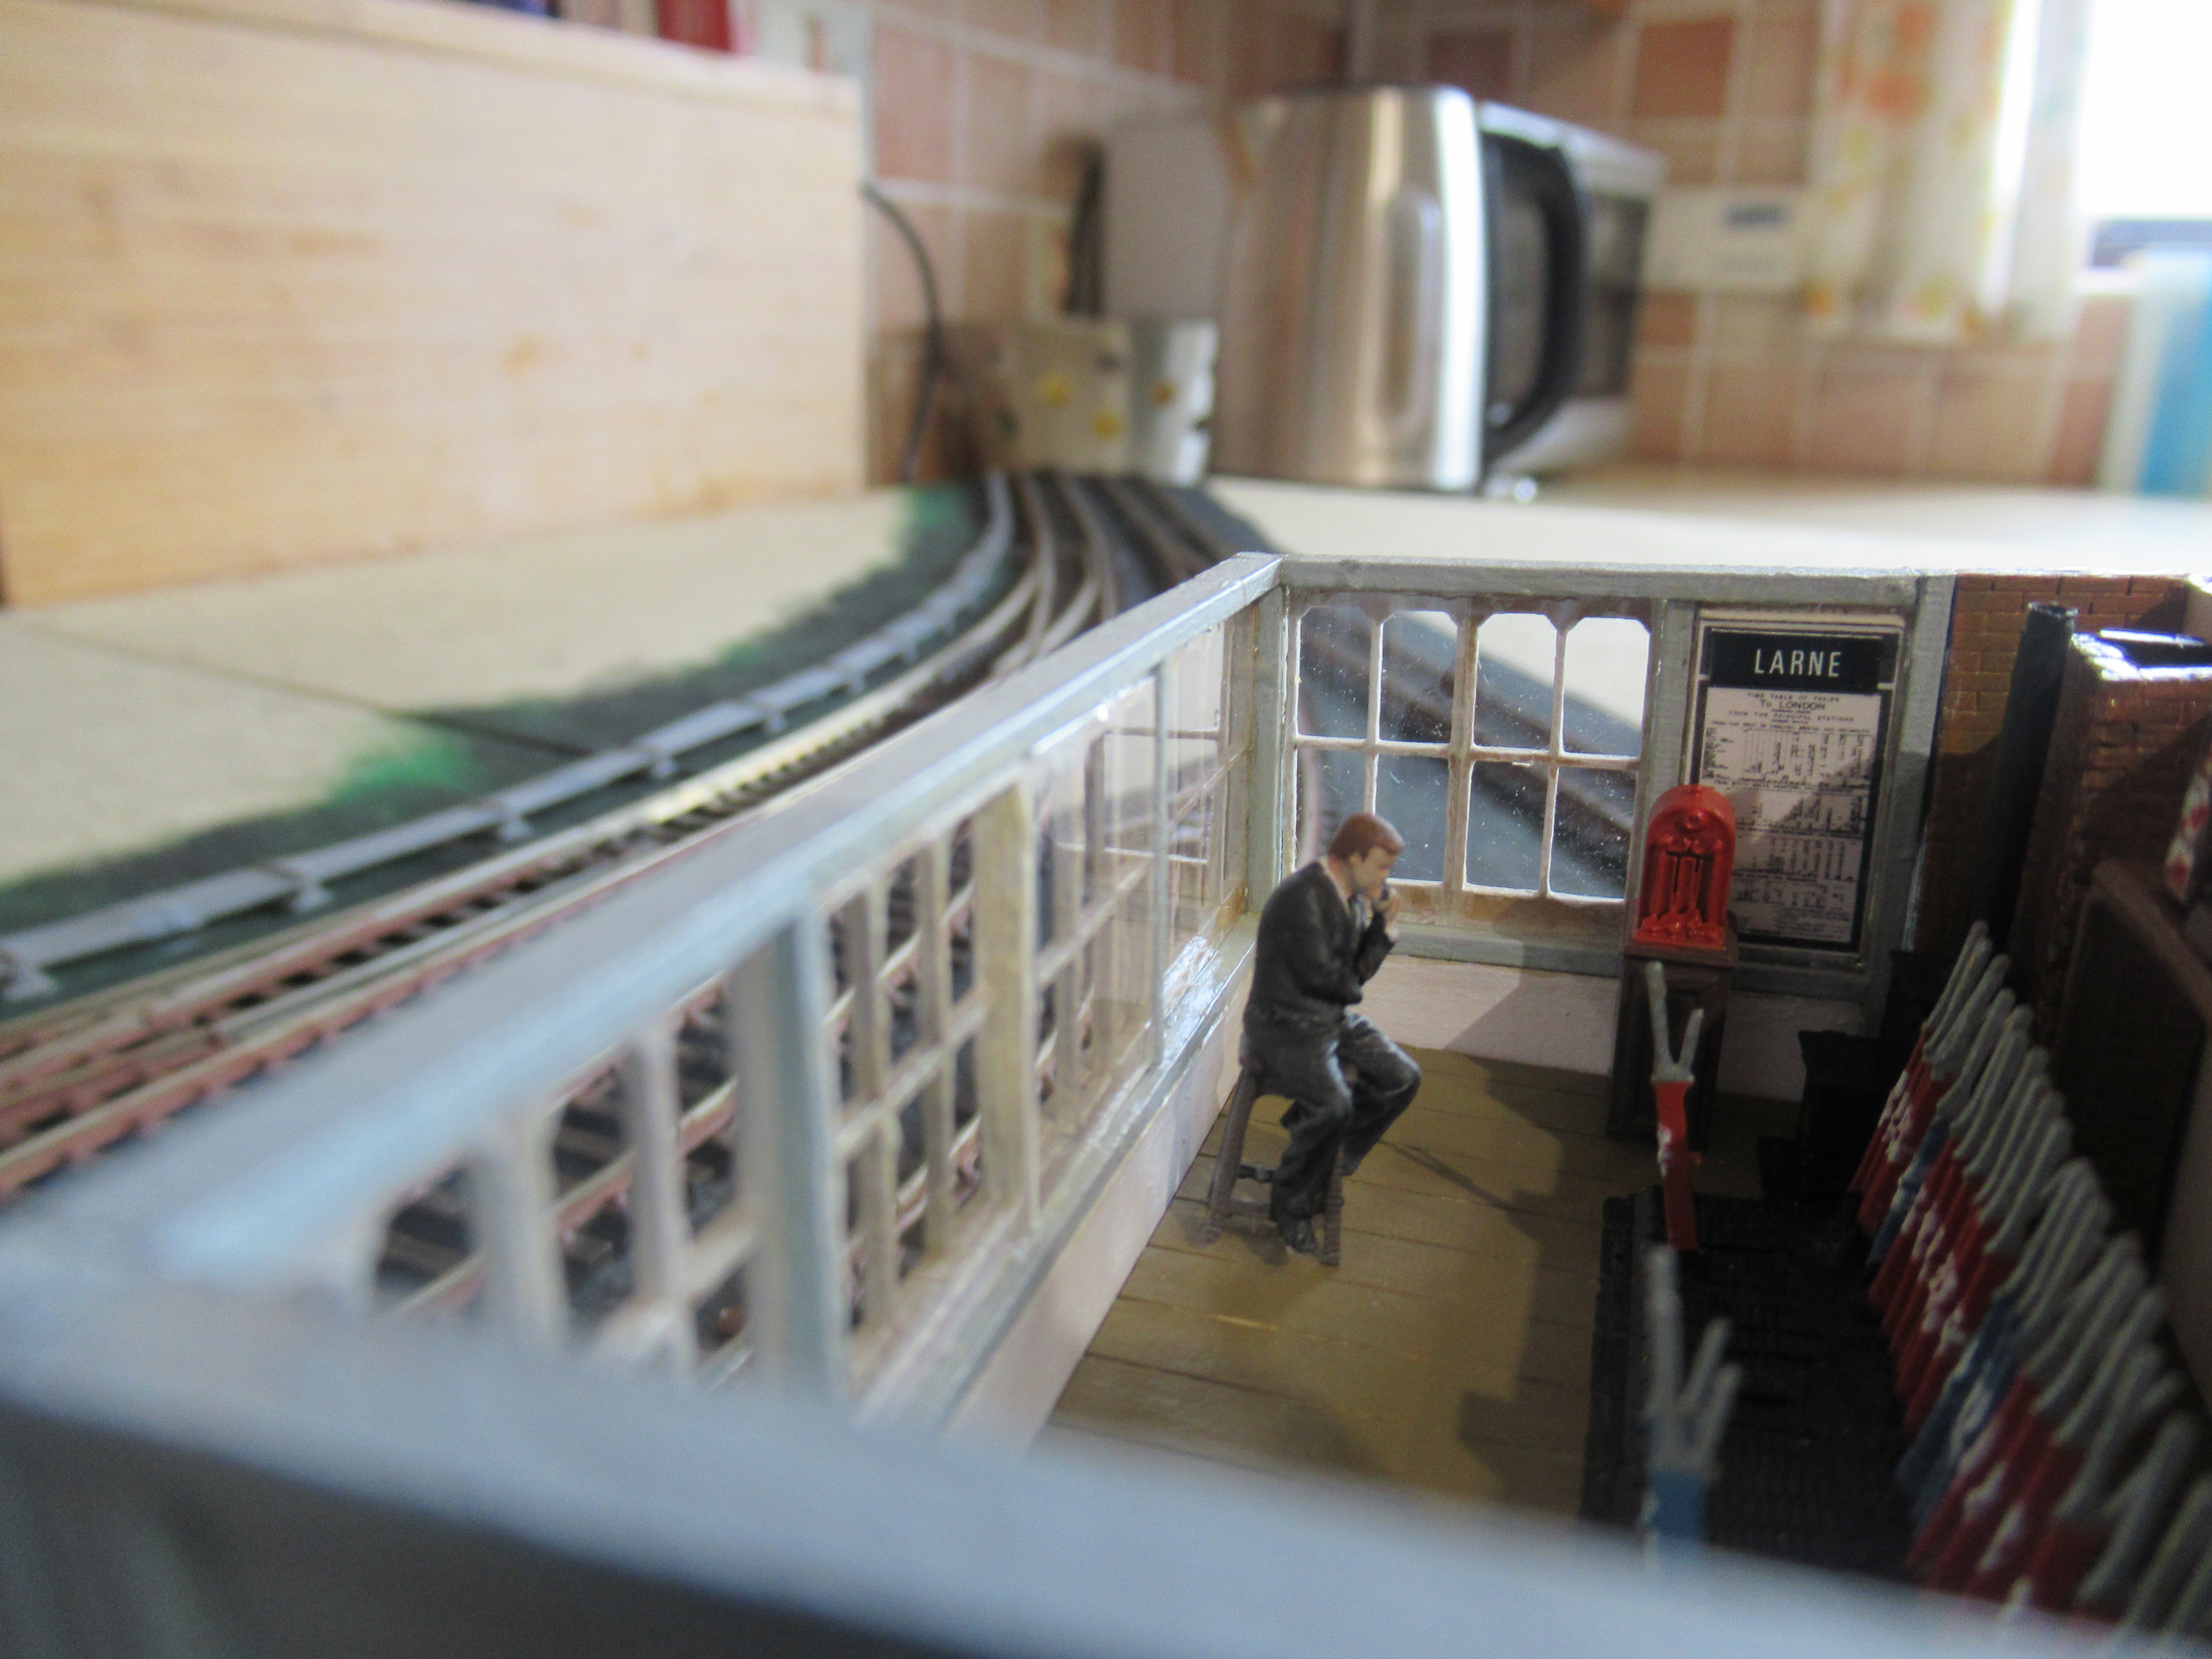
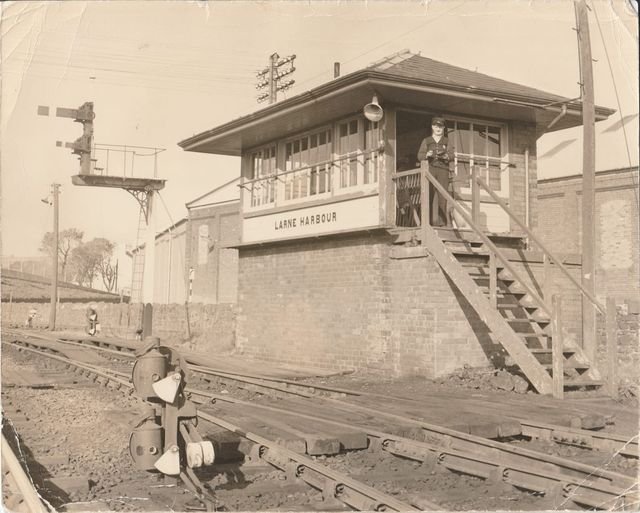
For me, modelling Larne Harbour Station in the 60's, this photo is a real gem. It was spotted by Patrick Davey and he suggested that I may be interested, I certainly was, thanks @Patrick Davey. It's taken me a long time to track down the owner, find out more about it, and get permission to post it here. © Posted with kind permission of the McIllhinney Family. There is a fantastic amount of detail in this photo and it has been invaluable to me in building The Bracket Signal. This is by far the best view of this signal that I have seen, as the vast majority of photos are taken from the Olderfleet Road Bridge side of the station. There's also lots of detail of the box itself, which I still need to add and the Aluminum Factory walls and Harbour Road background. Look at the fantastic view of The Double Stacked Ground Signal, with the pulley, in the foreground. Again invaluable when I come to model this signal. The current modelled version of the photo is posted below ... ... and a view of The Bracket Signal from the Olderfleet Road Bridge end of the station ... The research into this photo has prompted me to further research the real human aspect of life at Larne Harbour Station during the period being modelled, so as well as progressing building the model, and further developing the fictitious characters that I have already introduced, I hope to occasionally post factual snippets on the real Larne Harbour Station staff of the 50's and 60's, on this thread. I'll post the signalling aspects related to this photo, and others, on my LARNE CABIN'S LMS Upper Quadrant Semaphore Signals Workbench thread. Just click on the link at the bottom of this (or any Larne Harbour Station post) and you can follow the building of the signals at Larne Harbour Station. The gentleman in the photo, with the pipe and tobacco pouch, is John McIllhinney. John lived at Millbrook, near Larne, was in the army and served in Hong Kong. He left the army in 1958 and worked at the harbour in a number of areas before working for the UTA. He was signalman at Larne Harbour during the late 60's and early 70's. John left the railway to work at Ballylumford Power Station, in security. During John's time at Larne Harbour the relief signalman was Barkley Linton, but a number of different accounts state that the longest serving signalman was a man called Bobby Evans, who "spent most of his working life in 'that wee box', apart from the World War II years", so I hope to discover more about Bobby Evans. It would seem from the WWII reference that Bobby 's seemingly lengthy period of service was well before John's. John's youngest son, Brian McIllhinney, still works for Translink and has chatted about his father and his memories of spending time with his father in the signalbox, so some stories and yarns to follow later. Also from my local research, here is a very interesting photograph from 1962. Just look at the long rake of wagons in the Harbour Road Siding and more of the same in The Down Main Harbour Sidings and in Platform 2! Any thoughts on what's happening? © Joe Gillespie, Memories of Larne.
- 203 replies
-
- 11
-

-

LARNE CABIN's LMS Upper Quadrant Semaphore Signals Workbench
LARNE CABIN replied to LARNE CABIN's topic in Workbench
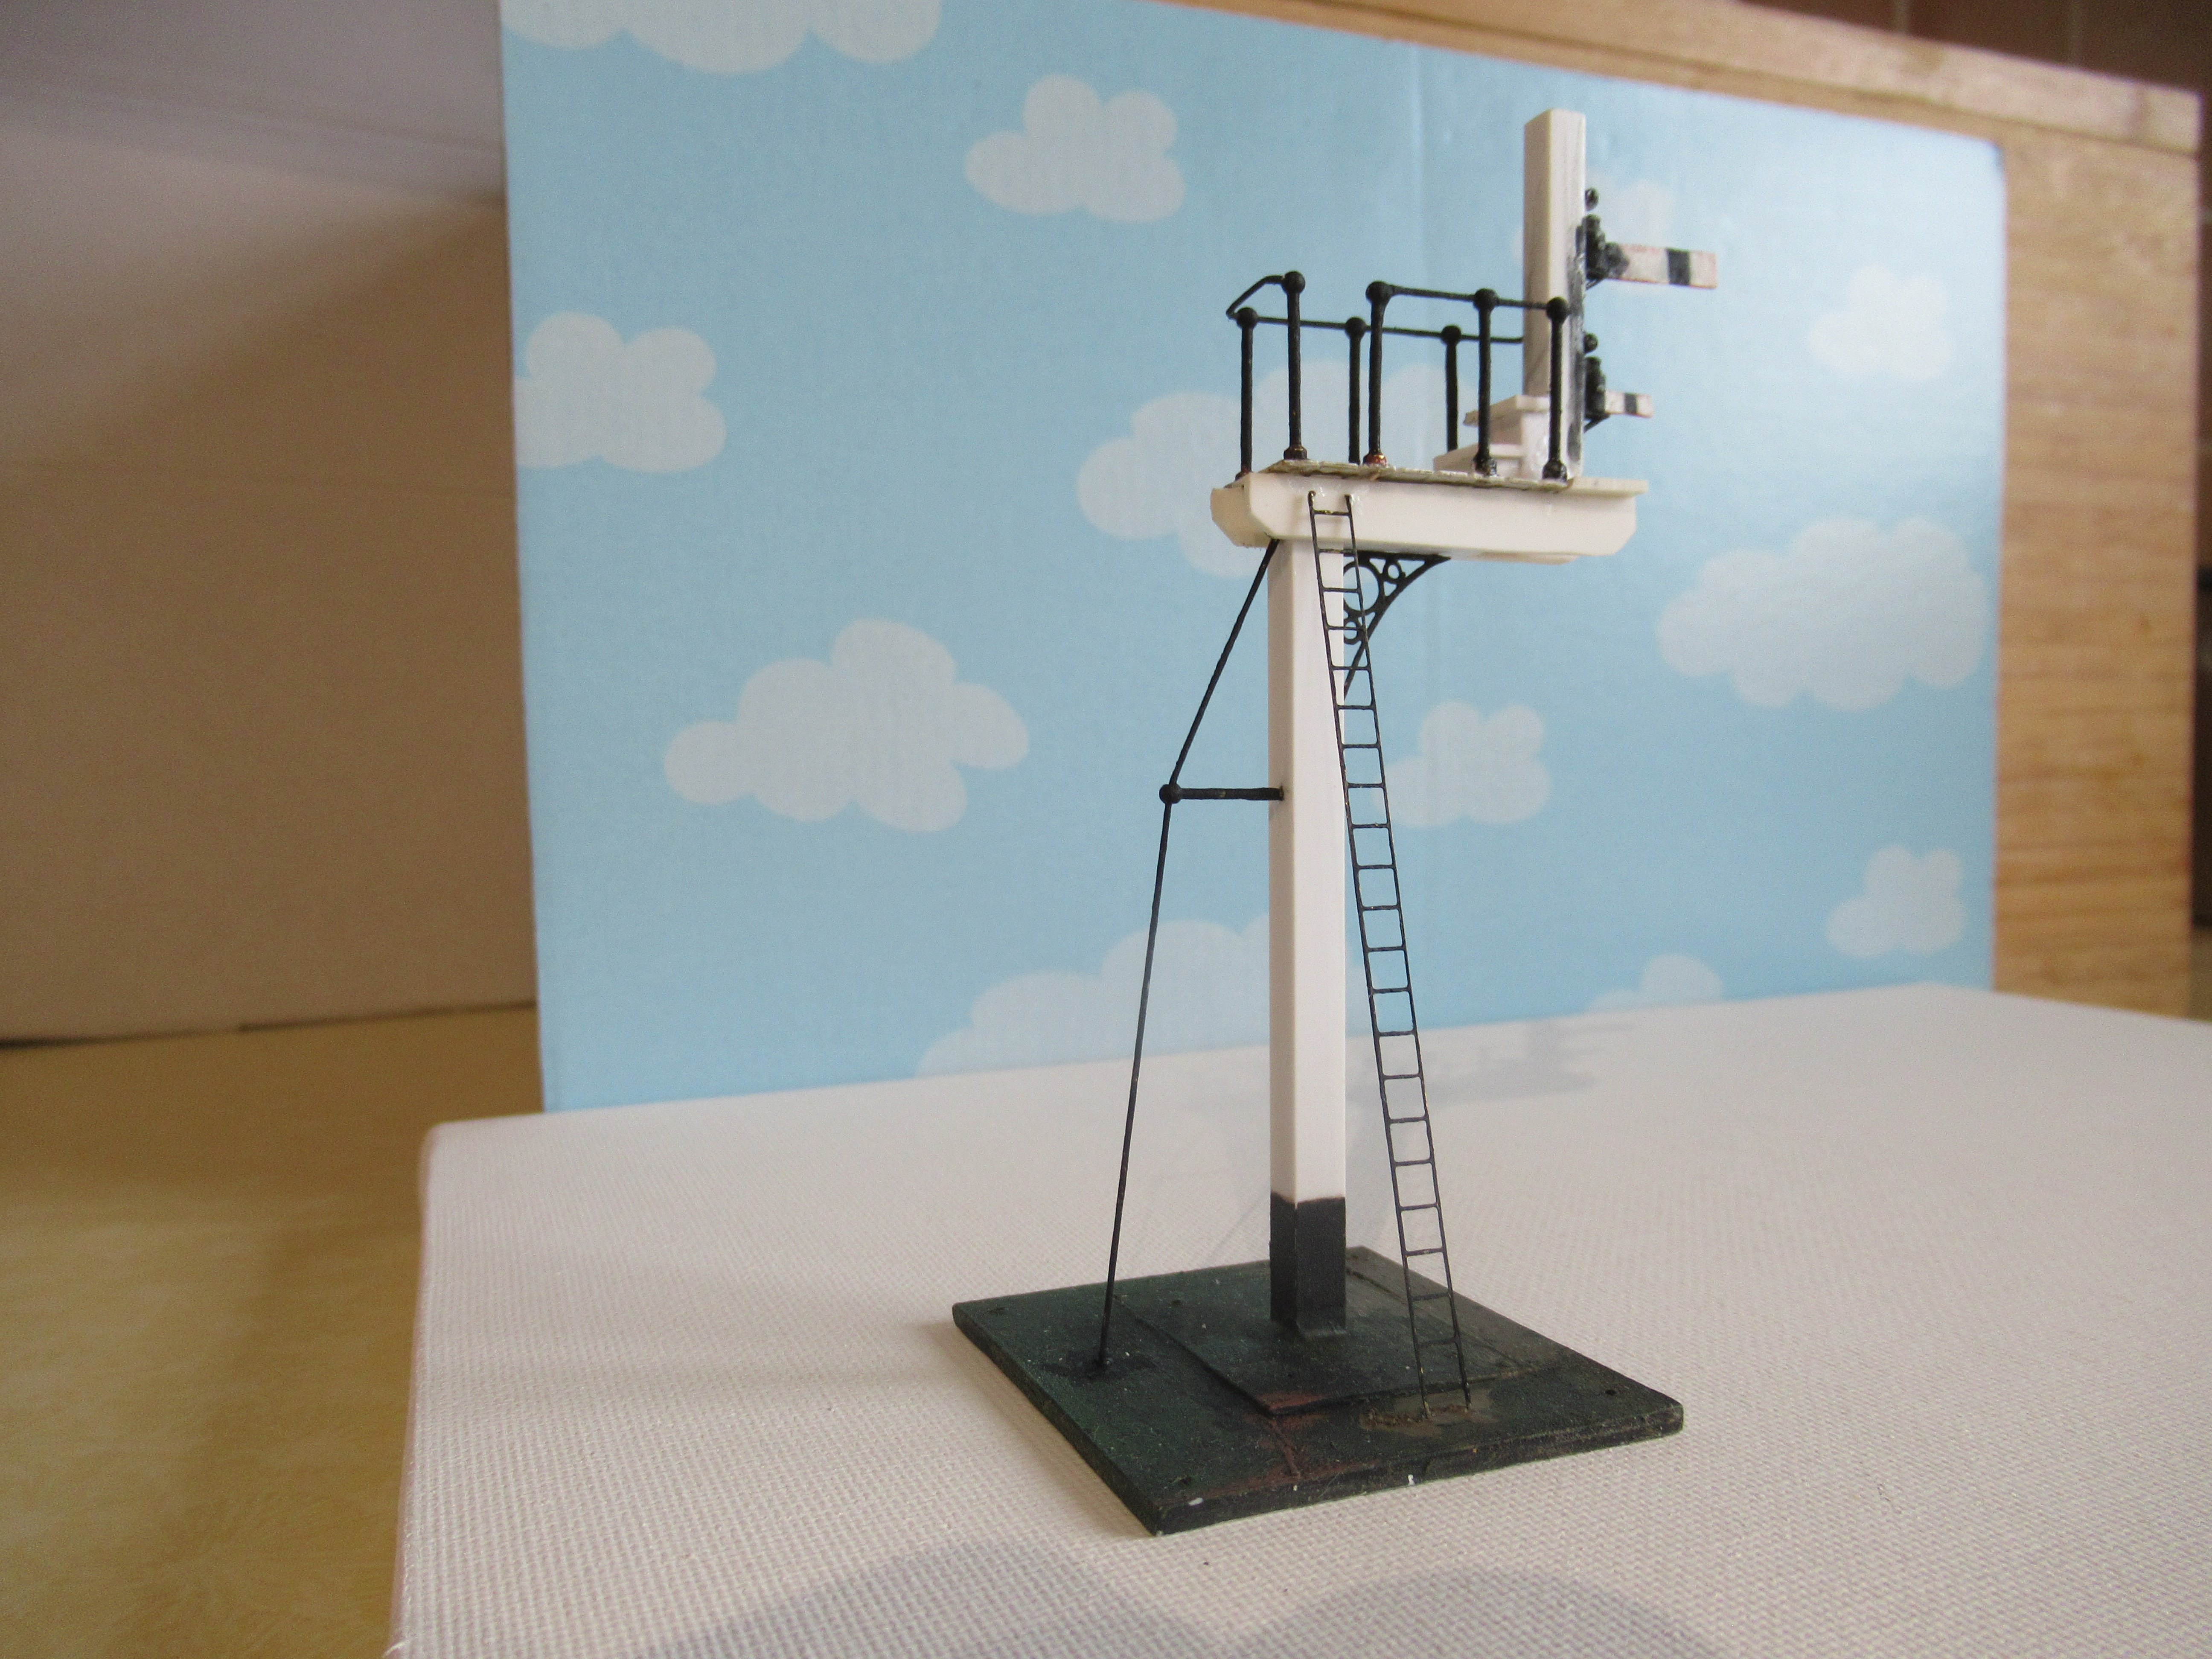
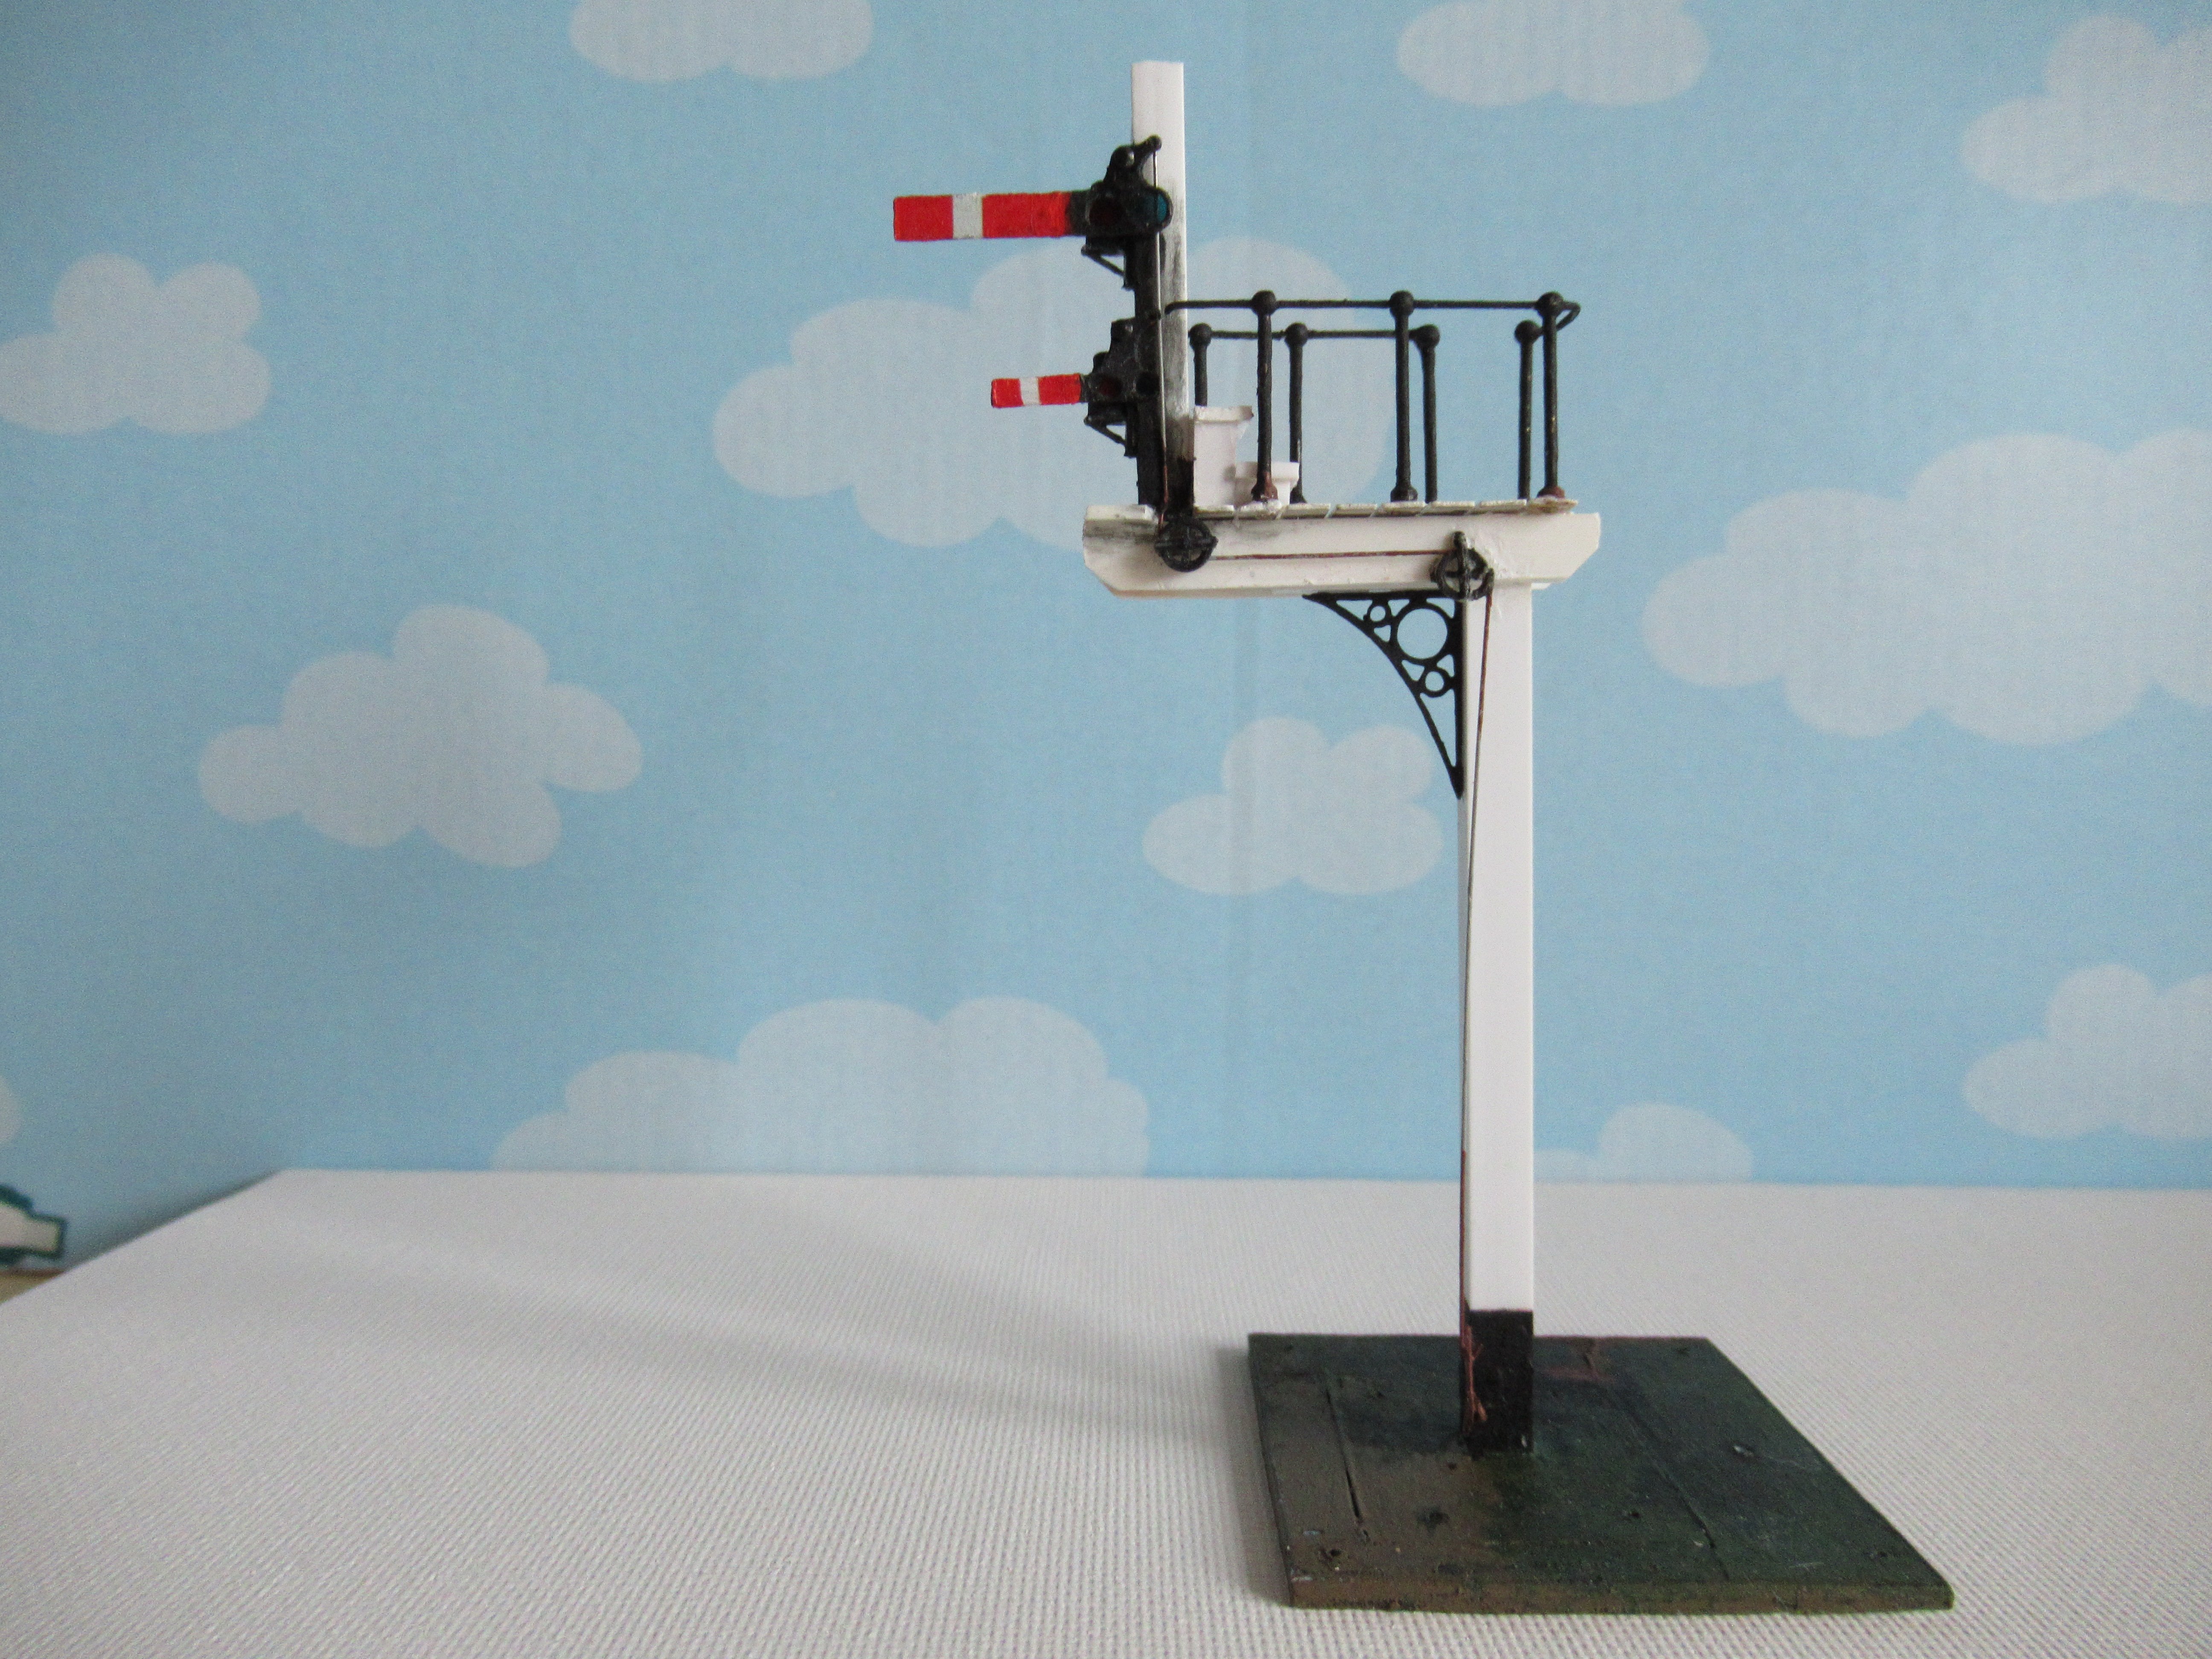
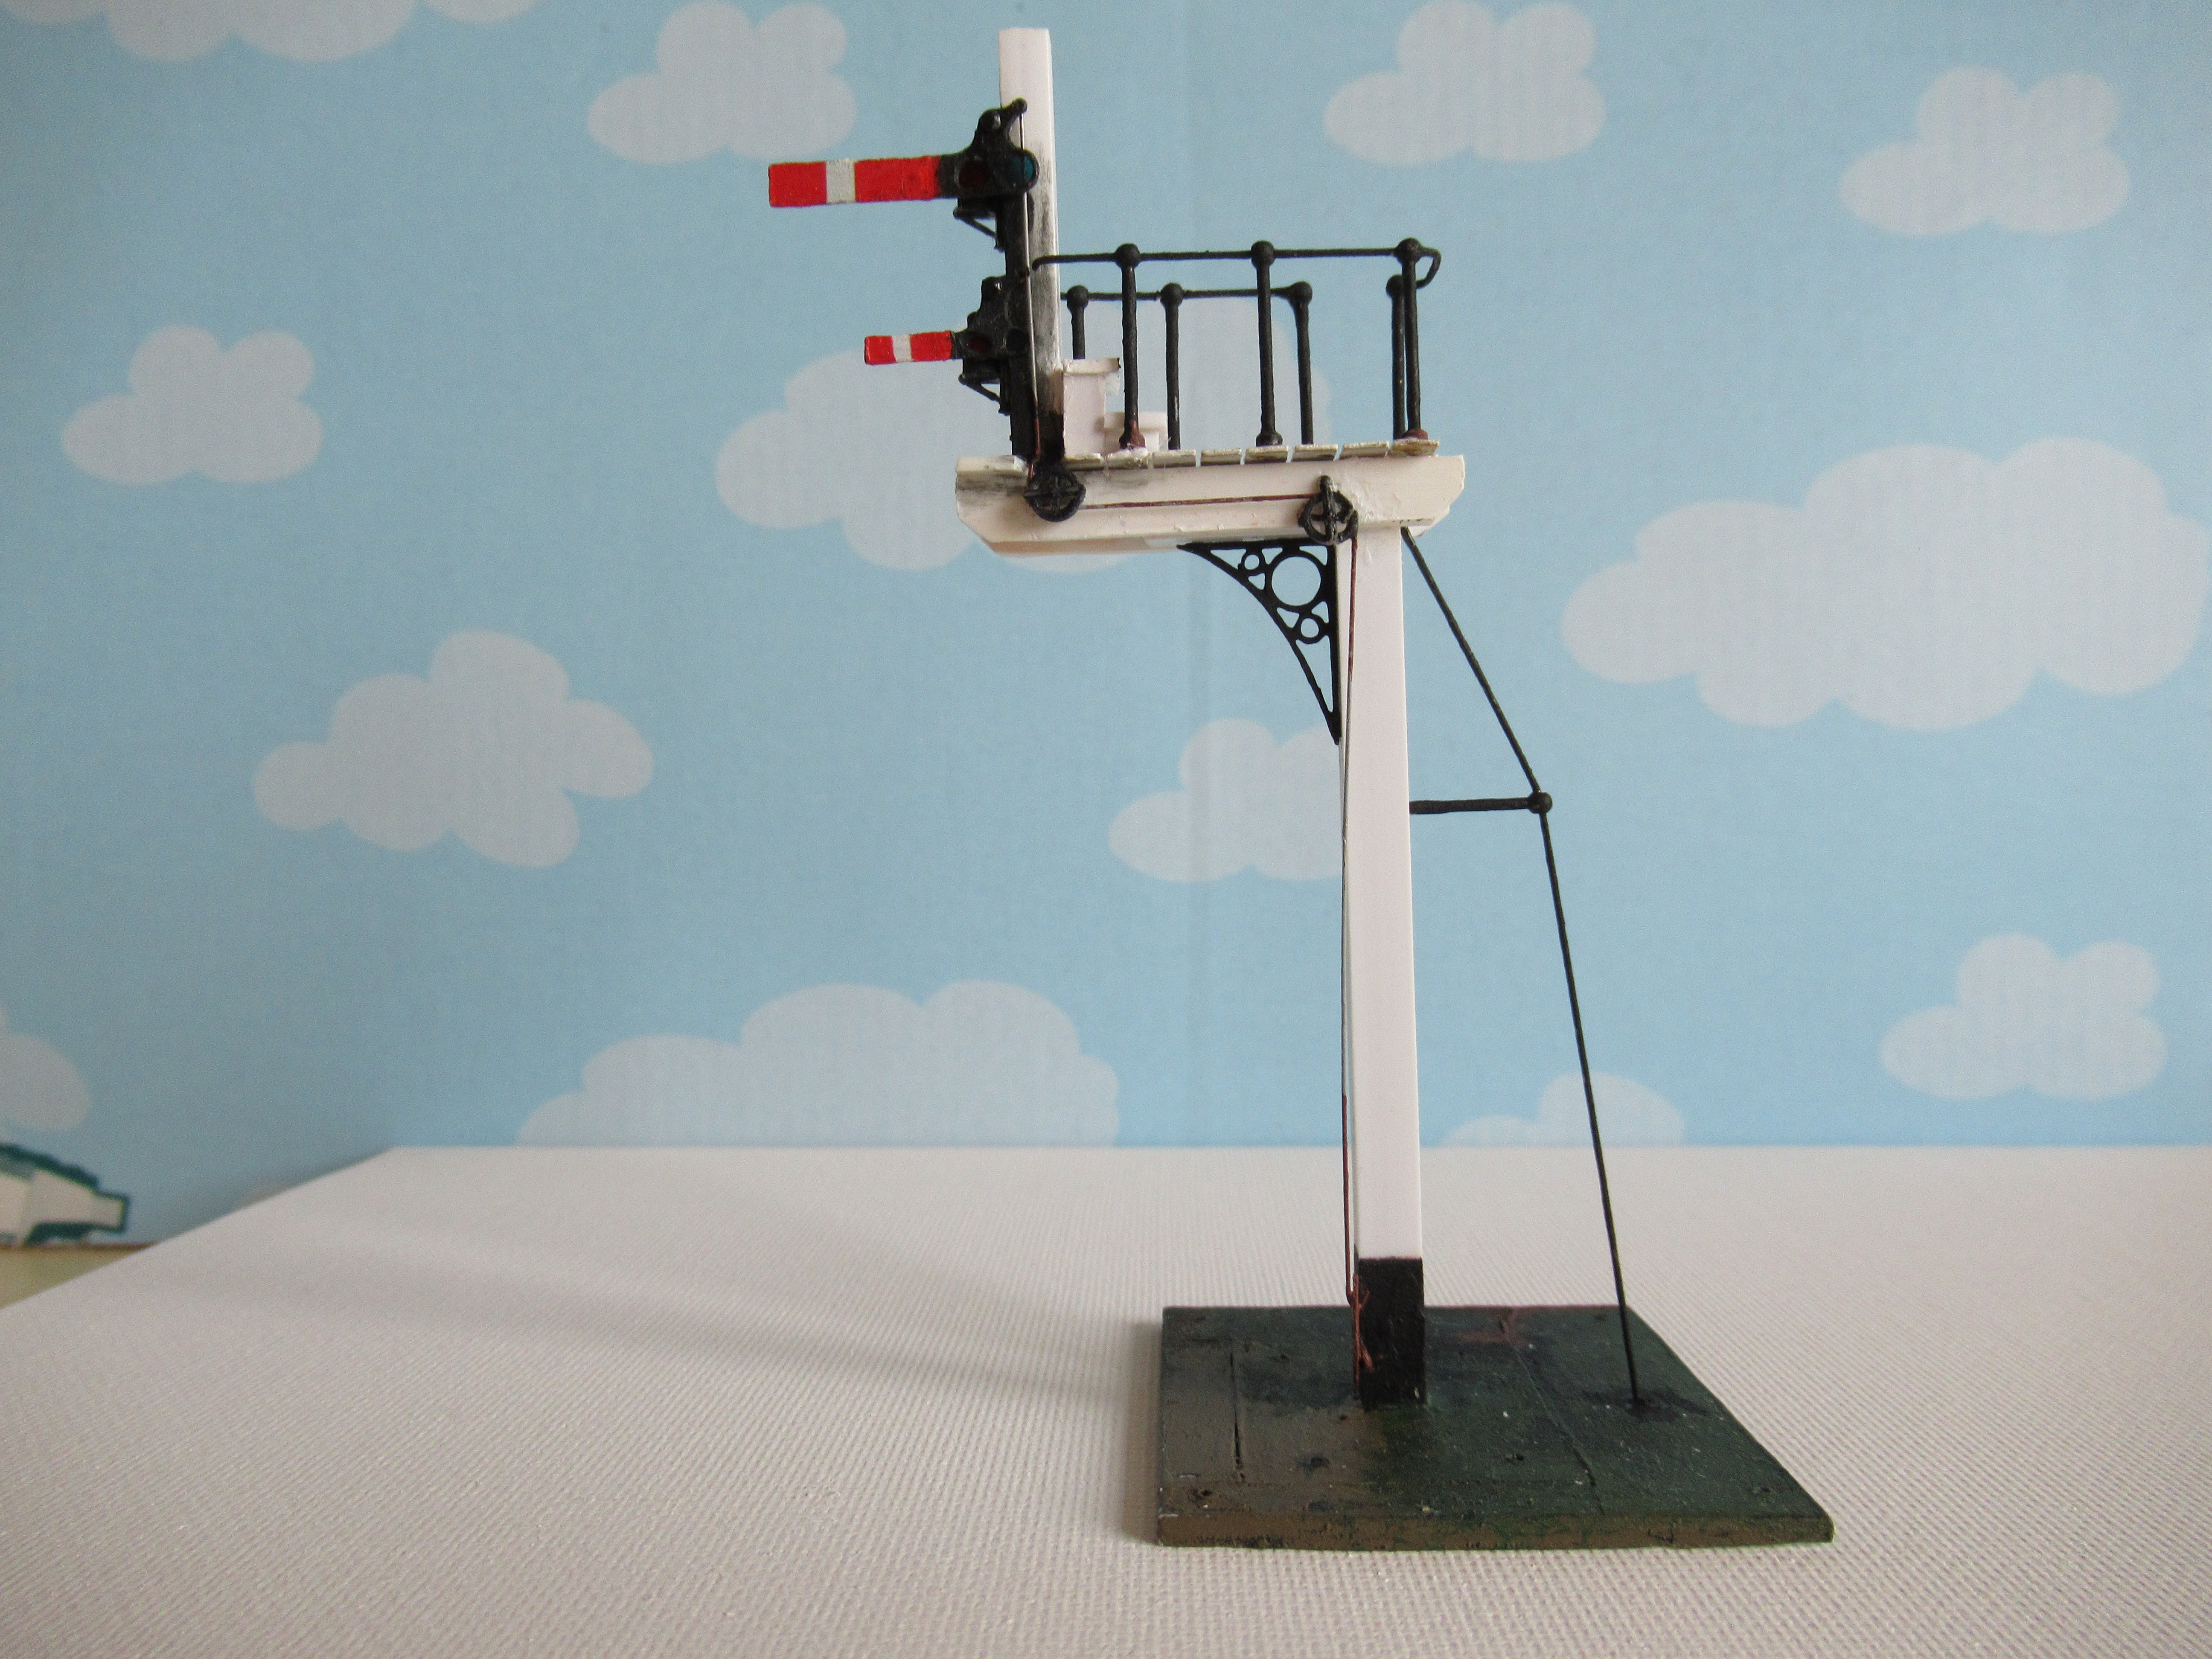
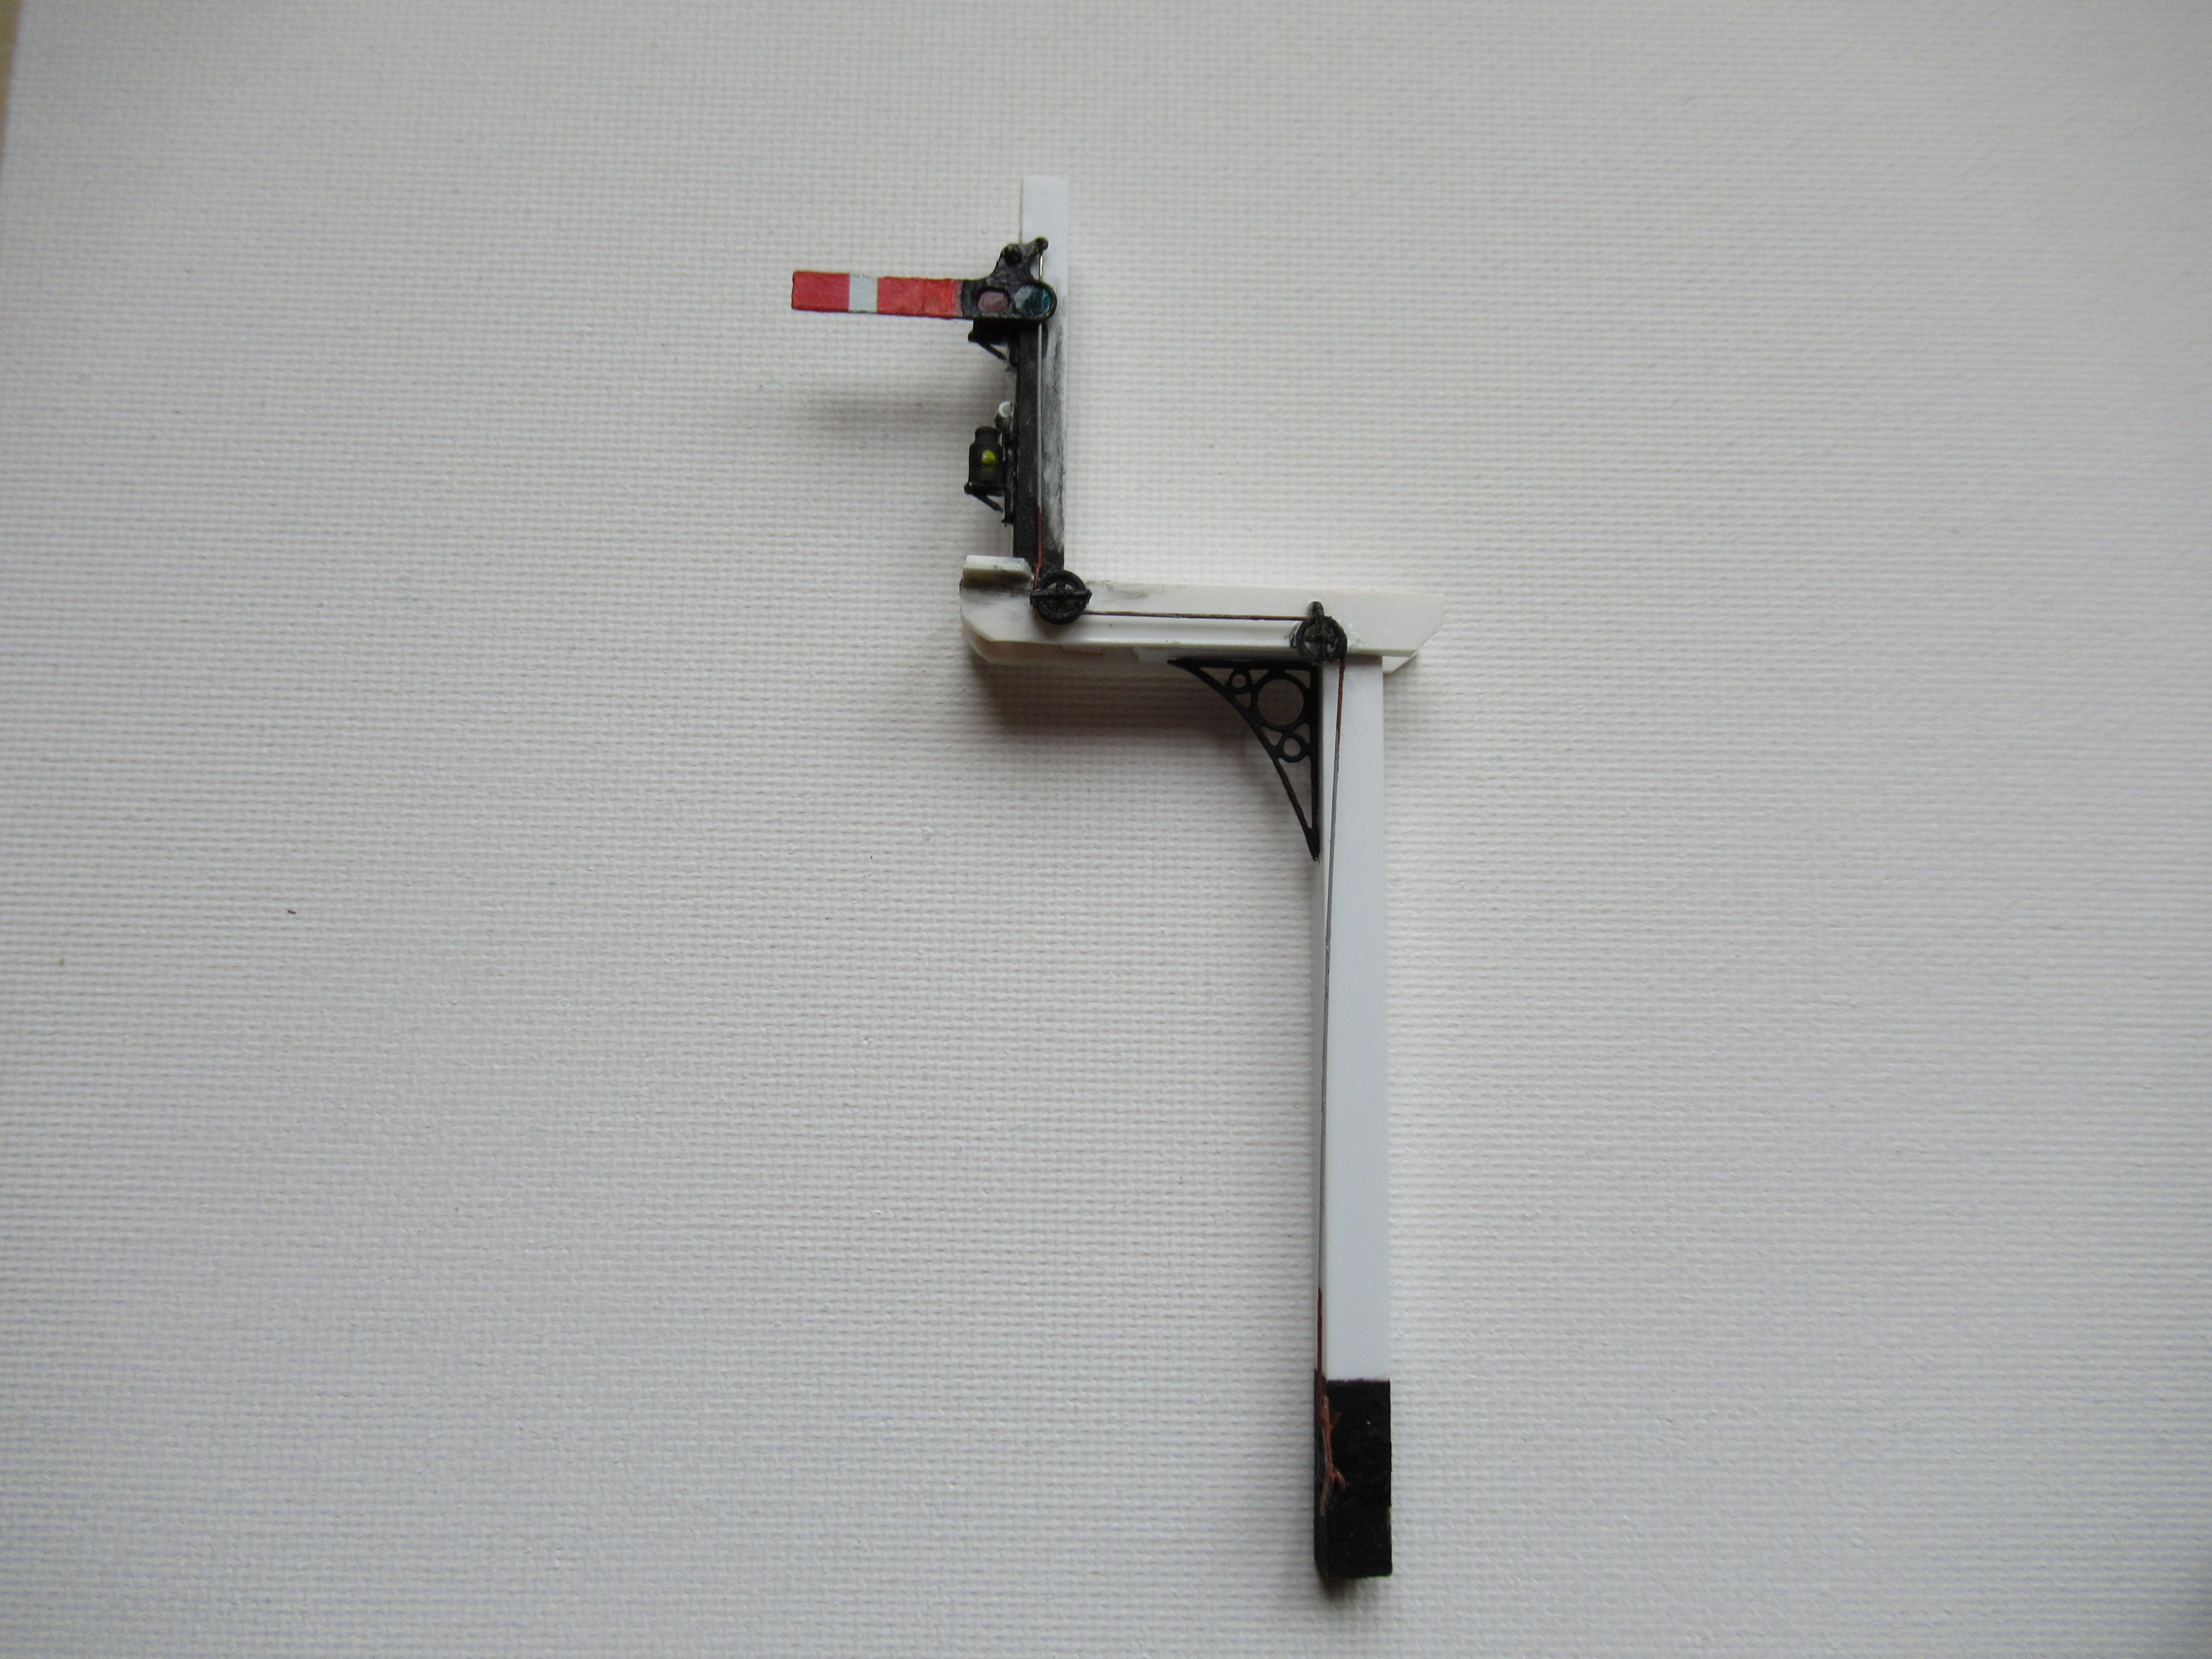
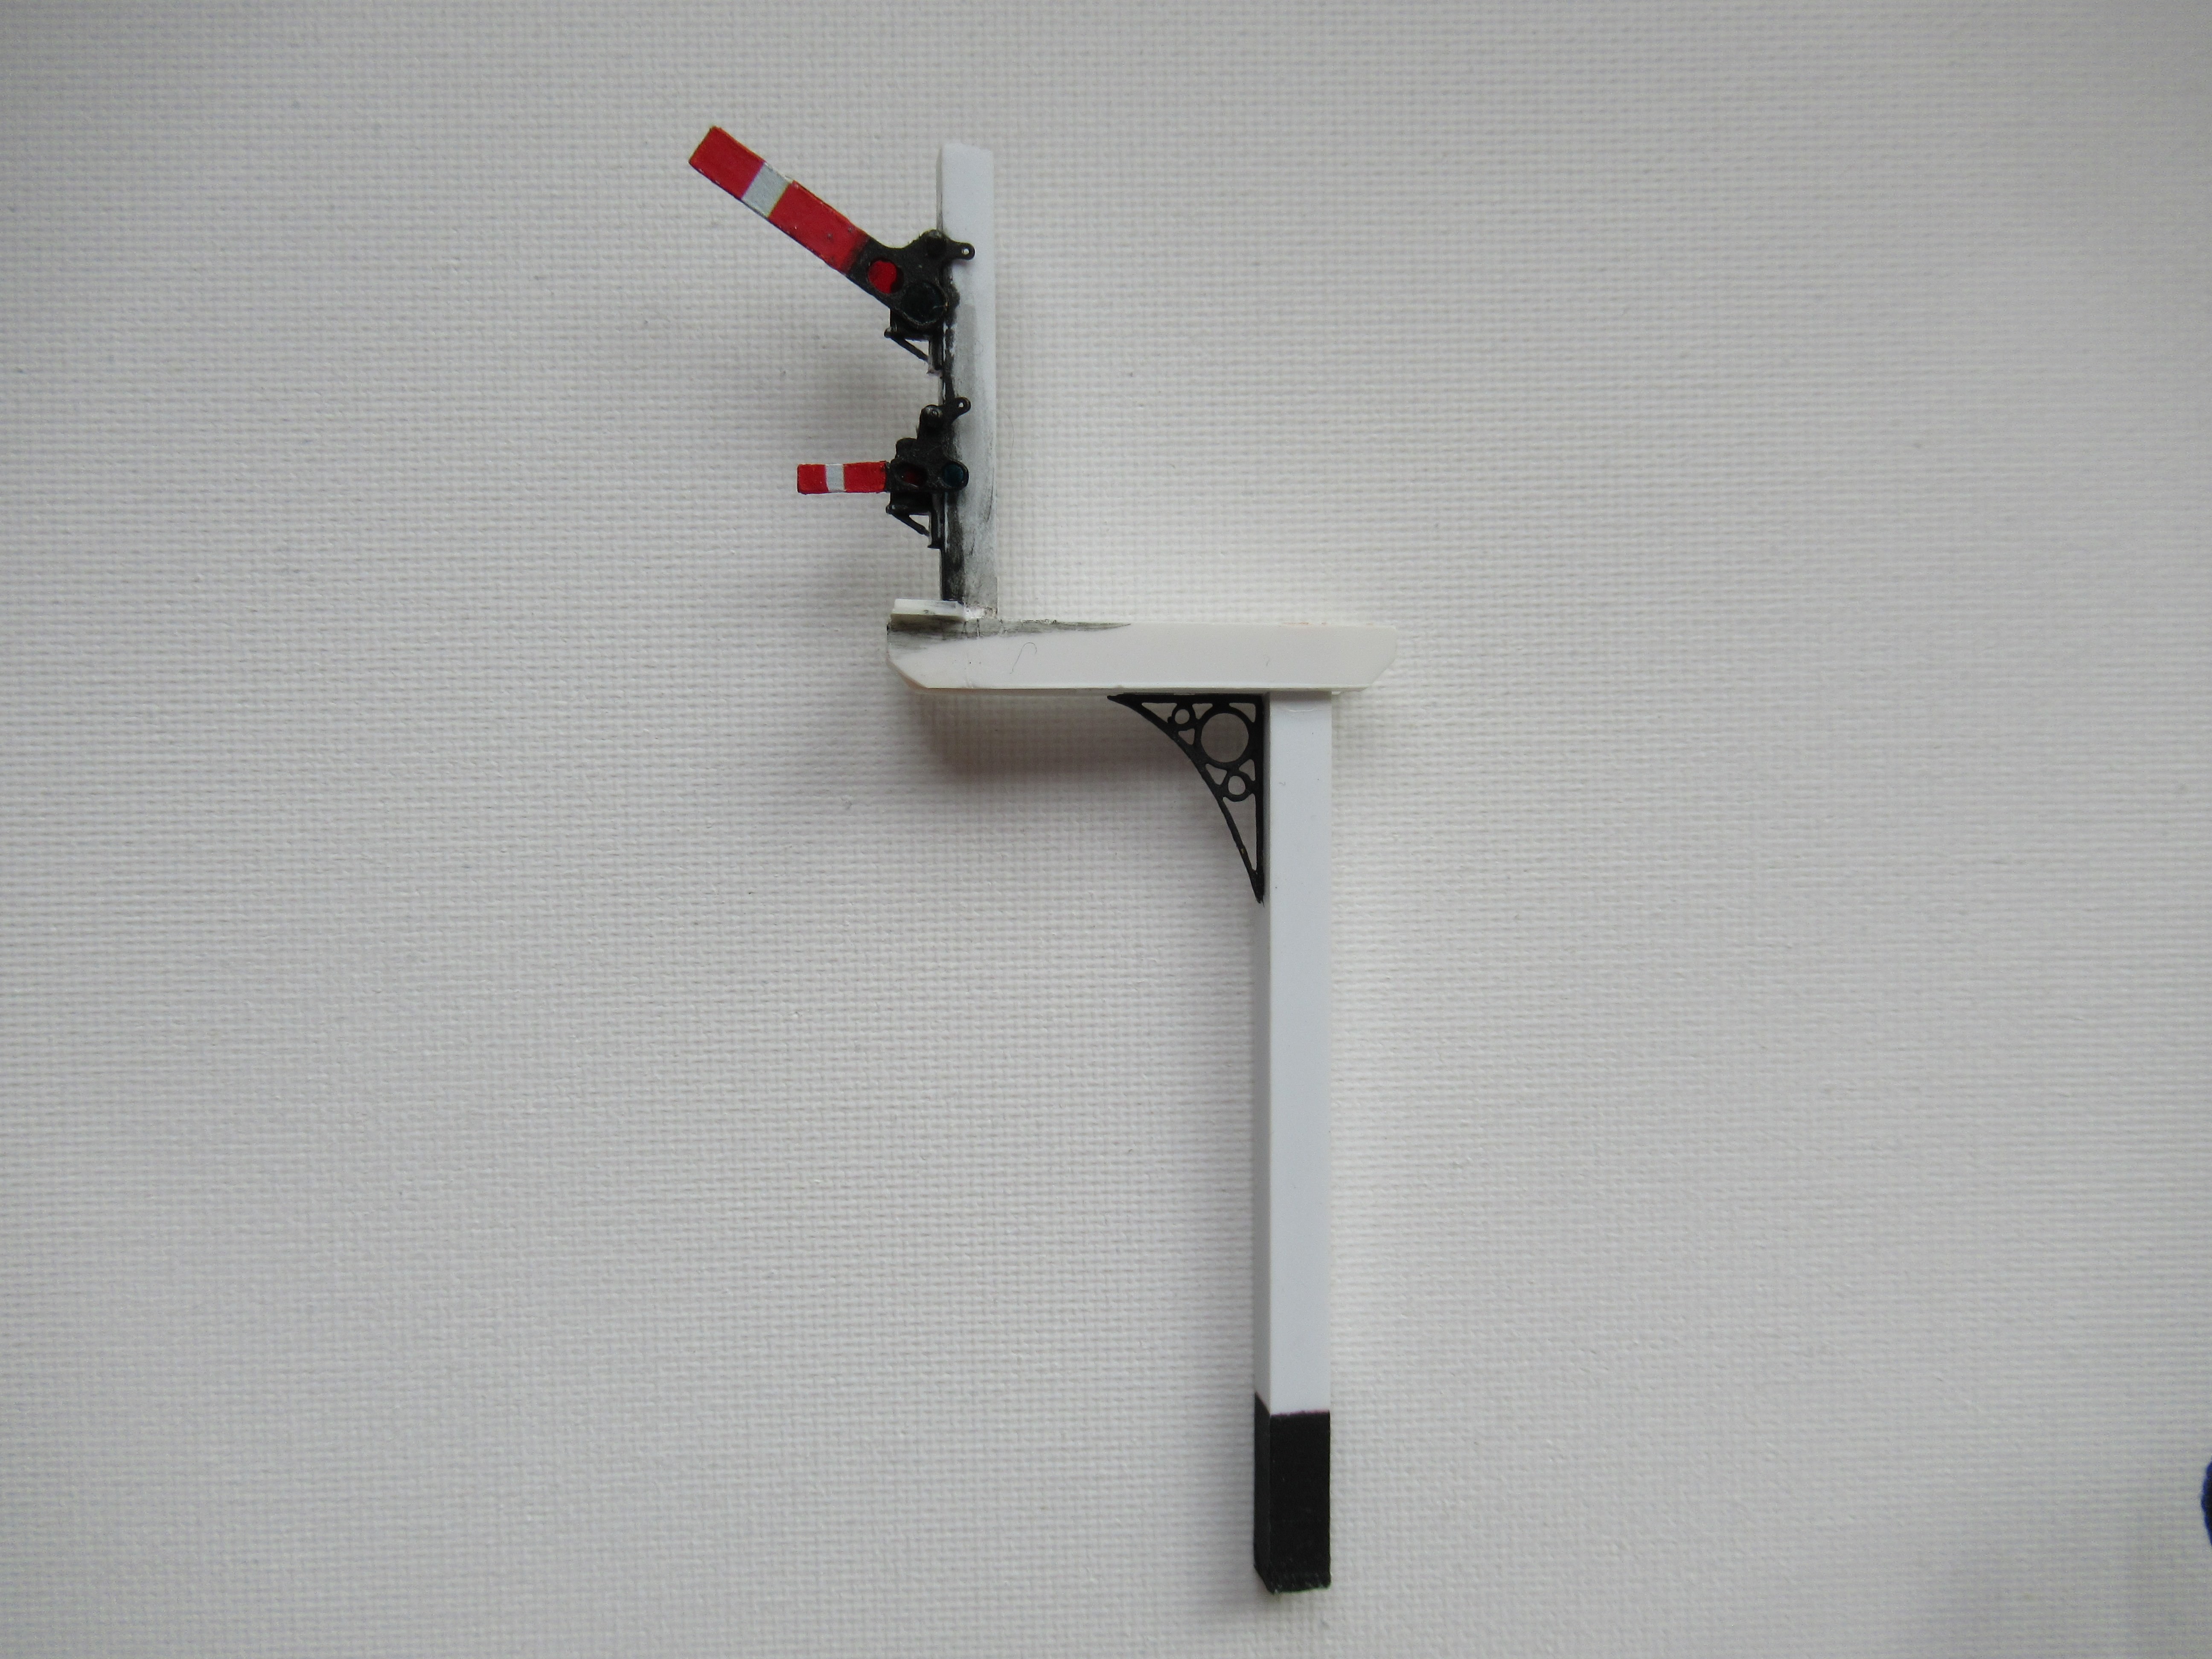
At last I have managed to bend and fit a piece of wire, sufficiently to my satisfaction, to represent the hoop on the handrail at the top of the ladder ... ... so that is The Bracket Signal now complete, apart from the LMS Finial! ... and another photo of it in temporary situ on the layout ... Again, I have to say that no ballasting or ground cover has been started. When it is, the signal base will be sunk into the baseboard to give a seamless merge into it's immediate surrounding area. I had intended to work on The Ground Signals next, but after some research on how to get them to work and dealing with their minuscule size, [about 2.5 feet (10mm) in height, and a disc 16 inches (5mm) in diameter], I've chickened out for now, and I'm going to work on The Shunt Signals next.
- 18 replies
-
- 11
-
-
That's well beyond me @Fowler4f, did you win the lottery?
-
LARNE CABIN's LMS Upper Quadrant Semaphore Signals Workbench
LARNE CABIN replied to LARNE CABIN's topic in Workbench
The Bracket Signal in temporary situ on the layout, as ballasting and ground cover are eventually added, the signal base will be sunk into the baseboard and a signal wire run from the crank to the cabin ... ... and the view from the Olderfleet Road Bridge end of the station...
-
LARNE CABIN's LMS Upper Quadrant Semaphore Signals Workbench
LARNE CABIN replied to LARNE CABIN's topic in Workbench
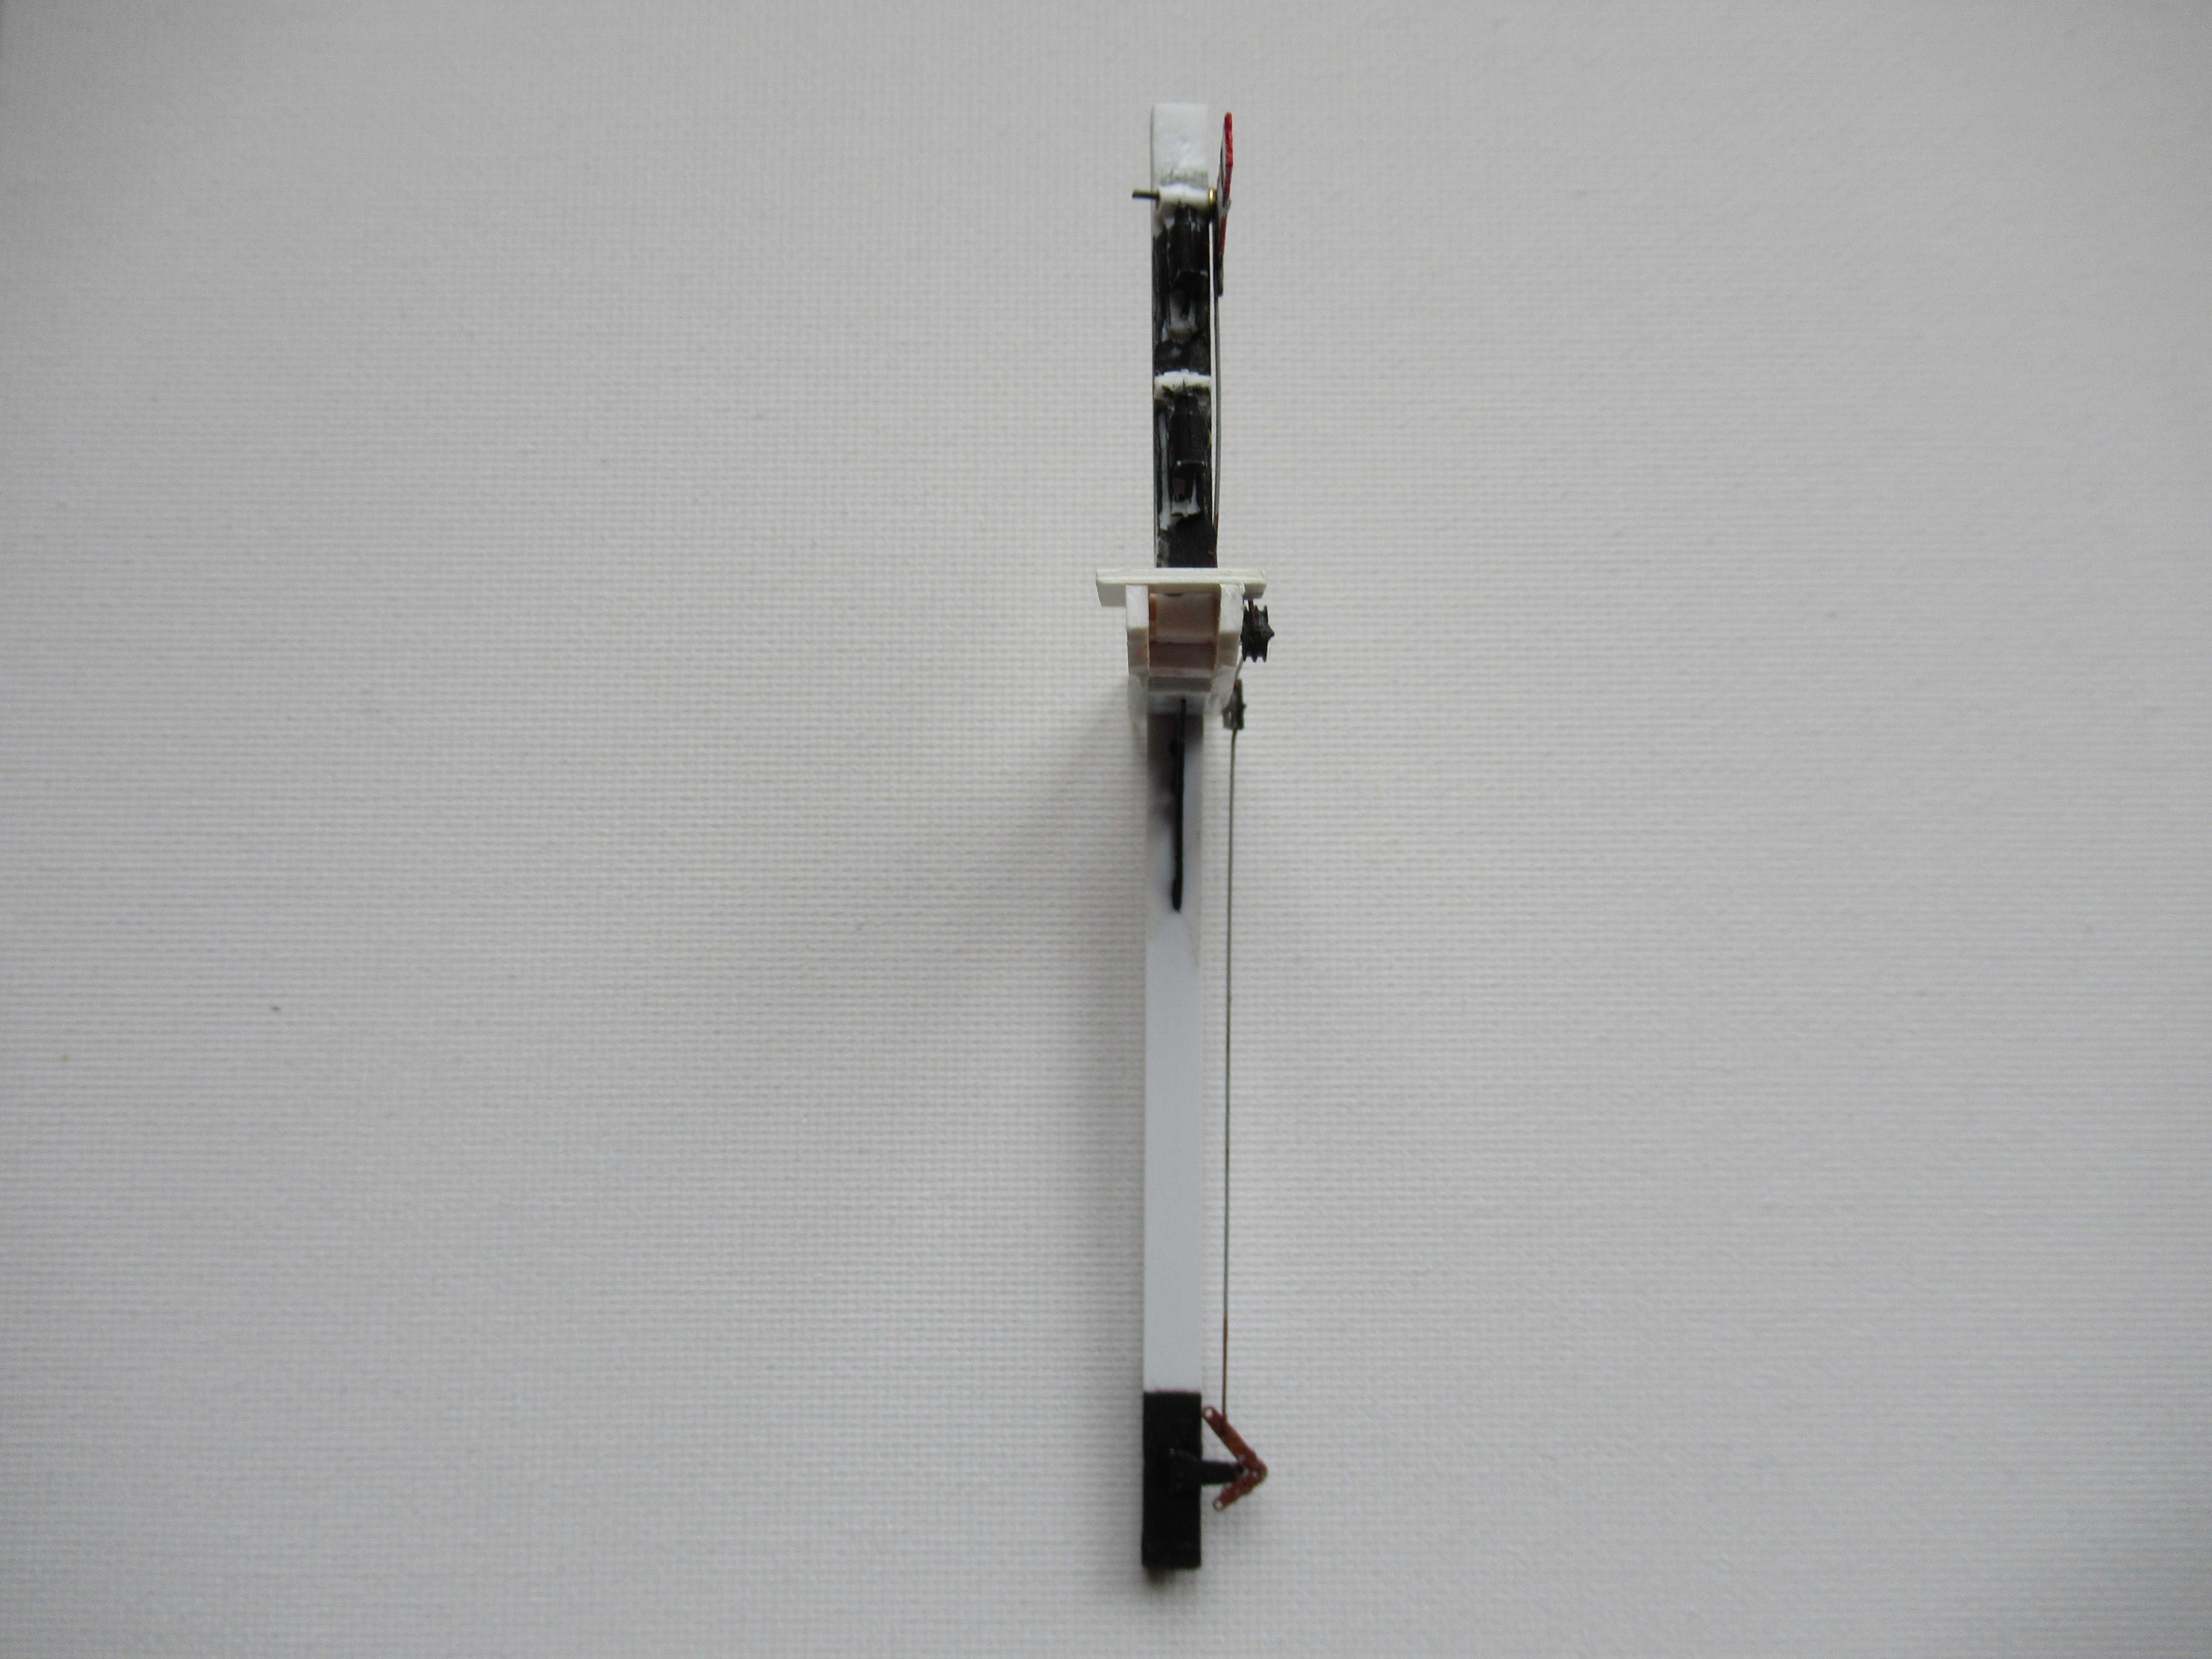
The MSE ladders have arrived... ... and been installed. Just the finial and the hoop to complete. Modelu do a very neat GWR Finial which can be provided in various sizes, so I'm hoping they will produce an LMS Finial soon! Comparison photos of prototype and model to follow soon.
-
LARNE CABIN's LMS Upper Quadrant Semaphore Signals Workbench
LARNE CABIN replied to LARNE CABIN's topic in Workbench
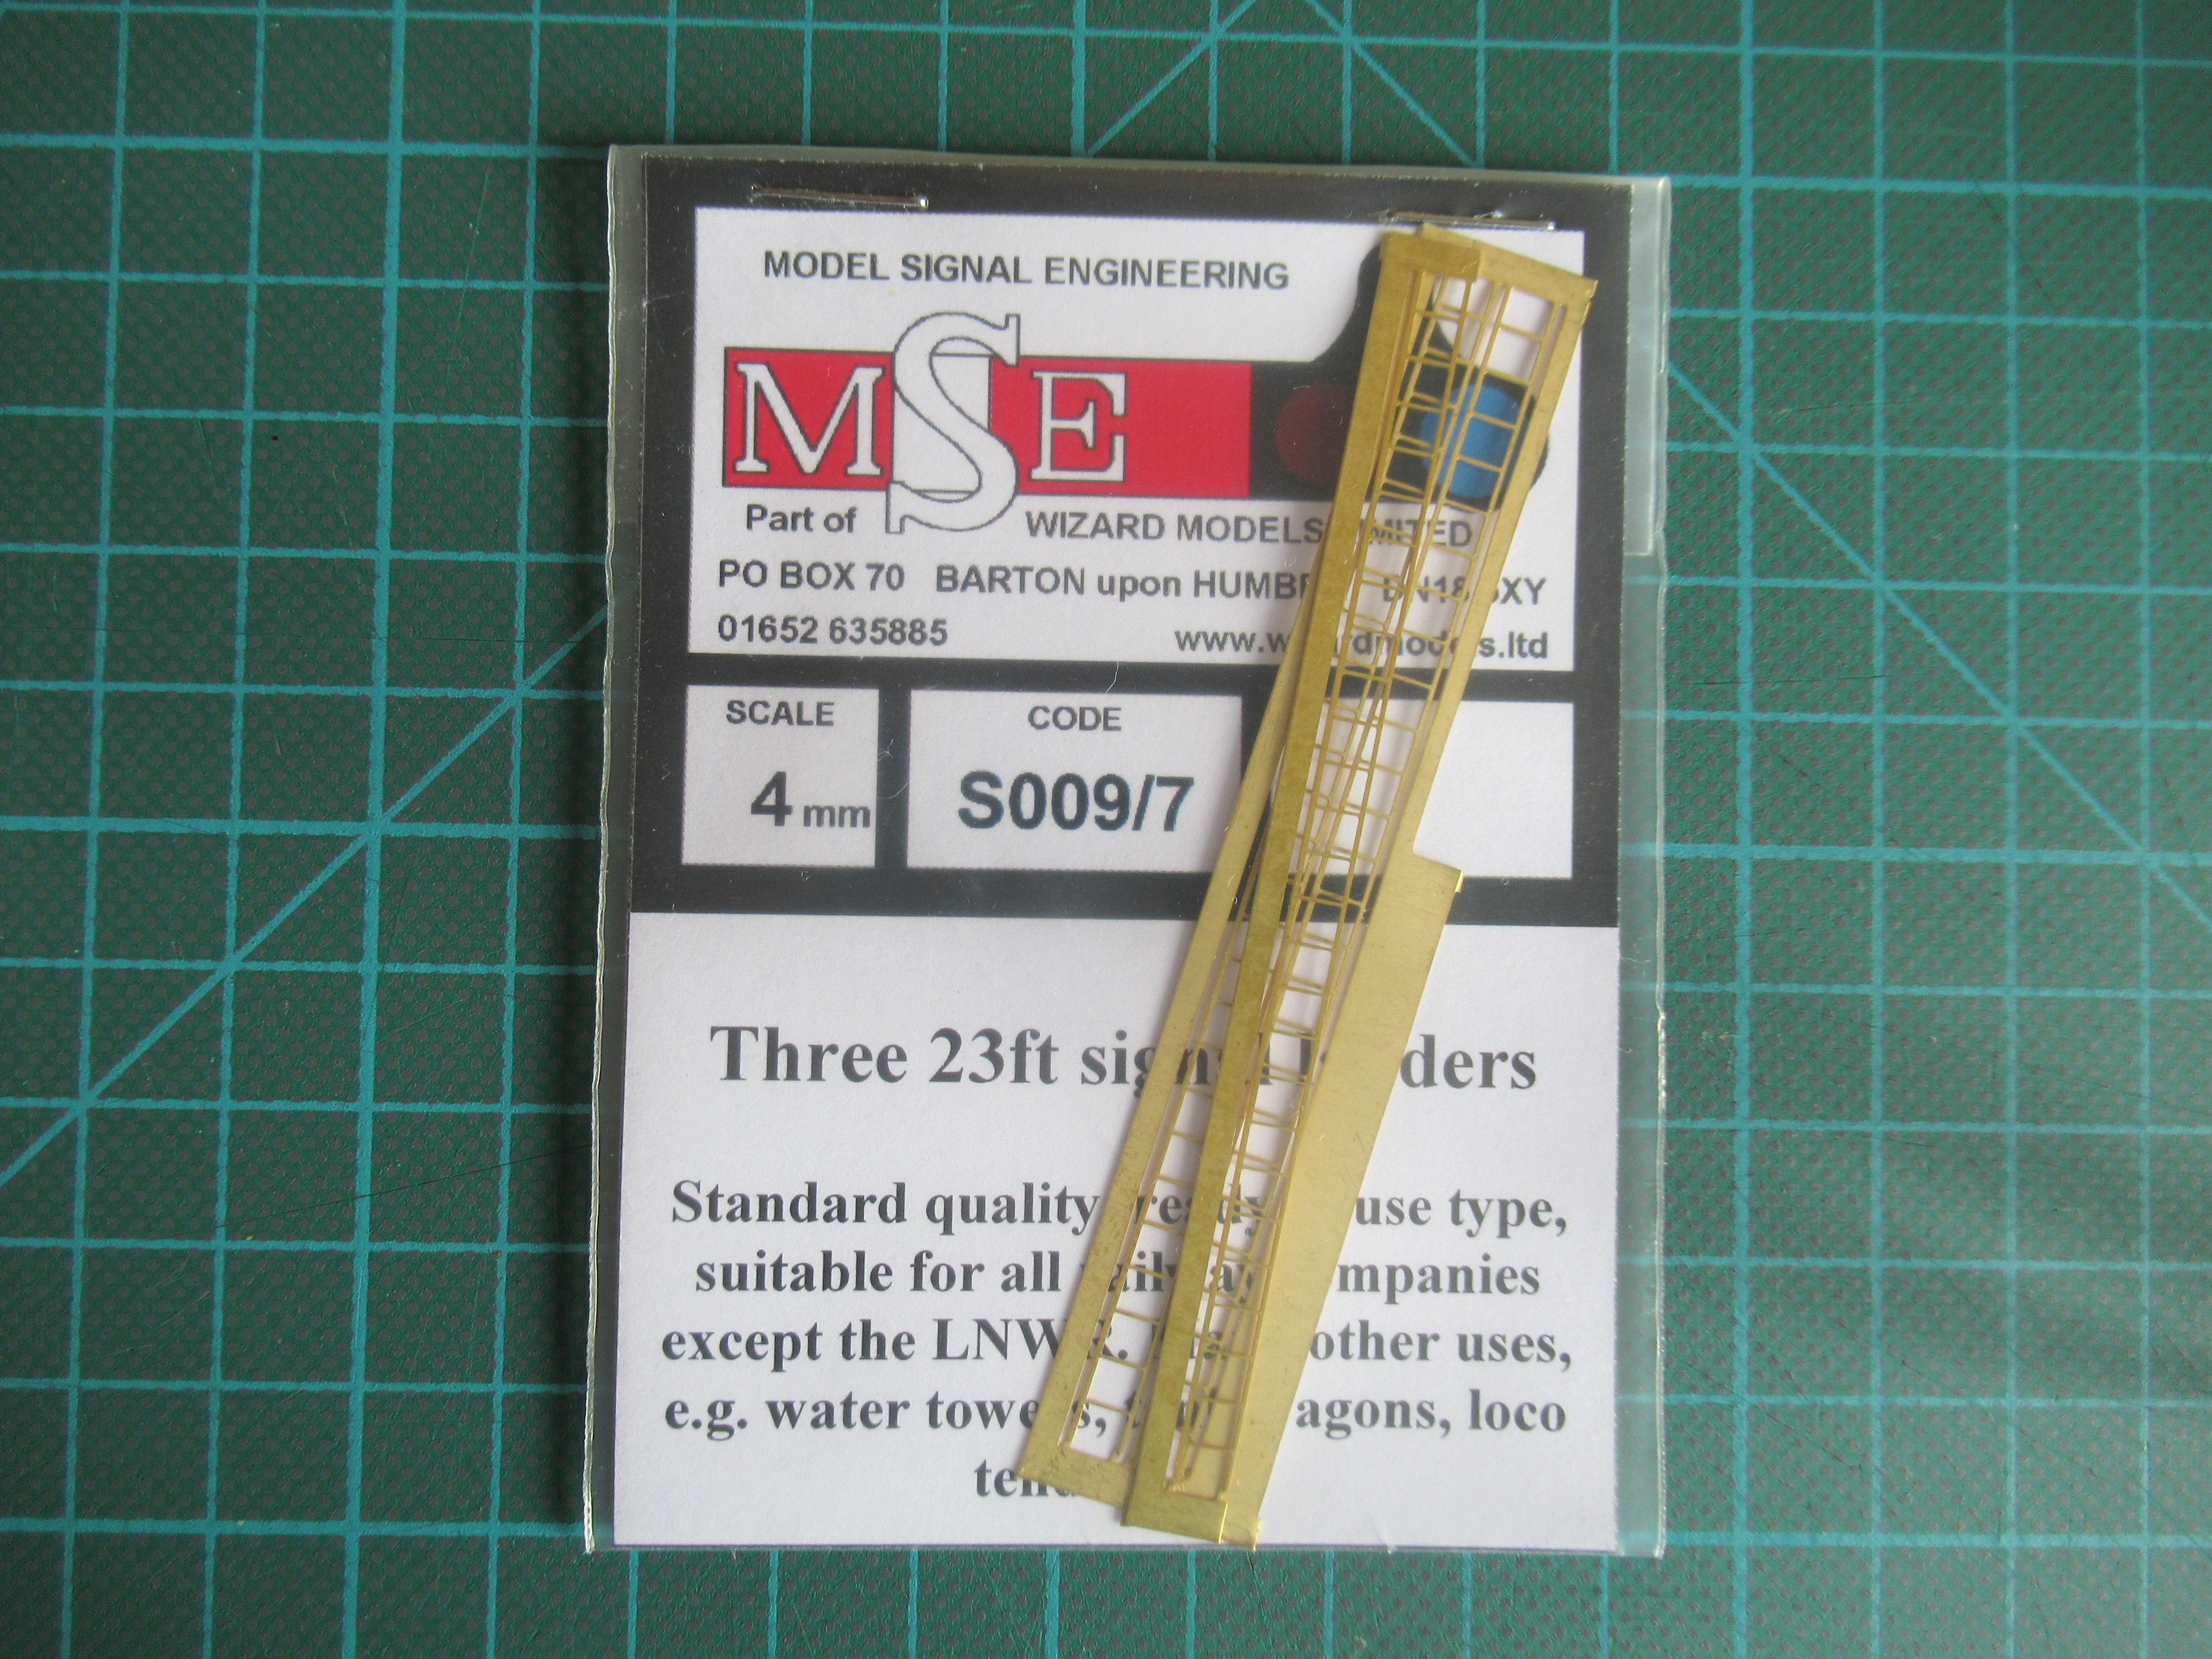
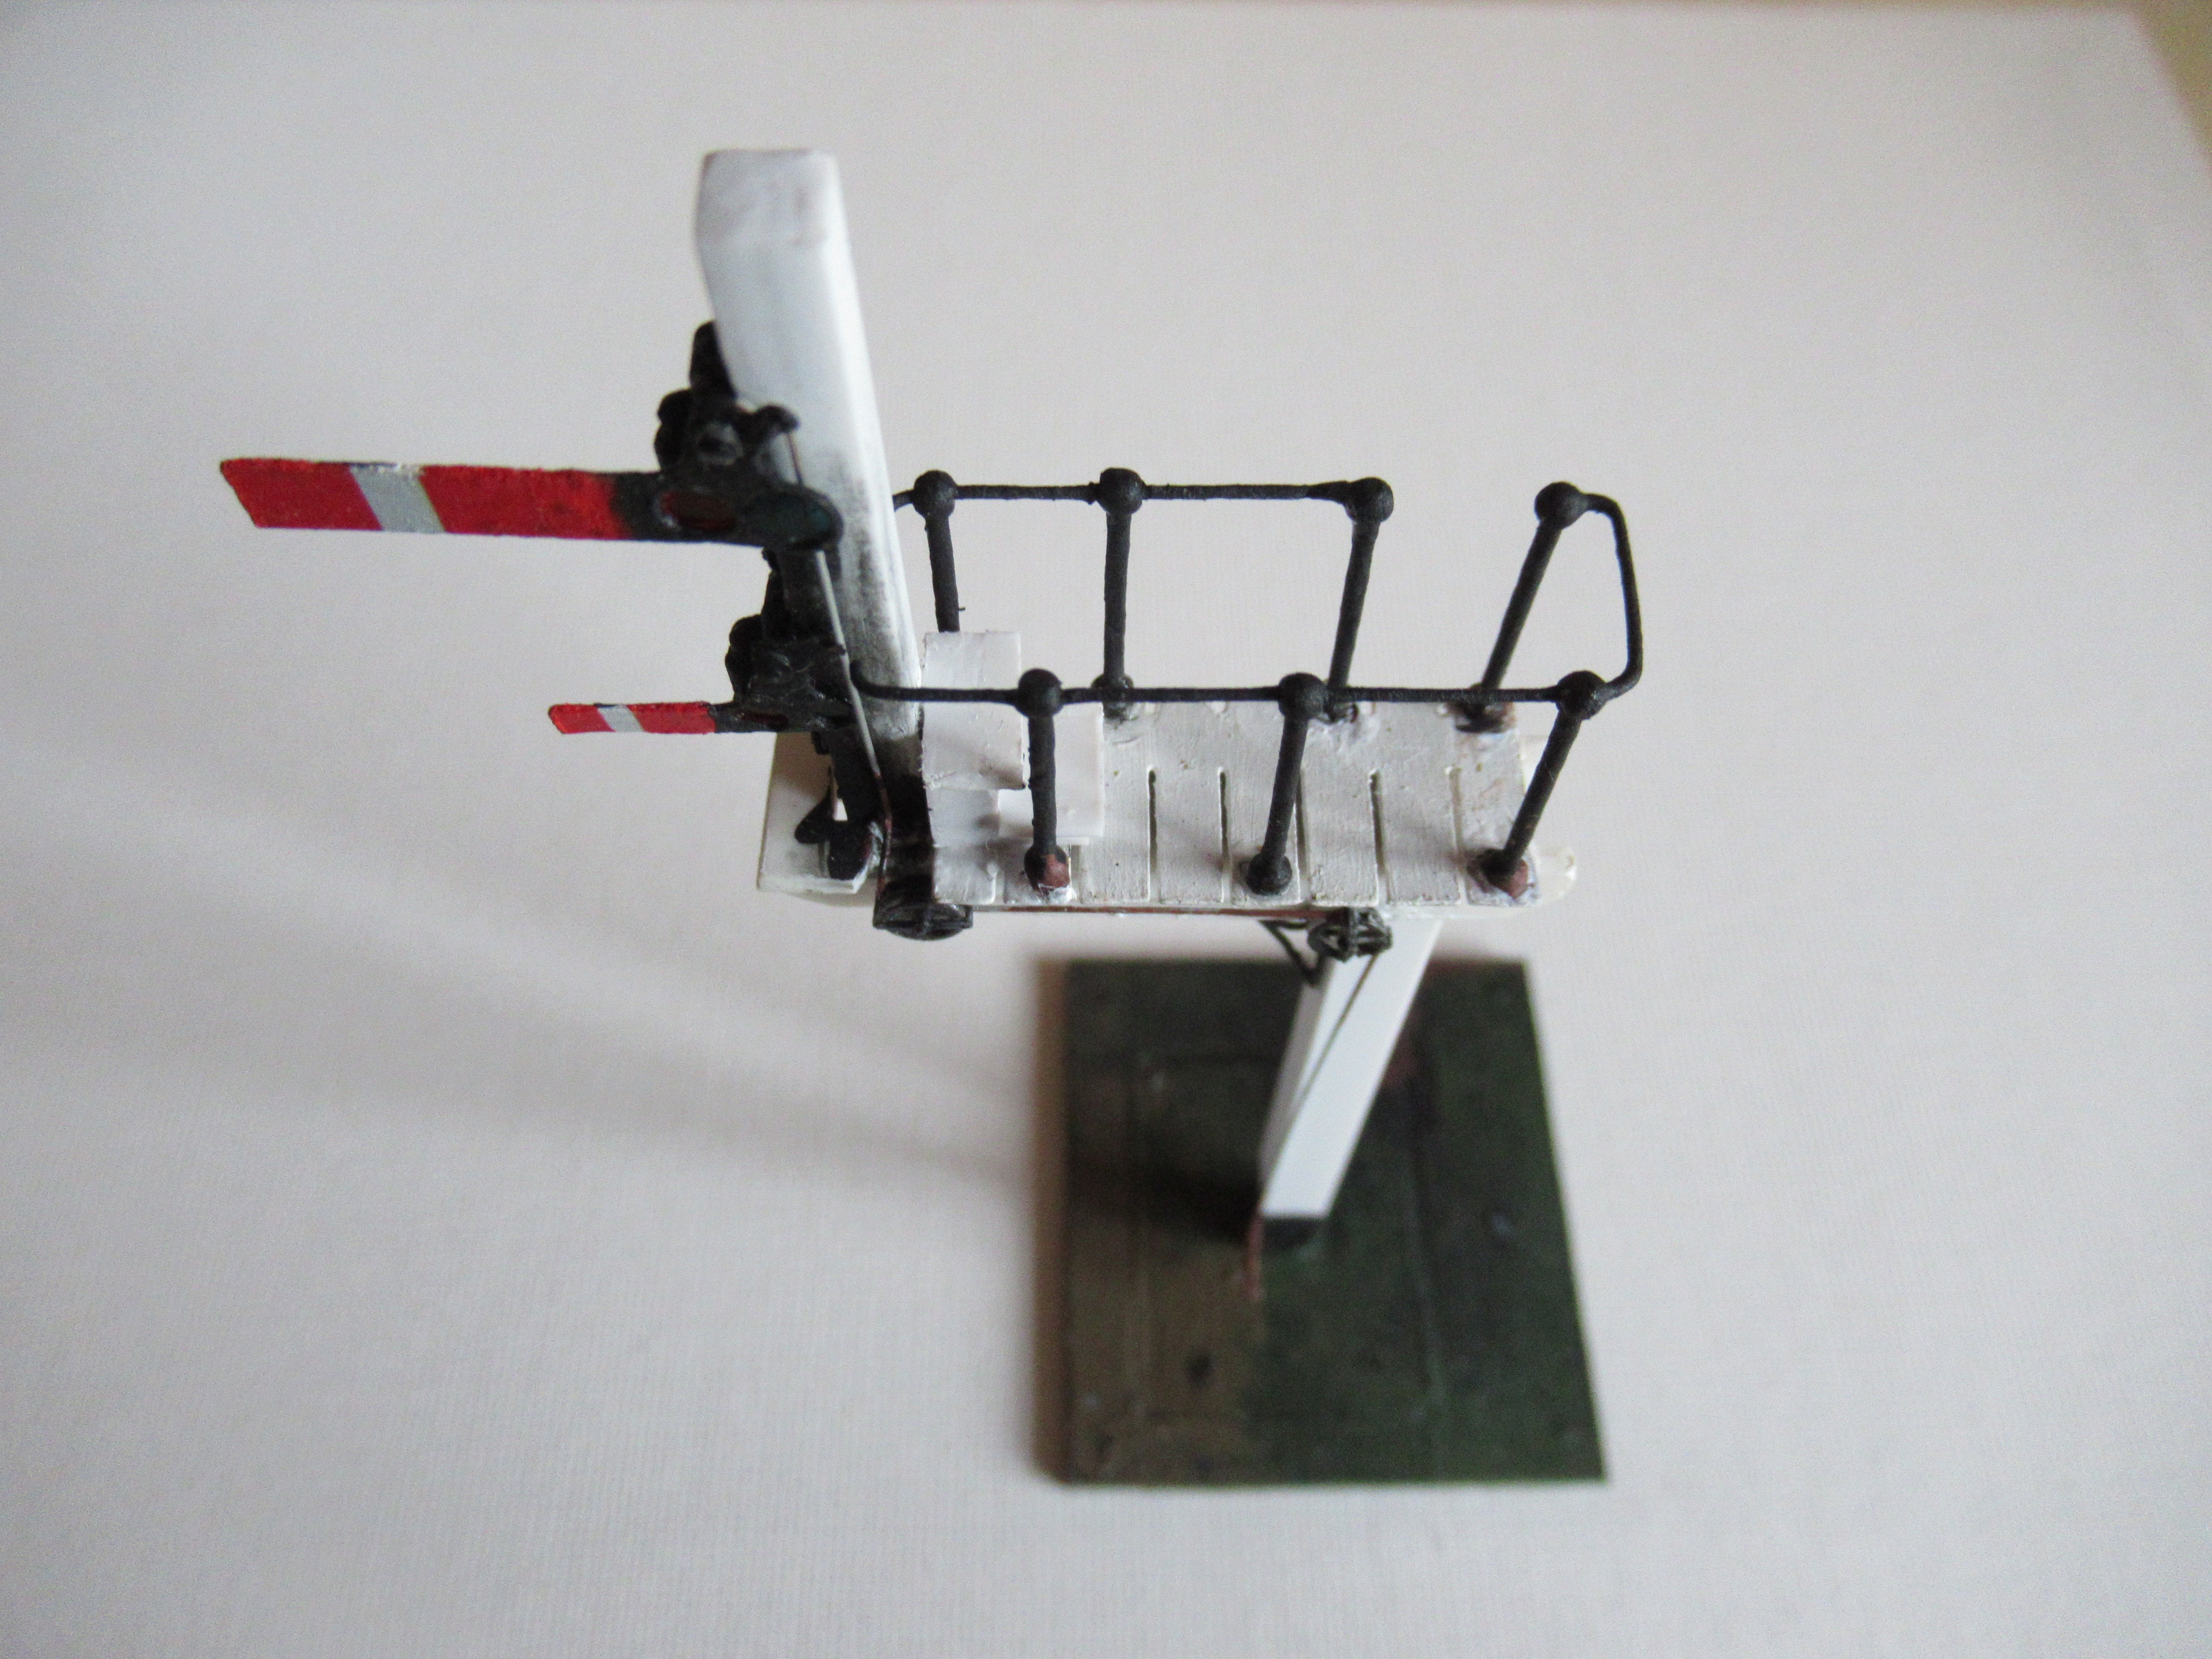
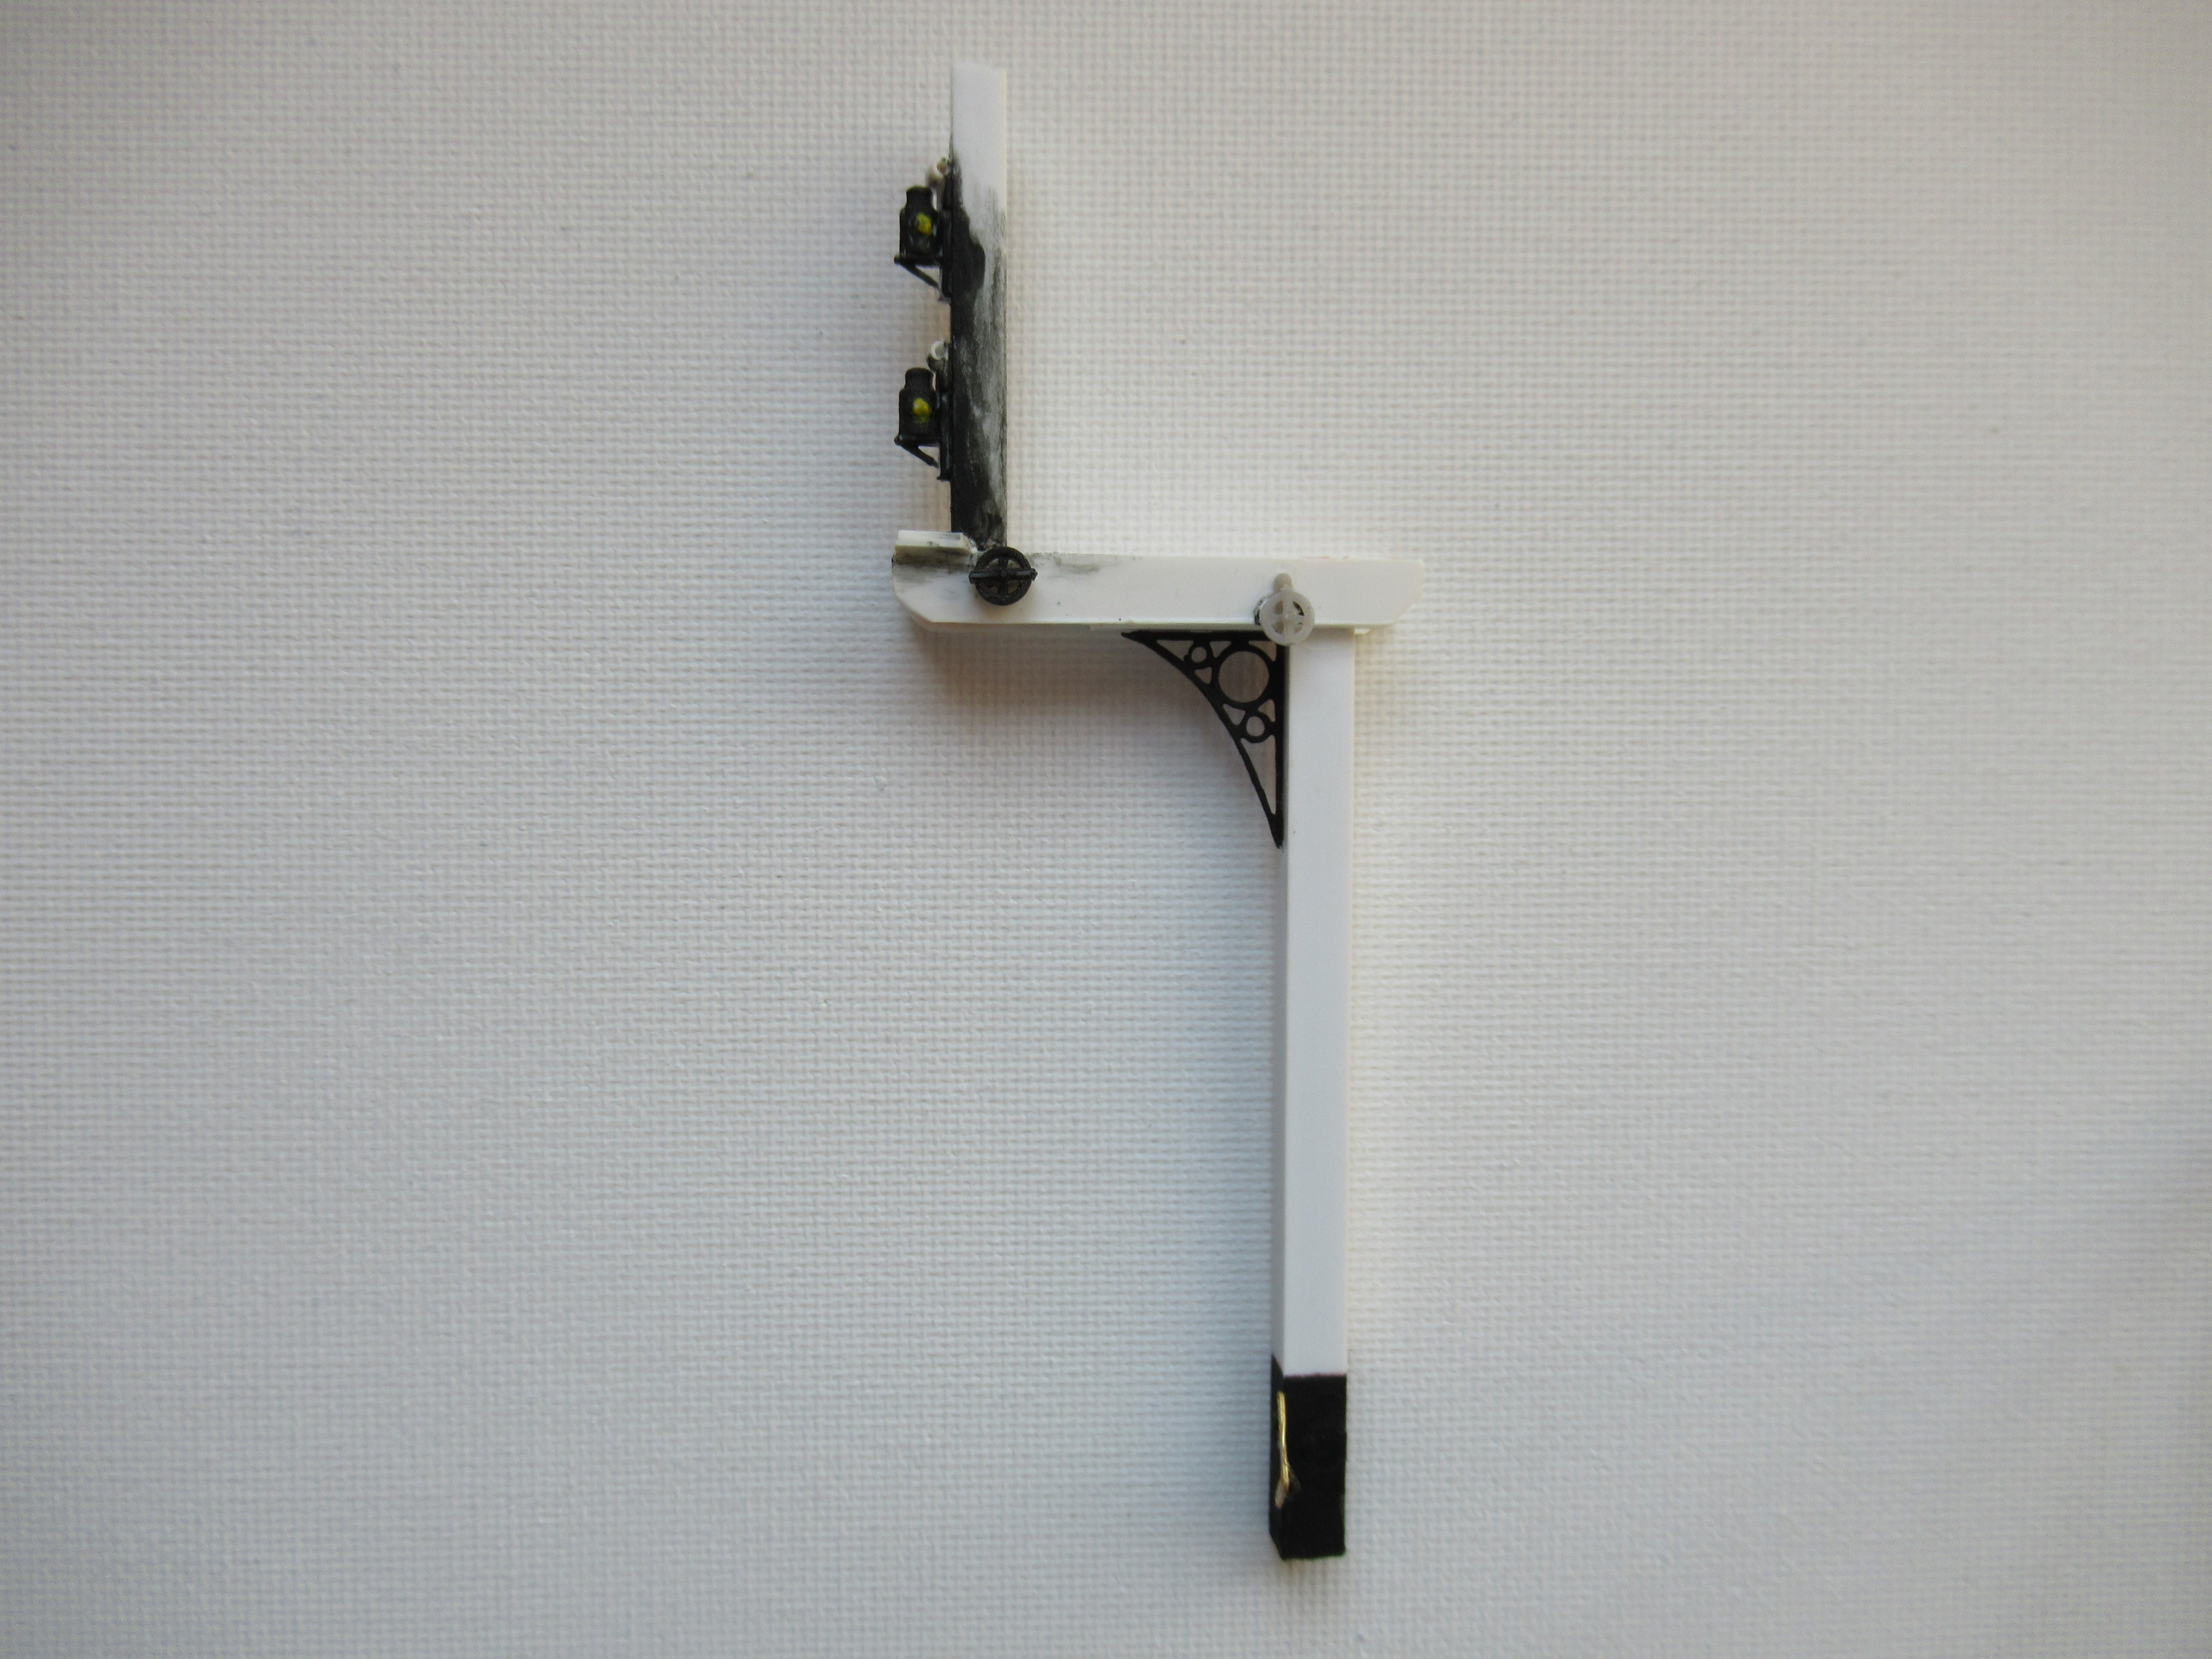
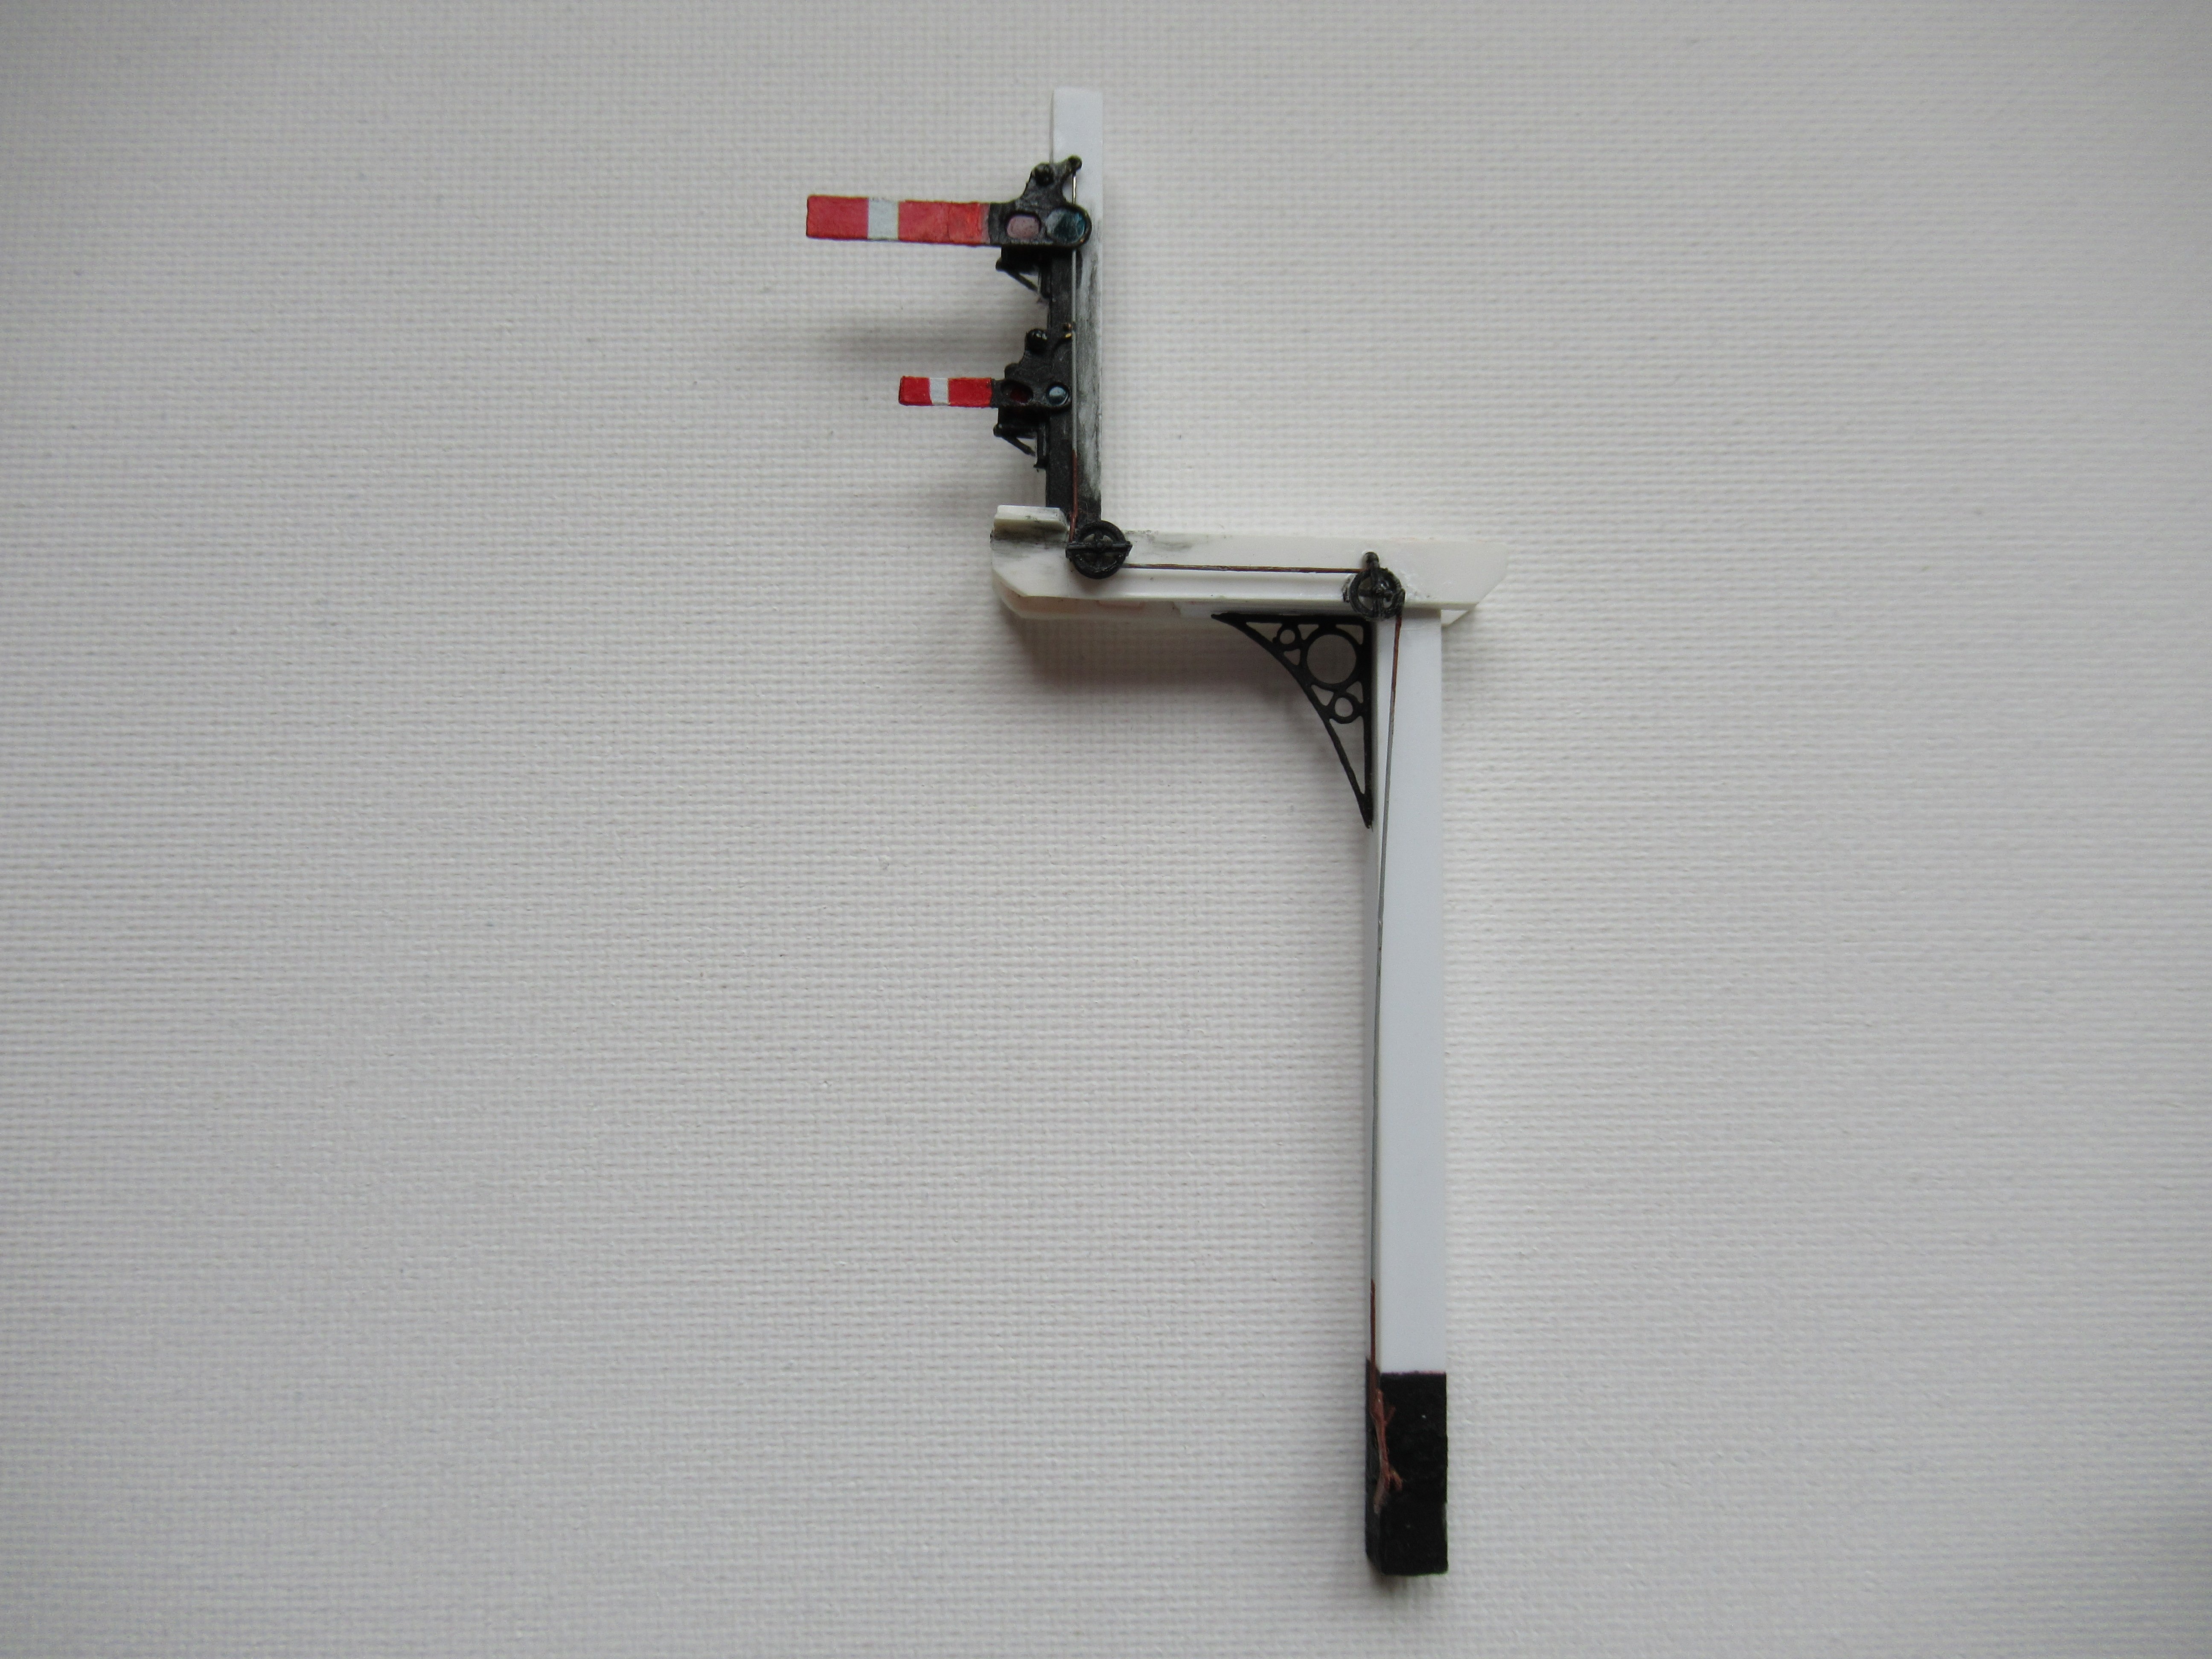
The landing back in place with holes drilled for the handrail... ... and the handrail built up and in place... Many tutorials say that one of the pet hates when building signals is the fiddling about making up the handrails, so much so that many give up and the handrails are totally ignored. I researched this for quite a few weeks. The Ratio and indeed the MSE solution of using 'moonfilament' and to rotate a length of rod NEAR, NOT IN, a flame to produce a 'globule' on the end to produce the upright posts and then to cement the top rail around this seemed too messy and would not satisfy my pursuit of 'perfection'. Another solution I found on RMWeb was to use Acupuncture Needles, copper 'bound' with an 'eye' at the top, just the thing for taking the wire handrail through. The pictures looked quite neat and tidy, but the post was from 2011 and when I looked up purchasing Acupuncture Needles things had obviously moved on a lot since 2011, so another dead end. I searched for ages for 'stanchions' on the internet and eventually found the above solution at https://www.modelboatbits.com , 1 hole 15mm Brass Handrail Stanchions, so for anyone building gantry handrails, or indeed for our boat modelling friends on the forum it's worth looking at what this supplier has to offer. The handrail is slightly over scale, but a compromise for symmetry and tidiness, (you know me by now). Also, against the doll, are steps to allow the signalman or porter to reach the lamp for the main signal arm, when replacing it. The procedure was normally to clean and refill the lamp somewhere at the station and then walk out to the signal and replace the lamp. (I well remember, as a young primary school boy, at Tandragee Station, Mr Morton, my friend's father, and the Station Master/Signalman/Porter/Ticket Clerk/Jack of All Trades, allowing us to walk out with him to the Outer Home Signals to replace the lamps. I should point out that this was when he was well aware that there was sufficient time between trains to do this leisurely and safely). The support stanchion has now been added. This is on the Harbour Road side of the signal. I mentioned earlier in this thread that this signal was a very sturdy structure, (I used 4.8mm Plastruct Styrene Tod to model the base post). The stanchion provides further support, presumably to cater for the fierce winds that come off the North Channel!. The Platform Starter, when we get to it, is anchored to the ground with steel wires, presumably for the same reason!. To complete The Bracket Signal, I'm waiting on MSE ladders from Wizard Models, (the Ratio offerings are too toy like to be realistic) and I'm searching for a decent LMS Finial! As I've made the doll a bit wider than standard Ratio 00 scale, the Ratio Finial is too small for my model, so I'm searching the internet again! I also need to get in place the hoop on the handrail at the top of the ladder and still pondering how best to achieve this! I've decided to work on The Ground Signals next, but before any posts on that I hope to shortly post comparison photos of the real Bracket Signal and the model!
- 18 replies
-
- 11
-
-

-
North Down MRS Show, Bangor, April 15th & 16th
LARNE CABIN replied to Patrick Davey's topic in General Chat
Patrick, @Patrick Davey, just looking again at your photos from Bangor Exhibition, and noticing the lattice post Upper Quadrant Semaphores on the Donaghadee layout. I know you're a bit of a BCDR aficionado, so is this authentic? I'm not at all questioning Gordon's absolutely wonderful model, and I'm sure that it's 100% accurate, but I was not aware of Upper Quadrants at Donaghadee! -
North Down MRS Show, Bangor, April 15th & 16th
LARNE CABIN replied to Patrick Davey's topic in General Chat
@Patrick Davey, @Galteemore, @leslie10646, sorry to have missed you guys. I had hoped to make it to Bangor on Saturday or Sunday, but was unable to do so, even though it's only 14 miles from Larne to Bangor (as the crow flies, 34 miles by road). Thanks for posting those photos, Patrick. Looks to have been a great exhibition. Hopefully next year, and hopefully Brookhall Mill will be there Patrick. -
Hi David, love those infrastructure photos, particularly the water tower and coal store and of course the signals. Terrific work.
-
LARNE CABIN's LMS Upper Quadrant Semaphore Signals Workbench
LARNE CABIN replied to LARNE CABIN's topic in Workbench
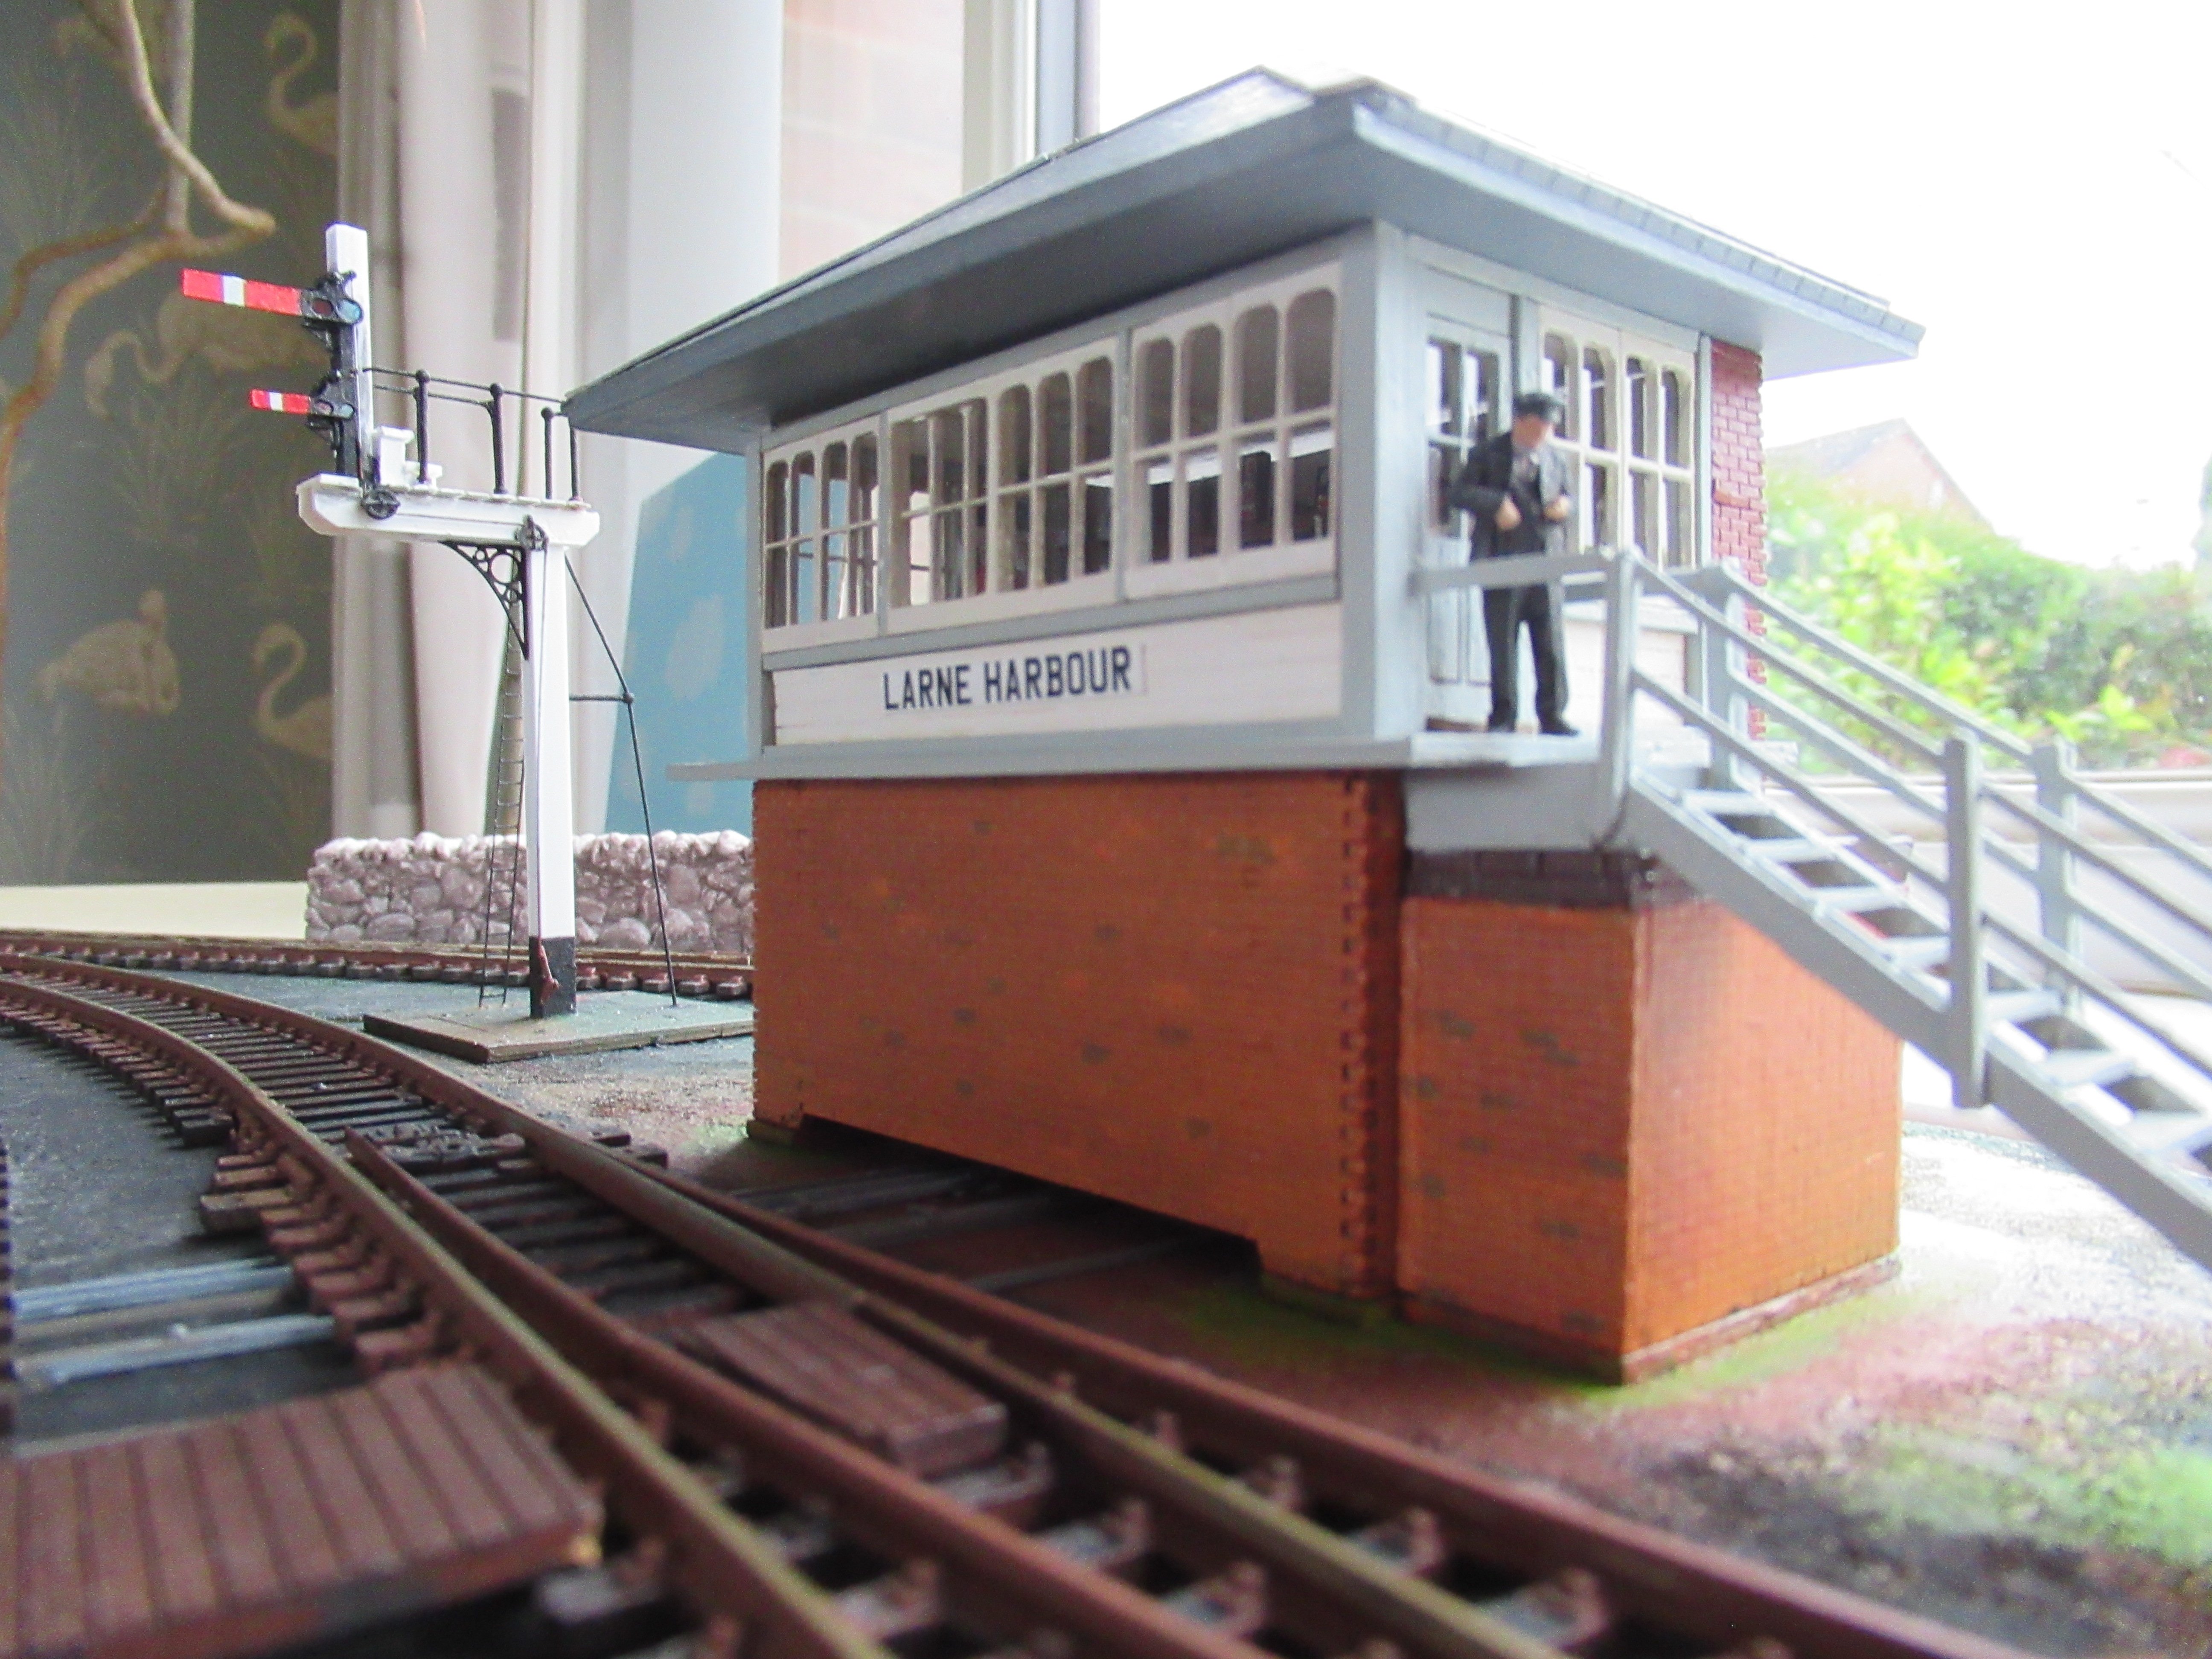
Hi @David Holman, David. Appreciate your comment re 'fine work'. This boy has been a bit of a learning curve and is the result of a lot of research, still a bit to go with handrail, ladder etc. On the layout I will have a signal wire running from the crank to the Signal Box. My aim on the layout is authenticity within the confines of a 6ft x 2ft model. As explained in previous posts, within the confines of the layout of the station area these signal arms would never be in the 'Off' position, hence non operational. Other signals would be functional to allow shunting movements and so I hope to make them operational. -
LARNE CABIN's LMS Upper Quadrant Semaphore Signals Workbench
LARNE CABIN replied to LARNE CABIN's topic in Workbench
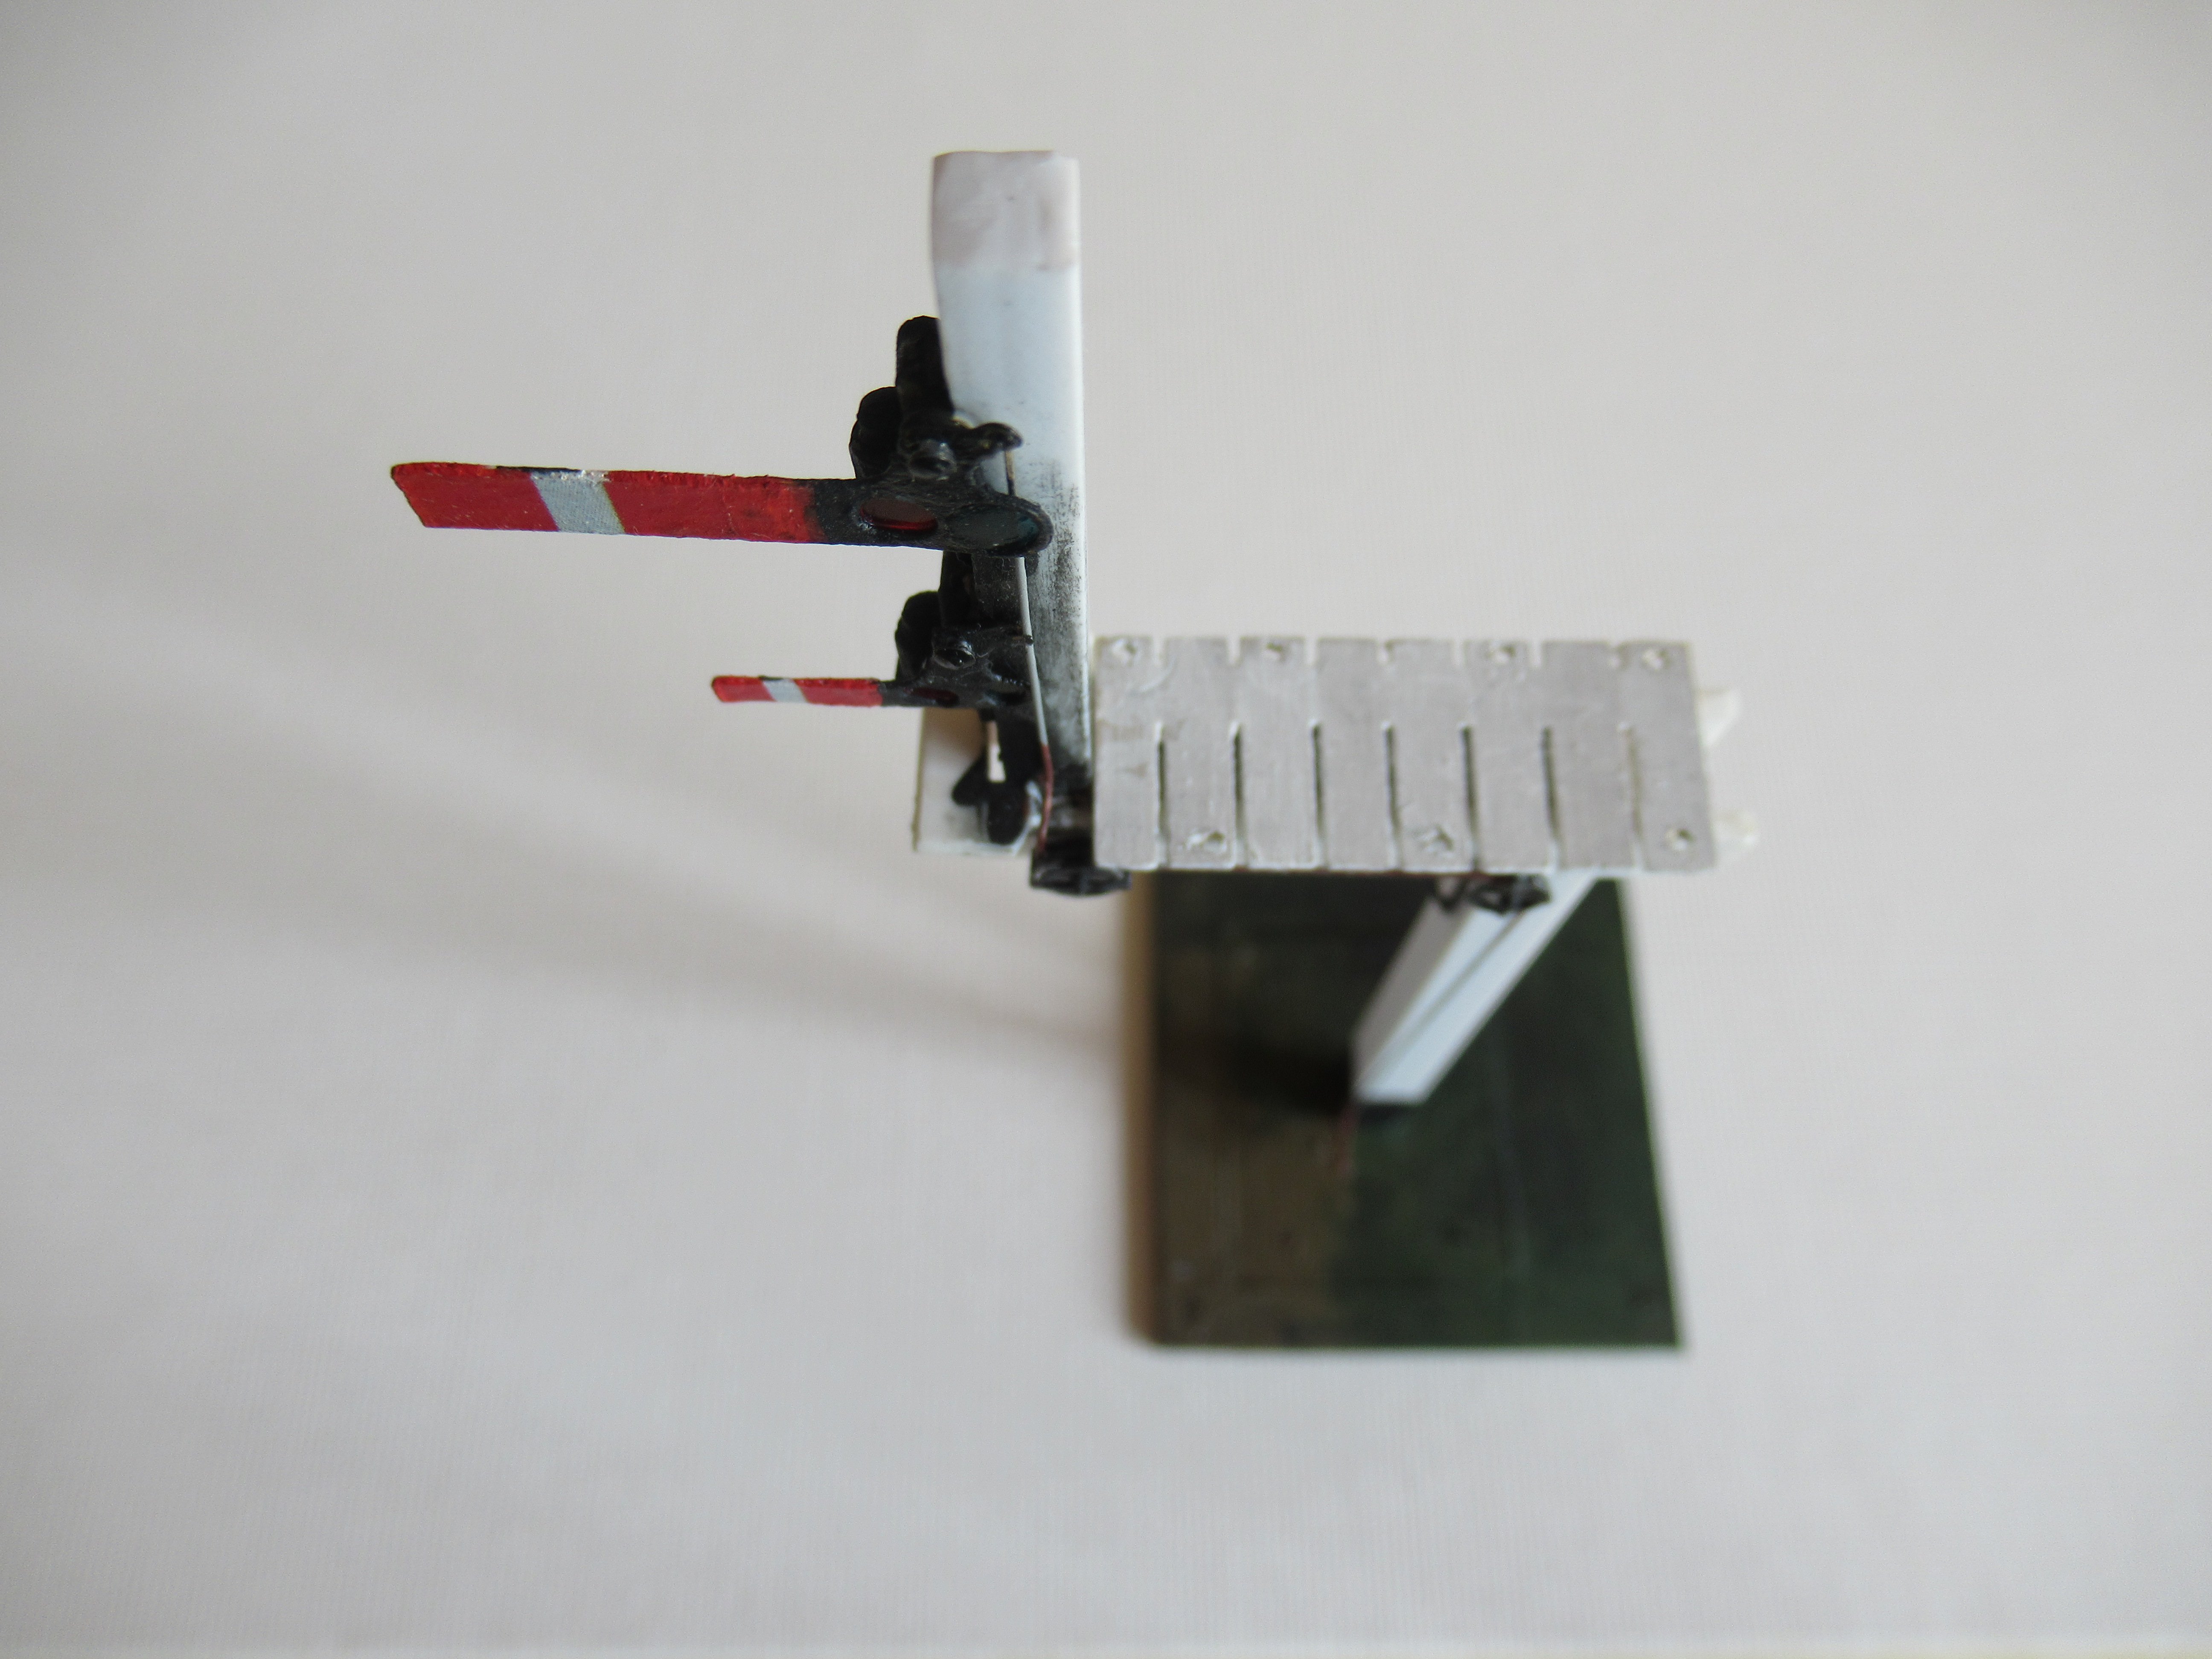
Here the arms are fixed loosely to allow alignment of the pulleys with the operating wire lugs. At this stage some black acrylic represents oil from the lamps. Photos show this signal to be very grimy around this area although the area on the doll above the lamps, the finial and the post itself are pure white... ... the pulleys in place on the trimmer and the crank in place at the base of the post... ... the main arm in place. The spindle is passed through the spindle hole and then a washer is placed on the spindle before passing it through the bearing. This is to leave enough space for the operating wire to pass down behind the spectacle plates. The operating wire then passes through the pulleys and down to the crank at the base of the post... ... looking side on, on the layout this is looking towards Harbour Road and the Signal Box is on the right. The crank changes the motion from horizontal, from the lever in the cabin, to the vertical via the pulleys to the signal arm... ...the shunt arm in place... So, the main challenges have now been conquered and I will be much wiser next time round. So what's next?.....I had to remove the landing as I had forgotten to drill the holes for the handrail, so firstly drill the holes, put back the landing and build up the handrail. Next, i want to make the base a bit bigger to accommodate the stanchion and the ladder as one structure so that the whole structure can be removed from the layout, if necessary. Finally, the LMS finial and that's The Bracket Signal complete. By the next post I hope to have a complete signal and NO Patrick it won't be operational! .
-
@Galteemore, David, yes, thanks for sharing. I haven't seen that film before. Very, very interesting. Some great shots of Brown Vans leaving York Road and Greenisland. Love the shots of the somersault signals at Greenisland. Disappointed there were no shots of the approach to Larne Harbour, but that clip at 4:28 going over the crossover into Platform 2 is the real deal! (I wonder how that was filmed?). Thanks again.
-
Brookhall Mill - A GNR(I) Micro Layout
LARNE CABIN replied to Patrick Davey's topic in Irish Model Layouts
Excellent video, Patrick, and great sound effects. -
LARNE CABIN's LMS Upper Quadrant Semaphore Signals Workbench
LARNE CABIN replied to LARNE CABIN's topic in Workbench
Hi Patrick, previous answer still applies: The Bracket Signal definitely won't be operational for the reasons given above. It's more a learning process but will look as authentic as possible. Hopefully some of the others will be! -
LARNE CABIN's LMS Upper Quadrant Semaphore Signals Workbench
LARNE CABIN replied to LARNE CABIN's topic in Workbench
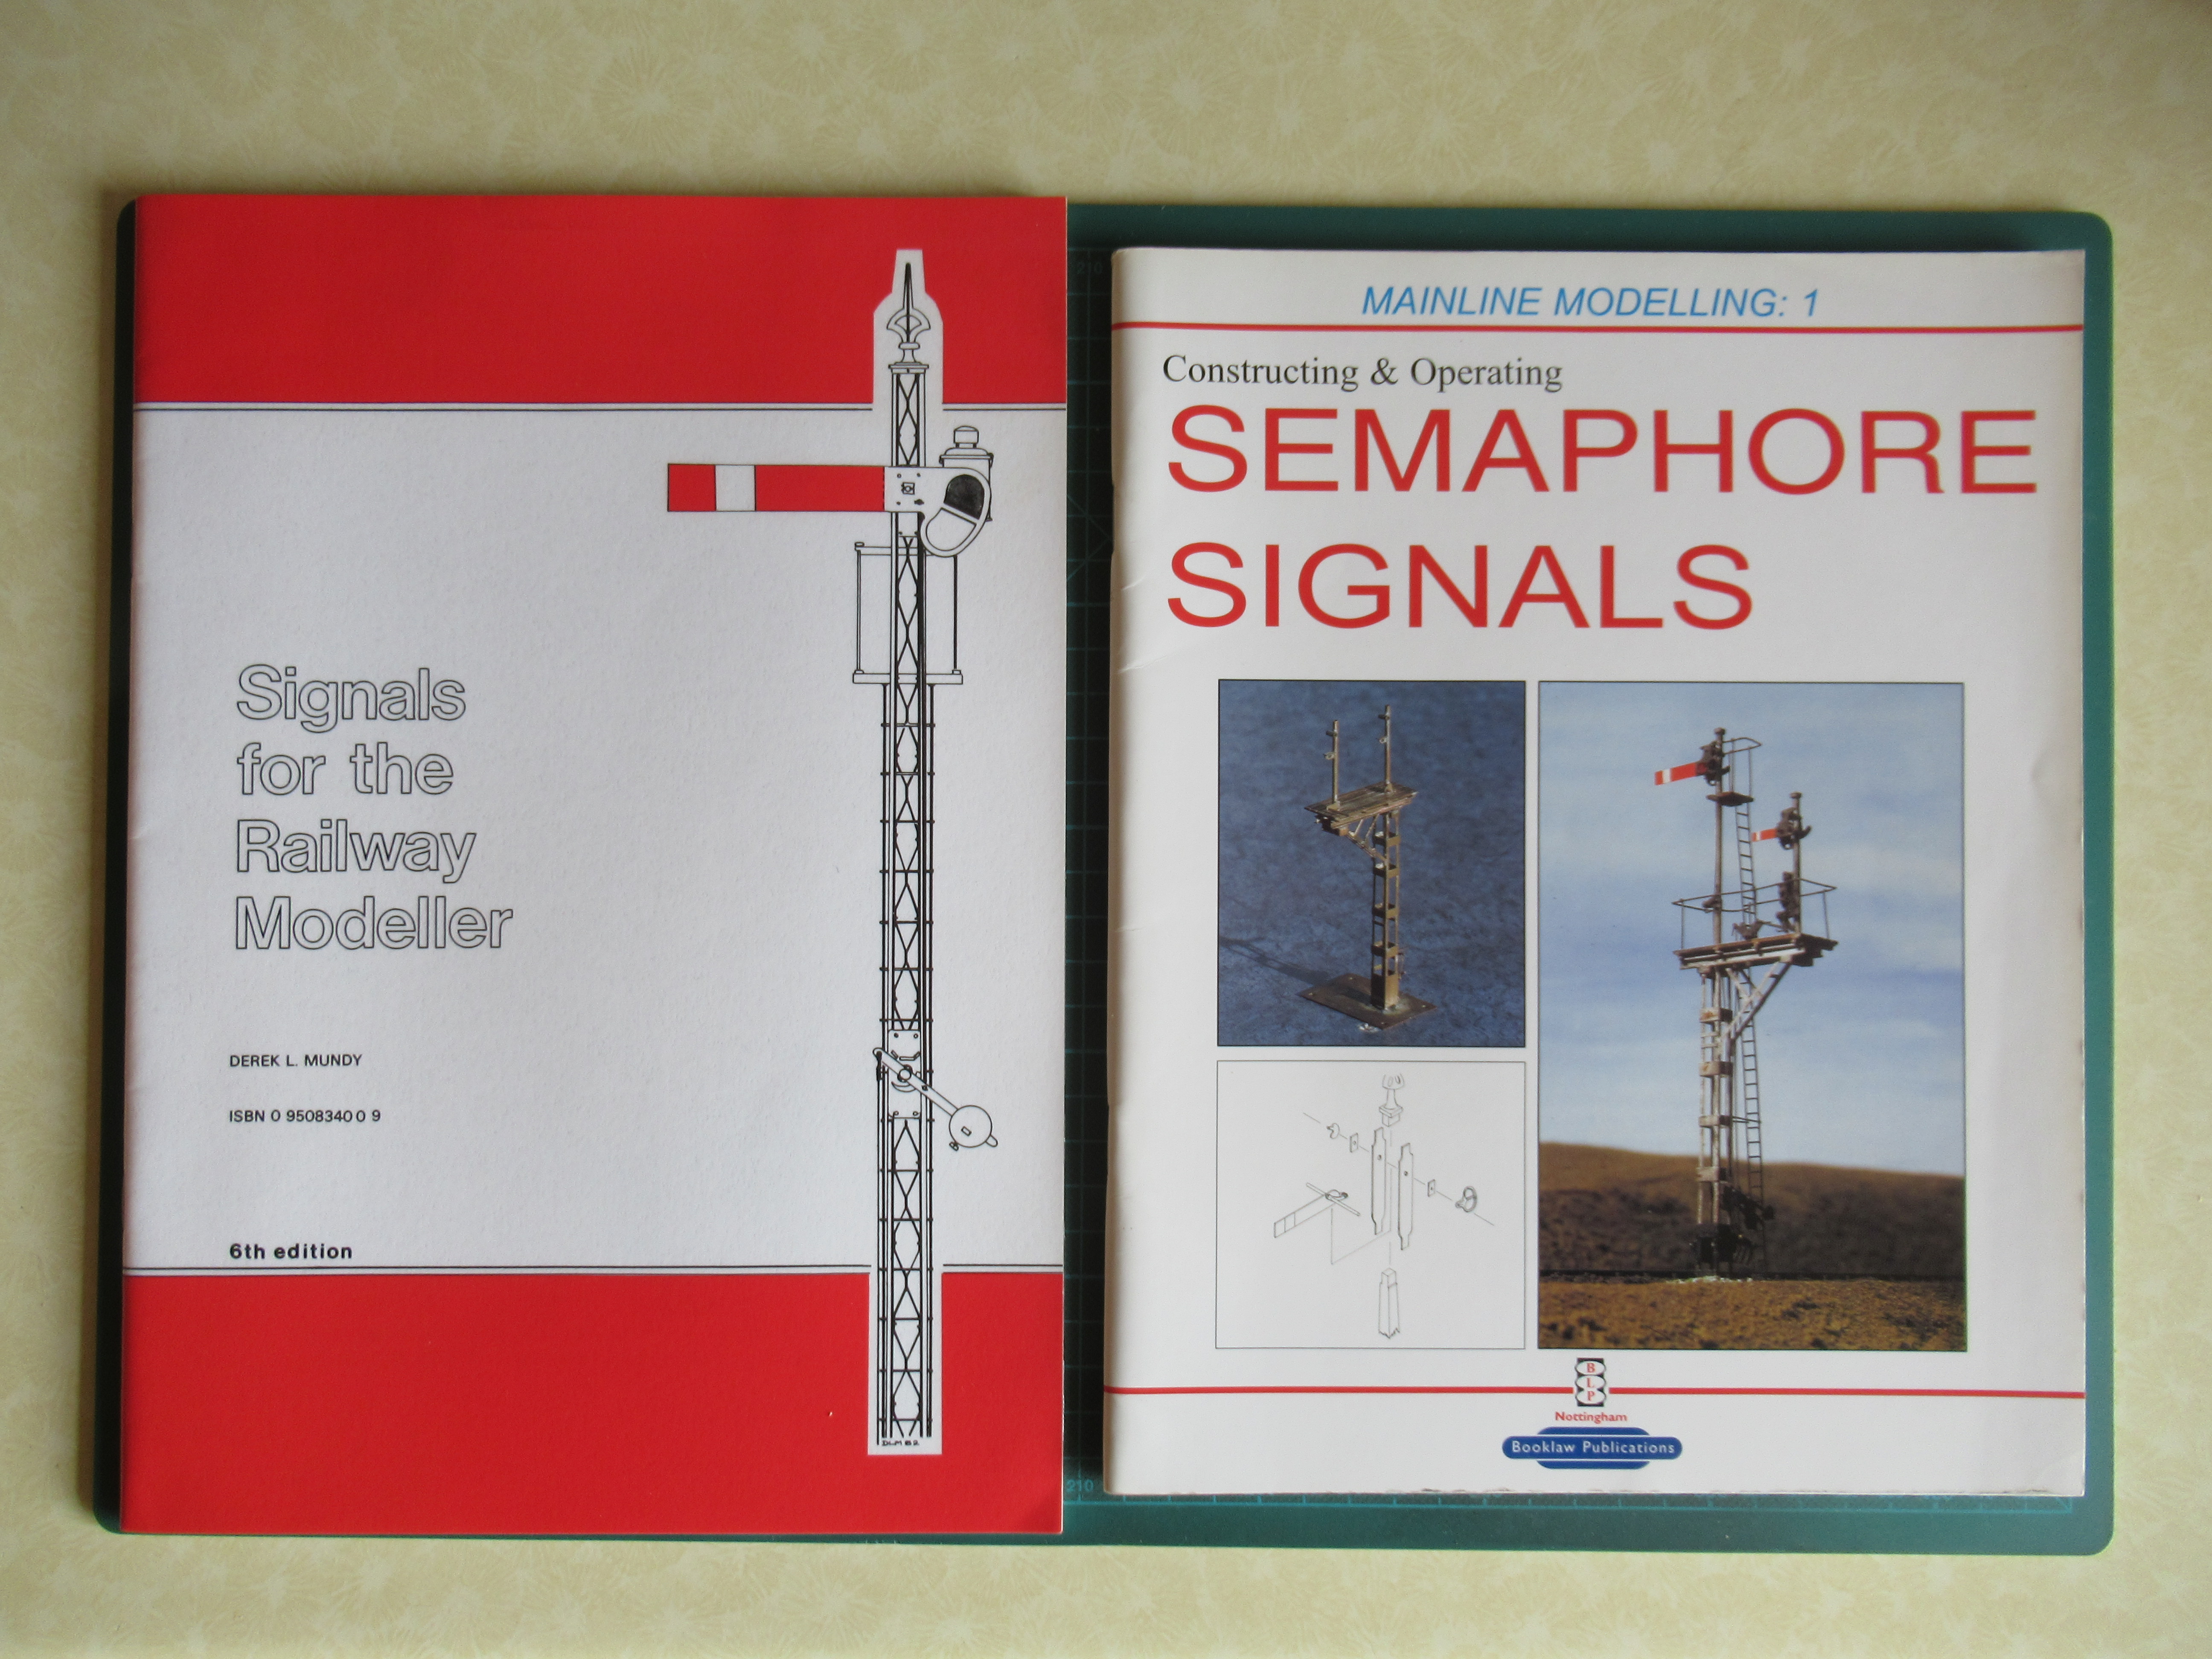
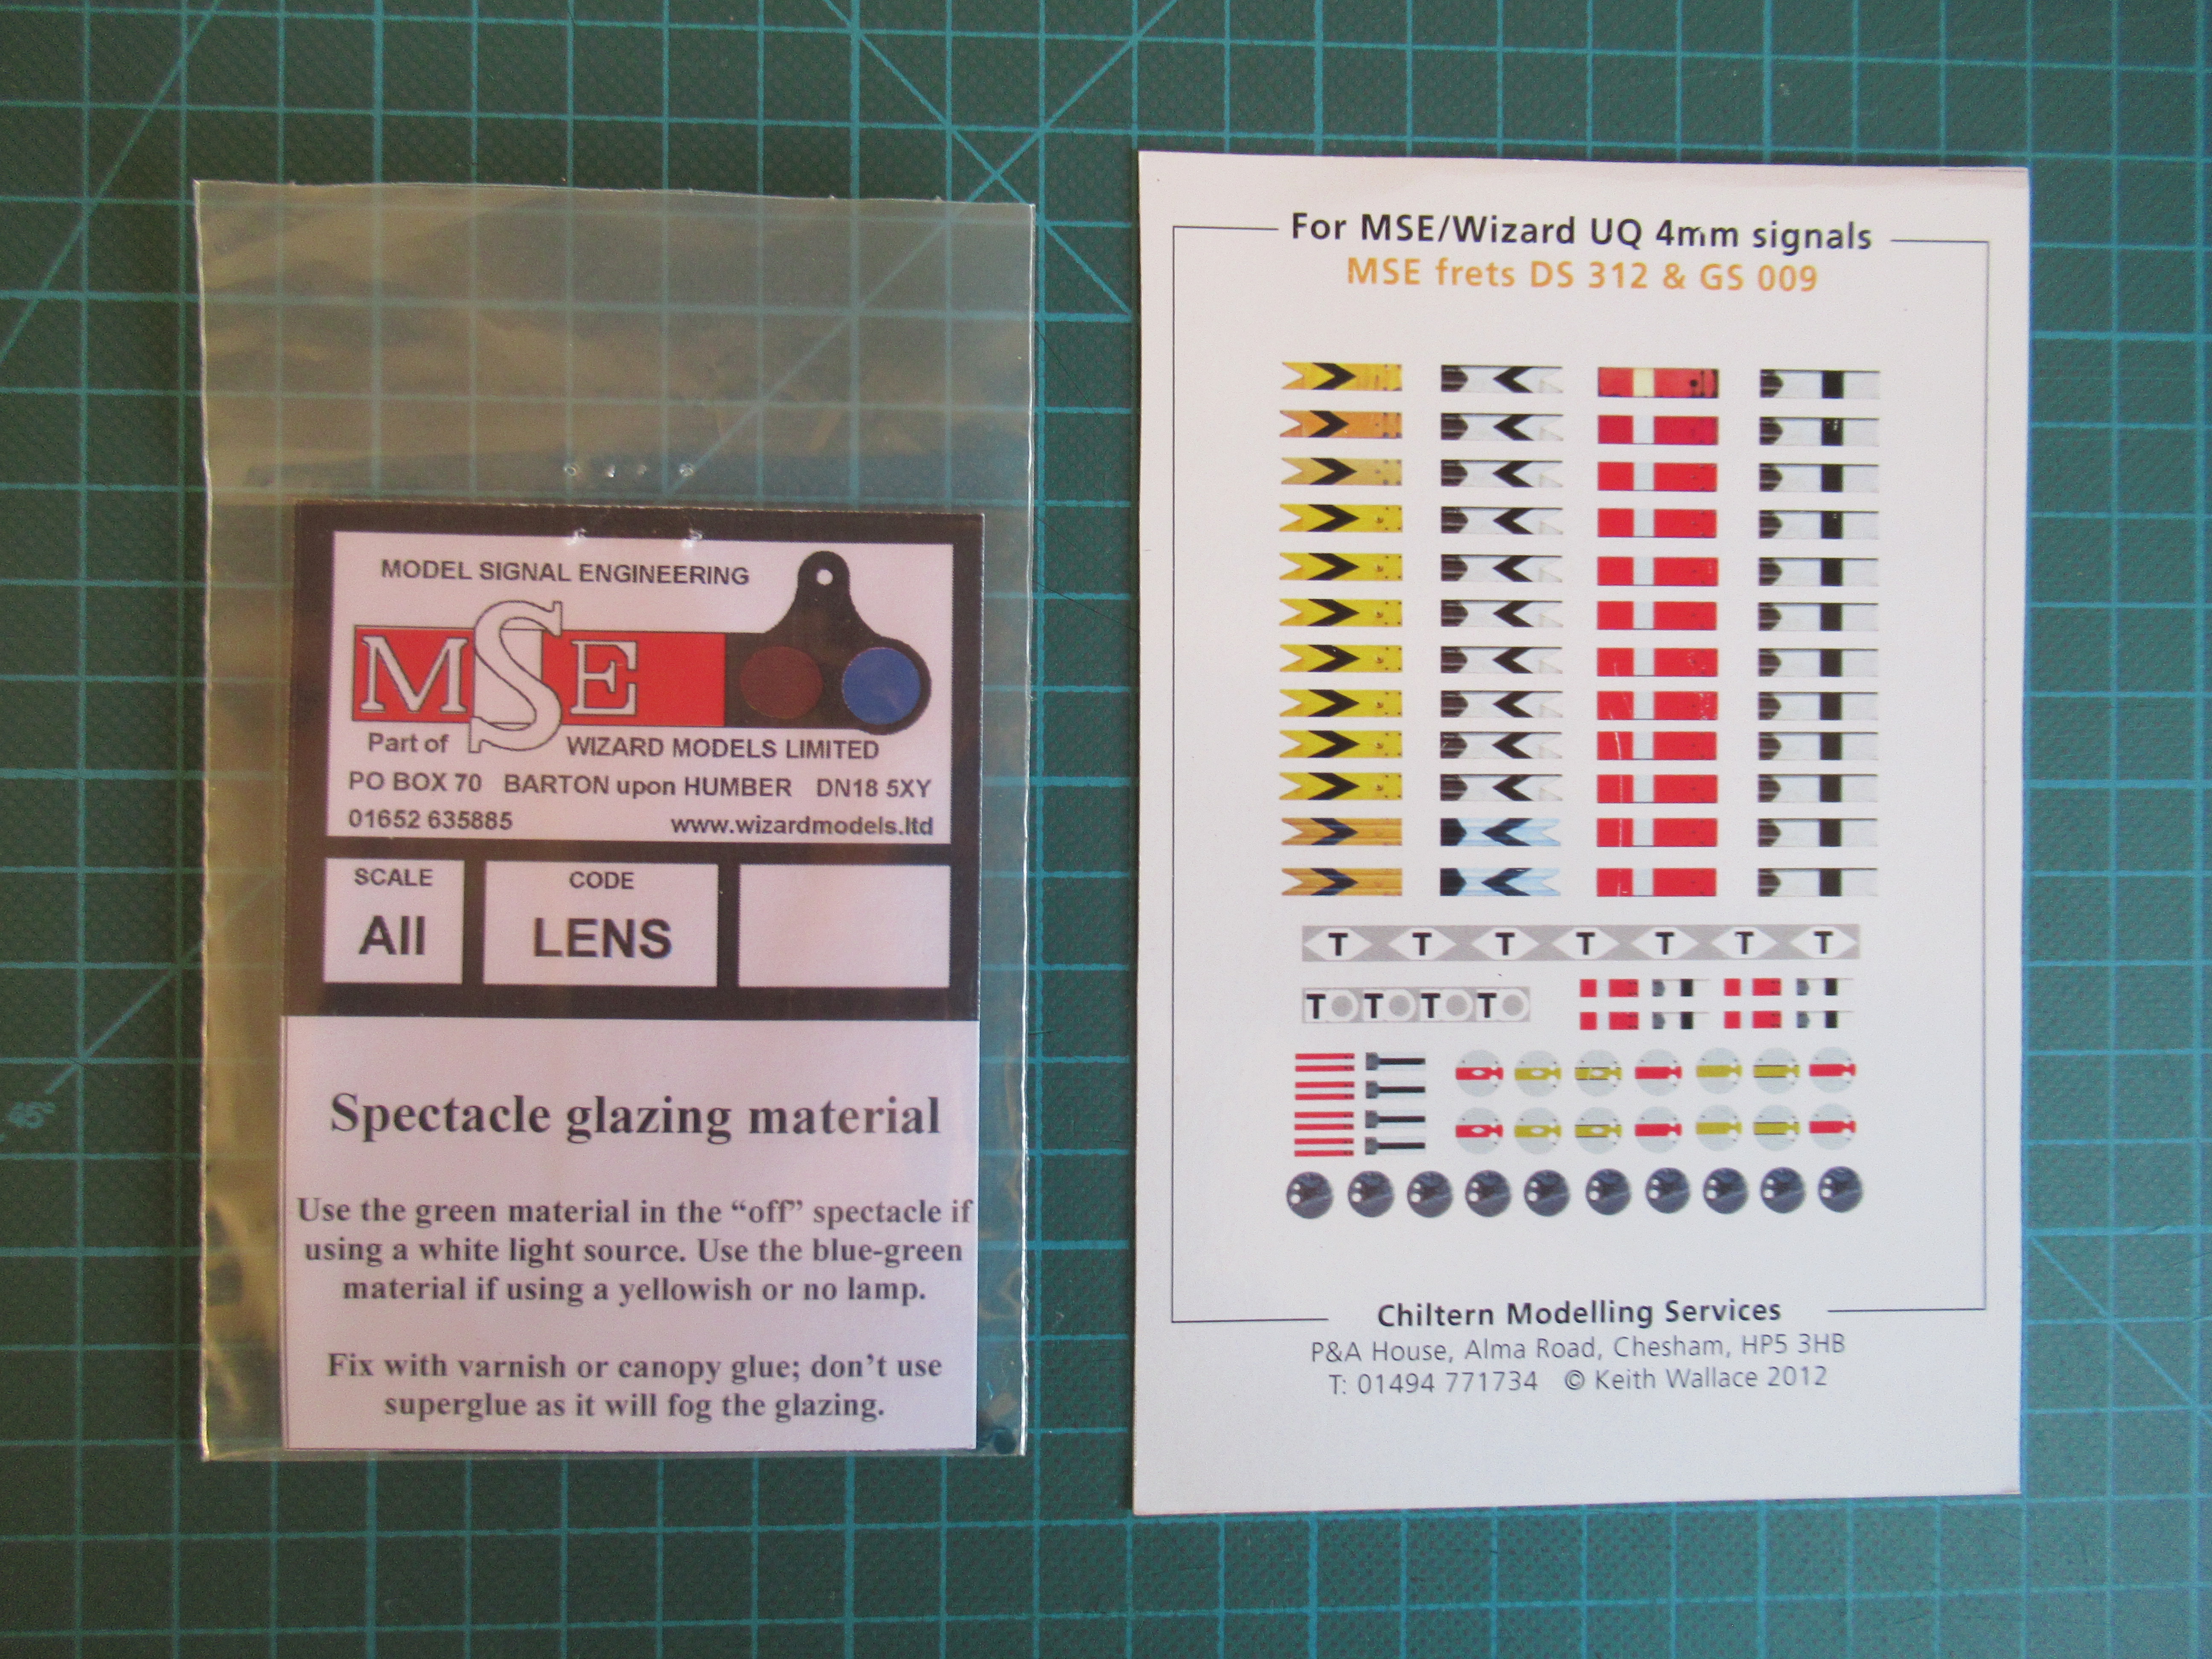
Although I have a huge interest in Signal Cabins and signalling this is my first attempt at scratch building model signals. It seemed quite daunting at first, but as well as researching Larne Harbour signalling I did quite a lot of research in general, particularly on building the model and how the prototype actually works. For those interested there's lots of good guidance available. I found Derek Mundy's MSE booklet and Mainline Modelling's Constructing and Operating Semaphore Signals extremely informative and useful as are the instructions that MSE supply with various components and signalling tutorials by Steve Hewitt on RMWeb. So, continuing with The Bracket Signal. I used MSE Spectacle Glazing and Waterslide Transfers from Chiltern Modelling Solutions...... ...... As shown in the previous post, I started by painting the area around the spectacle plates black and opening out the spindle holes in the arms. The rest of the arm was painted with a white primer. Then the spectacle plates were cut. The glazing sheet is quite tough and hard to cut accurately, but fortunately I spotted a tip from Steve Hewitt on RMWeb to go to a shoemaker with a leather punch and get him to punch out circles in various sizes. Some fit perfectly and those that don't can be easily trimmed slightly with a modelling knife. The spectacles were teased into place using a small fine brush, secured with clear gloss varnish and allowed to dry overnight. The transfers can be applied fairly easily following the supplier's instructions and again left overnight to dry. Once dried, I had to touch in the edges with Humbrol Signal Satin Red (174), and a little black on the reverse side, and again when dry a thin coat of clear satin varnish to seal everything, so now I have my two arms for The Bracket Signal. Next step will be to locate the arms on the doll, passing the spindle through it's bearing and attaching the back-blinder. Then passing the operating wire from the arm through the pulleys, on the trimmer and hence to a crank at the base of the post! More soon......
-
Will look forward to seeing photos/video of that "running in" session, @Darius43. Looks like typical Larne Line consist, MPD's, Red Star Parcels containers and Brown Van.
-
LARNE CABIN'S GNR(I) P2 Parcel Van Workbench
LARNE CABIN replied to LARNE CABIN's topic in Workbench
Thanks David, @Galteemore. The GN coach lurking in the rear is a Silver Fox GNR(I) K15. Although my model layout Is NCC/UTA, as I now live in Larne, my heart belongs to the GNR(I), my first love! -
LARNE CABIN'S GNR(I) P2 Parcel Van Workbench
LARNE CABIN replied to LARNE CABIN's topic in Workbench
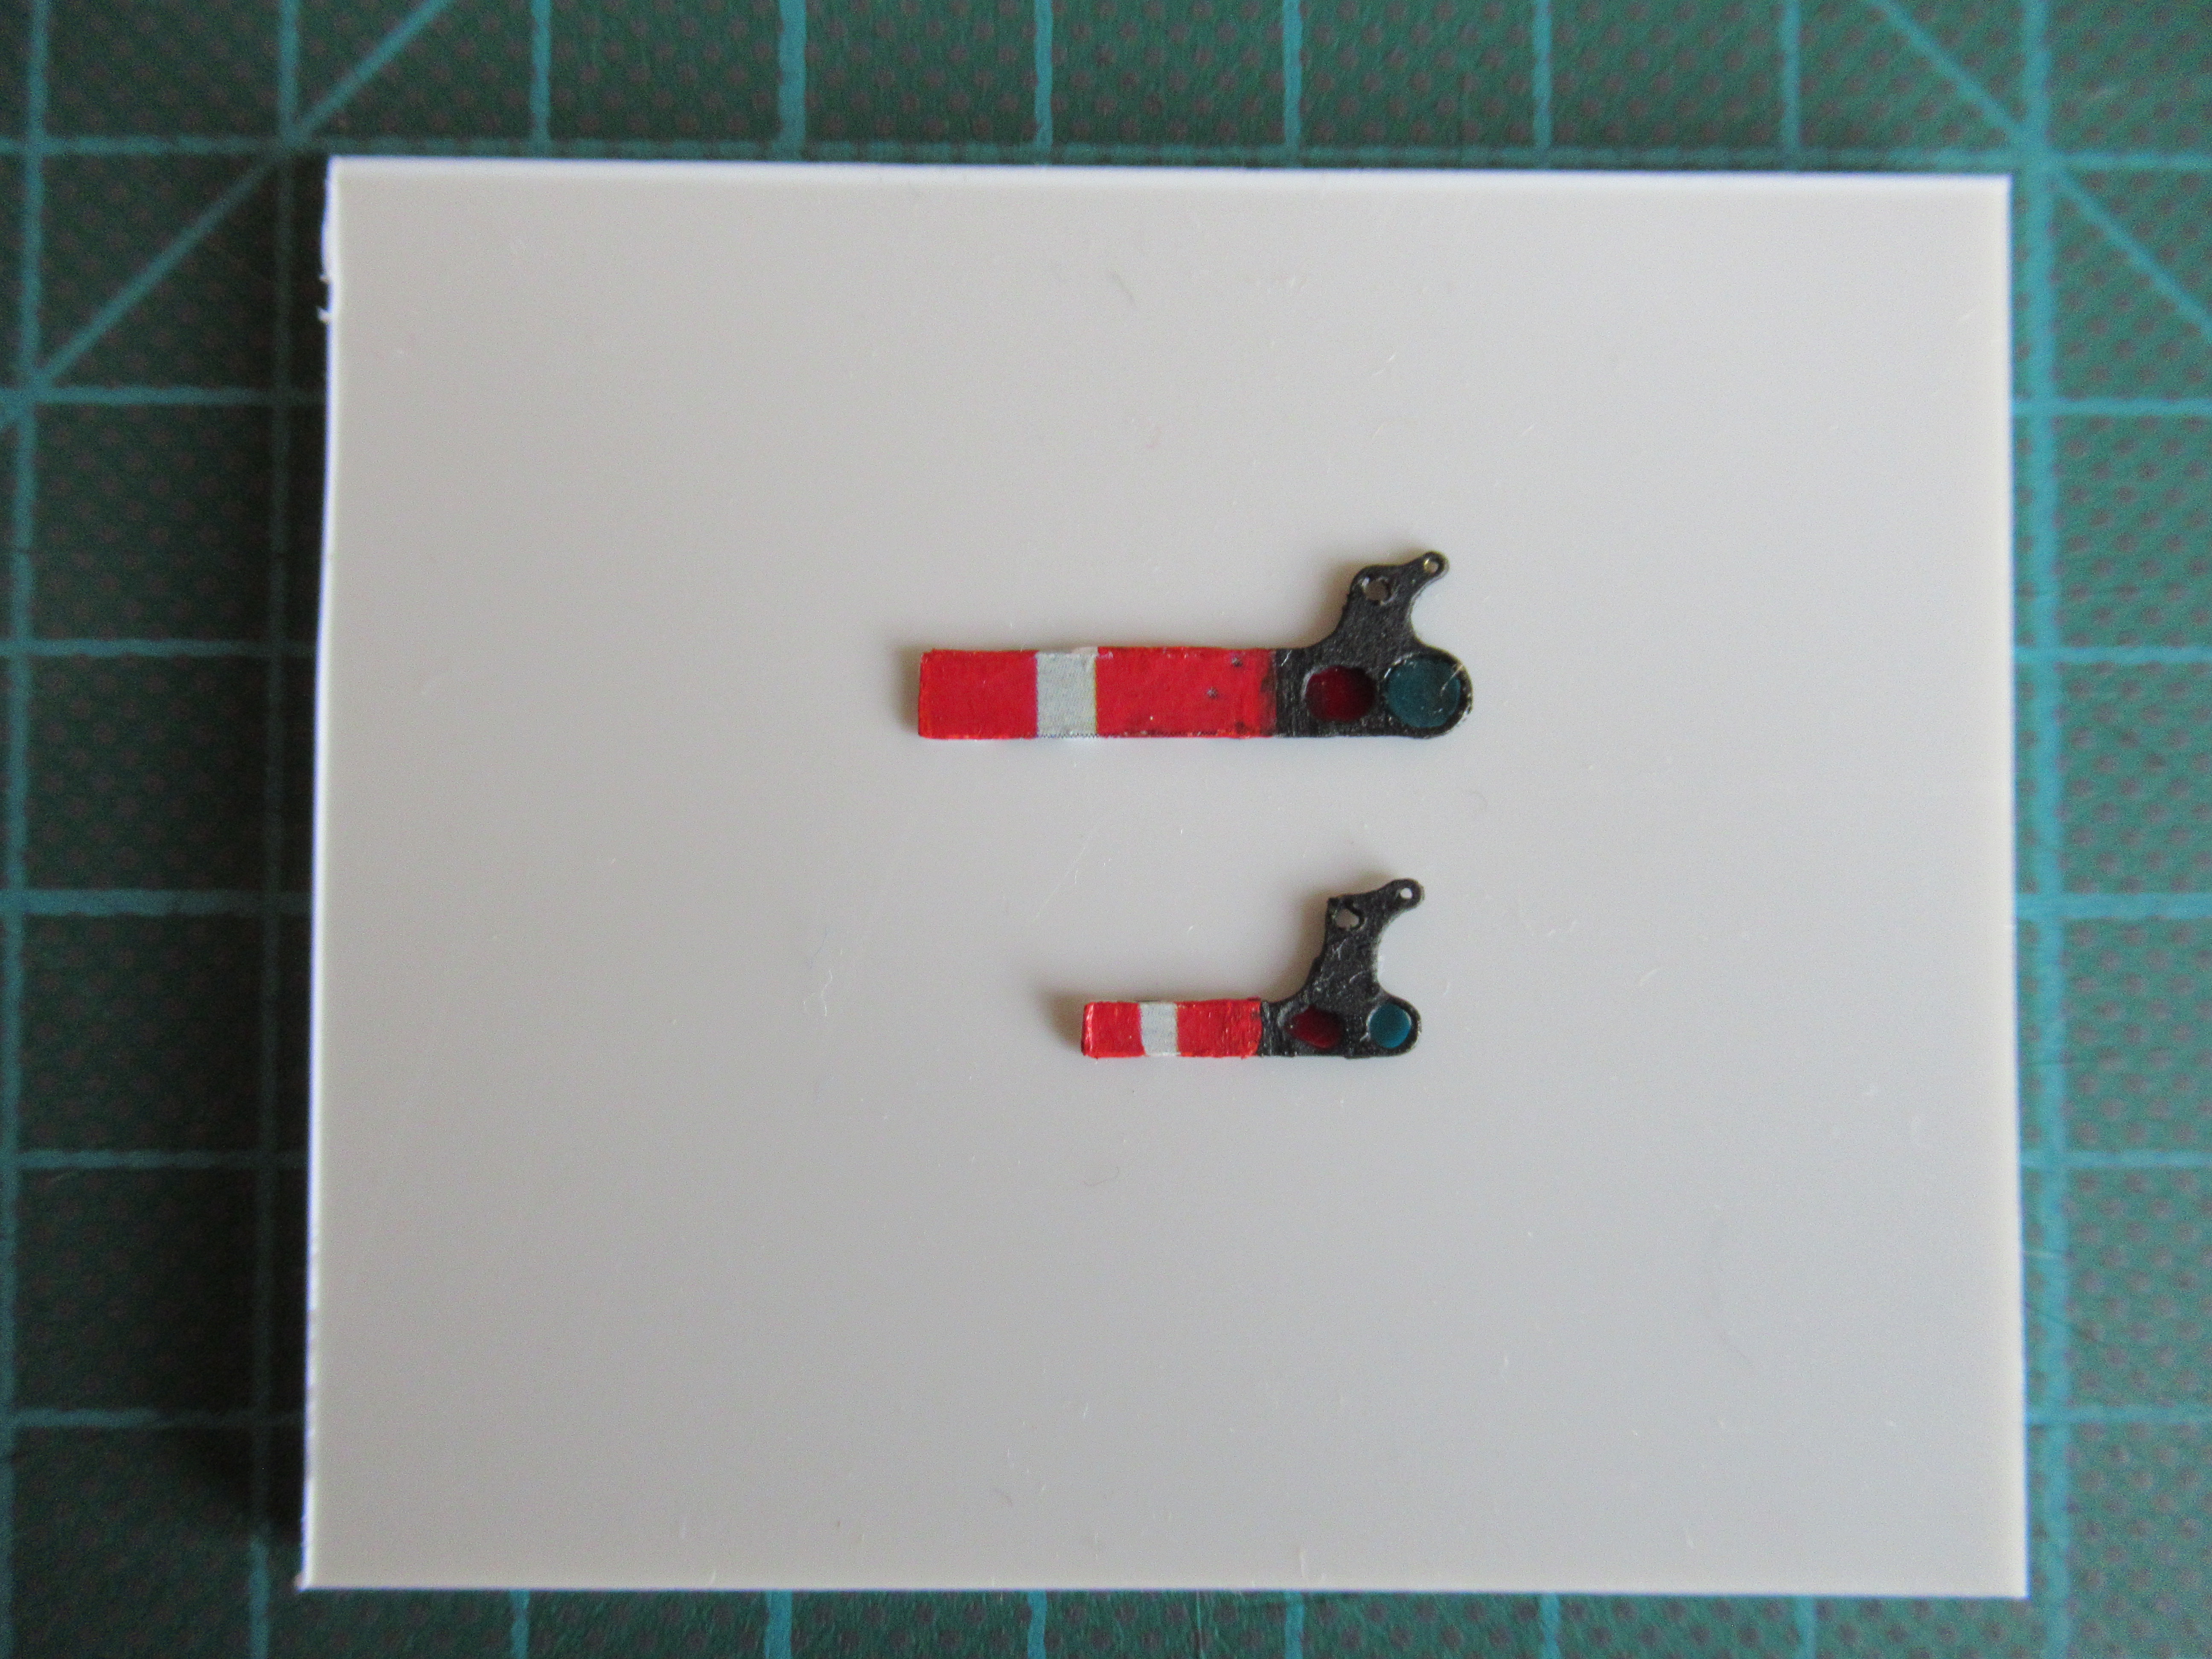
It's often been said that photographs unashamedly show up faults not necessarily so obvious with the naked eye or the two foot rule! That glaring gap on the top left of the body needs dealt with (added to the 'Still To Do' list), and that little mark on the left hand window in the top photo didn't exist, just a speck of dirt! Oh, it's terrible trying to be a perfectionist! A couple more photos for now .........
-
LARNE CABIN'S GNR(I) P2 Parcel Van Workbench
LARNE CABIN replied to LARNE CABIN's topic in Workbench
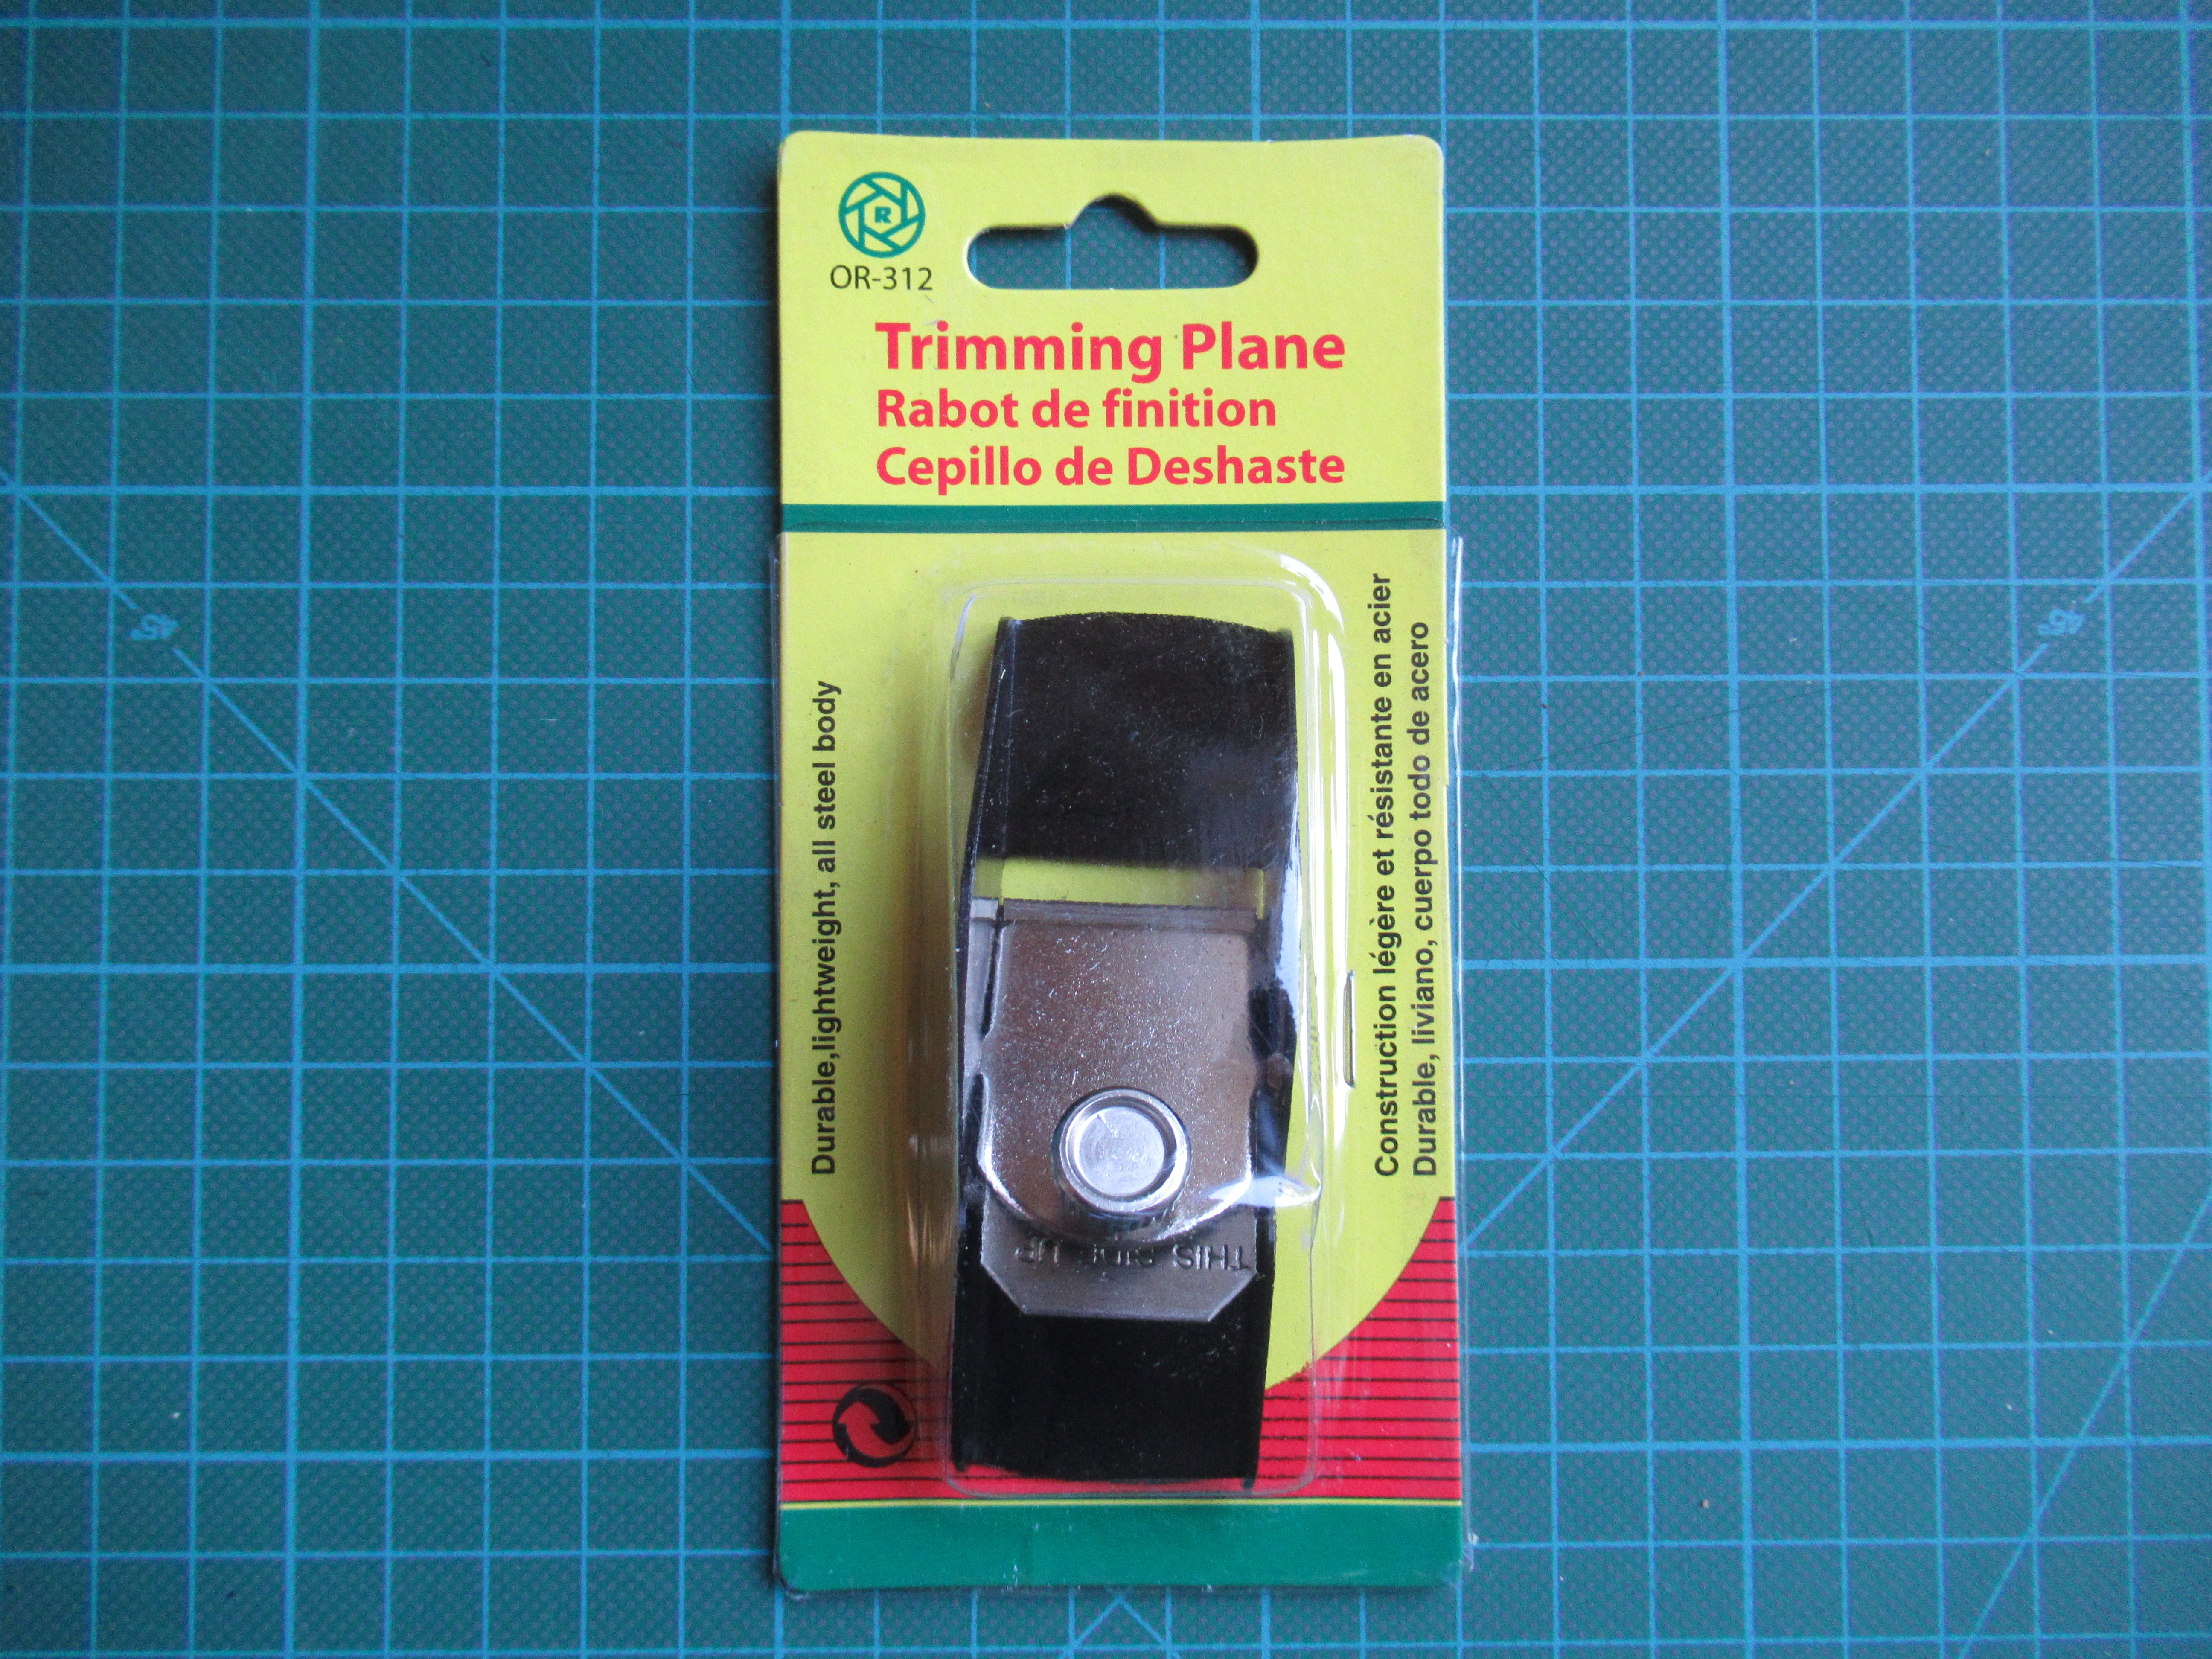
Hi David, @Galteemore, I got the plane on eBay, very cheap. It's an Expo Tool (OR-312), 78225. If you search for 'Hand Trimming Plane" you'll find it. -
LARNE CABIN'S GNR(I) P2 Parcel Van Workbench
LARNE CABIN replied to LARNE CABIN's topic in Workbench
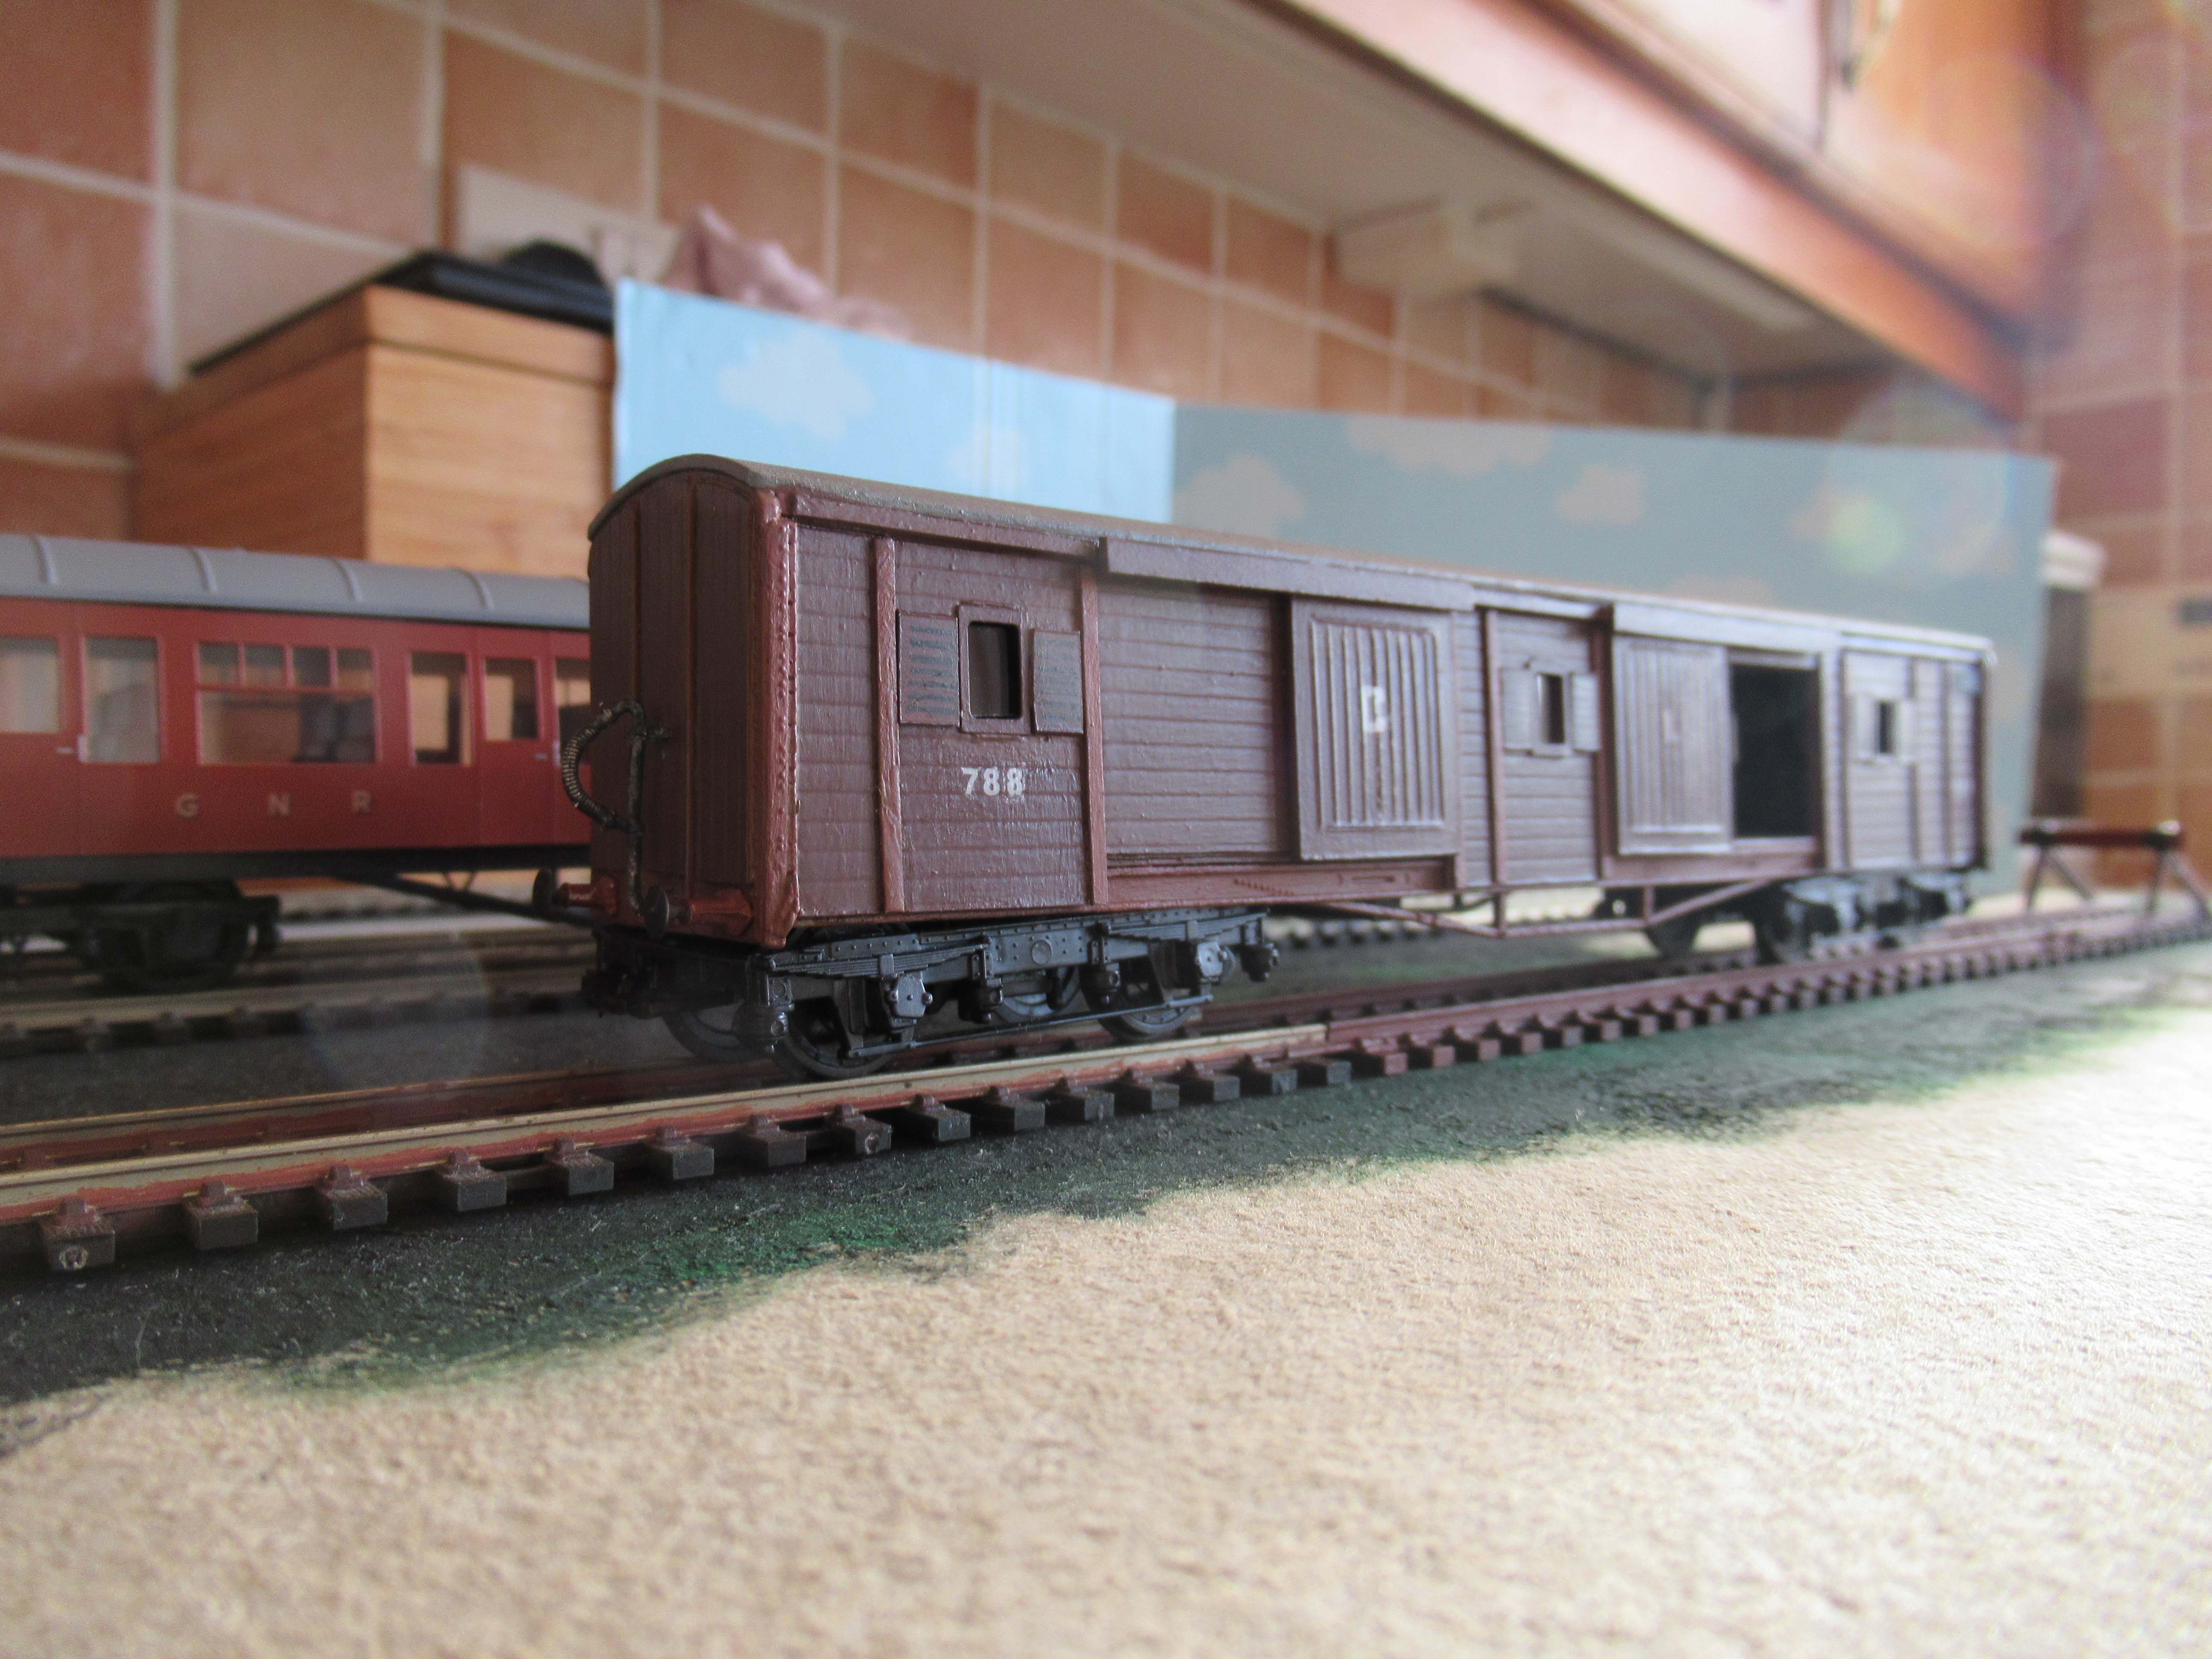
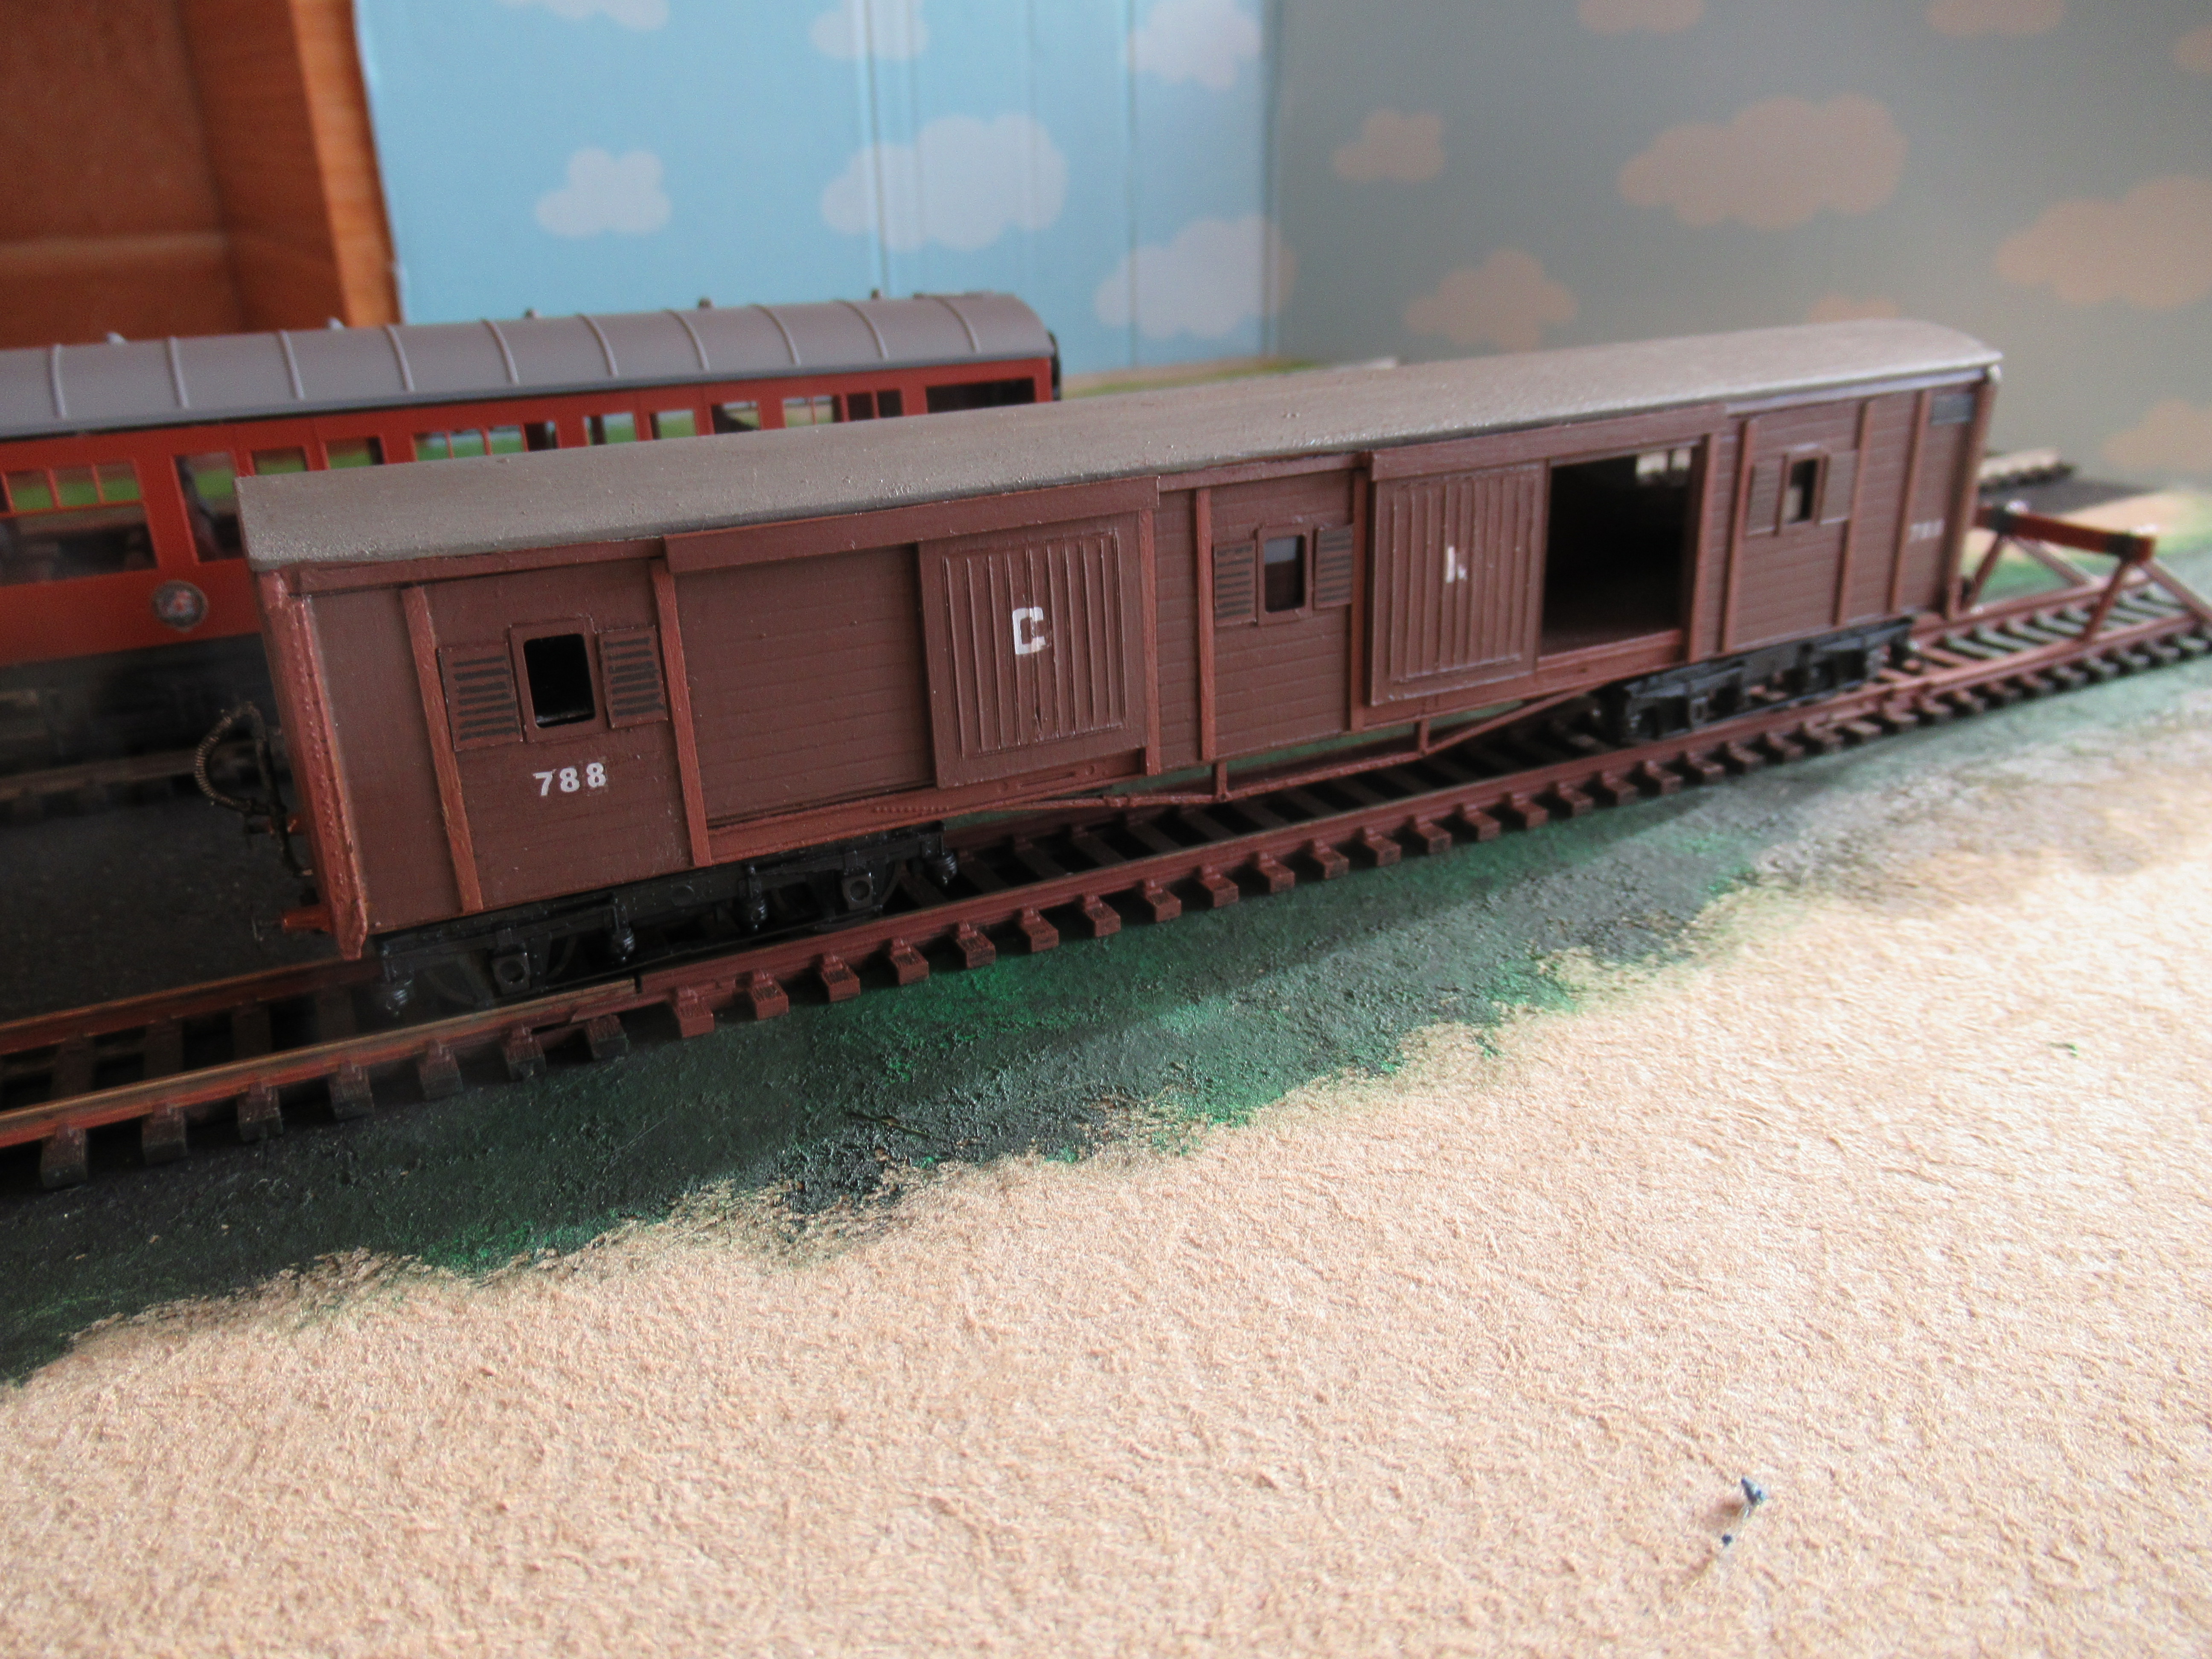
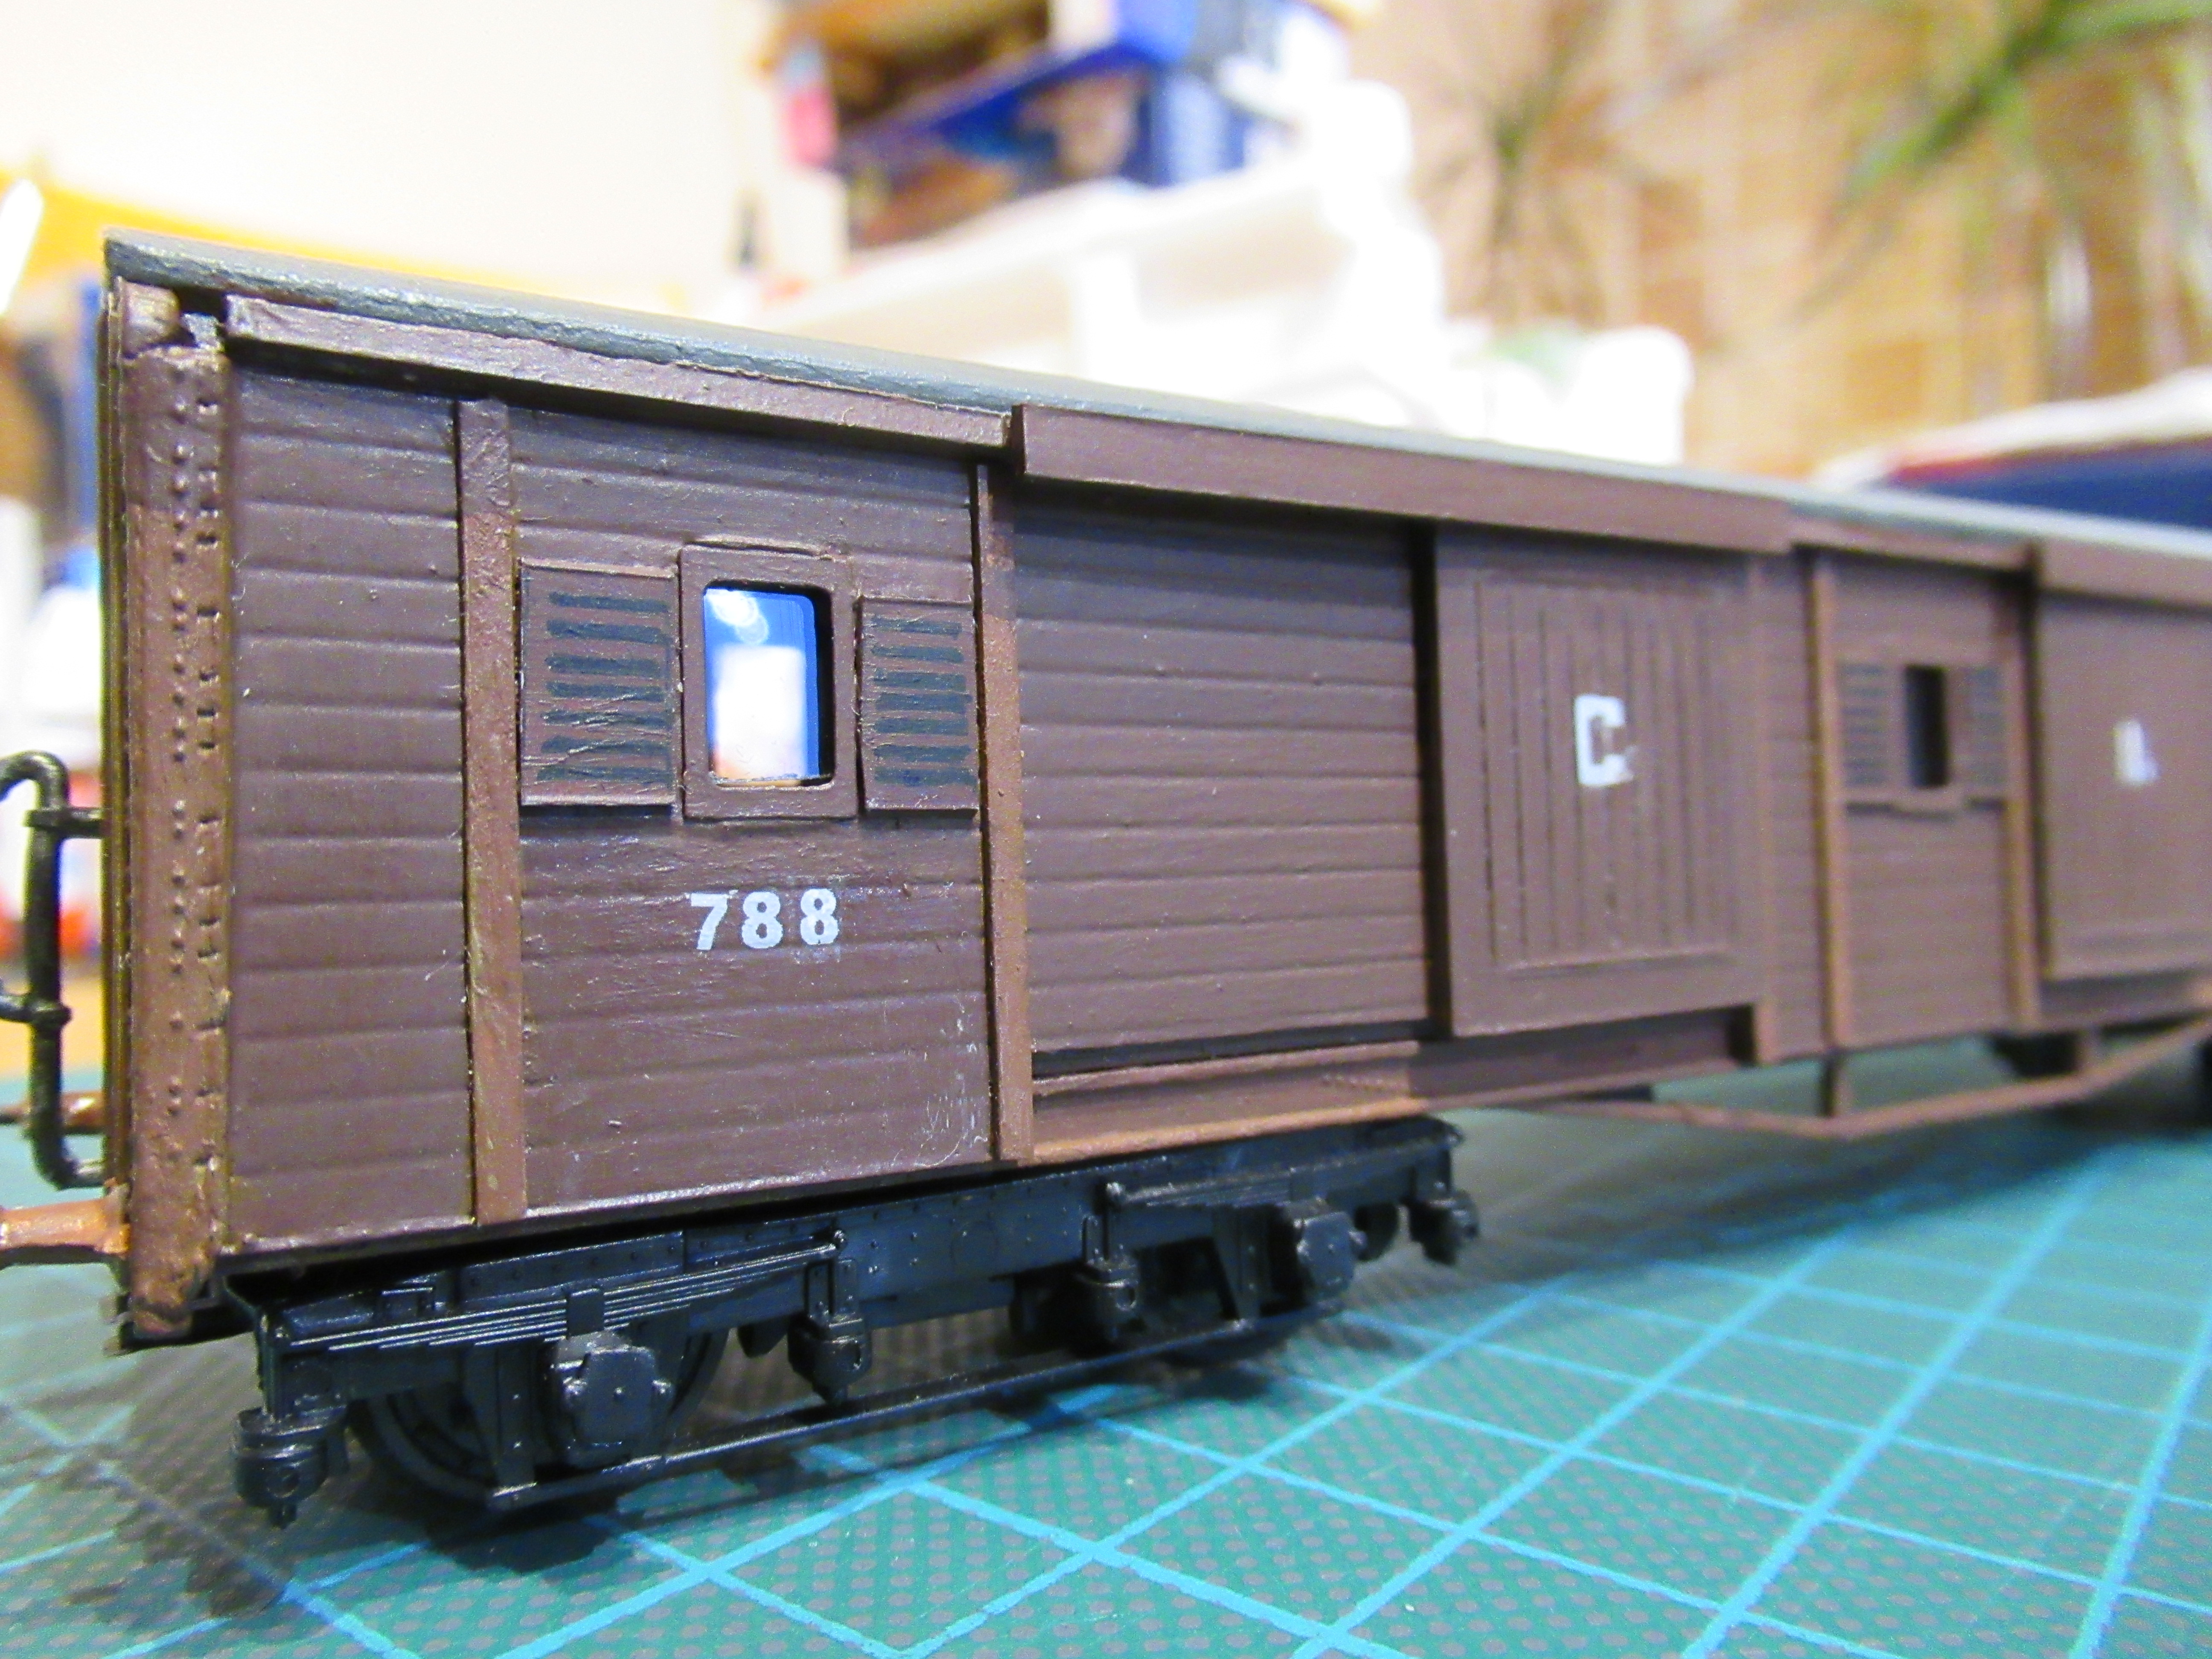
Some more progress on the GNR(I) P2 Parcel Van. Since the last post windows have had glazing installed and the distinctive valence over the doors has been added. Buffers and steam pipe have been added, the bogies have been completed, brake shoes etc and the roof shaped more like the real thing. The roof was over hanging the body far too much to be an accurate representation of the real thing, and I was getting nowhere with filing and sanding, so l purchased this handy little tool which let me complete the job in no time at all. It's great for Plastikard. It allows you to get more off than filing and sanding and less than using a modelling knife! Despite JHB's advice, that the "G N" would be gone by my period, late 60's,..... ........ I couldn't resist giving the model it's proper "G N" ancestry, albeit with the "N" partially faded, and it's number "788" in recognition of the fact that "788" still exists, albeit as a derelict shell at RPSI Whitehead (as advised in the first post on this thread). Still to do, the brake wheels that I had purchased (above post) I decided were too small, so I am waiting for 5mm/6mm versions to arrive, Kadee couplings, mail bags piled at the open door and maybe a wee bit of weathering. I think that's about it! Then ready for service in the mail bag unloading scenario at Larne Harbour Station.
-
Yer man on the footplate with the yellow hat is STILL on the phone! He's always on the phone. He must take full advantage of his mobile hours contract! That's a terrific scene, by the way, love the loco and the figures.
-
mgwr preserved railway Connemara Railway project.
LARNE CABIN replied to ttc0169's topic in What's happening on the network?
I have dipped in and out of this thread on numerous occasions, but have just spent a very enjoyable hour reading through from start to finish. This project is absolutely amazing and as has been said by many others throughout the thread enormous credit is due to all involved. The dedication and resolve is amazing and all the hard work is now bearing fruit. My particular interest is signalling and signal boxes and I found the posts on the MGWR Cabin particularly interesting and look forward to future posts on signalling. Good health and good luck to all concerned in this brilliant project.
.jpg.e96bed039bb46b9a7693befd8b11d062.jpg)


.JPG.78c18b2f39e3624a92458a0151dde41e.JPG)