33lima
-
Posts
190 -
Joined
-
Last visited
-
Days Won
2
Content Type
Profiles
Forums
Events
Gallery
Blogs
Everything posted by 33lima
-
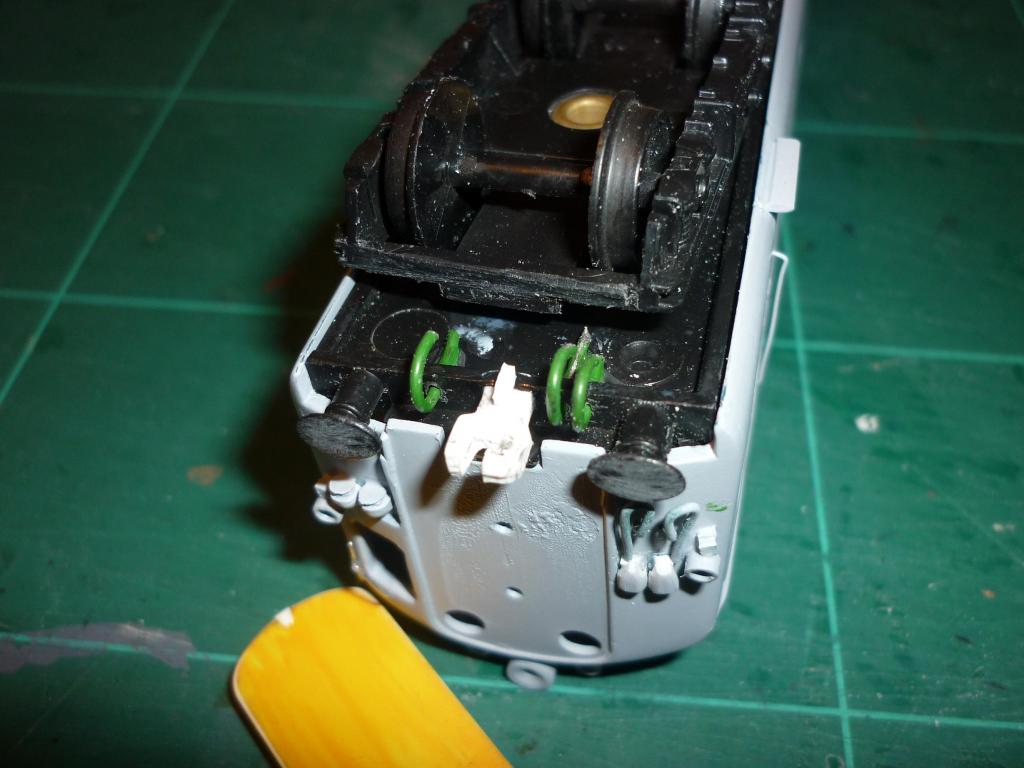
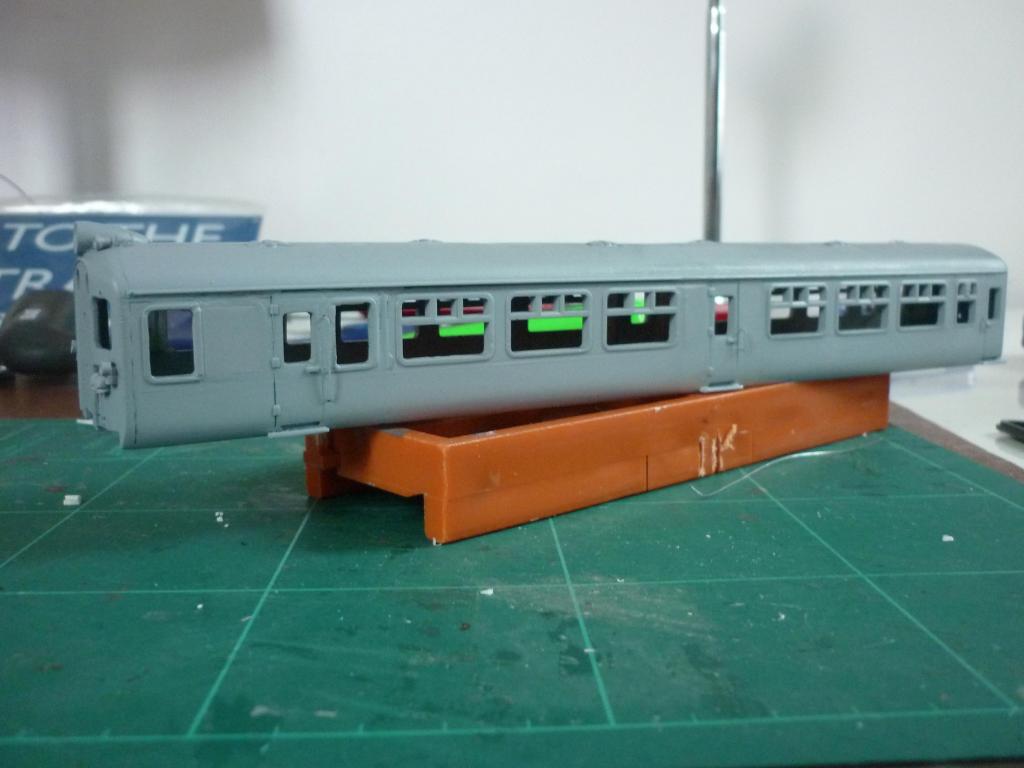
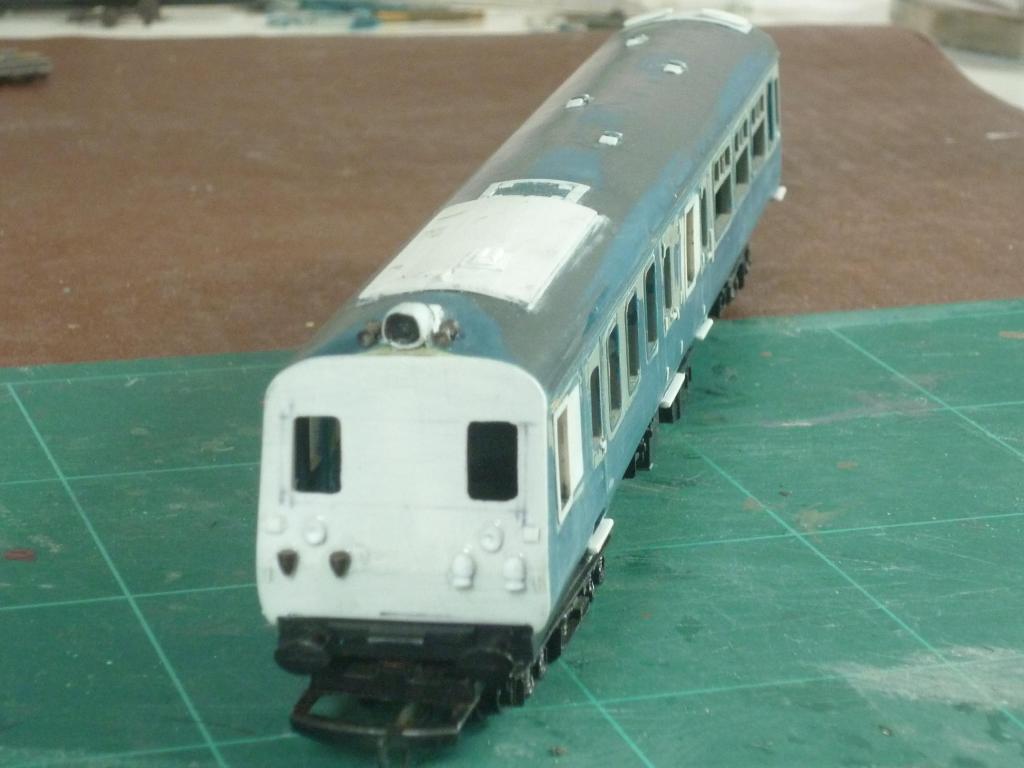
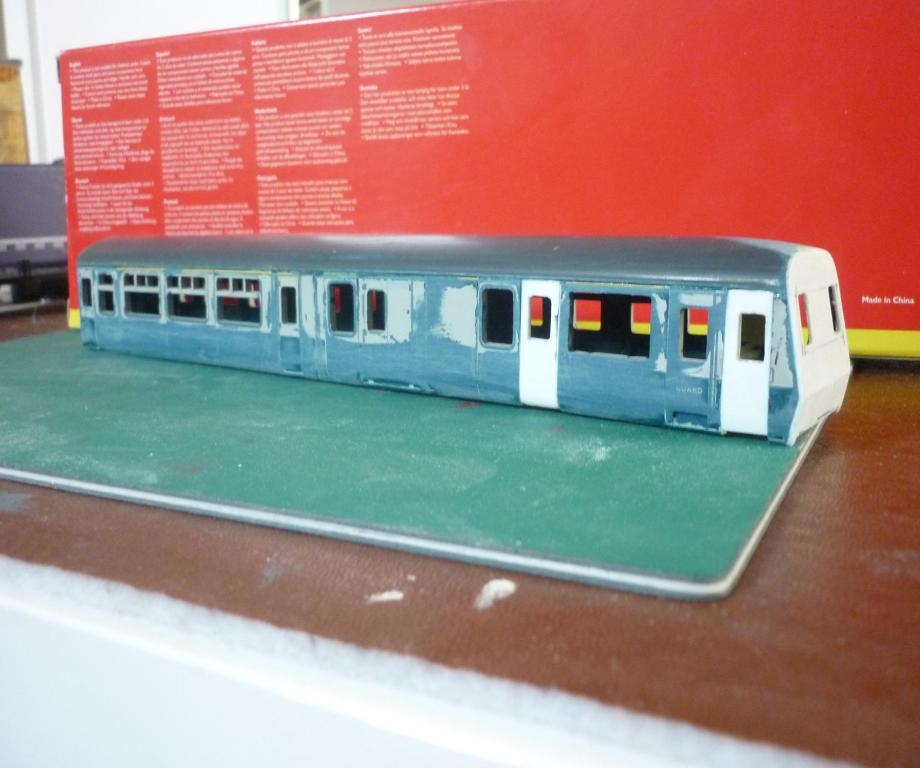
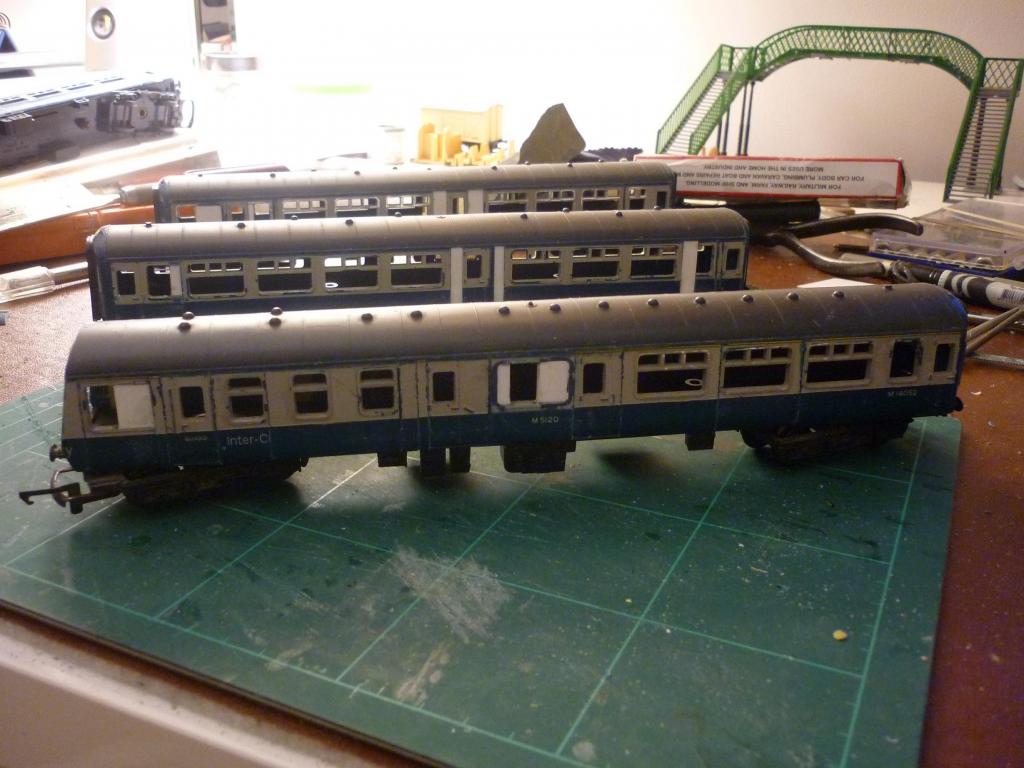
OK last job tonight, fitting buffer beam detail to the cab end of the driving trailer. Referring to pics, three 'C'-shaped loops were cut from some green florist's wire. Using a suitable drill in a pin vice, I made three suitable holes in the buffer bean in about the right places, pushed the long end of the 'C' into the hole, and secured with a dab of superglue in behind the buffer beam. The cab front jumper cables are also visible in this view; these, like the wire handrails, are just roughly pushed into place, as they will need removed before final painting. Likewise, the dangling wiper, which is just a couple of pieces of thinner florist's wire superglued together and pushed into a suitable hole drilled above the driver's front window. The buckeye coupling was made from two 'G'-shaped pieces of 30 thou plasticard, laminated together then glued in place, with some reinforcement from strip, top and bottom. I'll tidy it up a bit after the glue has thoroughly dried, tomorrow. Before that I had moved the car's cylindrical air tank closer to the rear bogie, removing a small box-like underframe fitting to make room, as the tank was previously somewhat too far towards the middle of the car. I had also made some modifications to the area at the corner of the body right under the steps, cutting away some plastic the better to reproduce the Mk2b wraparound door profile. Despite such work, on balance, I still think the Hornby Mk2a is a somewhat better basis for an 80 Class 'cut & shut' job than a Lima Mk2b, tho there's not much in it; and in both cases, the work required can be deceptive. This can be reduced a bit by modelling the trailers which didn't have centre doors, as I did for one of my own sets; but these were comparatively rare, so the centre-door cars are the more representative choice.

-
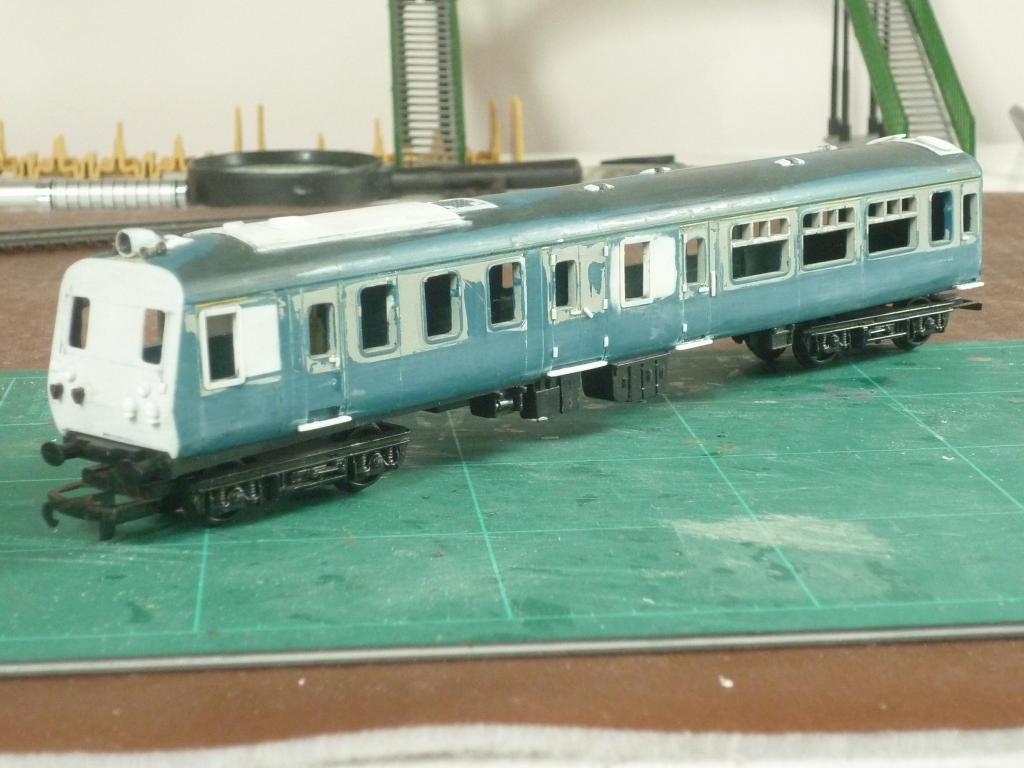
OK, time for an update on the latest progress. The driving trailer and centre car have now been primed, fitted with wire handrails and (on the cab front) jumper cables and wiper. I was unhappy with the alignment of the roof vents on the centre car and with the original, somewhat over-sized roof headlight on the driving cab, so I removed and replaced both. A corridor connection cover was cut from 20-30 thou plasticard and fitted to the cab-end component. Work on the trailer underframes has also been completed, short of putting some buffer-beam detail onto the cab end. Most existing components were cut off, as was the cab-end bogie's coupling. Air tanks and strapping were added from plasticard sheet and tube, as were such brakegear (?) components as available pics show, which seem different between driving and centre trailers (driving trailer detail shown). I'm quite pleased with the way these are shaping up. Next step will be a final coat of primer then Ford Polar Grey carspray, as the base colour for the 1990s blue and grey 'corporate' livery. Then adding some buffer beam detail to the driving trailer cab end and starting work on the power car chassis. Getting there!
-
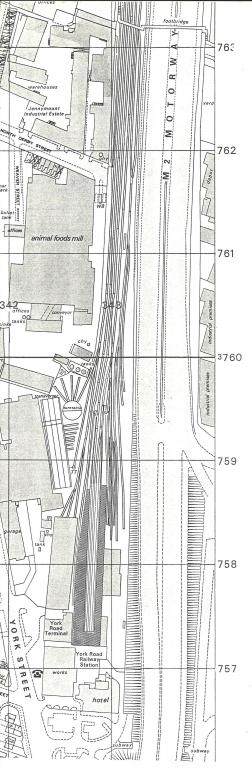
This any good? Not sure about the date but it obviously pre-dates Yorkgate, tho it's after the post-WW2 York Road station buildings were demolished; I'd say, 1980s. It's from an OS map that I got this extract copied from, in Belfast Central Library about 1992. PS in uploading here, the filesize has been taken right down but I can email you a better image if you need it.
-
Great work there. Love the hoppers especially!
-
Nice pics. Like the front end detail on A39 especially, impressive!
-
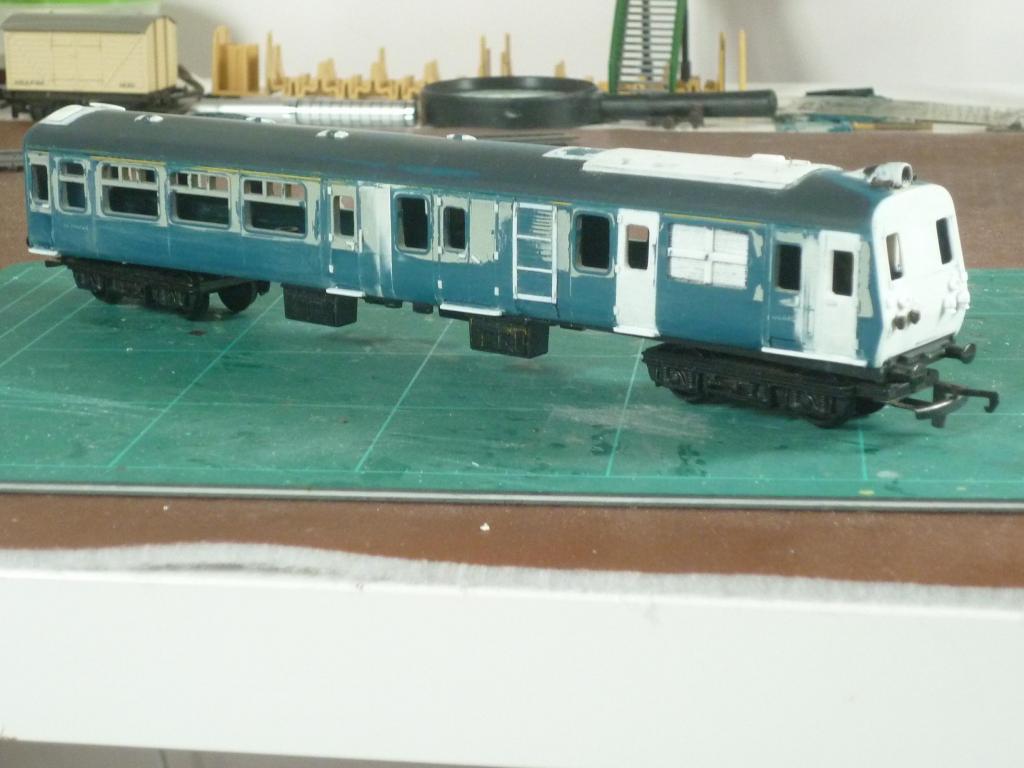
Latest pics are of the bodyshells of the power car and driving trailer, after first applications of grey primer. As with the power car, the driving trailer needed much surface detail to be restored or added, including horns, roof and cab front lights, footsteps, door handles and hinges, new roof ventilators, etc. As usual the primer showed up some spots where a bit of tidying will be needed but not too much. Wire handrails will be removed for final painting. Next step will be the same work on the centre car, then probably the underframes.
-
Nice pic - model and real-life recce shot! I suspect, tho, that the recce pic was more likely taken by a Ju86P2 than a Ju88, which developments of the older bomber by that time (1941) were still pretty well un-interceptable at the heights these pressurised machines operated, the U-2's of their day.
-
Caroline is just amazing, please post some more pics of her! The Tante Ju and jumping Falschirmjaeger too, nice low contrast between 70 and 71 upper surfaces. I see you have the good old Frog Spit XIV and V1 too. Is Bismarck the Revell or Tamiya? Haven't built one since the inaccurate but much-loved Airfix 1/600. Very nice rendition of the pre-Rheinubung Baltic scheme. Some good footage of the Denmark Straits action taken from (my fave Kriegsmarine boat) Prinz Eugen, in case you haven't seen it before, illustrating detail of how salvos were fired in action and other stuff you tend not to find elsewhere:
-
Hi Nelson and good to see you sharing your excellent models here too. Look forward to seeing your 70 Class set take shape.
-
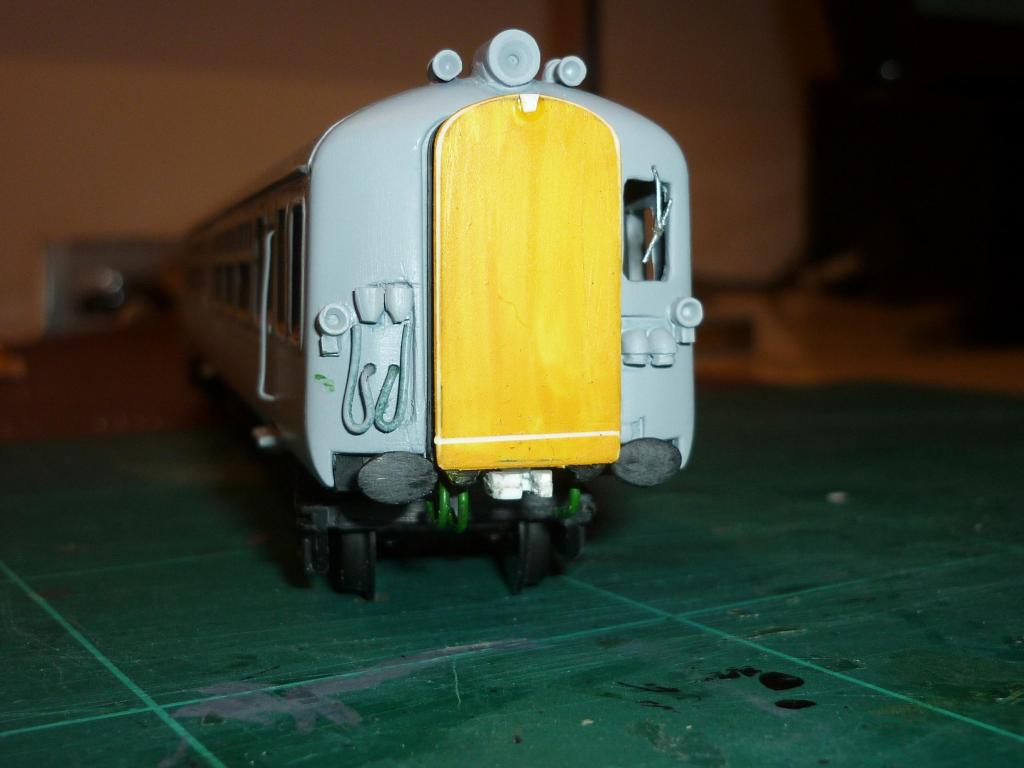
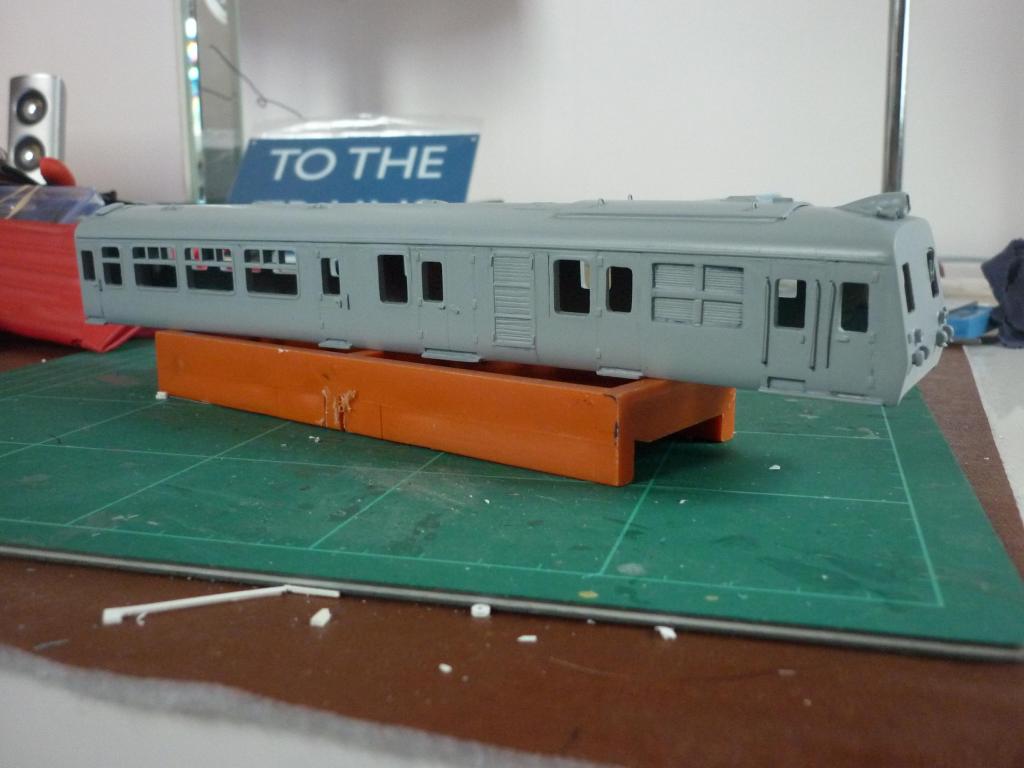
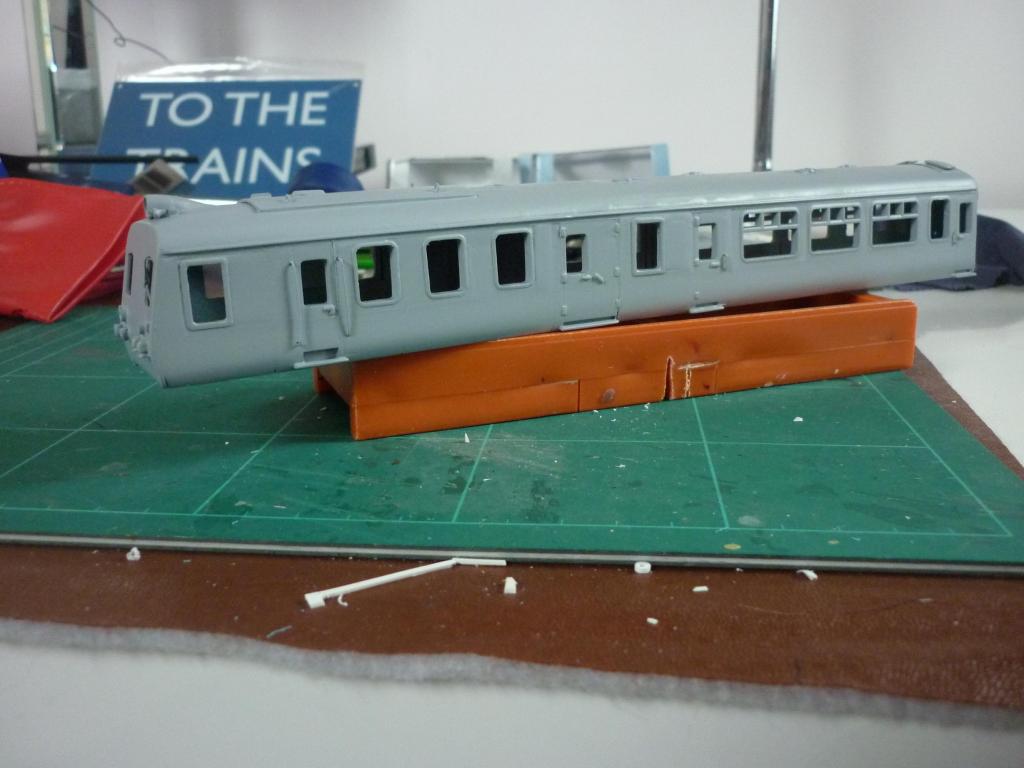
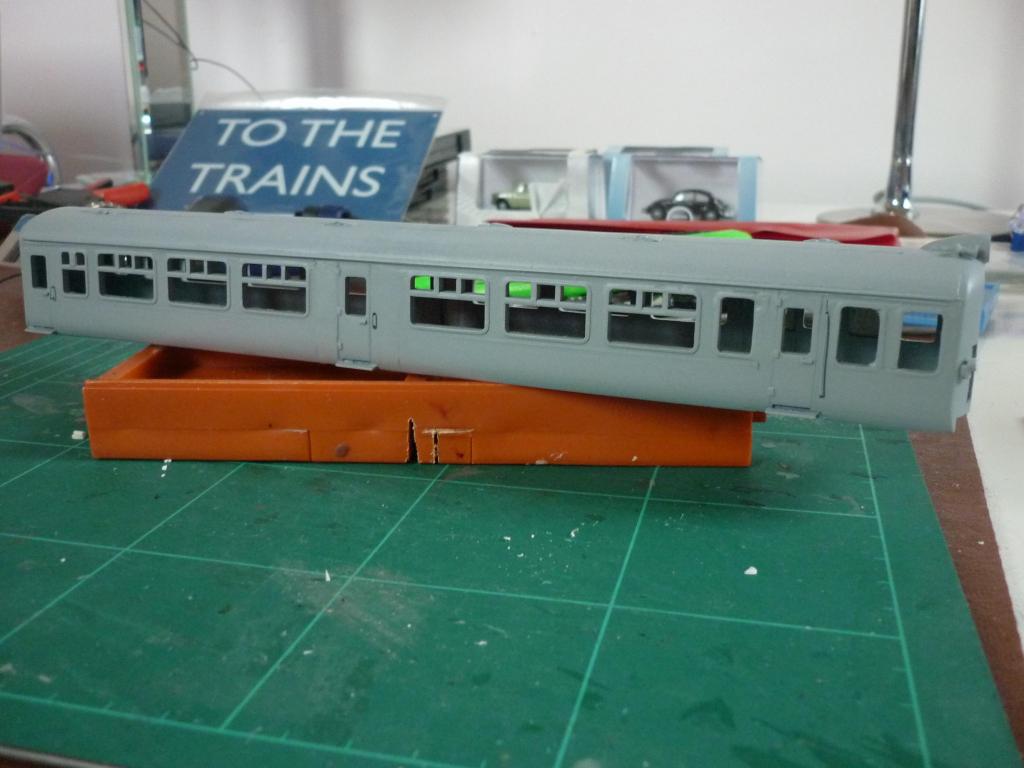
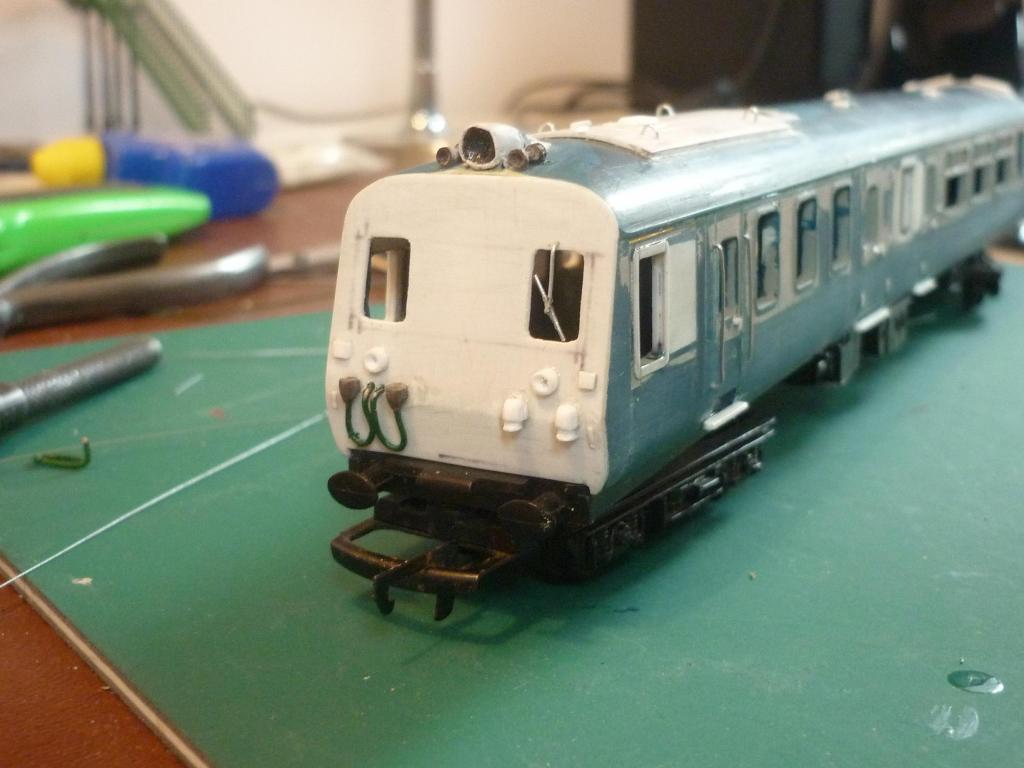
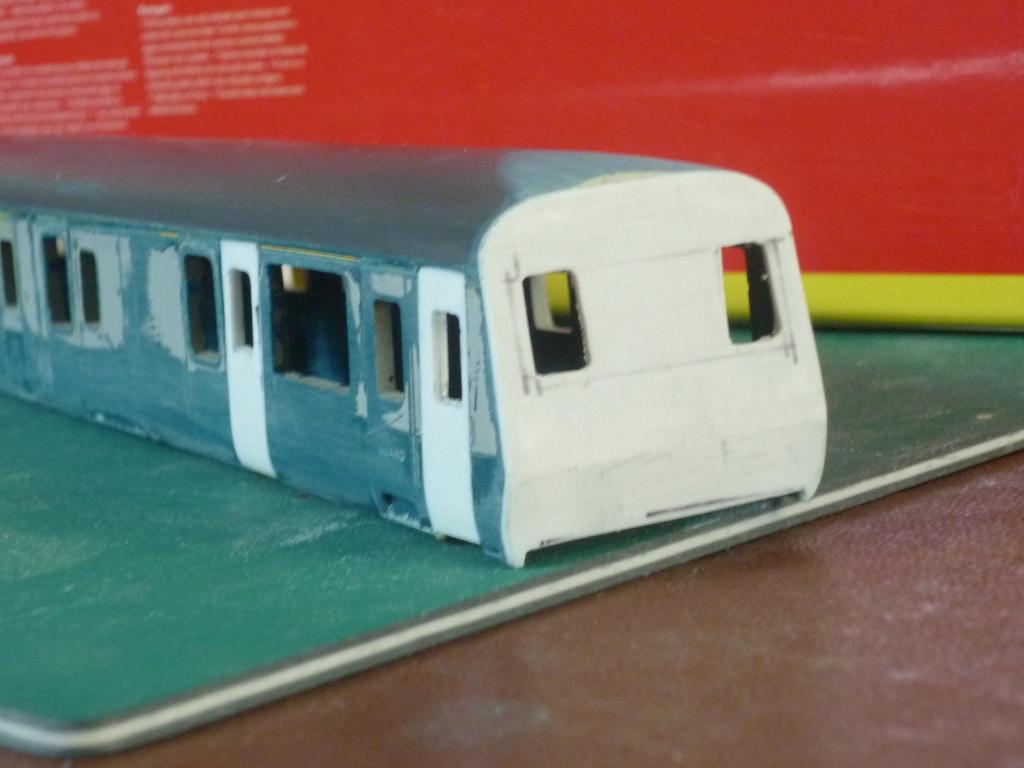
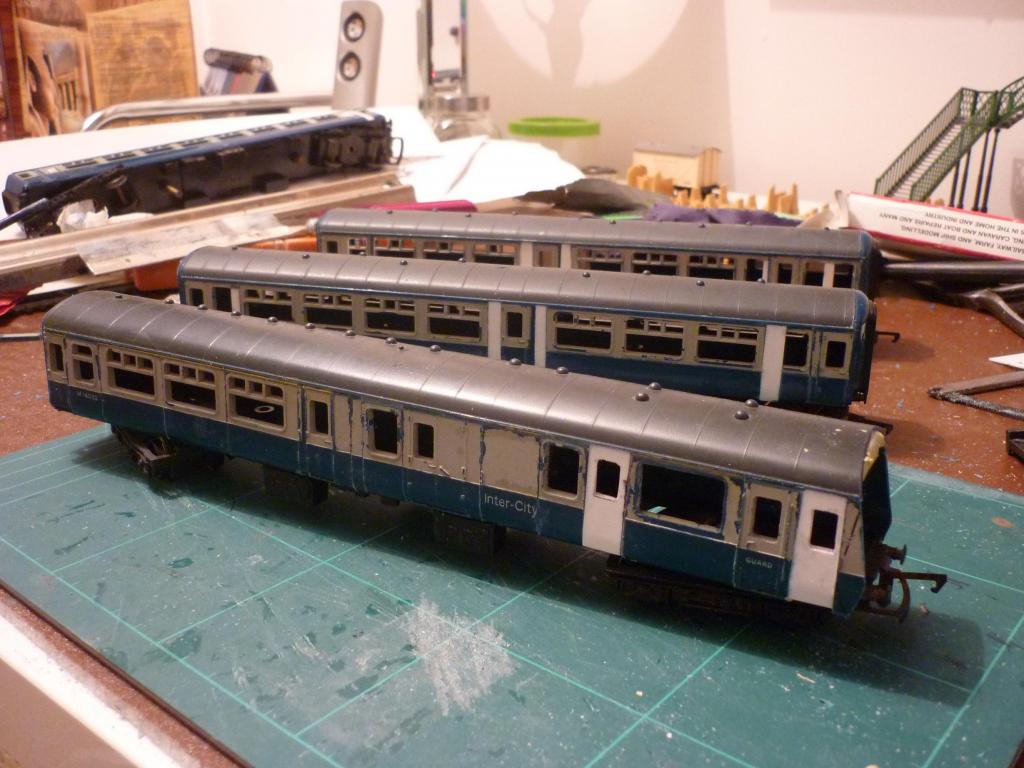
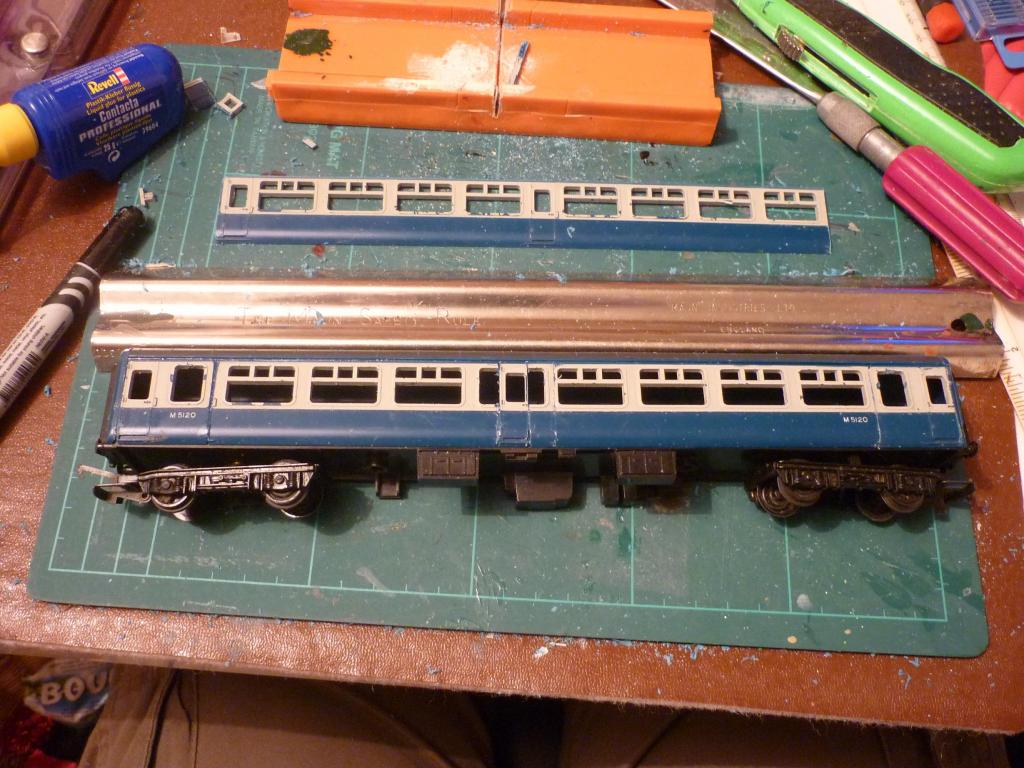
Last pics before a short break (unless I get some primer on later today). Not much is different but the cab front jumper cables have been replaced with finer wire, the sockets on the other side have been shaved and sanded down to make them slightly smaller, and tho not visible here, the plasticard strip vertical grab handles beside the passenger doors, two each side, have been removed and replaced with wire ones. All the wire bits (except the lifting lugs) are still just roughly push-fit so they can be removed for painting and finishing, hence the wonky wiper.
- 170 replies
-
- 1
-

-
- nir railcar
- nir 80 class
- (and 2 more)
-
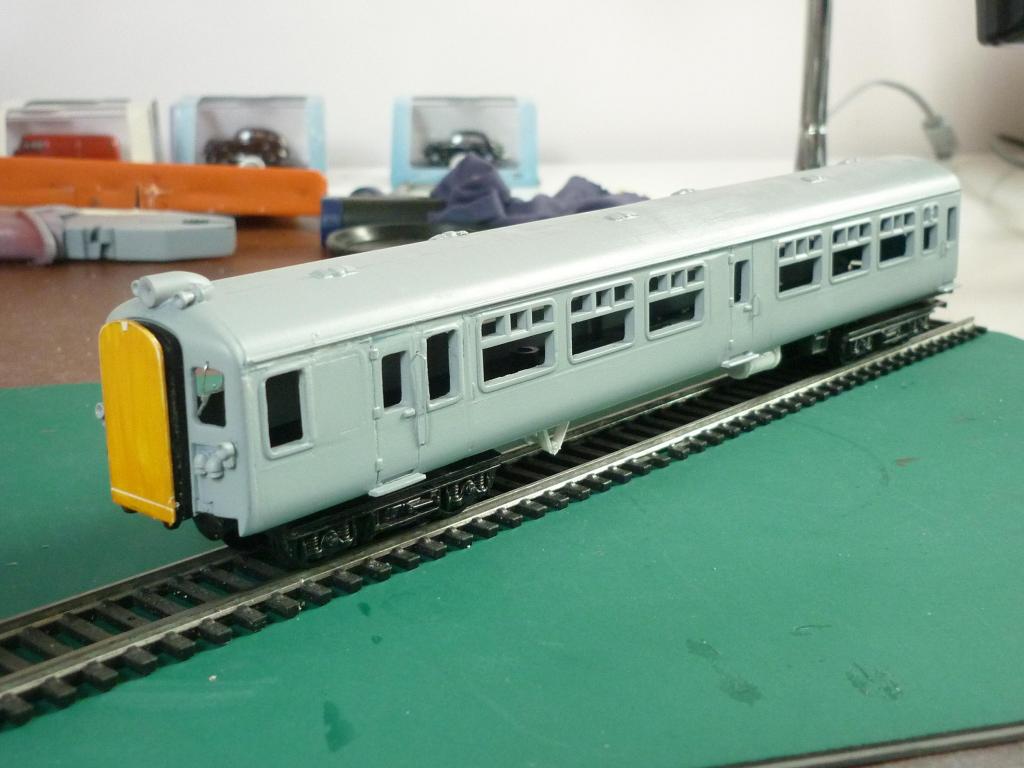
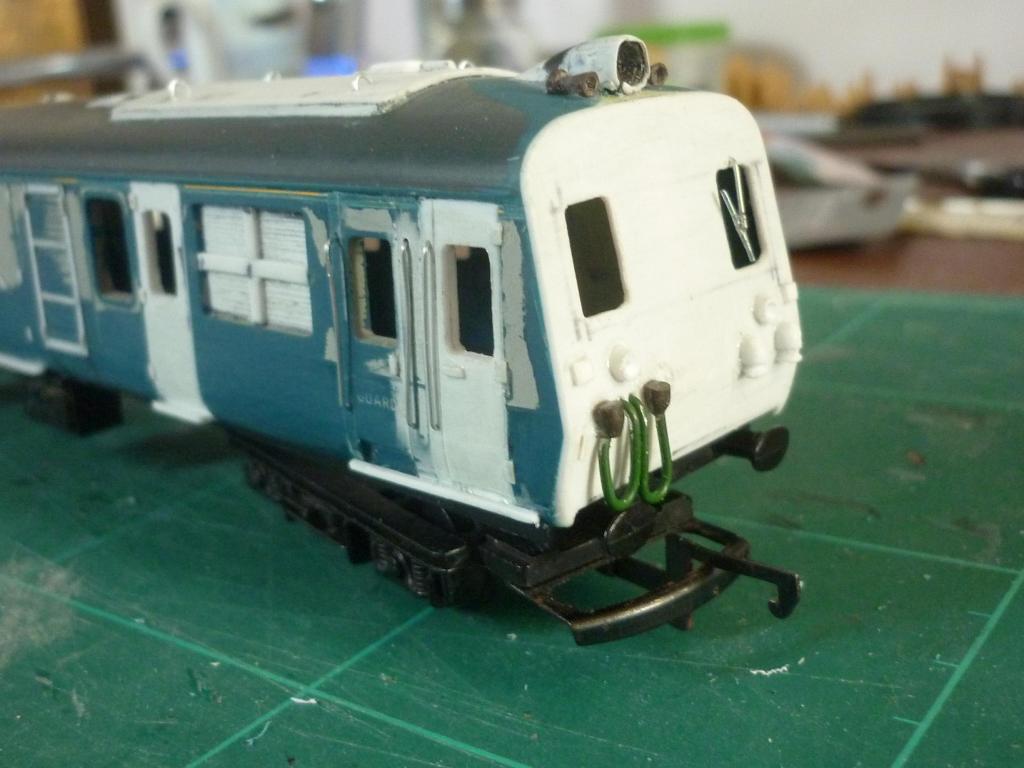
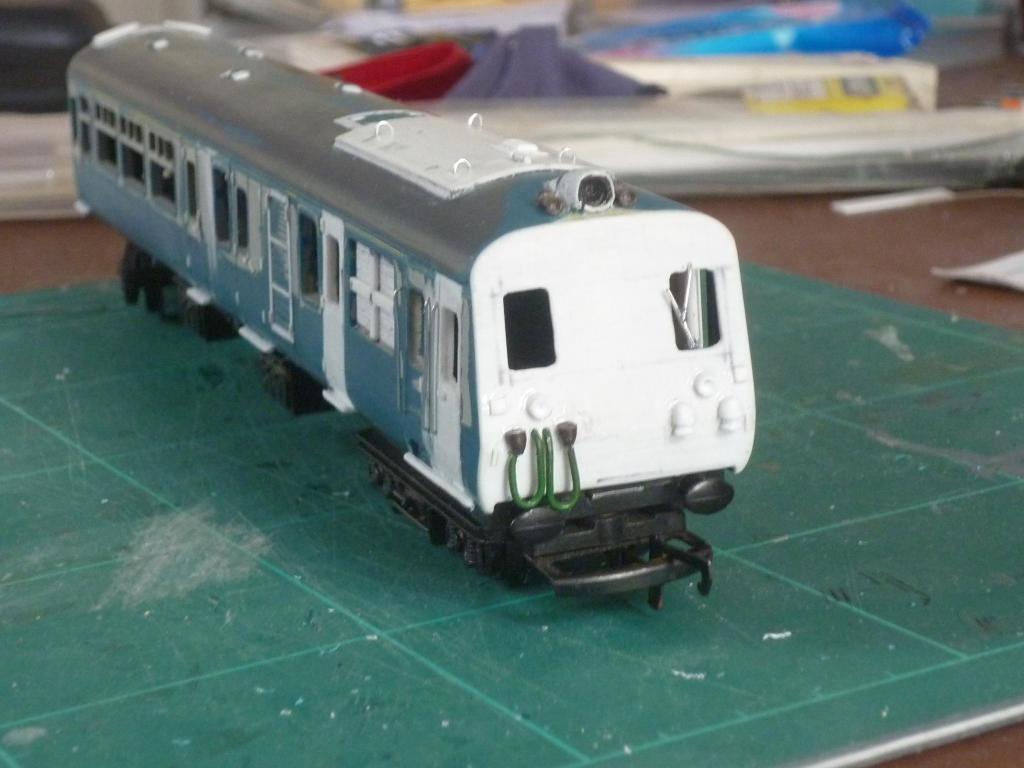
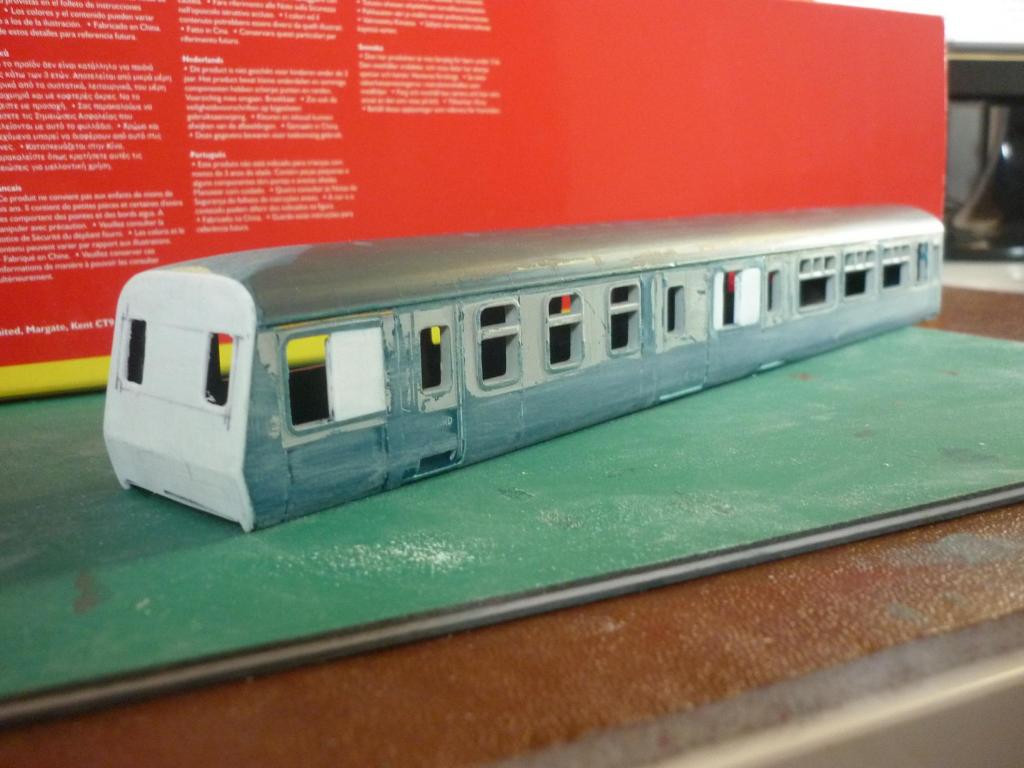
Thanks for the positive feedback, guys! Here's a couple more pics showing the wire bits added. Apart from the lifting lugs on the engine roof panel, all are just fitted loosely, pending painting and lining. The jumper cables are a little thick and I think I'll replace them with a finer wire, anyhow. As for lining, I think I'll use the same stuff I applied to the original models, Model Technics 'Trimline': http://www.modeltechnics.com/trimline.htm I may experiment with white decal sheet and computer-printing my own decals as Model Irish Railways are unfortumately no longer in business and making NIR intercity/corporate white/yellow/black/white lining decals. The Trimline is a bit thick but it's strong, looks good and is easy to apply. Finally, a Hornby Mk2a BFK 'before and after':
-
Right, here's an update on progress, which has been slow, as it's been down to the nitty-gritty, starting with the power car. The pics below show the current state of play. Basically, construction of the power car's bodyshell is complete, apart from drilling for and fitting wire jumper cables to the cab front and (florist's) wire handrails (which were plastic strip on my 1990s models, but I'm taking the opportunity to try and improve on these a tad). 'Fiddly' isn't the word, to describe the work. Door handles and hinges had either been mostly sanded back during construction or were hinged in the wrong place (in the case of the end doors, as the Mk2a coach I'm using for a base lacks the later 'wrap around' doors. Every one of these had to be smoothed over and replaced with tiny pieces cut from different sizes of plasticard strip and carefully lined up and glued in place. A couple of frames for the half-windows needed rebuilt from thin strip. Thicker strip restored the footboards, which had also been sanded smooth during building work. On to the roof. Headlight was a shaped biro offcut with a plasticard 'sleeve' on the forward section and horns were cut and shaped from plastic kit sprue (I managed to make these a bit finer than my last effort). Engine compartment top panel was 30 thou plasticard with a train radio antenna (?) and behind that the offset exhaust, both formed from more of the same material. Behind that again, a square was scribed to represent mesh and framed by thin plasticard strips, to produce the fan cover. Roof vents had been removed with a sharp knife before the roof itself was sanded smooth. Four of the removed vents were now replaced in a staggered double file, in what I judged from photos to be the the correct positions. These were flanked fore and aft with small plasticard rectangles and each vent filed and sanded to produce something approximating the correct appearance (a low, flat-topped disc with a small 'ramp' or fairing front and rear of it). Few people who model the 80 Class seem to bother with such detail (or modify much or any of the underframe detail on trailers or even powercar) but as they say, 'every little helps'. To the rear of the roof, a rectangle of thin plasticard produced the base for the twin 'mushroom' vents, each made from two rectangles of plasticard: a smaller one of thinner stuff below and the bigger one, overlapping all around, on top. Om the right-hand side of the body, an insert of scribed plasticard with strips for the cross-framing formed the front grill. The rear grill was scribed in place and then framed with thin strip; it's not perfect but it's a better job and sits flatter than my original efforts. Detail was then added to the cab front. Headlights were little discs cut from a plasticard rod after the front face of each disc had been reamed out with the tip of a modelling knife to produce a dished effect. Outside these, left and right, two little plasticard squares formed the red tail lights (I'm building early 1990s configuration, here). Lamp irons, low down each side, were just little plastic strips. Jumper sockets were sanded and scribed on plastic rod then cut free, tidied and glued in place. The tops of the jumper cables were made the same way, but from the same brown plastic kit sprue I used for the horns. Jumper sockets were also added to the read on the RH side of the corridor connection but these were flatter, low-profile versions, as they are much less visible. In the pics she's sitting in the original floor unit so is still 'up by the bows'. This will be replaced and suitable details provided, of course, and front buffer bean will also get a decent amount of detail. Rear buffers will be cut off as only the cab ends had these on 80 Class cars. Thank goodness the driving trailer and centre car bodyshells will be a lot easier to get to this point! As with the bodies, it's the detailing of the power car that accounts for the major part of the work on this stage of the project. Getting there!
-
Used Milliput (two-part) putty for inside the power car cab roof, happened to have the stuff handy. Externally, now using some Squadron 'White Putty' which (in it's former 'Green Stuff' incarnation) was my preferred medium from years gone by; this seems more suitable for 'light' filling where adhesion (but not so much hardness/strength) is needed.
-
Hi Chevron and welcome! I'm no expert in layouts but your choice of track plan for 4'x4' layout looks like a good one. There's a decent amount of siding space, and the potential to run your train out of one station, round the circuit, then into the second, then back again, with a second one sitting isolated in the 'passing loop' (the section of track on the far side of the platform in the top right-hand station), ready to move out when its turn comes. small means there's a good chance of getting it finished and up to whatever standard you're aiming for, in a shorter time. Don't worry a bit about modelling on a budget, or about buying what you can, when you can, secondhand at shows, swapmeets or on eBay. The older models you often find there are generally cheaper, can run nearly as well as the fancy modern ones, and while they will not be as detailed or accurate, they also have fewer bits to come loose and disappear, when handled or run. Equally if you're wanting to run some local stock, go for it! No need to feel thwarted, or stuck with British Railways/LMS etc etc, 'cos the budget doesn't extend to rakes of Cravens coaches, brass kits or ready-to-run Irish diesels. If you can make and finish a plastic kit to a standard you're happy with, you can also modify cheap models to provide 'near enough' replicas and thus have local trains running on your layout. For example: 1. Get a second-hand Tri-ang 2- or 3-car Diesel Multiple Unit (DMU, or 'railcar'), like this one: http://i619.photobucket.com/albums/tt278/pangolin44/May_13/R7_C.jpg Cut away the two pillars either side of the front, driver's windows, then glue one of the pillars back, in right in the middle. You now have a close approximation of a CIE or Great Northern AEC railcar, which you can paint 'black and tan', or in Great Northern blue and cream (or even in UTA or NIR colours, as the latter inherited some of the GNR(I)'s AEC railcars). Second-hand Tri-ang 9" coaches make good trailers and are cheaper that the purpose-made and rarer Tri-ang DMU centre cars. Yes it's not really accurate but it'll look the part. While the Silver Fox Models AEC railcar is much better and finished to an extremely high standard, it is still a repainted British Railways railcar. A 3-car railcar set composed of models like these (which are somewhat shorter than real scale length) would fit quite well onto your planned layout and would make a great 'entry-level' Irish diesel train. A lot of more experienced modellers started off like this and there's no reason you shouldn't. 2. For a steam loco, get an second-hand Airfix Class 4F 0-6-0 tender loco, like this one: http://www.rmweb.co.uk/community/uploads/monthly_12_2011/post-6680-0-05803300-1324299887.jpg You can just repaint it black to lose the markings, or if feeling a little more ambitious, sand down the 'square' corners to the firebox (eitehr side, ahead of the cab) to match the profile of the cylindrical boiler (put some model filler into the corners from the inside, if there is a risk of sanding through). You now have a pretty close approximation of the GNR(I)'s big goods loco of the SG Class, like this: http://farm8.staticflickr.com/7248/6851548240_27998e8ec7_m.jpg'>http://farm8.staticflickr.com/7248/6851548240_27998e8ec7_m.jpg With either model, you can improve the resemblance by a bit more surgery or the use of some easily cut and glued plasticard. Cheap, second-hand Tri-ang-Hornby Mk 2 coaches can be repainted in CIE, IR or NIR colours. Other coaches like Hornby or Airfix 'Stanniers' (the Airfix ones are much the better models) can be repainted to serve as earlier coaches, as used by CIE, GNR(I) or UTA. Graham Farish 'suburban' coaches and Mainline or Replica Railways LMS 'panelled' coaches are other models available second-hand, which can be repainted to provide decent look-alikes for Irish coaches. 3. There are a few diesel trains you may be able to get cheap, that don't look to bad if repainted into local colours, especially if you are prepared to do a little surgery: - the Tri-ang-Hornby 'Hymek' repainted maroon or sky blue bears a reasonable resemblance to the NIR Hunslet (a long time ago it was actually released in CIE 'black and tan' with CIE roundels!). Glueing a rectangle of plasticard over the centre pillar between the cab front windows and fitting a short ring cut from the likes of a pen barrel towards the top like the large light carried there, would improve the resemblance further. - the likes of a Lima Class 33, 26 or 27 could serve as a CIE C/201 Class, again better still if you modify the windows; - the Lima or Hornby Class 47 is good a bit too long but with a wider pillar between the front windows, could serve as a CIE A Class. There are sources for transfers/decals for things like CIE roundels that can help. - by basically drawing and then cutting out basically rectangular shapes from thin but strong and easily-worked 30-thou plasticard, you can make your own bodies for any suitable second-hand chassis you can get cheaply, cutting the chassis down the middle and shortening if necessary. If you can manage that, then you can make much more accurate replicas; not up to the standard of that you can buy as a kit or ready-made, but much more cheaply - see my article, 'Modelling the Metrovicks', here: http://farm8.staticflickr.com/7248/6851548240_27998e8ec7_m.jpg - look at the 'Workbench' projects here for inspiration; there are plenty of great tips and projects and they don't all cost the earth or require us to be born clutching a soldering iron (or a wad of dosh!); - study photos you can find online, especially on sites like flikr, of Irish railway wagons, and find models which resenble these and that you can look for cheaply, second-hand. Typical examples are conflat (CONtainer FLAT wagons), 4-plank wagons, and BR 4-wheel plywood vans with the distinctive, ribbed pressed-steel ends. Good luck with the layout - why not keep us posted by posting some pics of your progress on the 'Layout' section? Would be keen to see how you get on, it looks like a good project. My layout, such as it is, is still under construction and is a modified Hornby plans book double track loop, constructed about 50% second hand Hornby track, the rest might as well be having been bought 20 years ago! Having had to sand thru to bare metal (steel too, none of this nickel-silver stuff) to clear many of the rails, I'll probably spend a lot of time cleaning it and running is never going to be stellar but it works and looks ok so far. Hate the black Hornby sleepers but a wash of brown woodstain took care of that.
-
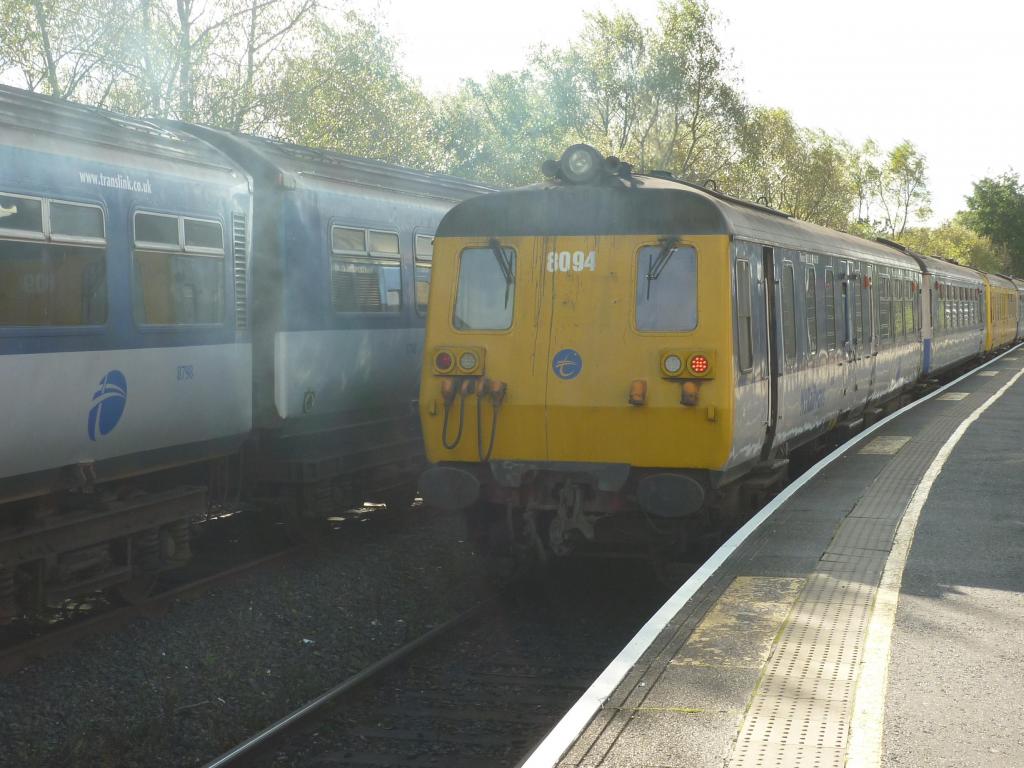
Don't recall seeing this. The MPDs started with a pair of horns under the buffer beam but in the mid-1960s, these moved to the cab fronts, side-by-side, pointing down & mounted just above the window. They had moved to the roof by the 70 Class, even for the driving trailers. MPD power car: 70 Class driving trailer: Even in their final guise, as Sandite trains, the 80 Class, while some cabfront fittings had changed, still have the horns are still 'up top', from what I've seen. I think 8094 has had the 'bannana treatment' since i took this pic and is resplended in eye-watering yellow overall. Central Station, 11 March 2013:
-
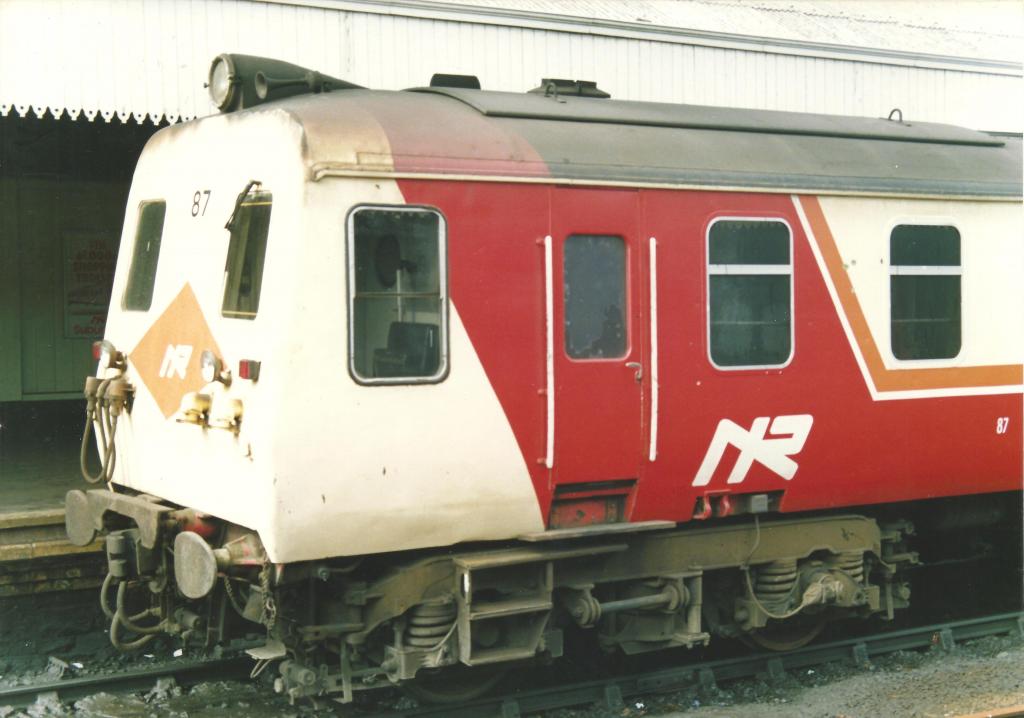
Was planning on casting some cosmetic sideframes from a Lima Class 33, which I think are the same (BR B6, IIRC) Bangor, May 1991
-
You mean this one? http://www.irishrailwaymodeller.com/showthread.php/625-GVS-and-Adelaide-lookalike?p=31213&viewfull=1#post31213 Interesting comparison with the maroon Hunslet in the pic above; both great models.
-
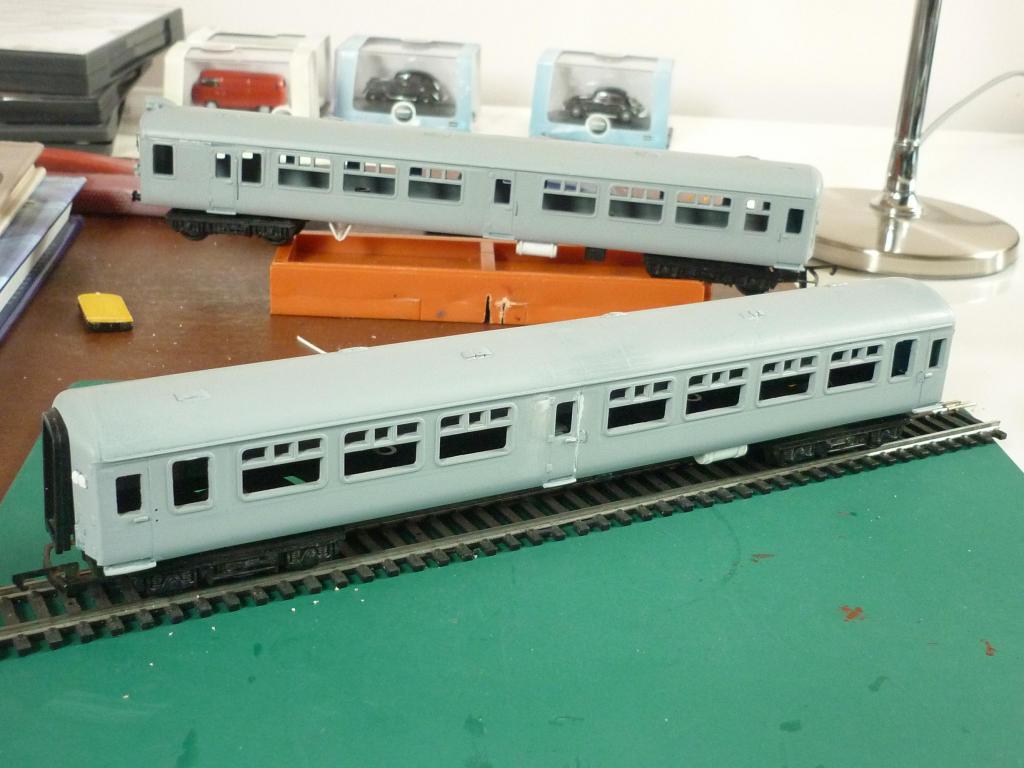
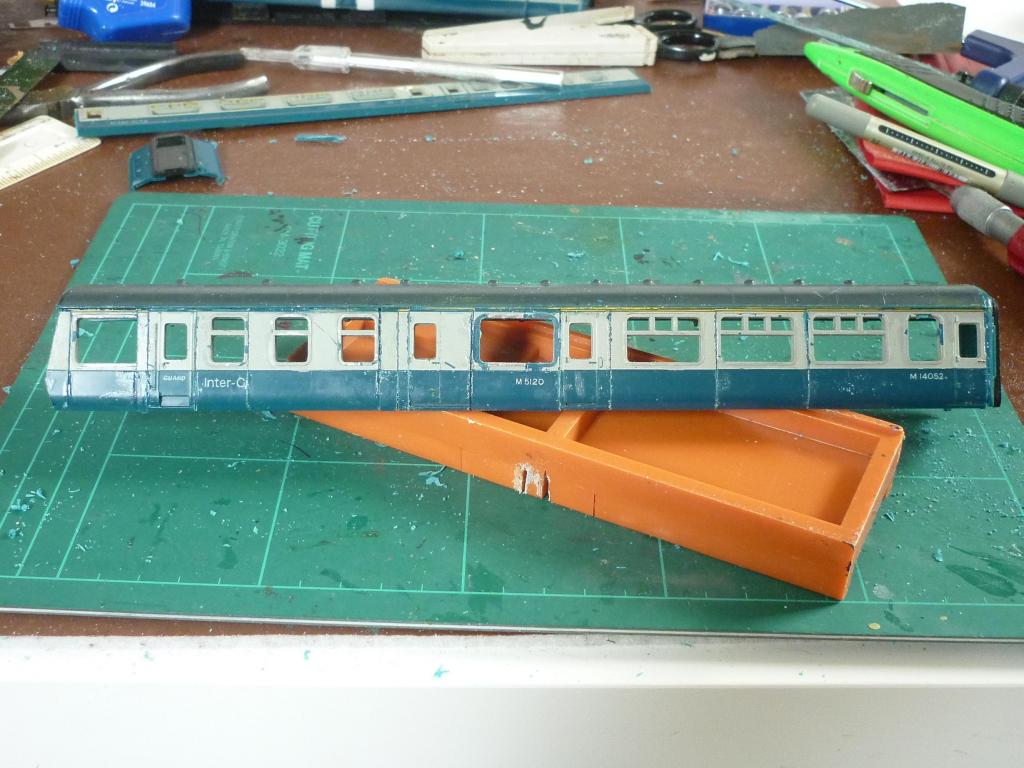
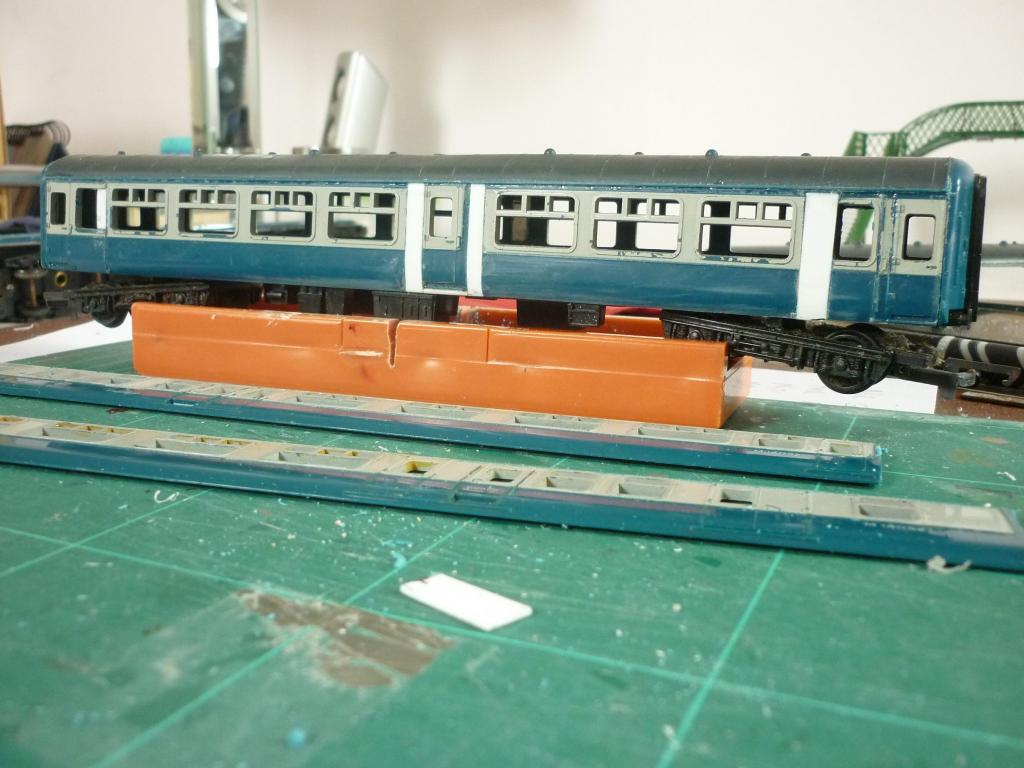
All three cars have now had roof detail removed, filler applied where needed and sanded down, ready for door lines to be scribed and then surface detail added/restored. I couldn't resist setting the bodyshells onto the as-yet untouched underframes and plonking them onto a bit of track, even tho the power car cab end sits a bit high. I'll post some more pics of the individual cars once the detailing has been applied and before undercoating, which will be with car aerosol grey primer. I suspect that I will need to ream out the inside of the window frames for the flush-glazing to fit properly, I must check that out before spraying.
-
Very nice - in a grimy sort of way. The livery suits her well!
-
Thanks for the positive feedback, guys! Here are some pics of the power car after the most recent session. Apart from the cab front, not a lot appears to have happened, but appearances are deceptive. I cut a rectangle of 30 (?) thou plasticard to a rectangle slightly bigger than the opening at the cab front, lined up the lower edge, and liquid poly'ed it to the front. Then trimmed it back, and began the laborious process of filing and sanding down the front of the roof, until I decided the slope and profile was about right. Some strips of plasticard were added across the inside of the lower cab front, for re-inforcement, well below the window, so the glazing would be reasonably flush when fitted. The roof ventilators were then cut off, and the roof itself sanded smooth. The cab front windows were then cut out carefully with a #1 modelling knife, with pics and one of my previous 80 Class models as a reference. Finally, the sides were sanded down with coarser then finer sandpaper, exposing the areas which would need a bit of filler. This will be the next job, then surface detail will be restored - door lines scribed and their fittings added, roof fittings, steps, grills etc. Long way still to go but she's getting there.
-
Some pics of this weekend's progress, mainly on the 80 class power car. Long job, because sides of the donor Hornby Mk2a BFK need more or less completely sliced up and reassembled. Like the centre car and driving trailer, for now this is still sitting on the original floor/underframe unit & bogies. It has had the corridor end cut away and filler applied under the inside of the roof, to permit sanding down to meet the flattened cab front roof. Next job will be fitting the cab front itself, at which point it'll begin to look like something resembling the prototype instead of a refugee from the breaker's yard, which is always a morale-boosting point in the project!
-
Here you go: http://www.rmweb.co.uk/community/index.php?/topic/75835-part-work-mk1-coachs-into-cie-green-livery/
-
It's a bit dated now, from well before Murphy Models (tho before kit and accessory makers Model Irish Railways folded) but you may find some interesting tips here, including some early modelling articles by Steve Johnson, co-author of the modelling book mentioned by murrayec; http://newirishlines.org/archive-2/ Some other useful links: http://www.studio-scale-models.com/Index.shtml http://www.provincialwagons.com/index.html http://silverfoxmodels.co.uk/category/northern-ireland-railways-2/ http://silverfoxmodels.co.uk/category/irish-railways-iarnrod-eireann/ http://www.worsleyworks.co.uk/WW/Irish_List.htm http://www.murphymodels.com/ PS best places to start on this site for info and inspiration, I would suggest, are the sub-forums 'Workbench' and 'Layouts'.
-
For the project I'm using two Hornby Mk2a open seconds, and one brake first. The latter needs quite a bit of work as the passenger windows are too widely spaced and need that bit more 'cutting and shutting' to get the right layout. Anyway, here's the centre car again, from both sides, showing the 3+4 window layout with the extra door in between. When you're digging a hole in the garden you always seem to end up with a greater volume of soil than came out of the hole. Conversely, when 'cutting and shutting' a coach model, I usually seem to end up with less length than I started, if you see what I mean. As usual, some plasticard sheet filled in the gaps. The driving trailer was next. This is similar to the centre car, except for one passenger window less at the end which has the corner cab. It needs a fair bit of surgery to reproduce the asymetrical window layouts at the cab end. Next job will be the power car bodyshell, from the Hornby Mk2a brake first. Then I'll do the finishing and detailing on all three vehicles. Next the underframes, where most of the existing components will need removed and replacement fittings added. Interiors I'll probably leave till after that, ahead of the paint jobs.
-
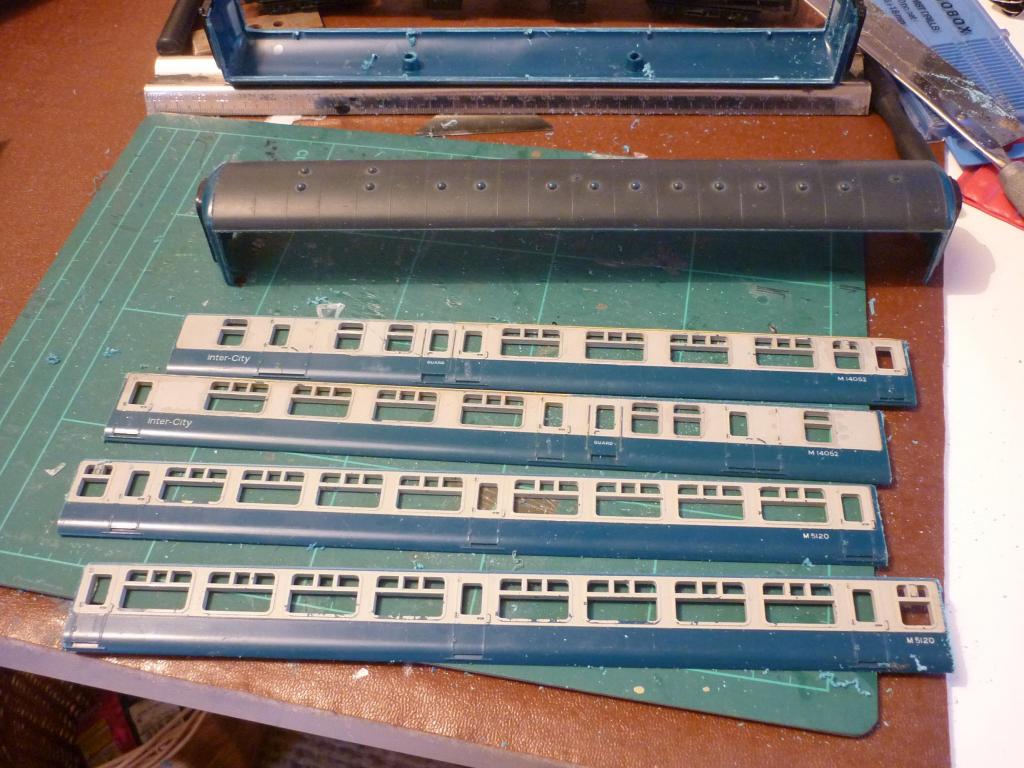
About 20 years after my first attempt at these, I've recently started another set for member TrainModel. For reference, I use mostly the pics I took in the early 1990s, of sets in red and cream 'suburban' livery, grey and blue 'intercity' livery, or the latter with 'intercity' branding removed which replaced both when the sectorisation of NIR was abandoned. To my eye, the sets looked best in these liveries. Most of these pics, I've uploaded to Flikr: http://www.flickr.com/photos/33lima/ First time around, as described in 'Irish Lines' #3 (https://www.dropbox.com/s/ci3elrw2itkh88t/Irish%20Lines%20-%20Issue%203%20-%201993%20Spring.pdf ) I used Lima Mk2b coaches as a basis. This time I'm using Hornby Mk2a's, which are more readily available than the Lima second class. Tho the latter's 'wraparound' end doors are in the right position, as you need to hack the coach sides, it's little trouble to hack and reposition the doors while you're at it. The Hornby coaches have the sides and ends moulded to the roof and this provides a better basis for re-assembly of the sides after 'cutting and shutting', than the Lima coach, whose sides are moulded to ends and a false floor, with a hard-to-prise-off roof made of brittle plastic which also forms the thick glazing pieces. I used a common-or-garden Stanley knife to slice the sides just under the gutters; repeated steady cuts, freehand but with the gutter acting as a guide. Then a vertical cut at each end, with a razor saw. Below is the centre car, with one side re-assembled on the roof/end piece, and the remains of the other side awaiting cutting, sitting above it. Setting the underframe/floor back in place before the liquid poly was completely dry, helped keep things liked up.