Robert Davies
-
Posts
312 -
Joined
-
Last visited
Content Type
Profiles
Forums
Events
Gallery
Blogs
Everything posted by Robert Davies
-
What the? http://www.ebay.co.uk/itm/160922281024
-
I don't think Dave's quite let you off comparing him to a gorilla in the google earth thread...
-
The postage to the UK is madder still - and to cap it all he's away until a week after the auction finishes so you won't be getting the item terribly quickly either...
-
Making the best of a space...suggestions ?
Robert Davies replied to aramand's topic in Irish Model Layouts
....or even a concertina type door? ....or a sliding door (outside the room)? -
Making the best of a space...suggestions ?
Robert Davies replied to aramand's topic in Irish Model Layouts
I'm not much liking the second plan. Say you have a three coach plus the engine train in the terminus station, when it leaves and goes out into the loop, it reach almost halfway around the circle and look a bit daft doing it - finally to get back into the terminus you'll need to do a 'Killarney' and reverse back in. The first plan is much better, with trains getting room to go 'somewhere'. Further, you could make use of elevation changes to 'hide' the fact that a couple of the stations are very close together. -Rob -
Aye Eamonn! The job was definitely good for spotting and seeing the unusual The knack being to keep one eye on the road to avoid being part of the unusual yourself! -Rob
-
I was just looking at your timber wagon, and thought it looked pretty OK to me - p'raps it could've done with being built on a longer wheelbased chassis, but all the elements are there ...and it's all yours! -Rob
-
Oops! Tom, sorry, they arrived on Friday morning, and I clean forgot to drop you a line to let you know. -Rob
-
Thanks Frank, and everyone else who've made comments RE: Kibri motorising instructions. None whatsoever Frank I'm afraid, which is a little curious in that some of the Viessmann mechanical models, I'm thinking of their motorised tamper in particular, are based on the Kibri kits. Kibri being part of the Viessmann company of course. That District Manager of the CIE at Cilldargan does seem to get away with a lot -Rob
-
http://www.ebay.co.uk/itm/murphy-models-bachmann-railways-/300813513141 This one's showing on UK ebay at the moment if it's still needed. -Rob
-
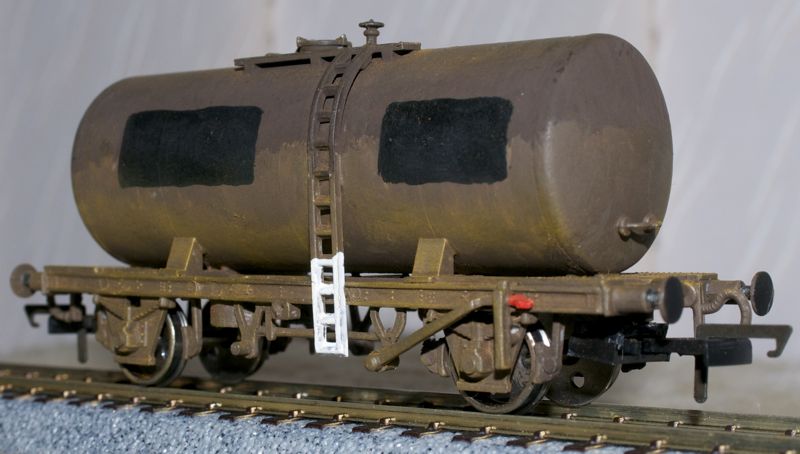
Dapol Esso rail car* Dear God! Where do I start! Shall we just say that this 'kit' has been on the market probably longer than I've been alive (I'm 47). Just about everything plastic-wise in it is bowed, warped or out of true. In the end I made a start by constructing one entire end of the chassis, clamped it, let it set, and twisted the other end to bring it into 'true', glued it, clamped it, and put it on one side. When I came back to it it still managed to develop a twist, but a quick dunk in hot water and a bit of manual tweaking sorted that out. The kit is supplied with some very nice quality wheels. The tank was glued, trued and fitted, with the holes where the 'Esso' board should be, filled. It all went together quite well after the chassis nightmare. Paint. Having looked at numerous examples in photos and on youtube, it became apparent that the condition of these wagons is about two shades away from being condemned ie. Rust and filth with a covering of more rust and filth - I threw some paint in the wagon's general direction, and followed that by sneezing some weathering powders over all. I really ought to get in touch with Weshty to get some transfers sorted out. -Rob ps *A good mate of mine worked in the local refinery and frequently admonishes me if I call them 'tank wagons', they're 'rail cars' in proper parlance apparently.

-
I believe not, but will await confirmation from Iarnrod. -Rob
-
Under the weather.... I recently got the offer of a Dapol pocket wagon for much cheapness, so I thoughts I'd have a go at weathering... I mixed up an enamel wash of one part matt black to twenty-ish parts of enamel thinner. I applied the wash, and as it dried I, with a reasonbly dry brush, brushed downwards through the wash to give the impression of rainwash down through the accumulated grime. When it was all but dry I dusted some Tamiya weathering powders across the the sides to pick up on the highlights - and also dusted alittle 'rust' to suggest brake dust. It isn't perfect by a long way but I can see where to improve - the container is factory fresh to highlight the difference between it and the wagon. Stepping aside for a moment.... I took up modelling the Irish scene for a number of reasons, living in North Wales, I'm nearer Belfast than Cardiff, and I'm nearer Dublin than London(!) - I have a terrible weakness for GM diesels, I wanted to have a crack at building rolling stock, and modelling Irish railways, you don't have a lot of choice in the matter! I took up modelling for another reason. Some years ago I was a Postman and loved the job, however one day I was held up in an armed robbery - shotguns, machetes, the whole nine yards - and afterwards, despite giving it my best, I got medically retired. Suicidal depression took a serious hold, and my wife suggested I try model railways - a decision we'll look back at and laugh about, one day(!) A few years ago I used to subscribe to RailExpress magazine in the UK, a 'modern image' magazine that used to devote a four or so page section per month to Irish Railways' news - a section I found myself paying more and more attention too with it's mention of 201s and 071s and 141/181s.... I can't work out what the attraction is between the modern and the dilapidated but the Irish rail network had it in spades. Moving on still further, I made my way here - the single best thing that stands out here, is that people here are prepared to recognise effort, that people have tried their best. Because of my depression, I sincerely believe that everything I do is rubbish - I'm not playing for praise, I just see no merit in anything I may have achieved - but there was Anto leaning on everyone to show what we'd all been doing, so it's his fault, and I'm also blaming him! -Rob
-
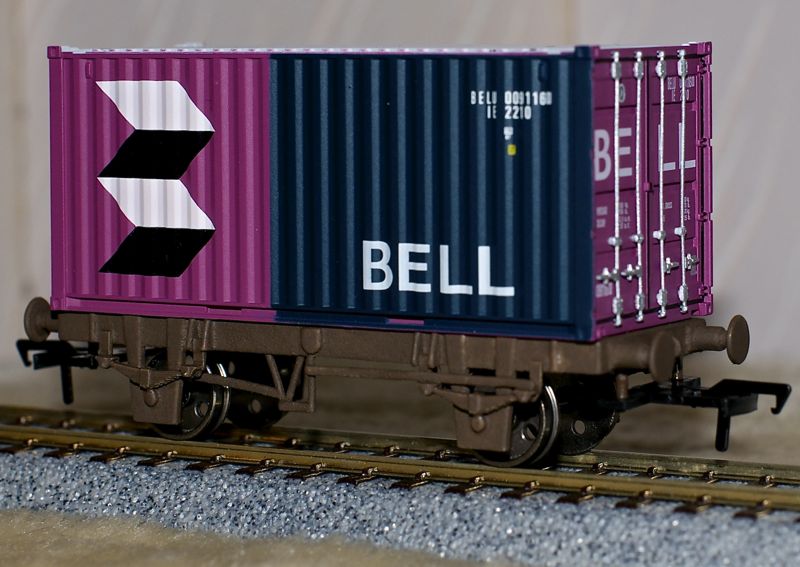
20 foot four wheel container wagon Thinking one day that my 20 foot Bell containers from C-Rail were rather too nice NOT to ride the rails, I placed an order with Tom Brady of Irish Freight Models for a pair of his 20 foot Skeletal Container wagons kits. The kits are mixed media plastic and whitemetal kits that any idiot can build, and so it proved The 'chassis' is cast pretty much as one, up on which you attach the rather nicely formed whitemetal detailing. A quality set of metal wheelsets were supplied as were a set of Bachmann couplings - you'll notice the wagons are still missing their supplied numbers, give me time, give me time! I'll admit the wagons are almost TOO nice to hide under a container, almost The Bell container is exquisite 'nuff said. That's enough evidence of my bodging for one day -Rob
-
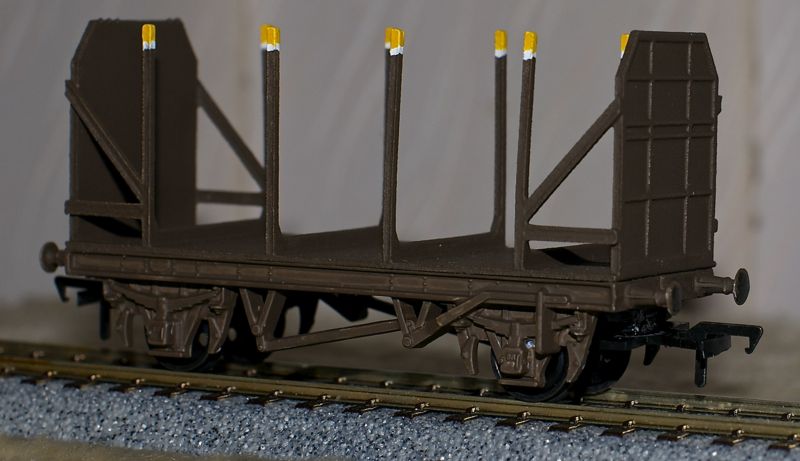
Another post, another victim. Four wheeled timber wagon This was knocked together from a collection of bits and bobs: Shapeways 3D printed body Hornby 'Norstand' wagon chassis Alan Gibson 12mm wheelsets (I had a load spare) Bachmann short couplings Mr Surfacer surface filler A strip of lead Various offcuts of plasticard Paints and superglue The odd bit of swearing When the bodies eventually arrived (Three plus weeks), I primed them as I'd been recommended to, with Mr Surfacer 500 - it's a grey sludge that evens out the surface imperfections (allegedly) in the 3D printed surfaces - It dries bloomin' quickly too! Too quickly if you're asking me.... Anywho, while that was left on one side I turned my minded to miniature powertools, aka 'the Dremel'. The Hornby chassis came equipped with those God awful h-U-G-e plastic couplings moulded into the ends of the chassis. After more careful thought, the Dremel was abandoned for a razor saw, and the couplings were carefully removed, rather than disappearing in a whirr of molten spinning... I digress... The old wheelsets were popped out and the new ones popped in - anote to self - if the layout ever does get built, it will need to be level with wheelsets this free running. I then fitted the new couplings on a block of several offcuts of plasticard. I then replaced the Hornby steel 'weight' with the 'strip of lead'. Superglue is wonderful stuff in it's place.... So now it was time to attach the body to the chassis, I personally recommend the superglue products of the Loctite brand, it gives just enough manoeuvring time before setting solid, but not quite enough manoeuvring time for me to realise I'd attached my thumb rather too firmly to the underside of the chassis... Now having done this in the past rather more often than I'd care to admit, I've learnt not to panic, but to peel - and with a few choice words, I was free, and with a rather fresh looking thumbprint on the bottom of the chassis - still it won't be seen, and if it is ever stolen (HA!) I can demonstrate ownership.... Paint, rather than slap on red oxide and then weather it, I looked at some wagons in a few pics at North Wall, and noticed that they'd faded to a dull brown colour. So 'dull brown colour' got slapped on my timber wagon victim. Sometime later I was idling though youtube (again!) when I noticed a train of four wheelers waiting in a loop, the wagons were faded, but the 'prongs' or whatever they're called had been freshly topped with a yellow and white stripe top. "Better do mine too" I thought, and I did. Still needs numbers and such, but there you are, I think it looks well on the rails. -Rob
-
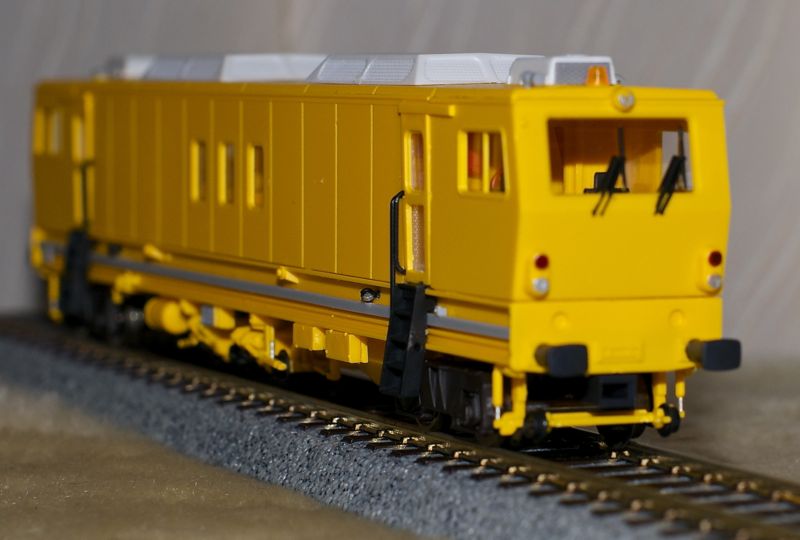
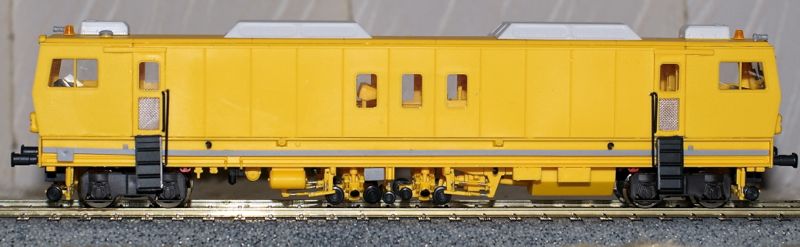
I'm almost embarrassed to start this 'Workbench'. Perhaps it'll serve as an example of 'how not to...' Anywho, on with the bodges: Kibri Dynamic Stabiliser/ballast compacter/whatever(!) One day I was thumbing through youtube and found a machine similar to the above part finished bodge up stationed at Kildare. So without any further excuse being needed, my wanderings went over to ebay and found the appropriate Kibri kit in Deutschland - 35 quid lighter, it arrived three days later. It actually goes together well, with the chassis being straight and true (which was nice...). The kit comes with nylon type wheelsets, but there was a further recommendation in the kit's blurb to use Roco DC metal wheelsets - back to ebay Deutschland and another 15 quid lighter, the wheelsets showed up four days later. The kit was built using Revell's equivalent of Liquid Poly glue, very sparingly. The various highlights where painted in, wipers, hydraulic rams, wheels, lights etc., and that's where it's up to at the moment - awaiting a sharp knife to carve up the transfers for application. -Rob ps Another unfortunate rail-borne victim will be along shortly(!)
-
Hattons (eHattons) Model Railway Shop Liverpool
Robert Davies replied to Blu Bianco's question in Questions & Answers
No worries - the mail came in at 1714hrs yesterday evening. Interestingly they say they sent it Royal Mail - however it arrived with a guy from Yodel. -Rob -
Hattons (eHattons) Model Railway Shop Liverpool
Robert Davies replied to Blu Bianco's question in Questions & Answers
I had a 112 on pre-order. I had a picking and despatch email last night for my 112 - which duly arrived midday today (the following day). -Rob ps I will admit that I'm considering giving Rails a go for either 071 or 082 tho' - I don't need 071 or 082, but I would like them -
Murphy Models 071 - New, detailed pre-production photos added!
Robert Davies replied to Admin's topic in Irish Models
Short answer = I don't know! Longer answer = I used Decoder Pro, part of JMRI to do the legwork. Explanation = It's a Lokpilot V4, which uses indexed CVs. Which means you end up writing CVs here there and everywhere to change just one lighting effect. If it was an older V3.5 it would just be a case of reading off a few CVs, copying them down here and that would be it - NOT with the V4... oh no... However, I mapped: aux1 -> F1 (red lights) aux2 -> F2 (main beam) aux3 -> F3 (No. 1 cab lights) aux4 -> F4 (No. 2 cab lights) The actual wiring of the lighting board is quite clever in that it will only allow the red lights and main beams to switch on when the marker lights on F0 are switched on. Further, it won't let you switch on main beams to point backwards, and it won't let you switch the reds to point forwards. -Rob ps I'll go and download the Lokpilot V4 manual and see if I can get the CV values to program the above in the old coal fired way. I just got spoiled running a PowerCab with a USB interface into JMRI and Decoder Pro -
Murphy Models 071 - New, detailed pre-production photos added!
Robert Davies replied to Admin's topic in Irish Models
The UK dealers have just started sending out their allocation of 071/082/112s. My 112 arrived this morning. Popped a Lokpilot v4 in it, did a bit of head scratching in/with DecoderPro, and finally got the red lights and main beams working under separate functions, and the cab lights turned down to a more reasonable level. The DCC lights on this 071/111 really are the best I've come across for a Irish/British Isles loco -Rob -
Proof that Hornby collectors will have a punch up over anything - Two of them fighting it out one bid at a time...
-
pm'd re: 187. -Rob
-
Have a look at Rail Modeller - I'll admit I last used it a few years ago when I was using sectional Kato HO Unitrack, and don't really know whether it's up to what you need - worth a look? It must be pretty simple If I could work out how to use it - I can never get my head around Xtrkcad -Rob
-
Murphy Models 071 - New, detailed pre-production photos added!
Robert Davies replied to Admin's topic in Irish Models
I've a couple of them too. The wagon bodies themselves are resin castings, and I've just had a good close look at the loads themselves, and they appear to be cast integral to the wagon bodies. I spoke to Tom at Irish Freight Models about the seeds that he used to create the master.... He can't remember(!) Sorry for jumping in. -Rob ps Once the Shapeways team are back up and running*, I might have a look at getting some of theirs - Not that there is anything at all wrong with Tom's, far from it! I've just a got a taste for building my own wagons at the moment *Hurricane Sandy took them down for a while... -
Poor farmers! Porsche and a Merc outside... Really nice job Anthony, it looks disturbingly real -Rob