

irishthump
-
Posts
1,840 -
Joined
-
Last visited
-
Days Won
7
Content Type
Profiles
Forums
Resource Library
Events
Gallery
Blogs
Store
Community Map
Posts posted by irishthump
-
-
Des they look amazing! Can't wait to get a few myself....
-
Kieran,weigh your Hornby weights that you are using,then see if you can put heavier weights into the same area.I use heavy duty washers that I can pick up in work in place of the suppliers weights in some loco's,as some of the weights supplied are not up to much.
Try and get your hands on a roll of lead flashing. It's soft enough to be cut with a heavy scissors and can be folded in shape easily.
-
Would spreading the additional weight by attachint to the underside of the body roof help spread the load more evenly rather than attaching it directly to the bogie?
I read that the weight should always be over the centre of the chassis for maximum adhesion to the rails even when only one bogie is powered.
-
Cheers! Me thinks I'll get one.
Like I said mine was made using the decoder file for the 071 which is file no. 97431 on the ESU website, I just asked them to replace the prime mover sound with the one from
file number 74436 which uses the EMD 567. It's a 16 cylinder rather than an 8 cylinder which was fitted to the 141's but as you can see it sounds fine. Remember they can give the decoder any engine sound you like. I was thinking of getting another decoder with the 8 cylinder 645 which was fitted in the 181's, they have that exact engine type listed on the site. Here's the link - http://www.esu.eu/en/downloads/sounds/generation-4/ the 071 and 201 decoders are listed under "soundfiles for specific locomotives", the 567 engine sound was under "soundfiles for US locomotives for common usage and all gauges". There are sound samples for each file that you can listen to.
I also got them to assign other sounds to different function buttons, just for my own convenience. This was especially handy with the "notch up/down" features which are assigned to function keys 18 and 19 on the 071 sound file. I had them assigned to function keys 4 and 5. Have a look at the profile for the 071 and get them to re-assign the function keys if it suits you. They can arrange them any way you like. Once I ordered the decoder it was shipped that same day!
Hope that helps.
-
Thats a little stunner! Love the sound, if you don't mind me asking how much was it?
No bother Dave, they're £100 with free shipping, so whatever that works out in Euro's!
-
Lads,
I posted a little tutorial on my workbench the other day showing the installation of sound into 142, here's a little video of the end result.
The decoder is a Loksound V4 that I ordered from Olivia's Trains in the UK. The sound file they used is basically the same one Murphy Models use
for their 071 decoder, the file is free to download from the ESU website for anybody with a Lokprogrammer. I had the idea of using this sound file for a 141 and just changing the prime mover sound for an EMD 567 from another file which Olivia's Trains did for me and I think it worked out well, the first part of the video shows the engine start up and runs through some of the other sounds and the rest is just 142 doing some shunting in my freight yard. The "notch up/down" feature makes it a lot of fun to drive. Enjoy!
-
Wow! Really flying along now!
And remember run what you want, it's YOUR railway!
-
Largest model railway in Europe?

Seriously though, great to see it finally getting a new permanent home.
-
I suppose the big question whether anything is gained by interfacing RC with DCC as in the Airwire System or a simple RC system like Aristocraft or RCS is more effective.
I think it would be a big plus if you could adapt your existing DCC system to RC or WiFi control. I would imagine modellers would be very reluctant to abandon a standardised system like DCC for a "manufacturer specific" control system. American modellers I would think would be very slow to accept the change. I think the success of DCC is down to standardisation (as well as backwards-compatibility) and also the fact that IT WORKS!
-
Bloody amazing!
-
The weathering on that set is phenomenal, and the lighting is the icing on the cake!
-
One other thing, surely if WiFi control takes off in any way it will need the same NMRA guidelines to provide some small measure of standardisation across the different manufacturers?
-
I recently picked up a Supertrain 142 from Wrenneire and a sound equipped decoder arrived in the post for it yesterday so I thought I might take a few pics of the installation process for anyone who isn't familiar with it. It's really not too hard and this might be useful for anyone comtemplating it.
First pic; 142 with the body off.
You'll notice the handrails are still attached. I could never get the hang of removing these and as you know they are a bu**er to put back on! As I mentioned on another thread I have found a way around it. First remove the front cab (the one at the opposite end from the roof grill. Now, you have to remember to release the handrails from the cab to allow you to pull it straight up, you may need to use a very small flat screwdriver to help release it from the body first.
Once that is done I turn the loco upside down (you really need a foam cradle for this job) and release plastic tabs that hold the body on from underneath. It's easier to see/access them if you remove the bogie sideframes.
The tabs are clearly visible in this pic (yes the orange coloured body really helps to locate them!)
The main body and other end cab can then be removed. Remembering again to detach the handrails from the cab sides.
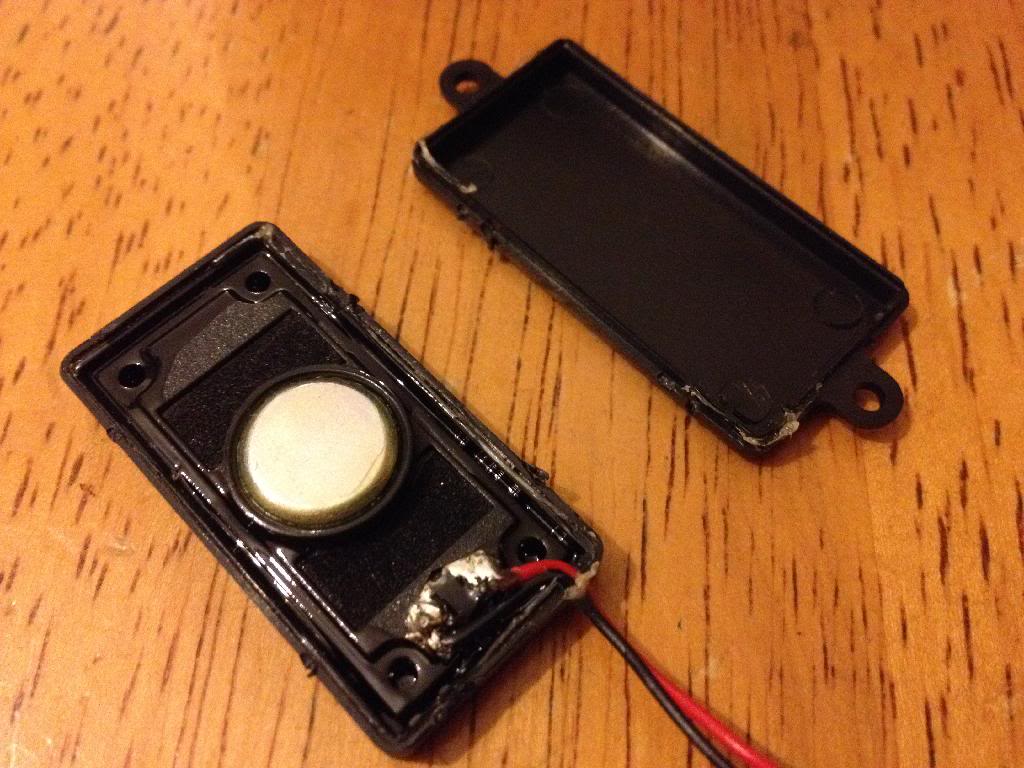
Next job is to install the speaker. I'm using a base enhanced speaker which as you may know will not fit under the body without a lot of work. The metal chassis block needs considerable filing down to make enough room. I'm not prepared to do that under any circumstances! Gareth from MSB recommended this little tip which is to remove the back of the speaker housing:
It is easily done with a small flat screwdriver and it doesn't effect the sound in any way. (At least not to my ears and I have tried the speaker with and without the back casing.)
Like this the speaker is a near perfect fit on top of the metal chassis block. It can be secured with silicone or blue tack. Just be careful of the wires under the speaker, I pushed them down too far and they ended up rubbing on the drive shaft and making an awful noise. I had to remove the body again to correct it!
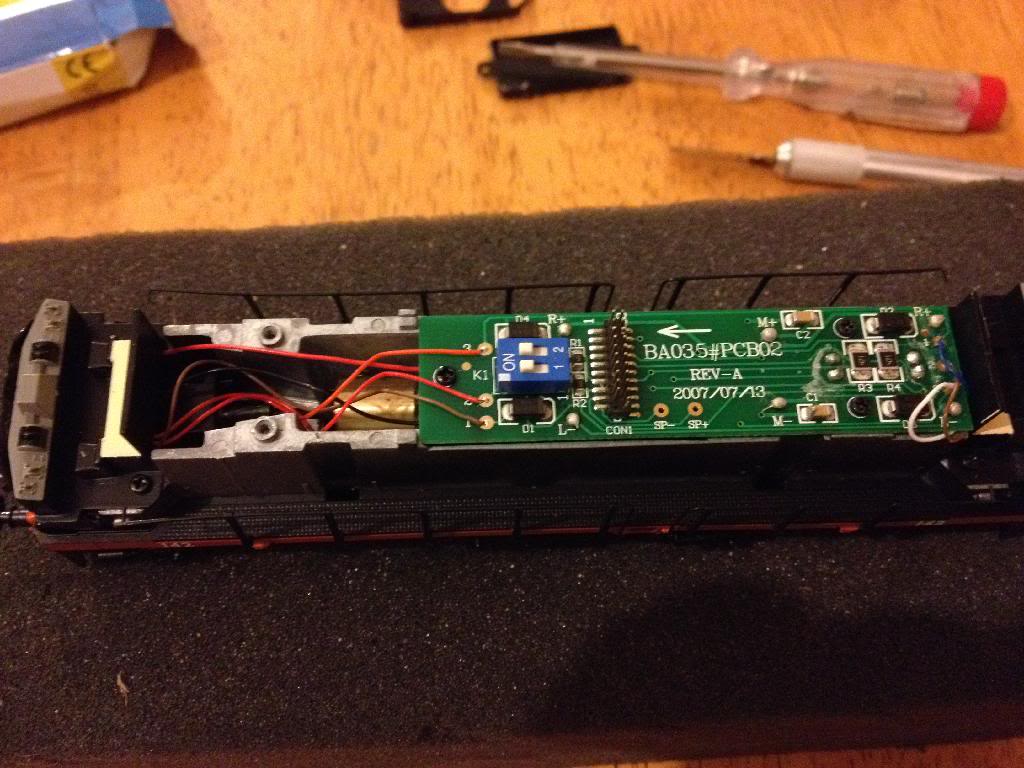
I trimmed the speaker leads as I didn't want them getting in the way when trying to refit the body, then soldered them to the connection points on the circuit board. These are clearly marked "SP+" and "SP-", red goes to "+" and black to "-".
Then it's a simple matter of plugging in the decoder, or so I thought! All my other sound equipped 141's have Zimo decoders which fit fine, but this one is a ESU Loksound which is slightly bulkier than the Zimo. I notice when I plugged it in that part of the decoder was touching the circuit board....
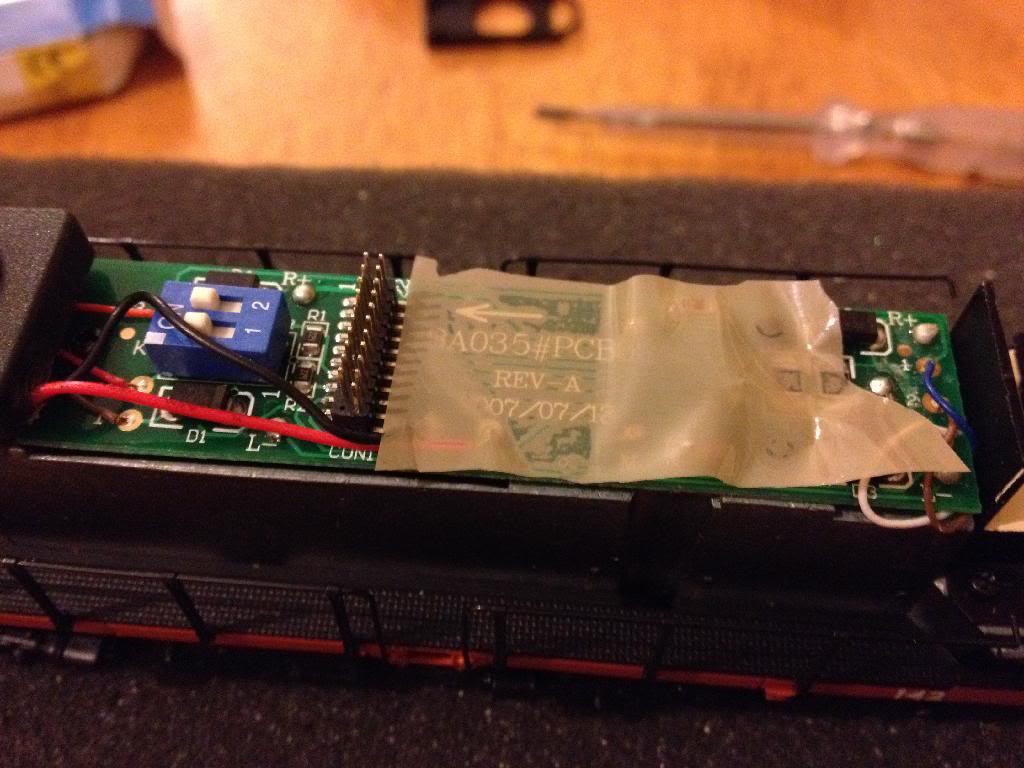
I wasn't sure if it was metal-on-metal contact but I didn't want to take the risk of a short circuit, so I placed some plastic tape on the circuit board to be safe.
It's normal packing tape, which insulates fine but I will have to keep an check to make sure it isn't affected by heat from the decoder.
And speaking of heat... Ventilation is an issue with dcc as the decoders generate a lot of heat in operation. I found that on the 141's the roof directly above the decoder could get quite hot, most likely because of the space inside the body being so tight. My answer to this was to drill out the exhaust outlet on the roof of the model! After all it's supposed to be a hole and I found that once I did this the body sheel didn't get anywhere near as hot, in fact you can feel the warmer air escape through it. How's that for prototypical!

I then gave the loco a quick test before replacing the body and cabs. Then it was time to play! I'll post a video of it in action soon...
-
Modern RTR use a lot of 'ballast' ie added metal to improve weight and traction.
If all that space and weight was modern gel batteries you'd be on a winner.
And get around the traction issue with rubber tyres on the wheels? Sounds like a plan...
-
Really looks like the Holy Grail doesn't it?! No need to clean rails, or even to wire track at all. You could even go back to steel track and let it rust rather than weathering it!
But like was already said, this is all dependent on getting battery technology to the point that it can fit into existing RTR models.
-
That's a hell of gradient, looks nearly vertical!
-
The very steepest gradients in Ireland were the quarter mile just short of Hillsborough station in the Knockmore Junction side and the cutting just south of Downpatrick station, through which it will one day become possible to travel again by train. These were 1 in sixty-ish - I'd have to look it up.
One in sixty - for example - would be one inch rise per sixty inches (or five feet / about 1.5m) length. A model railway will comfortably cope with gradients three times this steep.
What about Killarney station, the bank always looked savage steep to me!
Around about the 6 min mark the you'll see the driver having to rev the bejesus out of 147!
-
They look great! I don't normally buy RTR Irish coaching stock, I prefer to repaint whatever I can get my hands on, but I'd be tempted by these. You could add them to any rake and they will look the part.
-
The whole project is great, but I can't get over how good those locos look in N gauge!
-
Looks lovely, so clean!
Makes me feel like ripping up my own layout....
-
Glad you got sorted. Are you thinking of adding sound to a 141? Because it's not difficult at all, the worst part is getting the body off the loco.
-
Glad to help!
Here's a pic showing one of the tabs holding the body on. Like I said, easy to see when the body is orange! I forgot to mention it's best to remove the bogie frames to get at them.
-
Great presentation - like Thomas the Tank Engine for grown-ups..
Wait! You mean Thomas the Tank Engine isn't for grownups?!!
-
Hi Sulzer,
Hope this helps, this is the way I tackle it myself.
Remove the cab at the front end first, that is the opposite end to the roof grill. Remember to just unclip the handrails from the cab or you will break them off, it just slips out of the little hole at the corner of the cab side window. Most people recommend removing all the handrails first but I found them a nightmare to put back on, so this is a way around that.
The cab should just pull straight up but you may need to use a very small flat screwdriver to ease it away. What I do then is turn the loco upside down and if you turn the bogies to the side you will be able to see the small tabs which hold the body on. They will easy to spot if the loco is in an orange livery! You can then use the small screwdriver to help release the tabs, the body plus the cab at the grill end will then lift straight up. (Remember to unclip the handrails from the grill-end cab as well before removing the body!)
I find his much easier than trying to squeeze the body sides to get it to unclip, as you said you seem to need to use a lot of force to move it!


DCC Bus cable
in Questions & Answers
Posted
From what I've read I think your best bet would be to get some Twin and Earth cable. Strip off the outer covering and use the brown and blue cables as your bus wires. Soldering (as Dave said) is the best option for attaching the droppers, but can also use terminal connector blocks if you don't fancy soldering.
It may sound like overkill but here's an interesting thread on RMWeb...
http://www.rmweb.co.uk/community/index.php?/topic/81198-hot-box-lvz100-and-complete-shut-downs/
It's not strictly about DCC Buses, but the OP was experiencing problems that stemmed from an insufficient number of droppers and also from the main bus wire being not being heavy enough. His layout sounds comparable in size to your own.