irishthump
-
Posts
1,882 -
Joined
-
Last visited
-
Days Won
8
Content Type
Profiles
Forums
Events
Gallery
Blogs
Everything posted by irishthump
-
So CIE never used MK2 a's before then?
-
Guys, I have a few BR Mk2's I want to repaint and I was wondering about appropriate liveries. I know that IE bought some of these coaches around 1990 which were painted in the orange-with-2-white-stripes livery. I'm wondering did CIE ever run any MK2's coaches in Black and Tan in the 60/70/80's?
-
I think that was me, I used GW Macharius Solar Orange which is more of a match for the older "black and tan" orange.
-
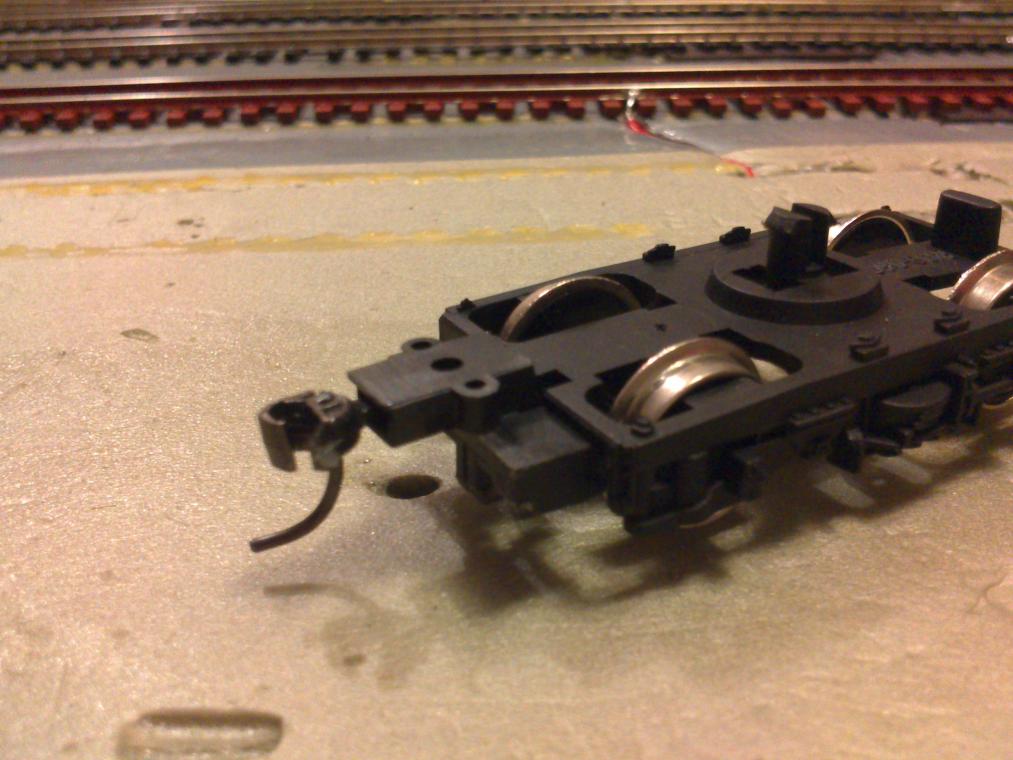
Hi, Tom. Rich's response there really sums it up, Anto is the resident authority on Kadees and there is also a wealth of info on other forums regarding fitting them to your stock. Rich also describes fitting the Kadees to the underside of the coach as opposed to the bogie which is the norm with US/HO stock. This is also prototypical and the way the couplers themselves are designed to operate. I initially tried this but found I had nothing but problems when traversing curves on the layout. I found through other forums that the majority of UK/OO modellers opt to fit them to the bogies so I tried this method and found my problems disappeared! Whether is was a problem with my fitting methods or the amount of tight curves on my layout I just don't know, but I had to go with what worked best for me. You can see in the pic below that fitting them to the Lima MK3's was simply a matter of removing the tension-lock hook and attaching the Kadee no.5 directly to the top of the bogie. The coupler height gauge that Kadee supply is absolutley essential for the getting the coupler to sit at the correct height, and by pure fluke the Kadee happened to sit at just the right level.

-
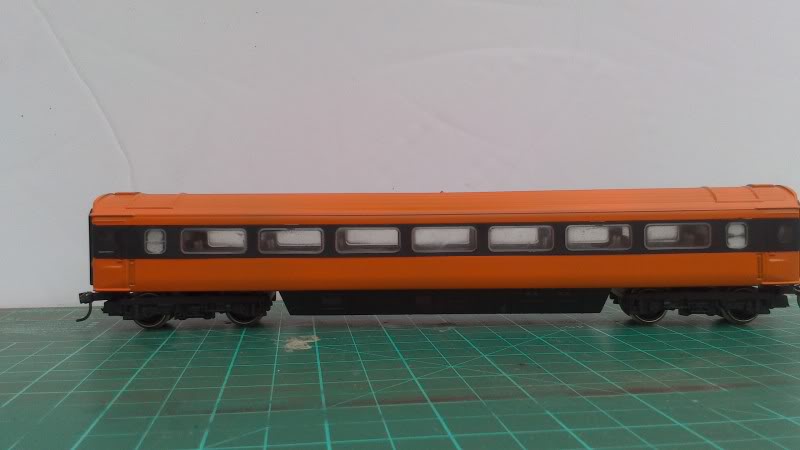
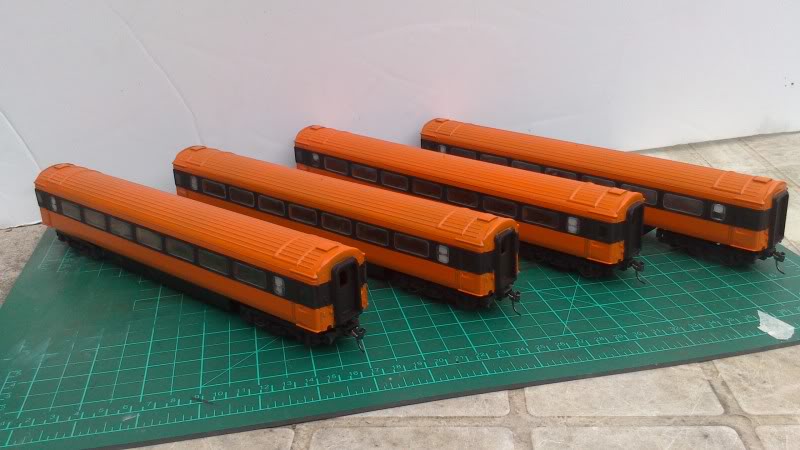
Here's one coach after reassembly... I had planned to paint the window frames but instead I just filed across the raised detail with a fine emory board which highlited the frames surprisingly well in a grey colour so I may not bother. The overspray on the glazing is annoying but since I'll be weathering these I don't think it's a huge issue, it resembles a good healthy coat of grime! Here's the full rake so far... I think the orange is a tad bright for Supertrain but I'm happy enough with it. Plenty more to do, I'm waiting for an order of transfers from Railtec and a few other details like the gangway doors need to be done. I'm also going to replace the old wheels as they are causing a few headaches on the insulfrog points. I also have a buffet car left to do and I saved the worst of the coaches for conversion to an EGV.
-
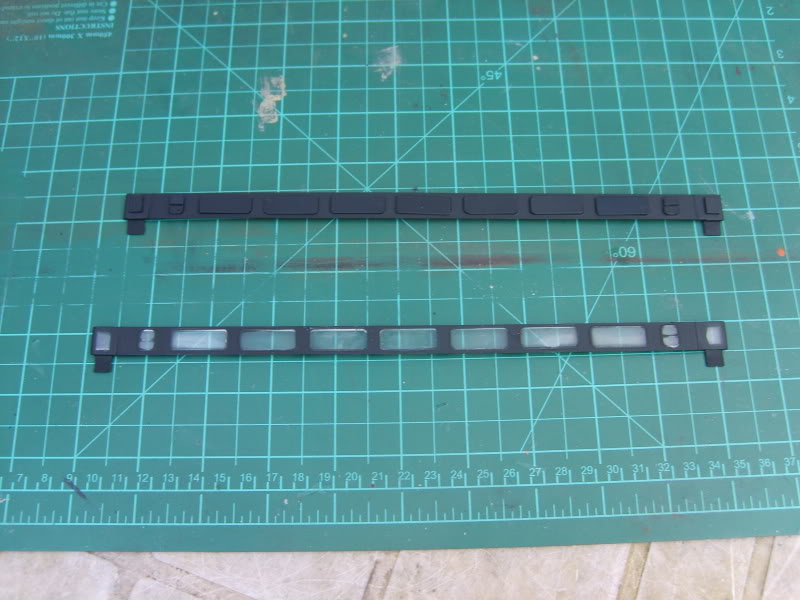
I had recently started repainting my own rake of MK3's into Supertrain livery in anticipation of the arrival of the 071's.... I had picked these up on Ebay a while back. They cost me next to nothing and when I got them I could see why! These are the older Hornby MK3's, the windows and glazing are a single strip which would be a nightmare to repaint.... I tried to mask the glazing with tape and cut around the window frames with a scalpel but this did'nt work. So I made small masking pieces from thin sheet styrene and fixed these over the windows before spraying with black primer. Did'nt work out TOO bad! A bit of overspray worked it's way under the masks, but since the end result would be weathered I could live with it. The bodies after several thin coats of orange... I used an aerosol can of acrylic which I stumbled across in the local Art and Hobby shop. Although I have an airbrush I chose the spray can out of pure laziness! Once again my masking let me down a little, so a fair bit of touching in was required.
-
Lovely work! I'm wrestling with a few old Hornby MK3's myself, if I can get mine to look half as good then I'll be happy....
-
Anto, can you give me any more info on this fault? I picked up a 141 cheap on Ebay a while back which I discovered was'nt picking up at all on one bogie. I could'nt see anything wrong with the board and ended up soldering the pickup wires from the dodgy bogey to where the other bogie's wires connect to the circuit board. Since then, it has run perfectly.
-
Layout is looking great! As the lads said, the lights take it to another level. I love the water tower, the rust looks so real. I noticed an Ikea bag in the backrocund of one of the pics, did you buy your ballast there?
-
Murphy Models 071 - New, detailed pre-production photos added!
irishthump replied to Admin's topic in Irish Models
Ah, sweet! Seems they learned from the 141/181s. I too have horror stories about removing the bodies from them.... -
Lovely work, Kirley. Personally I love the variation in the shades of arange on the MK2 stock... just like the real thing!
-
Graham's layout - Monkhill and Saltstown.
irishthump replied to irishthump's topic in Irish Model Layouts
Styrofoam shaped with a hot foam cutter. I covered it in a mix of ordinary plaster and pva then painted it grey when it was dry. It was then drybrushed to bring out the detail. -
Graham's layout - Monkhill and Saltstown.
irishthump replied to irishthump's topic in Irish Model Layouts
Thanks Boskonay... Yes, I used hanging basket liner from Woodies for the grass base. I'm gradually adding some layers of flock to give it a bit more variety of colour. The rails were painted with Rustoleum Red Oxide Primer in aerosol form, also bought from Woodies. I also saw it for sale in Halfords in a normal tin as well. -
Graham's layout - Monkhill and Saltstown.
irishthump replied to irishthump's topic in Irish Model Layouts
Finally got around to ballasting the scenic break on the layout, as well as adding a little more vegetation... Still a bit to be done, reckon I'll tone the ballast down with some washes and add a bit of grime. -
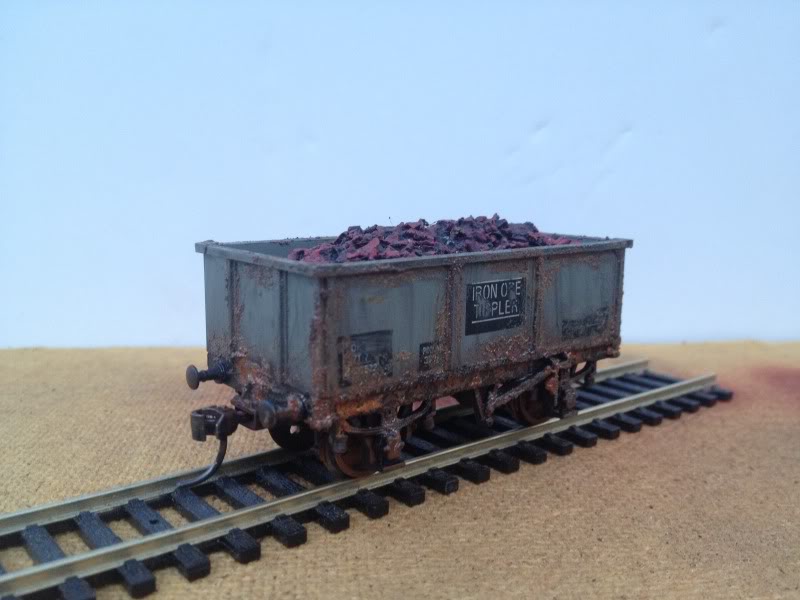
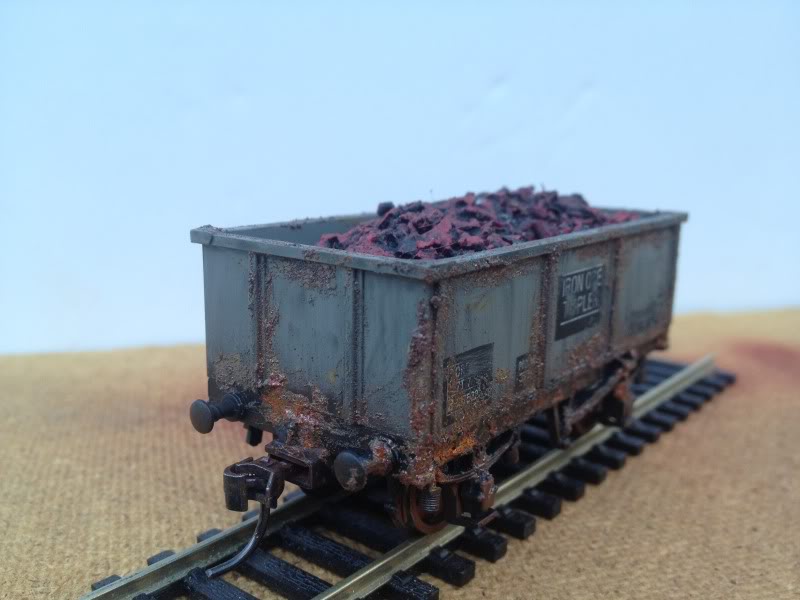
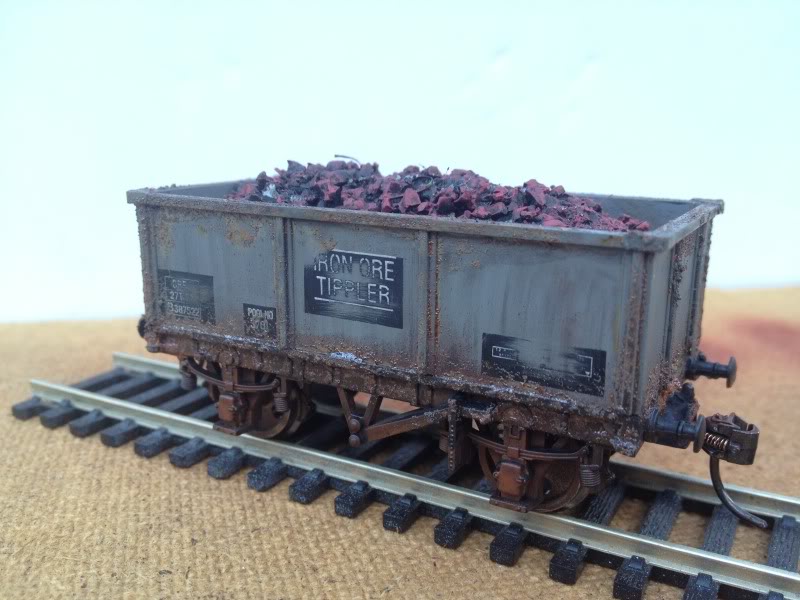
I picked up some Scenic Rust the other day and decided to give it a go on this wee wagon...
-
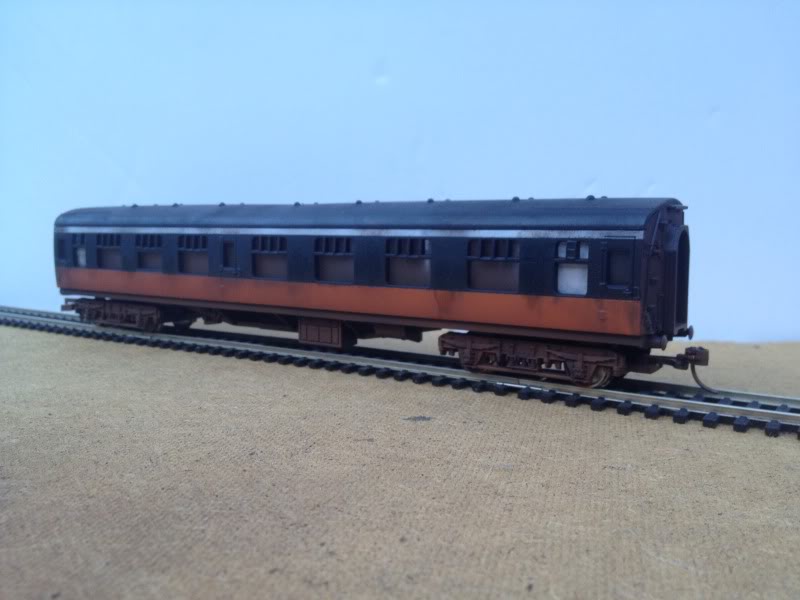
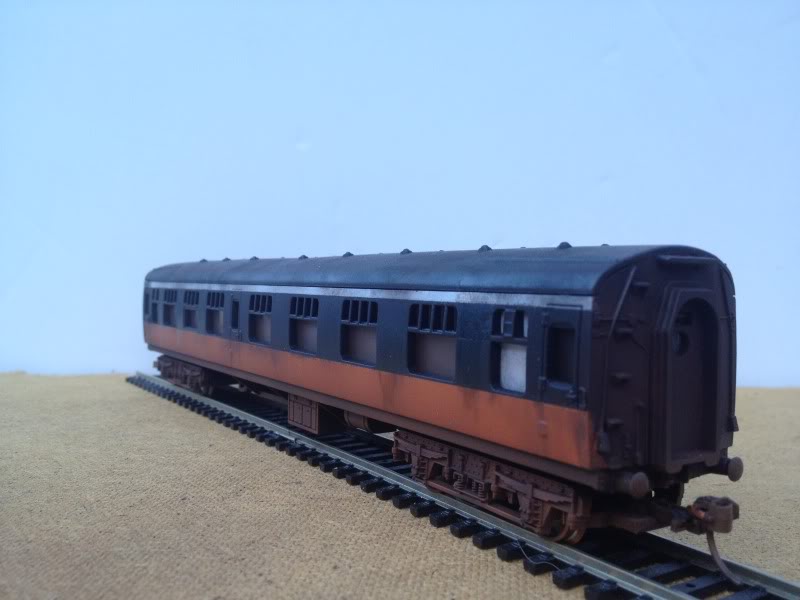
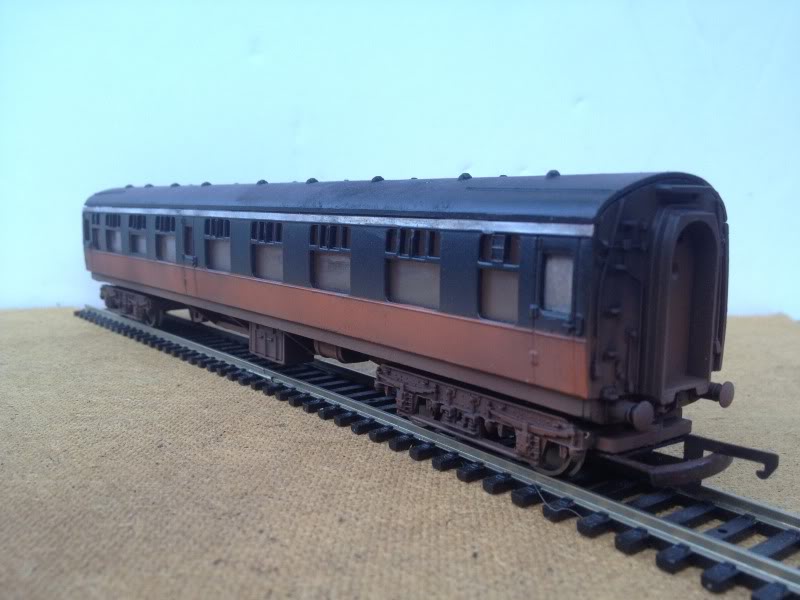
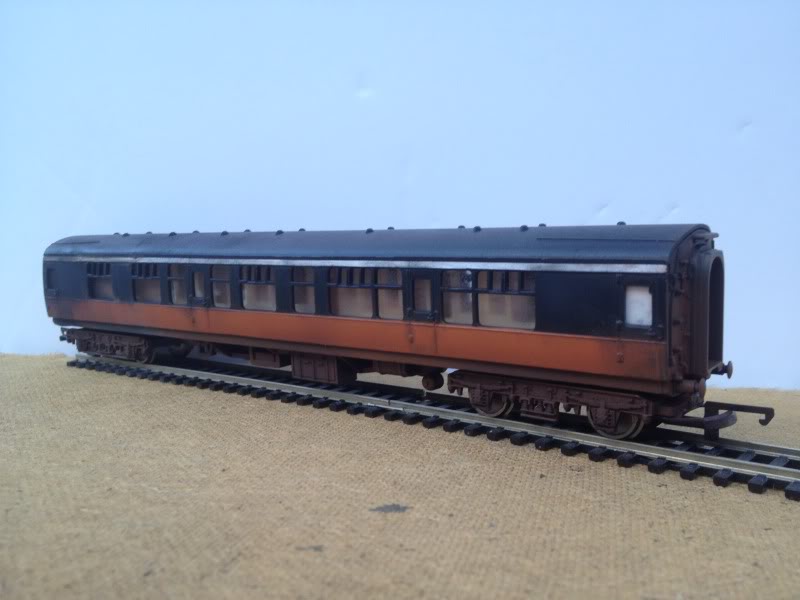
A couple of repainted MK1's that I recently weathered.
-
Murphy Models 071 - New, detailed pre-production photos added!
irishthump replied to Admin's topic in Irish Models
Regarding installing a decoder: is it the same drill as with the 141's, take off the main body? They will some with a speaker installed as well won't they? -
SEEP point motors also have a built in switch which can be used for LEDs. I don't use them for point indications but I have LED signals that are connected to them.
-
Murphy Models 071 - New, detailed pre-production photos added!
irishthump replied to Admin's topic in Irish Models
I'd say Anto will be all over both of those pics! -
Murphy Models 071 - New, detailed pre-production photos added!
irishthump replied to Admin's topic in Irish Models
Looks great! Any update on when we'll see the Supertrain livery arrive? -
Very nice! Any idea which wagons is he using for those Bell containers? Are they RTR or kit/scratchbuilt?
-
Baby G M what sound chip and speaker
irishthump replied to fitzguttentite's question in Questions & Answers
The Model Shop decoders are Zimo and they are fantastic. I have 3 of my 141/181s fitted with them, here's a few videos I posted of them in action. http://irishrailwaymodeller.com/showthread.php/315-Graham-s-layout-Monkhill-and-Saltstown?p=10161#post10161 -
Same here, Rich. Sorry to here you're unwell, a speedy recovery to you sir....
-
Much obliged Anto. How close are these to the IE wagons in use today?
-
Fantastic Anto! Great to see that monster engine shed bursting at the seems with locos... Can I ask which container wagons you're using in the pics with the crane?