2996 Victor
-
Posts
373 -
Joined
-
Last visited
-
Days Won
2
Content Type
Profiles
Forums
Events
Gallery
Blogs
Everything posted by 2996 Victor
-
Excellent! Style, it certainly is! Kind regards, Mark
- 42 replies
-
- 1
-

-
- kit building
- wagons
- (and 5 more)
-
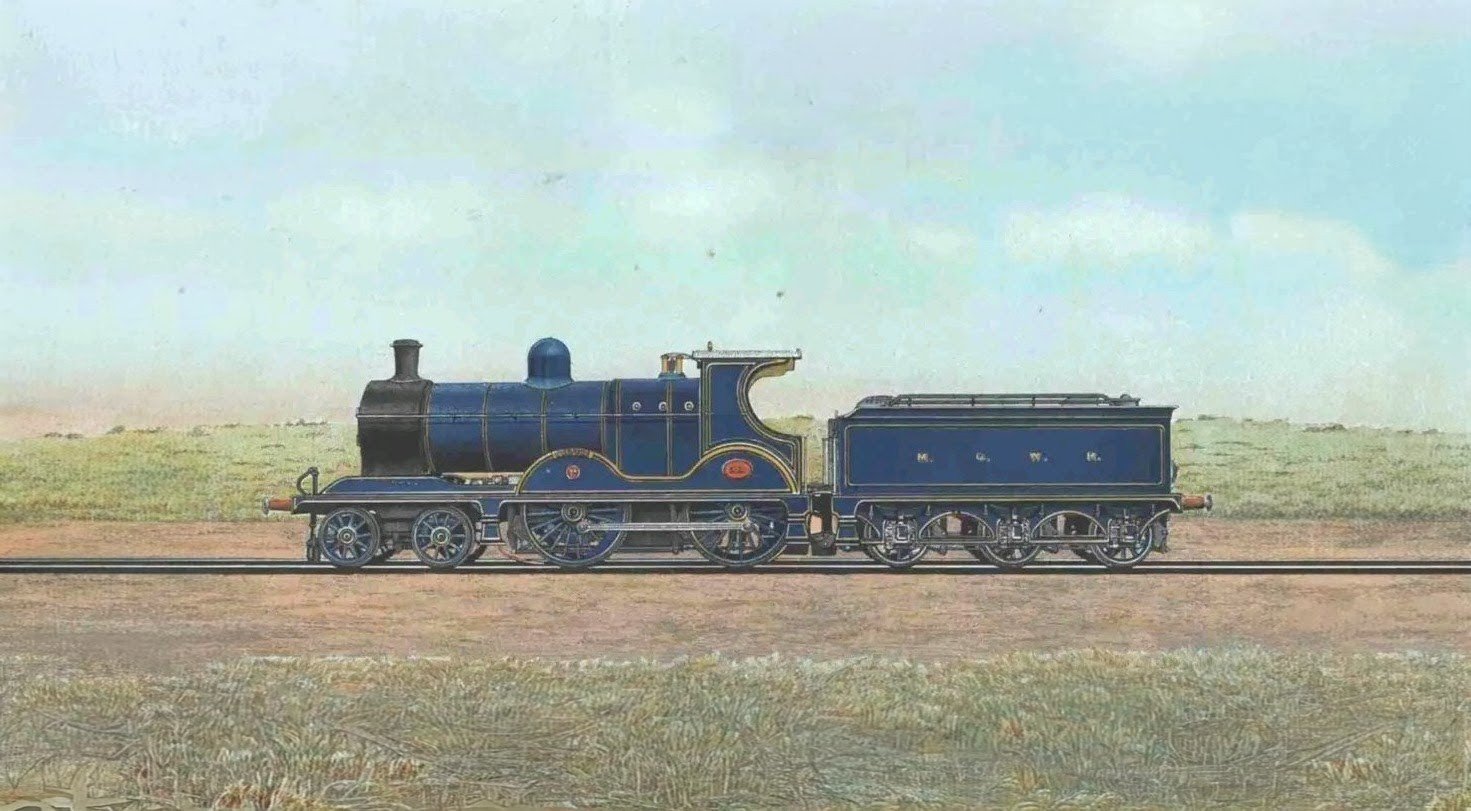
Hi @Midland Man and @Galteemore, Thanks for clarifying - as I said, I have a lot to learn! Interesting to note that both the 'E' and the 'P' have (brass?) numerals on their sandboxes. Was this an MGWR or a GSR practise? I'll definitely need at least one 'E' Class, but there may be a 'P' as well, even though I can't really justify one..... Best regards, Mark
- 42 replies
-
- 1
-
-
- kit building
- wagons
- (and 5 more)
-
Hi @Galteemore, Thanks for confirming that - I still have a lot to learn! Was it the 'P' Class that were the North Wall banking locos? Best regards, Mark
-
I also meant to add that the SSM kits of the MGWR convertible wagons have also arrived, along with some etched axleguard sets, so I've got plenty to be getting on with! Cheers for now, Mark
- 42 replies
-
- 1
-
-
- kit building
- wagons
- (and 5 more)
-
Not really appropriate for a rural branch, then, but a handsome loco nonetheless! Kind regards, Mark
-
Some photographs of the progress on the ballast wagons: Two floors scribed, along with enough side sheeting for four wagons: http:// And some ends marked out: http:// Two of the wagons had their interior planks scribed as the intention is to run one of them semi-empty, with just some things a track gang might need - I did two just to make sure one turned out alright! Here, they've been assembled, and the other two are part-assembled as well. On the latter two, I haven't bothered to scribe their interior planks and the floor is plain 40thou styrene sheet: http:// The simple jig I built to get the curvature of the ends the same: http:// And lastly a close-up of the better of the two with the full interior - at least, it will have the full interior in due course: http:// Apologies for the lack of clarity in some of my photographs - they should come out well as its a decent camera, but the light in my workroom, which great for modelling purposes, isn't great for photography! Hope to have a proper update soon! Regards, Mark
- 42 replies
-
- 6
-
-

-
- kit building
- wagons
- (and 5 more)
-
Hi MM, yes - that's exactly the sort of loco that I need to be building - a stalwart of the branch lines! Kind regards, Mark
-
Dear All, I realise that I haven't added any additional posts for quite a while, so here is a short update. First off, the microstrip for the Loco Coal wagons' side knees has arrived at last, although I haven't yet had time to make use of it. The ballast wagons have had their ends filed to their rounded profile, and all four have been assembled around their floors. I've made my choice as to which of the four would run mostly empty but with a few PW bits and bobs. My IRRS journal back issues have arrived, and I've been poring over Padraic O'Cuimin's article on MGWR goods stock, which has so much useful information I'm overwhelmed. There's a fantastic photograph of a Loco Coal wagon, too! However, in POC's article, although he mentions ballast wagons, there are none that tie in to the HMRS drawing with respect to dates which leaves me in a quandary: do I complete the ballast wagons I've started, or abandon them? I'll post a few photos soon! All the best, Mark
- 42 replies
-
- 2
-
-
- kit building
- wagons
- (and 5 more)
-
Hi MM, Looking forward to seeing your progress - I'll be following with great interest. Stay safe and stay well, Mark
-
Hi David, my copy of the June '20 Railway Modeller has just arrived, and I just had to say that Fintonagh looks absolutely superb (as expected!). Well done, sir, on another fantastic layout! With kind regards, Mark
-
Hi @seagoebox and @airfixfan, Thanks for both of those suggestions, I'll pop a PM to @leslie10646 and see if he can help! With kind regards, Mark
-
Hi @airfixfan, many thanks for the heads-up on the SRS Signal Box Register book. I'm certainly interested in finding a copy, but they seem non-existent on the second-hand market and the SRS Bookstall is completely closed until further notice. I'll just have to keep looking! With kind regards, Mark
-
Many, many thanks as always, gents, for coming to the rescue and providing so much valuable information. I thought it was the case that McKenzie & Holland had provided much equipment, photographs seem to show their design of cabin, views of Achill cabin in particular struck me as being M&H. [I've been studying McKenzie & Holland designs recently in respect of my Cambrian Railways project - M&H supplied some equipment to the Cambrian although most was from Dutton & Co - Dutton had been an M&H employee before setting up his own company, and his designs owe much to M&H practice.] Presumably, the paintwork would be the cherry red and cream, the darker colour on the wooden frames and the lighter on the panelling? Window frames white? Many thanks once again, and kind regards, Mark
-
Hi All, Guess what? Yep! Yet another question, but on a different subject! I think I've read somewhere, but can't now find where, that the MGWR used McKenzie & Holland signalling equipment, including their standard design signal boxes. Am I correct or did I dream that? Many thanks for any advice! With kind regards, Mark
-
Well, I've succeeded in marking out the sides and ends for four ballast wagons. But having realised I've got eight ends to file to the same rounded profile, this afternoon I've directed my efforts into fabricating a template to achieve some consistency. So that's it for today whilst the glue is hardening! Cheers for now!
-
Ah well, c'est la gare, to coin a phrase! It's all useful info, and I've got all three issues on their way. Kind regards, Mark
-
Returning to the topic of open cattle wagons, as mentioned above the HMRS has a drawing available from its archives, although they are of course completely closed at present. I've taken a screen shot, however, and in between looking at ballast wagons I've been studying that as well. Although definitely "do-able", it's a complicated vehicle for a scratchbuild and the idea of building a large number is quite daunting. However, it occurs to me that it's a perfect vehicle for 3D-printing..... There are a few photographs coming to light, so the next stage with this is to determine how many variations in design there were, and which were the most common. There's an excellent photograph of a rake of four open cattle wagons at Westport Quay in "Rails to Achill", by Jonathan Beaumont @jhb171achill, and the photos posted above by @Mayner. Anyway, that's all on the "to-do" list! With kind regards, Mark
- 309 replies
-
- 2
-
-
- mgwr
- 21mm gauge
- (and 1 more)
-
Now that I'm a fully paid-up member of the IRRS I've been in touch about obtaining the appropriate back issue of the Journal. There was also a second article on MGWR wagon stock in Issue 55 for June 1971, and one on carriage stock in Issue 56 for October 1971 - looking forward to their arrival! With kind regards, Mark
- 309 replies
-
- 2
-
-
- mgwr
- 21mm gauge
- (and 1 more)
-
Not a great deal has been happening on my workbench since my last post, with one or two things around the house to sort out. I'm waiting on the 20thou styrene strip for the Loco Coal wagons' internal side knees, so no progress there, unfortunately. In the meantime, I thought I'd make a start on a short rake of three or four ballast wagons from the HMRS drawing. Tuesday afternoon was spent working out the dimensions of the wagons' components, while on Wednesday I tried to make a start on a couple of floors. As the floorboards are 11" wide, they need to be hand scribed, and my efforts ended up with a couple of rather too wonky planks. Yesterday I tried again with a successful outcome, but at that point progress was interrupted. Thankfully, I'm planning on running two or three of these with a full load of ballast, so they won't need any interiors: the one with the best interior will have a load of a few sleepers and other PW odds and ends. Hopefully today will see some sides and ends marked out, and perhaps even a bit of assembly..... Kind regards, Mark
- 42 replies
-
- 3
-
-
- kit building
- wagons
- (and 5 more)
-
I'll have to try and get a copy of that - it sounds like essential information! Thanks for the tip, @airfixfan, it's hugely appreciated. With kind regards, Mark
- 309 replies
-
- 1
-
-
- mgwr
- 21mm gauge
- (and 1 more)
-
Hi @Galteemore, many thanks for your kind words! Wagon construction is actually quite fascinating, but from a modeller's point of view its useful to have an insight into what's what on the visible parts of any given vehicle. If anyone's interested, I can do no better than refer to Chris Crofts' series of articles in Model Railway Journal Nos.12, 13, 14 and 15. With kind regards, Mark
- 42 replies
-
- 1
-

-
- kit building
- wagons
- (and 5 more)
-
Over the weekend, I've started adding the details to the pair of 7 ton Loco Coal wagons: http:// As usual, I've made almost exclusive use of Evergreen styrene strip. The end pillars are a bit awkward, as they scale out at about 50thou square, which isn't a size that's available, of course. My solution is sand down 60thou square strip (yes, really!) until it's the right section. To try to keep it square during sanding, I keep hold of one end of a strip, and pinching it between a folded piece of sandpaper I draw the strip through the paper half a dozen times, sanding two opposite sides at once. I then rotate it through 90 degrees and repeat, and so on until I've rotated the strip 360 degrees. Then I check the size and repeat as necessary! The iron work consists of the corner plates which I've already talked about, plus washer plates and side knees (usually referred to as "strapping"). On wooden-framed wagons, the side knees are usually internal and are positioned either side of the door openings to support the wagon's side sheets, passing through the floor and turning under to be bolted to the frame members. As they have a structural job to do, the side knees are usually quite hefty iron. The remainder of the iron work is a bit lighter and consists of washer plates whose job it is to prevent the bolts holding everything together from pulling through the woodwork. Hence, there are washer plates for the end pillars and corner plates which are visible inside the wagon bodies: http:// The side knees haven't been added as I found I didn't have any 20thou styrene strip left, which is a bit annoying! The remainder of the iron work is represented by 10thou x 30thou strip for the washer plates and 10thou x 40thou for the vertical hinge plates on the doors: http:// The wagon on the left of the two has had its end pillar washer plates sanded down to about 5thou thickness; 10thou is a bit on the thick side, scaling out at 3/4" thick at 4mm/1ft scale. The layout of internal washer plates is conjectural but typical, and I'm following Derby practise and leaving them smooth - Derby used countersunk square-headed coach bolts with the countersunk head on the inside of the wagon. External bolt heads will be represented by Archer Rivet Transfers. I've also sanded the headstocks to their correct widths, using a packing piece to ensure they're all filed squarely and to the same size. Hopefully, I'll make a bit more progress this afternoon with the door iron work details, but until the material for the side knees arrives, these two will be stuck in limbo. With kind regards, Mark
- 42 replies
-
- 7
-
-
-
-
- kit building
- wagons
- (and 5 more)
-
Superb modelling, inspired and inspirational! Please keep the photos coming! Kind regards, Mark
-
 Hi Angus, This looks like being a fantastic project, and although 2mm/1ft isn't my scale, your recent posts elsewhere show that you've got it down to a fine art. I for one will be following closely for inspiration and ideas, so looking forward to seeing how you get on! With kind regards, Mark
 -
As the HMRS is in lockdown, I've been a bit naughty with this drawing and taken a screen-shot, and printed it to fit an A3. It certainly looks like a drawing that's been rolled up for a long time. Although the HMRS logo is still present, it's come out pretty clear, clear enough to start to produce my own drawing, except that the underframe details are not that clear. The underframe appears to be channel section iron or steel with what look like wooden extensions to headstocks to act as door buffers. Now, I'm an engineer by trade and I pride myself on being able to read an engineering drawing, but the lack of clarity is mildly frustrating. Bearing in mind that the drawing is from the Metro Cammell archives, and hence from a private builder, there's no reason why these wagons couldn't have had iron or steel underframes. But apart from a few goods brakes, the photos of MGWR wagons that I've seen all have wooden frames. I'll have a fresh look at it tomorrow! In the meantime, though, I've sent my membership application to the IRRS
- 309 replies
-
- 2
-
-
- mgwr
- 21mm gauge
- (and 1 more)
