

irishthump
-
Posts
1,812 -
Joined
-
Last visited
-
Days Won
7
Content Type
Profiles
Forums
Resource Library
Events
Gallery
Blogs
Store
Community Map
Posts posted by irishthump
-
-
Managed to get there this morning myself. Some great layouts on show and I got a demo of the 071 from the man himself as well as a chat, what a gent Pm is!
Missed Des and his Sulzer, but that's what you get for being late in the door....
-
Shem I tryed a Bachman 3 function first which did not
work,and ended up using the PM 201 chip from 222.
How do you mean? Did it not work at all or did certain functions not work?
-
I'm hoping to get over there tomorrow myself, marathon permitting.
But it looks like I will have missed most of the excitement...
-
Sorry to hear of your loss, Noel.
The tamper and the layout look great, as always!
-
Spare a thought for those of us that are waiting for the SUpertrain livery...
-
BTW here's a link to some of these switches on Ebay...
They sell a lot of interesting stuff and they're reliable, I've bought from them before.
-
£4.99 on eBay for 5 and 75p postage
Jayzus, that's pretty much the same. I would think you could get them in bulk for a lot cheaper....
@BabyGM:
How many do you need? Bear in mind you can use one switch to control 2 points at crossovers and you should always have one or two extra in case one fails.
-
Excellent
I'll give Marks a ring and see if they have them in stock
Thanks
I picked up a couple myself last week, so he should have a few left.
-
These are the switches you need...
http://www.nairnshire-modelling-supplies.co.uk/spdt-centre-bias-onoffon-switch-p-1062.html
They are also called "sprung centre-off" switches. They can be got in Maplins but they charge an arm and a leg for them, if you're close to Mark's Models in Dublin he has them there for about €3 a pair.
-
Here's a pair of 141's double heading a pair of cravens and steam generating van in 2004
Why would they be double-heading such a small train? Did one loco fail or is it just being transferred?
-
All I will say is -
BALLS OF STEEL!!!
-
@ FrankS,
The Bachmann NEM pockets can be hit and miss too. I find the 141's pocket sits just a shade low so you have to either stick a sliver of thin styrene under the coupler shank or bend it slightly to get it to align. The same with my Class 25 too.
Don't even talk to me about those little springs! Thank god they give you spares with the couplers... I find a few always fall out when they are sent through the post.
-
When fitting kadee's to Lima mk3's the #5 has to small a shank. I have found the the long shank kadees work best on the mk3's. Of the top of my head I think I used a kadee whisker coupler #146. You attach this to the chassis and not the bogie and it should work OK on tight curves.
I remember you advising me to get the #146 which I did but it sits too high when fixed to the floor of the coach. I got the offset version; #149 but it still required packing with very thin styrene to get it at the right height. But like I said it just would'nt behave itself on curves! When hauling coaches it was ok but shunting was a nightmare, especially when using delayed uncoupling.
Coupling was iffy too as due to space my sides have long curves. As you know if you're not dead straight when trying to couple body-mounted Kadees they just won't work. You can get away with this when they are bogie mounted.
I will have another go body mounting them again soon but I think I will need to buy a large selection of the different couplers and spend some time experimenting. As I wanted to get my stock up and running I decided to go with the "quick fix" and bogie mount them, which works great!
-
Nope.
Well that clears that up, thanks Warbonnet!
Looks like there's 2 choices; use "artistic licence" and paint them in Black and Tan to match the era of my other stock.
Or paint them in IE livery and buy another 141 or two to haul them!

-
They were bought second hand in the late 80s or early 90s from a scrap dealer in the UK (Vic Berry, who cut up some C Classes over there) so did not appear in Black and Tan. IR with the white stripes would've been the first livery.
So CIE never used MK2 a's before then?
-
Guys,
I have a few BR Mk2's I want to repaint and I was wondering about appropriate liveries.
I know that IE bought some of these coaches around 1990 which were painted in the orange-with-2-white-stripes
livery. I'm wondering did CIE ever run any MK2's coaches in Black and Tan in the 60/70/80's?
-
I used Vallejo German Orange via an airbrush and it isnt too far off. I got the recommendation from someone on here or maybe on the old yuku forum but I cant find it at the moment. The other poster had used a paint from Citadel range which was their equivalent of the Vallejo one.
http://shop.princeaugust.ie/paints-and-brushes/german-orange-acrylic-paint/.
I think that was me, I used GW Macharius Solar Orange which is more of a match for the older "black and tan" orange.
-
Hi, Tom.
Rich's response there really sums it up, Anto is the resident authority on Kadees and there is also a wealth of info on other forums regarding fitting them to your stock.
Rich also describes fitting the Kadees to the underside of the coach as opposed to the bogie which is the norm with US/HO stock. This is also prototypical and the way the couplers themselves are designed to operate.
I initially tried this but found I had nothing but problems when traversing curves on the layout. I found through other forums that the majority of UK/OO modellers opt to fit them to the bogies so I tried this method and found my problems disappeared! Whether is was a problem with my fitting methods or the amount of tight curves on my layout I just don't know, but I had to go with what worked best for me.
You can see in the pic below that fitting them to the Lima MK3's was simply a matter of removing the tension-lock hook and attaching the Kadee no.5 directly to the top of the bogie. The coupler height gauge that Kadee supply is absolutley essential for the getting the coupler to sit at the correct height, and by pure fluke the Kadee happened to sit at just the right level.
-
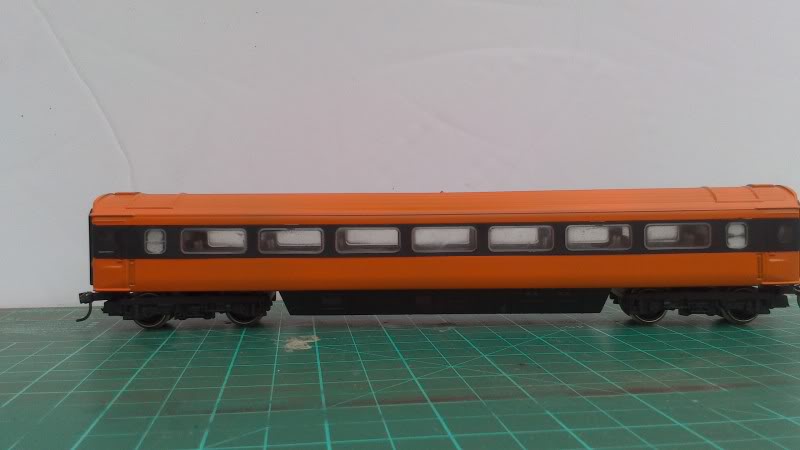
Here's one coach after reassembly...

I had planned to paint the window frames but instead I just filed across the raised detail with a fine emory board which highlited the frames
surprisingly well in a grey colour so I may not bother.
The overspray on the glazing is annoying but since I'll be weathering these I don't think it's a huge issue, it resembles a good healthy coat of grime!
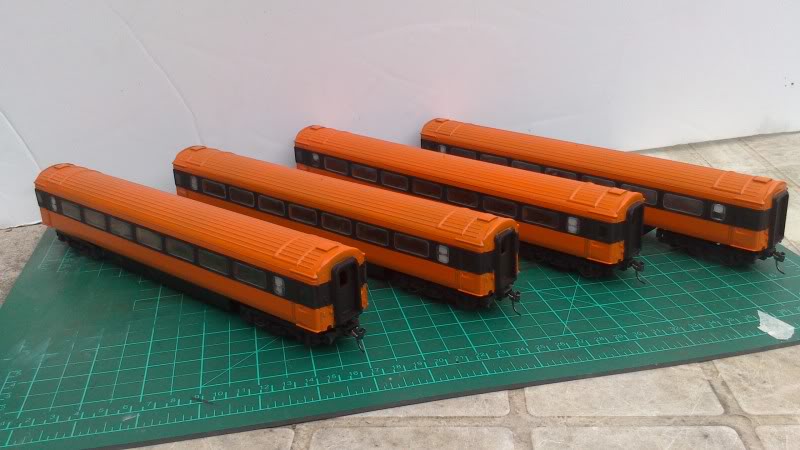
Here's the full rake so far...
I think the orange is a tad bright for Supertrain but I'm happy enough with it.
Plenty more to do, I'm waiting for an order of transfers from Railtec and a few other details like the gangway doors need to be done. I'm also going to replace the old wheels as they are causing a few headaches on the insulfrog points.
I also have a buffet car left to do and I saved the worst of the coaches for conversion to an EGV.
-
I had recently started repainting my own rake of MK3's into Supertrain livery in anticipation of the arrival of the 071's....
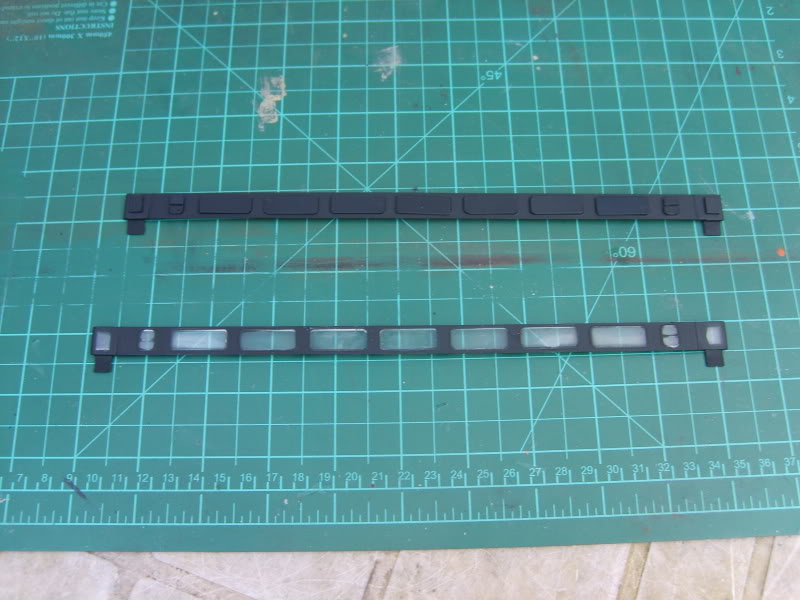
I had picked these up on Ebay a while back. They cost me next to nothing and when I got them I could see why! These are the older Hornby MK3's, the windows and glazing are a single strip which would be a nightmare to repaint....
I tried to mask the glazing with tape and cut around the window frames with a scalpel but this did'nt work. So I made small masking pieces from
thin sheet styrene and fixed these over the windows before spraying with black primer.
Did'nt work out TOO bad! A bit of overspray worked it's way under the masks, but since the end result would be weathered I could live with it.
The bodies after several thin coats of orange...
I used an aerosol can of acrylic which I stumbled across in the local Art and Hobby shop. Although I have an airbrush I chose the spray can out of
pure laziness!
Once again my masking let me down a little, so a fair bit of touching in was required.
-
Lovely work! I'm wrestling with a few old Hornby MK3's myself, if I can get mine to look half as good then I'll be happy....
-
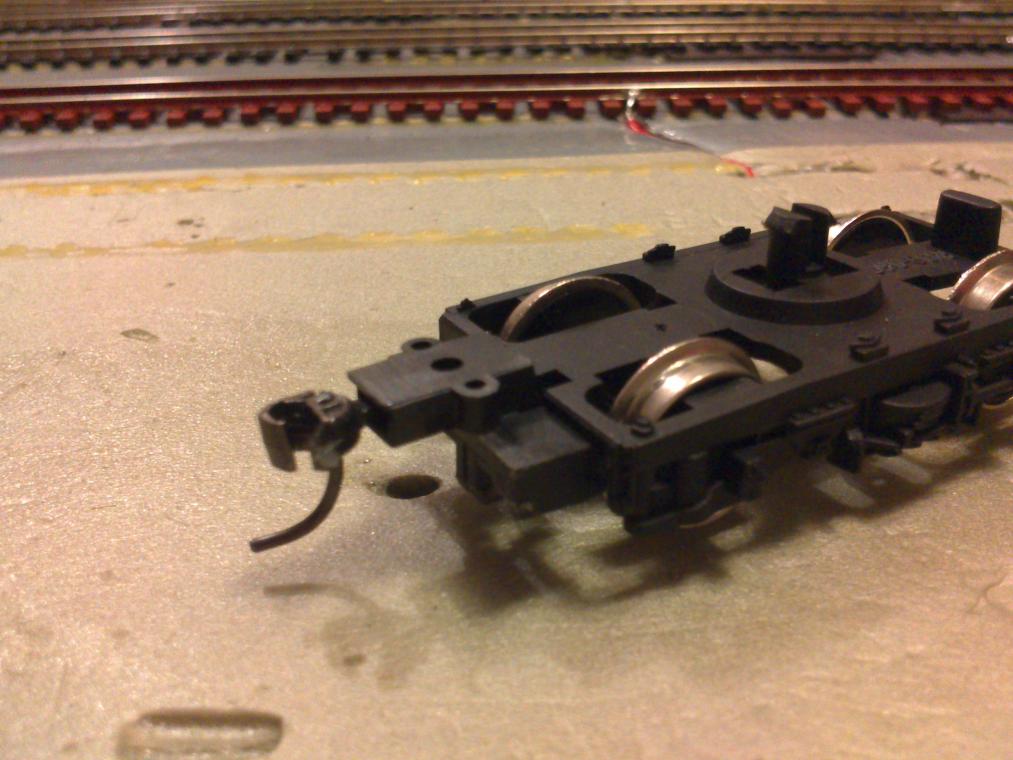
There is a small problem with some of the circuit boards on the 141/181 the very fine copper circuit that runs down each side of the board from the pickup wire to the decoder harness can burn out. Its an easy fix as all you have to do is solder on a couple of wires to replace the burnt out circuit. Take the body off and check out the circuits you will clearly see if they have burnt out on you.
Anto, can you give me any more info on this fault?
I picked up a 141 cheap on Ebay a while back which I discovered was'nt picking up at all on one bogie. I could'nt see anything wrong with the board and ended up soldering the pickup wires from the dodgy bogey to where the other bogie's wires connect to the circuit board. Since then, it has run perfectly.
-
Layout is looking great! As the lads said, the lights take it to another level.
I love the water tower, the rust looks so real.
I noticed an Ikea bag in the backrocund of one of the pics, did you buy your ballast there?
-
Body removal via 4 screws which are located (2 each) at the end of the bogies. Appears to be a single moulding-you can understand that I did not pull a preproduction model apart!!!!
Ah, sweet! Seems they learned from the 141/181s. I too have horror stories about removing the bodies from them....


Murphy Models 071 - New, detailed pre-production photos added!
in Irish Models
Posted
Why are'nt the headlights on F0? That's the standard default for headlights on all decoders...