Maitland
-
Posts
135 -
Joined
-
Last visited
-
Days Won
1
Content Type
Profiles
Forums
Events
Gallery
Blogs
Everything posted by Maitland
-
Resin prints can probably warp more than, say a brass kit - during printing or afterwards. You can probably get away with more with "normal" OO flanges, but P4 is more sensitive. And then there's my trackwork skills... Thanks for the clarification John. I'm now thinking in terms of adding printed W irons/ springs to the body print, with built- in pockets for metal bearings for those who can get away with it, and putting in a slot so the bearing can be slid in with the axle in place, then fixed with some suitable gunge. Hopefully of the sort that can be got out again with a needle. For others, a rocking frame with sleeve bearings on one of the axles can be part of the chassis assembly.
-
I was seeing how my prints turned out before designing the chassis. What I need to know is first, how flexible the material is for easing axle ends into bearing cups, but rather more than that how to achieve a good 3 point suspension for 21mm/ P4. BTW Rob that looks how I'd envisaged the thing. How long will it be before my printing's up to that?
-
Thanks John, ordered the protective film and will call at Toolstation next time I'm passing. I'll put off printing till I've got them. Daughter and g-kids here for weekend so I've got plenty to do anyway. Dry lube spray to printing side of PF film or non- printing side? Rob, don't do the small tank yet, having looked at supports I'm taking the chimney & dome off the boiler and making them separate components. Also I've decided my printed underframes are unlikely to work and looking at metal frames with turned spacers. That's part of my motivation for developing a one- off photoetch printer as mentioned in the etched kits thread, though it won't be done for this job. Traditional piercing saw and brute force I fear.
-
Looking though my graticuled goggling scope, I reckon it was printed at 45° in about 0.1 - 0.2mm layers. As I said, I don't expect the earth at that price, though a quicker turnaround would have been appreciated. Next, get my new Anycubic Mono 4 fired up (that was weeks late, too) and start wasting resin. It might be worth getting the latest update from Github if you're going to print it. But note I got the door handle hole spacing wrong... I've learned a great deal from the process of designing the thing with 3D CAD, and getting it into a manufacturable state. The feedback from Seeed justified the cost in itself.
-
That bad, is it?
-
I'm just getting started with 3D printing, but I'm beginning to understand the limitations, particularly with low end printers. I'm forming an idea that you need to use multiple technologies, exploiting the characteristics of each and not trying to enter elephants for the Grand National or ferrets pull logs around. And when it comes to finicky detail in the nearly- flat, etched metal is best. Cavan and Leitrim or Leek and Manifold end platform railings would be remarkable in resin (though I bet someone's done it), but diesel bodies or semi- domed carriage roofs are begging for resin. It also strikes me that railway modelling is a generational thing, and that the boom from the 70s to present is unsustainable. Many of us are approaching or beyond retirement age, and many younger people just haven't got the time, space or disposable income for what can be an expensive hobby. House prices and childcare costs perhaps. The next generation of modellers may well be thrown back on their own resources, and kitchen- table modelling (from recycled scrap like the 40s- 50s) could be the future. So things that "democratise" modelling could be useful. The drift of 3D printers towards affordable is encouraging, so can something similar be done for etched metal? So in quite another context I came across a DIY photoresist exposer for PCBs. It uses standard mechanism components as used in 3D printers. The electronic required is widely and cheaply available, cheaper than when the project was active 8 years ago. It needs upgrading to double- sided for metal etches. The project creator is still around, and much respected, having moved on to be the backbone of the grbHal CNC controller project (he lives in Norway). I have many of the electronics and programming skills required to take the project on; I'm decidedly deficient in mechanical nous. I know little about precision etching, though my wife once tried to make marrow chutney with ferric chloride, believing it to be vinegar. Any others here with interests in that direction? I used to be in MERG but seceded because they seemed to get a bit stuck in a rut.
-
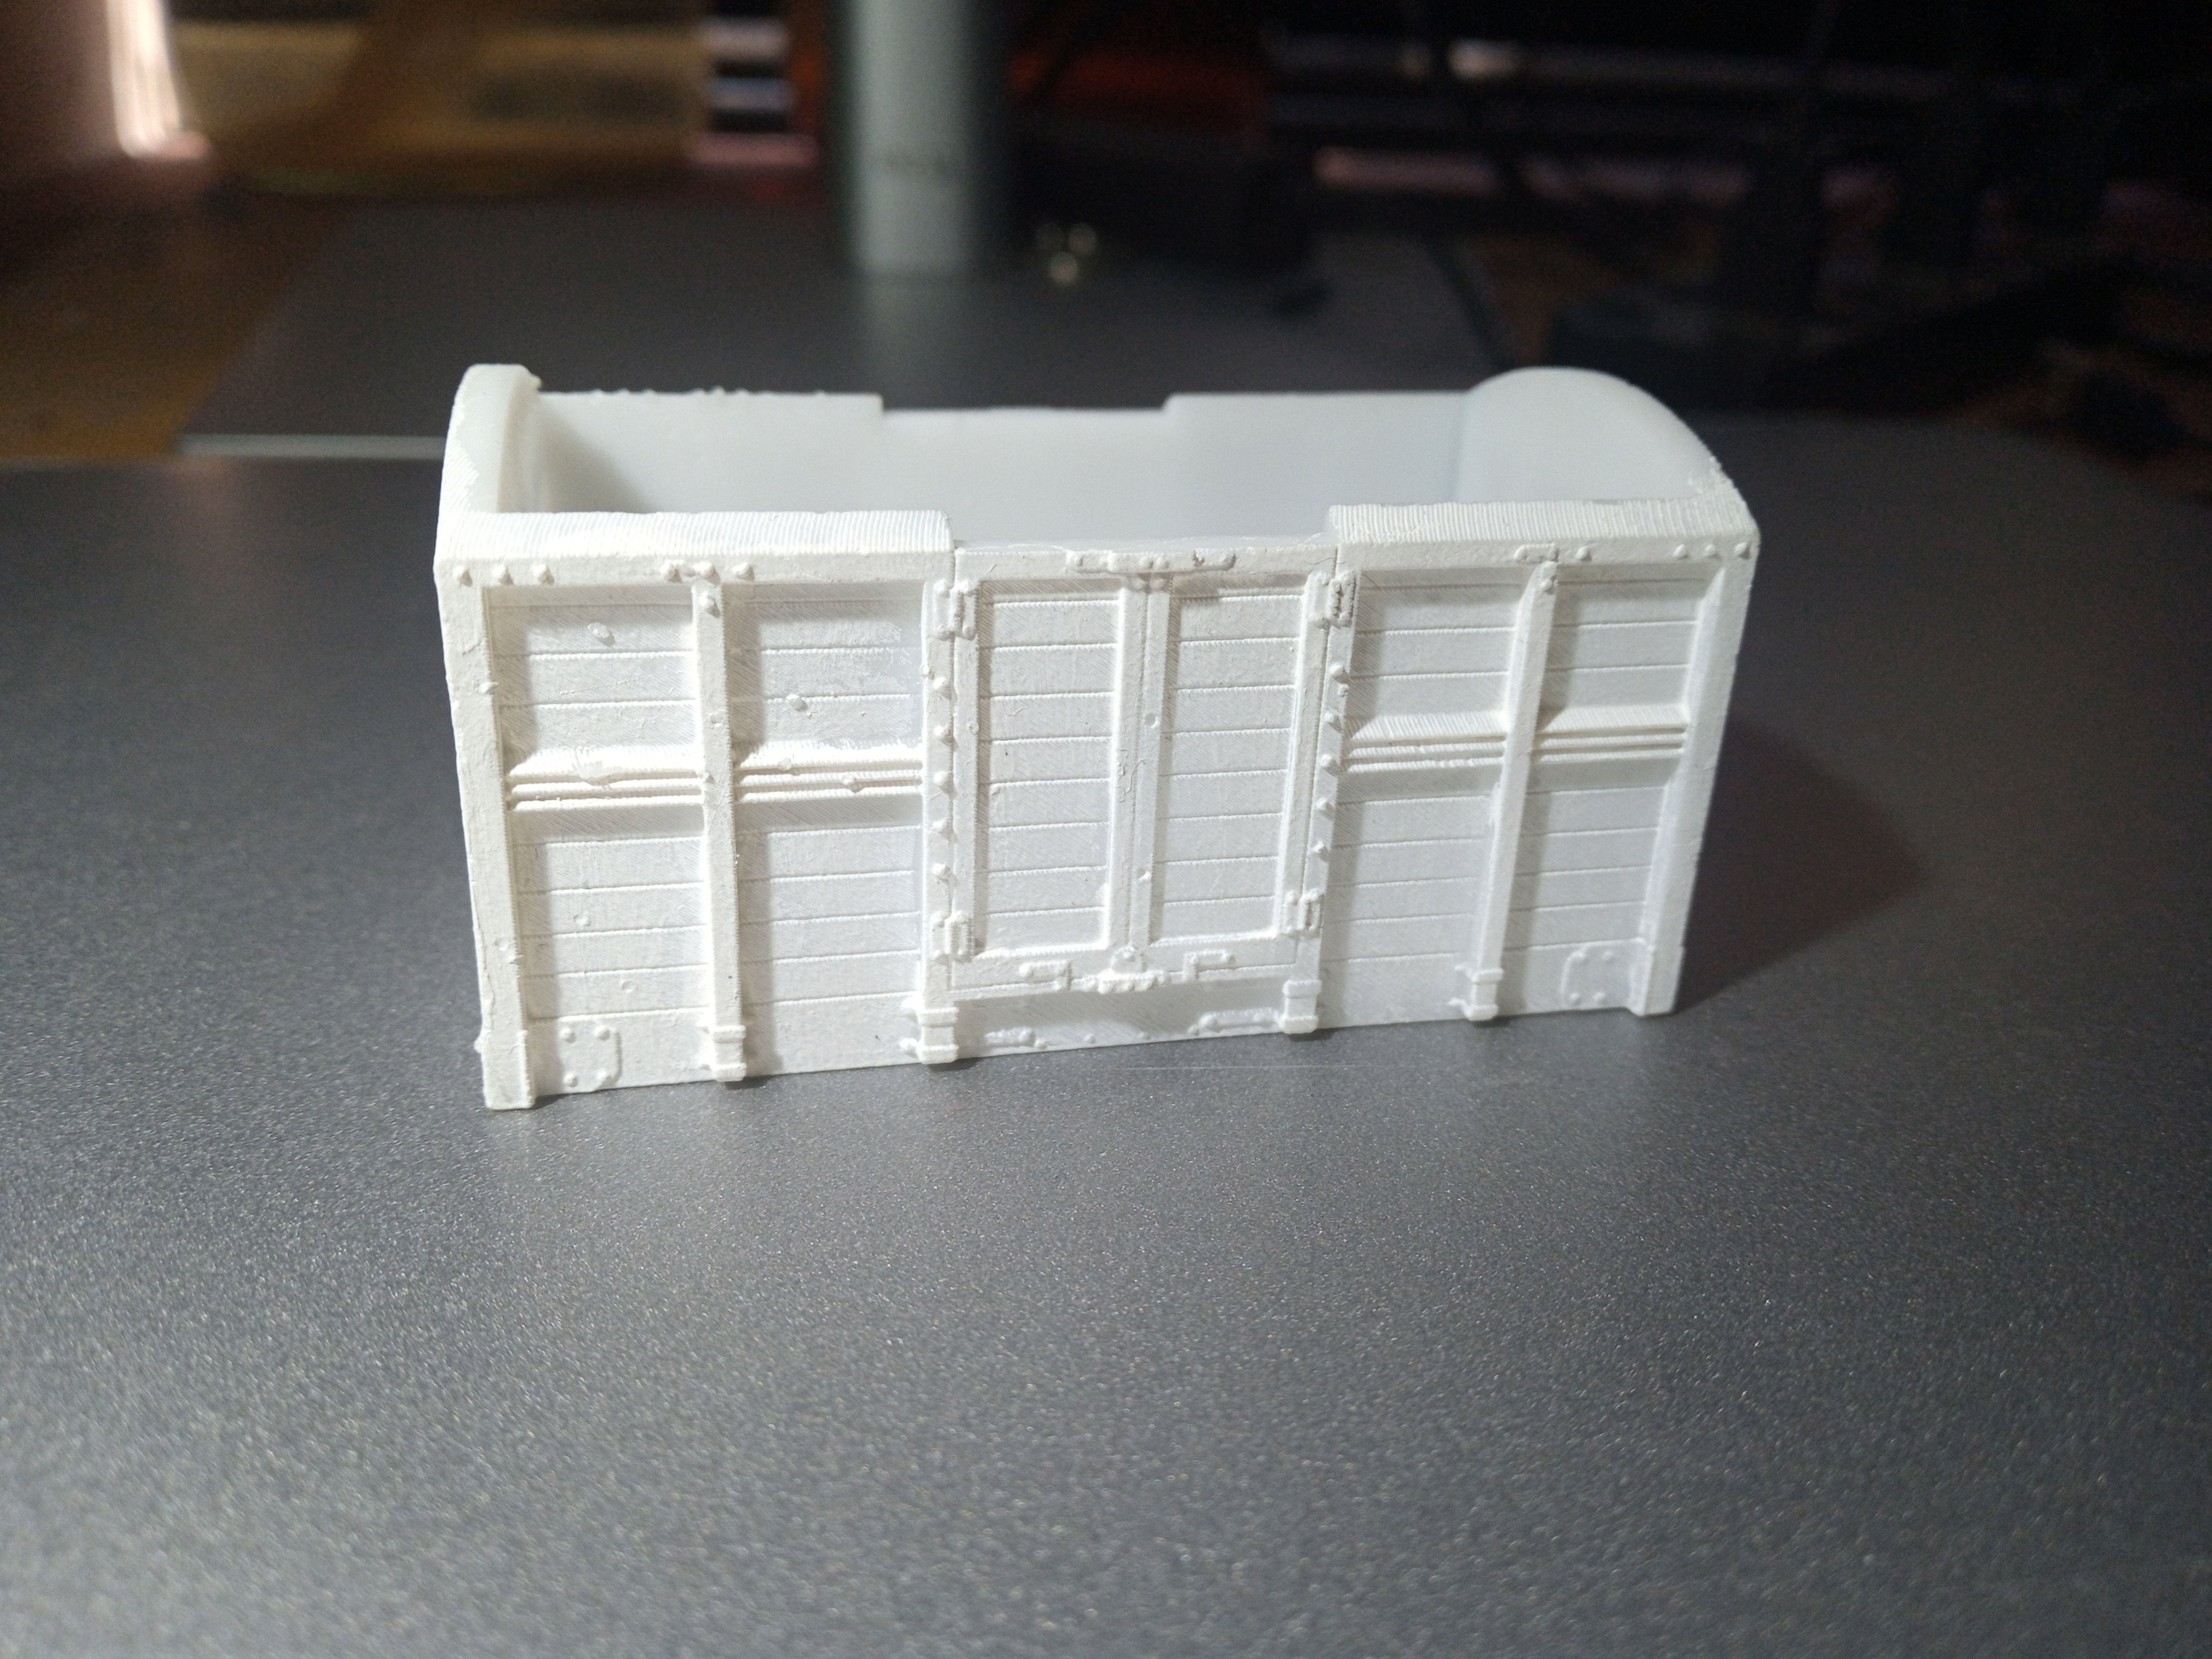
Someday my prints will come... actually they did, 6 weeks late but 4 units rather than the 2 I ordered. It seems that Chinese industry isn't infallible - they order was lost in the system. Some takeaways here: first that they admitted it (not the Chinese stereotype about "losing face"), second they were tremendously helpful about making my initial STP file printable, thirdly that they rewarded me for waiting. Maybe the final STP was so good that their just-in-case extra prints all passed muster. Now the prints themselves. I'm impressed by the detail they achieved, just standard resin. I was expecting the metalwork and bolthead detail to be worse. The strength of the units is acceptable- I haven't tested them to destruction, and my Pansy Potter niece who crushed a half - built 2mm scale brass 6 wheel carriage end to end 40 years ago- just to see how strong it was - is no longer available. She grew up to look like a supermodel and now lives in France most of the time. There's a little bowing in the ends, I can easily thicken them. The downside is that there are small excrescences here and there on the surface which are difficult to get off. They seem to be different on each unit, so I wonder if they are floaters in the resin rather than the remains of supports (I can't see where any supports were). You can see a couple on the louvres in the rather cruelly oversize (and badly painted) photo. All in all, I'm reasonably impressed. They will be perfectly useable at £5 each, and are much better than I could scratchbuild myself. What do out Printmaestros think?

-
Progress on SLNCR small tank. I've decided to use a cheap Chinese gearbox/ motor set at least initially. A fiver with Now, a question for you mech eng experts: have any of you tried printing driving wheels? I was thinking of the spokes etc of ABS type resin, the P4- ish tyres of mild steel (made with my trusty Unimat CNC lathe!), the lot "somehow" glued together. The motor has D shaped axles, and printing the wheels would make quartering easy as well as solving the problem of extracting the axle to replace it with a round one. And save £50+ for wheels. As you see from the screenshot, I haven't decided yet how to fix the wheelsets in the frames - I'm aiming for a Sharman type 3 point suspension with the driving axle rigid. Any experiences here would be gratefully listened to.
-
 Just realised I put this in a rather stupid place... could anyone move it somewhere better?
-
Still climbing the learning curve for Solid Edge. My Chinese van prints still haven't arrived - they say they got lost in the system, so it doesn't just happen here. In the meantime I thought I'd have a go at one of my favourite locos- the SLNCR "Leitrim" class small tanks. This is the all - in - one assembly, actually it's 3 parts - boiler, tanks & cab, and frames and running board. I thought I'd do that last bit together to give it a bit of depth in the hope that it will actually print. So work in progress: SLNCR Small Tank.stl
-
Northroader: Please don't even to begin to think such a thing is funny. It's quite possible that the "mug" is wearing oily overalls, and perfectly possible that your smouldering waste is hot enough to ignite it. Result? Burning to death, or at best a painful recovery. Or, especially in the case of volunteers who might be as past it as I am, a breathing crisis. Or a volunteer leaving the group. A prank went wrong last year in Swansea: (sadly the original newspaper report is behind a paywall). https://www.railforums.co.uk/threads/man-in-court-for-setting-fire-to-fellow-worker.302502/ No intention of being a killjoy, but that doesn't count as joy.
-
A3 & A5 awaiting trials. They were found guilty.
-
About 25 years ago, in the flatter south bit of Derbyshire near the Trent, a bloke got fed up of people raiding his shed for tools and stuff. So he rigged up a sawn off shotgun and a tripwire to tonimartinate the next intruder. Which, he having forgotten about it, was his good self. Apart from shooting his own wibbly bits off, he got several years for the illegal weapon. Leek & Manifold... it wouldn't have worked even if it had started from Leek rather than the middle of nowhere. A bit of an ego trip by a competent engineer but a poor economist, and not helped by the lead and copper mines that were supposed to supply the traffic being shut even before it was built.
-
Hope it goes well with the approaches. But I've a horrible feeling... about 10 years ago, there was an archaeology dig going on not far from here (the rules about amateur archaeology are very different from Ireland), and I got chatting to the people on site. They were very professional about it, they'd been digging there about 10 seasons, everything was recorded carefully, diagrams, photos, context sheets, artifacts, the lot. A year or so later I passed the same place, just a couple of people there. The group had basically dissolved after the death of one of the members. It turned out that the entire archive was in his (very secure) garage, but he'd died, and his relatives wanted to get the house sold. They cleared the garage, and everything went to the tip. They'd had reports published, fortunately, but only about some aspects of the findings, and it was so rich that there was years' worth of work still to be done. No longer possible.
-
Be patient, I'm waiting on a (4mm scale) resin print on a slowboat from China. I'll post photos when that's ready, but the design is evolving, it's in debug stage at the moment (see above). I think for most people who only want a small number occasionally, outsourcing is likely the best option.
-
The layer lines give it a bit of a wood effect. But at some point the buffer holes vanished. I'll fix that in Github. Flying Snail, I'd lay off that diesel wine. Even Co-op screwtop tastes better. V0.3 with buffer holes now in Github.
-
Link to the Github repository: Maitland's CAD model(s). The license is as open as can be: do as you will with it, but don't blame me! This will be true of anything I put there.
-
Looks like Cumbria was built specially for use on the Derry Central, and that "Kilsea" should be Kilrea.
-
There was one attractive if rather obscure contractor's saddle tank that worked in Ireland, details in PDF. It worked on the Great Central London extension, these pics from Contractors Locomotives G.C.R. by N Cossons BA (Leicester Museums 1963). Cumbria.pdf
-
Regarding the Mont Cenis tunnel and traction.
Maitland replied to spudfan's topic in Letting off Steam
The Fell system. It was trialled on the Cromford & High Peak line not all that far from me, and was meant to complete the Mont Cenis route while the tunnel was being built. Unfortunately for the promoters, the tunnel was completed using pneumatic drills much quicker than expected, the line was then obsolete, and they lost a lot of money. The centre rail was installed, for braking purposes only, on the Snaefell railway in the Isle of Man, and is still in use. Fell had other ideas for quickly built, lightly engineered railways, that never quite seemed to hit the target. The first two locos on the Pentewan Railway in Cornwall were to his design, and apart from having the cylinders above track level (!) were similar to those build for an experimental rapid- deployment "train set" military railway that didn't get adopted either. He had a very strange taste in locomotive design, even for that age. If you can be bothered scanning, I'd love a copy. -
It would be tragic if the artwork were lost. WW has been a major resource for years, and a project to digitise Allen's work (crowdfund it)? would be a gift to the future.
-
Rob: Thanks for the invite, but that's Chester folk festival weekend and another of my too- often less than healthy pursuits. I've got (somewhere) an article on tarp covers, but a quick web search suggested Tunnocks caramel wafer wrappers: https://yourmodelrailway.net/forum/index.php?page=topicview&id=hints-tips-smaller%2Fmaking-wagon-sheets.
-
Thanks for all the help, very much appreciated. I've decided in the end to leave the roof off. Having looked at the suggested supports that would be added, I wondered how I would get the ones inside off. So for now it's an open topped body with no running gear. Next phase of design follows for that. I've ordered 2 prints from Seeed at about £10 each including delivery & taxes, so let's see how it goes. I'll post a photo when I get them, should be 3-4 weeks. One of the slight surprises was the STL file repair needed when I loaded it into slicer software. I would have thought Dassault Siemens, who design Solid Edge and were also on the committee that designed the 3MF format, would have checked that during the STL generation process. But perhaps that's an artifact of having to learn the CAD package as I went along - when I used it 25 years ago it was almost entirely for 2D wiring diagrams. The whole process so far has taken about 3 (not at all continuous) weeks, including 4 iterations from scratch of the body shell as I worked out how to navigate through the vagaries of Solid Edge. One of the weirdest things about it is that it seems, when stressed, to switch sketches from where I designed them to another sketch. Another is that unless you keep a close watch on it and stay ready to hit the Undo button, you find that some trivial change made half an hour ago has had a drastic effect on some long- ago added feature and you have to unwind all that work. Moral, use save frequently and check everything after messing with it. I'll probably do the floor and roof in styrene sheet using the van ends as a template for ribs positioned to locate the roof securely. I'll put the body "as it stands" on Github here.
-
Thanks for all the comments, and sorry I've been slow responding- away for bank holiday weekend. I don't intend to market anything- I had quite enough of that being self- (un)employed for 20+ years, the world's worst businessman. If I had a gold brick I couldn't sell it. But anything I design will be made available freely for anyone to use, via Github probably, along with details of where it can As for the cost, well, count the hours of conventional scratch- building or high- quality kit assembly, and charge yourself- even at the minimum wage or less, it's not a cheap hobby. Now what I'm really after is to pick your brains. I've not done resin printing before, so what resin gives an acceptable level of detail (what level is realistically printable? 0.5mm, 0.2mm, 0.1mm?), what about thermal stability, do I correct for shrinkage or does the software do that, where to put supports, which way up to print it, etc. etc. I don't even know what questions to ask yet - but you've done it and probably learnt the hard way. If you've posted about this elsewhere, links please. Odd questions: If I have a van or carriage with a roof and a floor, or a tank wagon, how does the surplus resin get out? Can I print buffers, brake gear, door handles etc in- situ, or are they best separate? How do you get axles into the bogie or chassis? Is there any snazzy trick to allow an axle to float for 3 point suspension? What sort of paint for what sort of resin? I'm sure I've got dozens more questions coming as soon as the computer- generated ideal meets the sticky, messy real world.
-
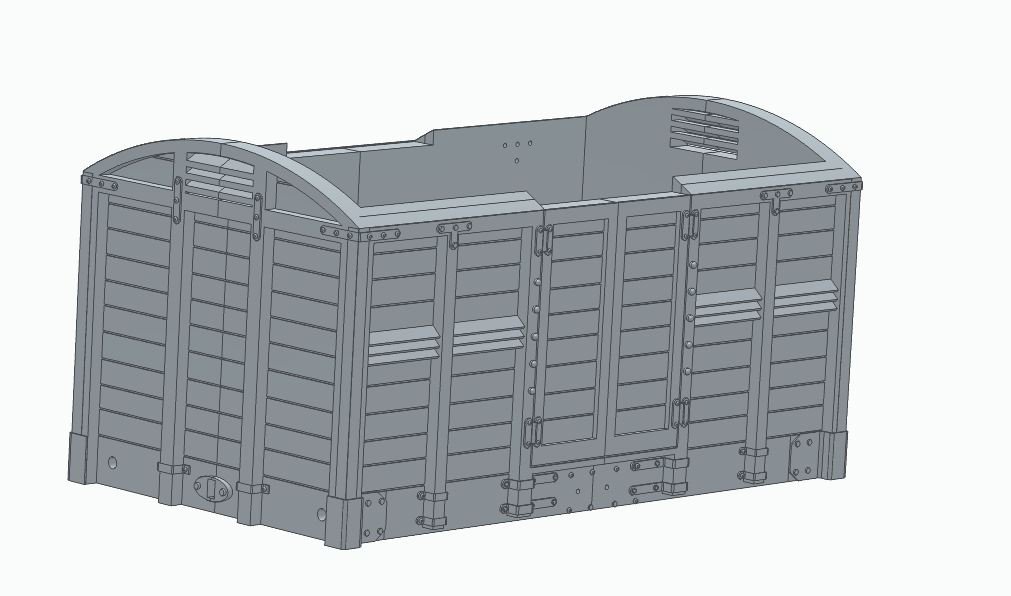
This represents the 1893 series, drawing in Ernie Shepherd's book. Created using Solid Edge community edition, and not quite complete- I haven't worked out how to do the door fastenings, obviously the undergear and roof are missing. It's actually to 4mm scale, but the STL (about 3MB) can be scaled. When reasonably complete, I intend to put this on Github so anyone can use it. I got a quote to make it from the Chinese company Seeed Studios, who I've used in the past to make very good PCBs, about $26 for two, including shipping and taxes. Actually I'm not very sure what they've quoted for, they could have taken dimensions as mm not inches, a bit like Spinal Tap's Stonehenge (how do I check the dimensions field in STL?), and I can't contact them as it's Chinese holidays. Who would grudge Chinese workers their holidays? Anyway, you resin printing experts: should I do the roof/ buffers as separate parts or will it print with them in place? I can't try it out as my order for a printer and washer hasn't been delivered yet, boohoo. Has anyone tried printing open- spoked wheels?
- 59 replies
-
- 13
-

-

-