Mayner
-
Posts
4,916 -
Joined
-
Last visited
-
Days Won
119
1 Follower
Mayner's Achievements
")


-

Small yards & locations on the irish railway system
Mayner replied to Celtic_transport's topic in General Chat
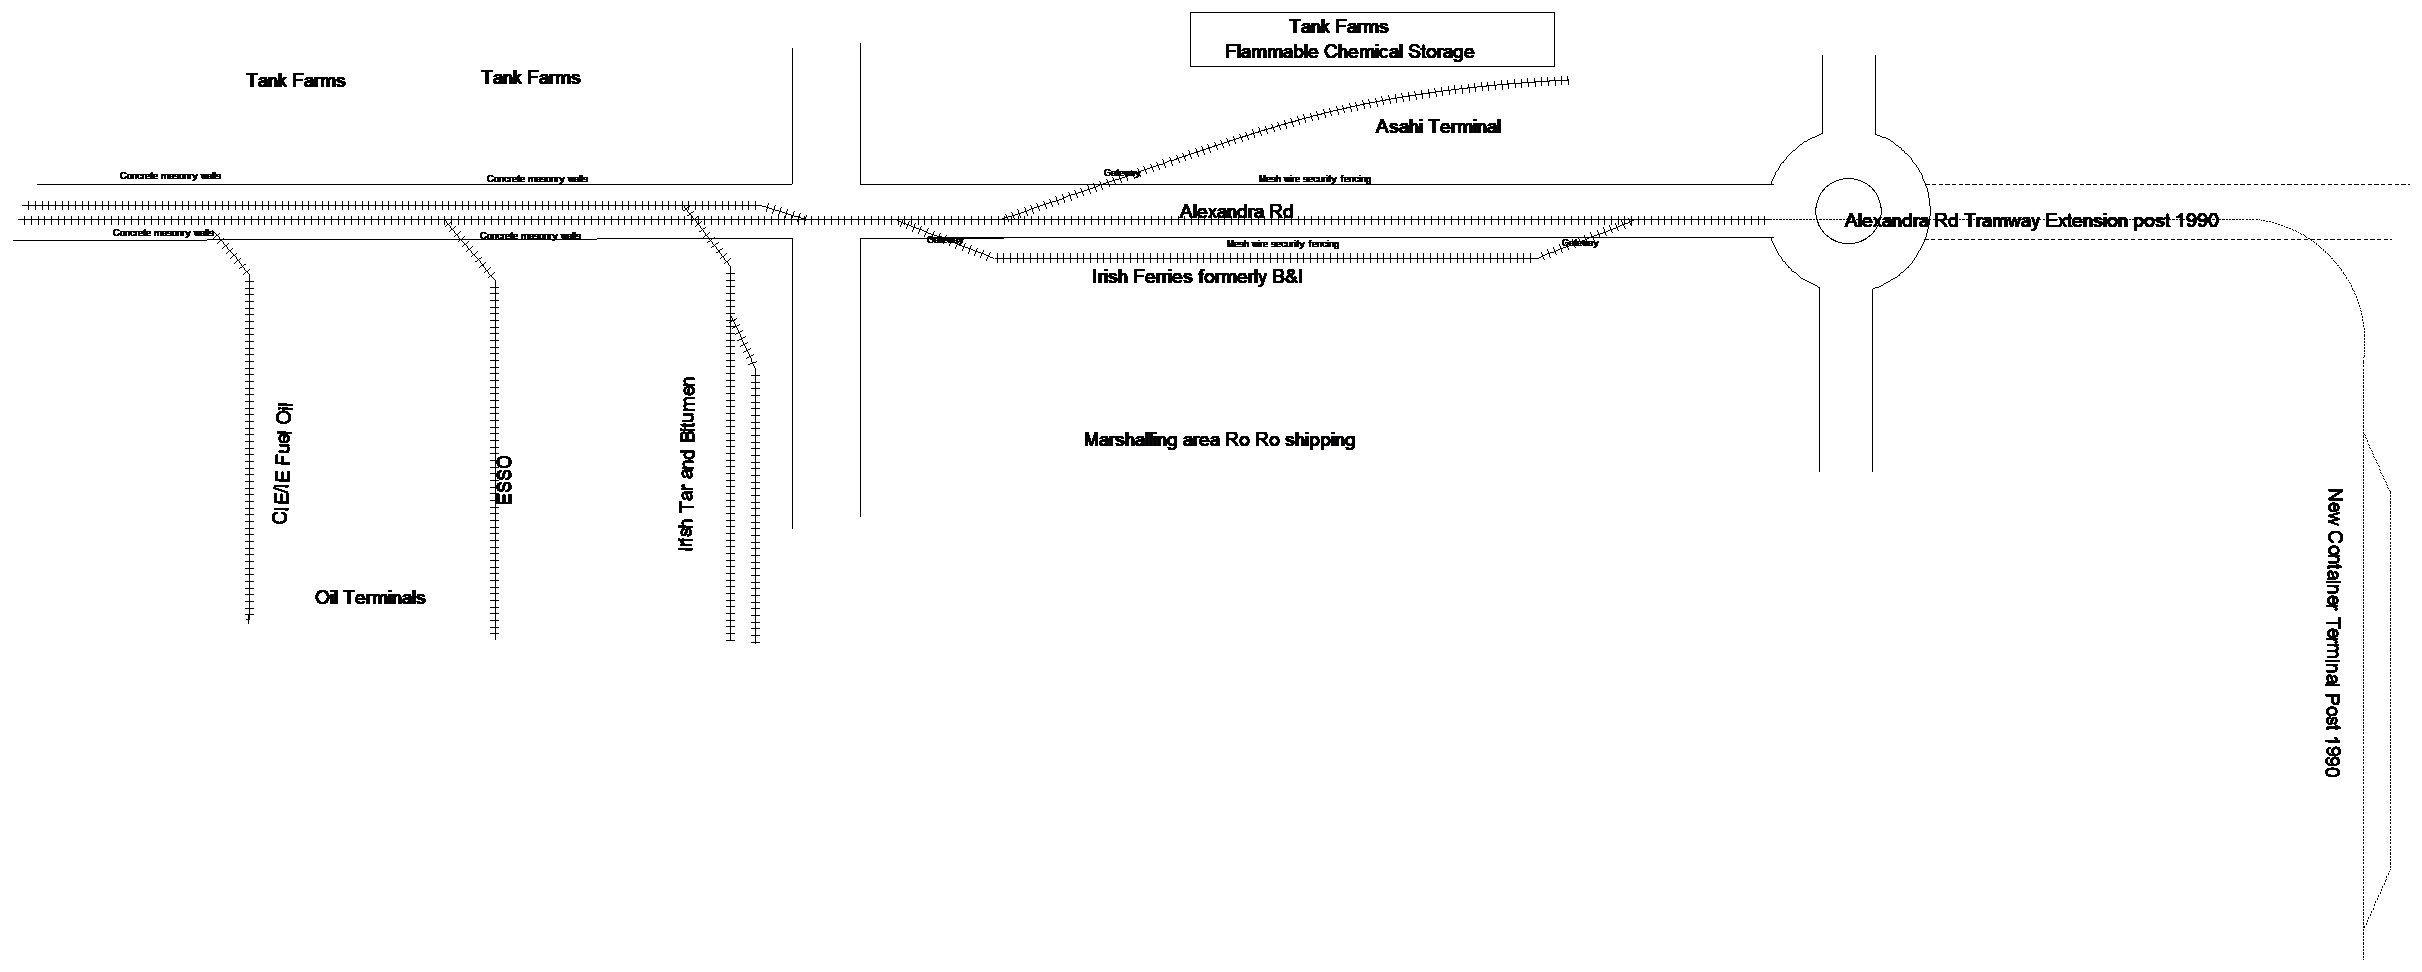
I worked on a construction project in Dublin during the late 90s and apart from the CDL/Gouldings siding i hadn't really thought of the potential of Dublin Port in terms of small layout for the 90s/00s era. Although CDL traffic had ceased Dublin Port renewed the connection to CDL/former Gouldings factory and disconnected a number of disused sidings when it upgraded the Alexandra Road Tramway during the late 90s Although traffic along the Alexandra road to and from the ESSO, Bitumen and Irish Rail fuel terminals appear to have been worked by Port Tractor, locomotive hauled mainly 141? workings operated along the Alexandra Rd Tramway to the short lined Container Terminal at the end of Alexandra Rd Tramway and the Ashai Chemical Terminal. The Asahi Trains ran round using a short loop within the Irish Ferries terminal on the south side of Alexandra Rd. The loop within the Irish Ferries premises was the terminal for B&I Liner trains during the 60s-70s. As far as I recall a container train (from Cork) operated along the Tramway mid-late morning, while the Asahi Chemical train was an evening departure. The trains handled at the Ashai terminal appeared to be relatively short , 42' flats used up to their final year of operation 1987? Tank wagons worked along tramway by Dublin Port owned Tractors, but possibly a shunter or main-line loco in a main line scenario. IRM/Heljan tankers--ESSO traffic Containers-4w Flat Irish Tar and Bitumen, though some 1950s era tankers sitll used for storage inside terminal late 90s. CIE?IE 1970s eara Fuel Tankers Wagonload era sidings serving miltiple oil terminals, granaries and quays. Shell-BP Planet diesel shunting loco to early 1970s Scope for mionimal space/modular or quite large layouts.
-
Brian McCann an MRSI member showed me a colour photo of a brown ex-GS grain in relatively good condition taken at Mullingar during the late 70s/early 80s, unfortunately I didn't ask for a copy!
-
Missing parts ( 1 tender wheelset & crankpin brushes) to complete No 1 arrived surprisingly from Wizard Models in the UK on Friday so completed shorting out the (plastric centred) wheels in fitting the loco with live axle pick up. Set of driving wheels with 'spider' soldered to wheel rim, suprlus metal and solder removed with needle file. Set of Bogie wheels 'spider' clamped in place with Micro-Mark clamps/heatsink (similar in principal to a metal clothes peg) No damage to plastic/nylon wheel centre after shorting out 7 wheelsets (14 soldered joints), used 145° solder and homebrewed phosphoric flux Undated photo Great Southern Locomotives "Transports of Delight" Smugmug site https://transportsofdelight.smugmug.com/RAILWAYS/IRISH-RAILWAYS/GREAT-SOUTHERN-RAILWAY-STEAM/i-H58MfCG Intending to complete the loco as No1 with original 'racing machine" cab in GSR condition "GSR Locomotives" "the bible" notes that the loco was rebuilt with a saturated boiler with a flush roundtopped firebox in 1930 and later rebuilt (date unknown) with a saturated boiler with a raised round topped boiler. The Smugmug photo may be of the loco in its second rebuilt state (mid-late 30s)with a 2 ringed boiler as the Class were orignally built with a 3 ring boiler with the dome centred on the boiler. Mock up of the that 1930s pose! Some adjustment required to the fitting of the loco and tender body on the chassis. Tender srings and numberplates are separately applied, safety valve casting came adrift during fitting, cab detail, coupling rods to be located or assembled, loco/tender to be balanced before trial running and painting finals.
-
Having spent over ten years investigating workplace accidents in both Ireland and New Zealand one of the common trends was that management and staff in large complex organisations (including railways) often take a 'tick the box' approach to safety admin to get the job done. In several incidents managers/staff have completed the paperwork ticked the relevant box without carrying out the corresponding physical checks. I would not judge the Spanish too harshly sometimes accidents occur in clusters while the Spanish high speed train de-railment appears similar in nature (rail condition) to the Hatfield de-railment in the UK two of the recent incidents may have been outside of the railways immediate control (incident with crane and landslip). I investigated an near-miss in 2003/4 when a crane on a construction site toppled onto the Cork Line near Inchacore, luckily nothing was passing at the time and a driver contacted CTC and stopped rail traffic. A cluster of three rail crashes involving multiple fatalities occurred on the East Coast Main Line in the UK (Hatfield, Selby and Potters Bar) between 2000 and 2003, CIE managed to de-rail the locos of the Sligo Passenger at Athlone and and oil train at Moyvalley in addition to staging the Cherryville Junction collision on 21 August 1983. Its arguable that Selby and Clough were unforseeable outside the railways control. Cost cutting/cutting corners to get the job done or even stubborness was a common thread in the other fatalities. Inadequate track maintenance possibly in combination with commercial pressure in a privatised environment contributed to Hatfield, Pottersbar disasters. 101 people died in the 1998 Eschede ICE train disaster in Germany
-
To be effective unpainted rust resistant/Corten must be exposed to the weather cycles of wet/dry conditions, its possible that the GSR may have selected rust resistant steel to eliminate the requirement to paint the interior of the hopper with a lead based paint (not exactly suitable for the interior of a container transporting a food stuff. Its possible CIE/Ranks may not have been bothered about the external appearance of its grain hoppers by the late 60s with the growing shift to road transport and the phasing out of wagon load traffic (considered totally un-economic in 1st McKinsey report. By contrast this former D&H Grain Car now in use on a mid-West Regional road, has not seen a repaint since these cars were introduced in 1974 over 50 years ago. Finding these cars in almost their as introduced livery on the Red River Valley and Western in Jan 2024 (complete with initials and shields came as a complete surprise. These cars were originally introduced in a bright red paint scheme not unlike the Ranks scheme of the 50s. The D&H PS-2CD cars had a 4427 Cu Ft capacity approx 60 tons equivalent to 5 Ranks wagons or over 60% of the entire Ranks Irl wagon fleet
-
I have become a bit of a loan wolf in recent years and not sure if I would inspire Kiwi modellers to take up Irish 21mm gauge modelling. In certain respectsI probabably would have achieved more if I have followed Richard Chown's and David Walker's example and worked in 7mm on 36.5 mm track rather than in 4mm when I started building Irish outline models. At the time everything would have had to be scratchbuilt anyway and working in 7mm would allowed me to hone my scratchbuilding skills and helped to avoid getting distracted collecting and assembling kits and later rtr models that were not strictly relevant to my interest in the MGW and more recently the Burma Rd during the steam era. Richard Chown's Castlerackrent evolved into a single track modular system capable of being exhibited in a number of different configurations, David Walkers Killanney layout (exhibited at the Chatham Show) apparrently was capable of operation with the Castle Rackrent System. Interestingly the One Track Minds group on the South Island exhibited a number of Sn3 layouts with realistically modelled NZ scenery, buildings and structures at exhibitions 15 or so years ago. FREMO-21 would appear to be an excellent option for Irish Outline modellers in Ireland or the UK intending to experiment in 21mm gauge, a series of plain single track modules, fed by cassette, sector plate or traverser storage and could potentially allow modellers using different wheel and track standards to share a modular layout.
-
Somehow I doubt that 'the MAK" would sell in similar numbers to an A Class let alone to the Class 89 Avocet She certainly caught my imagination when I first saw her during the late 80s, by comparison the Class 90s introduced a year or so later were nicknamed "Skodas' by WCML drivers and maintenance staff.
-
Photos of Ranks/ex GS Grain Wagons indicate that the paintwork was in quite poor condition by the late 60s/70s apparrently with a lost of rust showing. This was possibly as a result of poor practice/inadequate preparation when the Ranks wagons were repainted from red into grey during the 1960s (post 64? notes on Herbert Richards drawing). A 1930s Railway Magazine artice indicates that the grain wagon superstructure was fabricated in a rust resistant steel. Some railway owned wagons retained their GS paintwork at least into the 1950s solid snail added and GS initials blanked out, which indicates that the existing paintwork was considered adequate from a structural (rust pervention) perspective. Is possible that on a similar basis CIE may not have bothered to repaint the chassis on some wagons when the hopper bodies of the Ranks wagons were painted grey, CIE always focused on keeping the costs down! There is a David Murray colour photo of 654 shunting a train which appears to include two dark brown/red bulk grain wagons at Athlone West in June 1961 in Irish Railways in Colour and Second Glance Tom Ferris (Midland Pub) 1995. Its unclear whether the wagons retained their Ranks Ireland lettering but definitely appear to be dark brown/red, interestingly the leading vehicle in the train appears to be an ex-GN Bread/Parcel van in later CIE livery (Leslie once produced a resin model of these vans) ( unfortunately David Murray's photos don't appear to be included in the IRRS Flickr connection) Its possible CIE may have simply(hopefully)removed grime from the existing red paintwork and treated any rust before re-painting the wagons in (possibly a single coat) of grey, rusty appearance could possibly be as a result of breakdown of grey paintwork or reaction between (rust resistant) steelwork and paintwork as a result of poor paint preparation. Whatever the cause challenging to model!
-
Following our 2007 move to the Waikato I initially focused on getting a garden railway up and running 'quickly' while in the medium term to renovate/convert our garage into a workshop/railway room for a 4mm Irish outline "Burma Road" layout. While we got the garden railway up and running and completed the conversion of the garage into a railway workshop railway room within a reasonable timeframe, I still havent't started work on the 4mm layout, if I ever get around to it, although I set up the baseboard framing over 10 years ago. 4mm Irish outline layout. Its possible that I may start work on the layout at some stage this year, in a way I have already taken the first steps this year in clearing some of the junk that accumulated on the baseboards over the past 10 years and resuming work on a 21mm gauge 52 & 101 Class intended to operate on the layout, Kiltimagh signal cabin was assembled from a set of parts commissioned from Yorkmodel making several years ago and I have sets of custom etched parts and Wills Material sheets in stock for the station buildings, together with rail and sleepers and even Tortoise point motors I had in stock for over 20 years! Garden railway While the garden railway operates in a significantly larger space (26mx18m) the basic track layout and operating pattern is not a lot different to my Irish outline N gauge layout of the early 80s end to end from hidden staging to a terminus with an intermediate depot/station with crossing loop and junction. Although the layout is capable (just about) of handling a 15 Car (bogie) freight train trains generally load to a maximum of 7 Cars (approx 14 4wheelers) not a lot different to my N Gauge Irish outline layout of the early 80s. Main challenge for the forseeable future with the garden railway is maintaining/renewing sections of the track bed after almost 20 years exposure to humid Waikato conditions, though I am beginning to catch up on defferred maintenance and possibly in the long term source a replacement for K27 #464 preferribly before she disintegrates! While I seemed to go through periods of rapidly building successful layouts during the early 80s early & late 2000s my rate of progress tendes to be much more protracted particularly 4mm Irish Outline layout building, possibly because I have not found the classical branch line terminus-fiddle yard layout operationally satisfying. I originally started work on my Cavan & Leitrim inspired layout Keadue (7'6"X1' shelf) 'to get something running quickly" in a spare room shortly after we migrated to New Zealand in 2004, but quickly lost interest concentrating instead on converting our garage into a railway room and starting work on a large American style 'walk-around' layout initially in O-n30 before deciding to focus on American N and incorporating the existing "Irish' modules into the new layout. O-n30 although a compromise scale was too-overwhelming for the style of mountain layout I intended. Keadue was resurrected several years as a 9'X6' L shaped shelf layout in our home office motivated in part by 'layout visits' during Model Railway (Garden & National) Conventions hosted in our region and the layout as an Home Office/Guest Bedroom diorama. We had approx 180 people visited our railways during a 2-3 day period in connection with the 2014 New Zealand National Model Railway Convention. We experienced heavy rain during the convention and Keadue and a variety of models were set up in the garage in case we ware rained off in the garden. I had originally began collecting/assembling suitable locos and rolling stock as they became available during the early-mid 1990s and Bemo HOm track before our move to NZ, I originally intended to build a layout based on Drumshanbo, but settled on a layout set in Keadue on proposed extensions of the C&L from Arigna to Boyle and even Sligo! The Drumshanbo track layout did not fit into the available space and the station building complete with its 1917? two storey extension overwhelmed the scene, the station building is modelled on the drawing in Padraig Flannigan's C&L book, loco shed based on Dromad, Goods Store Belturbet all in Wills coursed stonework, background buildings in Wills 'cement render' sheets based on buildings in Counties Roscommon and Westmeath While Keadue is reasonably presentable I have done little work and seldom operated the layout in recent years, though I hope to tidy up (dust the layout) and carry out further detailing scenic work during the next years or so to maintain interest. The Timesaver. Mainly intended as a replacement for a series of attempted Irish and American outline layouts on the other two walls of our Home Office East Dock/North Wharf was originally conceived in 2021 as a "Timesaver" as minimum space self contained shunting/switching layout and as a showcase for my JM Design range of 3D Printed wagons. Initially set as a 6'X1' footprint switching/shunting puzzle, I later added a 1'10" traverser/staging as I disliked the self contained nature of the puzzle, I needed trains (shortish) to arrive from and depart to somewhere. I would have preferred a longer staging but restricted to 1'10"in the available space, largest usable diesel is a Bo Bo (B121) due to problems with buffer locing with larger locos (001 Class). I have had little time to work on the layout during the past couple of years, though planning to add a short (loco length) extension at one end of the station to allow arriving locos (track 1 ) pull up clear of the traverser so that5 wagon trains (incl Brake) can arrive in the staging and finally complete the buildings and structures, I started the redbrick tower building and malting from Grand Canal Dock 12-14 years ago. I guess the main lesson for me now in my late 60s is to try get on with and finish the projects/layouts I have planned/started because we cannot predict whether we will be around long enough to finish them.
-
My mistake ment the Bray-Greystones shuttle rather than Howth-Bray, travelled on an 80 Class on both Greystones shuttle and on a Cobh service during late 8s. There was also an 80 Class worked Sunday only Heuston-Dunlaoire service (intended for Mail Boat passengers) during the same period, possibly tied in with stock transfer between Bray and Inchacore or even Cork for servicing/maintenance, at the time I think IE had 3 80 Class sets on hire from NIR
-
I would expect that Accurascale/IRM would have a thorough understanding of the 'market' having successfully produced locos and stock for several years. In my experience sales of Irish outline items tends to breakdown 50/40% between the Republic of Ireland and the UK (incl Northern Ireland). In terms of the Hunslet/Enterprise sets, and to a greater degree the 800 Class and BR Class 89 electric Accurascale appears to be following a similar pattern to Hornby Dublo in the 50s and later British Trix in concentrating on the prestigious express passenger locos that may have an emotional appeal to collectors than a more workday loso like a baby Metrovick. Personally a Hunslet and maroon and blue Enterprise set or better still a blue Vs and rake of GN coaches satisfied the emptional appear as a result of childhood & teenage memories and the Class 89 certainly captured my imagination as a 30 something at a Bounds Green Open day during the late 80s. At the end of the day I decided to pass-go on a Hunslet & a 5 Coach Enterprise set as I already have too many rtr models between Irish & American outline models. I think Accurascale are correct in taking a more cautious approach to the development and introduction of new models following the rapid expansion of both the Accurascale and IRM ranges in recent years, particularly in the current level of instabliity (political and economic) on the world stage. While the risk of a retailer being left with unsold stock is lower than 20-30 years ago, the rapid expansion of British Outline rtr in the late 70s (Palitoy and Airfix entering the market) was followed by a long period of stagnation up to the early 90s-oversupply and the economic situation. I remember picking up new Mainline-Airfix-GMR locos and stock at reduced prices into the early 90s. Similarily Murphy Models carried a stick of unsold 071 locos and Craven coaches for several years, with a clearance sale immediately before the 2021? release of the B121s. Personally I think an 80 Class would be a better option for a rtr model than an AEC railcar set, both in terms of design and development costs and potential demand. An 80 Class set still exists allowing more a more accurate model to be produced than an AEC railcar set (I don't know if the sole remaining Push Pull control car survived) and being a MK2 design allows for use/modification of existing tooling. The 80 Class potentially appealing to people modelling NIR and CIE/IE from the 1970s to early 2000?. 80 Class occasionally operated excursions and specials south and west of Dublin and regularly operated Howth-Bray, Maynooth and Cork-Cobh suburban services during late 80s/early 90s era, besides filling in on Enterprise duties. AEC railcar set and intermediate coach (ideally 1953 Buffet or open) would have to be designed from scratch and require completly new tooling. Displaced from main line services and concentrated on Dublin Suburban services during late 60s before being modified into Push-Pull stock during early 70s withdrawn with the exception of a decrepit driving trailer and connector car for use on Bray-Greystones shuttle by 1984. Official information is misleading I have a large scale CIE/Park Royal drawing of an Irish AEC railcar on plate frame bogies similar to the GWR railcars.
-
Narrow Gauge in the Rockies not quite
Mayner replied to Mayner's topic in US / Canadian Railway Modelling
Managed to re-open the road this afternoon (& mow the lawn) Motor #6 on test run. Motor #4 on the Mail run. In "Mixed Train Daily" Beebe and Clegg (https://www.goodreads.com/book/show/10203958-mixed-train-daily)described a ride over the RGS in a Motor (Galloping Goose) passengers included a group of Native American taking a ride for a treat (women in their finest and a baby accompanied by a (very large) male) eating pop corn and lolly pops (there and back), the Native Americans bought two pair of wellington boots, and a lunch box with thermos in Telluride, an 'old timer" with one leg off to town where he had a bottle of 'indifferent" whisky and looked at the world with distain and the two enthusiasts, enlisted to lift the old-timer in and out of the Motor.
-
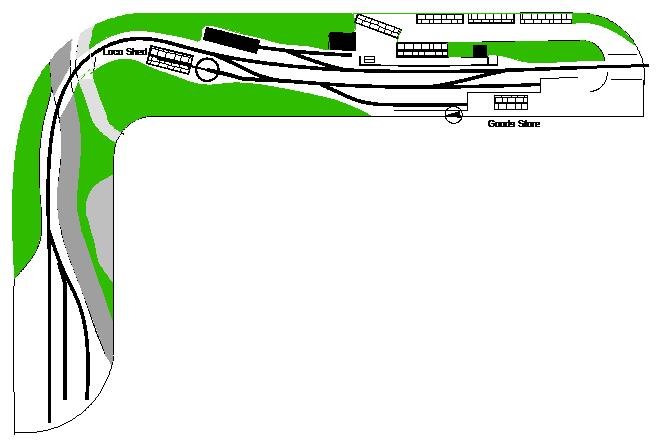
4mm 21mm gauge Irish branch line terminnus-fiddle yard in 8' not the most successful. During the late 80s decided to build an 8'X18" layout mainly as a test track for my Irish 21mm gauge models while staying in London. I used woodgrain finished melamine faced chipboard from local B&Q for basebards and its supports, wanting a neat finish similar to the furniture in my room and could be assembled quickly with minimal tools. The basebards and its supporting book case looked great but weighed a ton not the most portable! Layout was inspired by the Castlerack terminal, track was laid in Peco Conductor rail (Code60?) on copperclad sleepers, ballasted with woodland scenics fine ballast, buidlings (some of which re-used on Keadue) were mainly assembled with Wills materials sheets and some almost, but not quite complete! Layout supposedly a branch off the Meath LIne from Dunboyne westwards through Summerhill towards Ballivor or Devlin though Castleross may be close enough somewhere in Meath/Westmeath. Did not get far with the foreground scenic works. While locos and stock ran ok on plain track and turnouts, they did not like the double slip that forms part of the crossover from mainline to loop and sidings. Though proved a useful test bed for locos I built before I moved to Scotland in 93 and more of less abandoned the layout! Ironically I ran into the same problem trying to build a pair of double slips on a 21mm gauge layout over 20 years later. Meanwhile I began collecting N Scale American outline locos and stock in the late 80s but did not attempt a layout until I had returned to Ireland almost 10 years later. In the mean time I had collected books on railroads in the North East and regularly subscribed to the Model Railroader and its planning Annuals and visited the North East on a railfanning trip during the late 90s, so I had definitely fallen under the influence. American N Scale looped 8 with almost 'Surround Staging" in a 17'6" x 8' loft 2000-2004. One of my more successful layouts, I had started a 4mm 21mm layout based on Ballymoe in this loft before I moved to the UK in 86 and decided that N Scale would be a better option to get 'something running quickly" while working on my 4mm Irish & UK interests in my workshop(spare bedroom). The combination of a looped 8 track track plan in combination with the staging behind the scenic section was appealing both in terms of a decent length of run (two loops to complete a full circuit of the layout) and a decent train length. Earlier I had established workable train lengths using a temporary test track on boards at purlin height and decided on a maximum train length of 15-40-50' cars hauled by a consist of between 2-4 diesel locos although 50 cars turned out to be the maximum load. I settled on a system of permanent/fixed baseboards and track for the staging/hidden track (blue on diagram) with modular scenic sections based on the N-Trak concept (single main line DCC) as oNe-Trak modules in articles appeared far more realistic than the standard NTRAK modules. The downside was my initial Binghampton modules had more than one track and that I was unable to fit two 4' modules in the workshop so settled on two non-standard 3-6" modules for the initial sections originally built as a self contained layout. Trackwork on the scenic boards were laid in Peco Code 55 and ballasted with Woodlands scenics ballast, hidden trackwork and staging laid in standard Peco Code 80 unballasted some salvaged from an early 80s layout. Although a large section of the layout appeared to be double track it was actually operated as two parallel single lines! The staging tracks were each capable of handling two complete trains, the section with the small Town (Depot/station) and Viaduct was basically purely scenic and to maximise the length of run between the staging and main yard, 5 actual minutes at a reasonable speed. I dismantled the layout before moving to New Zealand in 2004, disposing of the scenic module and retaining the Binghampton modules which I later re-erected in our home in Auckland. Scenic basebards were mainly open frame construction in ply (surplus from work) and were strong, light in contrast to my eralier efforts in chipboard! I paid a lot of attention to avoiding the 'table top' effect achieving Z with scenery extending both above and below the track and trying to achieve a realistic view point Auckland 24'X12' American N Scale 2006-7 I was lucky for a short while to have a 24' X 12' space available for a layout in Auckland before a move to the Waikato with a much smaller garage, but a bigger garden but thats another story. As luck would have it I got a reasonable amount of work started in its new home after converting the garage to a layout room workshop. The main change was the additional space allowed the layout to be re-configured as an "American walk around" style layout with a central peninsula. Work was mainly concentrated on ammending the staging and Binghampton Yard areas, installing the staging at a lower level that the yard, extending the yard with an additional 4' module. The main-line was just roughed in temporarily to get trains running (I had recently bought a pair of Kato Genesis P42 diesels and a set of Superliner Passenger Cars!) and a pair of PA1s. Only permanent track laid was part of a reverse loop at low level using brand new Code 80 track! (intended to be hidden) DCC control had advanced since leaving Ireland, I introduced a CTC Panel and route setting between the staging and the main yard, though the temporary main line was still 'dark territory'
-
As far as I recall cattle wagon length was increased to 14' over headstocks as a result of a Board of Trade (animal welfare) requirement during the 1890s and later adapted as an Irish Railway Clearing House Standard. While covered wagons appear to have been gradually in creased from 14' to 15'2" to 16'11" the standard for an Irish cattle wagon remained 14' until CIE introduced its longer KN wagons. Its just about possible that some earlier shorter wagons may have survived on the cash strapped SLNCR, the MGW introduced some 13'6" convertibles in the early 1890s shortly before the BOT "changed the rules" and its possible the SLNCR may have found itself in a similar perdicament and may have been allowed to continue using the shorter wagons until they were due for 'renewal/replacement" which may have been a long time with the SLNCR. Cattle wagons are likely to have remained at 14' in order to avoid the wholesale replacement of loading pens spaced for 14' wagons, in practice stations that handed cattle traffic tended to have a long loading bank with a continuous fence on the rear (non-rail side) and sometimes two or three pens close to one end of the bank (Carlow had stoned walled pens, though generally fences and pens formed in old rail on GS/CIE, though sometimes old sleepers.
-
Seems to be a bit of a crossover with Robs post on SLNCR wagons. The buffer beam (and sometimes complete end) being pulled out of a wagon seems to have been common enough in loose coupled days including both GN and CIE wagons and make an interesting scenic effect. During the late 70s I recall an ex-GN Van (Patrickswell) and a CIE Van (Moate) dumped near the end of a siding/layby with one end, bufferbeam and draw gear missing but otherwise appeared ok. I suspect that mainly GN/SLNCR wagons were mainly used in later years with Collooney the main loading point for cattle traffic. In his SLNCR books Neil Spinks wrote about the "Southern Siding" being little used (for interchange traffic) after the formation of the GSR and being used only for wagon storage after 1944. (wagon load traffic being exchanged at Sligo Quay. Its possible cattle from the ex-WLWR line were unloaded in the Southern Yard and either driven to the SLNCR yard for loading or watered and rested before resuming their journey. My father remembered (as a kid) cattle been driven along the road from the fair in Kiltimagh (WLWR line) to Claremorris (Midland) for loading. Its possible Sligo/West of Ireland cattle dealers/ may have negotiated preferential rates for shipping export cattle over the SLNCR and GNR through Collooney rather than through routing via the GS/CIE. Interestingly Collooney (Midland) became the main loading point for the Sligo-North Wall "Shipper" after the SLNCR closed in 1957, its possible dealers arranged road transport to the railhead/lairage from local fairs. The Southern Yard was disconnected at some st6age before the Burma Rd closed in 1975.