Patrick Davey Posted May 20 Posted May 20 1 hour ago, Colonel said: Wibble - and beam me up Scotty. We need that J26 back... Yes please 1
Tullygrainey Posted May 20 Author Posted May 20 7 hours ago, jhb171achill said: I haven't the beginnings of a clue what yizzer talkin' about, lads. My reply to the above is therefore F6T1 89YG H4W7. I had one of those once but the wheels fell off 2
jhb171achill Posted May 20 Posted May 20 2 hours ago, Tullygrainey said: I had one of those once but the wheels fell off You should have fitted a X5S4 to it…. 1
Tullygrainey Posted May 20 Author Posted May 20 4 hours ago, jhb171achill said: You should have fitted a X5S4 to it…. I tried that but the one I had was a left handed thread and didn't fit. The gauge was wrong too. 1 1
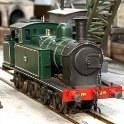
Tullygrainey Posted May 20 Author Posted May 20 8 hours ago, Colonel said: Wibble - and beam me up Scotty. We need that J26 back... As it happens, J26 no556 was back with me this last week or so for a severe talking to. It went to its owner Kieran who painted and finished it for its career at Kirley Junction. All was well for a while but then it began to develop personality disorders, running lumpily, stopping and starting then refusing to run at all. On examination a number of issues emerged. Two of the ScaleLink wheels had developed cracks in the boss where the crankpin screws in, meaning the crankpins may not have been secure. Given that I’ve had trouble with cracking cranks on my little Kirtley project, I suspect I need to rein in my cack-handedness when fitting crankpins. The wheels were replaced with a set of Markits and running improved noticably. Then the final drive gear came loose on its axle. The gearbox that was bundled with the kit is an early High Level RoadRunner Compact Plus with a plain brass final drive cog which has no grub screw. After repeated failures to secure the cog (threadlock, superglue, shouting at it, solder! I suspect it had been over-reamed at some stage. Maybe by me) I gave 556 a fresh RRC+ gearbox. The current version has a more reliable final drive gearwheel with brass boss and grub screw. (I had intended to just use this final drive cog in the old box but the design of the box has changed and it wouldn’t fit). While fitting the motor to the new gearbox, I discovered that the motor shaft was waving about in the breeze. Not normal! IMG_5023.MOV The plastic moulding securing the motor bearing seems to have crumbled away leaving the bearing free to jiggle around. No idea what’s caused this but on reflection, it may have been one of the root causes of the stop-start problems. Anyway, 556 now has new wheels, a new motor and a new gearbox and seems infinitely happier. It has a DCC chip stowed in the boiler and a ton of lead in the tanks. The Markit wheels are insulated/uninsulated pairs so pickups are now only needed on one side. A problem halved! After trial runs at Loughan Quay, 556 is now back on home turf and earning its keep. J26 at Kirley.mov Alan 6 2
Galteemore Posted May 20 Posted May 20 What a pain Alan! Interesting defects and rather unusual. Hope mine runs as well as that one. 1
Tullygrainey Posted May 20 Author Posted May 20 1 hour ago, Galteemore said: What a pain Alan! Interesting defects and rather unusual. Hope mine runs as well as that one. I'm quite sure it will David
jhb171achill Posted May 20 Posted May 20 Great to see a layout in full 1950s mode. What's that carriage in the middle of the rake?
Colonel Posted May 21 Posted May 21 Quite a saga - rare to get such a range of faults in pretty much all the working parts, especially when they all came from different manufacturers. More than entitled to feel a bit vexed! 1 1
Tullygrainey Posted May 21 Author Posted May 21 11 hours ago, jhb171achill said: Great to see a layout in full 1950s mode. What's that carriage in the middle of the rake? Kieran, whose models those are, tells me it’s a 1st Class Saloon coach
jhb171achill Posted May 21 Posted May 21 6 hours ago, Tullygrainey said: Kieran, whose models those are, tells me it’s a 1st Class Saloon coach Yes, the GSWR had several of that ilk!
Tullygrainey Posted May 26 Author Posted May 26 More ThreePee. Time for the tender. A fixed rear axle and the others lightly sprung. Good old lolly sticks. My excuse for eating Magnums. Quite a lot of tricky edge to edge soldering needed here. Hard not to get the stuff everywhere. I think I used a whole fibreglass pencil cleaning this one up. ThreePee is being built with live chassis to escape from pickup purgatory. The loco has Markit insulated driving wheels one side, uninsulated ones the other, but the tender needs its Gibson wheels shorted out on one side. I've used 'spiders' from ScaleLink with the square hole in the centre reamed a little to be a tight fit on the 2mm axles. They're then soldered to the axle and to the back of the wheel rims. Belt and braces. I've done the same for the loco bogie too. Brake rigging fitted. Fiddly stuff with the bits tending to flop around everywhere until the first few joints get soldered. I looked in my notebook to see how I did it when I built Kieran's PPs a few months back. I'd written "Chassis wheeled up and brakes added" Really useful. Quite a handsome beast. The boiler furniture is just set on for the photo. Mating chassis and body always turns up the odd problem and ThreePee is no exception. The first to occur was the driving wheels locking up when the 2 chassis mounting bolts were tightened down front and back. I usually avoid two bolt attachment because it can twist the chassis and affect the running and I think that's what was happening here. I dispensed with the rear bolt and soldered a little bit of angle inside the dragbeam instead. The chassis spacer slides under this and there's a little bit of wriggle room which avoids twisting pressure on the chassis. Seemed to cure the problem, but then.... I thought I'd filed enough clearance for motor and gearbox when I built the bodywork but of course I hadn't. The wheels were grinding on something - so hard to see exactly what - and when that was cured, the gearbox cogs started clouting something too. Par for the course really. At least it is when I build them. There's always a point when I think "This thing is never gonna work" but it's usually worth persevering. After an afternoon of filing, grinding and shouting I think we're out of the woods now but who knows what will turn up next. First run under its own motive power. Loco is a bit nose up and the tender is a bit skittish through points but a promising start. Plenty to do yet. The whole rig needs added weight here and there for a start. It's running on DC at the moment but it'll be chipped once the gremlins have been banished. IMG_5077.MOV Alan 9 5
Galteemore Posted May 26 Posted May 26 20 minutes ago, Tullygrainey said: More ThreePee. Time for the tender. A fixed rear axle and the others lightly sprung. Good old lolly sticks. My excuse for eating Magnums. Quite a lot of tricky edge to edge soldering needed here. Hard not to get the stuff everywhere. I think I used a whole fibreglass pencil cleaning this one up. ThreePee is being built with live chassis to escape from pickup purgatory. The loco has Markit insulated driving wheels one side, uninsulated ones the other, but the tender needs its Gibson wheels shorted out on one side. I've used 'spiders' from ScaleLink with the square hole in the centre reamed a little to be a tight fit on the 2mm axles. They're then soldered to the axle and to the back of the wheel rims. Belt and braces. I've done the same for the loco bogie too. Brake rigging fitted. Fiddly stuff with the bits tending to flop around everywhere until the first few joints get soldered. I looked in my notebook to see how I did it when I built Kieran's PPs a few months back. I'd written "Chassis wheeled up and brakes added" Really useful. Quite a handsome beast. The boiler furniture is just set on for the photo. Mating chassis and body always turns up the odd problem and ThreePee is no exception. The first to occur was the driving wheels locking up when the 2 chassis mounting bolts were tightened down front and back. I usually avoid two bolt attachment because it can twist the chassis and affect the running and I think that's what was happening here. I dispensed with the rear bolt and soldered a little bit of angle inside the dragbeam instead. The chassis spacer slides under this and there's a little bit of wriggle room which avoids twisting pressure on the chassis. Seemed to cure the problem, but then.... I thought I'd filed enough clearance for motor and gearbox when I built the bodywork but of course I hadn't. The wheels were grinding on something - so hard to see exactly what - and when that was cured, the gearbox cogs started clouting something too. Par for the course really. At least it is when I build them. There's always a point when I think "This thing is never gonna work" but it's usually worth persevering. After an afternoon of filing, grinding and shouting I think we're out of the woods now but who knows what will turn up next. First run under its own motive power. Loco is a bit nose up and the tender is a bit skittish through points but a promising start. Plenty to do yet. The whole rig needs added weight here and there for a start. It's running on DC at the moment but it'll be chipped once the gremlins have been banished. IMG_5077.MOV 31.92 MB · 0 downloads Alan That’s gorgeous Alan. Although I’m getting flashbacks……I ended up taking a Dremel to the inside of mine. I’m with you on the 2 bolt thing…. 1 1
Tullygrainey Posted May 26 Author Posted May 26 1 minute ago, Galteemore said: I’m with you on the 2 bolt thing…. Rice wrote about it. He said it was amazing how many poorly running locos could be improved just by slackening off one of the bolts! 1 1
Colonel Posted May 27 Posted May 27 Elegant work as ever. I suspect the Society of Why Don't My Models Work Without Fettling has a considerable number of members, of whom I am also a member. If I could be bothered, am sure a suitably rude sounding acronym could be formulated. 4
Patrick Davey Posted May 27 Posted May 27 2 hours ago, Colonel said: Elegant work as ever. I suspect the Society of Why Don't My Models Work Without Fettling has a considerable number of members, of whom I am also a member. If I could be bothered, am sure a suitably rude sounding acronym could be formulated. WTF - Why The Fettling? 1 3
Mol_PMB Posted May 28 Posted May 28 On 26/5/2026 at 10:08 PM, Tullygrainey said: the tender is a bit skittish through points When I saw the 'spiders' I wondered if they would cause a problem through checkrails. I think you need to shorten their legs so that they don't go right to the tip of the flange. At the moment you have effectively got 2 (or 4) spots of tight back-to-back per wheel rotation. The rest of it looks superb! 1
Tullygrainey Posted May 28 Author Posted May 28 12 minutes ago, Mol_PMB said: When I saw the 'spiders' I wondered if they would cause a problem through checkrails. I think you need to shorten their legs so that they don't go right to the tip of the flange. At the moment you have effectively got 2 (or 4) spots of tight back-to-back per wheel rotation. The rest of it looks superb! Thanks. Yes, the instructions that come with them recommend that. They’ve been filed back since that photo was taken. It’s negotiating points ok so far 2
Tullygrainey Posted June 4 Author Posted June 4 ThreePee now has some loco brake rigging. Strictly speaking loco and tender should have matching pull rods behind the wheels as well as on the outside but the space between frame and wheel back is tight and with sideways movement and tilting on the loco's leading driving axle, it seemed like a recipe for trouble with a high risk of short circuits so I left them off. A view of the underside where I store my spare solder. There's not much space in the loco for additional weight but I managed to squeeze some into the boiler above the driving wheels and there's a bit between the chassis frames too. The bogie also has added weight. The tender has lead in body and chassis. Because this is a live chassis build, loco and tender need to be isolated from one another. After experimenting with hook and loop, I ended up with this paxolin bar (a bit of pcb with the copper filed off) with a hole at each end fitting over 12BA bolts soldered to the respective chassis. Then it was time for the DCC installation. Chip and stay-alive are from Layout Concepts (formerly DCC Concepts with the bits still branded with the former's name). The big black thing labelled Zen in the middle is a control board linking chip to stay alive. It avoids the need for soldering and makes it easier to change the stay-alive for one with a different capacity but it's another, quite bulky item that has to be stowed somewhere. Swings and roundabouts. In ThreePee's case, it's all going into the boiler. The 8 pin plug was dispensed with and the unused wires trimmed back. Everything was wrapped up into a tight if untidy bundle and the relevant connections soldered. Trials on the rolling road looked promising. Patrick @Patrick Davey intends this one to be No. 74 so the chip was configured accordingly. IMG_5145.MOV Slow running is looking good - a tribute to that High Level gearbox/motor, a good chassis design and those nice big Markits wheels. ThreePee Chipped.mov Time for the whitemetal castings now. Alan 8 1
Galteemore Posted June 4 Posted June 4 Lovely work Alan. Something mesmerising about those huge wheels. 2
Patrick Davey Posted June 4 Posted June 4 Am a lucky lad! Thanks for this Alan, I have always dreamed of having one of these classic GNR locos! 1
Tullygrainey Posted June 4 Author Posted June 4 1 hour ago, Patrick Davey said: Am a lucky lad! Thanks for this Alan, I have always dreamed of having one of these classic GNR locos! Nearly there Patrick. Not too much longer I hope 1
Tullygrainey Posted June 5 Author Posted June 5 In between times, I've been dabbling with my Kirtley project using bits of the old K's kit as a starting point. With all the messing about, the original wheels were getting looser and looser on the axles calling for drastic measures. The live ones are soldered to the axles via the shorting spiders. The insulated ones were reamed out to allow a standard 1/8" axle bearing to be epoxied in and these were then soldered to the axles. A new set of Gibsons outside cranks were fitted to replace the ones that I managed to split. It'll never be a great performer with its wobbly wheels but at least it does run. IMG_5008.MOV It's been painted and weathered now. Still needs buffers and a crew but it's just about finished. However, when I was setting it up for some photos, I discovered that one of the new cranks had split! I was so careful this time, easing them out with a broach and bevelling the rear before fitting them. I don't know what I'm doing wrong. Anyhow, with another superglue repair, it still runs but it's probably one for the display cabinet. Here it is in all its glory. Alan 8
Horsetan Posted June 5 Posted June 5 1 minute ago, Tullygrainey said: ...I discovered that one of the new cranks had split! I was so careful this time, easing them out with a broach and bevelling the rear before fitting them. I don't know what I'm doing wrong. Anyhow, with another superglue repair, it still runs .... This is a problem I experienced with the outside cranks for the 08 diesel shunter. I think it's a combination of the axle bore being undersize and the axle itself being slightly oversize - this creates pressure resulting in a split. I ended up easing the axle bore and then trying to drill through the side of the crank into the axle and then inserting a pin to stop the whole thing slipping. It seemed to work, but then the Hornby coupling rods distorted, so new etched jointed rods are now a must. 1
Tullygrainey Posted June 5 Author Posted June 5 16 minutes ago, Horsetan said: This is a problem I experienced with the outside cranks for the 08 diesel shunter. I think it's a combination of the axle bore being undersize and the axle itself being slightly oversize - this creates pressure resulting in a split. I ended up easing the axle bore and then trying to drill through the side of the crank into the axle and then inserting a pin to stop the whole thing slipping. It seemed to work, but then the Hornby coupling rods distorted, so new etched jointed rods are now a must. Thanks for this. It does seem they need very careful handling. Hope you can get your 08 sorted with new rods.
Horsetan Posted June 5 Posted June 5 5 minutes ago, Tullygrainey said: Thanks for this. It does seem they need very careful handling. Hope you can get your 08 sorted with new rods. On reflection it was a mistake to use the original Hornby rods, as they're made of pot metal and easily distort. Ultrascale do make some very decent outside cranks for their 08 shunter wheel pack, but I don't think they will supply the cranks separately.
Mol_PMB Posted June 5 Posted June 5 I am now mentally deleting the idea of a 21mm gauge D class shunter from the projects list! Those cranks look like nothing but trouble.
Horsetan Posted June 5 Posted June 5 Just now, Mol_PMB said: I am now mentally deleting the idea of a 21mm gauge D class shunter from the projects list! Those cranks look like nothing but trouble. They're only trouble if they're not eased sufficiently. Pinning them seems to work if you're careful about drilling through into the axle. AGW axles are less forgiving than Ultrascale ones. 1
Galteemore Posted June 5 Posted June 5 58 minutes ago, Tullygrainey said: In between times, I've been dabbling with my Kirtley project using bits of the old K's kit as a starting point. With all the messing about, the original wheels were getting looser and looser on the axles calling for drastic measures. The live ones are soldered to the axles via the shorting spiders. The insulated ones were reamed out to allow a standard 1/8" axle bearing to be epoxied in and these were then soldered to the axles. A new set of Gibsons outside cranks were fitted to replace the ones that I managed to split. It'll never be a great performer with its wobbly wheels but at least it does run. IMG_5008.MOV 13.96 MB · 0 downloads It's been painted and weathered now. Still needs buffers and a crew but it's just about finished. However, when I was setting it up for some photos, I discovered that one of the new cranks had split! I was so careful this time, easing them out with a broach and bevelling the rear before fitting them. I don't know what I'm doing wrong. Anyhow, with another superglue repair, it still runs but it's probably one for the display cabinet. Here it is in all its glory. Alan Lovely work Alan. And I know about display case models sometimes it’s just good to get it finished and off the bench. It’s a handsome model 1
Tullygrainey Posted June 5 Author Posted June 5 (edited) ThreePee, having behaved impeccably up till now, suddenly developed a stutter going backwards. I am at a loss to understand why. This is it on the rollers, coupling rods disconnected and this is the driven back axle. Anyone any idea why it's doing this? Doesn't do it going forwards. IMG_5167.MOV Edited June 5 by Tullygrainey 2
Horsetan Posted June 5 Posted June 5 42 minutes ago, Tullygrainey said: ThreePee, having behaved impeccably up till now, suddenly developed a stutter going backwards. I am at a loss to understand why. This is it on the rollers, coupling rods disconnected and this is the driven back axle. Anyone any idea why it's doing this? Doesn't do it going forwards. IMG_5167.MOV 15.33 MB · 2 downloads I think the geartrain is snatching. Is there swarf or grit trapped in the gear teeth or the worm?
Galteemore Posted June 5 Posted June 5 (edited) Had similar with a coupling rod screw fouling a bearing. Has something worked slightly loose? Edited June 5 by Galteemore
Tullygrainey Posted June 5 Author Posted June 5 16 minutes ago, Horsetan said: I think the geartrain is snatching. Is there swarf or grit trapped in the gear teeth or the worm? The geartrain looks pretty clean and with the final drive grub screw loosened, it runs like a sewing machine in both directions. 14 minutes ago, Galteemore said: Had similar with a coupling rod screw fouling a bearing. Has something worked slightly loose? It’s not a motor issue by looks of it. Can't see anything rubbing and yes the motor is fine. Thanks for the prompt response gents. Appreciated. I put the rods back on and I think one is coming up tight at the same point in each rotation. Thought I'd sorted all that. It may be because some of the wheels are very slightly out of true so the crankpins bind on their bearings. I'm not keen to ream the rods too much more. There's already a fair bit of play. A wheel out of true could account for the odd behaviour on the rollers. 1
.png.c363cdf5c3fb7955cd92a55eb6dbbae0.png)
Recommended Posts
Create an account or sign in to comment
You need to be a member in order to leave a comment
Create an account
Sign up for a new account in our community. It's easy!
Register a new accountSign in
Already have an account? Sign in here.
Sign In Now