David Holman
-
Posts
4,359 -
Joined
-
Last visited
-
Days Won
117
Content Type
Profiles
Forums
Events
Gallery
Blogs
Community Map
Everything posted by David Holman
-
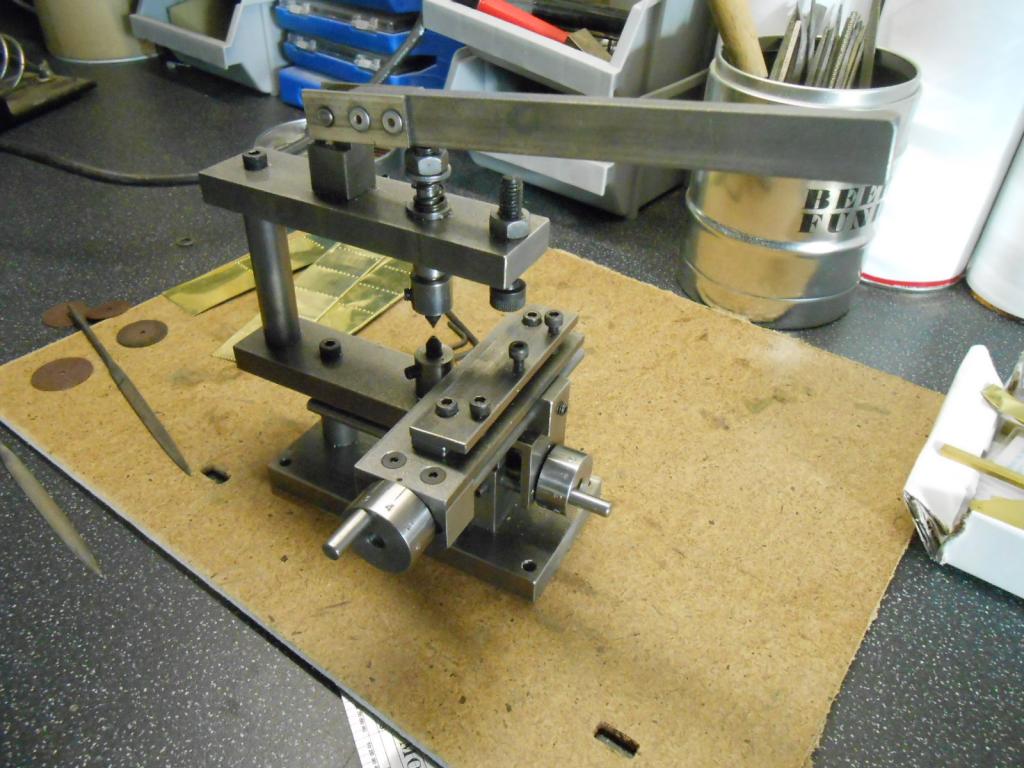
In engineering terms, it borders on heresy, John. Am using 10 thou brass, so it can be cut with strong scissors. Do the same with 15 thou [likewise nickel silver], but anything over that means the fret saw. Really don't like it much, as it takes so long, which was why the frames and rods took so long to make. However, am not above using a slitting disc in my Dremel. Needs care, but much quicker! In each case, cut as close to the marked lines as I dare, then clean up with files. The 10 thou brass is probably a bit thin for 7mm scale, so am reinforcing it with scrap strips and/or L shaped angle as appropriate. Definitely recommend the rivet press. Well engineered from mild steel, have had mine for several years & though it doesn't get used a lot, it is one of those tools I would not be without.

-
Arigna Town Exhibition Blog
David Holman commented on David Holman's blog entry in David Holman's Blog
The Worthing show went fairly well - a 6.15am start not withstanding on the Saturday morning. The venue was a modern high school, so good, flat floors - always a help. Most of the show was in the main corridor, which made a very quiet day, rather than the background noise you get in big hall. All went well on the Saturday, but I'd managed to get hold of some Track Magic for rail cleaning and though this works well, it turned out not to be a good idea to clean the wheels with the same stuff as adhesion suffered somewhat. Indeed the excursion track was inoperable with the G2 slipping to a standstill. A few other bits of remedial work are required for the next outing at Beckenham in three weeks time, including a new set of wheels for the railbus, as its drive wheels have become badly pitted. One sobering experience was driving on the A27 past the Shoreham air crash site - still very evident a month afterward. -
Slow progress this week, due to other commitments. However, have managed to cut out a footplate, adding 2mm brass angle for the valances, plus spare buffer beams left over from my 'Small Tank' kits. Since then, have been experimenting with 10 thou brass for the tank and bunker sides. Like the small tanks, Sir Henry has hundreds of rivets. Was thinking that I would have to do some serious marking out to create them. However, then remembered that my GW Models rivet press, has a spacing table, which enables you to mark out rivets easily, with spacings down to 1mm or less. The first couple of attempts went a bit awry, but these will form the inner tank sides. The third attempt is good enough for one of the outer sides, so now need to get the second one done. Have cut out the pieces for the bunker sides/end, plus the tank fronts, so a fair bit of riveting is now required. unfortunately, the photo of the rivet press is too big to post, so will have another go & update soon.
-
There are all sorts of options for fiddle yards, but as noted above, depends on whether you want a space for 'the rest of the world', or to leave it open & scenic. A good compromise is to hide the fiddle yard behind a scenic space - maybe your branch line? The simplest/smallest fiddle yard is a 'cassette'. this might just be a removable piece of track [on a strip of plywood perhaps], or use two pieces of aluminium angle screwed to a strip of ply. One train per cassette, that you set up for each move on to the layout. Have used cassettes quite a lot, including on exhibition layouts and they do offer quite a bit a flexibility. However, perforce they need to be fairly short - maybe loco & 3-4 coaches, or the length can become unmanageable.
-
They look like small tension locks to me Broithe. Fairly discrete too.
-
Check out the Dapol Terrier W, 'tis a little gem!
-
Sounds splendid John. When I joined the Chatham Club in the late 1980s, the Doyen was a lovely man called Tony - a genius with tinplate. His favourite medium was empty Castrol GTX oil cans. One of his now legendary exploits was in bringing a drawing of a LSWR B4 0-4-0T down the club one week and a completed model of it the next - all cut from GTX tinplate. He also favoured 20-50 motor oil to lubricate the mechanisms of his locos, applied by hypodermic syringe - his was was diabetic. This was towards the end of that era when if you wanted anything out of the ordinary, you built it yourself. If I was starting again, then maybe I'd be sticking to RTR, but there is much satisfaction in creating something from scratch and happily the Irish scene still provides that opportunity.
-
Thanks John. Several people at shows have suggested the Small Tanks were long boiler types and looking at them it is hard to disagree, even though the design must have been very outdated by then. There again, there were described as primaeval! Though the wheel base of the Large Tanks is a different spacing, overall it is the same as the small ones and the more I study them, the more Similarities emerge.
-
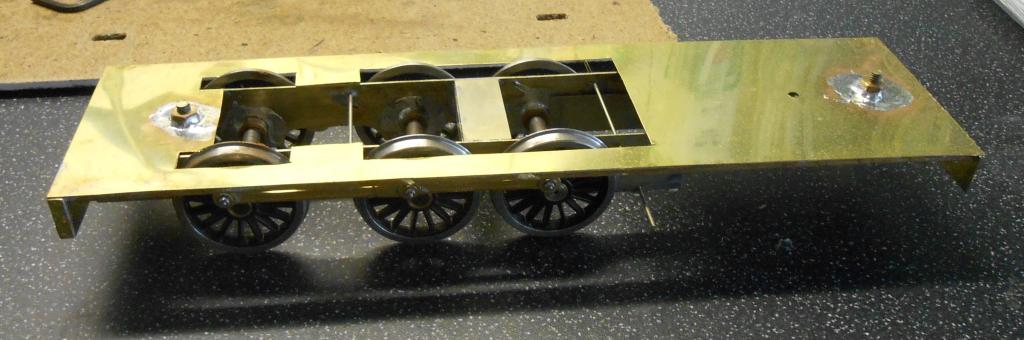
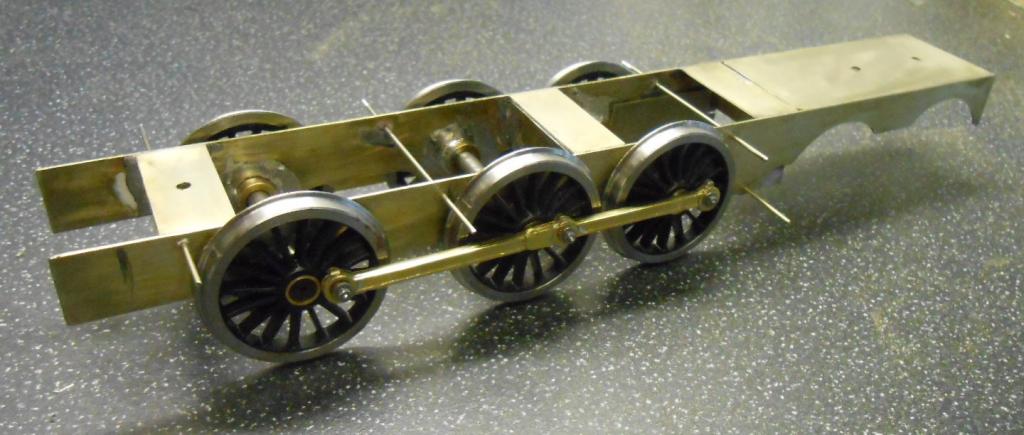
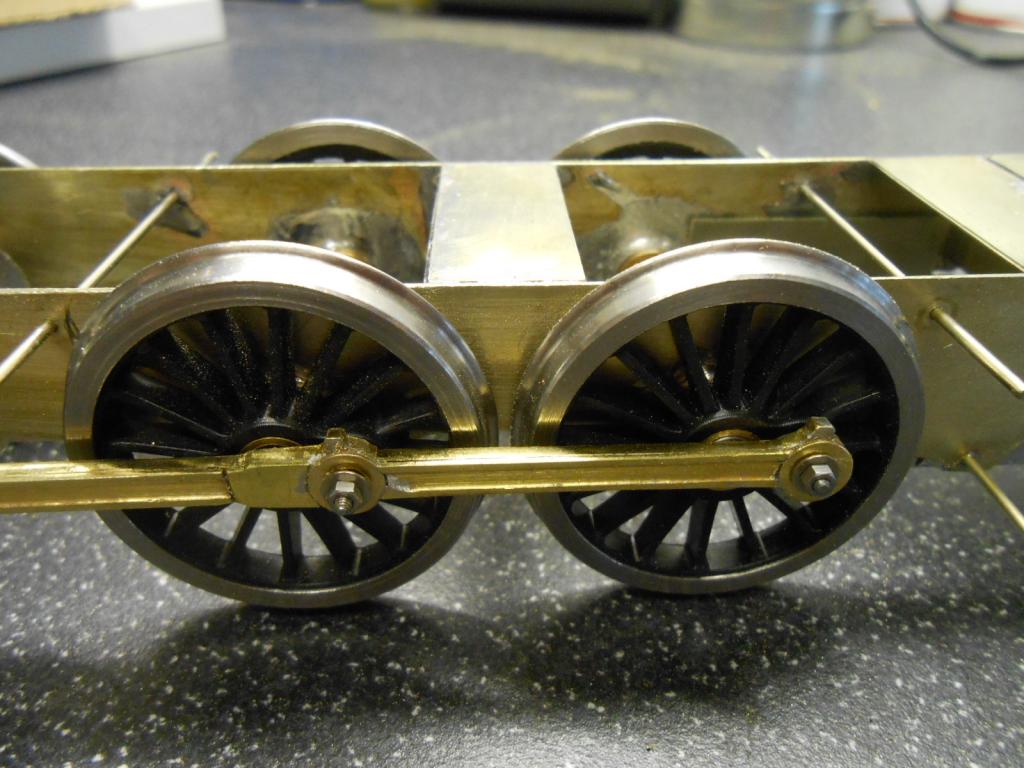
[ATTACH=CONFIG]20122 Around 4 days [probably getting on for over 20 hours] work has got a rolling chassis completed for Sir Henry. Helped very much by Slaters and the Royal Mail - put in an on line order for the wheels and bearings on Friday morning & the parcel was waiting when I got home from town on Friday morning. I had a few frame spacers left over from the Small Tank kit [now with Studio Models], plus a couple of spare buffer beams too, so the former were very useful when setting up the side frames. I used some 3/16" rods through the bearings to ensure the two frames were square, then added additional pieces that I cut myself afterwards. Hazlewood and Fermanagh form useful references for each stage of this project & I'm pretty much following the same order of construction. If it works... Anyway, this morning was able to assemble the wheels, drill out the coupling rods to 2.5mm and then [with more than a degree of trepidation] see if the chassis would roll. It was a bit tight at first, but this is not because of the rods, but the rather short crankpin throw on these wheels. The only 16 spoke ones available close to scale 4'8 are 4'7.5 for a GWR 2271 pannier tank. The throw is only 10", which means the 10BA crank pin bolt head fouls the frame bearings. Out with the Dremel again to grind a bit off each bearing. Guess I could have counter sunk the bolt heads, but in the past I've found this can reduce the strength of this joint. Anyway, all seems well and the chassis rolls very smoothly with just light finger pressure. Always a very satisfying moment in loco construction, 'cos if it doesn't work at this stage, then a lot of fettling can result before you get a good runner. One other thing to note from the pictures is the small gap between the two rear drivers - just as well I stole an inch on the frames - and indeed another inch on the drivers - or they would have been perilously close. Next step will be the footplate, then I can add the rear bogie. Happily, the Gladiator Models bogie equalising kit is the original from the Northstar - it still has their logo etched on it!
-
Much as I would like to extend, experience has taught my my limits in terms of exhibition layouts. Plus it was built to fit in my workshop and I don't have any storesge space for more boards. That said, I could well do a couple of diesels - C, 121, G etc, so there is still some mileage in the layout. Further ahead, a kit of the Clogher Valley Sharp Stewart tanks is being released soon and I've always liked the railcars...
-
Sorry W, know the scale, but is it 5'3 ( 36.75mm) gauge)
-
Very nice indeed.
-
Cobalt Point Motors (and Cobalt Digital)
David Holman replied to BosKonay's question in DCC, Electrics and Electronics
Have also hear there can be issues with Cobalts. Tortoise motors on the other hand are very robust. Year ago, the Gauge O Guild built test rigs to try various makes of point motor. Tortoise survived longest, indeed, the test rig broke first! I've used them extensively on exhibition layouts over many years and only had one failure, when the inner gear train jammed. However, undoing the outer case enabled me to free things and had no problems with it since. The guarantee was invalidated of course, but hey it was already at least 6 years old... -
Dare I ask what gauge these locos are? Very impressive, but would be nice to see someone else doing 36.75mm...
-
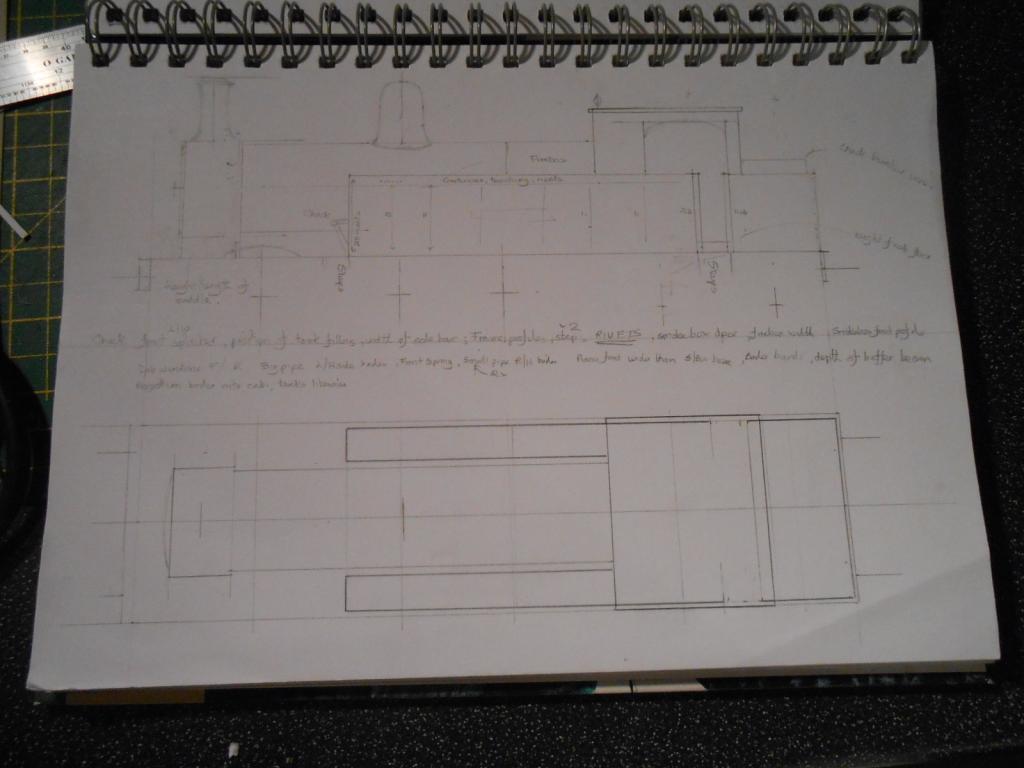
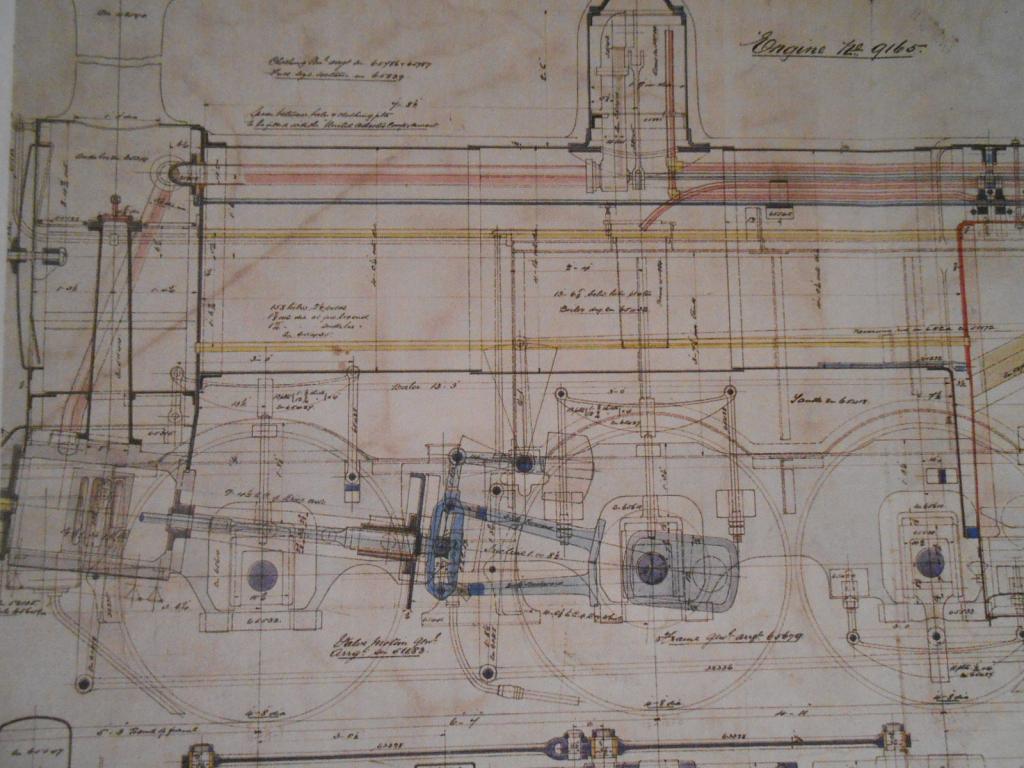
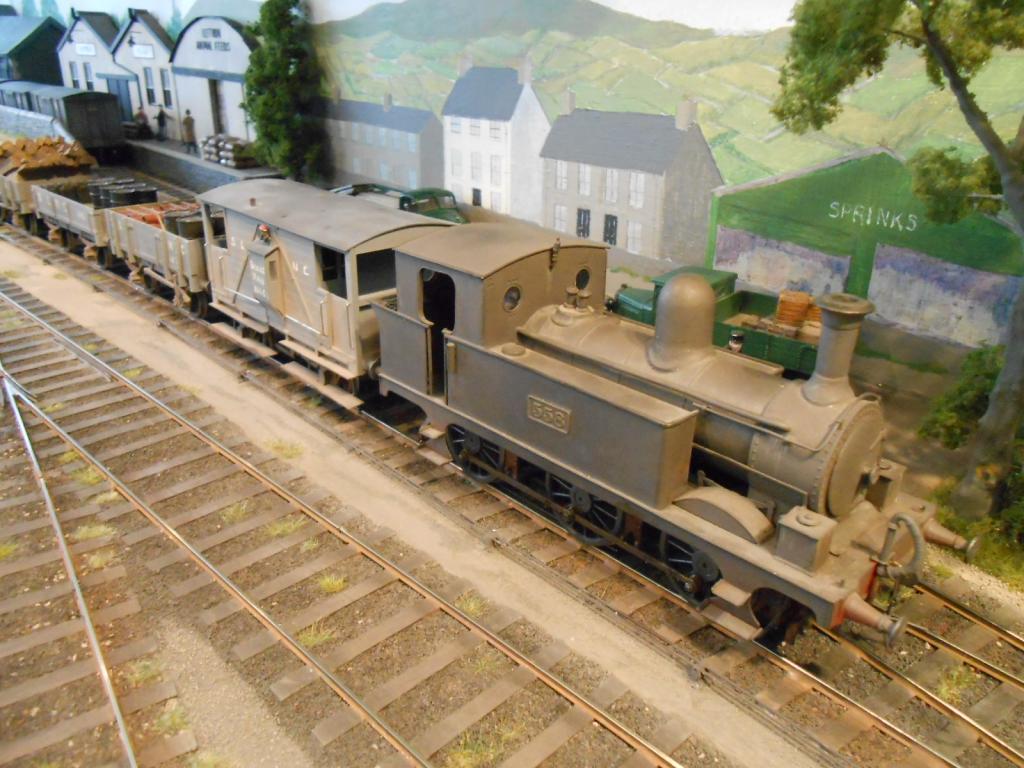
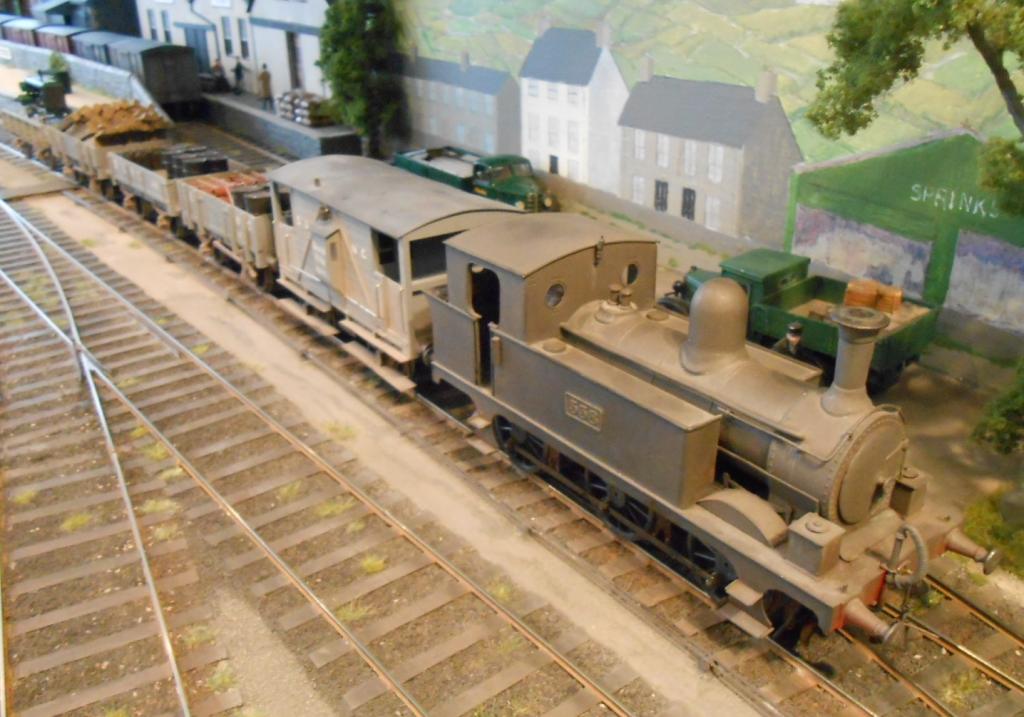
Ariana Town's fiddle yard has 7 tracks, six of which are now filled. The final track has long been reserved for Sir Henry, the SLNCR 'large tank', which I fell in love with courtesy of Neil Sprinks photo album of the line. Two things have put me off making a start, one the loco has to be a scratch build and with at least as many rivets as a small tank, is certainly no easy undertaking. Second, it was deciding on a train for it. I already have too many wagons, but didn't really want to add another freight train to the operating sequence. Looking through the Sprinks album once again gave me the idea of a short passenger train, made up of coach 10 or 11, plus a six wheeler and the parcels van I built last year. Alphagraphix do card kits of the coaches, so I've ordered a couple & finally decided to grasp the nettle on the loco. My CV now runs to well over 50 locos & though many are etched brass/nickel silver kits, I've only previous done two all metal scratch builds. Little and large, one is the Wantage Tramway well tank and the other a D16/3 [Claud Hamilton] 4-4-0. Plus, both were a while ago now, so it all added to the procrastination... However, the modelling season is upon us & creating a complete train seemed like a nice winter project - though it will probably take up autumn and spring as well. A starting point exists in that the Manchester Museum of Science & Industry holds a collection of Beyer Peacock drawings & I bought one a while ago and got as far as creating a basic outline drawing in 7mm scale. This was necessary because the BP one is a general arrangement [GA] drawing - a bit like a X-ray of the loco, showing much inside detail. Basic dimensions are also in the Sprinks history of the line, showing 4'8 16 spoke drivers and 3'0 bogie wheels. These are on order from Slaters, though there was an early issue in that the wheel spacing is 6'7+ 4'11. This means there is precious little space between the rear pair of drivers, so I've changed the spacing to 6'6+5'0 because there was every chance that the flags would be touching otherwise. Another problem is that there appears to be no source of coupling rods of this size, which is a shame, because rods are very time consuming to make and Premier Models do a very nice range of profile milled rods - but none that are anywhere near my needs. Also a pity, because I was tempted to build a sprung chassis, requiring jointed rods, but in the end chickened out and made a solid pair. These are very much the starting point for any loco chassis as by making the rods and them clamping them to the frames for drilling, there is a good chance that a smooth running loco will result. So far, have spent the last two days making the rods from 1.5mm brass strip, overlaid with a thin strip of 'fluted' brass. Nickel silver frames have been cut from 22swg & all in all this is not a quick process. Thin brass/nickel silver can be cut with strong scissors, but thicker stuck needs piercing saw, though I often cheat and use a slitting disc in the Dremel for longer cuts. A long list of castings/fittings is being prepared. I don't have a lathe, or indeed know how to use one, so am hoping there will be something suitable for the all important chimney & dome. At least I have a nice domed smokebox door in the spares box, otherwise a visit to the GOGuild Trade Show at Reading in December will help fill the shopping list. The photos show the loco, a section of the GA drawing and the start made with the rods, so watch this space
-
Arigna Town - this week's scenery
David Holman replied to David Holman's topic in Irish Model Layouts
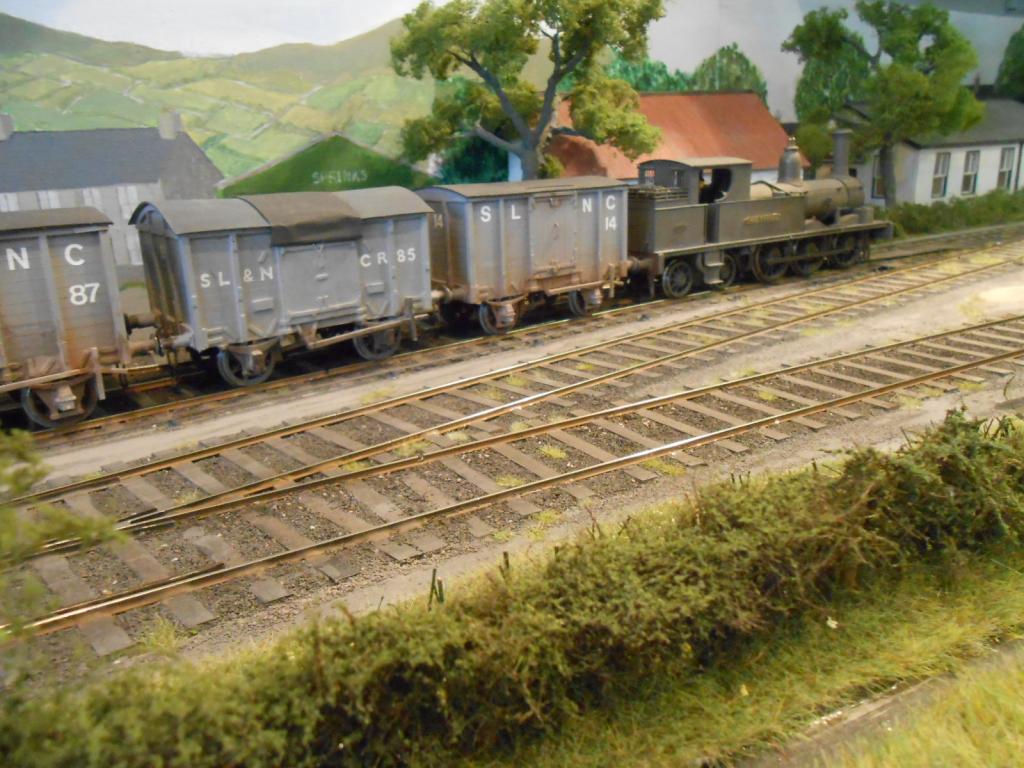
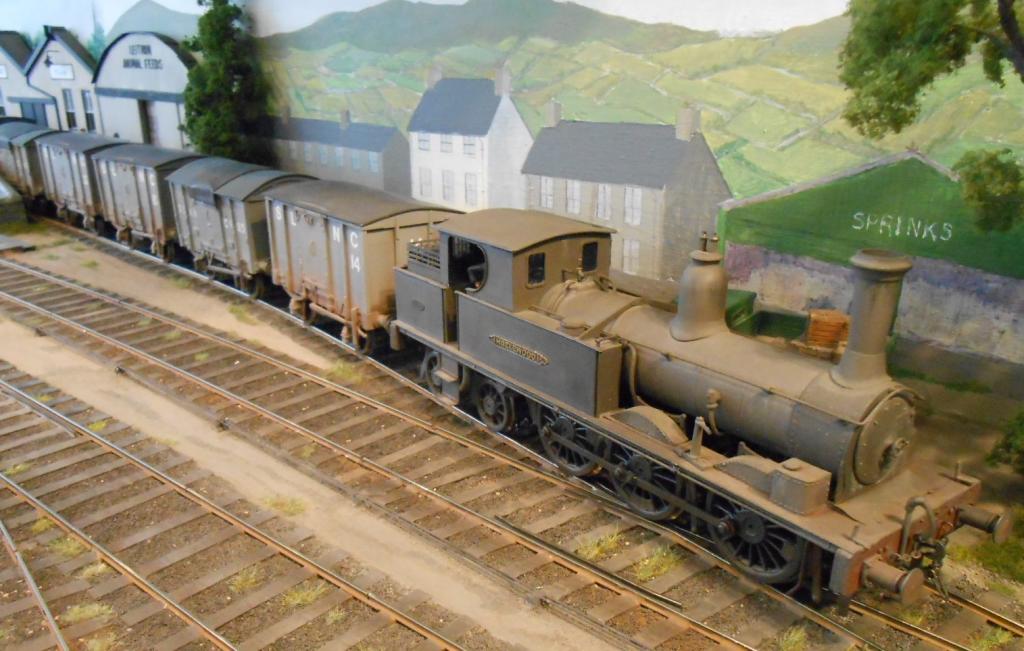
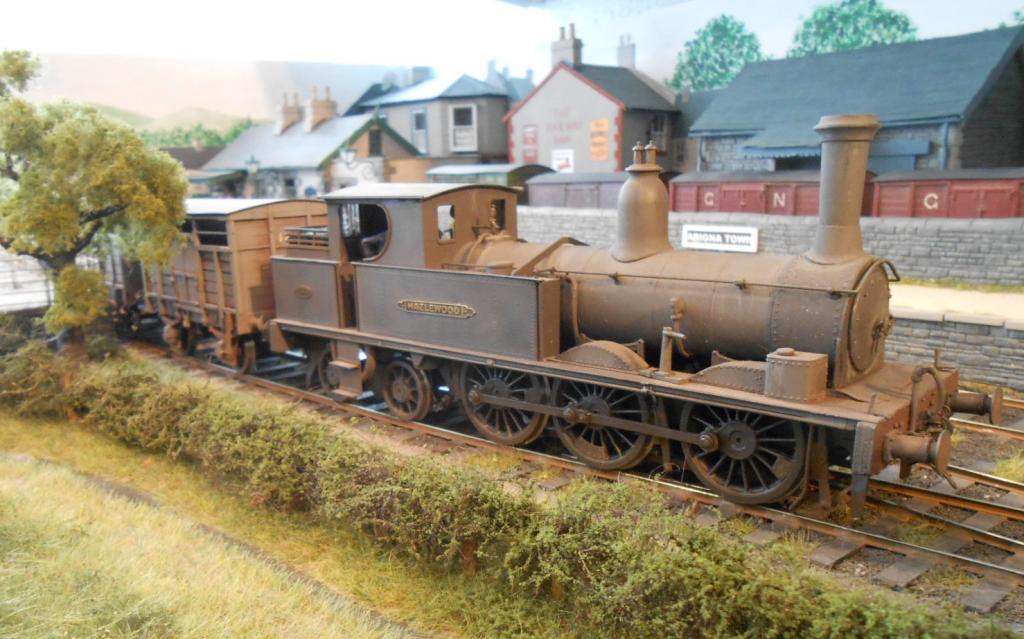
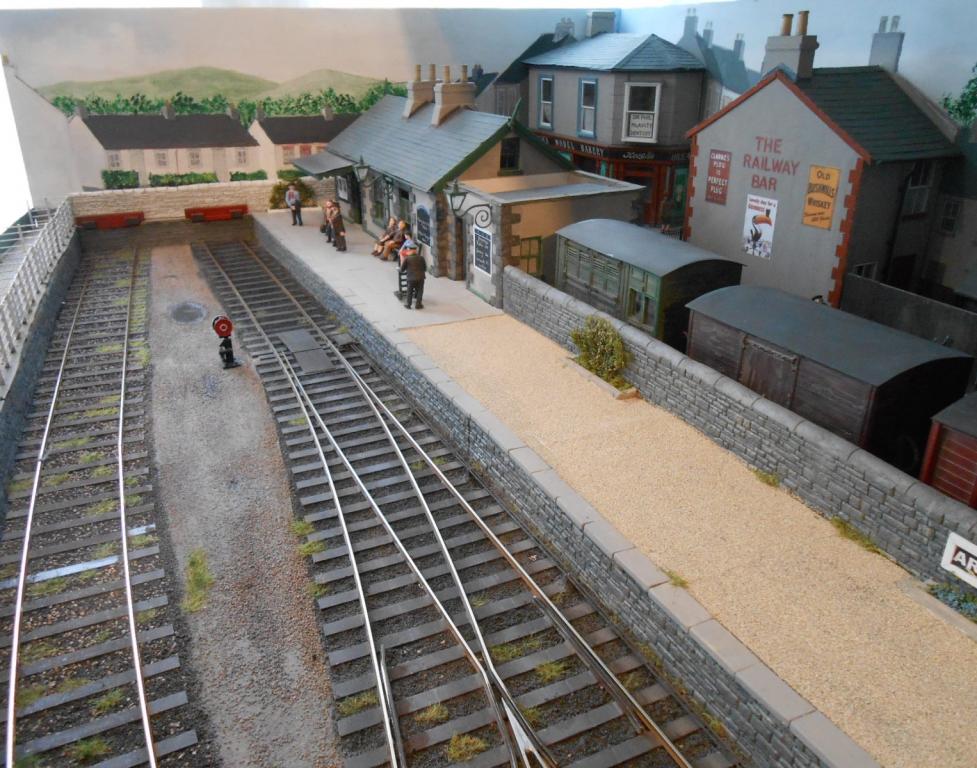
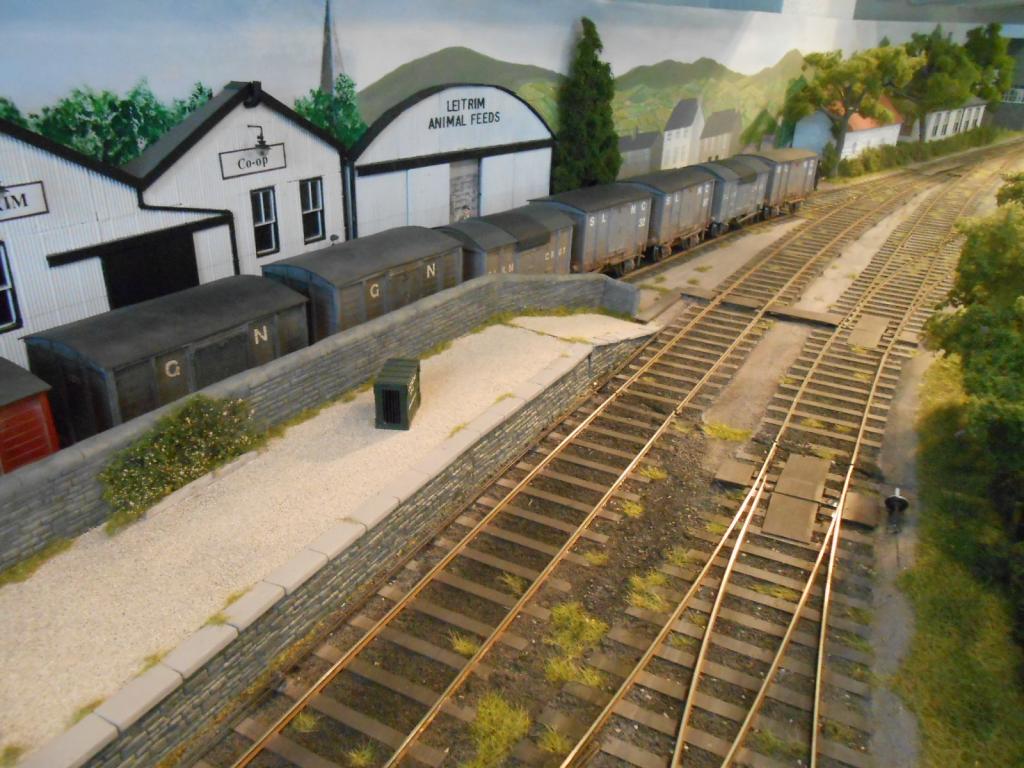
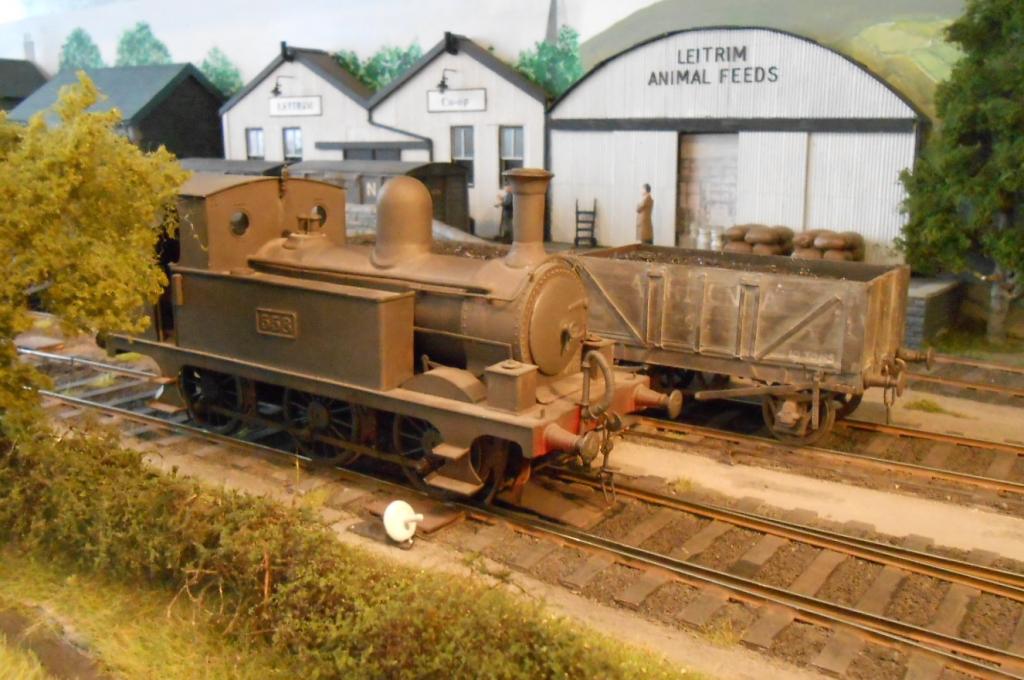
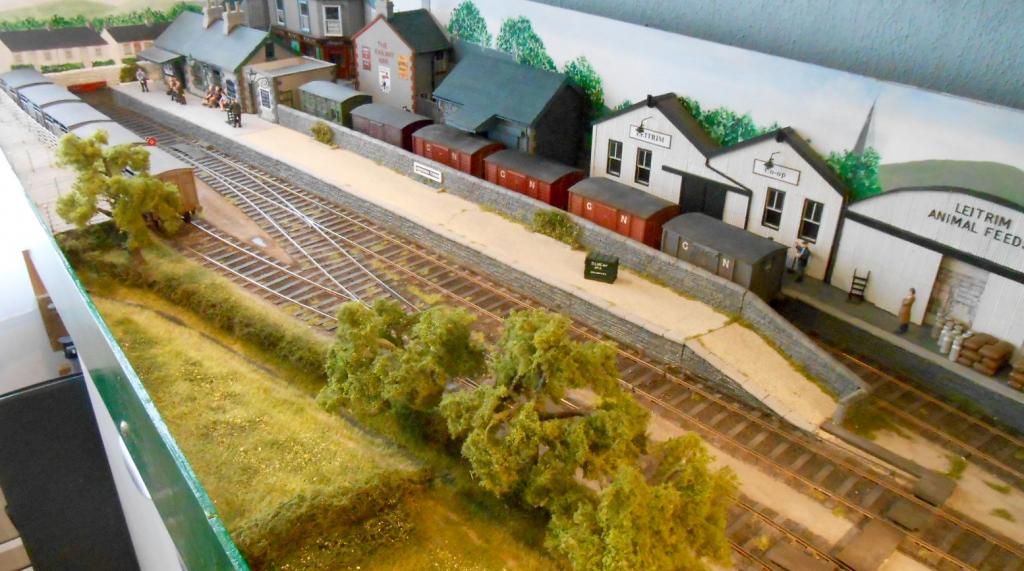
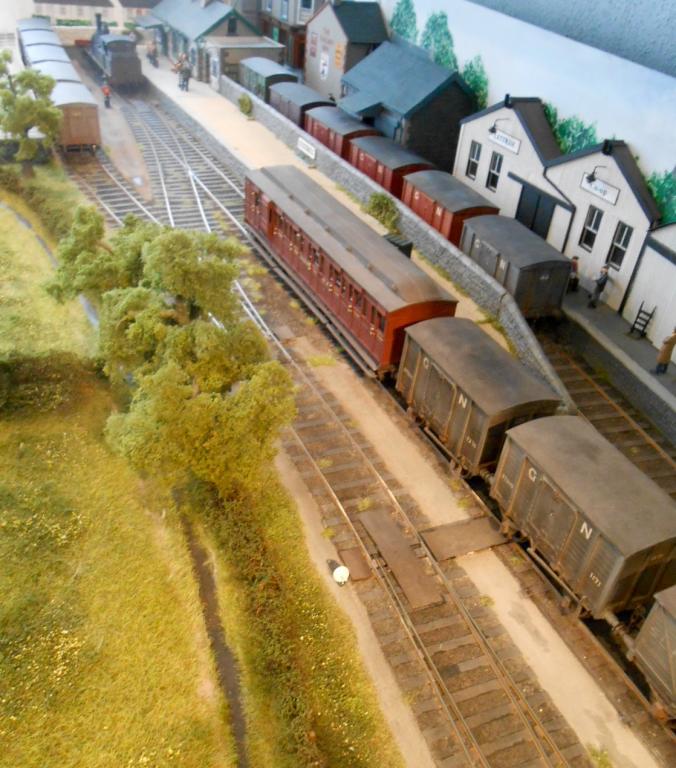
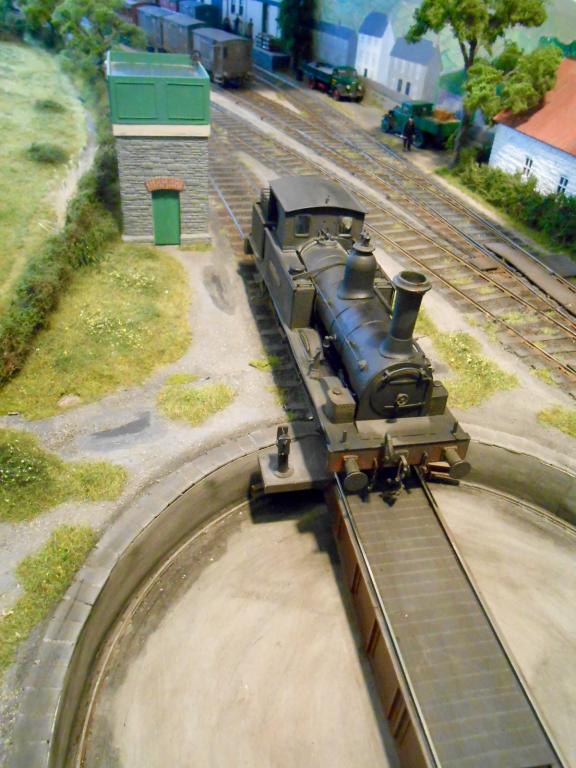
A case of goods in/cattle out. Hazlewood is the train engine, usually with five vans of SLNCR/GNR/CIE origin. After the loco runs round [and visits the turntable], the vans go to the goods siding & Hazlewood picks up the cattle vans to make up the return train. As can be seen from the photos, this means the good siding is completely full & a certain amount of trial and error has led to a specific set of wagons in the sequence. One too many [or indeed, couple too long] and the rake fouls the main platform line. On the reverse working, the cattle train enters the loop line [a rare use of the third doll on the signal] so the cattle vans go back to the dock after the loco has run round. Most of the time it all works really well, though occasionally I get the wagon order wrong and we find that the goods siding is overflowing. A few rude words [and when no one is looking] a bit of crane shunting usually sorts it out, though some of my more eager operators will happily fall on the resulting Chinese puzzle and spend 20 mins or so sorting it out the proper way. The last couple of pictures show the yard at the end of the sequence, after which the fiddle yard needs rotating, so a new sequence can begin. I haven't included the railcar/railbus or excursion train, as these are simple 'out and back' movements which have been shown extensively elsewhere on the site. However, look out for a new chapter in my workbench section - there is still one spare track in the fiddle yard and I'm hoping my 'winter project' will fill that, eventually!
-
Arigna Town - this week's scenery
David Holman replied to David Holman's topic in Irish Model Layouts
Been there, got the T shirt, Stephen - probably a whole drawer full by now. The most recent gremlin attack was at January's Orpington show, when a short on the points at the station throat effectively froze the whole layout. Given there are only 6 wires between baseboards 2 & 3, it was doubly frustrating. Took an hour to sort out & ended up cutting the wires to the two plug/sockets and hard soldering them. A lot easier to repair back on the workbench, instead of upside down under the layout! Thankfully, my other operator was able to chat to the public & it seems there was enough static interest on the layout to keep them amused - which is more than I was... Seems no matter how well you prepare, journeying to a show and unloading/setting up can still cause problems. The ones that annoy me are the 'built in' ones that the owner/operators of the layout haven't bothered to fix since the previous outing, or indeed at all. Not just the working bits either - saw a layout only this year that had clear footprints on the back scene! Like many things in life it can be a shame when we remember these more than the good bits, which out weigh the former many times over of course. -
Arigna Town - this week's scenery
David Holman replied to David Holman's topic in Irish Model Layouts
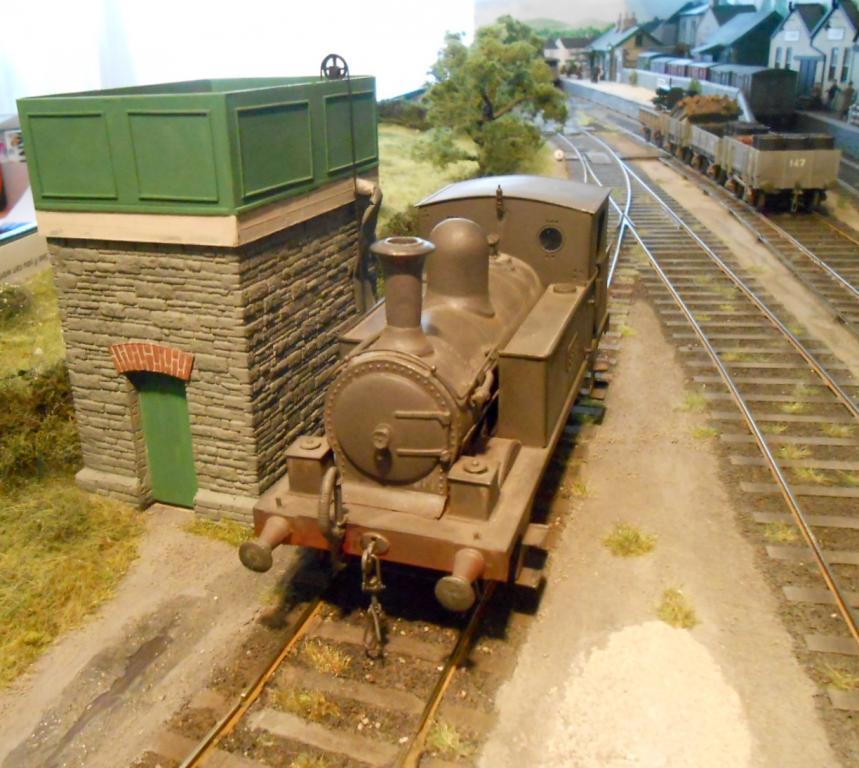
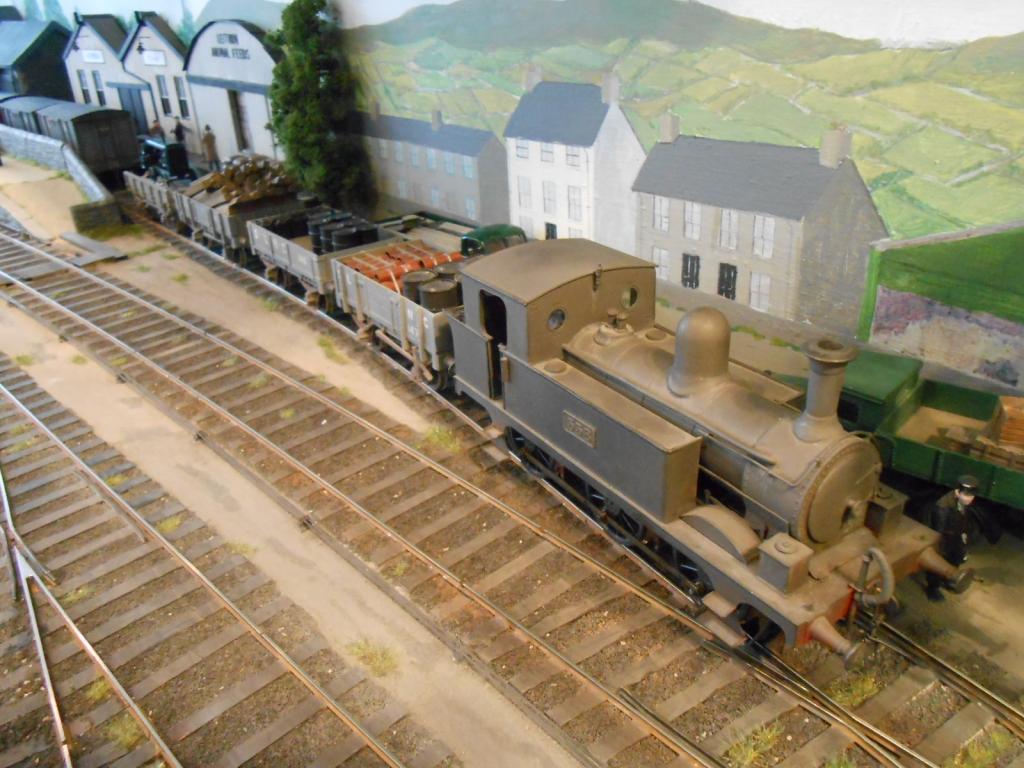
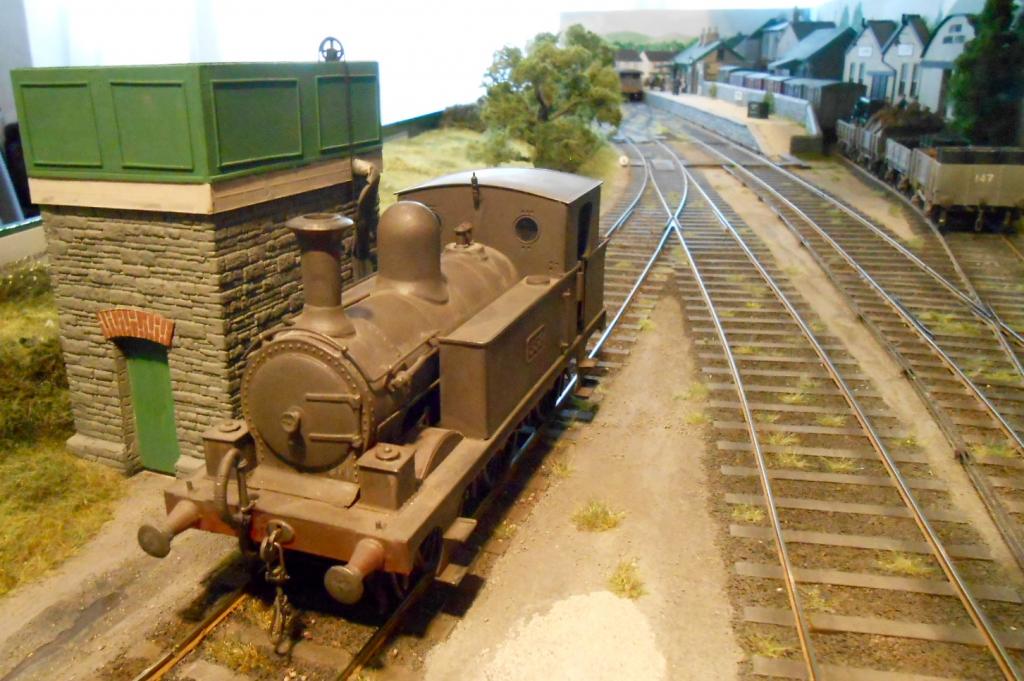
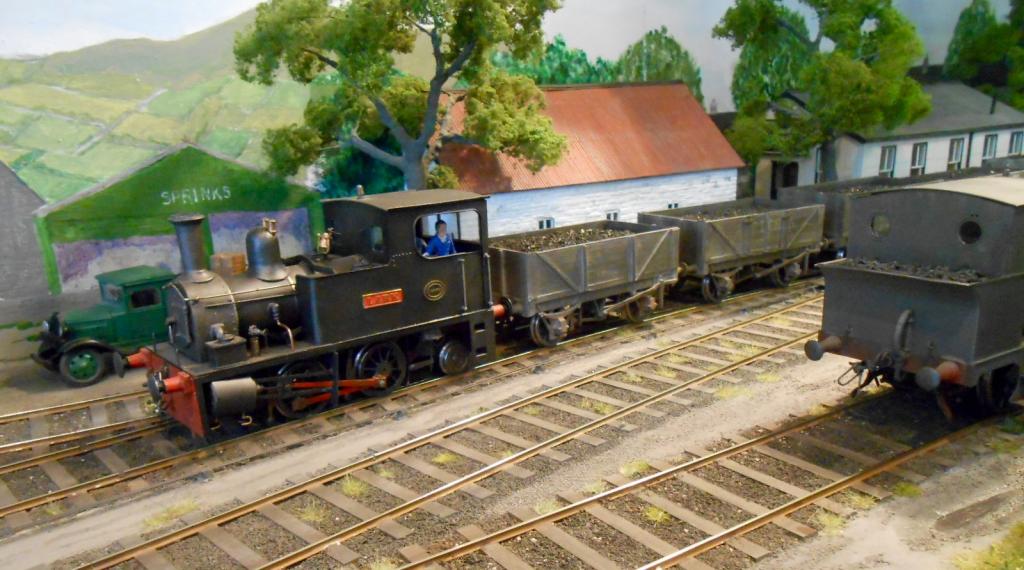
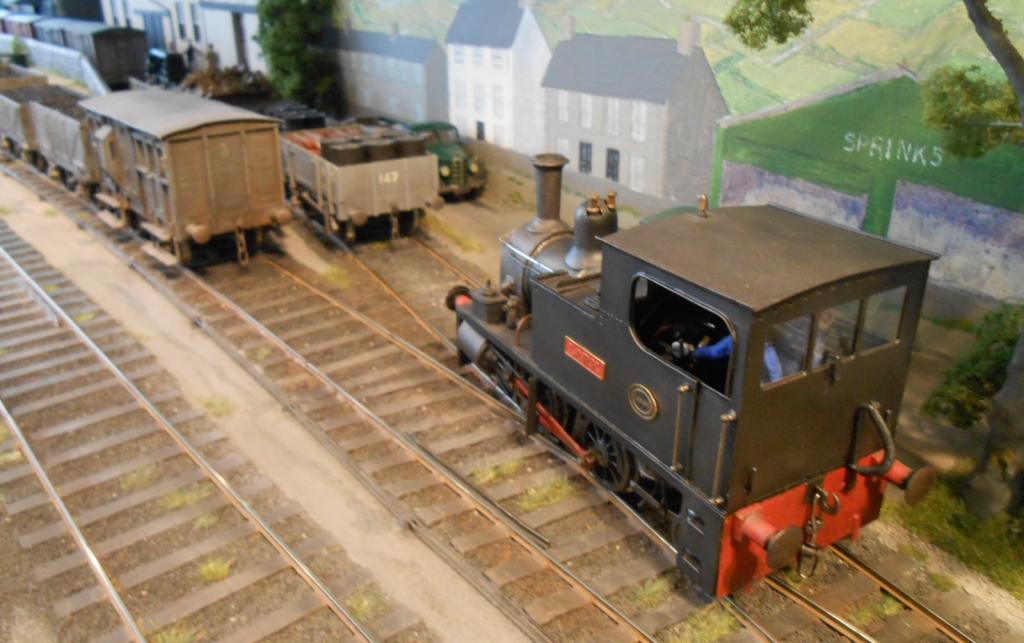
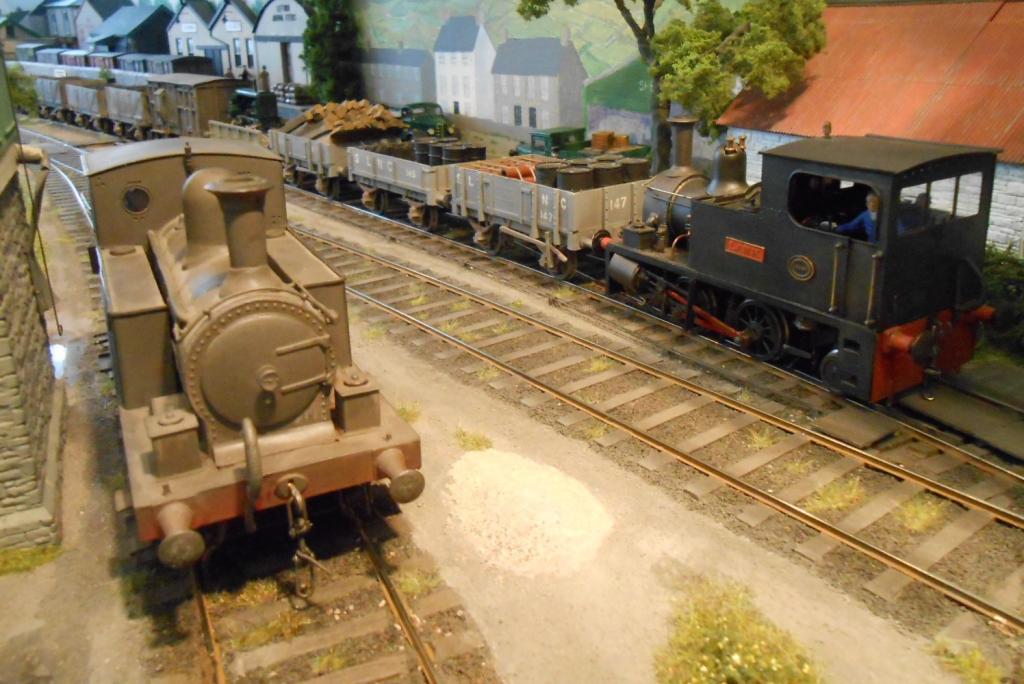
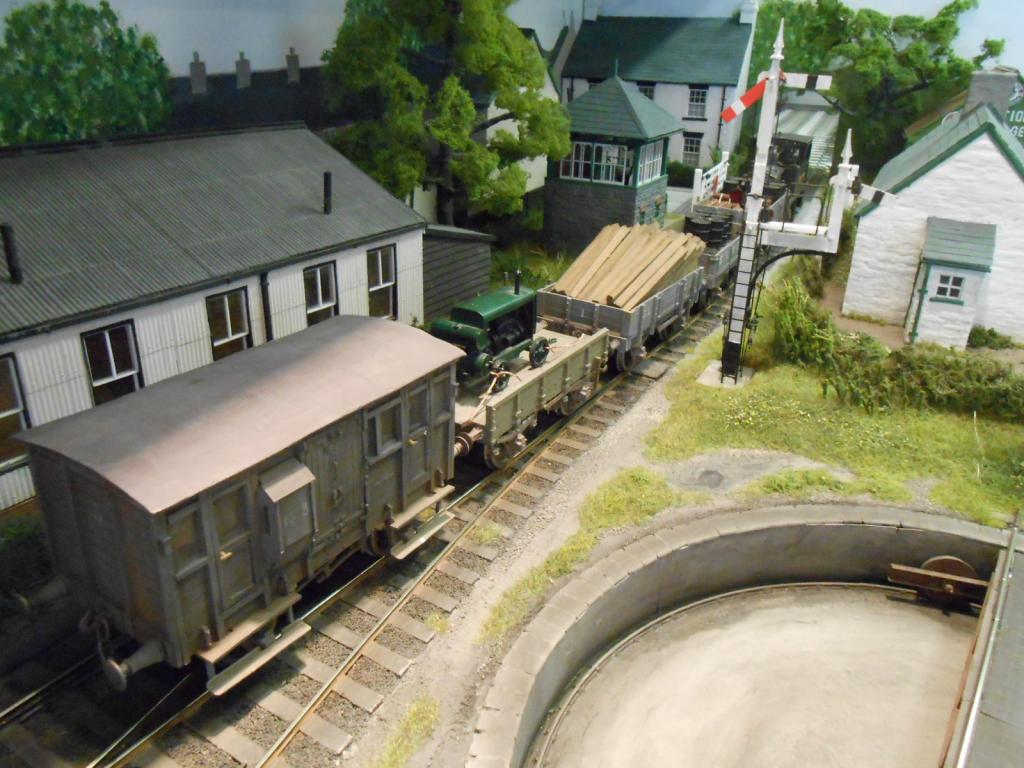
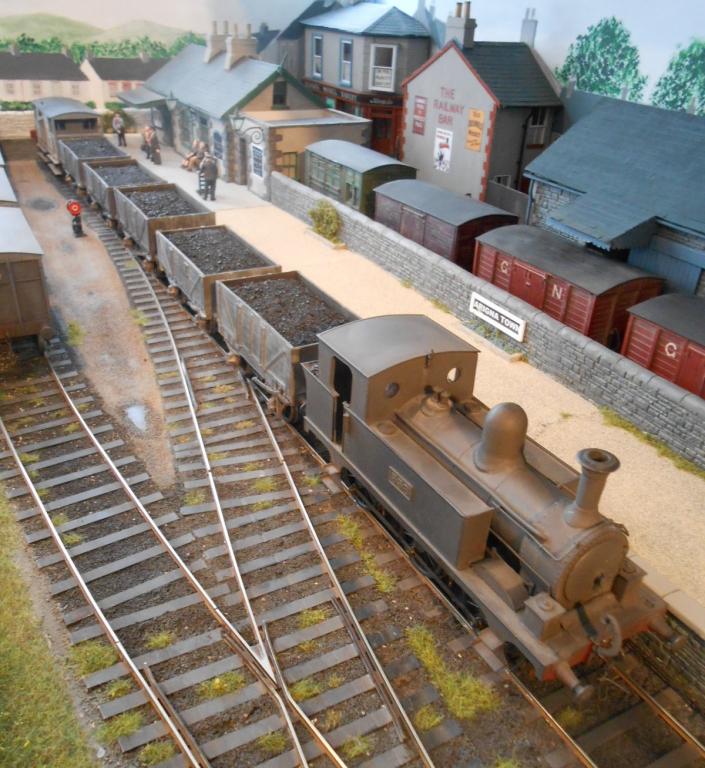
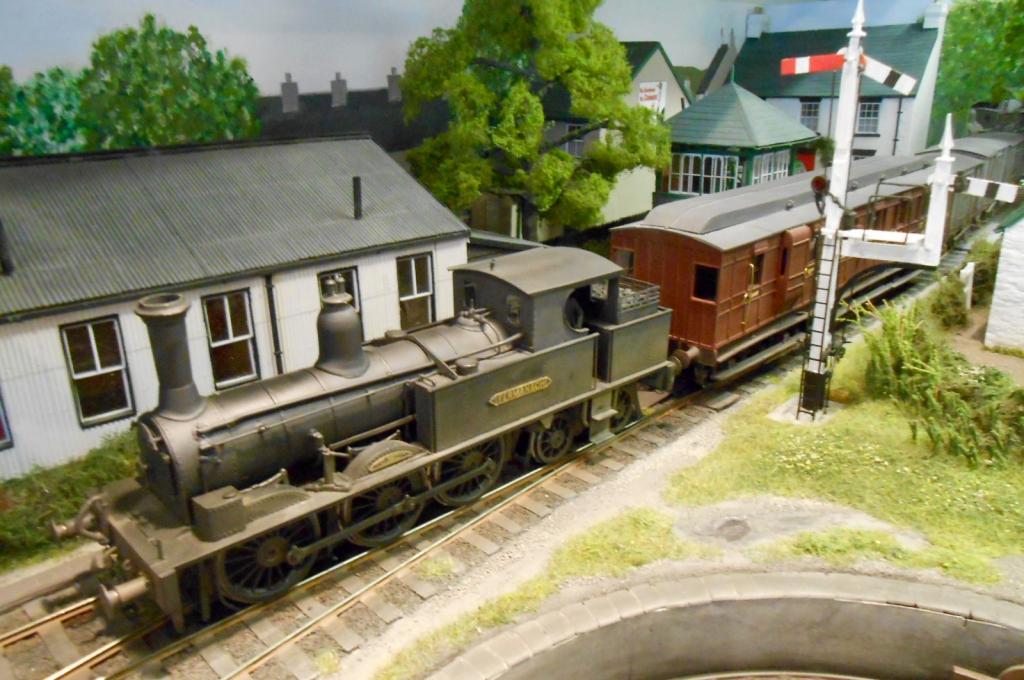
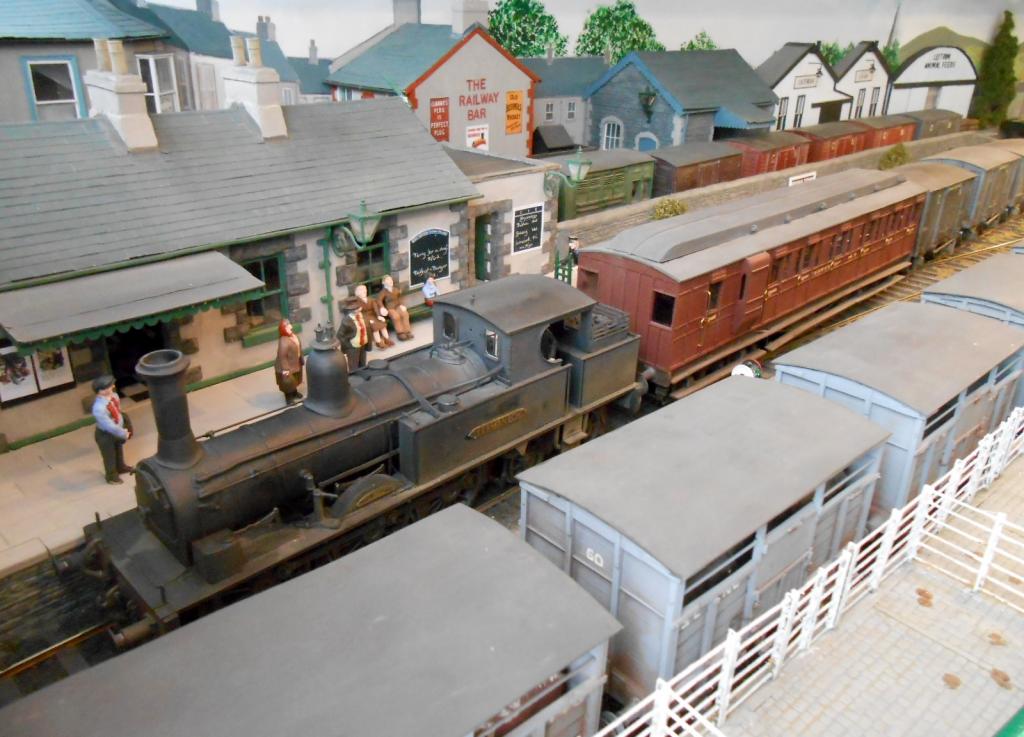
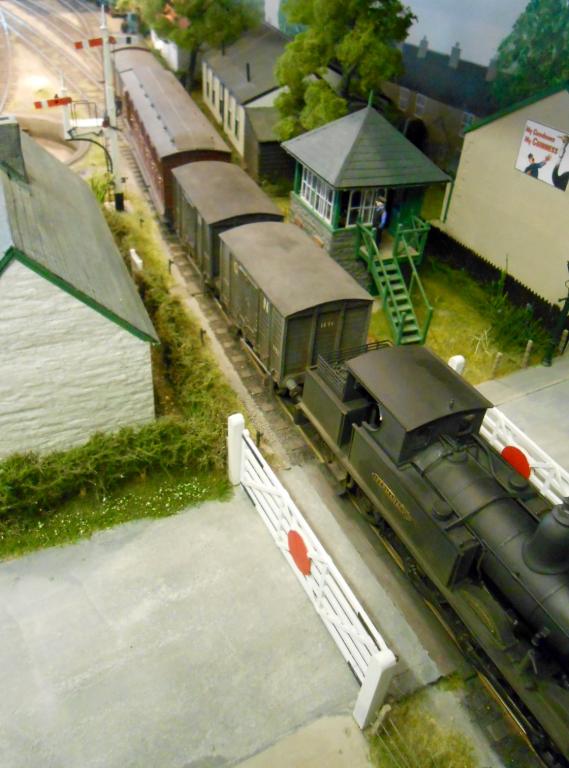
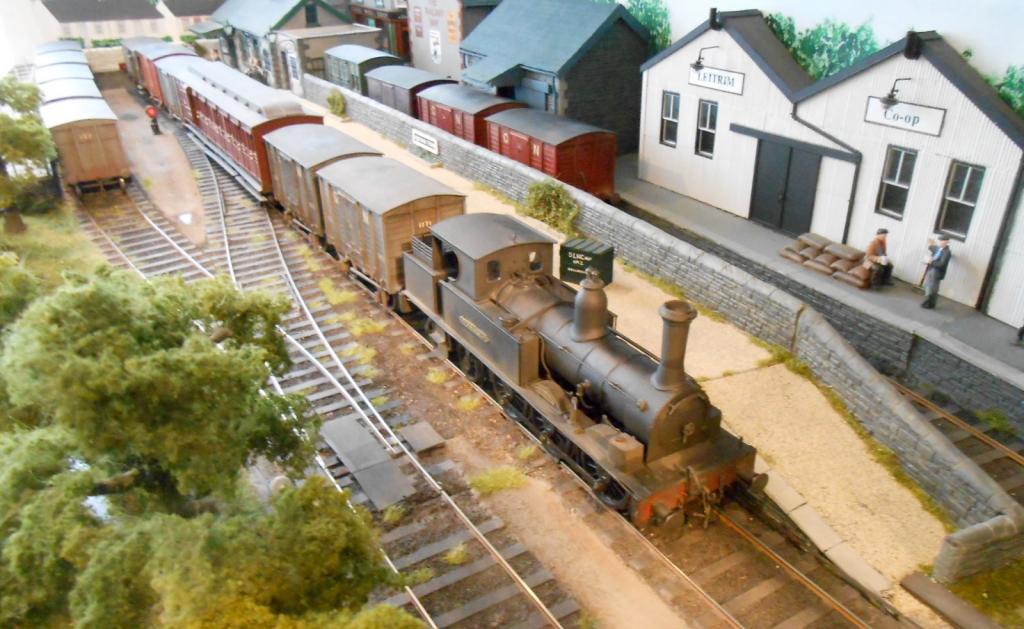
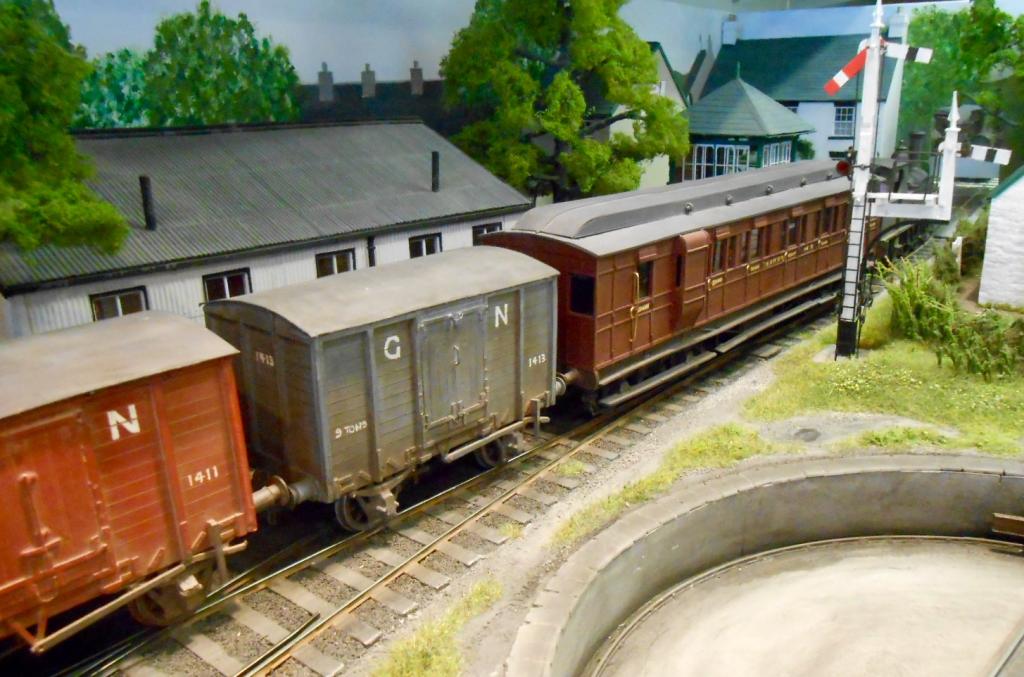
Thanks H - it is always nice to get something published and what is more you get a nice cheque for it too! While I'm here, might as well add the coal train pictures. This is the only time there are two trains on the layout. The theory is that 'Lark' [aka St Mologa] brings loaded coal wagons down from the mine & these are swapped with a stores train, brought up the 'mainline' by MGW E class 0-6-0T. The E arrives first, its short train comprising a carriage truck with a portable generator as a load, then an open wagon loaded with pit props, plus two more opens containing oil drums and drainage pipes. SLNCR brake van 6 brings up the rear. The E moves the train to the goods siding, then pushes the brake to the platform stop blocks & retires to the turntable siding, where it can take water from the tank. Lark then arrives with 5 loaded coal wagons. It runs round, picks up the stores wagons from the goods siding and then reverses this train on to the brake of the coal train. Once the latter is uncoupled\coupled, Lark can depart back up the mine branch. The E class can then come off the water tank and propel the loaded coal wagons back to the other brake, so it too can depart, this time for Sligo or wherever the fuel is needed. Perhaps one day, this will just be a short journey to the new power station being built on Lough Allen & eventually, it may even be diesel powered? At exhibitions, there is a reverse sequence to this, with Lark bringing an empty stores train down from the mine and the E class returning with coal empties. The coal loads [and the pit props] are removable, but at shows we rarely bother and so far, nobody has commented. Just goes to show that one can have too much detail, perhaps? See the upload has once again managed to put the photos in the wrong order. Hopefully folk can work out what the correct sequence should be.
-
Arigna Town - this week's scenery
David Holman replied to David Holman's topic in Irish Model Layouts
Thanks JB. 20 odd years of exhibiting has gradually taught me that simple layouts can look effective, especially if there is enough scenic interest to occupy the viewers between trains. However, they can be quite demanding to operate properly & though we don't use head/tail lamps, most train movements are properly signalled and we run at realistic speeds. I feel it is important to have a brief pause once a train has stopped in the station, before setting back into the loop to run round. Putting signals back to danger is the usual trick. Happily, the track rarely causes problems, though operator error is another matter! Three link couplings are a pain, even in this scale, while screw links require the tongue to be bitten from time to time - though I'm sure people know what we are thinking... What is interesting [indeed disappointing] is that younger/inexperienced operators can have little understanding of how a railway is run. Not their fault, because shunting is so rarely seen on the real thing these days. I'm no expert, but remember one awful occasion with a previous layout. Left a couple of club members in charge while I went to lunch with the advice to 'just shunt the goods train'. Quickly realised this was not understood, so expanded with 'run train into loop, run round, move brake van to stop blocks and then swop wagons from train with those in the sidings'. Technical terms which fell on deaf ears. When I returned 20 mins later, the operator was moving wagons around BY HAND, with a crowd three deep looking on. I seem to remember I wasn't happy, not least reminding him that these folk had paid good money to see trains run properly. Sadly I don't think he'd ever done much more than run his own trains round in an oval. Some serious tuition took place over the rest of the day, and things did improve, but I still see poor operation all too often at shows - sometimes by folk who ought to know better. -
A mighty beast indeed...
-
Arigna Town - this week's scenery
David Holman replied to David Holman's topic in Irish Model Layouts
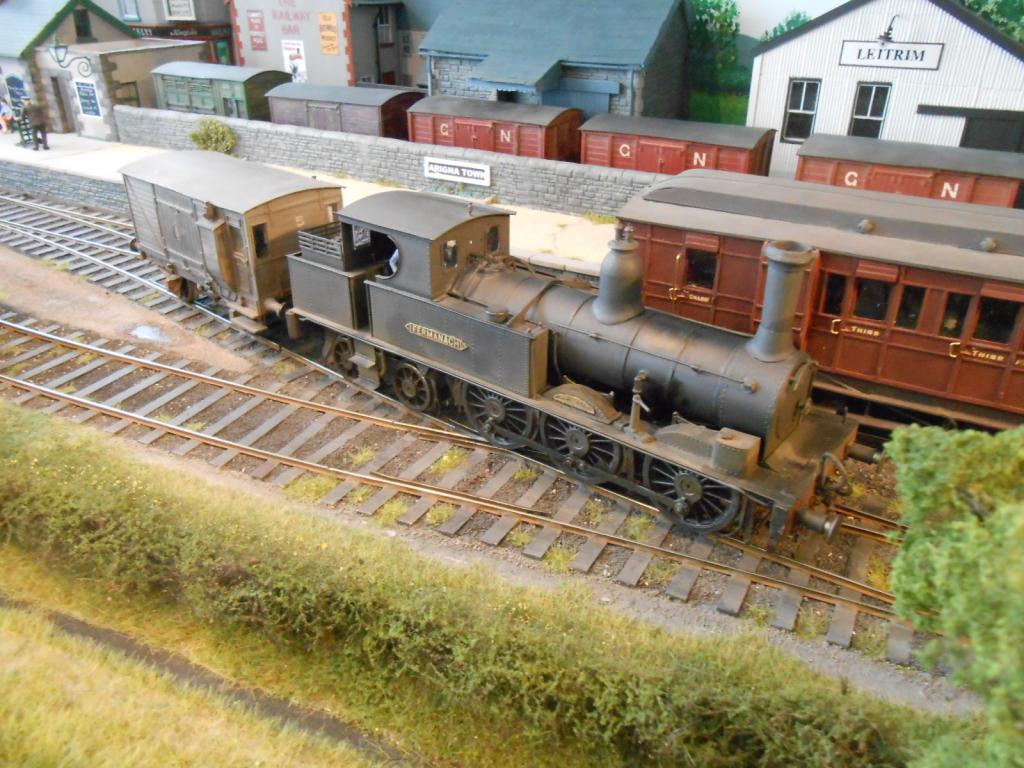
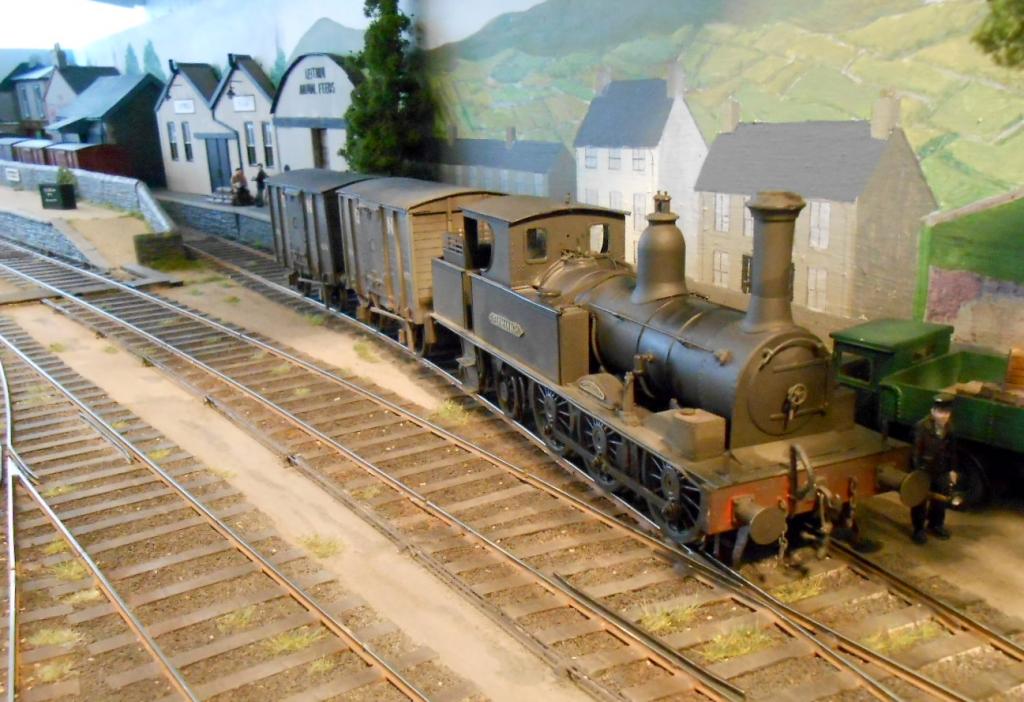
GG is correct, the layout's stock gets a photo feature with extended captions. However, little in the way of change scenic wise so, with stock needing checking prior to going to Worthing in a couple of weeks, thought it might be of interest to go through how the layout is operated at shows. We don't work to a timetable, but do operate a set sequence, in order to illustrate the types of trains which might have run on the branch, had it actually existed. Control is analogue, using a Gaugemaster handheld unit, while both points and signals are all wire in tube; couplings are three link and screw links. The underlying concept of the layout is that each train has a simple routine - enough to keep operation interesting, but [hopefully] not too taxing, so everything runs smoothly. First up is the mixed train, with Fermanagh, bogie brake third coach No 9, two vans and a brake. Shame it can't have more wagons, but this is all that will fit in the fiddle yard. On the layout, we can see that the cattle dock is full of vans waiting for the later goods train, while the siding to the goods shed has a range of vans, including a horse box and parcels van. The pictures show Fermanagh arriving & then it sets back the train, in order to run round. First though, it visits the turntable, then picks up the brake van and moves it to the stop blocks. The main shunt is the to pick up the rest of the train [coach included] and shunt into the goods siding to pick up two more vans. The vans/coach/vans sandwich then shunts back to the platform, where the coach and two new vans are attached to the brake van. The incoming vans can now be shunted into the goods siding and Fermanagh can then return to its train, couple up and be ready to depart. Next time, the coal & mine trains will feature.
-
Arigna Town's locos and rolling stock feature in the October RM [just out]. Am mostly pleased with the pictures, though one I took of Lark shows the works plate isn't straight. seem to remember it was done in haste, when plates were only held on with Blutak. Come to think of it, they still are!
-
Dichotomy - a dual scale layout
David Holman replied to David Holman's topic in US / Canadian Railway Modelling
Gawdloveus IT, have only just looked at this thread and see it is 18 months since your post! Am guessing you have found the answer to your question by now, but just in case... Was amused to find that the CD that comes with a Tsunami sound chip runs to over 200 pages if printed out. No chance of that, of course [not with my printer ink, anyway], but the main point with tuning a steam loco's sound is to avoid the 'chuff' happening all the time. The regulator only stays open while the driver is moving away/accelerating [especially on a small layout] , so what I did was adjust the coasting & braking settings on the chip. Hence when operating the loco, i give it an initial burst of speed, then reduce the controller back to zero. Chuffing dies away, leaving just the hiss, clank, brake squeal etc. Takes a bit of practice in terms of judging where the loco will stop, but adds to the fun and you can always open the throttle again briefly if the loco is coming up short. The little layout is due an outing shortly at the village 'Crafts Day', so have treated myself to a small diesel switcher [also with sound], which I got second hand for just £60. Will take some pictures and give an update shortly -
Arigna Town Exhibition Blog
David Holman commented on David Holman's blog entry in David Holman's Blog
Apropos nothing in particular, was in the local Halfords recently [uK national motoring shop/chain] & they are selling packs of lock together [jigsaw like] floor mats. Each one is 60cm square [two foot in old money] & are marketed as kneeling aids, floor coverings etc. Ten quid for a pack of six, so bought one, with the aim of having a row of them to stand on behind the layout at shows. When you are standing up most of the day, operating & talking to visitors, the feet take a bit of a hammering, so a bit of cushioning won't go amiss. Will have the additional advantage of covering up extension leads where necessary, plus can also be used to act as barriers inside the car, when the layout is loaded. Am sure a roll of old carpet works just as well, but these mats are a bit more flexible in that they can be arranged to suit your needs. Worthing show next, just over two weeks time, so will report on things then. -
Fine work Nelson & all the better with just scale couplings, though appreciate that may not be practical operationally...