David Holman
-
Posts
4,359 -
Joined
-
Last visited
-
Days Won
117
Content Type
Profiles
Forums
Events
Gallery
Blogs
Everything posted by David Holman
-
Arigna Town Exhibition Blog
David Holman commented on David Holman's blog entry in David Holman's Blog
Slightly more remedial work needed between shows this time. I decided that it was time to replace a badly pitted rear wheel on the rails. Perhaps because it is a wagon wheel, it has not reacted well to being used to pick up power from the track. An easy job to do though, as the wheel is just a press fit. So, undo body from chassis, pull off old wheel, prise off the sliver of pneumatic tyre, glue on to new wheel & press back on axle. A couple of adjustments to pickups & the bus is working fine again. Hopefully the wheel will stay cleaner too. The G2 2-4-0 & excursion train also needed attention. I think I over used the Track Magic rail cleaner & had to retire the train on the Sunday at Worthing because the loco was slipping to a standstill. Back home, found that a couple of the coach axles weren't running freely - clearly not helping the situation.... A bit of work with files soon eased this, but the G2 was still slipping, so stripped down the chassis, gave everything a good clean and then added some liquid lead [with 5 min epoxy to the firebox. This has added some much needed weight low down between the drivers & [so far] the train now runs properly again. The other main item was the Y point to the cattle dock. This suffered a damaged tie bar. The copper cladding had peeled away from the paxolin base. Only option was to replace it. That meant prising off the wooden covers hiding the 'wire in tube, removing the old tie bar & soldering in a new one. A bit fiddly as getting the operating wire to hook into a hole in the tie bar was not easy. However, all now complete & once the insulation gaps were cut everything is operating normally again. -
And here's proof...

-
Just seen your reply Eoin. Went to the workshop and did a test. Not only successful, but seems to work quicker on solder than clean brass or nickel silver. The effect is almost instant too, whereas brass & nickel need up to 20 seconds before neutralising with water. Like you, I've used Carrs metal black, but gun blue is much better.
-
4mm scale 'WT' rebuild from a Fowler 2-6-4T
David Holman replied to Richard EH's topic in Irish Models
Mmmmm, I am no expert, but that really does look the part. Great work. -
Many thanks, as ever JB. Methinks the fans might just stay on a while and drown their sorrows. A brave effort, which is more than can be said for my lot. However, having transferred my allegiance to Ireland, who should I follow next & put the curse on???
-
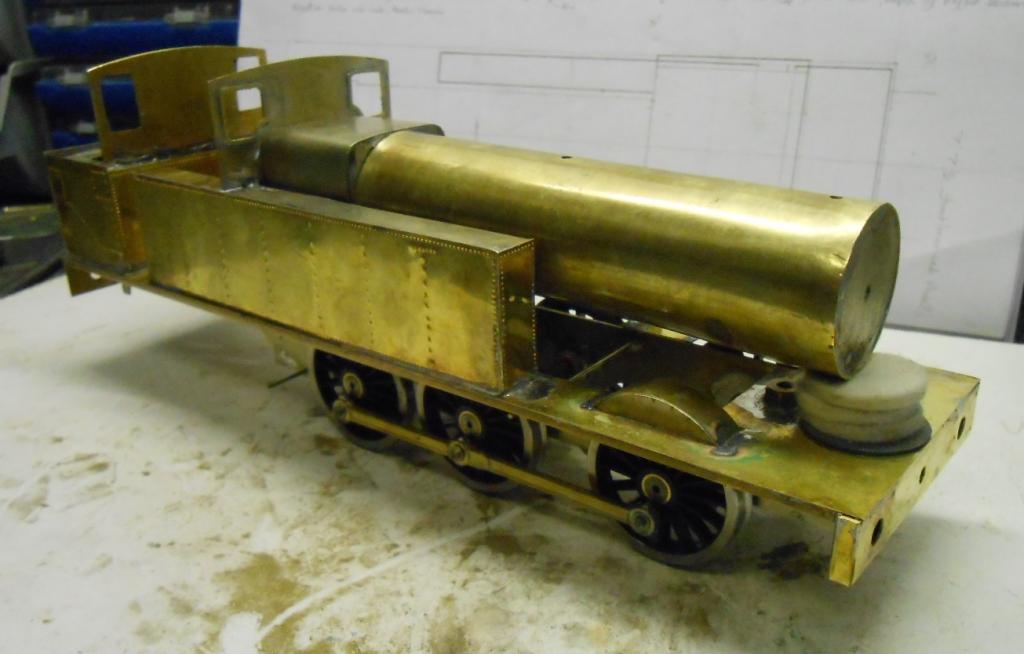
Re recent chat on cleaning/blackening, I've bottle of Birchwood Casey Gun Blue which I've been using for years as a blackener. Better than the Carr's stuff in my experience - I believe it is essentially selenium dioxide. Applied with a cotton bud, it works in seconds and is neutralised with tap water. Works a treat, but never tried it on chips... Sir Henry has progressed quite well to the smokebox phase. The latter is essentially two layers of 10 thou brass, the top one riveted appropriately. A nickel silver blank was shaped for the smokebox front & the whole unit sits on a saddle made from more 10 thou strip & bits. At this stage, it seems like the project is going fine, until I made a list of what needs doing. Counting brake gear as 6 separate items for example, there are still over 100 jobs to do & that is before cleaning up, painting & weathering. By the by ,just been to the Uckfield Show - easily the best of its kind in SE England - where I boughtNorman Johnson's last book 'Parting Shot'. Excellent. Interesting to see that a caption of one photo of the last SLNCR 0-6-4Ts says they were the final incarnation of the classic 'long boiler' locos [firebox behind the drivers], built nearly 100 years after they had gone out of date anywhere else! Sir Henry might have to take a bit of a back seat for a bit. The Beckenham Show is next week, plus I need to order a few bits/materials to move the project on again.
-
Am sure we will all look forward to seeing the silk purse emerge from the sow's ear! As you say, there is a definite pleasure is making something better, especially if it runs well too.
-
Wow, strong stuff indeed!
-
Interesting, thanks Eoin. Presumably, by pickling mixture, you mean vinegar? Tis the chutney season in our house at the moment, courtesy of the quince tree in the garden. Hence the place reeks. Must find a nice big [empty] jar.
-
Welcome to the hobby - hopefully you will find it as rewarding as the rest of us. One slight caution. Many a modelling project has fallen foul of starting too big. Just because you have 4m x 3m doesn't mean you have to fill it all immediately. A smaller project [eg a 2m x 0.5m loco depot] will enable you to develop skills, make mistakes [though we all keep doing those] and have something finished in a reasonably short time. Design it so it could fit into the larger project and time is not wasted. Equally by then, you find your interests have changed, but it will still be good experience.
-
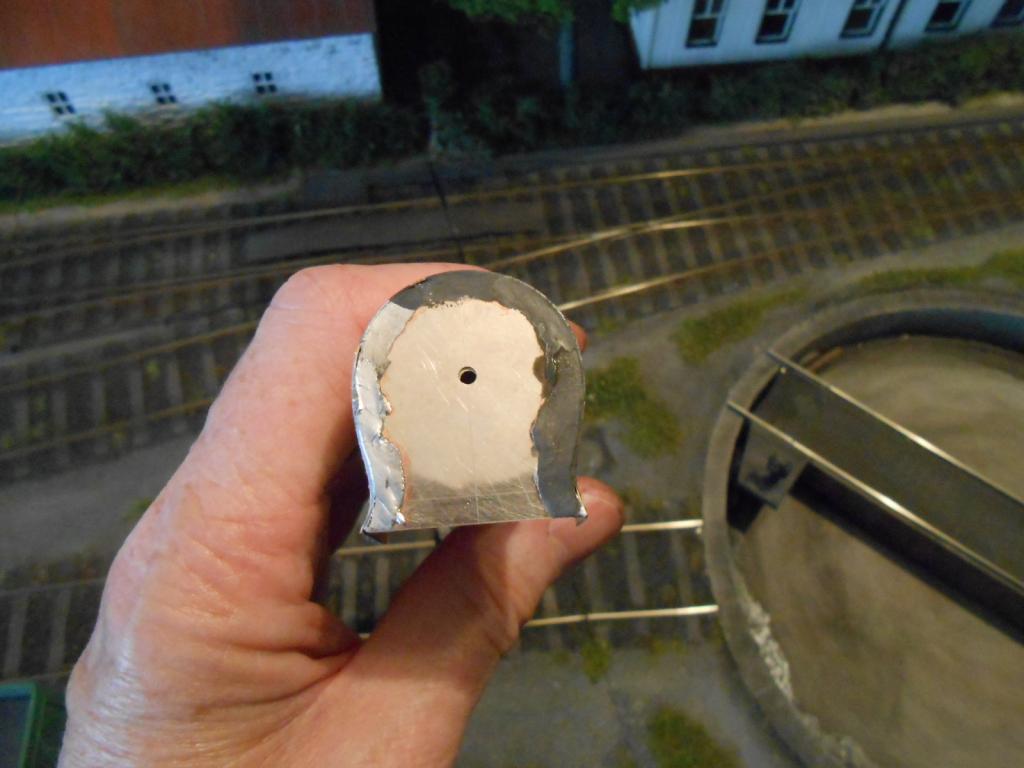
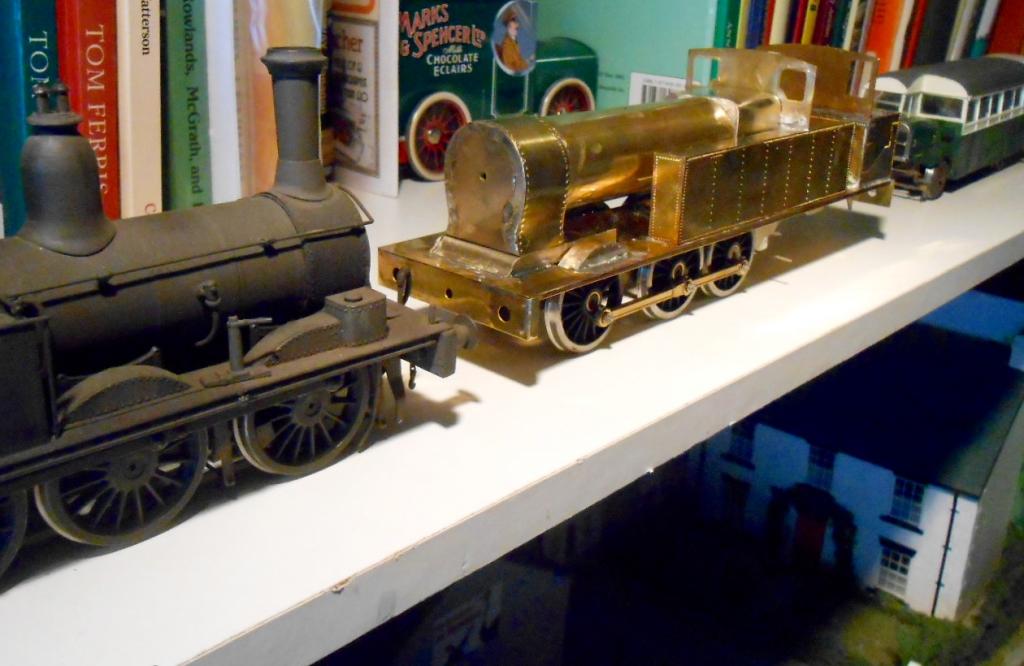
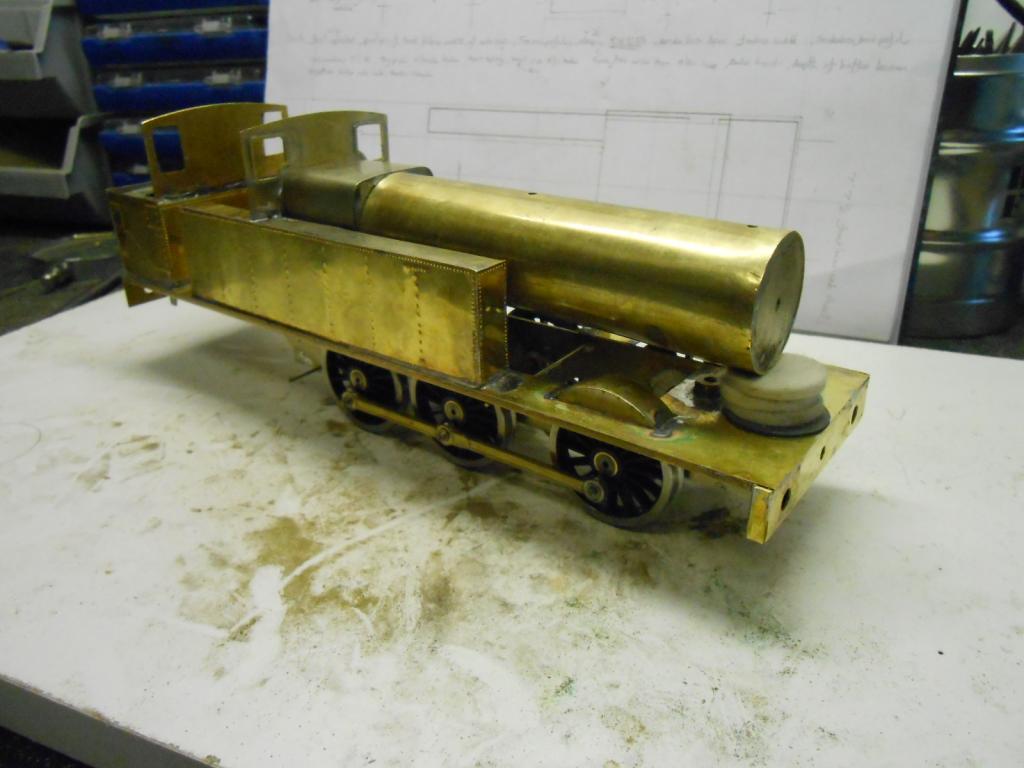
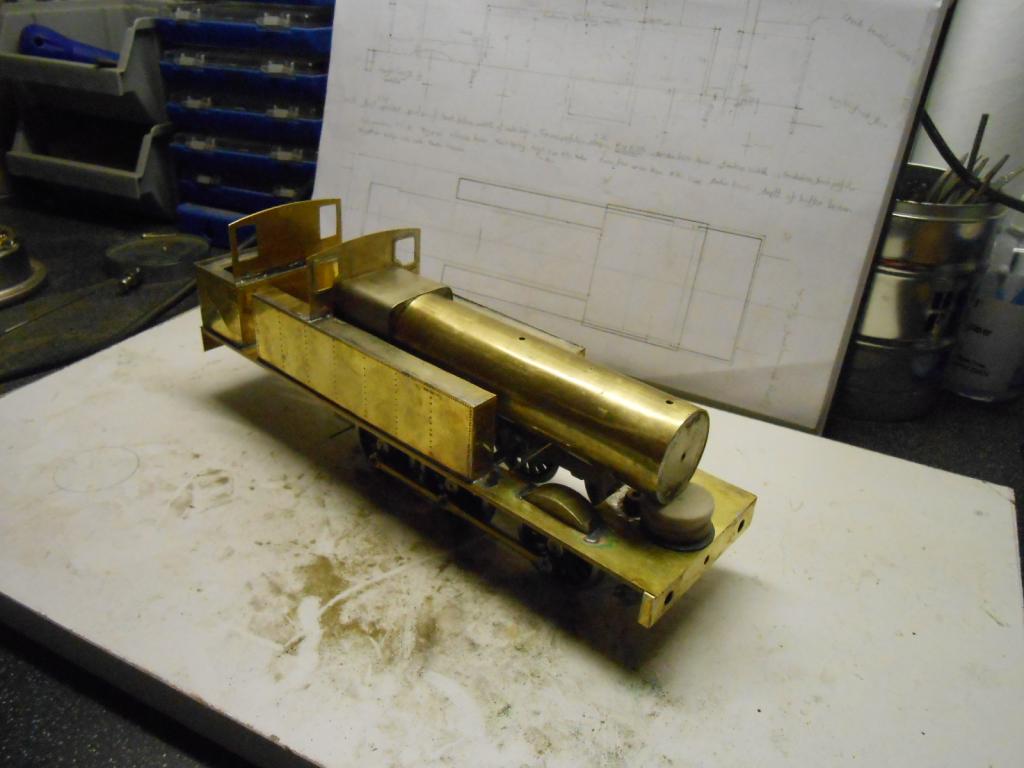
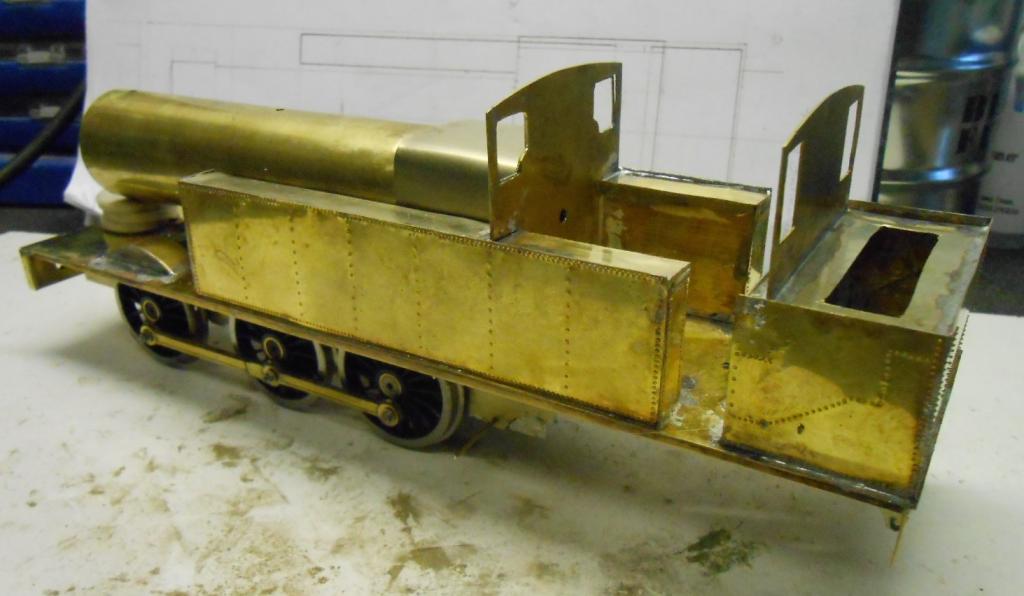
The last few days have seen the tank sides soldered in place. Eight pieces in all - outer & inner sides, plus front and rear sections. These were assembled first, then the cab front was cut to fit in between the two tanks. Also added a top to the bunker, which still needs a further set of sides fitting, plus the bunker front, inside the cab. This should have a hole for the fireman to shovel the coal, but it will be hidden by the crew [once fitted], so have decided to save myself the trouble... A good wash came next, to clean off the flux [or the metalwork soon goes green] & then it was time to sit back and decide what needed to come next. At the moment, I'm concentrating on getting the superstructure built & will go back to fitting details once the general outline is completed. This was a good time to remind myself that, though the model is taking shape, there is still a long way to go! To help with painting, have decided to make the boiler/firebox/smokebox unit removable. The boiler is actually the etch from my first Small Tank [Hazlewood]. I'd replaced it on the latter with a piece of copper pipe - right diameter, but almost impossible to solder anything too as it was a thick old bit of metal. Now, a Small Tank's boiler is smaller than Sir Henry's, but most of it is hidden between the longer side tanks. Hence a current gap at the bottom will be covered with a fillet of brass & the joint made good with some judicious filing. Waste not, want not. As it is you'll see that a mix of nickel silver and brass is being used for the superstructure, simply because I'm starting to run out of sheet metal. The firebox is nickel, I cut two end blanks from 18thou sheet and soldered a ten thou wrapper around them. The second attempt was much better than the first! End blanks for the boiler were also cut from thicker nickel. I used a puch to mark the centre of two circles, then scribed these with a compass, before cutting out with a slitting disc in the Dremel. These were filed to shape with a grinding disc [again in the Dremel], then I drilled through both so I could bolt them together [8BA] and file to shape in my pillar drill. There are centre holes in the fire box front/rear, plus the cab front. This means I can use 8BA nuts and bolts to assemble the boiler/firebox to the cab front. The firebox and boiler were also bolted together, prior to making a solder joint. As you can see from the photos, the boiler front rests on some polishing pads, to allow me to check alignments. At this stage, everything looks a bit anorexic & I'm constantly remeasuring clearances. Not so much a case of measure twice, cut once, as act in haste, repent at leisure. Forgot to mention the front splashers. Hate doing these things, even on a kit, as they are awkward soandsos to fit. Use 240 solder to fit the outer faces and 145 solder to fix the tops. These are 10 thou brass. Easy to shape, but finger singeing to fix... I'm sure you've spotted the dent in the boiler, worry not, it will be covered by the smokebox wrapper, which is the next item on the list.
-
Progressing well & should certainly be a nice runner with that chassis. A bit quicker than an etched kit methinks[!], but resin is the ideal medium for the complex shapes of diesel locos. Will look forward to seeing the paint job.
-
Greystones Model Railway Layout.
David Holman replied to closetmodeller's topic in Irish Model Layouts
Very smart & crisp modelling -
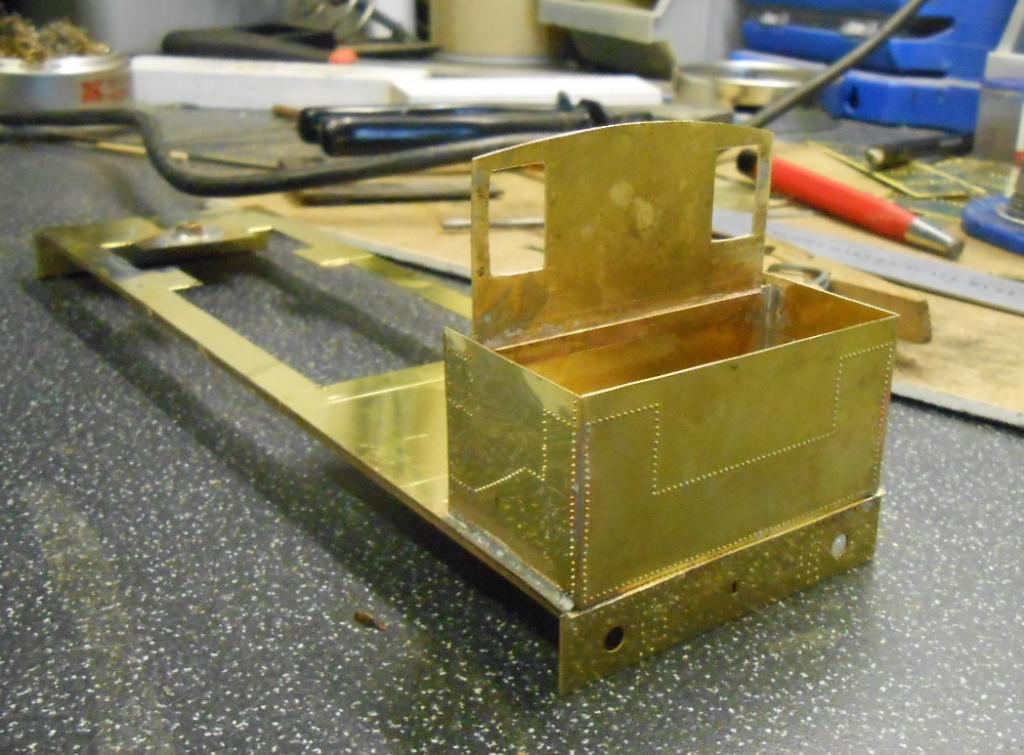
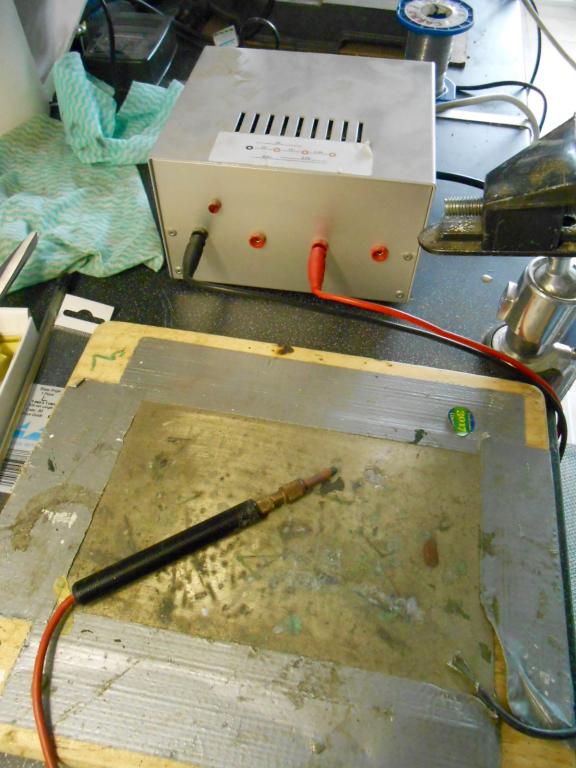
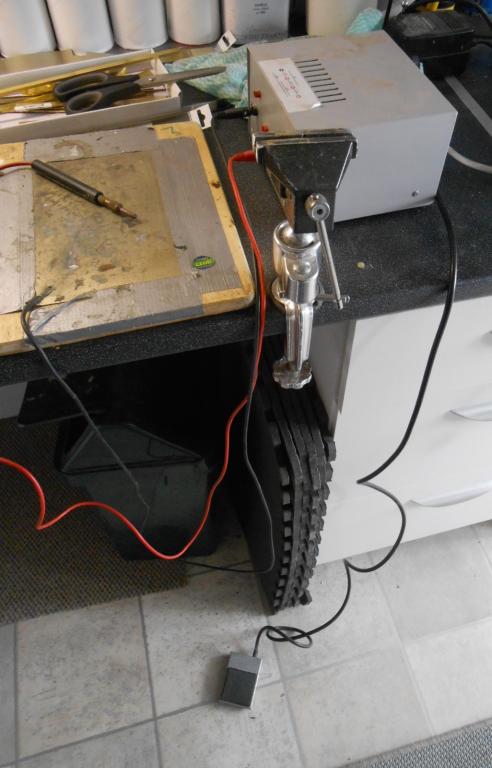
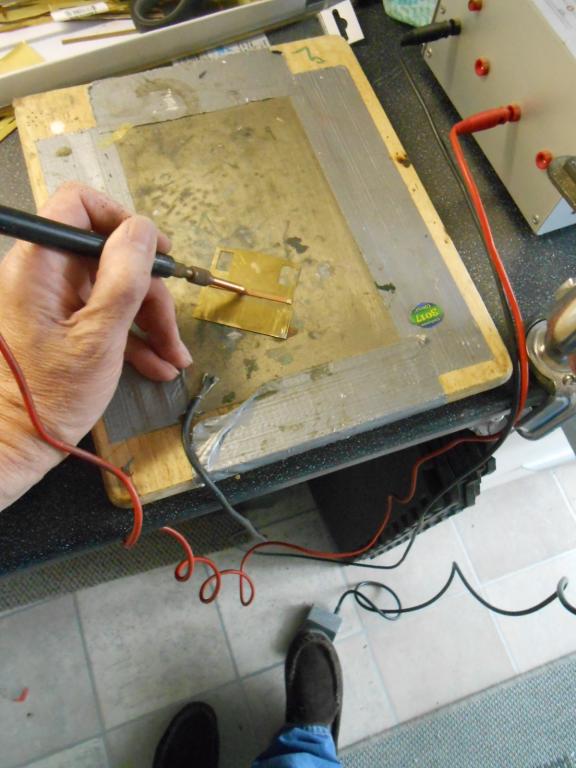
Every time I think I'm ready to start putting pieces together, I realise there is something else that needs doing first. However, this is the additional challenge of scratch building - though there are kits where it can pay to see what additional detail may be needed too. In the case of Sir Henry, realised that though I'd made the outer parts of the cab, tanks and bunkers, I hadn't sorted out how they fitted with the inner pieces, hence some further cutting and riveting required. In addition, because I'm using 10 thou [0.25mm] thick brass for the tanks and bunker, these need some reinforcing to keep their shape. Found some thicker brass strip in the scrap box and after tinning it first, got my truster RSU out to attach to the sides. Got mine several years ago, but I think Swanage Models may still sell them. Comparable in price to a temperature controlled unit, so not cheap... For those who haven't come across this, a resistance soldering unit works in a different way to a conventional iron. As you can see from the pictures, it comprises several parts - the main power box, a metal plate, a carbon probe and a foot switch. The probe and metal plate have leads which are plugged into the power box. This has several sockets to give different outputs, from 1 volt to 4.5 volts. Doesn't sound much but the higher outputs can literally vaporise small items if you are not careful! In this instance the cab/bunker rear is laid on the metal plate, then the reinforcing strip [already tinned & fluxed], placed in position. The carbon probe is pressed on the latter, which holds it in place and then the foot switch is used to apply power. Heating is almost instantaneous. Foot off the switch and hold the probe in place till the solder cools & job done. Not applicable for all soldering jobs, but very useful for some, including adding fine details/overlays etc - as long as you turn the power down. Photos also show the assembled bunker & cab rear on the footplate. Would like to say this didn't take long, but made a mess of the cab rear initially [not straight or central!] but didn't notice until I had the other parts on, so had to unsolder & start again. Even then the join is not perfect, though at this stage, it is just tack soldered in place till I'm happy with the overall way things sit. Stuff happens [or something like that, as the Bhuddists say] and at this stage of a model it is crucial to get basic alignments correct or it could end up throwing the whole model out of line later. Occasionally have to remind myself, it is not a race. Likewise, always best to stop when you are going well. Doing one more job almost always means you make a horlicks of it & it needs doing again later...
-
Quite a beast, John - very impressive. Re painting, I've always used car body spray primer from Halfords. Not sure if you have them over the water, but am guessing there will be something similar. Grey primer is also what I use for unfitted wagons and bauxite colour for fitted ones. Before painting, always give the model a good wash. Some folk suggest a proprietary stainless steel sink cream cleaner, though washing up liquid works just as well. Important to get any flux off, plus finger marks and even grease on the resin castings. Set aside to dry [or use a hair drier if in a hurry] & double check there are no droplets of water hidden anywhere. When spraying, I do have a proper spray booth, but for short jobs am happy using a bit of wire to hang the model from & them spray it outside in the garden. Hang from a shelf to dry after. Several light coats will avoiding over spray, with resultant running/sagging of paint. If you do get any blemishes, leave overnight to dry and treat with T-cut or similar.
-
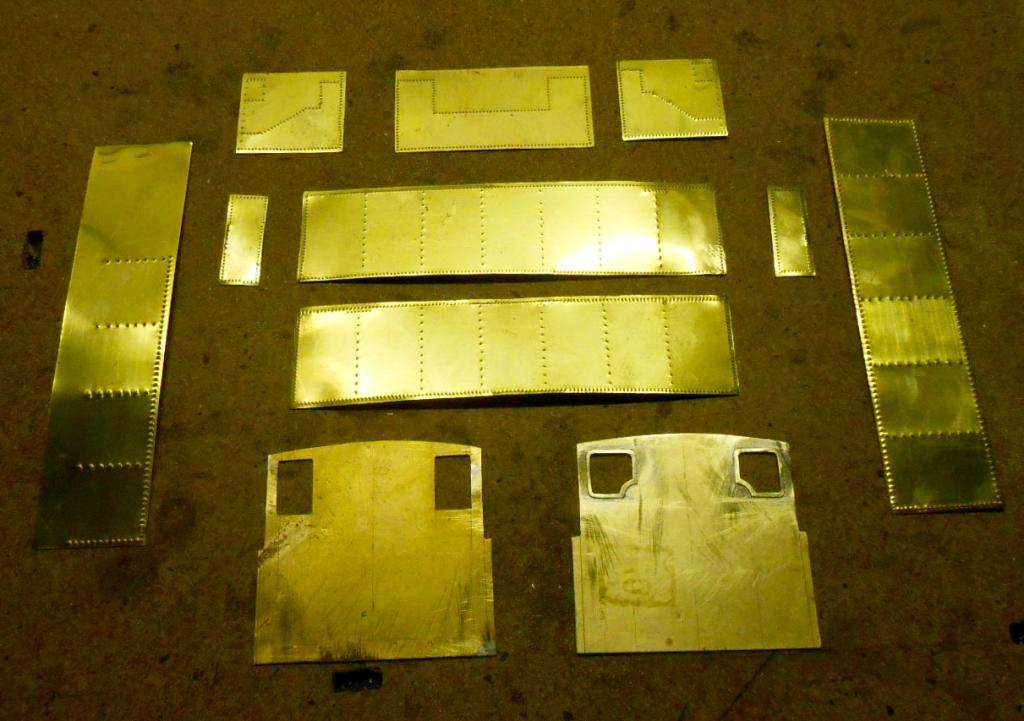
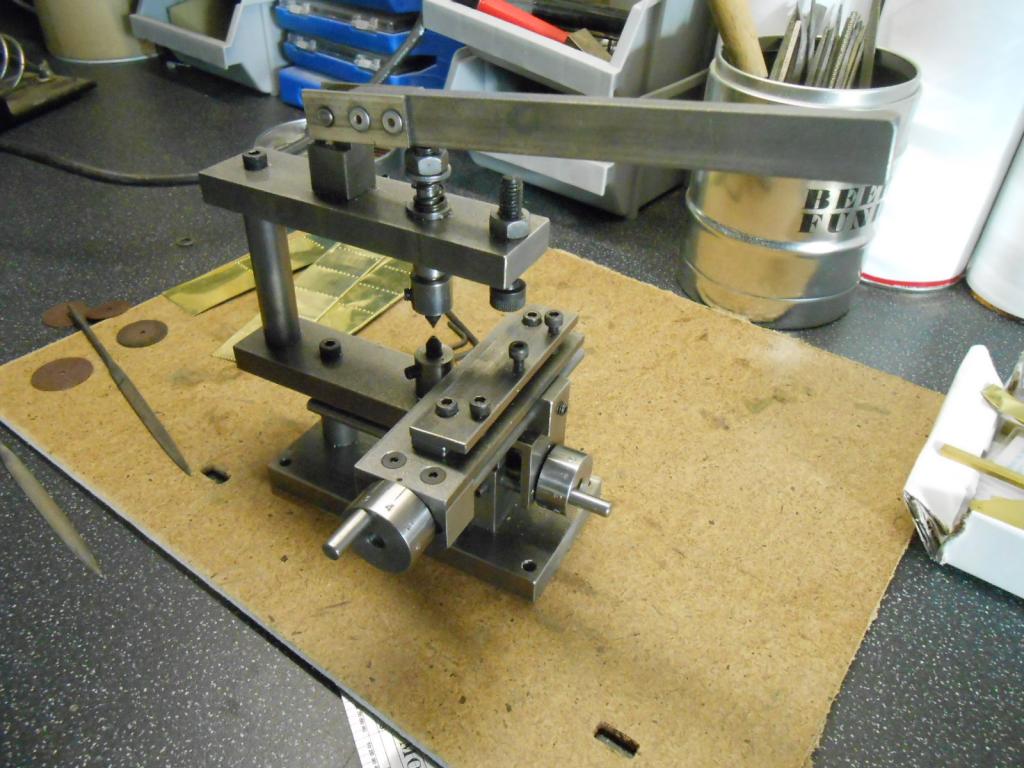
Spent the last few days going squiffy riveting. The GW Models press is superb for getting evenly spaced rivets, but still requires care setting up or you soon find the lines aren't as parallel as you'd wanted. Hence had to do a couple of pieces again, while the initial sides also had to be re-done because I got the spacings wrong... At least the rejects will serve as the inner tank sides, so not completely wasted. So, with well over a thousand rivets to do on the sides in the first place, I've probably almost doubled that. Not recommended. However, at least now have a basic set of parts to do the tanks and bunker - as you can see in the photos. Have included one which shows the difference between using the 7mm anvil in the press [at 1.5mm intervals] and the 4mm one at 1mm intervals. much neater methinks. The other picture is of the cab front sheet. Did this out of thicker brass, with the window surrounds done by soldering a 10 thou blank over the initial hole, the drilling & filing back. A fiddly trick taught me several years ago by Laurie Griffin in his MRJ scratch build of the Wantage Tramway loco 'Jane'. The next step before assembling the parts will be to solder stiffening strips to the back of the parts, some of which will be placed to help locate bunker and tank tops. A chance to get out the RSU [resistance soldering unit], so will hopefully show you how that works next time.
-
Still amazed by that photo of the turf train. What a superb piece of adaptability & as already commented, a model of such would perforce need an explanatory label. My aging, but much treasured copy of S Maxwell Hajducki's Railway Atlas of Ireland shows two Bord na Mona systems in north Mayo - Oweninny [1958] & Bangor Erris [1964]. Had the line to Belmullet been built, then perhaps this resource might have been tapped earlier & provided a reason to keep the line open into the 1950s. Sadly, can find no turf railways anywhere near Arigna & with a half decent coal supply the locals would perhaps not need the turf anyway? In 7mm scale, Alphagraphix do a range of etched brass 6 wheel coaches, plus there are their cardboard kits [with chassis available too]. This has certainly become a possible project for me, as the stock wouldn't be too difficult to construct, though a proper weathering job might take some effort and as to a turf load, I wonder what could be used in this scale? Certain types of rabbit food perhaps? Am sure the fertile mind out there will soon come up with suggestions!
-
What a fabulous picture! Just checked the calendar to make sure it is not April 1st... Am wondering if such a train would have run on the Sligo Leitrim? However, what prpted the question was see the turf railways on the Belmullet headland. JHB's book on Achill Island details the projected lines, so turf trains could have been a real possibility then. Food for thought!
-
Arigna Town - this week's scenery
David Holman replied to David Holman's topic in Irish Model Layouts
Especially if its a Guinness JB, though it is not quite the same this side of the water. -
Was turf ever carried by broad gauge lines & if so, what type of wagons were used?
-
anyone done a 21mm layout with murphy models
David Holman replied to Junctionmad's topic in General Chat
P4 now proven for those that like the precision. Plenty of layouts around now that run well - certainly not the case 10 years ago in my experience. 21mm to EM standards is [i'm fairly sure] the same as FS 16.5. The crossing gaps are slightly narrower & by the by, is why some folk in 7mm scale have a track gauge of 31.2 mm. Wheel back to backs stay the same, so flange ways through the points are tighter/smoother. -
Seems there are no rivet counters out there at the moment - or more to the point 'lines of rivets'. Thought I finished the horrendous job of doing the tank sides, only to find I'd put five panels of intermediate rivets instead of six... Reaction was fairly muted for once, though the word that rhymes with what rowers put their oars in was uttered at least once. However, had been increasingly feeling that the 7mm scale 'anvil' was producing rivets that were too big. So, out with some more brass sheet and spent much of the day making new tank sides, which [to my eyes at least] look neater. Probably also said something that rhymes with rugger too - though much of that and more was reserved for Saturday's debacle. No, not against the Aussies - they were just too good, it is the Wales match that rankles. So, must now transfer my allegiances to Ireland [of course, you say], though the Haikka is still my favourite piece of sporting theatre.
-
Arigna Town - this week's scenery
David Holman replied to David Holman's topic in Irish Model Layouts
The layout only gets seen as still photos on the web, but at the recent Worthing Show, some video footage was taken. it can be found on http://www.railwaymodellers.com Go the the 'Wadebridge Show' section & after a few minutes of modern image, Arigna town gets some attention. -
anyone done a 21mm layout with murphy models
David Holman replied to Junctionmad's topic in General Chat
21mm [or indeed 36.75mm] definitely the way to go. Everything just looks so right for the Irish scene & as Iain Rice would say, is THE prime layout'signature' While have no experience of 4mm scale, in 7mm 'fine scale' standards work perfectly well. OK the flange/crossing clearances are over scale compared to S7, but Arigna Town sees no derailments other than operator error & this is with Code 100 rail [as opposed to 124] as well. In 4mm scale, C&L point kits should make up perfectly well in 21mm gauge. As they come with blades ready machined and crossing fees already assembled, construction should be no more difficult than making a plastic kit... Can see why folk stick with 16.5mm in 4mm scale [especially the larger layouts] and as long as the viewpoint is kept at a low angle [plus using Code 75 rail], then it can look fine - as many photos on IRM show. Correct gauge really lifts things to another level though & would certainly encourage folk to have a go. Start with something small though! -
In engineering terms, it borders on heresy, John. Am using 10 thou brass, so it can be cut with strong scissors. Do the same with 15 thou [likewise nickel silver], but anything over that means the fret saw. Really don't like it much, as it takes so long, which was why the frames and rods took so long to make. However, am not above using a slitting disc in my Dremel. Needs care, but much quicker! In each case, cut as close to the marked lines as I dare, then clean up with files. The 10 thou brass is probably a bit thin for 7mm scale, so am reinforcing it with scrap strips and/or L shaped angle as appropriate. Definitely recommend the rivet press. Well engineered from mild steel, have had mine for several years & though it doesn't get used a lot, it is one of those tools I would not be without.