David Holman
-
Posts
4,359 -
Joined
-
Last visited
-
Days Won
117
Content Type
Profiles
Forums
Events
Gallery
Blogs
Everything posted by David Holman
-
Many thanks folks. It is by no means perfect, but it does seem to capture the character of the prototype & also [at the moment] runs very well, which is all I ask really. I keep promising myself I will improve my soldering skills, but it is amazing what you can get away with under a coat of paint. Have now built over 50 locos in both 4 & 7mm scale over the last 30 years, so have learnt a few things in that time I suppose, even if mostly not how to do things!
-
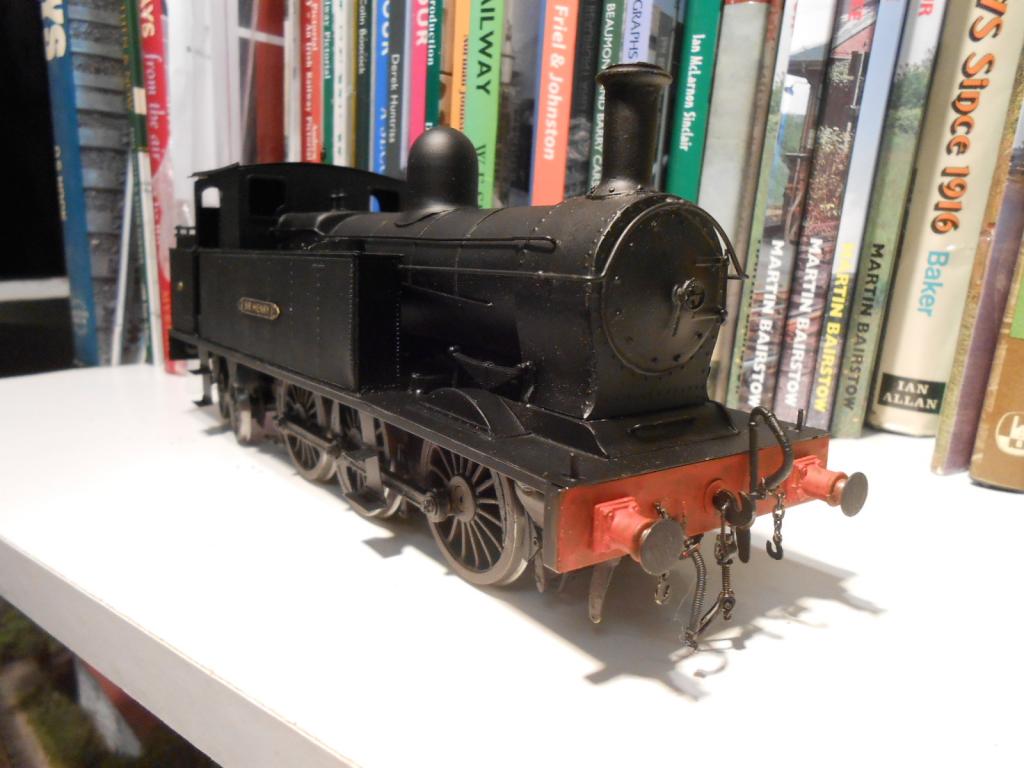
Began work on this model on 14th September, so 111 days later, it is finally complete. Did a weathering job on it yesterday, which involved getting the airbrush/compressor/spray cupboard out. Always fraught for me - was the clean up from last time thorough enough on the airbrush? Will I get the paint mix right? Will the spray pattern be ok or paint come out like a muck spreader, etc etc? Happily all was well & the paint mix [as per Martyn Welch's bible] of Humbrol Metacote Gunmetal, Tarmac and Leather in ratio of 2:1:1 is just right for toning down & highlighting the very deep, flat black you get from an automotive spray paint can. After a couple of hours letting the paint dry, then did some gentle work with weathering powders. This involved grey on the tops of the boiler & cab, with browner tints for the smokebox & footplate, plus burnt sienna around the brake shoes, base of firebox etc on the chassis. Then left it overnight to dry hard [find this works better than covering with matt varnish as a seal for the weathering powders], before joining the body & chassis again. While doing the latter, found that the sandboxes were too far inboard, so had to prise them off the chassis & pack them out to the correct width. The sandpipes now sit much better, which explains an earlier issue! The last bits of work were glazing the cab windows, adding the crew & finally putting coal in the bunker. The latter is from a pice I liberated from the concentration plant entrance in Arigna a couple of years ago - so am guessing it is more likely Polish and Irish... The photos show the finished model, note comparisons between weathered and plain black from last time, also alongside Hazlewood to show the differences between a Small Tank & a Large one. Also some poses on the layout. Not sure if I will get the two coaches finished in time for St Albans in two weeks time, so Sir Henry may well have its first outing running the excursion train with the three MGW six wheelers. The working inside motion shows up quite well & anyone who doesn't notice will certainly have it pointed out to them!

-
A decent model which am sure will be all the better for going through the carriage shops! The potential for doing Irish NG in both G and indeed Gauge 1 has long interested me. Gauge 1 would allow 0 gauge [32mm] track and around 1:29 scale. Tempting...
-
Seems like the festive period has not produced much modelling - or at least, none of it has been photographed/written about yet... Chrtistmas & New Year used to be one of my most productive times when still working. A two week break from school and little on TV to distract [not much change on the latter], meant I could get plenty done, just with a work board on my knee and glass of falling down water by my side. Current work on Sir Henry & the coaches is not something that can be done this way at present & though I managed to get a few figures painted, the loco has had to be fitted in during gaps when relative/friends were not present & I could sneak into the workshop. However, I'm sure my wife didn't feel entirely left out, as she could certainly hear all the swearing as it was a case of one step forward, two back. The issues stemmed initially from painting the chassis/body work, then re-assembling. It seemed there were shorts everywhere when I tried to run the loco on the track. add in a sticking bogie wheel, sticking bogie itself, the drop links from the reversing gear fouling the inside motion, etc etc and it has taken many hours of trial and error to get what was a very smooth running chassis on the work bench, translate that to running well on the layout. I also had to think the connecting rods by about half a millimetre and do the same to the front bearings, in order to get enough side play into the coupled wheelbase. The various shorts were cured by cutting back bodywork inside the side tanks and using insulating tape and/or cyano on the underside of the footplate/insides of front splashers. This all resulted in needing to refit the brake shoes, repainting of large parts of the wheels & chassis, plus taking off & replacing the wheels more times than I care to remember. Such are the perils of all metal locomotives. It is just as well Sir Henry is analogue & not DCC...
-
Drogheda MacBride Station and Depot layout build
David Holman replied to heustonconnolly's topic in Irish Model Layouts
Seems to me you will need to do a scale drawing [as opposed to your original sketch, as the curves will take up far more room than you think. In 00 scale, I wouldn't go under 24" radius from a visual and operating point of view, though I guess you could get away with 18" radius if you don't mind seeing your trains going round right angled bends. However, even 18" curves means your straight sections will be down to little more than 6' and 4', while remember that even small radius points will be 6" long. In addition, putting platforms on an 18" radius, 90 degree curve will mean clearances between coaches an platform edges will be cavernous. My suggestion would be to make most of the layout curved [ie no real straight sections], with the tightest radii hidden in cutting/tunnel and platforms on the gentlest radii. Putting the station almost on a diagonal will increase the length available & because you are only indicating scenery on the other boards, you can afford to make these fairly deep as you will not be reaching over to uncouple. As JHB has said, consider a second level too. Cyril Freezer's booklets [Peco] contain a wealth of ideas, plus there is a series running on double deck layouts in Railway modeller at the moment. -
That bridge scene and is surroundings are indeed splendid. Looks like a challenging location with all those trusses. A layout well worth seeing up close and personal to appreciate both the work and the artistry.
-
The loco has been going through the paint shop and final detailing this week, though there still remains much to do - not least because one or more of the pick ups is shorting out against the body at the moment. The perils of brass engines! However, thought it was worth a preview, even though in freshly applied black [automotive spray can], much of the detail is lost because it can be such a flat colour to photograph. After Christmas, will get busy weathering, which should help highlight the details, but an air brush is not the thing for the festive season - though aspects of the latter may help to steady the hands [but also blur the eyesight].
-
Prototype operation of models & layout design
David Holman replied to David Holman's topic in General Chat
Re exhibitions, my own view is that the customer comes first, after all they are paying good money to come in. So, as much movement as possible on the layout, without it becoming silly, plus good scenics, buildings etc for those times when nothing is moving - inevitable on a terminus fiddle yard sent up. Now, my take on that is likely to be different to the next person's, so it is therefore up to the exhibition organisers to ensure their show has a reasonable balance of displays. For general shows, this surely means are range of scales/gauges/prototypes/eras etc, large tail chasers and detailed dioramas, something for the kids, plus a good range of traders. The size of the show depends on what can be offered and the bigger it is, the more that can be accommodated. At my club, we try very hard to invite only those layouts that are interesting to look at and run well, though are obviously dependent on what is available at the time. Really good layouts can be like buses: none for a while, then several come along at once. So, while for me a really good show would be host to my favourite traders and display layouts of obscure prototypes alongside busy tail chasers, that would not be everyone's cup of tea. Appreciating there is a variety of interest out there is really important. Likewise, when inviting traders, you do not want multiple stalls selling the same thing. At one local show I counted no less than ten book sellers, with twice that number of second hand box shifters. OK for a swap meet maybe, but surely not a model show. Since 1987, I've exhibited at close to 100 shows and visited at least as many as a customer. Few people spend more that a couple of minutes at each layout and will move on in much less if nothing is moving. The only layouts to challenge that are the exceptional scenic ones. Gordon and Maggie Gravetts layouts are worth looking at regardless of movement, likewise Bramblewick Cove and Hursley and Petherick. All their builders are also consummate artists, which perhaps says it all... -
Lovely work. Puts my soldering to shame and am sure you spend far less time cleaning up than me!
-
Prototype operation of models & layout design
David Holman replied to David Holman's topic in General Chat
Seems like I've opened the proverbial can of worms here.... Not my intention! The issue is that of increasing numbers of people not having experienced railway operation pre 1970 and the effect it can have on layout design, choice of period etc etc. If folk want to do their own thing, fine. At times, I can enjoy seeing trains go round in circles, BUT doing things (reasonably) properly can very much enhance the whole experience, which is surely one of the main purposes of this forum. -
Prototype operation of models & layout design
David Holman replied to David Holman's topic in General Chat
Certainly agree with the above comments & at shows there is something special about a continuous run that is well operated. At Tolworth recently, the Guildford Club had their immense Normandy Junction [0 gauge] running at least 4 trains at once all day & there was rightly a big crowd the whole time. My own favourites are Dainton Bank [even though it is GWR!] and Stoke Summit. The latter was very much my home territory & despite being just a double track mainline and goods loop [no station at all], the crowds were always at least three deep. I even saw odd person [pun intended] writing down engine numbers! The key to this layout was a vast fiddle yard, with [i think], around 18 tracks each way, each capable of holding a 13 coach train or 40+ wagons. Despite fairly basic scenery, the anticipation of seeing the signals going off made the brief wait for the next train worthwhile. There again, I can get just as much enjoyment looking at a well main small layout/diorama. What I don't like are layouts that do not/are not run well & am sure we've all seen a few of these. As I've said before, things do go wrong [a drawer full of T-shirts at home for this], but I do ensure that everything works before I leave for a show & am not sure that is the case for everyone. Given the quality of modern RTR models, that seems fairly inexcusable. Hence every reason to run the layout properly and there is some superb stuff out there to enjoy. Rant over! -
Prototype operation of models & layout design
David Holman replied to David Holman's topic in General Chat
Indeed, Stephen. Everything we do is a compromise. Autocouplings can be hands free, but are not prototypical and few people try to connect brake hoses. At shows, it is mostly about keeping things moving, but I do think it important to try and work in a railway like manner. So reasonable speed (but not too slow -shunting could be quite smart) but careful buffering up, with a full stop to couple up. Always aim to have vacuum braked stock nearest the engine and ensure passenger trains are hauled by VAC braked locos. A few years ago, I had the privilege of operating Trevor Nunn's East Lynn. Fabulous S gauge layout. Interestingly, all points and signals worked by the signal box operate from a hidden lever frame, but local points in the goods yard and on the wharf are worked by hand levers in situ, as per the prototype. Personally, I can live with the big hand from the sky and find it better than shuffling a train back and forth over a magnet to do my uncoupling. Kaydees and the like work very nicely for running round, but Alex Jacksons just seem like witchcraft to me! The joy of the hobby is do do what we enjoy, feel comfortable with etc. So if folk are happy with a train set, that is fine, but I do worry a little that the knowledge of railway operation pre 1970 could be lost, because anyone born since then has not experienced it. -
Prototype operation of models & layout design
David Holman replied to David Holman's topic in General Chat
Three link/screw link on AT, Weshty. Have used Dinghams and Kaydees in the past. Considered Dinghams, but the turntables preclude this as they are one way only. Three links I can cope with, screw links a regular cause of expletives especially when between two coaches or vans! Alpraham Sidings was real state of the art stuff & all the more applaudable for it. Perhaps a bit too sophisticated for the likes of me, but them I'm more of a builder than an operator, even though I like to do things reasonably proper at shows. -
Recent correspondance about layout design has re-ignited a concern I've have for a while now, that [with the passage of time] there are a lot of modellers who can have had little experience of how railways ran in 'the good-old, bad-old' days of loose coupled freight. Indeed freight of any sort seems to be at a premium in Ireland, so anyone modelling the current scene is not really left with a lot to do methinks, though am sure that there will be those who want to prove otherwise & good on yer if you can. However, unless you are old enough to remember pick up goods, parcels traffic, mixed trains and loco hauled passenger, it seems to me that this knowledge is going to fade if we are not careful. This was forcibly brought home to me a couple of years ago when exhibiting at a show in Sussex. None of my usual operators were available that weekend, but a couple of other club members kindly volunteered. What I didn't realise [but was soon to find out], was that they had virtually no knowledge of railway operation & had probably never done more than run their own models round in circles. Come lunchtime, I said to them something like 'while I'm away, just take your time and shunt the pick up goods'. This drew rather blank stares, so I added 'run the train into the goods loop, then run round and swap wagons in the train for ones in the goods shed and sidings'. Keeping my fingers crossed that this shouldn't be too much of a problem, I left them to it. On my return 20 mins later [with a crowd 3 deep in front of the layout], it was to find them shuffling wagons, BY HAND,in front of bemused spectators, as they clearly had no idea how to manage a simple shunt. Indeed, even the term 'run round' was probably new to them. After I'd calmed down, I realised that the issue was as much mine as theirs. It just hadn't occurred to me that they wouldn't know how a pick up goods would be operated. Extensive tuition followed throughout the afternoon - including running at the right speed, buffering up and thinking out what might be the minimum number of moves possible to organise the wagons. We perhaps forget that, as well as being highly skilled and responsible, railwaymen were also very intelligent puzzle solvers. As modellers, we might be happy to endlessly shuffle wagons around, but they were like as not on piece work and the sooner they got things sorted, the sooner they went home. Since then, for exhibitions, I work to a very simple sequence, which sees each train do a very specific task & where freight is concerned, each goods train shunts just one particular siding [though Arigna Town only has two anyway]. This helps keep things moving for the public, but also helps operators get into a rhythm. Not fully prototypical, but then on my line, there would be gaps of several hours at times between train - which is clearly not acceptable. At home, perhaps the perfect scenario might be the American basement empire, where a whole line, from junction to terminus is modelled and the 'way freight' is driven from one end to the other, shunting each depot along the way. For those of us with more limited space, then the 'terminus-fiddle yard' is the most basic option, with the fiddle yard representing the 'rest of the world' and trains running from it to the terminus. A continuous run can do the same thing, with a fiddle yard to supply a succession of trains running past a through station in both directions. Now, if simply watching the trains go by is your thing, then fine, but for me, things take on extra dimensions if you can replicate what the prototype did. Maybe not an actual line perhaps, but at least representing the range of trains from the historical period you are modelling. Hence, a chance to do research & then a purpose behind what you buy and/or construct, so the layout takes on a real purpose and life of its own. So, I do think we need to nurture newcomers to our hobby or, with only heritage railways and unit trains to watch in the real world, they will miss out on what is a very satisfying part of railway modelling. What do others think?
-
My own two pence/cents worth is the same. End to end in 00, unless you just want to have a train set. 15" radius curves will look far too tight unless you stick to four wheel stock and even then it is pushing it. 10' is a decent length for a terminus fiddle yard and a nice way to start. Keep it 2' wide for easier access. N gauge would work very well in 10x3, though access to the rear might be difficult.
-
Several stands with stuff like these at the Reading Trade Show two weeks ago. They are even better 'in the flesh' as it were. Loveless, Masterpiece too & just as good, but each the price of a fairly decent second hand car. A full train would cost as much as a decent new one... Judging by the number of folk interested, there are those out there with pockets that deep, while one or two even have suitable layouts to run them on too. Maybe when I win the lottery, I'll buy a few, but need to buy a ticket first!
-
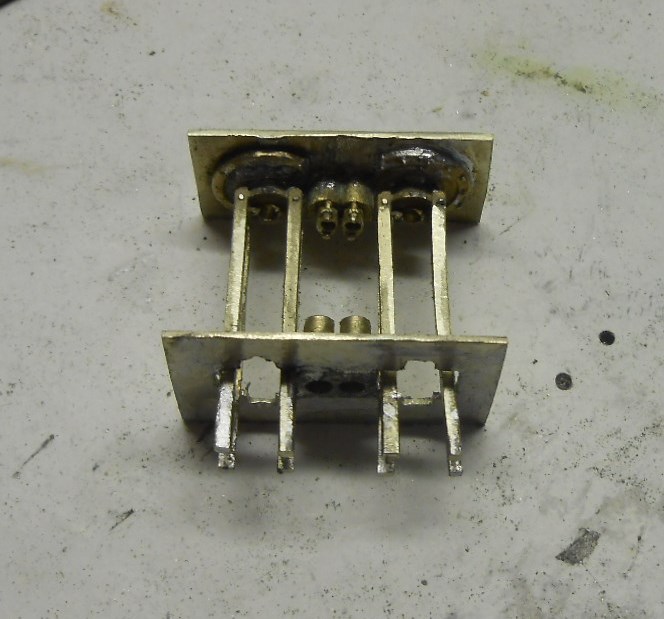
Congratulations to Laurie Griffin for his Stephenson's inside motion kit - it really goes together well. The only downsides are the castings are very hard indeed [& so take a lot of time to polish & finish], while there are also still elements that you have to make yourself. Chief of these are the rear plate of the inside cylinders/valve chest and the associated motion bracket. Made mine from .028 nickel silver & reckon that, with the cutting/polishing of the castings, it has taken me around 20 hours work since Saturday. Indeed, the motion bracket is a mark 3 version as I made a right Horlicks of the first two. The main problem was working out how far apart the two needed to be & then work out how to fix them together & also how to mount them on the loco. The issue here is to ensure it can come apart/re-assemble again for painting, maintenance etc. In the end, made the cylinder rear/slidebar/motion bracket as a single unit which bolts to the from chassis spacer with 10BAs. Don't worry, the bolts will be cut down! The crank axle is the other unit, to which the connecting rods have been added. A fair bit more fettling was needed to get everything running smoothly, so [for once], held off from assembling everything until each element ran smoothly by hand. Finally though, installed the motor gearbox and coupling rods again, before turning on the power. And [b****r me], it works!. A tad tight in places, but Laurie recommends running in with generous amounts of liquid metal polish. so, out came the Brasso and [surprisingly quickly], things started to settle down. After half an hour in each direction on the trusty old H&M clipper [basic rheostat controller, which shows up any tight spots], I then gave the mechanism a good dousing of WD 40, followed by a wipe down & a light oiling. By now, it was responding to the lightest touch of the controller, so things seem positive in terms of the loco becoming the next new piece of motive power on Arigna Town. Trouble is, I will now have to dismantle it all for painting, so can only hope it goes back together again afterwards. Did some video footage on my camera, but the site says the file is too big. Will see what I can do, because even though I say so myself, it looks fab twirling round. Chuffed? You bet!
-
The delights of 7mm narrow gauge
David Holman replied to David Holman's topic in Irish Model Layouts
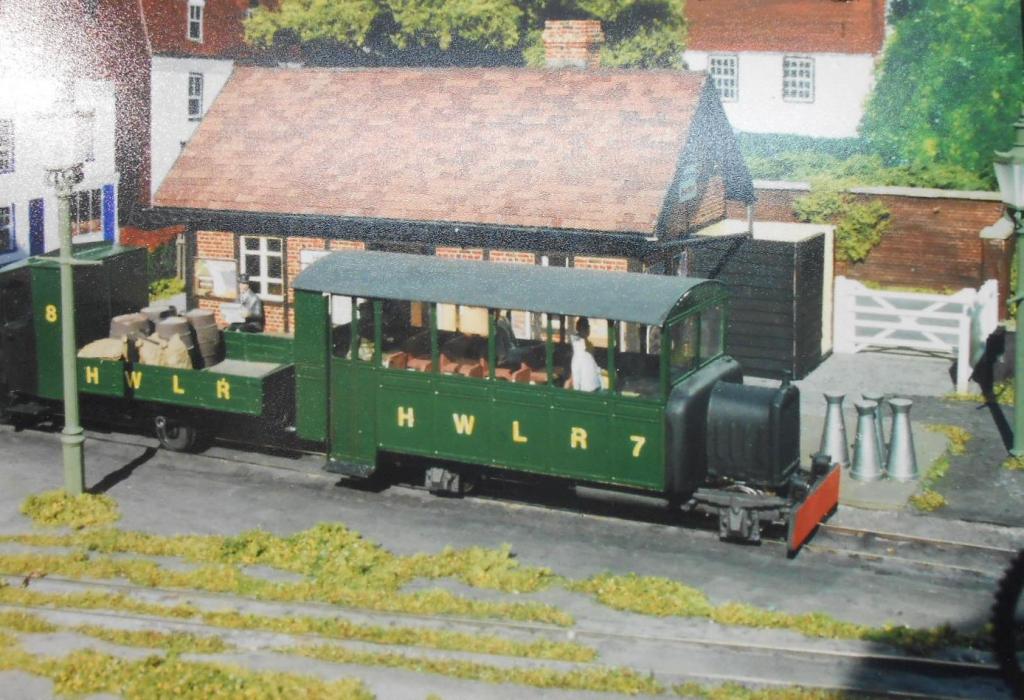
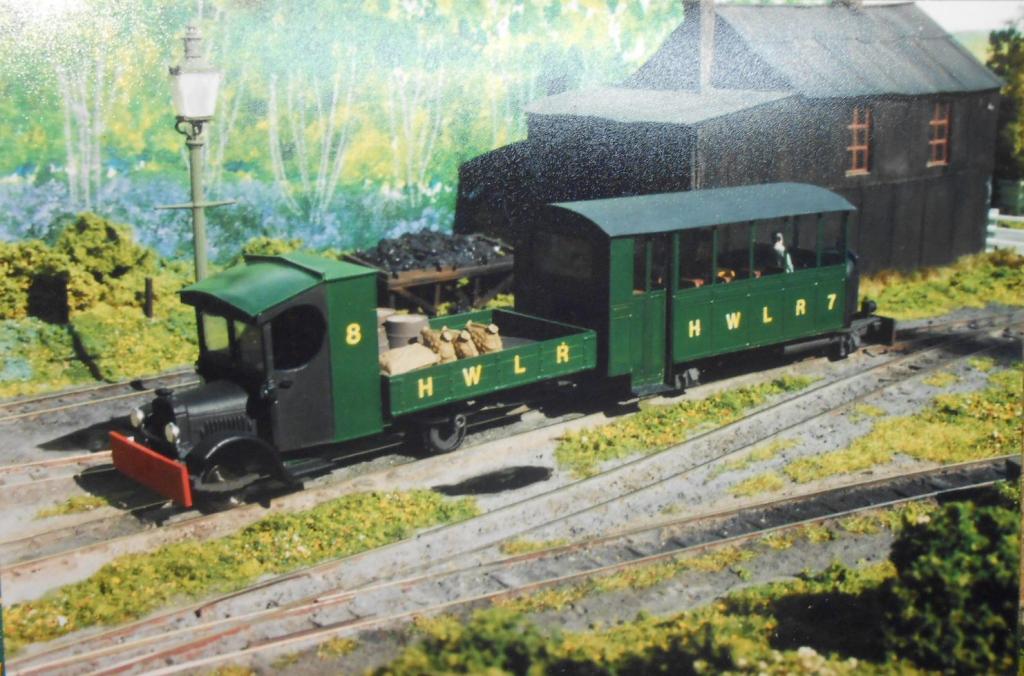
From my first 7mm NG layout, I then ventured into 7mm standard gauge, with a roadside tramway, based on the Wantage Town track plan. This by the way, scales out at just 7'2" long, full size, in 7mm. However, still had all my NG stock, but with the standard gauge bug well and truly biting, I decided to be quite mercenary and build a small, portable layout that I'd exhibit for a while, then sell, fully stocked, to create space for a new project. The result was Cranbrook Town. A sort of twig off the original Hawkhurst layout, it was much better built. just three baseboards at 3' x 18" [one of which was two thirds fiddle yard], it still holds my personal record for being in the car and on the way home after a show - just 15 minutes! The concept was as before [after all, the stock was largely the same], but used Peco NG track throughout, so was quite quick to build, not least because I re-used several buildings. The layout was set in spring time, enabling me to have a go with a bright palette of colours, including a bluebell wood on the backscene. New items of stock included a Branchlines Clogher Valley etched brass bogie coach [just bought a new one to go with my new Ragstone loco kit], plus the El Crappo railcar mentioned last time. The latter was a fairly basic set of etches & white metal castings, but being single ended, it needs something else to run with it as there was no room for a turntable on the layout. A new book about the Colonel Stephen's railcars provided the solution. The Selsey Tramway's first railcar ran back to back with a 'rail lorry' - very much in the style of the Clogher's later 'unit'. I made mine from a Corgi Lipton's Tea van, by removing the boxy body and building a low sided replacement. It was unpowered, but did have pick ups to spread collection to the motorised railcar. The new loco was built around the then just released Dapol [now Hornby] 08 diesel shunter. Remember upsetting the local model shop by saying I didn't care what colour it was as I was going to saw it into pieces when I got home! Splitting the bonnet from the cab & re-arranging things gave a model a bit like one of the West Clare Diesels, but 0-6-0 not bogie. It ran superbly & was a delight to work the pick up goods with. You can also see a further steam loco - this was a Wrightlines kit of a Baldwin 4-6-0T For me, both layouts sum up the fun that can be had with 7mm NG. It is small enough to fit most places, but nice and chunky as well. Go freelance and you can have a great time using up all those bits and pieces lingering in the spares box, so is about as cheap and cheerful kind of modelling as you can get. The layout was indeed sold after a couple of years exhibiting & I moved on to standard gauge for the next 15 years before going 'broad' with Arigna Town. However, the wheel is turning again & I am quietly planning a small layout based on Clogher Valley practice to use the new loco kit available & because I also want to have a crack at Railcar 1 [Donegal 10], but not just yet!
-
The delights of 7mm narrow gauge
David Holman replied to David Holman's topic in Irish Model Layouts
Thanks Tony and fear not, there are diesels in the follow up layout I built. One based on the then newly released 08 shunter, the other a railcar from an MTK El Crappo (yes, really) kit. Will post in a couple of days as my laptop is having a service. -
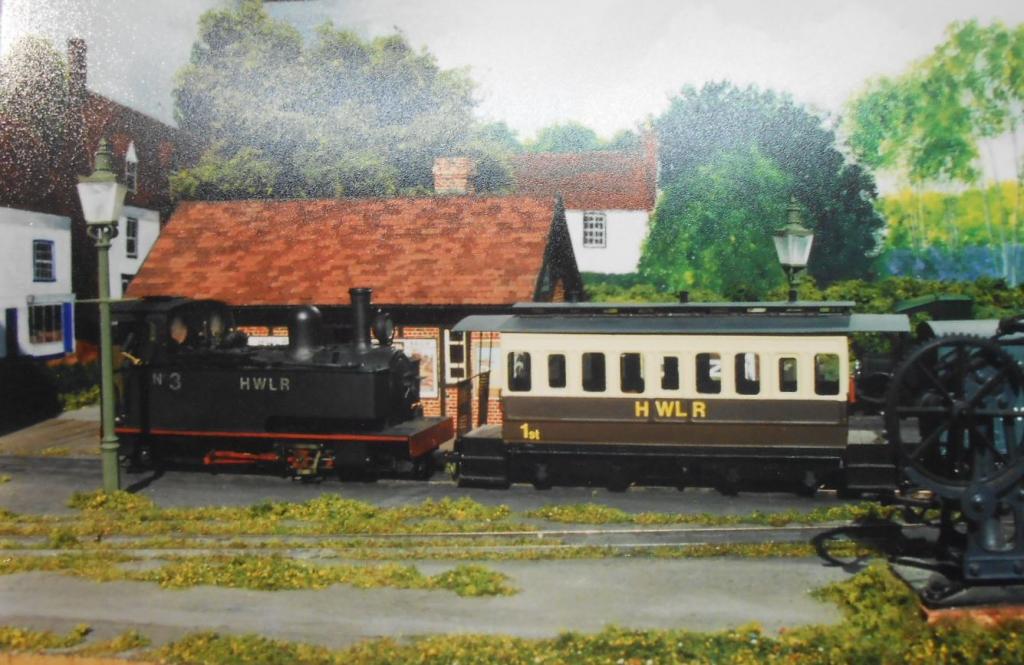
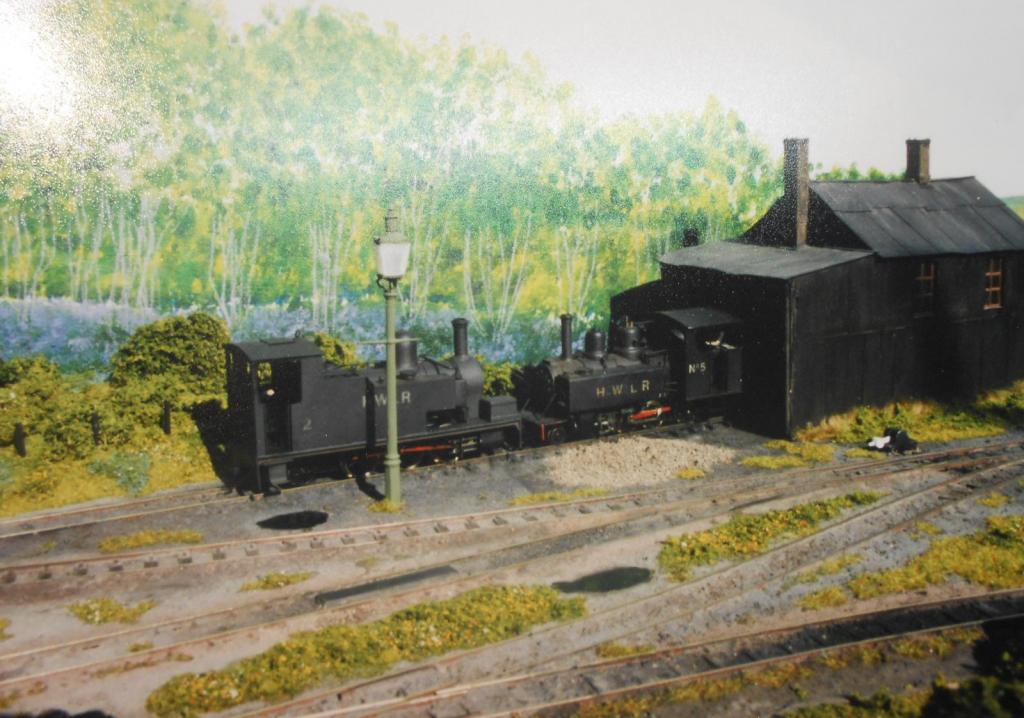
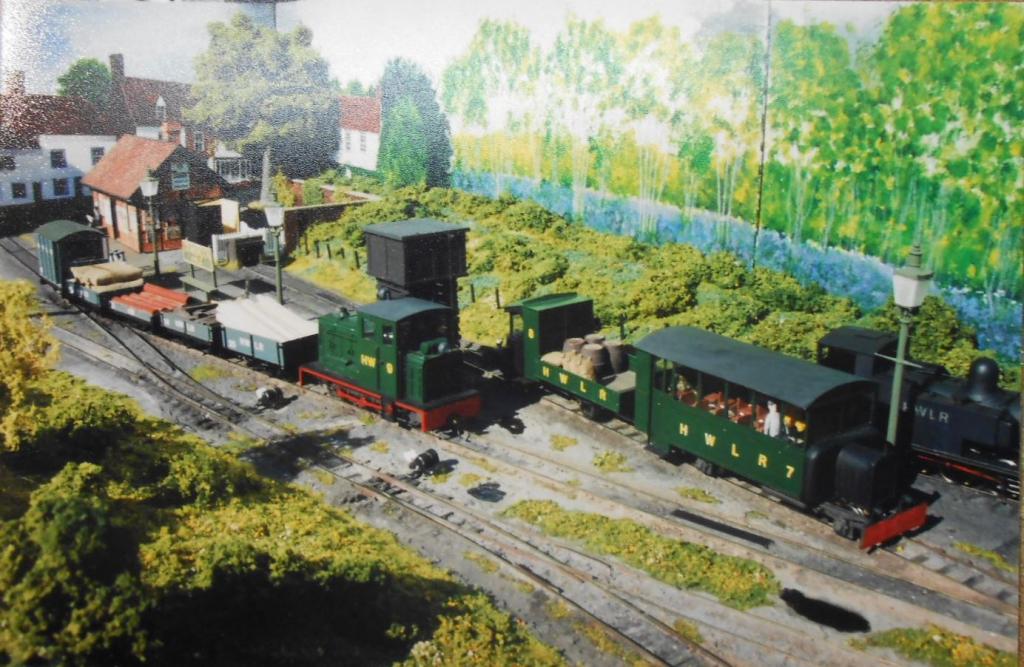
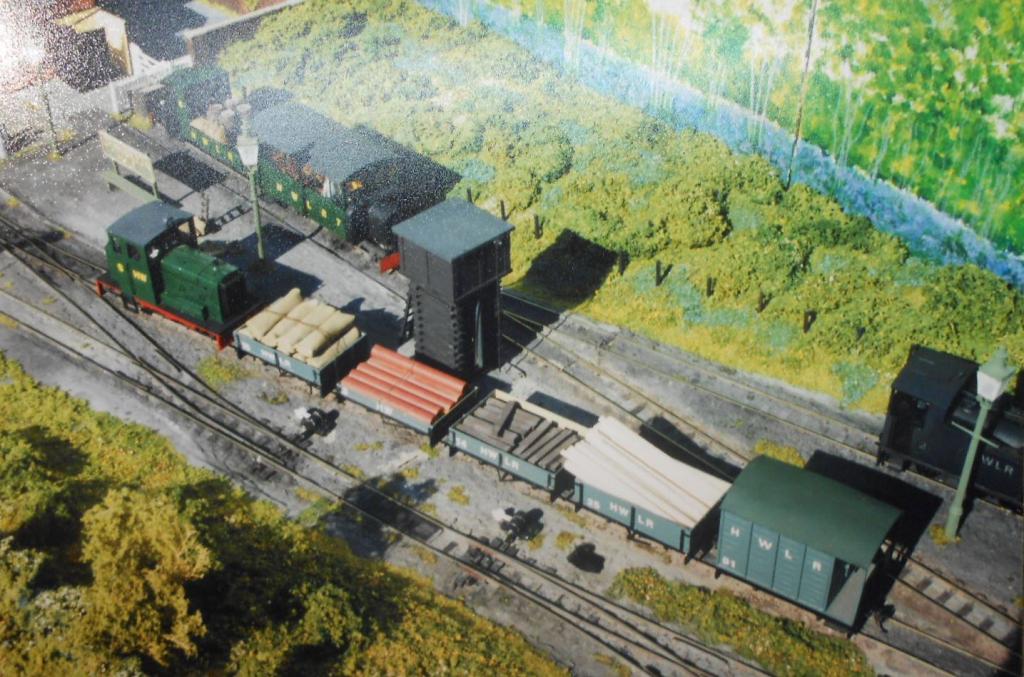
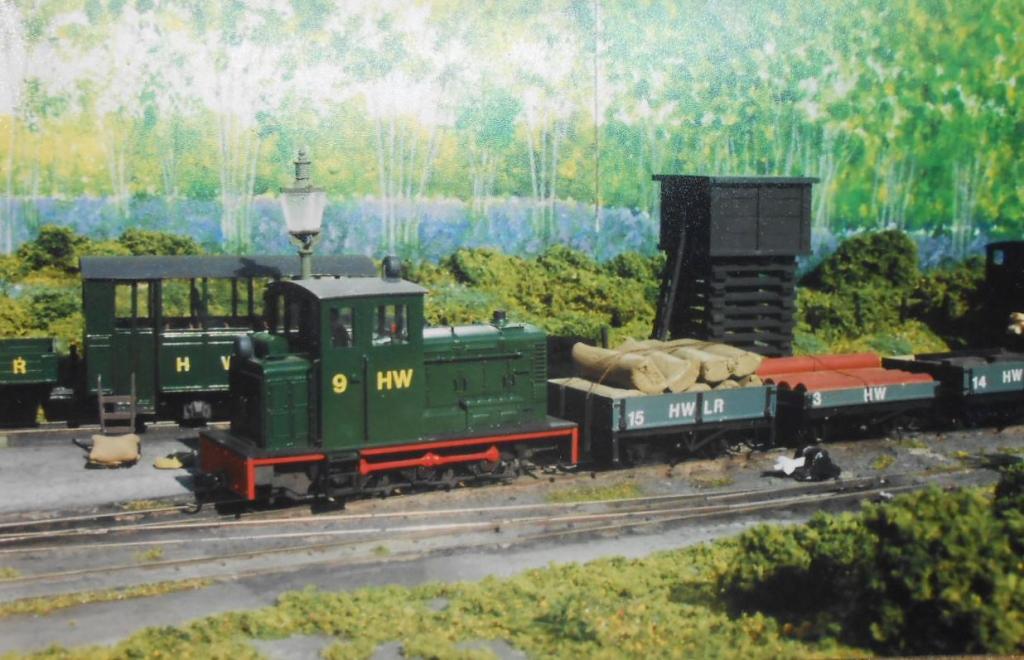
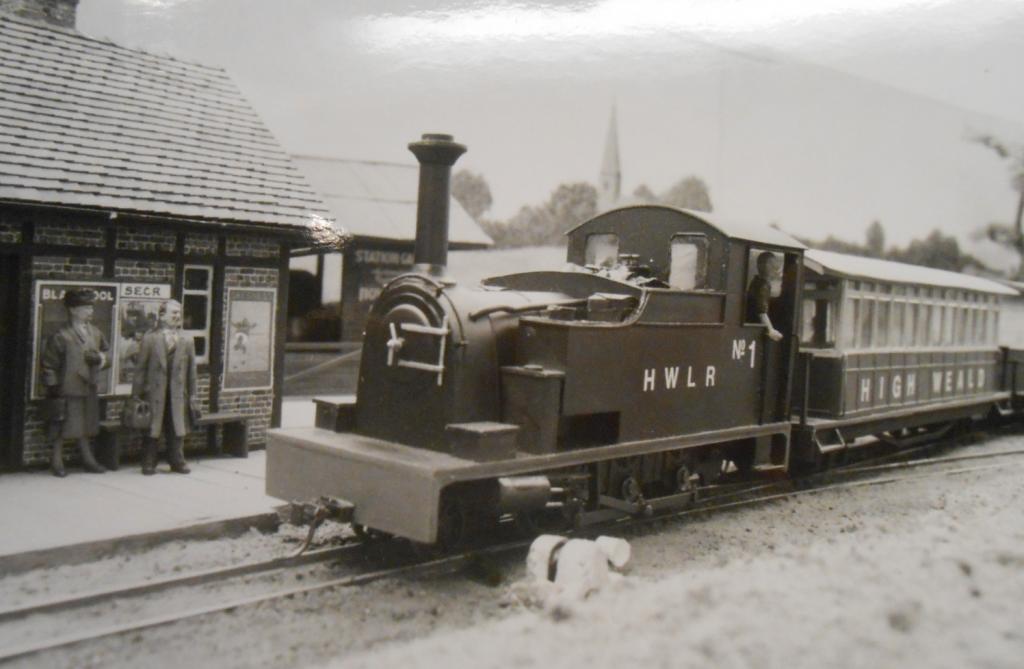
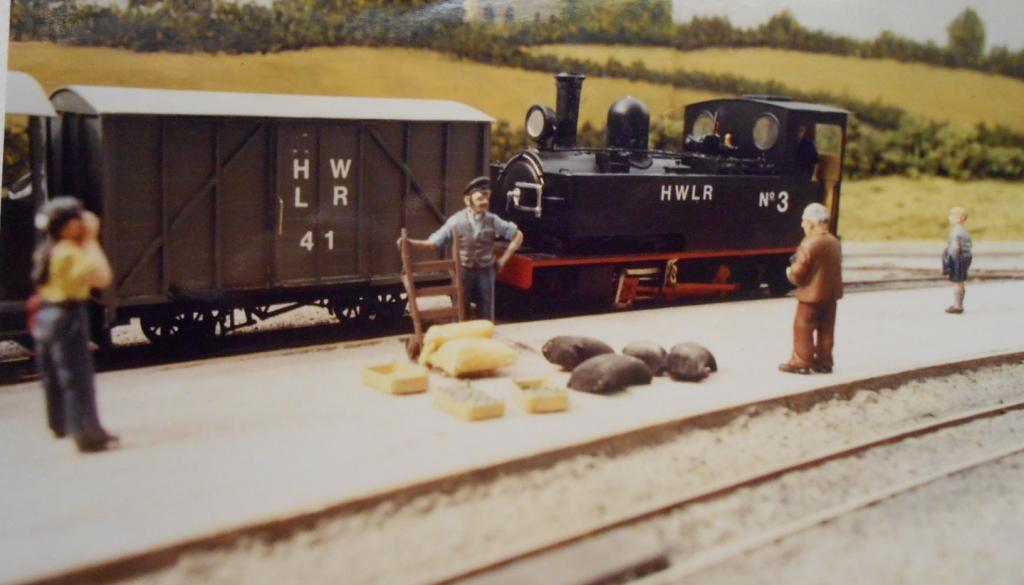
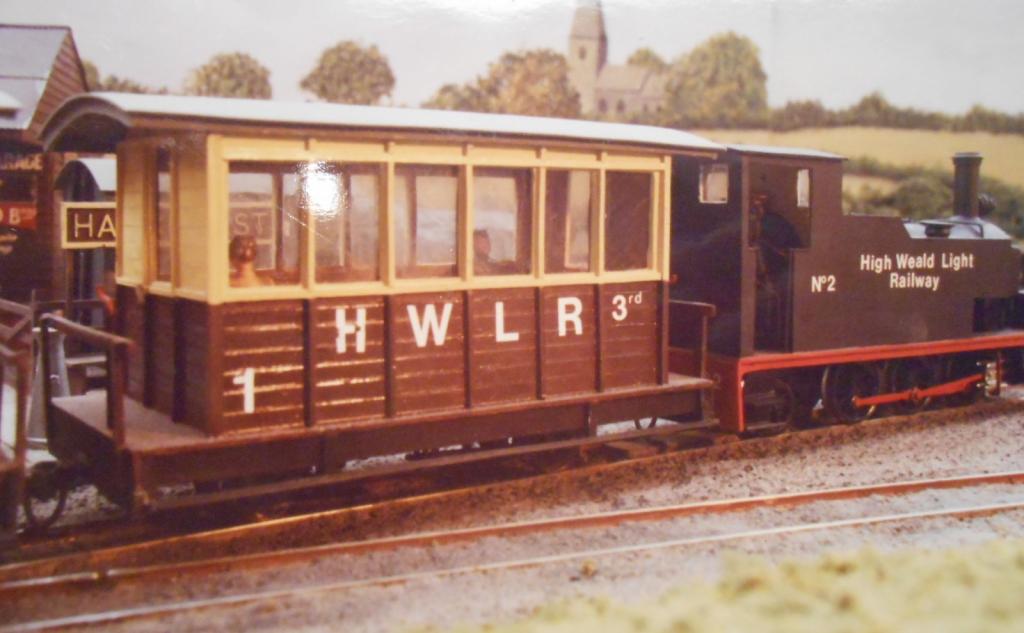
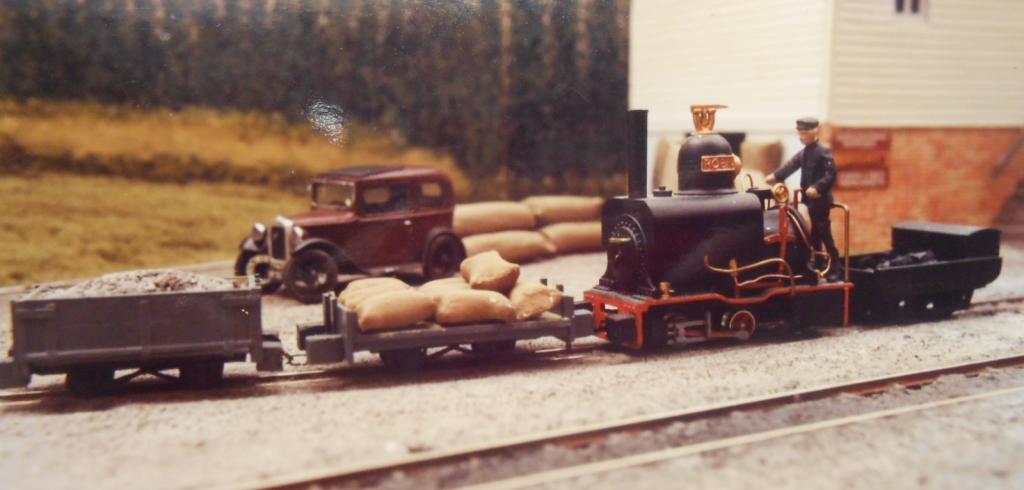
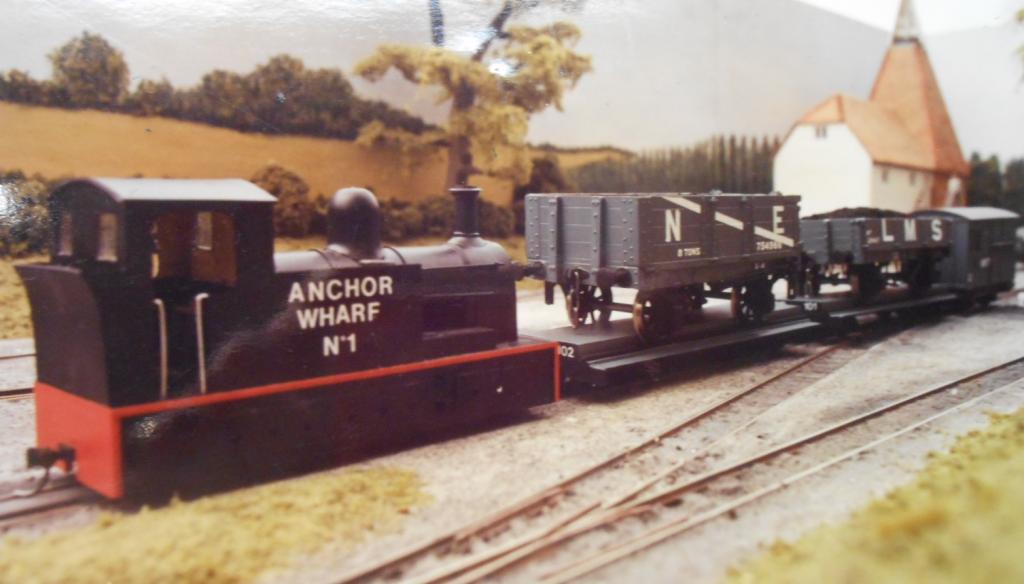
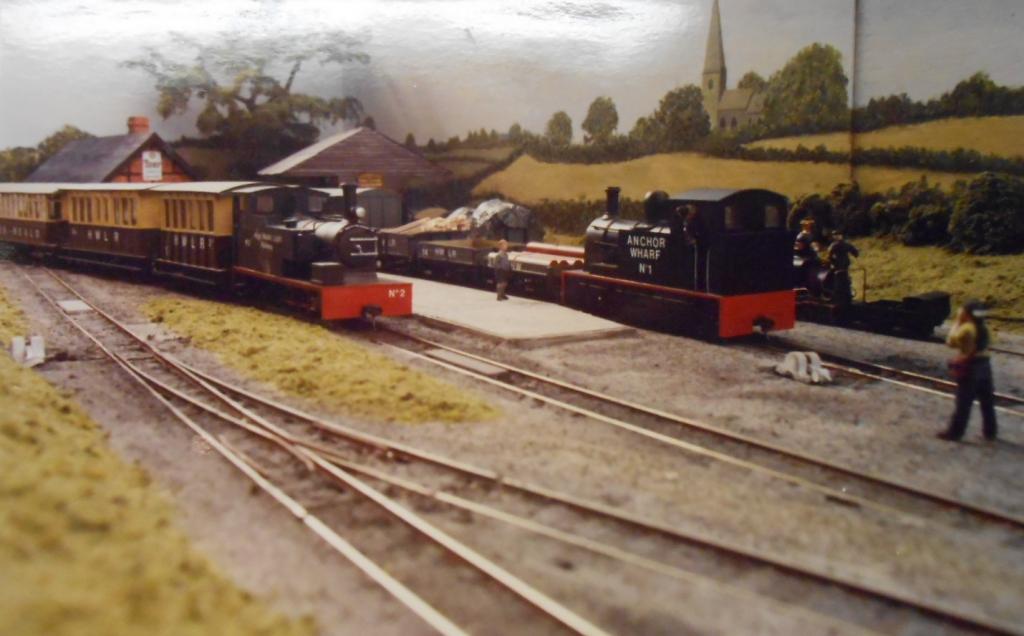
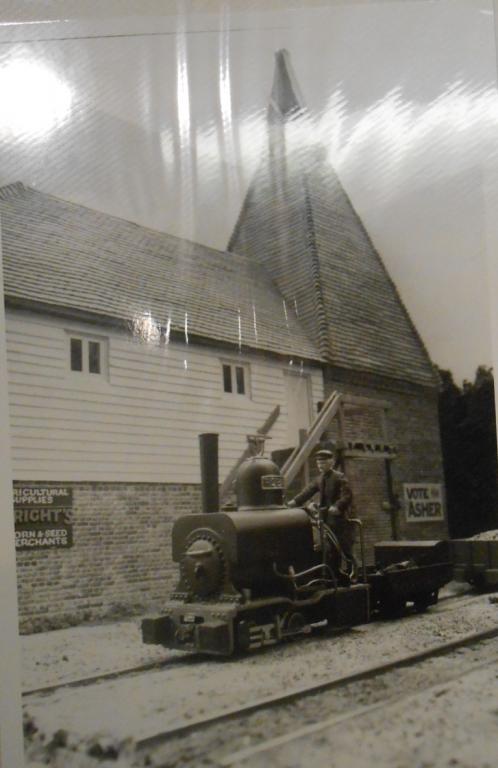
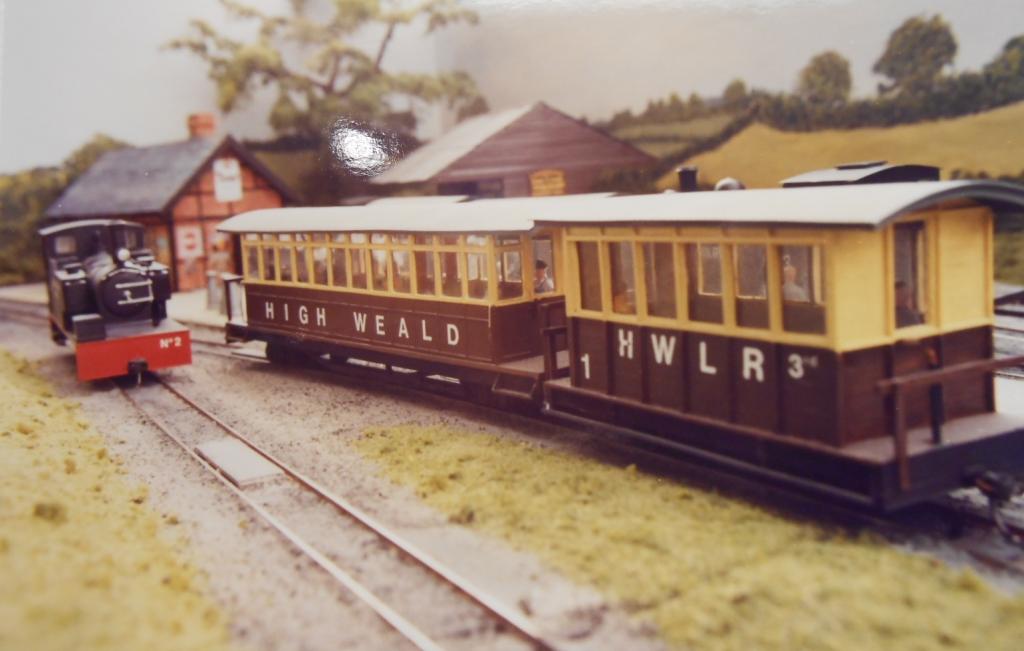
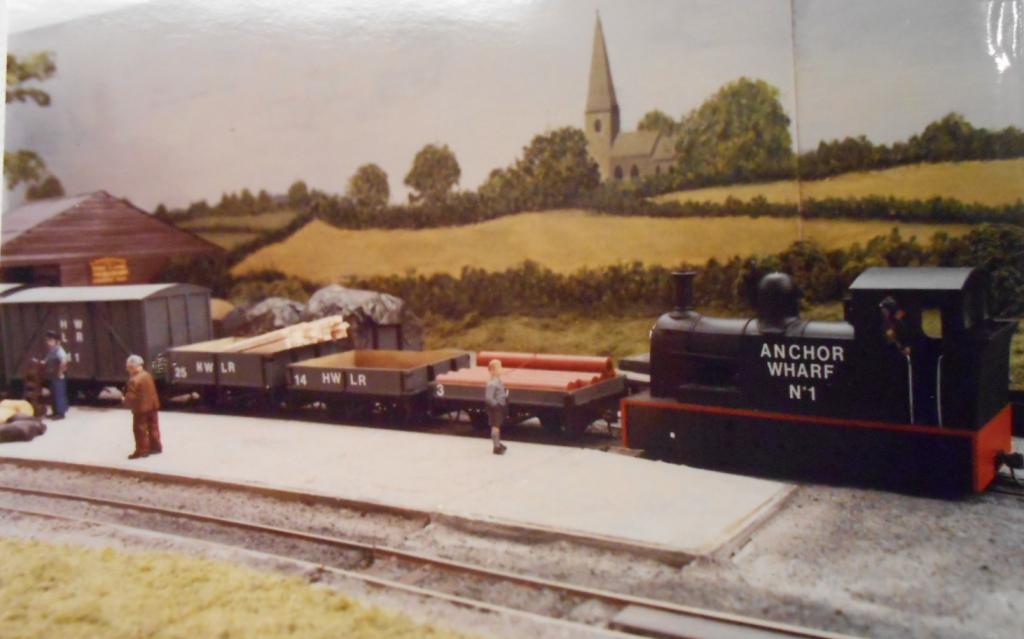
Following Tony's requests in Q&A recently, I promised to share some of my earlier narrow gauge stuff. Though the theme was Kentish, quite a bit of the stock was Irish inspired, though almost all of it was actually freelance. The High Weald Light Railway was created as a 'common carrier', very much on the principles of the Donegal, West Clare etc. It was built to 16.5mm [00] gauge, using hand made points and Peco plain track. There was also a 9mm gauge feeder line, representing 18" track. The pictures are all 'photos of photos', so apologies for the quality, as the layout was built in the early 1990s, indeed it featured in Railway Modeller a couple of times, including June 1991. The first picture was my first 7mmNG engine, based on a Clogher Valley tank. This was because I used a Lima 08 diesel shunter chassis [with the pancake motor], so the boxy outline covered the mechanism nicely. Being outside framed, the chassis leant itself nicely to narrow gauge & by undoing the middle crankpin nut, I was able to add outside cylinders and piston rods. Bodywork was all plastikard, with the chimney made by sawing a 4mm scale chimney in half and extending it with brass tube. Couplings, as per the rest of the stock were Kadee number 5s. The second photo is of the Sierra Leone Hunslet 0-6-2T that ended up on the Welshpool and Llanfair. A Vulcan etched brass kit, it was my first attempt at outside valve gear & taught me a lot. Lovely kit and with a Portescap motor it ran like a dream. The third loco was an 0-6-2T, loosely based on Irish outline, though I forget which, that used another Lima chassis, this time the GWR 2-6-2T. Plastic body as before. Picture 4 shows my first NG coach. Plastic sheet and strip on a Wrenn parcels van chassis Picture 5 shows the second coach, again a tramway balcony end, but this time a bogie, using the Ratio bogie ore wagon chassis. The sides weren't wasted, I got two open wagons from them! Next comes the 9mm gauge engine, a Peco white metal kit based on one of the Horwich Works locos. It ran on one of the Ibertren Cuckoo chassis - though never very well, it must be said. There a second photo of this tiny engine, as well. The other pictures show Anchor Wharf 1, which was built for a Club layout. Based on a Castlederg & Victoria Bridge style, it used an old Hornby 0-6-0 chassis, hidden under the skirts. In the photos, you can also see some of the wagons. These mainly used Ratio chassis and simple bodies built from plastikard, though note the transporter wagon, based on the Leek and Manifold examples & carrying my first standard gauge 7mm wagon. I had a lot o fun with this layout, but the baseboards were terrible & after a few years on the local exhibition circuit, it ended up in the rubbish recycling centre, though all the buildings were saved for a later project. The point of all this is to try and show that 7mm NG is well worth a go. It can take up no more space than a small 4mm layout and by going freelance, you can gain plenty of experience building stuff which nobody can say is wrong - because it never existed in the first place. Commercial chassis are so much better than we had 25 years ago [b****R, is it really that long??], yet can be found cheaply second hand. Not sure we've had much narrow gauge stuff on the website [Mayner excepted], so maybe this might tempt one or two of you to have ago?
-
No idea K - there are no pictures on my screen...
-
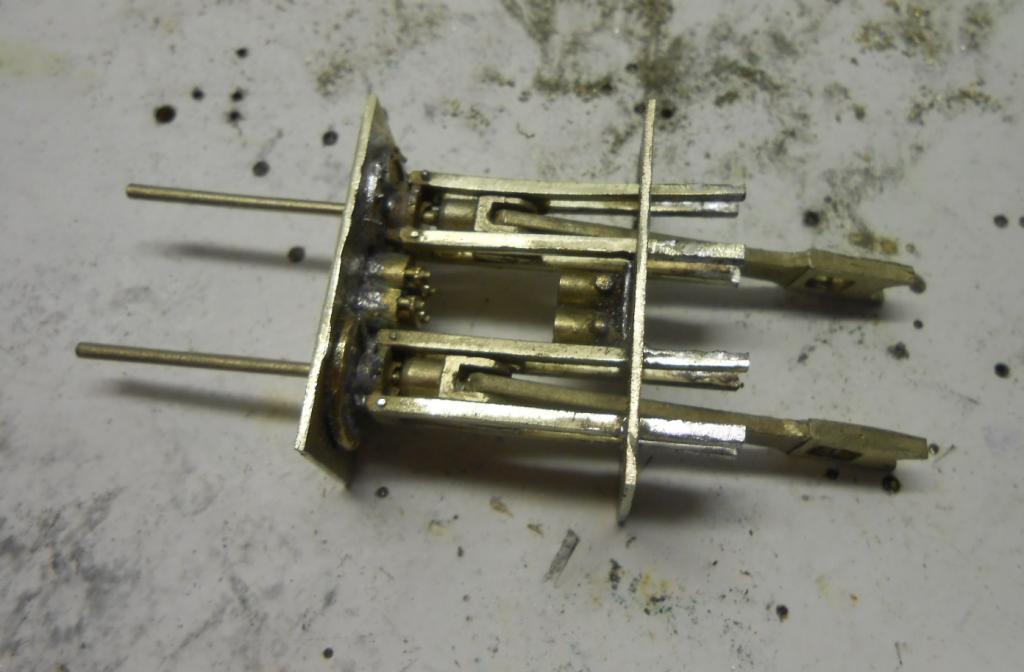
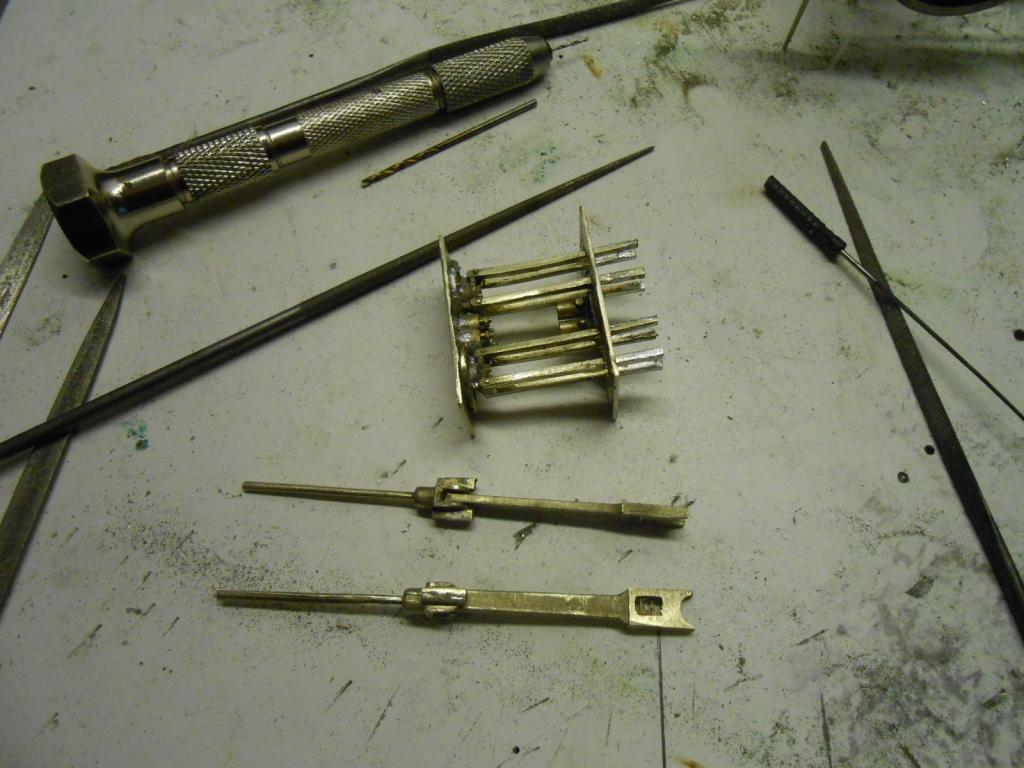
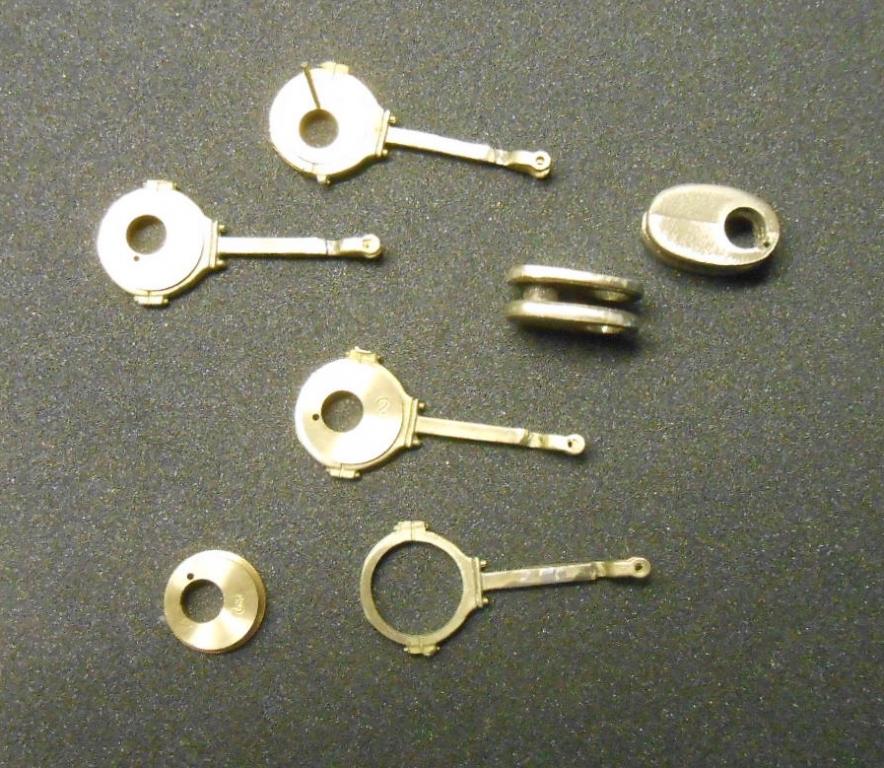
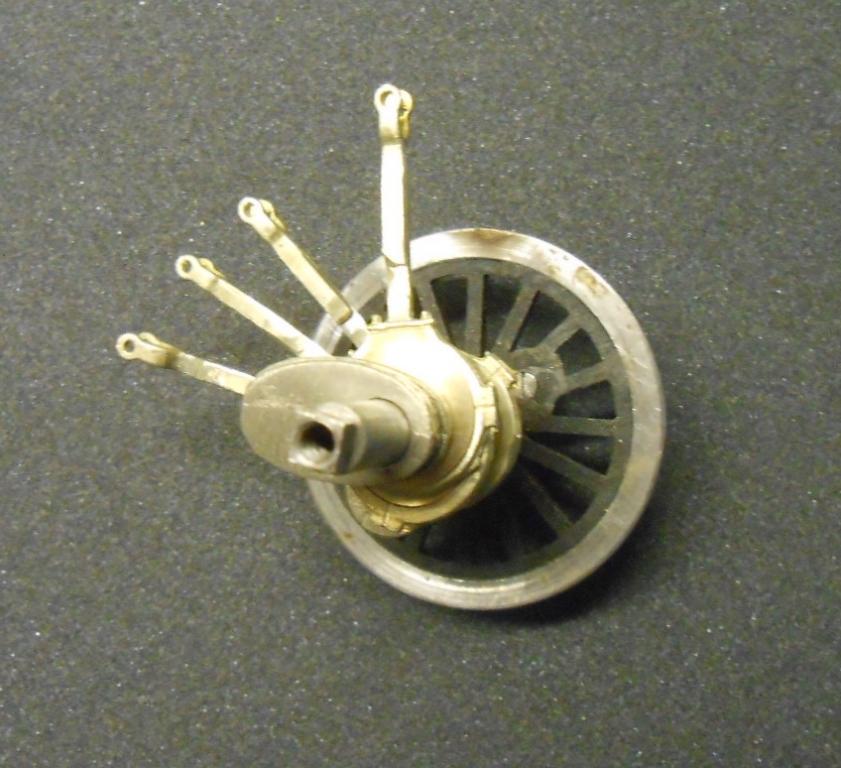
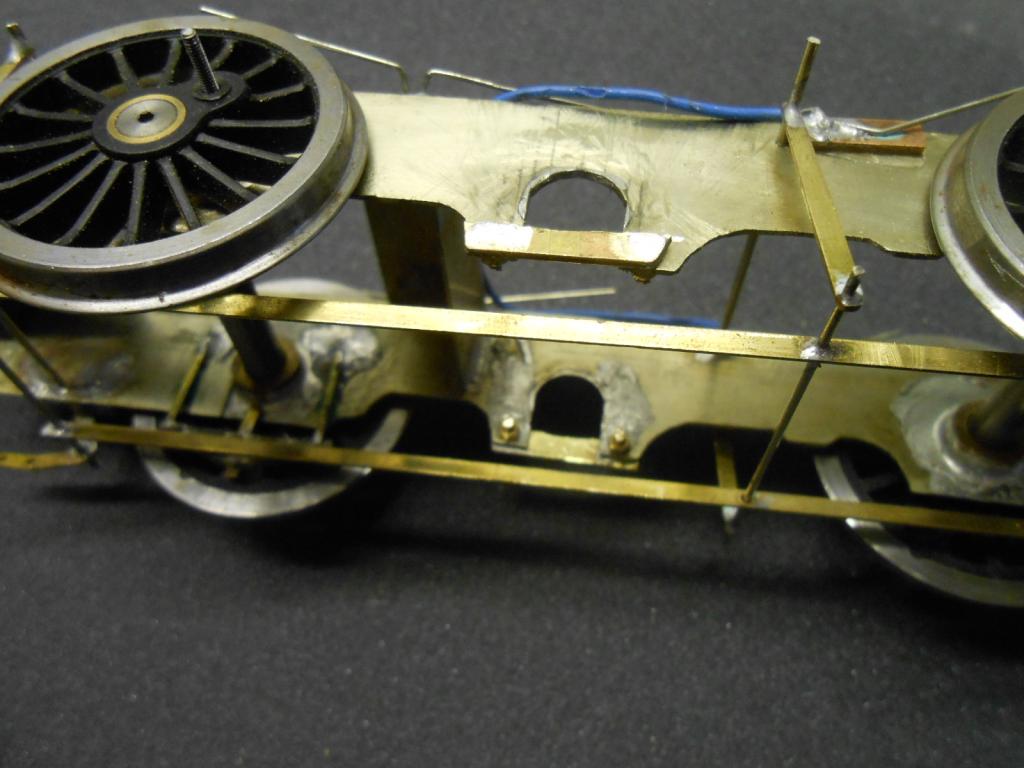
The biggest problem with the valve gear is working out what goes where. This is not the fault of the instructions, though a working knowledge of how the real thing works would certainly have helped - and it is something I don't have. So, a case of read & re-read, stare at the drawings, stare at the original GA drawing of the loco, read the instructions again etc etc. Thankfully, Book One of Geoff Kent's treatise on loco construction has a section on inside motion AND he uses Laurie Griffin's parts! The first picture shows the most important parts of the whole thing, namely the cranks & eccentrics. The loco axle goes through the crank, which is either glued or silver soldered in place or glued. The axles is then cut away between the cheeks of the crank and hey presto, you get a cranked axle. The eccentrics are also really clever, with a steel rod lining them up correctly with the cranks. The eccentric straps, which link the eccentrics to the piston valves [& hence act as forward & reverse gear on the real thing] come in two parts and need the forked ends adding to enable them to join to the expansion links. The latter are connected to the reversing lever in the loco's cab. If you are still with me - or already understood this - well done and please forgive my ham fisted description... The next two pictures show the cranks and eccentrics assembled on the loco axle. Rather than use silver solder [wouldn't know where to start], I opted for the Loctite 638 [at this point note the spell checker wants that to be 'lactate']. This is a powerful jointing compound favoured by 7.5" gauge live steam engineers, so should be up to the job for my project. A 5cc dispenser costs about £5 from Amazon [who else?]. It is dark green in colour and comes with dire warnings about contact with skin, eyes, ingestion etc. Creme de menthe it ain't. The third picture shows where the original axle was cut away [hacksaw job] to create the finished crank axle. The other two pictures show the assembly in a trial fit. Rather than chop out a rectangle for horn blocks, I've simply sweated out the bearings and then cut upwards from the bottom of the frames, so new ones could be used that just drop out, when required, as I don't want to be assembling this lot in situ. Small brass keeper plates hold the bearings in place with 10BA nuts and [captive] bolts, while a 'flat' filed on the outside face of the bearing stops it revolving. Thus far, and much to my surprise, the wheels still turn and the cranks and eccentric rotate as intended. Crossheads next, then try to assemble everything.
-
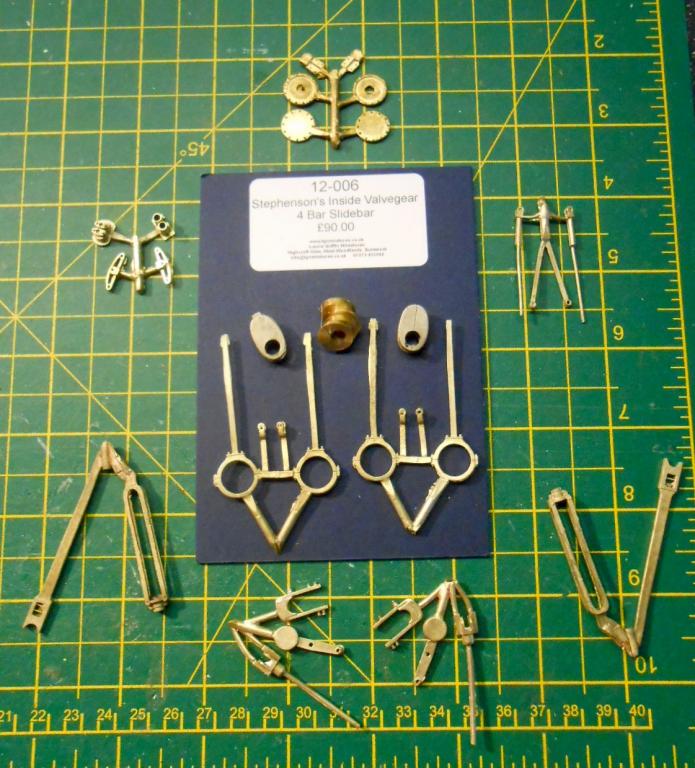
Attention now turns back to the chassis for Sir Henry. As an inside cylinder 0-6-4T, on the face of it, there is little need to bother about what goes on between the frames. However, there is a sizeable gap in front of the tanks [not helped by a high pitched boiler], plus there was a nagging voice in my head that kept suggesting I ought to have a go... Have done Walschaert's a few times, first with the Vulcan 7mmNG kit of the Sierra Leone Hunslet 2-6-2T. Lovely kit this I& the valve gear was actually held together by 14BA nuts and bolts. In model form, it taught me that all those rods and levers are really just flapping around outside the wheels and con rods etc, but don't actually contribute anything much else. Look good though1 Did a standard gauge set on my B17/6 4-6-0 Nottingham Forest. This included elements of conjugated valve gear for the inside, third, cylinder. On 6'8" drivers, it looks very impressive, though whenever I run the engine, I can't quite get over the thought that it will tangle up & bits fly off in all directions! Anyway, Laurie Griffin has long done a kit of parts for inside motion & if the 3mm boys on Ballyconnel Road can do it, then I ought to be able to with broad gauge frames in 7mm. We'll see. Began by reading the instructions umpteen times, but only really started to make sense when I opened the pack of castings. The really clever bit is the two cranks. The loco axle goes through them, to be held in place by 638 Loctite [a jointing compound, strong enough to be used by 7.5" gauge live steamers]. Once set, the axle is cut through between the cheeks on each crank, to which the con rods are eventually attached. you also get a set of 4 turned brass eccentrics which work the valve gear. A bit of surgery needed on my frames, as it is really only possible to assemble the crank axle & associated bits off the model. Hence had to sweat out the centre bearings & will have to replace them with horn blocks, so the crank axle can be dropped in & out for construction & maintenance. Basically, i'm writing this as much to clarify things in my own head, as much as sharing it with the website. It really is a step up in my modelling. Below is the neat set of lost wax castings Laurie supplies and yes, the price for these three bags of goodies really is £90, so it bloody well has to work!
-
Backhead down to you Des! A few of my own bits and pieces from the spares box, but the Lissadell castings work a treat. Many thanks.
-
Thanks chaps, appreciated as ever. Nothing special re the Belpaire firebox, it is a separate item, bolted to the boiler tube. Cut two ends to the required profile, then used ten thou nickel silver sheet for the wrapper. Centre lines marked on each part. Then bent the wrapper roughly to shape and tack soldered to one end. Repeat for other end and then complete seams all round. The rounded front shoulders are filled with solder on the inside then filed to shape. Crude but effective. Washout plugs as per Geoff Kent's book 2 on loco construction. Holes drilled in wrapper, then small plates with square brass rod soldered in behind.
.jpg.156a21ecda6de473a04b19bd3c4ecfd6.jpg)
.jpg.feac2bfa4ec69f27e56df7269970ebc1.jpg)
.jpg.f8c2a3a07075ab0882713c07e15aa269.jpg)
.jpg.2b034d97266153ab535ce5c8cbc503b0.jpg)
.jpg.3c0adfc8f019bcb3fe673f5da0d473c7.jpg)
.jpg.402e75a8becb9e0b0e45001433184700.jpg)
.jpg.6a1343affab97dcfcd05841f2497d04f.jpg)