David Holman
-
Posts
4,359 -
Joined
-
Last visited
-
Days Won
117
Content Type
Profiles
Forums
Events
Gallery
Blogs
Everything posted by David Holman
-
Fascinating stuff JB & even if we don't work to a timetable, this sort of thing is invaluable in terms of creating a sequence for running the trains.
-
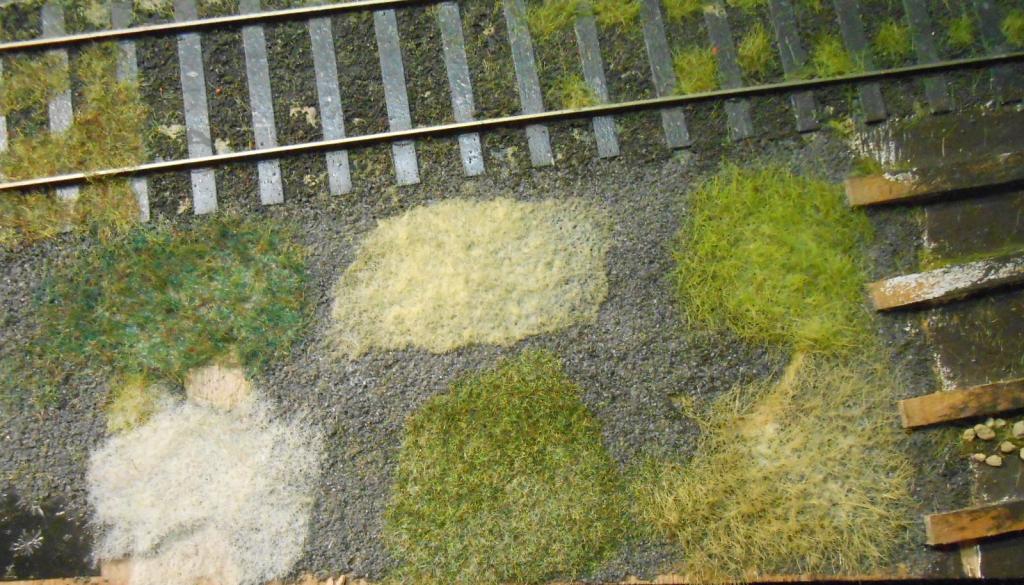
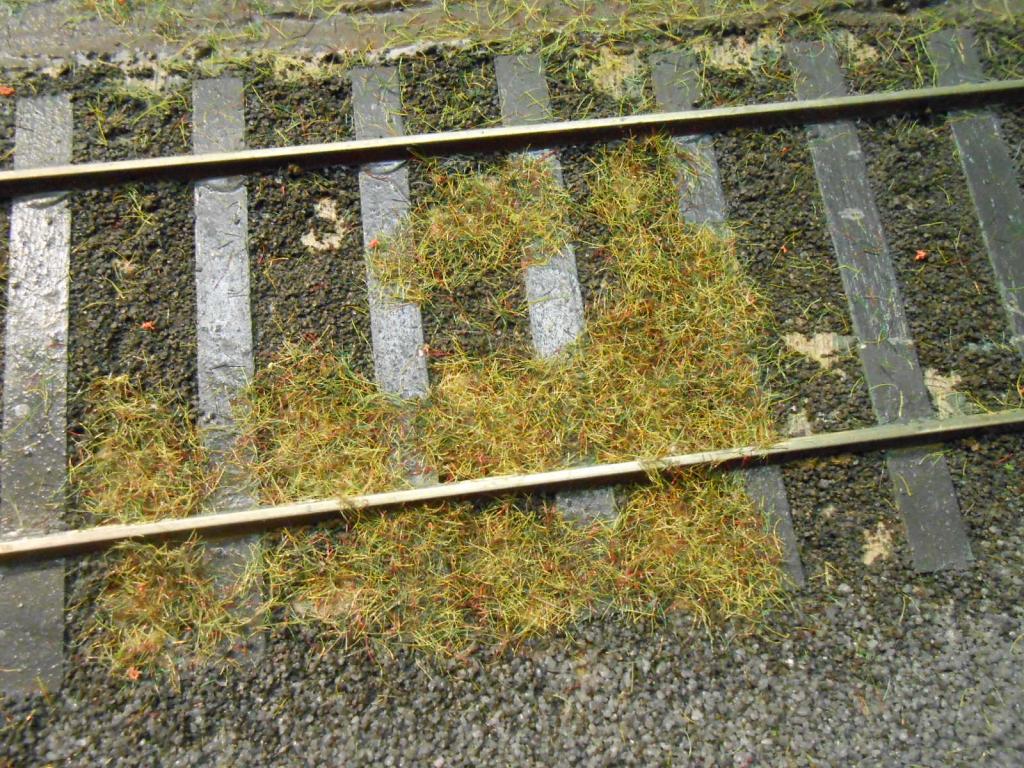
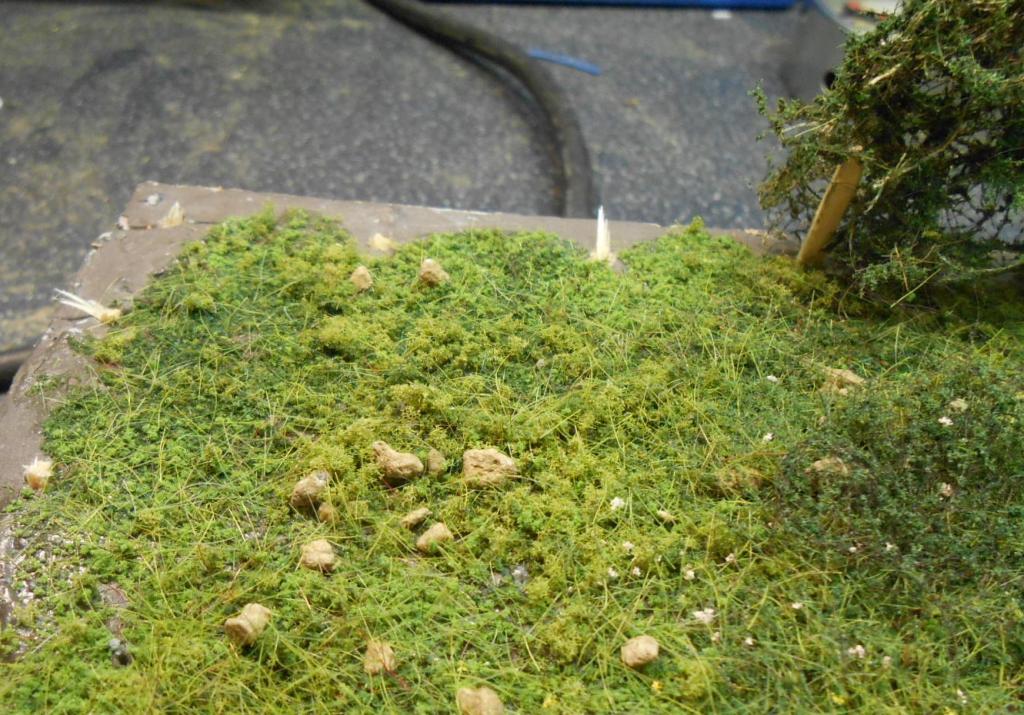
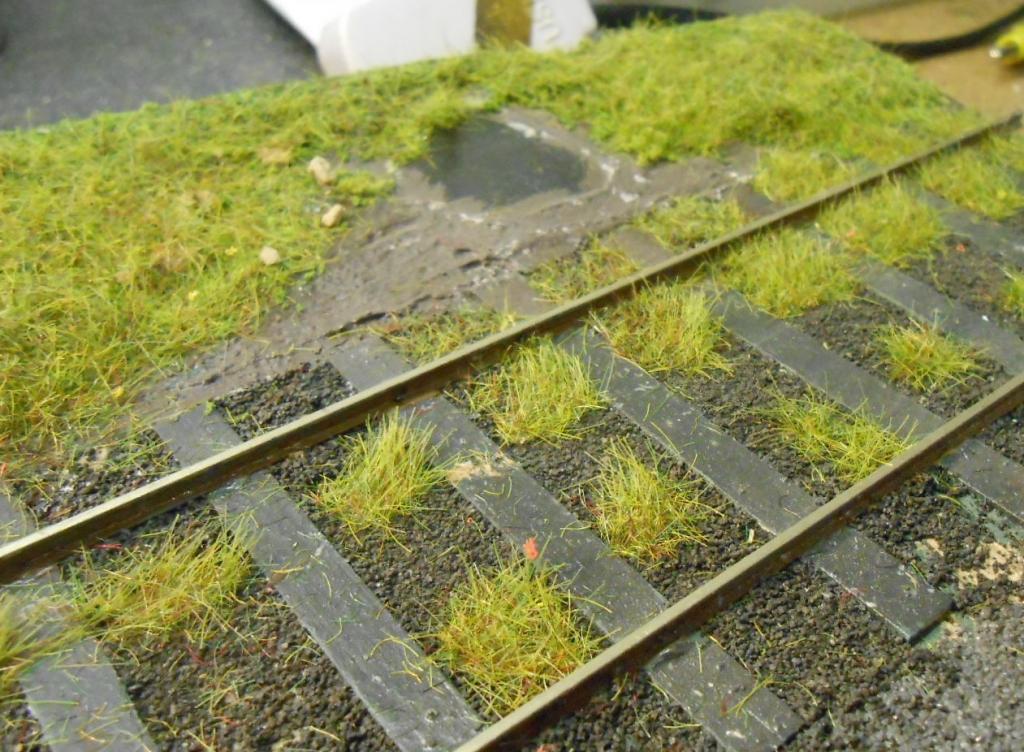
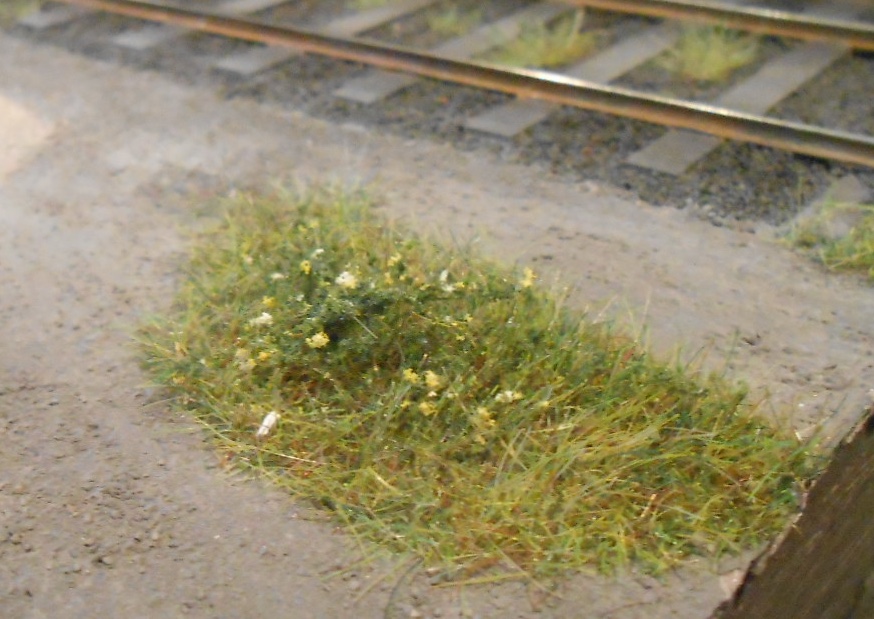
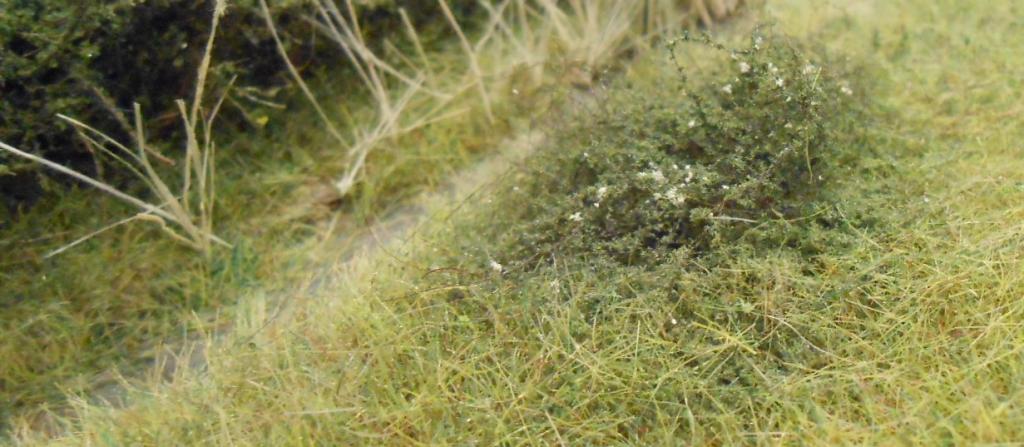
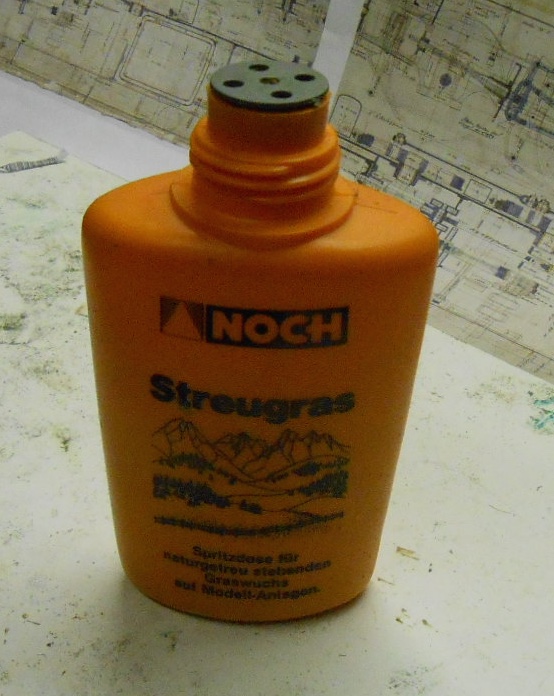
Rather than do scenery straigt on to the baseboard, it can be a good idea to practice by doing a small diorama on a bit of spare board. The one above I made when starting out on 36.75mm gauge. The track is code 100 rail glue to cardboard sleeper with contact adhesive & have played around with various materials/colours - especially since I treated myself to the Static Grass machine. None of the fibres you can see here are 'straight out of the packet'. All were mixed to some degree - mainly adding pale/straw types to light/darker green. The next pictures shows what happens if you only use a single colour. Top left are 'mixed long fibres' [6mm], below that is medium dry grass [3-4mm]. Top middle is 'short dry fibre' [1-2mm], while below is 'short, dark green. Top right is 'long hillside green with 'long wild grass' below. The last two are my favourites, but I mix them as, as required [& sometimes just what is available!]. A case of study pictures of where it is you are modelling. The shorter fibres give a more dense covering, but that said, once the first layer is dry, you can hit it with spray mount, clear varnish, etc and then go over it with the Grasstech again. At first, it is easy to get carried away by this and grow ever longer grass, but in practice after a couple of goes, it starts to look wrong. The other pictures show things like the effect of putting fibres on a layer of foam scatter [used extensively on Arigna Town] & also over boulders [coarse grave set in the same]. The grassy tufts in between the sleepers were done using the Noch puffer bottle [great for small or tight spaces], while there are a couple of shots where I've used Postiche for brambles etc. You can also see a couple of areas where I've mixed bright 'flower' coloured foam scatter with finer, dark green foam, to create a wild flower mix in amongst the static grass. More of that later. Am going down the Club tonight, so hope to do some photos of fibres on scatter foam, colour variations & so on, while on a future input will focus on just using scatter. with a static grass machine, note that total time for this sort of work is very much minutes & not hours. It really is very satisfying!

-
Dimensions of Irish Prototypical points
David Holman replied to DiveController's question in Questions & Answers
Junction mad says it all far better than me, likewise Mayner! -
Arigna Town Exhibition Blog
David Holman commented on David Holman's blog entry in David Holman's Blog
So, Tolworth this weekend and another show to prepare for. Hopefully have given the turntable mechanism a new lease of life in the form of the innards of a chocolate block connector. Stripped off the plastic coating and beneath is a brass block with two screws that nicely take 3mm steel rodding which forms the under baseboard drive shaft. Hence should now get a good, non slip purchase from the crank handle. Meanwhile, the Austin 7 needs a wheel fixing and everything else is due a pre-show clean up - track, wheels, pickups etc. Then it is an early start on Saturday for an 8am arrival to set up before the show. -
Sometimes, less is more - and this little scene = a lot
-
On 30th & 31st January next year, Arigna Town is going to the Pontefract and Normanton model railway show, at the heart of the Yorkshire liquorice & rhubarb triangle. As none of my usual helpers are available that weekend, I'm wondering if anyone from the IRM community is interested is joining me? You would need to be fairly local, as I would not be able to offer travel expenses or accommodation, as that has already be agreed with the club. However, you would get free entry to what is always a very good show, with lunch thrown in as well. The layout is very simple to operate, being analogue, with wire in tube point control and no section switches, though an ability to use three link couplings is essential, as is running trains a prototype speeds. It would be nice to link up with like minded souls, so if you think you can be available on either Saturday or Sunday, send me a personal message & I'll get back to you with further details.
-
Dimensions of Irish Prototypical points
David Holman replied to DiveController's question in Questions & Answers
With pretty much all RTR track work, as far as I'm aware, none are particularly close to prototype dimensions. Peco, for instance, has sleeper spacings that are wrong, because the track is a compromise to fit with HO as well as 00 [presumably for the USA and European markets. However, at least their medium radius points are about 900mm/3ft. Hornby's are much tighter, which is why tension lock couplings are a must - otherwise, buffer locking when propelling stock would be inevitable through reverse curves. A 900mm radius point [technically, it should be called a turnout] in 4mm scale works out at 68.4 metres on the real thing. In old money, that is just over three chains [66 yds], which would only happen in dockyards, where there would be a check rail and the locos would have big buffers to cope. I believe that early mainline diesels were built to cope with a minimum radius of 12 chains, or well over 3 metres in 4mm scale... So, getting prototype radii ain't going to happen unless you a blessed with enormous space. A simple oval would require the equivalent space of a double garage! In practice 900mm radii will look fine [especially compared to Hornby. Go along the self build route [eg C&L kits] and they do not talk about radii in mm, but go on A5, B5, A6, A7 etc turnouts. I've built some in 7mm scale, where [i think] a B5 equates to about 2400mm [8ft] radius. In 0 gauge, Peco points are 1800mm [6ft] radius, where aPeco point is about 450mm long, a C&L one nearer 600mm. In 4mm scale a 900mm point will be about 10 inches [250mm] long. Overall therefore, in 4mm scale 900mm radius points will work well and look good for most purposes. Tighter radii are fine in specific circumstances like dockyards, while broader/sweeping curves will certainly enhance a mainline scene. Trouble is, few of us have the room and even if we do, the urge is always to have more layout! By the by, the spell checker on this thing substituted g for f in the word buffers. Just as well I spotted it - though industrial engines did indeed often have big'uns... -
That is one very nice piece of work.
-
I have both Eoin and Geoff was indeed a true warrior. Never met him, but know one or two folk who did. The models he shares in the books are just stunning. There is a section on firebox washout plugs I need to go through shortly, can only hope a little of it rubs off...
-
More Klingon [in my dreams], than Viking... not sure there are many 'warrior' railway modellers out there!
-
I believe the kit is now marketed by Gladiator Models, Eoin. Don't envy you on the Scotsman - a serious amount of work, even without the flaws! Am hoping to fit working inside valve to Sir Henry. fingers crossed a Laurie Griffin Miniatures kit will do the job. At least there is decent room between the frames. Time was, you could call yourself a real man just by doing outside Walschaerts, now Ballyconnel Road locos have inside valve gear in 3mm scale...
-
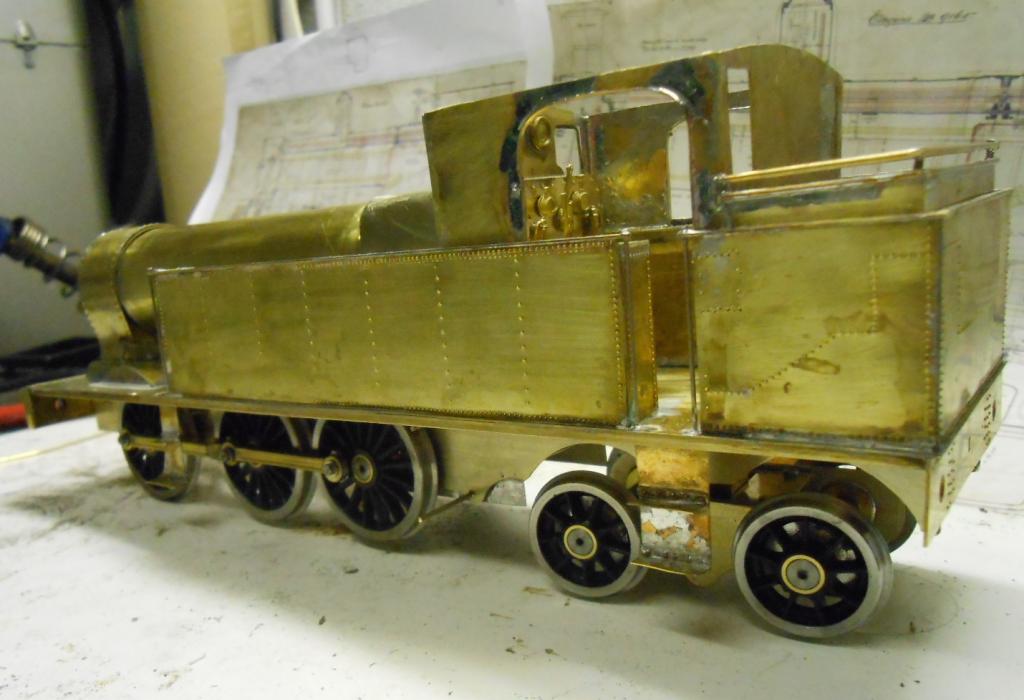
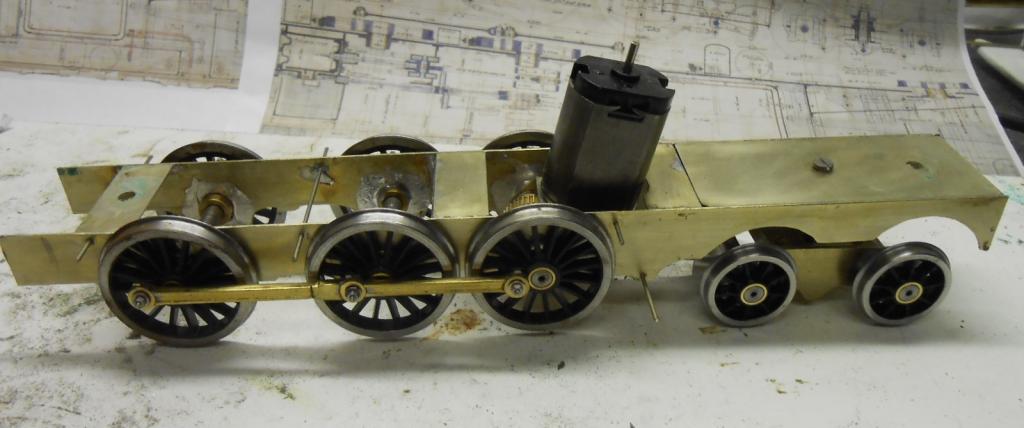
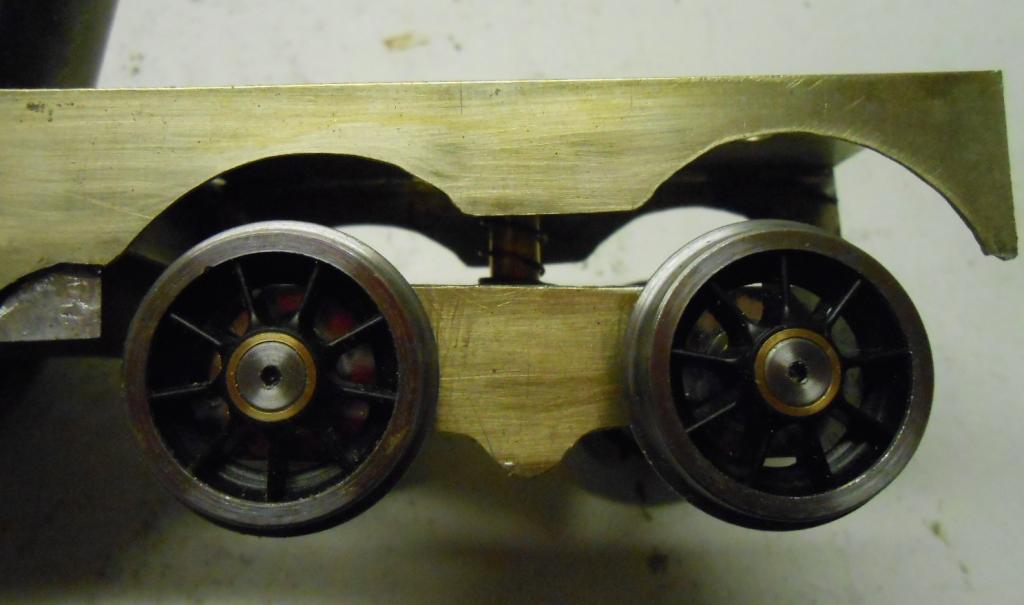
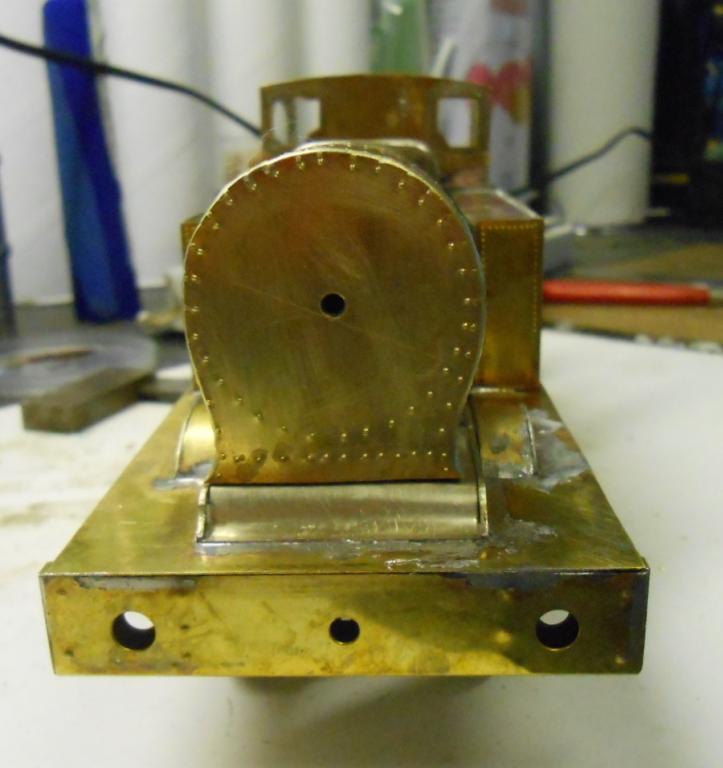
Went to Expo Narrow Gauge last Saturday & with Branchlines there, was able to get a motor gearbox. This one is an 1833 with 40:1 gears. Assembly is a matter of minutes and as luck would have it, the unit fits neatly inside Sir Henry's firebox. While I was on the chassis [and because I'd ordered the bogie wheels from Slater's], I had a go at the bogie unit. I'd bought a Northstar equalised unit ages ago for a 4-4-0 I was building, but ended up not using it.A standard gauge version, I took the easy way out and did a 'Tyrconnel' - in other words, soldered the bearings in back to front to take the longer axles. It is one of those additions that is seriously clever, giving both lateral and vertical springing. Will need to shorten the main spring a little I think, as it is currently a bit too strong. however, will wait until the loco is nearly finished as the eventual extra weight may not require it. The other pictures show additional work on the superstructure which includes beading on tanks, bunker and cab [always tricky], the smokebox door, steps and bunkers rails. The 'to do' list doesn't seem to be getting any shorter though!
-
Looking good so far.
-
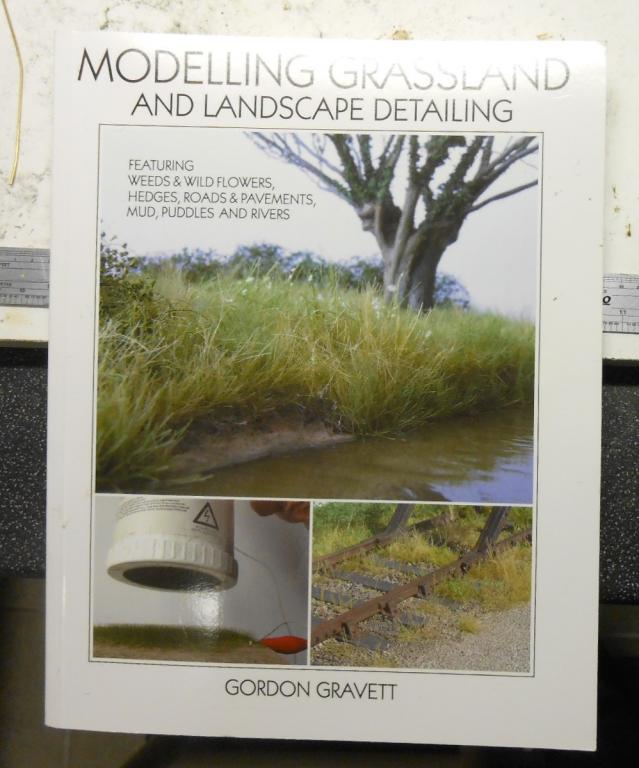
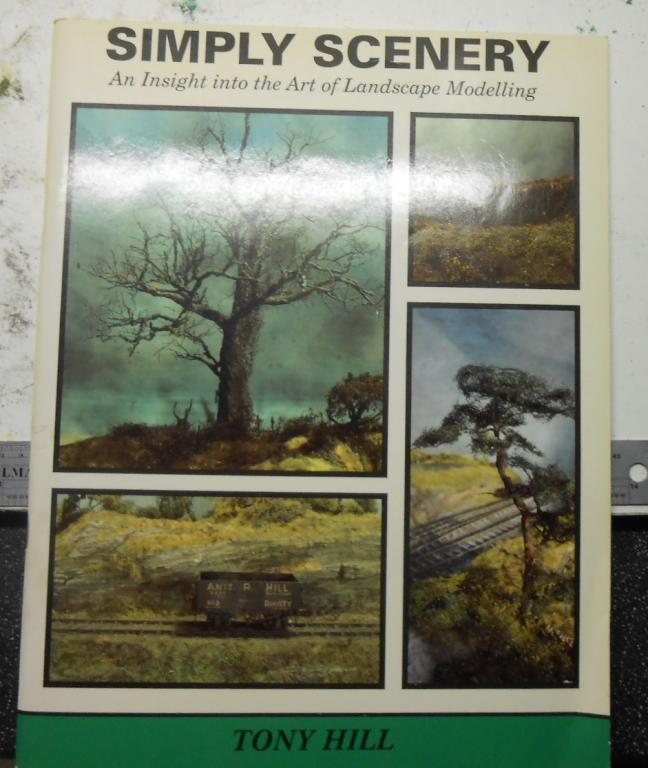
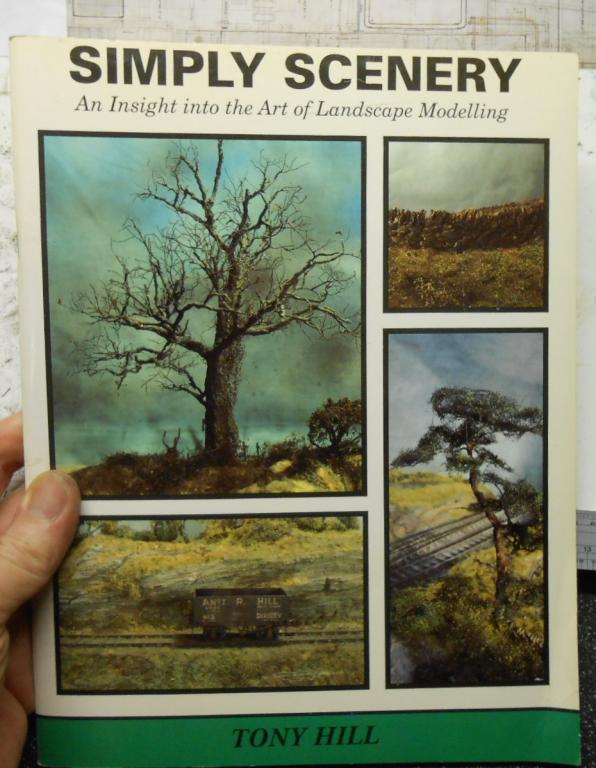
Re the recent thread on scenics, I thought I’d offer my own take on the subject & show you what I do. In fact, there is very little innovation in my work, more a case of pointing towards what I have learned from others. For me, there are three key names – Barry Norman, Tony Hill and Gordon Gravett. The books illustrated are in effect the bibles of scenic modelling. Barry’s came first, in 1985, following the launch of Petherick on the exhibition circuit. This was an EM gauge layout, set in Cornwall and at the time revolutionised what we did with scenic and [should have anyway] spelled the death knell of dyed sawdust, in favour of lint and plumbers hemp, among other things. Next came Tony’s book in 1995, which made the most of the newer materials available from Woodlands and the like – mainly scatter foams, plus stuff like teddy bear fur – while Gordon’s work is the most recent and takes advantage of the latest static grass machines, while refining earlier techniques in the search of ever greater realism. Lesson number one should therefore be to get hold of one or all of these books, for each of them makes realistic scenery achievable by anyone with a bit of time and some careful observation. All the books cover how to build scenic foundations, but to be honest, almost anything will do, as long as whatever shapes your landscape is covered by a mixture of filler, PVA glue and browny grey poster paint. Flat baseboards can be built up with card, card, polystyrene tiles or whatever. Papier mache works ok, though make sure surfaces are sealed first, or the moisture can cause warping. Open top boards can use chicken wire, cardboard weave etc. Either way, the PVA/filler mix gives a smooth, hard surface on top, while with paint mixed in, should you get any chips, no white patches show through. Tools For 4mm scale and above, there is no escaping the fact that an electrostatic grass machine is not just a luxury these days. The effects are wonderful and the time saving enormous. Top of the range models, like my Green Scene version [now marketed as a ‘Flock It’] cost well over 100 euros. Cheaper versions, like the one based on a flour sifter are around a third of the price, while the Noch puffer bottles still have their uses and are very cheap indeed. You could make your own of course, but only if you know what you are doing… Materials If using an electrostatic machine, then fibres are required. These come in 1-12mm lengths, the shorter ones best in the smaller scales, but all have their uses in the larger scales. Colurs are VERY important. Grass [the main use for fibres], is rarely bright green – even on a soft day in Ireland! Sorry chaps, but some of the layout threads show some pretty vibrant/virulent, bilious even, shades. Real grass ain’t that bright. Hence go for beige and straw like colours and mix liberally with your less bright greens, because another key fault people make is using just a single colour. Forty shades of green came well before 50 shades of grey methinks! As my art teacher explained, paint what you see, not what you think, so good colour photos are essential in capturing the feel of the area you want to model. Think about the time of year too. Autumn has to be the hardest – witness some pretty hideous efforts in the model press – because the subtle blend of colours required almost always end up too bright. Spring greens are obviously the brightest, but by late June, things are starting to dry out, with many more lighter shades coming through. Geology has an effect on the flora too, so study your chosen area carefully and aim to copy what it displays. Remember too, that colours fade as you go into the background – especially important when doing backscenes. ‘Crumb’ or scatter is still important to enhance static grass fibres and a decent substitute if you don’t want to go to that expense. My personal preference is for Woodland Scenics. Fine and medium textures work best for me and following Gordon Gravett’s advice, I generally put a layer of these down first, before adding fibres on top. Other brands of scatter can be both too coarse and/or too grainy, I find, but again, never be afraid to mix both colours and media. Nature is not monochrome. Save the darker shades for trees and bushes – next time you go out, notice how these are always darker than surrounding grassland. Various thicker fibres, dried flower heads etc are very useful for making smaller plants and shrubs, so it is worth having a small stock in hand. Likewise the Woodland Scenics fibre matting. Sold with their tree kits, it can also be bought separately and has many uses for bushes, brambles etc. My other ‘must have’ is Postiche. A type of artificial hair, it can be teased out to make even finer matting than the Woodlands type & as such has many uses. The Chatham Club is busy with scenic work at the moment, so will aim to add to this thread as our work develops and show you what goes on.
-
I have always laid my track on cork. I use the 3mm thick floor tiles, sold in DIY emporia. They enable you to create the all important ballast shoulder for main lines, while in stations I simply cover the whole area. Once upon a time, self-adhesive ones could be bought, which helped with the laying, but these days it is usually a case to out with the PVA glue and pin them down firmly while it dries. As others have indicated, the amount of sound insulation is limited and it is doubtful whether cork offers any improvement to running quality. However, working in 7mm scale, I do not find my models are noisy, despite being heavy and often all metal. Equally, Arigna Town is a branch terminus, so does not have the effect of a long train running round a circuit, where I guess the noise can build up considerably. On my last branch terminus, I used Tortoise point motors and the hum from these far outweighed the noise of a train; yet out at exhibitions, the points motor noise was rarely heard above the background noise...
-
There is a growing sense of delicacy and subtleness to your work, Nelson. The change to three link couplings certainly helps, but there is real finesse in that wagon - sharp lines, no evidence of glue/solvent. Stands up for itself even before it is painted. Proper job.
-
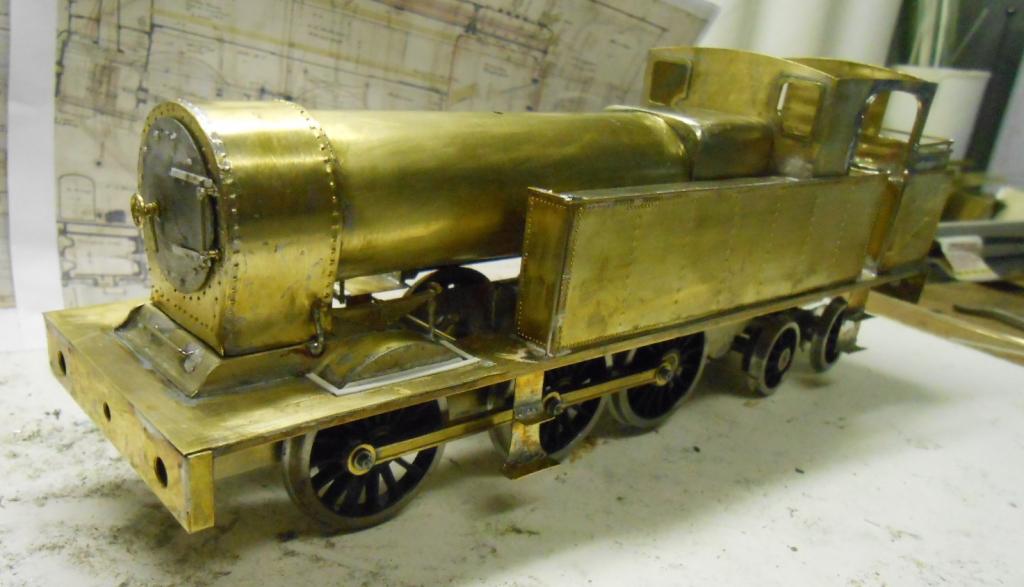
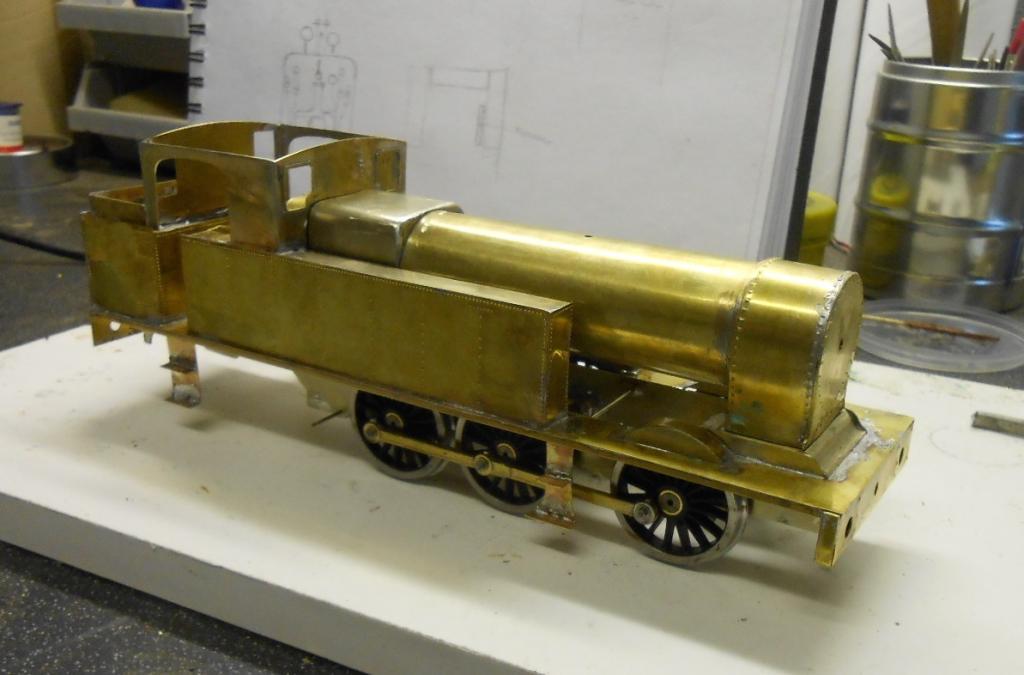
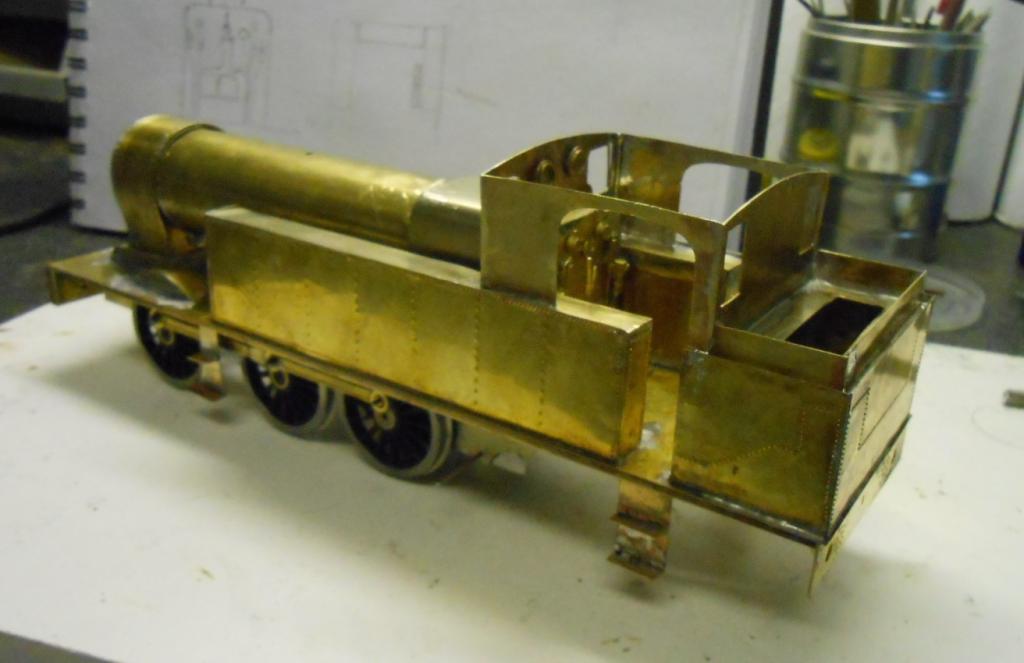
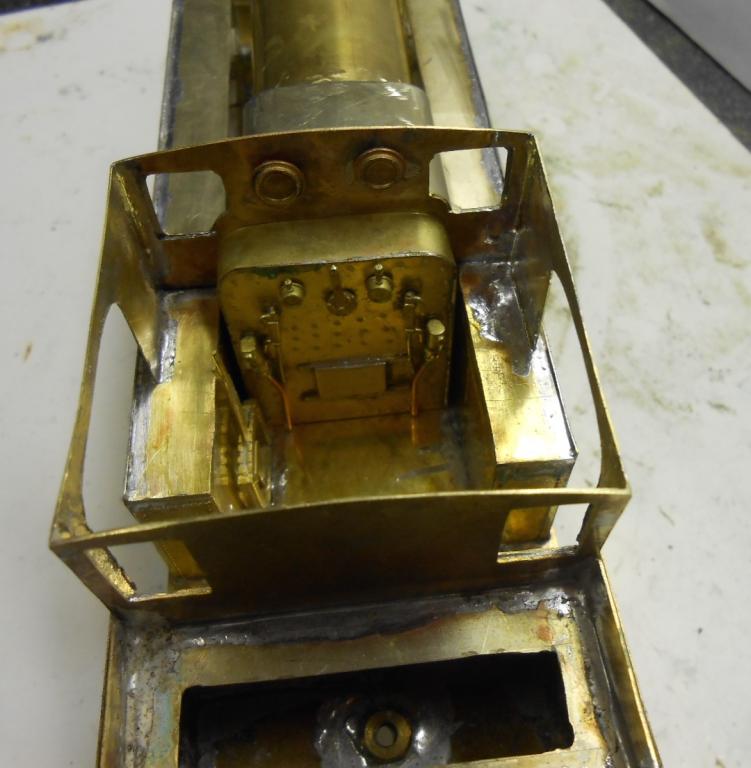
Since unloading the layout after Beckenham, have had two decent day's worth of modelling time. First up was the smokebox front. Picture shows the second attempt, though still not sure the rivets are right - the outer ring is a bit too close to the edge for comfort... It looks off centre too, but fear not, as it is not fixed down yet. A small job was tidying up the rear edge of the upper frames, so they match the profile of the splashers, likewise rounding off the front corners of the Belpaire firebox. Slightly more involved was the cab and bunker area. Began by adding the upper bunker sides [10 thou brass, as usual], then cut out a pair of blanks for the cab sides. These were soldered together before the shape was cut & filed to what I hope is a decent profile. Fiddliest of all were the four steps. Simple in shape, but the riveted strips above each step, made soldering tricky, so glad when these were done. Lastly, in this burst of activity, was the 'back head' [firebox rear]. Cut a sheet of thicker brass to the same profile as the footplate section, then marked out where the main controls would be. Used pictures from the Web to give an impression, but no idea if accurate for a Large Tank. The Tyrconnel G2 helped too - being a Beyer Peacock loco, as did Hazlewood. Des at Studio Scale Models was very kind in selling me a pack of castings from the Small Tank kit. These included water gauge glasses, injectors, pressure gauges, regulator & reversing levers, plus a brake standard. Also on the sprues were a smokebox door wheel and a couple of other useful items, so many thanks, Des! The basic structure of the loco is now complete, apart from the bogie, so next step will be a thorough clean up before I start adding the details. As you can see, i am not the neatest when it comes to soldering, so seems a good idea to get things tidied up before bits like beading, and castings go on. If anyone can tell me what the correct chimney and dome for a Large Tank in the 1950s should be and more particular where I can buy them, I will be very grateful.
-
Arigna Town Exhibition Blog
David Holman commented on David Holman's blog entry in David Holman's Blog
Enjoyable day at Beckenham, marred only by the fact that the church was cold and it rained while loading up afterwards. Thankfully for the latter, the Yeti's tailgate is a good umbrella and could park right next to the entrance. Gravetts very good company & Pempoul is still as stunning as ever. Ariana ran well, though the turntable mechanism is starting to slip. Traced it to the polystyrene tube that connects the crank hand to the drive shaft. Makes the former removable for transport. Hence either need to find some 3mm i/d tube or maybe find a collar that can be held in place with screws. -
Super video - the running qualities of the whole layout are very impressive. Must be a pleasure to operate. Love the blue & cream DMU too. Was there a more handsome prototype & why is it that DMUs are always so much more attractive in model form than [most of] the real thing?
-
Rachelstown and St Stephens Green
David Holman replied to The Derry Road's topic in Irish Model Layouts
Well done you. Signals add so much to a layout & can be daunting things to build. Just as well you are not using semaphores... -
Arigna Town Exhibition Blog
David Holman commented on David Holman's blog entry in David Holman's Blog
An undoubted treat this weekend will be hosting Gordon & Maggie Gravett, who are taking their Pempoul [Reseau Breton] layout to Beckenham. For me, perhaps the finest exhibition layout on the circuit [yet to see one better], I hadn't realised quite what a undertaking it is to exhibit. My layout takes just over an hour to set up, solo. Pempoul needs 3 hours! Setting up at shows is often a good time to see how others manage things & though I've previously listed what I take with me, thought that some of you might be interested to read how it all goes in the car. I have a set routine, which goes as follows: - remove rear seats from car & any stuff from the boot - two sheets of hardboard on boot floor, then - briefcase [with all electrics & admin folders] & tool box behind/under front seats - baseboards 1, 2 & 3 slid in on their back scenes - plywood plates then bolted to each end of boards to secure them together -longitudinal trestle beams go one side of baseboards, pelmets the other - two more sheets of hardboard go on top of baseboard unit - fiddle yard goes across top of baseboards, crossways, behind headrests of front seats - one trestle, folding seat, light posts & LED strip go on top of fiddle yard - sundries crate, stock boxes and cross beams go behind fiddle yard - other three trestles and tea shelf stand behind layout, just inside tailgate - still room for a front seat passenger and overnight bags! Cosy, but in many ways better than stuff being loose and rattling around. - -
Ulster Folk & Transport Museum 2015.
David Holman replied to popeye's topic in Photos & Videos of the Prototype
Shocking in some ways, JB. I'm one of those folk who trust museums to get things right - though as you say, colour is such a difficult area. One wonders if some of the bikes, cars etc are the wrong colour as well. Brings to mind the old quote of 'apart from that, Mrs Lincoln, how was the show?'.... -
Ulster Folk & Transport Museum 2015.
David Holman replied to popeye's topic in Photos & Videos of the Prototype
Went a couple of years ago & like Weshty, found taking photos difficult, so well done with these - they are much better than my efforts. Did do a lot of detail stuff on Donegal Railcar 10 though. One day... Cultra must be one of the finest museums anywhere, regardless of content. Interesting that the spell checker wants it to be 'Culture' & certainly better than 'Swanky' instead of Swanley for the ExpoNG venue! -
Arigna Town - this week's scenery
David Holman replied to David Holman's topic in Irish Model Layouts
Stunning - thanks Eoin, am sure I'll not be the only one to enjoy this. Immediately identifies two things missing from my layout - litter and a line side donkey! The first not too difficult, the second will have to wait until the Reading Trade Show in December, though might be something at ExpoNG next week in Swanley. Not sure how I mimic children running alongside the train though. Anyone doing holographic projections yet??? -
Maybe... Several Irish railways used 'off the shelf' signalling - usually Saxby & Farmer. Is there anything available in model form from that prototype?