David Holman
-
Posts
4,333 -
Joined
-
Last visited
-
Days Won
117
Content Type
Profiles
Forums
Events
Gallery
Blogs
Store
Community Map
Everything posted by David Holman
-
Arigna Town - this week's scenery
David Holman replied to David Holman's topic in Irish Model Layouts
Had my Arigna branch been built, I like to think it might have lasted, in some form at least until 1990. That was when the coal mines closed and the line would have gone past the power station on Lough Allen, where the coal was sent after the Cavan and Leitrim closed in 1959. The line was also wholly in the Republic, so no issues with border crossings. So, with a modicom of passenger traffic, the railcar might have been kept busy on a shuttle to Sligo, while coal may have been in the hands of a C or 121. The power station consumed around 1000 tons a week, or one ten to twelve wagon train a day. There again, perhaps the line would have been left as an isolated section from mine to power station, with an G or an industrial diesel brought in to work it. Not much interest as a layout though... -
Probably not this time, Harry. Am working up a design for a simple passing station, not dissimilar to Brookeborough, so no passing loop and just two short sidings. Having said that, both fiddle yards will be of the turntable variety, though doubt if they will have CDR loco frames!
-
Arigna Town - this week's scenery
David Holman replied to David Holman's topic in Irish Model Layouts
They are indeed. In fact, the layout would not have been built at all without Alphagraphix, for I have used several Tyrconnel etched brass kits, plus loads of the coach and wagon card kits as drawings to scratch build my own in plastic. You will no doubt have spotted the bakery, garage, station bar, Glenfarne goods shed, Florencecourt station & Manorhamilton signal box - all of which are based on the card kits but scratch built using Wills random stone on foam or 'greyboard' frames. Roger also put me in touch with Adrian Rowlands who let me buy his last tow 'small tank' kits - though happily they are now available again from Studio Scale Models & very fine kits they are too. -
It was a fine weekend at the Wood Green Animal Centre, venue for the St Neots show. A different sort of hall to the usual school hall/sports centre usually favoured for model shows. Beaten earth floor for one - though it was carpeted, if a little uneven. A big space - am guessing around 200 feet long and 100 wide, so plenty of room for lots of big layouts. Star of the show was Fencehouses, a 2mm fine scale layout, bigger than many 0 gauge ones. It exploits the scenic potential of the scale, yet still manages to major of detail and quality, with lots of scratch built stock. Deservedly won both trophies and well worth seeking out at future shows. Arigna Town generally worked well. The few issues I put down largely to the [very] different environment from home. My workshop is dry & centrally heated, so a 6.15am start on Saturday morning meant overnight in the car [when there was a frost]. Pretty damned cold in the hall too at first, then the heating got going & it soon became quite hot & very humid. I blame the fiddle yard turntable fouling the baseboard edge on this, so have been filing the edges down a bit to try and cure this in future. Three of the steam locos operated without a crew for the whole weekend. They had come loose on the journey up there & it was not possible to refix till I got home. What I did have was an excellent crew on Saturday - Mike84C has driven the real thing [9Fs!] for a living, while long time friend and former Chatham Club member Ryk was in the Royal Engineers [did Falklands & South Georgia among many adventures] but is now a vicar & we know how well they go with railways! Many thanks to both. Doing it all again this weekend at Alexandra Palace. BRM are doing a photo shoot for a future article, so will be busy this week making sure everything is looking as good as possible.
-
Simple pleasures, with fine results so far. Will likewise look forward to seeing this develop.
-
Wondered if it was a Backwoods - 4mm scale, am guessing? Have heard that they are not for the faint hearted, as can be a challenge, but in the right hands [like this model] certainly make up into something splendid.
-
Many thanks Eoin - been on holiday, so only just picked this up. Will certainly investigate!
-
Arigna Town - this week's scenery
David Holman replied to David Holman's topic in Irish Model Layouts
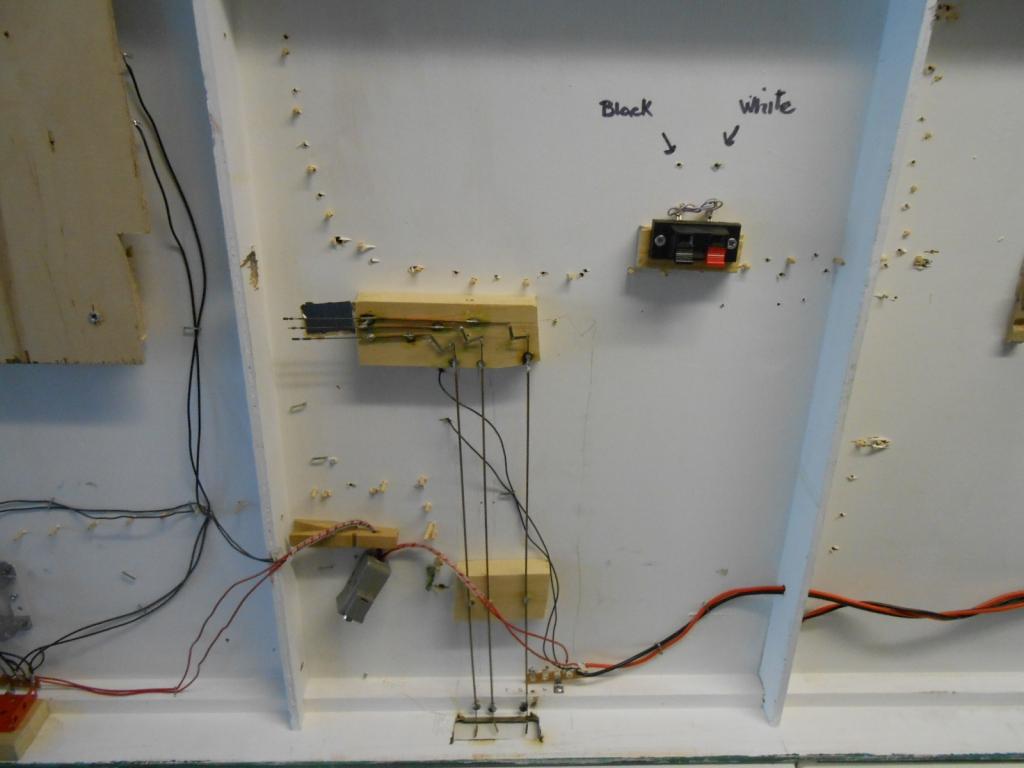
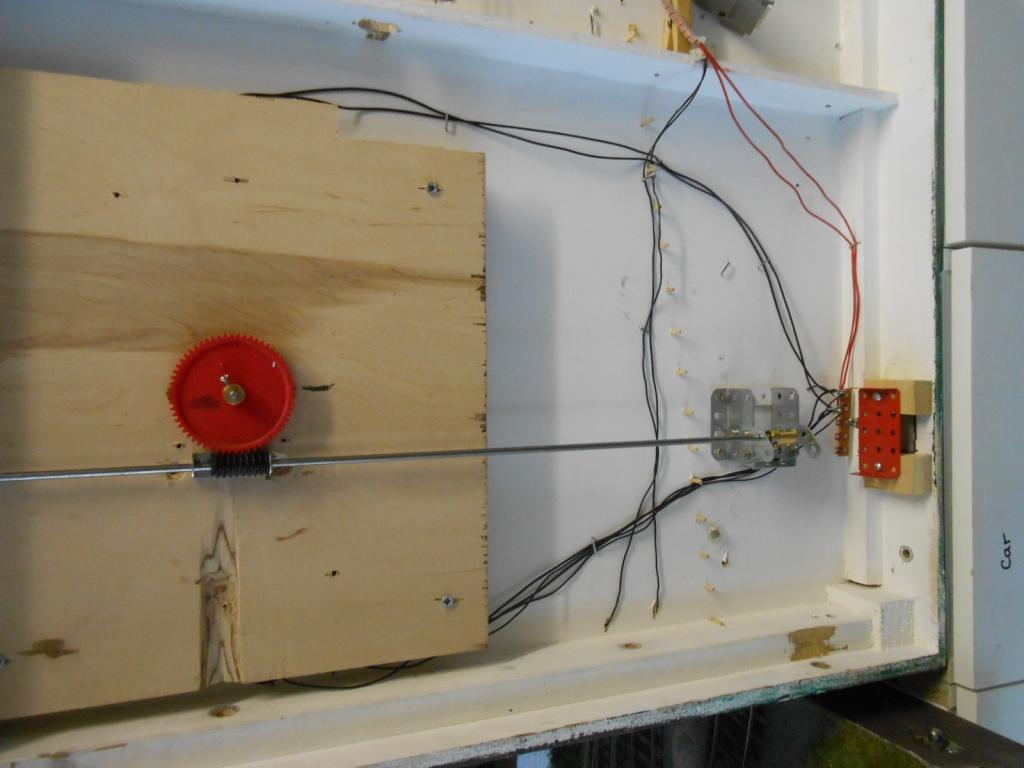
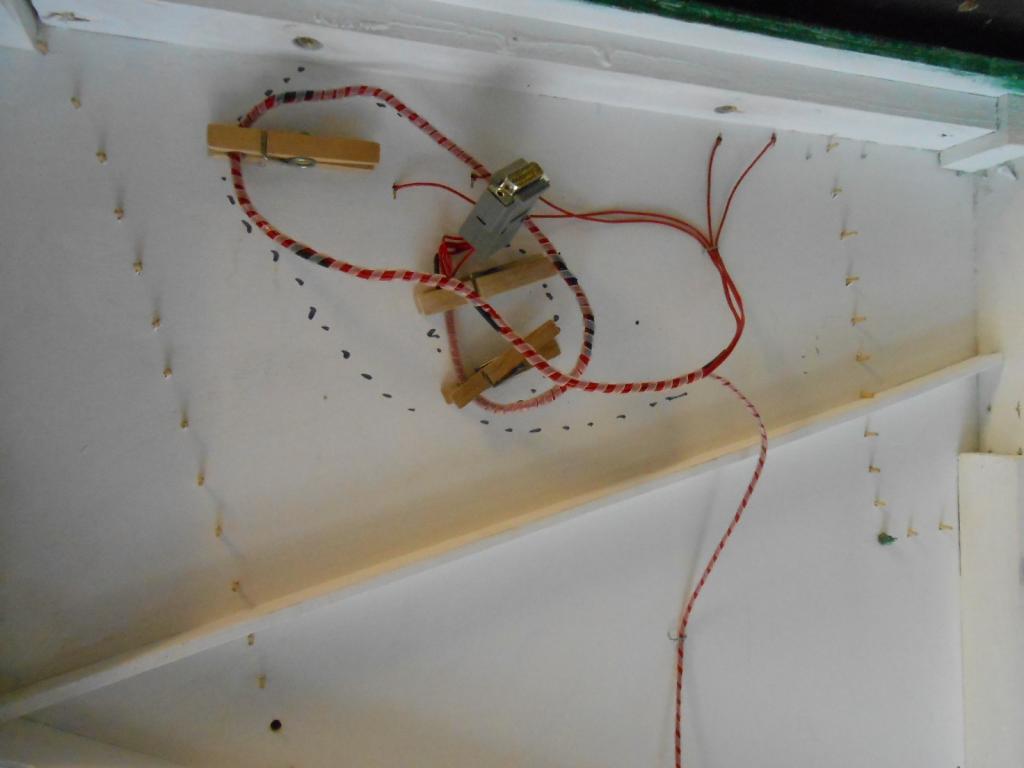
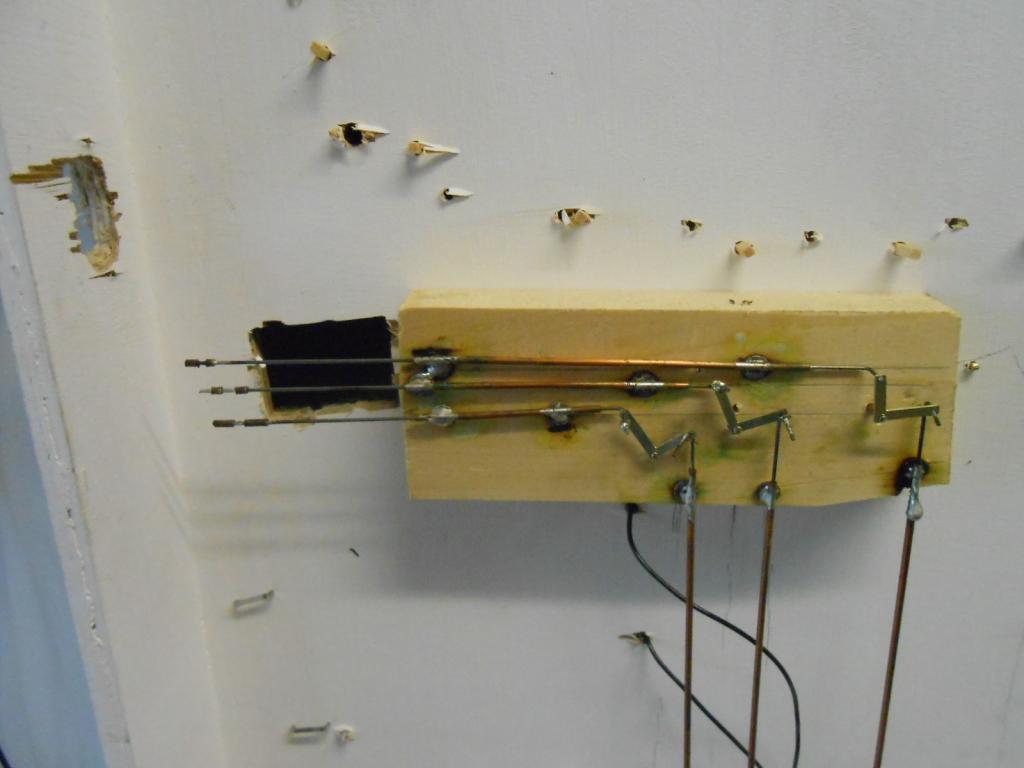
While preparing for two shows in the next two weeks [st Neots and Alyypally], have had the baseboards tipped up & wondered if I had shared some of the mechanical/electrica bits before? All have proved themselves over the last couple of years, so hope it might help anyone contemplating building a layout themselves. As you can see, nothing special on the electrics front, though I do find sprung audio terminals useful at shows, because they are quick to connect. A single, twin terminal for power from the transformer in the middle and two more [one each end] for the LED lights in the buildings. A simple, but not widely used innovation are the clothes pegs 'hot glued' to the underside of the baseboard, to hold cabling while in transit. Not my idea, but like all the simplest ones, is certainly a good 'un. Painting the underside in white emulsion not only seals the woodwork, but makes it easier when working on these areas. The two main mechanical bits are the turntable and the signals. The turntable mechanism is a Frizinghall Models kit [as advertised in RM & elsewhere]. Essentially a few bits of Meccanno, I have substituted a longer drive rod [3mm steel from Wickes] and a chocolate block connector to join the crank handle, which is removed in transit. The Frizinghall kit uses neoprene tube, but found this started to slip after a while, no doubt due to my heavy locos. The signals [like the points] are wire in tube, using home made cranks. Hopefully the picture shows more than I can describe.
-
Ye Gods, a Swilly 4-8-0. Scale, gauge, origins? A real beauty, whatever its origins. Like JB, am hoping there is dark green under the weathering. For me, the Swilly's locos represent the best of Irish narrow gauge. Would love to recreate Casserly's photos of Burtonport - if only I had the space...
-
The delights of 7mm narrow gauge
David Holman replied to David Holman's topic in Irish Model Layouts
Splendid to see my old coach recycled in such a great way, Dave and rather sobering to think that I originally built it over 25 years ago, yet still available today! Those pics on RMweb will be more than useful when I start the next one. Hopefully will make a better job of it this time too. Rumour has it they are selling as well as ever, no doubt due to new Ragstone kit. For those of you who have not come across Charmouth or Bridport, then pay careful attention. This is 7mm NG at its very best! -
Well done Harry, good to see someone challenging themselves. Re those laminated rods, from the pics, looks like you held them in the vice to solder. A better way is to use a couple of small panel pins/tacks, through the crank pin holes into a piece of wood or board. Tin the layers first, flux an then apply the iron. Take your time and get the chassis rolling smoothly and the rest is cosmetic.
-
The delights of 7mm narrow gauge
David Holman replied to David Holman's topic in Irish Model Layouts
Would I be right in thinking these vans are therefore on the wonderful Charmouth, or is this another DT? Either way, good to know the coach has found new lives. One of the many joys of 7mmNG is the fun in adapting things. Planning for a proper Clogher Valley layout is well under way and hope to start building this summer. Heard a couple of years ago that the standard gauge follow up to High Weald, a roadside tramway called Loose End (also Kent based) found its way to France and the same barn where Ditchling Green resides. Whether they are still there, I have no idea, but it was nice to think the layout was in such good company! -
Arigna Town and Valencia Harbour willing be flying the flag for 5'3 gauge in two weeks time at Allypally. If visiting, do come and say hello!
-
Problems with Halfords etch primer
David Holman replied to Junctionmad's question in Questions & Answers
I have been using Halfords spray cans for years without any issues whatsoever. Indeed, for whatever reason, find the nozzle on their cans to be superior to other makers such as Humbrol, Precision etc. However, I only use their standard grey or orange primers, NOT the self etch ones. Grey is ideal for non fitted wagons and orange for fitted (ie bauxite). I use the same methods as the others. Can at room temp, or on a towel on a radiator to warm up a bit and shake well of course. Often do my basic spraying outdoors, even in winter - though not when it is raining! Have various bits of thick wire bent into hooks and hang a model from one in one hand and spray can in the other. Yes, even kit built locos. Heresy I know, but works for me and of course there is extensive titivating done in the workshop after the paint has dried for 24 hours. -
I agree Mick. Saw their stand at St Albans and booked them for Chatham this year. The range of etches they produce, right down to exquisite sets of workshop tools, cry out for a model to be built around them.
-
Back to the '70s and '80s
David Holman replied to jhb171achill's topic in Photos & Videos of the Prototype
A gem of a picture JB. You didn't get the right hand side of the cab by any chance...??? -
Thanks Eoin, will see what I can find
-
Precision paints do a decent sleeper grime enamel pot, though as with all such things, it is really important to try and model a specific location, because not all track is the same colour. Areas where locos stand will have oily deposits [try Humbrol Metalcoate Gunmetal and Precision Tarmac], while the entry to a station platform is likely to have lots of brake dust deposits [like rust, so try weathering powders to simulate. Likewise ballast, it is rarely uniform and even when well maintained is unlikely to be look representative if only a single colour is used. Study the prototype and do not be afraid to mix colours to get the effect you want. Also, check the size of the granules too. On the modern scene, ballads is formed of quite large pieces, but for earlier times I find going down a scale works well - so try 2mm ballast for 4mm scale & 4mm scale for 7mm etc. In N gauge, sand can be better. Woodlands stuff looks best to my eye, though tis all in the beholder I guess.
-
At the St Albans show in January, there was a chap showing progress on his Lartigue layout. Unlike the French layout [which just goes round in a scenic circle], this will be part of one of the terminus stations, complete with turntable points and so one. A frames for the track were very nicely etched and the whole thing looked very promising. He brought a L&B wagon to compare with my Sligo ones & it was surprising how big the former were. No loco to show yet, but it is a bold project that deserves to do well.
-
Brand new ammonias, not yet sent out on trial.
David Holman replied to jhb171achill's topic in General Chat
Saturn V rocket out of nuclear submarine school of design, methinks... -
Splendid. Early diesels seem to have much more character, especially as models, though doesn't excuse what they got rid of!
-
Have certainly been tempted by the idea of a C for a possible 'dieselised' presentation of Arigna Town. Silver or green maybe, with perhaps a G and a 121 for company. An info on how the loco was built - drawing, chassis, etc would be welcome.
-
Very tasty indeed - the 4-4-0s that is. That Turfburner was an ugly so and so!
-
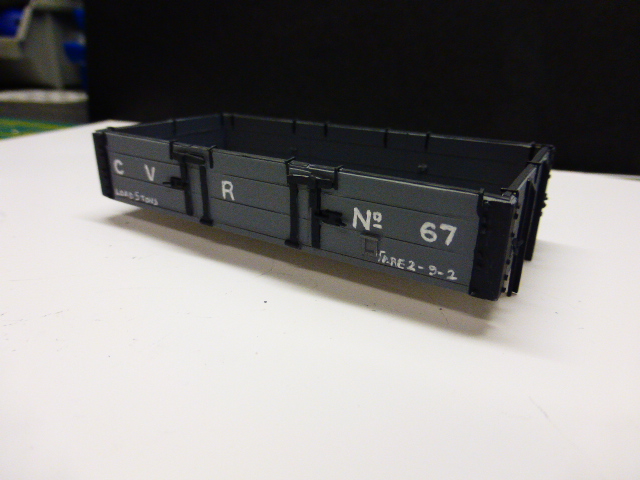
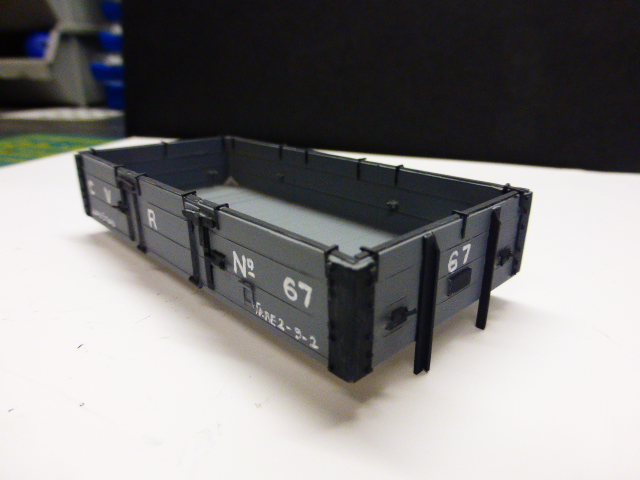
Decided the other day, that I'd make a formal start on my new project by doing something nice and simple, like an open wagon. The subject is the Clogher Valley Railway and Branchlines do a nice wagon chassis of the prototype, while in E M Patterson's book there is a very fine picture of a CVR 5 ton open wagon from 1937. The reason for doing an open, is that [at first sight], it is a simple open box. Three planks to scribe and just five pieces of plastikard to cut out and weld together. Well, how wrong can you be! The photo in Patterson's book [probably 4x larger than the actual model would be] showed a wealth of detail. Numerous large bolts hold the iron corner plates to the wooden sides and these looked too big to represent by using my GW Models riveting tool. So, 56 cubes cut from 20thou square strip used instead and put in individually. Then there was the iron strips fixed to the top edge of each side. Common on all open wagons, but rarely modelled it seems & probably little point in 4mm scale. However, in 7mm, I reckoned they were worth adding, especially as they are held down with 14 iron clips. Three pieces for each of these, so another 42 parts to cut, this time from 20x15 strip. Strapping, hinges and catches added umpteen more pieces of microstrip & then there are 8 cleats on sides and ends to wind the rope used to hold down tarpaulins when used. One bit of plastikard and two bits of bent 0.5mm wire for each of these. In all estimate there are close to 200 separate pieces in this one wagon body! Am thinking how I might do a master for sides and ends so I can resin cast future versions. However, none of it was over complicated - just a bit tedious at times, so might still build each one separately. One option will be to drill the strapping and use 1mm wire for the bolts, so these can then be seen on the inside of an empty wagon [or two]. Thankfully, this project is not going to require masses of rolling stock - probably a dozen or so wagons, a couple of coaches, two locos, the railcar & the tractor/unit. Hence tempting to try and do it to the highest possible [for me] standard with a much detail as I can find. Not sure if the lettering I've done [by hand with a white gel pen], is good enough, so may have to invest in some custom transfers. That's the plan anyway, with regular reminders to myself that it is not a race!
-
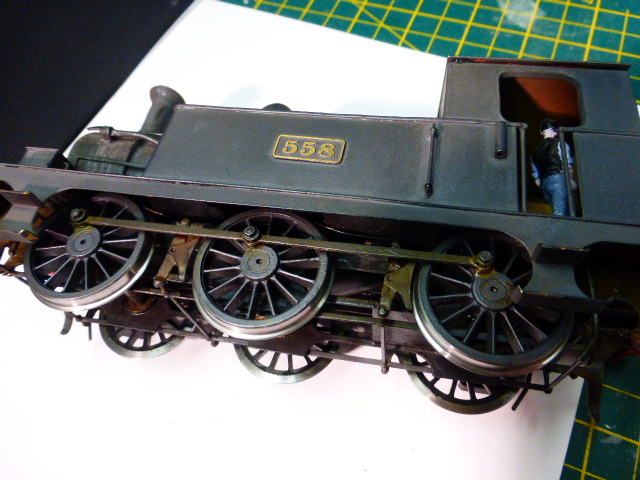
Have tried all sorts over the years, Harry, but these days stick mainly to wire scrapers. 0.5mm nickel silver or phosphor bronze, depending on what is available. Where possible, use small pieces of copper clad strip [4 or 7mm scale sleeper strip], stuck to the frames with 5 min epoxy, then solder the pick up wires to that. If I can, I arrange the wire pick ups to bear on the back of the wheels - either horizontally or vertically. On both the Sligo small tanks, the pick ups drop down vertically behind the driving wheels. On the J26, there is space to hide the pickups horizontally, so they bear on the back of the top of rear face or the tread of the wheels. Hopefully the photos show this. Overall, have found this method better than plunger pickups. Though these are neat and tidy, I find the springs can be too strong and end up acting as a brake. Goes without saying that the more pick ups the better and cleanliness comes well before godliness - track, wheels and pickups, to enable best quality running.