David Holman
-
Posts
4,359 -
Joined
-
Last visited
-
Days Won
117
Content Type
Profiles
Forums
Events
Gallery
Everything posted by David Holman
-
Love the signals! Do they work? If not, try getting hold of the latest Model Railway Journal, where Derek Munday has some interesting ideas on such things using servos
-
No idea Stephen, but Slaters do a nice 7mm scale version. The notes say they were short lived, mainly as they needed access to both sides. One would hope a 4mm version might be available somewhere.
-
Arigna Town - this week's scenery
David Holman replied to David Holman's topic in Irish Model Layouts
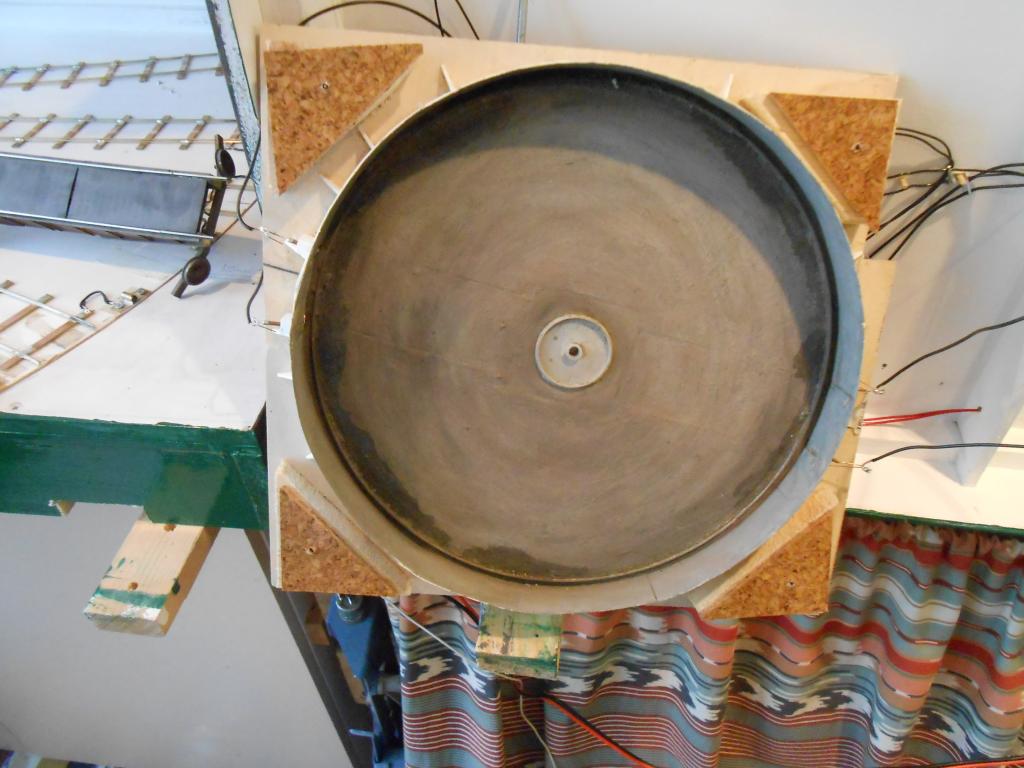
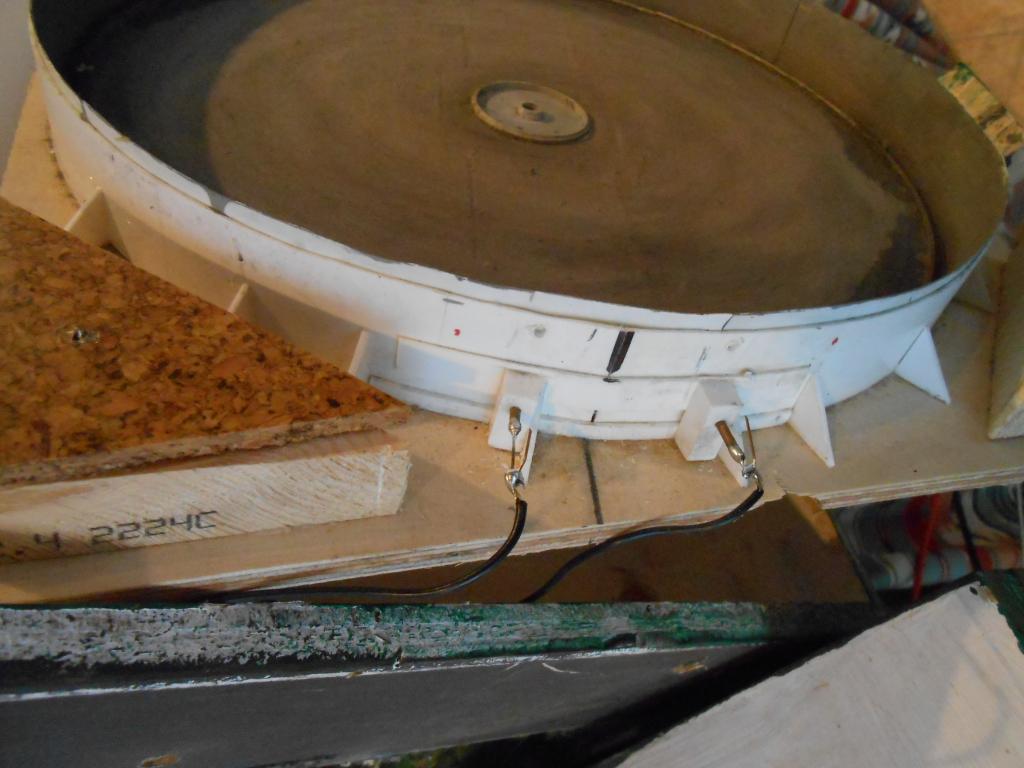
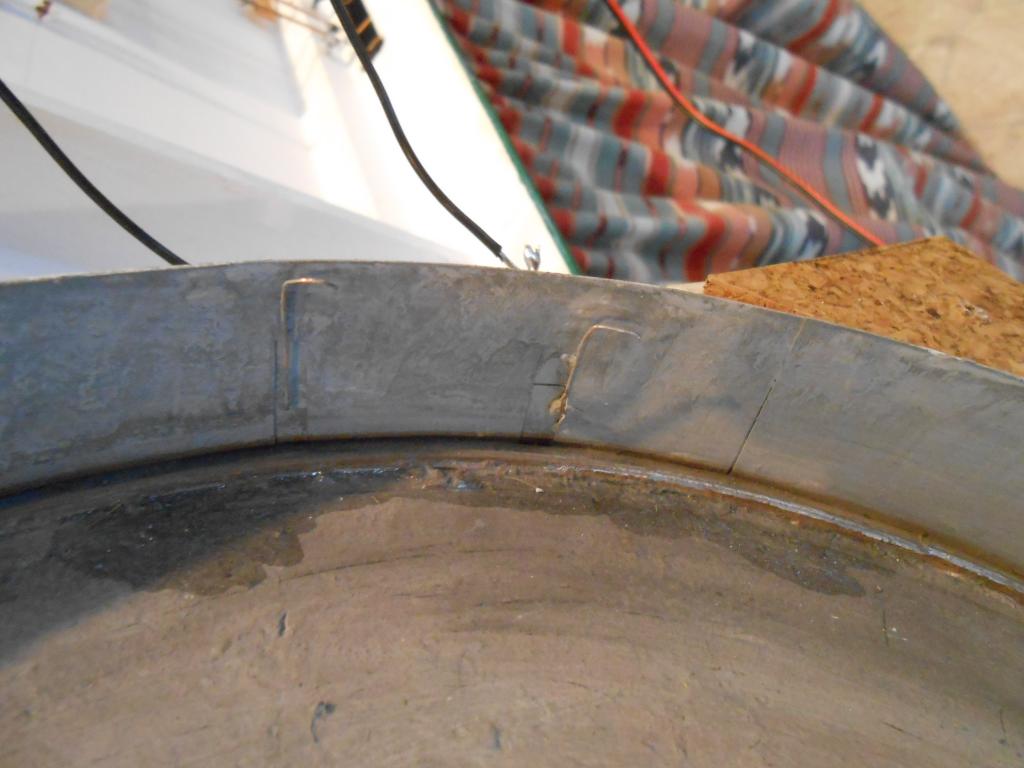
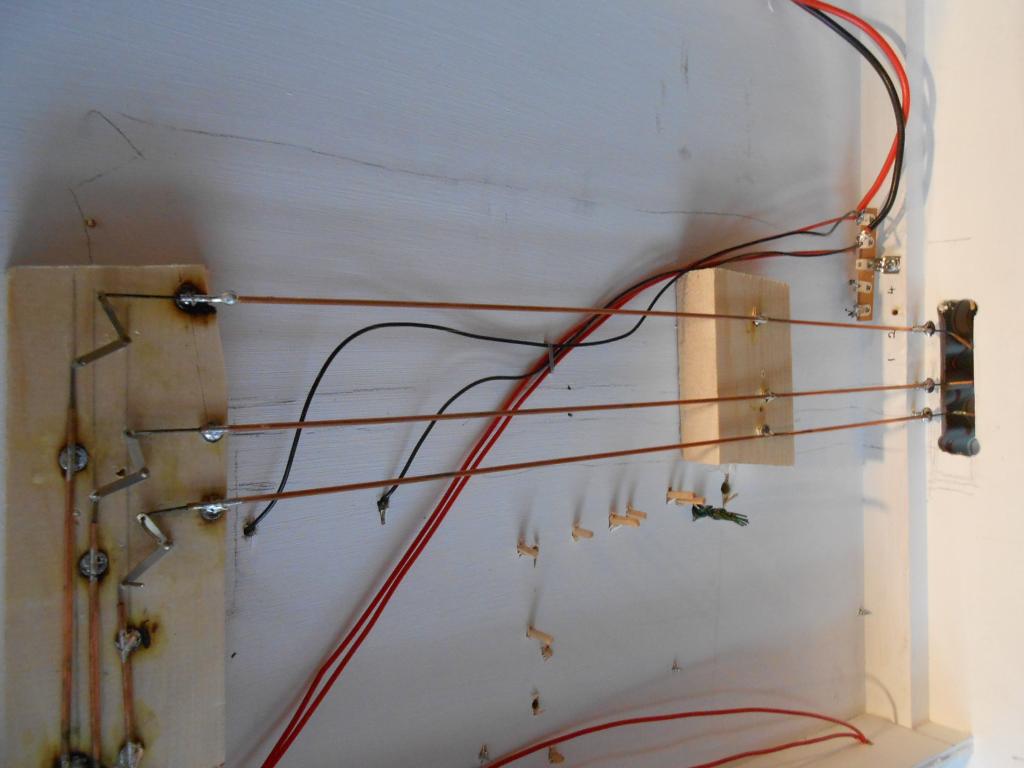
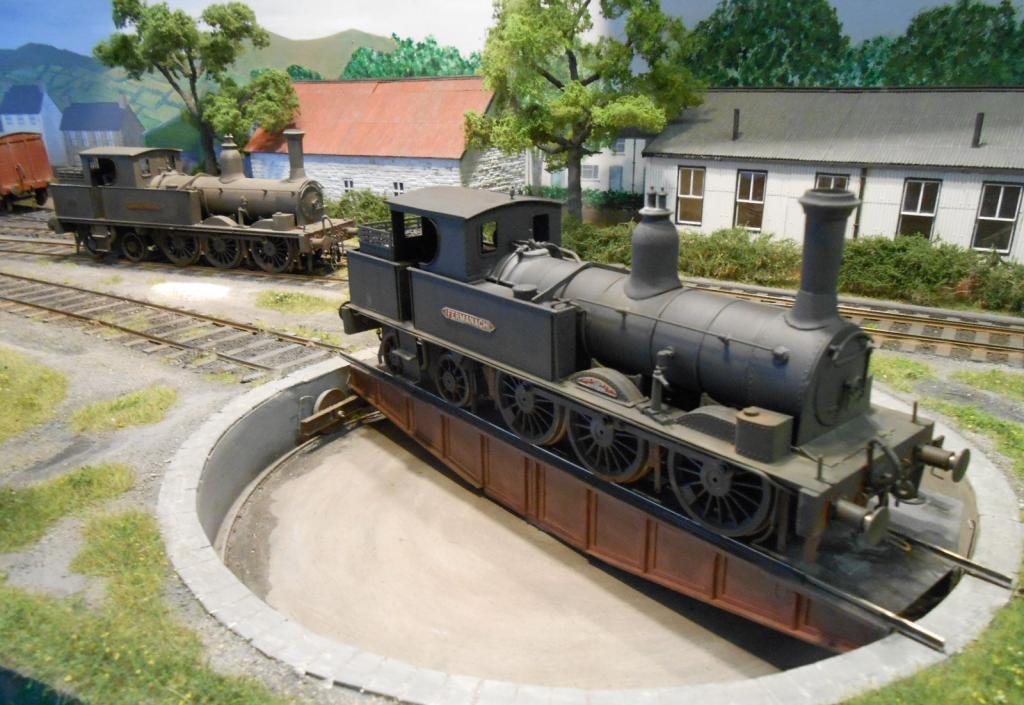
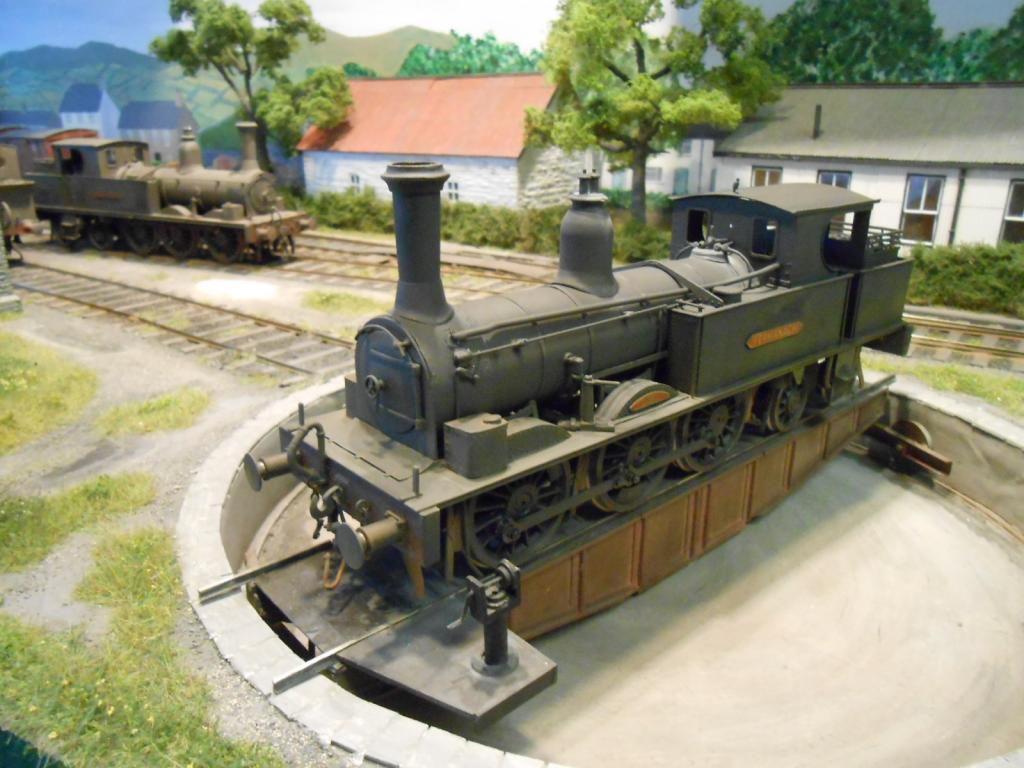
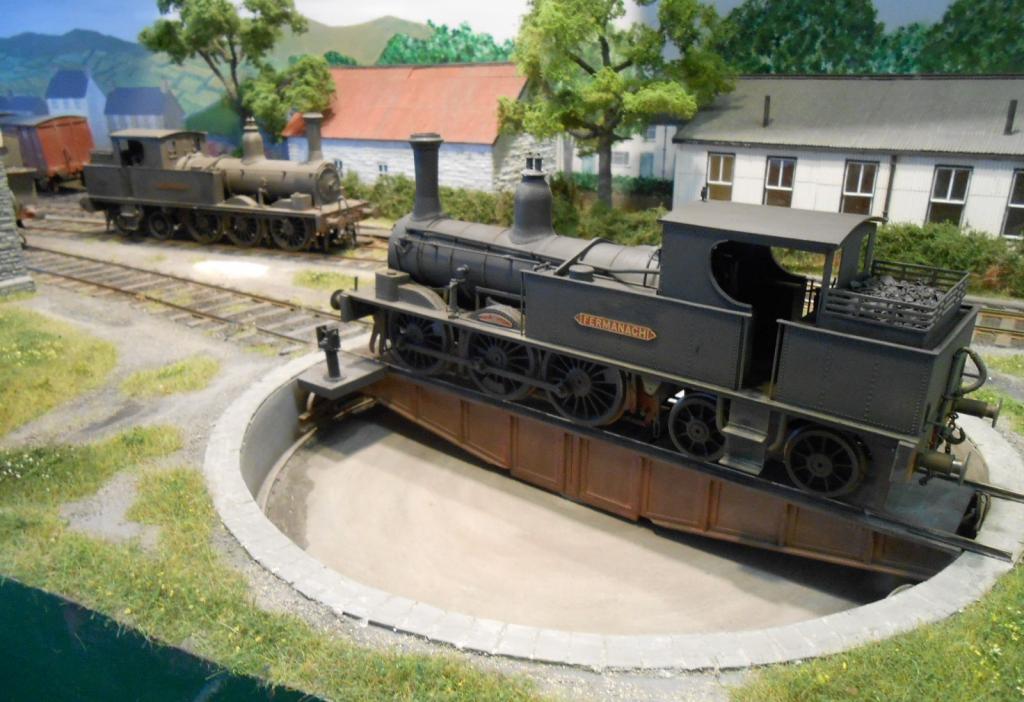
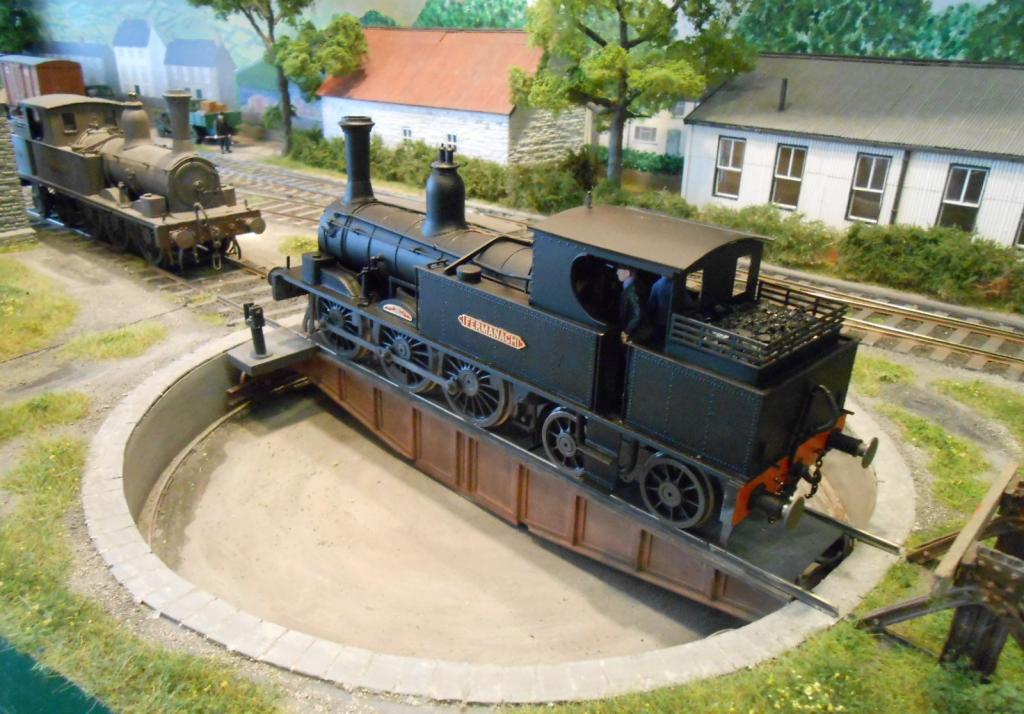
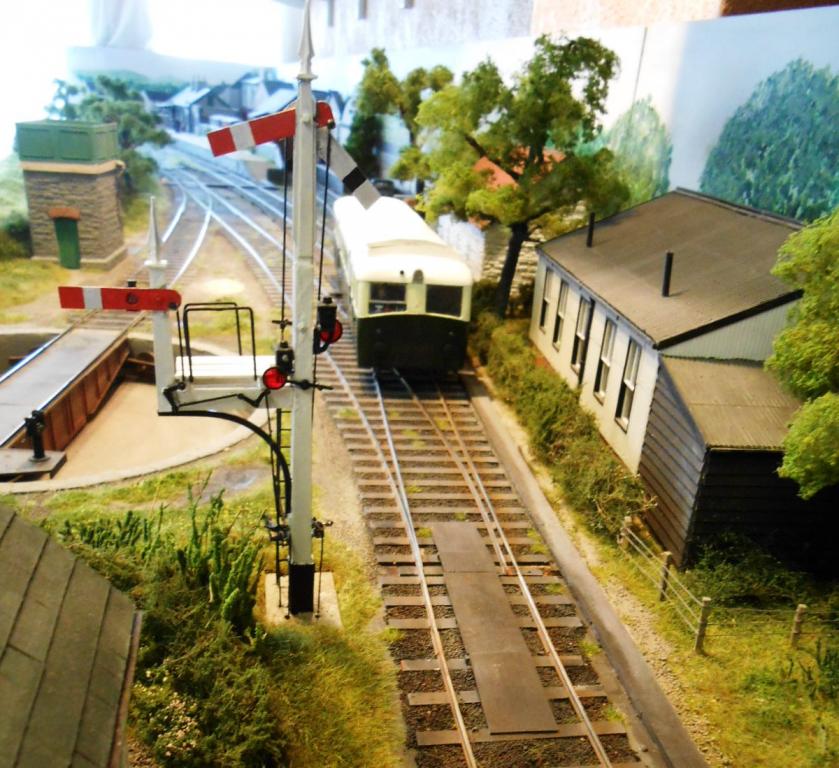
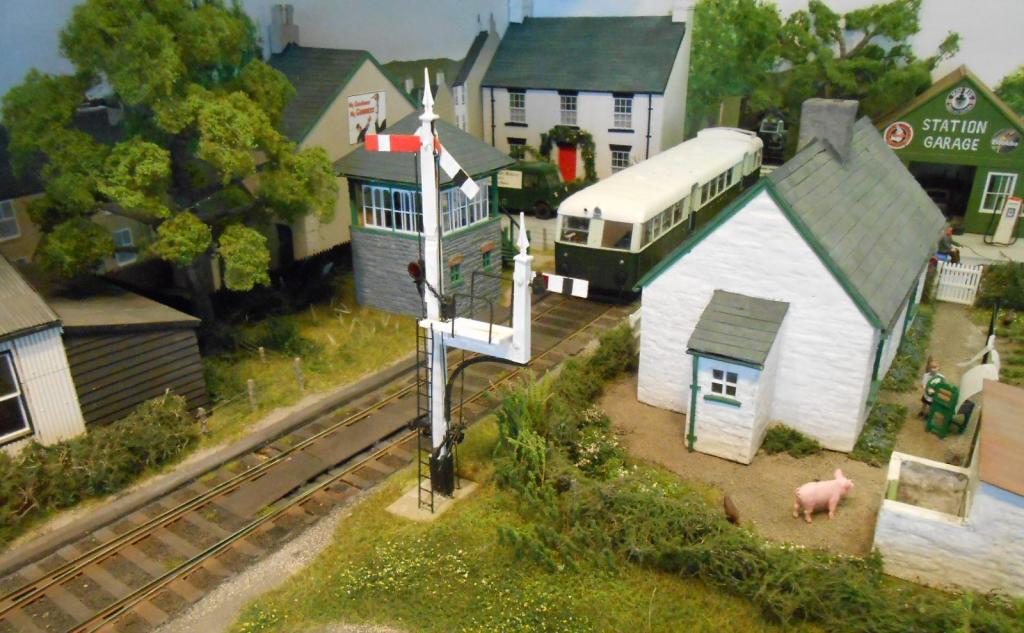
Did some web browsing on how to get power to the turntable tracks. Our American cousins seem to favour using a stereo jack plug as the main spindle and routing two wires from this to the rails. The other main method is to use the circular rail the table runs on and wiper pick ups to the deck rails, as per your locos. However, the Dapol kit is all plastic, so decided to have another go at my own method, which happily seems to work ok now. I've put two phosphor bronze wires in copper tube, through the wall of the turntable well, just below where the running rails are. The PB wire is bent to rub on small brass squares epoxied to the girders. Leads are then soldered to these and the deck rails. Provided the table is always rotated the same way, the PB wire contacts the brass squares and power from the track is taken to the table deck rails. This happens only when the track is aligned, so there is no danger of the loco running away when the table is half way round. with 'pick ups' at both ends there is a bit of 'belt and braces'. It seems to work for now - just hope it will prove robust enough in exhibition use - I estimate the table will be turned at least 50 times a day at a show, so time will tell.
-
Arigna Town - this week's scenery
David Holman replied to David Holman's topic in Irish Model Layouts
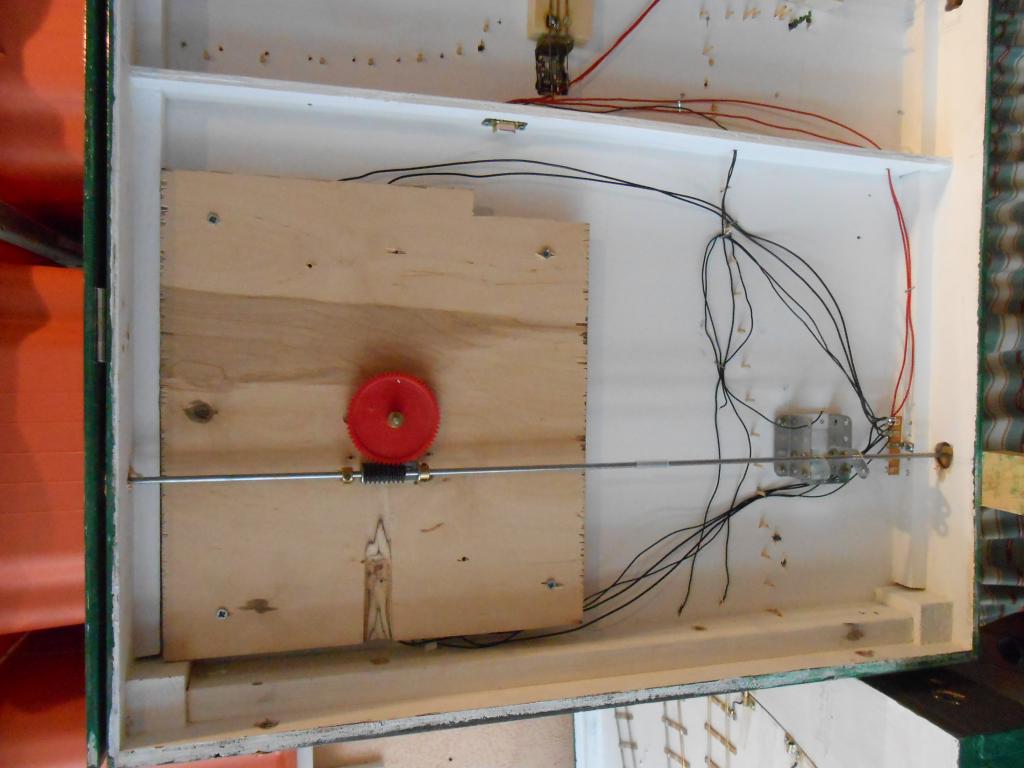
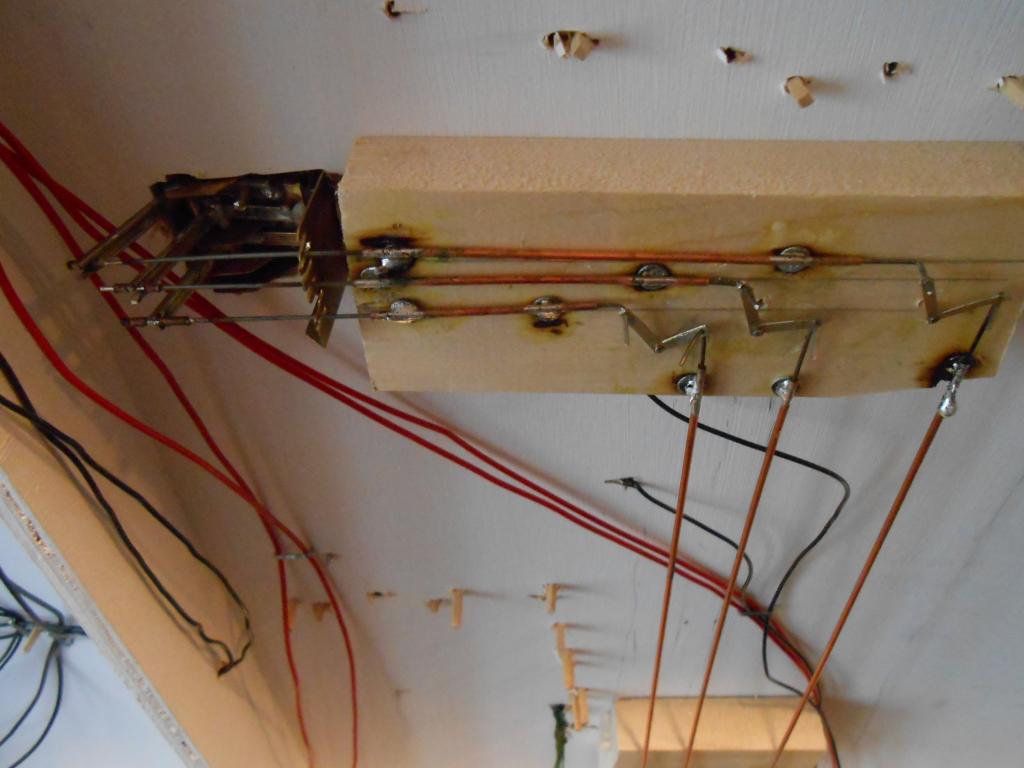
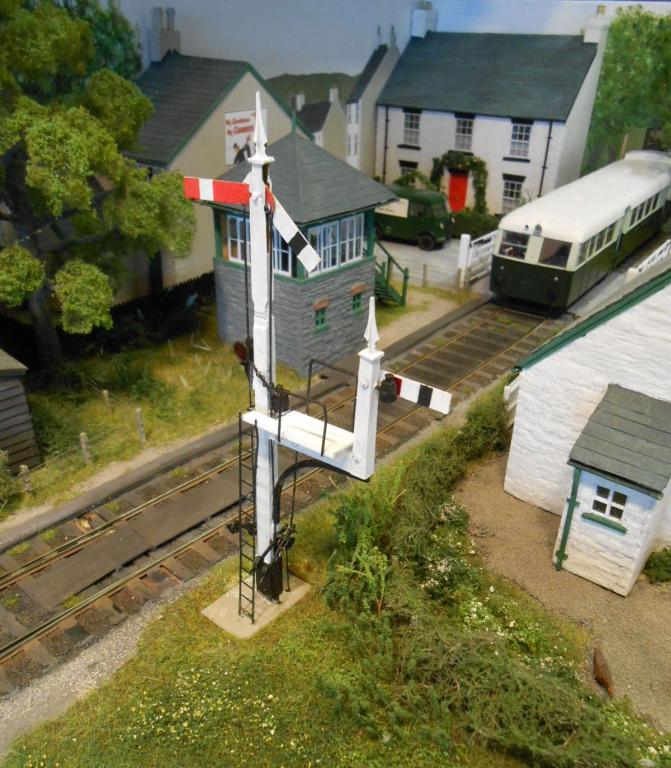
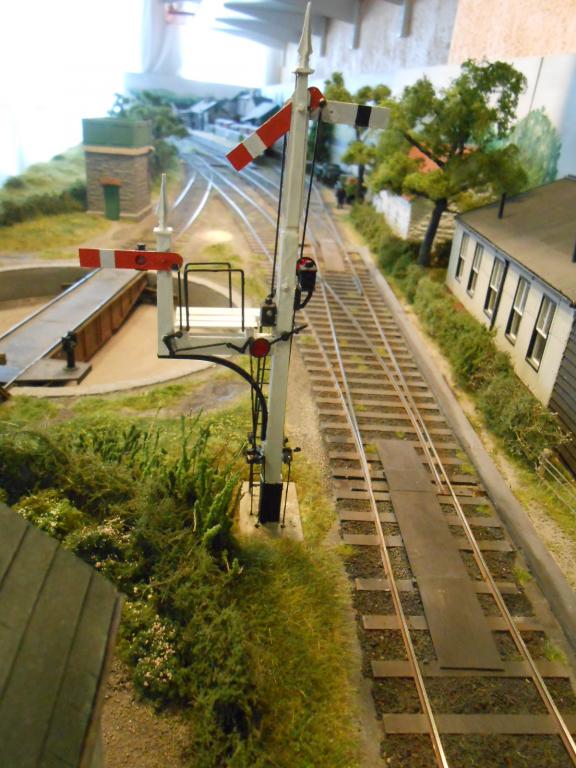
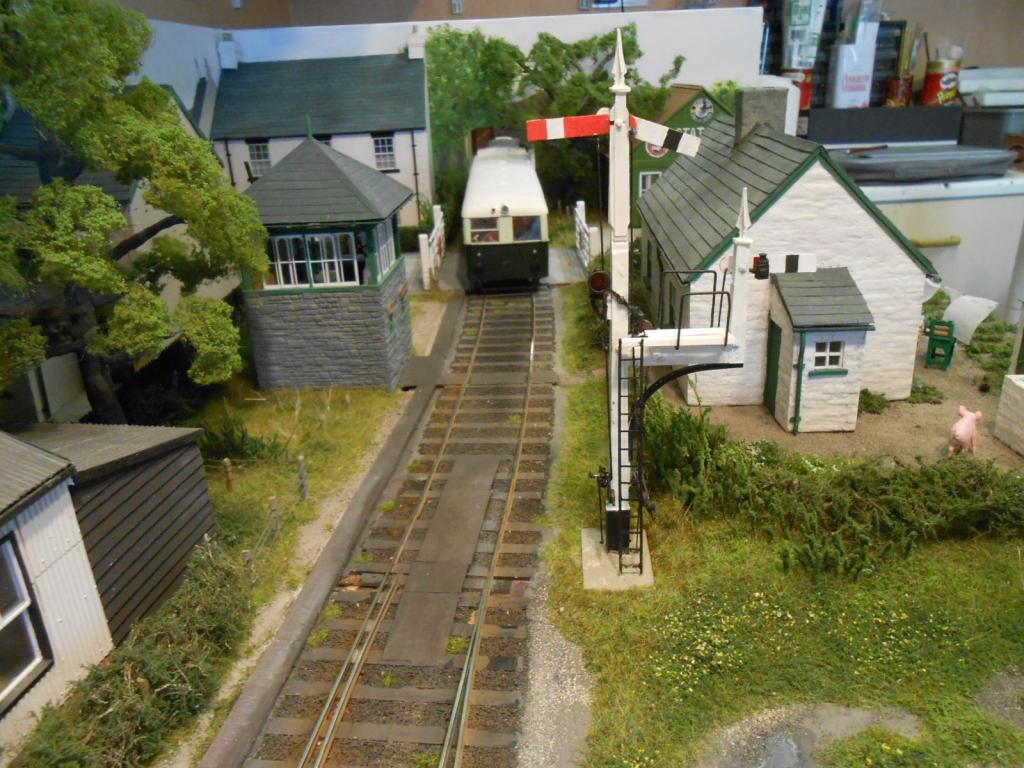
No not the nether regions of my maiden aunt, but the operator's side of the layout, plus a peek underneath, though am sure there was an Ealing Comedy on a similar theme & no doubt one of you out there has an Aunt Arigna with a large flat rear... As you might have gathered, the layout has been turned round, so the operating side is facing outwards in the workshop. This is because most of the scenic work is complete, so wanted to spend some time making sure it will be operationally sound for Chatham in June. First job was to complete the links for the signals. The photo shows the wire in tube and cranks to the edge of the baseboard. Copper tube and steel piano wire have been used - all a bit crude, but it seems to work and the signal can be lifted out to avoid damage when the layout is transported in the car. Next job was to enlarge the holes for the point control. The same wire in tube, but on the baseboard surface [under the scenery] this time. however, the initial holes drilled were too small to get my fingers in to pull/push the points, so these have been enlarged. A couple of points were VERY stiff, but turned out to be a bit of over painting & they were cleared fairly easily. Have therefore been test running stock & so far, all seems well. However, will do a lot more testing as previous experience shows that there will always be one or two movements that result in a wagon derailing for no apparent reason - usually at a show when a video camera is running - so it is important to try and weed these things out beforehand. One immediate problem is with the turntable, as the pickups to get power to the track on the deck are proving temperamental. Indeed one wire has already broken, so a re-think is needed. Can eventually see me having to cough up for a metal version [Metalsmith do one for around £100], but at the moment, at least the hand cranked gears are ok, but a 'table is no much use if you can't drive a loco on or off it, while for the Railbus, it is an essential. Any ideas on powering the track on a plastic [Dapol] turntable welcome! Currently am using phosphor bronze wire wipers rubbing on squares of copperclad at each end of the deck, but open to suggestions.
-
Your comments are very much appreciated folks! Mayners note about speed of construction set me thinking and he is right, the loco took just five weeks from start to finish and in one of those I was away on holiday. So, less than 30 days. However, I am currently increasingly retired from work, so estimate I was doing around 3-4 hours most days. That means about 100 hours overall, which seems to be about par for a 7mm kit. Perhaps I need to get out more(!), though with the winter modelling season coming to an end (and work on the layout moving to presentation fot it's first show), then it might be a while before a new project starts on the workbench.
-
The paint may be simple, but the application is splendid...
-
In the absence of an air brush, the two main options are weathering powders and dry brushing, Sean. The Art of Weathering, by Martyn Welch [Wild Swan] is the bible for all things dirt related and hasn't really been improved on, not least because it tells you which colours to use. However, the latest BRM has an interesting article on the topic, with a decent job done with just three colours! If you use acrylics, then it is possible to wipe off any over painting with a cotton bud dipped in water. White spirit does the same for enamels. coaches tend to be kept fairly clean above the sole bars, so the standard 'frame dirt' mix [or Precision ready made] will work fine. I use powders on my wagons and don't worry about sealing them with spray varnish. minimise handling & you'll be fine. However, did try both spray varnish and artist's fixative [for pastels] recently. All that happened was the body colour darkened, with no sign of the weathering I'd put on. Maybe you need to be heavier with the powders for this? Either way, suggest you first experiment with a wagon that 'doesn't matter'. Likewise, get a cheap loco body from a swapmeet and practice on that. Other big tip is 'paint what you see', so use colour pictures and try to imitate the effect. Needn't be the exact vehicle you have a model of, but will certainly help you get the right effect.
-
Apologies Sir - just re-read your notes and realised what you mean. Ticklish job to adjust though - having cleaning the dirt off the plates, it may well be I have to put it back on again.
-
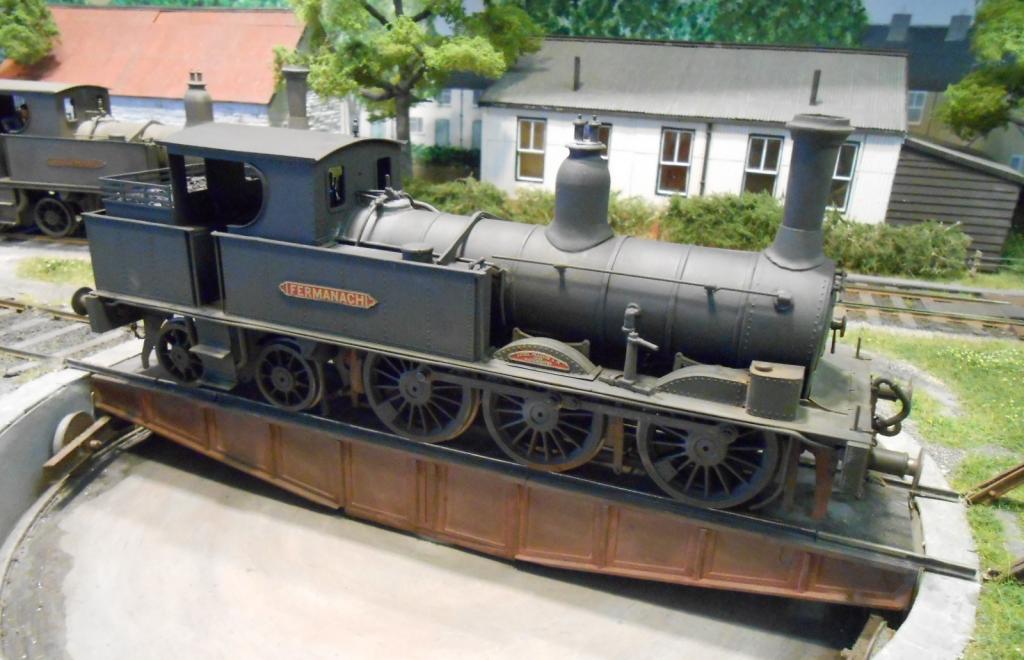
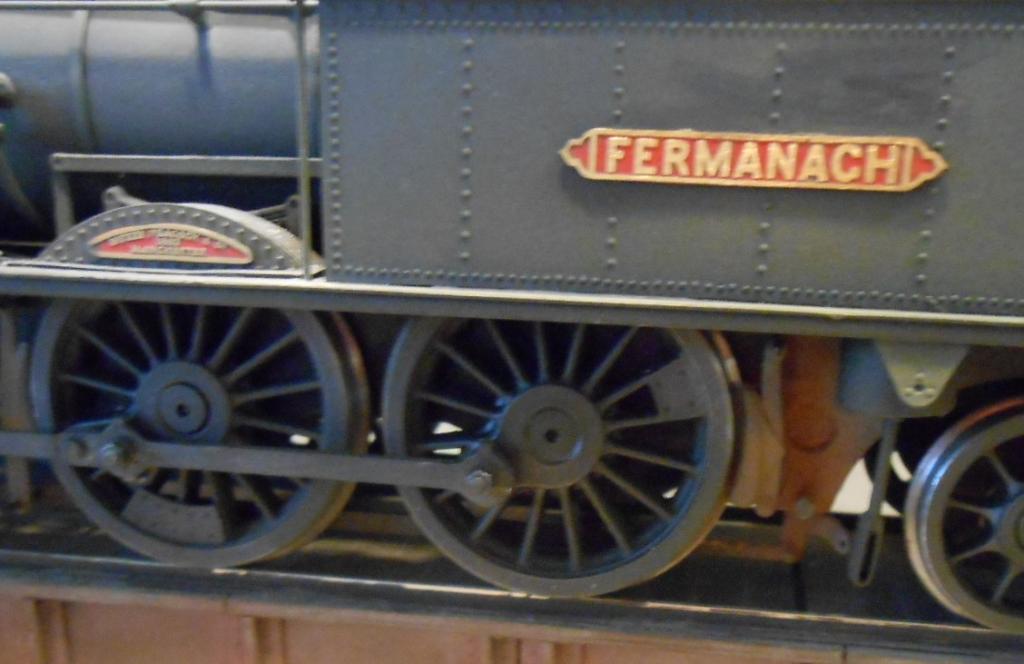
Not sure about the colour of the nameplates & happy to stand corrected there, but the loco is definitely not Lough Erne, as that was one of the two Large Tanks, got on the never never from Beyer Peacock in 1950. Fermanagh was one of the original small tanks from 1882... The nameplates came with the kit, so let me know if the colour needs changing folks, as that was how they were in the packet. So, thought the model was complete, but maybe not! Latest pictures show the results of weathering, plus glazing and final fixing of cab roof. got the air brush out for the weathering. It is a Badger 150 and a mix of 2 parts Humbrol Metalcote Gunmetal and one part Precision Tarmac, thinned 50% were sprayed on, followed by a lighter dusting of Humbrol leather. After that, out came the weathering powders for some final detailing. Last pictures show the model on one of its two duties that are shared with Hazlewood, namely the daily mixed train. The other is the general goods. That is that for motive power for now - at least until after the Chatham Show in June. Still fancy doing Sir Henry...
-
Keep it going Phil, it is all good stuff so far. I have just joined the Irish Railway Record Society. Journal has just arrived with some super photos of Bord workings and your models very much Ok the part.
-
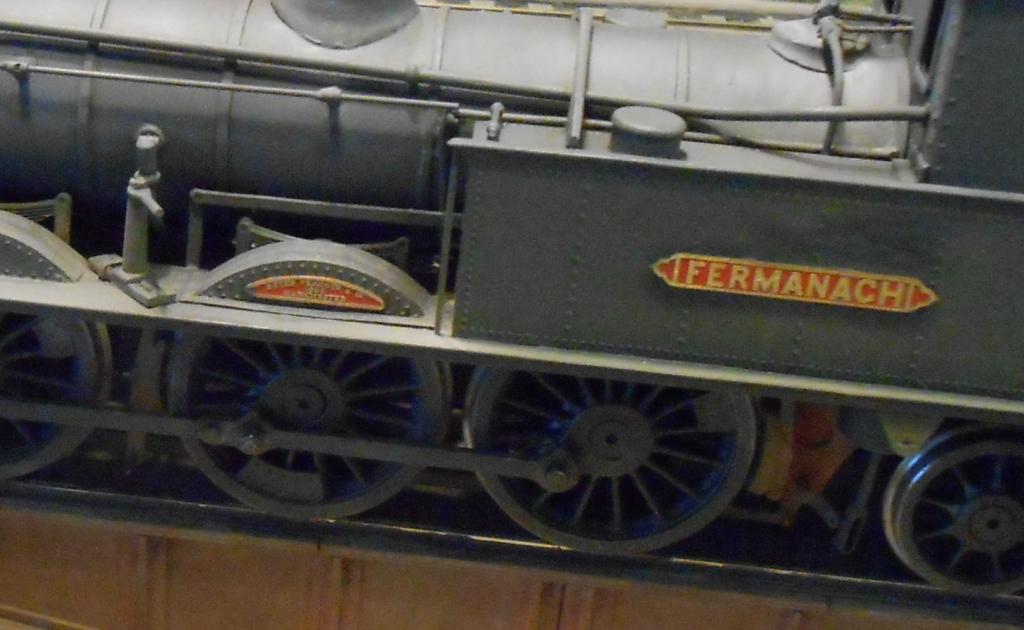
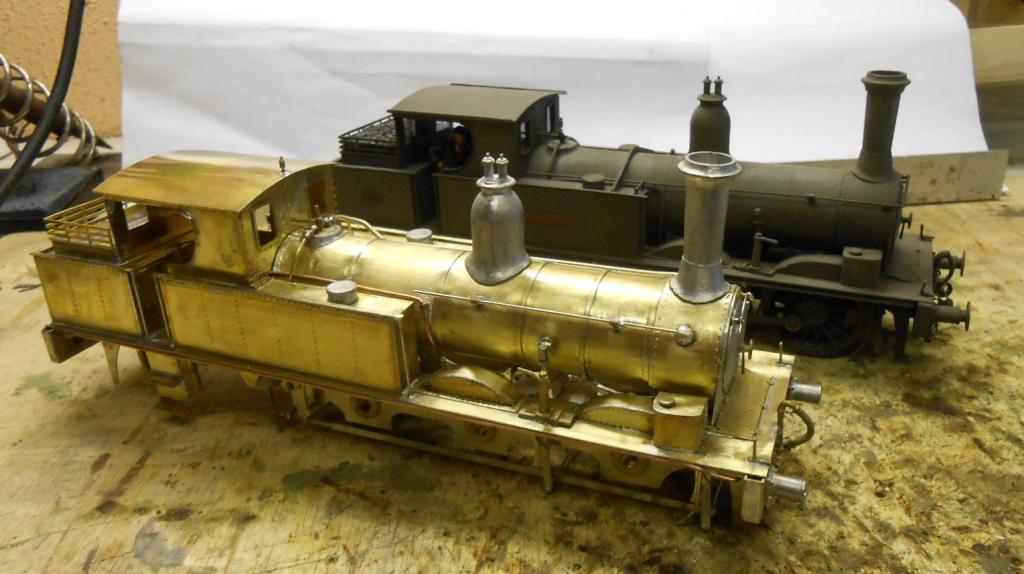
Halford's spray cans [grey primer, then matt black] were used to paint the separate boiler and tank/footplate units. Left overnight to dry, the parts were then re-united and bolted to the chassis and bogie unit. The strapping across the tanks was then added, after which the final, post painting, bits and pieces could go on including buffer heads, couplings and safety chains. The latter were probably the most fiddly part of the whole kit! The exquisite name and builders plates came with the kit and are from Guilplates. Photos show just how very black a spray of matt paint is - quite a contrast with the already weathered chassis and the work weary Hazlewood. Fermanagh was withdrawn in the early 1950s, but one would hope that the existence of the Arigna branch would have prolonged its life and the model with be more lightly weathered than Hazlewood, assuming a general overhaul at some point.
-
Well done sir - though really only four as the strapping across the tanks will go back once the paint shop has been visited. After 54 locos, this is the first time I have built two the same, so small details count! The paint job will also be significant as aim to make Fermanagh cleaner.
-
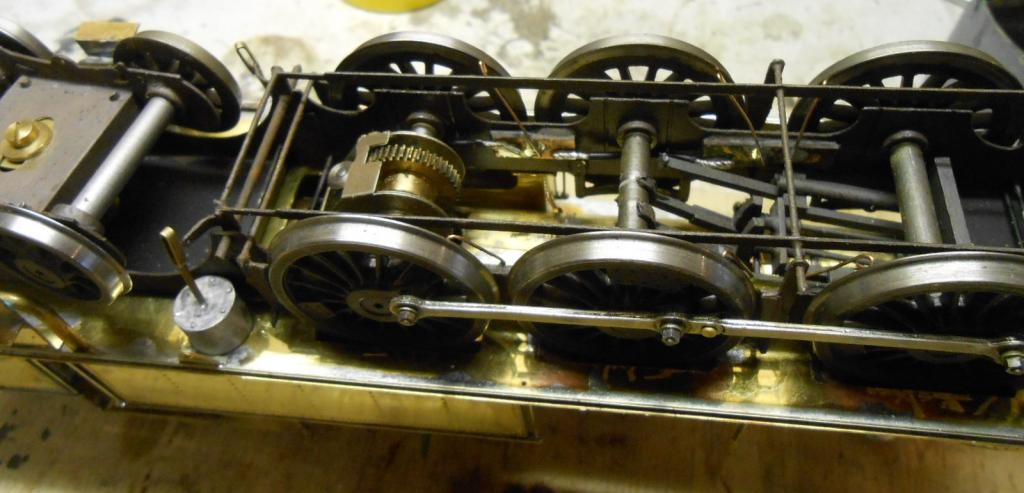
After my visit to Allypally, got the required bits and pieces to complete Fermanagh - handrail knobs, fine brass strip and the all important gearbox. Spent all day Sunday getting the loco running. Sometimes things just 'work', others it needs more effort!. No criticism of the kit mind - just one of those times when one has to persevere and a loco is little use if it doesn't run properly! So, first had to tune the gearbox [A Roxy Mouldings etch], because the brass bearings supplied were a bit tight and the motor was running hot. Once that was cured, then installed it on one axle of the loco and checked it would fit in the body cut out. Small amount of fettling needed, but soon fine, so then hooked up the con-rods for another test. This also went well and I then had a motorised chassis which ran without the motor getting warm. However, when I fitted the bodywork, it was clear that the front drivers were rubbing on the splashers - never good on a metal kit as there plethora of sparks showed when I tried it on the track! Only answer was to unsolder the front and middle splashers and open out the cut outs by a millimetre each side, before re-fitting the splasher bodies. Really a simple case of clearances being a bit tight for 36.75mm gauge - that and the fact that I should have checked them earlier. Even so, then needed to fit thicker washers to limit side play on the front drivers to an absolute minimum. Sod's Law then said the motor was running warm after 10 mins on the rolling road, so a bit of thinning required... Should now be fine for the 4 metre run that is all that is expected of the model though. All still not perfect though, as needed a couple goes at trimming the spring on the bogie, before the drivers sat properly on the track. However, it now seems to run pretty well & will continue to give it more time on the rolling road to bed things in. Now a case of adding the extra bits & pieces, such as the small handrails on the front of the tanks and the rainstrips [lips really] on the cab roof. Then painted the back head & took the model apart again, so I could do a thorough clean up, prior to priming. Will be very surprised if it doesn't need further work once this is done as primer provides a very useful 'witness coat' for the minor blemishes you miss on a gleaming brass finish. Pictures show the loco with Hazlewood - this now has its cab profile corrected and also now needs to visit the paint shop again. Also a couple of pics of the underside, showing how I've arranged the pickups. with no room to hide them behind splashers or solebars, they are fitted semi-vertically and bear on the backs of the flanges. Quite pleased with the effect, not least because my pickups normally end up very untidy & for once these are quite neat - for me especially!
-
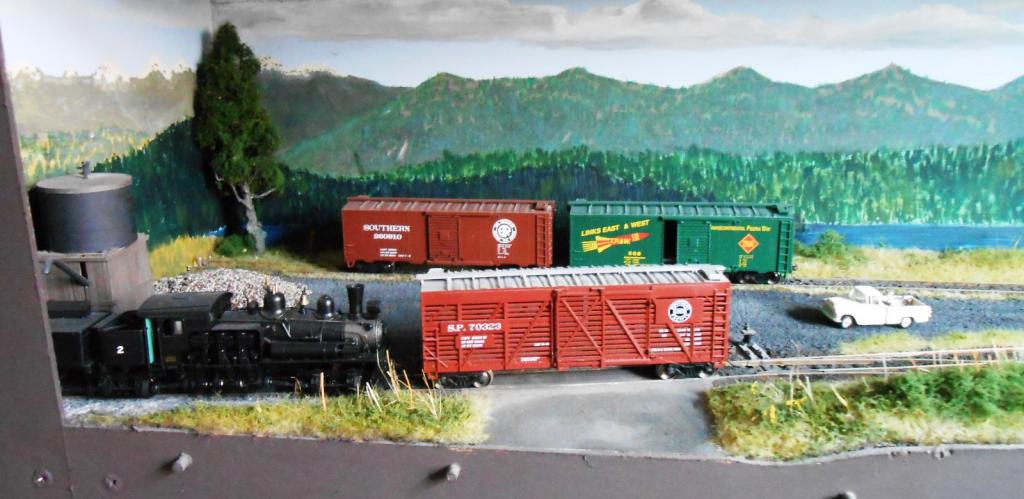
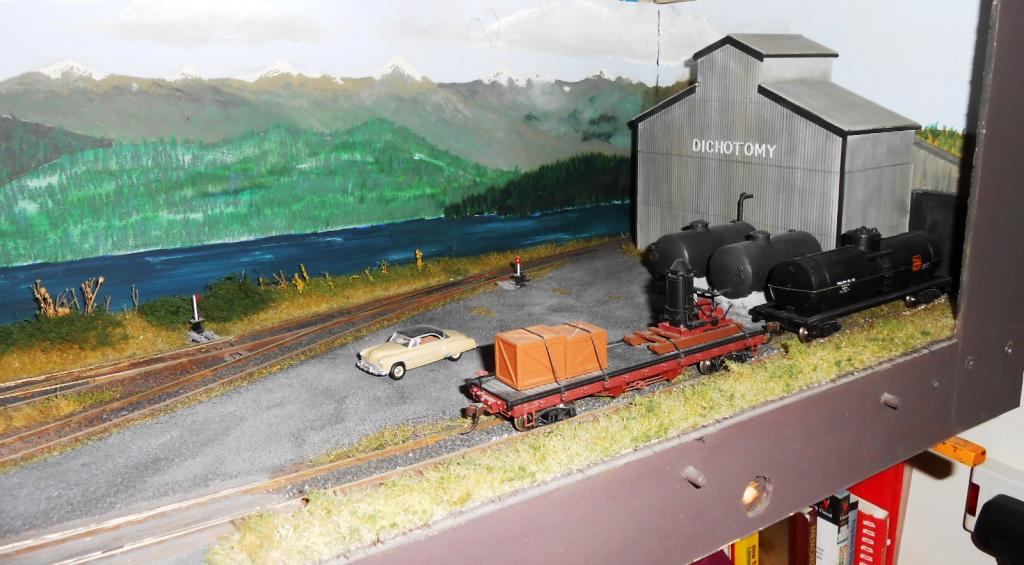
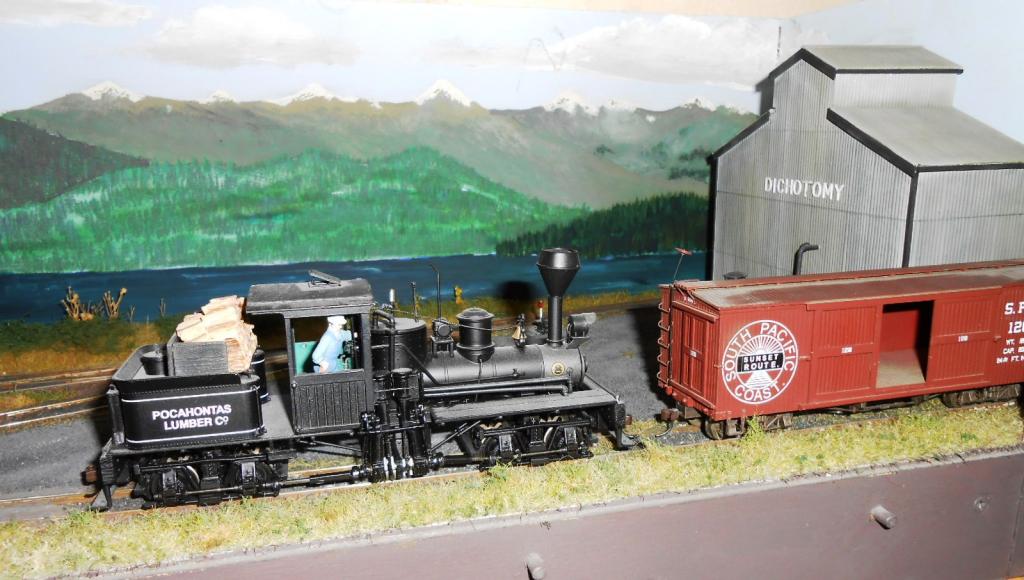
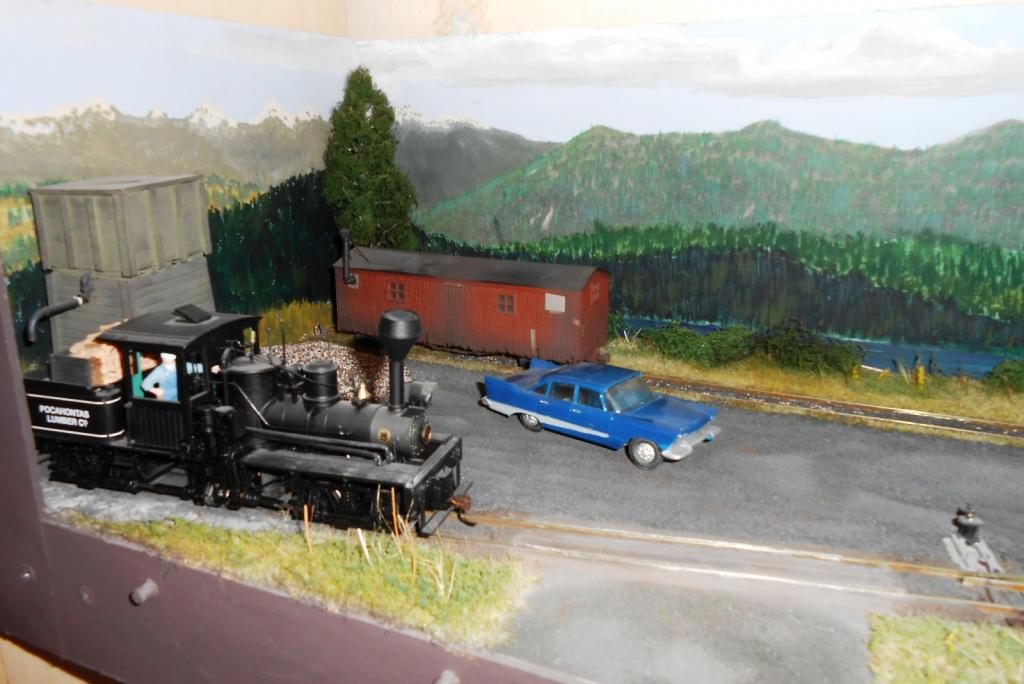
Like many modellers, I have catholic tastes, though they rarely manifest themselves beyond drawing layout plans in my case. However, with relatives in British Columbia, I have been fortunate to make several visits, including Vancouver Island, where the Forest Museum, near Duncan is home to a splendid collection of logging equipment, including several logging engines of various kinds, plus a working 3' gauge tourist line which gives a nice ride over a figure of 8 route around the museum. If you manage to get to BC, the Museum is a must. On one visit, I achieved something I never thought possible - a cab ride on their Shay. For those of you who don't know, these are geared logging engines, low in speed [about 10mph max], but high in power and able to climb 1 in 10 grades with ease. At full speed, they sound like a Pacific doing 90... For these reasons, I acquired a Bachmann 0n30 Shay a while back, very similar to the one at the Forest Museum. Ideas for a small layout/diorama were played around with but, then discovered my loco model shop was selling off a Bachmann HO shay, with a Tsunami sound chip for £110. Given the chip alone is worth that, it was too much to resist. So, could I then make a small layout on which I could run both shays - if not at the same time? Track gauge is the same of course, so it was a case of devising a simple plan, with the minimum of buildings that could work in both scales. thus Dichotomy yard was born. The track plan is a loop with two sidings, one in each direction & the layout is a completely self-contained shunting puzzle. The design came from a Gauge 0 Guild 'Small Layouts' book. The loop holds just one wagon, the headshunts each end a loco and a wagon, with one siding holding 4 wagons and the other three. A set of cards, one for each wagon are shuffled and dealt out to hang on pegs at the front of the layout. It is then a case of trying to shunt the wagons in the correct order. Easier said than done! The baseboard is just 4'6 x 1', track is Peco and control is DCC, though only to take advantage of the sound system on the HO loco. The Dichotomy warehouse at one end is 'multi-scale', at the other end the water tank is removable, so I have built two - one for each scale. Different road vehicles are used for each scale too. A hand painted backscene sets the layout alongside a narrow lake & the yard is assumed to be a small corner of a larger system. I'd just bought a static grass machine, so much fun was had experimenting with it to produce the ground cover. Normally, the layout sits on a shelf in my study, though it does have short folding legs and is exhibitable. I've bought a few HO and 0n30 wagons, so can operate happily in either scale as the mood takes me. The full range of sounds on the HO shay really expand the experience, though it is also nice to work in peace and quite - especially as the shunting puzzles are serious brain ache at times! Hopefully, you will be able to work out what scale each of the photos is.
-
While I'm sure that these new style connectors work fine, would echo earlier comments that they may not be the best thing for portable layouts. Equally, solder joints can fail occasionally too! On the subject of soldering, the maxim of 'cleanliness BEFORE Godliness' is essential. Therefore use fine wet & dry/fibreglass pencil etc to clean the surfaces to be joined. I use a paste type flux as well, though any sort will do. Like everything else a bit of practice helps, though soldering a wire to a connector, rail etc really is simple once you have done it a couple of times. Don't faff around with small wattage irons - a 15 watt may be ok for fine wires, but would suggest at least 25 watts for 00 and double that for larger scales/bigger pieces of metal. For years now, I have been using an Antex 100 watt jobbie for pretty much everything apart from layout wiring, where a 25 watt one is best. Treated myself to an RSU a few years ago & though a bit of a luxury, it really works well when you need an extra hand, thanks to its foot operated switch. Equally, I do not solder everything & prefer to use 5 min epoxy for whitemetal castings and the new cyanos where appropriate too.
-
Arigna Town - this week's scenery
David Holman replied to David Holman's topic in Irish Model Layouts
With work on Fermanagh sidelined for a few days till I can get a motor gearbox, an opportunity presented itself to 'plant' the signal post. Had to cut a scale 5'x3' hole in the baseboard surface and clear a section of foliage a bit like the real thing, I guess! This is because the operating mechanisms will be wire in tube/cranks below the baseboard. The idea is that the signal base is a nice tight fit in the hole, but the whole signal unit can be removed for transport or maintenance, with having to undo anything - a concept available from Wizard Models, though I have developed my own version to hopefully mean all three arms can be moved on/off. The surface of the base 'plate' is painted in weathered concrete. VERY unlikely that the sigs will ever be interlocked with the gates...
-
Fabulous trackwork & well worth the effort. Really sets the scene!
-
A case of function over form... Call me a sad so and so, but the decline of freight severely reduces interest in watching trains go by. At my local level crossing, the only interest is the daily stone train, but even here, counting the wagons is pointless, because it is block train, with 15 stone bogies. Slightly better than the 3 car EMU, but not much. Even in my diesel spotting days on the East Coast mainline, there was endless variety. I for one would love to see fewer lorries and more containers on the rails!
-
Gosh, they are ugly things! However not without charm and super modelling
-
Only just noticed this - what diameter are they? In 7mm scale I normally use Evergreen 80 or 100 though rod/square section strip, according to need. however, this stuff can cost up to 50p a strip, so always looking for alternatives. A further tip for gutters - use plastic sheet or strip. Only need to file the outside edge round [or add quarter round section to the edge if really fussy]. Paint the top black and stick to your building's wall. Works a treat and nobody sees the dodge, especially if you file a couple of cm at the ends to a full gutter profile.
-
And, well done with the rugby as well. Any team who wins in Paris deserves to be champions. A decent cricket team too!
-
John is right, 7mm scale is easier and having started in 4mm, EM gauge, I would not want to go back. Doing Railcar B's chassis reminded me how small and fiddly it is by comparison, while I have the greatest respect for the 2mm finescale folk too, whose models always seem to run so well. Suspect if I started again now in 4mm, my locos would all be 'off the shelf', because standards now are so much better than when I started 30 years ago. 7mm scale is potentially no more expensive than 4 or 2mm, mainly because, being bigger, you need less! RTR stuff is undoubtedly wallet emptying, compared to 4mm, but if you stick to smaller prototypes then kits are quite reasonable, while the new Dapol Terrier and 08 shunter are meant to be coming in under 200 euros. Their wagons start at about 40 euros - the same price as kits from Slaters and Parkside. Guess that 7mm is more of a builders [rather than operators] scale, because you need a lot of space for even a model station, while the 'basement empires' beloved of our cousins over the pond would need a lot of real estate in this scale. Am putting together some words for a possible IRRS article on 7mm scale and how 'doable' it is these days, especially 5'3, where it must be a lot easier than 4mm, with no need to go beyond finescale into S7. Would encourage anyone to have a go - a small diorama or shunting layout could be built quickly and reasonably cheaply. Alternatively, 7mm NG is a great way into the scale. That is how I started, with freelance locos built on commercial chassis and Ratio underframes for wagons and coaches - all in plasticard. A 7mm NG layout can be built in the same space as a 4mm line and you learn a lot in the process. However, it is VERY addictive!
-
Am inclined to agree with my namesake. Xuron cutter has its uses, but a slitting disc in a dremel or mini drill does the job. A triangular jeweller's file works in an emergency too - in my case about the first ten years of modelling. Slow, but I get there in the end.
-
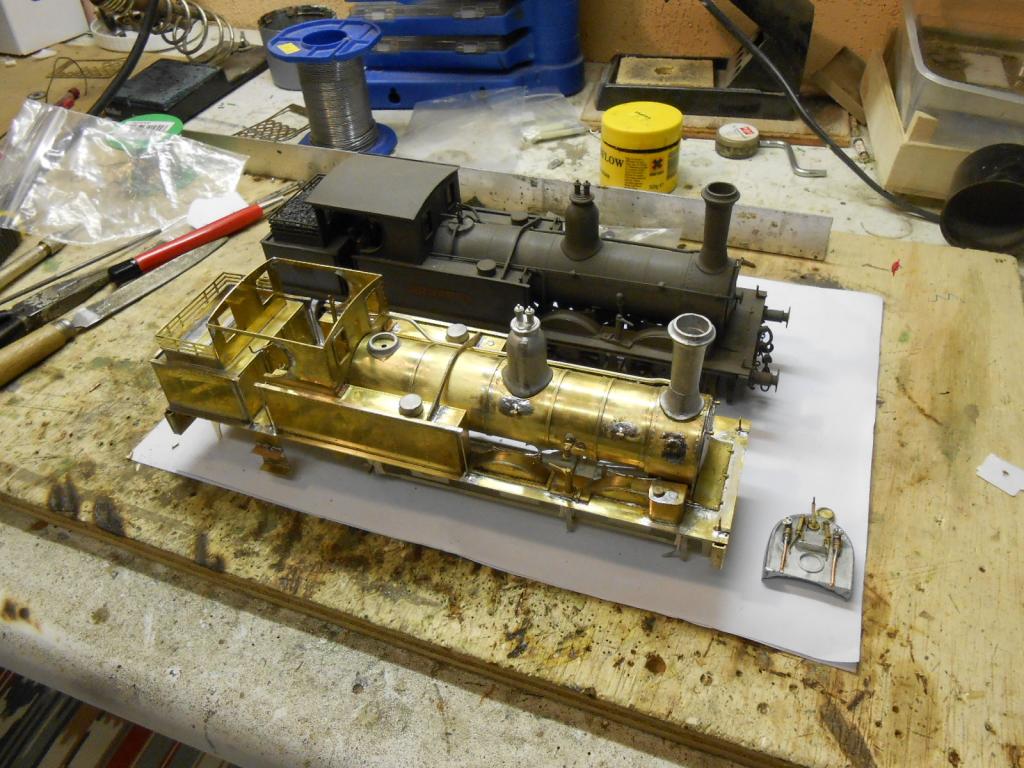
Mentioned last time that there were close to 100 items that still needing adding to Fermanagh, however, as most of them were only a couple of minutes each, it hasn't taken long to get them done. Had to remove the heavy strapping between the two tanks, as it gets in the way of removing the boiler unit. Hence will be glued back in place once the main painting has been done. However, buffer housings, handrails, piping etc have now been added and the backhead is ready for painting, though will not be able to fix this in place too permanently, as it covers one of the bolts that hold the boiler in place. Perhaps I could replace this bolt with a stud or brass rod, leaving just the bolt under the smokebox to hold the boiler unit in place. Any thoughts anyone? Spent a whole morning and afternoon [probably about 5 hours in all], doing a clean up on Fermanagh's bodywork. This is always a tedious job and would be easier if my soldering was neater. Use a cone shaped, grinder in the mini-drill, which gets rid of the worst of it, then it is out with the dreaded glass fibre pencil to tidy up the rest. This time, actually remembered to wear surgical gloves, so for once I will not spend the next few days picking pieces of fibre out of my fingers. Few things can be more painful for their size... Can't do a lot more now till after next weekend, as need some fine L shaped brass for the cab roof rainstrips, plus the all important motor gear box, both of which I'll hope to get from Allypally on Saturday. There's a certain S gauge Irish layout I want to see there too. See what differences you can spot between the two models.
-
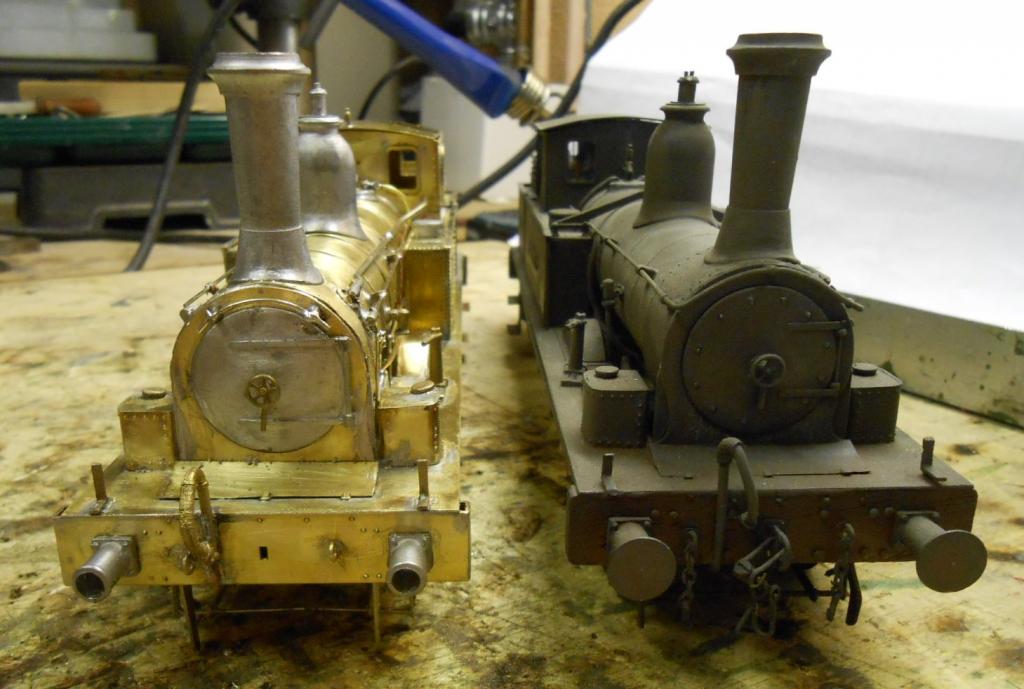
All the main parts are in place now & I am at that start of 'adding the details'. even within a class of just 5 locos, there are many differences & the decision to make this loco Fermanagh was largely based on the plain smokebox door. Hazlewood was built because there seemed to be more photos of it than the others - though still missed the new cab, which I hope to remedy shortly. Anyway, the photo shows the two locos together. Adding up the details, I estimate there are still around 100 individual items to add [& no I'm not counting individual safety chain links]. What will probably take just as much time will be the cleaning up process. Maybe if I worked more slowly, there would be less solder to scrape off, but it is what I do and along with putting a lot of effort into getting a model ready for the paint shop, helps hide the building process in places.