David Holman
-
Posts
4,359 -
Joined
-
Last visited
-
Days Won
117
Content Type
Profiles
Forums
Events
Gallery
Blogs
Everything posted by David Holman
-
Arigna Town - this week's scenery
David Holman replied to David Holman's topic in Irish Model Layouts
Got the layout safely back home on Sunday evening & have been going through a few things which needed attention. The main one was to repair the linkage to one of the signal arms. One of the angle cranks was made of too thin metal strip and the actuating wire broke through the hole it was fixed in. Not a job to do under the layout at the show, so had to wait until it came home. Easily fixed, so all is now back in working order. All the stock fared well & am sure benefitted from the 14 hours of running time over the show. Happily, there was no sign of any unforced derailments, while the simple sequence suited other operators. The only other thing which needed attention was transport, as it didn't fit in the car as well as I would have liked - ie, had to use the front passenger seat for a couple of stock bags. Have since worked out a better way [pairing up two of the boards to make a crate], which also enable me to store the layout safely at home [more of which below]. However, there is another project which I hope to complete before the layout goes out again. This is to build a new fiddle yard, which will have seven tracks and both slide and rotate. The latter feature really works well, but currently, only have four tracks, which are full, so as I build more stock, the fiddle yard will have to have greater capacity. The next outing is Uckfield in October, but before then, my BR, East Anglian layout, Eatonswell, has an appointment at the Croydon Show at the start of that month. Hence that is now out from storage & being tidied up & stock checked. will post a few pictures on the appropriate section later. Shows which have expressed an interest in Arigna include Hampton court, Wimbledon, Farnham, Deal, Maidstone, Gravesend, Burgess Hill, Croydon & Canterbury. Unsurprisingly, these are mainly in the south east, but I would very much like to take it to Ireland one day - though appreciate the costs would be considerable... -
Arigna Town - this week's scenery
David Holman replied to David Holman's topic in Irish Model Layouts
Good to see you, Brendan & Mike. Likewise all the other folk keen on the Irish scene. A quieter day on Sunday, but the layout ran well both days. The only fault was a broken linkage to the signal controlling entry to the loop. Otherwise, apart from the occasional dirt related pickup problems, everything went smoothly. Lots of interest for future shows - have a list of 12, mainly in the south east, but hopefully York next year or the one after. Next confirmed outing is Uckfield in mid October [always a god show], but will keep everyone informed once others are finalised. a full review of the show's experiences shortly. -
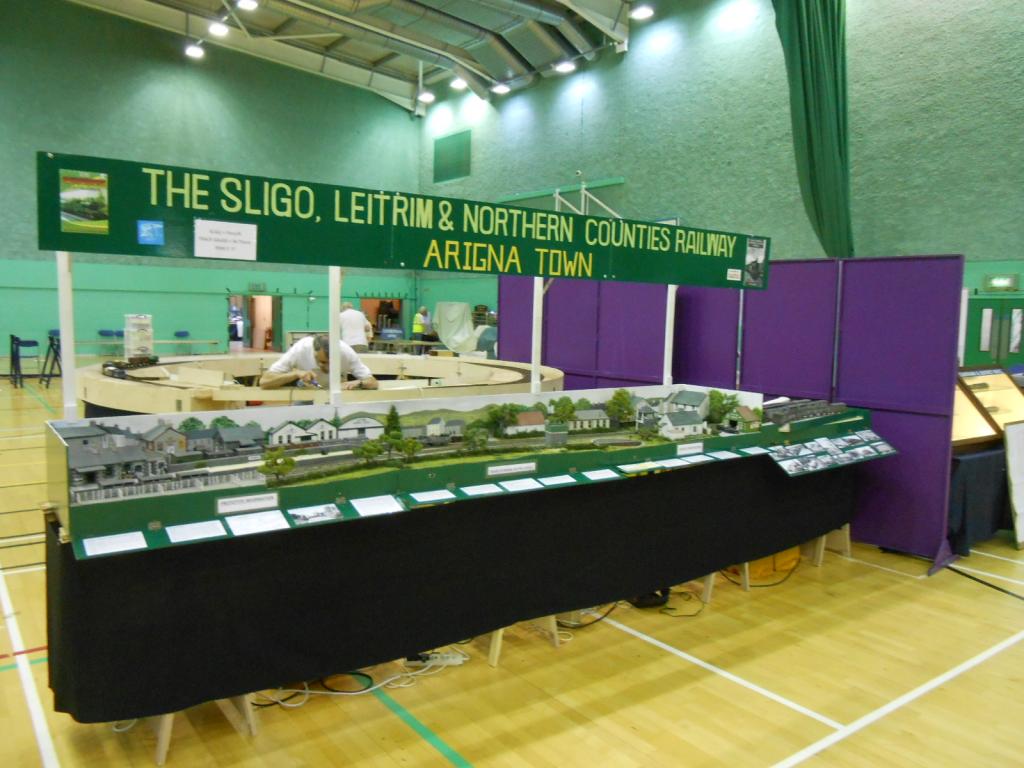
Arigna Town - this week's scenery
David Holman replied to David Holman's topic in Irish Model Layouts
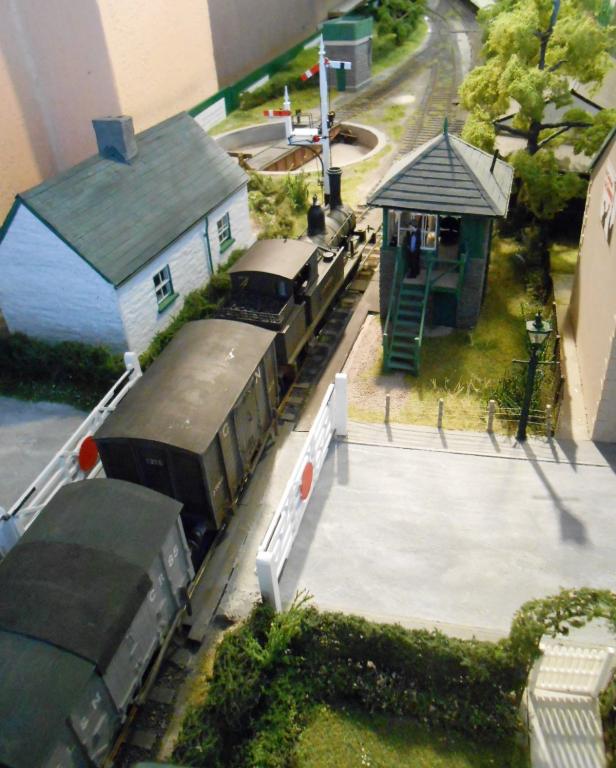
After around three years of planning and construction, Arigna Town is at last out in the public domain. Chatham Club members assembled from 7am this morning to begin setting up the exhibition halls, beginning with marking out the 100+ stands, while the sparkies began adding the same number of power points. A huge number of tables and chairs then needed setting out for exhibitors and the public - all in time for the first arrivals early in the afternoon. After setting up the new club's 0 gauge circular layout [only at the 'test track stage at present], I went home to get Arigna Town, which was fully set up by late afternoon. The photos show the layout in its full presentation mode, complete with pelmet and fascias, both of which include constructional and prototype information. Should any of you make it to the show - please come and say hello!
-
Arigna Town - this week's scenery
David Holman replied to David Holman's topic in Irish Model Layouts
-
Arigna Town - this week's scenery
David Holman replied to David Holman's topic in Irish Model Layouts
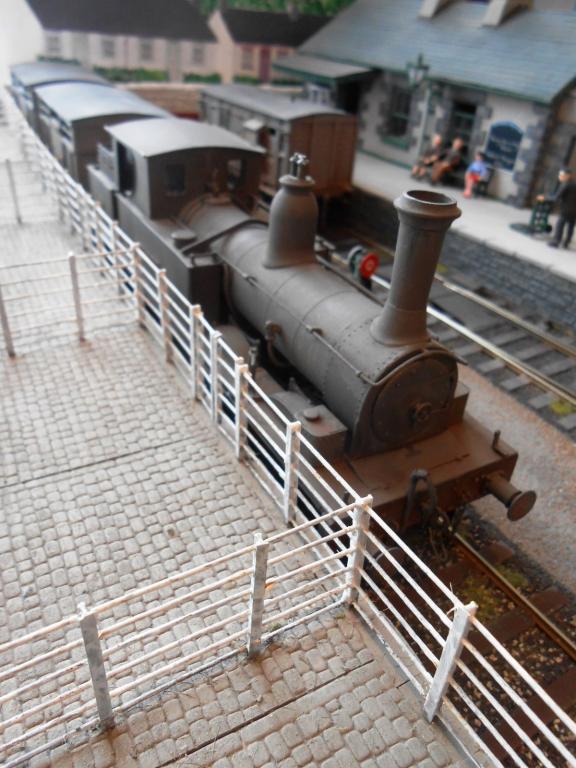
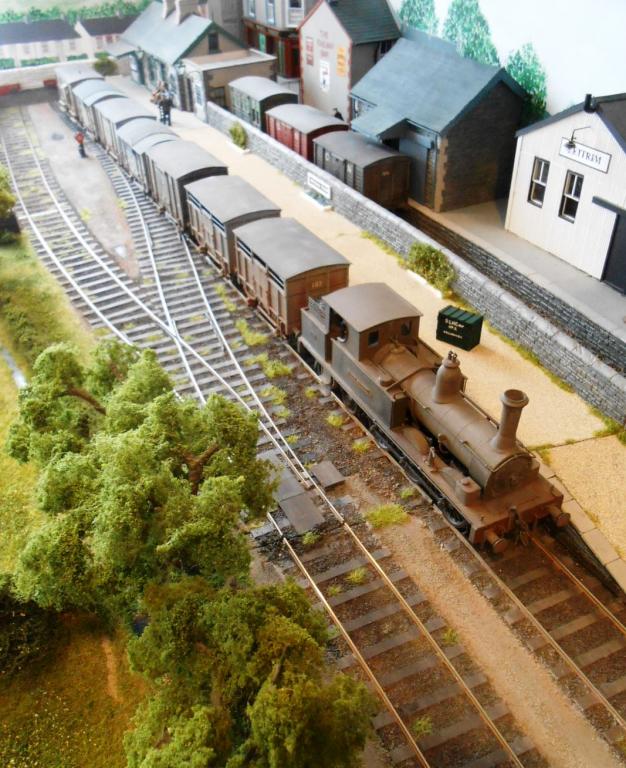
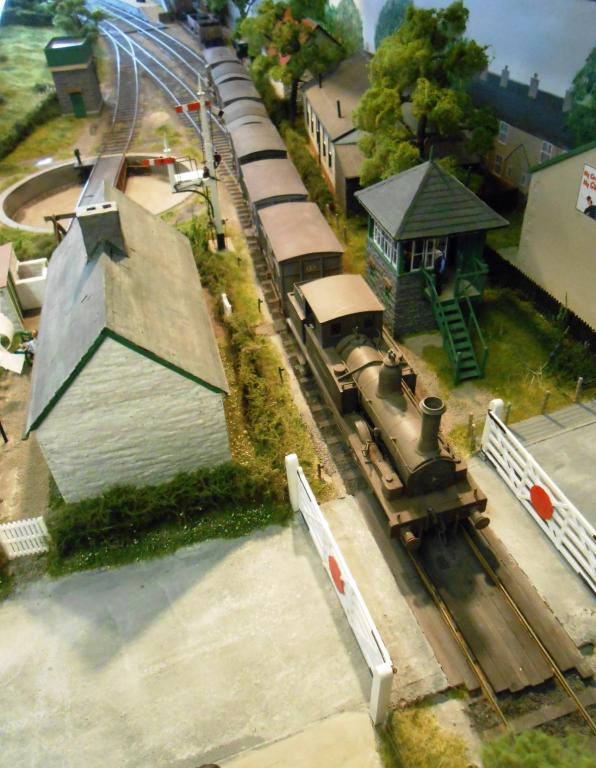
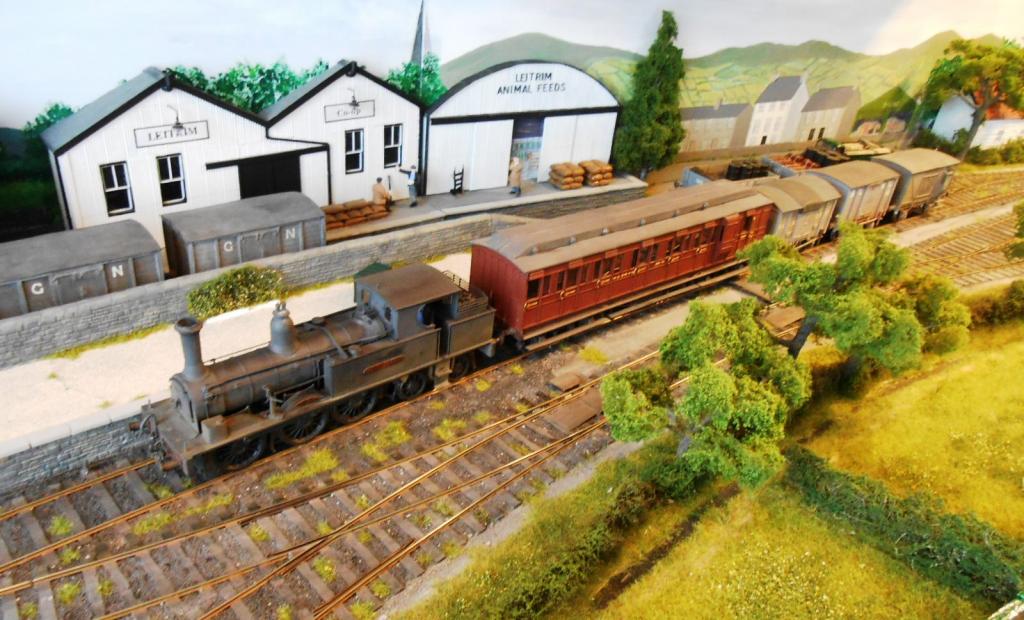
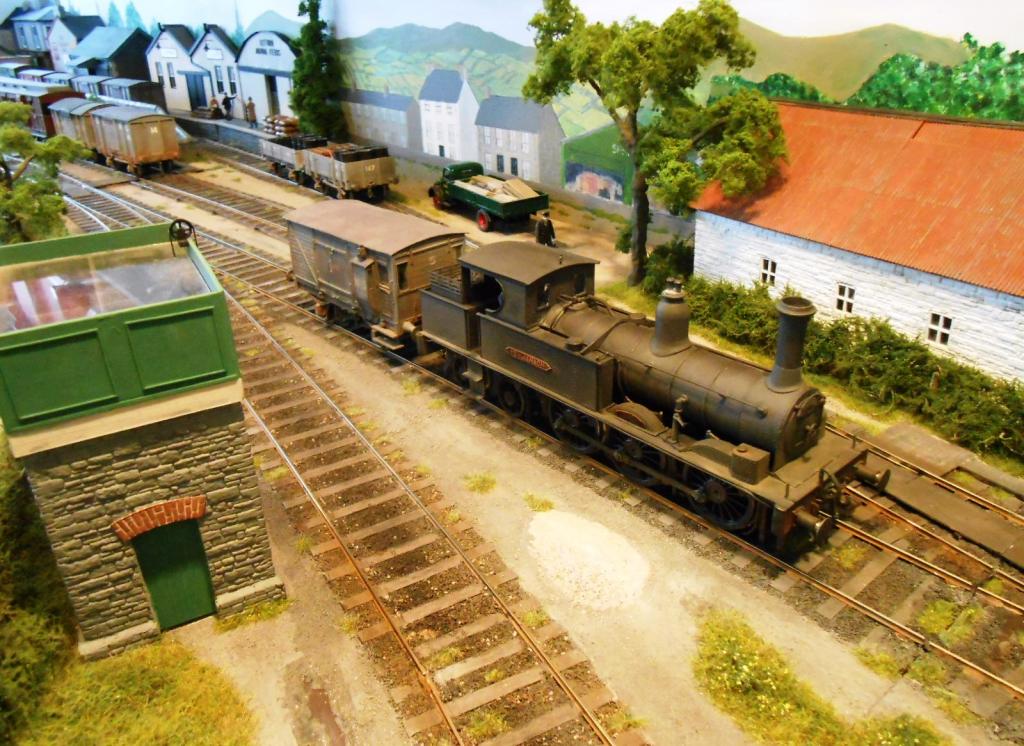
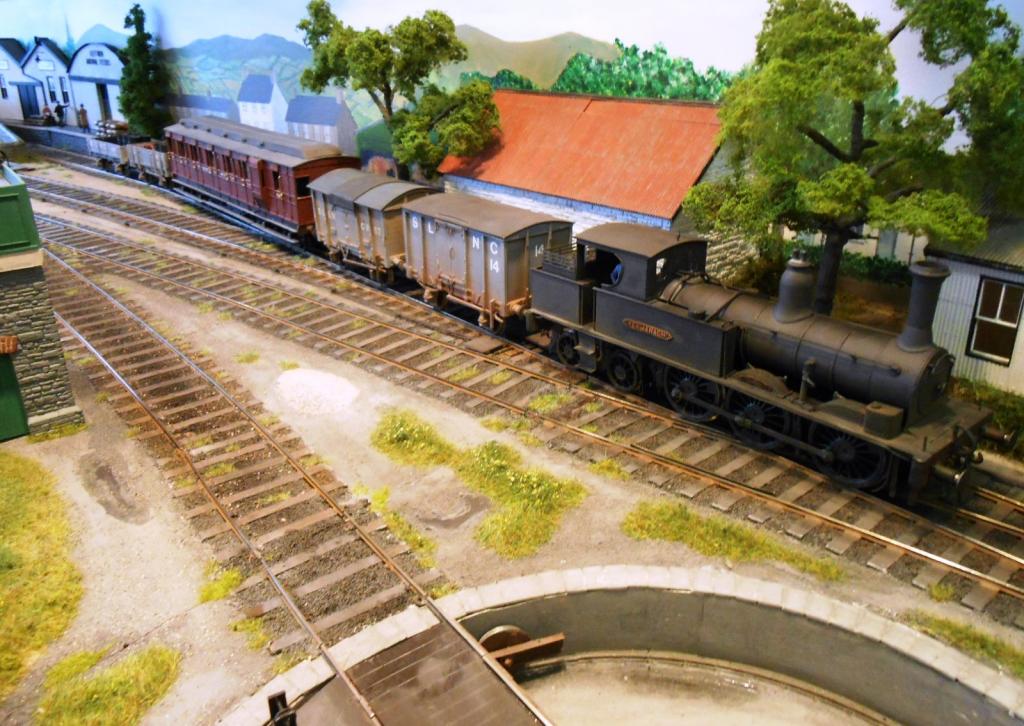
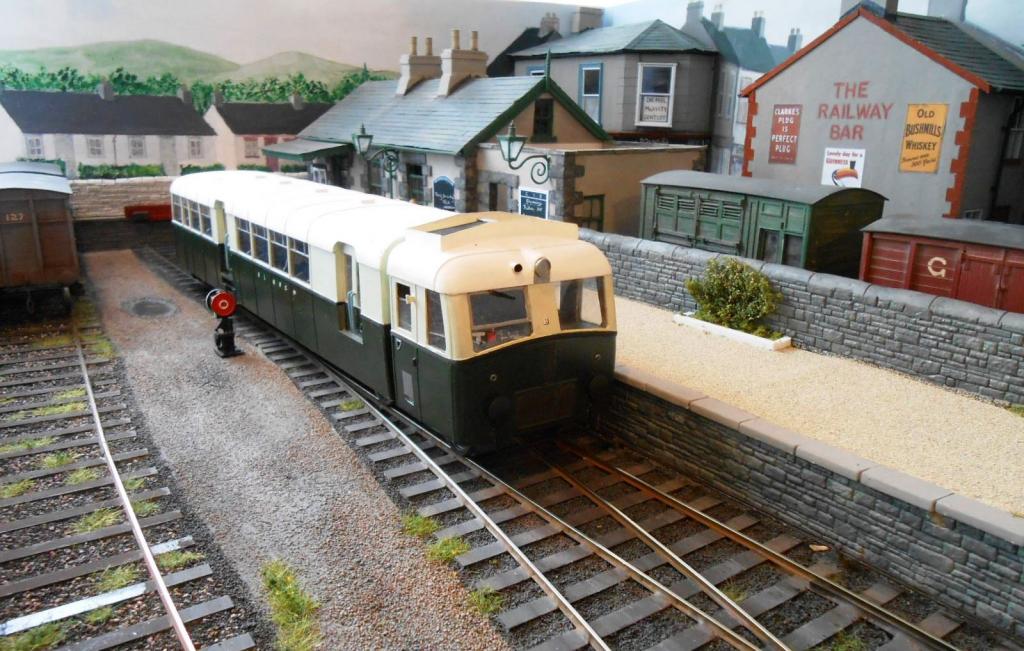
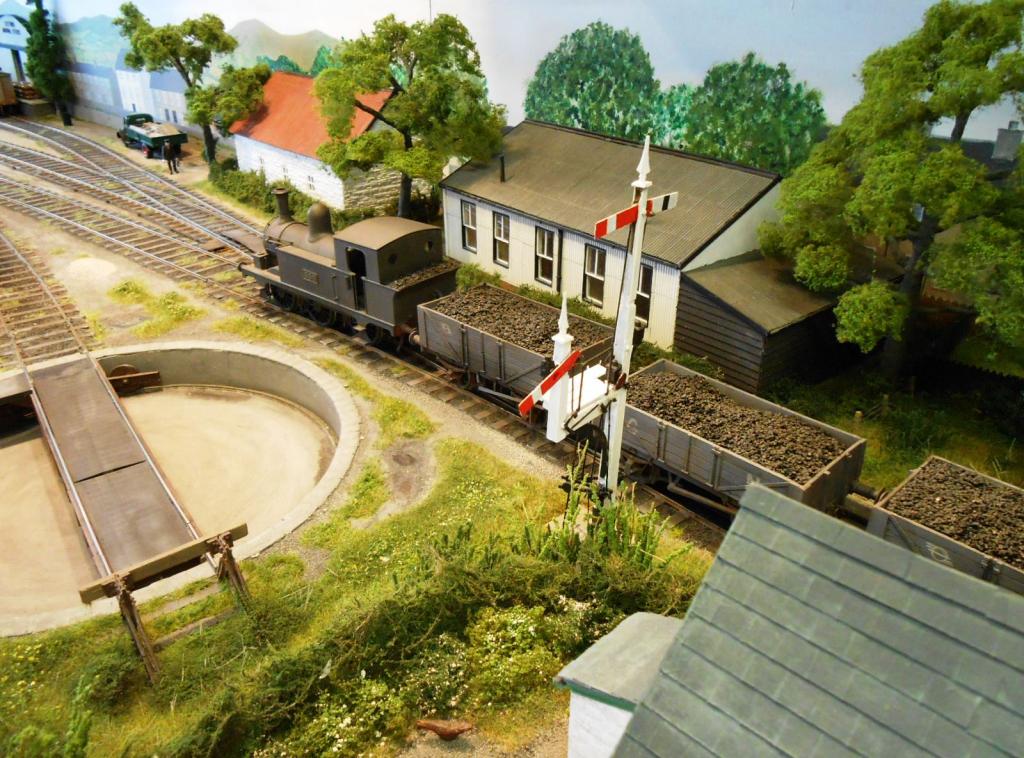
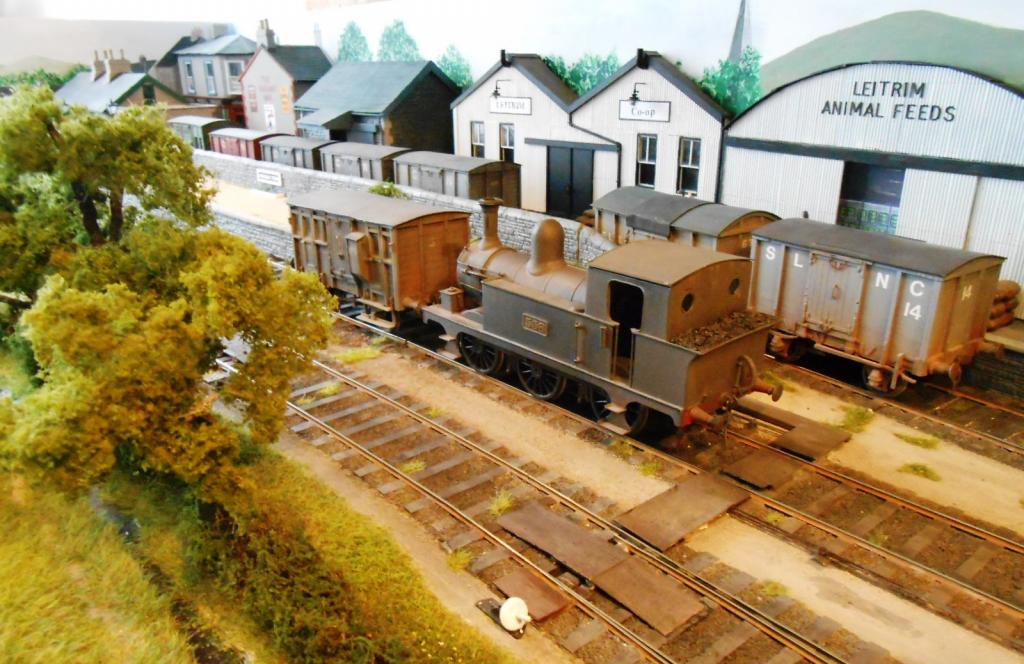
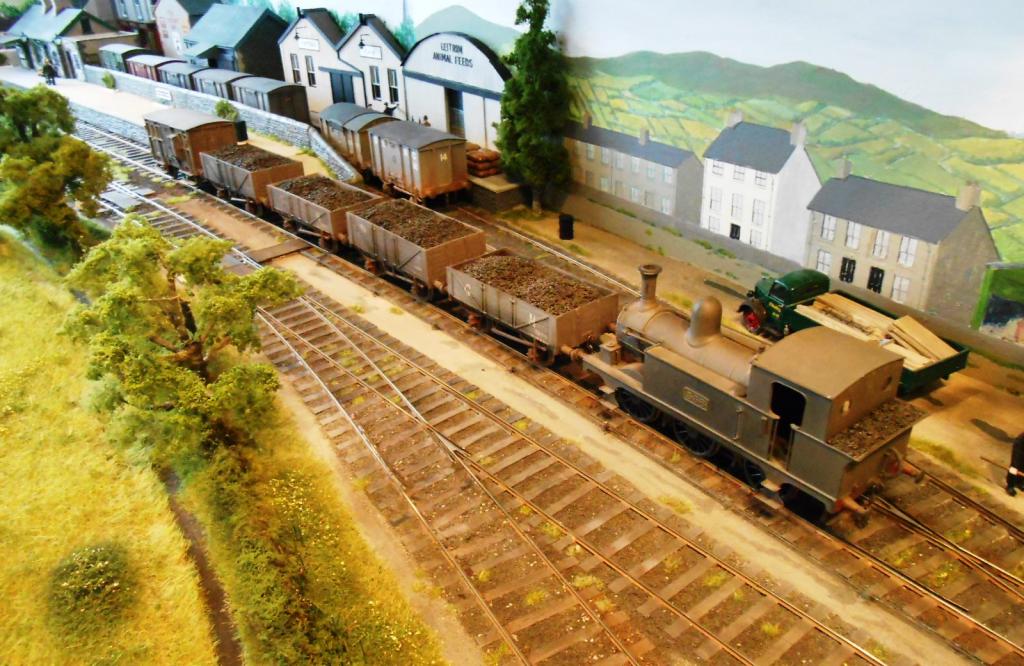
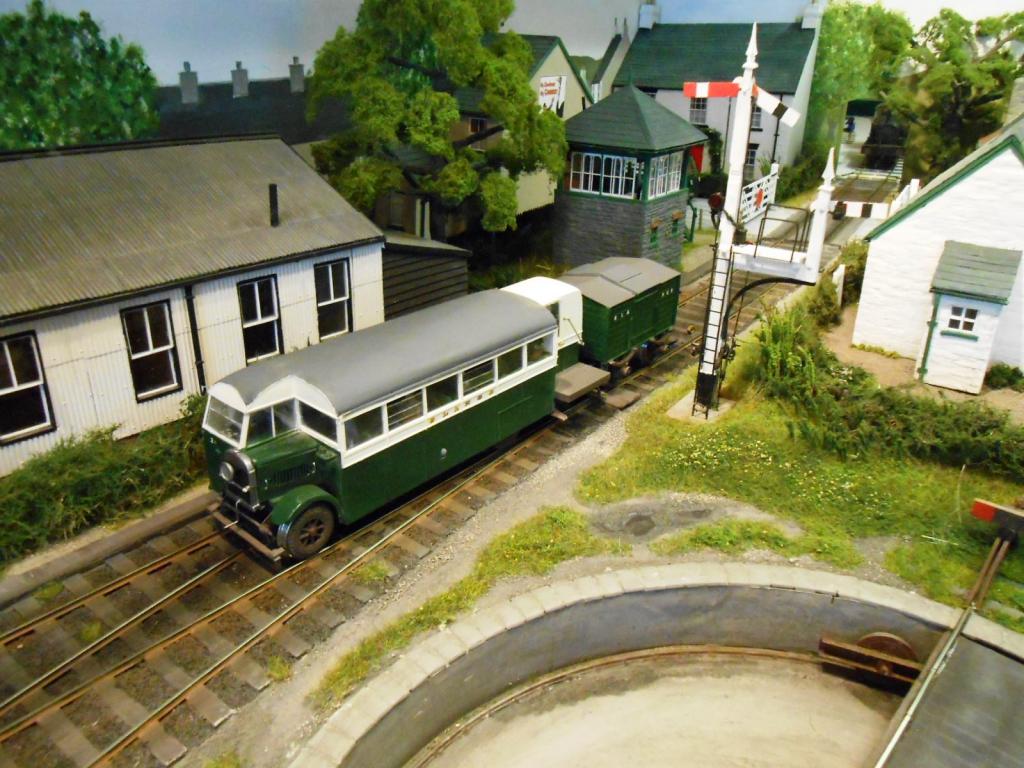
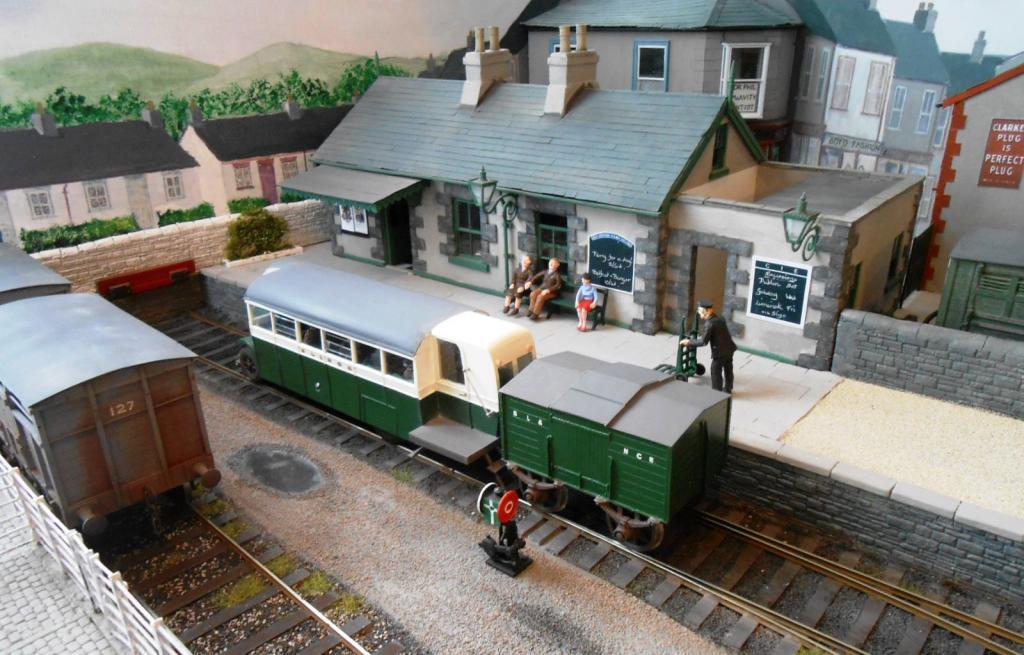
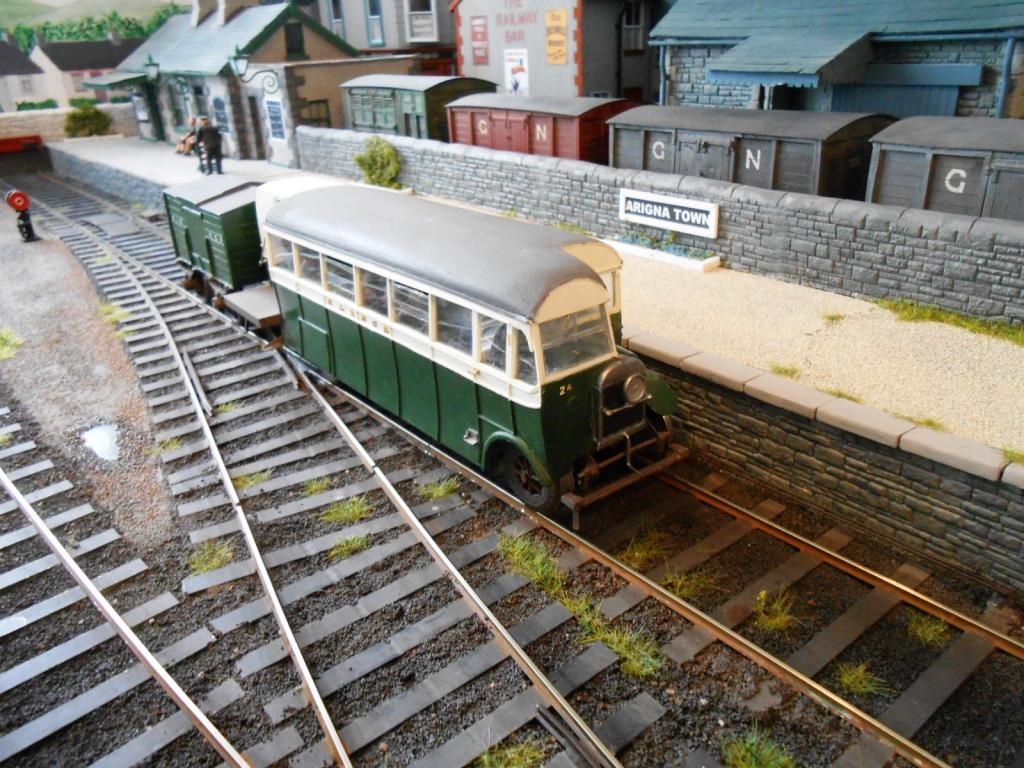
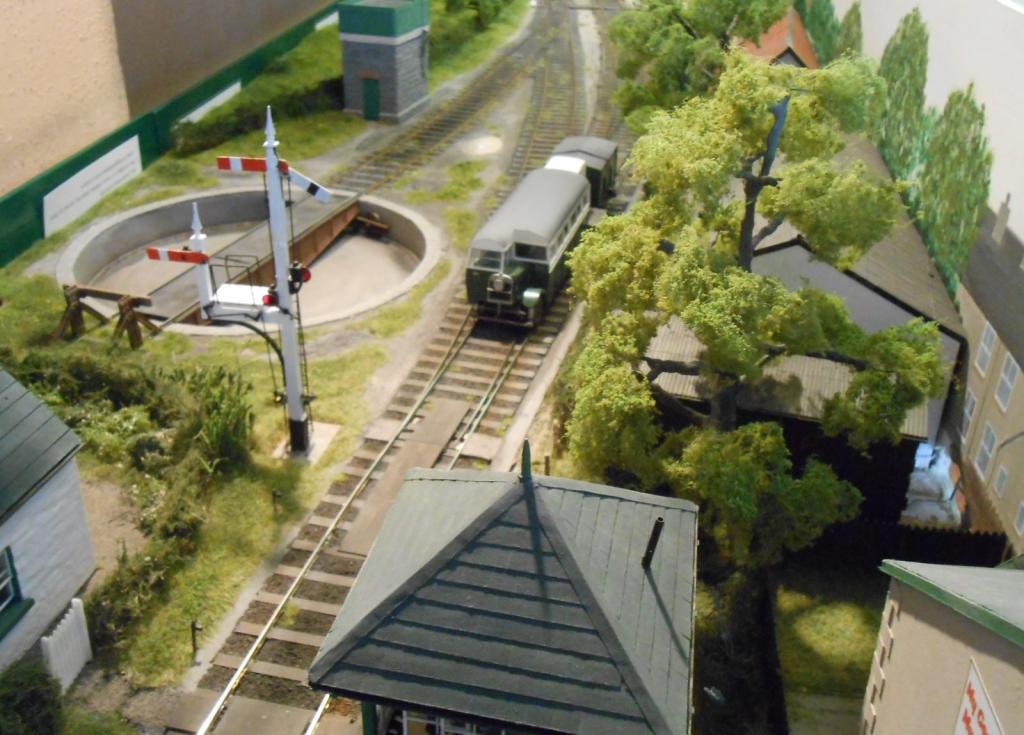
The layout is now about as finished as it can be for its debut, so here are pictures of the sequence of trains I'll be running. They are intended to reflect those of the real SLNCR. First up is the mixed train, Fermanagh, coach 9 & a couple of wagons. First job is to turn the loco, then move the brake to the stop blocks. After, in best Sligo style, the coach and wagons shunt the goods siding & all is made ready for departure. Next up is the railcar - a simple operation, out and back is all that is required. After comes the J26 and loaded coal wagons, down from the mines above Derreenavoggy. Arrive in the loop, move the brake to the platform [the intention is to eventually have a small group of miners here, looking like they are coming off shift], then away again. no turntable for the tank. We then have the railbus, which certainly needs turning & finally, Hazlewood and the goods. After turning, the loco shunts the cattle dock and goods siding, before departing with its small string of wagons. Too many pics, so will add the goods in a moment Turn the fiddle yard and start again...
-
Better still with a prototypical 1200 boxcar train in tow...The mind boggles at the cost of assembling such a beast - with a private nuclear power plant required as well methinks.
-
Now that is what I call classy.
-
Oozes atmosphere!
-
Just in case anyone has missed the adverts and all my other ramblings, the Chatham Show is coming up on 14th & 15th June. Over 100 stands [102 to be exact], with a good balance of layouts, trade support & societies. See the ads in BRM, RM, CM etc. Should be something for everyone, plus a certain 7mm sale Irish broad gauge layout making its debut...
-
More exhibition experiences - at the show itself...
David Holman commented on David Holman's blog entry in David Holman's Blog
Less than 3 weeks to the Show now & have turned the layout round so am operating from the back, as per at a show. As mentioned elsewhere, Fermanagh has had a new gearbox fitted to cure erratic running. Tried everything else & thankfully all now seems well. Running further improved by purchase of a new Gaugemaster hand held controller - this time with feedback to aid slow running. There is a marked difference to the W unit I'd been using, so the latter will be kept as a spare. Also have my now ancient H&M Clipper, which still finds use powering the wheel cleaner. Getting the track and wheels clean [and keeping them that way], has been a bit of a pain. A combination of paint, glue and grease means wheel and track cleaning has been far too frequent at first, but again now starting to improve. Another small issue was the height of one rail on the loco turntable, which somehow had risen a millimetre or so - enough to make exiting the table a bit of a lottery. Traced the problem to a weakened glue joint, so again all well again. Have also been making laminated instructions for any guest operators. In my experience, some are better than others, so I use a set of simple rules to try and keep them on the straight and narrow. Key points include: - using a very simple sequence - keeping shunting very basic, such as each train shunts just one siding - a big reminder to only crank the turntable handle clockwise [or it will ruin the pickups] - another to emphasise 'set points, then signals & only then drive the train' May do another about running at prototype speeds too... Me, a control freak? Well, nobody gets to be a headteacher without having at least a small one lurking somewhere! -
Really, really impressive. The low angle viewpoint works superbly. Is there a return working?!
-
Arigna Town - this week's scenery
David Holman replied to David Holman's topic in Irish Model Layouts
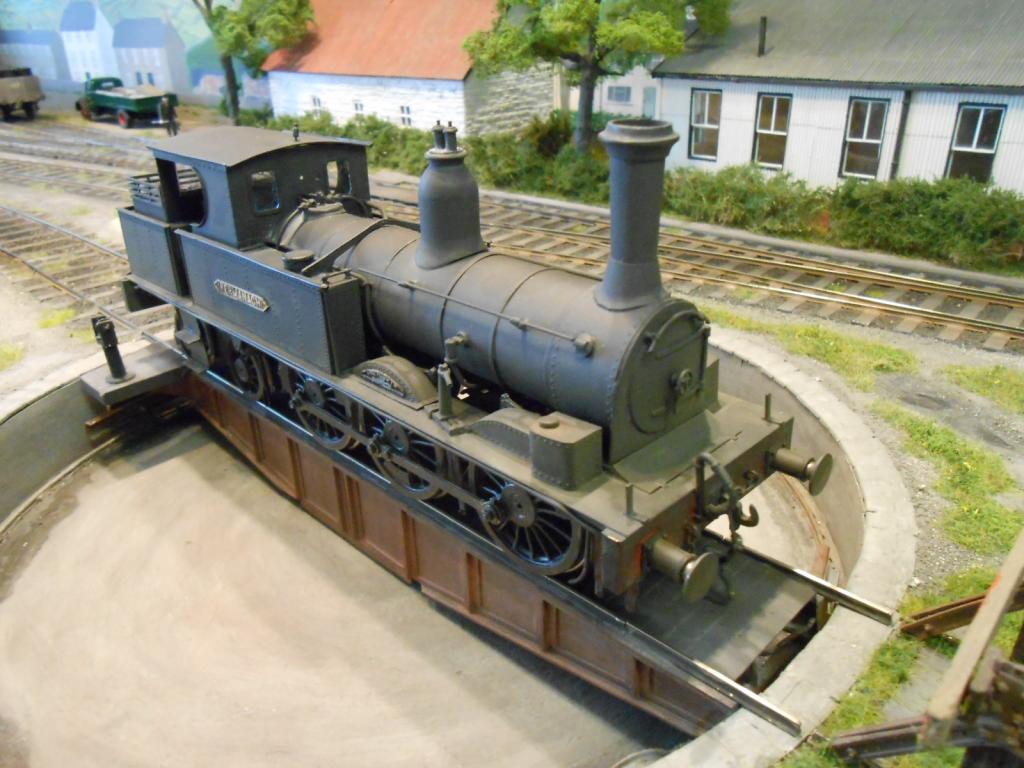
Hear what you say HF, though it is fairly grubby, but looks a lot lighter in the photos. Need to remove the deck to adjust the height of one of the rails, so will use the opportunity to add some more oil & grime. -
Arigna Town - this week's scenery
David Holman replied to David Holman's topic in Irish Model Layouts
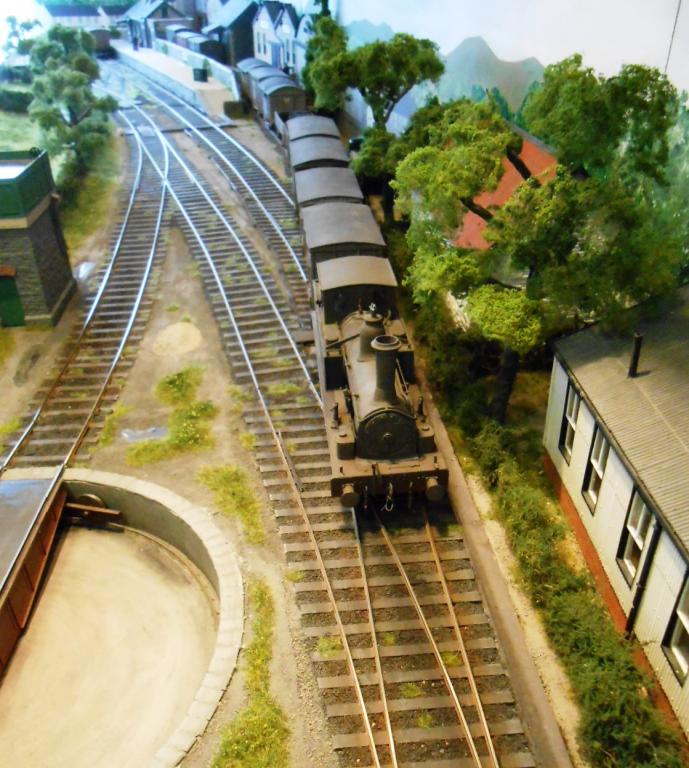
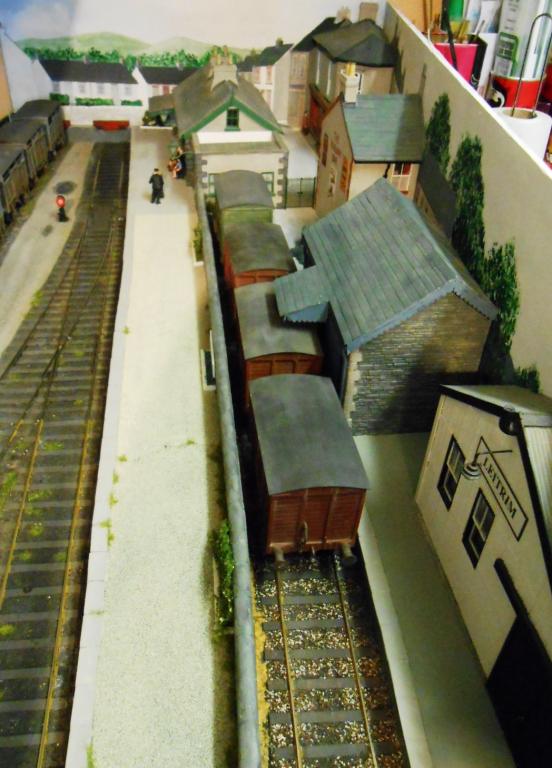
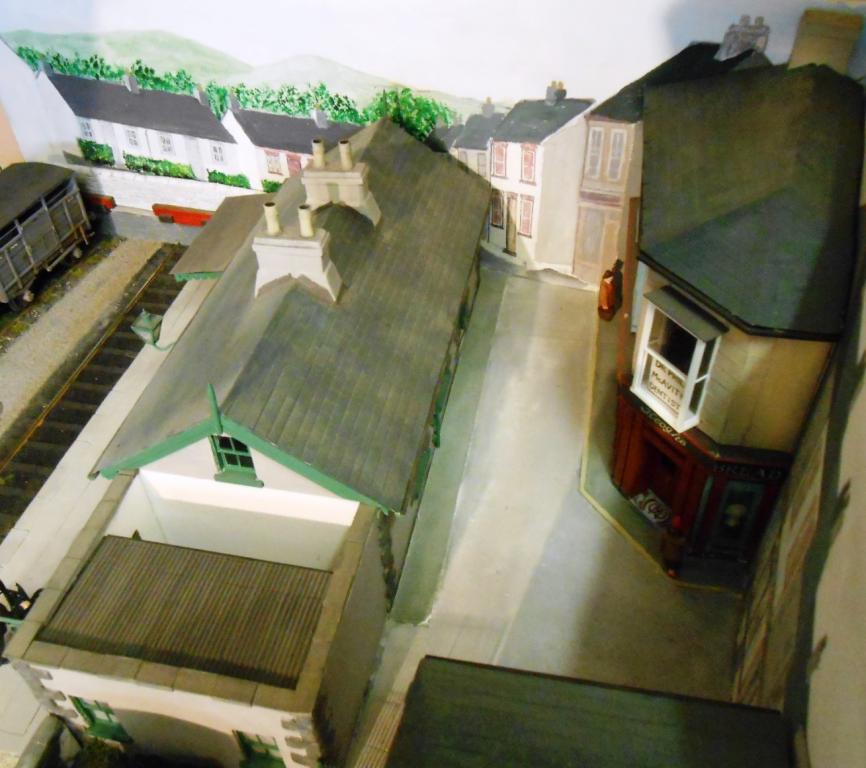
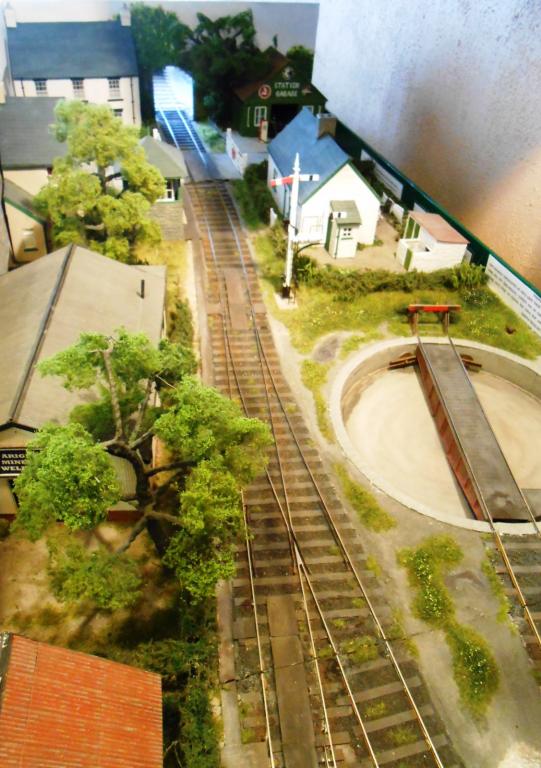
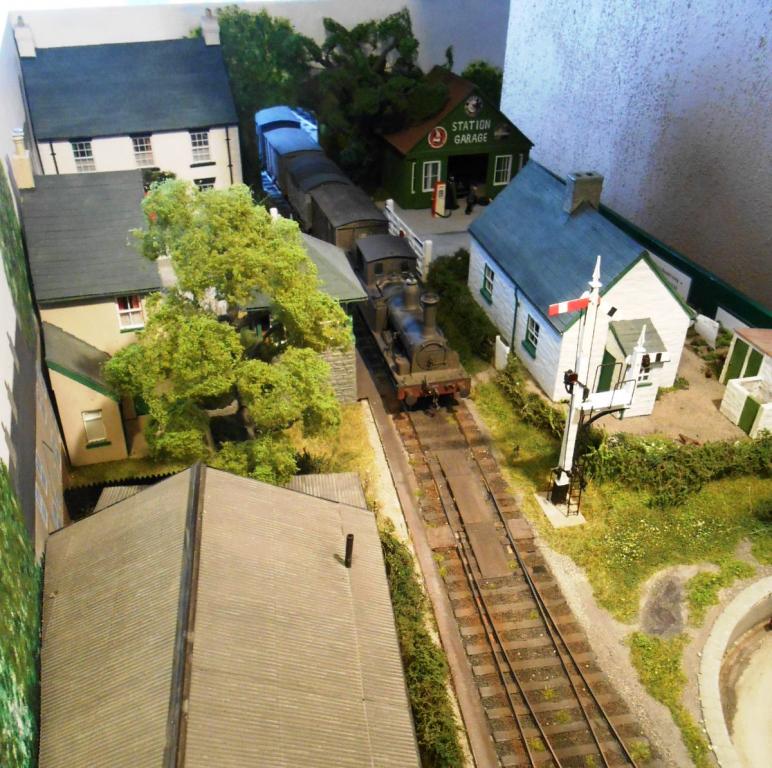
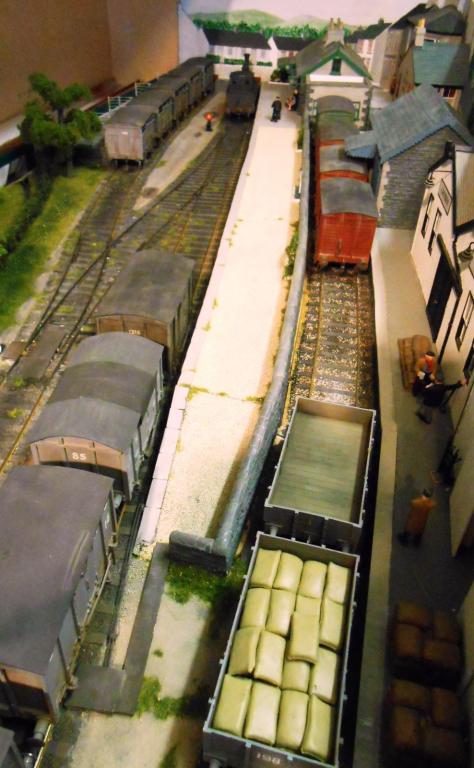
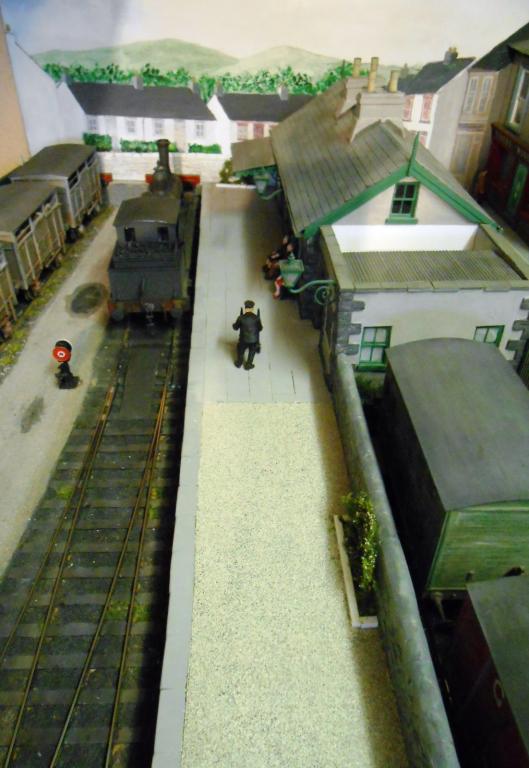
Turned the layout round recently, so I could do operating practice from behind - the way when it is exhibited. Discovered that there were a few areas that needed tidying up, not least that the rails were still shiny from this side. So, out came the rust coloured paint, along with a bit of track colour to touch up bare patches on the sleepers. Thought it then worthwhile to take a few pictures, as this viewpoint is not one that folk will see at a show. The downside is there is no backscene to frame the view. Also, Fermanagh has been receiving attention. The gearbox I used was not working well - the frames were too flimsy and the main gear too narrow. Replaced it with a Branchlines one. These are so much more robust and also really well etched. Just solder in the bearings and fold up the sides & it is complete. Fermanagh already runs more smoothly, which can only improve with a bit more running in on the rolling road.
-
Priests - now there's another thread... However, my [increasingly seasonal] day job includes doing headteacher performance reviews with their governors. One of my regular ports of call is a church school and last year, found myself faced with no less than three vicars. I made the obvious enquiry about the collective noun for such a group and was informed [with much delight] that the word was an 'hypocrasy'.... 'Nuff said???
-
Politicians too, no doubt. By the by, did you know the collective noun for a group of bankers is a 'wunch'?
-
Add a backscene, Nelson. Only needs to be a bit higher than your stock, but will make a very effective place to photograph all that fine stock you are building. Could be something you draw/paint yourself or a bit of landscape photo. There are some commercial pics out there [some better than others], but making your own should be well within your capabilities. You'll be in good company too. Master modeller and weathering expert Martyn Welch has long used something similar, as many photos in Model Railway Journal testify. The 'plank' works well by the way.
-
More exhibition experiences - at the show itself...
David Holman commented on David Holman's blog entry in David Holman's Blog
Before any show, I like to 'rehearse' the sequence I plan to use. Indeed, in the early stages, the sequence changes quite a lot, as I find out what is workable, or not. Recently, have discovered that Arigna Town's trackplan has a couple of entertaining [?] challenges inadvertently built in. These centre around the fact that the headshunt/engine release section by the buffers is a bit on the short side. It will hold a loco, the bogie coach, railbus or two wagons, but ideally it would have been better if three wagons long instead. This makes shunting the mixed train more difficult than I would like, especially in terms of getting the coach next to the locomotive. Originally, I'd decided the mixed would be an exchange of cattle vans, but the shunt is too protracted for an exhibition, when you need to keep things simple and moving. However, there are ways around it & the sequence has been altered to suit. Test running has shown that stock still needs fettling - mainly adjustment of coupling hooks/chains, but also some work on locos. For example, the J26 had been running ell, but them became erratic. suspected dirt, then pickups, but still no better. reamed out the couple roads, but again no good. Another look at the wheels revealed black marks on one of them. Answer, a short, where a pickup was touching bare metal on the body. No wonder the motor was also a bit warm! A bit of insulating tape and it is back running well again. Other minor issues include back to backs on some wheels, but [fingers crossed] the only derailments should be operator error & not the track. -
Arigna Town - this week's scenery
David Holman replied to David Holman's topic in Irish Model Layouts
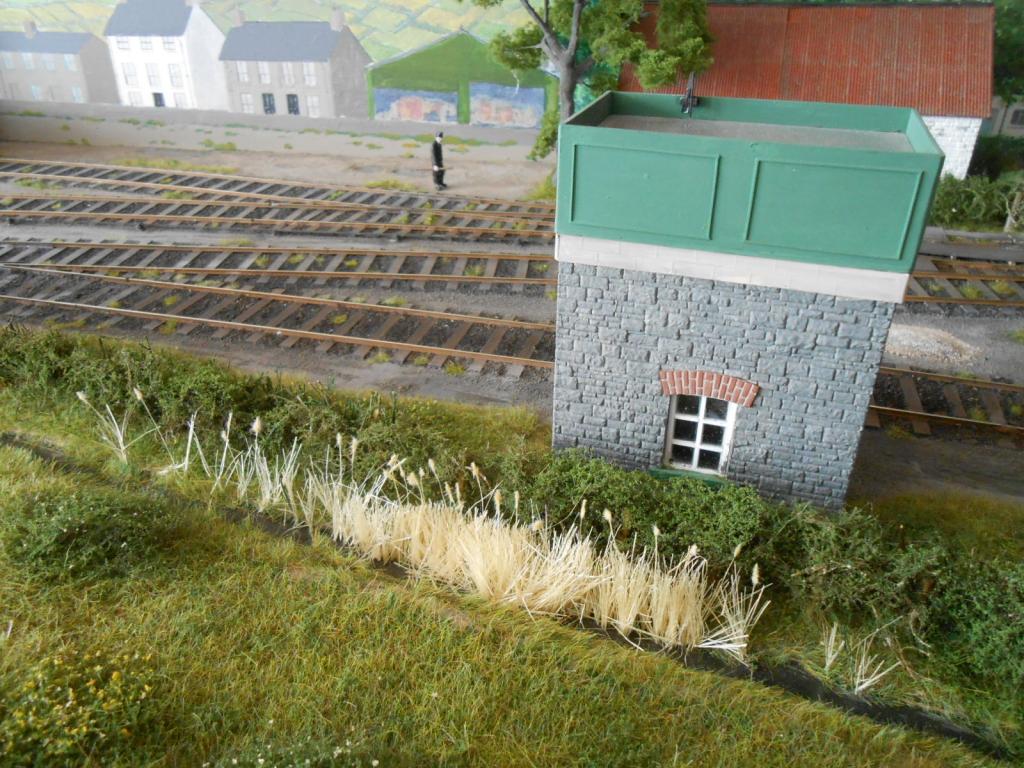
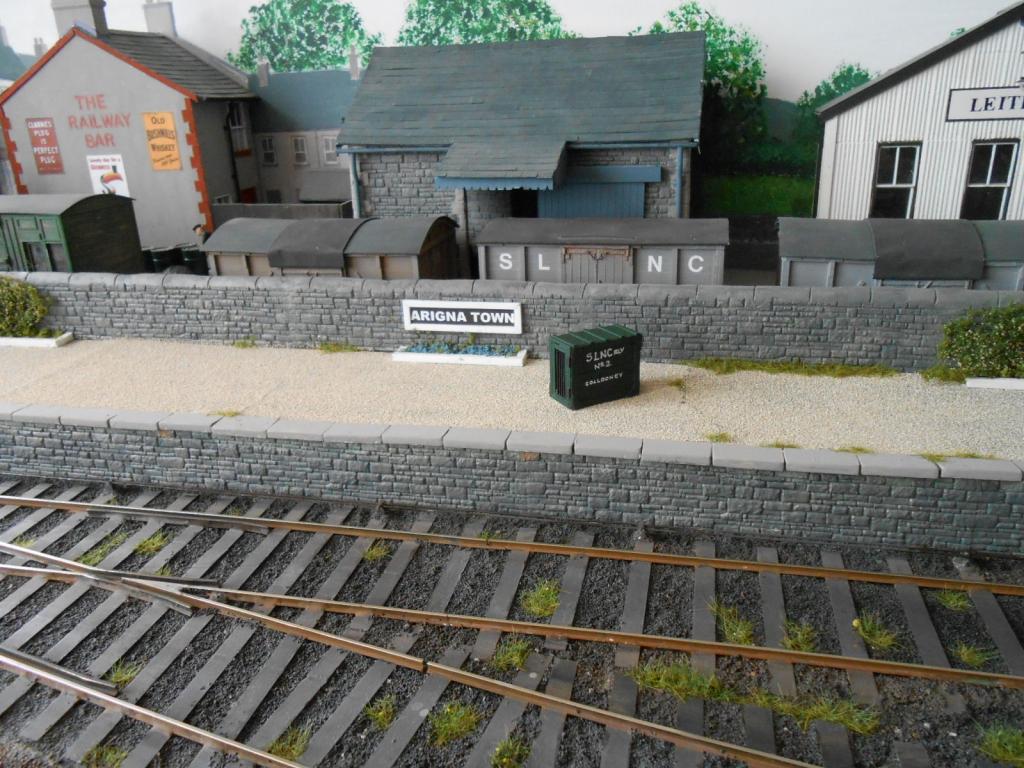
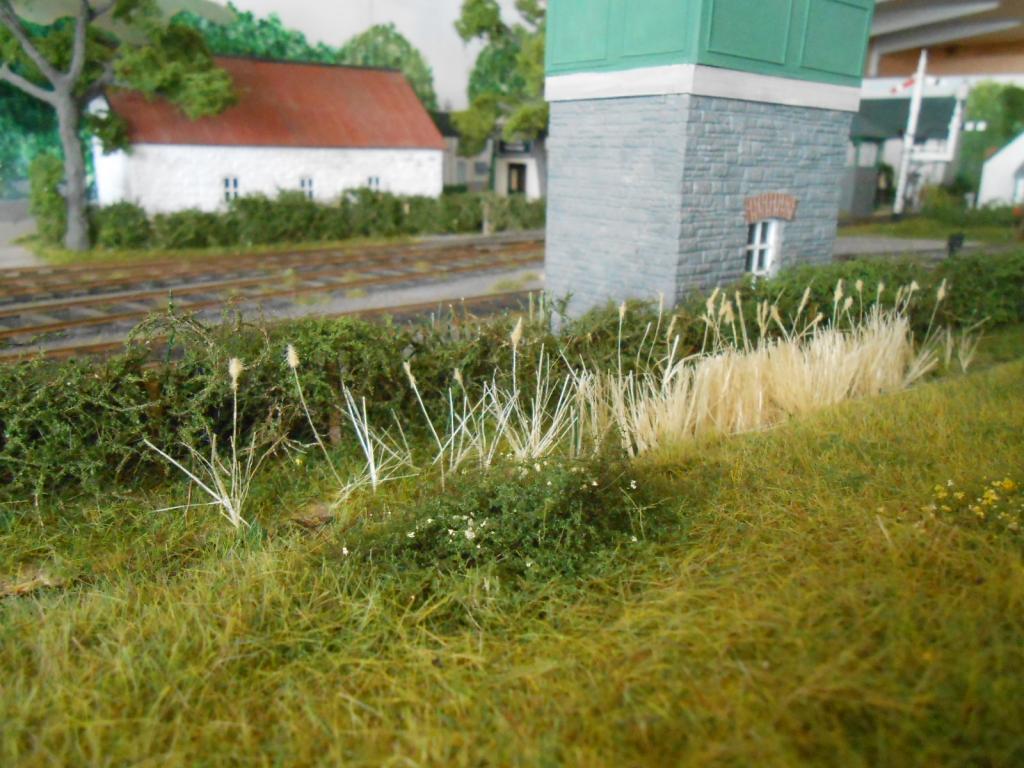
... please little minds - and I should know! In the Sprinks album of the SLNCR is a picture at Enniskillen showing what appears to be a dogbox of some kind, sitting on the loading dock, opposite the platform. It is quite large [enough for the eponymous wolfhound] and labelled 'SLNC Rly No2 Collooney'. Peering at the picture, it is quite a complex box &I couldn't resist building a model. However, not sure about the colour - in b&w the shade seemed to match the railbus [green] behind. However, am suspecting it may actually be a red or brown. Let me know - should be easy to correct. Also on the small side [though many of them] are the reeds I've been planting in the drainage dyke. Lengths of sisal [Woodlands Scenics], they all looked a bit uniform. Then a walk round my local marsh made me realise I needed some taller seed heads to break up the evenness. Longer sisal, dipped in PVA & then 'short dry grass' fibres did the trick & the scene looks a lot more convincing. Hope to eventually make the reeds more extensive, with some new green growth, but the process is a long way down the 'interesting things to do on the layout' list. The final picture shows the scenic boards all bolted together with some mdf end plates, which should keep things secure in transit.
-
Seriously good stuff Nelson. It is great to see you make the extra effort to convert /scratchbuild wagons, rather than rely on commercial clones. It is what modelling the Irish scene is all about & I sense a real momentum for this on other folk's pages too. Long may it continue.
-
Arigna Town - this week's scenery
David Holman replied to David Holman's topic in Irish Model Layouts
Overall I quote 16 feet by 30 inches Nelson. More precisely, each board is 46 inches long and 24 inches wide. Each of the scenic boards has a 5 inch fold down fascia which will have photos & info about the SLNCR on it. The train turntable is 44 inches long, so that end of the layout needs a bit more room for it to rotate. The slightly odd dimensions are because my workshop is the former integral garage [which was made habitable a few years ago, with access from the house]. This is just under 16 feet long and the layout runs down one side. My Eatonswell layout also [just] fits in the Yeti. It is 20 x 2, but a real tight fit as a 'sundries crate' goes in the front footwell and a pair of scenic board, crated together, sit on the front passenger seat. Decidedly cosy & needless to say, other operators make their own way... -
Arigna Town - this week's scenery
David Holman replied to David Holman's topic in Irish Model Layouts
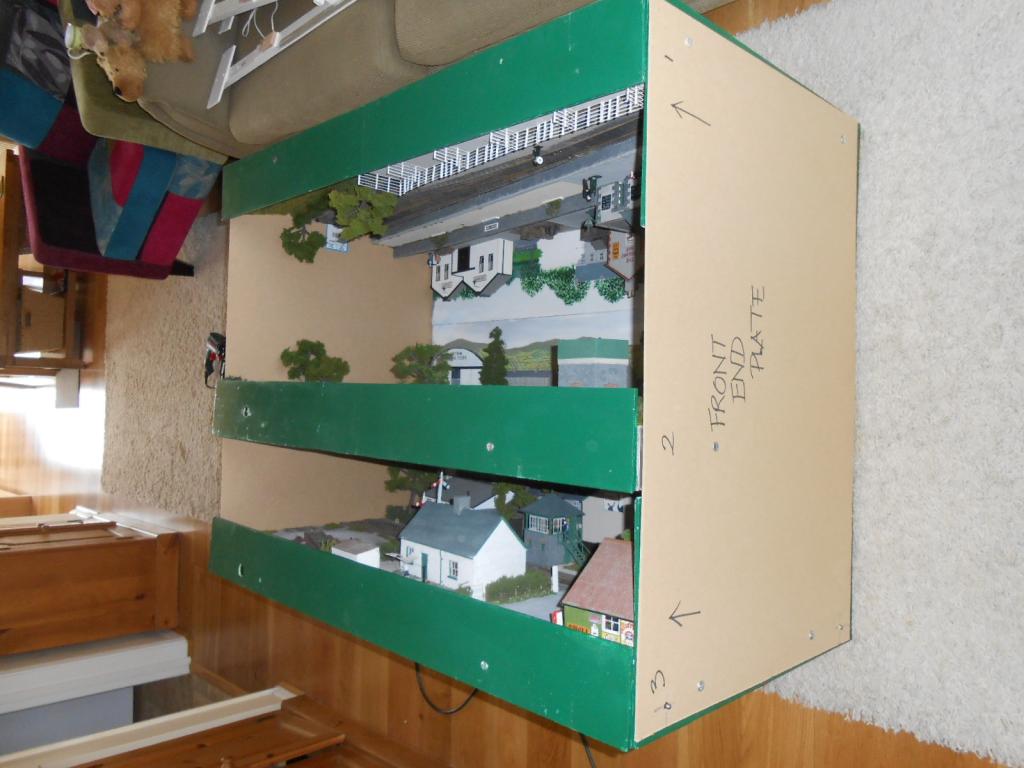
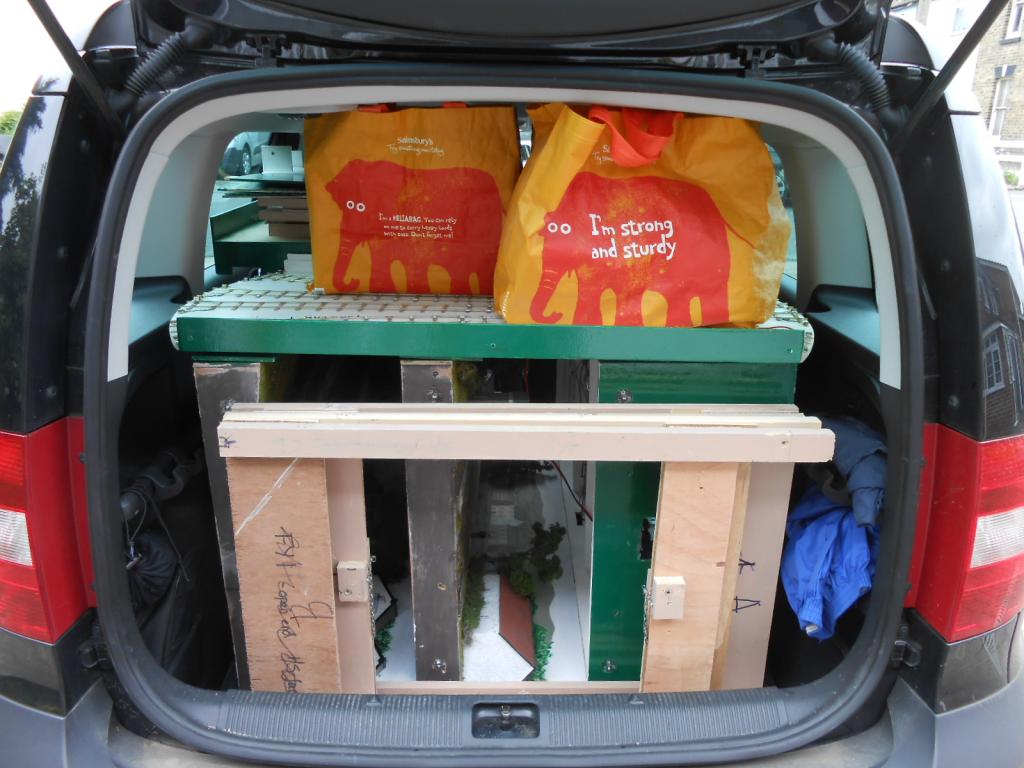
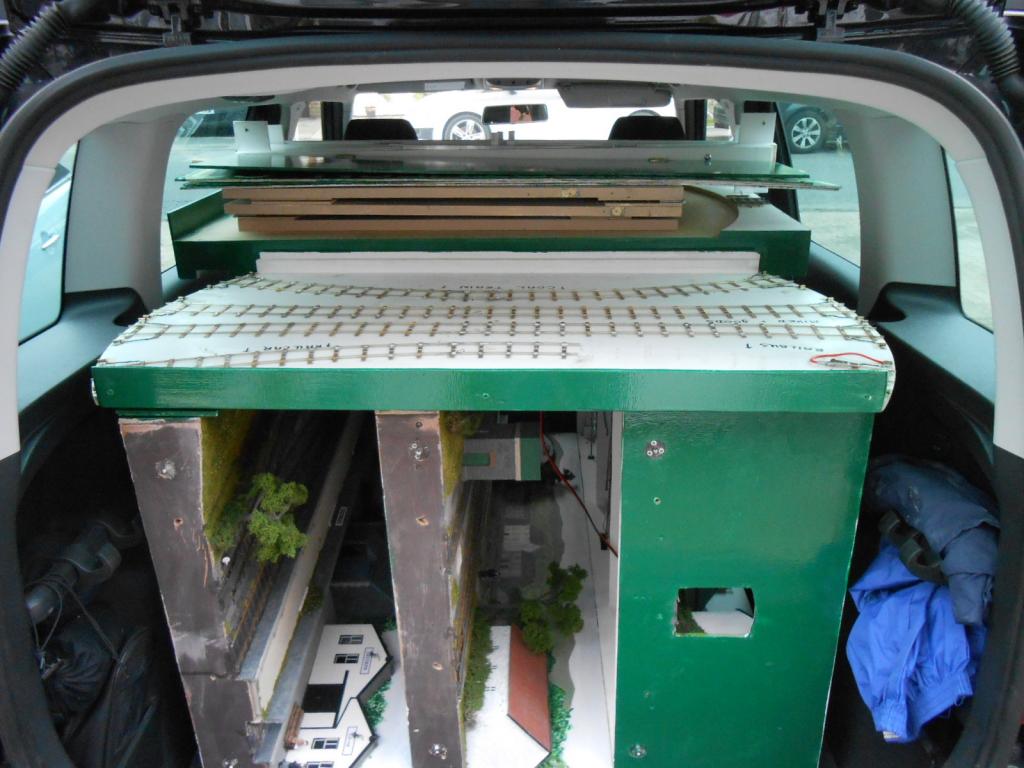
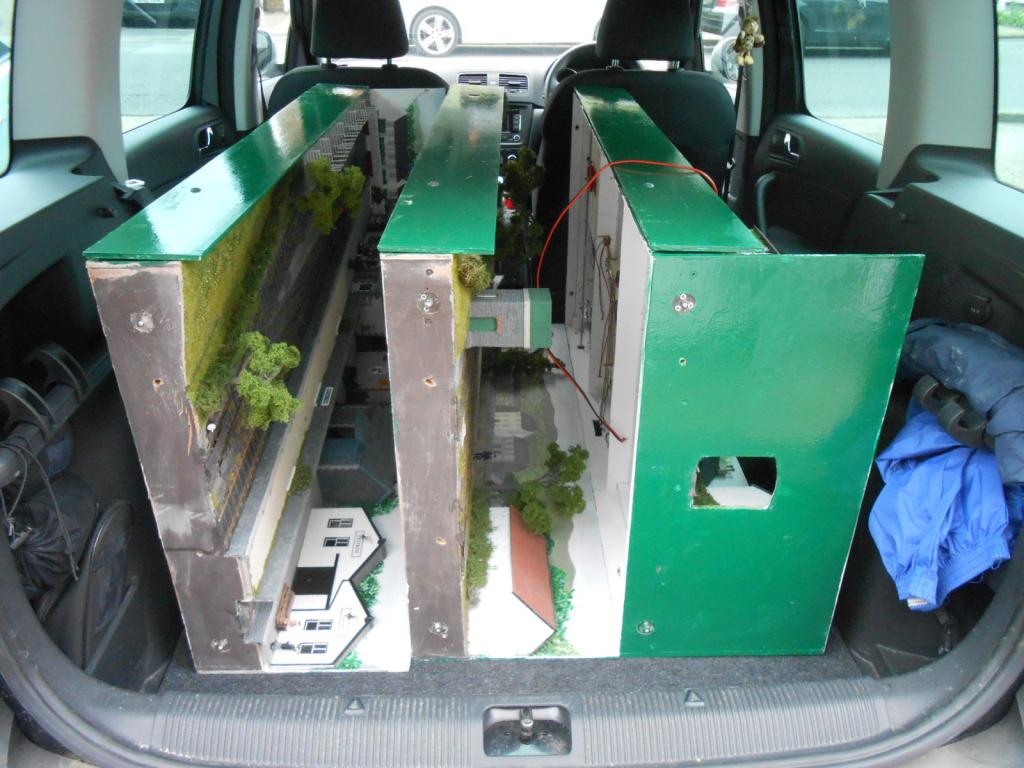
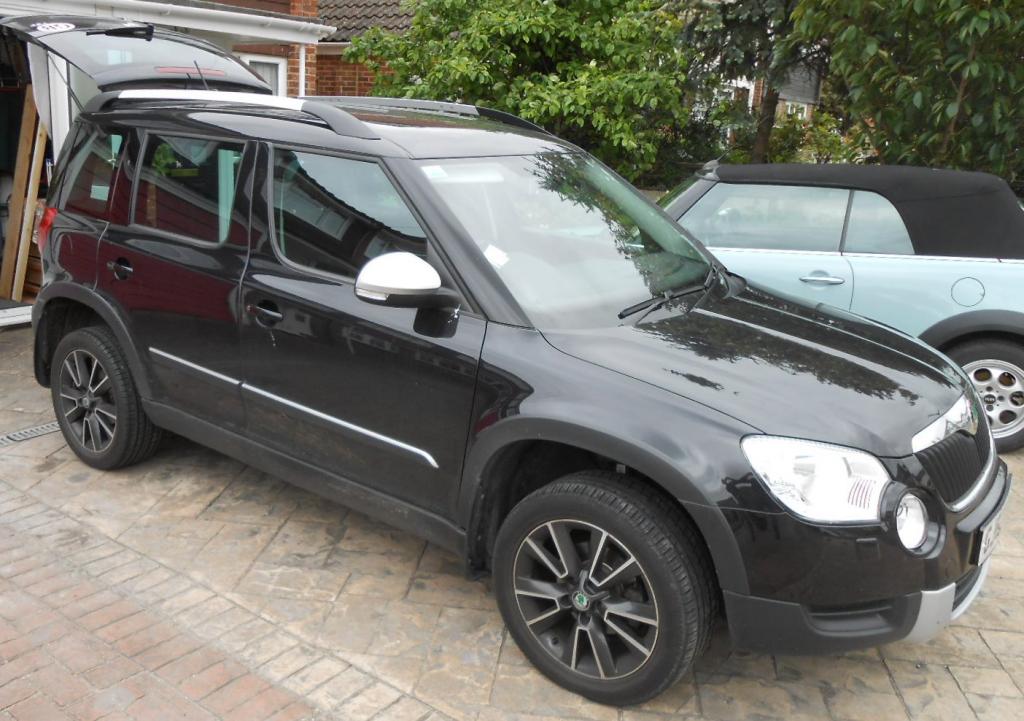
The vehicle of choice is currently a Skoda Yeti, which is an ideal dual purpose machine as, with the rear seats removed, it has the load carrying ability of a small van. Around 1800 litres in fact - with only stuff like Mazda 6 & Ford Mondeo estates [plus Skoda's Superb] matching that volume in terms of conventional cars. Previous motors I've had which were also good were the Honda Civic and the previous Mazda 6 & I occasionally muse at what the best dual purpose 'exhibition/family car/boy racer' might be. An AMG Mercedes E Class estate maybe? Discuss? Loading one's hard work in the car calls for care and attention, for you do not want to damage either. This morning, had a trial run, which despite lots of measuring and drawing, showed the importance of a proper practice. The three scenic board slide in on their backs & thereby occupy a footprint of approx. 4' x 3' x 2' high. MDF end plates [3x2] will be used to hold these together [apart?], with similar ones across the top. The latter are needed because the fiddle yard board goes across top of the front of the baseboard 'crate', with the train turntable across the rear. Two of the four trestles go on top of the fiddle yard board, along with the three pelmets and the lighting posts. The other two trestles fit just inside the tailgate, behind the baseboards. Meanwhile, the longitudinal beams which join the 4 trestles slide down the left side of the baseboards. There is then plenty of room on top of the train turntable for the two stock bags, plus two 'sundry bags' which contain things like the Clipspot lights, drapes & main extension leads. All the control equipment is taken in an old brief case, which also holds important documentation such as the wiring diagrams & layout details for anyone who might want to invite me to future shows. The briefcase fits in a convenient space just behind the front passenger seat, while my modelling toolbox goes behind the driver's seat. Never like to be without the latter, though in truth a soldering iron & some gaffer tape are probably what gets used most! So, rearview mirror now redundant & door mirrors vital... Goes without saying that one tends to drive more carefully with such a full load. The worst parts of any journey to a show are undoubtedly the urban bits - motorways tend to be fairly smooth, but round town, potholes, drain covers and the like can cause enough rattles and bangs to make you wonder if the layout will have been reduced to kit form by the time you arrive. What you really want to avoid though is hard braking, to say nothing about flat tyres! Anyway, hopefully the pictures will give you some idea of what is involved. Experience says it takes about half an hour to load/unload, but quite a bit longer to put the layout back together again.
-
Arigna Town - this week's scenery
David Holman replied to David Holman's topic in Irish Model Layouts
Many thanks Seamus - much as I'm looking forward to it, I will increasingly like a cat on hot bricks till its over! -
Arigna Town - this week's scenery
David Holman replied to David Holman's topic in Irish Model Layouts
Not much modelling of late, but a lot of effort to make the layout look presentable for its debut at Chatham in a month's time. Have built and painted a full pelmet to frame the layout and hide the lights. The lettering took ages, but now looks the part, I hope. Am also preparing notes to go on the fascia along the front of the layout, as am guessing not too many folk will be over familiar with the SLNCR over here, so am hoping to educate them. Wired up the lights to the buildings & almost set fire to a transformer when the temporary crocodile clips I was using ended up touching each other & causing a short. The nasty smell of plastic starting to overheat was a bit of a give away & very much a 'lesson without words'... Small bit of publicity in this month's Railway Modeller as editor Steve Flint put in a short blurb about the Chatham Show & a small pic of Hazlewood. Full article in the next edition of New Irish Lines though & always a nice buzz to get something published. -
More exhibition experiences - at the show itself...
David Holman posted a blog entry in David Holman's Blog
I really enjoy exhibiting, especially when things go well. Guess it is the teacher [bit of a show off?] in me. However, I also find the process both tiring and a bit stressful at times & with my layout fast approaching its exhibition debut, these notes are as much a reminder to myself about final preparation as a window to any reader about how I go about things. I’ve been exhibiting since 1987, with over 50 shows in that time. When displaying my models, I am always conscious of the fact that folk are paying to come and watch, so therefore it is essential to put on a good show. This leads to an important rule: ‘The layout must not only run well, but trains need to be frequent [far more than the prototype] and during any breaks in service, there should be enough interest to sustain the viewer’s interest.’ I’m afraid this is not always the case in my experience - & my own attention span [or lack of it] tends to mean I soon move on if nothing is moving, unless the scenics are very good indeed. Two good examples of the latter were the late Tom Harland’s ‘Bramblewick’ – a North Eastern layout of impeccable design and more recently ‘The End of the Line’ a 7mm model with working radio controlled lorries, which more than entertained when there were no trains. On the other hand no doubt we can all cite 4 track main line layouts with trains less frequent than a country branch or those with more operators than trains and no interest in engaging the viewers. So, what to do… Preparation is vital and cleanliness is key to that. ALL wheels get a thorough clean [wagons and locos], as does the track before any show & before the layout leaves home [cleaned again after setting up too]. Couplings need a look. I use 3 links, which always seem to get in a tangle, so these need checking again as wagons are put on the layout. All motive power is checked and serviced, a little light oiling, cleaning & adjusting of pickups, plus a quick once over in terms of paintwork & any fine details which may have come loose. Much rehearsal goes on before a show, to check that each train in the sequence does what it is supposed to. That means no derailments, buffer locking, etc & anything that does is put to one side for attention. At a show I also have a small notebook to record any problems & try to make sure these are attended to before the layout goes out again. Enough spare stock to cope with the odd breakdown is therefore useful. Testing hopefully weeds out any other issues, such as point & signal control & the loco controllers themselves. I have always carried a spare since a very early show when a short on a loco caused a handheld controller to overheat. ‘Ere mate, did you know your controller is on fire?’ was the comment that drew my attention. It was certainly giving off smoke… Hopefully, the Show organisers will provide barriers. Personally, I don’t like Perspex screens to keep inquisitive fingers away, but appreciate why some do. At one show, folk were so close to the layout, their heads were encroaching on to the running tracks. One chap seemed keen to look through the ‘hole in the sky’ to see into the fiddle yard. Not sure why, as it was open to view, but after asking him if he wouldn’t mind moving & not getting a response, I announced in a loud voice that if he didn’t move, then the next train would be driven up his nose. He soon shifted! What you can pretty much be sure of at a show, is that you will spend many hours on your feet and do a lot of talking to people who want to know more. This is very tiring, but can be very rewarding. Many’s the time I have learned something new about what I’ve been trying to model. The worst part of exhibiting, is at the end of the show. All that packing up to do and just when you really just want to get home – which may well be a long drive away. Can never understand why some shows go on till 5pm or later on a Sunday. Most shops shut at 4pm and have lost count of the number of times when the only folk left in the exhibition hall after 4pm are the exhibitors themselves... My usual routine is to gradually get all the stock packed away as closing time approaches. This is where a railcar or similar is useful, to keep something running for those still left. After that, it really pays to be disciplined about packing up, for this is the time when most damage can occur. Somehow, things don’t go back in the car the same way as you set off so care and patience is essential. Then you have to do it all again when you get home, especially if the van has to go back Monday morning or you need the car for work. Here is where a trailer can score. Unhook, roll into the garage and go to bed! At the next opportunity, the notebook comes out on what went wrong & the whole sequence starts again, ready for the next show. Weather permitting, will be doing a trial fit of Arigna Town in the car soon, so will post a few pics - as long as it fits ok! -
Looks a treat, John. Will post some photos of the Forest Museum on Vancouver Island, but will need to compress them first. These days, it is generally very tidy and well kept, but it wasn't always so!