David Holman
-
Posts
4,359 -
Joined
-
Last visited
-
Days Won
117
Content Type
Profiles
Forums
Events
Gallery
Blogs
Everything posted by David Holman
-
Looking again, the ferns and conifer needles are a bit of a give away. Very atmospheric picture though.
-
Like the look of those boxes Murrayec, though the minimum for 7mm scale is at least 70mm deep and 350mm long [for locos anyway], which may make things expensive. Then again, what price does one put on protecting one's pride and joy?
-
Nice one, Mayner. The Convention idea has much to commend it and is starting to occur in Britain, particularly among American enthusiasts. Fellow club member, Andrew Browne [you may have come across his Fulton Terminal layout] has held a couple and 20+ folk have attended each one. The layout is worth checking for his model ships. A bit of a craftmans to say the least, his latest model is an HO Liberty Ship. Entire layouts have been built is less space and the rigging etc is superb. The idea of modellers visiting the layout, rather than the other way round certainly avoids a shed load of problems, though UK models do tend to be smaller, which makes life easier. However, if I'm right in assuming that second photo is actually a model and not the real thing, then it a stunning example of what can be done outdoors.
-
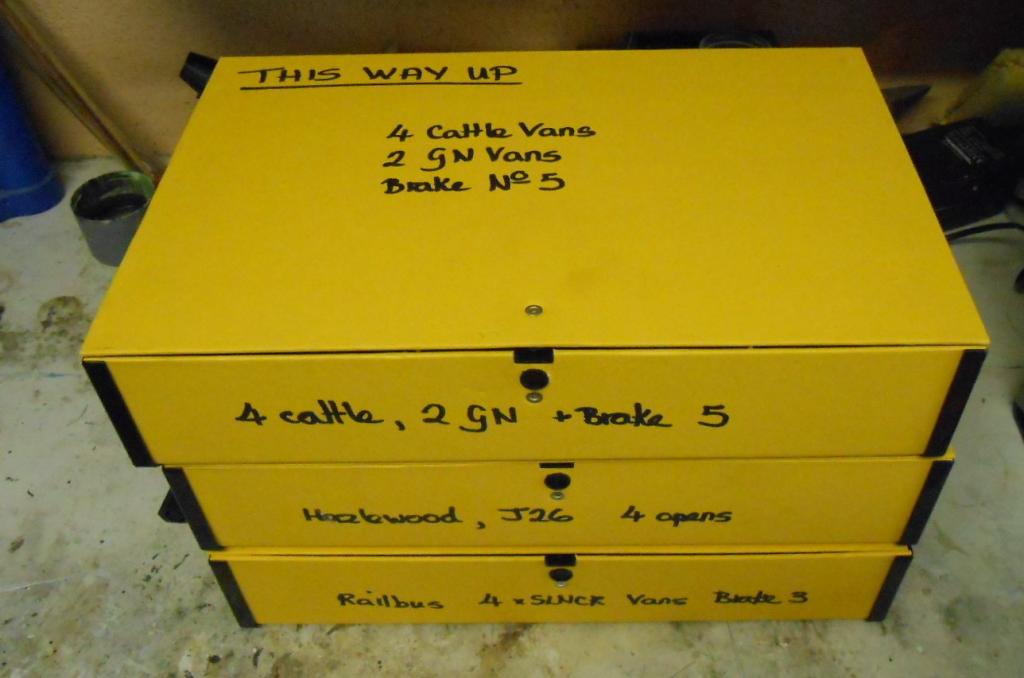
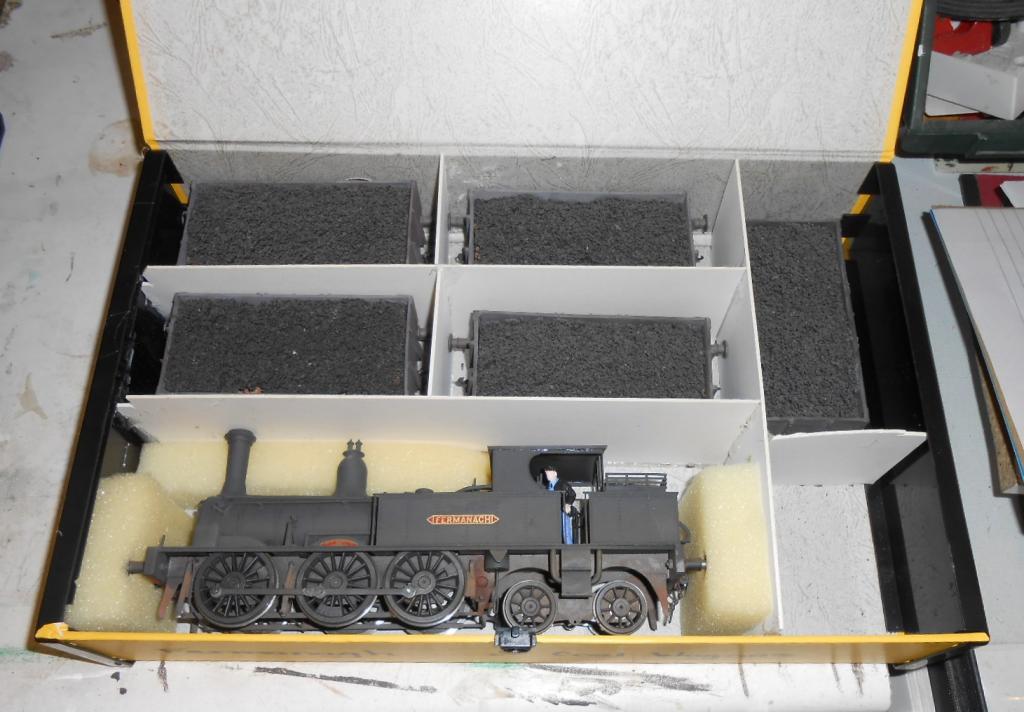
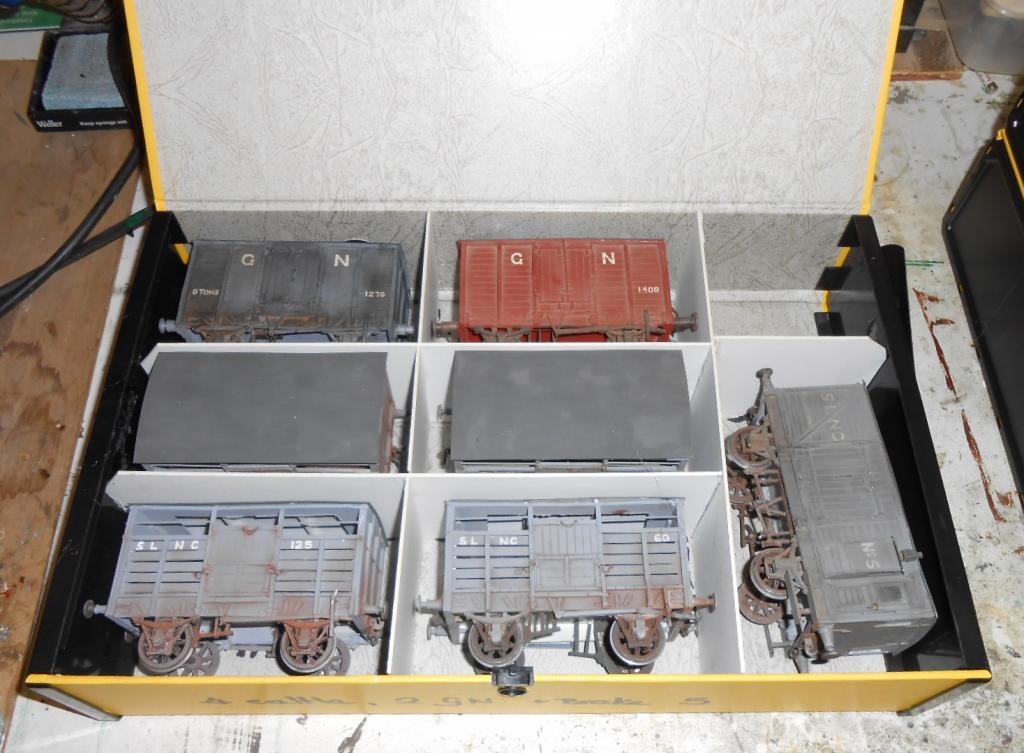
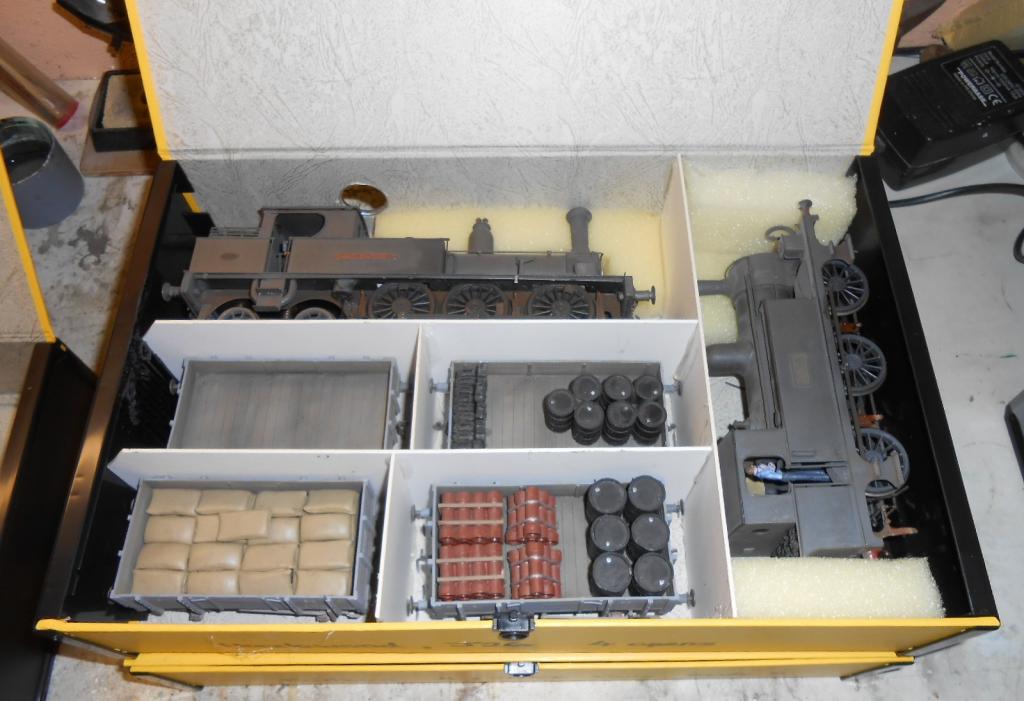
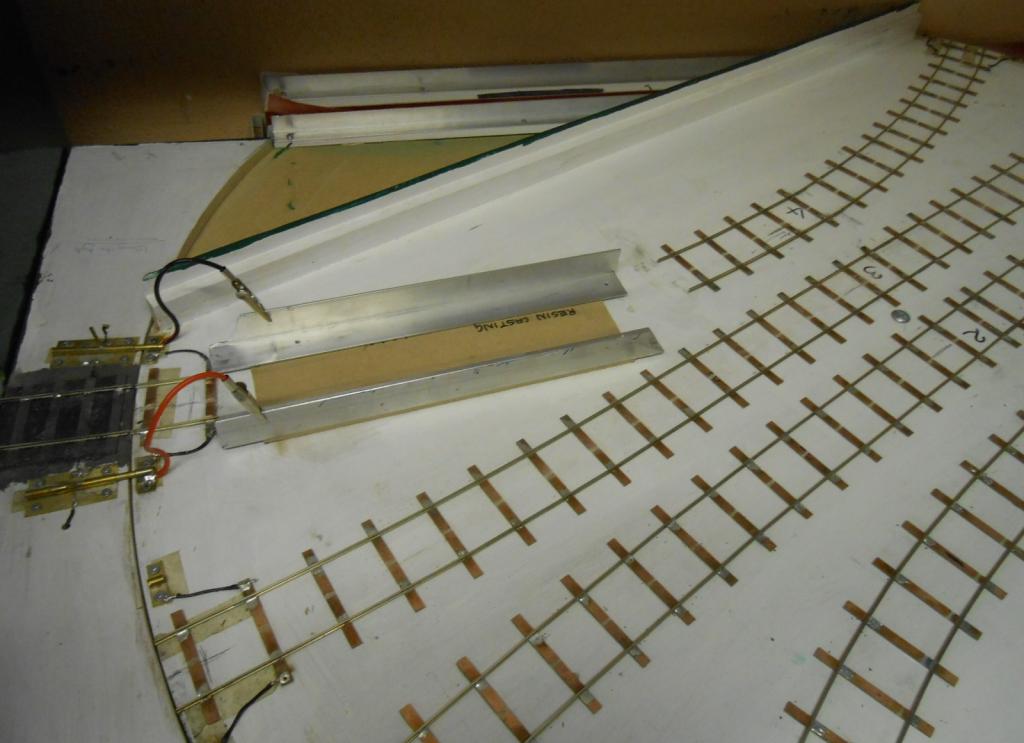
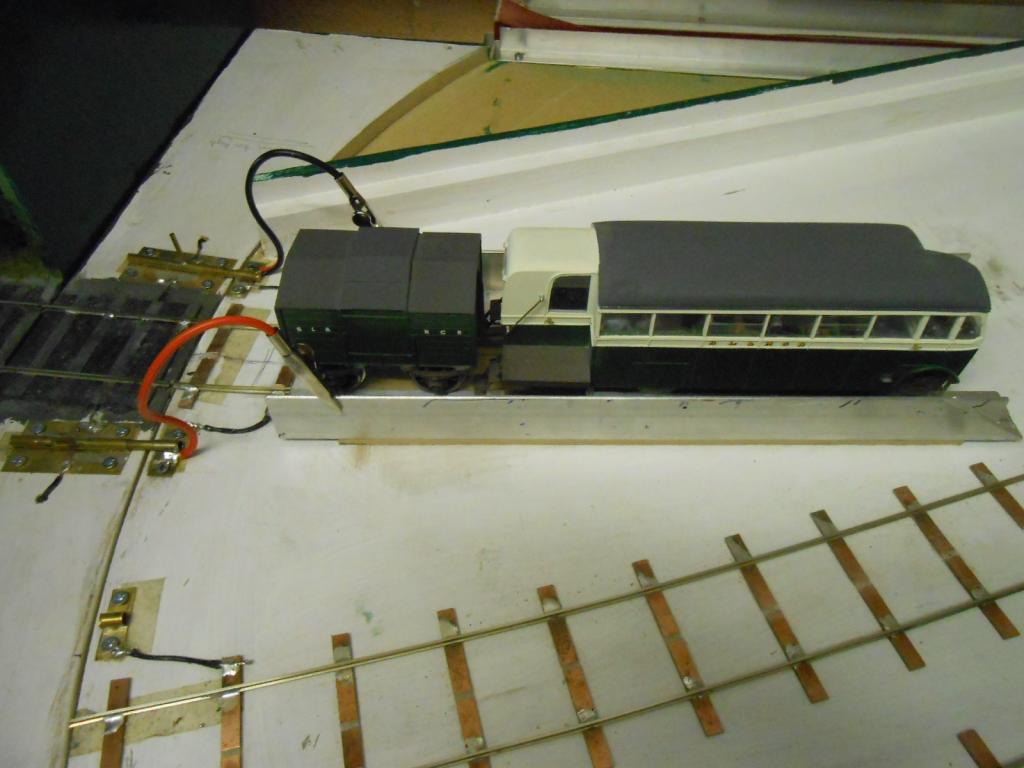
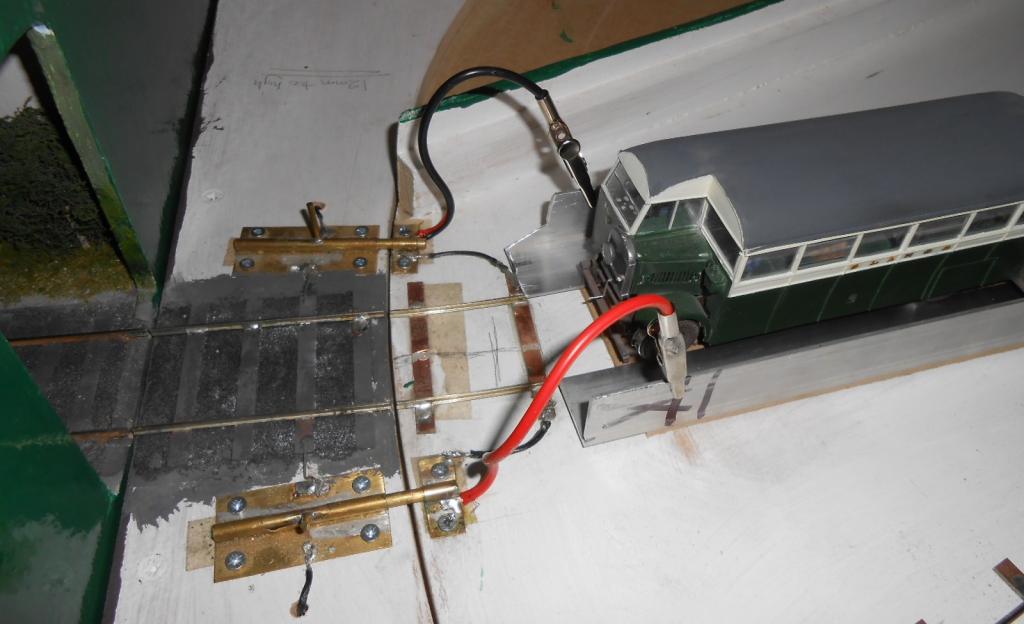
This is perhaps more to do with my exhibition blog, but as it involved a bit of practical work, it fits as well here as any. Those of you with home based layouts may well be able to keep much of your stock on the tracks, but going out and about requires a different approach. Ready to run stock may well come in a conveniently sized box, though sometimes, manufacturers seem to take the Easter egg route and the loco or wagon comes in a package about 4x the size really needed. Likewise, though some kit makers [eg [slaters and Parkside] will supply a box big enough for the finished model, it is not always thus and in 7mm scale or bigger, models take up an increasingly disproportionate amount of space, which creates issues re transportation to shows. For example, my Eatonswell BR layout needs the equivalent of 4 large storage crates. For Arigna Town, with nearly all the stock being scratchbuilt, suitable storage boxes were part of the planning from the start & after much thought, found that Foolscap box files [just a bit bigger than A4] were ideal. Office Supply chain Staples [do you have them outside the UK?], do a suitable example for around 5 euros, so worked out that half a dozen were needed & therefore bought. The pictures show how I've used mounting board to make dividers to keep the models from moving around during transport & how nearly all my locos, coaches and wagons will fit. The only model that is too big is Railcar B, so like many of my BR locos and coaches, I've made a specific box for it. 3mm MDF is the material, which is easily cut with a craft knife & the parts fixed together with a hot glue gun. The lid is held on with gaffer tape, which acts as a basic hinge. Given that a custom made storage box can cost 30 euros or more [depending on size], I think these represent good value. You will also see that I carry both types of box around in jumbo Sainsbury carrier bags, which are strong and have good carrying handles. In fact, one bag will hold up to 4 foolscap box files, while the same bag can also carry up to 30 Parkside or Slaters wagon boxes. The last two pictures show the new cassette I've made for the fiddle yard. The railbus needs turning at each end of its run and this seems an easier approach that trying to shuffle it round with Railcar B on the layout. Have used cassettes on several previous layouts & they are a very effective space saver. This one follows my usual practice of 25mm aluminium angle forming the 'track'. It is expoxied to 3mm MDF and then just butts up against the incoming rails on the fiddle yard. Power is transferred by two crocodile clips. Simples, as Alexander would say. Apologies that the photos do not appear in the right order...

-
O'Dea Collection - now digitised
David Holman replied to Eiretrains's topic in Photos & Videos of the Prototype
Be still my beating heart. Fabulous link - thankyou! -
Forgive me if there is a note elsewhere, but the latest edition of Steam Days contains a lengthy article by Neil Sprinks on the Irish scene in 1953. Second part next month. Fine photos and the high quality prose one has come to expect from this fine historian. Hero worship? You bet.
-
Dichotomy - a dual scale layout
David Holman replied to David Holman's topic in US / Canadian Railway Modelling
Re decoder tweaks... First of all I'm no expert on DCC, despite having a dozen locos with chips on my Eatonswell layout. This is one way of saying - 'done a bit of dabbling, but don't quote me!' However, seemed to me that the key of changing the CVs which control the top speed of the loco and when it will start coasting. On some chips [& certainly on my Bachmann Prodigy controller], there is the option of 'shunt speed', which obviously keeps things under close control. On the Shay, the issue was stopping the loco 'chuffing' all the time it was running, because after a certain amount of time, the driver will shut off steam and let the engine coast, or apply the brake. Hence the chuffs fade to nothing and the hiss and clanks come to the fore, along with the squeal of brakes. If I can make this happen on a layout 1.5m long, then there is hope for everyone! Can't remember which CV/section it was, but try looking up in the instructions where this part is and alter accordingly. Am guessing that if you let up know the loco and chip, there will be someone out there who will have the quick fix. details are important, as it tends to vary from one manufacturer to another. -
Nelson, the van is a gem & I would be happy to have produced one to that level of detail in 7mm scale. You are right to be pleased with the axles box/W irons & I was wondering myself how they were done - very fine indeed! May I suggest this is an area where rein casting may be of value, though am sure individual items will be very small & the contents of a casting starter kit would enable you to produce hundreds... However, for multiple van sides, as well as the detail parts, casting has its merits & who knows, you may have people wanting copies, such is the quality of your work. Super stuff.
-
Can only agree with Murrayec. That is as concise an account as you could want. And it works. Just add, have used 5 min epoxy for white metal, it is less scary than solder, while many cyano glues do not like white metal at all and all that happens is you stick your fingers together instead... Re cutting out etched pieces, I get by quite happily using a heavy duty craft knife. Works for me anyway.
-
Other exhibition stuff and Chatham Cranes
David Holman commented on David Holman's blog entry in David Holman's Blog
Fear not sir - the amount of stuff both decreases and increases with the size of the layout. So a four foot self jobbie will go in the boot of the car with one or two lights and box of bits no problem. Something like Gresley Beat requires two seven ton trucks, which just doesn't bear thinking about, but the team obviously enjoy it. Once had a 7mm ng layout on three 90cm x 45cm boards, which included folding legs. While set up time was an hour, by slowly packing away stock at the end of a show, it was in the car in 15 - 20 mins. As for curtains, one of the best ideas I've seen was on a Hornby tinplate layout.nthey used tea towels which had clearly been gathered from preserved railways. Looked really good and a nice change from plain black. -
Dichotomy - a dual scale layout
David Holman replied to David Holman's topic in US / Canadian Railway Modelling
As it happens, all but two of my 12 layouts have been English, Warbonnet, though only one was BR. That is the previous project, Eatonswell, which is East Anglia in the late 50s. Will post a few pics soon, though they need compressing as they are all 5m plus. All the rest were light railway and/or narrow gauge practice. Have always been a fan of the Colonel and we do share a name of course! Could easily be tempted by all your ideas, JB, especially after visiting Achilles and Clifden last year. Blessington would make an unusual and attractive project too, while Kenmare has long appealed, as does Timoleague and Courtmacsherry, this now very do able thanks to the Tyrconnel kits. One day... -
Dichotomy - a dual scale layout
David Holman replied to David Holman's topic in US / Canadian Railway Modelling
The shays run beautifully, Warbonnet. The sound is very effective on the HO one, but it did need fine tuning to get a decent effect. That was an interesting project in itself. The tsunami hand book runs to over 200 pages! The On16.5 sound can be even better, because you can fit a bigger speaker which deepens the resonance. Must admit, it took me months to even realise there were non Irish sections to the site. Was amazed to see 15 000 though, which is why I was surprised there were no comments either way, especially as I haven't come across the 'dual scale' concept anywhere else. Probably only works on a micro layout like this, but does give me the chance to operate both sets of stock . Equally, with Arigna Town almost finished, thoughts turn to a fresh project and there are a fair few ideas to fill the space Dichotomy presently occupies. Maybe even Irish 3'... -
Dichotomy - a dual scale layout
David Holman replied to David Holman's topic in US / Canadian Railway Modelling
Am slightly surprised to see that there have been 15 000+ viewings of this layout, but not one comment - good, bad or indifferent. Am considering selling it to make room for something else. Anyone interested? If so, will put an ad in the 'for sale' section. -
That is just fab and the low level photo really sets it off well.
-
Love the signals! Do they work? If not, try getting hold of the latest Model Railway Journal, where Derek Munday has some interesting ideas on such things using servos
-
No idea Stephen, but Slaters do a nice 7mm scale version. The notes say they were short lived, mainly as they needed access to both sides. One would hope a 4mm version might be available somewhere.
-
These are the cranes I mentioned at the Dockyard & which the late Ted McIlroy made fully working 7mm scale models of. See Mayner's blog/thread on the Fenit branch. As for exhibiting... The amount of other stuff that the exhibitor needs to take with him/her is considerable and no doubt I am not alone in being neurotic about leaving something vital behind when I go to a show. So, along with the baseboards, trestles or other supports, plus lighting and pelmets, what else needs to go? Starting from the ground up, we need a set of drapes, to hide the baseboard legs. These days, they should be fireproof and not be within 15cm or so of the ground. Thankfully, my drapes have been recycled over several layouts, though I still rely on drawing pins [and sore thumbs] to fix them in place. Velcro one day… Electrics come next. Most shows only give you a single mains socket, so that means several additional multipoint leads. Arigna Town needs four points for its lights, plus one for layout power, two more for buildings, plus at least two more for the spare controller [wheel cleaning] and a soldering iron. And this is a relatively small layout. Generally, this all goes in what I call my ‘sundries box’, which also includes odds and ends like pieces of plywood [for packing layout feet], eight clip-spots, screwdriver, gaffer taper, soldering iron and a plastic box with all the M6 bolts and wing nuts which hold the various fittings in place. The latter something I dread leaving behind! An additional ‘box’ is an old brief case, which takes the transformers, hand held controller [Gaugemaster], spare controller [H&M Clipper], uncoupling hooks and an A4 file with layout info. One set for me [the wiring diagram amongst it], the other basic info on the layout for folk who might want to invite it to future shows. Then there is the ‘tool box’. This is my long suffering cantilever box with all my modelling tools, plus a range of minor bits and pieces. Essentially, if I need something that isn’t in there, I can only hope there is a tool stand [like Eileen’s Emporium], or I’m stuffed. That said, if the layout is well built, then nothing should go wrong, but given the state of British roads these days, I am often amazed that the entire layout hasn’t been reduced to kit form, long before I arrive at the destination. Will be fascinated to know what other folk take & any ideas on keepimg things to a minimum. For me, this is the key difference between the owner/operator [who has a couple of mates along to help at shows] and the group layout which may well arrive in a large van or even a 7 tonner. When Mostyn Yard [a splendid P4 opus] arrived at Chatham last year, the team spent at least 5-7 hours setting up and knocking down. Much as I admire that sort of dedication, I like to be away within an hour of the show closing & the record was actually just 15 minutes, with a 3 board 7mm NG layout.
-
Model Railway Planning Irish Style 5 Fenit & Tralee
David Holman commented on Mayner's blog entry in Mayner's Blog
Interesting - was at Chatham Dockyard's transport festival today and took a couple of pictures of their steam cranes, one with its bodywork removed to show the innards. Haven't mastered posting pics here yet, so you can find it on my next blog. Sorry about that. -
At exhibitions, I often find myself paying as much attention to how a layout is built, as its scenic 'face'. This is because, despite many layouts and many more shows, I am still trying to find ways of making transportation & setting up simpler. My preferred favourite [not yet built I might add] would be an inflatable layout, which could be taken to shows in a carrier bag, but be able to be blown up to many times its deflated size... This is probably some way off [would need inflatable stock too!], so over the last three layouts have used the same set up. This is the 'Ulysses' frame, devised by Iain Rice in his Small Layouts book. My version has folding trestles, linked by pairs of longitudinal beams. The latter are around five feet long and are bolted together at their ends, which provides reasonable stability. Angle plates at one end of each beam fit into the slot at the top of the trestle. The photos show the layout set up in the living room [wife out shopping], so I could fit the lighting posts/pelmets and check the levels of the baseboards on the beams. Thankfully, all went well, so the last couple of days have been spent painting the rear and fascias of each board & am now starting the lettering for the pelmets.
-
Arigna Town - this week's scenery
David Holman replied to David Holman's topic in Irish Model Layouts
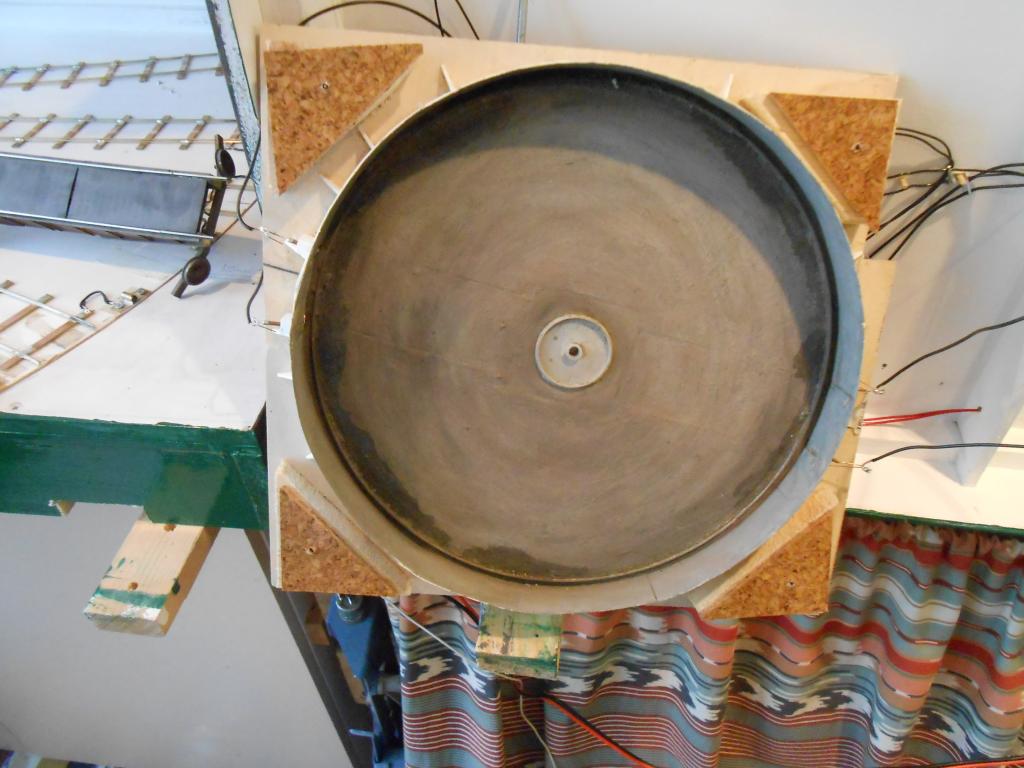
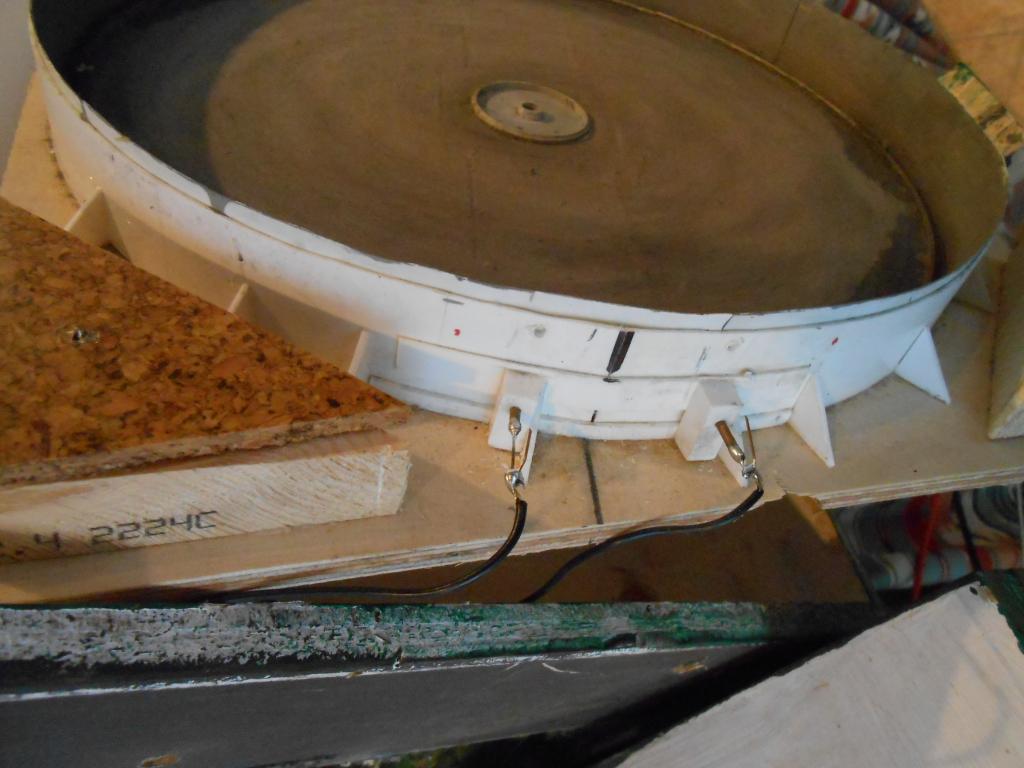
Did some web browsing on how to get power to the turntable tracks. Our American cousins seem to favour using a stereo jack plug as the main spindle and routing two wires from this to the rails. The other main method is to use the circular rail the table runs on and wiper pick ups to the deck rails, as per your locos. However, the Dapol kit is all plastic, so decided to have another go at my own method, which happily seems to work ok now. I've put two phosphor bronze wires in copper tube, through the wall of the turntable well, just below where the running rails are. The PB wire is bent to rub on small brass squares epoxied to the girders. Leads are then soldered to these and the deck rails. Provided the table is always rotated the same way, the PB wire contacts the brass squares and power from the track is taken to the table deck rails. This happens only when the track is aligned, so there is no danger of the loco running away when the table is half way round. with 'pick ups' at both ends there is a bit of 'belt and braces'. It seems to work for now - just hope it will prove robust enough in exhibition use - I estimate the table will be turned at least 50 times a day at a show, so time will tell.
-
I may be wrong, but looking at the ‘My Layout’ pages, most contributors have what might be called ‘home layouts’ – in other words, non-portable ones. Well done the Wexford crew though - a nice surprise in the latest RM. Arigna Town was designed from the outset to be a portable, exhibition layout [as indeed have all my previous efforts] and, aside from the obvious issues of needing to be taken apart & put together again for shows, there are various other aspects, such as transport and presentation, which need to be considered. Therefore, thought it might be worth sharing my experiences of taking layouts to shows over the last 27 years. That last number is a bit scary, but it was 1987 that I first tried exhibiting, with a little EM gauge layout at the Chatham Show. Arigna Town is made up of 4 identical baseboards, each a nominal 120cm x 60cm. Curved and/or irregular boards may be ideal for some, particularly in portraying a specific prototype, but for me, baseboard size & shape is all about transportation and storage and this size is about the biggest I can manage on my own. However, when you exhibit a model, there is a lot else that needs to go with you. Legs, trestles or whatever, for it to stand on; power supply, controllers & such, your stock [which needs careful protection], plus a host of sundries including tool box and items for presentation – in particular lighting. Most exhibition halls will not be bright enough to show off all your hard work & indeed may not even be the right sort. I do my painting under normal household bulbs, so when seen under fluorescent lighting, the colours look all washed out. In recent years, have settled on ‘clip-spot’ type lights, set on gallows type brackets, bolted to the rear of the layout. The clip-spots [i have 8 in all] provide good light, but the gallows brackets were a pain to both store and transport – it is surprising how much room they take up. Hence, have now made some folding brackets, which will hopefully solve that problem. The gallows will also hold the layout pelmet – more of which later. Hopefully the pictures help. In the coming week, I will be having a trial run to see how everything fits in the car, so will let you know how I get on.
-
Model Railway Planning Irish Style 5 Fenit & Tralee
David Holman commented on Mayner's blog entry in Mayner's Blog
The whole Fenit track plan would make a very good basis as an exhibtion layout. Am surprised Iain Rice hasn't drawn something as looks right up his street. The pier and causeway are just as interesting Chatham dockyard has several mobile cranes and former member Ted McIlroy (sadly killed in a road accident last year) built 7mm scale models of two of them. He used RG4 motors to enable full operation - they could move along the track, while the jibs could lift and slew, plus the cables wind up and down. Contro was via additional pick ups on parallel rails, as this was per DCC. Utterly exquisite, they worked beautifully and would have looked fabulous on something like Fenit pier. -
Arigna Town - this week's scenery
David Holman replied to David Holman's topic in Irish Model Layouts
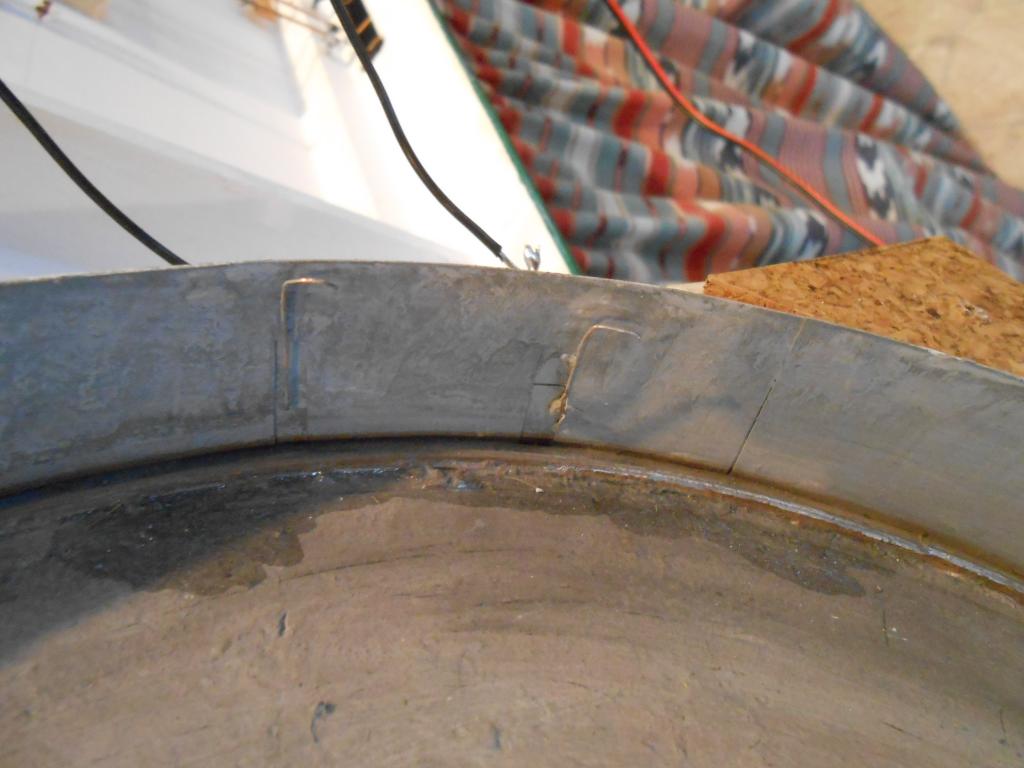
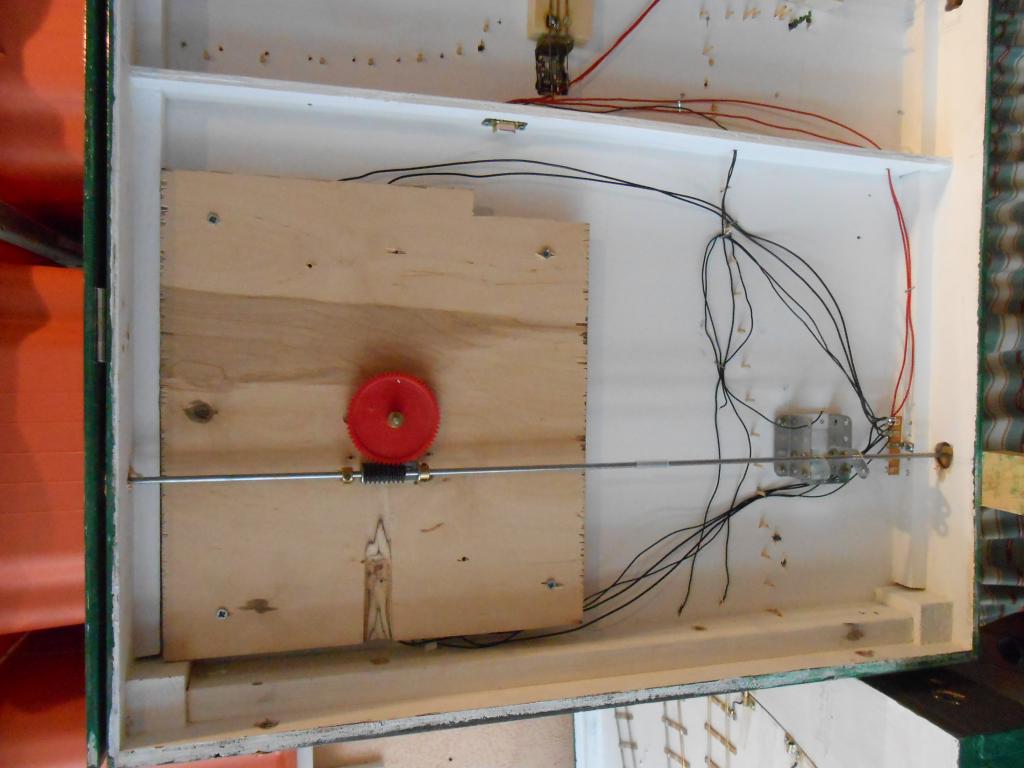
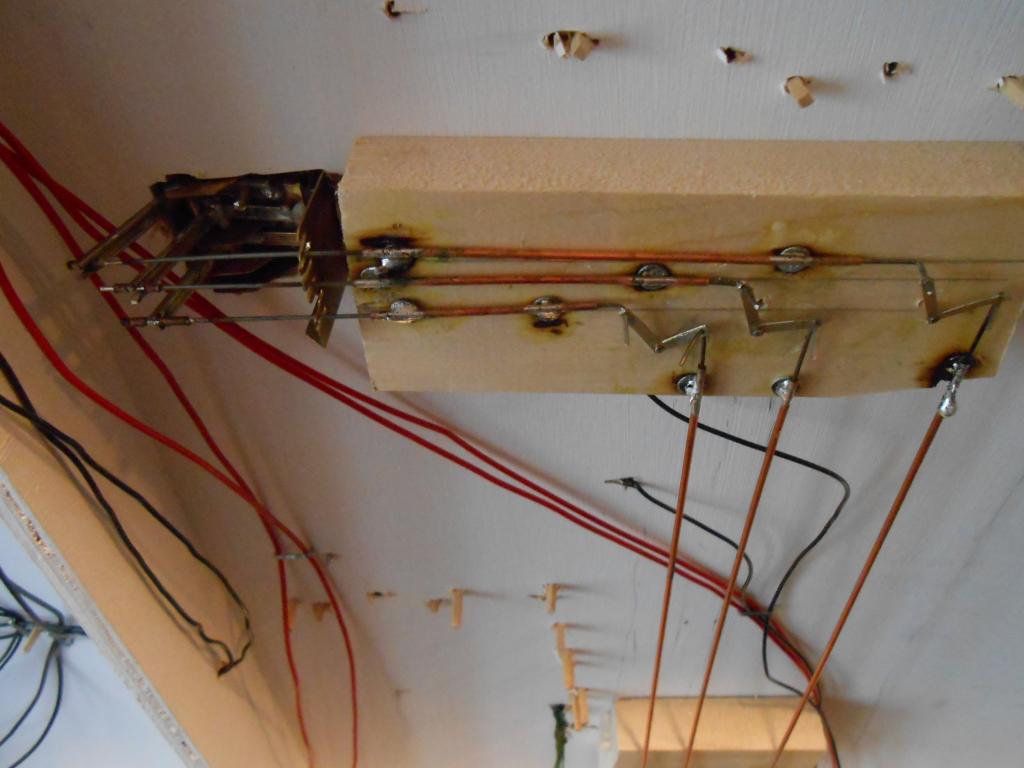
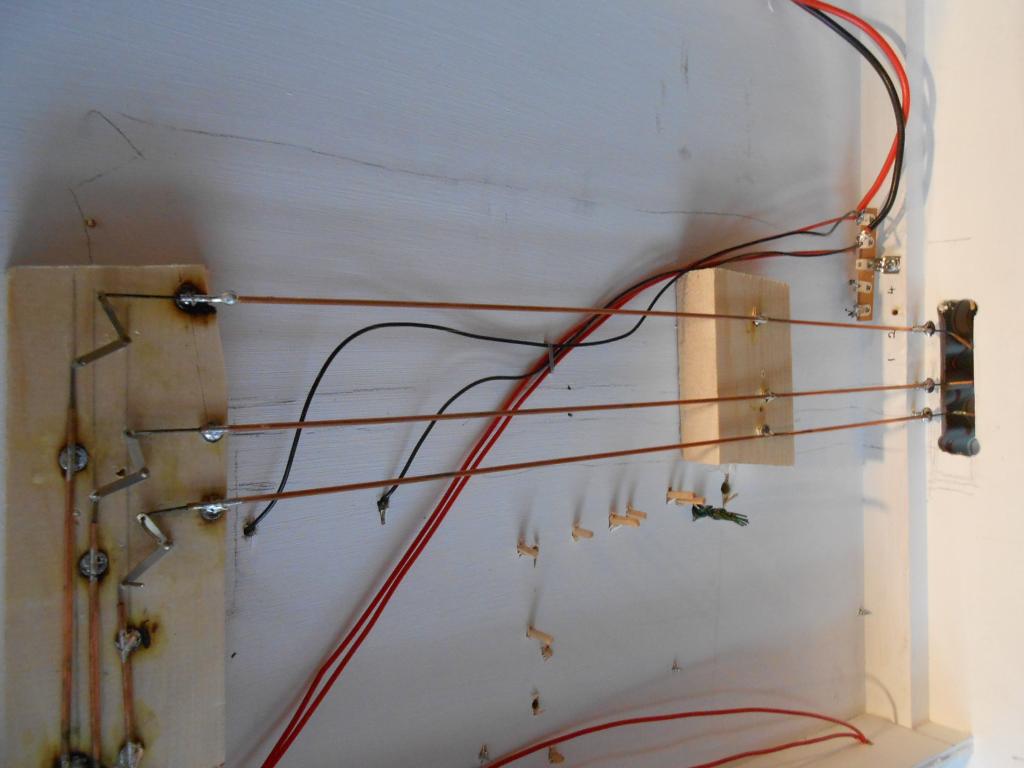
No not the nether regions of my maiden aunt, but the operator's side of the layout, plus a peek underneath, though am sure there was an Ealing Comedy on a similar theme & no doubt one of you out there has an Aunt Arigna with a large flat rear... As you might have gathered, the layout has been turned round, so the operating side is facing outwards in the workshop. This is because most of the scenic work is complete, so wanted to spend some time making sure it will be operationally sound for Chatham in June. First job was to complete the links for the signals. The photo shows the wire in tube and cranks to the edge of the baseboard. Copper tube and steel piano wire have been used - all a bit crude, but it seems to work and the signal can be lifted out to avoid damage when the layout is transported in the car. Next job was to enlarge the holes for the point control. The same wire in tube, but on the baseboard surface [under the scenery] this time. however, the initial holes drilled were too small to get my fingers in to pull/push the points, so these have been enlarged. A couple of points were VERY stiff, but turned out to be a bit of over painting & they were cleared fairly easily. Have therefore been test running stock & so far, all seems well. However, will do a lot more testing as previous experience shows that there will always be one or two movements that result in a wagon derailing for no apparent reason - usually at a show when a video camera is running - so it is important to try and weed these things out beforehand. One immediate problem is with the turntable, as the pickups to get power to the track on the deck are proving temperamental. Indeed one wire has already broken, so a re-think is needed. Can eventually see me having to cough up for a metal version [Metalsmith do one for around £100], but at the moment, at least the hand cranked gears are ok, but a 'table is no much use if you can't drive a loco on or off it, while for the Railbus, it is an essential. Any ideas on powering the track on a plastic [Dapol] turntable welcome! Currently am using phosphor bronze wire wipers rubbing on squares of copperclad at each end of the deck, but open to suggestions.
-
Allypally and thoughts of scale and gauge
David Holman commented on David Holman's blog entry in David Holman's Blog
Well worth it, Warbonnet. As you say, a grand venue and a really eclectic mix of models. Always something for everyone. Best of all, lots of space, both for big layouts and to help avoid the rucksack luggers. A good day out. -
Your comments are very much appreciated folks! Mayners note about speed of construction set me thinking and he is right, the loco took just five weeks from start to finish and in one of those I was away on holiday. So, less than 30 days. However, I am currently increasingly retired from work, so estimate I was doing around 3-4 hours most days. That means about 100 hours overall, which seems to be about par for a 7mm kit. Perhaps I need to get out more(!), though with the winter modelling season coming to an end (and work on the layout moving to presentation fot it's first show), then it might be a while before a new project starts on the workbench.