

Mol_PMB
-
Posts
2,165 -
Joined
-
Last visited
-
Days Won
112
Content Type
Profiles
Forums
Events
Gallery
Blogs
Store
Community Map
Everything posted by Mol_PMB
-
Bogie flat wagons with steel floors 30091-30098 - photos?
Mol_PMB replied to Mol_PMB's question in Questions & Answers
Some newly uploaded photos from the IRRS Archive on Flickr, relevant to this thread; one of these may be the image in Doyle & Hirsch: https://www.flickr.com/photos/irishrailwayarchive/54402778987 https://www.flickr.com/photos/irishrailwayarchive/54404027795 -
101 spent part of its life as an oil burner so it could deserve a white spot.
-
As well as the picture albums, and noting your memories of the Larne line, then if your main interest is NIR I would suggest: Jonathan Allen’s book ‘35 years of NIR’ is excellent for a wordy history with illustrations. Edwin McMillan’s ‘Dark Days and Brighter Days’ is a very readable, more personal history of NIR. ‘Diesel Dawn’ is an excellent more technical book about the development of diesel railcars of Ireland, particularly those north of the border. They should all be available secondhand.
-
The Eyre Lee Bird Railtour Cork-Galway-Return
Mol_PMB commented on Niles's event in Community Calendar
-
Some 33 new photos on the archive this weekend - many thanks Ciaran! These are mostly black and white images of CIE wagons and containers, some nice detail shots and I’ll add links into my relevant threads when I’m home again in a couple of days. Some images will be familiar from the Doyle&Hirsch stock books or CIE diagrams, but now visible at a better size. https://flic.kr/p/2qTtSBQ https://flic.kr/p/2qTosTa etc
-
If you search on ebay for Irish Railway Models there are 4 of the grey/blue NIR Mk2 coach packs for sale at present - which may be suitable for the Hunslets but some are slightly later types that ran with the 111s. Maroon/blue NIR Mk2s have been promised!
-
And We Thought Only Locos Used Turn Tables!
Mol_PMB replied to murrayec's topic in Letting off Steam
There is a trolleybus turntable somewhere in Europe, where the route terminates but there’s no space for a turning loop. -
Indeed! This is a picture I keep coming back to when looking at greens. It’s on the cusp between genuinely different paint colours, and the same paint but the difference between newly outshopped versus a few years of weathering. Maybe I should stick with silver! On the subject of the faded tan on the B101s it’s worth remembering that there were 3 different liveries on the withdrawn locos - one still had the early 1960s black and deep tan (without the white stripe at the cantrail), and had been withdrawn almost a decade earlier than the rest. Several had the black and shallow tan of the late 1960s. Some of the black and tan ones were looking almost greenish with weathering by the time they were cut up. Some of the other B101s received supertrain livery after being stopped! Only a few carried it in service.
-
Park Royals appeared in two distinct shades of green, There's a super colour photo dated 1961 in the book 'Keith Pirt Colour Portfolio' page 4 showing Park Royals in both shades in the same rake. The lighter green ones have black ends, and are cleaner so probably newly repainted. I'm pretty sure the AEC railcars appeared in the same two shades. And these two coaches are surely showing the contrast between the same two shades: The Park Royals in the 1959 image with C231 are the darker shade, and have green ends. I could be persuaded that C231 is the same colour as the Park Royals, just a bit cleaner (except for the black bits!) I don't think C231 is the lighter green seen on the railcars above, and on these photos of C class without lines The colour that to me always looks darker than all of the above, is the shade used on carriages in the 1940s with the two thick bands of eau-de-nil. Also applied to shunters 1000-1004. But perhaps it wasn't really darker. There aren't many colour photos of the 1940s livery and many of them may show vehicles after years in traffic that have darkened due to dirt, revarnishing etc. Perhaps also the bigger expanse of eau-de-nil makes it look darker? Is the official view that the green in this 1940s livery is the same as the darker shade applied to the AECs and Park Royals? Maybe after enough pints of stout all the shades of green will look the same?
-
Making an ‘E’ – the Maybach Diesel Model Assembly thread
Mol_PMB replied to Mol_PMB's topic in Irish Models
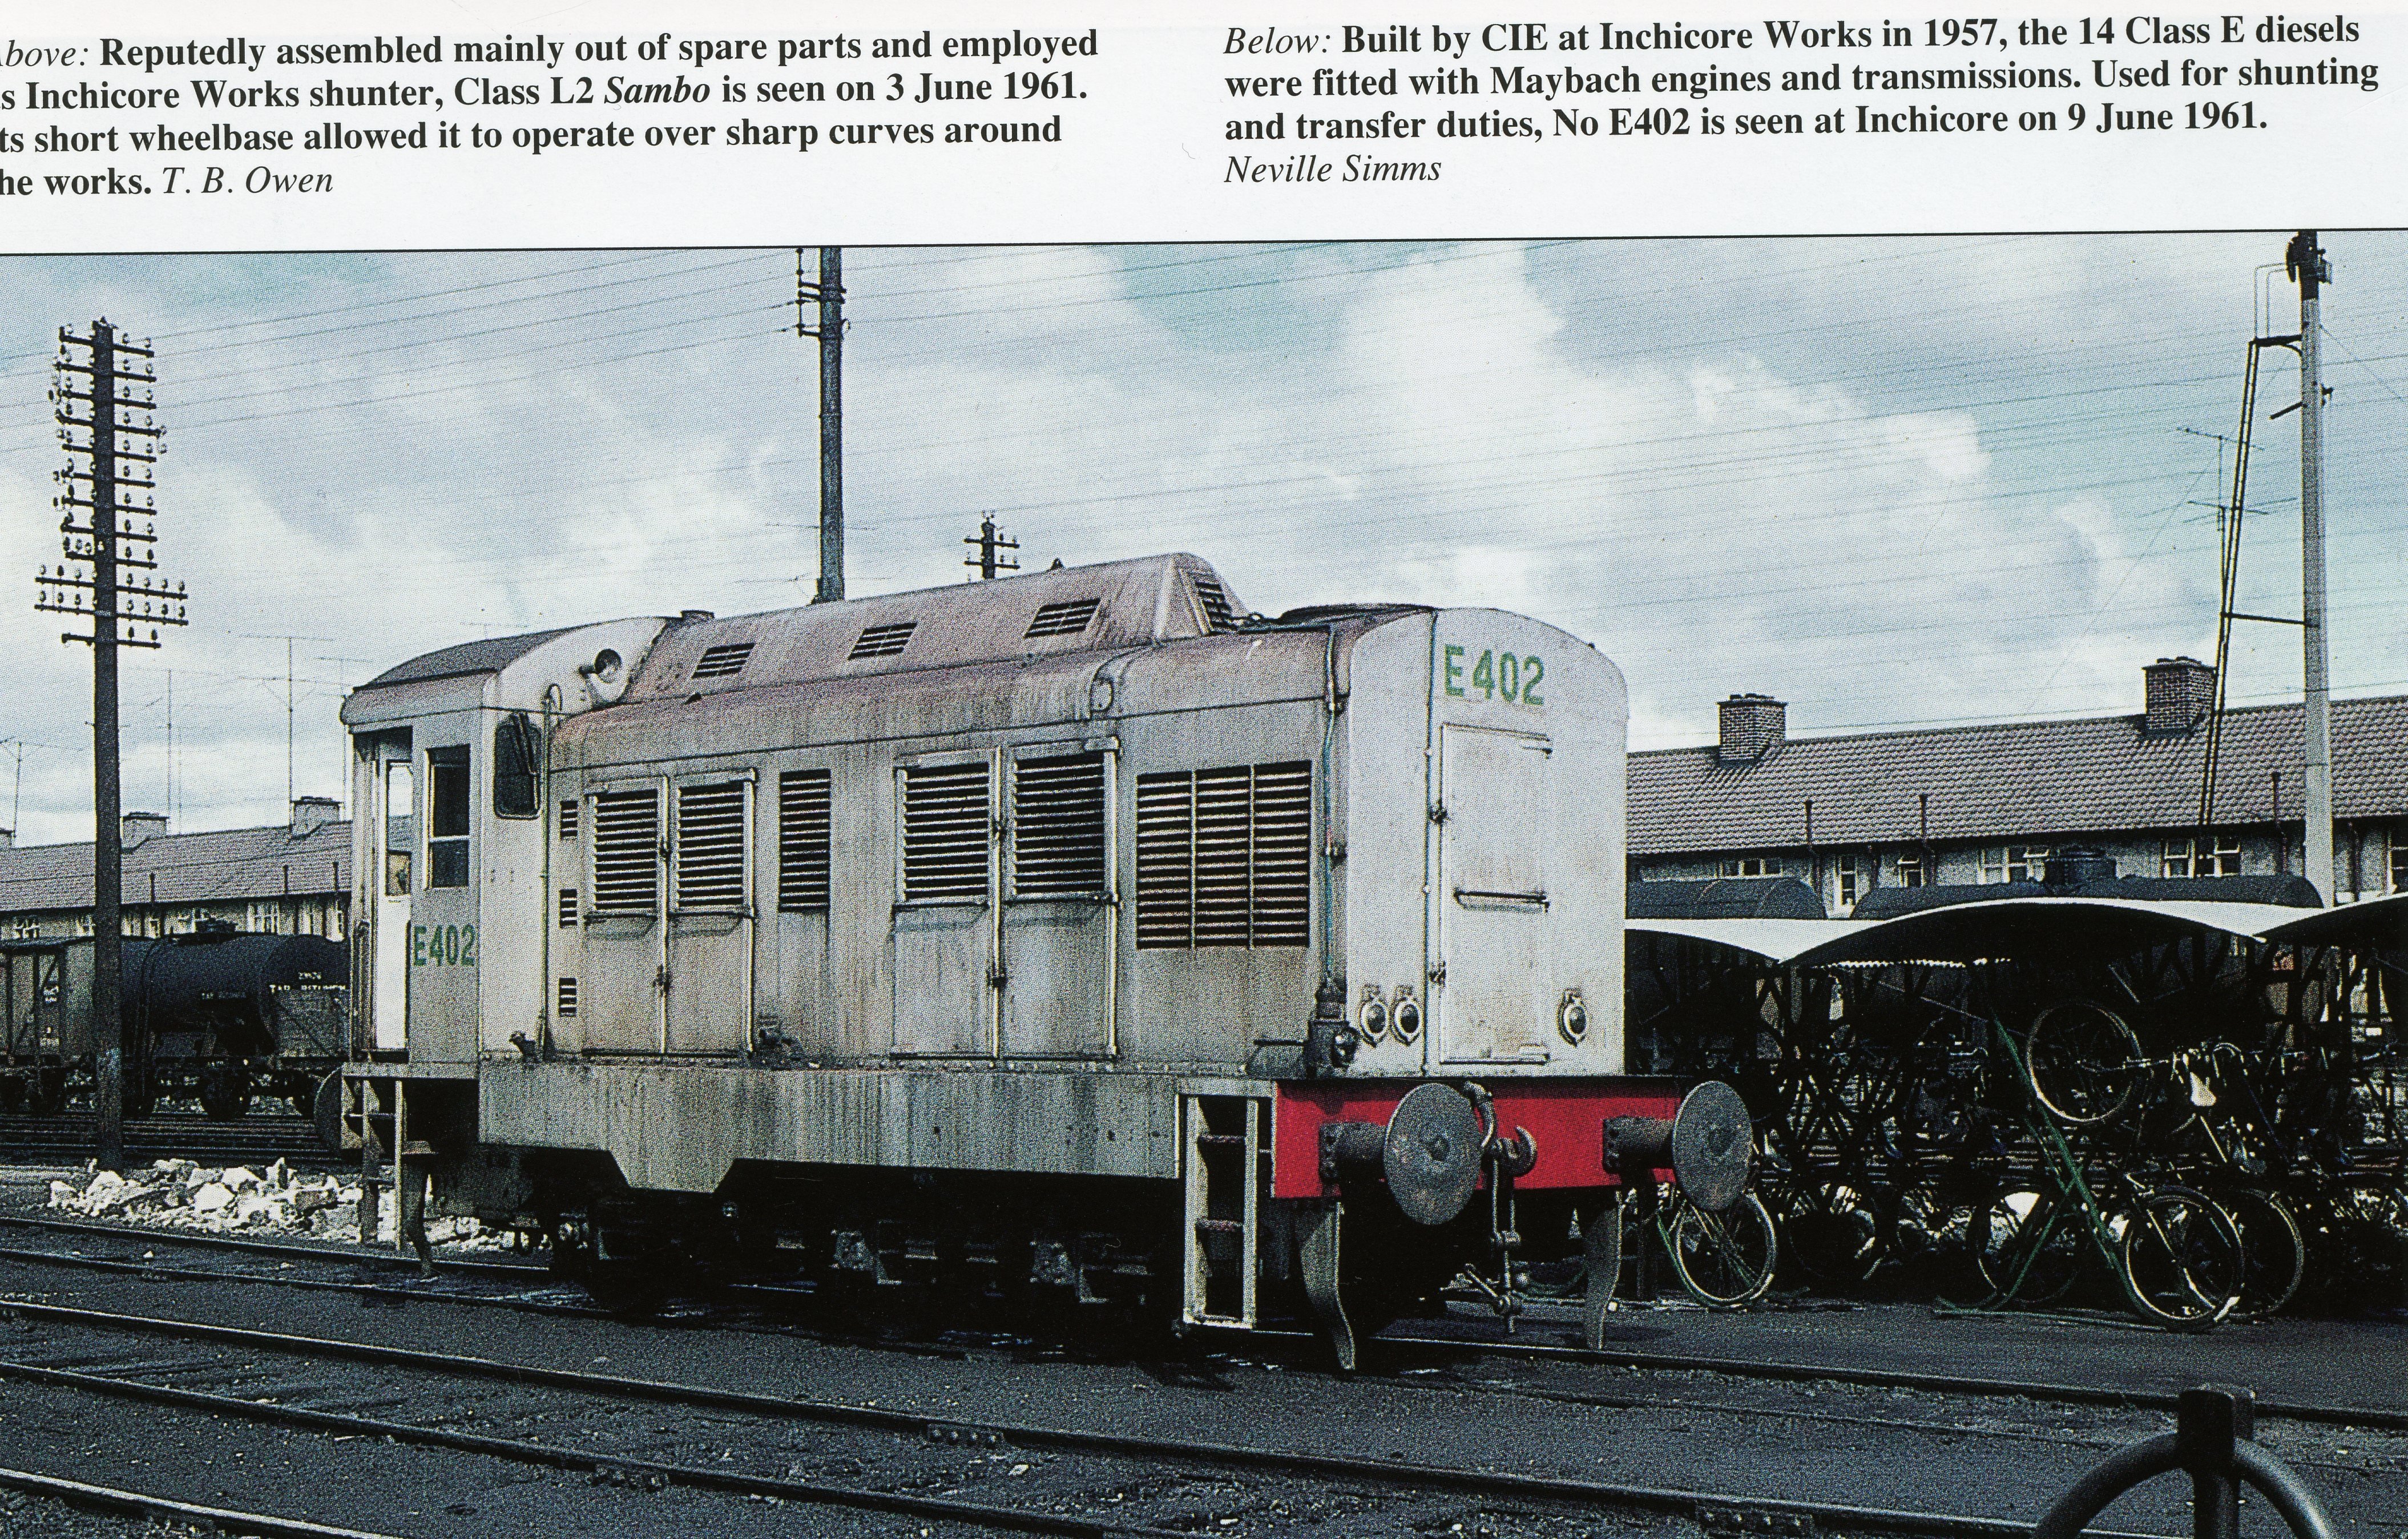
The two photos I have of E410 in silver are at Fenit in 1958 and Albert Quay in 1959, and I think it is in similar condition to E402 in the picture posted above, so that's what I'm going with. There's a lot of subtle staining down the sides, with heavier dirt on the horizontal surfaces. Should be an interesting challenge! Fenit: Cork: https://www.flickr.com/photos/irishrailwayarchive/54323027377 -
Making an ‘E’ – the Maybach Diesel Model Assembly thread
Mol_PMB replied to Mol_PMB's topic in Irish Models
Colour photos of the E class in silver livery aren't numerous, but I've found half a dozen in various states of grime that I will be using to guide my weathering. I'm going to aim for something like this: This one has a similar degree of grime: https://www.flickr.com/photos/irishrailwayarchive/54255284989/ But there were some much worse examples, like the one on the edge of this photo: https://www.flickr.com/photos/irishrailwayarchive/54255052946/ This view shows how the dirt accumulated on the bonnet top:
-
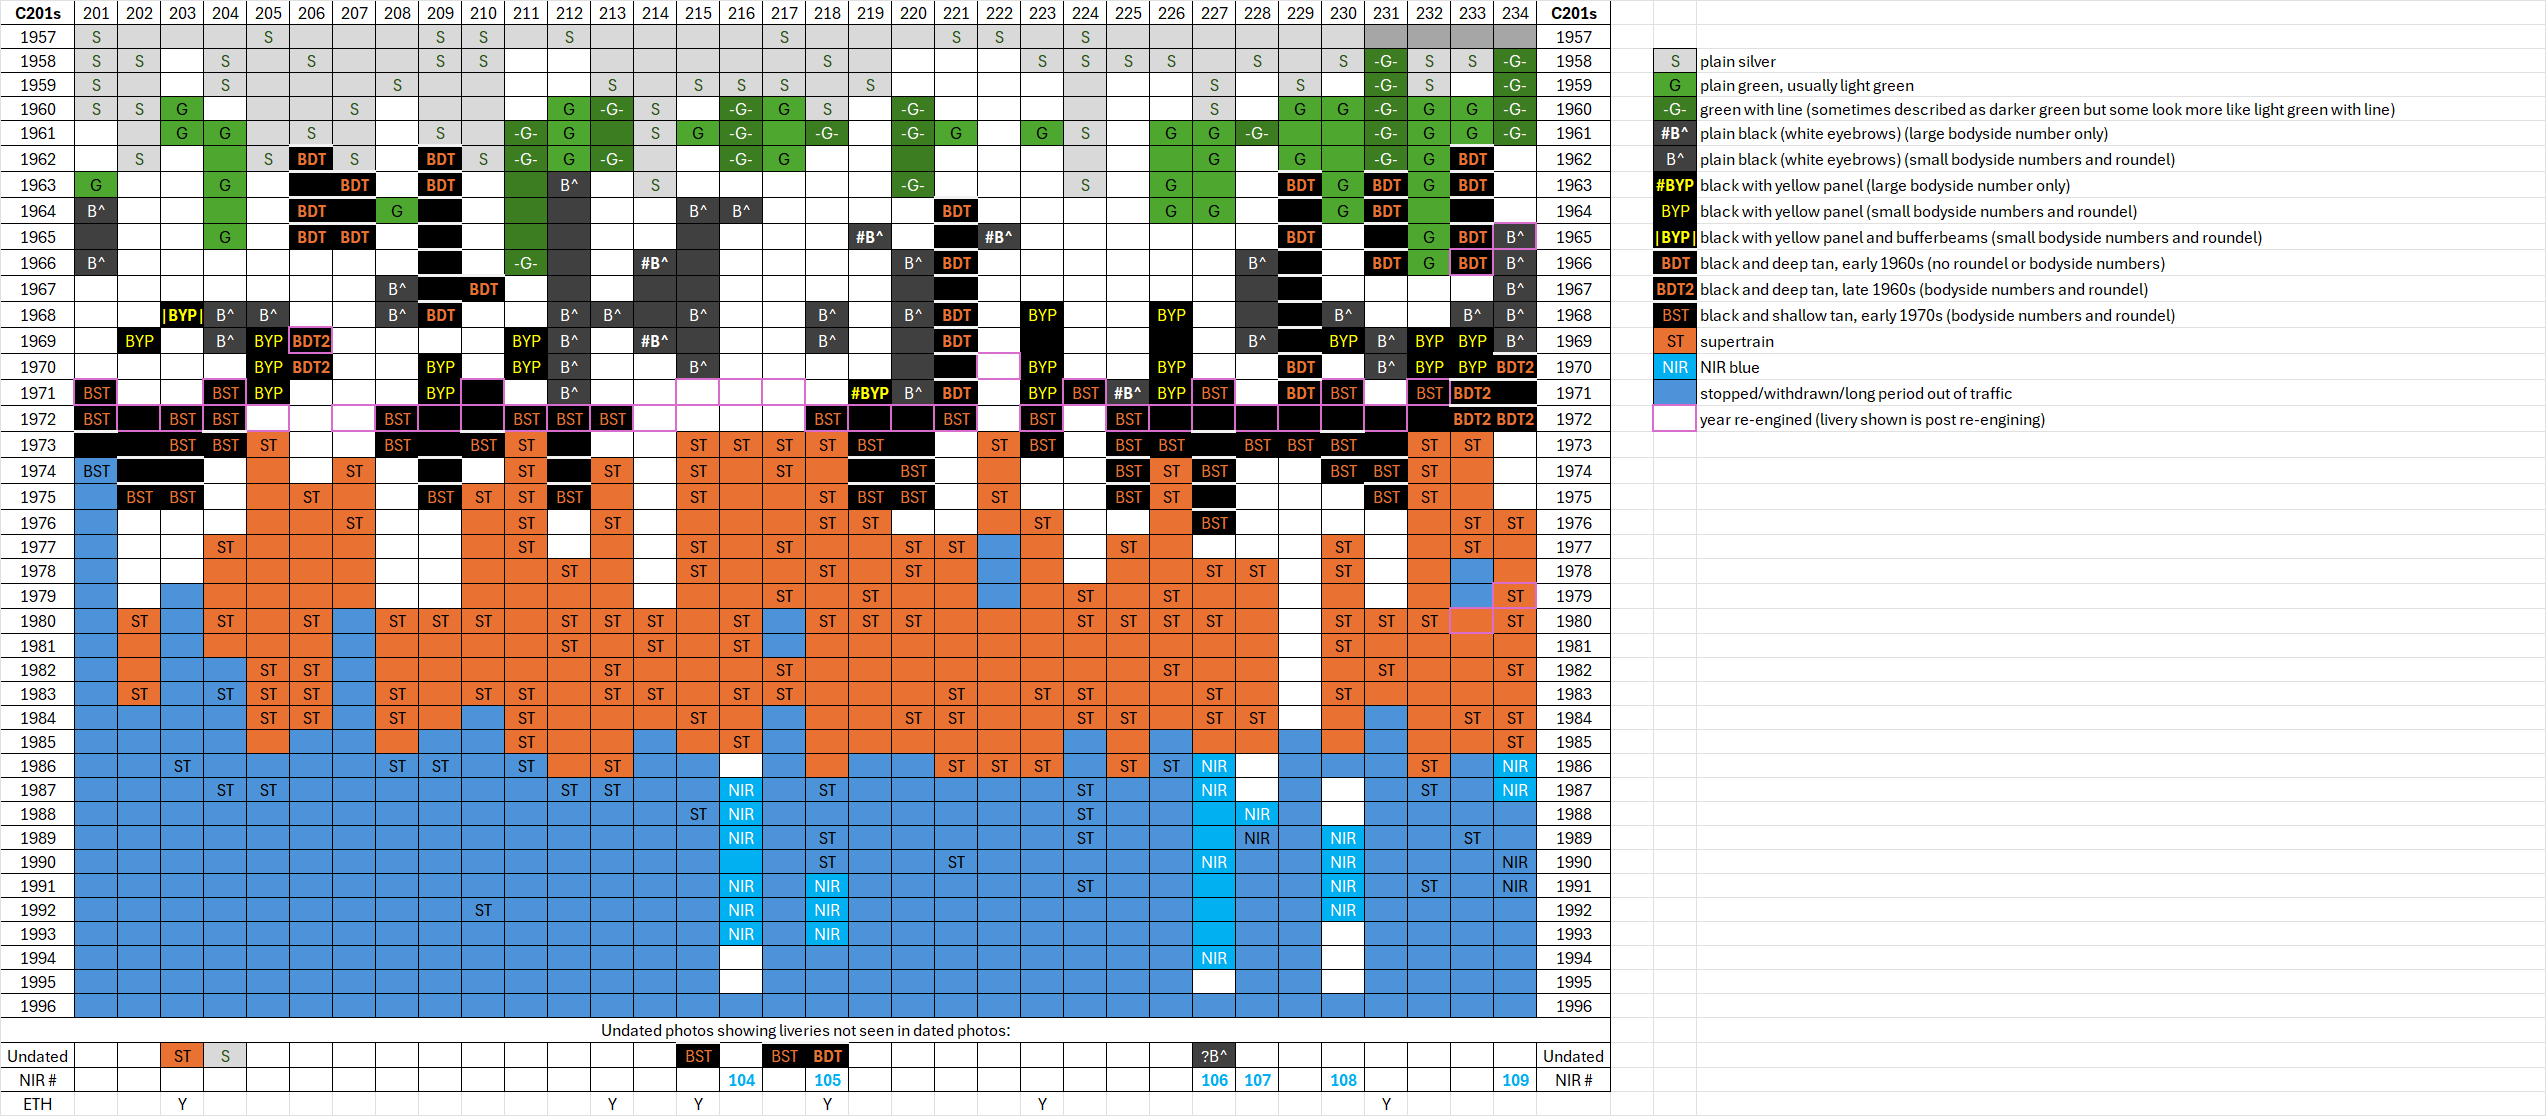
There are a few more variants not in your list, particularly variants of black and black'n'tan. I have looked into the green ones in more detail and I believe there were some in light green with line, possibly 211, 218, 220, maybe others. Whereas 231 and 234 (which were painted green from new, and at the same time as A46) were mid green with line. Good colour pictures with other green vehicles to compare to are needed to make a good judgement. I'm calling C231 in this image 'mid green': I know it's heresy but I think there were 3 shades of CIE green... But in my livery matrix I'm presently just showing whether green locos have the line or not. This is the current status of my C class livery matrix: There are some locos that would be particularly useful representatives of some liveries. Focusing on Crossley-engined examples for now: C231 or C234 for the mid green with line C232 carried unlined light green for much longer than most. A good example for silver livery would be one that never got painted green, and was still carrying silver in 1962/3, such as C202, C210, C214, C224 C209, C221 and C229 carried the black and deep tan (i.e. 'high band' in your terminology) livery for a long period C223 and C226 had the yellow panels for longer than most There are 5 variants of the black livery; when doing the A class IRM missed the most common one (with roundel on the side, but without yellow panel) so hopefully we'll have at least one C in that scheme which looked very smart when clean. C212, C215 or C220 might be good examples as they carried it for a long time.
-
All good stuff - many thanks! I think what this is telling me that for main-line diesel models at least, any number will do and I don't need to restrict myself to ones known to have worked in a particular area. Having said that, would we on the forum have any influence over which liveries and numbers are produced when the IRM C class breaks cover?
-
The wagon appears identical to the T&FHC one, though the only photo of that in T&FHC livery appears to be a maker’s photo before delivery. I have no idea if there was more than one. The T&FHC had fallen out with the W&LR to the extent that they bought their own loco, so perhaps no surprise they bought one or more wagons too.
-
I wonder how it behaved around the sharp curve onto Fenit pier? I reckon it was about 65m / 3 chains radius. Bogie rotation wouldn't have been a problem but I'd imagine that bufferlocking could be an issue. Maybe one day I'll find out in model form?
-
An excellent find! Well done!
-
My understanding is that in steam days in Ireland, specific locos were allocated to sheds, often for many years, with those sheds being responsible for maintenance and running repairs. Only if a major overhaul or heavy repair was needed would the loco go back to Inchicore. The same system was used in the UK too. D Renehan's articles on the various early diesel loco classes also mention particular locos being allocated to routes or sheds. For example, Cork's C-class allocation around 1960 included C203, C206, C207, C210, C214, C218, C225, C227 and C232. The G601's each seem to have been allocated to particular branches too - 601 at Kanturk-Newmarket, 602 to the branches around Tralee, and 603 at Clara-Banagher. For many years E428 was based at Limerick and E429 at Cork. My question is about how long this system lasted into the diesel era? Did the improved reliability and standardisation of the GMs lead the change to a centralised 'common-user' approach? Modern allocations tend to be a whole fleet together at a depot, with the operating diagrams arranged so that they return to base each week or so for exams and maintenance.
-
Making an ‘E’ – the Maybach Diesel Model Assembly thread
Mol_PMB replied to Mol_PMB's topic in Irish Models
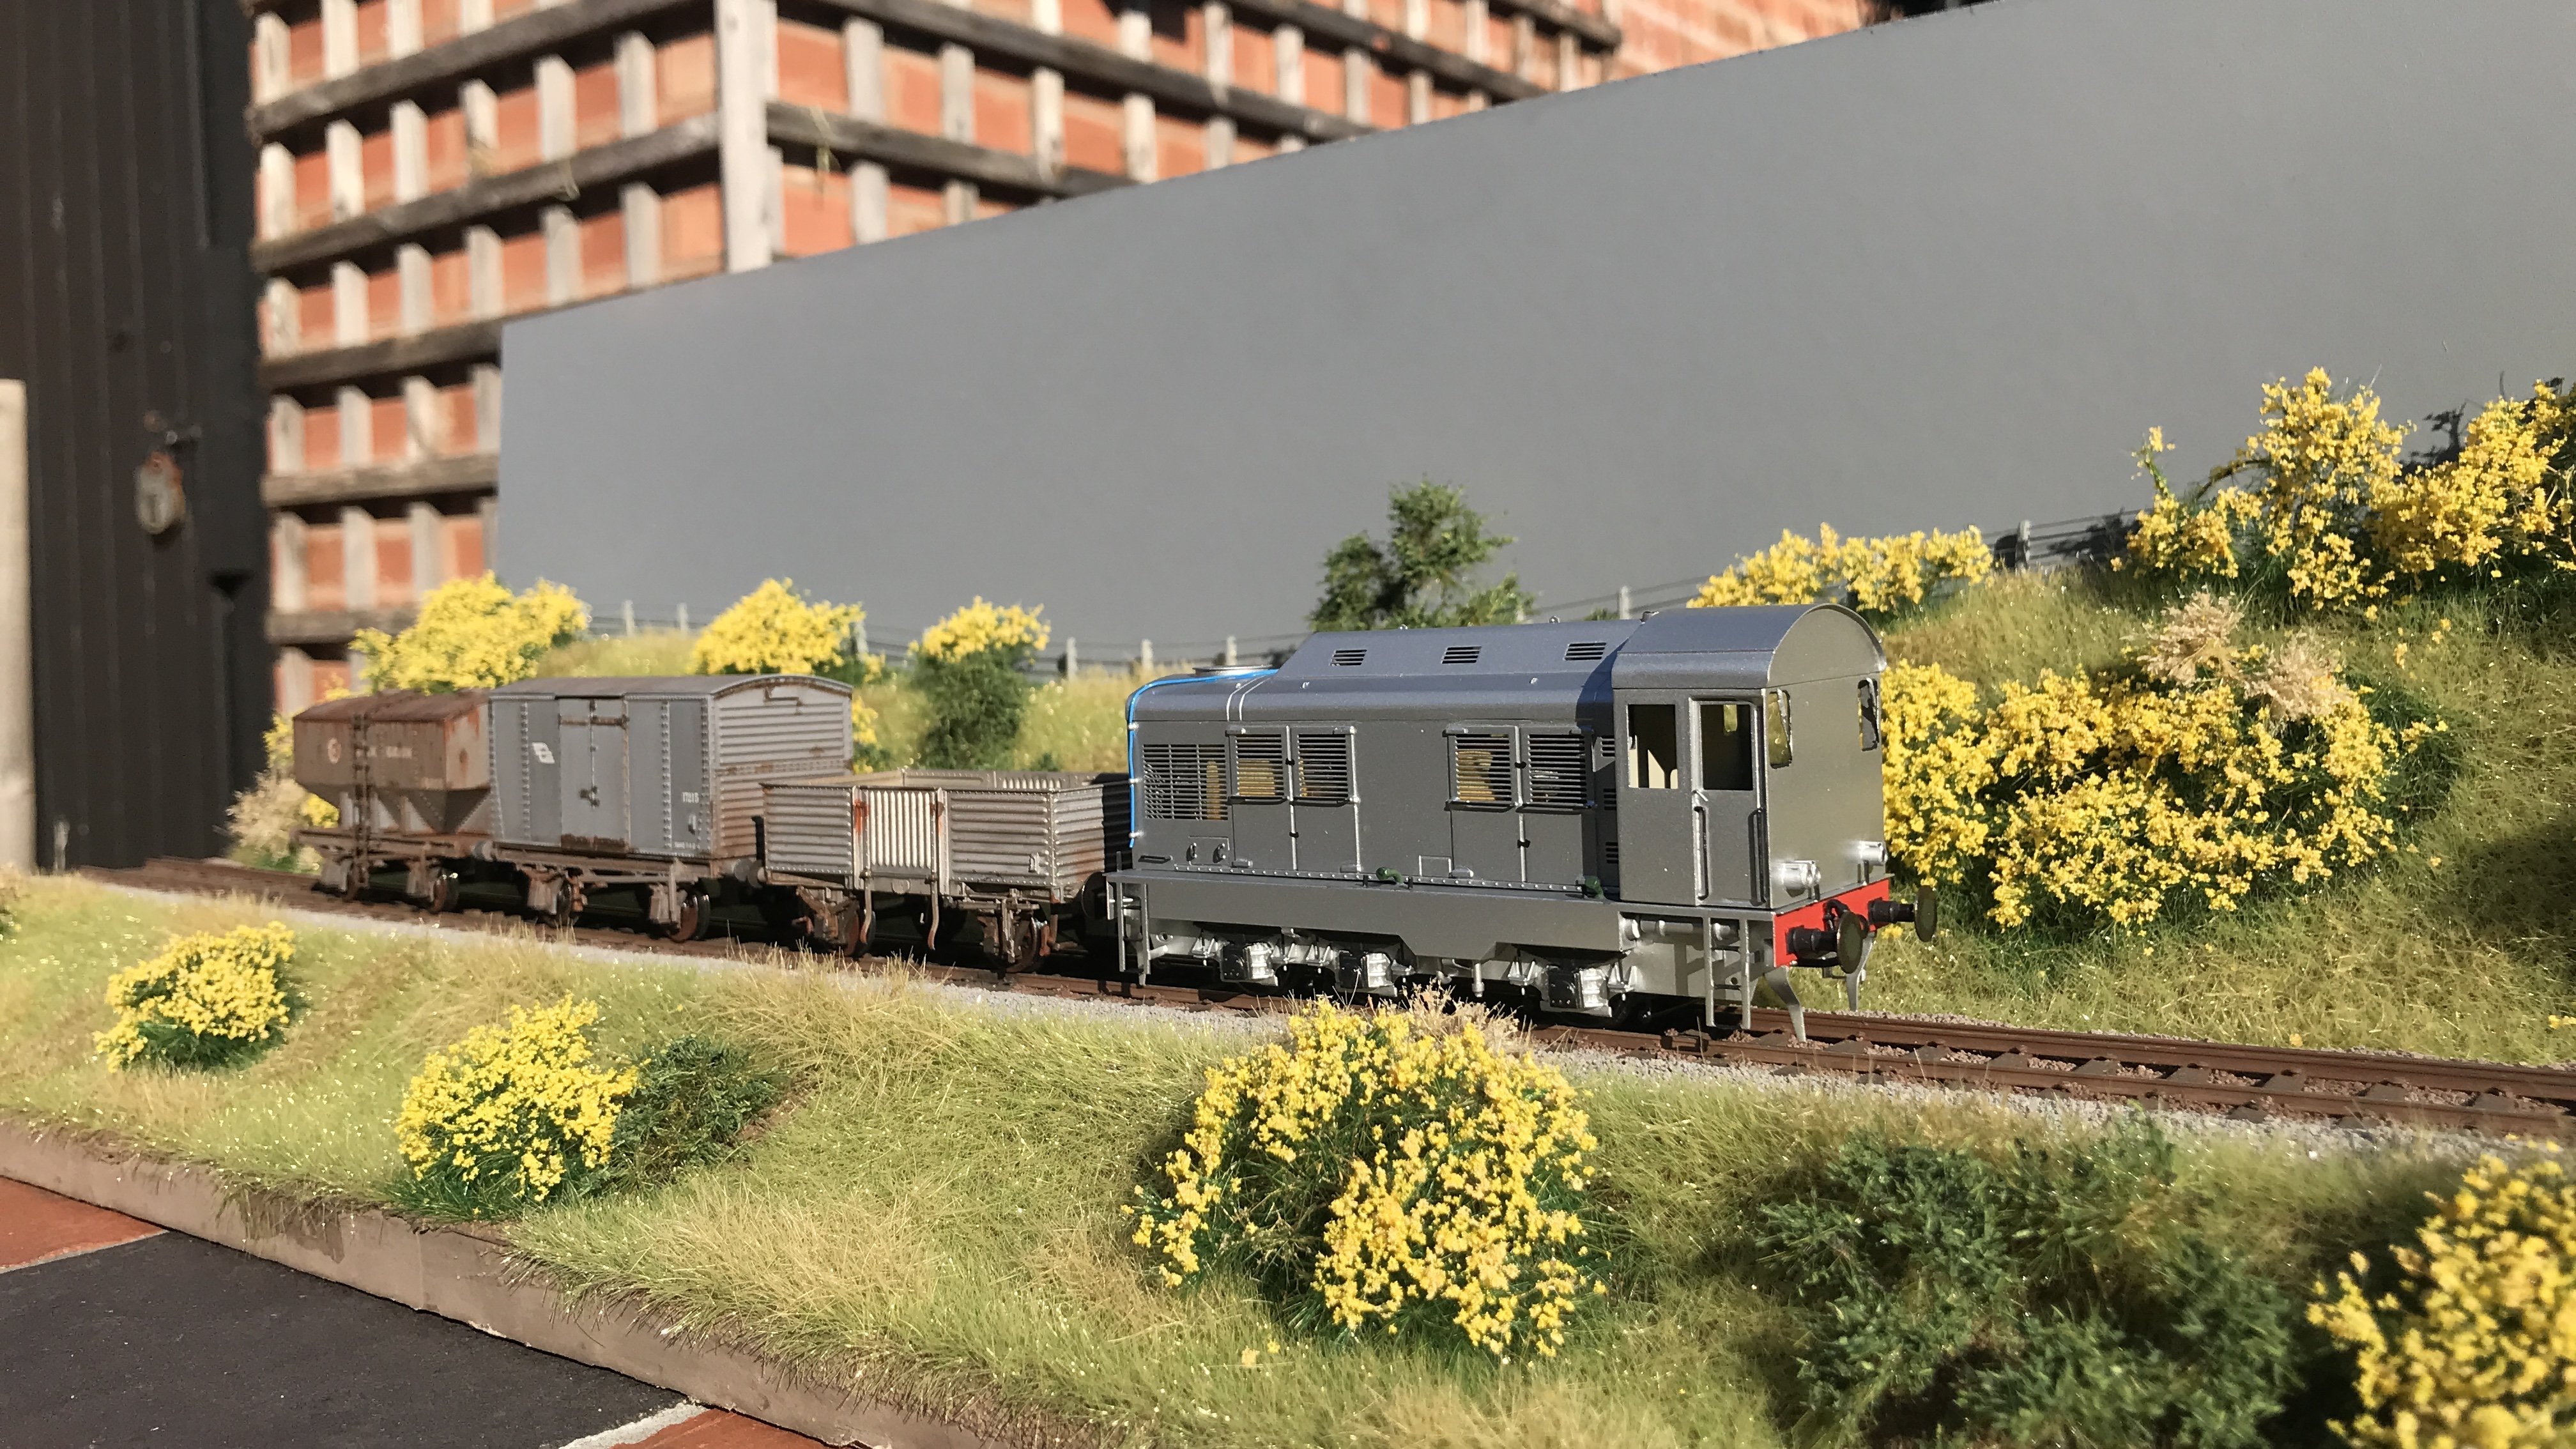
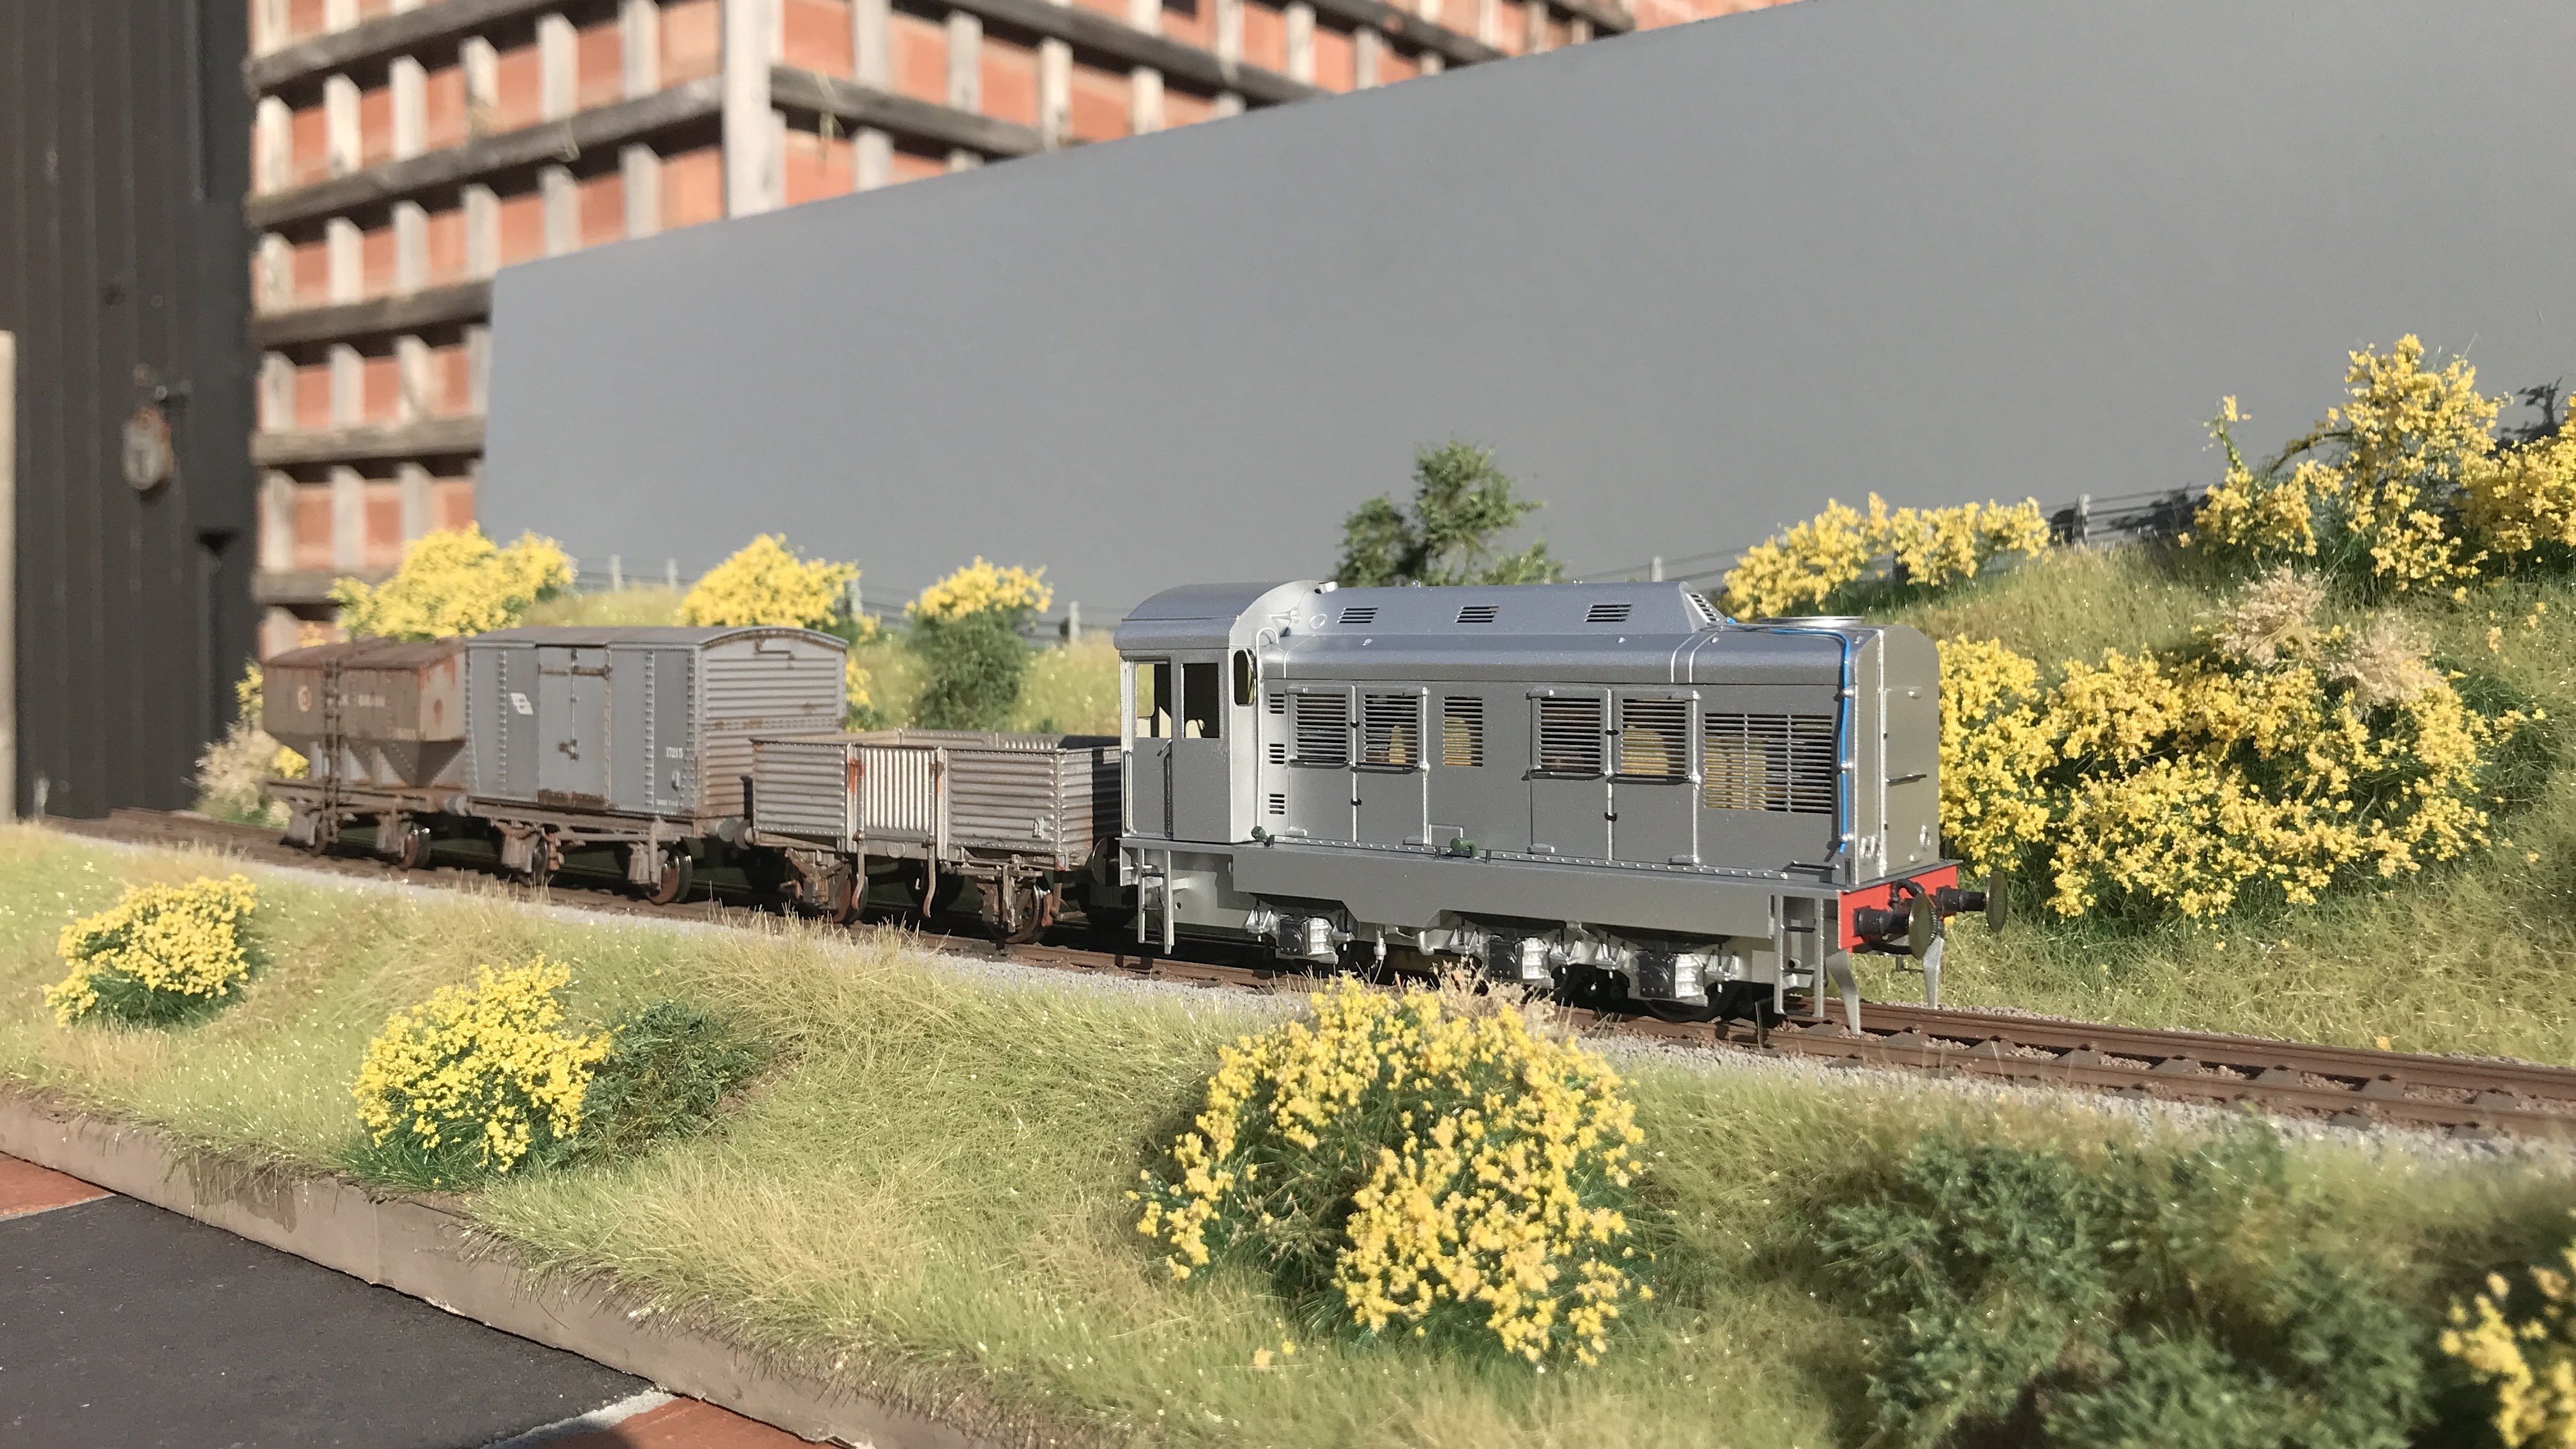
Thanks! The loco will be weathered too in due course. -
Making an ‘E’ – the Maybach Diesel Model Assembly thread
Mol_PMB replied to Mol_PMB's topic in Irish Models
Life has quiet and busy patches and this week is a busier one, but I have got round to fitting the buffers and painting the bufferbeams, and it's a sunny morning today so another couple of pics. The electronics parts have arrived (DCC decoder, stay-alive, LEDs etc) so that's probably my next job.
- 200 replies
-
- 22
-

-
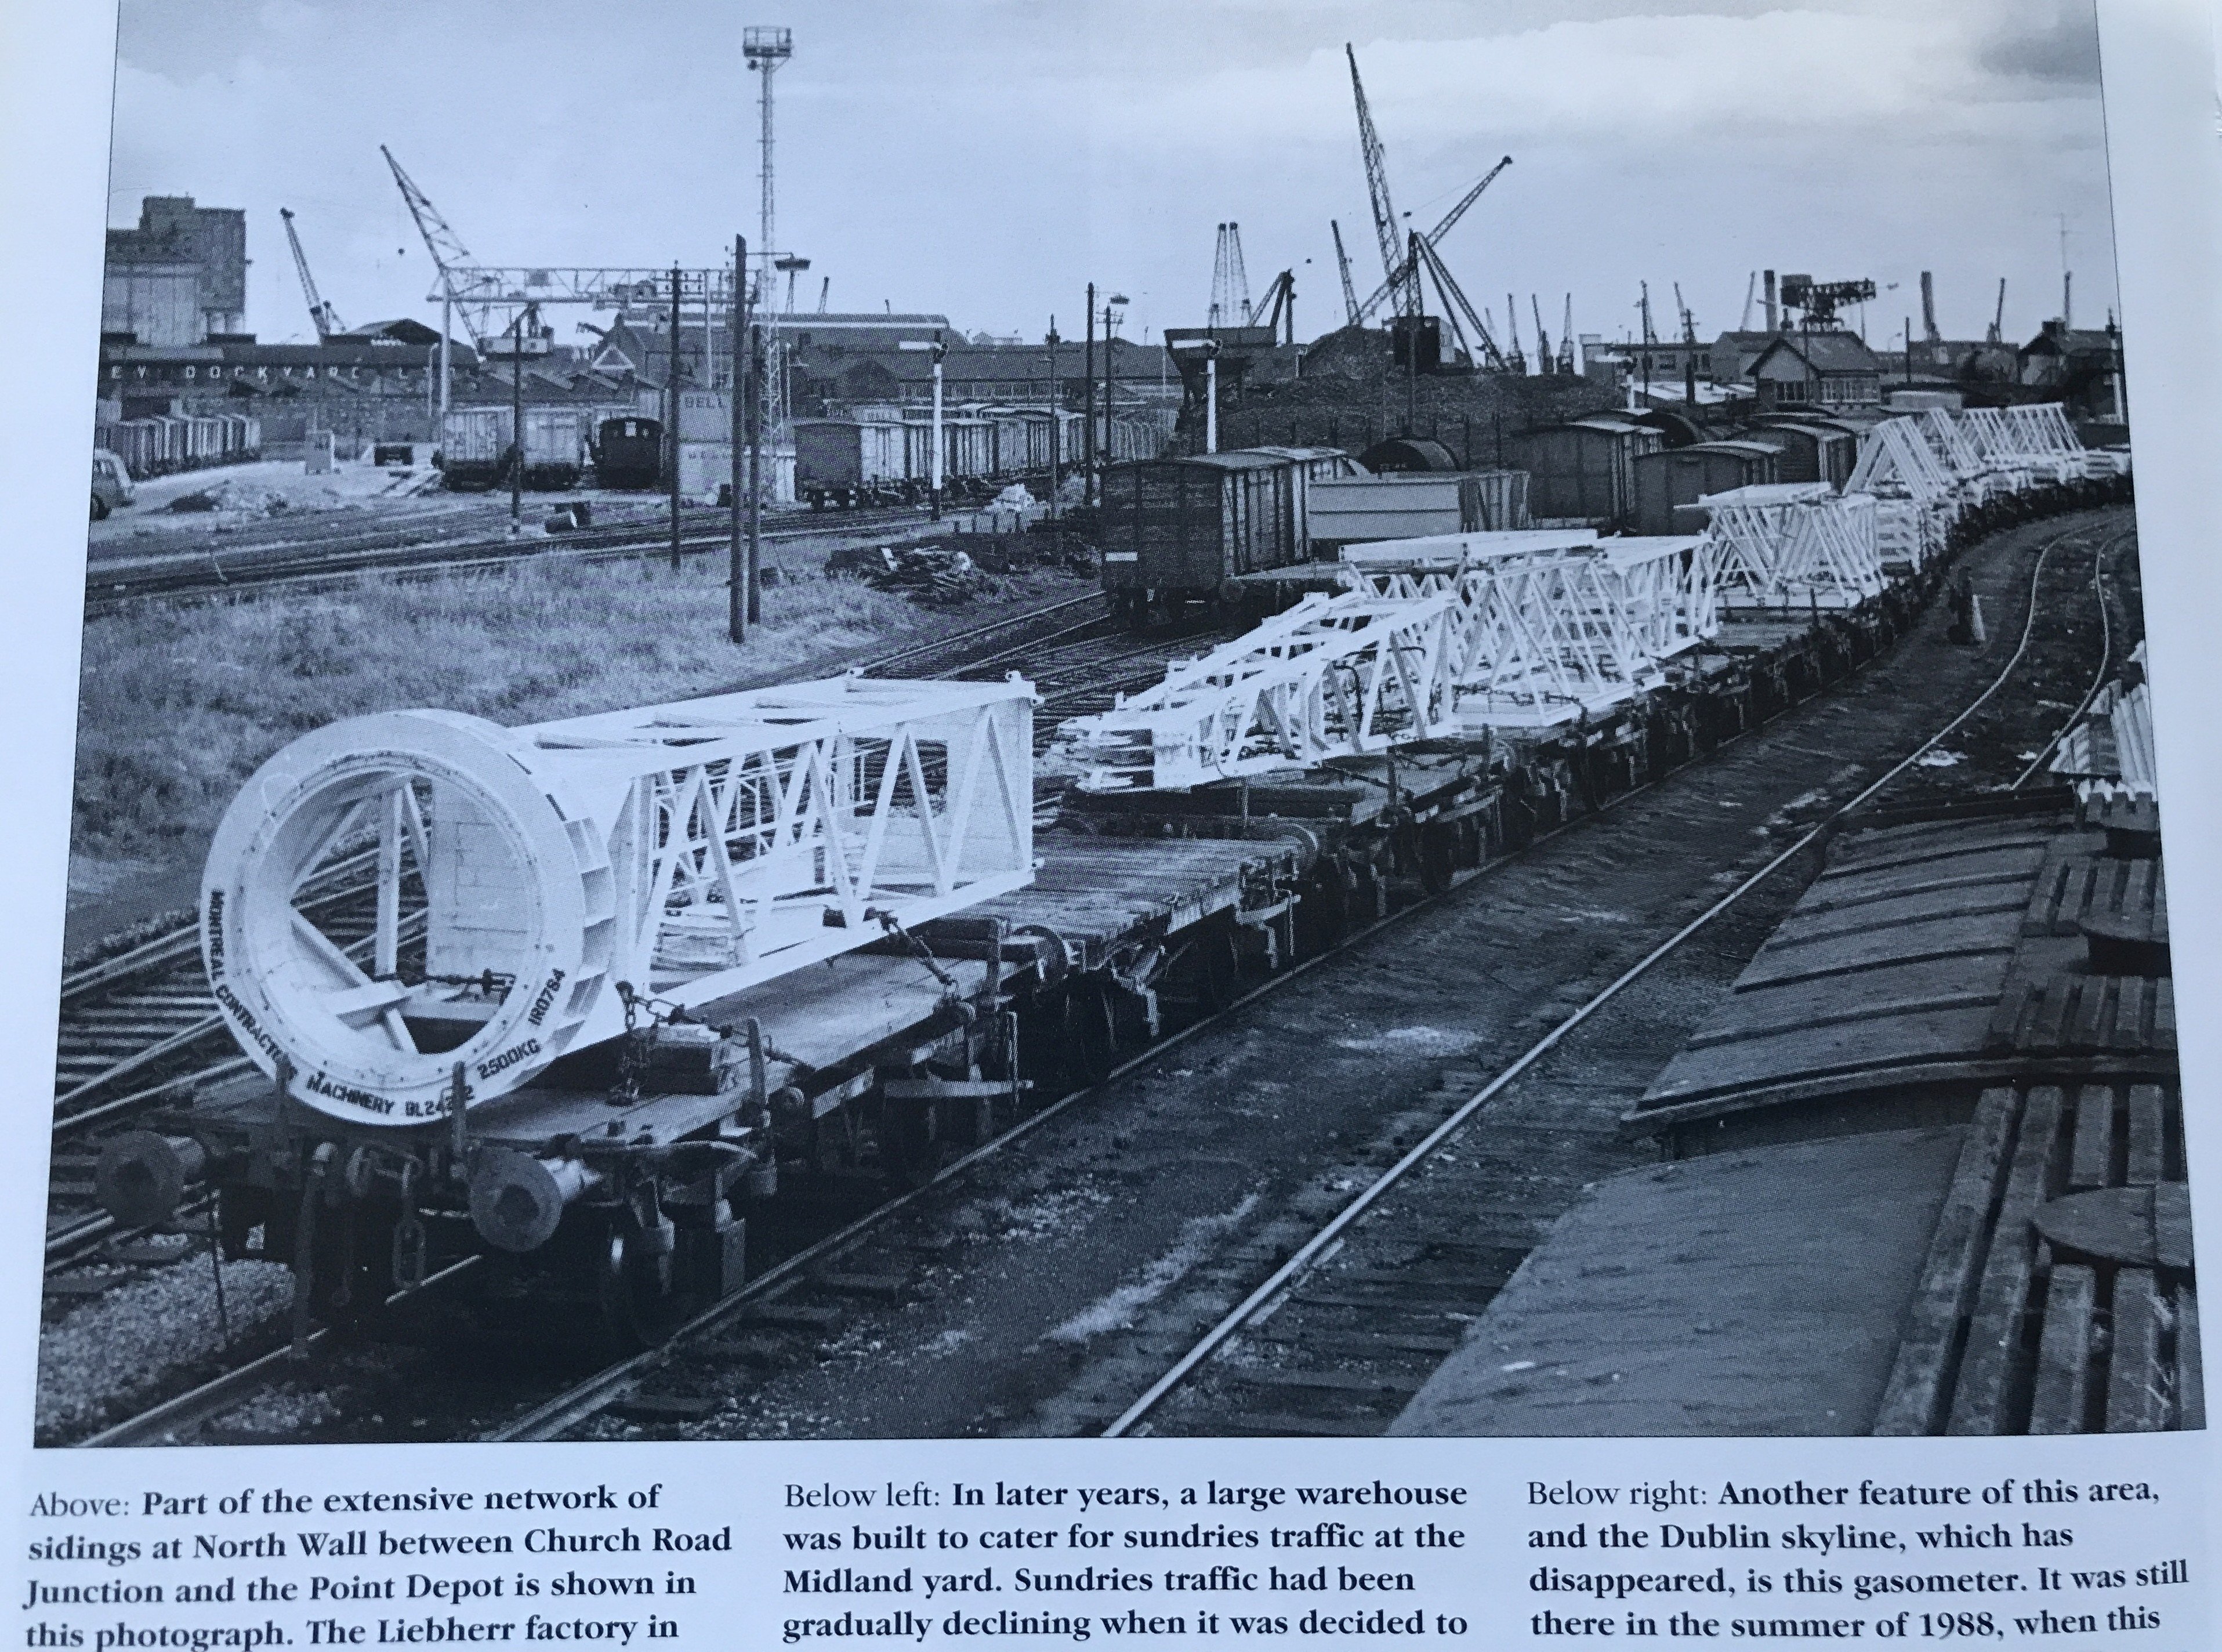
Thanks! I have only visited Fenit once, about 30 years ago, but I plan to go again in a few weeks time while I'm over in Cork for the railtour. The plan is train to Tralee, bus to Fenit, explore and photograph, then walk back to Tralee along the trackbed. Back in the 1960s/70s the Liebherr cranes did go by train to Dublin Port, though they seem to have gone by road to Fenit. It's not bending reality too far for me to model a train like this at Fenit: The Kennelly Archive has a superb selection of over 1000 photos on Fenit Pier from the 1950s to 1970s period. Very few locomotives appear in them, but plenty of ships, wagons and all the buildings etc. https://www.kennellyarchive.com/?search=fenit
-
Regarding Fenit locos, this is what I have pieced together from a variety of sources including photos, 'Waterford, Limerick and Western Railway' (Shepherd), 'The North Kerry Line' (O'Rourke) and 'Tralee to Castleisland, Dingle and Fenit' (O'Meara, IRRS Journal 179). The line was opened in 1887 by the Tralee & Fenit Railway but operated by the Waterford & Limerick Railway, whilst the pier and harbour were the responsibility of the Tralee & Fenit Harbour Commissioners. The W&LR also operated the pier on behalf of the T&FHC between 1887 and 1899. Until 1901, the branch was usually worked by W&LR 42, an 0-6-0WT built by Hawthorns in 1862, and originally 4'8.5" gauge. That is probably the loco pictured here: As early as 1892, were disagreements between the W&LR and the T&FHC, and the situation deteriorated until the T&FHC acquired their own loco secondhand in 1899. This was Hunslet 557 of 1892, an 0-6-0ST. In 1901 it became GSWR and GSR 299, and after reboilering in 1937 it continued to work Fenit pier until it was closed in 1941. 299 latterly worked in the Cork area, surviving until 1957: https://www.flickr.com/photos/irishrailwayarchive/53511909775/ A similar Hunslet loco GSWR 300 was also used at Fenit for a while in the late 1920s. GSWR 100 also worked at Fenit for a while in the 1930s, probably covering for 299's absence. As well as the closure of the pier (owing to its poor condition) in 1941, traffic on the branch in the 1940s was badly affected by the fuel shortages during the Emergency and with traffic dwindling to a few wagons of beet, complete closure was considered in early CIE days. However, Fenit Pier was heavily rebuilt and reopened in 1955, giving the line another lease of life. CIE's initial plan was to overhaul 299 and return it to Fenit. However, there was a change of plan and MGWR 0-6-0T 560 was transferred from the Waterford & Tramore. 560 became the main loco at Fenit until 1963. Until the end of the 1950s, if a smaller loco was unavailable, the loco from the Limerick-Tralee goods was used on the Fenit branch. This was most often a J15, and there are reports or photos of 100, 102, 105, 182 at Fenit. https://www.flickr.com/photos/irishrailwayarchive/53510358262/ However, the diesels were coming, and Fenit was no exception. From 1964 the branch was considered a suitable use for a small Deutz loco and this came to pass. In 1957, G602 was allocated to Tralee primarily to work the Castleisland branch and stayed in the area for several years. During this time it also operated to Fenit and was photographed there in 1960. Colour-Rail FIE05083 and FIE05084 show the loco clearly, it's also just visible at the end of the rake of vans here in Ernie's photo: In 1958, E410 was trialled on the branch. Photos indicate that this loco was based in Cork in 1958/59. Trials of a C class on the pier were also considered but this did not take place. However, at busier times the C class worked freight trains on the Fenit branch, with a smaller loco working the pier itself. It seems that 560 remained in charge on the pier until 1963 when G617 arrived. As with G602, it seems to have been used on the Castleisland branch too. There are lots of photos of G617 at Fenit in 1963/64. As yet I haven't found any photos of other members of the G class at Fenit - only G602 and G617. However, there are photos of G611 at Castleisland in 1967 so it's quite possible that other members of the G class did work to Fenit. Meanwhile, from 1959 to 1970 there were summer Sunday passenger services to Fenit, which used the loco and stock from Cork-Tralee services. There could be up to 3 round trips to Fenit on a busy day, and sometimes two train sets were used. From 1959 the traction was either a C class or an AEC railcar, sometimes one of each. Here's C212 and a railcar set; the railcar numbers are harder to read but I think I have confirmed 2601 and 2606 on other photos. https://www.flickr.com/photos/irishrailwayarchive/54252073152/ https://www.flickr.com/photos/irishrailwayarchive/54253392935 1962 the B141s took over and remained in charge until the early 1970s when these trains ceased. Locos included B151, B153, B156, B162, B169 Freight services remained in the hands of the C class, such as C218 here: https://catalogue.nli.ie/Record/vtls000307571 But increasingly the A class made appearances, both before and after rebuild. These did not venture onto the pier. https://catalogue.nli.ie/Record/vtls000307414 Of course there were railtours as well, featuring G617, 560 and 186 (both before and after preservation by the RPSI) My planned layout will only feature the pier in its post-1955, which rather restricts the suitable motive power. I'm taking the view that if it went to Fenit at least once, that's good enough for me. So I have made E410, I have a G class kit to build (I'll probably need 2 eventually), and I'm in early stages of planning a model of 560. When IRM make a C class I'll have to bend the rules a little. To help me decide which G611 class to model, Has anyone got photos of G611 class at Fenit, other than G617? There are loads of photos of G617 but they are almost all from two dates in 1963/64 when railtours visited Fenit. I suspect that others of the class also worked there but I can't prove it. Definitely that. Thanks! Here's an anonymous G611 class at Fenit in 1968, but which one is it? https://www.kennellyarchive.com/media/e425c297-bf48-42a6-9969-ae1f6b7d7378
-
This 071 looks like good value: https://www.ebay.co.uk/itm/267193827978
-
Retro liveried locomotive 220
Mol_PMB replied to ttc0169's topic in What's happening on the network?
That looks a lot like my model photo plank! The 201's a bit new for me though, even in retro livery.
-
For the more traditional type of wagon sheet I use the paper-backed foil wrappers from Tunnock's Caramel Wafers.
-
The ultimate sort of Dremel-like tool is an air-powered one, much safer because if it jams in the job it just stops, rather than trying to rip your wrist off and/or destroy the work. I don’t have one in my home workshop but I have used them elsewhere.


until