Mol_PMB
-
Posts
2,165 -
Joined
-
Last visited
-
Days Won
112
Content Type
Profiles
Forums
Events
Gallery
Blogs
Store
Community Map
Everything posted by Mol_PMB
-
Nice! Do you have any photos of the trips that you could share here? I’m planning a Sunday trip from Cork to Fenit this weekend, but the last leg from Tralee will be by bus or on foot.
-
This takes me back a few decades! Begging to be rescued by @Darius43? https://www.ebay.co.uk/itm/286451562171?mkcid=16&mkevt=1&mkrid=711-127632-2357-0&ssspo=yppbTabUTsm&sssrc=4429486&ssuid=PWnBnL0RQpq&var=&widget_ver=artemis&media=COPY
-
Moving on to the railtours, I have identified four so far. There are many photos of most of these because they were packed with gricers! So I won't attach links to them all but just pick a few. 5 June 1961, MGWR tank engine 560 (which was at the time the regular freight loco on the Fenit branch) hauled a railtour. The train was formed entirely of CIE-era stock: a tin van, two laminates and a buffet car: https://www.flickr.com/photos/irishrailwayarchive/53468560926/ https://www.flickr.com/photos/irishrailwayarchive/53468878174/ 7th September 1963, G617 hauled a railtour to both Castleisland and Fenit. Whilst at Fenit it gave rides along the causeway to the pier, light engine. The train was formed of a tin van, a GSWR corridor third, and a Park Royal: https://www.flickr.com/photos/irishrailwayarchive/53511154971/ https://www.flickr.com/photos/irishrailwayarchive/53511470444 https://www.flickr.com/photos/irishrailwayarchive/54419865290 8 June 1964, the grand tour visited Fenit behind 186 (before it was preserved). The train was formed of a 6-wheel van, Bredin corridor first, old panelled diner, two 1497-series seconds, and a tin van. It was too long for the loop and G617 was on hand to help shunt the train. Finally (as far as I know) 186 visited again on 3 June 1972 whilst on a Limerick-Tralee (and branches) railtour. The set was formed of a 1449 series laminate, Park Royal, 1449 laminate, Cravens, and a tin van. The tin van was repositioned at the rear when the train reversed at Fenit. https://www.flickr.com/photos/irishrailwayarchive/53511662404/ https://www.flickr.com/photos/irishrailwayarchive/53510434637 I think that was the end for railtours to Fenit, unless anyone was lucky enough to blag themselves a trip on the weedspray trains!
-
It has toilets at each end so isn't it more likely a corridor third? Or did the GSWR build some with internal corridors but no gangway? It's early one anyway, with an arc roof. A similar vehicle in this train: https://www.flickr.com/photos/irishrailwayarchive/54418615712 For bonus points, what's this one with a birdcage on the roof? Pictures not so clear though. https://www.flickr.com/photos/irishrailwayarchive/54253198698/ https://www.flickr.com/photos/irishrailwayarchive/54253211714/
-
Moving forward into the black and tan era, B141s became the preferred traction. On 29th August 1965, B162 hauled a train of 4 bogies (2 green, 2 BnT) including a former GSWR panelled corridor third and a 1900 series brake standard; no separate van. This features in two different photos in the books Irish Traction in Colour (Huntriss) p84 and Rails Through North Kerry (Beaumont/Carse) p114. The caption notes that the train returned empty to Tralee to form a second excursion. On 3rd September 1967, B156 hauled a train of 3 bogie coaches and a tin van, unusally with the tin van near the middle of the rake. The whole train was in BnT and included a Park Royal and other CIE-era stock. https://www.flickr.com/photos/irishrailwayarchive/53510250437/ https://www.flickr.com/photos/irishrailwayarchive/53570446236/ https://www.flickr.com/photos/irishrailwayarchive/53570445691/ https://www.flickr.com/photos/irishrailwayarchive/53508784679/ On 29th June 1969, B153 had a train of 3 bogie coaches and a tin van, all flush-sided and in BnT livery but mostly (all?) compartment stock: https://www.flickr.com/photos/irishrailwayarchive/53511462933/ https://www.flickr.com/photos/irishrailwayarchive/53511296941/ https://www.flickr.com/photos/irishrailwayarchive/53511296936/ On 9th August 1970, B143 hauled a train formed of 4 bogie coaches including a 1900 series brake standard and a Cravens number 1523. This train is pictured in Rails Through North Kerry (Beaumont/Carse) p112. On an undated occasion in the early 1970s, the train was formed of B169, three Cravens, a CIE compartment coach and a tin van: https://www.flickr.com/photos/irishrailwayarchive/53446885166/ And the final undated photo shows B151 at Fenit, we can only see the first two coaches one of which is a brake standard:
-
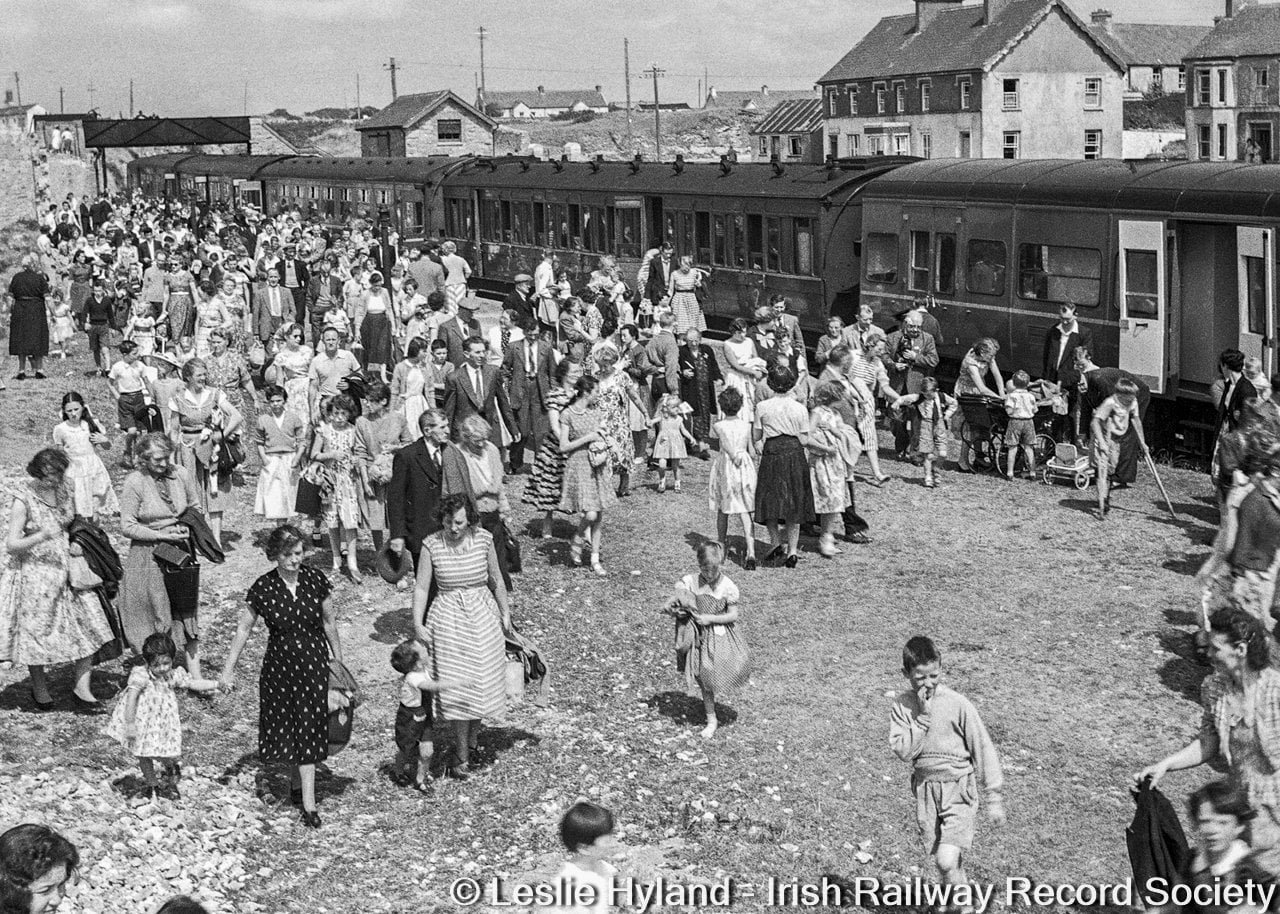
Inspired by some recent uploads to the IRRS Flickr archive, I thought I'd take another look at the summer Sunday excursion trains to Fenit. Normal passenger services had ceased between the wars and the branch was on the verge of total closure in the 1940s. But after the pier and freight services saw a resurgence in the 1950s, the passenger services came back, with the first one running on 21 June 1959. On busy days (fine weather for the beach) there could be three round trips daily. They only ran on summer Sundays and ceased around 1973. Still, that's a 15-year period of regular, if infrequent, passenger traffic. The 1967 working timetable (the oldest one I have) shows a 1015 Cork-Fenit arriving at 1330, then returning at 1815 to be back in Cork at 2135. This ran on Sundays from 18th June until 3rd September. I'll think about the railtours later - there were at least four. The photos of the 'green era' Sunday services I've found so far are as follows: 1959: Alan O'Rourke's book 'The North Kerry Line' p.241 shows an AEC set headed by 2606 on the Fenit branch in summer 1959 21 August 1960: At least two excursion trains came to Fenit, and the station was quite congested! One was a 6-piece AEC railcar set including 2601 from Castleisland. The other train from Cork was formed of C212 hauling 4 bogie coaches and a 6-wheel van. Fortunately a couple of IRRS members were there (on the train from Castleisland) to record the occasion and the shunt moves: http://www.mainevalleypost.com/2021/02/12/castleisland-railway-reminescenses-from-august-21-1960/ https://www.flickr.com/photos/irishrailwayarchive/54253392935/ https://www.flickr.com/photos/irishrailwayarchive/54253392940/ https://www.flickr.com/photos/irishrailwayarchive/54252110532/ https://www.flickr.com/photos/irishrailwayarchive/54252073152/ https://www.flickr.com/photos/irishrailwayarchive/54253211714/ https://www.flickr.com/photos/irishrailwayarchive/54253198678/ https://www.flickr.com/photos/irishrailwayarchive/54253198698/ https://www.flickr.com/photos/irishrailwayarchive/54252110497/ https://www.flickr.com/photos/irishrailwayarchive/54253391920/ 22nd July 1962: C232 hauled the train from Cork with a tin van and 3 bogie coaches: https://www.flickr.com/photos/irishrailwayarchive/54419865335 https://www.flickr.com/photos/irishrailwayarchive/54419669699 https://www.flickr.com/photos/irishrailwayarchive/54418615712 https://www.flickr.com/photos/irishrailwayarchive/54256976078/ https://www.flickr.com/photos/irishrailwayarchive/54257001693 https://www.flickr.com/photos/irishrailwayarchive/54419722693 I don't know the date of this one but it's likely to be early 1960s as well. A train of 4 bogies and 2 tin vans: Each of the loco-hauled trains includes at least one old panelled coach among CIE stock and Park Royals, plus some sort of brake van. That's all I've got for the green era, but I think it's enough to give a flavour of the trains; I'll do another post for the black and tan era.

-
Making an ‘E’ – the Maybach Diesel Model Assembly thread
Mol_PMB replied to Mol_PMB's topic in Irish Models
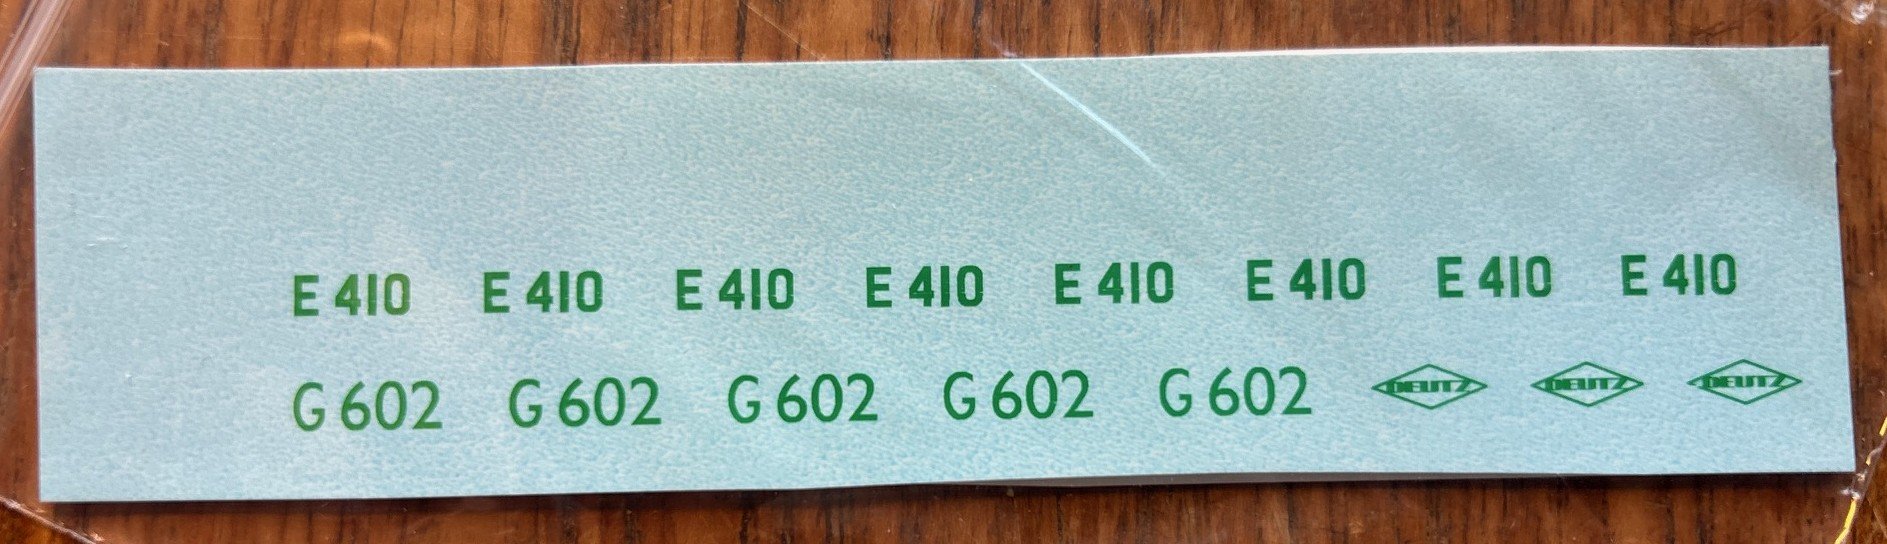
Decals arrived today, and are already applied and varnished over. From John Peck of Precision decals this little custom sheet cost £4 including postage. Bargain! I thought while I was getting green decals I'd have some done for a Deutz as well. That was before Ciaran posted this photo and I realised that I've got the colouring of the diamond wrong. I based it on the black livery as until yesterday I didn't have a closeup photo of the cab back of a silver G. Doh! No-one but me will notice I'm sure... https://www.flickr.com/photos/irishrailwayarchive/54419865730
-
But are they full of Accurascale products? How many packs of wagons did you buy?
-
You're right, an astute observation that such photos are unusual. Super to see the trains in the landscape rather than just close-up! It's great to see the whole train formation rather than just the loco (even if in some cases it is just a loco or loco+van). The 10-12 coach trains are impressive, some with lots of livery variation and others remarkably consistent. A few more nice ones: https://www.flickr.com/photos/irishrailwayarchive/54418626352 https://www.flickr.com/photos/irishrailwayarchive/54419733333 https://www.flickr.com/photos/irishrailwayarchive/54419680904 https://www.flickr.com/photos/irishrailwayarchive/54419680949 https://www.flickr.com/photos/irishrailwayarchive/54419680914 There's even a nice 'train in landscape' shot on the Fenit branch, with a typical Sunday excursion train in the early 1960s - a C class with a tin van and 3 assorted gangwayed bogie coaches: https://www.flickr.com/photos/irishrailwayarchive/54419865335 I think the normal Cork-Tralee sets were used through to Fenit. They only ran in the summer so no need for a heating van. Very modellable...
-
Indeed. There are about 50 photos in and around Portadown in the latest upload, including this nice AEC set passing some of your GN vans (vac fitted versions): NMA_GNR_AEC_Portadown_04_Mar_1961 | [Photographer: Norman Mc… | Flickr
-
The "Eyre Lee Bird" railtour Cork-Galway-Return 5th April 2025
Mol_PMB replied to Niles's topic in What's On?
A question that's only marginally related to the tour, as I'm just looking at other things to do on my visit and wondering if I can fit in some loco haulage: Are all the Dublin-Cork direct services booked for 201+Mk4 or are some worked by ICRs? If it's a mix, is there any way to work out which is which from the timetables? -
A few more unusual items of wagonry in the new upload: Behind the rusty old kettle, a much more interesting LMA van: https://www.flickr.com/photos/irishrailwayarchive/54419691789 A rake of 4 CIE furniture containers on flat wagons (which itself is quite unusual). All containers in green livery, 3 with diagonal 'eau de nil' stripe and one with a horizontal stripe: https://www.flickr.com/photos/irishrailwayarchive/54419744938 Another green H van, with the usual black ends: https://www.flickr.com/photos/irishrailwayarchive/54419684984 Bell tank container in full blue/petunia scheme, 3 Manchester Liners and some CIE bulk grain boxes behind: https://www.flickr.com/photos/irishrailwayarchive/54419646114
-
Hi Colin, you'll need to be an IRRS member to view the Flickr links. It's a set of photos at a loco shed showing a group of three steam loco types including an 800, and two other widely-requested classes.
-
More container photos in the latest IRRS upload: CIE furniture container in dark green with diagonal 'eau de nil' stripe, in a wagon: https://www.flickr.com/photos/irishrailwayarchive/54419737288 BR container in a UTA wagon with a GNR loco: https://www.flickr.com/photos/irishrailwayarchive/54419686089 CIE open container, with sheet, on a flat wagon: https://www.flickr.com/photos/irishrailwayarchive/54419695864 Some rather grubby older insulated containers in the background: https://www.flickr.com/photos/irishrailwayarchive/54418642707 End view of an early CIE ISO box, note the white lettering which was less common: https://www.flickr.com/photos/irishrailwayarchive/54418642157 Some nice 1980s ISO container variety: https://www.flickr.com/photos/irishrailwayarchive/54418592342 https://www.flickr.com/photos/irishrailwayarchive/54418592257 https://www.flickr.com/photos/irishrailwayarchive/54419646289
-
Silver composite in a mostly black'n'tan rake in 1963, just a couple of greens in there too: https://www.flickr.com/photos/irishrailwayarchive/54419680764 https://www.flickr.com/photos/irishrailwayarchive/54418626222 Another mixed livery rake - 2 silver seconds and a van, with 3 green coaches and a van, black'n'tan loco, also in 1963: https://www.flickr.com/photos/irishrailwayarchive/54419866190 Silver loco and tin van, with coaches in dark green, light green and black'n'tan, one of each! 1962: https://www.flickr.com/photos/irishrailwayarchive/54419876190 https://www.flickr.com/photos/irishrailwayarchive/54419876160
-
IRM future steam loco plans revealed? https://www.flickr.com/photos/irishrailwayarchive/54419692139 https://www.flickr.com/photos/irishrailwayarchive/54419707569 https://www.flickr.com/photos/irishrailwayarchive/54419692149
-
See, there's a good reason for the oversize IRM/AS boxes. Otherwise your H vans would arrive like this: https://www.flickr.com/photos/irishrailwayarchive/54419477691
-
A couple of additions to the green van album in the latest IRRS upload, but as usual they're teasers - partially obscured and incomplete views: https://www.flickr.com/photos/irishrailwayarchive/54419513421 https://www.flickr.com/photos/irishrailwayarchive/54419477691
-
Another bumper upload (must be over 1000) to the IRRS Flickr today, thanks Ciaran! The latest uploads are mostly GNR and Northern Ireland, so something for @leslie10646 to be sure, though they span many decades. https://www.flickr.com/photos/irishrailwayarchive/54419492341 But there are a lot from the South too, primarily 1960s railtours, and I was pleased to see some nice shots at Fenit, of two separate railtours and two different summer Sunday specials! https://www.flickr.com/photos/irishrailwayarchive/54418615712 A few links here that caught my eye, but there are hundreds more to enjoy, even narrow gauge and industrial so something for everyone: https://www.flickr.com/photos/irishrailwayarchive/54418653362 https://www.flickr.com/photos/irishrailwayarchive/54419502136 https://www.flickr.com/photos/irishrailwayarchive/54419503006 https://www.flickr.com/photos/irishrailwayarchive/54419696639 https://www.flickr.com/photos/irishrailwayarchive/54419887730 https://www.flickr.com/photos/irishrailwayarchive/54419685054 https://www.flickr.com/photos/irishrailwayarchive/54419879670 https://www.flickr.com/photos/irishrailwayarchive/54419738053 https://www.flickr.com/photos/irishrailwayarchive/54419876190 https://www.flickr.com/photos/irishrailwayarchive/54419670884 https://www.flickr.com/photos/irishrailwayarchive/54418626222 https://www.flickr.com/photos/irishrailwayarchive/54419867040 https://www.flickr.com/photos/irishrailwayarchive/54419453021 I'll have to trawl through this new lot looking for additions to my diesel loco livery matrix, also green vans (I've found two already) and interesting containers. There's just the one more silver E class: https://www.flickr.com/photos/irishrailwayarchive/54419498891
-
Rail freight is more competitive over long distances. It may help that Ballina is a long way away?
-
I have been down a rabbit-hole looking at the rail-mounted cranes at Fenit, see the attached pdf: Fenit_cranes.pdf I also found this thread on a related subject from @David Holman which has a nice drawing of a typical crane: This website has a nice selection of photos and drawings of small rail-mounted steam cranes built by Smith of Rodley: https://tractors.fandom.com/wiki/Thomas_Smith_%26_Sons_(Rodley)_Ltd At first I thought the Fenit cranes might be by Smith of Rodley but after further study I think at least two of them were from Coles of Derby: http://uploads.worldlibrary.net/uploads/pdf/20150311065744coles_vintage_3t_steam_rail_crane_1879_10_03_15_sm_c.pdf https://tractors.fandom.com/wiki/Coles_Cranes Whilst searching I found these official documents giving the harbour charges (including craneage) for Fenit. The first one is dated 1954 when the pier had been newly refurbished, and the second one is some additional clauses dated 1970 when the new gantry crane had just been installed: https://www.irishstatutebook.ie/eli/1954/si/266/made/en/print http://www.legislation.ie/eli/1970/si/83/made/en/print
-
Making an ‘E’ – the Maybach Diesel Model Assembly thread
Mol_PMB replied to Mol_PMB's topic in Irish Models
No need to apologise! I will do in future, and I expect that once painted in shades of brown-grey and ballasted it would be less obvious anyway. This is just a very quick plinth so I can safely bring the loco to Ireland next week, I don't need a perfect appearance for the track. -
Making an ‘E’ – the Maybach Diesel Model Assembly thread
Mol_PMB replied to Mol_PMB's topic in Irish Models
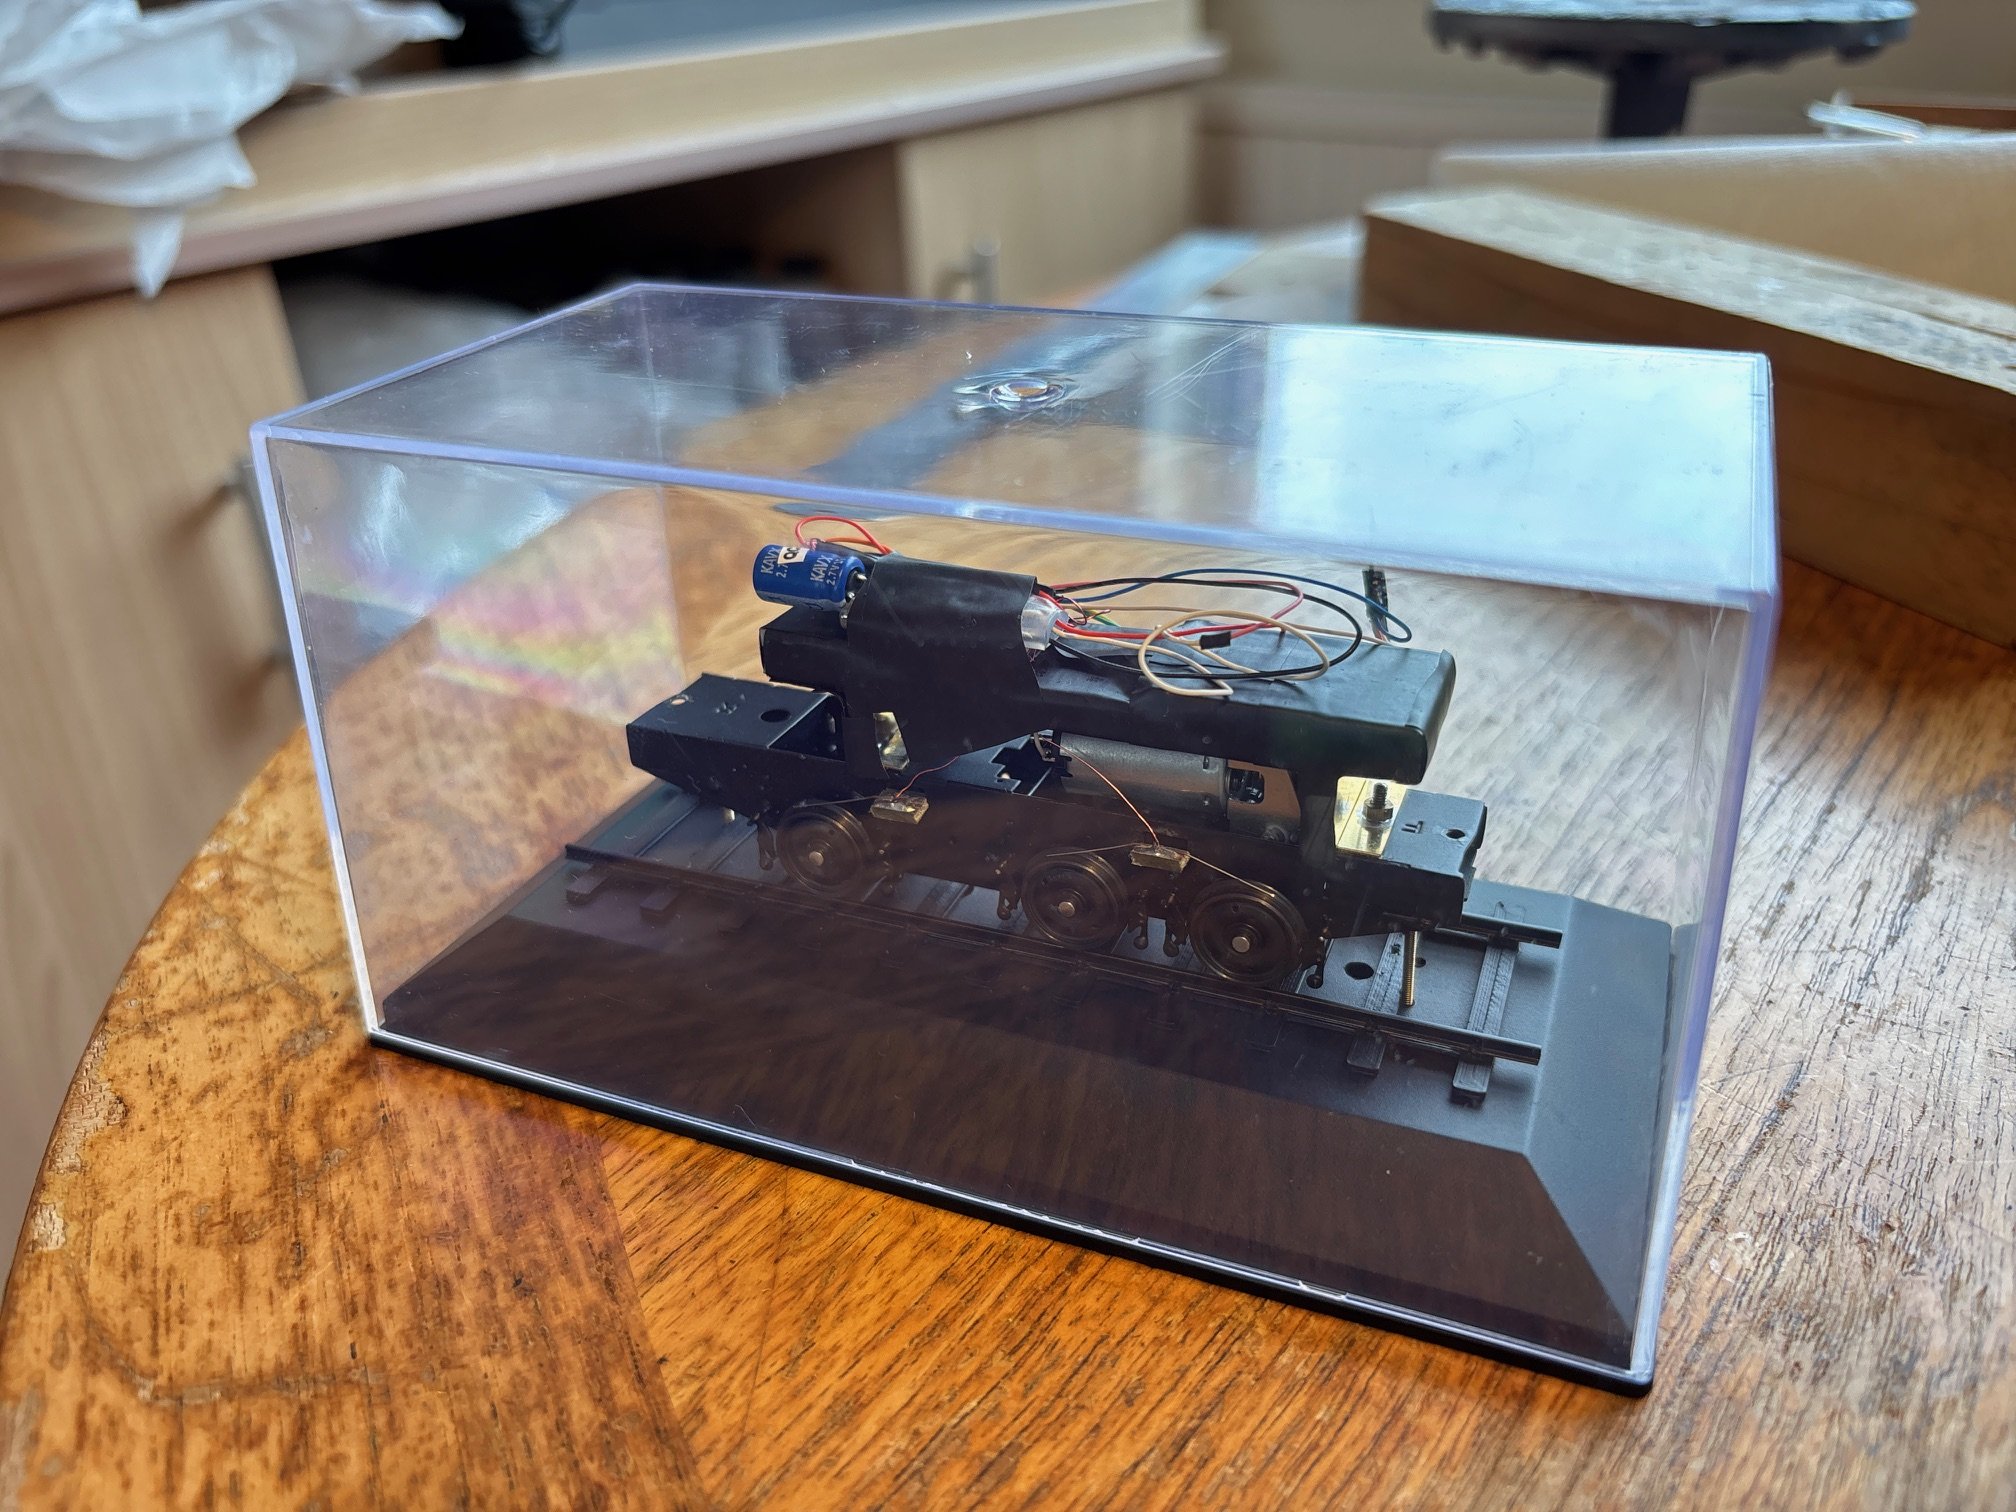
I have made some body armour for my Maybach... @DJ Dangerous may recognise the plinth and box from an IXO model. Added to that is a length of Rob R's track and a coat of black paint. I wondered about ballasting the track but decided that it might not travel well. A couple of long 12BA bolts are fitted up through the base and screwed into the Kadee coupler mount locations on the loco chassis. That should keep all your grubby fingers off my little toy train! Meanwhile on the body I'm in the final stages of fitting the LEDs.
-
A couple more Fenit photos I've come across recently. Firstly, posted in a couple of different Facebook sites byTralee Railway Terrace Reunion, here is "Paddy McMahon down Fenit Pier with the Deutz 1962"At this date it was most likely G617 but I can't be sure. Perhaps of more interest is this view from the Tralee & Dingle Railway Preservation Society on Facebook, entitled 'The DEUTZ shunting Fenit Pier, 1972' Most photos of rail activity on the pier are from the 1960s so this is a welcome later image. Again the loco is unidentified but it's in the black livery which narrows it down to G611, G615 or G616. It's not G611 or G615 because they had their roundels higher up, immediately below the cabside window. So it must be G616 which had the roundel lower down as seen here. I'll add that to my list of locos to model! Note that the modern gantry crane has been installed but there's still at least one steam crane in action unloading the ship, and a lengthy rake of wagons along the pier.
-
Which sort of 2600 are you thinking of? 1950s not 1990s for me!