Mayner
-
Posts
4,925 -
Joined
-
Last visited
-
Days Won
119
1 Follower
Mayner's Achievements
")


-
It seems that the Park Royal coach builders struggled to build the AEC railcars in accordance with the 'official drawings" I have copies of official drawings and diagrams of the railcars, the CIE diagram appears closer to what was actually built than the detailed dimensioned drawings! The title section of the drawing is illegible but possibly based on a Park Royal origonal. Section from large scale drawing, bogies similar design (longer wheelbase) to GWR railcars. Windscreen profile appears similar to GWR cars. Section from 1955 diagram of "Diesel Railcar Set with Buffet Car attached, appears closer in general outline to what was actually built than the large scale official drawings (if you ignore the buffers! I guess the biggest challenge facing a potential manufacturer is obtaining adequate information to construct a reasonably accurate model. The railcars were de-motored over 50 years, does the remaining Push-Pull Driving Trailer 6107 still exist? I built a pair of AEC railcars from a set of Worsley Works parts about 15 years ago and forming the curved end profile was not a significant problem, I formed the roof from balsa wood though these days would form the roof and a jig for forming the ends using 3D modelling and print technology.

-
Politics and windscreen wipers. Missing LH wiper possibly an economy (penny-pinching) measure under Todd Andrews Chairmanship of CIE during late 50s, LH wipers missing in the majority of late 50s photos of A, B101 and C Class, but LH wipers re-appear in photos taken from early 60s, possibly following Andrew's resignation. The Government expected Andrews to make CIE 'pay its way" in return for being given a free hand in the management of CIE and the railways with economy measures and major closures, but met his match when the Unions refused to agree to one-man operation of Dublin? bus services and resigned when the Government refused to support Andrew's taking a storng stance with the Unions. Whatever about its financial position CIE definitely improved the image and ultimately the reliability of CIE and the railways after Andrews departure with new corporate image and initially smarter. cleaner new livery and the introduction of reliable GM locos.
-
I checked out Cabra and Athenry cement terminals on a number of occasions during the 80s-90s on each visit no road-tankers or CIE personnel were present! I guess the tankers had earlier collected their load of bulk cement from the terminal and were either en-route to the customers premises or had discharged their load and returning to the terminal. A bulk cement train had arrived from Limerick just before I visited Athenry on a Saturday morning in 1996, a pair of local teenagers were 'hanging out' with the signalman in his cabin when I asked if I could have a look around and we walked together to the silo for the signalman to check the rate of discharge, the train crew having booked off following the arrival of the train and connecting several wagons to the discharge system. There were relatively few people to be seen about CIE goods yards following the ending of loose-coupled goods operation during the late 70s. I guess all thats needed to accommodate a short cut of Cement Bubbles is a siding with vehicle access where the wagons can be spotted for unloading even if no suitable road vehicles are available. Flange Lubricator I had completly forgotten about CIEs twin silo bulk tankers on Leyland chassis, perhas Enda (CK Prints) might produce a 3D print of those distinctive t bodies to fit on an EFE 8 legger chassis?
-
Bulk Cement appears to have been transhipped direct from rail to road (bulk tanker) at Ballina in connection with the construction of the Killala Asahi Plant during the mid-late 70s. I saw a couple of Cement Bubbles marshalled towards the centre of the then daily Claremorris-Limerick goods train outside Athenry station on more than one occasion while travelling by train from Dublin-to Galway during the Summer Holidays during 77-78. Athenry later began receiving Bulk Cement by weekly? block train from Mugnet after the opening of a silo on an existing loading bank on the downside on the west side of the level crossing. The loading bank was served by a loop with connections to the Galway and Limerick lines, Bagged Fertiliser wass received and distributed from this area. Bulk Cement is transported by road in bulk powder containers (similar in principal but smaller than modern road tankers) Some bulk cement trucks/trainers were fitted with a donkey engine driven air compressor to load/discharge cement.https://www.donedeal.ie/trailers-for-sale/cement-tanker/41345804?modal=gallery Up to the 1990s Bulk Cement was likely to have been distributed largely in CIE owned trucks initally 4 axle rigid (8 leggers) possibly Leyland or AEC, tanker bodies possibly fabricated to CIE own design or proprietary UK design https://www.roadtransportimages.com/shop/product/p8-wheeler-15ton-bulk-powder-tank-body Roadstone and RMC may have used their own trucks for distribution from the factory/railhead to precast yards and pre-mix plants in the Dublin area. Artics with 2 axle trailers mainly used 70s-90s bulk cement tankers were similar in outline/profile but shorter than the "County Down" donedeal.ie trailer, but with the donkey engine/compressor mounted at the rear of the trailer above the axles! A distinctive feature of the donkey engine/compressor was that they were mounted in an enclosure with a metal hood and tarpaulin sides. I guess the question is whats the best option for accomodating Bulk Cement wagons with no really suitable trucks/trailers available from EFE/Base Toys. Bulk Cement wagons appear to have been discharged at Waterside and Ballina in a siding where truck could draw alongside a siding using its one truck/trailer mounted compressor or possibly a protable compressor. A compact silo incorporated into an existing goods yard may be worth considering as an option, a signature structure with a compact footprint similar to that at Athenry or Tullamore.
-

My next Irish Loco build (15mm West Clare Walker Diesel)
Mayner replied to commerlad's topic in General Chat
A Bachmann "Big Haulier" GE diesel was one of the first locos I converted to on-board battery RC control about 10 years ago as the power pick up system was unreliable on track power. I modified the loco from a centre to an end cabbed design based on the GE diesels used on the Georgetown Loop Railroad https://hawkinsrails.net/preservation/glr/grl_motive.html leaving plenty of space for a pair of 7.2V NiMh batteries, but possibly need to use more compact batteries converting a centre cabbed loco to on-board battery power. -
I was recently in contact with Roger who confirmed that he had received sufficient expressions of interest in a MGW 6w 5 Compt (3rd) coach and had actually begun to modify the (existing 7mm artwork to produce a 4mm version. Roger further advised that he did not need 'many more' suscribers to proceed with the J19 & MGW BK 3rd in 4mm scale. I am planning at some stage (possibly 1-2 years) to produce some etched 4mm MGW coaches for my own use incl 6w TPO, 6w Comp & 1st (Cusack profile) with the etched parts available direct from my supplier in the UK in a similar manner to my existing 4mm kits. Though ironically 7mm may be a better option (easier to see and work with as we get older)
-
I seriously considered upscaling to 7mm with a Timoleague & Courtmacsharry themed layout about 10 years ago, I guess I will need to make a decision soon hands are not as steady or eyesight not as sharp as it once was. Still necessity is the mother of invention and might prompt a change to a larger scale. A couple of locos, a couple of coaches and a handful of wagons is tempting, though what to do with 40 years collection of mainly kit built 4mm stuff.
-
Narrow Gauge in the Rockies not quite
Mayner replied to Mayner's topic in US / Canadian Railway Modelling
Had a running session this evening and noticed a phenonomum as unusual as Newgrange's alignment with the Winter Solstice. Sunlight flowing through the tunnel at dusk on 1st Feb #464 & 463 completed a couple of laps of the circuit without incident.
-
Bush Tramway Club Waikato one of my 'happy places!
Mayner replied to Mayner's topic in Photos & Videos of the Prototype
Visited Pukemiro Junction today (1st Feb) for their 1st operating day of the New Year, not a lot of people about being a hot sunny day probably gone to the beach. Passenger was topped and tailed by a pair of small diesels while recently restored 1650 was running up and down the yard! The Climax was used on a "Bush Tramway" (NZ) logging line in "King Country" as opposed to a New Zealand Railways (NZR) operation. Geared locomotives including Climax, Heisler and locally manufactured AG Price locos were widely used on Bush Tramways and in industry. Vee engined Heisler locomotive undergoing overhaul at Pukemiro Local engineering firm AG Price Type E combined features of the Climax B (engine) and Heisler coupling rods. The AG Price C locomotive of the 1920s echoed the design of the Climax A with 2 cylinder vertical cab mounted engine! Former Pukemiro Colliery Co Peckett 0-6-0T once worked the private 1/2 mile line between the Junction and the Pukemiro Mine, the loco is similar in outline and size and outline to the 2' gauge 0-4-2T Karen preserved by the Welsh Highland Heritage Railway formerly used on the Seluke Peak Light Railway in Rhodesia (chromium mines) NZR F Class 185 Dubs & Co 1874 'standard" mixed traffic loco of the 1870-80s replaced in main line service by larger (more modern) locos from the 1890s onwards. 185 was sold into industrial service with a local coal mining company in 1933 and purchased by the Bush Tramway Club in 1973, out of service since the late 2000s currently awaiting an overhaul.
-
Small yards & locations on the irish railway system
Mayner replied to Celtic_transport's topic in General Chat
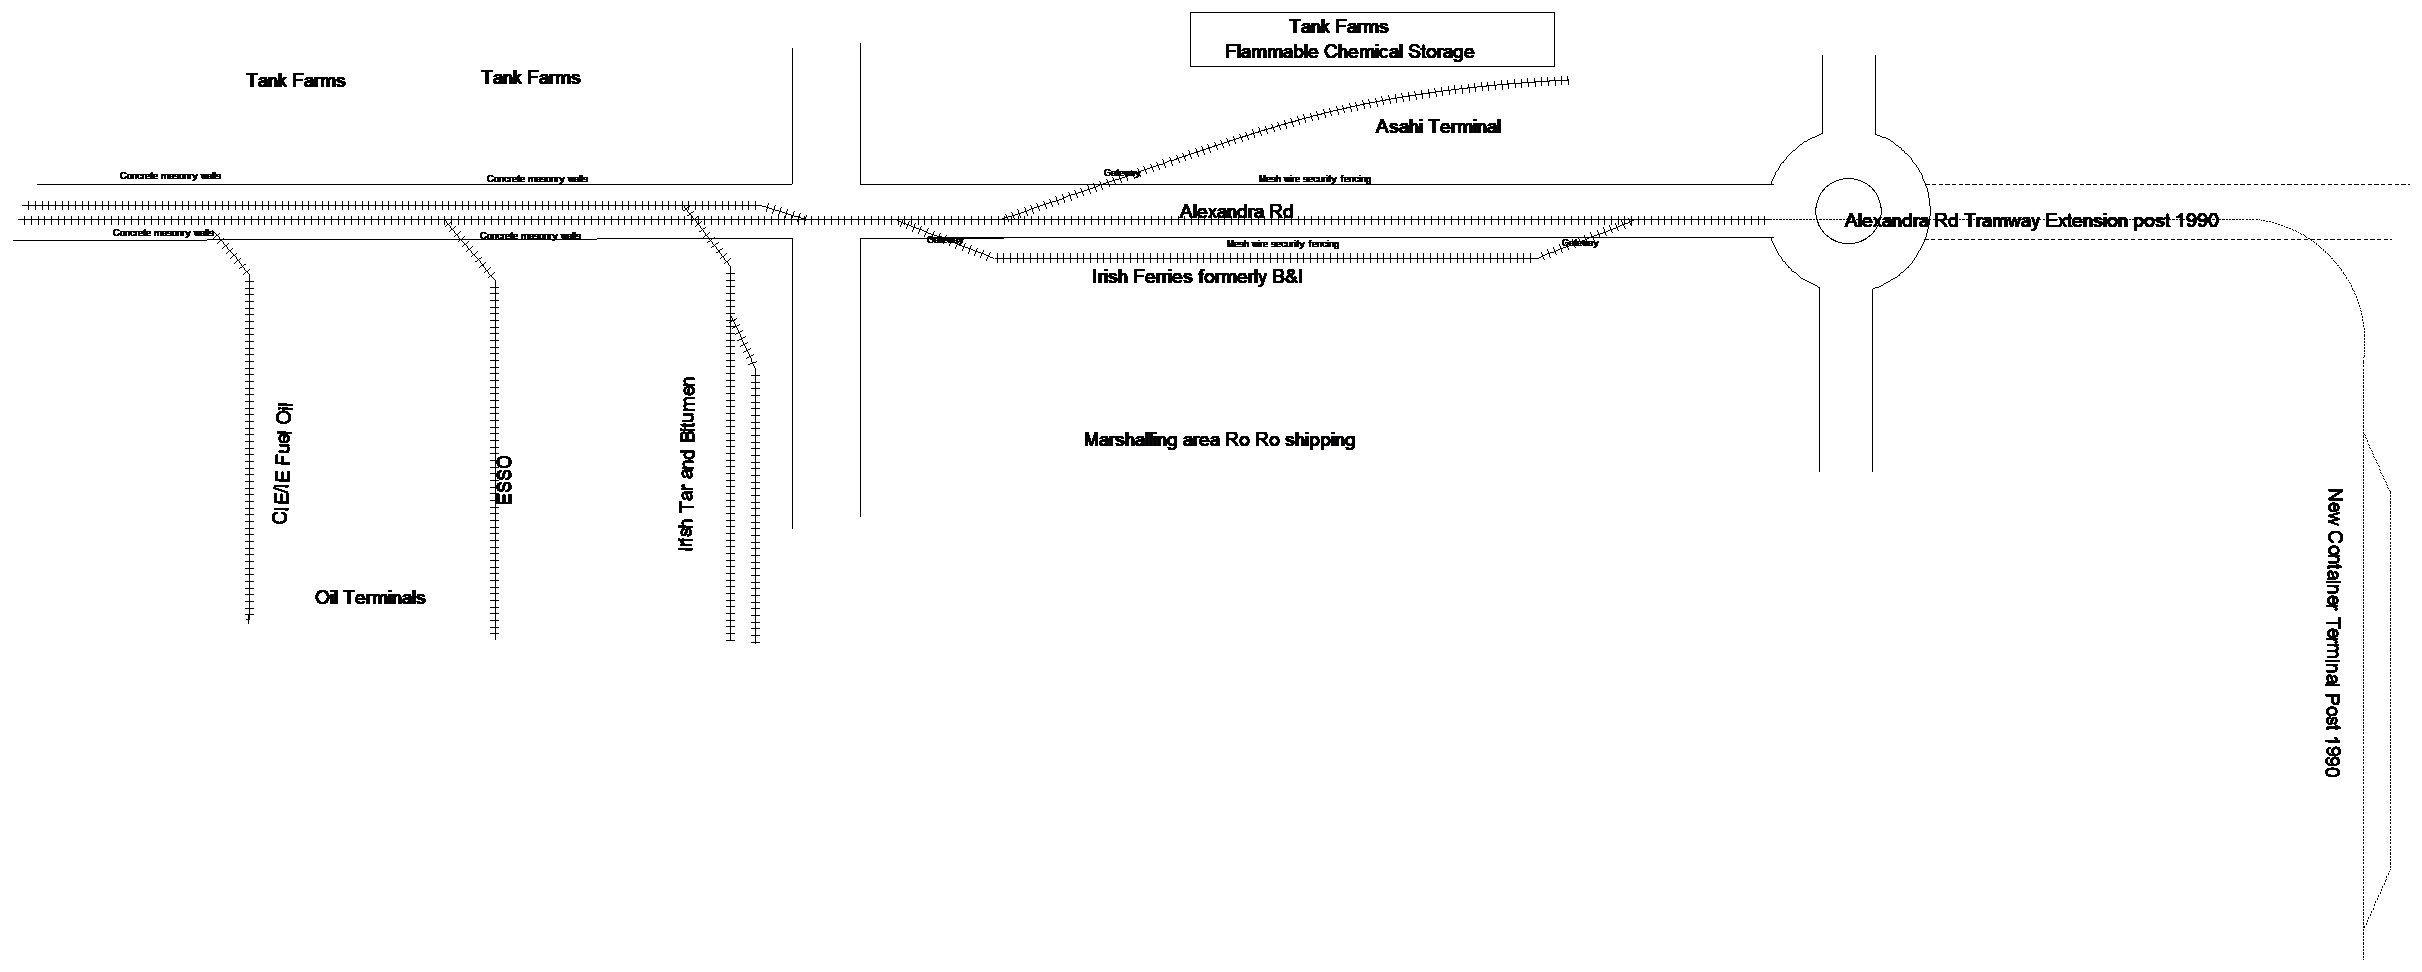
I worked on a construction project in Dublin during the late 90s and apart from the CDL/Gouldings siding i hadn't really thought of the potential of Dublin Port in terms of small layout for the 90s/00s era. Although CDL traffic had ceased Dublin Port renewed the connection to CDL/former Gouldings factory and disconnected a number of disused sidings when it upgraded the Alexandra Road Tramway during the late 90s Although traffic along the Alexandra road to and from the ESSO, Bitumen and Irish Rail fuel terminals appear to have been worked by Port Tractor, locomotive hauled mainly 141? workings operated along the Alexandra Rd Tramway to the short lined Container Terminal at the end of Alexandra Rd Tramway and the Ashai Chemical Terminal. The Asahi Trains ran round using a short loop within the Irish Ferries terminal on the south side of Alexandra Rd. The loop within the Irish Ferries premises was the terminal for B&I Liner trains during the 60s-70s. As far as I recall a container train (from Cork) operated along the Tramway mid-late morning, while the Asahi Chemical train was an evening departure. The trains handled at the Ashai terminal appeared to be relatively short , 42' flats used up to their final year of operation 1987? Tank wagons worked along tramway by Dublin Port owned Tractors, but possibly a shunter or main-line loco in a main line scenario. IRM/Heljan tankers--ESSO traffic Containers-4w Flat Irish Tar and Bitumen, though some 1950s era tankers sitll used for storage inside terminal late 90s. CIE?IE 1970s eara Fuel Tankers Wagonload era sidings serving miltiple oil terminals, granaries and quays. Shell-BP Planet diesel shunting loco to early 1970s Scope for mionimal space/modular or quite large layouts.
-
Brian McCann an MRSI member showed me a colour photo of a brown ex-GS grain in relatively good condition taken at Mullingar during the late 70s/early 80s, unfortunately I didn't ask for a copy!
-
Missing parts ( 1 tender wheelset & crankpin brushes) to complete No 1 arrived surprisingly from Wizard Models in the UK on Friday so completed shorting out the (plastric centred) wheels in fitting the loco with live axle pick up. Set of driving wheels with 'spider' soldered to wheel rim, suprlus metal and solder removed with needle file. Set of Bogie wheels 'spider' clamped in place with Micro-Mark clamps/heatsink (similar in principal to a metal clothes peg) No damage to plastic/nylon wheel centre after shorting out 7 wheelsets (14 soldered joints), used 145° solder and homebrewed phosphoric flux Undated photo Great Southern Locomotives "Transports of Delight" Smugmug site https://transportsofdelight.smugmug.com/RAILWAYS/IRISH-RAILWAYS/GREAT-SOUTHERN-RAILWAY-STEAM/i-H58MfCG Intending to complete the loco as No1 with original 'racing machine" cab in GSR condition "GSR Locomotives" "the bible" notes that the loco was rebuilt with a saturated boiler with a flush roundtopped firebox in 1930 and later rebuilt (date unknown) with a saturated boiler with a raised round topped boiler. The Smugmug photo may be of the loco in its second rebuilt state (mid-late 30s)with a 2 ringed boiler as the Class were orignally built with a 3 ring boiler with the dome centred on the boiler. Mock up of the that 1930s pose! Some adjustment required to the fitting of the loco and tender body on the chassis. Tender srings and numberplates are separately applied, safety valve casting came adrift during fitting, cab detail, coupling rods to be located or assembled, loco/tender to be balanced before trial running and painting finals.
-
Having spent over ten years investigating workplace accidents in both Ireland and New Zealand one of the common trends was that management and staff in large complex organisations (including railways) often take a 'tick the box' approach to safety admin to get the job done. In several incidents managers/staff have completed the paperwork ticked the relevant box without carrying out the corresponding physical checks. I would not judge the Spanish too harshly sometimes accidents occur in clusters while the Spanish high speed train de-railment appears similar in nature (rail condition) to the Hatfield de-railment in the UK two of the recent incidents may have been outside of the railways immediate control (incident with crane and landslip). I investigated an near-miss in 2003/4 when a crane on a construction site toppled onto the Cork Line near Inchacore, luckily nothing was passing at the time and a driver contacted CTC and stopped rail traffic. A cluster of three rail crashes involving multiple fatalities occurred on the East Coast Main Line in the UK (Hatfield, Selby and Potters Bar) between 2000 and 2003, CIE managed to de-rail the locos of the Sligo Passenger at Athlone and and oil train at Moyvalley in addition to staging the Cherryville Junction collision on 21 August 1983. Its arguable that Selby and Clough were unforseeable outside the railways control. Cost cutting/cutting corners to get the job done or even stubborness was a common thread in the other fatalities. Inadequate track maintenance possibly in combination with commercial pressure in a privatised environment contributed to Hatfield, Pottersbar disasters. 101 people died in the 1998 Eschede ICE train disaster in Germany
-
To be effective unpainted rust resistant/Corten must be exposed to the weather cycles of wet/dry conditions, its possible that the GSR may have selected rust resistant steel to eliminate the requirement to paint the interior of the hopper with a lead based paint (not exactly suitable for the interior of a container transporting a food stuff. Its possible CIE/Ranks may not have been bothered about the external appearance of its grain hoppers by the late 60s with the growing shift to road transport and the phasing out of wagon load traffic (considered totally un-economic in 1st McKinsey report. By contrast this former D&H Grain Car now in use on a mid-West Regional road, has not seen a repaint since these cars were introduced in 1974 over 50 years ago. Finding these cars in almost their as introduced livery on the Red River Valley and Western in Jan 2024 (complete with initials and shields came as a complete surprise. These cars were originally introduced in a bright red paint scheme not unlike the Ranks scheme of the 50s. The D&H PS-2CD cars had a 4427 Cu Ft capacity approx 60 tons equivalent to 5 Ranks wagons or over 60% of the entire Ranks Irl wagon fleet
-
I have become a bit of a loan wolf in recent years and not sure if I would inspire Kiwi modellers to take up Irish 21mm gauge modelling. In certain respectsI probabably would have achieved more if I have followed Richard Chown's and David Walker's example and worked in 7mm on 36.5 mm track rather than in 4mm when I started building Irish outline models. At the time everything would have had to be scratchbuilt anyway and working in 7mm would allowed me to hone my scratchbuilding skills and helped to avoid getting distracted collecting and assembling kits and later rtr models that were not strictly relevant to my interest in the MGW and more recently the Burma Rd during the steam era. Richard Chown's Castlerackrent evolved into a single track modular system capable of being exhibited in a number of different configurations, David Walkers Killanney layout (exhibited at the Chatham Show) apparrently was capable of operation with the Castle Rackrent System. Interestingly the One Track Minds group on the South Island exhibited a number of Sn3 layouts with realistically modelled NZ scenery, buildings and structures at exhibitions 15 or so years ago. FREMO-21 would appear to be an excellent option for Irish Outline modellers in Ireland or the UK intending to experiment in 21mm gauge, a series of plain single track modules, fed by cassette, sector plate or traverser storage and could potentially allow modellers using different wheel and track standards to share a modular layout.