Mayner
-
Posts
5,100 -
Joined
-
Last visited
-
Days Won
126
Content Type
Profiles
Forums
Events
Gallery
Blogs
Everything posted by Mayner
-
J52---GSR 201-J11, 204-J12 The J52 may have potential as a rtr chassis for a 201 J11 Class or their close relative 204 J12, overall wheelbase & wheel size appears correct. The J11 & J12 were basically a tank version of the J15 and apart from shunting and banking Cork & possibly Dublin, appear to have regularly worked goods and sometimes passenger trains on the West Cork. While 204 was withdrawn by in 1952, most of the 10 201 Class survived into the late 1950s so potentially a very useful loco. J52---Midland P GSR 614-J10 The overall wheelbase of the J52 at 15'6" was longer than the 14' 11" of the P 614 J10. These locos were basically the tank version of the Midland 'Standard Goods" (J16,18,19) used mainly for shunting and banking duties (on the Midland) in the Dublin area, though there is a photo of one (in almost MGW form) with a horsebox and what looks like a 6w Departmental van at Amiens St (GSR) during the early 30s. Most of the 5 memberss of the Class had gone by the early 50s with the remaining locos withdrawn in 1955 614 & 1959 617.
-
Emergency generator to make sure the colour light signalling system & level crossings continues to operate if there is a power cut. Interesting to see stonework cladding/facing to the Adare interlocking/generator room, possibly a planning condition/requirement. Simple pre-cast structures were used to house the signal interlocking and emergency generators during the 1st phase of the Cork Line CTC (Inchacore to Ballybroply) during the mid 70s, shipping containers for the second phase to Mallow & Kilbarry (late 80s), no expense spared on the Foynes re-build. The Adare interlocking may include an Emergency Control Panel to allow Ryder Cup Services to terminate & reverse direction and possibly store empty trains on the section towards Foynes.
-
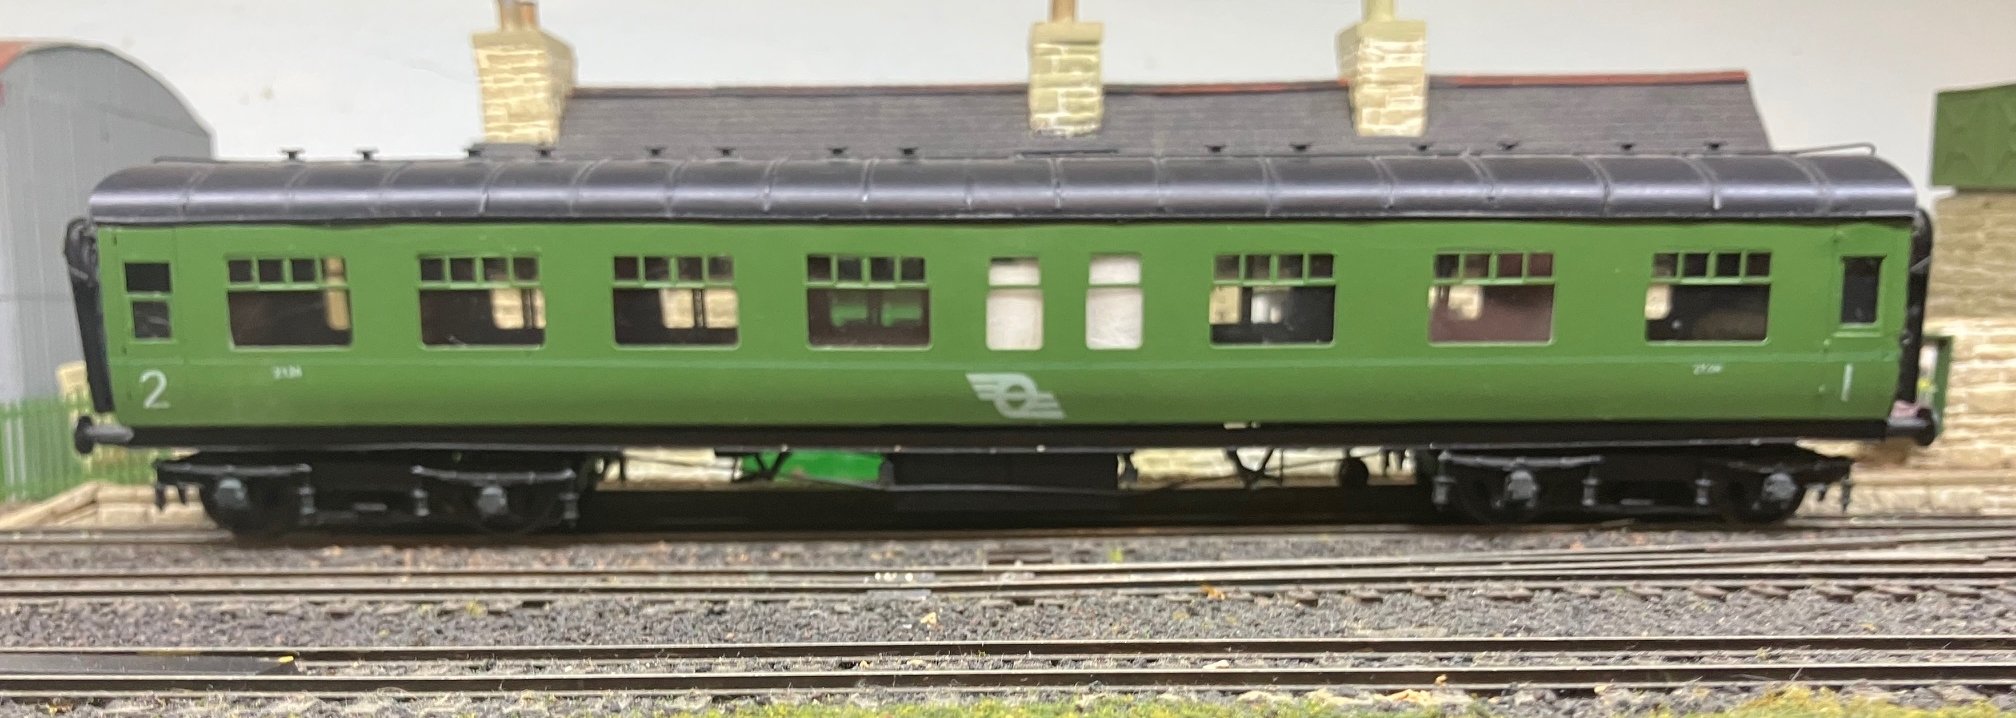
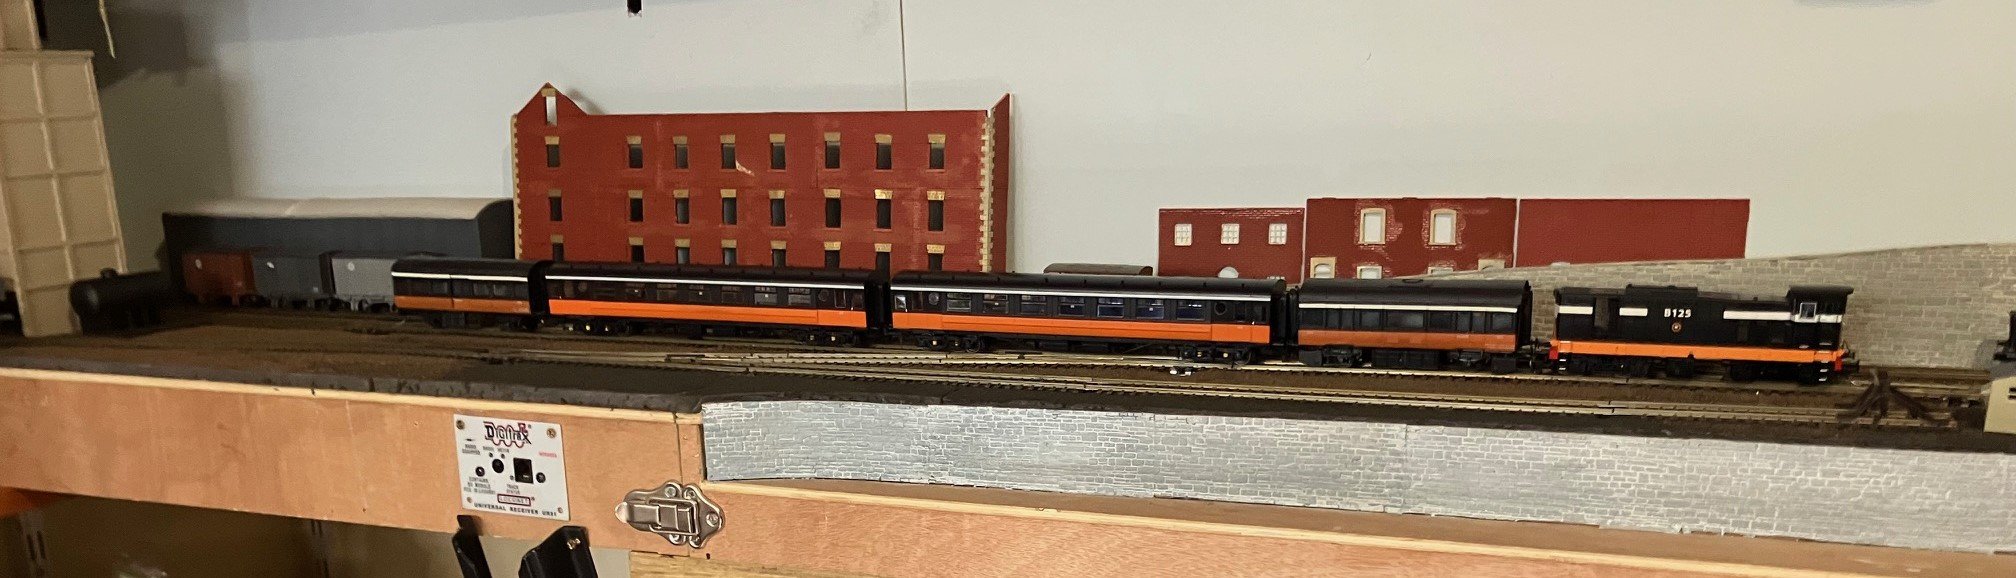
Remember a heated discussion with my cousins (all of us teenagers) on a summer holiday trip to Bray (late 60s) who were convinced that the carriages were dark blue and amber, though at least we managed to agree on the amber.
-
 Interesting double junction complete with diamond crossing at the West Junction although what was possibly the down line from the South Junction now a siding with the main line protected by a catch point. There are a couple of photos of arriving and departing trains at the North Junction the 'avoiding line' apparently double track connects to the loop by a pair of plain turnouts but a trap/catch point on one leg of the avoiding line protecting the main line. Interesting subject for a layout substantial 'tail traffic" in most photos of passenger trains NCP stock, Bread Containers and even strings of cattle wagons and interchange of tail traffic between the Bundoran Branch and trains to and from Omagh (traffic to/from the Derry-Belfast direction. Apparently bagged cement traffic from Drogheda to Sligo was sometimes routed over the Derry Road through Omagh to the SLNCR connection at Enniskillen rather than via the Irish North through Clones.
 -
Wagon Stock of the MGWR, P O'Cuimin, IRRS Journal Feb 1970 includes detailed information standard details for MGWR wagon stock including brake and running gear. Brake gear: 1872-about 1885: Single wooden block operating on one wheel applied by a single lever. 1885------Two cast iron blocks operating on one pair of wheels, still applied by a single lever on one side. Photos indicate that some covered wagons appear to have retained this type of gear into the 1960s! A J I C Boyd 1962 photo of 2592m an 1895 built 'convertible" in P O'Cuimin's paper appears to retain this type of gear. An undated photo of 1906 built convertible 937 in Ernie Shepherds Midland Great Western Railway of Ireland appears to have retained this gear apperently with the brake shoe on the opposite side to the lever removed. The brake shaft and ironwork that supports the shaft is visible in the photo of 937. There is an LGRP photo of 2691 an 1899 built coal wagon in the IRRS paper showing the 2 block arrangement from the lever side. 1906-----Board of Trade regulation prescribing either side brakes to be fitted to all new stock and existing wagons to be converted within 10 years from 1907 later extended to 15. The standard MGWR handbrake lever holding bracket incorporated a casting with toothed ratchet to secure the lever unlike the chain and pin arrangement used by most companies.
-
I think at one stage the Board of Trade imposed a requirement to form junctions between two single lines as a double junction, with 3 turnouts (points) and a diamond crossing rather than a single turnout. There was a similar arrangement at Morebath Junction (between the GWR Branstaple Branch and Exe Valley line) in Devon though no station at the actual junction, signal diagram appeared in the Railway Modeller during early 1970s. Apparently the Junction between the Bundoran Branch and 'main line" was originally laid out as a double junction and simplified at some stage before the 1954 photo, there is a photo of a train with a similar consist possibly hauled by a J Class approaching the junction during the inter War era in HC Casserley's Irish Railways in the Heyday of Steam & speculation in a review in 5'3" that the origonal junction was still in place! Photos in "Railways in Ulster's Lakeland" Colourpoint, Anthony Burges 2005 indicate that the junction was simplified before closure to a single facing turnout for trains travelling towards Omagh/Bundoran, the diamond crossing and connection to the loop removed. There are some interesting photos and commentary on life at Bundoran Junction before the closure of the "Irish North". Interestingly there only appears to have been a single Bundoran Branch platform although the avoiding line between the North and West Junctions which allowed trains from the Omagh direction to run onto the branch without reversing appeared to be double track. Hopefully Ernie will dig out some photos showing the North and West Junctions one of Ireland's rare triangular junctions.
-
Drylube PF film: I spray the resin side/inside face of the PF film before filling the resin vat on Murray ECMs recommendation. It help the model separate from the film as the build plate rises after each layer is printed and reduces the risk of a fragment of the newly printed layer remaining stuck to the layer and breaking off the model as the plate rises. Chassis/running gear options: My suppliers (NZ & China) successfully printed (approx 300) wagon underframes using resins with ABS properties in full size 'Bottom Up' printers, but I have struggled to achieve satisfactory results using "flexible" resins in an Anycubic desktop printer. Main problem is that that the majority of proprietary resins have insufficient resilience/flex to "get the wheels in' and brake gear/fine detail break during normal usage. Last year I achieved acceptable results printing detail parts using a Monocure (Australia) "Impact" resin mixed with a "Flex" admixture. I have a Kg of their "Tensile" "Industrial Strength' resin to trial on a rollingstock/running gear project if I get the time. I don't know whether the major resin suppliers have custommix options or supply additives. W/irons/brass fold up underframe. Brass w irons or a fold up chassis in combination with 3D printed springs and axleboxes may be a better option than 3D printed running gear particularly in 21mm gauge. Several years ago I produced an 8'6" wb fold up underframe for assembling a batch of Leslie's GN cattle wagons to 21mm gauge, but have not yet got round to actually assembling the wagons.
-
Personally I think those wagon prints came out very well, you really captured the distinctive MGW ironwork especially hinges and door catches. Quality, pricing & service consistent with the wagons I had printed for several years by a supplier in China. I would not recommend printing models flat off the build plate without taking precautions to protect the printer LCD screen from resin spillage if the bottom of the resin vat ruptures. I found out the hard way that printing flat off the plate/vertically increases the risk of rupturing/puncturing the film that forms the bottom of the vat resulting in cured resin forming on the printers LCD screen. Main lessons learned have been (a) Fit an LCD screen with protective film. https://store.anycubic.com/products/screen-protector and (b) Coat the PF film that forms the bottom of the resin vat with a PTFE based dry lube spray as recommended by Eoin ECM. For rolling stock/detail parts I use a resin with abs/resilient properties to reduce brittleness compared to standard resins, recently been experimenting with (a cheap) water washable resin for buildings and structures, nice to work with but cured resin brittle even when compared to 'standard' resins.
-
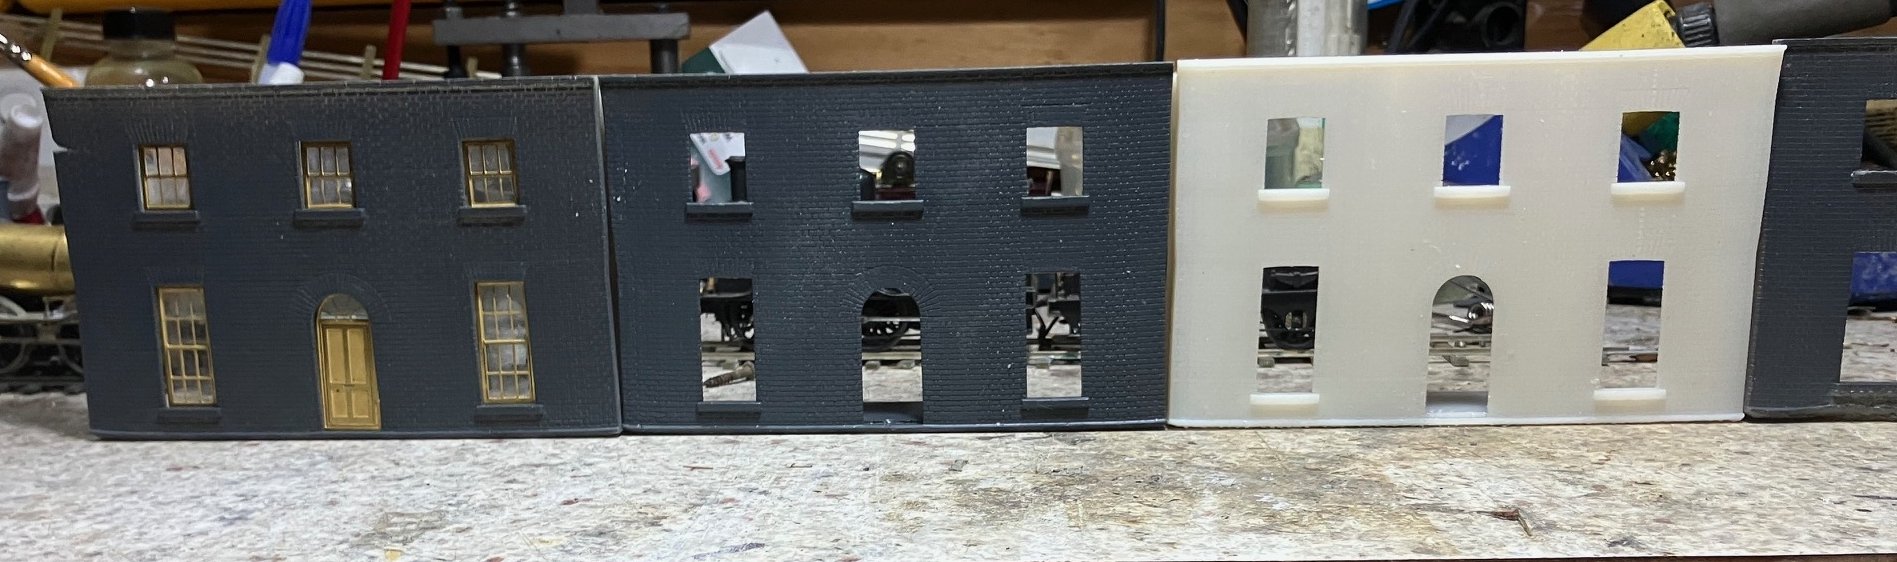
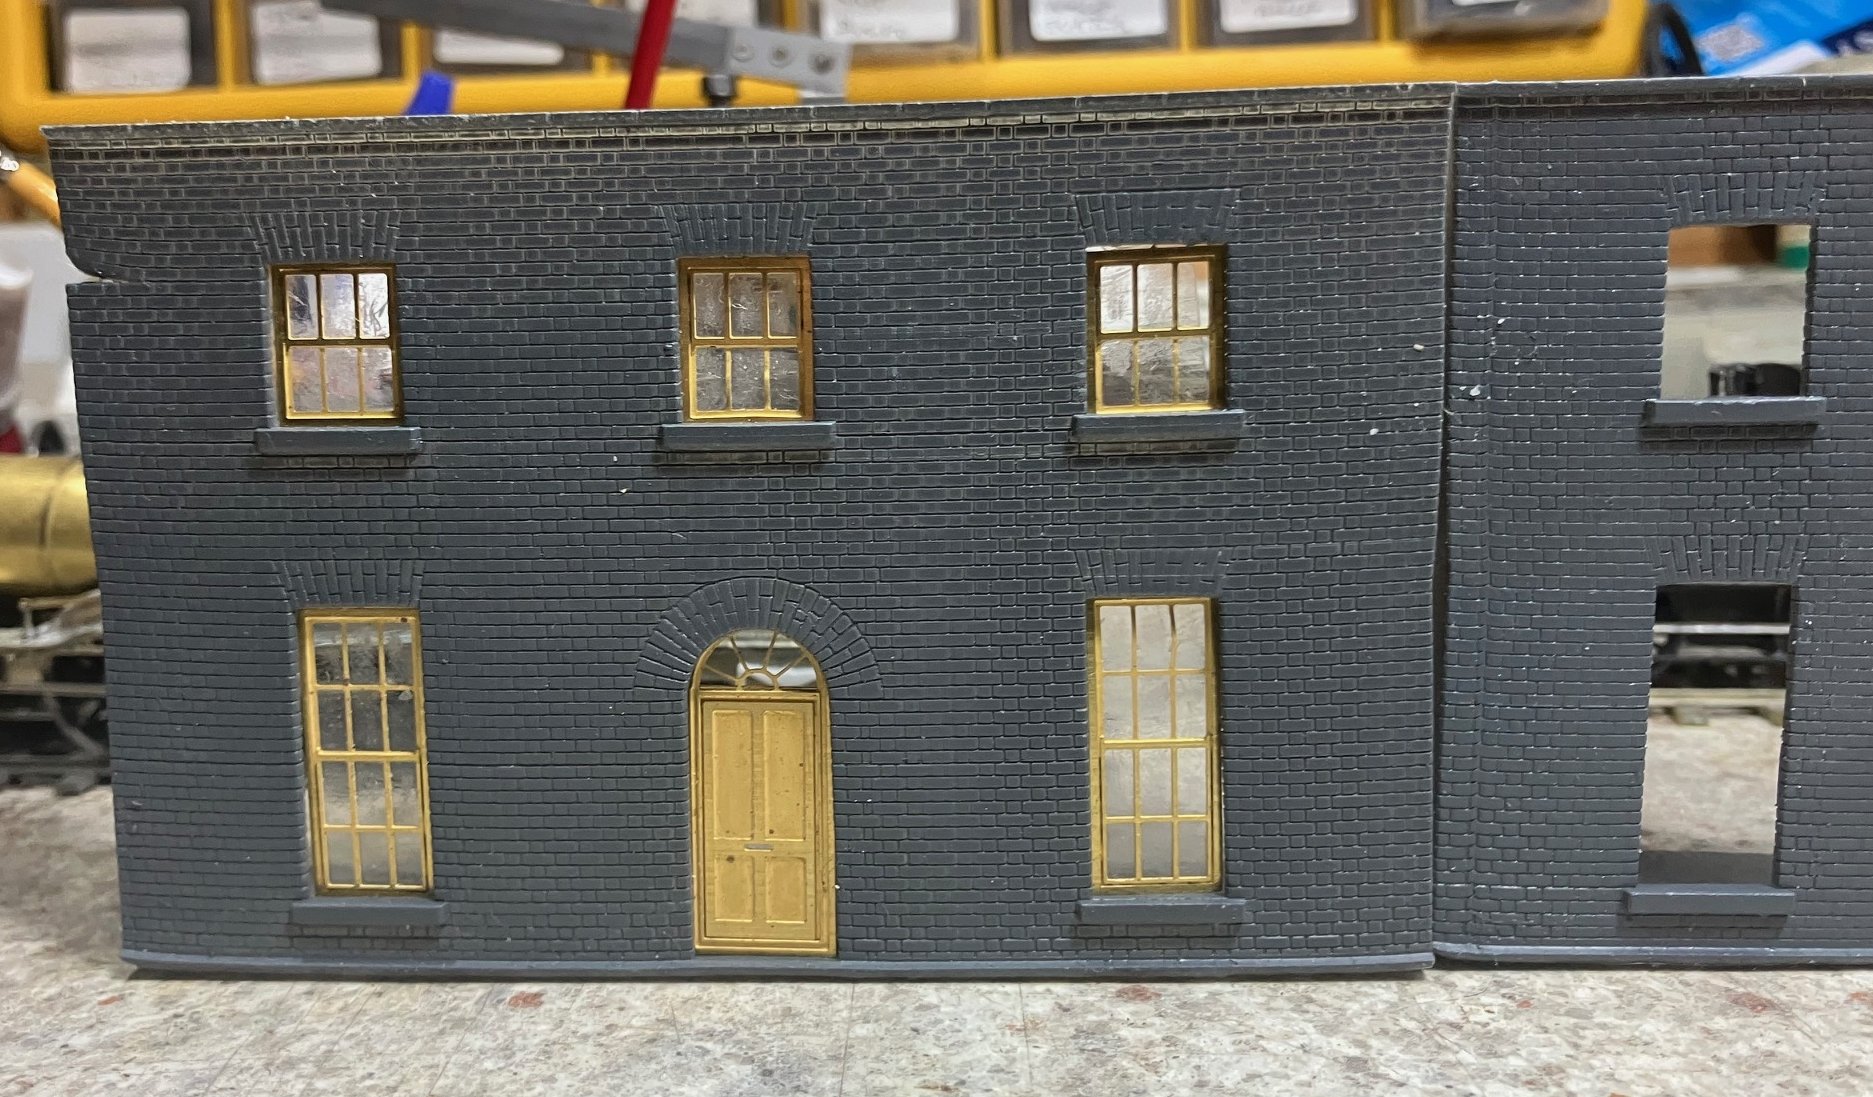
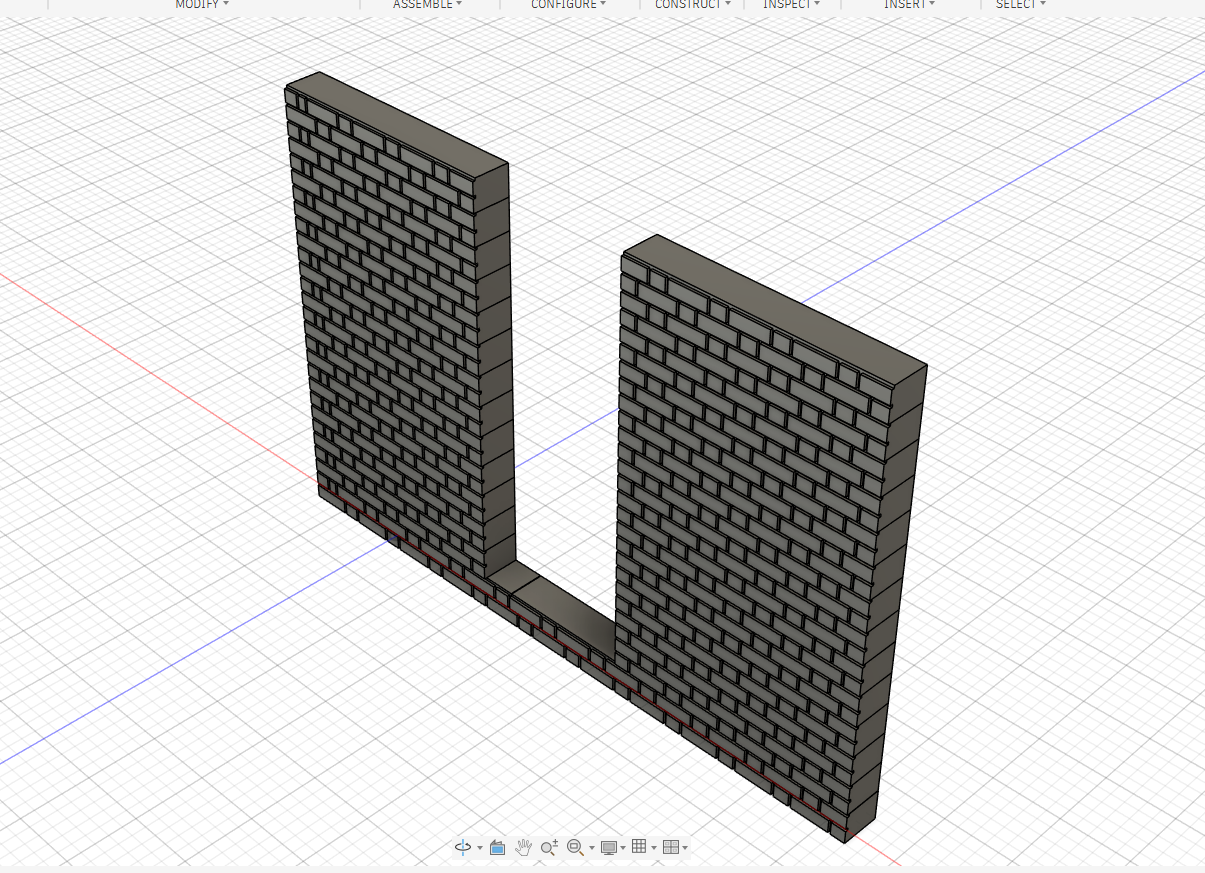
More workshop than layout topic today. Successfully printed the facades of some of the low relief background buildings first planned approx 14 years ago. Terrace of 3-4 houses . The windows/doorway originally etched in 2012, the intention to use Wills Flemish Bond material sheets in combination with etched window/doorways and lintols. The Dublin Port layout reserrected in a different in OO about 10 years later with some of the buildings in 3D printed form. Windows/doorway placed temporarily in the openings to check fit before carrying out final (hopefully) adjustments to the 3D model & print set up. While brick coarsing, opening, cill, lintol and parapet lines came out well some 'interesting' distortion along the party wall between adjacent buildings & de-lamination between layers in one corner (joy of resin printing) Some tweaks to the model (digital reinforcing) to reduce distrotion and delamination resulted in some improvement to the building on the right! The pitched roofs & chimneys on this terrace are hidden behind a low parapet when viewed from street level! Next challenge will be painting and weathering the brickwork.

-
There are a number of businesses in the UK that will produce one off or small production runs; MOL_PMB E401 & GSWR Bogie Coach are excellent examples. The etcher has a one off fee for setting up a photo tool & a charge per sheet of metal. Basically a case of finding a designer capable of preparing the artwork/CAD for the planned model or developing the CAD skills yourself https://ppdltd.com/artwork-guide.html. I basically followed the artwork guide on the PPD site https://ppdltd.com/artwork-guide.html using a cheap CAD package and a lot of trial and error. At the end of the day it takes me a similar amount of time to prepare the artwork for an etched model as it would take me to transfer/mark out a design from a drawing to a set of components on a sheet of metal or plasticard, the big advantage is that a set of etched parts largely avoids the tedious cutting out & finishing process. From memory one off tooling cost for an A4 sheet of metal worked out round £25-30, etched sheet of 0.4 brass £15 approx. Personally I think sheet metal is superior to an injected molded plastic (or 3D printed) for a model of a flush side coach. These day I mainly assemble etched/3D printed models to my own design, my hands are not as steady as they once were and generally faster than scratchbuilding for multiple items. Though scratchbuilding in plasticard should not be dismissed for one off or unusual items (David Jenkinsons "Carriage Modelling Made Easy" is an inspiration, better than waiting in anticipation of someone releasing a RTR model. "Back in the day" 30 or so years ago I scratchbuilt a MGWR goods brake and a pair of IRCH "Standard Open" wagons using plasticard, applying individual rivets to the brake and cast detail parts to the wagons, it took me about a year & opens still havent fitted brake gear to the opens. More recently I produced a batch of one piece C&L open wagon bodies cast in resin in a rubber mould using a master formed using etched brass parts. David (the Colonel) recently described casting covered wagon/van bodies in resin from plasticard masters.
-
There is a paragraph on Loughrea/G Class rostering in the Irish Railway News of the Feb 1975 edition of the IRRS Journal. "By September G613 & G616 which were in Limerick Junction were brought gradually to the Loughrea branch. G613 was refurbished and the two locos stored in Loughrea prior to commencing service in mid-December. G613 appears to work the branch passenger train oof 1904 only" Now the really interesting bit: "In the interval between the arrival of the 12:00 ex Attymon (with driver) and the 15:35 departure, G616 is brought out of the goods store and aided by G613 prepares its goods train for Attymon" G613 and G616 were in Thurles for the 1973/4, but this year G617 is there overhaauled and repainted in the black-and-tan livery. One Journal (don't remember year) commented that the CSE locos had been more reliable than the CIE G Class!
-
Thought I would save time 15-20 years ago by using MTK/No Nonsence AEC railcar bogie sideframes in combination with Black Beetle bogies while building an AEC railcar set using Worsley Works parts. I ordered powered & unpowered 21mm gauge Black Beetle bogies with the correct 10' wb, turned out the MTK/ No Nonsence AEC railcar sideframes scaled out at 9'6". Still haven't probably never get round to correcting the bogie sideframes.
-
The Foynes mixed is an interesting one. There was an article about a journey behind a J15 on the mixed in one of the British (steam era) railway magazines, the writer a visiting enthusiast appears to have been the sole passenger boarding at Limerick. It appears that the Mixed may have usually departed the goods yard unless passengers were travelling, our passenger was escorted by a member of staff to the end of a platform and instructed to wait while the staff member walked up the yard to fetch the loco & coach! Loco and coach arrived at platform end to pick up our passenger, then propelled/reversed back towards the Check Cabin coupling onto its train, propelling the whole train back until it was clear of the junction with the Foynes/North Kerry line before departing for Foynes rather than using the "Direct Curve' that allowed trains to run between the passenger station and the North Kerry without reversal. Must have been seeing things when I looked at several photos of a G611 on the Foynes Mixed (1962) in Rails through North Kerry it was G611 not 612! and it seems G611 had a re-paint (maybe partial) at some stage between 1962 & 67 loosing the tan element of her livery. 6w Brake Comp 36m the regular branch coach during the 1950s, a 4 Compt Atock 6w coach (possibly comp or 1st) appears in the 1962 photos of G611 on the mixed at Foynes and Askeaton. Without guards/brake compt were parcels/mails conveyed in a passenger compartment. Interestingly in the Askeaton photo the train was made up of G611, ex-Midland 6w coach, ex-GN bagged cement wagon, CIE KN (long) cattle wagon & ex-GN 20T goods brake. Bulleid open coupled behind the coach in the photo departing? mixed at Foynes. Solid rakes of Bullied opens behind and in the loop alongside (sheeted) the mixed at Foynes a fertiliser factory was a major source of traffic at Foynes before NET Shelton Abbey came on line during the mid 1960s
-
A G611 was used for a short time on the Limerick-Foynes mixed train before the service was withdrawn in April 1963, though the last train was hauled by a B101 Class 'Birmingham Sulzer. There are a number of September 1962 photos of G612 on the mixed in "Rails Through North Kerry" JHB, Barry Carse Colourpoint. The passenger accomodation on G612s train appears to be an ex-MGWR 6w 4 Compt 1st, there are photos of 36m a 6W Brake Comp (former Slip Coach) on the mided during the 50s. G612 was introduced on the Loughrea Branch in February 1963 with Laminate Brake Second 1910 of 1959 converted to composite and fitted with storage heaters as the regular branch coach. Interestingly 1910 continued to run in late 50s green livery following its introduction on the branch while G613At one stage (1974?) Mixed train working was abolished on the Loughrea Branch replaced by separate passenger good/freight workings. Two G Class were allocated to the Branch with G613 working pasenger trains and G613 double heading and early afternoon goods with G611 to Attymon and back! Final trains on the Loughrea branch were worked by B201 Class, apparently because of the poor state of the track. Interestingly there seem to have been G611 Class goods and passenger liveries. G612 & 613 ran in the 1960s black and tan livery, while the G611 and possibly G617 ran in a simplified mainly black and white scheme.
-
Wagon kits for 1960s and 1970s
Mayner replied to west_clare_wanderer's question in Questions & Answers
In certain respects its almost an ideal time to for building a mid 50-early 2000s era Irish outline layout with the sheer amount of quality RTR locos & stock released since the mid 2000s. The majority of wagon stock (with a few exceptions) introduced since the mid 50s is available in RTR form and CKPrints help fill some of the gaps in post 70 stock/containers (Pallet Cement, Fuel Oil bodies, UniLoad, Coal & Oil Containers. The "Standard Irish" wooden bodied wagon and earlier versions of the H Van had largely gone by the early 70s. Maindraw back with using a British prototype is that Irish and Britsh wagons were quite different in appearance (mainly brake gear & body detail) so challenging even to convert a British outline kit, though tank wagons built to a common standard. A lot depends on what you are trying to achieve as a modeller; whether your interesting in modelling/operating a railway or more interested in modelling individual locos and pieces of rolling stock. Applying the 2' rule, some British outline opens in weathered CIE livery (allover grey) less likely to stand out like a sore thumb and blend in as part of the train/model. -
Interesting; I distinctly recall Pete McParlin telling me that he had only sold 1 CVR 0-4-2T during a conversation almost 30 years ago. During our conversation Pete spoke about poor demand for his Irish 00n3 kits and used the CVR loco to reinforce his point. At the time I was a regular customer and had no reason to doubt Pete's word. Good that Backwoods Miniatures has sold at least four of the CVR loco kits (still currently listed on the website). A CVR 0-4-2T has been on my to-do list for several years, have to decide whether to scratchbuild the loco, prepare a set of etched parts or trial the 3D printed route. I assembled a pair of CVR Coaches and a Horsebox from Branchlines kits about 35 years ago & need a suitable loco.
-
Wagon kits for 1960s and 1970s
Mayner replied to west_clare_wanderer's question in Questions & Answers
1980s-90s was probabably the heyday for Irish outline wagon kits with Model Irish Railways (MIR) of Portadown producing 60s-70s era wagon and diesel loco kits until the late 2000s. 1. Model Irish Railways (MIR) Ian McNally. Initially whitemetal later resin kits: CIE 121,141,071 diesel available complete with wheels gears & motor. A Class/001 body possibly ex-MTK. NIR Hunslet 1 piece resin body. 80Class etched overlays/whitemetal ends to fit Lima MK2 body shells. Wagons. CIE Cement Bubble: Pallet Cement: 20T-14' wb 4w Container Flat+ 20' container: 42' Bogie Flat + 40' container: Bogie Fertiliser Wagon: Bogie Cement Wagon: Bogie Ammonia Tank Wagon. Wagons originally had whitemetal chassis (reasonable quality & standard of detail) replaced with one piece resin chassis after 2000. Cement bubble vacuum formed plastic body, containers plastic injection moulded kit, Bogie Cement & Ammonia one piece resin bodies. Sylvimcnall-O continues to sell MIR decals and spare parts on E bay https://www.ebay.co.uk/sch/i.html?item=117226927670&rt=nc&_trksid=p4429486.m3561.l161211&_ssn=sylvimcnall-0 2. Studio Scale Models. Post 1960 Etched kit CIE 30T Brake Van. Etched body glue or solder assembly on Dapol Prestwin chassis. 42' Container Flat, Ammonia Tank Wagon (brass kit)Pre-1960 Etched kit GN 20T Brake Van (relatively complex kit). Cast metal kits. GSWR & MGWR "Convertible" Wagons (gone by late 1950s, Irish "Standard" Open Wagon GSWR/Midland/GSR/CIE some lasted to late 60s/early 70s. 3. Jeremy Suters Irish Kits. High quality whitemetal kits introduced late 90s/early 2000s. Likely to be rare sold at UK exhibitions and advertised on New Irish Lines. Pre-1960 mainly Ulster subjects: GNR(I) Standard Covered Van: GNR(I) Bread Container Wagon & Container (both duplicated by Provincial Wagons/Leslie) NCC version of Bread Container Wagon, UTA Parcels Van converted from GNR Bread Van (possible Provincial duplicate: MGWR Loco Coal Wagon gone by late 50s? Post 2010 Fallen Flag suppliers. Model Irish Scale Rail (Martin McKay) planned to introduce an extensive range of RTR CIE wagons using resin body on Dapol chassis. Despite favourable reviews of a Bulleid Open & H Van in the May 2013 edition P173-4 of New Irish Lines https://www.dropbox.com/scl/fi/ad8q0xs64ed1b9be0ktwe/New-Irish-Lines-Vol.-6-No.-5-2013-May.pdf?rlkey=ev4qbxmrymaqeqczbofgnsdh5&e=1&dl=0 the business does not appear to have been a success. Irish Freight Models initially produced wagons with resin or 3D printed on Bachmann? rtr chassis later shifting to producing resin bodies rtr coaches and coach kits. JM Design. I produced etched kits/detail parts since 2010, produced 3D printed wagons mainly RTR between 2021-24 with very little interest in/ demand for kits. Most wagons produced would have operated to mid-1970s Details on wagon produced I guess MIR/SSM/Jeremy Suter/MISR/IFM/JMD wagon kits will eventually appear on-line auctions, exhibitions and executors scales. -
Remember seeing Wallabies (marsupials not Aussie Rugby Union Team) at Fota when I visited the park in the 80s & 90s. Surprised thay havn't taken the train to Cork. Kangaroos are listed on the parks website. https://www.fotawildlife.ie/pages/animal-and-plant-listing/eastern-grey-kangaroo
-
My first memory of a train on the Midland, westbound train approaching Kilcock GM loco possibly late 60sS?, two probabably Park Royal coaches topped and tailed by Bulleid Vans. Family was returning home to Dublin after a Sunday afternoon drive in with my Dad a fisherman checking out the Boyne and its tributaries. Had intended to compare with a Park Royal assembled from a set of Worsley Works parts about 20 years ago. bascially to check whether it was worth upgrading the bogies. Main issue was non-matching roof profiles and mine had collected almost 20 years grime in the display case.
-
Is a 'signature on delivery" option available for UK and EU deliveries? Quite common in this part of the World even for relatively low value items sent by NZ Post or courier/logistics companies.
-
I remember a local importer/former major Auckland model shop owner complaining about 15-20 years ago that modellers importing models (locos & stock) direct from the UK and States without paying duty and customs charges were undermining his business and charging duty/customs charges on each individual item was the only item. He had seen the writing on the wall in terms of modellers importing model from overseas retailers or direct from the manufatures and sold the business. The new owner focusing more on diecast, RC aircraft and cars, effectively running down the model railway side of the business only now stocking Hornby, rather than the once large range of British, American outline by several major manufacturers. Now apart from Hornby and a handful of retailers that stock Bachmann or Atlas model railway items (in an area the size of the UK has to be imported. The delay in eliminating the De-Minimus exemption was that until recently it cost more to collect the duty/customs charges than it generated in revenue, the almost world-wide change to electronic/automated customs clearance systems around 2021 has changed all that, and the Irish Government have been pretty efficient that Customs and An Post extract every cent.
-
The end of wagonload freight?
Mayner replied to west_clare_wanderer's question in Questions & Answers
North Wall-Sligo followed by North Wall-Wexford were the first routes to convert to Liner Train (mixed freight) operation initially with fixed formation trains possibly during 77-78. The change over on the Sligo line was covered in a Weekly Notice or possibly Nuacht the CIE newspaper, as it specified that traffic for Sligo Line stations could only be accepted in ISO equipment, and (gross) container weight/load limits at each station. As far as I recall 7½ Tonne Mullingar & Boyle, 25 possibly 30T Longford & Sligo. The scheduled Liners typically conveyed sundries traffic, individual containers (full/half height/keg) individual tank wagons (effectively what was once wagon load traffic re-classified as Unit Load and transported on fully fitted trains. Possibly North Wall-Dundalk or North Wall-Mayo & Galway (Galway & Westport Liner running via Tullamore) North Wall- Ballina Ashai out by Tullamore return by Mullingar. The "Southern" with Dublin-Tralee was apparently the last to go over to Liner Train operation for sundries traffic after a coupling broke on a Dublin-Tralee loose couple goods while climbing the Gullet and the wagons ran back into Heuston Station possibly 78-9. Its possible the 'final' Dublin-Tralee goods was still operated from Heuston Goods and traffic did not transfer to the North Wall until Tralee traffic went over to Liner Train operation. The runaway and changeover to Liner Train operation is likely to be covered in IRRS Journals of the era & CIE weekly notice/staff newsletter. During the mid- late 70s one of our suppliers used CIE to ship its output from Youghal (road & rail) to Dublin & leased warehouse space at Heuston Goods. The supplier used a 2 axle (possibly Ford D series or Bedford TK) truck with skeletal bed for transporting 20' containers, driver (Richie) & helper possibly a member of CIE staff. Interestingly during the changeover period from loose coupled good to Liner Train operation ISO Containers on 20T Flats appear to have been used on some routes in place of the traditional H Van & Open wagon. While travelling by train from Dublin to Waterford in 1978 I remember seeing a 20T Flat with a CIE side door container and a second with a Half Height being loaded/unloaded in the goods yard at Athy a station that was scheduled to close to sundries and wagon load traffic under Rail Plan 80. Loose coupled trains continued to operate for beet and PW operation for several years after the majority of goods/freight traffic converted to Liner Train operation, one exception was Dundalk-Belfast cross-border freight operation (operated by NIR crews) which appear to have run of several as loose-coupled trains with 'modern" fitted stock for several years. -
My two Acurrascale Park Royals arrived today one by DHL this morning on by Royal Mail International Tracked this afternoon! Both shipped from James & James Fulfilment on 4 June! Quite an achievement 6 days Northampton to the Waikato by RM International , currently NZ Post investigations are struggling to trace an important document I sent by Courier to Ireland nearly 3 weeks ago. Was charged a recently introduced "Low Value Regulatory Tax" (goods less than $1000NZ in value) on the DHL shipment but no customs charges on the Royal Mail shipment. The new tax appears similar to Trumps 2025 ending of De Minimis exemption for 'low value" goods to enter the country free exempt from duty and import tax. The new tax does not appear (at this stage anyway) to apply to goods arriving by post. Can't complain the new tax amounted to $2.21 on an order of over $500, no import tax or DHL clearing fee charged. Several years ago when I went through a phase pase of buying Large Scale locos and stock, was charged 5% import duty, 15% GST (VAT) + clearance and bio security fees &approx ($40) on shipments of over $1,000 in value.
-
Checked out Gabriel (Peckett 4-4-0T) and the Bay of Islands Vintage Railway when we visited Northland about 20 years ago. At the time the railway was going through a difficult time, the NZ Transport Agency had withdrawn the railways operating license in 2001 and Gabriel required a major repairs. The group that controls the railway began to gradually restore and re-open the line and recently completed the overhaul of Gabriel complete with a new boiler https://bayofislandsvintagerailway.org.nz/. As far as I recall the loco built 1927 for use in a Cement Works only acquired the name "Gabiel" after it passed into preservation during the late 1980s. Apparently Peckett supplied five 4-4-0T of the same/similar design to Gabriel: Two to the S&S, Two to Borneo (plantations?) & One to New Zealand (Cement Works which also operated 2 small Peckett 0-4-2Ts) One of the most distinctive features of the Bay of Islands Vintage Railway is that the line runs down the main street of KawaKawa (a reasonable sized town) in similaar manner to the Clogher Valley through Fivemile town. The main street is on SH1 the main road linking Northland to Auckland and the rest of the country and can be quite busy. At one stage the line was a section of a main line from Auckland to the port of Opua in the Bay of Islands served by the trice weekly "Opua Express' with 4-8-2 and main line EE & A1A A1A locos & diesel railcars regularly operating over the line. I must find an excuse to visit Northland again and ride the train.
-
Some brickwork test prints before attempting a building facade. 1st attempt replacement chimney stack for Keadue Goods shed. The original (made using Wills scenic materials) disappeared several years ago after it became dislodged from the roof. Much quicker to draw a 3D model than to assemble the chimney using Wills scenic materials (Brick material sheets, chimney cap & flue) 3D model sample panel for flemish bond brickwork. Basically I "set out' the openings by laying two coarses of brickwork then copied subsequent coarses to the the top of the panel. Brickwork incl joints are close to scale dimensions, main point of the test was to check that the brickwork would look ok in 4mm scale. The test prints were printed vertically, horizontally and at 45° angle. The grey is an etch primer, the brown a custom aerosol I once used for painting CIE wagons. Progress with the facade beginning to add-in /sculpt the 'soldier coarses" above the windows and the archway above the hall door. I used a 2D drawing of the facade imported into Fusion as a template for the 3D model, one of the quirks of my 2D software is that it sometimes appears as a mirror image when imported into different brands of software something I have got used to over time.