Mayner
-
Posts
4,877 -
Joined
-
Last visited
-
Days Won
119
Content Type
Profiles
Forums
Events
Gallery
Everything posted by Mayner
-
Did Fry produce models of any of the private operators that were absorbed into the GSR or ceased to operate following the 1934 Transport Act? My father who lived near Brittas County Dublin in the 1930s spoke fondly of the "Paragon Bus Company" that operated a direct Dublin-New Ross Bus service and of the DBST running converted Model T busses and not a railway enthusiast he also spoke of Model Ts operating on the Clogher Valley. An friend of my father lived beside the DBST at Crooksling spoke about borrowing a p.w. trolley (which had a damaged wheel) for evening/nightime joy-rides as young adults to-Brittas.
-
Its challenging forming details like quoins from embossed plasticard or Wills Scenic Materials due to the thickness of the sheet, there days I usually model quoins, window frames and building details in etched brass rather than plasticard, but seldom get round to actually assembling the buildings. Some fine scale modellers 4mm modellers clad their buildings 'one-brick at a time" using individual paper "bricks" from punched cards once used to programme computers and CNC machinery back in the day. https://www.rmweb.co.uk/topic/110534-computer-chad-bricks/ Laying individual computer bricks was said to be slow, but calming and therapeutic and practiced by famous building/structure modellers including Alan Downes , Bow Barlow and Iain Rice
-

Bush Tramway Club Waikato one of my 'happy places!
Mayner replied to Mayner's topic in Photos & Videos of the Prototype
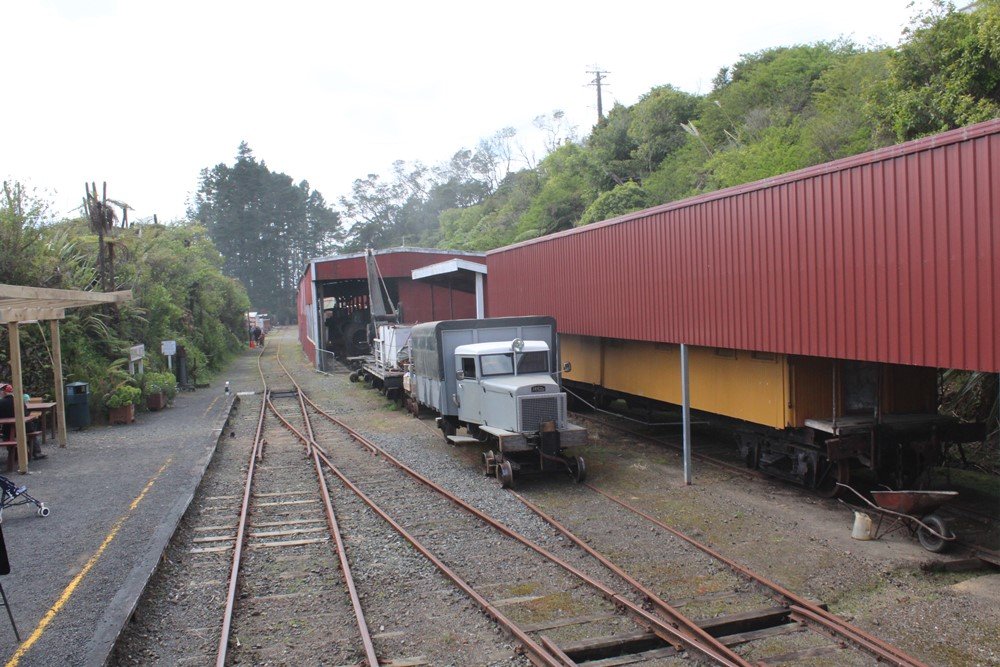
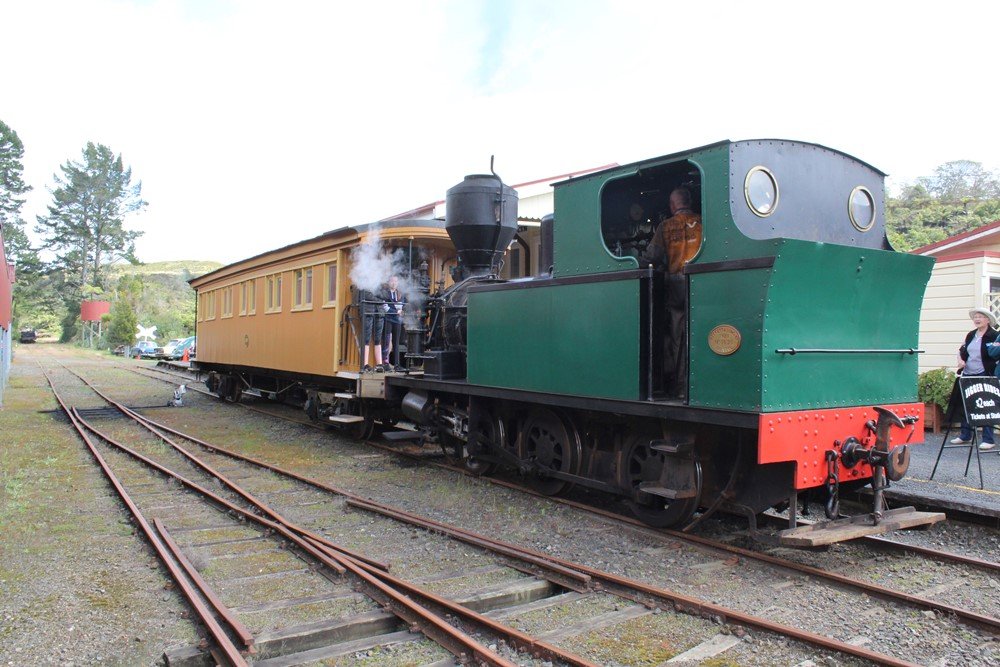
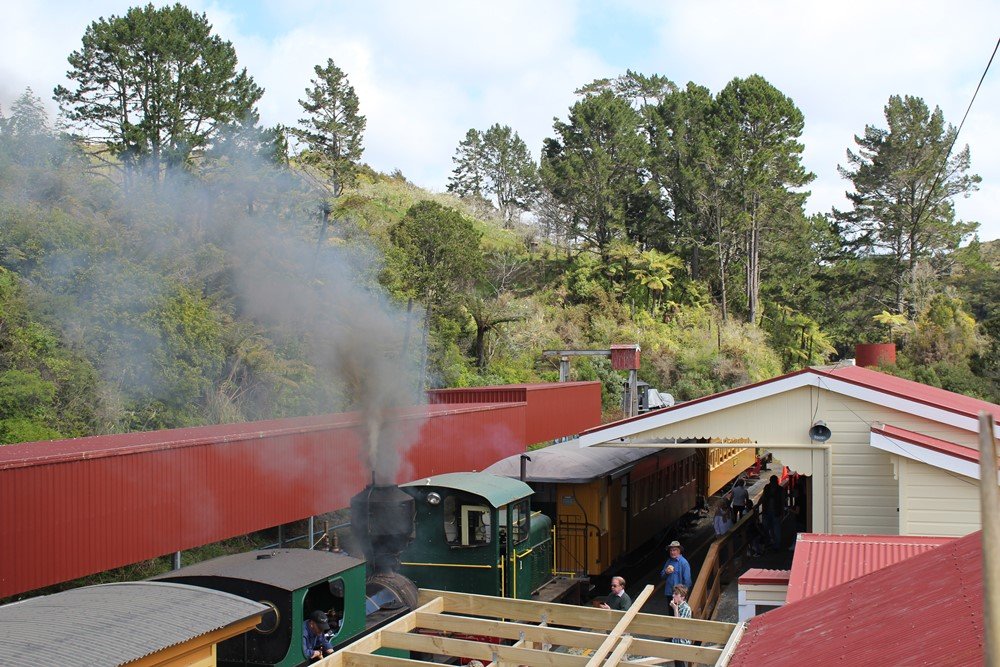
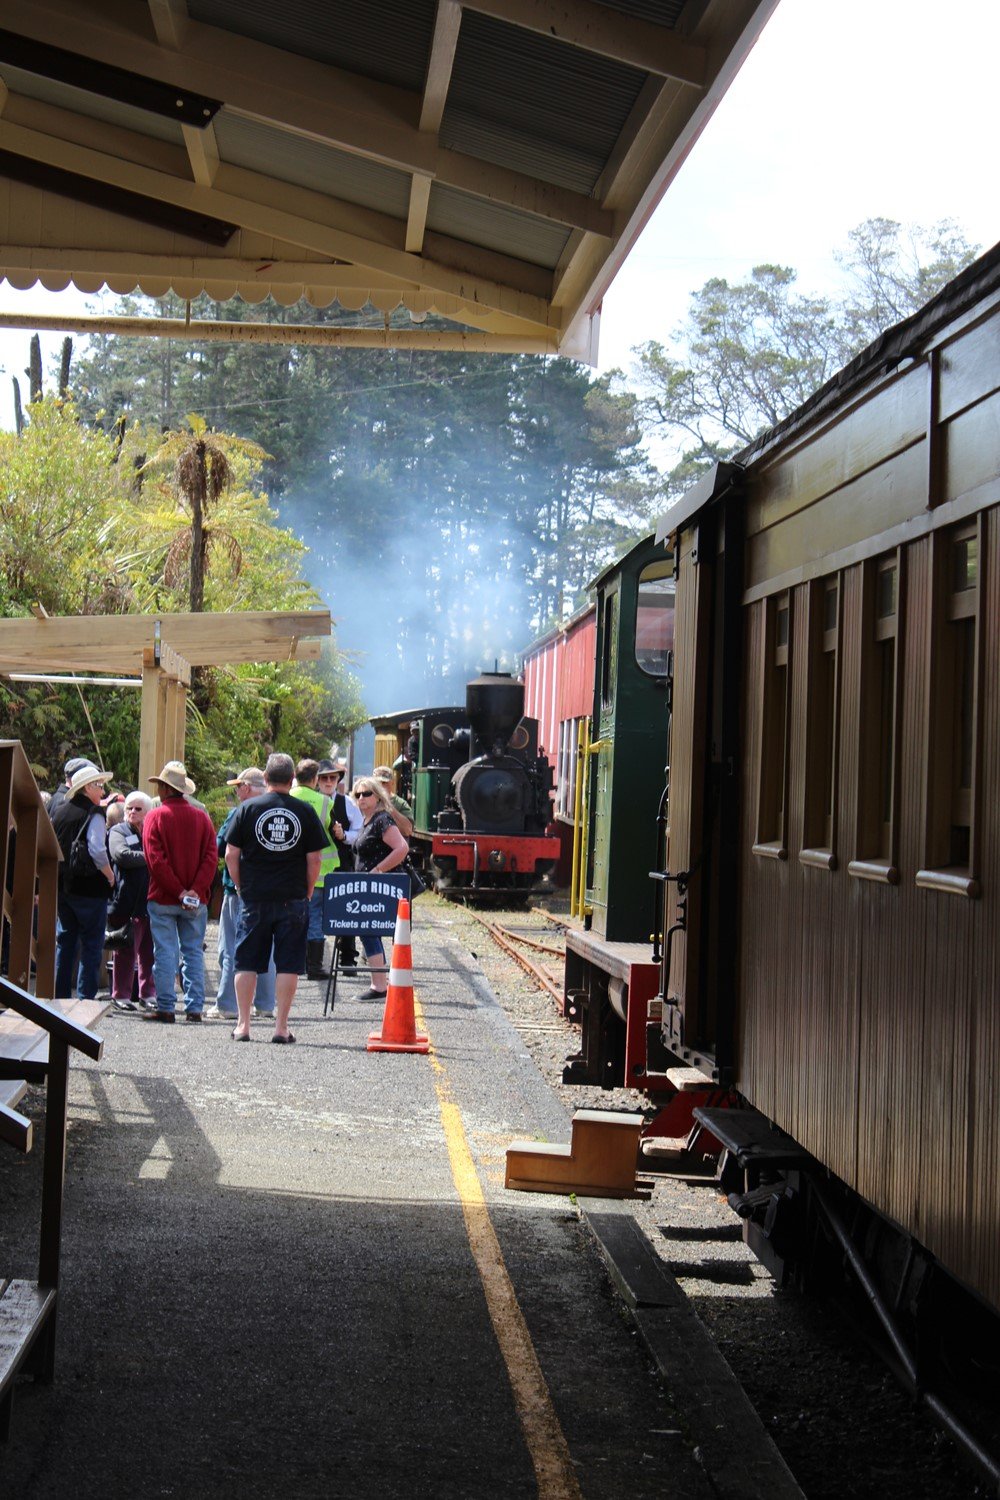
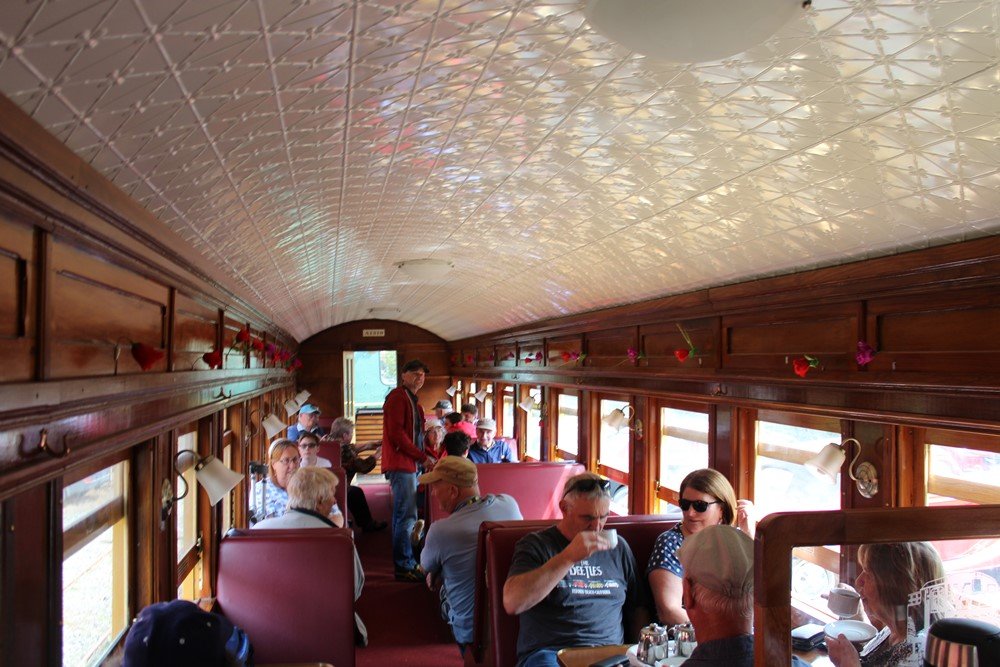
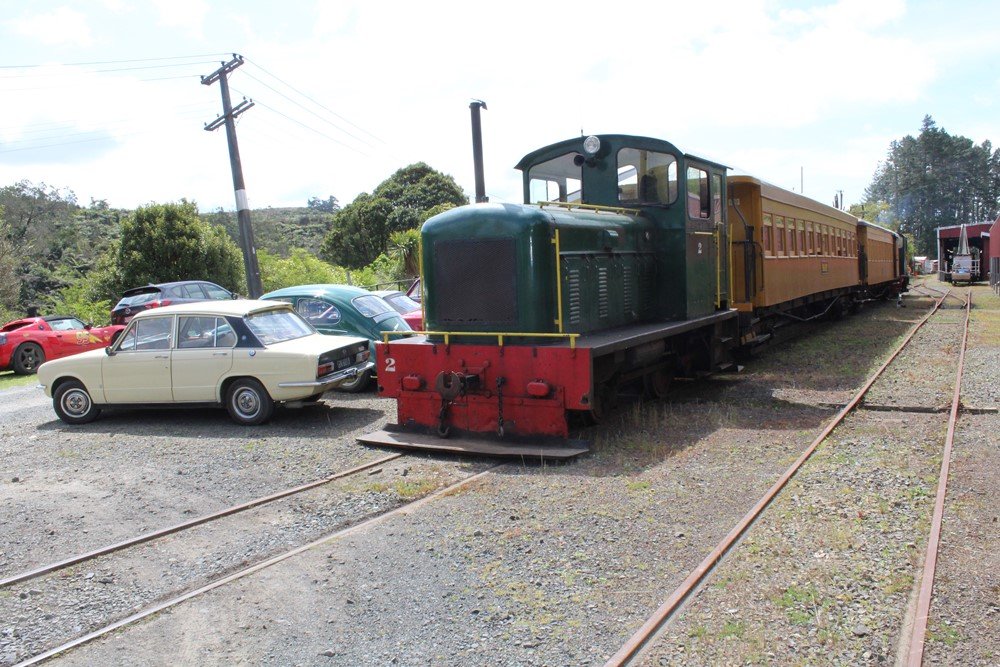
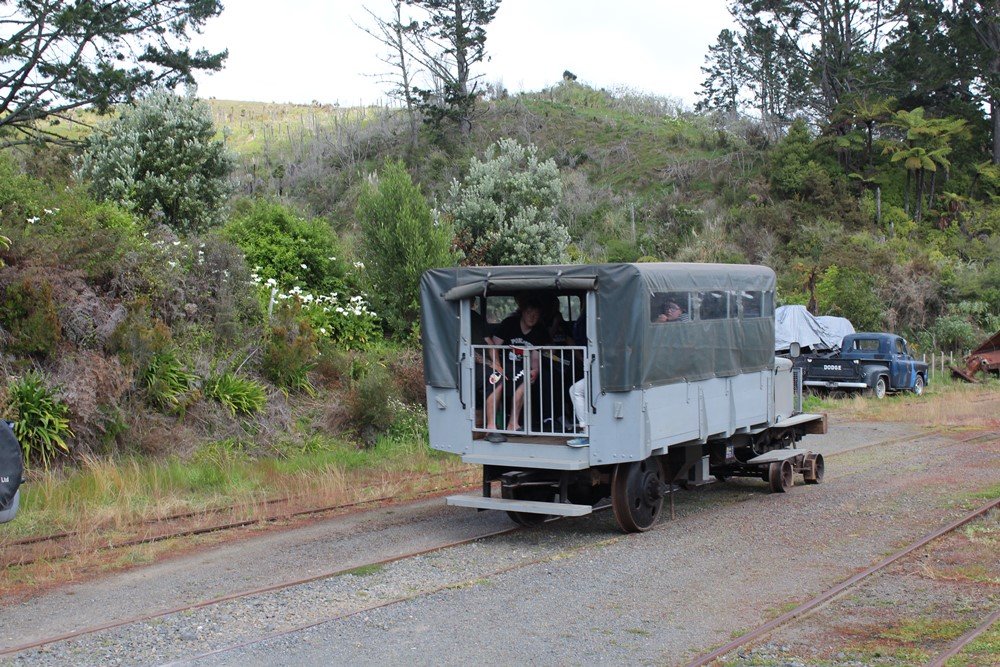
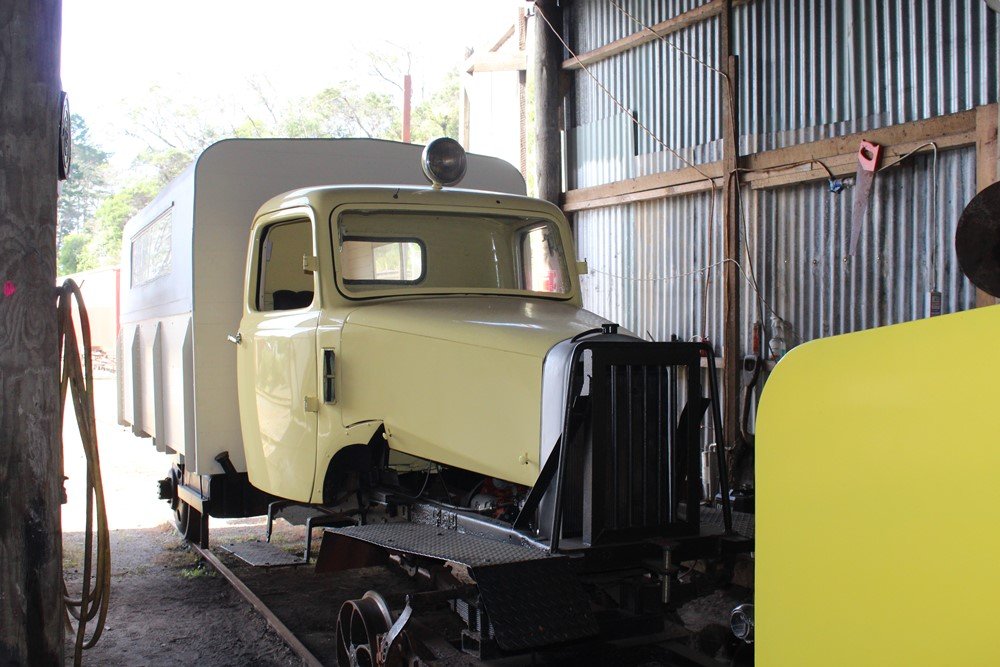
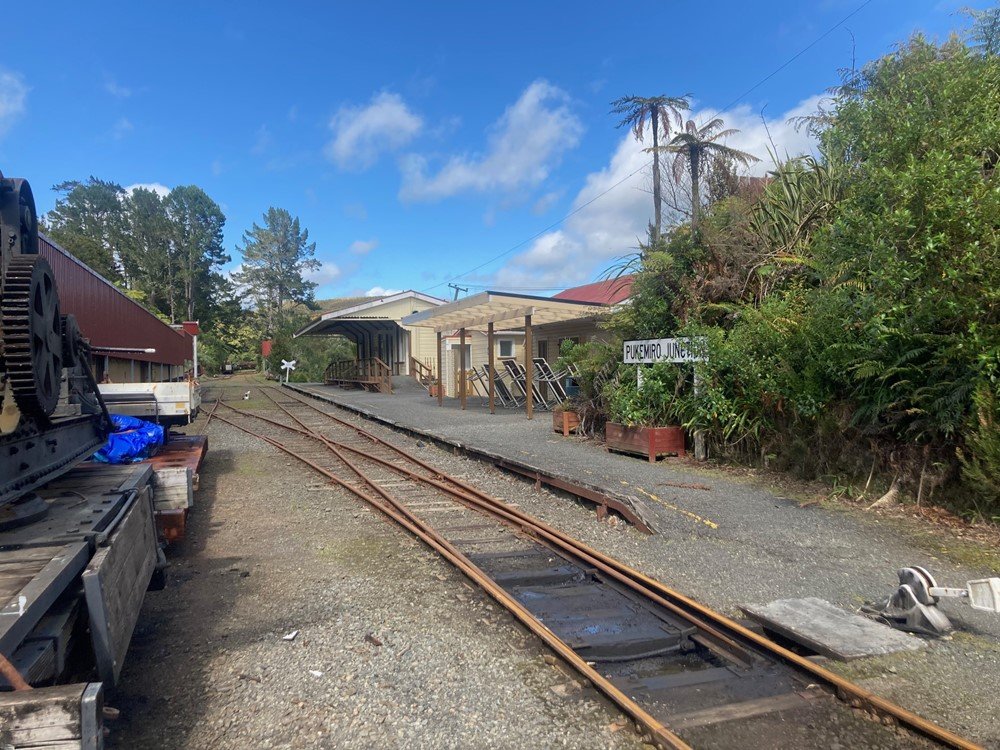
Back to an October 2020 Bush Tramway Operating Day after the 1st round of Covid restrictions were lifted General view carriage shed and workshop The rail truck on the right is a restored "Bush Jigger" converted from a 1940 White truck to transport workers and equipment on a Bush Tramway (forestry railway in the Rotorua area and now used to give "jigger rides" between trains! Jigger Rides using self propelled rail trollies is a popular feature on some New Zealand heritage railways The Jigger has a built in turntable to avoid running backwards Sole operating steam loco a Peckett 0-6-0T once owned by the Pukemiro Coal Company which connected with the Main Line at this location The steam train currently operates between the station and the bottom end of the line, coach was once used on local coal miners trains, one coach is about the limit with this loco because of the grades. Busy time at Pukemiro Junction with trains connecting. Currently the top end of the line is worked by a 2 coach set topped and tailed by small Drewry diesels basically an 0-4-0 150hp version of the British Drewry 204hp 0-6-0 diesels (04 Class) Steam train arriving as diesels wait with connection. Typical NZR coach interior Diesel waits to depart vintage car enthusiasts on day out Jigger returning with passengers Another recently restored Jigger in the workshop Typical New Zealand level crossing, ridge in background is an earthwork screening a large open cast coal mine F Class 0-6-0ST once the mainstay of the line currently out of service requiring major boiler work Class B Climax currently undergoing major overhaul
-
Going totally off topic the 80 Class sets were borrowed (leased/hired) by IE in response to an acute coaching stock shortage in the mid/late 1980s, under the Government's 'Building on Reality Programme" there was to be no further investment in the railways after IE completed the Cork Line re-signalling and the MK3 Main Line Coach order. As far as I recall one 80 Class set was used to work the Bray-Greystones shuttle, a second to work Cork-Cobh and a third to cover maintenance as sets were rotated between Bray and Cork as it would have been extremely challenging to keep three sets in operation simultaneously. The Bray-Greystones shuttle were replaced by a bus service when the 80 Class sets were returned to NIR in the mid 90s, suburban train services not restored until the DART was extended to Bray in the early 2000s I don't thing 80 Class regularly worked Maynooth suburban trains the original service was worked by a AEC Push-pull set with the Connolly-Sligo and Connolly-Rosslare sets working early morning Maynooth-Connolly services before taking up their main-line diagrams. Maynooth trains were mainly hauled stock until replaced by diesel railcars in the mid-late 90s. A 2 Coach MK3 Push Pull set haulled by a 141 with the loco running round regularly operated a Saturday afternoon Connolly-Maynooth service in the Mid 90s. Born out of an Albert Reynolds election promise Maynooth was the poor relation of Dublin Suburban services.
-
Facing up to reality really, I get most of my enjoyment out of buiding models and tend to loose interest once I complete the main assembly, ending up with a lot ofpart completed models. I get a great kick out of knowing that some of my kits/models are running on other peoples layouts. I had no plans for further loco kits after I completed the 52 Class, but am tempted to produce a set of parts for a 60 Class and a Midland "Standard Goods". My most successful layouts mainly N tended to be layouts that were interesting to operate rather than scenically complete, with a couple of stations or yards with a sense that trains were going and arriving from somewhere, I struggle to keep interest in a small or cameo layout running short trains even if it operates 100% reliably.
-
One 80 Class set was used on Bray-Greystones shuttles, a second on Cork-Cobh suburban trains. The third a maintenance spare rotating between the Greystones and Cobh sets, one of its more unusual workings was a Sunday morning Dunlaoire-Heuston 'Boat-Train rather than the usual Dublin City Services bus transfer between Dunlaoire and Connolly. Its possible an 80 Class set was rotated between Dublin and Cork on a weekly basis for maintenance purposes, though I don't know if the transfer working was a revenue or ECS working. Passengers were regularly carried in Mitsui 2600 railcar sets on Cork-Dublin transfer working during the 1990s a long slow uncomfortable journey compared with a MK3 set. Another oddity was that IE advertised a Sunday afternoon/evening Mayo-Waterford passenger service reversing at Kildare following the arrival of the 2700 railcar sets in the late 90s most likely aimed at Waterford College of Technology students. Checked out Kildare Station on the appointed date to find a long 80 Class set (Most likely 10 car) waiting in the platform, but no signs of a 70 Class set. The 80 Class was actually on a NIR Curragh Race Special. IE stopped advertising its Mayo-Waterford Sunday evening service, the 2700s were eventually introduced into service on Pearse-Drogheda trains after a very long commissioning period apparently as a result of design and manufacturing defects.
-
Had several 'dream" layouts Irish and American down the years, though none progressed to far as I seldom stayed in the same place/country too long. I have been planning to build a 21mm gauge layout based on Kiltimagh on the Burma Road for the past 30 years and beyond setting up the baseboard haven't really progressed further during the past 10 years at this stage its doubtful if I will ever reach the tracklayng stage on an Irish 4mm layout in 21mm or OO I am struggling at this stage to find time for modelling as a result of family commitments and its likely we will have to downsize at some stage to a smaller property and possibly dust off the American N gauge I had in storage for the past 20 years and cull/dispose of my Irish 4mm and American Large Scale collections.
-
Bush Tramway Club Waikato one of my 'happy places!
Mayner replied to Mayner's topic in Photos & Videos of the Prototype
I think you are missing the fundamental purpose of the majority of so called preserved railways, whatever its declared objectives the Bush Tramway Club and a lot of other similar organisations is a place where the member can 'hang out' have a natter, play with trains and restore things rather than any grand educational or historic purpose. The restored station, locos and passenger stock at the front of house brings in the fare revenue that helps along with donations and membership subscriptions to play trains, restored freight stock is unikely to generate income to pay for the restoration unless you have enough people willing to pay for photo charters to make it worth while. The biggest challenge facing these organisations is that people that established these groups during the 60s/70s are now quite elderly and there are fewer people coming through in their middle age to take their place. Interestingly apart from the bogie flat most of the stock in photo three is in reasonable 'in service' condition and would not look out of place on a demonstration freight. -
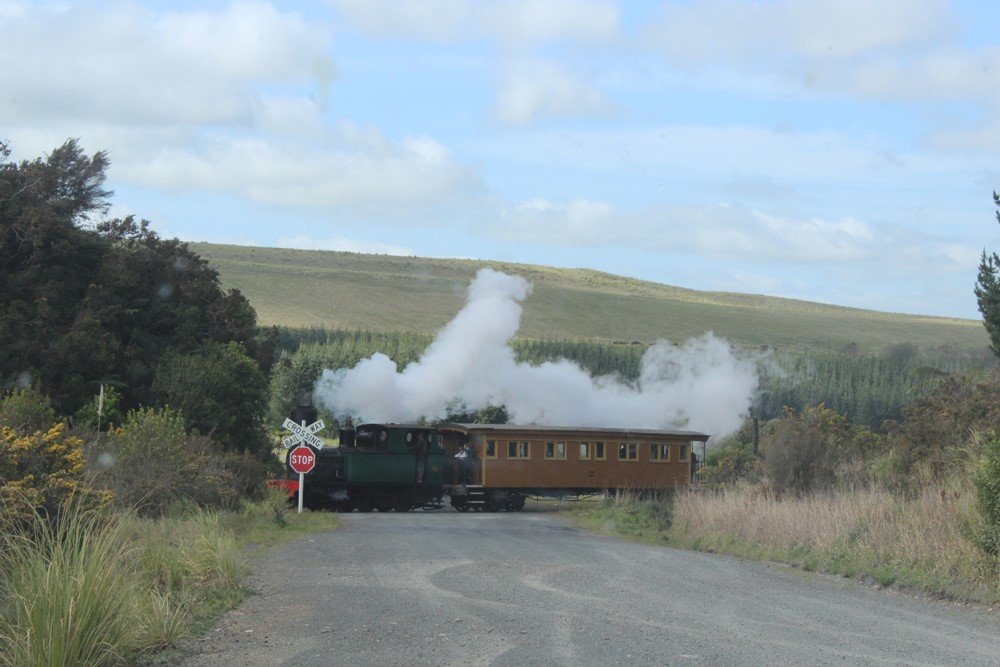
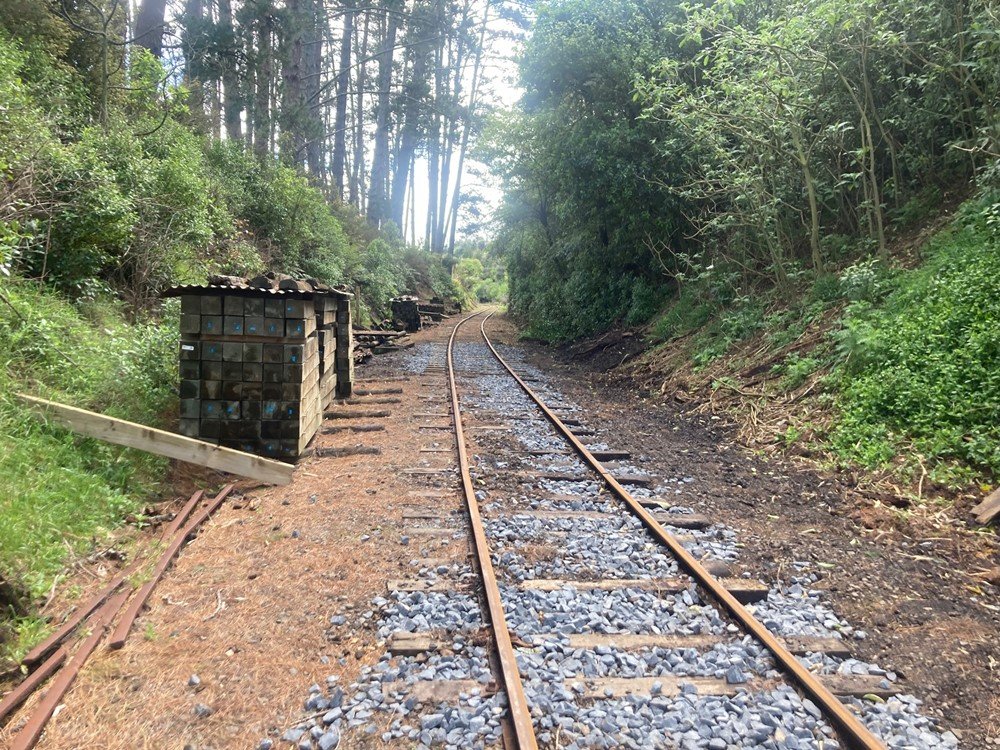
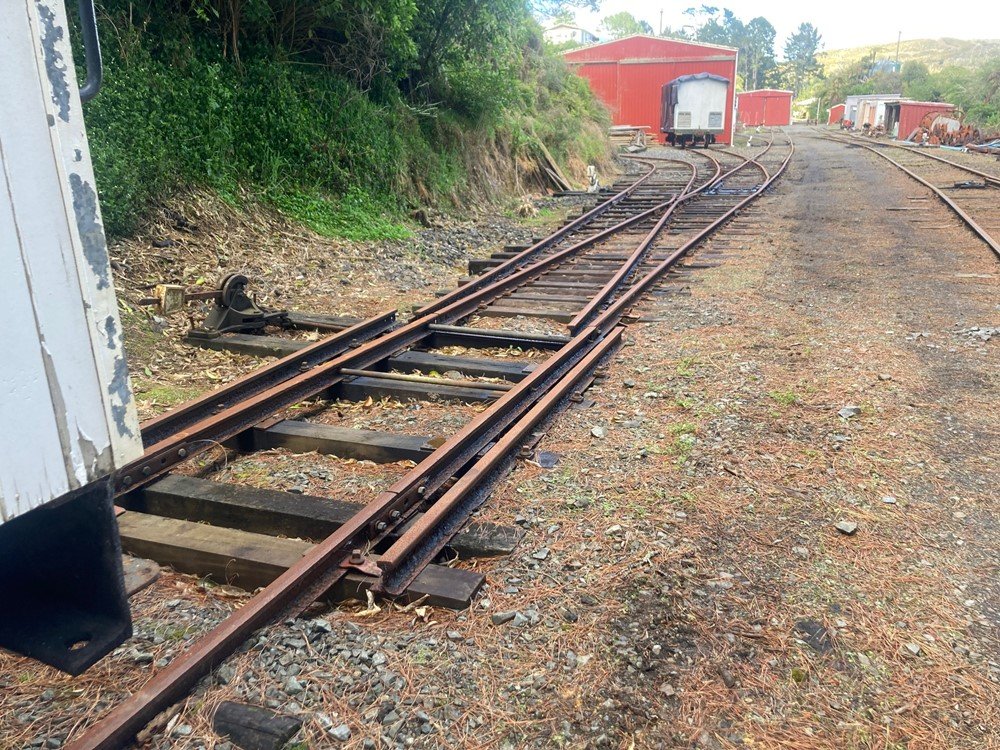
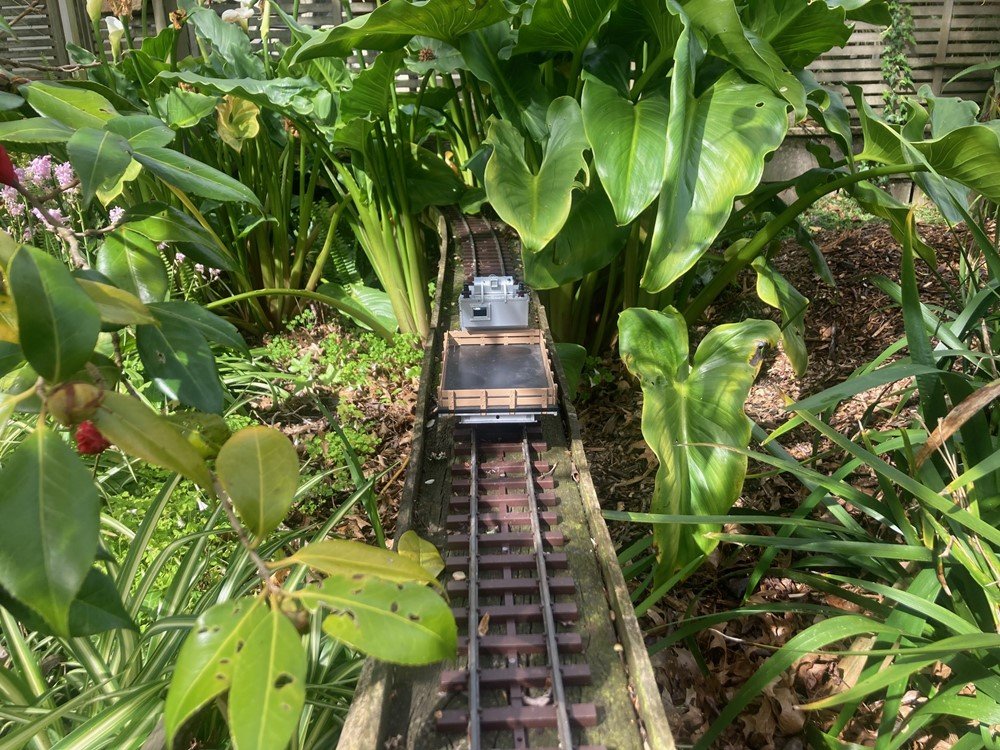
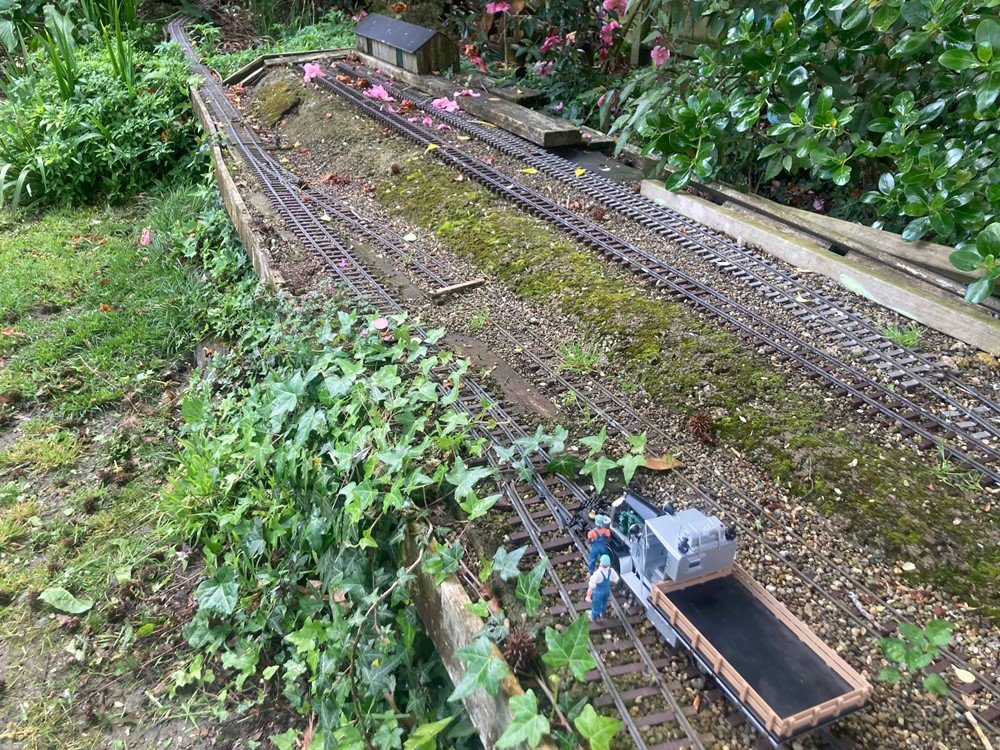
Made some time to go on walkabout after dropping daughter at School on Monday had originally planned on a bush walk (walk in the woods) but ended checking out the Bush Tramway Clubs Pukemiro Junction Yard and the top end of the Glen Afton branch, one of my escapes when I am under pressure. The Club which was founded to preserve and restore New Zealand Bush (Logging) locos and stock in the early 60s took over the top end of New Zealand Railways Glen Afton Branch which served several collieries in the area west of Huntly the largest centre in the Waikato Coalfield. The top end of the Glen Afton closed when the centre section of the branch and Rotowaro township(Lake of glowing embers) was abandoned for the new opencast Rotowaro mine constructed to serve the Glenbrook Steel Mill near Auckland. The Bush Tramway Club operation is unusual in that Pukemiro Junction the operating base and station is in the middle of the line with loco hauled passenger trains 'topped and tailed" by locos as there are no run round loops at either end of the line. The railway traditionally operated on the 1st Sunday of the month from March to December when the fire risk was low, but planning to operate monthly in 2024. https://www.bushtramwayclub.com/index.html Hadn't visited the line in several years, noticable change was a carriage shed to protect the coaches and an AG Price E Class Bush Lokie (a Climax Heisler cross) stuffed and mounted. Looking up the line towards Glen Afton with classical NZR style water vat the main running line on the right the Branch to Pukemiro Colliery veered off at a triangular junction in the left distance, the colliery had its own Peckett 0-6-0T loco which is currently the sole operating steam loco on the railway. Looking down the line towards the station and yard, steam loco bunker on the right is from a Heisler geared steam loco under restoration, diesel is a typical AG Price 0-4-0 dating from the 50s-60s. This type of loco are still used to shunt railway works and are often hired out to Industrial sites for yard shunting though no longer in "main line" use' Rail is the original from NZR days an obsolete profile no longer available. The station building is a typical NZR wooden station building, in this care the original Rotowaro station building, the building with the lean to canopy is a cafe typical NZ corrugated iron roof and timber weatherboard/framing construction. Classic NZR portable workshop/store/bunkhouse Recent re-sleepering and ballasting carried out at the Rotowaro (East) end of the yard, sleeper stack protected from the rail with corrugated iron! The top end of the branch is basically on a continuous 1:50 ish. grade and very twisty. Interesting bit of trackwork Stub switch/point outside carriage works Top end of the line at Glen Afton line is on a steep grade and in a cutting, branch was severed by road widening, former station yard and colliery was behind the stand of trees in the distance. Memorial to 1939 Glen Afton coal mine disaster.
-
O Gauge Irish Class A and Class B Tank Wagons
Mayner replied to DJ Dangerous's topic in Irish Models
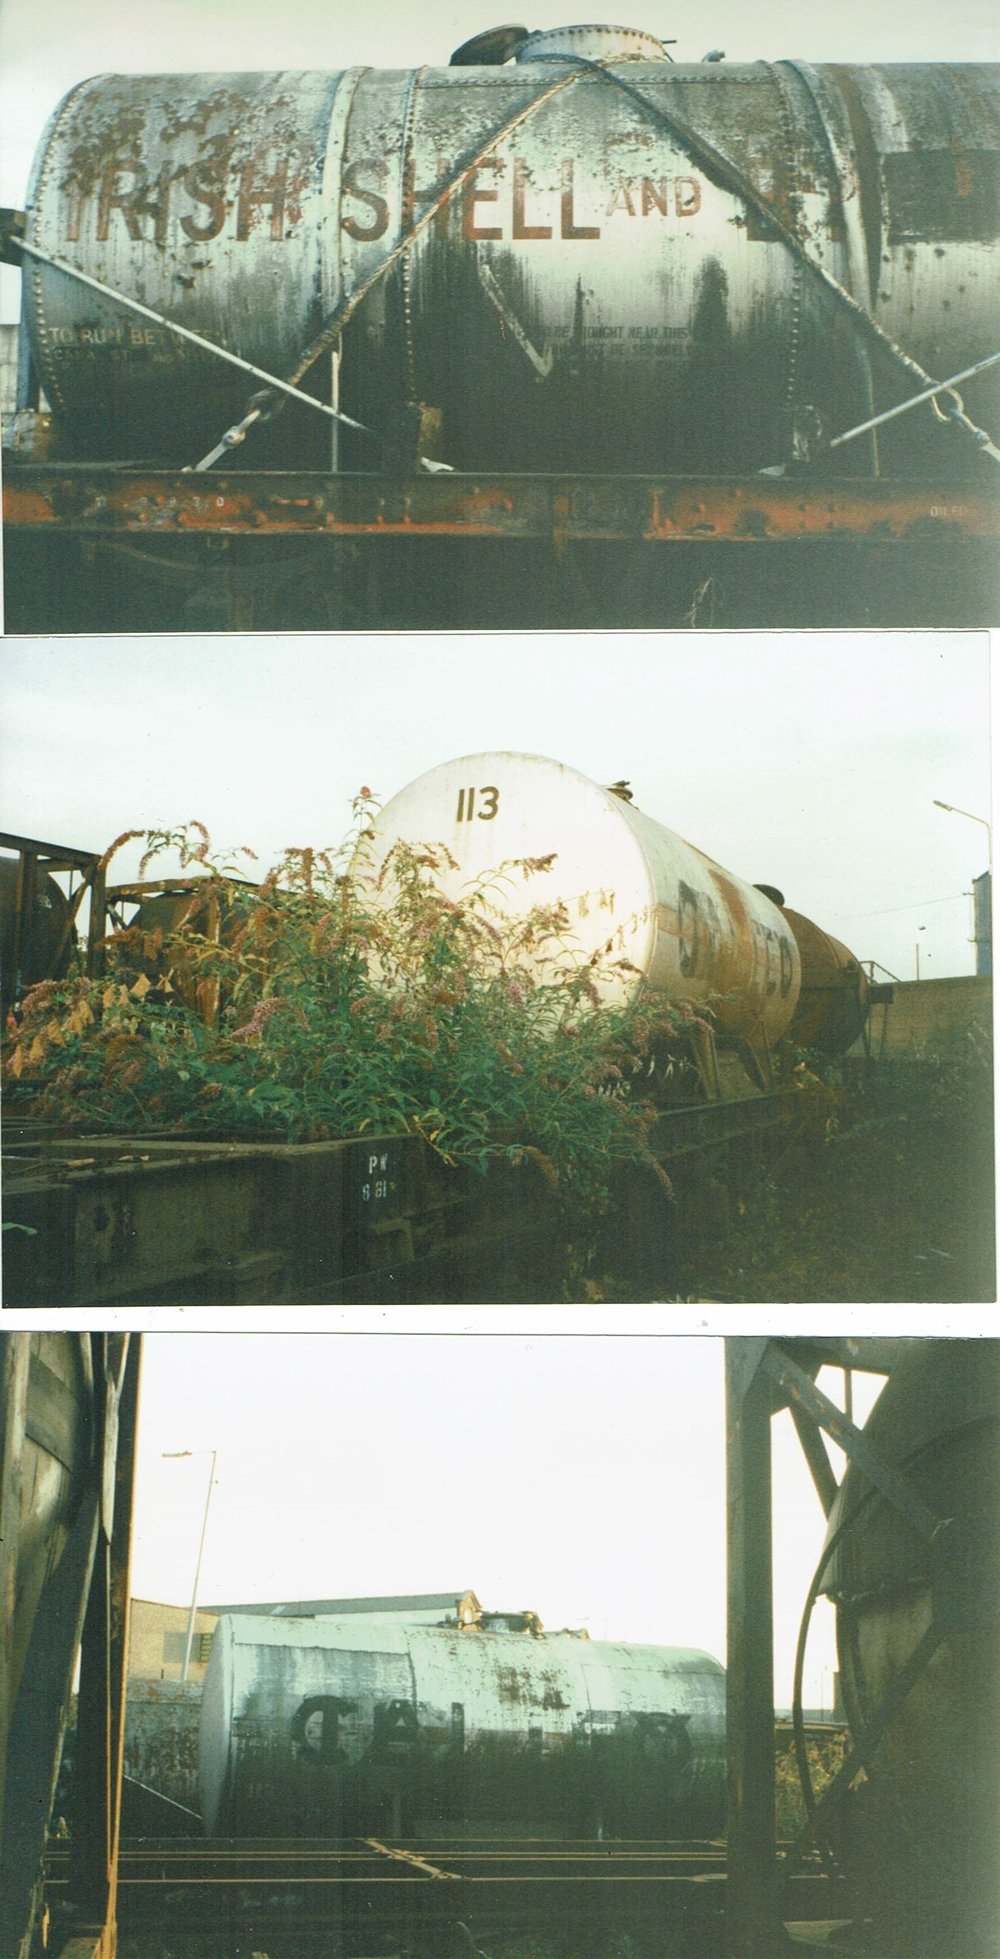
Most Irish tank wagons up to the mid 1960s were standard British RCH designs assembled by builders like Hurst Nelson and Charles Roberts not dissimilar to the Slaters O Gauge and Bachmann OO Gauge RCH wagons, the main physical difference between the Class A and B wagons was the discharge arrangement the Class A through a siphon pipe on top of the barrel and the B through a discharge pipe under the wagon operated by a hand wheel on the top! CIE started building 'modern" vacuum braked tank wagons in the early-mid 60s for Foynes-Drogheda & Limerick fuel oil traffic for Cement Limited and later built small batches of tank wagons in the early 70s for Burmah (6 wagons) possibly general use and fuel oil traffic to loco depots and bus garages. The ESSO wagons were owned by ESSO Teo and were re-gauged type A & B Charles Roberts built ESSO tank wagons dating from the late 50s made redundant by the introduction of larger air braked wagons. The majority of the older tank wagons were dumped/stored in the Sherriff St/East Wall Yard until the yard was cleared out during the early 2000s. One interesting group of wagons similar to the Dapol Type A anchor mounted wagons formerly owned by Caltex/Texaco that were used on North Wall-Inchacore fuel trains into the late 70s early 80s. Originally branded CALTEX they were re-branded TEXACO and ended up with the CALTEX lettering "grinning" through the paintwork an interesting lettering/weathering challenge. Not great photos taken late afternoon late 90sThe Irish Shell Wagon is a late 1920s RCH Type A with silver body and red solebars 113 is one of the Anchor mounted Caltex wagons re-branded as Texaco. The Caltex wagon in the bottom photo is an older anchor mounted Class A design with a rivet3ed tank barrel possibly dating from the 1940s Type A tank wagons originally had a horizontal orange? strip at mode barrel and black solebars, later changed to red solebars!
-
Narrow Gauge in the Rockies not quite
Mayner replied to Mayner's topic in US / Canadian Railway Modelling
Bit like the real RGS keep maintenance to the absolute minimum to run the odd train. Haven't had much time or interest in running/maintaining the garden railway during the last couple of years. Last spring-summer's La-Niña weather systems with the tail end of tropical cyclones has not helped, though we are due dry El-Niño systems this spring-summer hopefully without the bushfires/flashfloods Australia is already experiencing. Currently everything is too saturated to burn and the raised track base has worked well when the garden floods after heavy rain, at least we haven't got crocs, snakes and poisonous spiders, though we did see a copperhead while on holiday in the States Track gang is getting a bit scarce we had a very active garden railway group with monthly running sessions on each others railways when we started out, but became defunct in recent years younger members haven't the time to play with trains, others moving on or passing away -
Its an industrial railway doing what its intended to do and no more transporting peat from the loading points to the power-stations, Briquette plants and road transfer plants. Permanent way and rolling stock is radically different from heavy rail practice. Most of the track portable and permanent is sectional complete with Setrack Points, Portable Track is usually laid directly on graded peat on polythene on the surface of the bog, using BNM custom buolt graders/track laying machines, permanent track is usually laid on polythene under lay on ravel ballast, peat and grass help bind everything together. The wagons are unusual in that the wheels rotate independenty on the axle which both improves stability and reduces wear on track and wagons are completely un-braked. Operation was intensive in its heyday operating 24hr daily 365 to feed the power stations transporting around 5million tonnes annually mpre than twice CIE/IEs tonnage. Trains operated on line of sight, drivers possibly on bonus, de-railed wagons were simply dumped at the line side and recovered at a later date the focus was on feeding the power stations. The commercially successful Clonmacnoise and West Offaly Tourist operation closed because it was disruptive to peat traffic to the then new West Offaly Powerstation. The maintenance depots on some of the systems had an air of a scrapyard with old or obsolete locos and stock stored out of use since the 80s as Wagon Masters replaced the R&H locos of the 40s-60s, the Wagonmasters later replaced by more modern BNM designed locos from the late 80s onwards, toegther with a bewildering variety of peat harvesting machinery as sod gave way to milled peat production. Wear and tear on locos, stock, track and bog machinery would have been phenonomal with the sheer volume and intensity of traffic
-
Would you model in 21mm if RTR track and models were readily available?
Mayner replied to BosKonay's topic in Irish Models
Apart from OO Works J15 no rtr manufacturer currently produces a rtr model of an Irish steam loco, Murphy Models formerly released Irish repaints of two Bachmann OO gauge British outline locos an LMS Jinty 0-6-0T and a Southern Railway N Class 2-6-0 loco. I think one of the directors of Irish Railway Models-Accurascale explained that it was not practicable to produce its GWR/BR Manor locomotive as a rtr EM gauge model (closer to 4'8"½ gauge than OO) due to the manufacturing tolerances of the materials used. A P4 or EM gauge modeller would need to replace the existing chassis with a sheet metal chassis and replace the plastic injection moulded splashers with sheet metal as it was not practicable to achieve sufficient running clearace between wheels, cylinders and splashers in P4 or EM with a plastic injection moulded or dies cast body. In my experience problem becomes more acute in 21mm gauge where its challenging to achieve sufficient clearance between wheels and splashers even when using sheetmetal (brass or nickel silver) construction unless you work to P4 standards with close to prototypical wheel standards. -
Narrow Gauge in the Rockies not quite
Mayner replied to Mayner's topic in US / Canadian Railway Modelling
Treated timber was the best available option when I started work on the layout in 2007, plastic/PVC is not widely used as a building material in New Zealand though becoming fashionable for front garden fences/gates on more expensive houses! The timber is graded for outdoor use mainly fencing, retaining walls and decks, I had a lot of the timber in stock from my days as a jobbing builder and has stood up fairly well to 17 years exposure to the Waikato weather, I had to replace half the plastic sleepers on the line after about 10 years use! Dealing with the effects of the weather makes Garden Railways more interesting to maintain and operate than an indoor layout, more in common with full size railway track and structure maintenance. -
Basically it depends on ore prices rising sufficiently to make it worthwhile for Boliden to open up the "Tara Deep' ore body, the existing Tara and Bula ore-bodies are bascially exhausted. It looks like Boliden is planning to continue using rail if mining ever resumes, IE was planning to order new ore wagons to replace the existing 46 year old Tara wagons Boliden have began development work on "Tara Deep" https://www.boliden.com/48fd1d/globalassets/investor-relations/reports-and-presentations/capital-markets-day/2017/tara/tara-deep-mineral-resource.pdf but development work ceased as a result of flooding before closure. IDrogheda-Navan shuttles would basically depend on the NTA or Meath County Council subsidising the service.
-
Narrow Gauge in the Rockies not quite
Mayner replied to Mayner's topic in US / Canadian Railway Modelling
I haven't had time to do anything on the model railway front since July as a result of a family crisis, though I finally made time this weekend to carry out an overdue inspection of the Jackson County. I first started work on the Jackson County in 2007 using treated timber piles and track supports which have held up fairly well to local weather conditions (high humidity -high rainfall. Most serious immediate problem was a 6"X2" splice plate had rotted right through at a trackbase joint on the High Line effectively severing the Staging Tracks in the garage from the rest of the railway. More long term problem is that some of the posts that support the garden fence are beginning to fail requirieng expensive replacement although the fence rails and boarding is still in reasonable condition. I originally fixed the track base directy to the fence rather than independent foundations to get something up and running quickly. I still have a good stock of treated 6X2 in stock, usually nail with annular gun nails, though the nicad charger for the the nail gun is kaput and replcements unavailable. Two sections of track-base had rotted through above supports on the main line, though the supporting structure appears ok. Possibly installed the trackbase with the grain facing upward trapping moisture. Utah Junction looking scruffy, needs weed and moss treatment and hedge trimming. Once a sunny sport this area is in the shad for most of the day a small native shrub planted 15-16 years ago has grown into a medium size tree, because of our humid climate trees (and Grass) grows at a faster rate than the UK or Ireland, we have a 40' tall 15 year oak close to our house. The Tunnel and bridge are holding up well though we gave up on the water feature because of falling leaves and tree debris Though we would run RGS Motor 6 on the inspection trip though the motor appears to have overheated. The Motor is a Berlyn Locomotive Works Korean Brass rtr model bought mint second hand on e-bay for an eye watering price by Irish standards several years ago. Planning to convert the model to battery RC operation some time during the next 12 months after several years in a display case. Figures are Woodland Scenics nicely modelled though brittle Engineers (driver) right hand snapped off. Motor 6 on the main line High Line in the background border shrubbery in this area died off shaded by a tree several a couple of years ago. Into the "Jungle" this area was originally a Sun trap planned as the site for a large wooden trestle similar to those at Ophir on the RGS, but taken over by lillies during Spring before dying off during the Summer. Took the photos on a sunny Spring morning before heavy rain and thunderstorms in late afternoon evening. Obstruction faced by Motor 6 ivy grew across the track during the last 2-3 weeks with new Spring growth, apart from trackbase repairs, trimming back the shrubbery, next big job is weedkilling (residual weedkiller backpack sprayer) depending on the weather forecast. While the railway is 1:20.3 scale weather, vegetation and animals are all 1:1 scale and call the shots.
- 87 replies
-
- 10
-

-
This thread or Tara Mines ?
-
Scratchbuilding or commissioning someone to scratch build a GSWR 4-4-0 is probably the most practical approach for someone who wants a GSWR 4-4-0 as its difficult to see a manufacturer or "commissioner" with the possible exception of OO Works producing a rtr model or a kit. One of the difficulties in the sheer level of variation among the three classes of pre 1900 and six Classes of post 1900 4-4-0s that survived into the CIE era, not counting the ex-WLWR 4-4-0s JHB points out that 4-4-0s "The Kerry Bogies (a tiny engine) once worked the Kenmare branch all surviving members of the class were re-built by the GSR with Belpair boilers once common in Cork and Kerry all had gone by 1954. I produced a kit of the 52 Class with raised round topped firebox that could be assembled in GSWR or GSR/CIE condition, the majority of the Class were re-built with Belpair Boiler boilers in the 1930-40s in my opining spoiling the looks of the loco, 59 the "Quiet Man" engine was basically a 'one off" loco with a flush round topped firebox and 4'4" boiler not shared with other members of the class, possibly 3 sets of boiler and cab toolings for a single class of loco. The sheer number of variations in the slightly larger 60 Class are somewhat mind-blowing along with the original and superheated belpaire boiler versions, the GSR re-built come locos with new raised running boards and Bazin cabs similar to the large 321 Class to give them a more "contemporary" look during the 1920s. In all probability one of the large "modern looking" post 1900 321 or 333 Class 4-4-0s with a rake of Bachmann/Mainline Period 1 LMS coaches in GSR or early CIE livery would be a better option for an Irish "Train Set" steam loco, though unlikely to have hauled a solid rake of 6 wheel coaches unless on a GAA special. The re-built 321s were reasonably consistent in their appearance an express passenger loco used on the Main Line don't know if they worked to Limerick, Waterford or Tralee.
-
Clogherhead - A GNR(I) Seaside Terminus
Mayner replied to Patrick Davey's topic in Irish Model Layouts
A Dundalk-Tuam Beet special operated up to the closure of the Tuam factory at the end of the 84/85 Campaign, Navan would have been served by a trip working to and from Drogheda. I was stopped by a very long Tuam-Dundalk empty special at Coolmine Level Crossing on my way home from work one Autumn evening in 84. Its possible Clogherhead might have loaded 2-3 wagons daily by a trip working from Drogheda in a similar manner to Fenit in its final years. In later years beet was usually unloaded directly by tipper lorry to the wagons from a raised section of the loading bank. Trucks would have been a mixture of Ford, Bedford and Dodge SWB 2 axle tippers with high wooden body owned by local hauliers rather than 'company' vehicles. There is a 1950s photo of beet being tipped into wagons at Tullamore in the O'Dea National Library collection -
Don't think balancing was an issue more the fact that I produced 3 variations of the MGWR 2-4-0 and 1 of the GSWR 4-4-0. In my experience the demand for kits of Irish locos/stock is very low, with a relatively small number of regular customers, a high proportion of whom are experienced builders. There is little difference between balancing a 4-4-0 and a 2-4-0 ideally both types best assembled with a weighted tender to haul a reasonable load. Balancing appears to have been a problem with the OO Works GNR(I) U where there does not appear to have been a provision for transferring weight from the tender to the loco drawbar
-
Its more likely that a J15 hauled ex-GSWR branch line trains in CIE days, the majority of GSWR branch lines lost their passenger services by 1947 leaving Birr, Kenmare, Valencia and Youghal open to passenger traffic. Large ex-GSWR 0-6-0s and 4-4-0s likely to have been used on Cork-Youghal Line. Valencia branch trains were restricted to 6w coaches until restrictions eased and bogie coaches with large dia buffers allowed during mid 1950s Interestingly my ex-MGWR 2-4-0 kits sold a lot better than my ex-GSWR 52 Class 4-4-0 kits in a 3:1 ratio. Perhaps the best option would be for OO Works to produce a model of McDonald's NER D38 Class https://www.lner.info/locos/D/ner_38.php which look very close to the GSWR 60 Class, though its difficult if there is sufficient interest in a D38 Class among NER enthusiasts. Or to ask the company that holds the streaming rights to the Quite Man to sponsor a train set with a high quality model of No 59
-
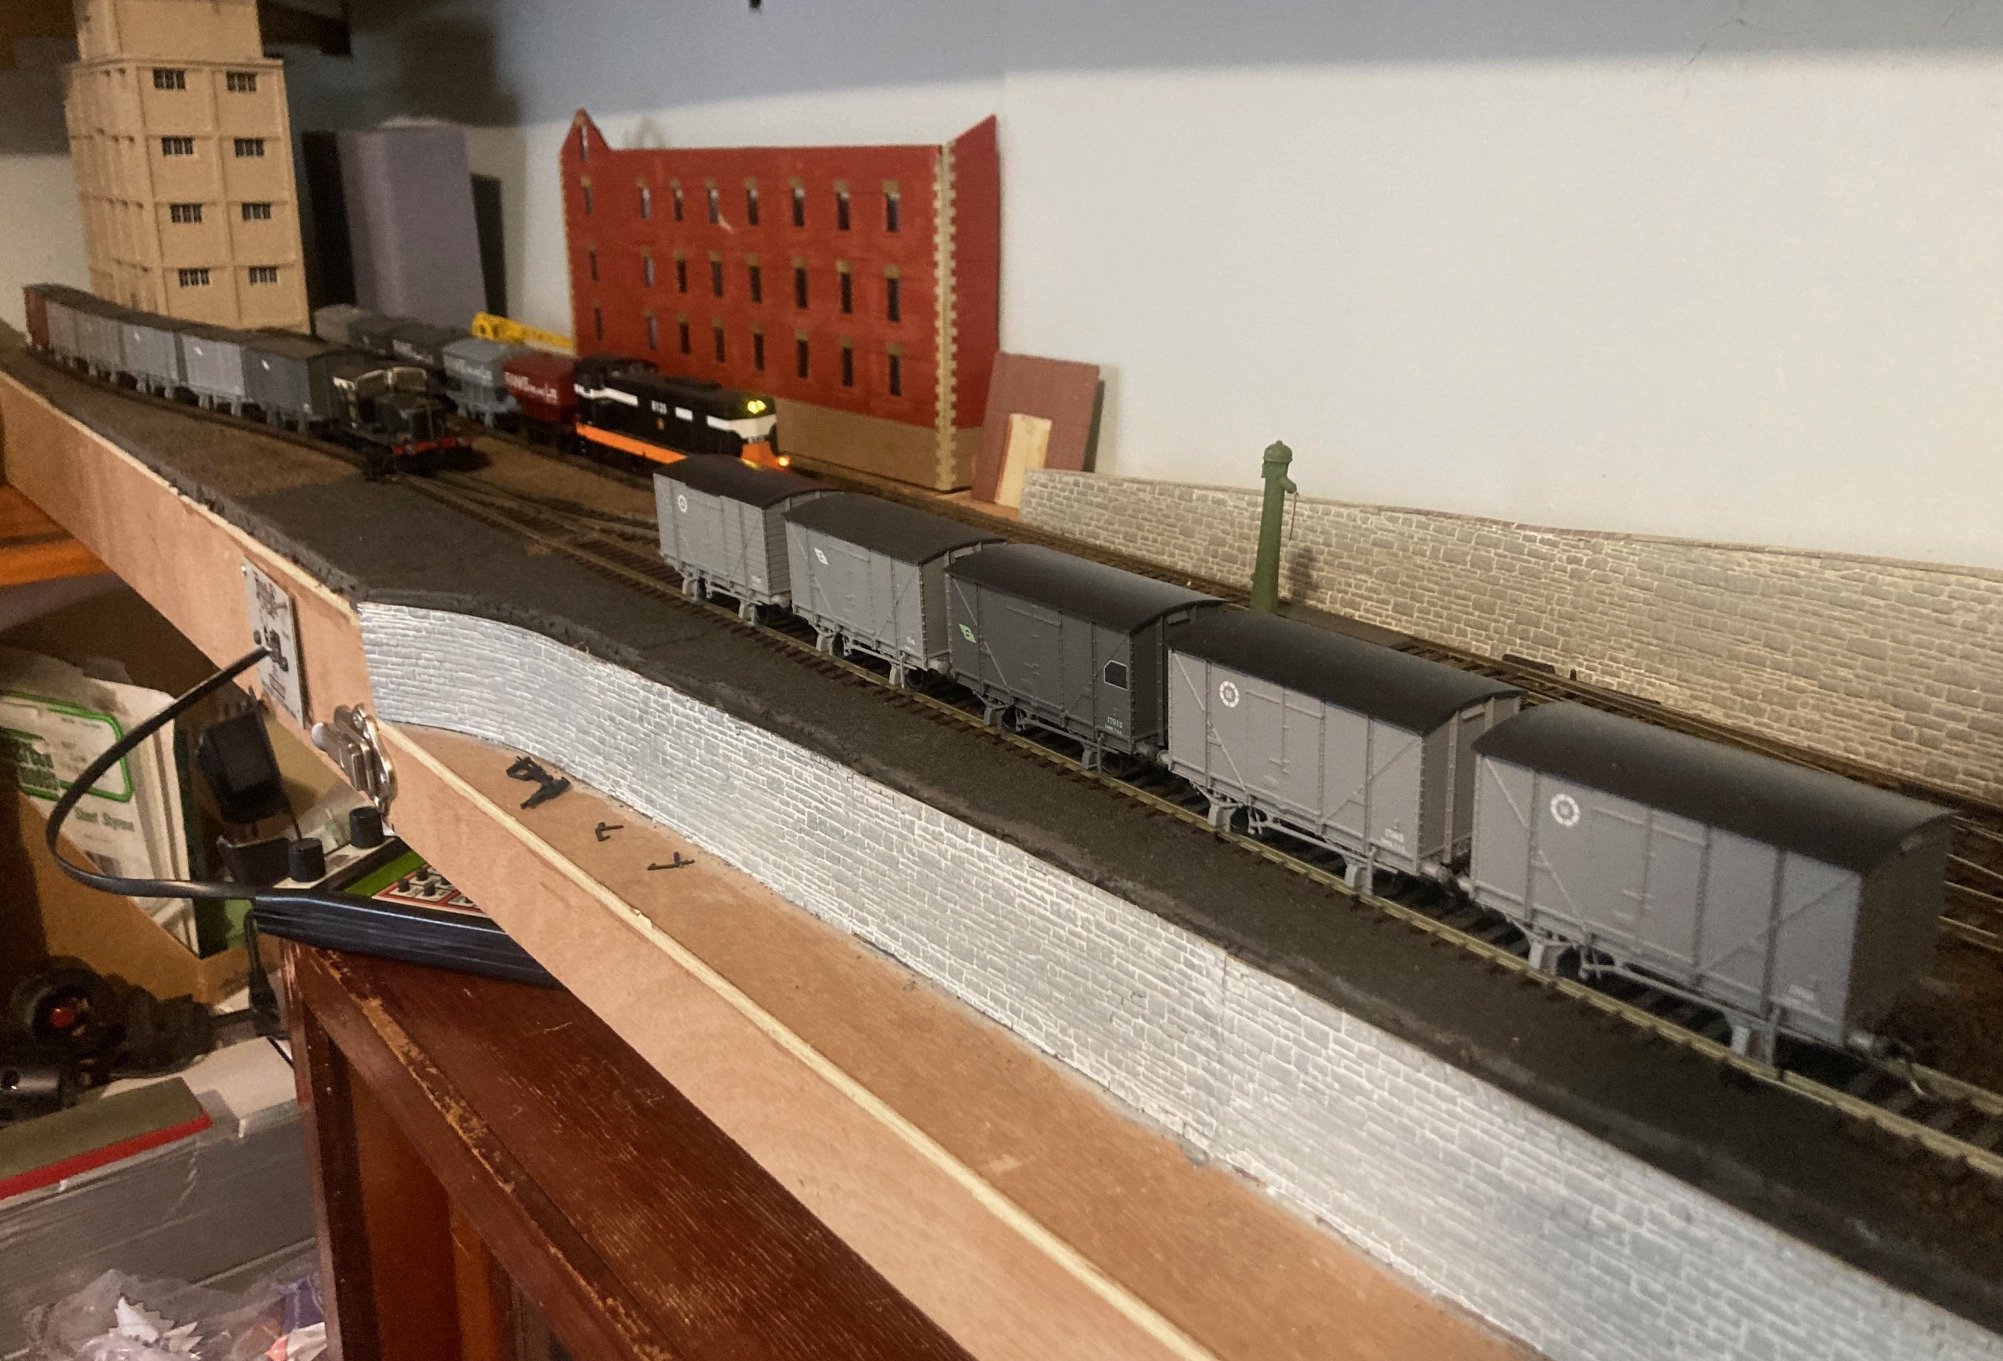
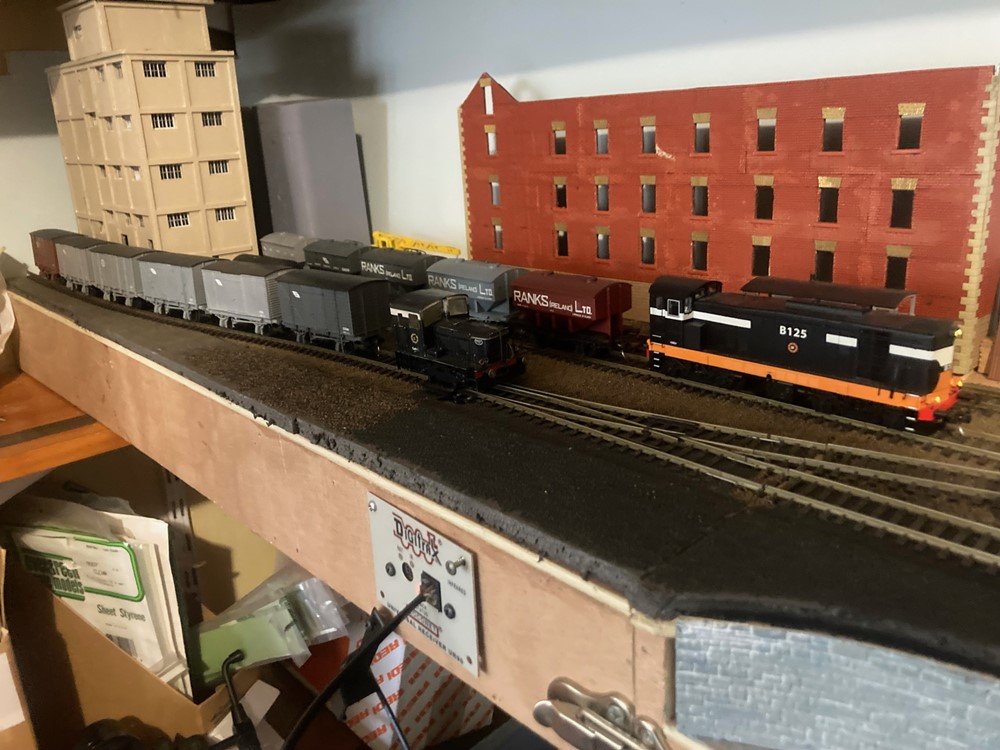
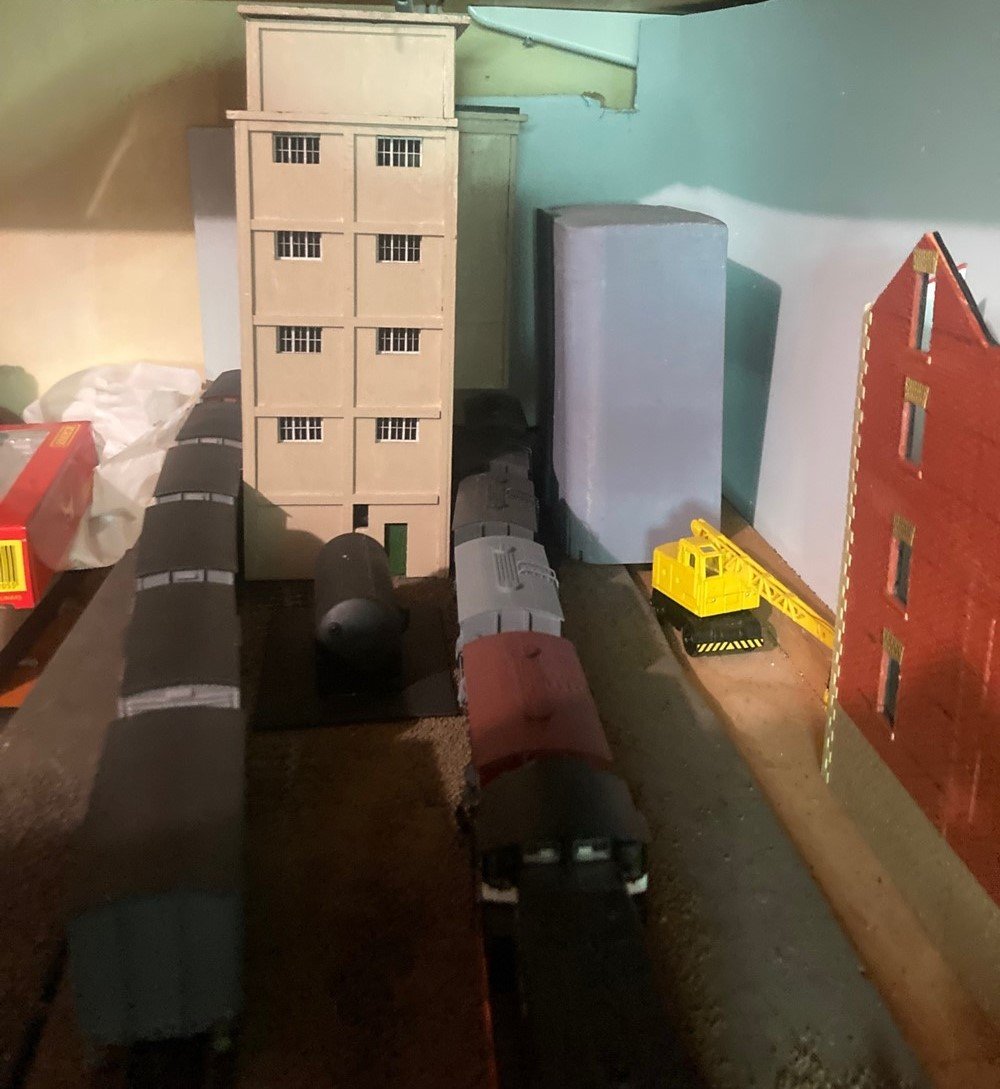
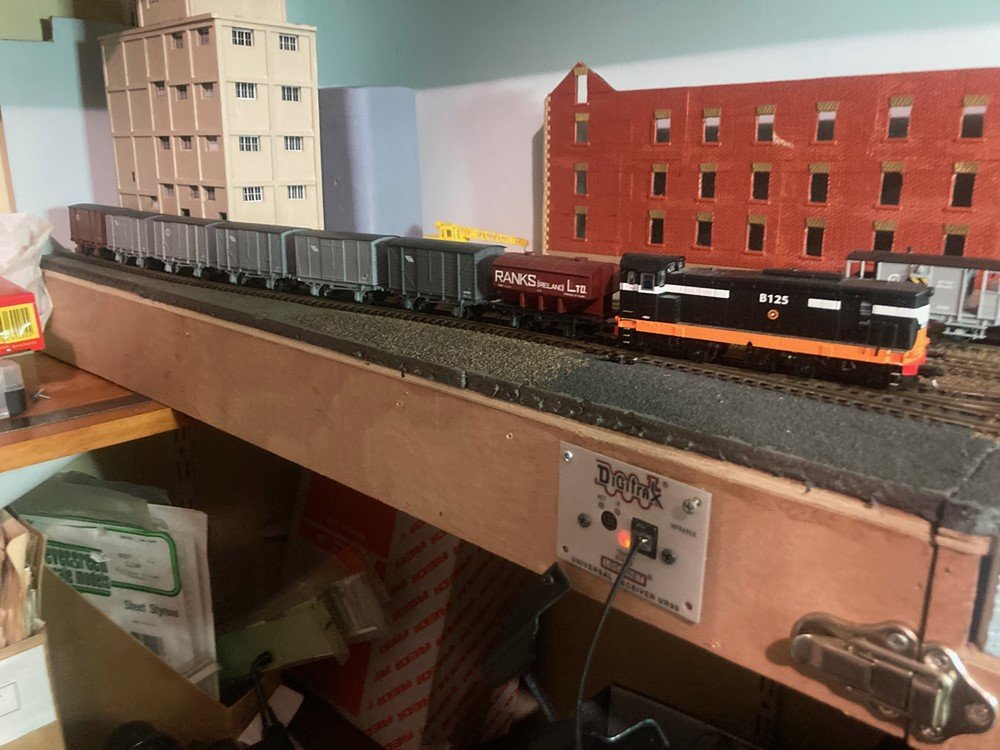
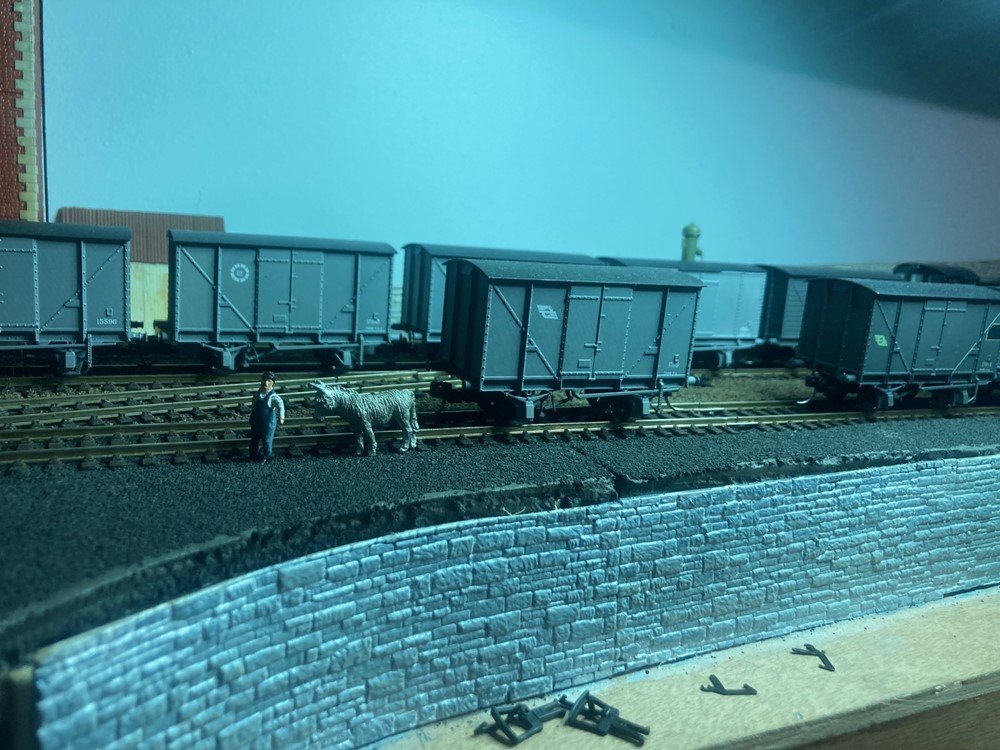
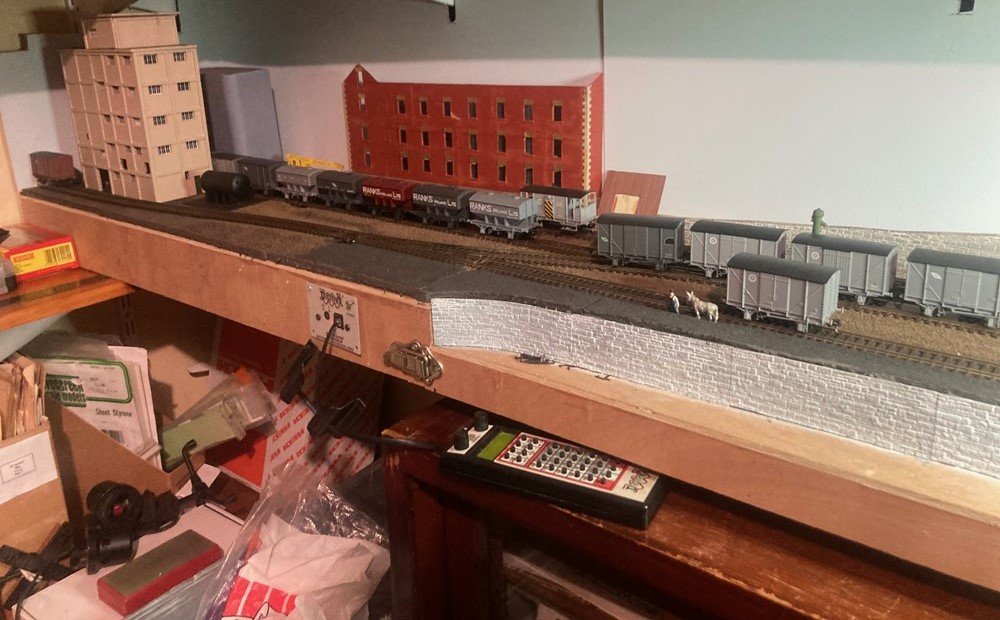
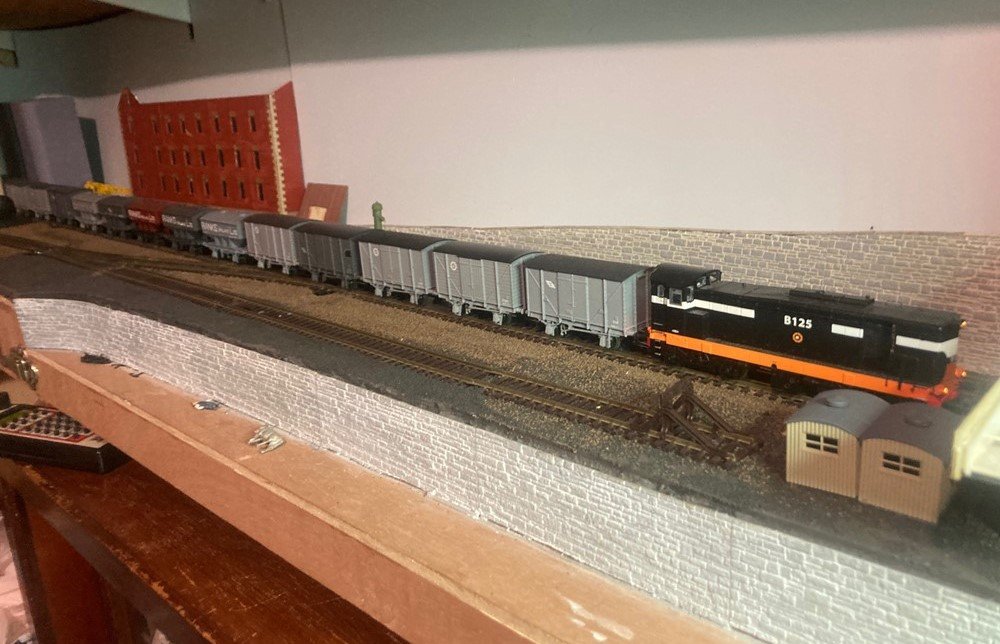
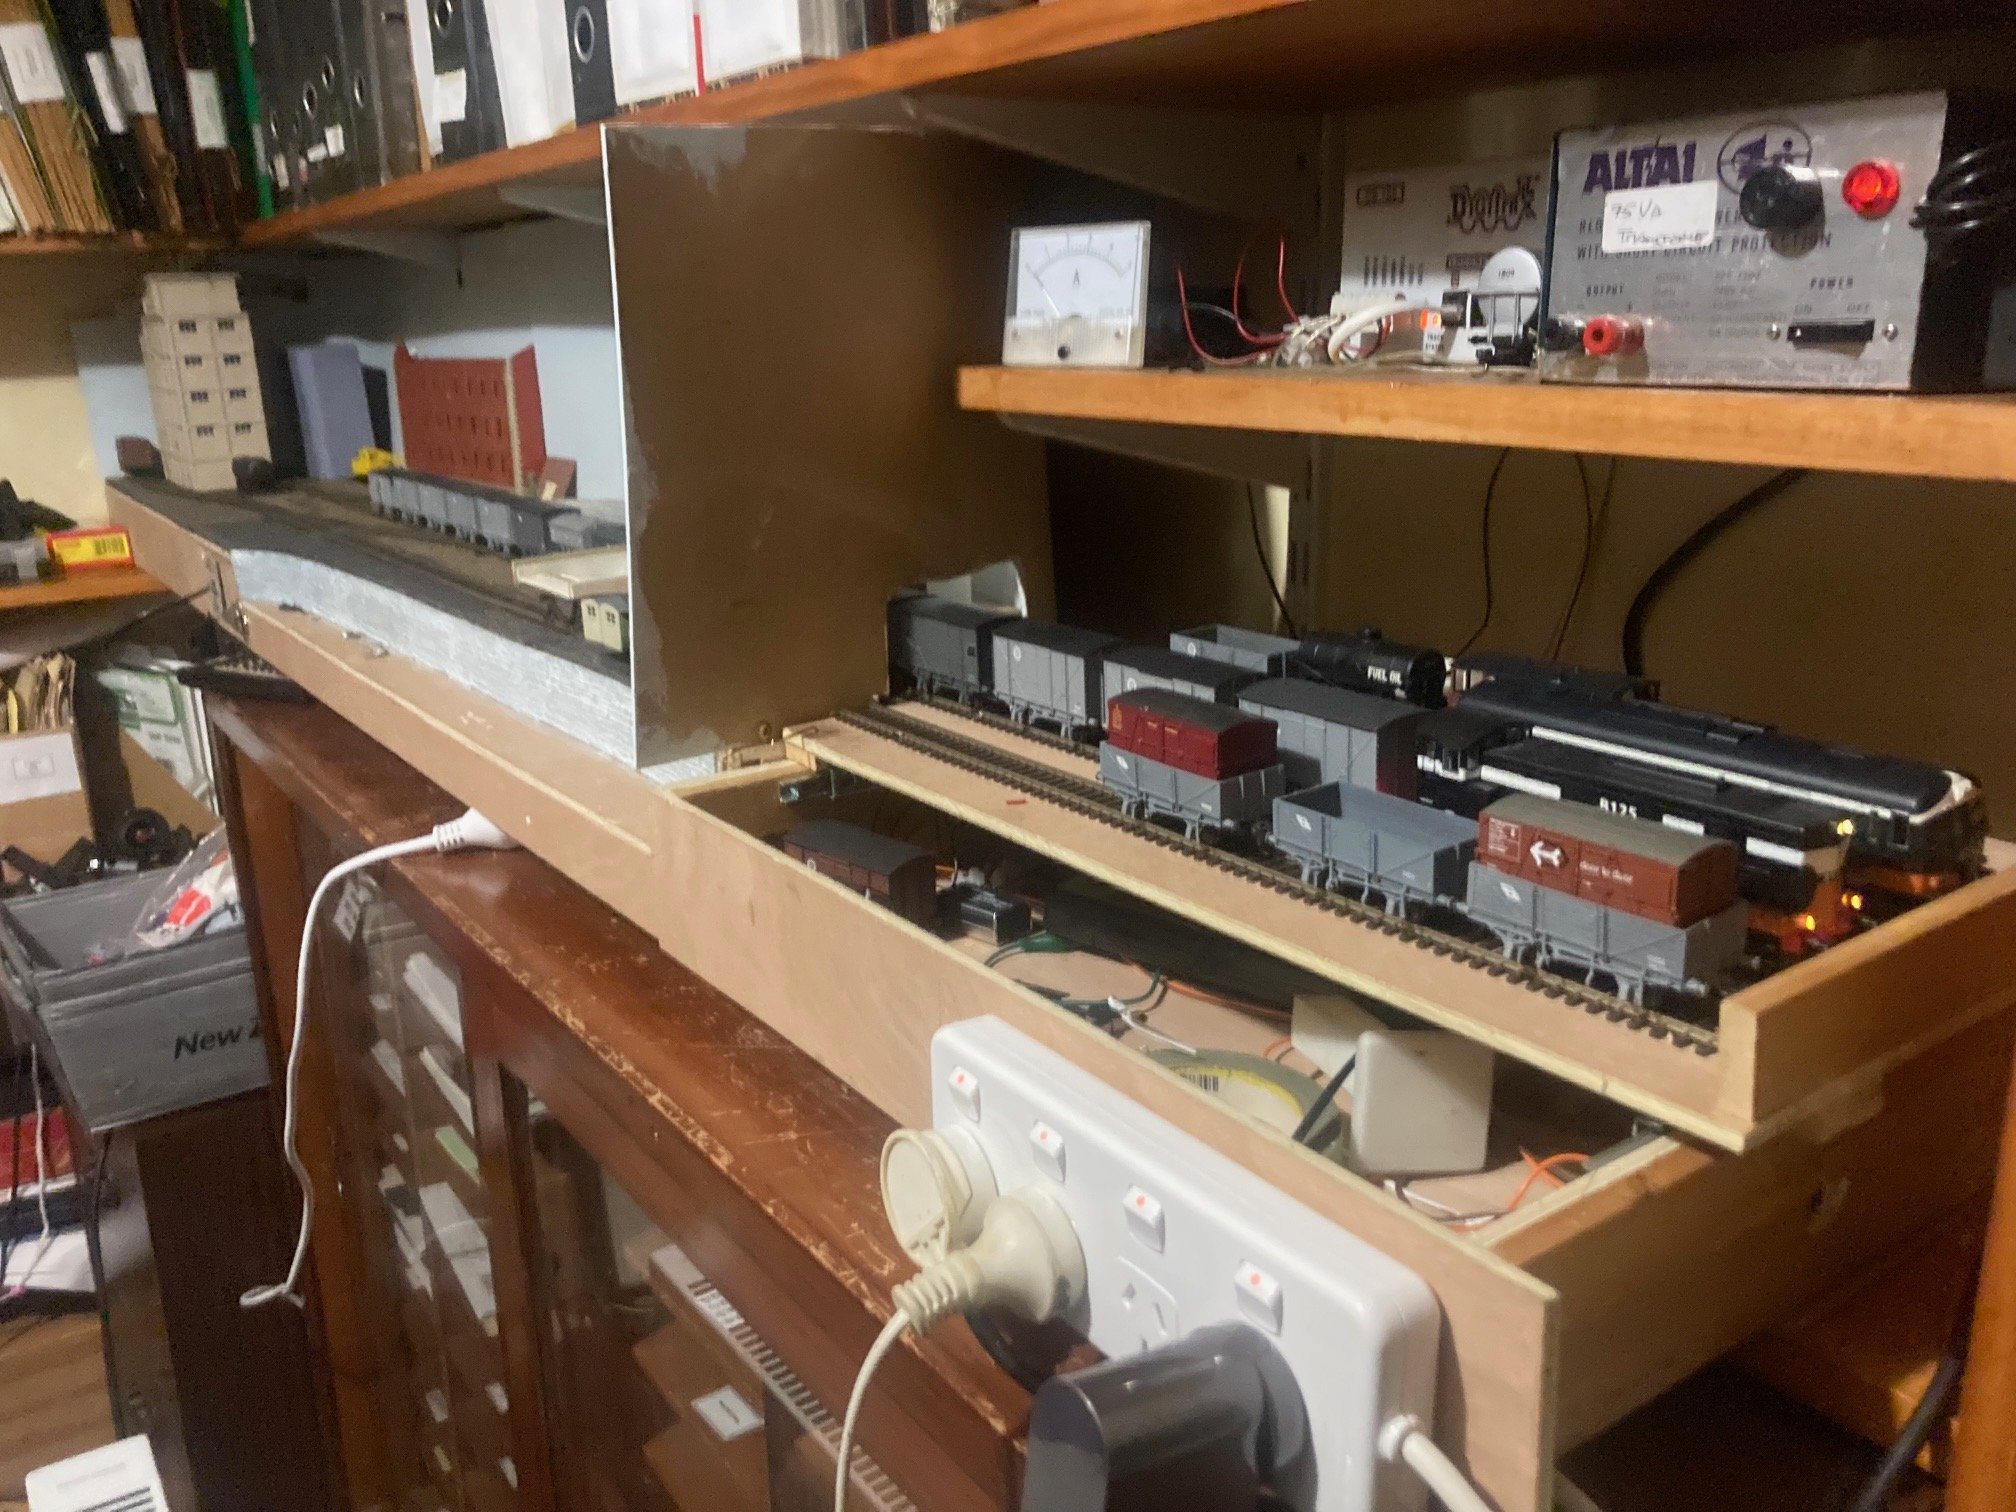
First time I had a chance to operate the layout (play with trains) since June as a result of family commitments, CIE got an order to move another shipload of animal feed that arrived at Northwharf with the line open to wagon load traffic as-required. The yard is basically full of wagons! Local yard staff and train crews had hard words with Motive Power Control and sent a B121 after an A Class buffer locked running round wagons on the last grain special. The B121 is positioning bulk grain wagons for loading from the elevator, with hard topped wagons for bagged feed. There is a lot of shunting involved as only 2 wagons of bagged and 1 bulk grain wagon can be loaded at a time! The grey object behind the crane is a 3D print of an American elevator that took the best part of a day to print and punctured the printer p.f. film fortunately without destroying the printer LCD screen (the joys of home 3D printing) I am planning to build a dry-goods store in this area corrugated cladding and curved roof similar to Ranks Clara to fill the area between the old brick Maltings building and the elevator. The G Class dropped her guts (as been known to happen) and the B121 took over the shunting of laden H Vans between the mill and yard tracks. "Edward" and his handler moved the empties one at a time from the headshunt to the Mill. Its probable that wagons may have been used by capstan (rope) power on the Wharf siding though a modified tractor is likely to have been used by the late 60s, though a shunting horse would make a nice scenic feature. The wagon by the mill is a cripple (no couplers) and Edward go the gig because I seem to have mislaid my Hornby Peckett which is concerning. B125 with her train made up and ready to depart leaving Northwharf to slumber until the boat comes in. For me the real draw back with the layout, is that I can only run very short trains because of the restricted space (7'6")
- 56 replies
-
- 12
-
-

-
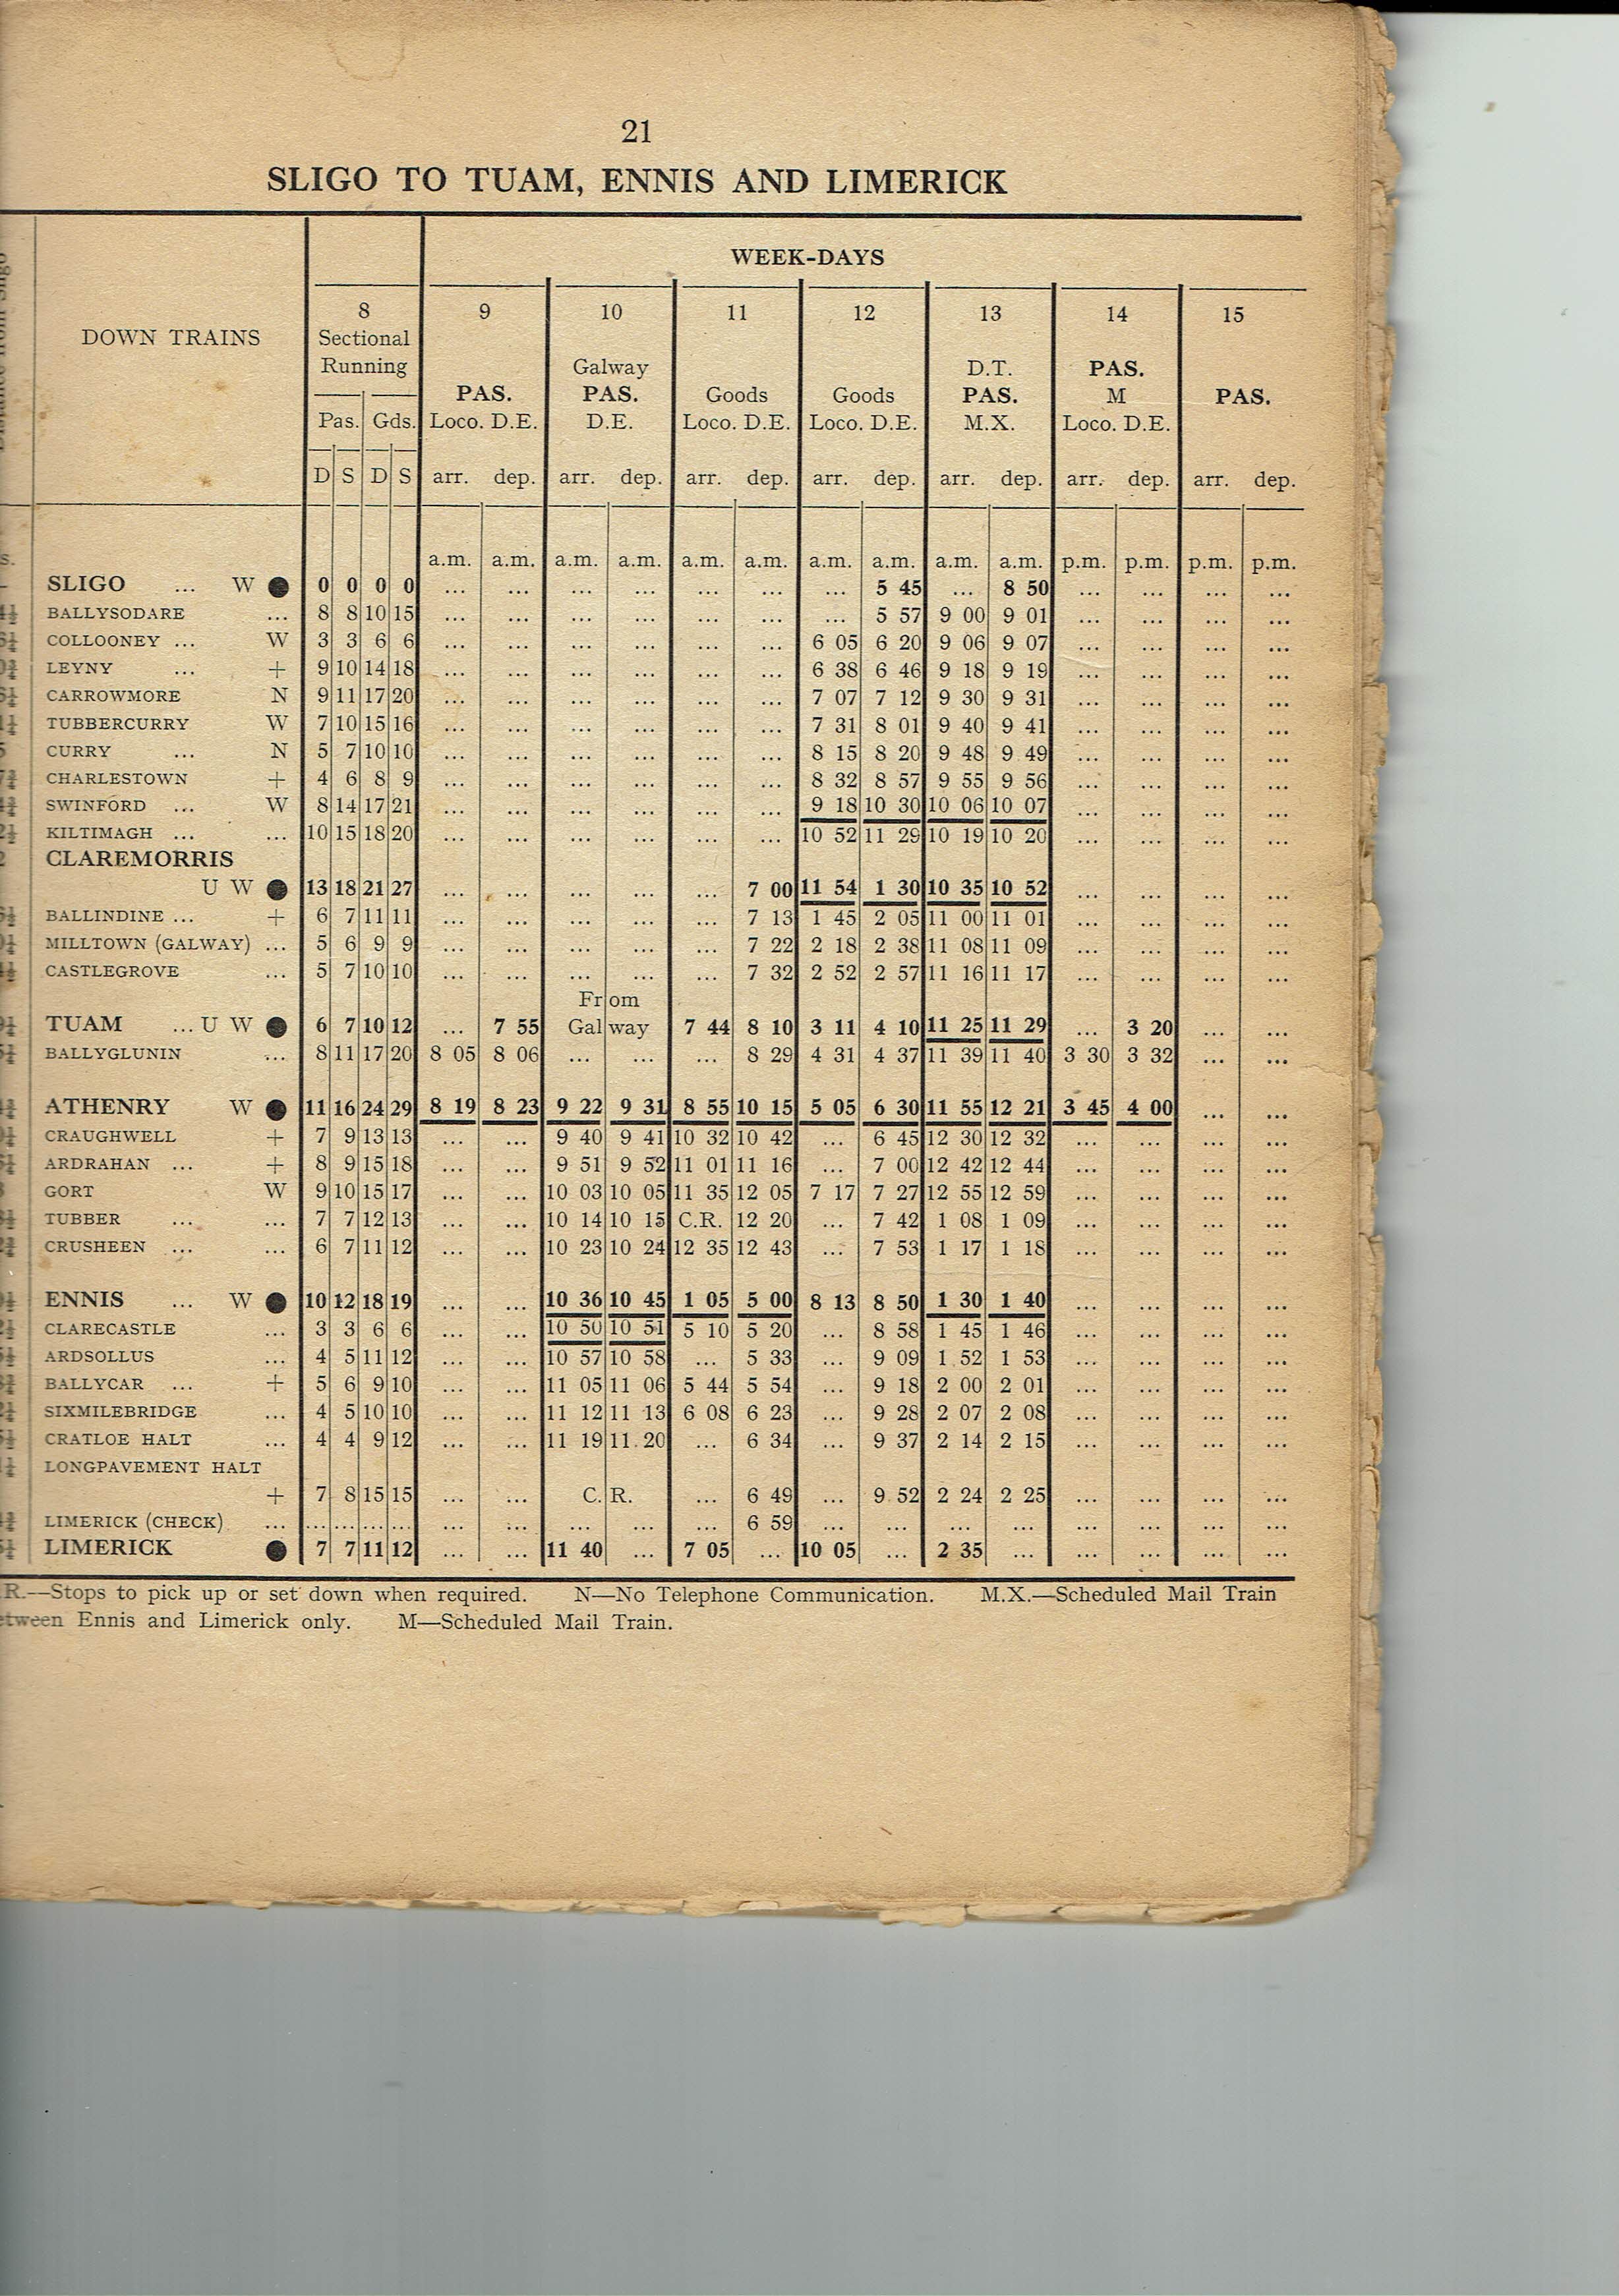
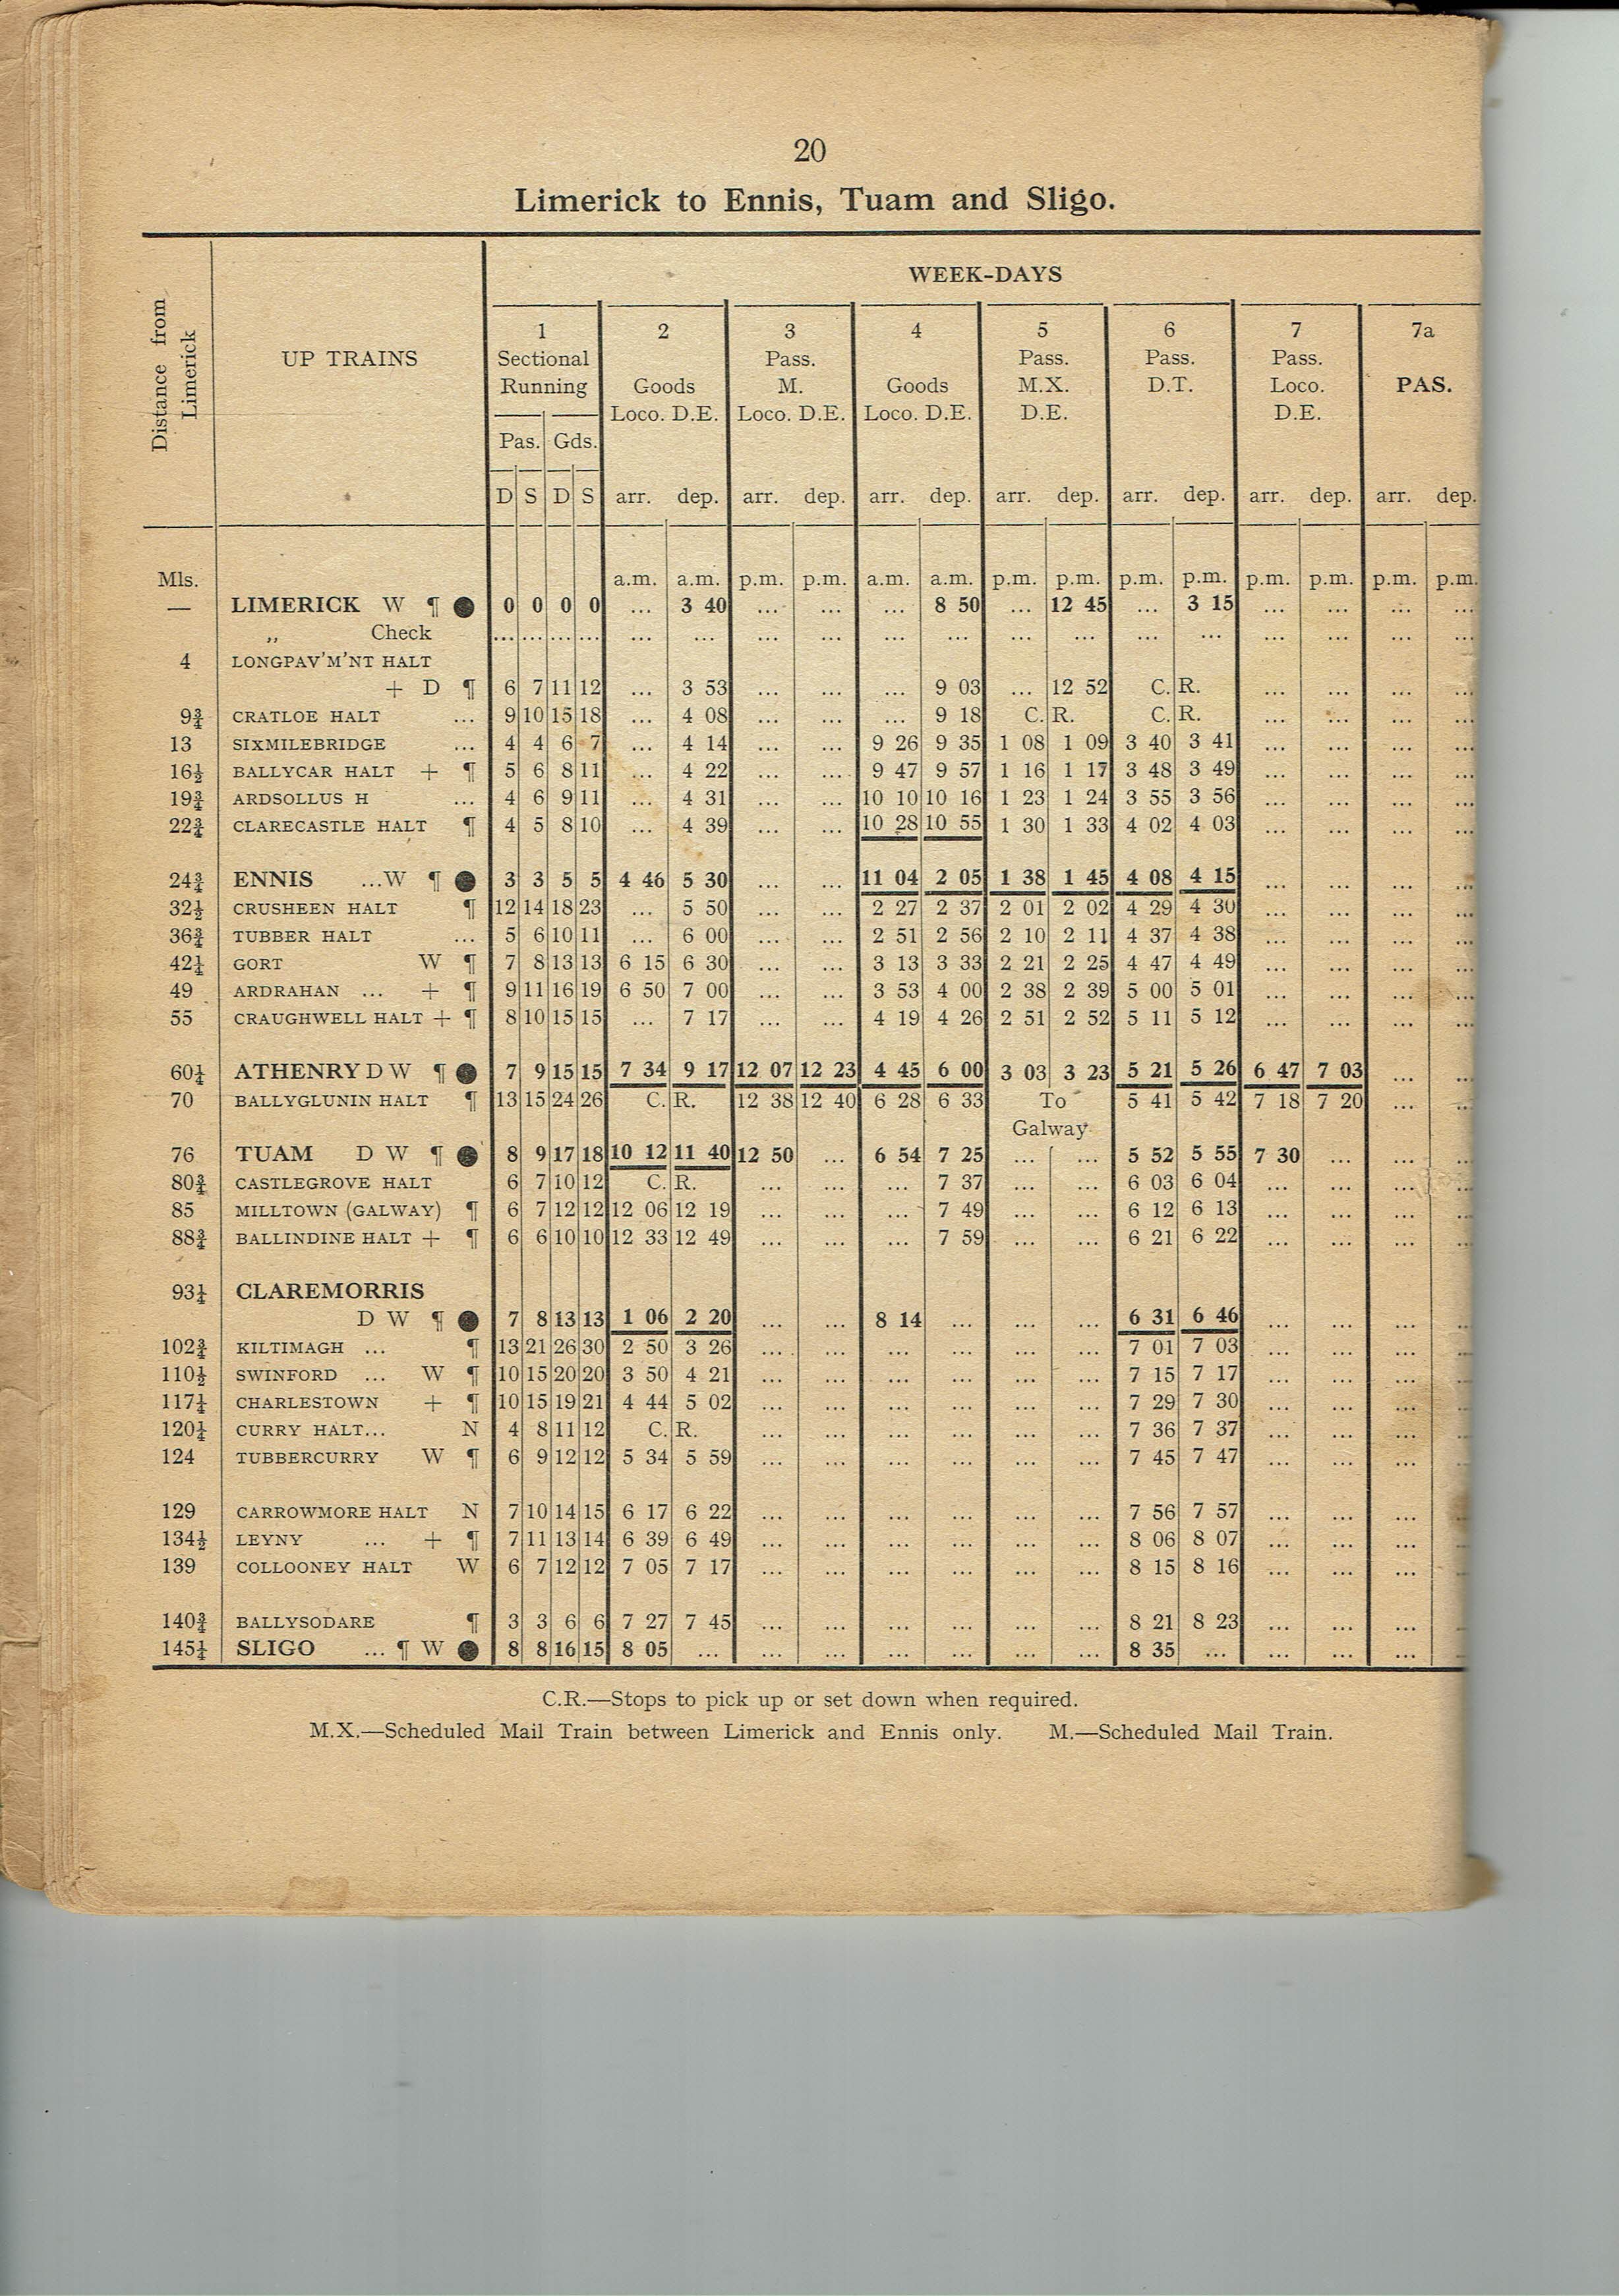
Getting a bit pedantic B145 hauled the last Down Burma Road goods according to the WTT the WLWR down road was from Sligo to Limerick & Waterford Irelands Longest continuous main line even if it involved a reversal at Ennis Junction In its final years of operation the Sligo-Limerick and Limerick-Sligo goods trains basically operated as fast freights only calling at Ennis, Gort, Athenry and Tuam en-rout before becoming an all stations stopper serving Kiltimagh, Swinford, Charlestown and Tubbercurry on the Burma Rd
-
Stone buildings look very impressive, I must complete the buildings I started for the dock layout about 10 years ago, got to the same stage completing the stonew work and window openings and never progressed further.
-
10 Ton GSWR Ballast Brake Plough Van
Mayner replied to Glenderg's topic in Photos & Videos of the Prototype
In OO probably easier to scratch-build the body in plasticard on a Dapol Presflow or IRM Ballast Plough, in later years IE rebuilt the remaining ex-GSWR Brakes with similar running gear and ploughs to the "modern" ballast prloughs