
.JPG.a0cb0a0427dfeecca048bbd6322ee442.JPG)
Shinkansen
-
Posts
259 -
Joined
-
Last visited
Content Type
Profiles
Forums
Events
Gallery
Blogs
Everything posted by Shinkansen
-
Exquisite Stuff Warbonnet, would make one want to 'turn to the Darkside' that is American HO modelling very easily. Tom.
-
I know its a word that's very over used these days, but I have to say your work on those buildings truely is 'Awesome'. Top stuff as always
-
Hi Boskonay, can ya tell me more about the SMD LEDs, have had an idea about scratch building a container crane for a while. I'm not gonna go down the road of motorising it tough. I'd like to keep my hair/sanity thanks. But some LED lighting on a crane would make a freight yard come to life:cool: Tom
-
Gentlemen, some excellent advice there regarding the Kadee couplers, very much appreciated thanks. It's good to get some first hand accounts of how these things work. Have done a little Google research on the subject. Unfortunately alot relates to American stock. Body mounting the couplers as opposed to boggie mounting. They don't have much trouble negotiating bends because EVERYTHING is bigger in the States/Canada... including their model railways!!! Some great info guys, hope to put it to use in the near future. But first there's a layout that needs building! Tom.
-
Hi Frank, Some excellent advice there regarding the photos. Natural light is absolutly essential for half decent pictures, as is use of a tripod/stable surface. Have started using the 2 second delay on my own camera to take 'shake free' pictures once a shot has been composed. Failing that, taking heaps of photos from different angles and cropping/keeping the better ones also helps. Talk about Photography being an expensive hobby is right, have looked into it in the past... Will be sticking with my Panasonic compact thank you very much! Keep up the good work. Tom.
-
Hi Frank, your layout pics dont look much like models.... theyre more like the real thing. Lovely camera work and nicely done scenics/models
-
Nice work on the 'Super train' Mk3s, will look very tasty with the new 071s hauling them:tumbsup: Is it much of a job to kit them out with the Kadee couplers? Bit of a novice when it comes to these. All I know about them is that they look heaps better than the standard tension lock couplers. Nice work. Tom
-
Nice one Des, another thing to add to my 'to do' list
-
Would be a great use for the Waterford - Ballinacourty line. Or a cycle track would also be good... if the finger ever gets pulled out! Some interesting kiwi enginuity
-
Hi Ciotog, excellent scenic work. Have to say I'm really liking the viaduct and 'real' water effect river. Tasty stuff. More photos please
-
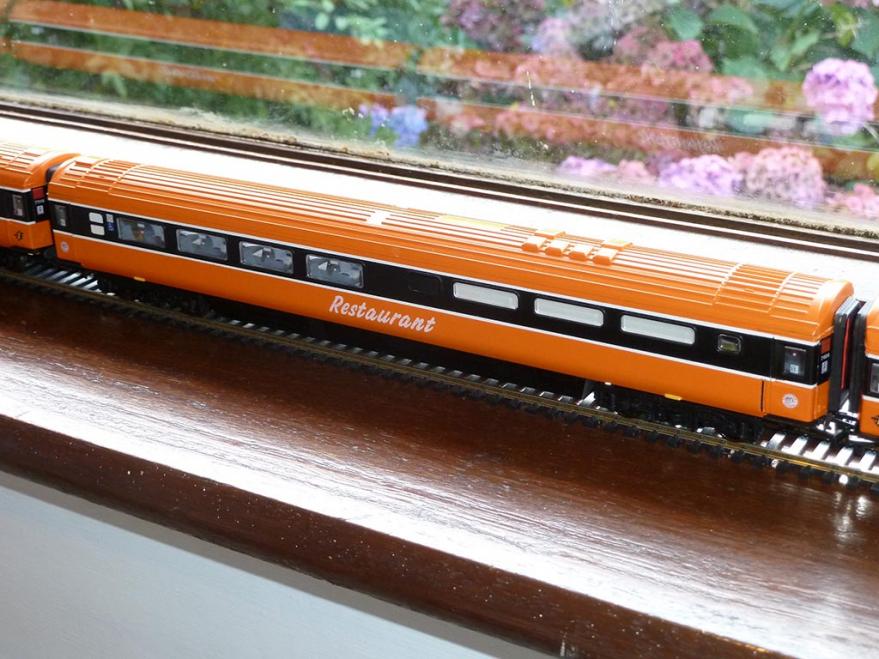
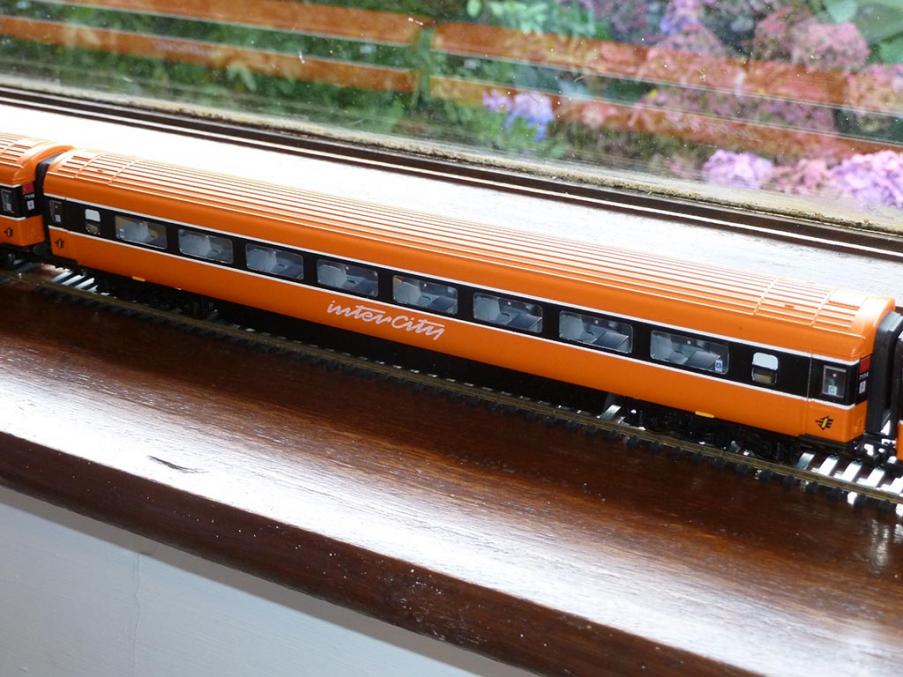
Hi Antony, I sealed the decals at the ends of each coach with Microsatin. As for the main 'Restaurant' and 'InterCity' decals, I'm still of two minds about this. There's no douting it would save them alot over time alright. Tom.
-
Tis right josefstadt, never had the opportunity, the few times I travelled by train in Ireland during the 00's was always on Mk2's (which I tought were well past it) or on DMUs. Would loved to have got the chance. A mid life Mk3 upgrade would have been interesting to see. Could you imagine an 'Irish Rail' livered Mk3, Silver with Green roof? Would have been a site to see!
-
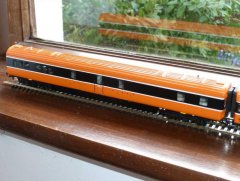
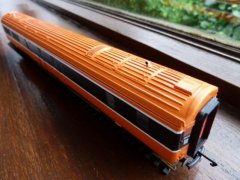
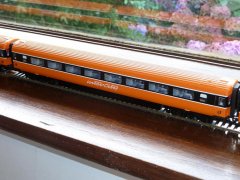
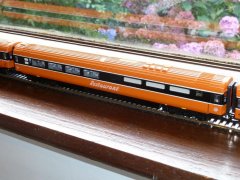
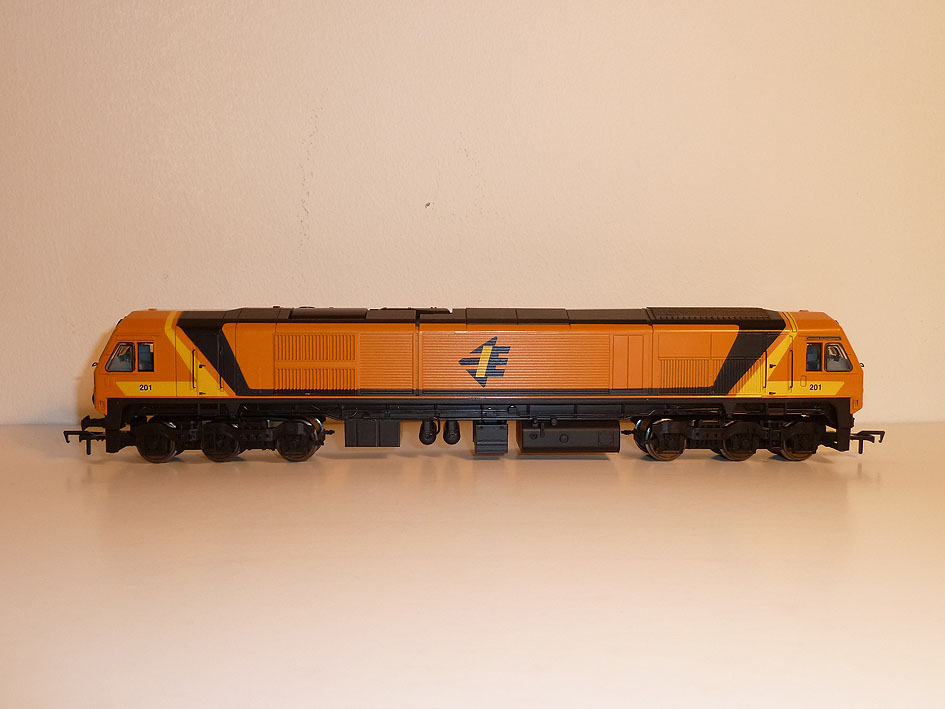
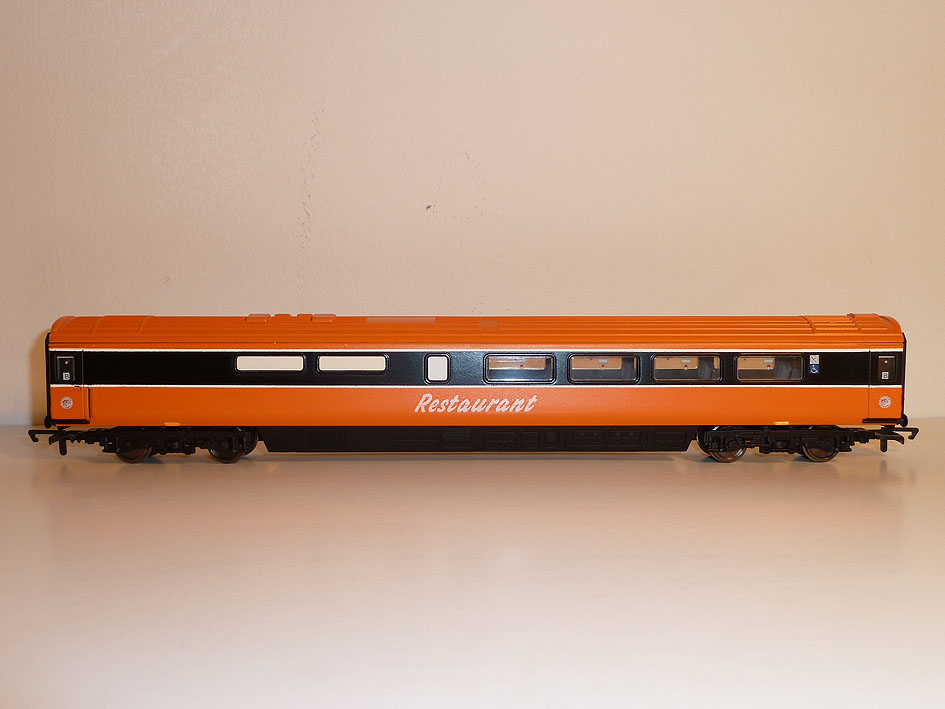
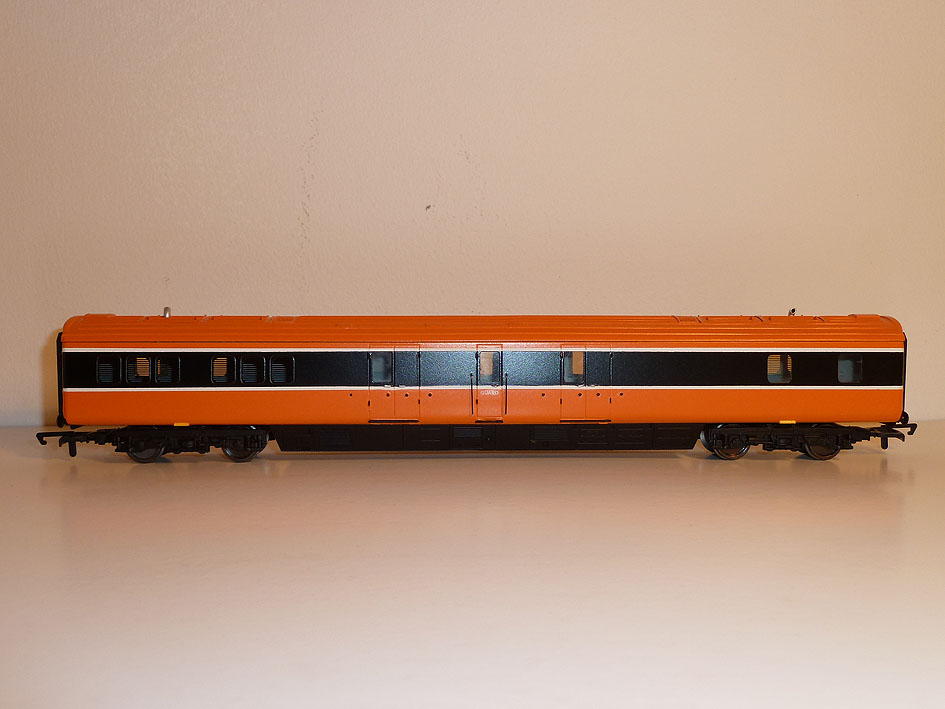
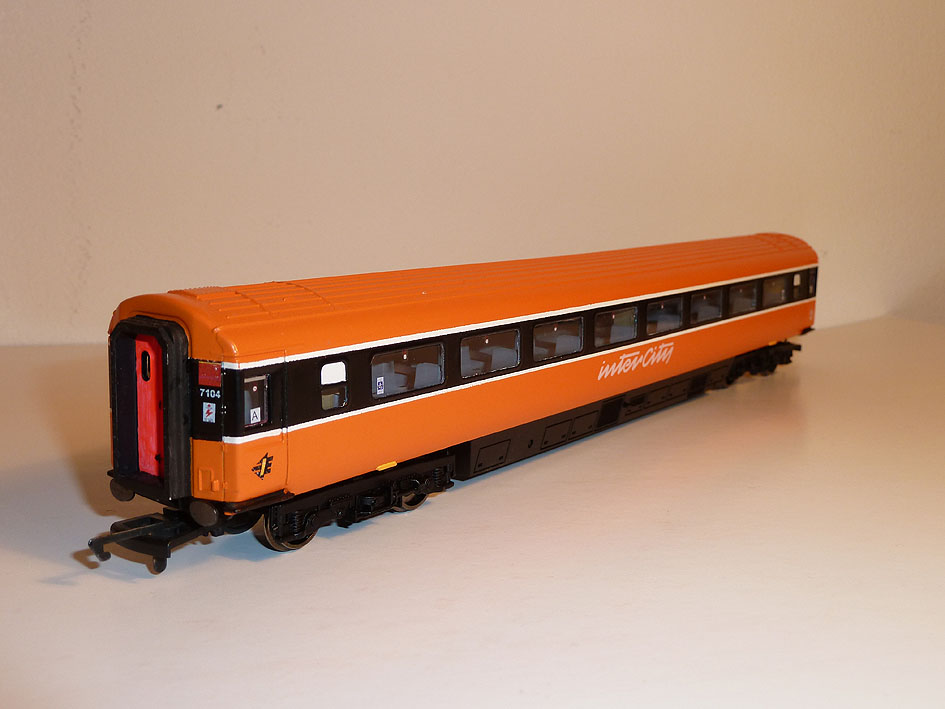
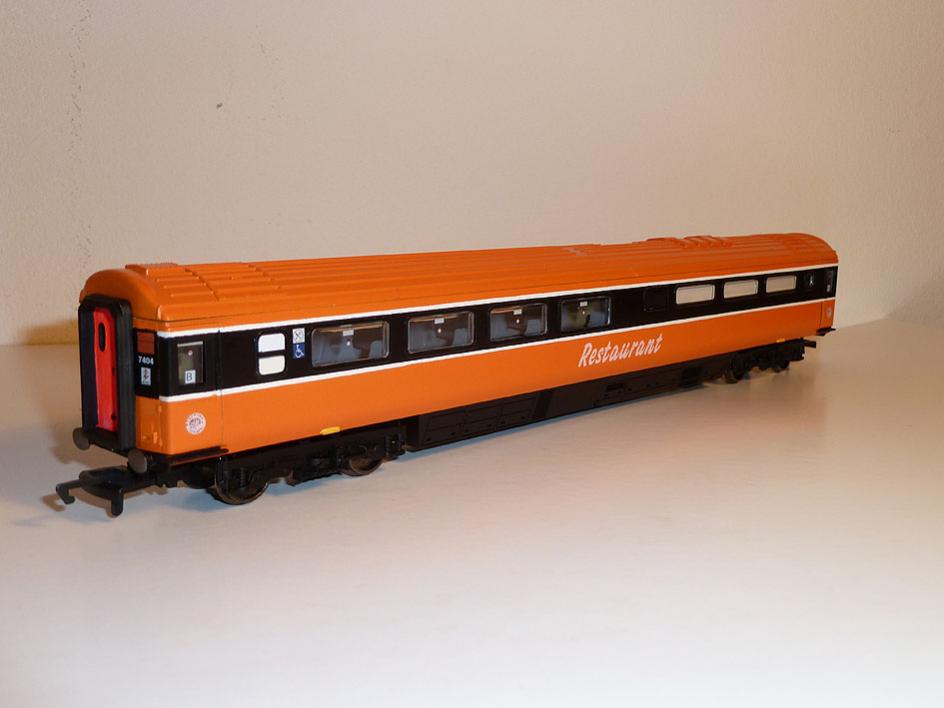
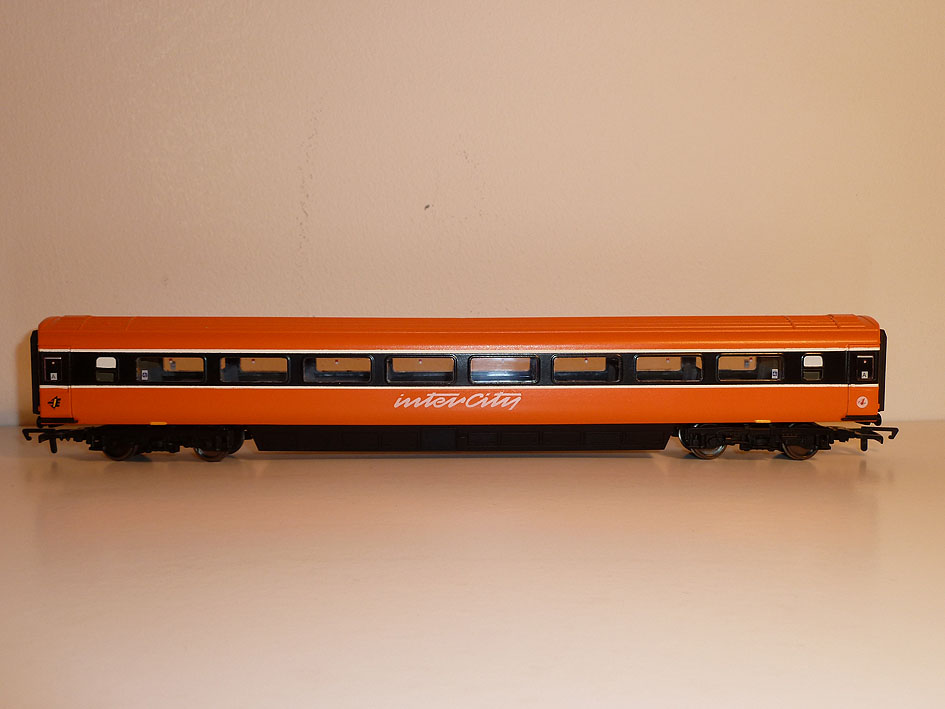
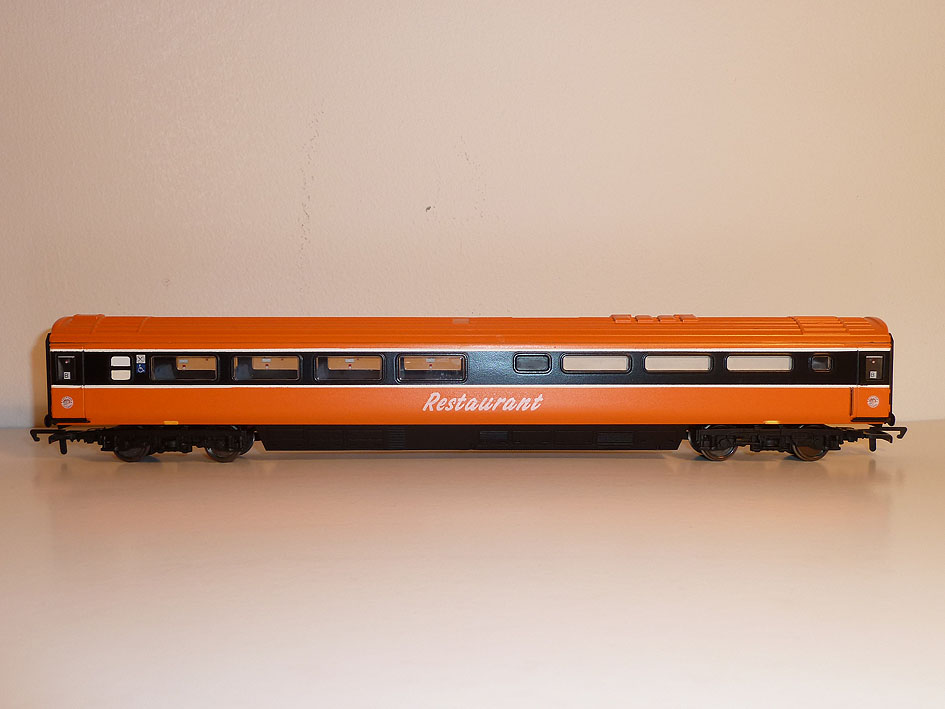
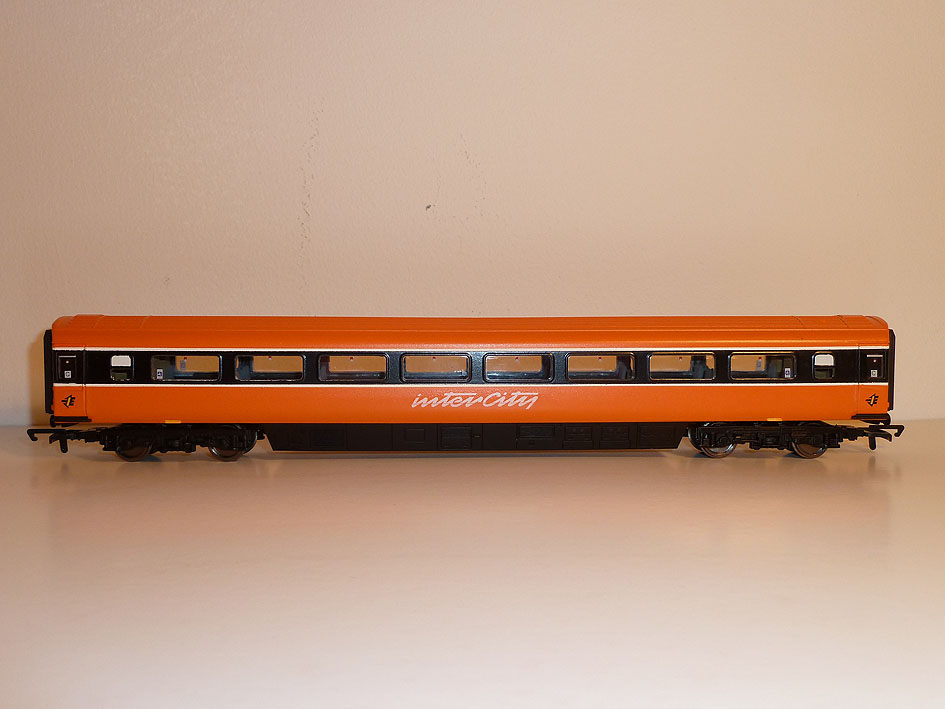
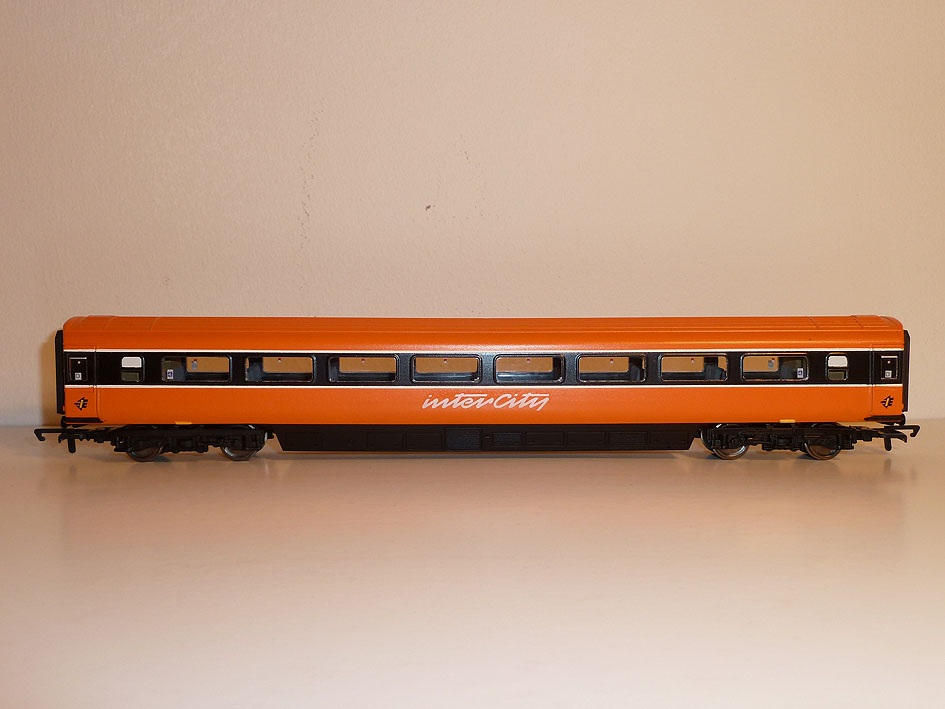
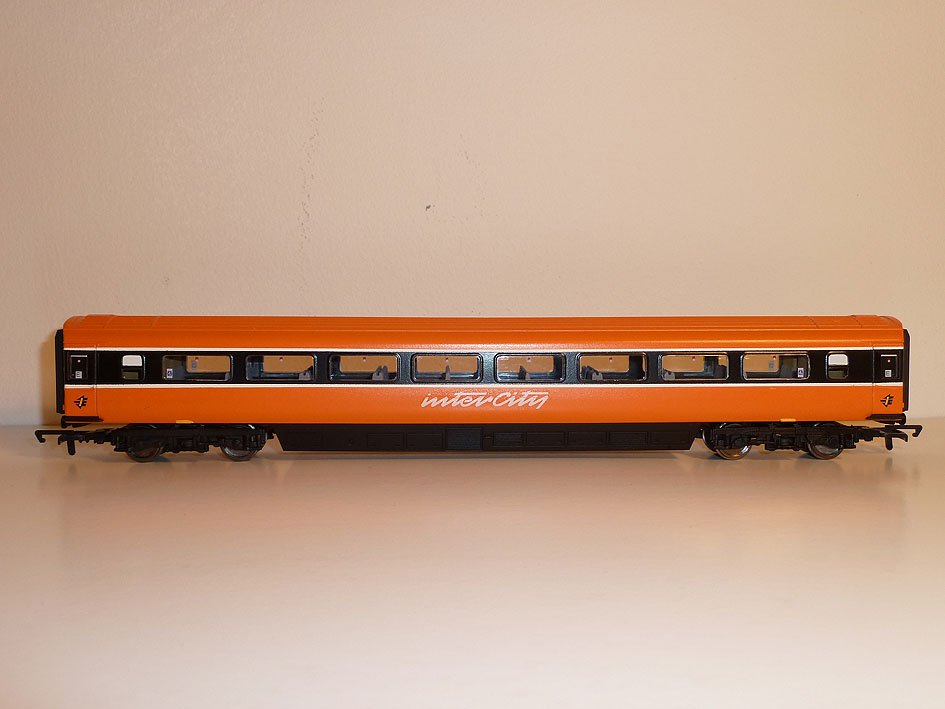
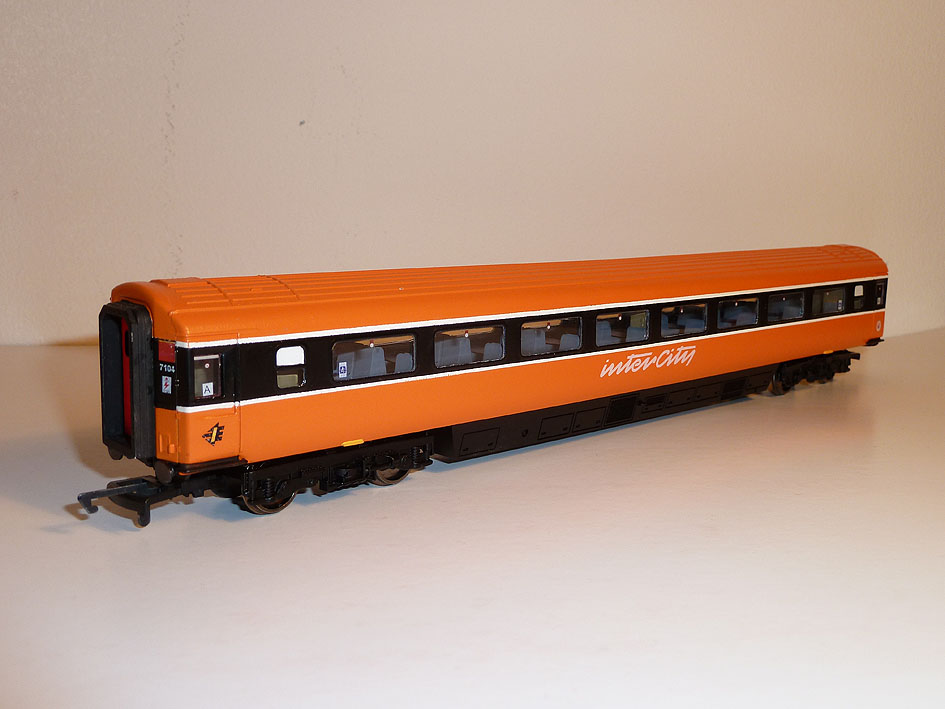
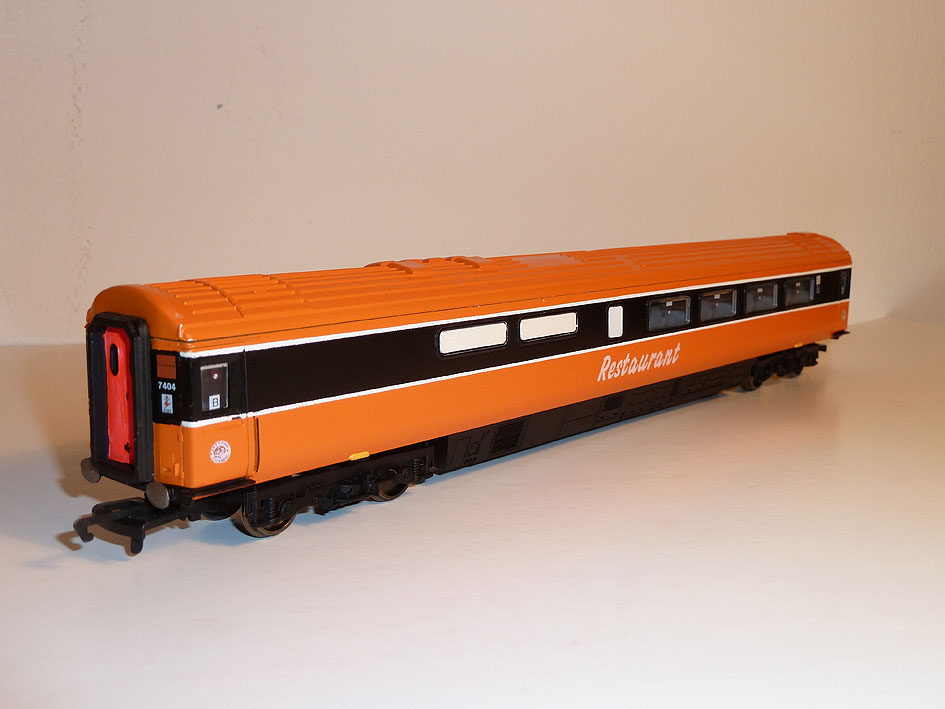
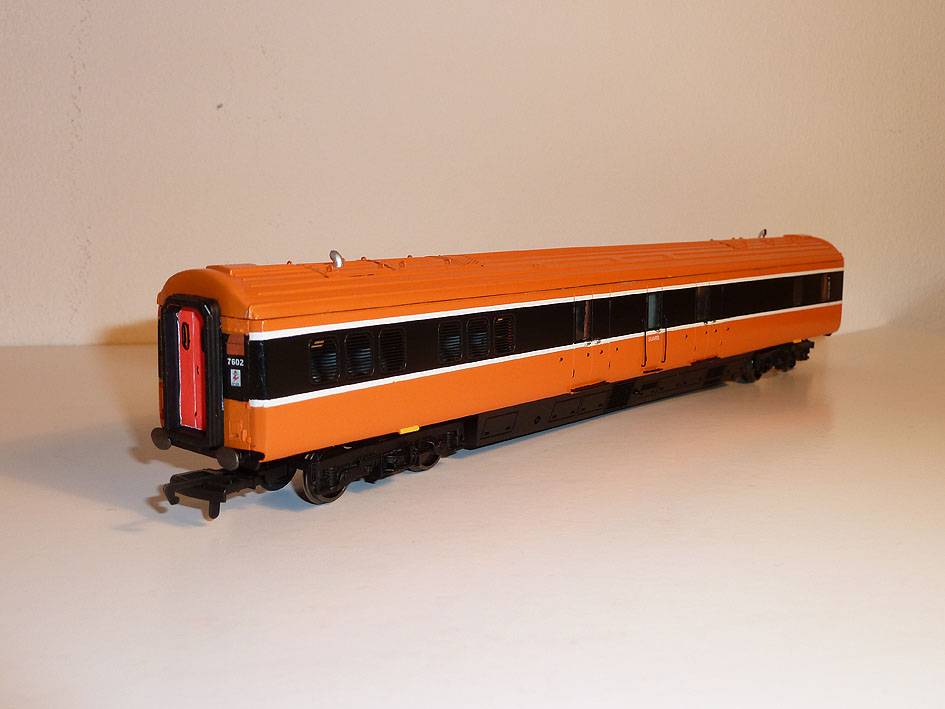
Cheers NIRCLASS80 As requested, details are as follows: Orange top coat: aerosol mixed by my local Top Part Auto factors (paint code RAL2011). Black Stripe: Simoniz Satin black aerosol White Lining: The base coat of Halfords/Simoniz white plastic primer (achived using masking tape). Masking tape: Tamiya 10mm, the absolute dogs for getting clear consistent lines in paint with minimal bleed thru. Method: Have the paint warm, sit the aerosol can in warm water to help heat the paint up. A warm day also helps too. No point painting in a cold damp shed on a wet day cos dampness in the air will make the paint end up matt and horrible. I even warmed the surface to be painted with a heat gun (but a hair dryer would suffice). I don't own an airbrush but find the aerosols quiet effective. Shake can well. After that it's just two-three very thin coats of paint, just enough to get coverage. no need to go to town on it because it'll take ages to cure. If conditions are right it should be touch dry in 10-20 mins. But I must stress, Aerosols and spray finishes in general level of finish is very much dependant on tempreture and athmopheric humidity. Just something to keep in mind with our cold damp climate. Start with your lightest colour, white primer. Prime the entire model first. 2-3 light coats should be plenty. Rub down the second with fine wet/dry sandpaper. Wipe down model with a lint free cotton cloth or tack rag. The cleaner you can keep things the better the finish. Mask off your white/black stripe section, paint the model orange. Again, 2-3 light coats are enough. Leave for a day or two for paint to fully cure. Remove masking tape. Overlay the previously masked area with more masking tape. About 1-1.5mm over part of the white area, this forms the white lining. Yes it's tedious and fiddly but worth it. Spray the satin black, leave this to cure also. it can be tempting to pull off all masking tape at this stage. Once this is cured you should be safe enough. The other paints used on the model were: Grey primer for the seats inside the coaches, takes the plastiky look off them. Revell SM332 enamel for the gangway doors, A strange lumious red-pink! Humbrol 33 matt black for the ganway rubber surrounds, Humbrol Aluminium/matt black mixed up to make a gun metal colour for the buffers. Transfers were the 'Mk3 Rake set' supplied by Studio Scale Models (aka Westy on the forum). They'll do seven coaches (including 1st class & restaurant) plus an EGV. Used Microscale industries Microset and Microsol on the decals. These worked very well in making the decals 'sink' into the paintwork. Might eventually coat the decals with Mircosatin, a water based varnish that seals and protects the decals. Don't use Oil based varnish as it damages the decals. Well that's what I did, but like most things in life there's probably a couple of ways to do it. Hope it's a help. Tom
-
Cheers Rich, It's an Hornby/Lima Restaurant Coach. The type where the glazing is part of the roof structure and has to be prized apart with great difficulty/cursing/swearing! Unlike the new type Hornby which simply pull apart. This one started out as a 'Grand Central Railways' Mk3 model, found it on special offer in Modelzone in the UK when I was over earlier in the year. From what I can see there's a number of different window configurations for these restaurants, both in model form and in the real thing. Mine is close enough for me. You could modify a standard, but I reckon it would be a lot of graft. Might be better off to source a new/secondhand one and do some converting.
-
Hi Glenderg, Don't talk to me about that masking tape... nearly broke my heart! It's the one drawback with the new type Hornby Mk3s. The flush glazing is superglued in place. I think perhaps a masking solution might be a better option than the one I choose. That Hombrol Maskol or similar might do the job. Would be handier than a full roll of Tamiya masking tape and a scalple thats for sure. Thanks for the compliments. Tom
-
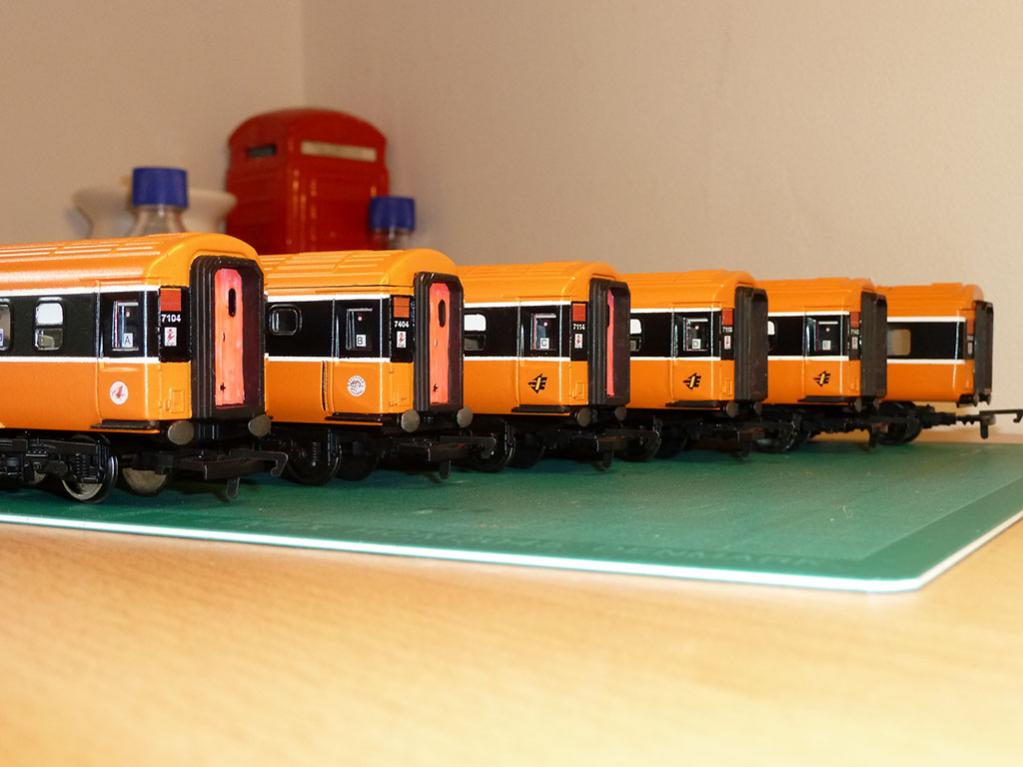
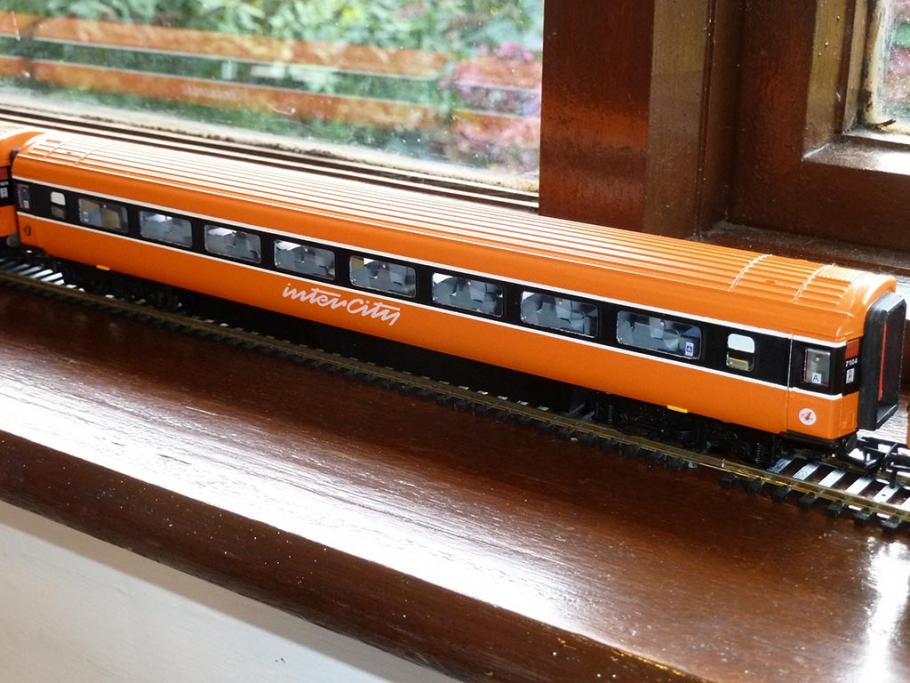
Hello again, Here's some more detailed pics of the Mk3's as promised. If anyone here has any pointers on the transfers I'd like to here them. Have tried to keep it all as accurate as possible. Tricky enough to get the good side-on pictures needed for researching placing of decals and paintwork. The rake of 'real' Mk3's parked up in Waterford west was a very useful guide. Hope it's a help for anyone planning a rake of there own. Will answer all your questions hopefully tomorrow night, it's been a crazy day and time to put the feet up! 201 River Shannon providing traction

-
Hi all, I have to say I'm genuinly humbled by all the positive responses to my rake of Mk3 coaches. Thanks for the big vote of confidence lads, It's very much appreciated I will post up a few more detailed pics in the next day or two. Monday night's a busy one for me but I'll be back later and try and answer all your questions. Learned plenty from the build so hope to pass on what I can. Cheers Tom.
-
Hi all, here's my attempt at creating a rake of Mk3 coaches to go along with my Murphy Models 201. The coaching stock consists of new type Hornby Mk3s plus a couple of older Hornby/Lima coaches for the Retaurant and EGV. The EGV is a SSM kit and the very first item i built, in retrospect I probably wouldnt have started with the trickiest item! All in all it was a fairly enoyable learning curve. Will probably give them a light bit of weathering in future, take the 'box fresh' look off and add a bit of realism. I have had plenty inspiration from what I've seen on the site so far and know the standards are very high. I do hope to contribute a bit more in future. But first I have to go build a layout to run them on, that's the next project Cheers, Tom
-
.jpg.55629afc086a799212e2de6e03a8c546.jpg)
-
-
-
-
-
.jpg.cc4ba5c7525e5f869ff2f0829d4767aa.jpg)
-
.jpg.30bff4224195edf96685aac46c59b692.jpg)
.thumb.JPG.46e9e32a646c371548ac3758baf1d056.JPG)


.jpg.10476fc9ac9a5f5831997382c7421e9b.jpg)
.jpg.deec852c8832222bdc81ed6af1a1cc17.jpg)

.jpg.28e52357440bb481736ee092b47ddaf9.jpg)


.jpg.454c8ae0145725922ea3c127b1e91f4a.jpg)
.jpg.0ef3ad87171ae7cc030190f3b2490726.jpg)

.jpg.e0c6be06620b0bef3ad5ebb993bc0fcb.jpg)


.jpg.2f3eb7f66f3954a61fd7d89b1aa5785a.jpg)
.jpg.66f34825d65880fdec24190ec8336a6d.jpg)

.jpg.c8c6476a9c9ed7bdaff6436c242c1c73.jpg)
.jpg.9063c7de7ed9af92af50b1304f675db9.jpg)
